
STL 712 W - Washing machine Scandomestic - Free user manual and instructions
Find the device manual for free STL 712 W Scandomestic in PDF.


| Product Type | Washing Machine |
| Brand | Scandomestic |
| Model | STL 712 W |
| Load Capacity (Dry) | 7 kg |
| Water Pressure Range | 0.05 - 0.8 MPa |
| Number of Programmes | 16 (Whites, Cottons+, ECO 40-60, 20°C, Synthetics, Delicates, Rinse, Spin, Drain, Rapid 14'/30'/44', Dark Colours, Shirts, Silk, Wool, Hand Wash) |
| Options | Extra Rinse, Hygiene+, Easy Iron |
| Delay Start | Up to 24 hours |
| Display | Digital display with cycle duration, temperature, spin speed, and indicator lights |
| Spin Speed Adjustment | Adjustable (reduce or cancel spin cycle) |
| Temperature Selection | Adjustable per programme (cold to max programme temperature) |
| Door Lock | Automatic safety lock with indicator light |
| Child Lock (Key Lock) | Yes |
| Filter | Easy-clean filter at front bottom |
| Detergent Dispenser | 3 compartments (prewash, main wash, fabric softener) |
| Overload Protection | Yes (imbalance detection, foam detection) |
| Energy Efficiency | See rating plate (ECO 40-60 programme for standard tests) |
| Installation | Transport screws removal, adjustable levelling feet, water supply and drain connection |
| Warranty | Standard manufacturer warranty (see certificate) |
| Spare Parts Availability | Minimum 10 years |
Frequently Asked Questions - STL 712 W Scandomestic
User questions about STL 712 W Scandomestic
0 question about this device. Answer the ones you know or ask your own.
Ask a new question about this device
Download the instructions for your Washing machine in PDF format for free! Find your manual STL 712 W - Scandomestic and take your electronic device back in hand. On this page are published all the documents necessary for the use of your device. STL 712 W by Scandomestic.
USER MANUAL STL 712 W Scandomestic

* TILBEH∅R SÆLGES SÆRSKILT



3. PRAKTISKE TIPS
Påfyldningstips
natural_image
Illustration showing a hand holding a magnifying glass with rotating arrows, next to a close-up of the handle (no text or symbols)STANDARDPROGRAMMER I HENHOLD TIL
natural_image
Close-up of a device's internal components with a connector and directional arrows indicating movement (no text or symbols)natural_image
Four-panel photo sequence showing hands cleaning a kitchen appliance with a labeled component (A), no text or symbols present.7. FEJLFINDING OG GARANTI
Thank you for choosing this product.
We are proud to offer the ideal product for you and the best complete range of home appliances for your daily routine.
Carefully read this manual for correct and safe appliance use and for helpful tips or efficient maintenance.

Only use the washing machine after carefully reading these instructions. We recommend you always keep this manual on hand and in good condition for any future owners.
FOR U.K. ONLY
On receipt of your appliance please check it carefully for damage. Any damage found must be reported to the delivery driver immediately. Alternatively damage found must be reported to the retailer within 2 days of receipt.
Each product is identified by a unique 16 character code, also called the “serial number”, printed on the sticker. This can be found inside the door opening. This code is a unique code for your product that you will need to register the product warranty, or you need to contact the Customer Service Centre.
Environmental conditions

This appliance is marked according to the European directive 2012/19/EU on Waste Electrical and Electronic Equipment (WEEE).
WEEE contains both polluting substances (which can cause negative consequences for the environment) and basic components (which can be re-used). It is important to have WEEE subjected to specific treatments, in order to remove and dispose properly all pollutants, and recover and recycle all materials. Individuals can play an important role in ensuring that WEEE does not become an environmental issue; it is essential to follow some basic rules:
● WEEE should not be treated as household waste;
● WEEE should be handed over to the relevant collection points managed by the municipality or by registered companies. In many countries, for large WEEE, home collection could be present.
In many countries, when you buy a new appliance, the old one may be returned to the retailer who has to collect it free of charge on a one-to-one basis, as long as the equipment is of equivalent type and has the same functions at the supplied equipment.
Contents
- GENERAL SAFETY RULES
- INSTALLATION
- PRACTICAL HINTS
- CLEANING AND MAINTENANCE
- QUICK USER GUIDE
- CONTROLS AND PROGRAMS
- TROUBLESHOOTING AND WARRANTY
1. GENERAL SAFETY RULES
● This appliance is intended to be used in household and similar applications such as:
- Staff kitchen areas in shops, offices and other working environments;
- Farm houses;
- By clients in hotels, motels and other residential type environments;
- Bed and breakfast type environments. A different use of this appliance from household environment or from typical housekeeping functions, as commercial use by expert or trained users, is excluded even in the above applications. If the appliance is used in a manner inconsistent with this it may reduce the life of the appliance and may void the manufacturer's warranty. Any damage to the appliance or other damage or loss arising through use that is not consistent with domestic or household use (even if located in a domestic or household environment) shall not be accepted by the manufacturer to the fullest extent permitted by law.
- This appliance can be used by children aged from 8 years and above and persons with reduced physical, sensory or mental capabilities or lack of experience and knowledge if they have been given supervision or instruction concerning use of the appliance
in a safe way and understand the hazards involved.
Children shall not play with the appliance. Cleaning and user maintenance shall not be made by children without supervision.
- Children should be supervised to ensure that they do not play with the appliance.
● Children of less than 3 years should be kept away unless continuously supervised. - If the supply cord is damaged, it must be replaced by a special cord or assembly available from the manufacturer or its service agent.
- Only use the hose-sets supplied with the appliance for the water supply connection (do not reuse old hose-sets).
● Water pressure must be between 0.05 MPa and 0.8 MPa. - Make sure carpets or rugs do not obstruct the base or any of the ventilation openings.
-
The OFF condition is reached by placing the reference mark on the programmes control/knob in the vertical position. Any other different position of such control sets the machine in ON condition (only for models with programmes knob).
-
After installation, the appliance must be positioned so that the plug is accessible.
- The maximum load capacity of dry clothes depends on the model used (see control panel).
- To consult the product technical specification please refer to the manufacturer website.
Electrical connections and safety instructions
- The technical details (supply voltage and power input) are indicated on the product rating plate
- Make sure that the electrical system is earthed, complies with all applicable law and that the (electricity) socket is compatible with the plug of the appliance. Otherwise, seek qualified professional assistance.
- The use of converters, multiple sockets or extension cords is strongly advised against
- Before cleaning or maintaining the washing machine, unplug the appliance and turn off the water tap.
- Do not pull on the power cord or appliance to unplug the machine.

WARNING:
water may reach very high temperatures during the wash cycle.
- Do not expose the washing machine to rain, direct sunlight or other weather elements. Protect from possible freezing.
- In the event of fault and/or malfunction, turn off the washing machine, close the water tap and do not tamper with the appliance.
Immediately contact the Customer Service Centre and only use original spare parts. Failure to observe these instruction may jeopardise appliance safety.
2. INSTALLATION
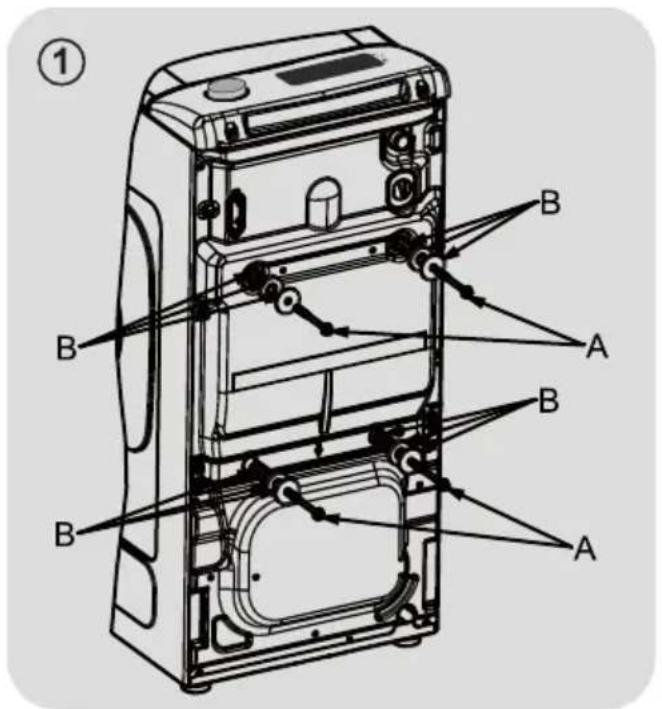
- Remove the 2 or 4 transportation screws (A) on the back and remove the 2 or 4 flat washers, rubber bungs and plastic spacer tubes (B) as illustrated in figure 1.

● Fit the trims provided "C" (fig. 2).

* ACCESSORY SOLD SEPARATELY

- The washing machine should be connected to the water mains via the new tube supplied with the appliance (inside the drum). Do not use the old tube for this purpose.
- Connect one end of the water inlet pipe with the elbow bend to the electrovalve (top rear part of the machine) and the other end to a tap or a plumbed-in 3/4" gas threaded connection.
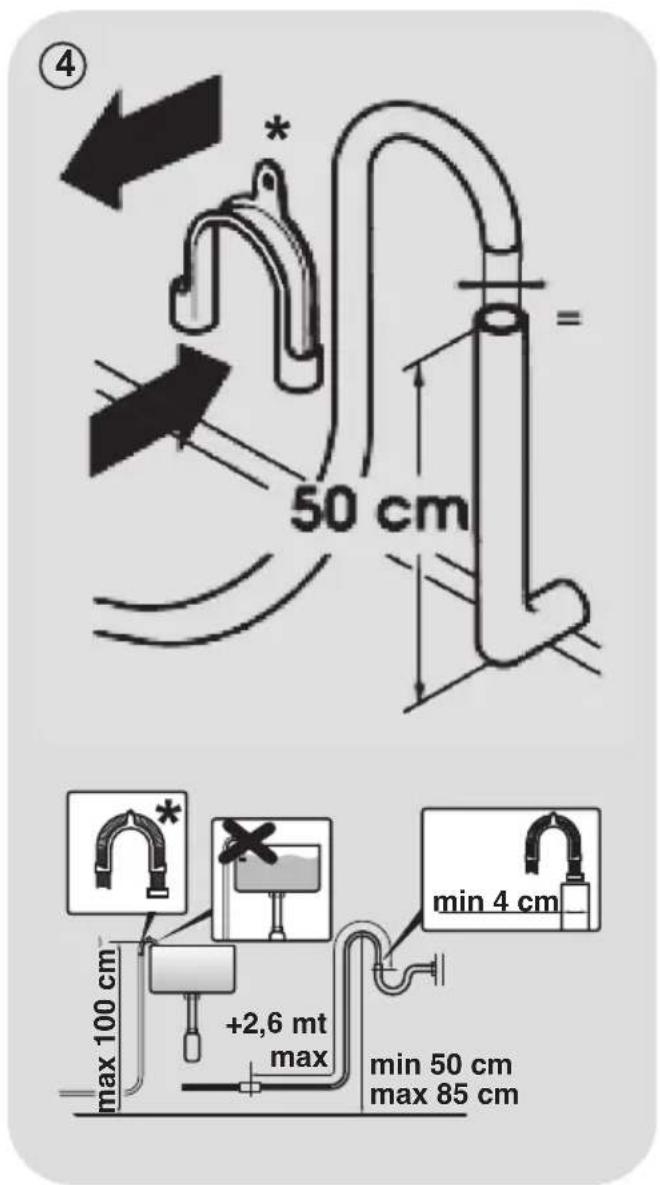
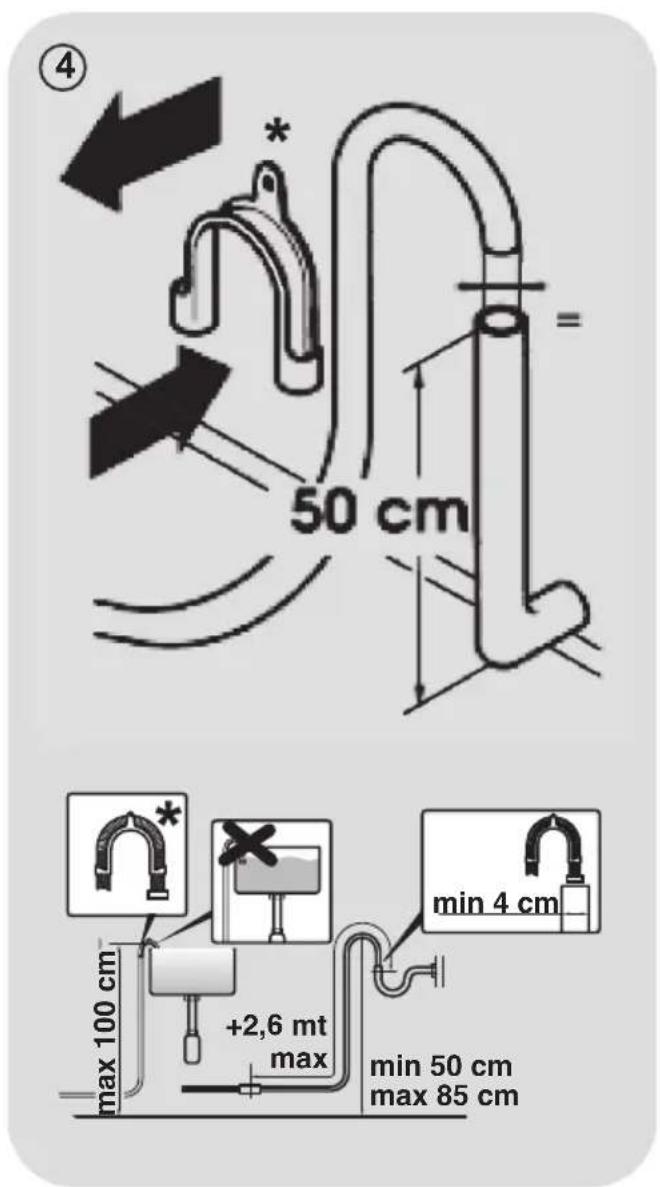
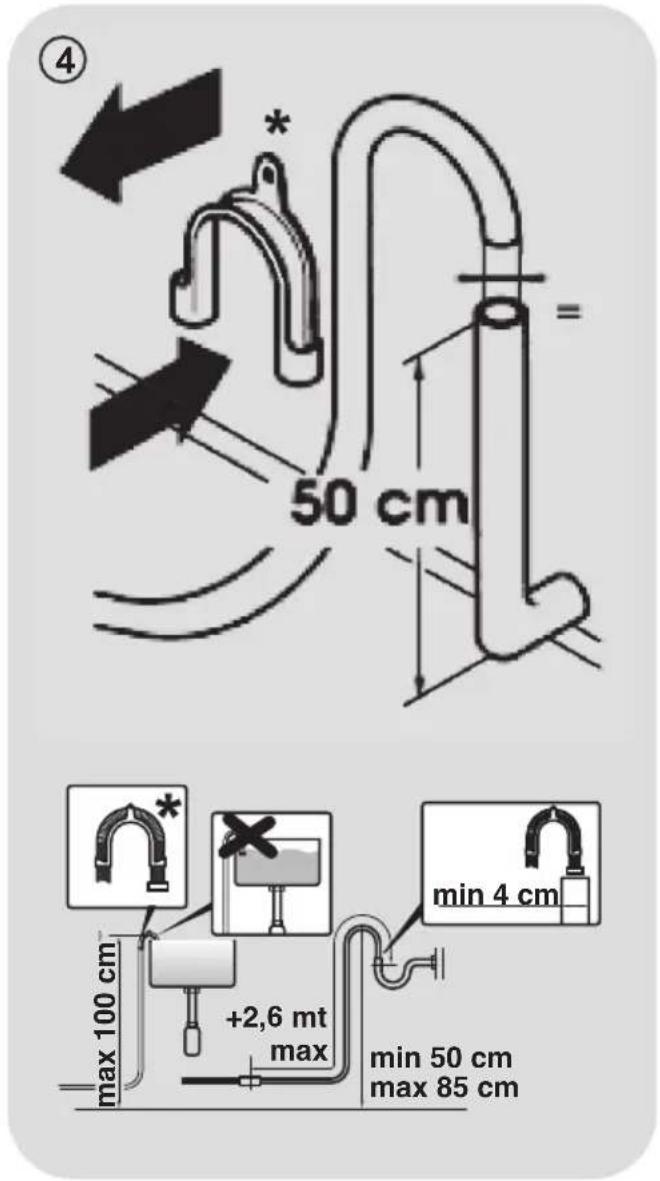
- Place the washing machine close to the wall, ensuring that there are no bends or kinks anywhere in the tube. Hook the outlet pipe to the edge of the sink or preferably to a fixed drainage outlet of a diameter greater
than that of the outlet pipe and at a height of min. 50 cm. and a maximum of 75 cm. from the floor (fig. 4).
- If necessary, use the curved* accessory to attach and support the outlet pipe more securely.
If your model offers this function:
- To move the washing machine easily, turn the trolley lever to the right. Once you have finished moving the machine, return the lever to its original position.
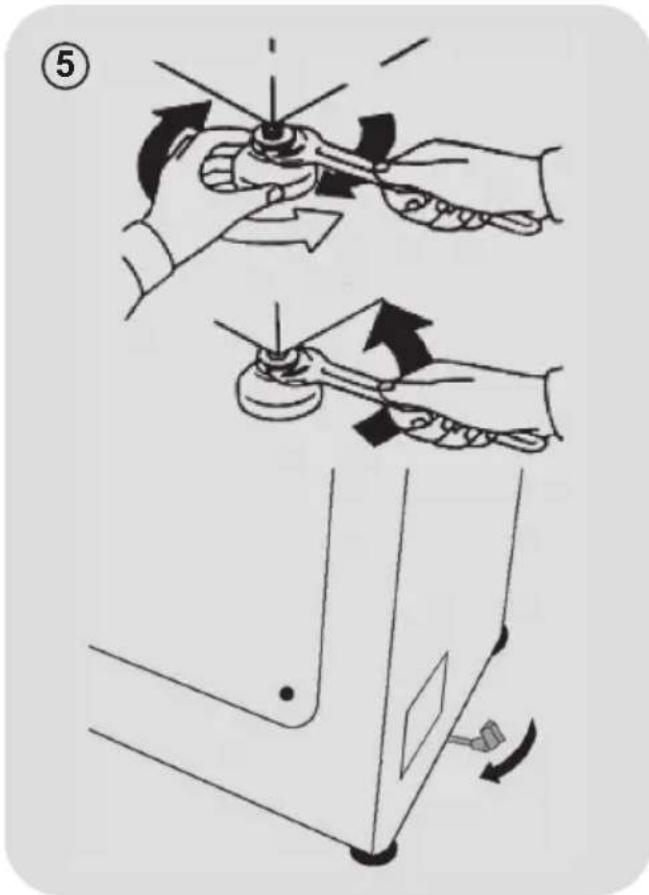
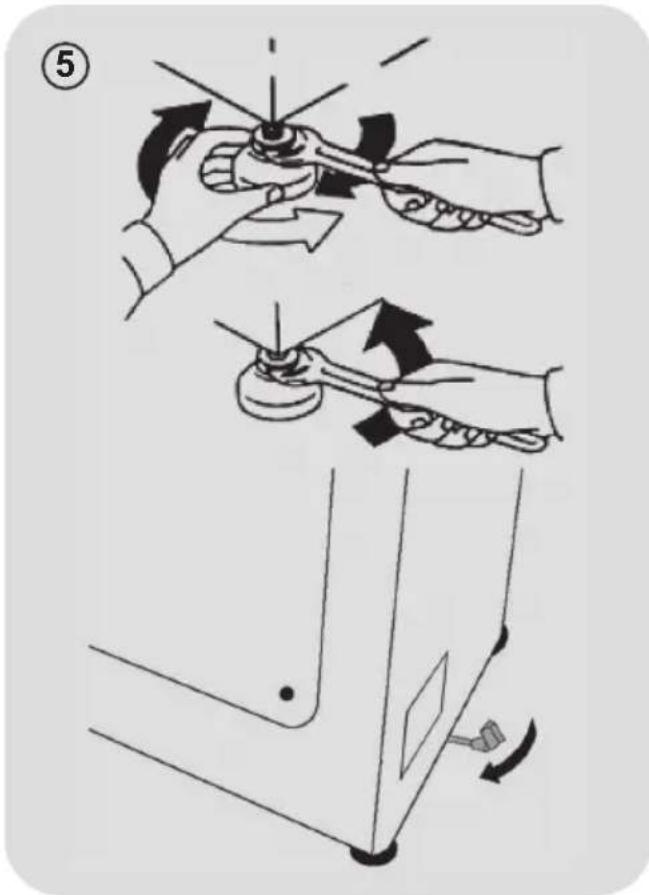
- Level the machine by adjusting the front feet (fig. 5).
a) Turn the nut clockwise to release the screw on the foot.
b) Raise or lower the foot by rotating it until it stands firmly on the floor.
c) Lock the foot in position by turning the nut anticlockwise until it comes up against the bottom of the washing machine.
- Check that the appliance is properly levelled.
- Check that the washing machine does not rock by trying to move two diagonally opposite top corners at the same time.
- If you move the washing machine from one place to another, you must level the feet again afterwards.
Hydraulic connections
- Connect the water hose to the water supply tap (fig. 6) only using the hose supplied with the appliance (do not reuse old hose-sets).
● SOME MODELS may include one or more of the following features:
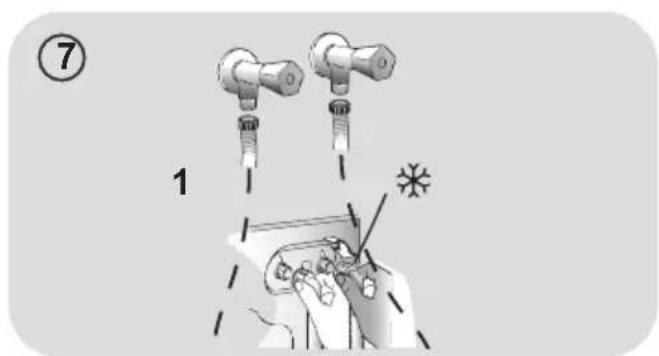
● HOT&COLD (fig. 7):
water mains connection settings with hot and cold water for higher energy savings. Connect the grey tube to the cold water faucet ✦ and the red one to the hot water faucet. The machine can be connected to the cold water faucet only: in this case some programs may start a few minutes later.
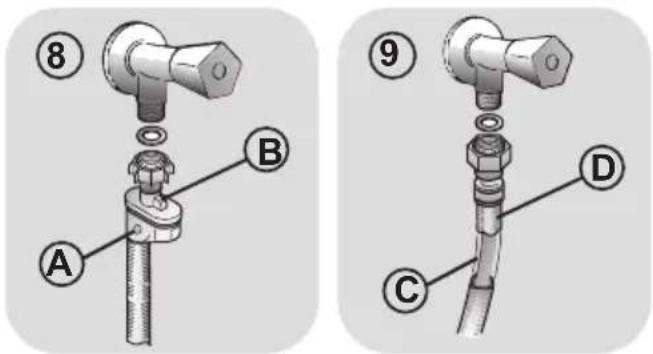
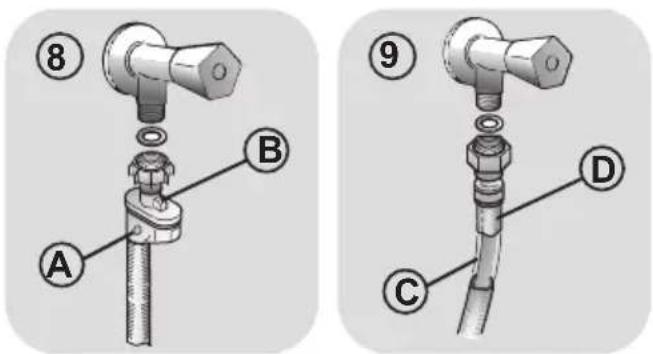
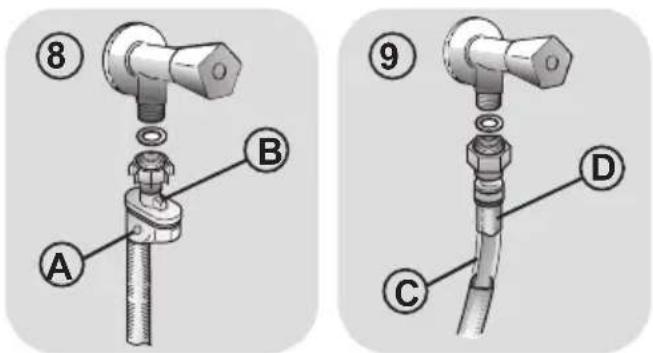
● AQUASTOP (fig. 8):
a device located on the supply tube stops water flow if the tube deteriorate in this case, a red mark will appear in the window "A" and the tube must be replaced. To unscrew the nut, press the one-way lock device "B".
● AQUAPROTECT – SUPPLY TUBE WITH GUARD (fig. 9):
Should water leak from the primary internal tube "C", the transparent containment sheath "D" will contain water to permit the washing cycle to complete. At the end of the cycle, contact the Customer Service Centre to replace the supply tube.



3. PRACTICAL HINTS
Load tips
When sorting laundry, make sure:
- have eliminated metallic objects such as hair clips, pins, coins, from laundry;
- to have buttoned pillow cases, closed zips, tied loose belts and long robe ribbons;
- to have removed rollers, hooks or clips from curtains;
- to have carefully read clothing washing labels;
- to have removed any persistent stains using specific detergents.
- When washing rugs, bedcovers or other heavy clothing, we recommend you avoid the spinning cycle.
● To wash wool, make sure the item can be machine washed. Check the fabric label.
Useful advice for saving
Tips on how to save money and not damage the environment when using your appliance.
- Load the machine to the highest capacity shown in the programme table for each programme - this will allow you to SAVE energy and water.
● Noise and residual laundry moisture are affected by spin speed: a faster spin is associated with greater noise and lower residual moisture in the laundry. - The most efficient programmes in terms of combined use of water and energy are usually the longer-lasting ones with lower temperature.
Maximise the load size
- Achieve the best use of energy, water, detergent and time by using the recommended maximum load size.
Save up to 50% energy by washing a full load instead of 2 half loads.
Do you need to pre-wash?
- For heavily soiled laundry only! SAVE detergent, time, water and between 5 to 15% energy consumption by NOT selecting Prewash for slight to normally soiled laundry.
Is a hot wash required?
- Pretreat stains with stain remover or soak dried in stains in water before washing to reduce the necessity of a hot wash programme. Save energy by using a low temperature wash programme.
Before using a drying programme (WASHER-DRYERS)
- SAVE energy and time by selecting a high spin speed to reduce the water content in laundry before using a drying programme.
Dosing the detergent
Below is a short guide with tips and advice on the use of detergent.
- Only use detergents suitable for machine washing.
- Select your detergent according to the type of fabric (cotton, delicates, synthetics, wool, silk, etc.), the colour, the type and level of soiling and the programmed washing temperature.
- To use the right amount of detergent, softener or any other additives, carefully follow the manufacturer's instructions every time: correctly using the appliance with the right dose allows you to avoid waste and to reduce the environmental impact.
When washing heavily soiled whites we recommend using cotton programs of 60^ C or above and a normal washing powder (heavy duty) that contains bleaching agents that at medium/high temperatures provide excellent results.
For washes between 40°C and 60°C the type of detergent used needs to be appropriate for the type of fabric and level of soiling. Normal powders are suitable for “white” or colour fast fabrics with high soiling, while liquid detergents or “colour protecting” powders are suitable for coloured fabrics with light levels of soiling.
For washing at temperatures below 40^ C we recommend the use of liquid detergents or detergents specifically labeled as suitable for low temperature washing.
For washing wool or silk, only use detergents specifically formulated for these fabrics.
● Too much detergent leads to excessive foam, which prevents the cycle being carried out correctly. It could also affect the quality of the washing and rinsing.
The use of ecological detergents without phosphates may cause the following effects:
- cloudier rinse drain water: This effect is tied to the suspended zeolites which do not have negative effects on rinse efficiency.
- white powder (zeolites) on laundry at the end of the wash: this is normal, the powder is not absorbed by fabric and does not change its colour.
To remove the zeolites, select a rinse programme. In the future consider using slightly less detergent.
- foam in the water at last rinse: this does not necessary indicate poor rinsing.
Consider using less detergent in future washes.
- abundant foam: This is often due to the anionic surfactants found in the detergents which are hard to eliminate from laundry. In this case, do not re-rinse to eliminate these effects: it will not help at all.
We suggest conducting a maintenance wash using a proprietary cleaner.
If the problem persists or if you suspect a malfunction, immediately contact an Authorised Customer Service Centre.
4. CLEANING AND MAINTENANCE
Looking after your appliance correctly can extend its lifespan.
Cleaning the appliance's exterior
- Disconnect the machine from the power supply.
To clean the washing machine exterior, use a damp cloth, avoiding abrasives, alcohol and/or solvents. The washing machine does not require any special care for ordinary cleaning: clean drawer compartments and the filter; some tips on how to move the machine or on long periods of disuse are provided below.
Filter cleaning
● The washing machine comes with a special filter able to trap large residue, such as buttons or coins, which could clog the drain.
● ONLY AVAILABLE ON CERTAIN MODELS: pull out the corrugated hose, remove the stopper and drain the water into a container.
● Before unscrewing the filter, we recommend you place an absorbent cloth under it to keep the floor dry.
● Turn the filter counter-clockwise to the limit stop in the vertical position.
- Remove and clean the filter; when finished, replace it turning it clockwise.
- Repeat the previous steps in reverse order to reassemble all parts.

natural_image
Illustration showing a hand adjusting a mechanical component with directional arrows (no text or symbols)Suggestions for moves or prolonged disuse
● Should the washing machine be stored in an unheated room for a long period of time, drain all water from tubes.
● Unplug the washing machine.
- Detach the tube from the strap and lower it, fully draining water into a bowl.
- Secure the drain tube with the strap when finished.
Cleaning the detergent dispenser and its compartments
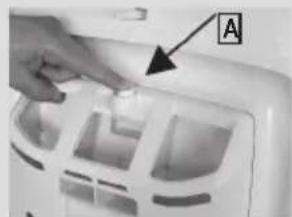
- Press button (A).
● Hold down the button and turn the detergent dispenser outwards. - Remove the dispenser and clean it.
- It is recommended to remove any remaining detergent in the compartments to avoid any build up that could cause blockages and restrict the water flow from the dispenser to drum.
- Pulling out and extract the trap/traps (S) that are located in the back part of the dispenser and clean them carefully.
- Remove any solid residue which could block the holes in the compartments.
natural_image
Close-up of a hand placing a small white object into a white plastic container with a label 'A' pointing to it (no text or symbols on the object itself)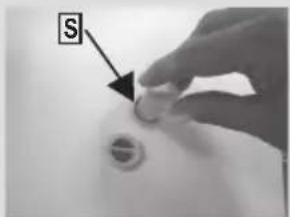

natural_image
Close-up of a wall-mounted pipe fitting with a label 'B' pointing to the side (no other text or symbols visible)
natural_image
Close-up of a mechanical component with a labeled arrow pointing to a feature (no text or symbols visible)Fitting
Fit in the tabs as shown (B).
Turn the detergent dispenser towards the housing (C) in the door until the tab clicks into place.
5. QUICK USER GUIDE
This washing machine automatically adjusts the level of the water to the type and quantity of washing. This system gives a reduction in energy consumption and a saving in washing times.
Program selection
- Turn on the washing machine and select the required program.
- Adjust the washing temperature if necessary and press the required "option" buttons.
- Press the START/PAUSE button to start washing.
If there is a break in the power supply whilst the machine is operating, when the power is restored, the machine will restart from the beginning of the phase it was in when the power was lost.
- At the end of the programme, the message "End" will appear on the display or, on some models, all wash stage indicator lights will turn on.
Wait until the DOOR LOCKED light has gone out before opening the door.
● Turn off the washing machine.
For any type of wash, see the program table and follow the operating sequence as indicated.
Technical data
Water pressure:
min 0.05 Mpa / max 0.8 Mpa
(0.05 MPa dispenses approximately 1 litre of water in 10 seconds)
Power input / Power current fuse amp / Supply voltage: See rating plate.
6. CONTROLS AND PROGRAMS

flowchart
graph TD
    A["Time Remaining"] --> B["Time Remaining"]
    B --> C["H"]
    B --> D["O"]
    B --> E["LMN"]
    B --> F["P"]
    B --> G["ED"]
    B --> H["E"]

A Programme selector with OFF position
B START/PAUSE button
C DELAY START button
D OPTIONS button
E RAPID / STAIN LEVEL button
F TEMPERATURE SELECTION button
G SPIN SPEED button
F+G KEY LOCK
H Digital display
I OPTIONS indicator lights
L DOOR LOCKED indicator light
M KG LOAD indicator light
N KEY LOCK indicator light
O TEMPERATURE SELECTION indicator lights
P SPIN SPEED indicator lights
Opening the door
A special safety device prevents the door from being opened immediately after the end of the cycle.
Wait for 2 minutes after the wash cycle has finished and the "Door Security" light has gone out before opening the door.
PROGRAMME selector with OFF position
When the programme selector is turned the display lights up to show the settings for the programme selected.
For energy saving, at the end of the cycle or with an inactivity period, the display level contrast will decrease.
N.B.: To switch the machine off, turn the programme selector to the OFF position.
- Press the START/PAUSE button to start the selected cycle.
- Once a programme is selected the programme selector remains stationary on the selected programme till cycle ends.
- Switch off the washing machine by turning the selector to OFF.
The programme selector must be returned to the OFF position at the end of each cycle or when starting a subsequent wash cycle prior to the next programme being selected and started.
START/PAUSE button
Close the door BEFORE selecting the button START/PAUSE.
- Press to start the selected cycle.
When the START/PAUSE button has been pressed, the appliance can take few seconds before it starts working.
ADD OR REMOVE ITEMS AFTER THE PROGRAMMES HAS STARTED (PAUSE)
- Press and hold the START/PAUSE button for about 2 seconds (some indicator light and the time remaining indicator will flash, showing that the machine has been paused).
- Wait 2 minutes until the safety device unlocks the door.
Before you open the door, please check water level is below the door opening to avoid flooding.
● After you have added or removed items, close the door and press the START/PAUSE button (the programme will start from where it left off).
CANCELLING THE PROGRAMME
- To cancel the programme, set the selector to the OFF position.
DELAY START button
- This button allows you to pre-programme the wash cycle to delay the start of the cycle for up to 24 hours.
● To delay the start use the following procedure:
- Select the required programme.
- Press the delay start button once to activate it (h00 appears on the display) and then press it again to set a 1 hour delay (h01 appears on the display). The pre-set delay increases by 1 hour each
time the button is pressed, until h24 appears on the display, at which point pressing the button again will reset the delay start to zero.
- Confirm by pressing the START/PAUSE button. The delay countdown will begin and when it has finished the programme will start automatically.
- It is possible to cancel the delay start by turning the programme selector to OFF.
If there is any break in the power supply while the machine is operating, a special memory stores the selected programme and, when the power is restored, it continues where it left OFF.
The option buttons should be selected before pressing the START/PAUSE button.
OPTIONS button
This button allows you to choose between three different options:
- EXTRA RINSE
- This option allows you to add one rinse at the end of the washing cycle and is useful for people with delicate and sensitive skin, for which a small amount of detergent residue can cause irritations or allergies.
- It is advisable to also use this function for the children clothes and for the washing of heavily soiled items, which requires a lot of detergent to be used, or for the washing of toweling items whose fibres mostly have the tendency to hold the detergent.
- HYGIENE +
Activated when you set 60^ C of temperature. This option allows deep cleaning of your clothes by maintaining the same temperature for the whole wash.
- EASY IRON
This function allows you to minimize creases as much as possible, eliminating the intermediate spins or reducing the intensity of the last one.
If an option is selected that is not compatible with the selected programme then the option indicator light first flashes and then goes off.
RAPID / STAIN LEVEL button
This button allows you to choose between two different options, depending on the selected programme.
- RAPID
The button becomes active when you select the RAPID (14/30/44 Min.) programme on the knob and allows you to select one of three durations indicated.
- STAIN LEVEL button
- Once the programme has been selected the wash time set for that programme will be automatically shown.
- This option allows you to choose between 3 levels of wash intensity modifying the length of the programme, depending on how much the fabrics are soiled (can only be used on some programmes as shown in the table of programmes).
TEMPERATURE SELECTION button
● This button allows you to change the temperature of the wash cycles.
- It is not possible to raise the temperature over the maximum allowed for the programme, in order to protect the fabrics.
- If you want carry out a cold wash all the indicators must be off.
SPIN SPEED button
- By pressing this button, it is possible to reduce the maximum speed, and if you wish, the spin cycle can be cancelled.
- If the label does not indicate specific information, it is possible to use the maximum spin expected in the program.
To prevent damage to the fabrics, it is not possible to increase the speed over the maximum allowed for the programme.
● To reactivate the spin cycle press the button until you reach the spin speed you would like to set.
- It is possible to modify the spin speed without pausing the machine.
An over dosing of detergent can cause excessive foaming. If the appliance detects the presence of excessive foam, it may exclude the spinning phase or extend the duration of the program and increase water consumption.
The machine is fitted with a special electronic device, which prevents the spin cycle without load or on particularly unbalanced load. This reduces the noise and vibration in the machine and so prolongs the life of your machine.
KEY LOCK
- Pressing simultaneously the buttons TEMPERATURE SELECTION and SPIN SPEED for about 3 seconds, the
machine allows you to lock the keys. In this way, you can avoid making accidental or unwanted changes if a button on the display is pressed accidentally during a cycle.
● The key lock can be simply cancelled by pressing the two buttons simultaneously again or turning off the appliance.
Digital Display
The display's indicator system allows you to be constantly informed about the status of the machine.
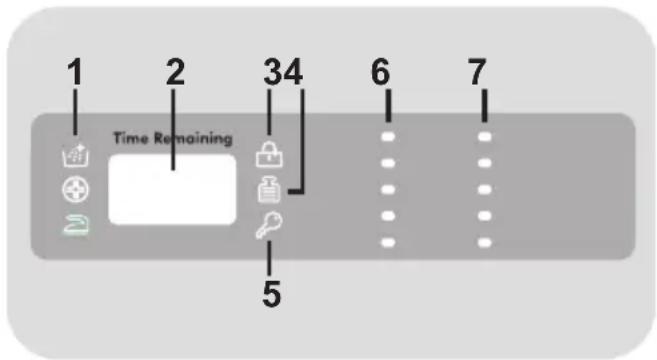
1) OPTIONS INDICATOR LIGHTS
The indicator lights show the options that can be selected by the relevant button.
2) CYCLE DURATION
- When a programme is selected the display automatically shows the cycle duration, which can vary, depending on the options selected.
- During the initial filling phase of the cycle the machine calculates the actual cycle time needed based on the load size, content and options selected. The real time of the wash will then be displayed. This time can recaulculate during the wash depending on detergent levels and load balancing.
3) DOOR LOCKED INDICATOR LIGHT
● The indicator light is illuminated when the door is fully closed.
Close the door BEFORE selecting the START/PAUSE button.
- When START/PAUSE is pressed on the machine with the door closed, the indicator will flash momentarily and then illuminate.
If the door is not properly closed, the light will continue to flash for about 7 seconds, after which the start command will be automatically cancelled. In this case, close the door in the proper way and press the START/PAUSE button.
- A special safety device prevents the door from being opened immediately after the end of the cycle. Wait for 2 minutes after the wash cycle has finished and the DOOR LOCKED light has gone out before opening the door. At the end of the cycle turn the programme selector to OFF.
4) Kg LOAD INDICATOR LIGHT (function active only on Cotton and Synthetics programmes)
- During the first minutes of the cycle, the "Kg LOAD" indicator will remain on while the intelligent sensor will weigh the laundry and adjust the cycle time, water and electricity consumption accordingly.
-
Through every wash phase "Kg LOAD" allows to monitor information on the wash load in the drum and in the first minutes of the wash it:
-
adjusts the amount of water required;
- determines the length of the wash cycle;
- controls rinsing according to the type of fabric selected to be washed it;
- adjusts the rhythm of drum rotation for the type of fabric being washed;
- recognises the presence of too much soap suds, and if necessary, adjust the amount of rinse water.
- adjusts the spin speed according to the load, thus avoiding any imbalance.
5) KEY LOCK INDICATOR LIGHT
The indicator light show that the keys are locked.
6) WASH TEMPERATURE INDICATOR LIGHTS
This show the washing temperature of the selected programme that can be changed (where allowed) by the relevant button. If you want carry out a cold wash all the indicators must be off.
7) SPIN SPEED INDICATOR LIGHTS
This show the spin speed of the selected programme, you can reduce or omit by the relevant button.
Table of programmes

| PROGRAMME |  (see control panel) (see control panel) | 1) (MAX.) (MAX.) | DETERGENT | ||||||||
| 5kg | 5,5kg | 6kg | 6,5kg | 7kg | 8kg | I o ll | |||||
 | Whites 2) | 5 | 5,5 | 6 | 6,5 | 7 | 8 | 90° | ● | ● | |
 | Cottons + 2) Prewash | 5 | 5,5 | 6 | 6,5 | 7 | 8 | 60° | ● | ● | ● |
 | ECO 40-60 2) | 5 | 5,5 | 6 | 6,5 | 7 | 8 | 60° | ● | ● | |
| 20°C | 20°C | 5 | 5,5 | 6 | 6,5 | 7 | 8 | 20° | ● | ● | |
 | Synthetics 2) | 2,5 | 2,5 | 3 | 3 | 3,5 | 4 | 60° | ● | ● | |
 | Delicates | 2 | 2 | 2 | 2 | 2,5 | 2,5 | 40° | ● | ● | |
 | Rinse | - | - | - | - | - | - | - | △ | ● | |
 | Spin | - | - | - | - | - | - | - | |||
 | Drain | - | - | - | - | - | - | - | |||
| Rapid 14'-30'-44' | 14' Rapid 3) 30' 44' | 1 | 1 | 1 | 1 | 1 | 1,5 | 30° | ● | ● | |
| 1,5 | 1,5 | 2 | 2 | 2,5 | 2,5 | 30° | ● | ● | |||
| 3 | 3 | 3 | 3 | 3,5 | 3,5 | 40° | ● | ● | |||
 | Dark Colours | 2,5 | 2,5 | 3 | 3 | 3,5 | 4 | 40° | ● | ● | |
| [TS43] | Shirts 2) | 2,5 | 2,5 | 3 | 3 | 3,5 | 4 | 30° | ● | ● | |
 | Silk | 1 | 1 | 1 | 1 | 1 | 2 | 30° | ● | ● | |
 | Wool | 1 | 1 | 1 | 1 | 1 | 2 | 40° | ● | ● | |
 | Hand Wash | 1 | 1 | 1 | 1 | 1 | 2 | 30° | ● | ● | |
Please read these notes:
* Maximum load capacity of dry clothes, according to the model used (see control panel).
INFORMATION FOR THE TEST LABORATORIES
STANDARD PROGRAMMES
ACCORDING TO
(EU) No 1015/2010 e No 1061/2010
ECO 40-60 PROGRAMME
SETTING THE TEMPERATURE TO 40°C
ECO 40-60 PROGRAMME
SETTING THE TEMPERATURE TO 60°C
STANDARD PROGRAMME
ACCORDING TO
(EU) No 2019/2023
ECO 40-60 PROGRAMME
Before closing the cover and start the washing process, please check that the internal drum is perfectly closed. When possible, please align the position indicators with drum to assure the best washing performance.

natural_image
Close-up of a refrigerator interior showing a slot, ventilation slots, and a door handle (no text or symbols visible)The spin speed may also be reduced, to match any guidelines suggested on the fabric label, or for very delicate fabrics cancel the spin completely this option is available with a spin speed button. This function can be activated with the button SPIN SELECTION. If the label does not indicate specific information, it is possible to use the maximum spin expected in the program. An over dosing of detergent can cause excessive foaming. If the appliance detects the presence of excessive foam, may exclude the spinning phase or extend the duration of the program and increase water consumption.
(●) Only with PREWASH option selected (programmes with PREWASH option available).
1) When a programme is selected, on the display is shown the display shows the recommended wash temperature that can be reduced (where allowed) by the relevant button.
2) For the programmes shown you can adjust the duration and intensity of the wash using the STAIN LEVEL button.
3) Selecting the RAPID program on the knob, it will be possible to select with the RAPID button, one of the three rapid programs available among 14', 30' and 44'.
- PREWASH: if the dispenser has the specific compartment for pre-wash, pour the detergent in it. Otherwise, pour the detergent in the perforated area preser on the drum, following the dosage indications of the detergent producer.
IMPORTANT: do not use the pre-wash mode with start-delay option.
Programmes selection
To clean different types of fabrics and various levels of dirt, the washing machine has specific programs to meet every need of washing (see table of programmes).
Whites
An intensive wash. The final spin at maximum speed gives more efficient removal.
Cottons + Prewash
This programme has been designed to remove the stronger stains from cotton white clothes. The prewash guarantees the tough dirt removal. Add into compartment "1" a quantity of detergent equal to 20% of that used for main wash.
ECO 40-60
The ECO 40-60 programme is able to clean normally soiled cotton laundry declared to be washable at 40^ C or 60^ C, together in the same cycle. This programme is used to assess the compliance with the EU Ecodesign legislation (environmentally friendly products design).
20°C
This innovative programme, allows you to wash different fabrics and colours together, such as cottons, synthetics and mixed fabrics at only 20°C and provides an excellent cleaning performance.
Consumption on this program is about 40% of a conventional 40^ C cottons wash.
Synthetics
The washing and rinsing optimise the speed and rhythm of the drum action and water levels. The gentle spin, ensures a reduced formation of creases in the fabric.
Delicates
This program has reduced periods of drum rotation during the cycle and is particularly suitable or washing delicate fabrics. The wash cycle and rinses are carried out with a high level of water to ensure the best performance.
Rinse
This program performs 3 rinses with an intermediate spin (which can be reduced or excluded by using the appropriate button). It is used for rinsing any type of fabric, for example after a wash carried out by hand.
Spin
Programme "SPIN" carries out a maximum spin (which can be reduced by using the correct button).
Drain
This programme drains out the water.
Rapid (14/30/44 Min.)
Washing cycle suggested for low loads an slightly dirty. With this program it is recommended to reduce the quantity of detergent normally used, in order to avoid unnecessary waste. Selecting the RAPID program and acting on the button you can choose one of three programs available.
Dark Colours
Program designed to mix all dark garments and to avoid the loss of colour and the formation of creases. We recommend the use of liquid detergent.
Shirts
The washing cycle is optimized to reduce the creation of creases, keeping an excellent washing performance. It is also possible to further reduce the spin speed, to ensure an easier ironing.
Silk
Dedicated program for silk fabrics that can be wash with a washing machine washable. The rotations of the drum are delicate, the temperature does not exceed 30^ C and the program ends with a gentle spin.
Wool
This program performs a wash cycle dedicated to the wool fabrics that can be washed in a washing machine, or the articles to be washed by hand.
Hand Wash
Program for hand wash only clothes, the program ends with 3 rinses and a slow spin.
Preparing the wash
Opening/ closing the drum
- Open the washing machine lid.
- Open the drum by pressing the (A) button with one hand while pressing down on the opposite door with the other.
- Place clothes in the drum one item at a time, and without squashing. Do not exceed the load limits recommended in the “programme table”. An overloaded washing machine will not wash properly, and will leave clothing wrinkled.
● To close the drum, place the doors so that the one with the (A) button is below the other and they fit together perfectly.

natural_image
Four-panel photo sequence showing hands cleaning a kitchen appliance with a labeled component (A), no text or symbols present.● The compartment ✿ is for fabric conditioners, scenting agents and special additives such as starch, blueing, etc.
● MAX - on the detergent case is underlined the maximum level of detergent to be used. Do not exceed this level.
- When the clothes present stains that need treatment with bleaches liquids products, you can proceed to their preliminary cleaning in the washing machine. For that: Introduce the bleac product in the "compartment 2", and set the rinse program. Once finished the treatment set the programmer to the OFF position, add the rest of the laundry, and proceed to the normal washing with the wanted program.
1) Maximum Main wash washing powder
2) Maximum Main wash washing liquid
3) Maximum scenting agent

Detergent load
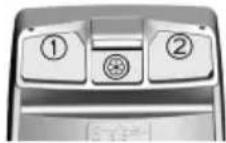
The detergent dispenser is divided into 3 compartments:
● Compartment 1 is for powder detergent.
- Compartment 2 is for liquid detergent.
7. TROUBLESHOOTING AND WARRANTY
If you believe the washing machine is not working correctly, consult the quick guide provided below which includes some practical tips on how to fix the most common problems.
ERROR CODE FORMAT
- Models with a display: the error is shown by a number preceded by the letter "E" (example: E2 = Error 2).
- Models without display: an error is shown by a sequence of flashes of every LED. The error code is shown by the number of flashes followed by a pause of 5 seconds (example: two flashes – pause 5 seconds – two flashes – repeating = Error 2).
| Error shown | Possible causes and practical solutions |
| E2 (with display)2 flashes of the LEDs (without display) | The machine cannot load water. |
| Make sure the water supply tap is open. | |
| Make sure the water supply hose isn't bent, kinked or trapped. | |
| Make sure the drain pipe is at the proper height (see installation section). | |
| Close the water supply tap, unscrew the filler hose from the back of the washing machine and make sure the “anti-sand” filter is clean and not blocked. | |
| Check that the filter is not clogged or that there are no foreign bodies inside the filter compartment that can obstruct the proper flow of water. | |
| E3 (with display)3 flashes of the LEDs (without display) | The washing machine does not drain water. |
| Check that the filter is not clogged or that there are no foreign bodies inside the filter compartment that can obstruct the proper flow of water. | |
| Make sure the drain hose isn't bent, kinked or trapped. | |
| Make sure the home drainage system is not blocked and is allowing water to flow through without obstruction. Try to drain the water in the sink. | |
| E4 (with display)4 flashes of the LEDs (without display) | There is too much foam and/or water. |
| Ensure the correct amount of detergent is being used and the detergent is designed for use in a washing machine. | |
| E7 (with display)7 flashes of the LEDs (without display) | Door problem. |
| Make sure the door is correctly closed.Make sure the clothes inside the drum are not preventing the door from closing fully. | |
| If the door is locked, turn off and unplug the washing machine from the electrical supply socket, wait 2-3 minutes and reopen the door. | |
| Any other code | Turn off and unplug the washing machine, wait a minute. Turn on the machine and restart a program. If the error occurs again contact an Authorised Customer Service Centre directly. |
| Problem | Possible causes and practical solutions |
| The washing machine does not work / start | Make sure the product is plugged into a working supply socket. |
| Make sure power is on. | |
| Make sure the wall socket is working, testing it with another appliance such as a lamp. | |
| The door may not be correctly closed: open and close it again. | |
| Check whether the required program was correctly selected and the start button pressed. | |
| Make sure the washing machine is not in pause or time delay mode. | |
| Water leaked on the floor near the washing machine | This may be due to a leak from the seal between the tap, supply hose and fill valve; in this case, replace it and tighten the hose connections correctly. |
| Make sure the front filter is correctly closed. | |
| The washing machine does not spin | The machine is fitted with a detection system that protects the load and product from damage if the load is not balanced before spinning. This may result in:-• The machine attempts to balance the load, increasing the time of spin.• Reduction of the speed of spin to decrease vibrations and noise.• The spin cycle aborting to protect the machine and load. If this is experienced remove the load de-tangle it, reload it and restart the spin program. |
| This could be due to the fact that water has not been completely drained: wait a few minutes. If the problem persists, see Error 3 section. | |
| Some models include a "no spin" function: make sure it is not selected. | |
| Check which options are selected and their effect on the spin cycle. | |
| Excessive detergent can impede the spin cycle, ensure the correct amount of detergent is being used. | |
| Strong vibrations / noises are heard during the spin cycle | The washing machine may not be fully levelled: if necessary, adjust the feet as indicated in the specific section. |
| Make sure transport screws, rubber bungs and spacer tubes were removed. | |
| Make sure there are no foreign objects inside the drum (coins, hinges, buttons, etc...). |

The standard manufacturer warranty covers faults caused by electrical or mechanical faults in the product due to an act or omission of the manufacturer. If a fault is found to be caused by factors outside the product supplied, miss-use or as a result of the instructions on use not being followed, a charge may be applied.
It is always recommended to use original spare parts, that are available at our Authorised Customer Service Centres.
Warranty
The product is guaranteed under the terms and conditions stated on the certificate included with the product. The certificate has to be stored so as to be shown to the Authorized Customer Service Centre in case of need. You can also check the warranty conditions on our web site. To obtain assistance, please fill in the form on-line or contact us at the number indicated on the support page of our web site.
By placing the mark on this product, we are confirming compliance to all relevant European safety, health and environmental requirements which are applicable in legislation for this product.
The manufacturer declines all responsibility for any printing errors in the booklet included with this product. Moreover, it also reserves the right to make any changes deemed useful to its products without changing their essential characteristics.
* ERIKSEEN MYYTÄVÄ LISÄVARUSTE


3. YLEISOHJEITA
Täyttövinkkejä
natural_image
Diagram showing a hand holding a magnifying glass with rotating arrows, alongside a close-up of the handle (no text or symbols present)natural_image
Close-up of a refrigerator interior showing a slot, ventilation slots, and a door handle (no text or symbols visible)natural_image
Four-panel sequence showing hands cleaning a kitchen appliance with a labeled component (A), no text or symbols present.Pesuaineen annostus
7. VIANMÄÄRITYS JA TAKUU

* TILLBEHÖRET SÄLJS SEPARAT


3. ALLMÄNNA RÅD
Tips om tvättlast
natural_image
Illustration showing a hand holding a magnifying glass with directional arrows indicating rotation (no text or symbols)FÖRDRÖJD START-knapp
5) KNAPPLÅS INDIKATORLAMPA
natural_image
Close-up of a refrigerator interior showing a slot, ventilation slots, and a door handle (no text or symbols visible)natural_image
Four-panel photo sequence showing hands cleaning a kitchen appliance with labeled component 'A' (no text or symbols on main objects)Tvättmedel
7. FELSÖKNING OCH GARANTI
* TILBEH∅R SOLGT SEPARAT


- Vaskemaskinen må kobles til vannfordelingsnettet ved hjelp av den nye rørledningen som leveres med apparatet (inne i trommelen). Man må ikke bruke den gamle rørledningen til dette formål.
- Koble den ene enden av vanntilførselsrørledningen, dvs. der som har knerør, til elektroventilen (øverst på apparatets bakside) og den andre enden til en kran eller vanninntaksanordning med 34 gjenget gassmunning.
- Når man setter vaskemaskinen på plass mot veggen, må man passe på at rørledningen ikke bøyes eller strupes. Deretter fester mar avløpsrørledningen til kanten på vasken, eller heller til et fast avløp,


3. PRATISKE RÅD
Innleggingstips
natural_image
Diagram showing a hand holding a valve with directional arrows indicating rotation or adjustment (no text or symbols present)natural_image
Close-up of a hand placing a small white object into a white plastic container with a label 'A' pointing to it (no readable text or symbols beyond the label)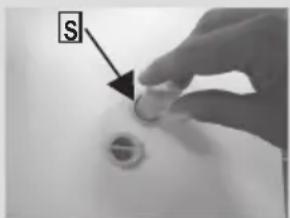
natural_image
Close-up of a hand holding a small circular object with a label 'S' pointing to it (no other text or symbols visible)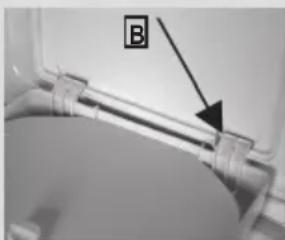
natural_image
Close-up of a toilet sink with a label 'B' pointing to the drain (no other text or symbols visible)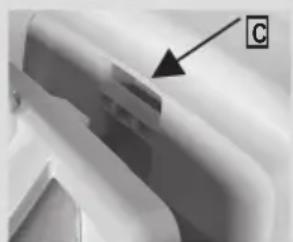
natural_image
Close-up of a mechanical component with a labeled arrow pointing to a feature (no text or symbols present)Montering
natural_image
Close-up of a device's front panel showing a connector and a vertical rod, with no visible text or symbols.natural_image
Four-panel black-and-white photo showing hands cleaning a kitchen appliance into a washing machine, with no visible text or symbols.7. FEILS∅KING OG GARANTI
Access to professional repair, such as internet webpages, addresses, contact details.
Model no: STL 712 W
Aftersales service station list:
| Address | Scandomestic A/S |
| Contact Number | 7242 5571 |
| Website | Scandomestic.dk |
| QR code | 356824 |
| Relevant information for ordering spare parts, directly or through other channels provided by the manufacturer, importer or authorised representative; | Scandomestic A/S |
| The minimum period during which spare parts, necessary for the repair of the appliance, are available; | 10 years |
| Instruction on how to find the model information in the product database, as defined in Regulation (EU) 2019/2019 by means of a weblink that links to the model information as stored in the product database or a link to the product database and information on how to find the model identifier on the product.) | www.scandomestic.dk |
Note: The address or contact phone number of the service site is subject to change without prior notice. Please confirm whether the service station is a directly affiliated one of our company when requiring services.
DE


- PRAKTISKE TIPS
- Påfyldningstips
- STANDARDPROGRAMMER I HENHOLD TIL
- FEJLFINDING OG GARANTI
- FOR U.K. ONLY
- Environmental conditions
- Contents
- GENERAL SAFETY RULES
- Electrical connections and safety instructions
- WARNING:
- INSTALLATION
- If your model offers this function:
- Hydraulic connections
- PRACTICAL HINTS
- Load tips
- When sorting laundry, make sure:
- Useful advice for saving
- Maximise the load size
- Do you need to pre-wash?
- Is a hot wash required?
- Before using a drying programme (WASHER-DRYERS)
- Dosing the detergent
- CLEANING AND MAINTENANCE
- Cleaning the appliance's exterior
- Filter cleaning
- Suggestions for moves or prolonged disuse
- Cleaning the detergent dispenser and its compartments
- Fitting
- QUICK USER GUIDE
- Program selection
- Technical data
- CONTROLS AND PROGRAMS
- Opening the door
- PROGRAMME selector with OFF position
- START/PAUSE button
- ADD OR REMOVE ITEMS AFTER THE PROGRAMMES HAS STARTED (PAUSE)
- CANCELLING THE PROGRAMME
- DELAY START button
- OPTIONS button
- - EXTRA RINSE
- - HYGIENE +
- - EASY IRON
- RAPID / STAIN LEVEL button
- - RAPID
- - STAIN LEVEL button
- TEMPERATURE SELECTION button
- SPIN SPEED button
- KEY LOCK
- Digital Display
- 1) OPTIONS INDICATOR LIGHTS
- 2) CYCLE DURATION
- 3) DOOR LOCKED INDICATOR LIGHT
- 4) Kg LOAD INDICATOR LIGHT (function active only on Cotton and Synthetics programmes)
- 5) KEY LOCK INDICATOR LIGHT
- 6) WASH TEMPERATURE INDICATOR LIGHTS
- 7) SPIN SPEED INDICATOR LIGHTS
- Please read these notes:
- INFORMATION FOR THE TEST LABORATORIES
- STANDARD PROGRAMMES
- ACCORDING TO
- Programmes selection
- Whites
- Cottons + Prewash
- ECO 40-60
- 20°C
- Synthetics
- Delicates
- Rinse
- Spin
- Drain
- Rapid (14/30/44 Min.)
- Dark Colours
- Shirts
- Silk
- Wool
- Hand Wash
- Preparing the wash
- Opening/ closing the drum
- Detergent load
- TROUBLESHOOTING AND WARRANTY
- ERROR CODE FORMAT
- Warranty
- YLEISOHJEITA
- Täyttövinkkejä
- Pesuaineen annostus
- VIANMÄÄRITYS JA TAKUU
- ALLMÄNNA RÅD
- Tips om tvättlast
- FÖRDRÖJD START-knapp
- 5) KNAPPLÅS INDIKATORLAMPA
- Tvättmedel
- FELSÖKNING OCH GARANTI
- PRATISKE RÅD
- Innleggingstips
- Montering
- FEILS∅KING OG GARANTI
- DE
Brand : Scandomestic
Model : STL 712 W
Category : Washing machine