
RTP-805 - Electric kettle Redmond - Free user manual and instructions
Find the device manual for free RTP-805 Redmond in PDF.


| Product Type | Thermopot (water boiler and dispenser) |
| Model | RTP-805 |
| Brand | Redmond |
| Power | 1900 W |
| Voltage | 220-240 V, 50/60 Hz |
| Capacity | 5 L |
| Dimensions (W×D×H) | 238 × 315 × 217 mm |
| Net Weight | 2.7 kg |
| Power Cord Length | 0.65 m |
| Safety Class | Class I |
| Overheating Protection | Yes |
| Battery Backup | 4 × LR06 (AA) batteries (not included) for autonomous water supply |
| Housing Material | Plastic |
| Water Tank Material | Stainless steel |
| Heating Element | Disk |
| Cooling Fan | Hidden |
| Control Type | Touch panel with LED display |
| Operation Modes | Water boil, heating (45–90°C in 5°C increments), cooling, water temperature maintenance |
| Water Supply | Automatic (150 ml / 250 ml presets) and manual |
| Timer | On-delay timer 1–12 hours |
| Auto Shut-off | When empty, in case of overheating |
| Lid | Removable |
| Package Includes | Thermopot, power cord, user manual, service book |
Frequently Asked Questions - RTP-805 Redmond
User questions about RTP-805 Redmond
0 question about this device. Answer the ones you know or ask your own.
Ask a new question about this device
Download the instructions for your Electric kettle in PDF format for free! Find your manual RTP-805 - Redmond and take your electronic device back in hand. On this page are published all the documents necessary for the use of your device. RTP-805 by Redmond.
USER MANUAL RTP-805 Redmond
natural_image
White and black Redmono coffee maker with digital display (no visible text or symbols on device body)
IMPORTANT SAFEGUARDS....6
Technical Specifications 8
Package Includes 9
Parts of Appliance....9
Control panel 9
I. PRIOR TO FIRST USE 9
II. OPERATING THE APPLIANCE 10
Water-temperature maintenance mode....10
Manual water supply 11
Automatic water supply....11
Changing the program setting....11
Water cooling mode....11
Timer setting....12
Autonomous water supply function 12
III. CLEANING AND MAINTENANCE 12
Removing and installing the appliance lid 13
Daily care....13
Body and lid cleaning....13
Cleaning the water tank....13
Descaling....13
Storage and transportation 13
IV. BEFORE CONTACTING SERVICE CENTER....13

A1
A2
Carefully read all instructions before operating the appliance and save them for future reference. By carefully following these instructions you can considerably prolong the service life of your appliance.
The safety measures and instructions contained in this manual do not cover all possible situations that may arise during the operation of the appliance. When operating the device the user should be guided by common sense, be cautious and attentive.
IMPORTANT SAFEGUARDS
- The manufacturer is not responsible for injuries caused by failure to comply with the safety requirements and operation rules of the appliance.
- This appliance is intended to be used for nonindustrial use in house hold and similar spheres of application. Industrial application or any other misuse will be regarded as violation of proper service conditions. Should this happen, manufacturer is not responsible for possible consequences.
-
Before plugging in the appliance ensure that the circuit voltage matches operating voltage of the appliance (see technical specifications or manufacturer's plate on the appliance).
-
Use an extension cord designed for the power consumption of the appliance as the parameter mismatch may result in a short circuit or fire outbreak.
- Use only earthed electric sockets as this is an obligatory safety requirement. Use an earthed extension cord as well.
- Unplug the appliance after use, while cleaning or moving. Remove the power cord with dry hands holding it by the plug, not cord.
STOP
CAUTION! Appliance runs hot while operating. Do not touch the housing while the appliance is operating. Do not lean over the appliance when the lid is on to avoid scalds.
- Never open the lid while boiling.
- Use the appliance for its intended purpose only. Otherwise it will be considered as misuse.
- Use the appliance for water heating only. Do not use it to heat milk or any other liquids.
- Do not place the cord in doorframes or by heat sources. Do not twist or bend the power cord, ensure that it is not in contact with sharp objects, corners and edges of furniture.
STOP
REMEMBER: Accidental damage to the power cord may cause electric shock or breakdown not covered by the terms of warranty. Promptly contact the service centre to have the damaged power cord replaced. Do not place the appliance on soft, unstable surface.
- Do not put the appliance on temperature-sensitive surface, do not cover the appliance while it is in operation as it may result in a fault or breakdown of the appliance.
- Do not use the appliance outdoors as ingress of moisture or foreign objects inside the housing can result in damage.
- Use the appliance at an altitude of no more than 2000 m.
- Before cleaning the appliance ensure that it is unplugged and has cooled down. Follow the instructions while cleaning the device.
STOP
DO NOT immerse the appliance in water or keep in running water!
- This appliance can be used by children aged from 8 years and above and persons with reduced physical, sensory or mental capabilities or lack of experience and knowledge if they have been given supervision or instruction concerning use of the appliance in a safe way and understand the hazards involved. Children shall not play with the appliance. Keep the appliance and its cord out of reach of children aged less than 8 years. Cleaning and user maintenance shall not be made by children without supervision.
- Keep the packaging (film, foam plastic and other) out of reach of children as they may choke on them.
- No modifications or adjustments to the product are allowed. All service and repair works should be
REDMOND
carried out by an authorized service centre. Failure to do so may result in device and property damage or injury.

CAUTION! Do not use the appliance in case any breakdown has been noticed.
Technical Specifications
Model.....RTP-805
Power....1900 W
Voltage 220-240 V, 50/60 Hz
Electrical safety......class I
Overheating protection....available
Battery....4 × LR06 (AA)
Capacity 5 l
Operation modes:
- water boil
• heating water without boiling
• heating (45–90 °C in 5 °C increments) - cooling
Type of control.....touch
Autonomous water supply function....available
Heating element....disk
Cooling fan....hidden
Housing material ....plastic
Water tank material....stainless steel
Lid......removable
Display......LED
Water supply and lock....automatic/manual
Auto shut-off:
- when empty
- in case of overheating
Overall dimensions 238 × 315 × 217 mm
Net weight 2.7 kg
Power cord length 0.65 m
Package Includes
Thermopot 1 pc.
Power cord....1 pc.
User manual....1 pc.
Service book....1 pc.
In accordance with the policy of continuous improvement, the manufacturer reserves the right to make any modifications to design, configuration, or specification of the product without prior notice. The specification allows an error of ±10% .
Parts of Appliance (scheme A1, p. 3)
- Steam outlet hole
- Lid
- Lid latch
- Carrying handle
- Housing
- Removable power cord
- Lid release button
- Control panel with display
- Spout
- Water level graduated scale
- Removable battery compartment
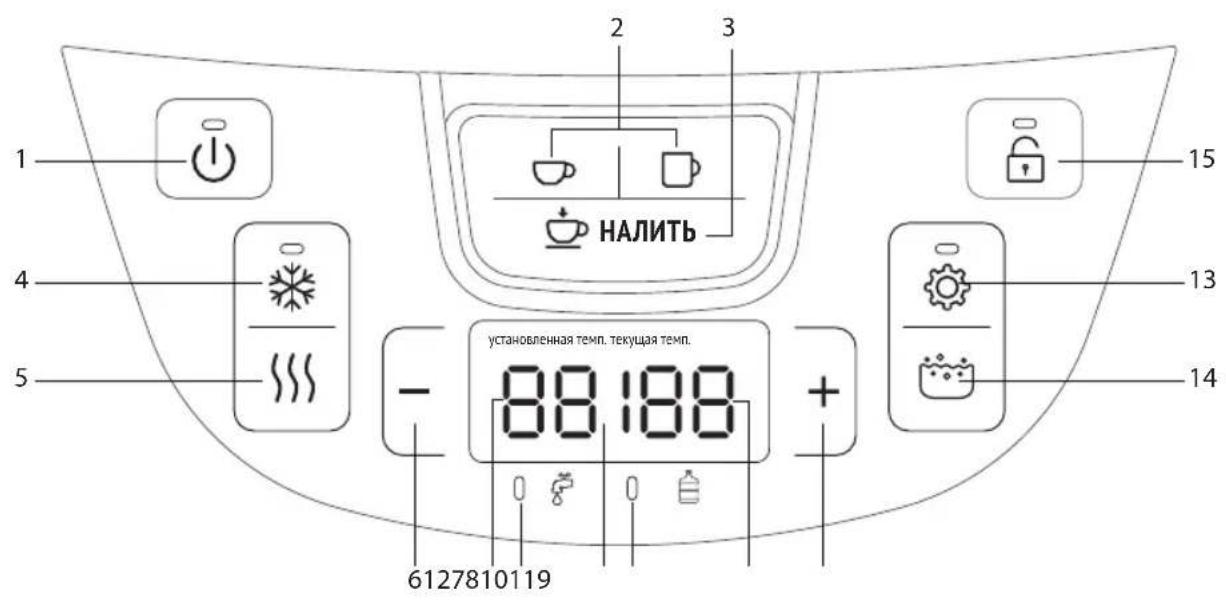
Control panel (scheme A2, p. 4)
- button with indicator - enable/disable the appliance
-
and buttons - automatic water supply
-
"НАЛИТЬ" button - manual water supply
- button with indicator - water cooling mode
- button - set water temperature maintaining mode
- button - heating temperature decrease
- Display
- Set temperature digital indicator
- Current temperature digital indicator
- unfiltered water indicator
- filtered water indicator
- button - heating temperature increase
- button with indicator - timer setting
- button - enabling/disabling water pre-boiling
- button with indicator - water supply system unlock
I. PRIOR TO FIRST USE
Carefully take the appliance and its detachable parts out of the package.

Remove all wrapping materials and stickers except for the serial number identification sticker!
After the appliance transportation or storage at low temperature keep it at room temperature for at least two hours before plugging in.
- Wipe the base of the appliance with a damp cloth, then let it dry. You are advised to boil water in the appliance a few times before the first use to get foreign smell out and disinfect the appliance.
REDMOND
- Place the appliance to the dry, solid, horizontal surface. Ensure the escaping steam does not fall on wallpaper, decorative coats, electric units and other items, which can be damaged by steam and high temperature.
- Unwind the power cord to the desired length. If necessary use the extender of a suitable power (no less than 2.5 kW).
- Press the lid latch and pull it up to open the lid.
- Carefully pour cold water from a jar or other reservoir into the appliance. The water level must not exceed the FULL mark. If you fill the appliance with water above the max mark, it is possible to spray boiling water. If there is too little water, the appliance may overheat.

Do not pour water directly from the tap so that it does not get on the electrical contacts inside the appliance. It may lead to malfunction.
CAUTION! the appliance is to be used only for heating and boiling water.
- Close the lid of the appliance tightly.
II. OPERATING THE APPLIANCE
Water-temperature maintenance mode
- Connect the appliance to the mains, it will make a sound, the display will show the current temperature of water in the thermopot, the button indicator will flash.
-
Press the button, the button indicator lights up, the button indicator will be lit constantly.
-
Use the 🎨 button to select heating with pre-boil (indicator – recommended when using unfiltered water) or heating without pre-boiling (indicator – recommended when using filtered water).
- Use the and buttons to set the desired water temperature (in the range of 45–90 °C, in 5°C increments), the set temperature indicator will flash. Do not press the buttons on the control panel until the set temperature and unfiltered water indicators are continuously lit.
The desired water temperature may be changed at any stage of the programme.
If the current water temperature in the thermopot is higher than the set one, five short beeps will sound. The set water temperature maintaining mode turns on when the water cools down to the selected value.
- The water heating process will start, and the heating process will be displayed on the current temperature digital indicator.
- After the water boils (when heating with pre-boiling is selected) or after the set temperature is reached (when heating without pre-boiling is selected), the thermopot will make five short beeps.
- If heating without pre-boiling was selected, the set water temperature maintaining mode will turn on after heating to the set temperature is completed.
- If pre-boiling heating has been selected, the set water temperature maintaining mode is enabled when the temperature of water in the thermopot drops to the set value.
- To turn off the appliance, press the button, beep will sound, indicators and the display will go off.
Manual water supply
- Place a cup under the thermopot spout.
- Press the button to unlock water supply; the button indicator will light up.
- Press and hold the "НАЛИТЬ" button until your cup is full.
- 10 seconds after the water supply is finished, the lock will turn on automatically, the indicator of the button will turn off.
- To lock water supply manually (before it turns on automatically), press the button; an audible signal will sound, the button indicator will turn off.
Automatic water supply
- Place a cup under the thermopot spout.
- Press the button to unlock water supply; the button indicator will light up.
- Press the (approx. 150 ml) or (approx. 250 ml) button, the water supply process will start.
- The water supply will stop when the programmed volume is reached.
- To interrupt water supply, press the or button again.
Automatic water supply can also be interrupted by pressing the ⏻, "НАЛИТЬ" or button.
Changing the program setting
You can adjust the volume of the automatic water supply and save your own settings instead of the factory settings. To do this:
- Press the button to unlock water supply; the button indicator will light up.
- Press the op button, the water supply process will start.
- Release the button when the desired volume is reached The next time you start the adjusted program, the water supply process will automatically stop after reaching the volume you have set.
You can also restore factory settings. To do this:
- When the water supply system is locked (the button indicator is off), press and hold the button until you hear a beep.
- The appliance will return to operation with the factory settings.
Water cooling mode
The mode is recommended for accelerated cooling of water to the required temperature.
- Press the button, the button indicator will start flashing.
- Use the —and + buttons to set the desired water temperature (in the range of 45–90 °C, in 5°C increments).
- Do not press the control panel buttons until five short beeps sound; the water cooling process starts.
- During the mode operation, instead of the digital indicator of the current temperature, will be displayed; the button indicator will be constantly lit.
- To stop the water cooling mode, press the button; the button indicator will turn off. Pressing the button again restarts the cooling process to the set temperature.
REDMOND
If the current temperature of water in the thermopot is higher than the set temperature, just press the button to turn on the cooling mode.
If the current temperature of the water in the thermopot is lower or equal to the set temperature, the cooling mode will not start and five beeps will sound. In this case, if you want to cool water even more, first press the button, use the and buttons to set the desired water temperature and press the button.
- After the water has cooled, the button indicator will turn off and the current temperature digital indicator will return to displaying water temperature.
Timer setting
The on-delay timer will help you reduce energy costs.
- To set the standby timer, press the button, the indicator of the button will flash, and the hour value will flash on the digital display.
- Use the — and + buttons to set the timer value from 1 to 12 hours in 1 hour increments.
- Set the required operating mode of the thermopot in accordance with the Sections "Water-temperature maintenance mode" and "Water cooling mode".
-
Once you have set the required operating mode, the timer will start counting down. The display will show the set water temperature and the timer value; the indicators of the 🔊 and buttons will be constantly lit.
-
When the timer is reset, the indicator of the button will turn off; the thermopot will start working in the selected mode. The digital indicator of current temperature will return to displaying the temperature of the water in the thermopot.
Autonomous water supply function
You can pour water from the thermopot even when it is disconnected from the mains. To do this, install the batteries (not included) into the appropriate compartment and connect it to the thermopot, as shown in Figure A3, page 5. Water is supplied in the same way as when it is connected to the mains.
⚠️ Installing the battery ensure that your hands and the unit are dry.
III. CLEANING AND MAINTENANCE
Before cleaning, unplug the appliance. Remove the appliance lid, drain water through the left side (mark ▲ the body) and let it cool down completely.
STOP DO NOT immerse the appliance in water or wash under running water! DO NOT clean with abrasives or chemical substances not recommended for items that come into contact with foodstuffs. Do not drain water through the control panel or the back. Do not allow water to enter the socket of the power cord.
CAUTION! Before using the appliance again, make sure that the electrical contacts are completely dry!
Removing and installing the appliance lid (scheme A4, p. 5)
Press the lidr latch and pull it up. Open the lid to 45°, press the lid release button on the back of the thermopot, and remove the lid.
To reattach the lid, insert the metal pin on the back of the lid into the groove on the body, holding the lid at an angle 45^ . Gently check if the lid is installed securely.
Daily care
It is recommended to discharge the remaining water completely every day, otherwise its taste will deteriorate with refilling, and probability of scale occurrence on the walls of the tank will increase. After water discharge, wipe the tank walls with a clean descaling cloth.
Body and lid cleaning
Clean the appliance body and the lid with a damp soft cloth occasionally. Remove gross contamination with mild detergents. Dry the appliance completely before use.
Cleaning the water tank
Clean the water tank with a damp sponge. Do not use ordinary detergents: they may leave unpleasant odour and spoil taste of water.
Descaling
During operation, depending on composition of the water used, plaque and scale may form on the heating element and the internal walls of the appliance. Use special non-abrasive agents for cleaning and descaling kitchen appliances to remove them. Follow the cleaning agent manufacturer's instructions. After cleaning, discharge the solution and rinse the tank thoroughly with cold water. Wipe the water tank with a damp cloth. To eliminate unpleasant odour of the cleaning agent, fill the water tank up to the maximum mark, boil it and then drain it.
Storage and transportation
Before repeated operation or storage completely dry all parts of the appliance. Store the assembled appliance in a dry, ventilated place away from heating appliances and direct sunlight.
During transportation and storage, do not expose the device to mechanical stress, that may lead to damage of the device and/or violation of the package integrity.
Keep the device package away from water and other liquids.
IV. BEFORE CONTACTING SERVICE CENTER
| Problem Possible cause Solution | ||
| The appliance does not switch on | No power supply | Connect the appliance to a properly working electric socket |
| Error message is dis - played on the screen "E1", "E3" or "E7" | System error | Unplug the appliance, after 5 minutes, plug it back into the mains. If the appliance still doesn't work, apply to the service center |
REDMOND
| Problem Possible cause Solution | ||
| Error message is dis - played on the screen "E4" or "E6" | There is no or not enough water in the tank. The appliance overheats during operation, overheating protection tripped | Unplug the appliance from the mains, let it cool down add cold water to the tank. Plug it back into the mains |
| Error message is dis - played on the screen "E5" | System error, possible failure of the control board | Unplug the appliance from the mains and let it cool down. Plug it back into the mains. If the appliance still doesn't work, apply to the service center |
| Water leaks from the appliance | The tank is filled above the MAX mark | Remove the lid, allow water to cool and discharge the overflow from the tank |
| Water does not flow well from the dispenser or does not flow at all | Water supply lock is enabled | Disable the water supply lock |
| No power supply | Connect the appliance to a properly working electric socket | |
| The battery is worn out | Replace the battery | |
| Mineral deposits or foreign inclusions in the water tank | Descale the tank (see 'Cleaning and Maintenance') | |
| A loud sound is heard during boiling | Scale has formed on the walls of the water tank | |

In case you didn't manage to eliminate the defects, please, refer to the authorized service centre.
Environmentally friendly disposal (WEEE)
The packaging, user manual and the device itself shall be taken to the applicable collection point for the recycling of electrical and electronic equipment. Do not throw away the electronic waste to help protect the environment.
Old appliances must not be disposed with other household waste but must be collected separately. Municipal disposal of recyclable wastes is free of charge. The owners of old appliances are required to bring it to a waste facility centre. With this little extra effort, you can help to ensure that valuable raw materials are recycled and pollutants are treated as appropriate.
This appliance is labelled in accordance with European Directive 2012/19/EU – concerning used electrical and electronic appliances (waste electrical and electronic equipment WEEE).
The guideline determines the framework for the return and recycling of used appliances as applicable throughout the EU.
Manufacturer: "Power Point Inc Limited" №1202 Hai Yun Ge (B1) Lin Hai Shan Zhuang Xiameilin Futian Shenzhen. China. 518049. Under license of REDMOND® Изготовитель: «Пауэр Пойнт Инк. Лимитед» №1202 Хай Юн Гэ (B1) Лин Хай Шан Чжуан Сямейлин Футьян, Шеньжень, Китай, 518049. По лицензии REDMOND® Виробник: «Пауэр Пойнт Інк. Лімітед» № 1202 Хай Юн Ге (B1) Лін Хай Шан Чжуан Сямейлін Футьян, Шеньжень, Китай, 518049. За ліцензією REDMOND®
Importer (EU): SIA "SPILVA TRADING" Address: Jelgava, Meiju cels 43 – 62, LV-3007 Reg. Nr. 43603078598. BA Uvoznik i distributer za Bosnu i Hercegovinju: ASBIS d.o.o., Dzemala Bijedica 162, 71 000, Sarajevo, Bosna i Hercegovina. Tel.: +587 33 770 200, e-mail: prodaja@asbis.ba, www.asbis.ba. BG Вносител: АСБИС България ЕООД И.Н.: BG121655056 Адрес: София, бул, Исскърско щосе 7. ТЛ Европа, срп. 3. Tel.: 02/4284111, www.asbis.bg. CZ Dovozce: ASBIS CZ spol. s ro Obchodní 103, 251 01 Cestlice, Praha – vychod, Praha, Czech Republic. Tel.: +420 272 117 111, www.asbis.cz. HU Importor: ASBIS Magyarország Kit., H-1135, Budapest, Reitter Ferenc utca 46-48. Tel.: +36 1 236-1000, Fax: +36 1 236-1010, www.asbis.hu. PL ASBIS POLAND SP Z.O.O., Ul. Krasnowolska 17 A, 02-849, Warszawa. Tel: +48 22 33 71 510, www.asbis.pl. RO Importator: ASBIS Romania SRL, Splaiul Independentei 319, SEMA PARA, Obiectiv 5, Etaj 2, Sector 6, Bucuresti, 062650, Romania. Tel.: +40 21 337 1099, www.asbis.ro. RU Импортер в России: ООО «ИЛОТ», 198099, г. Санкт-Петербург, ул. Промышленная., д. 38, к. 2, лит. А., тел.: +7(812) 740-16-30. SK Importer/distributor pre SR: ASBIS SK spol.s r.o., Tuhovska 33, 831 06, Bratislava. Tel.: +440-2-32165111, www.online.asbis.sk. RS Uvoznik i servis za Republiku Srbiju: ASBIS d.o.o., Cara Dušana 205A, 11080 Žemun, Beograd. Tel.: +381 11 310 77 00, www.asbis.rs.LV Izplatitājs: SIA „ASBIS BALTICS“; Latvia, Riga, Bauskas iela 58A-15, LV-1004; Tel.: +371 66047820, e-mail: sales@asbis.lv, www.asbis.lv. UA Импортер в Україні: ТОВ ПІІІ «АСЫС-УКРАЇНА», 03061, м. Київ, вул. Газова, будинок 30. Ten.: +58 044 455 44 11, www.asbis.ua. SL Distributer, dajalec garancije in servis za Slovenijo, Asbis d.o.o., Brodište 15. 1236 Trzin; Tel.: +386 (0) 590 79 927; e-mail: infosales@asbis.si; www.asbis.si. HR ASBISc-CR d.o.o.; Slavonska avenija, 24/6 - 1 kat; 10000 Zagreb Croatia; Tel.: +385 1 600 9900, e-mail: prodaja@asbis.hr; www.asbis.hr. EE Maaletooja: SIA „ASBIS BALTICS“; Iuri 10c, 11313, Tallinn, Estonia; Tel.: +372 66047815, e-mail: sales@asbis.ee; www.asbis.ee. LT Importuotojas: SIA „ASBIS BALTICS“; Ateities q. 25B, 06326, Vilnius, Lietuva; Tel.: +370 66047814, e-mail: sales@asbis.lt; www.asbis.lt. CY Importer Cyprus: ASBIS Kypros Limited; 26, Spyrou Kyprianou Str, 4040, Germasogeia, Limassol, Cyprus. Tel.: +357 25 257 350; Fax: +357 25 322 432, e-mail: info@asbis.com.cy; www.asbis.com.cy
www.redmond.company
www.multivarka.pro
www.store.redmond.company
www.smartredmond.com
Made in China
RTP-805-ENG-UM-1

- IMPORTANT SAFEGUARDS
- STOP
- REDMOND
- Technical Specifications
- Package Includes
- Parts of Appliance (scheme A1, p. 3)
- Control panel (scheme A2, p. 4)
- PRIOR TO FIRST USE
- OPERATING THE APPLIANCE
- Water-temperature maintenance mode
- Manual water supply
- Automatic water supply
- Changing the program setting
- Water cooling mode
- Timer setting
- Autonomous water supply function
- CLEANING AND MAINTENANCE
- Daily care
- Body and lid cleaning
- Cleaning the water tank
- Descaling
- Storage and transportation
- BEFORE CONTACTING SERVICE CENTER
- Environmentally friendly disposal (WEEE)
Brand : Redmond
Model : RTP-805
Category : Electric kettle