
7745 - Blender OBH NORDICA - Free user manual and instructions
Find the device manual for free 7745 OBH NORDICA in PDF.


| Product Type | Vacuum Blender 3-in-1 |
| Model Number | 7745 |
| Brand | OBH Nordica |
| Blender Jug Capacity | 1.5 liters |
| Bottle Capacity | 700 ml |
| Motor Unit Power Supply | 220-240 V AC, 50-60 Hz |
| Vacuum Pump Power Supply | DC 5V, 1-2 A (via USB, adapter not included) |
| Max Continuous Operation Time (Blender) | 3 minutes, then 5 minutes rest |
| Blender Programs | Juice (90 sec), Crushed Ice (20 sec), Smoothies (45 sec) for jug; Juice (60 sec), Crushed Ice (18 sec), Smoothies (45 sec) for bottle |
| Pulse Function | Yes, max 60 seconds |
| Variable Speed | Yes, continuous from MIN to MAX |
| Vacuum Function | Removable vacuum pump for preserving freshness and antioxidants |
| Max Liquid Temperature (with vacuum) | 40 °C |
| Max Liquid Temperature (without vacuum) | 80 °C |
| Blade Material | Stainless steel (sharp) |
| Cleaning | Hand wash jug, bottle, lid, blade unit; damp cloth for motor unit |
| Safety Features | Overheat protection (thermostat), automatic shut-off, lockable handle |
| Warranty | 2 years limited (domestic use) |
| Included Accessories | Measuring lid, vacuum lid, jug lid, blade unit, grey silicone seal, vacuum pump, USB cable, cleaning brush, bottle with drinking spout lid, bottle vacuum lid |
Frequently Asked Questions - 7745 OBH NORDICA
User questions about 7745 OBH NORDICA
0 question about this device. Answer the ones you know or ask your own.
Ask a new question about this device
Download the instructions for your Blender in PDF format for free! Find your manual 7745 - OBH NORDICA and take your electronic device back in hand. On this page are published all the documents necessary for the use of your device. 7745 by OBH NORDICA.
USER MANUAL 7745 OBH NORDICA
DESIGNING GOOD LIFE
Vacuum Blender 3-IN-1
When air is outside, good remains inside
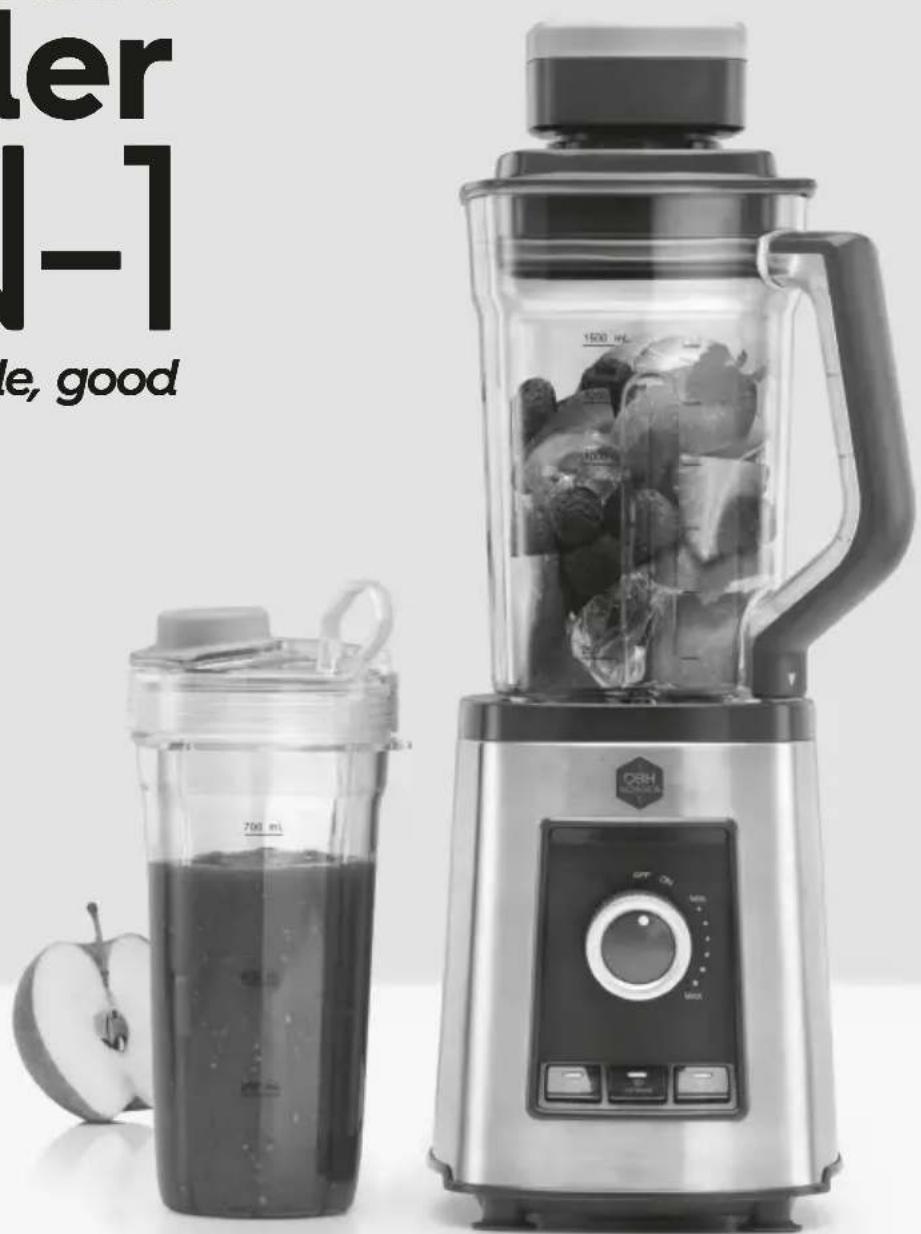
Making good!
Bruksanvisning - svenska......sida 4 - 15

(Pic 1)
(Pic 2)
| ✓ | ✓ | ✓ | |
| ✓ | × | ✓ | |
| × | × | ✓ | |
| × | × | ✓ |

Felsökning
Fig 10


(Pic 1)
(Pic 2)
| ✓ | ✓ | ✓ | |
| ✓ | × | ✓ | |
| × | × | ✓ | |
| × | × | ✓ |

Fejlfinding
Visiting address: Deltapark 37, 3. sal
Phone: +45 43 350 350
Direct: +45 43 350 367
www.obhnordica.dk
Tekniske data
OBH Nordica 7745


(Pic 1)
Sett kontakten (9) i uttaket på vakuumpumpen, og sett deretter den andre kontakten i en adapter (DC5V, 1-2A). Adapter følger ikke med. Bilde 1.

(Pic 2)
Koble adapteren til et strømuttak (230 V) for å starte ladingen. LED-indikatoren på vakuumpumpen blinker rødt for å vise at lading pågår. Bilde 2.

(Pic 3)
Feilsøking
BEGRENSET GARANTI for OBH Nordica
Garantien
(Pic 1)
(Pic 2)
| ✓ | ✓ | ✓ | |
| ✓ | × | ✓ | |
| × | × | ✓ | |
| × | × | ✓ |
Vianmääritys
- Read the instruction manual carefully before use and save it for future use.
- Plug the appliance to a household outlet of 220-240 Volt AC only and use the appliance only for the intended use.
- Always unplug the appliance from the mains supply in case of a problem, after use, when parts are mounted or removed from the appliance and before cleaning and maintenance.
- Never immerse the appliance in water or any other liquid.
- Do not let children use the appliance. Keep the appliance and the cord out of the reach of children.
- Do not let children carry out cleaning and maintenance. Children should always be supervised in order that they do not play with the appliance.
- This appliance can be used by persons with reduced physical, sensory or mental capabilities or lack of experience with/knowledge about the appliance, if they have been given supervision or instructions concerning the use of the appliance by a person responsible for their safety and when they are aware of possible risks.
- Check that the cord is not hanging free from the edge of the table.
- Do not place the appliance on or near hotplates, open fire or the like.
-
The appliance should only be used under supervision.
-
Be careful when handling the appliance, as the blade is extremely sharp! Do not touch the blade during use. Be careful that neither fingers nor tools touch the blade! Always unplug before cleaning.
-
The blender must not be used for more than 3 minutes at a time. Then leave the blender to rest for 5 minutes before restarting it (to avoid overheating).
-
In order to avoid hazard due to inadvertent resetting of the thermal cutout, this appliance must not be supplied through an external switching device, such as a timer, or connected to a circuit that is regularly switched on and off by the utility.
-
Always check the appliance, the cord and the switch before use. If the cord is damaged, it must be replaced by the manufacturer, an authorized service agent or a similarly qualified person in order to avoid a hazard.
-
Extra protection can be obtained by installation of a residual current device of 30 mA. Check with your installer.
-
The appliance is for domestic use only.
-
If the appliance is used for other purposes than intended, or is not handled in accordance with the instruction manual, the full responsibility for any consequences will rest with the user. Any damages as a consequence of the above to the product are not covered by the warranty.
Before use
Clean all the parts as described under “Cleaning and maintenance”. The blade at the base of the jug is very sharp and must be handled with the utmost care. The blade unit (6) can be removed and washed separately. Use a damp cloth to clean the motor unit.
Main components (see image on page 3)
- Measuring lid for blender jug
- Vacuum lid for blender jug
- Lid for blender jug
- Blender jug 1.5 litres
- Grey silicone seal
- Blade unit
- Motor unit
- Vacuum pump
- USB cable
- Cleaning brush
- Lid with drinking spout for bottle
- Bottle 700 ml
- Vacuum lid for bottle
- Function selector
Use
The blender can be used for blending, chopping, puréeing and mixing e.g. milkshakes, baby food, soups and sauces. You can also crush ice for drinks, etc. If you use the removable vacuum pump (8) you can also make delicious smoothies with a brighter colour and fewer bubbles that stay fresher longer. It also preserves the antioxidants.
The blender motor moves the blade at high speed in order to guarantee thorough mixing. It is important, therefore, that the blender is always placed on a flat, dry surface before it is started. When the jug is correctly positioned on the motor unit, a beep is heard. Remember to put the measuring lid (1) or vacuum lid (2) in the jug lid (3) before starting the blender.
Mixing in blender jug (without vacuum pump)
The blender jug (4) can tolerate hot ingredients and liquids/soups up to 80°C. When mixing a hot liquid in a closed container (e.g. the blender jug with the measuring lid on), pressure can build up due to the air in the jug expanding rapidly from the heat. There is a risk, therefore, that when you start the appliance, the lid will fly off and hot liquid will spray out. To avoid pressure building up when mixing hot ingredients, start at a low speed and gradually increase the speed. NOTE! It is important that only the measuring lid (1) is used when mixing hot liquids.

- Screw the blade unit (6) securely to the bottom of the blender jug in an anticlockwise direction. Fig 1.
- Pour the ingredients into the blender jug (4). Do not exceed the maximum mark. Fig 2.
- Place the lid on the blender jug (3) and press it down firmly. Fig 3.

- Place the blender jug (4) on the motor unit (7) and turn the handle to the locked padlock position. Fig 4.
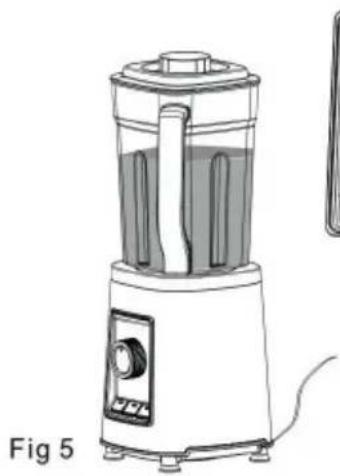
- Turn the function selector (14) to ON and select the required program or optional variable setting. The mixing process starts. Fig 5.
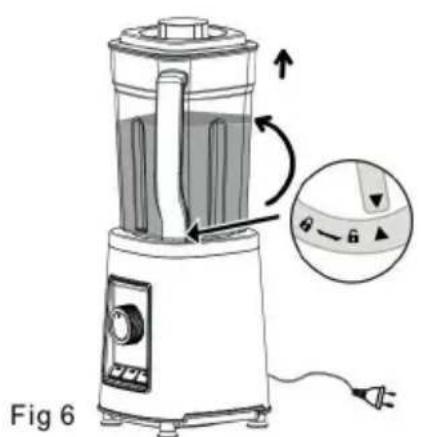

- Switch off the blender once the mixing process is complete and turn the function selector (14) to OFF. Unplug the appliance. Fig 6.
- Lift off the lid and serve directly from the blender jug (4). Fig 7.
Blender programs:
Blender jug (1500 ml)
Program Program time Suitable for
Juice 90 sec. Fruit, vegetables, drinks and juices Crushed ice 20 sec. Crushed ice for drinks, etc. Smoothies 45 sec. Milkshakes and drinks
Bottle (700 ml)
Program Program time Suitable for
Juice 60 sec. Fruit, vegetables, drinks and juices
Crushed ice 18 sec. Crushed ice for drinks, etc.
Smoothies 45 sec. Milkshakes and drinks
Fill the blender jug (4) with the ingredients to be mixed and then place it on the motor unit (7). Plug the blender in and turn the function selector (14) to ON. A beep is heard and the indicator lights come on. Select the required program by pressing the relevant button. The corresponding indicator light will come on and the mixing process will start.
The blender works in intervals and switches off automatically. All the indicator lights come on. You can also stop the mixing process by turning the speed selector (14) to OFF.
Pulse function (P)
Use the pulse mode for short intervals. The pulse button must be kept depressed for the blender to operate. As soon as the button is released, the blender switches off. The maximum operating time for the pulse function is 60 seconds.
Continuous speed MIN-MAX
The blender has continuous speed adjustment. Start at a low speed and gradually increase as required. Turn the function selector (14) to the required speed to start the mixing process. The blender switches off automatically after 1 minute. Note that the function selector must then be turned back to ON to be able to restart the blender. The blender can also be switched off manually by turning the function selector back to OFF.
It is recommended that you try various speeds to work out what is best for the ingredients you are mixing. Always keep an eye on the mixing process and switch the appliance off once the required results have been reached. Always unplug the appliance after use.
Never remove the blender jug/bottle (4, 12) from the appliance when the motor is running.
NOTE! Please note that the blender must not be started up with only dry ingredients (e.g. nuts) in the blender jug (4), as this may break the appliance. Always add a splash of liquid before starting the blender.
Mixing with vacuum pump
NOTE! Note that the maximum temperature for liquids is 40° C for mixing with the vacuum pump due to the pressure that can build up.

- Screw the blade unit (6) securely to the bottom of the blender jug (4) in an anticlockwise direction. Fig 1.
- Pour the ingredients into the blender jug. Do not exceed the maximum mark. Fig 2.
- Place the vacuum lid (2) on the blender jug and press it down firmly. Fig 3.

- Place the blender jug (4) on the motor unit (7) and turn the handle to the locked padlock position. Fig 4.
- Place the vacuum pump (8) on the vacuum lid (2) and make sure that it is firmly in place. Make sure that the silicone valve on the vacuum lid is closed. Press the button on the vacuum pump to start the vacuum process. Fig 5. The pump automatically switches off once the process is complete. Remove the vacuum pump (8) afterwards.
- Turn the function selector (14) to ON and select the required program or optional variable setting. The mixing process starts. Fig 6.

- Switch off the blender once the mixing process is complete and turn the function selector (14) to OFF. Unplug the appliance. Fig 7.
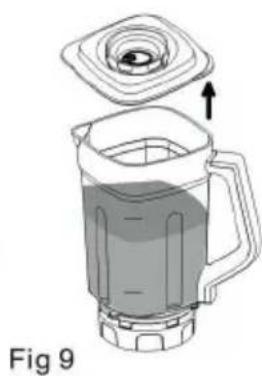
- Open the silicone valve on the vacuum lid (2) to release the vacuum pressure from the jug. Fig 8.
- Lift off the lid and serve directly from the jug. Fig 9.
Mixing in the bottle
NOTE! Note that the maximum temperature for liquids is 40° C for mixing with the vacuum pump due to the pressure that can build up.

- Pour the ingredients into the bottle (12). Do not exceed the maximum mark. Fig 8.
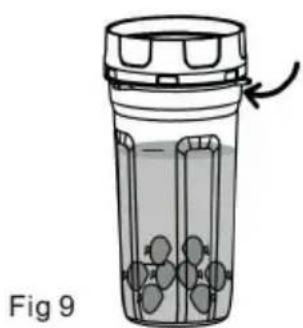
- Screw the blade unit (6) securely to the bottle opening by turning it clockwise. Fig 9.
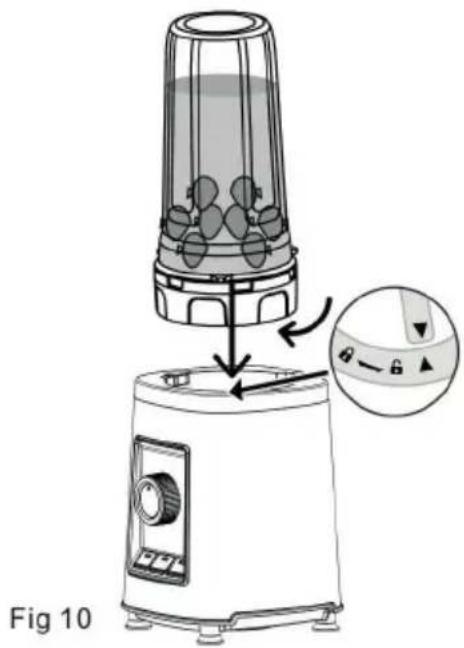
- Turn the bottle upside down and place it on the motor unit (7). Fig 10.
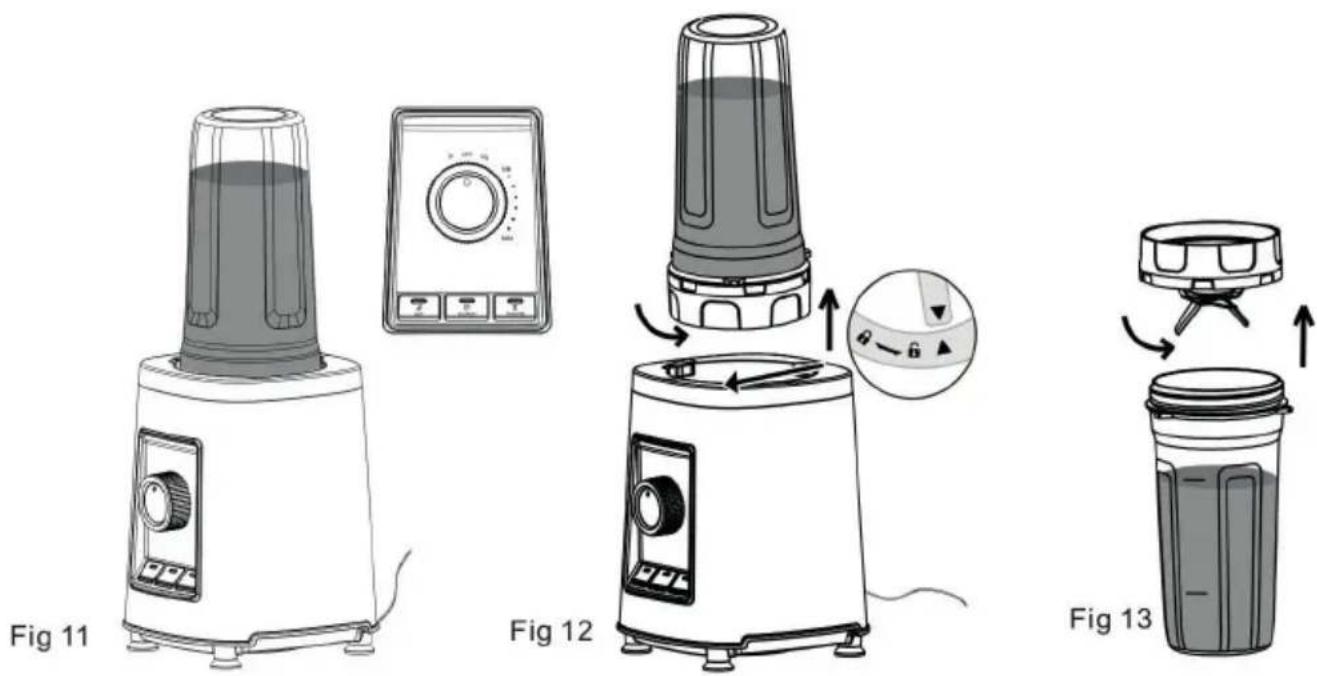
- Plug in and turn the function selector (14) to ON. Select the required program or optional variable setting. Fig 11.
- Once the mixing is complete, turn the function selector to OFF. Remove the bottle (12) from the motor unit (7) by turning it anticlockwise and then unscrew the blade unit (6). Fig 12 and 13.

- First mix the contents as per the previous instructions. Unscrew the blade unit (6) from the bottle opening. Fig 14.
- Place the vacuum lid (13) on the bottle. Fig 15.
- Press the vacuum lid (13) down firmly. Fig 16.


- Place the vacuum pump (8) on the vacuum lid (13). Press the button to start the vacuum process. The process starts automatically. Fig 17.
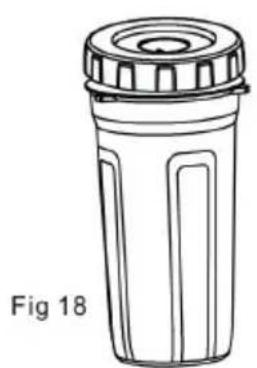
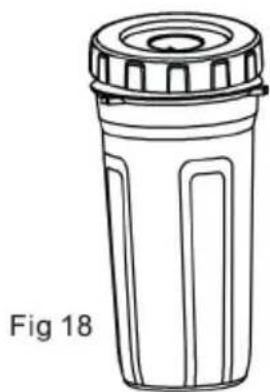
- The contents can now be stored in the bottle. Fig 18.

- Open the silicone valve on the vacuum lid to release the vacuum pressure from the bottle (13). Fig 19.
- Remove the vacuum lid (fig 20) and attach the lid with the drinking spout (11).
Overheating
The blender is equipped with a thermostat that is activated if the motor is overloaded. If the thermostat is activated, turn off the appliance and unplug it. Wait 30 minutes before restarting the appliance. Clean the parts as instructed in “Cleaning and maintenance”.
Charging the vacuum pump (8)

(Pic 1)
Insert the connector (9) into the vacuum pump's socket and then insert the other connector into an adapter (DC5V, 1-2A). Adapter not included. Pic 1.

(Pic 2)
Plug the adapter into a wall socket (230V) to start charging. The vacuum pump's LED indicator flashes red to indicate that charging is in progress. Pic 2.

Once the indicator is permanently lit, charging is complete. Unplug the adapter and vacuum pump. Pic 3.
NOTE! During vacuum sealing, the vacuum pump's (8) indicator will always shine white. Once the indicator starts flashing, it is time to recharge the vacuum pump.
The vacuum pump (8) must be fully charged at least once a month for optimum product life.
Cleaning and maintenance
Always unplug before cleaning. Important! Always clean the blender jug (4)/bottle (12) after use. This is to avoid the jug/bottle discolouring. See the table for how to clean the various parts.
| ✓ | ✓ | ✓ | |
| ✓ | × | ✓ | |
| × | × | ✓ | |
| × | × | ✓ |
Note that the blades are very sharp. Carefully dry all the parts before putting them away. Do not use abrasive cleaning products. Remove any stubborn stains by soaking and rubbing with a soft cloth and mild detergent.
Use a damp cloth when cleaning the motor unit (7). Dry thoroughly before reusing the appliance or putting it away.
You can also clean the blender jug (4) by pouring around 3 dl of water into the jug along with a few drops of washing-up liquid and then running the pulse function for 30 seconds. Then rinse the jug carefully with clean water.
Place the jug upside down and unscrew the blade unit (6) by turning it anticlockwise. Clean the blade unit separately as follows: lift the blade unit out of the jug and remove the seal (5) from the blade unit using the end of the supplied cleaning brush (10). Carefully hand wash the blade unit and seal. Then dry. Note that the blades are very sharp.
Be careful when replacing the seal (5) to ensure it is in the right position in the blade unit (6) after cleaning. If it is placed upside down, it will not be possible to place the blender jug on the motor unit correctly. The appliance cannot then be started.

Troubleshooting
The blender will not start. a) Ensure that the blender jug (4) is correctly positioned. A beep will be heard when the jug is correctly positioned.b) Make sure that the grey seal (5) is in the correct position in the blade unit. |
| The vacuum pump is not working. a) Ensure that the vacuum pump (8) is pressed firmly down in the vacuum lid (2).b) Ensure that the vacuum pump (8) is fully charged. See under “Charging the vacuum pump”.c) Check that the green silicone valve in the vacuum lid (2) is closed. |
Disposing of the appliance

By law, electrical and electronic equipment must be collected for the recycling of components. Electrical and electronic equipment marked with the waste management symbol must be disposed of at a municipal recycling point.
OBH Nordica LIMITED GUARANTEE
The Guarantee
OBH Nordica guarantees this product against any manufacturing defect in materials or workmanship during 2 years within Sweden, Norway, Denmark and Finland, starting from the initial date of purchase or delivery date.
This manufacturer's commercial guarantee covers all costs related to restoring the proven defective product so that it conforms to its original specifications, through the repair or replacement of any defective part and the necessary labour. At OBH Nordicas choice, a replacement product may be provided instead of repairing a defective product. OBH Nordicas sole obligation and your exclusive resolution under this guarantee are limited to such repair or replacement.
Conditions & Exclusions
OBH Nordica shall not be obliged to repair or replace any product which is not accompanied by a valid proof of purchase. The defective product may be returned to the store of purchase.
This guarantee applies only for products purchased and used for domestic purposes and will not cover any damage which occurs as a result of misuse, negligence, failure to follow OBH Nordica instructions, or a modification or unauthorised repair of the product, faulty packaging by the owner or mishandling by any carrier. It also does not cover normal wear and tear, maintenance or replacement of consumable parts, or the following:
- using the wrong type of water or consumable
- mechanical damages, overloading
- damages or poor results specifically due to wrong voltage or frequency as stamped on the product ID or specification
- ingress of water, dust or insects into the product
- scaling (any de-scaling must be carried out according to the instructions for use)
- damage as a result of lightning or power surges
- damage to any glass or porcelain ware in the product
- accidents including fire, flood, etc
- professional or commercial use
Consumer Statutory Rights
OBH Nordica's commercial guarantee does not affect the Statutory Rights a consumer may have or those rights that cannot be excluded or limited, nor rights against the retailer from which the consumer purchased the product. This guarantee gives a consumer specific legal rights, and the consumer may also have other legal rights which vary from Country to Country. The consumer may assert any such rights at his sole discretion.
These instructions are also available on our website www.obhnordica.com.
TEFAL - OBH Nordica Group AB
Löfströms Allé 5
Phone.: +46 08-629 25 00
www.obhnordica.com
Technical data
OBH Nordica 7745
We reserve the right to make changes without notice.


- VACUUM BLENDER 3-IN-1
- FELSÖKNING
- FEJLFINDING
- TEKNISKE DATA
- FEILSØKING
- BEGRENSET GARANTI FOR OBH NORDICA
- GARANTIEN
- BEFORE USE
- MAIN COMPONENTS (SEE IMAGE ON PAGE 3)
- USE
- MIXING IN BLENDER JUG (WITHOUT VACUUM PUMP)
- BLENDER PROGRAMS
- BLENDER JUG (1500 ML)
- PROGRAM PROGRAM TIME SUITABLE FOR
- BOTTLE (700 ML)
- PULSE FUNCTION (P)
- CONTINUOUS SPEED MIN-MAX
- MIXING WITH VACUUM PUMP
- MIXING IN THE BOTTLE
- OVERHEATING
- CHARGING THE VACUUM PUMP (8)
- CLEANING AND MAINTENANCE
- DISPOSING OF THE APPLIANCE
- OBH NORDICA LIMITED GUARANTEE
- THE GUARANTEE
- CONDITIONS & EXCLUSIONS
- CONSUMER STATUTORY RIGHTS
- TEFAL - OBH NORDICA GROUP AB
- TECHNICAL DATA
Brand : OBH NORDICA
Model : 7745
Category : Blender