
BGR-115696 - Beard trimmer Emerio - Free user manual and instructions
Find the device manual for free BGR-115696 Emerio in PDF.


| Product Type | Beard Trimmer |
| Brand | Emerio |
| Model | BGR-115696 |
| Power Supply | 220-240V ~ 50/60Hz, 3W |
| Charging Time | Approximately 8-10 hours |
| Usage Time (Cordless) | Up to 30-35 minutes |
| Trimming Length Settings | 1mm to 10mm (10 settings via adjustment ring) |
| Cutting Unit | Removable, washable under warm water |
| Included Accessories | Trimming comb, cleaning brush, charger, support stand |
| Battery Type | Rechargeable (built-in) |
| Operation | Cordless, with on/off switch |
| Cleaning | Remove comb and cutting unit; rinse cutting unit under warm water; air dry thoroughly |
| Safety Features | Do not use near water; keep away from heat; avoid direct sunlight; do not immerse |
| Storage | Dry, moisture-free area; do not wrap cord around appliance |
| Warranty | 2 years from date of purchase |
| Disposal | Recycle according to EU Directive 2012/19/EU; do not dispose with household waste |
Frequently Asked Questions - BGR-115696 Emerio
User questions about BGR-115696 Emerio
0 question about this device. Answer the ones you know or ask your own.
Ask a new question about this device
Download the instructions for your Beard trimmer in PDF format for free! Find your manual BGR-115696 - Emerio and take your electronic device back in hand. On this page are published all the documents necessary for the use of your device. BGR-115696 by Emerio.
USER MANUAL BGR-115696 Emerio
natural_image
Black and white photo of a Starro brand hairbrush (no visible text or symbols)Beard trimmer (EN)
Habemetrimmer (ET)
Bārdas trimmeris (LV)
Barzdaskutė (LT)
CE
Content – Sisukord – Saturs – Turinys
Instruction manual – English...... - 2 -
Kasutusjuhend – Estonian...... - 11 -
Instrukciju rokasgrāmata – Latvian...... - 22 -
Instrukciju vadovas – Lithuanian ...... - 33 -
SAFETY INSTRUCTIONS
Before use make sure to read all of the below instructions in order to avoid injury or damage, and to get the best results from the appliance. Make sure to keep this manual in a safe place. If you give or transfer this appliance to someone else make sure to also include this manual.
In case of damage caused by user failing to follow the instructions in this manual the warranty will be void. The manufacturer/importer accepts no liability for damages caused by failure to follow the manual, a negligent use or use not in accordance with the requirements of this manual.
-
There is a potential risk of injuries from misuse.
-
This appliance can be used by children aged from 8 years and above and persons with reduced physical, sensory or mental capabilities or lack of experience and knowledge if they have been given supervision or instruction concerning use of the appliance in a safe way and understand the hazards involved.
-
Children shall not play with the appliance.
- Cleaning and user maintenance shall not be made by children without supervision.
- The appliance is only to be used with the power supply unit provided with the appliance.
- Care shall be taken when handling the sharp cutting blade.

- WARNING: Do not use this appliance near bathtubs,
showers, basins or other vessels containing water.
-
Close supervision is necessary when this appliance is used by, on, or near children or invalids.
-
Use this Trimmer for its intended household use as described in this manual. Do not use attachments not recommended.
-
Never operate this Trimmer if it has a damaged charger, if it is not working properly, if it has been dropped, damaged, or dropped into water.
-
Keep the Trimmer, charger and any attachments away from heated surfaces.
-
Never drop or insert any object into any opening.
-
Do not operate, charge, clean or plug in Trimmer outdoors or where aerosol (spray) products are being used or where oxygen is being administered.
-
Always check cutters, cutting unit
and comb before using the Trimmer. Do not use the Trimmer if cutters, cutting unit and comb are damaged, as injury may occur.
-
To prevent possible damage to the cord, do not wrap cord around the Trimmer.
-
Never put Trimmer in direct sunlight or store at a temperature above 60^ C.
-
Never immerse the Trimmer in water or rinse under the tap.
-
This Trimmer is for use on human hair only. Do not use this Trimmer for any other purpose.
-
Always store your Trimmer, attachments and charger in a moisture-free area. Make sure the cord is disconnected from the Trimmer.
-
Only use the charger and other accessories supplied with the appliance.
-
The appliance is intended for trimming purposes only.
-
Keep the appliance dry.
PARTS DESCRIPTION
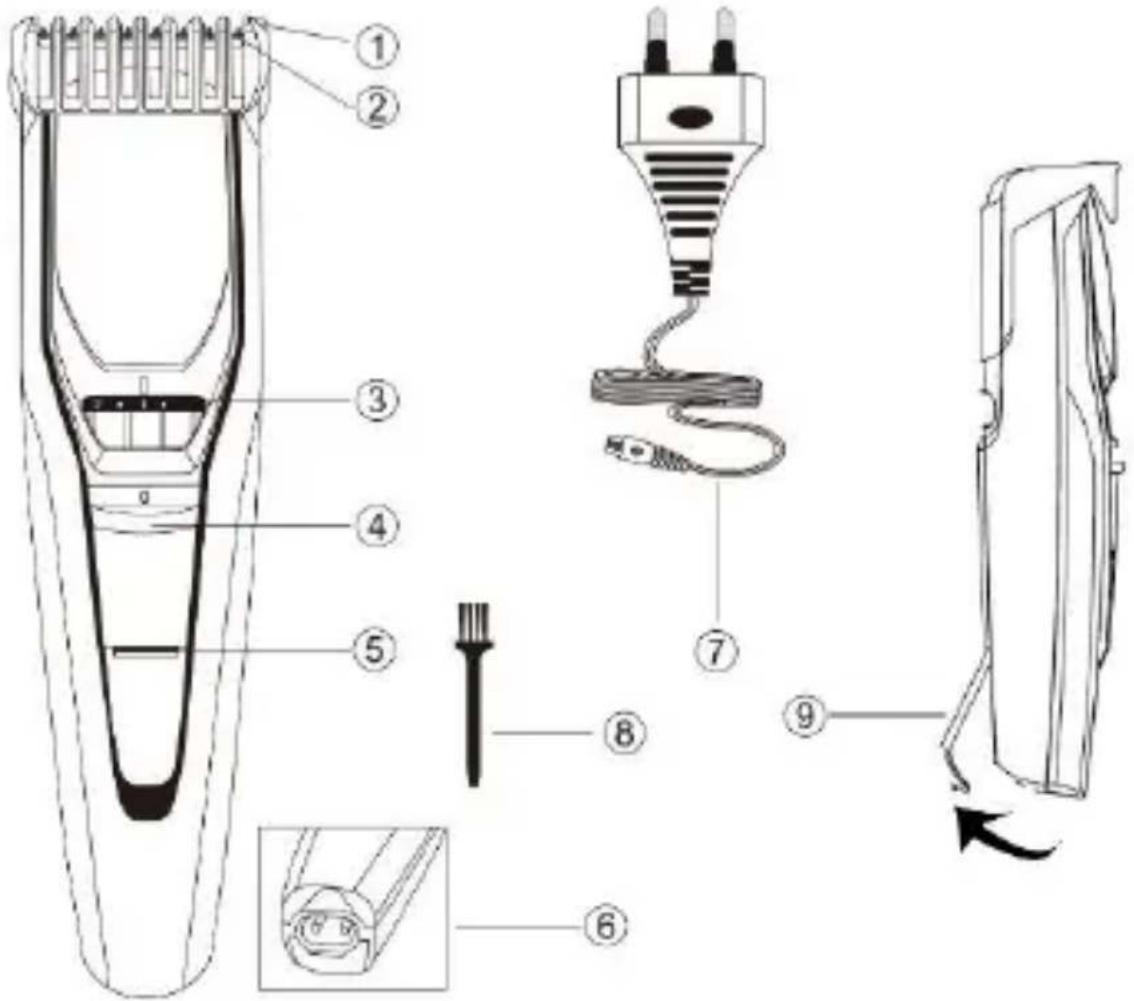
- Trimming comb
- Cutting unit
- Adjustment ring
- On/off switch
- Charge lamp
- Charge port
- Charger
- Cleaning brush
- Support standing
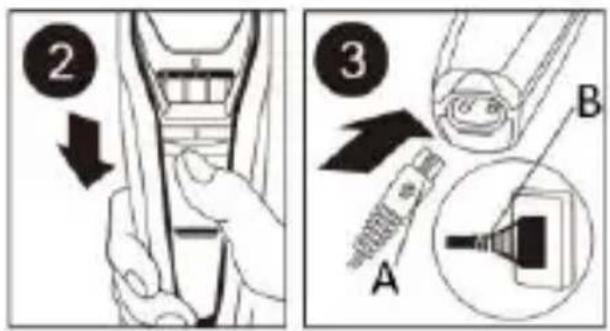
TO CHARGE/ RECHARGE
- Turn off the appliance (fig. 2).
-
Connect the cord (A) of the charger directly into the charge port and the plug (B) into the power supply (fig. 3).
-
The charge lamp lights up to indicate the appliance is charging. After fully charging, the charge lamp will remain lighting.
-
Unplug and remove the cord (A) from the appliance.
Note:
- Fully charge the Trimmer before using for the first time.
- Charging or using the Trimmer at temperatures below 4^ C or higher than 35^ C adversely affects lifespan of the battery.
- It will take approximately 8-10 hours to fully charge the Timmer for a cordless trimming time of up to 30-35 minutes.
- If Trimmer is subjected to a major change in temperature, pressure or humidity, let the trimmer acclimatize for 30 minutes before using.
- Do not use the appliance when it is charging.
Optimize the working life of the battery
- After the Trimmer has been charged for the first time, do not recharge the Trimmer between trimming sessions. Continue using it until the battery is completely empty.
- Do not charge for more than 24 hours.
- Do not keep the charger permanently plugged in.
- Discharge/run down the battery completely twice a year by letting the motor run until it stops.
- If the Trimmer hasn't been used for a long period of time, it must be recharged for a full 8-10 hours.
CORDLESS TRIMMING
- Slide ON/OFF switch to position "0" to turn on the appliance.
- When finished, slide to position "I" to turn off the appliance.
Note:
● Always comb the beard and/or moustache with a fine comb before you start trimming.
- If you are trimming for the first time, be careful. Do not move the Trimmer too fast. Make smooth and gentle movements.
1. Trimming with the trimming comb
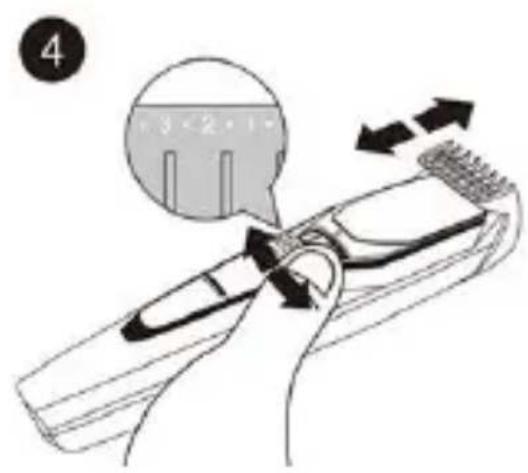
1) Turn the adjustment ring to the desired trimming length
setting (see table). The setting is indicated in the center of the adjustment ring (fig. 4).
Note: If you are trimming for the first time, start by using the comb at the maximum trimming length setting (#10) to prevent accidentally trimming hairs too short.
| Setting | Hair length after trimming |
| 1 | 1mm |
| 2 | 2mm |
| 3 | 3mm |
| 4 | 4mm |
| 5 | 5mm |
| 6 | 6mm |
| 7 | 7mm |
| 8 | 8mm |
| 9 | 9mm |
| 10 | 10mm |
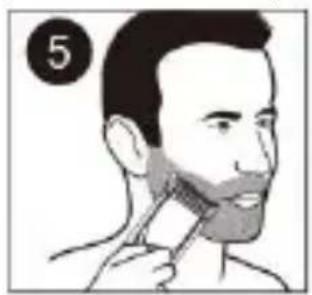
2) Switch the Trimmer on.
3) To trim in the most effective way, move the Trimmer against the direction of hair growth. Make sure the surface of the comb always stays in contact with the skin (fig. 5).
Note: If cut hairs have accumulated in the comb, turn Trimmer off, remove the comb and blow and/or shake the hair out of the comb (fig. 6). The selected trimming length setting will not change when you do this.
For example:
Trimming for 'Stubble' look
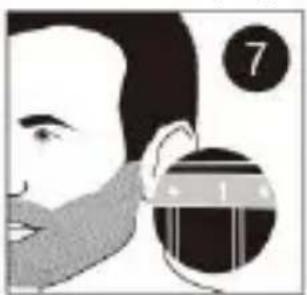
Make sure trimming comb is on the Trimmer and use setting 1 (3/64in/1mm) to result in a 'stubble' look (fig. 7).
natural_image
Illustration of a person applying a toothbrush to their face (no text or symbols)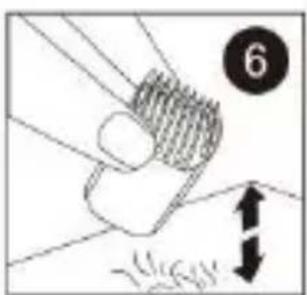
natural_image
Side profile illustration of a person's head with a beanie and a numbered circle highlighting the face area (no text or symbols)2. Trimming without the trimming comb
1) Be sure the Trimmer is in the position off.
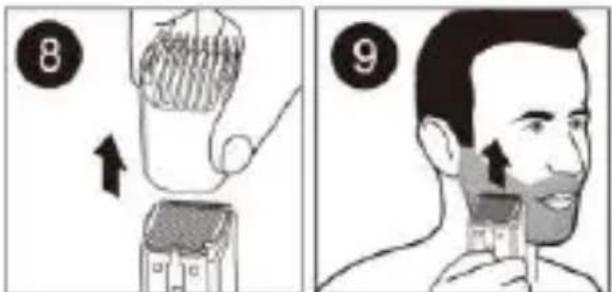
2) Remove the trimming comb by pulling it off the Trimmer (fig. 8).
3) Switch the trimmer on.
4) Make well-controlled movements. Touch the hair/skin lightly with the Trimmer (fig. 9).
Be careful when you are trimming without the comb as when the trimmer is turned on it will trim every hair it touches.
CLEANING
- Clean the Trimmer after each use. Make sure the Trimmer is switched OFF and disconnected from the electrical outlet.
- Remove the Trimming Comb and clean with the brush.
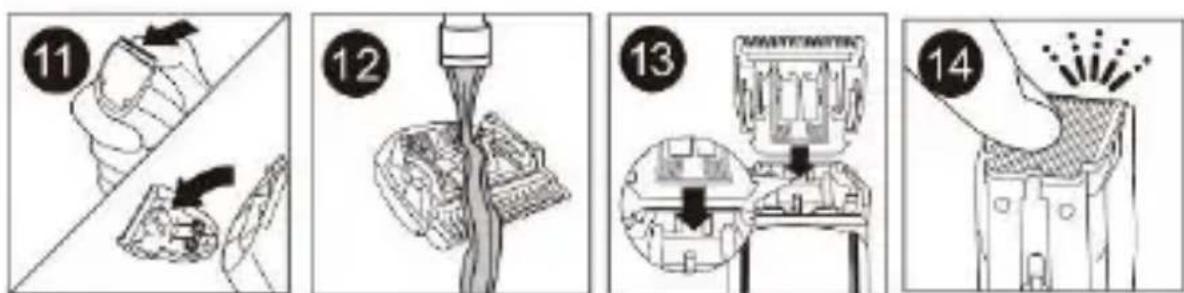
- Remove the cutting unit by pushing against the teeth of the cutting unit (fig. 11) and rinse under warm tap water (fig. 12) or use the brush supplied. Allow to air dry thoroughly.
- Place the cutting unit back by inserting the notch of the cutting unit into the guiding slot (fig. 13).
- Push the cutting unit back into place on the Trimmer until you hear a click (fig. 14).
- Use a soft, dry cloth to clean the Trimmer handle.
- Never immerse the Trimmer in water or rinse under the tap.
- Do not use abrasive cleaning agents, scourers or aggressive liquids such as alcohol, gasoline, or acetone to clean the Trimmer and attachments.
- Do not touch cutters with hard objects as this may damage them.
STORAGE
● Be sure trimmer is turned off and unplugged.
- Store the appliance and its charger in a safe, dry location where they will not be crushed, banged, or subject to damage.
- Do not wrap cord around the appliance when storing.
TECHNICAL DATA
Operating voltage: 220-240V \~ 50/60Hz
Power: 3 W
GUARANTEE AND CUSTOMER SERVICE
Before delivery our devices are subjected to rigorous quality control. If, despite all care, damage has occurred during production or transportation, please return the device to your dealer. In addition to statutory legal rights, the purchaser has an option to claim under the terms of the following guarantee: For the purchased device we provide 2 years guarantee, commencing from the day of sale. If you have a defective product, you can directly go back to the point of purchase. Defects which arise due to improper handling of the device and malfunctions due to interventions and repairs by third parties or the fitting of non-original parts are not covered by this guarantee. Always keep your receipt, without the receipt you can't claim any form of warranty. Damage caused by not following the instruction manual, will lead to a void of warranty, if this results in consequential damages then we will not be liable. Neither can we hold responsible for material damage or personal injury caused by improper use or if the instruction manual are not properly executed. Damage to accessories does not mean free replacement of the whole appliance. In such case please contact our service department. Broken glass or breakage of plastic parts is always subject to a charge. Defects to consumables or parts subjected to wearing, as well as cleaning, maintenance or the replacement of said parts are not covered by the warranty and are to be paid.
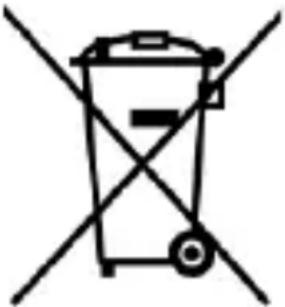
ENVIRONMENT FRIENDLY DISPOSAL
natural_image
Simple line drawing of a trash bin with crossed lines indicating no waste or discharge (no text or symbols)
Recycling – European Directive 2012/19/EU This marking indicates that this product should not be disposed with other household wastes. To prevent possible harm to the environment or human health from uncontrolled waste disposal, recycle it responsibly to promote the sustainable reuse of material resources. To return your used device, please use the return and collection systems or contact the retailer where the product was purchased. They can take this product for environmental safe recycling.
OHUTUSJUHISED
LAADIMISEKS /TAASLAADIMISEKS
PUHASTAMINE
natural_image
Symbol of a trash bin crossed with no text or numbers, representing environmental restriction (no text present)7. BRÍDINAJUMS!
TİRİŞANA
UZGLABĀŠANA
natural_image
Simple line drawing of a trash bin with crossed lines indicating no waste or discharge (no text or symbols)
KAIP JKRAUTI
VALYMAS
LAIKYMAS
natural_image
Symbol of a trash bin with crossed lines indicating no waste or discharge, and a solid black rectangle below (no text or labels)- Content – Sisukord – Saturs – Turinys
- SAFETY INSTRUCTIONS
- TO CHARGE/ RECHARGE
- Note:
- Optimize the working life of the battery
- CORDLESS TRIMMING
- Trimming with the trimming comb
- For example:
- Trimming for 'Stubble' look
- Trimming without the trimming comb
- CLEANING
- STORAGE
- TECHNICAL DATA
- GUARANTEE AND CUSTOMER SERVICE
- ENVIRONMENT FRIENDLY DISPOSAL
- OHUTUSJUHISED
- LAADIMISEKS /TAASLAADIMISEKS
- PUHASTAMINE
- BRÍDINAJUMS!
- TİRİŞANA
- UZGLABĀŠANA
- KAIP JKRAUTI
- VALYMAS
- LAIKYMAS
Brand : Emerio
Model : BGR-115696
Category : Beard trimmer