
AromaMist HUE-55W - Air conditioner WILFA - Free user manual and instructions
Find the device manual for free AromaMist HUE-55W WILFA in PDF.


| Product Type | Air Conditioner (Humidifier) |
| Brand | Wilfa |
| Model | AromaMist HUE-55W |
| Functions | Cool and warm mist, Auto mode, Night mode, Humidistat mode, 12-hour timer, Aroma function, UV lamp, Negative ion generator |
| Mist Levels | Low, moderate, high (3 steps) |
| Timer Range | 1 to 10 hours |
| Humidity Control | Adjustable 40%-80% RH; Auto mode maintains 55%-68% RH |
| Water Tank Capacity | Not specified in manual (typical 4-5 liters) |
| Power Supply | Check voltage carefully to ensure compatibility |
| Safety Features | Automatic shut-off when water tank lifted; do not operate without water |
| Cleaning Frequency | Water tank and sink twice a week with daily use; descale transducer as needed |
| Storage | Drain water, dry completely, store in dry place |
| Aroma Function | Use water-soluble aroma oil on aroma pad; rinse pad with clean water to deactivate |
| Warm Mist | Activate via key; built-in PTC heating element |
| UV Lamp | Kills bacteria in the air |
| Negative Ion Generator | Improves air quality |
| Placement | On firm, flat surface; away from heat sources and direct sunlight |
| Working Environment | 5°C to 40°C, relative humidity below 80% RH |
| Water Temperature | Fresh water below 40°C |
| Parts | Mist nozzle, handle, water tank, float, aroma pad, power cord, PTC heating element, tank cover |
| Troubleshooting | Check plug, power switch, water level; clean tank if smell; reposition tank if noise; etc. |
Frequently Asked Questions - AromaMist HUE-55W WILFA
User questions about AromaMist HUE-55W WILFA
0 question about this device. Answer the ones you know or ask your own.
Ask a new question about this device
Download the instructions for your Air conditioner in PDF format for free! Find your manual AromaMist HUE-55W - WILFA and take your electronic device back in hand. On this page are published all the documents necessary for the use of your device. AromaMist HUE-55W by WILFA.
USER MANUAL AromaMist HUE-55W WILFA
natural_image
White portable air conditioner unit with control buttons and a digital display (no visible text or symbols)WILFA AROMA MIST
Hybrid ultrasonic humidifier
Bruksanvisning
Bruksanvisning
Operating Instructions
HUE-55W


LES ALLE ANVISNINGER F∅R BRUK
LÄS IGENOM ALLA INSTRUKTIONER INNAN PRODUKTEN ANVÄNDS
LÆS ALLE VEJLEDNINGER INDEN BRUG
LUE OHJEET HUOLELLISESTI ENNEN KÄYTTÖÄ
READ ALL INSTRUCTIONS BEFORE USING
PLASSERING
PLACERING
PLACERING
SIJOITUSPAIKKA
TOIMINNOT JA OMINAISUUDET
Please read this manual carefully before operation and save it for future reference.
IMPORTANT SAFEGUARDS ....5
Schematic Drawing of Structure....8
Placement....9
Function and features....9
Operation instruction....9
Cleaning & Maintenance....10
Troubleshooting....11
IMPORTANT SAFEGUARDS
- Check the voltage carefully to ensure your home power voltage fits the product
- Ensure the plug exactly inserts to the right socket. Make sure there is good contact.
- Do not extend the wire.
- Use the plug when pulling the plug, not the cord!
- Do not use the product in dusty, oily or smoky environments, as this may cause electric shock or fire.
- Do not use the product in a wet environment, such as bathroom, as this may cause electric shock or fire.
- In some cases, such as in areas of high humidity or if the units is used at maximum capacity, this can eventually cause steam to be emitted, resulting in the area where the units is situated becoming moist. Regular monitoring of the unit is therefore recommended and if this occurs the units should be stopped.
- Do not use the product near a window, to avoid ran or curtains covering the air inlet or mist outlet. This will cause the temperature to rise and may cause a fire.
- Do not place your hands or appliances on top of the product as this may damage the device or result in the device not functioning properly.
-
Remove the water tank before moving the device.
-
Do not touch the plug or cord with wet hands as this may cause electric shock.
- Do not clean the water sink while the water is still hot.
- Please place the device on an even surface. If the surface is uneven, this may cause water to flood out.
- Do not clean the machine while it is operating.
- Turn of the machine and wait for 60 minutes before cleaning the machine.
- Do not expose the machine to direct sunlight or place it close to a heater.
- Please disconnect the unit from the electrical socket while you fill it with water, clean the unit, or if the unit is left unused for a long time.
- Do not place metal or easily combustible materials close to the air inlet or mist outlet areas.
- If the unit is damaged or does not work, please take the product to a certified shop or back to the store from which you bought the unit. Do not perform any disassemble or assembly of the unit yourself.
- Care should be taken when using the appliance due to the emission of hot water vapor.
-
If the supply cord is damaged, it must be replaced by the manufacturer, the manufacturer's service agent or similarly qualified persons in order to avoid a hazard.
-
This appliance can be used by children aged from 8 years and above and persons with reduced physical, sensory or mental capabilities or lack of experience and knowledge if they have been given supervision or instruction concerning use of the appliance in a safe way and understand the hazards involved.
• Children shall not play with the appliance. - Cleaning and user maintenance shall not be made by children without supervision.
- Avoid to come in contact or too close to the mist nozzle when warm mist function is activated.
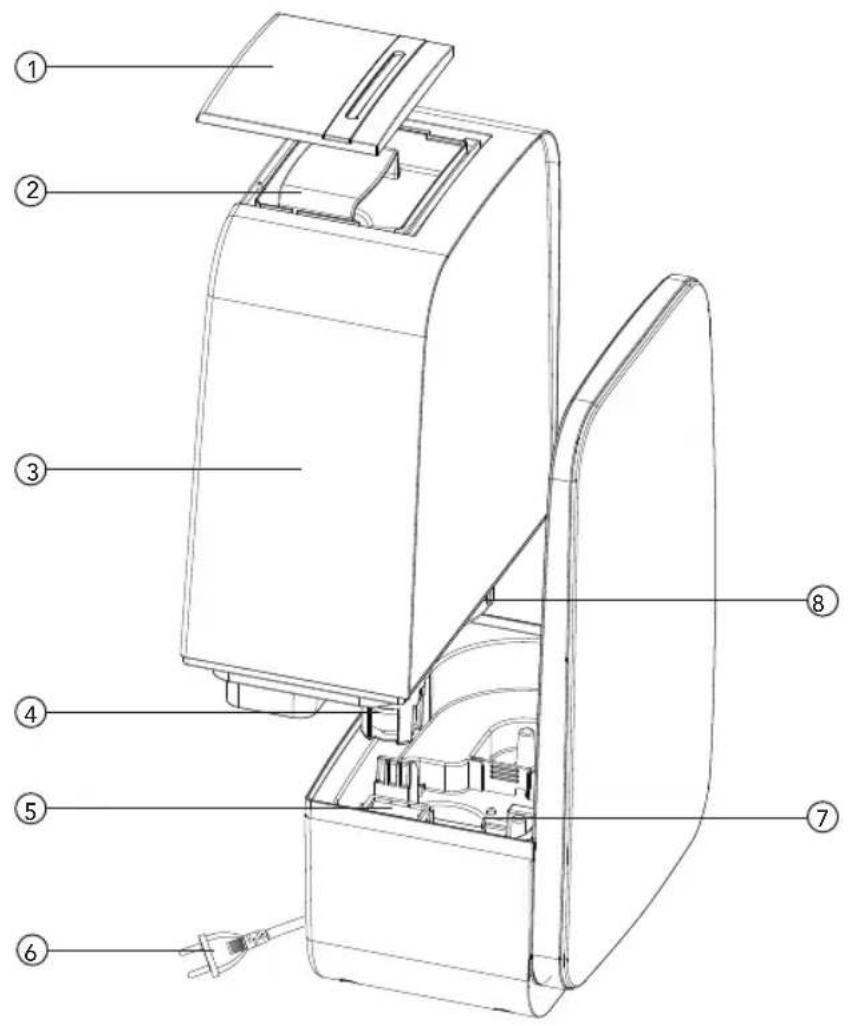
SCHEMATIC DRAWING OF STRUCTURE
① Mist Nozzle
② Handle
③ Water tank
④ Float
⑤ Aroma pad
⑥ Power cord
⑦ PTC heating element
⑧ Tank cover
PLACEMENT
- Place the product on firm, flat surface. The humidifier should be placed on flat horizontal surface and keep it steady.
- Do not place the product near or close to any heat sources. The humidifier should be far away from any heat sources, such as stoves or fire places. Do not expose the product to direct sunlight.
- Do not place the product near or close to furniture or electric appliances. The mist outlet from the humidifier should not be directed towards furniture and the electronic appliances, to avoid damage.
FUNCTION AND FEATURES
• Large humidifying capacity.
- Cool and warm mist function.
• Auto mode / Night mode / Humidistat mode
• 12 hours timer setting.
- Aroma function.
- UV lamp to reduce bacteria and purify the air.
- Build in negative ion generator to improve air quality.
• Automatically stop working when lifting the water tank
- The working environment for humidifier is in temperatures between 5^ C to 40^ C, with a relative humidity level below than 80% RH.
- Use fresh water lower than 40 degree.
- Clean water tank and water flume when the product is put into operation after a long break.
Keys instruction

Power: When the appliance is plugged into power, there is a beep sound, and the humidifier will be set in standby mode. When pressing the "On" key, the machine starts to work and the LED display will be lit. Press the "On/Off" key again to return to standby mode.

Negative Ion: Press this the "Negative Ion" key to start the negative ion function, press it again to stop negative ion function.

AUTO mode: Press the "AUTO mode" key, to set the humidifier in automatic control mode. The humidifier will work to maintain a relative humidity level between 55%\~68%. The machine will choose the best humidifying method depending on the different ambient humidity in the room.
Timer mode: Press "Timer mode" key to start timer setting function. The humidifier can be programmed to run continuously for a preset time. Press the "Timer key" repeatedly to increase the operation time (full hours) min 1 hour max 10 hours. The machine automatically stops when the timer has reached the preset time.
Night mode: Hold the "Timer mode" key for 3 sec to enable night mode. The humidifier will dim the LED display. Press any key to stop the night mode.
UV Lamp: Press the "UV Lamp" key to start the UV lamp function. The UV Lamp will kill bacteria in the air, press the key again to stop UV lamp function.
Mist Level: Steam intensity can be adjusted in three steps. Press the "Mist Level" key to adjust the mist intensity from low to moderate to high intensity.
Humidistat: Press the "Humidistat" key to set the desirable humidity; the humidifier will stop working once humidity reached the preset humidity level. Humidity can be adjusted from 40%-80%RH. When machine start working, it will humidify for 2 mins no matter what the current humidifying level is.

Warm mist: Press "Warm mist" key to start the warm mist function. The build in heat element will become activated and will warm the mist, press "Warm mist" key again to stop the warm mist function. When the warm mist function is off, the machine will return to emit cool mist.
Operation condition
- Detach the water tank from the base station, unscrew the lid and fill the tank with fresh clean water. Put the lid back on and attach the water tank to the base station. Make sure it fits correctly.
- Make sure that the mist outlet nozzle and handle cover are assembled correctly on the water tank.
- Connect the humidifier to the power and press the "On/Off" key to start the machine.
-
Follow the steps below to use the aroma function:
-
Detach the aroma pad located in the water basin underneath the water tank.
-
Use water-soluble aroma oil and let a couple of drops drip on the aroma pad.
-
Place the aroma pad on its designated place and start the machine. The scent of the aroma will be emitted with the mist from the machine.
-
To deactivate the aroma scent, simply remove the aroma pad from its holder and rinse it in clean water. NOTE: Make sure that the aroma pad is free from any water-soluble aroma oil before storing the product for a long time.
CLEANING & MAINTENANCE
Before any cleaning is performed make sure that the product has been turned off and that the power cord has been disconnected.
Water tank inside
Clean water tank inside and water sink twice per week at least when using the on a daily basis. Water residuals may form along the tank's inside and can be removed with soft dish brush. A soft cloth can also be used to wipe the insides of the water tank.
Don't put acid, alkalescence, bleacher detergent into water tank to avoid damage.
Water sink inside
The water quality in some regions can be rich of calcium (hard water). This can result in increased calcium deposits inside water tank or transducer. Users in areas with high content a minerals should perform maintenance as often as needed.
- Add cleaning agent on the transducer surface (The amount of detergent is directly dependent on the amount of calcium deposits).
- Fill water into the space that is located under the water tank placement (water sink). Let the machine rest for 10-15 min.
- Then gently brush the transducer area free of calcium deposits. Clean the entire sink area free of detergent and mineral deposits by using a dish brush.
- Rinse with fresh water and repeat at least two times. Don't use acid detergents to wash the inside off the water sink this is to due avoid damage on the transducer.
Body and water tank outside
Wipe it gently with a soft cloth mixed with a small amount of detergent.
Storage
Drain the water in tank and body, remove any stains or dirt. Make sure that the product has dried completely before it is put into storage. Store the product in a dry environment.
TROUBLESHOOTING
If the machine doses not work appropriately, please check the troubleshooting table before returning product for maintenance service.
| Problem Possible reasons | Solutions | |
| No steam | Check plug Plug into socket | |
| Check power switch Turn on power switch | ||
| No water in tank Add water | ||
| Not enough water in the tank. Add water | ||
| Peculiar smell steam | New machine Take off tank cover, place the water tank in cool and dry place for 12 hours | |
| Too dirty water, Or water in tank too long time | Clean water tank and refill with clean water | |
| Noise | Tank in incorrect position Put the tank in correct position | |
| Not enough water in the tank Add water | ||
| Uneven level for machine Place it on even surface or ground | ||
| Steam out from outlet surrounding | Clearance between steam outlet and water tank | Sink the steam outlet cap in water and use it again |
If the machine is still not working after checking the possible reasons above, the machine may have other problems, please contact the local store for further assistance with the product.
Under the Waste Electrical and Electronic Equipment Directive (WEEE), such waste must be collected separately and processed. If in future you need to discard this product, please do not throw it out with your normal rubbish. Please send this product to a collection point where one is available.

in homes since 1948
- WILFA AROMA MIST
- PLASSERING
- PLACERING
- SIJOITUSPAIKKA
- TOIMINNOT JA OMINAISUUDET
- IMPORTANT SAFEGUARDS
- SCHEMATIC DRAWING OF STRUCTURE
- PLACEMENT
- FUNCTION AND FEATURES
- Keys instruction
- Operation condition
- CLEANING & MAINTENANCE
- Water tank inside
- Water sink inside
- Body and water tank outside
- Storage
- TROUBLESHOOTING
Brand : WILFA
Model : AromaMist HUE-55W
Category : Air conditioner