
Lun Komfort POB-1000 - Air-conditioner WILFA - Free user manual and instructions
Find the device manual for free Lun Komfort POB-1000 WILFA in PDF.


| Product Type | Panel Heater |
| Brand | Wilfa |
| Model | Lun Komfort POB-1000 |
| Power | 1000 W |
| Voltage | 230 V ~ 50 Hz |
| Current Draw | 5.5 A |
| Installation | Wall-mounted using included fixture and screws |
| Safety Features | Overheating protection, earthed plug, tip-over switch (not specified but implied), do not cover warning |
| Controls | Thermostat dial and rocker switches for heating elements |
| Minimum Clearances | At least 0.2 m from sides to flammable materials, more than 2 m from ceiling, more than 0.05 m from floor |
| Cleaning | Wipe with damp cloth; do not use detergents or abrasives; unplug before cleaning |
| Storage | Keep in clean, dry place when not in use |
| Warranty | Refer to manufacturer; user serviceable parts not available |
| Compliance | WEEE directive |
| Manufacturer | AS WILFA, Industriveien 25, Postboks 146, 1483 Skytta, Norway |
Frequently Asked Questions - Lun Komfort POB-1000 WILFA
User questions about Lun Komfort POB-1000 WILFA
0 question about this device. Answer the ones you know or ask your own.
Ask a new question about this device
Download the instructions for your Air-conditioner in PDF format for free! Find your manual Lun Komfort POB-1000 - WILFA and take your electronic device back in hand. On this page are published all the documents necessary for the use of your device. Lun Komfort POB-1000 by WILFA.
USER MANUAL Lun Komfort POB-1000 WILFA
natural_image
White electronic device with cooling fins and a black control panel, shown against a plain white background (no text or symbols visible)Lun Komfort
Panel heater
Bruksanvisning
Bruksanvisning
Brugsanvisning
Käyttöohje
Instruction manual
Ugit officia porem et
ent, inctorem resent
volorumqui bearum
POB-600, POB-800,
POB-1000, POB-1250
Panelovn
Sikkerhetsinstrukser 3
Spesifikasjoner 5
natural_image
Architectural line drawing of a two-story building with a glegg wall detail view (no text or symbols)Fig. 6
Bruk
Det er normalt at varmeovnen avgir litt lukt første gang den slås på, eller när den ikke har vært i bruk på lang tid. Lukten forsvinner när varmeovnen har vært slått på en kort stund.
1 Velg et egnet sted for montering av varmeovnen med tanke på sikkerhetsanvisningene over.
2 Sett varmeovnens støpsel i en egnet stikkontakt.
3 Drei termostathjulet med urviseren til ønsket romtemperatur ved hjelp av gradeanvisningene på hjulet.
4 Slå på varmeelementene med vippebryterne på siden av varmeovnen.
5 Laveste termostatinnstilling. Ved denne innstillingen (avhengig av rommets størrelse) vil varmeovnen holde temperaturen over frysepunktet.
Rengjøre varmeovnen
natural_image
Technical line drawing of a mechanical component with an inset circular detail (no text or symbols)natural_image
Technical line drawing of a door frame with two side-mounted clamps and a central handle (no text or symbols)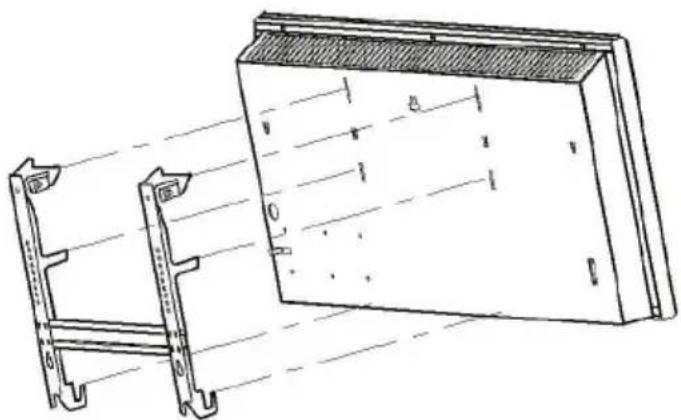
natural_image
Technical line drawing of a mechanical assembly with no visible text or symbolsFig. 3
The image contains only background horizontal lines, which are stylistic or background elements. According to Rule 2, such lines must be ignored by the OCR result. Therefore, the correct OCR output is empty.
(no text)
Lämmitin
Turvaohjeet....3
Tekniset tiedot ....5
Seinäasennus 5
Käyttäminen 9
natural_image
Technical line drawing of a mechanical component with an inset close-up view (no text or symbols)natural_image
Technical line drawing of a door frame with internal components and mounting holes (no text or symbols)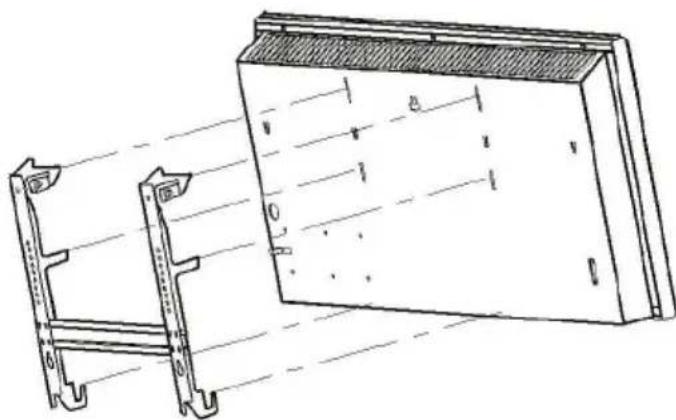
natural_image
Technical line drawing of a mechanical assembly with two views (front and side), no visible text or symbolsKuva 3
The image contains only background horizontal lines, which are stylistic or background elements. According to Rule 2, such lines must be ignored by the OCR result. Therefore, the corrected OCR text is:
[Empty String]
Panel Heater
Safety instructions ....3
Specifications 5
Instructions for wall mounting ....5
Operation 9
Cleaning the heater 10
It is important that you read these instructions before using your new panel heater. We strongly recommend that you keep them in a safe place for future reference.
Safety instructions
When using this electrical panel heater, basic precautions should always be followed to reduce the risk of fire, electric shock and personal injury. Read all instructions before using this heater, including the following:
- Do not cover or obstruct the upper and lower air vents of the heater, as this will cause the heater to overheat. The text "Do not cover" and related symbol are printed close to the upper air vent of the heater.
This heater is hot when in use. To avoid burns, do not let bare skin touch hot surfaces. - Keep flammable materials, such as furniture, pillows, bedding, papers, clothes and curtains at least 1 m from the front of the heater, and also keep them away from the sides and rear.
■ Always check the power cord, and do not operate the heater with a damaged cord or plug.
This heater is equipped with an earthed plug and must be plugged into an earthed outlet. This is a safety feature: DO NOT REPLACE THIS PLUG!
■ DO NOT OPEN HEATER. There are no user serviceable parts inside.
- Do not use the heater if it has malfunctioned, or if it has been damaged or dropped in any way. If this happens, return the heater to an authorised service facility for examination and/or repair.
- Do not use outdoors – always use indoors. This heater is not intended for use in bathrooms, laundry areas, wet areas or similar.
Never position the heater so that it can fall into a bathtub or other water container.
■ Do not run the heater power cord under carpeting or otherwise cover the cord. Ensure that the power cord is out of the way so that it does not pose a tripping risk.
■ Turn off heater before unplugging from the electrical outlet.
- Do not insert objects through the air vents of the heater as this may cause electric shock or fire. To prevent fire, do not block air intakes or exhaust in any manner.
A heater has hot and arcing parts inside. Never use the heater close to places where paint thinners, gasoline, paint or other flammable liquids are used or stored.
■ Use this heater only as described in this manual. Any other use may cause personal injury, damage to property or electric shock.
- Avoid using an extension cord to power the heater. The extension cord may overheat and cause a risk of fire.
This heater draws 5.5 amps during operation. To prevent overloading a circuit, take this into consideration when plugging the heater into a circuit that is already being used to power other appliances.
■ The plug should not feel hot to the touch. A loose fit between the plug and the socket may cause overheating and the plug may become warped. If the plug is loose, this may mean that the socket is loose or worn out and needs to be replaced by a qualified electrician.
■ Do not allow water to splash on the heater. If the heater appears to be damp, discontinue use immediately.
■ The output of this heater and its temperature may become intense enough to burn exposed skin. This heater is not recommended for use by persons with reduced sensitivity to heat or inability to react to avoid burns.
■ Aside from cleaning, all servicing of the heater must be performed by an authorised service centre. The appliance contains no parts that can be repaired by the user. Repairs may only be carried out by authorised service technicians.
■ The heater features internal protection from overheating, which automatically switches appliance off if it detects overheating. The appliance switches back on again once it has cooled down.
■ Do not use this heater in the immediate vicinity of a bath, shower or swimming pool.
■ The heater must not be positioned immediately below and in front of the mains socket.
■ The appliance must not be used by children or persons with reduced physical, sensory or mental capabilities, or lack of experience and knowledge, unless they are supervised or have received instructions.
■ Children must not be allowed to play with the appliance unsupervised.
If the power cord is damaged, it must be replaced by the manufacturer, a service technician or similarly qualified person in order to avoid a hazard.
Specifications
| Model POB-600 POB-800 POB-1000 POB-1250 | ||||
| Power 600W 800W | 1000W 1250W | |||
| Voltage 230V AC/50Hz | ||||
Instructions for wall mounting
Affix the heater to the wall before operating, using these instructions:
1 When fitted, adequate space must be left around the heater; see Fig. 2.
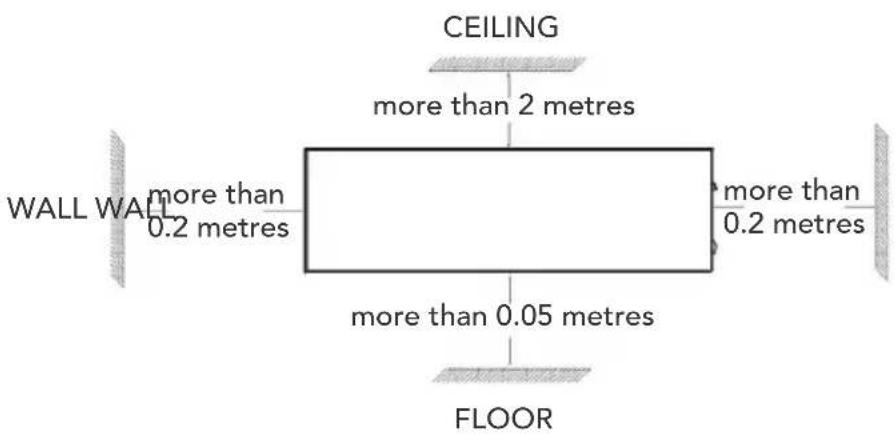
Fig. 2
WARNING: Heater should be positioned against a wall with no flammable material above it. The sides of the heater should be at least 0.2 m away from any flammable material.
2 Press the two clips on the fixture and push down to remove the fixture (Fig. 3).
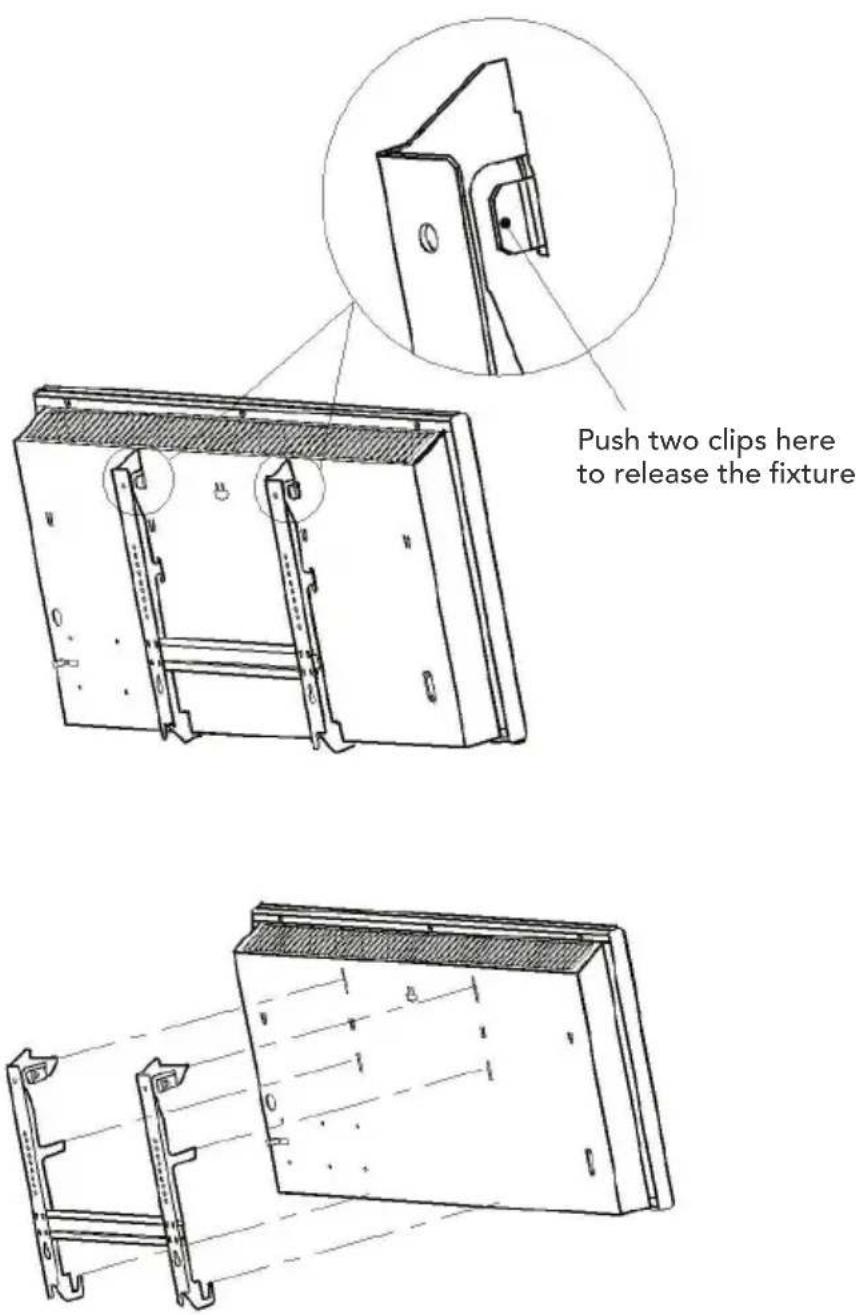
Fig. 3
3 Drill 4 holes in the wall to match the ones on the fixture. Ensure that the diameter of the holes is the same as that of the plastic expansion pin (included in a separate plastic bag), and that the depth of the holes is the same as the length of the plastic expansion pin (see Fig. 4).
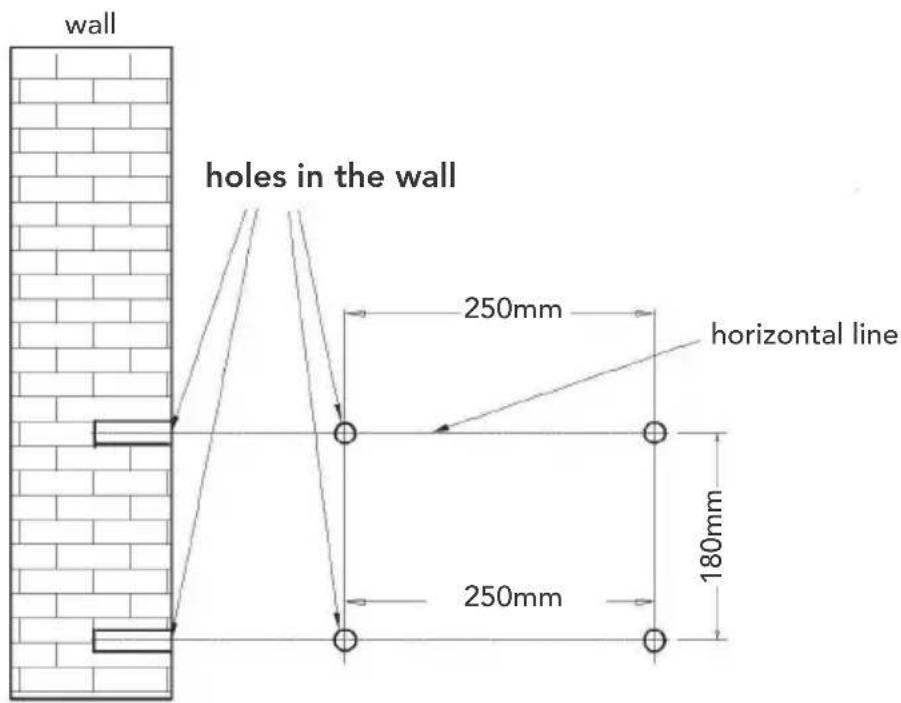
Fig. 4
4 Insert the plastic expansion pin into the four holes on the wall, and firmly affix the fixture to the wall using 4 screws. See Fig. 5.
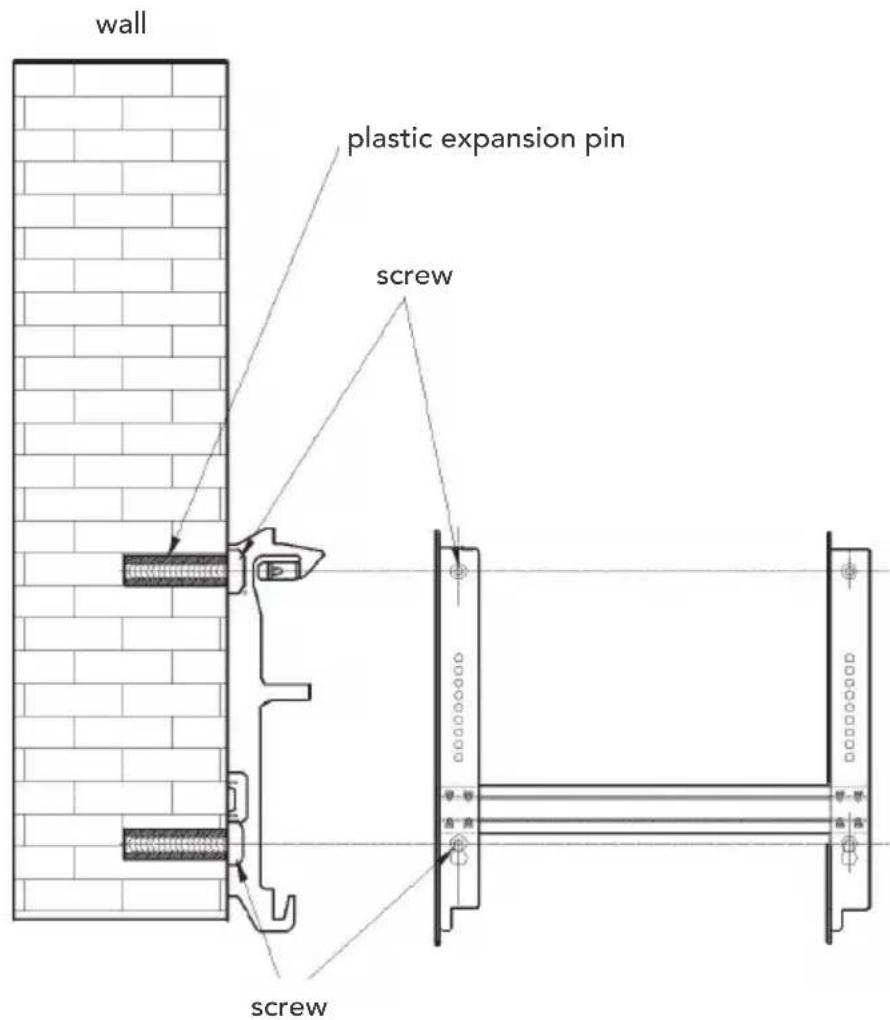
Fig. 5
5 Mount the heater on the fixture, ensuring that the fixture hooks slide into the slots at the bottom of the heater. Align the two fixture clips with the slots on the back of the heater. Press the heater securely into the fixture clips (Fig. 6).
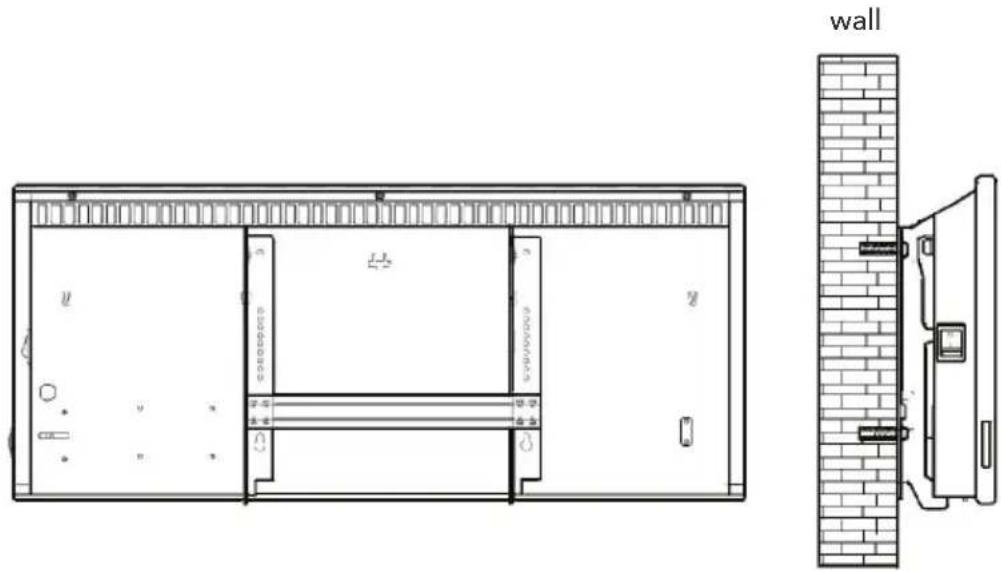
Fig. 6
Operation
It is normal for the heater to emit some odour when it is turned on for the first time, or after it has not been used for a long period of time. This odour will disappear when the heater has been on for a short while.
1 Choose a suitable location for the heater, taking into account the safety instructions above.
2 Insert the heater plug of the heater into a suitable mains socket.
3 Turn the thermostat dial in a clockwise direction to the desired room temperature setting according to the scale on the dial.
4 Turn on the heating elements by means of the rocker switches on the sides of the heater.
5 Thermostat in minimum position. In this position, (depending on the size of the room), the heater will maintain the temperature above freezing.
Cleaning the heater
1 Always unplug the heater from the socket and allow it to cool down before cleaning.
2 Clean the outside of the heater by wiping with a damp cloth and then buff with a dry cloth.
3 Do not use any detergents or abrasives and do not allow any water to enter the heater.
4 When the heater is not used for long periods, it should be protected from dust and stored in a clean, dry place.
Under the Waste Electrical and Electronic Equipment Directive (WEEE), such waste must be collected separately and processed. If in future you need to discard this product, please do not throw it out with your normal rubbish. Please send this product to a collection point where one is available.

AS WILFA
Industriveien 25
Postboks 146
1483 Skytta
Tel: 67 06 33 00
Fax: 67 06 33 91
Brand : WILFA
Model : Lun Komfort POB-1000
Category : Air-conditioner