
IAN 334226 - Scooter CRIVIT - Free user manual and instructions
Find the device manual for free IAN 334226 CRIVIT in PDF.


| Product Type | Tri Scooter (3-wheel scooter) |
| Brand | CRIVIT |
| Model | IAN 334226 |
| Maximum Load | 100 kg (Class A) |
| Dimensions (Unfolded) | Approx. 75 × 33 × 102 cm (L × W × H) |
| Handlebar Height (Adjustable) | Approx. 90–102 cm |
| Weight | Approx. 4.4 kg |
| Front Wheel Diameter | 120 mm |
| Back Wheel Diameter | 100 mm |
| Bearing Rating | ABEC 7 |
| Date of Manufacture | 02/2020 |
| Intended Use | Leisure, private outdoor use; not for public roads or jumps |
| Assembly Required | Yes, by adults; includes handlebar attachment and height adjustment |
| Safety Gear Recommended | Helmet, hand protectors, wrist guards, elbow pads, knee pads |
| Brake Type | Foot brake plate on rear |
| Folding Mechanism | Yes, for transport; safety lever and locking knob |
| Wheel Replacement | Front and rear wheels replaceable with hex key (size 5) |
| Bearing Replacement | Ball bearings replaceable with hex key |
| Cleaning | Clean and dry after use; grease bearings externally |
| Warranty | 3 years from date of purchase (material and workmanship) |
| Package Contents | Tri scooter, T-handlebars, 2× hex key size 5, 1× hex key size 4, instructions |
| Country of Origin | China (assumed, typical for Lidl products) |
Frequently Asked Questions - IAN 334226 CRIVIT
User questions about IAN 334226 CRIVIT
0 question about this device. Answer the ones you know or ask your own.
Ask a new question about this device
Download the instructions for your Scooter in PDF format for free! Find your manual IAN 334226 - CRIVIT and take your electronic device back in hand. On this page are published all the documents necessary for the use of your device. IAN 334226 by CRIVIT.
USER MANUAL IAN 334226 CRIVIT
natural_image
Modern electric scooter with black handle and three wheels, isolated on white background (no text or symbols)
TRI SCOOTER
GB IE NI
TRI SCOOTER
Instructions for use
DK
L∅BEHJUL
Brugervejledning
SK
KOLOBEŽKA
Navod na použivanie
DE AT CH
TRI-SCOOTER
Gebrauchsanweisung


Congratulations!
You have chosen to purchase a high-quality product. Familiarise yourself with the product before using it for the first time.

Read the following instructions for use carefully.
Use the product only as described and only for the given areas of application. Store these instructions for use carefully. When passing the product on to third parties, please also hand over all accompanying documents.
Package contents (Fig. A)
1 x tri scooter (1)
1 x T-handlebars (2)
2 x hex key size 5 (3)
1 x hex key size 4 (4)
1 x instructions for use
Technical data
Maximum load: class A - 100kg

Maximum load: 100kg
Dimensions unfolded:
approx. 75 × 33 × 102cm (L × W × H)
Handlebar height:
adjustable from approx. 90–102cm
Weight: approx. 4.4kg
Front wheels: ∅ 120mm
Back wheel: ∅ 100mm
Bearing: ABEC 7

Date of manufacture (month/year):
02/2020
Intended use
This product is a leisure product, not a toy. The product contains small parts which could be swallowed by children and requires concentration and good motor skills. This product is designed for private outdoor use with a maximum load capacity of 100kg. This product is not suitable for jumps. This product is not a vehicle in terms of the Road Traffic Act and may not be used on public roads.
Inform yourself about the statutory regulations before using the product.

Safety information
WARNING!
Risk of suffocation for children!
- Do not allow children to play unsupervised with the product or the packaging materials.
Risk of injury!
- The product must only be assembled by adults as it contains small parts!
- The product may only be used by one person at a time.
- Check the product for damage or wear before each use. Always check that all connectors and fasteners, such as the folding mechanism and the height adjustment on the steering column are tight. Only use the product if it is in perfect condition!
- Make sure that the nuts and bolts retain their self-locking properties.
- Do not modify the product in such a way that it could potentially endanger your safety.
- Do not use the product indoors. The tyres may lose their grip and skid on smooth surfaces like laminate, parquet, wooden floorboards, tiles, etc.

Danger of crushed fingers!
- Pay attention to pinch and shear points when folding and unfolding the product.
- Always wear suitable protective gear (helmet, hand protectors, wrist guards, elbow pads and knee pads) and shoes!
• Always watch out for other people! - Only use the product on appropriate surfaces that are level, clean and dry. Keep away from other traffic users, if possible. Avoid sloping terrain, stairs and open water.
- Never ride in darkness or when visibility is poor.
- The brake gets hot if used continuously. To avoid getting burned, do not touch it until it has cooled down.
- Do not let your child use the product unsupervised as children cannot adequately assess potential dangers.
Preventing damage to the product!
- Avoid water, oil, potholes and very rough surfaces.
Assembly
The product is supplied folded up in its transport-able state. Proceed as follows to get it ready for scooting:
Unfolding the product (Fig. B)
- Pull the safety lever (1a) upwards and hold it.
- Fold the steering column (1b) forwards and release the safety lever to lock the steering column in place.
Adjusting the height of the steering column (Fig. C)
The steering column can be adjusted to three different heights. The product may only be used if the locking knob is locked in place into one of the three holes provided and the steering column is then secured with the quick release fastener!
- Loosen the quick release fastener (1c) on the steering column (1b).
- Pull the steering column upwards until the locking knob locks in place into one of the three holes.
- Secure the steering column by locking the quick release fastener.
Note: if the quick release fastener does not fit snugly on the steering column when tightening, tighten the knurled screw firmly with the enclosed hex key. Make sure that the quick release fastener is secured before tightening.
Replacing the handlebars (Fig. D)
- Remove the sealing cap (1e) from the steering knob (1f).
- Remove the screw inside the steering knob with the hex key (3).
- Place the T-handlebars (2) on the steering column (1b) and fasten them with the screw.
- Fasten the sealing cap on the T-handlebars.
Converting the product into its transportable state
- Pull the safety lever (1a) upwards and hold it.
- Press the steering column (1b) towards the deck (1g) until it locks into place.
Use
Riding, braking (Fig. E)
- Place one leg on the deck (1g) and create momentum by regularly pushing off with the other leg. Steer the product by shifting your body's weight.
- Step on the brake plate (1h) to brake.
Maintenance
Replacing the front wheels (5) (Fig. F) Important!
Pay attention to the section "Technical data". Wheels that have a different diameter may alter the riding characteristics and could possibly endanger the user. Do not use wheels that cannot be installed properly. Never use wheels that are larger than the original wheels on the product. Wheels wear out. This wear depends on many factors, for example, the terrain, the size and weight of the user, the weather conditions, the material of the wheels and their hardness, etc. Therefore, it is necessary to replace them now and then.
- Tightly grasp the self-retaining nut (7) with an open-end spanner.
- Loosen the axle bolt (8) from the front wheels (5) with a size 5 hex key (3).
- Pull out the axle bolts and remove the wheel.
- Install the new wheels and fasten them with the axle bolts.
After replacing the wheels:
Do not use the wheels if they pull sideways after installing them!
After the first few minutes of riding, make sure that all screws are still tight and that nothing has detached or become loose.
Tension the wheels once more to make sure that they are running quietly and that the bearings are not making any noise.
Replacing the back wheel (6) (Fig. G) Important!
Pay attention to the section "Technical data". Wheels that have a different diameter may alter the riding characteristics and could possibly endanger the user. Do not use wheels that cannot be installed properly. Never use wheels that are larger than the original wheels on the product.
Wheels wear out. This wear depends on many factors, for example, the terrain, the size and weight of the user, the weather conditions, the material of the wheels and their hardness, etc. Therefore, it is necessary to replace them now and then.
- Loosen the axle bolts (9) (10) from the back wheel (6) with two size 5 hex keys (3).
- Pull out the axle bolts and remove the wheel.
- Install the new wheel and fasten it with the axle bolts.
After replacing the wheel:
Do not use the wheel if it pulls sideways after installing it!
After the first few minutes of riding, make sure that all screws are still tight and that nothing has detached or become loose.
Tension the wheel once more to make sure that it is running quietly and that the bearings are not making any noise.
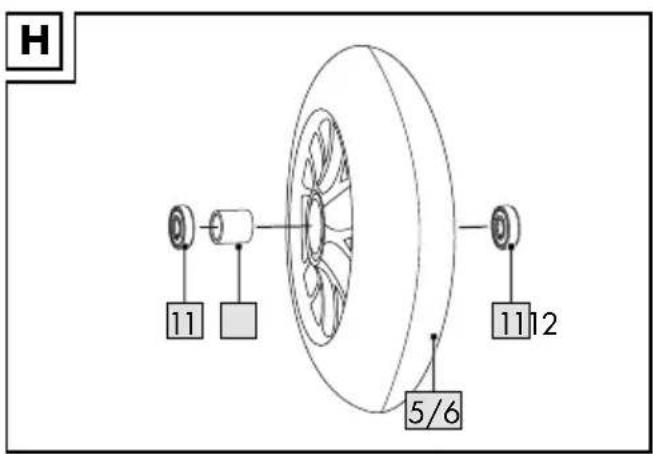
Replacing the ball bearings (Fig. H)
- Remove the wheel (5) or (6) as described in the section "Replacing the front wheels" or "Replacing the back wheel".
- Use a hex key to lever out a bearing (11).
- Remove the spacer (12) from the wheel and turn it over.
- Lever out the other bearing (11) with a hex key.
- Press in a new bearing. Turn the wheel over, insert the washer and the spacer and then push in a second new bearing.
- Fasten the wheel again as described in the section "Replacing the front wheels" or "Replacing the back wheel".
Storage, cleaning
We recommend that you clean and dry the product thoroughly after use.
Remove small stones or other objects that may have got caught on the wheels. Dry wet or damp ball bearings with a clean cloth. Grease the bearings with a suitable bearing lubricant from the outside to prevent external rust. Always store the product in a dry place.
Disposal
Dispose of the article and the packaging materials in accordance with current local regulations. Packaging materials such as foil bags are not suitable to be given to children. Keep the packaging materials out of the reach of children.

Dispose of the products and the packaging in an environmentally friendly manner.

The recycling code is used to identify various materials for recycling.
The code consists of the recycling symbol - which is meant to reflect the recycling cycle - and a number which identifies the material.
Notes on the guarantee and service handling
The product was produced with great care and under constant supervision. You receive a three-year warranty for this product from the date of purchase. Please retain your receipt.
The warranty applies only to material and workmanship and does not apply to misuse or improper handling. Your statutory rights, especially the warranty rights, are not affected by this warranty.
With regard to complaints, please contact the following service hotline or contact us by e-mail. Our service employees will advise as to the subsequent procedure as quickly as possible. We will be personally available to discuss the situation with you.
Any repairs under the warranty, statutory guarantees or through goodwill do not extend the warranty period. This also applies to replaced and repaired parts. Repairs after the warranty are subject to a charge.
IAN: 334226_1907
GB Service Great Britain
Tel.: 0800 404 7657
E-Mail: deltasport@lidl.co.uk
IE Service Ireland
NI Tel.: 1890 930 034 (0,08 EUR/Min., (peak)) (0,06 EUR/Min., (off peak))
E-Mail: deltasport@lidl.ie
Blahoželáme!
- TRI SCOOTER
- L∅BEHJUL
- KOLOBEŽKA
- TRI-SCOOTER
- Read the following instructions for use carefully.
- Package contents (Fig. A)
- Technical data
- Intended use
- Safety information
- WARNING!
- Risk of suffocation for children!
- Risk of injury!
- Danger of crushed fingers!
- Preventing damage to the product!
- Assembly
- Unfolding the product (Fig. B)
- Adjusting the height of the steering column (Fig. C)
- Replacing the handlebars (Fig. D)
- Converting the product into its transportable state
- Use
- Riding, braking (Fig. E)
- Maintenance
- Replacing the front wheels (5) (Fig. F) Important!
- After replacing the wheels:
- Replacing the back wheel (6) (Fig. G) Important!
- After replacing the wheel:
- Replacing the ball bearings (Fig. H)
- Storage, cleaning
- Disposal
- Notes on the guarantee and service handling
Brand : CRIVIT
Model : IAN 334226
Category : Scooter