
Grind Aroma - Coffee maker OBH NORDICA - Free user manual and instructions
Find the device manual for free Grind Aroma OBH NORDICA in PDF.


| Product Type | Coffee maker with built-in grinder |
| Brand | OBH Nordica |
| Model | Grind Aroma |
| Capacity | 10 cups |
| Grinder Type | Adjustable burr grinder |
| Grind Settings | Coarse to fine via Grind Adjust Knob |
| Brewing Methods | Whole bean and pre-ground coffee |
| Display | Digital with clock, timer, and indicators |
| Preset Timer | Yes, 24-hour programmable |
| Keep Warm | 30 minutes automatic |
| Water Tank | Removable with max level indicator |
| Safety Features | Auto shut-off, overheat protection, child lock (grinder) |
| Cleaning | Removable grinder shaft, descaling cycle |
| Descaling | Dedicated program with indicator |
| Materials | Plastic housing, glass carafe |
| Voltage | 220-240V (assumed for European market) |
| Power | Approximately 1000W (typical) |
| Dimensions | Not specified, typical coffee maker size |
| Weight | Not specified |
| Warranty | 2 years (limited) |
Frequently Asked Questions - Grind Aroma OBH NORDICA
User questions about Grind Aroma OBH NORDICA
0 question about this device. Answer the ones you know or ask your own.
Ask a new question about this device
Download the instructions for your Coffee maker in PDF format for free! Find your manual Grind Aroma - OBH NORDICA and take your electronic device back in hand. On this page are published all the documents necessary for the use of your device. Grind Aroma by OBH NORDICA.
USER MANUAL Grind Aroma OBH NORDICA
DESIGNING GOOD LIFE
Coffee Maker
GRIND AROMA
Enjoy freshly ground coffee any time

Making good!
Bruksanvisning - svenska......sida 5 - 15




Visiting address: Deltapark 37, 3. sal
Phone: +45 43 350 350
Direct: +45 43 350 367
www.obhnordica.dk
BEGRENSET GARANTI for OBH Nordica
Garantien
Important safe guards
Please read the instructions for use carefully before using your appliance for the first time to avoid potential injury from misuse and retain them for future reference: Manufacturer cannot accept any liability for non compliant appliance use.
-
This appliance is not intended for use by persons (including children) with reduced physical, sensory or mental capabilities, or lack of experience and knowledge, unless they have been given supervision or instruction concerning use of the appliance by a person responsible for their safety.
-
Children should be supervised to ensure that they do not play with the appliance.
-
Do not use the appliance if the power cord or plug is damaged. The power cord must be replaced by the manufacturer, its after-sales service or similarly qualified persons in order to avoid danger.
-
Your appliance is intended for domestic use inside the home only at an altitude below 2000m.
-
Do not immerse the appliance, power cord or plug in water or any other liquid.
-
Your appliance is designed for domestic use only.
-
It is not intended to be used in the following applications, and the guarantee will not apply for:
- staff kitchen areas in shops, offices and other working environments;
- farm houses;
- by clients in hotels, motels and other residential type environments;
- bed and breakfast type environments.
- Always follow the cleaning instruction to clean your appliance and especially parts in contact with food.
- Unplug the appliance.
- Do not clean the appliance while hot.
- Clean with a damp cloth or sponge.
-
Never immerse the appliance in water or put it under running water.
-
WARNING: Risks of injuries if you don't use this appliance correctly.
-
WARNING: After using, do not to touch the keep warm plate, subjected to residual heat. Be sure to manipulate only the handle of glass jar during heating until cooling down.
- This appliance may be used by children of at least 8 years of age, as long as they are supervised and have been given instructions about using the appliance safely and are fully aware of the dangers involved. Cleaning and user maintenance shall not be made by children unless they are older than 8 and they are supervised by an adult.
- Keep the appliance and its cord out of reach of children under 8 years of age.
- This appliance may be used by persons with reduced physical, sensory or mental capabilities, or whose experience or knowledge is not sufficient, provided they are supervised or have received instruction to use the appliance safely and understand the dangers.
- Children should not use the appliance as a toy.
- The coffee-maker must not be placed in a cabinet when in use.
- Before plugging the appliance in, make sure that the power it uses corresponds to your electrical supply system and that the outlet is earthed.
- Any error in the electrical connection will negate your guarantee.
- Unplug the appliance when you have finished using it and when you clean it.
- Do not use the appliance if it is not working
properly or if it has been damaged. If this occurs, contact an authorised service centre.
-
All interventions other than cleaning and everyday maintenance by the customer must be performed by an authorised service centre.
-
The power cord must never be close to or in contact with the hot parts of your appliance, near a source of heat or over a sharp edge.
-
For your safety, only use the manufacturer's accessories and spare parts designed for your appliance.
-
Do not pull on the cord to unplug the appliance.
-
Never put your coffee jug in a microwave oven, on a flame or on electric cooking plates.
-
Do not fill the appliance with water if it is still hot.
-
All appliances are subject to strict quality control procedures. These include actual usage tests on randomly selected appliances, which would explain any traces of use.
-
Always close the lid when running the coffee maker.
-
For Grinder function:
-
Switch off the appliance and disconnect from power supply before changing accessories or approaching parts which move in use.
- Always disconnect the appliance from the supply if it is left unattended and before assembling, disassembling or cleaning.
- This function shall not be used by children. Keep the appliance and its cord out of reach of children.
- Grinder function can be used by persons with reduced physical, sensory or mental capabilities or lack of experience and knowledge if they have been given supervision or instruction concerning
use of the grinder function in a safe way and if they understand the hazards involved.
- Children shall not play with the grinder function.
- Do not brew coffee if the carafe already has coffee in it.
- To prevent any overflow, the carafe must be placed on the heated base of the coffee maker, otherwise there could be some overflow of hot water or hot coffee.
- The coffee maker becomes very hot during the infusion cycle. Please handle it with care.
- Do not disassemble the appliance.
- Do not use the jug without the lid.
- Do not pour hot water in the tanks.
- The coffee-maker shall not be placed in a cabinet when in use.
- Do not use too oily beans which may damage your appliance.
Description
A Coffee bean box cover
B Coffee bean box
C Grind and brew basket
D Upper burr (grinder)
E Water tank cover
F Grind Adjust Knob
G Display
1 Time display
2 Coffee strength indicator
3 Ground coffee indicator
4 Operating indicator
5 Number of cups indicator
6 Descaling indicator
7 Preset time indicator
H Control Panel
1 On/Off button
2 On/Off indicator
3 Number of cups button
4 Coffee strength button
5 Preset time button
6 Time settings (Hour)
7 Time settings (Minute)
8 Ground coffee selection button
9 Descaling button
I Water level indicator
J Carafe
K Heating Plate
Use
Before first use
When the machine is plugged in main socket:
- All displayable contents from (G1-G7) appear on the display.
- The On/Off indicator (H2) lights up.
-
All display contents and the On/Off indicator (H2) flash for 2 seconds, then:
-
Display show time 00:00, default cups No. '4' and default coffee strength 2 coffee beans icon.
- On/Off indicator (H2) switches off.
- Time display (G1) displays 00:00, all four digits flash to invite the user to set the current time.
Current time setting
- Press and hold the Time setting HR button (H6) for around 3 seconds. The first two digits 00: flash while the last two digits :00 are fixed, you can set the Hour using the same button (H6). Holding down the button will increase the hour value progressively faster.
- When hour value is correct, wait for 5 seconds. The first two digits 00: stop flashing and fix, the current Hour is memorised.
- Hold the Time setting MIN button (H7) for around 3 seconds. The last two digits :00 flash (the first two digits for HR 00: stay fixed), you can set the Minute using the same button (H7). While the button is held down, minute value increases progressively faster.
- When minute value is selected, wait for 5 seconds. The last two digits :00 become fix, the current Minute is memorised.
NOTE: Only the Time (24h format) is displayed at this point.
- The machine is in "Ready to use" status for coffee preparation.
Coffee preparation with coffee beans
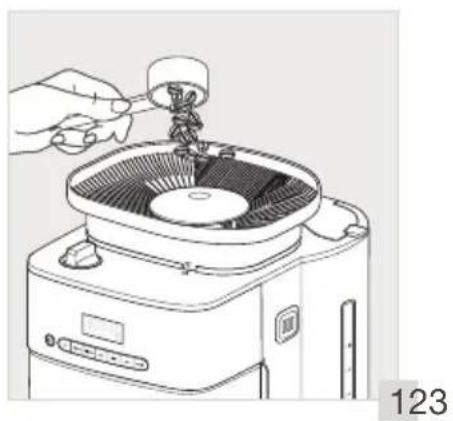
- Fill coffee bean box with coffee beans. (fig.1)
Beware! Do not use too oily beans which may damage your appliance.
- Open the filter holder.
- Insert the paper filter. (fig.4)
- Close the filter holder. (fig.6.1)
- Place coffee carafe on the keep warm plate. (fig.6.2)
-
Set desired grinding fineness using Grind adjust knob (F). (fig.3) Grind your coffee from coarse to fine by using Grind adjust knob (F) from big point to small point.
-
Set the desired number of cups using Number of cups button(H3). Number of cups (G5) displays the number chosen.
-
Set coffee strength using Coffee strength button (H4). Coffee strength indicator (G2) displays the strength chosen.
-
Press On/Off button (H1) to start the coffee preparation cycle:
- On/Off indicator (H2) flashes.
- Operation indicator (G4) flashes.
- Grinder runs, then hot water goes across the ground coffee freshly prepared by the grinder.
- When the coffee cycle is finished:
- The appliance beeps 3 times when it is switched off.
- On/Off indicator (H2) changes from "flashes" to "lights up".
- Operation indicator (G4) stops and disappears.
- The appliance enters 30 minutes keep warm.
- On/Off indicator (H2) lights off after keep warm.
Coffee preparation with pre-ground coffee
- Open the filter holder.
- Insert the paper filter.
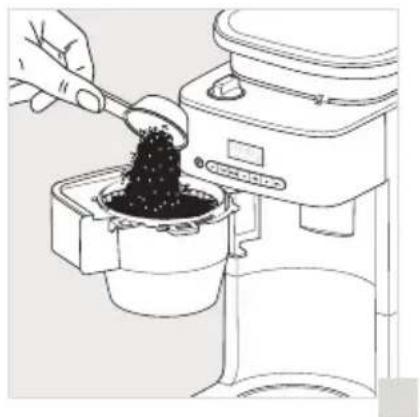
- Put desired quantity of coffee powder into the filter. (fig.5)
- Close the filter holder.
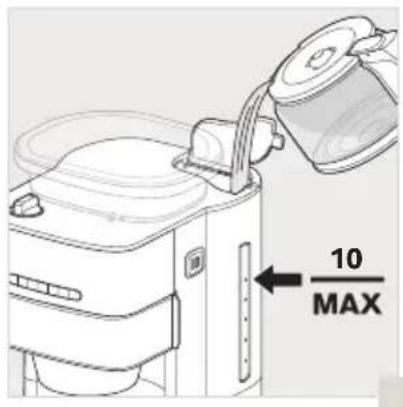
- Fill water tank with desired quantity of water.
Beware! Do not put coffee powder in the bean container, only in the paper filter, or it may damage your appliance.
- Place coffee carafe on the keep warm plate.
- Press the Ground coffee selection button (H8). Ground coffee indicator (G3) appears on the display.
-
Press Ôn/Off button (H1) button to start the coffee preparation cycle:
-
On/Off indicator (H2) flashes.
- Operation indicator (G4) flashes.
- Ground coffee indicator (G3) lights up.
-
Hot water flows through the ground coffee into the carafe.
-
When the coffee cycle is finished:
-
On/Off indicator (H2) changes from "flashes" to "lights up".
- Operation indicator (G4) stops and disappears.
- Ground coffee indicator (G3) disappears.
- Machine enters 30 minutes keep warm.
- On/Off indicator (H2) switches off after keep warm.
Coffee preparation with preset time
Fill water tank with desired quantity of water.
- Open the filter holder.
- Insert the paper filter.
- Close the filter holder.
- Set grinder parameters or Put desired quantity of coffee powder into the filter.
-
Place coffee carafe (J) on the keep warm plate.
-
Maintain the Preset time button (H5) pressed for 2 seconds. Preset time indicator (G7) appears on the display. Time display(G1) will show preset timer and flash, means enter into the preset state, will exit the preset time setting state if not pressing the button within 5 seconds.
-
Set the time using the buttons of Time settings HR (H6) to select hour. Hour value is displayed on screen (when maintaining Time settings HR (H6) pressed, hour values go faster). It will exit the Time setting state (setting time has been saved) if the button is not pressed within 3 seconds, the Preset time indicator (G7) disappears, and the Time display (G1) shows the current time.
-
In the Preset time setting state (Preset time indicator (G7) flashes), short press Preset time button (H5) to exit the Preset time setting state (the setting time has been saved when adjusting the HR (H6) and MIN (H7) buttons), the preset time indicator (G7) disappears, and the Time display (G1) shows Current Time.
-
In the standby state, short press Preset time button (H5), the preset time indicator (G7) flashes, the Time display (G1) flashes to show the preset time for 3 seconds, the Time display (G1) shows the current time and the preset time indicator (G7) light up, indicating that the machine start the preset time.
-
Once the preset time is reached, the coffee preparation cycle starts automatically:
-
Preset time indicator (G7) disappears.
- On/Off indicator (H2) flashes.
- Operation indicator (G4) flashes.
-
Hot water flows through the ground coffee into the carafe.
-
When the coffee cycle is finished:
-
On/Off indicator (H2) changes from "flashes" to "lights up"
- Operation indicator (G4) stops and disappears.
- Preset time indicator (G7) disappears.
- Machine enters 30 minutes keep warm.
- On/Off indicator (H2) switches off after keep warm.
Standby mode
- If no operation on the machine for 10 minutes, the appliance enters Standby mode for Energy saving. All display switch off.
- To wake up the machine: Press any button on the front panel
- The Time (24h format) is displayed.
- The machine enters "Ready to use" status for coffee preparation.
Cleaning and Care
NOTICES
Do not use any toxic, corrosive or abrasive cleaning agents or scouring sponges to clean the appliance. These can damage the surface.
-
Clean the filter basket and the carafe (J) after every use with mild detergent and warm water.
-
If necessary, wipe down the coffee bean box (B) and the cover (A) with a damp cloth.
- Wipe down the housing with a damp cloth. If necessary, use a little mild detergent if necessary.
- Check the mains cable regularly for any damage.
Cleaning the Grinder Shaft
- Remove the coffee beans from the coffee bean box (B). (Apart from the few beans that you cannot reach by hand.)
- Insert a basket filter paper into the filter insert.
- Press the button to switch on the appliance. The grinding process will start.
- Once the rest of the coffee beans have been ground – you can tell this from the change in the grinding noise – stop the grinding process by pressing the button again.
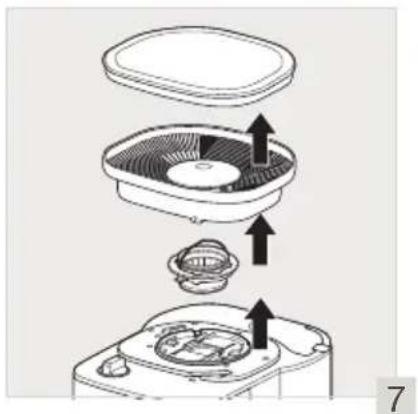
Unplug the Appliance - Take out the coffee bean box: To do this, turn it a little anticlockwise until it disengages (fig.7). Lift it off.
- Move the grinding fineness dial to the "Open" position.
- Pull out the top part of the grinder (D).
- Clean the grinder shaft and the grinder with cleaning brush.
- Reinsert the top part of the grinder and press it down. Make sure it is in the correct position (arrow marking). Fold the handle down again.
- Adjust the grinding fineness dial back to a grinding fineness. The grinder is locked again.
- Place on the coffee bean box at an angle and turn it clockwise a little until it engages.
- Dispose the filter paper and clean Grind and brew basket (C).
Descaling cycle
- Fill water tank with descaling solution (or vinegar).
- Press Descaling button (H9). Descaling indicator (G6) appears on the display.
- Press On/Off button (H1) to start the descaling cycle:
- On/Off indicator (H2) flashes
- Descaling indicator (G6) flashes
- Hot descaling solution goes across the empty filter holder
- When the descaling cycle is finished:
- On/Off indicator (H2) switches off
- Descaling indicator (G6) stops and disappears
Note:
, Descaling cycle can last longer.
, After the descaling cycle, launch 2 cycles using tankful clear water (10 cups) to rinse the machine.
Trouble shooting
| Problem Solutions | |
| The coffee does not brew or the appliance does not turn on. | ■ Make sure the appliance is well connected to a working outlet and that it is in the “ON” position.■ The water tank is empty.■ There is a power outage.■ Unplug the machine, then plug it back in.■ The clock should be reprogrammed after a power outage. |
| The appliance seems to leak. | ■ Make sure the water tank has not been filled beyond the maximum limit.■ Make sure the water tank is not damaged. |
| Brewing takes a long time. | ■ It may be time to descale the appliance.■ Several minerals can accumulate in the coffee maker's circuitry. Regular descaling of the machine is recommended. This may need to be done more often depending on the hardness of your water. For more information, please consult the “Descaling” section.■ CAUTION: do not take the appliance apart |
| The filter holder overflows or the coffee flows too slowly. | ■ The coffee maker needs cleaning.■ There is too much coffee. We recommend using one measuring spoon or one soup spoon of ground coffee per cup.■ The ground coffee is too fine (e.g., ground coffee for espresso won't work in a drip coffee maker).■ There is ground coffee lodged between the paper filter and the filter holder.■ The paper filter is not open properly or is not well placed.■ Rinse the filter holder before inserting the paper filter so it will adhere to the damp walls of the filter basket.■ Make sure you have not inserted a paper filter at the same time as the permanent filter.■ There is more than one paper filter in the filter holder.■ Make sure the filter holder is pushed down all the way. |
| You have used ground coffee instead of coffee beans. | ■ Use your vacuum cleaner to remove the pre-ground coffee from the coffee bean container. |
| You put water in the coffee bean compartment. | ■ Bring your coffee machine to the customer service. |
| Coffee grinder doesn't work | ■ You maybe have use oily coffee beans (if your coffee beans are very dark, it might be oily). This type of machine does not work with oily coffee beans. |
| The coffee tastes bad. | ■ Clean the coffee maker■ The ground coffee is not right for your coffee maker.■ The proportion of coffee and water is not sufficient. Adjust to suit your taste.■ The quality and freshness of the coffee is not the best.■ The water is of poor quality. |
| The coffee does not flow. | ■ See if there is water in the water tank.■ The coffee flow system may be obstructed. You may clean it simply by rinsing with water. |
| The time is not correct (There is a time difference). | ■ The timer is synchronised and depends on your electrical network. If there is a time difference, we recommend that you program the time once a week to be sure it is correct. |
If your appliance does not always work properly, call customer service in your country.
European directive 2012/19/UE on Waste Electrical and Electronic Equipment (WEEE), requires that old household electrical appliances are not thrown into the normal flow of municipal waste. Old appliances must be collected separately in order to optimize the recovery and recycling of materials they contain and reduce the impact on human health and the environment.
Help protect the environment!
i Your machine contains many recoverable or recyclable materials.
Take these to a collection centre, or to an approved service centre for processing.
OBH Nordica LIMITED GUARANTEE
The Guarantee
OBH Nordica guarantees this product against any manufacturing defect in materials or workmanship during 2 years within Sweden, Norway, Denmark and Finland, starting from the initial date of purchase or delivery date.
This manufacturer's commercial guarantee covers all costs related to restoring the proven defective product so that it conforms to its original specifications, through the repair or replacement of any defective part and the necessary labour. At OBH Nordicas choice, a replacement product may be provided instead of repairing a defective product. OBH Nordicas sole obligation and your exclusive resolution under this guarantee are limited to such repair or replacement.
Conditions & Exclusions
OBH Nordica shall not be obliged to repair or replace any product which is not accompanied by a valid proof of purchase. The defective product may be returned to the store of purchase.
This guarantee applies only for products purchased and used for domestic purposes and will not cover any damage which occurs as a result of misuse, negligence, failure to follow OBH Nordica instructions, or a modification or unauthorised repair of the product, faulty packaging by the owner or mishandling by any carrier. It also does not cover normal wear and tear, maintenance or replacement of consumable parts, or the following:
- using the wrong type of water or consumable
- mechanical damages, overloading
- damages or poor results specifically due to wrong voltage or frequency as stamped on the product ID or specification
- ingress of water, dust or insects into the product
- scaling (any de-scaling must be carried out according to the instructions for use)
- damage as a result of lightning or power surges
- damage to any glass or porcelain ware in the product
- accidents including fire, flood, etc
- professional or commercial use
Consumer Statutory Rights
OBH Nordica's commercial guarantee does not affect the Statutory Rights a consumer may have or those rights that cannot be excluded or limited, nor rights against the retailer from which the consumer purchased the product. This guarantee gives a consumer specific legal rights, and the consumer may also have other legal rights which vary from Country to Country. The consumer may assert any such rights at his sole discretion.
These instructions are also available on our website www.obhnordica.com.
TEFAL - OBH Nordica Group AB
Löfströms Allé 5
Phone.: +46 08-629 25 00
www.obhnordica.com


- COFFEE MAKER
- BEGRENSET GARANTI FOR OBH NORDICA
- GARANTIEN
- IMPORTANT SAFE GUARDS
- DESCRIPTION
- USE
- BEFORE FIRST USE
- CURRENT TIME SETTING
- COFFEE PREPARATION WITH COFFEE BEANS
- COFFEE PREPARATION WITH PRE-GROUND COFFEE
- COFFEE PREPARATION WITH PRESET TIME
- STANDBY MODE
- CLEANING AND CARE
- NOTICES
- CLEANING THE GRINDER SHAFT
- DESCALING CYCLE
- NOTE
- HELP PROTECT THE ENVIRONMENT
- OBH NORDICA LIMITED GUARANTEE
- THE GUARANTEE
- CONDITIONS & EXCLUSIONS
- CONSUMER STATUTORY RIGHTS
- TEFAL - OBH NORDICA GROUP AB
Brand : OBH NORDICA
Model : Grind Aroma
Category : Coffee maker