RGI 622 - Cooktop ROSIERES - Free user manual and instructions
Find the device manual for free RGI 622 ROSIERES in PDF.
| Product type | Induction-gas mixed hob |
| Brand | ROSIERES |
| Model | RGI 622 |
| Built-in dimensions (W x D x H) | 77 x 51 x 5.5 cm |
| Net weight | 12 kg (estimated) |
| Power supply | 230 V ~ 50 Hz, 20 A |
| Gas supply | Natural gas G20/G25 (20/25 mbar) or butane/propane G30/G31 (28-30/37 mbar) |
| Total gas burners power | 4.75 kW (3 kW + 1.75 kW) |
| Maximum induction power | 3700 W (3200 W + 1800 W with sharing) |
| Number of cooking zones | 4 (2 gas + 2 induction) |
| Type of gas burners | 1 rapid (3 kW) + 1 semi-rapid (1.75 kW) with integrated ignition and thermocouple safety |
| Type of induction zones | 2 zones: Ø145 mm (1800 W) and Ø210 mm (3200 W) with touch controls |
| Booster function | Yes, on each induction zone for 10 minutes |
| Electronic timer | Yes, adjustable from 0 to 99 minutes per zone |
| Control lock | Yes, dedicated key with indicator light |
| Residual heat indicator | Yes, display 'H' |
| Automatic pan detection | Yes, display 'U' if absent |
| Cooking surface | Ceramic glass for induction, enameled grates for gas |
| Included accessories | Spare injectors, seal, fixing brackets with screws |
| Safety | Overflow safety, transistor safety, empty pan safety, automatic shut-off |
Frequently Asked Questions - RGI 622 ROSIERES
User questions about RGI 622 ROSIERES
0 question about this device. Answer the ones you know or ask your own.
Ask a new question about this device
Download the instructions for your Cooktop in PDF format for free! Find your manual RGI 622 - ROSIERES and take your electronic device back in hand. On this page are published all the documents necessary for the use of your device. RGI 622 by ROSIERES.
USER MANUAL RGI 622 ROSIERES
FR NOTICE D'EMPLOI ET D'INSTALLATION
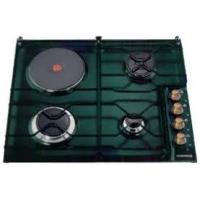
Table de cuisson Induction-Gaz
GB INSTRUCTIONS FOR USING AND INSTALLING
Induction-Gas hob
SL KUHALNA PLOŠCA
Navodila za uporabo
INSTALLATION: "LE CHANGEMENT GAZ"
This appliance is marked according to the European directive 2002/96/EC on Waste Electrical and Electronic Equipment (WEEE).
By ensuring this product is disposed of correctly, you will help prevent potential negative consequences for the environment and human health, which could otherwise be caused by inappropriate waste handling of this product.
The symbol on the product indicates that this product may not be treated as household waste. Instead it shall be handed over to the applicable collection point for the recycling of electrical and electronic equipment
Disposal must be carried out in accordance with local environmental regulations for waste disposal.
For more detailed information about treatment, recovery and recycling of this product, please contact your local city office, your household waste disposal service or the shop where you purchased the product.
All data is given for information only. In order to improve the quality of its products, ROSIERES may modify its appliances with technological developments which adhere to the conditions set out in the Consumer Code.

Ceramic hob complies with the requirements of Directives 73/23/ EEC, 89/336/EEC and 90/396/EEC.
This appliance can be used by children aged from 8 years and above and persons with reduced physical, sensory or mental capabilities or lack of experience and knowledge if they have been given supervision or instruction concerning use of the appliance in a safe way and understand the hazards involved.
CONTENTS
Unpacking the appliance 25
Recommendations 26
- INSTALLATION
Fitting the hob - Gas connection - Electrical connection 27-33
- PRESENTATION
Presentation of the hob 34
GAS
The gas burners - Some tips - Igniting and setting the burner..... 35-36
- Induction
Use procedure - The safety devices - Use 37-43
CLEANING
The gas burners - Ceramic hob 44-45
PROBLEMS AND SOLUTIONS
Advice 46-47
UNPACKING THE APPLIANCE
Inside the appliance, you will find a bag containing :
new jets for the gas modification, if you have changed the type of gas, the fixing brackets with screws required for installing the hob in the worktop, a watertight seal to avoid any leakage into the supporting cabinet.
SAFETY INSTRUCTIONS - RECOMMENDATIONS
- The appliance and its accessible parts become hot during use. Care should be taken to avoid touching heating elements.
- It is strongly recommended to keep children away from the cooking zones while they are in operation or when they are switched off, so long as the residual heat indicator is on, in order to prevent the risks of serious burns.
- When cooking with fats or oils, take care always to watch the cooking process as heated fats and oils can catch fire rapidly.
- Never try to extinguish a fire with water, but switch off the appliance and then cover flame e.g. with a lid or a fire blanket.
- Aluminium foil and plastic containers must not be placed on the hot surfaces.
- After every use, some cleaning of the top is necessary to prevent the build up of dirt and grease. If left, this is recooked when the hob is used and burns giving off smoke and unpleasant smells, not to mention the risks of fire propagation.
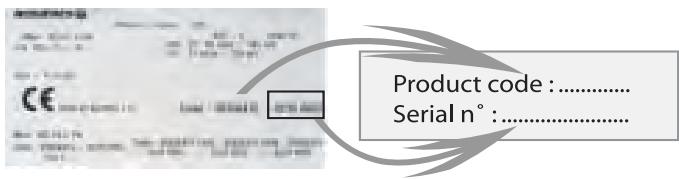
READ THE INSTRUCTIONS CAREFULLY TO MAKE THE MOST OF YOUR HOB. We recommend you keep the instructions for installation and use for later reference, and before installing the hob, note its serial number below in case you need to get help from the after sales service.
. Identification plate (located under the hob's bottom casing)
- The hob's control area is sensitive, do not place hot containers on it.
- Never cook directly on the hob surface, use pots and pans.
- Always centre the pan well on the cooking zone used.
- Do not use the hob surface as a cutting board, or work top.
- Metallic objects such as knives, forks, spoons and sauce pan lids must not be placed on the hob surface as they can get hot.
- Do not slide pans on the hob: risk of scratching.
- Do not store heavy objects above the hob, they can fall and damage it.
- WARNING: Danger of fire: do not store any objects whatever on the hob.
- Children under 8 Year of age must be kept away from the appliance unless they are continuously supervised. Children must not play with the appliance.
- In the unlikely event of a crack appearing on the glass, immediately disconnect the unit from the mains and contact the after-sales service directly.
- This appliance is not intended to be operated by means of an external timer or separate remote-control system.
INSTALLATION
Installing a domestic appliance can be a complicated operation which if not carried out correctly, can seriously affect consumer safety.
It is for this reason that the task should be undertaken by a professionally qualified person who will carry it out in accordance with the technical regulations in force.
In the event that this advice is ignored and the installation is carried out by an unqualified person, ROSIERES declines all responsibility for any technical failure of the product whether or not it results in damage to goods or injury to individuals.
Before installing the hob :
1 make sure that the appliance is compatible with the gas supply source. The hob is pre-set in the factory to work with the type of gas shown on the packing and the plate attached to it.
Natural gas G 20-20 mbar / G 25-25 mbar : mains gas
② if necessary, adapt the hob for use with another type of gas : if the hob must be used with another type of gas than the gas pre-set in the factory, it is necessary to adapt the hob gas burners (page 28).
For installation, the technician must :
③ built-in hob (page 29/30).
④ make the gas connection according to the type of gas to be used : based on the gas to be used, choose the appropriate gas connection (page 31).
⑤ make the hob electrical connection according to the instructions (page 32).
⑥ if gas modification of the gas setting and after final installation, adjust the minimum flame of the taps by turning the by-pass screw (page 33).
All modification concerning the hob gas setting must be indicated on the rating plate of the hob.
INSTALLATION: "GAS CONNECTION"
- CHANGING THE GAS TYPE : the calorific power output and gas pressure will vary according to the gas supply.
When changing gas type, you must follow the procedure below :
. fit the correct jets (see table below),
. adjust the minimum flame on the taps (see page 33).
CHANGING THE JETS : each jet is designated by size.
To gain access to the jets :
remove the pan supports,
remove the burner cap and body,
Fast burner body*
Jet
Semi-fast burner body*
| Natural gas G20-20 mbar / G25-25 mbar | Butane :G30 28-30 mbar Propane :G31 37 mbar | |
| 3 kW Fast 1,75 kW Semi-fast | Jet 130 | Jet 86 |
| Jet 100 | Jet 67 |
. using the spanner supplied with the appliance, unscrew the jet,
. fit the correct jet for the type of gas to be used,
. secure the jet tightly,
. replace the burner body, cap and the pan support.
INSTALLATION - FITTING
The unit or support for the hob, as well as the walls of any adjacent units, must be made of high temperature resisting material. In addition, the laminate covering the unit or support should be laid using heat-resistant adhesive to prevent it coming away.
Installation:
- Remove all the accessories of the hob (pan support, burner cap and body).
- A seal is supplied with the hob. To install it,
. turn over the hob, glass side down, taking care to protect the glass.
. place the seal all round the hob.
. make sure it is placed correctly to prevent any ingress in the support unit.
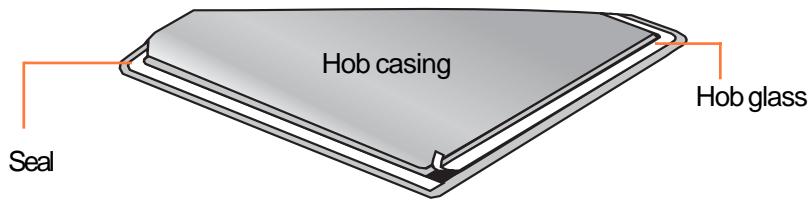
Hob with glass side down
- It it important to fit the hob on a level supporting surface.
- Deformations caused by incorrect fitting can alter the specifications of the worktop and the performance of the hob.
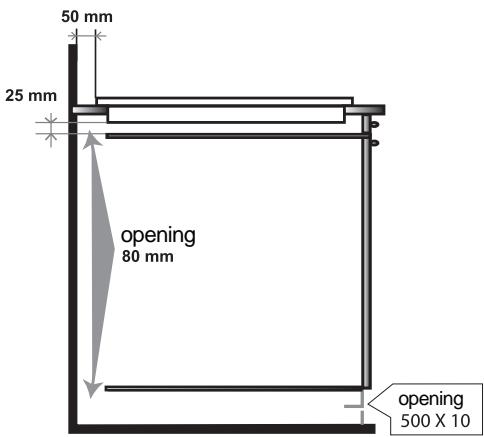
- Leave a gap of at least 5cm between the appliance and any neighbouring vertical surfaces.
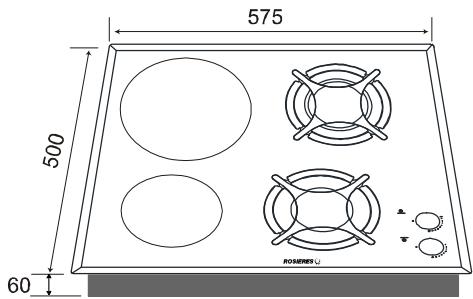
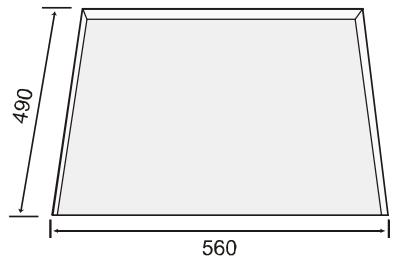
- It is absolutely essential that the recess conforms with the dimensions indicated.
- The height of the flush-mounted part of the hob is 5,5cm .
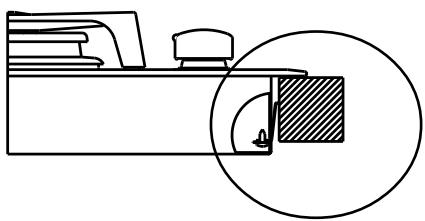
- If there is an intermediate division :
. the clearance between the bottom of the casing and in intermediate floor or part of a furniture unit must greater than 2,5 cm so as to allow air circulate. The minimum distance should be 8 cm.
. furthermore, you should ensure that there is at the rear a ventilation (8 cm).
- You can not build the hob in above an oven with no fan, a dishwasher, fridge, freezer or washing machine.
- The body of the hob is fitted which 4 location holes to take the fixing clamps intended to fix the hob in the unit. Place the 4 fixing clamps, before building-in the hob, in such a way that the hob is placed perfectly in the support unit.
Built-in:
4 fixing clamps
Fitting dimensions
Fitting the hob in a support unit
Fitting the hob above a ventilated oven* (*equipped with a cooling fan for the electrical components)
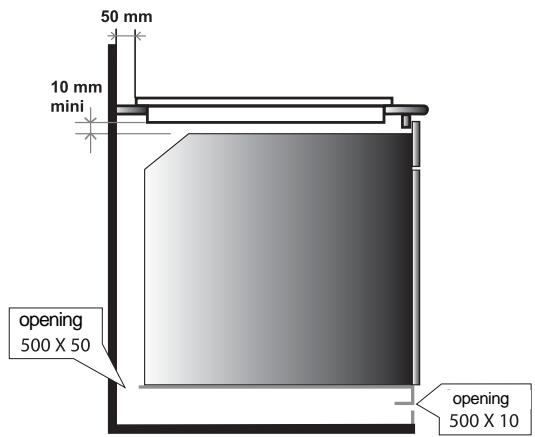
It is forbidden to fit the hob above a non-ventilated oven.
INSTALLATION - GAS CONNECTION
The hob can be built-in ; in class 3 (in compliance with gas regulations EN 30.1.1) ; adjoining furniture should not be higher than the level of the hob.
This appliance is not connected to an evacuation device for the products of combustion. It must be installed and connected in compliance with the norms in force in the country of installation. Particular attention should be given to the availability of ventilation. The turnover of air necessary for combustion is a minimum of 2m^3/h per kW of power.
Gas connection should be carried out in compliance with the norms in force in the country of installation. A stop tap, a regulator valve or a release valve for propane gas, should be fitted to the gas supply pipe. Use only taps, regulator valves, connectors and flexible hoses with the official mark of approval of the country of installation.
Built-in appliance
Butane Rigid - Flexible pipe with mechanical connectors (1) -
Propane Rigid - Flexible pipe with mechanical connectors (1) -
Natural Rigid - Flexible pipe with mechanical connectors (1) -
(1) on condition that the hose is accessible along the whole of its length it should be located so it cannot be reached by naked flame or affected by combustion gases. Neither should it be near hot parts of the hob nor anywhere where hot spillages could affect it.
2 POSSIBLES MEANS OF CONNECTION :
- CONNECTION BY RIGID PIPE
Connect directly to the threaded end of the inlet pipe. - CONNECTION BY FLEXIBLE PIPE WITH MECHANICAL CONNECTOR
Screw the nuts of the flexible pipe directly on to the inlet pipe at one end and the gas supply stop tap at the other.
We recommend this type of connection.
INSTALLATION - ELECTRICAL CONNECTION
The mains electricity supply connected to the appliance should comply with the norms in force in the country of installation.
The ROSIERES company does not accept any responsibility if this provision is not complied with.
Connection to the mains electricity supply should be through a socket with an earth terminal, or through an intermediary switching device with a gap between contacts of at least 3mm . The power supply unit must be protected by appropriate fuses and use cables of a large enough cross section to provide a normal supply to the appliance.
The hob is fitted with a power supply cable* which allow it to be connected only to a power supply of 230V between phases, or between phase and neutral.
- Connect to a socket. Before connecting, it is compulsory to check :
. the power supply voltage shown on the electricity meter,
. the adjustment of the circuit breaker, and
. the fuse rating 20A.
Note: the socket must be reachable for any eventual repair. Take care of its location at the time you install the hob.
Warning : before proceeding with the connection, check the continuity of the earthing of the power supply unit.
We cannot be held responsible for any accident which has resulting from the use of an appliance which is not connected to earth, or whose earthing is defective.
- The eventual replacement of the supplying cord must be carried on by the After Sales Service or by an agreed engineer, with a cord whose characteristics must be similar to the original one.
INSTALLATION - SETTING THE IDLE FLAME
SETTING THE IDLE FLAME :
If you have changed the type of gas, it is important to verify the flame stability at the minimum regulation.
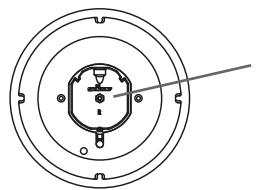
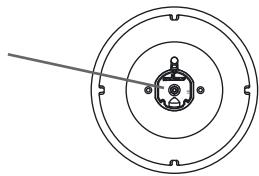
"Gaining access to the by-pass screw"
To gain access to hob burner by-pass screws, remove the knobs from the control panel.
By-pass screw of the hob burner

Never loosen the others screws !
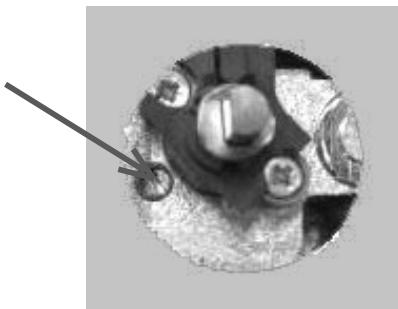
REGULATING THE MINIMUM FLAME ON THE HOB BURNER
a) Natural gas :
. Simply loosen the screw.
. Switch on the burner and turn the knob to minimum.
. Turn the by-pass screw until a low flame is visible. Turn the control knob from minimum to maximum position to check that it is satisfactory.
b) Butane-propane gas :
The by-pass screw should be screwed fully home, without being locked.
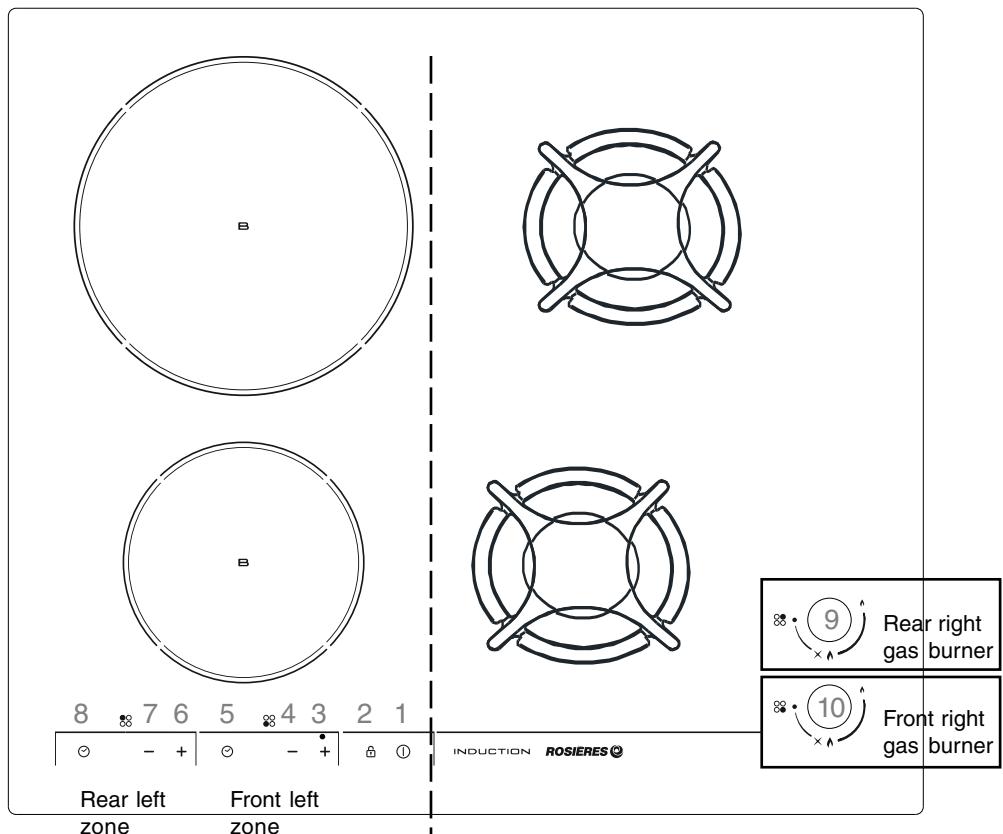
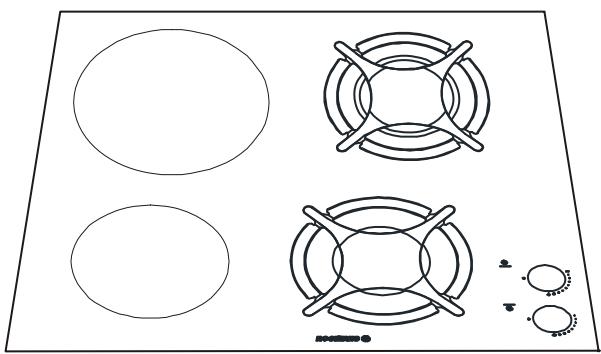
INDUCTION HOB
- Hob on/off button
- Control locking button with indicator lamp
Front left zone
- "+" button
- " - button
- Timer on/off button
Rear left zone
- "+" button
- "--" button
- Timer on/off button
GAS HOB
Rear right gas burner
- Control knob for fast gas burner
3 kW with safety device and automatic ignition
Front left gas burner
- Control knob for semi-fast gas burner 1,75 kW with safety device and automatic ignition
THE VERY FAST BURNER has a power rating of 3,5 kW :
Use the large burner for bringing to the boil, for cooking large quantities, and generally for all foods requiring rapid cooking.
THE SEMI-FAST BURNER has a power rating of 1,75 kW :
It is ideal for stewing, sauces and slow cooking.
The pan support is working as Mijorose when the burner set on low rate.
. on the slow setting, the flame only comes into contact with the cast iron burner cap.
This is ideal for slow cooking, as the heat is evenly distributed under the pan and food doesn't dry out or stick to the bottom of the pan.
. on the high position, the flame heat directly the pan allowing all cookings on quick gas.
For a proper use of the burners, choose pans which match the dimensions given below :
| Burner 1,75 kW | Burner 3 kW |
| Ø 16 cm | Ø 22 cm |
SOME TIPS....
- Pans with curved, ridged or warped bottoms are not recommended.
- Centre the pan on the "pan support".
- Do not place the same pan on two burners.
- Avoid boiling food too intensely. Food is not cooked any more quickly this way. In fact, it is subjected to severe agitation, which may cause the food to lose some of its flavour.
- To save gas, make sure that the flames do not overlap the bottom of the pan.
- Do not use the gas burner with an empty pan.
RECOMMENDATIONS : when the burners are not in service, the general gas supply tap should always be turned off.
Each burner is controlled by a tap with progressive settings allowing :
- a wider choice of settings from the maximum position to the lowest and most precise one,
- easier flame regulation according to the pan diameter,
- no risk of cutting off the flame or switching off when the flame is turned down quickly.
Each burner is fitted with :
. an automatic ignition, and,
. a thermocouple safety device allowing the automatic cut-off of the gas in case the flame dies out accidentally.
USE :
- Turn on the gas tap,
- A symbol next to each control knob indicates which burner is lit.
- Press and turn the knob to position "+" keeping it pressed to produce sparks which in turn ignite the burner. Keep the pressure on the control knob a few seconds to permit the releasing of the safety device.
- Set the flame according to your cooking requirements. Intermediate positions are available between the "+" and "-" settings on the control knob.
- To turn the flame out, turn the control knob back to stop position.
Please note :
. if there is a power cut, the burner can be ignited by pressing in and turning the knob to position "+" and holding a naked flame to the burner.
. when the flames goes off accidentally, you simply process a new ignition according to the instructions mentioned above.
INDUCTION
Use procedure
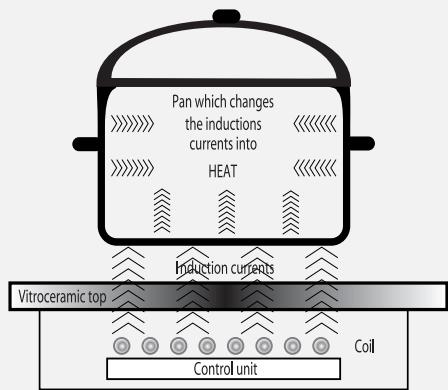
An electronic generator powers a coil located inside the appliance.
This coil creates a magnetic field, so that when the pan is placed on the hob, it is permeated by the induction currents.
These currents make the pan into a real heat transmitter, while the glass ceramic hob remains cold.
This system is designed for use with magnetic-bottomed pans.
Put simply, induction technology has two main advantages :
. as heat is emitted only by the pan, heat is maintained at its maximum level and cooking takes place without any heat loss.
. There is no thermal inertia, as cooking automatically starts when the pan is placed on the hob and stops when it is removed.
A HIGH SAFETY APPLIANCE ....
If your hob is correctly installed and used, the safety devices will rarely be needed.
- Ventilation fan : to protect and cool the supply and control components. It has two speeds, operating automatically. The fan works even if the plates are off and this till the electronic system has enough cooled down.
- Safety "Transistor": a probe checks permanently the temperature of the electronic components. If the heat is increasing excessively, it automatically decreases the power of the plates then cuts them down (the display for power level is flashing) as far as the temperature of the components meets with the standard again, the hob starts working.
- Safety "Empty pan": a probe is placed under each heating area. It will immediately detect a wrong temperature for the empty pan, or the glass ceramic.
- Safety "Detection": the presence detector allows the working and so the heating. A small object (eg a spoon, knife or ring) placed on the heating area will not be considered as a pan and therefore the hob will not come on.
- Safety "Boiling over and splashing : if any boiling over and splashing occur, the hob will stop. If a big spill or object covers at least two buttons, for at least 10 seconds, clean up the spill or remove the object, the hob is not operating.
The pan detector is only fitted to the induction zones.
When the hob is operating, the pan detector provides the advantage of automatically stopping or starting the heat of the cooking zone in contact with or on removal of the pan. If therefore offers energy savings.
If the cooking zone is used with a suitable pan*: the display shows the heat level or P if the Booster function is operating.
- The induction needs pans compatibles so fitted with magnetic-bottomed, see table on the next page.
If the cooking zone is used without a pan or with an unsuitable pan :
the display shows . The zone does not start. If no pan is detected after 10 minutes, the starting operation is cancelled.
To stop the cooking zone, you must stop the hob normally, you cannot just remove the pan.
IMPORTANT: the pan detector does not work as the hob on/off button.
CHOOSING UTENSILS
You should use high quality utensils to obtain good cooking results:

- Use high quality utensils with flat and thick bottoms: a very flat bottom eliminates hot spots causing food to stick, and the thickness of the metal gives excellent heat distribution.
- Make sure that utensil bottoms are dry: when you fill the container or use a pan straight out of the fridge, for example, make sure that it is dry; this check will stop any dirt getting on the cooking surface.
- Use pans big enough to fully cover the heat source: it is best to make sure that the bottom is at least as large as the cooking zone. If the bottom is slightly larger, the energy is used most efficiently.
| Induction zone | |
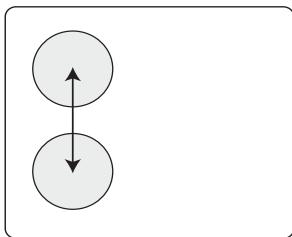
| Mark on kitchen utensils | On the label, check the mark which shows if the pan is compatible with induction. |
| Use magnetic pans (enamelled iron sheet, cast-iron ferritic stainless steel) apply a magnet on the bottom of the pan (it must stick). | |
| Stainless steel | Non detectable |
| Excepted stainless steel ferromagnetic. | |
| Aluminium | Non detectable |
| Cast-iron | Good performance |
| Warning: can scratch the surface. | |
| Enamelled steel | Good performance |
| Flat, thick and smooth bottom recommended. | |
| Glass | Non detectable |
| Porcelain | Non detectable |
| Copper bottom | Non detectable |
THE DIFFERENT POSITIONS
The different positions correspond to the following power ratings :
| INDUCTION | |
| Positions | % power |
| Lo | 10/30 |
| 1 | 2 |
| 2 | 3 |
| 3 | 4,5 |
| 4 | 6,5 |
| 5 | 8,5 |
| 6 | 12 |
| 7 | 16 |
| 8 | 22 |
| 9 | 30 |
| 10 | 42 |
| 11 | 64 |
| 12 | 100 |
| BOOSTER Ø 210 | 3200 W |
| BOOSTER Ø 145 | 1800 W |
For increased safety, the cooking zones cut off automatically if they are left on too long. The cut off depends on the heat level used.
NOTE:
The induction hob works with a generator which supplies simultaneously the 2 plates :
The area takes in charge a maximum power of 3700 W.
Consequently, when the Booster function is on and the second plate has reached a power level of 12 or 11 the latest is automatically decreased to the level 9 and this decrease is shown by a flashing display for information.
Warning : as indicated on the powers table, the Booster works during 10 minutes, after this time, it stops and the plate starts heating again at the setting 12, the power of the generator being decreased, the power level of the second plate comes back to its previous setting.
USING THE HOB
- After powering up the hob, wait 8 seconds to activate the electronic controls.
. Press the button ① , for 1 second.
Electronic control of the hob is activated. In each display zone the heat level "0" is displayed.
After 10 seconds without use, the electronic control goes off and the starting operation has to be repeated.
Each pressure on an active key is confirmed by a beep.
- STARTING A COOKING ZONE
. Press the "+" or "-" selection button of the required cooking zone. On the display, the led comes on, it shows that the zone is activated.
. Select the heat level between 1 and 12.
If you press on the "+" button the heat level "6" is displayed, pressing the "-" button the heat level "12" is displayed.
Hold down the "+" or "-" button and the heat level increases or decreases gradually.
There is a position known as "low temperature" (temperature 65^ ) between 0 and 1 to allow a keeping warm of the cooked dish.
- ACTIVATION THE BOOSTER FUNCTION
The booster function allows to get by a simple pressure the cooking zone working with a power of 1800 W (Ø 145 mm zone) or 3200 W (Ø 210 mm zone) according to the model, for 10 minutes period.
Ideal to bring to the boil large quantities of liquids ...
Activation of the BOOSTER function :
. Press the setting key of the cooking zone. Selected the heat level "12", release the button and press it again, the booster function is active for 10 minutes.
The P mark (power) appears.
When the time is over, the power level decreases to 12.
A pressure on the key "-" cancels the booster function, and the power level decreases to 12.
- STOPPING A COOKING ZONE
. Press the button "-" to display level "Lo". Release the button and press it again the indication "0". Now the zone goes off after 10 seconds.
. To stop rapidly, press the "+" and "-" buttons at the same time. The heat level automatically goes down to "0". The cooking zone goes off.
GENERAL STOP
The cooking zones can be stopped at any moment by pressing for 3 seconds on the On-Off button.
- RESIDUAL HEAT INDICATOR
The control panel tells the user when the surface temperature of the cooking zones exceeds about 60^ , by the following displaying: "H".
For ending the cooking, we advise switching off the cooking zone and using the residual heat of the zone to finish cooking gently.
When the temperature goes back below 60^ , the "H" display goes off.
N.B. After a cut in the current, the residual heat indicator disappears completely, even if the surface temperature exceeds 60^ .
- LOCKING OPERATION
The locking function holds the current settings, or prevents anyone from starting the hob. It is also used for cleaning the control strip as the controls can be locked without the hob being on.
. Press the on/off button.
. According to your choice, select or not select a heat level for the zone.
. Press the control locking button to set the data ; in this way no other button works, except the On/off button.
The locking indicator lamp comes on.
If during the locking phase, the timer is in operation, the duration will be deducted automatically and will cut the zone at the end of programmed time.
To release the locking function, just press the control locking button; the indicator lamp goes off, all the controls work again.
If the locking control is on when the hob is finally shut down, the locking control stays operational and prevents any action when the hob is restarted, press the control locking button to release the locking function.
Every cooking zone can be programmed for a maximum of 99 minutes.
. Press on the on/off button of the hob.
. Start the required zone required by following the previous instructions.
. Press on the Timer button of the zone required, the control led blinks above the display.
. Press on the "+" or "-" button to choose a time in minutes.
. The programmed time can be modified at any moment by reactivating the Timer button. The Timer control led must blink ; it indicates that the modification is for the timer. When the time has run, the cooking zone goes off automatically and an audible beep sounds for 1 minute. To stop it press the Timer button, the control led disappears.
. To change the heat level, when the timer is operating, the control led above the display must be fixed. If not, press again the Timer button.
. The programmed time can be reset to "00" using the "-" button or pressing the "-" or "+" buttons at the same time, press the Timer button to stop the control led.
. The timer can be used alone as reminder, it will ring at the end of the programmed time.
Caution : In order to avoid a hazard due to inadvertent resetting of the thermal cutout, this appliance must not be supplied through an external switching device, such as a timer, or connected to a circuit that is regularly switched on and off by the utility.
CLEANING THE HOB
- It is important to wait for the ceramic hob surface to cool completely before cleaning it.
- Only use special products for cleaning ceramic surfaces, cream and scraper. You can find them easily in the shops.
- Avoid spills; messes that fall onto the cooking surface burn fast and are then harder to clean off.
- It is recommended to keep away from the cooking surface anything likely to melt like plastic articles, sugar or products with a high sugar content.
THE GAS BURNERS

- Burner caps and pan supports: Just lift them off and clean with a damp, slightly soapy sponge.
Do not immerse them in cold water immediately after use to avoid cracking the enamel from the thermal shock.
The use of abrasive cleansers is not recommended as they scratch and dull the enamel.
- The burner head : the burner cap is simply placed on the burner head. If the holes are clogged, brush the caps using soapy water and dry with a clean cloth.
Each burner is simply layed on a flange slightly bossed to drain the overflows far from the flame and the hot areas which make cleaning easier.
- After cleaning of each element, it is important to wipe them correctly and care of fitting them rightly in their initial position. The re-fitting must be perfect because a bad positioning can bring serious anomalies in the combustion.
Warning : be careful, not to let any water get into the burners.
THE KNOBS
- For thorough cleaning, the control knobs can be removed by pulling them upwards. Only clean with soapy water and dry well before replacing them.
If you have to take the knobs off for a full cleaning, take care not to let water go into the open zone.
CLEANING:
. Sprinkle a few drops of special ceramic surface cleaner.
. Rub, working hard on any stained parts, using slightly damp soft cloth or kitchen roll.
. Rinse if necessary.
. Wipe with dry soft cloth or kitchen roll until the surface is clean.
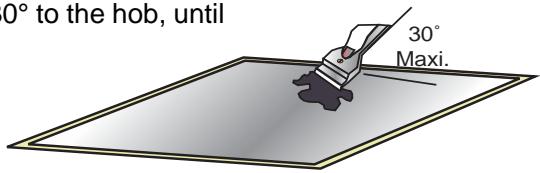
If stains remain after this usual cleaning:
. Sprinkle a few more drops of special cleaner.
. Use a scraper, keeping it at an angle of 30^ to the hob, until the difficult marks go. Rinse if necessary.
. Wipe with dry soft cloth or kitchen roll until the surface is clean.
1. Repeat if necessary.
ADVICE:
Regular cleaning leaves an protective layer that is essential to prevent scratches and wear. Make sure that the surface is clean before using the hob again.
To remove traces of water and scale, use a few drops of white vinegar or lemon juice. Rinse and dry off using absorbent paper, and then apply a few drops of special cleaner and wipe.
Ceramic glass withstands the rubbing of flat-bottomed cooking utensils, but it is nevertheless advisable to lift them before moving them.
NOTE:
. Avoid using a sponge with too much water.
. Never use a steel tool like a knife or screwdriver.
. A razor blade scraper cannot damage the surface if it is used at an angle of 30^
. Do not leave the razor blade scraper within the reach of children.
. Do not use abrasive cleaners or scouring powder.
. Do not use a steam cleaner for cleaning operations.
. Cleaning and user maintenance shall not be made by children without supervision.
PROBLEMS AND SOLUTIONS
The cooking zones do not simmer or only fry gently.
-
Only use flat-bottomed pans. If light is visible between the pan and the hob, the zone is not transmitting heat correctly.
-
The pan bottom should fully cover the diameter of the selected zone.
The cooking is too slow.
- Unsuitable pans are being used. Only use flat-bottomed utensils, that are heavy and have a diameter at least the same as the cooking zone.
Small scratches or abrasions on the hob's glass surface.
- Incorrect cleaning or rough-bottomed pans are used; particles like grains of sand or salt get between the hob and the bottom of the pan. Refer to the «CLEANING» section; make sure that pan bottoms are clean before use and only use smooth bottomed pans. Scratches can be lessened only if the cleaning is done correctly.
Metal marks.
-
Do not slide aluminium pans on the hob. Refer to the cleaning recommendations.
-
You use the correct materials, but the stains persist. Use a razor blade and follow the "CLEANING" section.
Dark stains.
- Use a razor blade and follow the «CLEANING» section.
Light surfaces on the hob.
- Marks from an aluminium or copper pan, but also mineral, water or food deposits; they can be removed using the cream cleaner.
Caramelisation or melted plastic on the hob.
Refer to the «CLEANING» section.
PROBLEMS AND SOLUTIONS
The hob is not operating.
- A big spill or object covers at least two buttons, for at least 10 seconds. Clean up the spill or remove the object.
- The control panel is locked. Press the "Locking" button to release.
The hob does not cut off.
- The control panel is locked. Press the "Locking" button to release.
The hob stops automatically
- A spill covers at least two buttons for more than 10 seconds; the hob switches to safety, and an audible beep sounds. Clean up the spill or remove the object.
- The cooking zones stop automatically if they are left on for too long. See chapter p 40.
Frequency of on/off operations for cooking zones
-
The on-off cycles vary according to the required heat level:
-
low level: short operating time,
- high level: long operating time.
"H" display, residual heat indicator, blinking.
- The electronic temperature is too high. A technician should verify the fitting in compliance with the recommendations, page 29 & 30.

- "+" gumb
- "--" gumb
- Timer on/off gumb
Zadnje levo kuhališće
6. "+" gumb
7. "--" gumb
8. Timer on/off gumb
PLINSKI KUHALIŠCI
Zadnji desni gorilnik
9. Regulacijski gumb za hitri gorilnik 3kW s temičnim varovalom in samodejnim vžigom plamena.
. Pritisnite on/off gumb.
. Po zeIJI izberite stopnjo kuhališca.
. Pritisnite gumb za zaklepanje funkcj; na ta način razen On/Off gumba, ne deluje vec noben gumb.
Prižge se indicator ključavnice.
. Pritisnite on/off gumb.
Vključite Željeno kuhališće po navodilih.