
Design Espresso Piccolo 42717 - Coffee machine Gastroback - Free user manual and instructions
Find the device manual for free Design Espresso Piccolo 42717 Gastroback in PDF.


| Product Type | Espresso Machine |
| Model Numbers | 42716 (Stainless Steel), 42717 (White), 42718 (Black), 42719 (Red) |
| Dimensions (W x D x H) | 158 mm x 300 mm x 308 mm |
| Weight | Approx. 4.4 kg |
| Power Supply | 220-240 V AC, 50/60 Hz, 1400 W |
| Water Tank Capacity | 1.5 Litres (removable, top-fill) |
| Brewing Functions | 1 Cup (single espresso), 2 Cups (double espresso), programmable extraction volume |
| Steam Function | Texturing milk for cappuccino/latte; 180° swivel cool-touch steam wand |
| Hot Water Function | For Long Black, pre-heating cups, and other hot drinks |
| Pre-Infusion | Low-pressure pre-infusion for even extraction |
| Pump Type | Integrated high-pressure pump |
| Portafilter | Die-cast aluminum with 2 spouts; includes 1-cup and 2-cup filter baskets |
| Heating Time | Approx. 40 seconds to reach operating temperature |
| Automatic Shut-Off | After approx. 20 minutes of inactivity |
| Water Filter | Integrated water filter to reduce lime deposits and improve taste |
| Descaling Indicator | Red LED warns when descaling is needed; adjustable based on water hardness |
| Water Hardness Setting | Adjustable to low, medium, or high; affects descaling frequency |
| Cup Warming Tray | Separately heated top tray for pre-warming cups |
| Included Accessories | Measuring spoon/tamper, cleaning tool, water filter, 2 filter baskets |
| Care and Cleaning | Removable drip tray with float indicator; easy-clean steam wand; descaling required periodically |
| Safety Features | Auto shut-off, overheat protection, low water indicator, pressure relief |
| Warranty | 2 years (defects in materials/workmanship) |
| Certifications | CE, RoHS (implied) |
Frequently Asked Questions - Design Espresso Piccolo 42717 Gastroback
User questions about Design Espresso Piccolo 42717 Gastroback
0 question about this device. Answer the ones you know or ask your own.
Ask a new question about this device
Download the instructions for your Coffee machine in PDF format for free! Find your manual Design Espresso Piccolo 42717 - Gastroback and take your electronic device back in hand. On this page are published all the documents necessary for the use of your device. Design Espresso Piccolo 42717 by Gastroback.
USER MANUAL Design Espresso Piccolo 42717 Gastroback
natural_image
Exterior view of a modern stainless steel Gastroback coffee maker (no visible text or symbols on the device body)BEDIENUNGSANLEITUNG
Art.- Nr. 42716 » Design Espresso Piccolo - Edelstahl «
natural_image
Exterior view of a modern stainless steel Gastroback coffee maker (no visible text or symbols on the device body)OPERATING INSTRUCTIONS
Art.- No. 42716 » Design Espresso Piccolo - Stainless steel «
Art.- No. 42717 » Design Espresso Piccolo - White «
Art.- No. 42718 » Design Espresso Piccolo - Black «
Art.- No. 42719 » Design Espresso Piccolo - Red «
Read all provided instructions before first usage!
Model and attachments are subject to change
For household use only!
Deutsch
English
TABLE OF CONTENTS
Important Safeguards 65
General Safety Instructions....65
Important Safeguards for Electrical Appliances 67
High Temperatures – Risk of Burns 69
Technical Specifications 69
Knowing Your >Design Espresso Piccolo<......70
Properties of Your New >Design Espresso Piccolo< 72
Tips for Best Results....73
Selection and Storage of Coffee Beans 73
The Grind....73
Filling the Filter Basket....73
The Water Quality....74
Tips for the Best Extraction Results 75
Extraction Guide....75
Tips for Texturing Milk....75
First Use 76
Before First Use 77
Inserting or Changing the Water Filter 78
Adjusting the Water Hardness....79
Preparation 80
Operation 82
Selecting the Appropriate Filter Basket 82
Pre-Heating 82
Filling in Coffee Powder 83
Starting the Espresso Extraction....84
After the Extraction 85
Long Black - Normal Coffee 86
Texturing Milk 87
Cooling Down to Brewing Temperature 89
Hot Water 90
Programming the Extraction Volume....91
Resetting the Appliance to Factory Settings 92
Solving Problems....93
Care and Cleaning 102
Replacing the Water Filter and Cleaning the Water Tank 102
Cleaning the Steam Wand....103
Immediately After Use.... 104
Removing Obstacles from the Steam Wand Tip 104
Soaking the Steam Wand.... 105
Cleaning the Filter Basket and Portafilter.... 106
Cleaning the Group Head 106
Cleaning the Drip Tray 107
Cleaning the Storage Chamber....108
Cleaning the Housing and Warming Plate 108
After cleaning....108
Descaling the Machine.... 109
Storage 112
Notes for Disposal.... 113
Information And Service.... 113
Warranty 114
Household Use....114
DEAR CUSTOMER!
The >Design Espresso Piccolo is an easy-to-use coffee extraction machine, offering the special benefits of an espresso machine in an astonishing compact design: Even textured milk and hot water for making various coffee specialities and other hot drinks are available in a few seconds whenever you like! Within 40 seconds after switching on, the machine will be ready for operation. Using your new EspressoAdvanced, you will get a delightful Espresso, Long Black, cappuccino, or latte without a lot of time-consuming preparations.
The instructions in this booklet will inform you on the features of the machine, thus making it easy to take pleasure in your new espresso machine.
We wish you a lot of delightful coffee brakes with your new >Design Espresso Piccolo.
Your Gastroback GmbH

IMPORTANT SAFEGUARDS
Carefully read all instructions given in this booklet before operation of this appliance. Save all instructions for further reference.
Do not attempt to use or treat this appliance in any other way or for any other than the intended use, described in this booklet. Any unintended use and especially misuse may cause severe injuries and damage due to electric shock, high pressure, fire, and heat. Any utilization for any other purpose is forbidden by the manufacturer. There is no warranty claim of the purchaser or liability to recourse of the manufacturer, if any damage and injuries are caused by unintended use or improper treatment.
These instructions are an essential part of the appliance. Do not pass the appliance without this booklet to third parties. If there are any uncertainties or additional information is required, please feel free to contact an authorized service centre or the Gastroback Customer Care Center (phone: +49(0)4165/22 25 - 0 / e-mail: info@gastroback.de).
Any operation, repair and technical maintenance of the appliance or any part of it (e.g. housing, power cord, or water system) other than described in these instructions may only be performed at an authorised service centre. Please contact your vendor.

GENERAL SAFETY INSTRUCTIONS
- This appliance is for household use only and NOT intended for use in moving vehicles. Do not operate or store the appliance in humid or wet areas or outdoors. Always keep the appliance where it is dry, frost-free, and clean, and where young children cannot reach it. Do not leave the appliance or any part of it unattended, when in reach of young children.
- Any use of accessories, attachments or spare parts that are not recommended by the manufacturer or damaged in any way may result in injuries to persons and/or damage.
- Check the entire appliance regularly for proper operation – especially the power cord (e.g. check for distortion, discolouration, cracks, leaks). Do not operate the appliance, when the appliance or any part of it is likely to be damaged, to avoid risk of fire, electric shock, or any other injuries to persons and/or damage. The appliance or its parts are likely to be damaged, if the appliance has been subject to
inadmissible strain (e.g. overheating, mechanical or electric shock), or if there are any perceptible damages or leakages, or if the appliance is not working properly. If one of these cases occurs during operation, immediately unplug the appliance. Get in contact with an authorized service centre for examination and/or repair.
- Operate the appliance on a well accessible, stable, level, dry, and suitable large table or counter that is resistant against water. Always keep the appliance and the table or counter clean and dry, and wipe off spilled liquids immediately. Do not place the appliance on a metal surface (e.g. sink) for operation or on the edge of the table or counter.
- Do not place the appliance or any part of it on or near hot surfaces (e.g. burner, heater, or oven). Do not use the appliance or any parts or accessories of the appliance with any other device or for any other purpose than described in this booklet.
- During operation keep the appliance in an appropriate distance of at least 30 cm on each side to any sensitive or delicate objects, to avoid damage due to heat and moisture. Ensure free access to the operating elements at the front of the appliance. Occasionally you need free access to the water tank at the back too.
- This appliance can be used by persons with reduced physical, sensory or mental capabilities or lack of experience and knowledge, including children aged from 8 years on, if they have been given supervision or instruction concerning the use of the appliance in a safe way and understand the hazards involved. Even care and cleaning shall not be performed by children without supervision. Children must always be supervised to ensure that they do not play with the appliance or any parts of the appliance or the packaging.
- Always ensure that you have assembled the appliance completely and correctly according to the instructions in this booklet before connecting the appliance to the power supply and operating the appliance. Do not use violence to avoid damage.
- Do not place any clothes or tissues or similar materials on or under the appliance during operation, to avoid overheating, fire and electric shock. Do not place any heavy and/or sharp-edged foreign objects
on or in the appliance or any of its parts (e.g. warming plate or cup tray), to avoid damage.
- Only use heat-resistant cups, mugs, and glasses with the appliance to avoid damage and severe injuries due to splinters and hot liquids. For texturing milk, do not use glass vessels, because even heat-resistant glass could crack due to the local heating during texturing.
- For operation, only fill cold, clear tap water or low-mineral bottled water in the water tank up to the MAX filling level marking at the maximum (max. 1.5 litres). However, do not operate the appliance while the water tank is empty to avoid overheating.
- Always switch OFF (press the power button), unplug the appliance, and leave the appliance cool down, before cleaning the appliance, or when the appliance is not in use. Additionally, remove the drip tray and empty the water tank, before moving the appliance. Always hold the machine back post at both sides for moving the appliance. Do not hold the appliance at the group head, water tank, drip tray, or power cord for moving the appliance.
- Keep the appliance and its parts and accessories clean. Clean the appliance according to the instructions in chapter 'Care and Cleaning'. Do not use any abrasive cleaners, cleaning pads (e.g. metal scouring pads), or any corrosive cleaners (e.g. disinfectants, chemical bleach, unsuited descaling solutions) for cleaning. Do not use any hard or sharp-edged foreign objects for cleaning the appliance.
- Do not place the espresso machine or any of its parts or accessories in an automatic dishwasher.

IMPORTANT SAFEGUARDS FOR ELECTRICAL APPLIANCES
The appliance is driven electrically. Place the appliance near a suitable wall power outlet to connect the appliance directly to a protected mains power supply with protective conductor (earth/ground) connected properly. Ensure that the voltage rating of your mains power supply corresponds to the voltage requirements of the appliance (220 - 240 V, 50/60 Hz, AC, rated for at least 16 A). The power outlet socket must be installed separately from other power outlet sockets to avoid interference with other appliances.
The installation of a residual current operated circuit breaker (r.c.c.d.) with a maximum rated residual operating current of 30 mA in the supplying electrical circuit is strongly recommended. If in doubt, contact your electrician for further information.
- In various foreign countries, the specifications for power supplies are subject to incompatible norms. Therefore it is possible that power supplies in foreign countries do not meet the requirements for safe operation of the appliance. Thus, before operating the appliance abroad, ensure that safe operation is possible.
- Do not use any desk top multi socket outlet, external switching device, or remote control systems, or extension cord to avoid risk of fire or electric shock. Ensure that the power outlet socket used is always accessible for unplugging the appliance immediately in case of malfunction or danger.
- The appliance may not be operated on metal surfaces (e.g. sink) to avoid risk of electric shock. Do not touch the power cord or the appliance with wet hands.
- DO NOT pour or spill any liquids on or under the housing of the appliance or the power cord. Do not overfill the water tank (max. 1.5 litres, 1500 ml). Otherwise, water could run out and cause hazards due to overheating, fire and electric shock. Always wipe off spilled liquids immediately. If liquids run out or are spilled in the housing, immediately unplug the appliance. Do not immerse the appliance, power cord, or power plug in water or other liquids. Do not place the appliance on wet surfaces. When liquids overflowed or are spilled on the housing or power cord or accumulate under the appliance, immediately unplug the appliance. Thereafter, dry the appliance and let it dry naturally for at least 1 day. If in doubt, carefully check the appliance for leakage.
- Always completely unwind the power cord before use. Power cords may never be knotted, twisted, strained or squeezed. Do not let the plug or power cord hang over the edge of the table or counter. The power cord may not touch hot surfaces or sharp edges. Always keep the power cord out of reach of young children. Ensure that no one will pull the appliance by the power cord. Take care not to entangle in the power cord. Always grasp the plug to disconnect the power cord.

HIGH TEMPERATURES - RISK OF BURNS
Your new EspressoAdvanced is designed for brewing coffee and producing hot water and hot steam under high pressure. Thus, some parts (e.g. lower part of the group head, portafilter, filter basket, steam wand) will get very hot during operation and hot steam and water can escape during operation and shortly thereafter. Please adhere to the following precautions to avoid injuries and damage.
- Do not hold your hands and arms or any delicate objects under or near the portafilter, group head, or steam wand during operation and while the appliance is still hot. Only touch the portafilter and steam wand at the dedicated handles. Always ensure that the steam wand points to the drip tray, when it is not in use.
- Always ensure that the portafilter is installed firmly and correctly in the group head. Do not remove the portafilter from the group head during operation to avoid risk of burns as the machine gives off hot water under high pressure.
- Always wait until the appliance has cooled down to room temperature, before cleaning or moving the appliance.
TECHNICAL SPECIFICATIONS
| Model: | Art.- No.: 42716 / 42717 / 42718 / 42719 >Design Espresso Pio |
| Power supply: | 220-240 V AC, 50/60 Hz |
| Power consumption: | 1400 W |
| Length of power cord: | approx. 100 cm |
| Weight: | approx. 4.4 kg |
| Dimensions: | approx. 158 mm x 300 mm x 308 mm(width x depth x height) |
| Capacity, water tank: | 1.5 Litres |
| Certification: |   |
These specifications may change without notice.
KNOWING YOUR »DESIGN ESPRESSO PICCOLO«
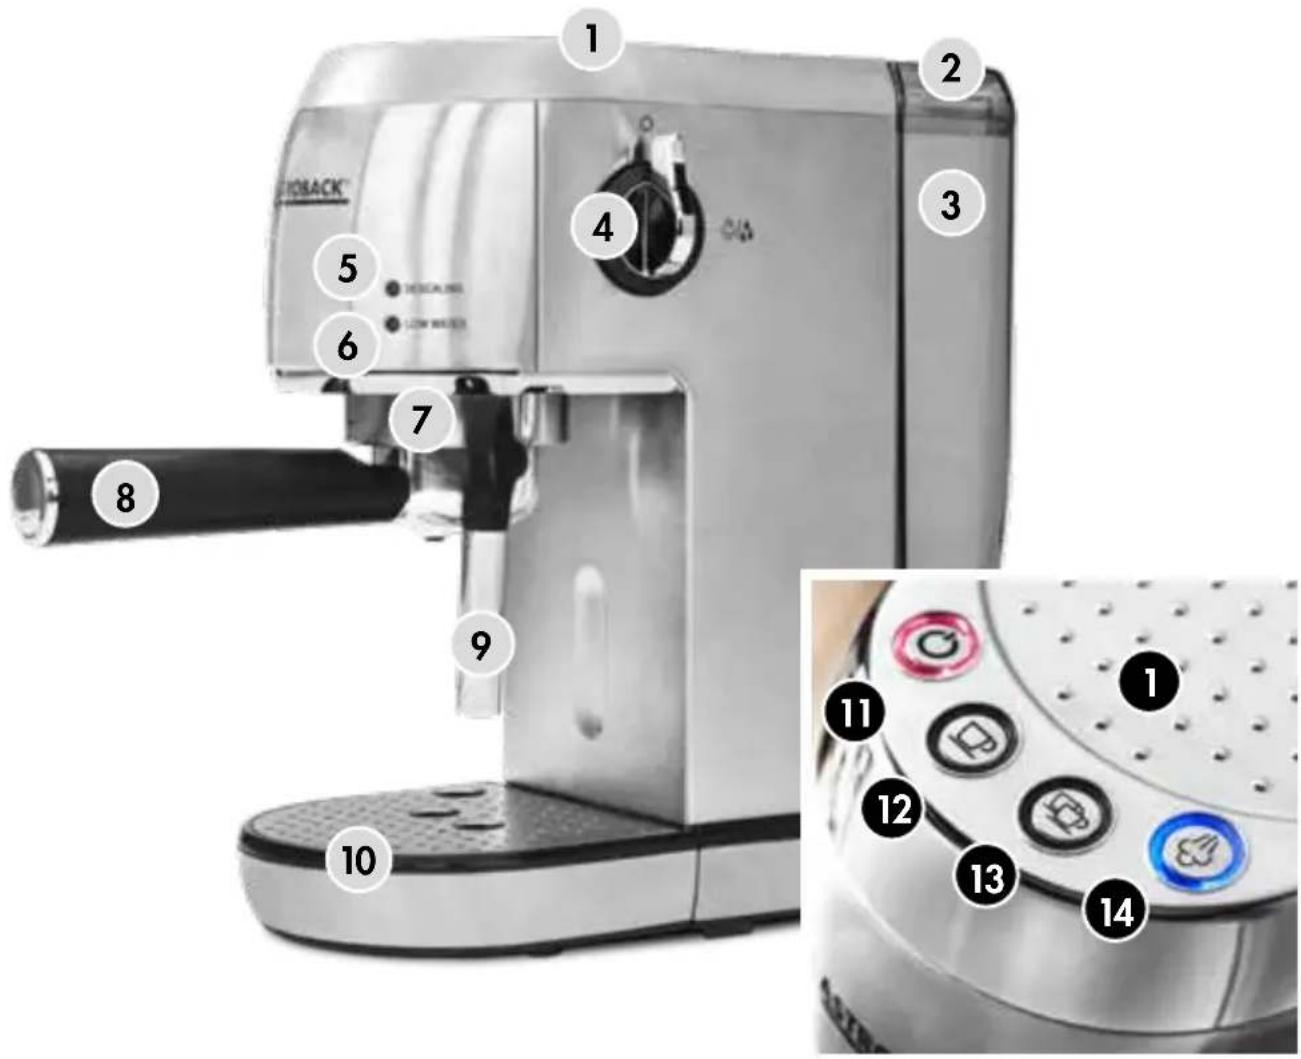
1 SEPARATELY HEATED CUP WARMING TRAY - for pre-heating and warm keeping heat-resistant cups and glasses
2 WATER TANK LID - simply remove this cover to fill the water tank, while it is installed in the machine
3 1.5L WATER TANK - top fill removable with integrated water filter and MAX filling level marking
4 HOT WATER/STEAM SWITCH - turn this switch for activating or stopping the hot water flow or steam function
5 DESCALING INDICATOR - will be illuminated red, when descaling is required.
6 WATER LOW INDICATOR - re-fill the water tank, when this indicator is illuminated red
7 GROUP HEAD - install the portafilter here for brewing espresso
8 DIE CAST ALUMINUM PORTAFILTER - place the desired filter basket in here
9 180° SWIVEL COOL TOUCH STEAM WAND - for providing hot water and steam
10 DRIP TRAY - removable with metal cup tray and filling indicator (red button)
1.1 POWER BUTTON - for switching the espresso machine on and off. The button is flashing during the heating process, and illuminated continuously, when the appliance is ready-to-use
12 1 CUP BUTTON - press here for extracting 1 cup of espresso
13 2 CUPS BUTTON - press this button for brewing 2 cups of espresso.
14 STEAM BUTTON - pressing this button will toggle between the steam function (button is illuminated) and hot water function (button is dark)
Accessories Provided on Delivery
1 cup filter basket; 2 cups filter basket; Water filter; Cleaning tool for cleaning the openings of the steam wand tip (STEAM) and filter basket mesh (FILTER); Measuring spoon with tamper at the handle
Optional Accessories and Consumables
Order the following accessories and consumables from the Gastroback Customer Care Center by phone: +49 (0)4165/22 25-0 or e-mail info@gastroback.de
Cleaning tabs for espresso machines (Gastroback Art.-Nr.: 97830). This cleaning agent may be used for removing extremely stubborn residues from the steam wand, portafilter, and filter baskets
Gastroback Premium Descaler for coffee makers and espresso machines (Gastroback Art.-Nr.: 98175)
PROPERTIES OF YOUR NEW >DESIGN ESPRESSO PICCOLO<
This chapter will provide an overview on the various functions and features of your new EspressoAdvanced.
| Function Used for ... | |
| Two pre-programmed brewing functions | By pressing the 1 cup button or 2 cups button, you can extract a single espresso (approx. 20 ml) or double espresso (approx. 125 ml). As soon as the selected amount is given off, the machine will stop operation automatically.For brewing a single espresso, it is best to use the 1 cup filter basket and fill in only 1 level measuring spoon of coffee powder.For brewing a double espresso or 2 separate cups in a single step of operation, the 2 cups filter basket is required, which can be filled with up to 2 level measuring spoonful of coffee powder. |
| Low pressure pre-infusion | Gives off hot water under reduced pressure for gently expanding the coffee grinds. This way, you will get a more even extraction. After pre-infusion, the brewing system will pressurize the group head for starting the real extraction. |
| Removable water tank The valve at the bottom of the water tank will open and close automatically. Thus, no water will run out when removing the tank. | |
| Water filter Supports the machine on optimal functioning as well as brewing an even high quality coffee and obtaining perfect taste. | |
| Portafilter with 2 spouts Thanks to the 2 spouts of the portafilter, 2 cups can be filled simultaneously. Place 1 cup under each spout. If you wish to fill only 1 cup, simply centre your cup under the portafilter. | |
| For espresso pads Use the 1 cup filter basket, if you do not wish to dose and tamp the coffee grinds on your own. Ensure to buy suitable espresso pads for this filter basket. | |
| Steam wand Via this feature, steam and hot water may be given off. Use the thermally insulated handle to move the steam wand, when it is hot after usage.use the steam function to texture milkthe hot water function may be used for diluting your espresso for a Long Black (“normal” coffee), for preparing various hot drinks (e.g. tea, cocoa, hot chocolate), and for pre-heating your cups and the portafilter. | |
| Automatic shut-off Switches off the machine automatically after being idle for approx. 20 minutes. | |
| For experienced users: programmable extraction volume | When using this feature, within a wide range you can set the extraction volume according to your individual liking. Your settings will be kept in memory permanently. |
TIPS FOR BEST RESULTS
Preparing delightful coffee is an art you will learn quite easily using your new espresso machine. This chapter will give you good advice for your perfect coffee.
SELECTION AND STORAGE OF COFFEE BEANS
- To maximise flavour and taste it is best to grind directly before the extraction. Start with fresh coffee beans to get the best possible extraction.
- We recommend quality beans with a "Roasted On" date stamped on the bag, not a "Best Before" or "Use By" date. Coffee beans are best consumed between 1 - 3 weeks after the "Roasted On" date.
- Store coffee beans or ground coffee on a cool, dark place in a dry, air-tight container. Vacuum seal if possible. Using a vacuum sealer from Gastroback, you can seal your coffee in appropriate portions to preserve aroma and taste.
- Buy coffee beans in small batches to reduce the storage time. Aroma and taste will fade quickly, when storing ground coffee for more than a week.
THE GRIND
- The grind size will affect the rate at which the water flows through the ground coffee in the filter basket and, therefore, the taste of the espresso. The grind size should be fine but not too fine. If the grind is too fine (looks like powder and feels like flour when rubbed between fingers), the water will not flow through the coffee even when under pressure. The resulting espresso will be dark in colour and bitter in flavour. If the grind is too coarse the water will flow through the ground coffee in the filter basket too quickly. The resulting espresso will be lacking in colour and flavour.
- For adapting the grind size to your favourite taste, begin with a medium grind size in a range, suited for espresso machines. Then, change the settings of your coffee grinder in small steps to reach the desired optimum.
- When purchasing already ground coffee, ensure that the coffee is suited for espresso machines, as indicated on the packet.
FILLING THE FILTER BASKET
- Do not overfill the filter baskets. Use 1 level measuring spoon for filling the 1 cup filter basket. When using the 2 cups filter basket, you may fill in up to 2 level measuring spoons full.
- For measuring the amount of coffee powder, do not press on the coffee powder in the measuring spoon. Distribute the coffee powder evenly. By using the back
of a knife or a similar tool, take off any surplus coffee powder protruding the rim of the measuring spoon to get a level filling.
- In the filter basket, if required to avoid overflow and for getting an even surface, distribute the coffee powder in portions. Then tamp the coffee powder. Getting an even surface is crucial for making the water flow evenly through the complete filling during the extraction process.
- Ensure that the rim of the filter basket is completely clean, before installing the portafilter at the group head. Wipe off any surplus coffee grinds, using a clean, dry cloth or kitchen towel.
- Espresso pads may be used only in combination with the 1 cup filter basket. Do not place more than 1 espresso pad at a time into the 1 cup filter basket.
- You may use E.S.E. espresso pads or soft espresso pads of sufficient size Always place the espresso pads in the centre of the 1 cup filter basket. Please, adhere to the instructions given on the packet of your espresso pads.
- Ensure that the rim of the espresso pad does cover the rim of the filter basket. The rim of the filter baskets must be left completely free. If required, fold in the rim of the espresso pad.
THE WATER QUALITY
- De-mineralized or highly filtered water as well as mineral water with high mineral content are not recommended for brewing coffee. In most cases, clear, cold tap water is suited best.
- If the tap water in your residential area has a very high water hardness (high mineral content of 4° - 5°, approx. 350mg/L and more), we recommend to use low-mineral bottled water (table water). This will help you protecting your machine from excessive lime deposits and improve the taste of your coffee.
- For operation, only fill cold, clear water into the water tank of the machine. Without any important reason (e.g. disinfection of the water is required), do not heat or boil the water prior to filling the water tank. In all cases, always use COLD water. The water filter of the appliance will retain most of the contaminants, which could cause an unpleasant taste of your coffee.
- Do not leave the water in the water tank for an elongated period of time. It is good advice to empty the water tank every day and fill it up before starting the next coffee making session.
- Empty the water tank if the appliance will not be used for more than a few days to avoid excessive lime deposits and the build-up of algae. Additionally, your coffee could get an unpleasant, flat taste when using stale water.
TIPS FOR THE BEST EXTRACTION RESULTS
- The taste and consistency of your espresso will not only depend on the type, freshness, grind size, storage of the coffee powder, filling level of the filter basket, and water quality. Even the pressure applied for tamping in the filter basket will have a great influence on the taste and consistency of the results.
- The extraction time is one of the essential parameters influencing the taste and consistency of the coffee, and a result of the amount of coffee powder, tamping pressure, and grind size (see below: 'Extraction Guide').
- If your espresso does not meet your requirements, you should only change one of the essential parameters mentioned above at a time. Then check, if you have got closer to your favourite taste. This way, you will succeed step by step.
- Pre-heat cups and portafilter before each extraction to maintain the correct temperature of your espresso. For this, you may use the hot water function of the appliance. Place cups and glasses onto the warming plate for keeping them warm during the brewing process.
- Only use completely heat-resistant vessels (e.g. cups, glasses, and mugs) that will not melt or crack.
EXTRACTION GUIDE
| Extraction Type Grind Coffee Starts Flowing Total Shot Duration | |||
| Over-Extracted (bitter and astringent) too fine after 12 seconds over 40 seconds | |||
| Balanced optimum between 8-12 seconds between 25-35 seconds | |||
| Under-Extracted (underdeveloped, sour) | too coarse | before 8 seconds | less than 20 seconds |
TIPS FOR TEXTURING MILK
- When texturing milk (e.g. for latte or cappuccino), you should avoid using glasses, because even heat-resistant glass could crack due to the local heating during texturing.
- Porcelain only slowly conducts heat. Thus, mugs made of porcelain need some time to get hot, when the milk inside is heated, and the milk inside may have a significantly higher temperature than the exterior of the mug. Therefore, if you wish to get good temperature control use metal mugs for frothing. With a metal mug, the optimum temperature is reached, when the exterior of the mug becomes too hot to touch.
- For optimum milk texturing performance it is crucial that the hole in the steam
wand tip is completely clear. An even partly blocked steam wand may affect the ability of the steam wand to produce a satisfactory amount of froth.
- Prior to texturing milk, we recommend to purge the steam wand by shortly operating the steam function to make the steam flow for 1-2 seconds.
- Always start with fresh, cold milk. Fat-reduced milk will give the best results. However, different brands and types of milk and milk alternatives will texture differently. Additionally, the freshness of the milk will have high influence. You may need to adjust the procedure accordingly. You may use the steam function with or without stainless steel sleeve. Just give it a try. To remove the stainless steel sleeve, hold the steam wand by the handle and turn the stainless steel sleeve to and fro while pulling it downwards. To re-assemble the stainless steel sleeve, simply push the stainless steel sleeve back onto the steam wand until there is no gap left between the stainless steel sleeve and the steam wand handle.
- You should consume textured milk immediately as the froth will collapse after a while.
- When not in use, the steam wand may be left immersed in a high vessel filled with clear water to reduce the risk of blockages.
FIRST USE
⚠ WARNING-RISK OF CHOKING: Always ensure that young children do not play with any packaging material of the appliance! Do not leave young children without supervision with the appliance, any part of it, or the packaging in their reach.
⚠ WARNING-RISK OF BURNS: During operation, some parts of the appliance get very hot. Additionally, the appliance is designed to give off hot water and hot steam under high pressure. Always ensure to assemble the appliance completely and correctly before starting a brewing cycle. Always switch OFF (press the power button), unplug and wait until the appliance cooled down, before cleaning the appliance. Additionally, remove the drip tray and empty the water tank before moving the appliance.
Always keep the workspace clean and dry. Do not pour or spill any liquids on or under the appliance. Do not place clothes or similar materials on or under the appliance during operation. If any liquid has been spilled on the appliance or ran into the housing, immediately switch OFF (press the power button) and unplug the appliance. Thereafter clean the appliance according to the instructions in chapter 'Care and Cleaning'.
BEFORE FIRST USE
-
Pull the appliance out of the box. Remove and discard all promotional labels, stickers, and packaging materials attached to your espresso machine, but do not remove the model label and serial number at the bottom of the appliance. Always ensure that young children do not play with any parts or accessories or the packaging!
-
Before discarding the packaging, ensure that you have found all parts and accessories. See: 'Knowing Your EspressoAdvanced'. We recommend to store the cleaning tool and filter basket not in use within the storage chamber. This way these accessories will not get lost.
⚠️ CAUTION: For removing the water tank, the water tank must be lifted straight upwards. Do not attempt to tilt the water tank, when removing it to avoid damage to the support of the water tank and the valves of the water tank and base of the appliance. If required, press the housing of the appliance down with your thumbs, while lifting the water tank up.
- Ensure that the appliance is switched off. Then grasp the water tank at both sides and pull it out vertically.
⚠️ CAUTION: Do not use any abrasive cleaners, cleaning pads (e.g. metal scouring pads), or any corrosive cleaners (e.g. disinfectants, chemical bleach) for cleaning. Do not use any hard or sharp-edged objects for cleaning the appliance. Do not place the appliance or any part of it in an automatic dishwasher.
-
Clean water tank, cleaning tool, portafilter, filter baskets, and drip tray using warm water and a gentle dish washing liquid. Rinse well with running tap water, than dry thoroughly.
-
Place the appliance on an appropriate working place near a suitable wall power outlet.
Note
Before each use, check the filling level of the water tank. We recommend to change the water daily. Fill the water tank with cold, fresh tap water or low-mineral bottled table water. Do not use mineral water, de-ionized water or other liquids (see: 'Tips for Best Results / The Water Quality').
-
Assemble the drip tray with filling level indicator and cup tray and push the drip tray into the base of the machine.
-
Insert the water filter into the water tank (see below: 'Inserting or Changing the Water Filter'), fill the water tank, and slide down the water tank at the back of
the appliance. Push the water tank down until the water tank lid levels up with the top of the appliance. Purge the water filter (see below: 'Inserting or Changing the Water Filter').
INSERTING OR CHANGING THE WATER FILTER
To guarantee long lasting proper working order of your espresso machine we recommend to use the designated water filters and change the water filter regularly (see table below). With the water hardness set correctly, we recommend to change the water filter with every third descaling process.
| Water Hardness Amount of Water | ||
| low up to 50 mg/l approx. 60 litres | ||
| medium 50-350mg/lapprox. 35 litres | ||
| high above 350mg/lapprox. 20 litres | ||
Please, use the designated Gastroback water filters only. Contact your vendor for further reference.
| Note |
| If your water hardness is 4 or 5 (high; approx. 350 mg/l or more), we strongly recommend to use an alternate water source (e.g. low-mineral table water). Low-mineral table water will extend both the life of your water filter and the descaling intervals as well as giving superior taste. You can get information on the water hardness via the supplier of your water (water works or bottling plant). |
- Remove the water tank from the back of the appliance by grasping the water tank at its sides and pulling it upwards vertically. Pour out any remaining water. Pull the water filter out of the water tank.
- Clean and rinse the water tank thoroughly (see: 'Replacing the Water Filter and Cleaning the Water Tank').
- Align the circular opening in the base of the new water filter with the valve inside the water tank. Carefully press the water filter down. Then fill the water tank up to the MAX filling level with fresh, cold water.
-
Slide the water tank vertically downwards at the back of the espresso machine. Push the water tank down until the water tank lid levels up with the top of the appliance. With the water tank installed correctly, the valves at the bottom of the water tank and in the base of the machine will open automatically. Prepare the appliance for operation and switch on (see: 'Preparation'). Wait until operating temperature is reached (power button is illuminated continuously).
-
Place a sufficiently large and heat-resistant bowl (at least 1/2 litres) onto the drip tray and point the steam wand into the bowl.
- Turn the hot water/steam switch clockwise to pump out hot water via the steam wand. Leave the appliance operate until the hot water stops automatically. Turn the hot water/steam switch back to the vertical position.
- Empty the bowl and place it onto the drip tray again. Wait until the appliance reaches the correct operating temperature again (power button is illuminated continuously).
- For completely washing out any small particles of activated carbon from the water filter, repeat the steps 5 to 7 3-5 times. If required, do not forget to refill the water tank intermediately.
- Fill the water tank with cold water.
ADJUSTING THE WATER HARDNESS
You can set the DESCALING warning time to one of the three water hardness levels (high, middle, or low, see: 'Descaling the Machine').
Note
The espresso machine is delivered with the water hardness set to high. However, the DESCALING indicator is only for information and will illuminate as soon as the water volume set as a default is reached. The DESCALING indicator will remain illuminated until it is reset manually. It will not interfere with any operation of the espresso machine.
Note
After switching on the appliance, wait until the appliance reached operating temperature (power button is illuminated continuously). No settings can be made during the heating process (power button is flashing).
The water hardness levels are assigned to the buttons of the appliance as given in the following table.
Button Water hardness Amount of water until
| descaling warning | |||
| 1 cup button low up to 50 mg/l every 20 litres | |||
| 2 cups button | medium | 50-350 mg/l | every 12 litres |
| steam button | high | higher than 350 mg/l | every 6 litres |
Important: You should change the factory settings only, if the water hardness of the water used for the machine has a really low or medium water hardness. There is no liability claim of the purchaser for any damage caused by excessive lime deposits within the machine.
Important: After activating the water hardness setting mode, you need to press the button assigned to the water hardness in your local area within 5 seconds. After 5 seconds with no button pressed, the appliance will shut-off automatically with the previously set water hardness in memory.
- Check the actual water hardness of the water you are going to use for the machine. Information can be provided by your local water works or the responsible bottling plant.
- Ensure that the appliance is live but switched off (all buttons are dark).
- Hold the power button, 1 cup button, and 2 cups button pressed simultaneously for at least 5 seconds. Then release the buttons. The button assigned to the currently selected water hardness will be flashing (see table above).
Note
After delivery or reset (see: 'Resetting the Appliance to Factory Settings'), D will flash for 5 seconds (as the high water hardness is the factory setting). If another water hardness has been set previously, C or B will flash.
- Press the button, assigned to the water hardness in your residential area (see the table above). With no further action within 5 seconds, the selected button will flash for 5 seconds. Thereafter, the appliance will switch off automatically. You may use the appliance now as usual.
Note
The selection will be kept in memory, even after disconnecting the appliance from the power supply.
PREPARATION
Important: For operation, only fill clear tap water or low-mineral table water into the water tank. Do NOT use high-mineral water or distilled or highly filtered water, as this will affect the taste of your coffee and the functioning of your machine unfavourably.
⚠️ CAUTION: For removing or installing the water tank, do not tilt the water tank. Only move the water tank up or down vertically. When filling the water tank with the water tank still installed, ensure not to spill any water on the housing of the appliance. Always wipe off spilled liquids immediately. Do not use a glass vessel for purging the system! Due to the local heating up during the purging process, even heat-resistant glass could crack.
Important: The water hardness is crucial for the frequency of descaling. You determine the water hardness correctly and descale the appliance in time to avoid damage and high energy loss due to excessive deposits of lime (see: 'Adjusting the Water Hardness').
- Ensure that the water tank is filled with clear, cold water up to the MAX filling level. You may leave the water tank within the appliance for filling. Remove the water tank lid, and pour in the water via a jug, ensuring not to spill any water on the housing of the appliance.
Alternatively, you can fill the water tank by removing the complete water tank from the rear of the machine. Grasp the water tank at both sides and pull it out upwards. Ensure that the exterior of the water tank is completely dry, before sliding the water tank vertically down at the back of the machine. - Connect the machine to a suitable mains power supply (see: 'Important Safe-guards for Electrical Appliances'). Press the power button to turn the espresso machine on. The power button flashes, while the machine is pre-heating the water system. Wait, until the power button is illuminated continuously. For the first use or after an elongated period of storage, purge the water system: Place a heat-resistant bowl made of china or metal (minimum capacity: 1/2 litres) on the drip tray. Point the steam wand into the bowl.
- Turn the hot water/steam switch at the right side of the machine clockwise to start the hot water function. Wait until the water flow stops automatically. Thereafter turn the hot water/steam switch back to the vertical position. Press the 2 cups button to purge the group head. The appliance will complete this function automatically.
- Repeat step 3 until the filling level in the water tank drops to approx. 5 cm. During this procedure, do not forget to empty the bowl in time.
- If required, fill the water tank again up to the MAX filling level (see step 1). The appliance is now ready for extracting espresso.
OPERATION
For various useful tips concerning the following instructions, please refer to 'Tips for Best Results'.
SELECTING THE APPROPRIATE FILTER BASKET
Select the filter basket according to the number of coffees and/or the strength of the coffee you wish to make.
- Use the 1 cup filter basket for making a single cup of espresso and/or a smooth taste.
-
Use the 2 cups filter basket for making 2 cups and/or a stronger taste; normally use this filter basket for mugs or larger cups. The 2 cups filter basket is labelled at its back.
• For using espresso pads: select the 1 cup filter basket. -
Insert the filter basket into the portafilter and press the filter basket down. The filter basket engages with a click.
Important: Press down the filter basket until there is no gap left between the rim of the filter basket and the rim of the portafilter. Only insert one single filter basket!
PRE-HEATING
⚠ WARNING: The steam wand will get hot, when hot water or steam is released. Even after operation, some hot water or steam may escape. Only touch the steam wand at its handle. Do not hold your hands on or under the steam wand, during operation and thereafter.
Pre-Heating Cups and Mugs
⚠ WARNING: Only use heat-resistant cups, mugs, and glasses. Other materials could crack or melt. This way splinters and other particles or chemicals from molten materials could get into your drinks, causing severe injuries. Additionally, hot liquids could run out, causing scalds and damage.
When pre-heating your cups and mugs, the optimum temperature of your coffee will be kept. For pre-heating, rinse the cups with hot water using the hot water function.
- Ensure that the water tank is filled with a sufficient amount of water (250 - 1500 ml).
- Prepare the appliance for operation (see: 'Preparation'). If required (power button is dark): press the power button to switch on the appliance. The power button is flashing, while the appliance is pre-heating the water system. After 40
seconds at the maximum, the power button is illuminated continuously to indicate that the appliance is ready for operation.
- Place the cup under the steam wand and turn the hot water/steam switch clockwise to start the hot water flow.
- With some hot water in the cup, turn the hot water/steam switch back to the vertical position to stop the hot water flow.
- Place your cups onto the warming plate on top of the appliance to keep them warm.
Pre-heating the Portafilter and Filter Basket
If the portafilter and filter basket are cold, the extraction temperature will drop significantly first, when the extraction just starts. This can affect the quality of your coffee unfavourably. Thus, you should warm up the portafilter and filter basket before filling in coffee grinds. For this, you may use hot water using the hot water function.
Important: Portafilter and filter basket must be completely dry, before filling in coffee grinds. Otherwise, during extraction the hot water from the group head could run down beside the coffee grinds resulting in a poor extraction.
- Point the steam wand at the drip tray. Hold the portafilter with filter basket under the steam wand. Then, turn the hot water/steam switch clockwise to start the hot water function.
- When a sufficient amount of hot water has been given off, turn the hot water/steam switch back to the vertical position to stop the hot water flow.
- Thoroughly wipe dry the portafilter and filter basket.
FILLING IN COFFEE POWDER
- When using espresso pads, ensure that the 1 cup filter basket is installed in the portafilter. Place one single espresso pad in the centre of the filter basket. If required, fold in the rim of the espresso pad to ensure that the rim of the espresso pad does not cover the rim of the filter basket. Then proceed with section 'Starting the Espresso Extraction'.
- When using coffee powder, fill the filter basket via the provided measuring spoon: 1 spoonful with the 1 cup filter basket, and up to 2 spoonful in the 2 cup filter basket (see: 'Filling the Filter Basket').
-
Distribute the coffee powder as evenly as possible. For this, carefully tapping at the sides of the portafilter may be useful.
-
Using the tamping tool (back of the measuring spoon), tamper the coffee grinds.
Note
Press on the coffee powder with approx. 15-20 kg. If you press too hard, the water will flow too slow and the coffee will get bitter and dark (over-extracted). When pressing too timid, the water will flow too fast, leading to a weak and watery taste (under-extracted). However, the force for pressing is not as crucial as the evenness. As a rule of thump for dosing, after tamping the rim of the tamping tool should level up with the rim of the filter basket.
- Thoroughly remove any excess coffee grinds from the rim of the portafilter. Otherwise, leakage between portafilter and group head could occur during extraction.
STARTING THE ESPRESSO EXTRACTION
-
Ensure that the water tank is filled with a sufficient amount of water (250 - 1500 ml).
-
Align the portafilter handle with the INSERTION position on the group head and lift the portafilter to insert it into the group head. If required, hold the appliance at the top of the group head and rotate the portafilter to the right until tight resistance is felt. The portafilter handle must point at least in 90° angle to the front of the appliance.
Note
It may be possible to turn the portafilter beyond the 90^ position a little for getting a tight seal. There is no need for concern that the seal at the group head will get damaged.
- For filling 1 cup, place the cup in the centre of the drip tray just below the portafilter. When brewing 2 cups, place two cups directly next to each other onto the drip tray, ensuring that the two spouts of the portafilter lie over your cups.
- Select the desired option: Press the 1 cup button or the 2 cups button. The selected button illuminates and the appliance starts working. After some seconds, the coffee drips from the spouts of the portafilter. The appliance will finish the extraction automatically and the selected button gets dark.
Tip: You can cancel the process at any time you like. Simply press the selected button again (illuminated blue) to terminate the running brewing function.
-
For making a Long Black, refer to 'Long Black—Normal Coffee' below.
-
If you wish to make cappuccino or latte, you can texture milk via the steam wand. Proceed as described in chapter 'Texturing Milk'.
AFTER THE EXTRACTION
⚠ WARNING: The metal parts of the portafilter and the lower part of the group head may be very hot during use and thereafter. Only touch the portafilter by the black handle and the group head at the top of the appliance. If required, cool the portafilter down in cold water before touching the portafilter or filter basket with your hands.
- After the extraction, first remove your coffee cup from the drip tray.
- Remove the portafilter from the group head. For this, hold the portafilter by the handle and, if required, grasp the appliance by the top of the group head. Rotate the portafilter to the INSERTION position to unlock it and lower it down from the group head.
- Empty the portafilter by holding it upside down and hitting the coffee grinds out. Rinse the filter basket and portafilter with hot water to remove residues of coffee powder and coffee oils. Hot water may be obtained via the hot water function of the appliance (see: 'Hot Water').
- Immediately after each extraction, you should purge the group head to remove residues of coffee powder from the shower screen (in the group head). For this, simply press the 1 cup button to give off hot water via the group head. If required, after some seconds press the 1 cup button again to stop the water flow.
- Wipe dry the portafilter, and leave dry naturally.
- Empty the drip tray and, thereafter, push it back into the base of the appliance.
- Do not leave the appliance switched on and/or connected to the power supply uselessly. If you do not wish to use the appliance again, press the power button to switch off the appliance. Then unplug.
Note
Used coffee grinds easily go mouldy. Thus, dispose of the coffee grinds in domestic waste or degradable organic waste at least at the end of the day, and clean the vessel used for coffee grinds. Do not dispose of the coffee grinds in the sink to avoid clogging the outlet pipe.
Note
If the appliance is idle for more than 20 minutes, it will shut off automatically. If you wish to switch on the appliance again, simply press the power button.
LONG BLACK - NORMAL COFFEE
The Long Black is according to "normal" coffee. Due to adding hot water (see: 'Hot Water'), the Long Black is milder than espresso. By selecting the appropriate function (1 cup or 2 cups) and adapting the amount of hot water added, you can adjust the taste to your likings.
⚠ WARNING: After using the hot water/steam function, the steam wand is very hot! Only touch the steam wand at the black handle.
⚠️ CAUTION: The hot water will flow from the steam wand under pressure. If possible, immerse the tip of the steam wand into your already prepared espresso, before starting the hot water function. Otherwise, hot water could splash. Alternatively, point the steam wand at an angle to the side-wall of your mug. However, you should avoid this procedure, when using glasses, because even heat-resistant glass could crack, due to the extreme local heating up. Always switch off the hot water function, before removing your mug.
- Prepare an espresso (1 cup or 2 cups) as described above.
- After brewing, add the desired amount of hot water via the steam wand (see: 'Hot Water')). For this, immerse the tip of the steam wand into the coffee to avoid splashing. Alternatively, point the steam wand at an angle at the inner sidewall of your mug (only with china mugs). Ensure that the steam button is dark and the power button is illuminated continuously.
- Turn the hot water/steam switch clockwise to start the hot water function.
- Wait until the desired amount of water is supplied. Then turn the hot water/steam switch back to the vertical position to stop the hot water flow.
- Remove your mug and wipe the steam wand using a damp, clean cloth. By the handle, turn the steam wand to the drip tray.
- Repeat steps 3 and 4. Let the appliance operate 1-2 seconds to purge the steam wand.
Note
When knowing the required amount of water, you may start with hot water also and thereafter fill up your mug with coffee.
TEXTURING MILK
⚠ WARNING - RISK OF BURNS: During operation and shortly thereafter, the steam wand will be very hot and hot steam and hot water could escape from the steam wand. Do not hold your hands and arms near the steam wand tip. Always ensure that the steam wand points to the drip tray, when not in use. Young Children must always be supervised when the espresso machine is in their reach.
Do not lift the steam wand out of the milk as long as steam is given off, to avoid that hot milk will splash out and hot steam could escape. To avoid splashing of hot milk, before removing the milk, always stop the steam flow by turning the hot water/steam switch to the vertical position and wait 1-2 seconds. After texturing, the steam wand will be hot. Only touch the steam wand at the handle to avoid scalding!
⚠️ CAUTION: Do not use glass vessels for texturing. Even heat-resistant glass may crack during texturing due to the local heating up. Metal vessels are suited best. Porcelain (china) may be used as well.
Note
You cannot use the espresso functions and steam function at the same time.
Note
If the machine is run continuously for 60 seconds (1 minute), allow the machine to cool for 1 minute before next use.
Various useful tips for texturing milk are given in section 'Tips for Best Results/Tips for Texturing Milk'.
- Ensure that the water tank is filled with a sufficient amount of water (at least 250 ml; see: 'Preparation'). If required, press the power button to switch on the appliance and wait until the power button is illuminated continuously (appliance is ready for operation).
- Fill a sufficiently large, high vessel made of porcelain or metal (e.g. coffee mug, milk jug) with the desired amount of fresh, cold milk. When preparing usual cap-puccino, you will need approx. 100ml milk. However, there must be enough milk in the vessel to immerse the steam wand. The tip of the steam wand must be immersed at least 1cm below the surface.
- Ensure that the steam wand points at the drip tray. Press the steam button to select the steam function. The steam button illuminates and the power button may flash to indicate that the water system is heating for producing steam.
- Wait until the power button is illuminated continuously. Then turn the hot water/steam switch clockwise to produce a short steam blast for purging the steam
wand. Wait until steam escapes from the steam wand. Then turn the hot water/steam switch back to the vertical position to stop the steam function.
Note
It may last a few seconds until steam is given off.
- By the handle, turn the steam wand until you can hold the milk vessel conveniently under the steam wand. Lift the milk vessel to immerse the tip of the steam wand at an angle at least 1cm below the surface of the milk. The steam wand should be near the side of the milk vessel.
Important: Due to texturing, the milk may extend up to the three-fold volume. If required, stop texturing in time to ensure that the milk will not overflow. The milk and milk jug will be heated up via the steam. Be careful, while touching the milk jug during texturing.
-
To start frothing, turn the hot water/steam switch clockwise. With the steam wand held correctly, a vortex will be build in the milk.
-
As soon as the vortex is built, lower the milk vessel carefully to bring the steam wand tip near the surface of the milk, thus inflating the milk with air for frothing. Hold your hand at the bottom of the milk vessel to feel the temperature. While doing so, ensure that the milk will not overflow.
⚠ WARNING: After texturing, the steam wand will be hot. Hot steam and hot water may escape even after switching off the steam function. Handle with care to avoid scalding! Only touch the steam wand at the handle.
-
When the desired consistency is reached, BEFORE removing the milk vessel, turn the hot water/steam switch back to the vertical position to stop the steam flow. Wait until the steam flow stops. Thereafter, place the milk vessel onto the warming tray.
-
Immediately, wipe the steam wand and tip with the damp cloth, ensuring not to touch the metal parts of the steam wand with your skin. By the handle, turn the steam wand to the drip tray. Purge the steam wand by activating the steam function shortly.
-
If you do not wish to use the steam function again, press the steam button to switch back to the hot water function. The buttons of the brewing functions will flash. Please, refer to the following section 'Cooling Down to Brewing Temperature'.
-
Consume the textured milk immediately, as milk froth will collapse after a short time.
-
If you do not wish to use the appliance again, press the power button to switch off the appliance. Then unplug.
Tip: When not in use, the steam wand may be left immersed in a high vessel filled with clear water to reduce the risk of blockages.
Important: If you wish to extract espresso after steam production, the water system of the appliance must cool down first. For this, refer to the following section.
COOLING DOWN TO BREWING TEMPERATURE
Note
After using the steam function, the water system is too hot for brewing espresso and the buttons of the brewing function are flashing. Before starting an extraction, the water system has to cool down accordingly.
If you wish to start an extraction, you may cool down the water system manually.
- If required, press the steam button to deselect the steam function (steam button must be dark). With the water system still at steam temperature, the buttons of the brewing functions will be flashing simultaneously.
- Ensure that the steam wand is pointed at the drip tray. Turn the hot water/steam switch clockwise to start the pump. Water will be given off via the steam wand, cooling down the water system. Wait a few seconds, until the pump stops automatically.
- Turn the hot water/steam switch back to the vertical position. The appliance is ready for extraction again (only the power button is illuminated).
Note
You do not need to cool down the water system manually, if the appliance will be idle for up to 10 minutes. As soon as the correct brewing temperature is reached again, the buttons of the brewing functions will stop flashing automatically and the brewing functions will be available again.
HOT WATER
⚠ WARNING – RISK OF BURNS: The hot water jet is given off under pressure and may splash. Even after operation, hot steam and hot water could escape from the steam wand and the steam wand will be hot. Ensure to keep your hands and any delicate object in appropriate distance to the steam wand.
The hot water function can be used to pre-heat cups and the portafilter, or to give off hot water for a mug of coffee (see: 'Long Black—Normal Coffee'), tea or other hot drinks.
Important: The appliance is not intended for producing large amounts of hot water. After approx. 30 seconds, the hot water function stops automatically to ensure that the water keeps the correct temperature. Depending on the required amount, you may need to start the hot water function again after making a break. In this case, wait for approx. 1 minute, before using the function again to avoid overheating.
Note
The espresso and hot water functions cannot be operated at the same time.
- Ensure that the water tank is filled sufficiently (at least 250 ml, see: 'Preparation'). If required, press the power button to switch on the appliance and wait for the appliance to get ready (power button is illuminated continuously).
- Ensure that the steam wand is pointed at the drip tray and the steam button is dark.
- Turn the hot water/steam switch clockwise to start the hot water function for shortly purging the steam wand with hot water. Turn the hot water/steam switch back to the vertical position to stop the hot water function.
- If you wish to pre-heat cups or the portafilter, hold your cup or portafilter below the steam wand.
If you wish to fill a cup with hot water, then insert the steam wand in the cup, prepared accordingly.
For preparing Long Black from an already brewed espresso, the steam wand should be immersed into the espresso, to avoid splashing of hot espresso or water.
- Turn the hot water/steam switch clockwise to start the hot water function. Wait until the desired amount of hot water is given off. Turn the hot water/steam switch back to the vertical position to stop the hot water function.
- If required, wipe the steam wand using a soft moistened cloth.
- By the handle, turn the steam wand to the drip tray and repeat step 3.
SPECIAL FEATURES FOR ADVANCED USERS
The factory settings are suitable for most cases. You can adapt the extraction volume to your individual liking.
Note
Even after programming your own settings, the factory settings will be kept in memory and can be restored (see: 'Resetting the Appliance to Factory Settings'). When problems occur that may originate in inappropriate settings, you should reset the appliance to the factory settings. Many problems can be solved this way.
PROGRAMMING THE EXTRACTION VOLUME
You can pre-program the extraction volume within a wide range (see the following table). Use this feature to pre-set the appliance according to your liking. If you prefer normal coffee (Long Black), you can use this feature to ease the making of normal coffee by avoiding the annoying addition of hot water. The appliance will brew your coffee automatically using the selected amount of water. However, you should adapt the grind size and amount of coffee powder to this procedure.
Brewing function Factory Setting Minimum Maximum
| 1 cup 40 ml 20 ml 150 ml | |||
| 2 cups 125 ml 40 ml 300 ml |
Note
When you have programmed a high extraction volume (e.g. for Long Black), but occasionally wish to extract an espresso with the appropriate low extraction volume, simply stop the extraction manually. This is done by pressing the previously selected function button (1 cup or 2 cups; will be illuminated during the extraction) as soon as the desired volume has been given off.
While programming the extraction volume, the appliance will skip the pre-infusion function. The pre-infusion function is used for moistening the coffee powder before starting the extraction. Thus, we recommend to program the extraction volume without coffee powder.
Important: Via this procedure, the previously programmed extraction volume will be overwritten. There is no way to revoke the process. Only the factory settings can be restored. However, this will reset all functions and individual settings of the appliance: both brewing functions, the water hardness setting, and the amount of water given off since the last descaling process.
If the filling level within the water tank is not sufficient for programming the desired
volume, the setting will be invalid and the appliance will cancel the process. In this case, the previously programmed extraction volume will be kept in memory.
- Insert a filter basket in the portafilter and install the portafilter in the group head but without coffee powder. Place a cup or mug of sufficient size below the porta-filter.
- Ensure that a sufficient amount of water is in the water tank. At least, the white handle of the water filter should be covered with water.
- Hold the button pressed that is assigned to the brewing function you wish to program (1 cup or 2 cups). For programming, you need to hold the button pressed, until the minimum extraction volume of the selected brewing function dripped out of the portafilter (see table above).
- Release the button as soon as the desired amount of water is in the cup.
Note
The appliance will stop pumping automatically, when the maximum extraction volume is reached.
The volume given off during this process will be memorized for the brewing function you selected. When pressing this button again, the appliance will start a usual extraction, including the pre-infusion function, but with the new extraction volume. The new extraction volume will be kept in memory even after shut-off and disconnecting the appliance from the mains power supply.
RESETTING THE APPLIANCE TO FACTORY SETTINGS
Note
If there are any problems arising with your own settings, we recommend to restart the appliance with the factory settings. This will delete all your individual settings from memory.
Important: There is no way to reverse this step. All settings made previously will be overwritten by the factory settings and get lost. This holds as well for the water hardness and amount of water that has been given off after the last descaling process. If required, you need to re-enter your settings (water hardness and extraction volume).
- Connect the appliance to the mains power supply. Ensure that the appliance is switched off (power button is dark).
-
Hold all 4 buttons pressed simultaneously at least for 5 seconds until all buttons are flashing. Release the buttons. The factory settings are restored.
-
If required (low or medium water hardness), set the water hardness of the water you are using with the appliance (see: 'Adjusting the Water Hardness').
SOLVING PROBLEMS
If any problems occur during operation, you will find the solution in this chapter.
| Problem Possible Reason The Solution | ||
| Emergency stop? Press the power button (power button gets dark), then unplug. | ||
| The appliance does not work. | The appliance is not live or switched off. | Ensure that the power supply outlet is live. Connect a lamp. After approx. 20 minutes of being idle, the appliance will switch off automatically. Press the power button to switch on the appliance. |
| The appliance did not reach the correct operating temperature (power button is flashing). | Wait until the power button is illuminated continuously. Then try again. | |
| Not enough water in the water tank (WATER LOW is illuminated). | The water tank must be filled with at least 250ml of water. If required, fill the water tank. Then try again. | |
| The water tank is not installed correctly (WATER LOW is illuminated). | Ensure that the water tank is installed correctly at the rear of the appliance. Without violence push the water tank down. | |
| During heating, the hot water/steam switch is in the horizontal operating position (all buttons flashing). | While the appliance is heating, the hot water/steam functions are not available. Turn the hot water/steam switch back to the vertical position and wait, until the power button is illuminated continuously. Then try again. | |
| A severe problem occurred (all buttons flashing). | Get in contact with an authorized service centre for examination and repair. | |
| The appliance is live and switched on (power button is illuminated continuously), but the brewing functions are not working. | The steam function is selected (seam button is illuminated).Not enough water in the water tank. The WATER LOW indicator is illuminated. | For generating steam, the appliance increases the water temperature. Thus, with the steam function selected (steam button is illuminated), the brewing functions are not available. Switch off the steam function and cool down the water system manually (see: 'Cooling Down to Brewing Temperature').Fill at least 250 ml cold water into the water tank. |
| The water system is over-heated. | Ensure that the steam function is deselected. Cool down the water system manually (see: ‘Cooling Down to Brewing Temperature’). | |
| The portafilter comes out of the group head during an extraction. | The portafilter is not inserted correctly at the group head. | Ensure that the portafilter is rotated to the right until the handle is past the centre and is securely locked in place. Rotating past the centre will not damage the silicone seal. |
| There are coffee grounds around the filter basket rim. | Clean excess coffee from the rim of the filter basket after filling to ensure a proper seal in group head. | |
| The filter basket rim or the underside of portafilter lugs have been wet. | Wet surfaces reduce the friction required to hold the portafilter in place, while under pressure during an extraction. Always ensure that filter basket and portafilter are dried thoroughly before filling the filter basket with coffee. | |
| Espresso runs out around the edge of the portafilter. | Der Siebträger ist nicht richtig am Brühkopf eingesetzt. | Vergewissern Sie sich vor jedem Brühvorgang, dass der Siebträger fest am Brühkopf verriegelt ist. Die Silikondichtung des Brühkopfes wird nicht beschädigt, wenn Sie den Siebträger über die mittlere Position hinaus drehen (siehe: ,Die Extraktion starten’). |
| There are coffee grounds around the filter basket rim. | Clean excess coffee from the rim of the filter basket after filling to ensure a proper seal in the group head. | |
| The filter basket rim or the underside of portafilter lugs have been wet. | Wet surfaces reduce the friction required to hold the portafilter in place, while under pressure during an extraction. Always ensure that filter basket and portafilter are dried thoroughly before filling with coffee, tamping and inserting into the group head. | |
| Too much coffee powder in the filter basket. | Ensure to use the correct filter basket for the amount of coffee powder used. Level up the coffee powder in the measuring spoon, before filling the filter basket. Do not tamper the coffee powder in the measuring spoon (see: ‘Tips for Best Results’). | |
| The coffee powder has been tamped with too much pressure. | Do not apply too much pressure when tamping the coffee powder in the filter basket (see: ‘Tips for Best Results’). | |
| You are not using the correct filter basket. | Always use the correct filter basket for the desired amount of coffee powder. (see: ‘Tips for Best Results’). | |
| The seal in the group head is wet or coffee powder is sticking to the seal. | Clean the shower screen and seal within the group head (see: ‘Cleaning the Group Head’). | |
| The seal in the group head is worn out or damaged. | Get in contact with an authorized service centre for examination and repair. Do not poke in the group head with any type of hard or sharp-edged objects. | |
| You cannot insert the portafilter at the group head. | The filter basket is over-filled. | Always leave a small free space above the tamped coffee powder. Scrape off excess coffee powder before installing the portafilter. Only use the correct amounts for the filter baskets (see: ‘Filling the Filter Basket’). |
| The filter basket is not installed correctly in the portafilter. | There may be no gap between the rim of the filter basket and the rim of the portafilter. Press the filter basket down. | |
| The pump continues to operate, the steam is very wet, the steam wand leaks. | You are using unsuited water, which is affecting how the machine is designed to function. | We recommend using cold tap water. We do not recommend using de-mineralized or highly filtered water (see: ‘The Water Quality’). If the problem persists, contact an authorized service centre. |
| The WATER LOW indicator is illuminated but the water tank is filled. | The water tank is not inserted correctly. | Push the water tank down at the back of the appliance until the outer sides of the water tank level up with the housing of the appliance (see: ‘Inserting or Changing the Water Filter’). |
| The coffee does not flow from the group head. | Machine is not live, not switched on, or did not reach brewing temperature. | Ensure the machine is plugged in and the power button is illuminated continuously (not flashing). Allow time for the machine to reach operating temperature. The power button will stop flashing, when the machine is ready-to-use. |
| The water tank is empty. The WATER LOW indicator is illuminated. | Fill a sufficient amount of water into the water tank. Avoid emptying the water tank below the 250 ml MIN marking. | |
| The water tank is not inserted correctly. | Push the water tank down at the back of the appliance until the water tank lid levels up with the top of the housing of the appliance (see: ‘Preparation’). | |
| The water system is still on steam temperature. The brewing buttons are flashing. | For producing steam, the appliance heats the water system to the somewhat higher steam temperature. You need to manually cool down the water system, before extraction (see: ‘Cooling Down to Brewing Temperature’). | |
| The coffee powder is too fine. | Use coffee powder suited for espresso machines. See: 'Tips for Best Results'. | |
| Too much coffee powder in the filter basket. | Ensure that you have selected the correct filter basket for the amount of coffee powder used. Only level up the measuring spoon, when filling. Do not tamper the coffee powder in the measuring spoon (see: 'Filling the Filter Basket'). | |
| The coffee powder is tamped too firmly. | Reduce the pressure applied when tamping the coffee powder (see: 'Tips for Best Results'). | |
| Excessive lime deposits in the water system. | Descale the espresso machine (see: 'Descaling the Machine'). Ensure that the water hardness is set correctly (see: 'Adjusting the Water Hardness'). | |
| The filter basket is clogged. | Clean the filter basket. You may open clogged holes in the filter mesh via a needle or the fine pin of the cleaning tool. See: 'Cleaning the Filter Basket and Portafilter'. | |
| The spouts of the portafilter are clogged. | Remove the filter basket from the portafilter and clean the spouts at the bottom of the portafilter. Then rinse the portafilter thoroughly with hot water. | |
| The coffee flows out too quickly and/or the coffee tastes weak and watery. | The coffee powder is stale or too coarse. | Use fresh coffee beans and coffee powder with a grind size suited for espresso machines. Pre-ground coffee powder is labelled accordingly. Adjust the grind size of your coffee grinder somewhat finer (see: 'Tips for Best Results'). |
| There is too little coffee powder in the filter basket. | Ensure that you have selected the correct filter basket for the amount of coffee powder used. Use the measuring spoon to measure the correct amount of coffee powder (see: 'Filling the Filter Basket'). | |
| You applied too little pressure when tamping the coffee powder in the filter basket. | To press the coffee powder into the filter basket, apply a pressure of 15-20 kg via the provided tamper at the handle of the measuring spoon (see: 'Filling the Filter Basket'). | |
| The extraction time is too long. | See: 'Special Features for Advanced Users'. | |
| Coffee runs out around the edge of the portafilter. | The portafilter is not inserted correctly in the group head.Particles of coffee powder are on the filter basket rim. | Ensure that the handle of the portafilter is rotated to the right until it is facing at least in right angle to the front of the appliance. Perhaps, you may turn the portafilter beyond the central (right angle) position a little (see: 'Starting the Espresso Extraction').Clean excess coffee powder from the rim of the filter basket before assembling the portafilter to the group head to ensure a proper seal. |
| The rim of the filter basket and/or the lower part of the portafilter rim have been wet. | Moisture reduces the friction between portafilter and group head. Always ensure that filter basket and portafilter are completely dry before filling in coffee powder and before installing the portafilter at the group head. | |
| Too much coffee powder in the filter basket. | Ensure that you have selected the correct filter basket for the amount of coffee powder used. Only level up the measuring spoon, when filling. Do not tamper the coffee powder in the measuring spoon (see: ‘Filling the Filter Basket’). | |
| The coffee powder is tamped too firmly. | Apply the correct pressure (15-20kg) when tamping the coffee powder in the filter basket (see: ‘Filling the Filter Basket’). | |
| You have selected an unsuited filter basket. | Ensure to use the correct amount with the appropriate filter basket (see: ‘Filling the Filter Basket’). | |
| Coffee powder or moisture on the seal in the group head. | Clean the group head (see: ‘Cleaning the Group Head’). | |
| The seal in the group head is damaged or worn out. | Get in contact with an authorized service centre for examination and repair. | |
| The coffee only drips from the portafilter spouts (restricted flow) and/or not enough coffee is extracted. | The filling level in the water tank is low. | Fill the water tank. The filling level must be between 250 ml and 1500 ml (MAX). |
| The coffee powder is too fine. | Use coffee powder suited for espresso machines. Adjust your coffee grinder accordingly (see: ‘Tips for Best Results’). Pre-ground coffee powder is labelled accordingly. | |
| Too much coffee powder in the filter basket. | Ensure that you have selected the correct filter basket for the amount of coffee powder used. Measure the amount of coffee powder via the measuring spoon (see: ‘Filling the Filter Basket’). | |
| The filter basket is clogged. | Clean the filter basket. You may use a needle or the fine pin of the cleaning tool to open clogged holes in the filter basket mesh (see: ‘Cleaning the Filter Basket and Portafilter’). | |
| The water system within the machine is clogged. | Descale the machine (see: ‘Descaling the Machine’). | |
| The extraction volume is too small. | See: 'Special Features for Advanced Users'. | |
| The amount of extracted coffee has changed, although all settings are the same. | As coffee beans age, the extraction rate changes and can affect the extracted volume. | Use freshly roasted coffee beans with a 'Roasted On' date and consume between 5-20 days after that date. |
| The machine is making an unusual loud and continuous pumping noise. | Not enough water in the water tank. | Fill the water tank. The filling level must be between 250ml and 1500ml (MAX). |
| The water tank is not inserted correctly. | Push the water tank down at the back of the appliance until the the water tank lid levels up with the top of the appliance. | |
| The coffee is too cold. | You did not pre-heat the cups. | Rinse your cups and mugs via the hot water function, and place your cups onto the warming plate, before starting an extraction (see: 'Pre-Heating'). |
| You did not pre-heat the portafilter. | Pre-heat the portafilter and filter basket via the hot water function (see: 'Pre-Heating'). | |
| The milk is not hot enough (if making cappuccino or latté etc). | Use a metal milk jug for texturing milk. During texturing, hold your hand on the milk jug to feel the temperature (see: 'Texturing Milk'). | |
| No crema. The coffee powder is not tamped firmly enough. | Apply the correct pressure (15-20kg) when tamping the coffee powder (see: 'Filling the Filter Basket'). | |
| Use coffee powder suited for espresso machines or adjust the grind size accordingly (see: 'The Grind'). Pre-ground coffee powder is labelled accordingly. | ||
| Use freshly ground coffee beans. Store coffee powder in an airtight container. However, do not store it for more than 1 week. | ||
| Clean the filter basket. You may open clogged holes in the filter mesh via a needle or the fine pin of the cleaning tool (see: 'Cleaning the Filter Basket and Portafilter'). | ||
| The filter basket sticks to the group head, when removing the portafilter. | This may happen occasionally. | Install the portafilter. Press the 1 cup button and wait for the appliance to stop the function automatically. Then remove the portafilter. |
| The appliance is making pulsing, whistling, and pumping noises during operation. | This is normal and no reason for concern. | No action required. |
| No steam, no hot water. | The machine is not live, not turned on, or did not reach operating temperature. | Ensure that the machine is plugged in and the power button is illuminated continuously (not flashing). It may take some seconds until steam is given off. |
| The water tank is empty. Fill | the water tank. The filling level must be between 250 ml and 1500 ml (MAX). | |
| The operating temperature is not reached (power button flashes). | Wait until the power button is illuminated continuously. Then try again. | |
| You have operated the hot water/steam function for more than 3 minutes. | After approx. 3 minutes of operation the hot water/steam function stops automatically. Turn the hot water/steam switch back to the vertical position and wait until the water system reaches operating temperature again (power button is illuminated continuously). If required, try again. | |
| The steam wand is blocked. | Leave the steam wand cool down and clean the steam wand (see: 'Cleaning the Steam Wand'). | |
| Not enough milk texture. | The milk is not fresh and/or not cold enough. | Use refrigerated and really fresh milk for texturing (see: 'Tips for Texturing Milk'). |
| You need to improve your texturing procedure. | Proceed according to the instructions in the sections 'Texturing Milk' and 'Tips for Texturing Milk'. Check whether you get better results, when working with or without the stainless steel sleeve. | |
| You stopped texturing prematurely. | The texturing process needs some time. Leave the appliance operate until the desired quantity of froth is produced. | |
| Not enough steam is given off. | The steam wand could be blocked. Leave the steam wand cool down and clean the steam wand (see: 'Cleaning the Steam Wand'). | |
| Different brands and types of milk and milk alternatives will texture differently. | You may need to adapt the texturing procedure. Give it a try (see: 'Texturing Milk'). | |
| The milk has a stale taste. | The milk is not fresh and/or not cold enough. | Use refrigerated and really fresh milk for texturing (see: 'Texturing Milk'). |
| The steam wand is not clean. | Clean the steam wand thoroughly (see: 'Cleaning the Steam Wand'). | |
| With the drip tray full, the filling level indicator does not come up. | The red float (filling level indicator) sticks to the support. | Pull the filling level indicator upwards and out. Then turn the a little and push it onto the support again. When installed in correct orientation, the filling level indicator can move freely up and down. |
| All buttons are flashing. | While switching on the appliance, the hot water/steam switch has been in horizontal operating position. | The hot water function is available only when the water system reached the brewing temperature (power button is illuminated continuously). Turn the hot water/steam switch back to the vertical position and wait until the power button will not flash any longer. |
| You attempted to use the hot water/steam function, before the water system reached brewing temperature. | The functions of the appliance are available only, when the water system reached operating temperature (power button is illuminated continuously). Turn the hot water/steam switch back to the vertical position and wait until the power button will not flash any longer. | |
| You attempted to use the hot water/steam function, while a brewing cycle is running. | During brewing, the hot water/steam function is not available. Turn the hot water/steam switch back to the vertical position. | |
| A severe problem occurred. | Immediately unplug the appliance and get in contact with an authorized service centre for examination and repair. | |
| The buttons of the brewing functions (1 cup and 2 cups) and the steam button are flashing. | You attempted to use the hot water/steam function, while a brewing cycle is running. | During brewing, the hot water/steam function is not available. Turn the hot water/steam switch back to the vertical position. |
| The buttons of the brewing functions (1 cup and 2 cups) are flashing for some seconds but nothing else happens. | Not enough water in the water tank. The WATER LOW indicator is illuminated.After using the steam function, the appliance must be cooled down manually for brewing. | Pour at least 250 ml cold water into the water tank. Then try again.This is normal. The temperature necessary for steam production is too high for brewing. Proceed as described in section ‘Cooling Down to Brewing Temperature’. |
| Not enough water in the water tank. The WATER LOW indicator is illuminated. | Pour at least 250ml cold drinking water into the water tank. Then try again. | |
| The power button and steam button are illuminated, the 1 cup and 2 cups buttons are flashing. | The overheat protection has been triggered during a brewing cycle. | The machine will return to normal operation automatically, as soon as the water system cooled down sufficiently. Simply wait. The appliance is not intended for continuous operation. Make a break in time. |
| A technical problem occurred. | If the machine does not recover automatically within 10 minutes, switch off the appliance (press the power button) and wait for approx. 30 minutes. Then try again. If the problem persists, get in contact with an authorized service centre. | |
| The machine is switched on but ceases to operate or steam escapes from the group head. | Possibly, the overheat protection of the pump is active. | Switch off the machine and unplug. Wait for 15-30 minutes. Then try again. |
| You have operated the hot water/steam function for more than 3 minutes. | This is normal. Turn the hot water/steam switch back to the vertical position and wait until the water system reaches operating temperature again (power button is illuminated continuously). If required, try again. | |
CARE AND CLEANING
⚠ WARNING: Always ensure that the appliance and all its parts and accessories are out of reach of young children. The lower part of the group head, as well as the portafilter, filter basket, and steam wand will get very hot during operation and shortly thereafter and steam and hot water may escape. Handle with care to avoid scalds. Always switch OFF the appliance (press the power button), then unplug the appliance, and leave the appliance cool down before cleaning the appliance. Additionally, remove the drip tray and empty the water tank before moving the appliance. Adhere to the following instructions for cleaning the appliance and observe all given safety hints. Do not attempt to move the appliance or disassemble any parts during operation.
⚠ WARNING - RISK OF INJURIES AND CHOKING: Little children could swallow some parts or accessories of the appliance. Do not leave little children play with any part or accessory.
Do not clean the appliance, or power cord, or any of the parts or accessories in an automatic dishwasher! Do not immerse the housing, power plug, or power cord in water or any other liquid, to avoid hazards due to electric shock and damage. Do not spill or drip any liquids on the housing and power cord to avoid risk of overheating, fire, and electric shock.
Do not use violence. Do not use any abrasive cleaners or cleaning pads (e.g. metal scouring pads) for cleaning the appliance or any part of it, to avoid damage to the surfaces. For cleaning, do not use any hard or sharp-edged foreign objects, except for the cleaning tool. The cleaning tool holds two fine pins. Handle with care to avoid pricking and damage. Hygienic cleaning is performed according to the following instructions.
REPLACING THE WATER FILTER AND CLEANING THE WATER TANK
The water filter helps to prevent the excessive accumulation of lime within the inner parts of the machine. Lime deposits can affect the performance of your machine over time, potentially causing blockages and heating problems. Replacing the water filter regularly will reduce the mineral build-up in the machine (see also: 'Descaling the Machine').
Note
If the water used for the machine has a very high mineral content (4 or 5), you should change the water filter more frequently (see: 'Inserting or Changing the Water Filter' and 'Descaling the Machine'). Contact the water works or the bottling plant in charge for information on the water hardness of your water. At the latest, you should install a new water filter after performing the descaling process for the third time. Visit www.gastroback.de or call your vendor to purchase the designated water filter.
- Remove the water tank at the rear of the machine by grasping the water tank at both sides and pulling the water tank upwards and out. Empty the water tank.
- Pull the water filter out of the water tank. If required, replace the water filter (after every third descaling process).
- Rinse the water filter with cold water.
- Wash the water tank and water tank lid with warm water and a soft nylon brush. Then wipe dry the exterior of the water tank and water tank lid thoroughly.
- To install the water filter in the water tank, align the circular opening at the base of the water filter with the valve inside the water tank and push down the water filter gently.
- Fill the water tank up to the MAX filling level and slide the water tank down at the rear of the machine. Gently push down the water tank. The valve at the bottom of the water tank will open automatically.
CLEANING THE STEAM WAND
⚠ WARNING – RISK OF BURNS: During use and even shortly thereafter, hot water and steam could escape from the steam wand and the metal parts of the steam wand will be hot. Do not touch the metal parts of the steam wand with your skin or any delicate objects, while the steam wand is still hot. Ensure that the steam wand always points to the drip tray, when not in use.
Note
Immediately after texturing milk, wipe residues of milk from the steam wand (see below: 'Immediately After Use'). Additionally, regularly follow the instructions on thorough cleaning of the steam wand (see: 'Soaking the Steam Wand') to ensure long-lasting high performance of the steam wand.
Immediately After Use
⚠ WARNING: Shortly after operation of the steam wand, hot steam and hot water may escape from the steam wand and the steam wand will be hot. Ensure not to touch the steam wand with your skin to avoid scalding.
Note
After texturing milk, to maintain good performance of the steam wand, always immediately wipe off residues of milk from the steam wand. Otherwise, the milk texturing performance may be affected due to blockage of the steam nozzle within the steam wand tip. Additionally, the milk could get a stale taste.
- After each usage, carefully wipe the steam wand tip using a soft moist cloth. Ensure not to touch the metal parts of the steam wand with your skin.
- Then, by the handle, turn the steam wand to the drip tray.
- Shortly turn the hot water/steam switch clockwise to purge the steam wand via a short steam blast. Then turn the hot water/steam switch back to the vertical position.
Note
When texturing milk, even with the nozzle blocked only partially the ability of the steam wand to produce a sufficient froth volume may be affect. If the water only drips from the steam wand, the nozzle in the steam wand tip may be clogged. Proceed according to the following instructions to remove the obstacle. However, in any case, you should perform thorough cleaning regularly (see: 'Soaking the Steam Wand').
Removing Obstacles from the Steam Wand Tip
- After usage, wait for some minutes until the steam wand cooled down. Carefully check, whether the steam wand is still hot to the touch.
- Remove the stainless steel sleeve by pulling it down. You may find it easier to remove the stainless steel sleeve, when turning it to and fro.
- Insert the coarse pin of the cleaning tool (labelled as STEAM) carefully into the central opening of the steam wand tip to remove any obstacles. Thereafter, turn the steam wand over the drip tray.
-
Keep your hands away from the steam wand and turn the hot water/steam switch clockwise to give off some steam or hot water for purging the opening in the steam wand tip.
-
After some seconds, turn the hot water/steam switch back to the vertical position to stop the function.
- If required, repeat the steps 4 to 8.
- If the steam wand is still not working properly, proceed according to the following instruction.
Soaking the Steam Wand
- Leave the steam wand cool down completely.
- If required, remove the stainless steel sleeve by pulling the stainless steel sleeve down, slightly turning the stainless steel sleeve to and fro.
- Unscrew the steam wand tip. The steam wand tip is mounted via a right-hand thread as almost any other threaded nut. Ensure to turn the steam wand tip in the correct direction.
- Fill a high vessel with hot dishwater and insert the stainless steel sleeve and steam wand tip into the dishwater. By placing the vessel onto the drip tray, insert the steam wand shaft into the dishwater, too. Soak for approx. 20 minutes.
Note
With extremely stubborn residues in the interior of the steam wand, you may solve a Gastroback cleaning tab (Art.-Nr. 97830) in approx. 200 ml hot water and soak all parts of the steam wand in this solution.
- Thereafter, hold the steam wand tip and stainless steel sleeve up to the light to check whether the interior of these parts is completely clean. If required, remove any residues in the opening of the steam wand tip via the coarse pin of the cleaning tool (labelled as STEAM). You may use a clean pipe-cleaner for removing any residues from the interior of the steam wand tip. Clean the interior of the stainless steel sleeve via a small bottle brush.
- Wipe the steam wand shaft via a soft, moist cloth to remove any residues of milk.
- Discard the dishwater. Rinse the steam wand tip and stainless steel sleeve thoroughly under running tap water.
- Switch on the appliance and wait until the power button is illuminated continuously.
-
Ensure that the steam wand shaft points at the drip tray. Turn the hot water/steam switch clockwise to give off some hot water for purging the steam wand shaft. After a few seconds, turn the hot water/steam switch back to the vertical position.
-
In all cases, wait until the steam wand cooled down again (approx. 10 min.).
Important: Do not over tighten the steam wand tip, to avoid damage to the seal. However, for operation, there may be no gab between the steam wand tip and steam wand shaft.
- Screw the steam wand tip back onto the steam wand shaft.
- Ensure that the steam wand points at the drip tray. Activate the hot water function again by turning the hot water/steam switch clockwise. After approx. 5 seconds, turn the hot water/steam switch back to the vertical position to stop the hot water.
- If required, re-assemble the stainless steel sleeve by pushing the stainless steel sleeve up onto the steam wand until the stainless steel sleeve stops at the black handle of the steam wand.
Tip: When not in use, the steam wand may be left immersed in a high vessel filled with clear water to reduce the risk of blockages and avoid that residues of milk dry on the surfaces.
CLEANING THE FILTER BASKET AND PORTAFILTER
- Rinse the filter basket and portafilter under hot water after each coffee making session to remove all residues of coffee grinds and oils. For this, you may use the hot water function of the appliance.
- If the holes in the filter basket became blocked, soak the filter basket and portafilter in hot dishwater for approx. 20 minutes. Alternatively, dissolve a Gastroback cleaning tab (Art.-Nr. 97830) to get a suitable cleaning solution.
- After soaking, rinse thoroughly. Hold the filter basket up to the light to see, whether the holes are clear.
- If required, use the fine pin of the cleaning tool (labelled as FILTER) to open the holes of the filter mesh.
CLEANING THE GROUP HEAD
After each coffee making session we recommend to run water through the group head via a brewing function but without any ground coffee, to rinse out residual coffee particles.
If the machine will not be used for an elongated time, you should clean the shower screen and group head seal within the group head to avoid that residues of coffee
grinds dry on these parts. The group head seal lays around the shower screen.
⚠️ CAUTION: Do not poke with any hard or sharp-edged objects in the group head to avoid damage.
Tip: For checking the shower screen and group head seal, we recommend to hold a small mirror below the group head.
- Switch off the appliance and unplug. Wait until the appliance cooled down completely (approx. 30 minutes).
- Use a small soft nylon brush to remove any particles from the shower screen and the group head seal within the group head.
- Then wipe the interior of the group head using a soft damp cloth.
- Connect the appliance to the mains power supply and switch on. Wait until the power button is illuminated continuously. Insert the portafilter in the group head but without filter basket and coffee powder.
- Ensure that the water tank is filled and the drip tray is empty. With the appliance switched on, purge the shower screen within the group head by pressing the 2 cups button.
- Repeat step 5 approx. 5 times. This will remove any residues left.
- Remove the portafilter from the group head and rinse the portafilter with running tap water.
- Before continuing in cleaning according to the following sections: switch off and unplug the appliance. Wait for the appliance to cool down.
CLEANING THE DRIP TRAY
The drip tray should be removed and emptied after each brewing session or, at the latest, when the filling level indicator is seen. Clean the drip tray daily after switching off the appliance.
Important: The water in the drip tray may be hot. Handle with care. Carefully pull out the drip tray to avoid spilling water in the housing of the appliance. This holds especially when the drip tray is full up. For cleaning, do not use abrasive cleaners, pads or cloths, which can scratch the surfaces.
-
Carefully pull the drip tray out of the housing. Remove the cup tray and pull the filling level indicator upwards and out. Empty the drip tray in the sink. Dispose of residues of coffee powder in domestic waste.
-
Wash the drip tray, filling level indicator, and cup tray in warm soapy water using a soft nylon brush or cloth. Wipe dry all parts.
- Push the filling level indicator back onto its support until it engages with a click. To ensure correct functioning, check whether the filling level indicator can move freely up and down. When the filling level indicator sticks to the support, pull it out again and turn it a little. Then insert the filling level indicator again.
- Replace the cup tray. Insert the drip tray in the base of the housing.
Important: Within the base of the appliance, via an overflow opening surplus water drains away from the group head. With the drip tray inserted correctly, the water will flow into the drip tray. Thus, do not operate the appliance without the drip tray inserted correctly.
CLEANING THE STORAGE CHAMBER
The cleaning tool and the second filter basket may be stored in the storage chamber at the top of the housing. Because the storage chamber is covered by a lid, it will not need much cleaning effort.
- Remove the lid of the storage chamber and take out the cleaning tool and filter basket.
- You may clean the lid of the storage chamber, cleaning tool, and filter basket in warm dishwater. Handle the cleaning tool with care to avoid pricking.
- Thereafter rinse the parts thoroughly and wipe dry.
- Wipe the interior of the storage chamber with a soft damp cloth. Then wipe dry.
- Leave all parts and the storage chamber dry naturally. Then re-insert the accessories and re-place the storage chamber lid.
CLEANING THE HOUSING AND WARMING PLATE
Important: Do not use abrasive cleaners, pads or cloths, which could scratch the surfaces.
The outer housing, power cord, and warming tray can be cleaned with a soft, damp cloth. Polish with a soft, dry cloth.
AFTER CLEANING
Leave all parts of the appliance dry naturally for at least 1/2 hours. Thereafter assemble the appliance completely according to the instructions given for each component.
DESCALING THE MACHINE
Minerals solved in the water can cause lime build-up in and on many of the internal components, reducing the water flow and power of the machine, and affecting the quality of your coffee. To ensure optimum performance we recommend to descale the appliance regularly according to the mineral content of the water used. At least, with the DESCALING indicator illuminated, you should descale the appliance. For descaling strictly adhere to the instructions given in this section.
⚠️ CAUTION: Do not attempt to descale your machine using any descaling solution or any descaling procedure not recommended to avoid damage to the machine. Additionally your coffee could get undrinkable. Only use the descaling solutions recommended in this booklet to avoid damage and health problems due to harmful chemicals.
Important: The DESCALING indicator will remind you, if the appropriate amount of water has been given off, according to the water hardness set (see: 'Adjusting the Water Hardness'). You should change the factory setting only if the water hardness of the water used for the machine is really medium or low. There is no liability claim of the purchaser for any damage caused by excessive lime deposits within the machine.
⚠ WARNING: During the descaling process hot water could drip from the group head and steam wand. Always ensure to empty and re-insert the drip tray in time at least with the filling level indicator (red button in the cup tray) coming up. Otherwise, hot descaling liquid could run out. Always ensure good ventilation during descaling. Do not aspire any vapours of the descaling solution to avoid injuries to your aspiration tract.
It is best to use the Gastroback Premium De-Scaler (Art.- No.: 98175), containing special additives for preserving the metal surfaces thus maintaining high performance of our machines. Mix 70 ml of the Gastroback Premium De-Scaler with up to 1400 ml of clear water. Do not use any corrosive chemicals as these could damage the metal and seals of the machine.
Because of the natural variations in water hardness and usage of the machine, we can only give some guidelines for the frequency of descaling the machine.
See the following table as a rule of thumb:
| Hardness Recommended frequency of descaling | ||
| low up to 50 mg/L every 20 | litres | |
| medium 50-350 mg/L every | 12 litres | |
| high | over 350 mg/Levery 6 litres | |
After every third descaling process, you should change the water filter (see: 'Inserting or Changing the Water Filter').
Note
The manufacturer will not be liable for any damage to the appliance caused by excessive build-up of scale.
- Switch off the appliance via the power button. Then clean the appliance (see: 'Care and Cleaning').
- Pull the water tank upwards and out of the appliance and empty the water tank. Pull the water filter out of the water tank. Prepare the descaling solution. Rinse the water tank with clear tap water. Then fill the descaling solution into the water tank.
- Slide the water tank down at the rear of the appliance to re-install the water tank. Ensure that the drip tray is inserted correctly and empty. Insert a filter basket into the portafilter and assemble the portafilter at the group head, but WITHOUT coffee powder.
- Switch on the appliance and wait until the power button is illuminated continuously.
- Place a heat-resistant bowl of sufficient size below the group head and direct the steam wand into the bowl. Press the 2 cups button and wait for the appliance to complete the function. Operate the 2 cups brewing function a second time.
- Ensure that the steam wand is pointing into the bowl. Then turn the hot water/steam switch clockwise to start the hot water function. Leave the appliance operate for approx. 20 seconds. Then turn the hot water/steam switch back to the vertical position to stop the function. Empty the bowl.
- Repeat the steps 5 and 6 until the WATER LOW indicator illuminates.
-
Press the power button to switch off the appliance. Pull out the water tank and empty the water tank completely. Then rinse the water tank thoroughly with clear, cold water. Fill the water tank with cold water and repeat the steps 3 to 7.
-
If you notice any odour of descaling solution still, then repeat the steps 3 to 8 once more.
- After descaling, insert the water filter (see: 'Inserting or Changing the Water Filter').
Note
After performing three descaling processes, you should insert a new water filter.
- Erase the DESCALING warning: with the appliance switched off, press the power button and steam button simultaneously for at least 5 seconds. With the next start of the appliance, the descaling indicator will be dark and the appliance starts again measuring the amount of water used until descaling is required.
Note
The frequency of descaling can be adjusted to the water hardness of the water used for the machine (see: 'Adjusting the Water Hardness').
STORAGE
⚠ WARNING: When the appliance is not in use, always switch off (press the power button), and unplug the appliance. Only store the appliance where it is protected against inadmissible strain (e.g. moisture, electric or mechanic shock, heat, frost, direct sunlight) and out of reach of young children.
CAUTION: Always leave the appliance cool down, remove the drip tray, and empty the water tank, before moving the appliance for storage. Always grasp the appliance at both sides at the machine back post for moving it. Do not grasp the appliance at the group head, drip tray, water tank, or power cord for moving. Always store the appliance in upright position on a stable, dry, frost-free, and clean surface. Do not place any hard or heavy objects on or in the appliance or its parts. Store all accessories with the appliance.
- Before storing for an elongated period of time, you should descale the appliance (see: 'Descaling the Machine'). Clean the appliance and all parts and accessories before storage according to the instructions in chapter: 'Care and Cleaning'. Ensure that the appliance and all parts are completely dry.
- You should install a filter basket and the portafilter at the group head to protect the interior of the portafilter and the filter basket against dust. Place the cleaning tool and second filter basket into the storage chamber and close the storage chamber.
- Remove the drip tray to avoid that the drip tray will fall out during moving. Grasp the appliance with both hands at the sides of the machine back post and place it on an suitable surface. Reassemble all parts to avoid loss (e.g. drip tray, stainless steel sleeve of the steam wand).
- Lay the power cord loosely around the appliance. The power cord may not be knotted, squeezed, or bent.
Important: Do not use any parts or accessories of the appliance for any other purpose than operating the appliance. It is good advice to store the parts and accessories of the appliance with the appliance.
NOTES FOR DISPOSAL

Dispose of the appliance and packaging must be effected in accordance with the corresponding local regulations and requirements for electrical appliances and packaging. Please contact your local disposal company.
Do not dispose of electrical appliances as unsorted municipal waste, use separate collection facilities. Contact your local government for information regarding the collection systems available. If electrical appliances are disposed of in landfills, dumps, or refuse incineration, hazardous substances can leak into the groundwater or can be emitted into air, thus getting into the food chain, and damaging your health and well-being as well as poisoning flora and fauna. When replacing old appliances with new once, the vendor is legally obligated to take back your old appliance for disposal at least for free of charge.
INFORMATION AND SERVICE
Please check www.gastroback.de for further information.
For technical support, please contact Gastroback Customer Care Center by phone:
+49 (0)4165/22 25-0 or e-mail info@gastroback.de.
Please refer to our home page for a copy of these operating instructions in pdf format.
WARRANTY
We guarantee that all our products are free of defects at the time of purchase. Any demonstrable manufacturing or material defects will be to the exclusion of any further claim and within 2 years after purchasing the appliance free of charge repaired or substituted. There is no Warranty claim of the purchaser if the damage or defect of the appliance is caused by inappropriate treatment, over loading or installation mistakes. The Warranty claim expires if there is any technical interference of a third party without a written agreement. The purchaser has to present the sales slip in assertion-of-claim and has to bear all charges of costs and risk of the transport.
Note
Customers from Germany and Austria: For repair and service, please send Gastroback products to the following address:
Gastroback GmbH, Gewerbestr. 20, D-21279 Hollenstedt, Germany.
Customers from other countries: Please contact your dealer.
Please agree that we cannot bear the charge of receipt. Submission of appliances: Please ensure packing the appliance ready for shipment without accessories. Add the sales slip and a short fault description. The processing time after receipt of the defective appliance will be approx. 2 weeks; we will inform you automatically. After the warranty period, please send defective appliances to the given address. You will get a free quotation and, thereafter, can decide, whether we shall repair the appliance to the costs possibly accrued, send back the defective appliance for free of charge, or dispose of the appliance for free of charge.
HOUSEHOLD USE
The appliance is intended for household use only and NOT suited for commercial, industrial or trade usage. Do not attempt to use this appliance in any other way or for any other purpose than the intended use, described in these instructions. Any other use is regarded as unintended use or misuse, and can cause severe injuries or damage. There is no warranty claim of the purchaser if any injuries or damages are caused by unintended use.
GASTROBACK®
GASTROBACK GmbH
Gewerbestraße 20. 21279 Hollenstedt / Germany Telefon +49(0)4165/2225-0 • Telefax +49(0)4165/2225-29 info@gastroback.de • www.gastroback.de
- BEDIENUNGSANLEITUNG
- OPERATING INSTRUCTIONS
- TABLE OF CONTENTS
- DEAR CUSTOMER!
- IMPORTANT SAFEGUARDS
- GENERAL SAFETY INSTRUCTIONS
- IMPORTANT SAFEGUARDS FOR ELECTRICAL APPLIANCES
- HIGH TEMPERATURES - RISK OF BURNS
- KNOWING YOUR »DESIGN ESPRESSO PICCOLO«
- Accessories Provided on Delivery
- Optional Accessories and Consumables
- PROPERTIES OF YOUR NEW >DESIGN ESPRESSO PICCOLO<
- TIPS FOR BEST RESULTS
- SELECTION AND STORAGE OF COFFEE BEANS
- THE GRIND
- FILLING THE FILTER BASKET
- THE WATER QUALITY
- TIPS FOR THE BEST EXTRACTION RESULTS
- EXTRACTION GUIDE
- TIPS FOR TEXTURING MILK
- FIRST USE
- BEFORE FIRST USE
- Note
- INSERTING OR CHANGING THE WATER FILTER
- ADJUSTING THE WATER HARDNESS
- PREPARATION
- OPERATION
- SELECTING THE APPROPRIATE FILTER BASKET
- PRE-HEATING
- Pre-Heating Cups and Mugs
- Pre-heating the Portafilter and Filter Basket
- FILLING IN COFFEE POWDER
- STARTING THE ESPRESSO EXTRACTION
- AFTER THE EXTRACTION
- LONG BLACK - NORMAL COFFEE
- TEXTURING MILK
- COOLING DOWN TO BREWING TEMPERATURE
- HOT WATER
- SPECIAL FEATURES FOR ADVANCED USERS
- PROGRAMMING THE EXTRACTION VOLUME
- RESETTING THE APPLIANCE TO FACTORY SETTINGS
- SOLVING PROBLEMS
- CARE AND CLEANING
- REPLACING THE WATER FILTER AND CLEANING THE WATER TANK
- CLEANING THE STEAM WAND
- Immediately After Use
- Removing Obstacles from the Steam Wand Tip
- Soaking the Steam Wand
- CLEANING THE FILTER BASKET AND PORTAFILTER
- CLEANING THE GROUP HEAD
- CLEANING THE DRIP TRAY
- CLEANING THE STORAGE CHAMBER
- CLEANING THE HOUSING AND WARMING PLATE
- AFTER CLEANING
- DESCALING THE MACHINE
- STORAGE
- NOTES FOR DISPOSAL
- INFORMATION AND SERVICE
- WARRANTY
- HOUSEHOLD USE
- GASTROBACK GmbH
Brand : Gastroback
Model : Design Espresso Piccolo 42717
Category : Coffee machine