CD Box RS2 T - CD Player PRO-JECT - Free user manual and instructions
Find the device manual for free CD Box RS2 T PRO-JECT in PDF.


| Product Type | CD Player |
| Supported Disc Formats | CD, CD-R, CD-RW (finalized), Hybrid-SACD |
| Digital Outputs | 1 x balanced (AES/EBU) on XLR, 1 x optical (TOSlink), 1 x coaxial (RCA), 1 x I2S on HDMI (for Pre Box RS2 Digital only) |
| Power Supply | Outboard 20V/3.000mA DC, suitable for your country |
| Power Consumption | 600mA DC, < 0.5W in standby |
| Dimensions (W x H x D) | 206 x 78 x 200 mm (210 mm with sockets) |
| Weight | 3,000 g without power supply |
| Remote Control Battery | 1 x CR2032 / 3V or 1 x CR2025 / 3V |
| Display Dimming | 10 brightness steps, switchable black/white background |
| Playback Functions | Play, Pause, Stop, Track skip, Scan, Repeat (track/all), Shuffle, Direct track access |
| Standby Mode | Via remote control or front lever switch (must be up) |
| I2S Connection | For use with Pre Box RS2 Digital only; includes master clock from DAC |
| Disc Loading | Top-loading with magnetic clamp; label side up |
| Safety Features | Laser diode caution; do not play damaged discs; use only full circular CDs |
| Warranty | Manufacturer liability limited; modifications void warranty |
Frequently Asked Questions - CD Box RS2 T PRO-JECT
User questions about CD Box RS2 T PRO-JECT
0 question about this device. Answer the ones you know or ask your own.
Ask a new question about this device
Download the instructions for your CD Player in PDF format for free! Find your manual CD Box RS2 T - PRO-JECT and take your electronic device back in hand. On this page are published all the documents necessary for the use of your device. CD Box RS2 T by PRO-JECT.
USER MANUAL CD Box RS2 T PRO-JECT
BY PRO-JECT AUDIO SYSTEMS
INSTRUCTIONS FOR USE Pro-Ject CD Box RS2 T
Dear music lover,
thank you for purchasing a Pro-Ject Audio Systems CD player.
In order to achieve maximum performance and reliability you should study these instructions for use carefully.


Warning of a hazard for the user, the unit or possible misuse.
Important notice.
Caution! Laser diode, discs to avoid, safety instructions
This product contains a laser diode. Refer all servicing to qualified personnel.
If a disc is cracked, chipped, warped, or otherwise damaged, don't risk to play it. You could end damaging the unit. This player is designed for use with fully circular, full size CDs only. Use of shaped discs is not recommended. The manufacturer and the distributor disclaims all liability arising in connection with the use of damaged or shaped discs.

AC outlet voltages vary from country to country. Before connecting to the mains, make sure that the voltage in your area meets the voltage requirements printed on the power supply.
The power supply is used to disconnect the unit from the mains. Make sure that the power supply is easier accessible at all times. Never handle the device, the power supply while your hands are wet or damp.
Avoid letting liquids enter the device or the power supply. Never place any item containing liquid, such as a flower vase on or near the device. Never spill any liquid on the device or the power supply. Never place any naked flame sources, such as lighted candles on or near the device. The product shall not be in damp or wet locations, next to a bathtub, sink, swimming pool or any other similar conditions.
Connectors
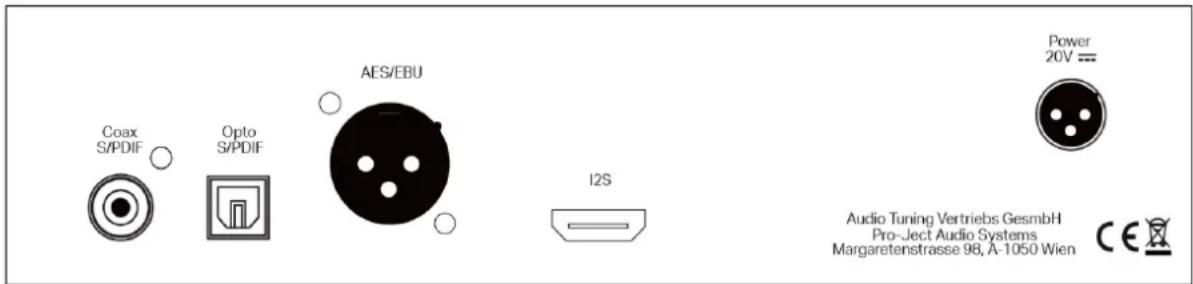

Make all connections whilst the CD player is disconnected from the power supply.
Never use any other power supply than the one supplied with the unit - except suitable Pro-Ject Power Box RS device.
Connection to an external D/A-converter
Use one of the available S/PDIF outputs (Coaxial, Optical and AES/EBU) or I2S to connect the CD player to a D/A converter or AV processor.

I2S connection is made for connection with Pre Box RS2 Digital only. It includes also masterclock from the DAC and ensures the best possible performance.
Mains power connection
Connect the low voltage plug from the power supply to the Power 20V socket of the unit before connecting the power supply to the mains.
Inserting and removing a disc
Open the top lid and remove the magnetic clamp. Insert the disc with the label side facing upwards, place the magnetic clamp on the disc and close the lid. After "Reading" display shows the total number of tracks on the disc and the total duration of the disc. Unit must be powered on for disc loading.
Front panel controls
Power on/Standby
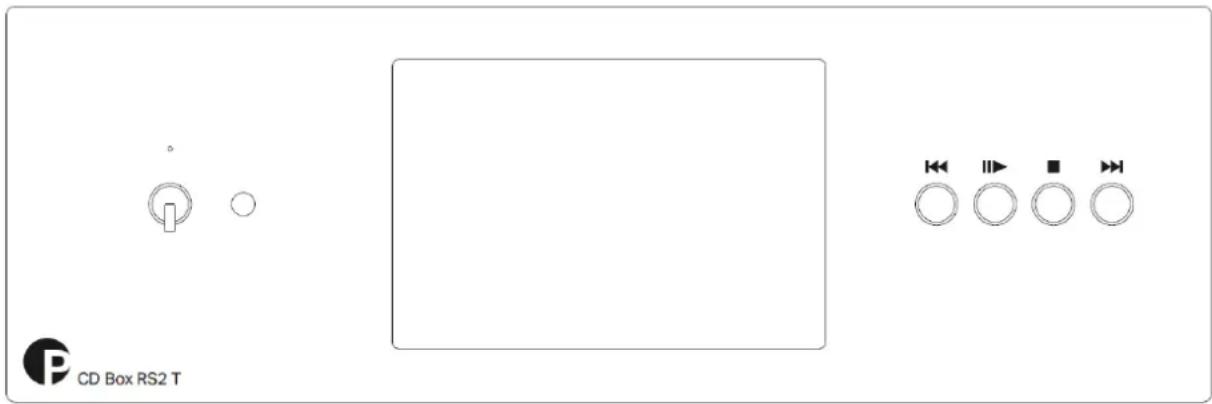
The lever switch on the front panel of the unit turns the power on or off. The blue LED on the front panel lits when unit is on. You can put the device via remote control in standby mode as well as turn it on again. Please note that hereon the lever switch must be in the up position.
Dimming the display
Use button "mode" on the remote control to change brightness - 10 steps and display scheme: Black background + white font and vice versa.
Play
▶ starts playback of the first track. The display shows the current track number, the elapsed time of the current track and the play icon.
Pause
▶ pauses playback. The display shows the current track number, the elapsed time of the current track and the pause icon.
To resume playback press I again.
Stop
A short press of the button stops playback. The display shows the total number of tracks on the disc, the total duration of the disc and the stop icon.
Stepping between tracks
Press the buttons (previous track) or (next track).
Pressing While playback, the current track starts playing from the beginning.
The display shows the number of the tracks as you step, the elapsed time of the current track and the step icon.
Scanning through the disc
Press and hold the button (fast backward) or (forward) to scan through the disc. The display shows the current track number, the elapsed time of the current track and the scan icon.
Releasing let will take you back to playback.
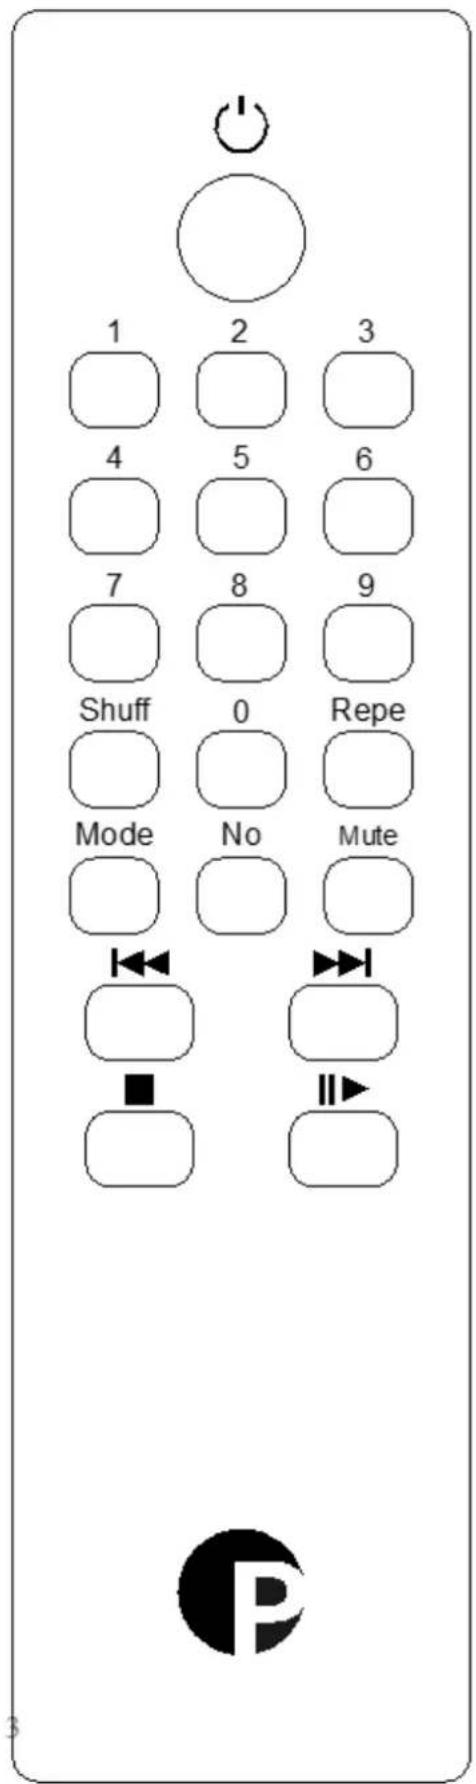
Button on top turns the unit on or back to standby. (The lever switch must be in the up position)
▶, □ and have the same functions as front panel buttons
Selecting tracks
1 - 9 and 0 accesses a specific track directly and start playback. For example, to play track 19, press "0" or "No" and "1" and "9".
Repeat and random play
| "Repe" |  | repeat play for the current track |
 | repeat play for all tracks | |
| "Shuff" |  | shuffle play |
| "Mode" | Setting of Brightness and display scheme (see chapter "Dimming") | |
| "No" | use for direct access to tracks 10 and above | |
| "Mute" | this button dis/engages mute on Pro-Ject Pre Box RS/RS2 Digial, MaiA DS/DS2 or similar |

Replacing batteries
Proceed as follows:
• Unscrew 4 screws on the back side of remote and remove whole back side
- Replace the battery - Make sure the battery is the right way round!
- Put the back side on its place and screw all screws back
Battery type: 1 x CR2032 / 3V or 1 x CR2025 / 3V

Do not dispose the batteries as ordinary domestic refuse. Please dispose your exhausted batteries at the appropriate collection sites - usually located at supermarkets and drugstores.
Technical parameters :
Supports: CD, CD-R, CD-RW (finalized) and Hybrid-SACD
Digital outputs 1 x balanced (AES/EBU) on XLR connector
1 x optical (TOSlink®)
1 x coaxial (RCA socket)
Digital I2S output + Master Clock: 1 x HDMI connector
Outboard power supply: 20V/3.000mA DC, suitable for your country
Power consumption: 600mA DC, < 0,5W in standby
Replacement battery remote control: 1 x CR2032 / 3V or 1 x CR2025 / 3V
Dimensions W x H x D (D with sockets): 206 x 78 x 200 (210)mm
Weight: 3.000g without power supply
Service
Should you encounter a problem which you are not able to alleviate or identify, please contact your dealer for further advice. Only if the problem cannot be resolved there, the unit should be sent to the responsible distributor in your country.
Warranty

The manufacturer accepts no responsibility for damage caused by not adhering to these instructions for use. Modification or changes to any part of the product by unauthorized persons release a manufacturer from any liability over and above the lawful rights of the customer.
Copyright, trademarks
Pro-Ject Audio Systems is a registered Trademark of H. Lichtenegger.
This guide was produced by: Pro-Ject Audio Systems Copyright © 2019. All rights reserved.
The information was correct at the time of going to press. The manufacturer reserves the right to make changes to the technical specification without pricing notice as deemed necessary to uphold the ongoing process of technical development.
TOSlink® is a registered trademark of Toshiba corporation. HDMI is a trademark of HDMI Licensing Administrator, Inc
Waste from Electrical and Electronic Equipment (WEEE): This directive mandates the collection and recycling of electronics and component materials in order to reduce the amount going to landfills. Outside North America, when the user decides to discard this product, it must be sent to a separate collection facility for recycling. Please contact your point of purchase for more details.
- INSTRUCTIONS FOR USE Pro-Ject CD Box RS2 T
- Caution! Laser diode, discs to avoid, safety instructions
- Connection to an external D/A-converter
- Mains power connection
- Inserting and removing a disc
- Front panel controls
- Power on/Standby
- Dimming the display
- Play
- Pause
- Stop
- Stepping between tracks
- Scanning through the disc
- Selecting tracks
- Replacing batteries
- Technical parameters :
- Service
- Warranty
- Copyright, trademarks
Brand : PRO-JECT
Model : CD Box RS2 T
Category : CD Player