
TT685 - Flash GODOX - Free user manual and instructions
Find the device manual for free TT685 GODOX in PDF.

| Product Type | Electronic Camera Flash (TTL) for Canon EOS |
| Model | Godox TT685C (Canon version) |
| Guide Number | 60 (m ISO 100 @200mm) / 190 ft |
| Flash Coverage | 20–200mm (14mm with wide panel) |
| Flash Duration | 1/300 – 1/20000 sec |
| Recycle Time | Approx. 0.1–2.6 sec (Ni-MH) |
| Full Power Flashes | Approx. 230 (2500mAh Ni-MH) |
| Power Source | 4× AA batteries (Ni-MH recommended) |
| Dimensions (W×H×D) | 64 × 76 × 190 mm |
| Weight (without batteries) | 410 g |
| Weight (with batteries) | 530 g |
| Flash Modes | E-TTL II, Manual (M), Multi (Stroboscopic), Gr |
| Sync Modes | High-Speed Sync (up to 1/8000s), 1st/2nd curtain |
| Wireless System | 2.4G radio (100m range) & optical (up to 15m indoors) |
| Wireless Groups | Radio: A/B/C/D/E; Optical: A/B/C |
| Channels | Radio: 32; Optical: 4 |
| Other Features | FEC, FEB, FE lock, modeling flash, AF assist beam, bounce/swivel head |
| Maintenance | Clean contacts; avoid shock; do not disassemble; service by authorized center |
| Safety | Over-temperature protection; do not fire directly into eyes; keep dry |
| Spare Parts / Repairability | Flash tube consumable; firmware upgrade via micro USB; one-year warranty (except consumables) |
Frequently Asked Questions - TT685 GODOX
User questions about TT685 GODOX
0 question about this device. Answer the ones you know or ask your own.
Ask a new question about this device
Download the instructions for your Flash in PDF format for free! Find your manual TT685 - GODOX and take your electronic device back in hand. On this page are published all the documents necessary for the use of your device. TT685 by GODOX.
USER MANUAL TT685 GODOX
natural_image
Line drawing of a Godox brand flash unit with open lid and control buttons (no text or symbols on body)INSTRUCTION MANUAL
说明手册
中英文双语 / Chinese English Bilingual
深圳市神牛摄影器材有限公司
GODOX Photo Equipment Co., Ltd.
地址/Add: 深圳市宝安区福海街道塘尾社区鲤川工业区厂房2栋1层至4层、4栋1层至4层
1st to 4th Floor, Building 2/1st to 4th Floor, Building 4, Yaochuan Industrial Zone, Tangwei Community, Fuhai Street, Bao'an District, Shenzhen 518103, China
电话/Tel: +86-755-29609320(8062) 传真/Fax: +86-755-25723423
邮箱/E-mail: http://www.godox.comgodox@godox.com
705-TT685C-00
Made In China
FC CE RoHS
在使用本产品之前:
Before using this product:
Please read this user manual carefully in order to ensure your safety and the proper operation of this product. Keep for future reference.
前言
感谢您购买神牛产品。
Electronic Camera Flash
迅丽TTL机顶闪光灯
Thinklite TTL Camera Flash
本说明书中使用的约定
- 2.4G无线传输:作为主控

- 2.4G无线传输:作为从属

- 标配物品
natural_image
Collection of black-and-white product images including flashlights, a walkie-talkie, a camera module, and a textured fabric (no visible text or symbols)装卸闪光灯
natural_image
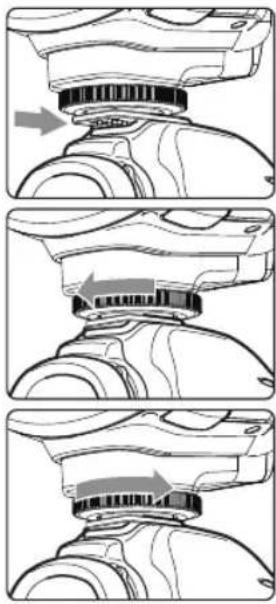
Three-step mechanical assembly diagram showing progressive assembly of a device component (no text or symbols)1 安装闪光灯。
FEB(闪光包围曝光)
natural_image
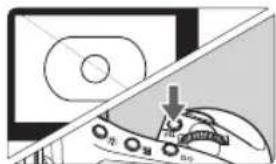
Diagram showing a mechanical component with a cutting tool and a downward arrow, no text or symbols present.1 对被摄体对焦。
2 按下
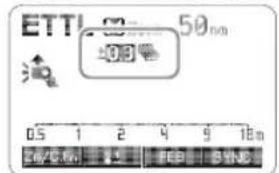
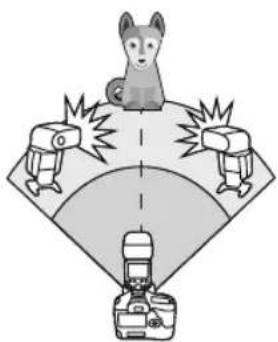
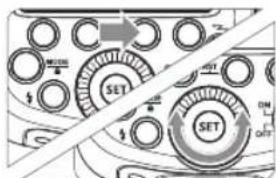
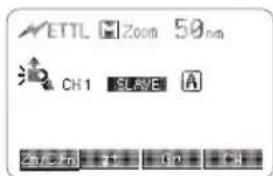
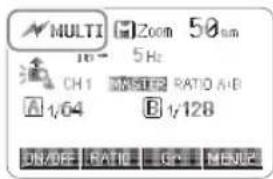
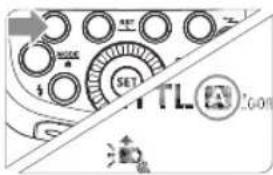
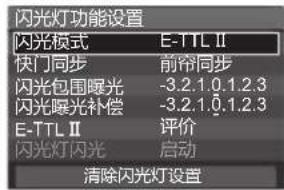
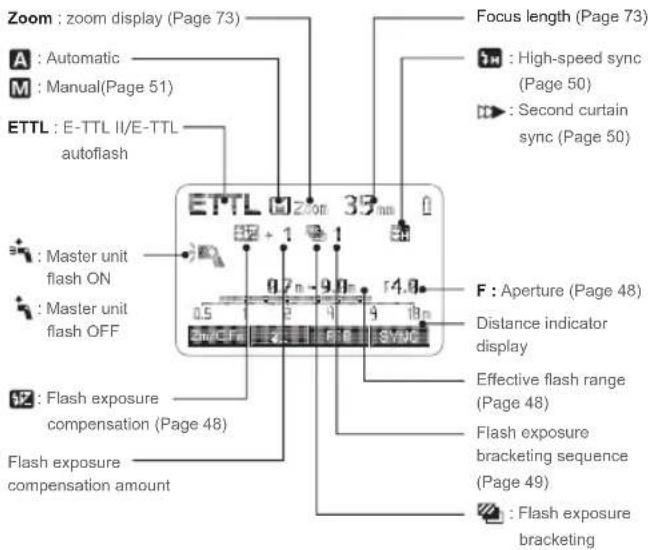
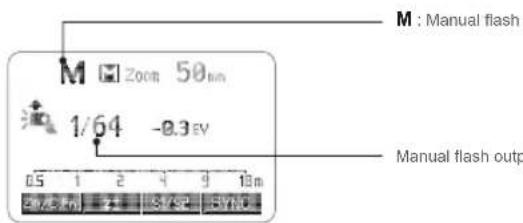
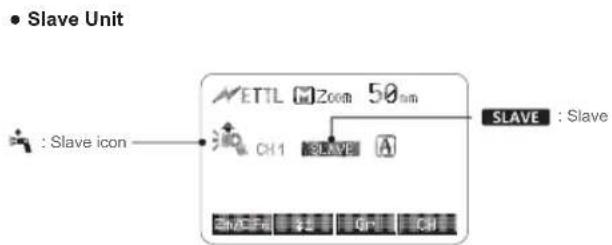
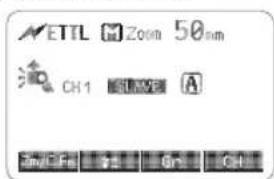
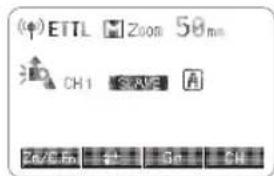
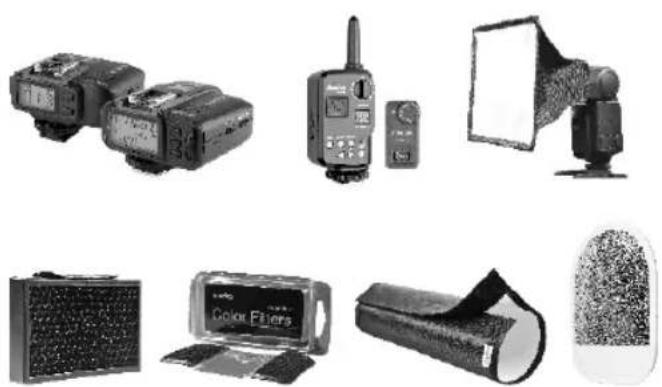
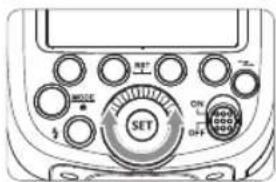
如果设置快门速度等于或慢于相机的最大闪光同步速度,取景器中将不显示< img>。 使用慢速快门,您可以在被摄体后创建一条光线轨迹。在快门关闭前的瞬间闪光灯闪光。 按下功能按钮4 您可以在1/128功率至1/1全功率间以1/3档为增量设置闪光输出。为获得正确的闪光曝光,请使用手持的闪光测光表确定所需的闪光输出。 1 按 2 转动调节旋钮设置闪光输出功率。 3 按下 拍摄过程中更改闪光输出时,下表将清楚地显示光圈值是如何更改的,如 1/2-0.31/2+0.3 。您可以在增加或减少闪光输出时查看光圈值的更改规律。 例如,将闪光输出量减少至1/2、1/2-0.3或1/2-0.7,然后再将其增加至大于1/2、 1/2+0.3 、 1/2+0.7 时,将显示1/1。 减少闪光输出指数→ ←增加闪光输出指数 在M手动闪光模式下,可以使用S1功能,闪光灯可作为副灯使用,创造多种照明效果,适用于手动闪光环境。它会与主闪光灯的第一次闪光同步触发闪光,效果与使用无线引闪器一致。 在M手动闪光模式下,可以使用S2功能,闪光灯可作为副灯使用,适用于TTL闪光环境。具有防预闪功能,使用带一次预闪功能的相机能用光控实现同步拍摄。它会与主闪光灯的第二次闪光同步触发闪光,即2次光控引闪。 - 只有在M模式下才支持S1/S2光控引闪模式。 使用频闪闪光,可以发出一系列快速的闪光。它可以在一张照片上拍摄移动物体的多个图像。您可以设置闪光频率(每秒的闪光次数,以Hz表示)、闪光次数和闪光输出。 1 按 3 转动调节旋钮设置闪光输出功率。 按下 在频闪闪光过程中,到闪光停止为止快门应保持开启状态。使用下面的公式计算快门速度,然后用相机进行设置。 例如,如果闪光次数是10,闪光频率是5Hz,快门速度则至少为2秒。 为防止闪光灯头过热并损坏,请勿执行连续10次以上的频闪闪光连拍。闪光10次后,请让闪光灯至少冷却15分钟。如果您试图执行连续10次以上的频闪闪光连拍,为防止闪光灯头过热,闪光可能自动停止。如果发生了这种情况,请让闪光灯至少冷却15分钟。 - 反光很强的被摄体在暗背景前使用频闪闪光更加有效。 最大频闪闪光次数 如果闪光次数显示为--,则不论闪光频率是多少,最大的闪光次数如下表所示。 当相机的拍摄模式设为全自动模式或程序影像控制区模式时,无法利用本章中的操作。将相机的拍摄模式设为P/Tv/Av/M/B(创意拍摄区模式)。 - 安装在相机上的TT685C称为主控单元,受无线控制的TT685C称为从属单元。
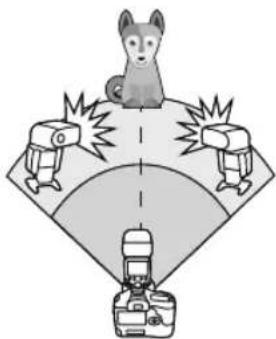
- 还可以用闪光灯信号发射器X1T-C(另购)无线控制设为从属单元的TT685C。有关设定主控单元功能的详细说明,请参考信号发射器的使用说明书。 使具有无线电传输无线拍摄功能的闪光灯(主控/从属),可按照与普通E-TTL II自动闪光拍摄同样的方法,轻松利用高级无线多重闪光照明进行拍摄。基本相对位置和操作范围如图所示,只要将主控单元设定为 定位和操作范围(无线闪光拍摄的示例) - 使用一个从属单元进行自动闪光拍摄 - 使用附带的微型支架定位从属单元。
- 开始拍摄前请进行测试闪光和试拍。
- 受从属单元的位置、周围环境、天气状况等影响,传输距离可能更短。 可以将从属单元分割为两个或三个组并在改变闪光光比(倍率)的同时进行E-TTL II自动闪光拍摄。此外,可以为各闪光组(最多5个组)设定并用不同的闪光模式拍摄。 - 用两个从属组进行自动闪光拍摄。 - 用三个从属组进行自动闪光拍摄。 - 用为各组设定的不同闪光模式进行拍摄。 外部环境2.4G信号干扰(如无线基站、2.4Gwifi路由、蓝牙设备等)→请调节引闪器的频道CH设置(建议+10),找到无干扰的频道来工作,或者在工作时关闭其他2.4G设备。 请确认闪光灯是否已经回电或者回电速度已经跟上连拍速度(闪光灯就绪指示灯已经亮起),并且没有处于过热保护或者其他异常状态中,请下调闪光灯的档位,如是TTL模式可以尝试改为M模式(TTL模式下需要预闪一次)。 是否引闪器和闪光灯距离太近(距离<0.5m) 请在引闪器上打开“近距离无线模式”:
X1系列:按住引闪按钮不放,然后开机,直至指示灯闪2次。
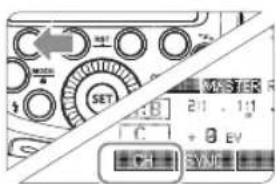
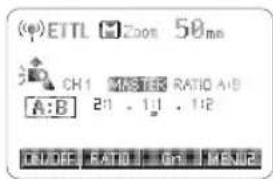
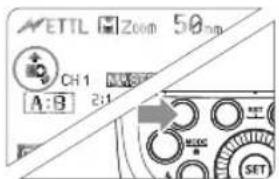
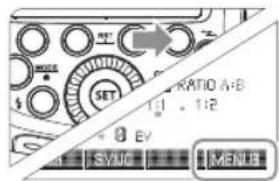
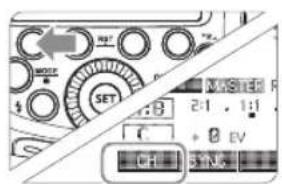
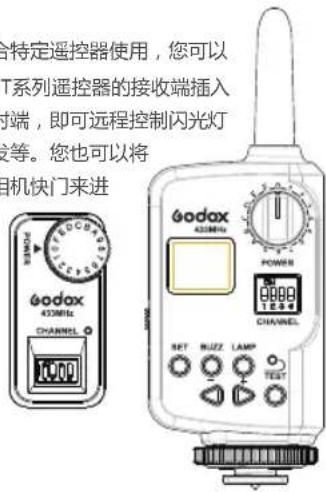
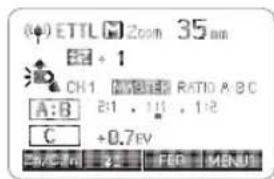
Xpro系列:设置C.Fn-DIST为0-30m。 请更换电池(引闪器电池建议使用1.5V一次性碱性电池)。 无线电传输比光学传输的拍摄具有优势,距离更远,耗电更少,受障碍物的影响更小。无线电传输和光学传输的差异: - 无线电有4种闪光模式:TTL、M、Multi、Gr,通过按MODE按钮选择。 您可以在普通闪光和无线闪光之间切换。对于普通闪光,请务必将无线设置设为“关”。 主控单元设置 按下<“>无线设置按钮,令屏幕显示<(φ)>和 从属单元设置 按下<->无线设置按钮,令屏幕显示<()>和 在禁用主控单元闪光模式下,只有从属单元的闪光灯闪光。 1 按下功能按钮4以显示 2 按功能按钮1 如果在拍摄现场不止一个无线闪光系统,您可以通过更改通讯频道来防止信号干扰。保证主控单元和从属单元设置为相同的频道编号即可。 1 按下功能按钮4以显示 2 按下功能按钮1 为了避免信号干扰,除了改变无线通讯频道还可以通过改变无线ID来防止干扰;主控单元和从控单元设为相同的频道和无线ID即可。进入C.Fn ID,选择01-99其中任意一数无线ID打开,选OFF无线ID关闭。 使用一个从属单元的自动闪光拍摄 - 将要被无线控制TT685C设为从属单元。(第17页) - 将主控单元和从属单元的频道设为一致。(第18页) - 将其定位在(第16页)所示的范围内。 当需要更大的闪光输出或想要更加轻松地进行照明时,可以增加从属单元的数量并将其作为单个闪光灯闪光。 要添加从属单元,使用与“使用一个从属单元的自动闪光拍摄”相同的步骤,可以设定任何闪光组(A/B/C)。 当增加了从属单元的数量或主控闪光灯闪光设为ON时,执行自动控制以使所有闪光灯以相同的闪光输出闪光并确保总闪光输出能够达到标准曝光。 - 可以按相机上的景深预示按钮进行造型闪光。 在主控单元上设定的闪光曝光补偿和其他设置也会在从属单元中自动设定。不需要操作从属单元。可按照与普通闪光拍摄相同的方法使用以下设置进行无线闪光拍摄。 闪光曝光锁定(第11页) 高速同步(SYNC /第12页) 可以使用两个或两个以上主控单元。通过准备多台装有主控单元的相机,可以在保持相同照明(从属单元)期间更换相机进行拍摄。 -19- 可以将从属单元分成两个闪光组A和B并调整拍摄用照明平衡(闪光光比)。自动控制曝光以使闪光组A和B的总闪光输出达到标准曝光。 - 按下功能按钮2 - 从属单元以设定的闪光光比闪光。 可将闪光组C添加到闪光组A和B。C有助于消除被摄体阴影的照明。基本设定方法与“用两个从属组进行自动闪光拍摄”相同。 - 按照前一页步骤1相同的方法设定闪光灯闪光组 - 按照前一页步骤2和步骤3的相同方法将主控单元设为 - 按照前一页步骤1相同的方法设定闪光灯闪光组
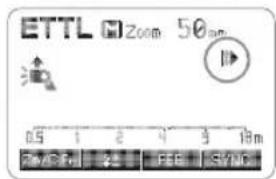
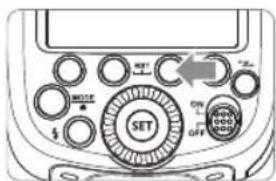
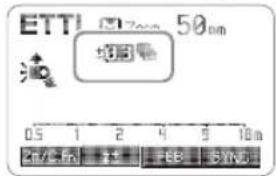
- 按下功能按钮2<,旋转调节旋钮设置闪光曝光补偿量并按 -20- 从尾单元组A 如果将具有三个从属单元的闪光组设为,这三个从属单元将被作为从属单元组A的一个闪光灯来控制。 ▲ 要让三个闪光组A、B和C同时闪光,设定 - 当换算为档数时,闪光光比8:1至1:1至1:8相当于3:1至1:1至1:3(1/2档增量)。 - 闪光光比设置的详细说明如下。 使用手动闪光的无线(多重闪光)拍摄,可以为每个从属单元(闪光组)设定不同的闪光输出进行拍摄。在主控单元上设定所有参数。 1 将闪光模式设为 ALL(RATIO OFF)→ A/B(RATIO A:B)→ A/B/C(RATIO A:B:C). 2 设置闪光输出 - 按下功能按钮3 4 拍摄照片 - 各组以设定的闪光光比闪光。 可以直接操作从属单元以手动设定手动闪光或频闪闪光。 1 设定从属单元。(第17页) 1 设定 当使用从2012年开始发售的EOS数码相机(如EOS-1D X)时(EOS 1200D除外),可以为各闪光组(最多5个组(A/B/C/D/E))设定不同的闪光模式进行拍摄。 可以设定的闪光模式为①E-TTL II自动闪光和②手动闪光。当闪光模式为③时,作为单个组控制曝光以获得主被摄体的标准曝光。此功能面相对照明非常熟知和有经验的高级用户。 - 按主控单元上的 - 各从属单元以各自设定的闪光模式闪光。 该产品支持无线闪光功能,具有主控闪光和从属闪光功能。作为主控单元,可以引闪580EXII、600EX-RT等闪光灯。作为从属单元,可接收580EXII、600EX-RT闪光灯无线信号、7D/60D/600D内闪指令,从而实现无线闪光。 主控单元/从属单元设置位置和范围 您可以在普通闪光和无线闪光之间切换。对于普通闪光,请务必将无线设置设为“关”。 主控单元设置 按下<→>无线设置按钮,令屏幕显示<↗>和 从属单元设置 按下<→>无线设置按钮,令屏幕显示<↗>和 在禁用主控单元闪光模式下,只有从属单元的闪光灯闪光。 1 按下功能按钮4以显示 2 按功能按钮1 - 即使使用禁用主控单元的闪光灯闪光,它仍然会进行预闪以传输无线信号。 如果在拍摄现场不止一个无线闪光系统,您可以通过更改通讯频道来防止信号干扰。保证主控单元和从属单元设置为相同的频道编号即可。 1 按下功能按钮4以显示 2 按下功能按钮1 使用一个从属单元的自动闪光拍摄 - 将主控单元和从属单元的频道设为一致。(第25页) - 将其定位在(第24页)所示的范围内。 当需要更大的闪光输出或想要更加轻松地进行照明时,可以增加从属单元的数量并将其作为单个闪光灯闪光。 要添加从属单元,使用与“使用一个从属单元的自动闪光拍摄”相同的步骤,可以设定任何闪光组(A/B/C)。 当增加了从属单元的数量或主控闪光灯闪光设为ON时,执行自动控制以使所有闪光灯以相同的闪光输出闪光并确保总闪光输出能够达到标准曝光。 如果从属单元附近有荧光灯或电脑显示器,这些光源的存在可能会导致从属单元发生故障,并导致其意外闪光。 - 可以按相机上的景深预示按钮进行造型闪光。 - 如果从属单元的自动关闭电源生效,按主控单元的测试闪光按钮打开从属单元。请注意在相机的测光定时工作期间,无法进行测试闪光。 - 可以改变到从属单元的自动关闭电源生效为止的时间(C.Fn-Sv APOT/第33页)。 - 可以进行设置以使自动对焦辅助发射器在从属单元回电完毕时不闪烁(C.Fn-AF/第33页)。 在主控单元上设定的闪光曝光补偿和其他设置也会在从属单元中自动设定。不需要操作从属单元。可按照与普通闪光拍摄相同的方法使用以下设置进行无线闪光拍摄。 闪光曝光锁定(第11页) 高速同步(SYNC /第12页) 当按功能按钮4时显示< >、< SYNC >和< □>。 可以使用两个或两个以上主控单元。通过准备多台装有主控单元的相机,可以在保持相同照明(从属单元)期间更换相机进行拍摄。 可以将从属单元分成两个闪光组A和B并调整拍摄用照明平衡(闪光光比)。自动控制曝光以使闪光组A和B的总闪光输出达到标准曝光。 - 按下功能按钮2 - 从属单元以设定的闪光光比闪光。 可将闪光组C添加到闪光组A和B。C有助于消除被摄体阴影的照明。基本设定方法与“用两个从属组进行自动闪光拍摄”相同。 - 按照前一页步骤1相同的方法设定闪光灯闪光组 - 按照前一页步骤2和步骤3的相同方法将主控单元设为 - 按照前一页步骤1相同的方法设定闪光灯闪光组 - 按下功能按钮2<,旋转调节旋钮设置闪光曝光补偿量并按 从属单元组A 如果将具有三个从属单元的闪光组设为,这三个从属单元将被作为从属单元组A的一个闪光灯来控制。 ▲ 要让三个闪光组A、B和C同时闪光,设定 - 当换算为档数时,闪光光比8:1至1:1至1:8相当于3:1至1:1至1:3(1/2档增量)。 - 闪光光比设置的详细说明如下。 使用手动闪光的无线(多重闪光)拍摄,可以为每个从属单元(闪光组)设定不同的闪光输出进行拍摄。在主控单元上设定所有参数。 1 将闪光模式设为 ALL(RATIO OFF)→ A/B(RATIO A:B)→ A/B/C(RATIO A:B:C). 2 设置闪光输出 - 按下功能按钮3 4 拍摄照片 - 各组以设定的闪光光比闪光。 可以直接操作从属单元以手动设定手动闪光或频闪闪光。 1 设定从属单元。(第25页) 1 设定 闪光灯内置无线控制插座,配合特定遥控器使用,您可以实现对闪光灯的无线控制。将FT系列遥控器的接收端插入无线控制插座,手持遥控器发射端,即可远程控制闪光灯的功率开关和大小、闪光灯触发等。您也可以将 发射端置于相机热靴上,通过相机快门来进行同步引闪。 - 更多遥控器的使用方法,请查阅FT系列遥控器的说明书。 同步插孔规格为Φ3.5mm,此处可插入同步线或者触发器触发插头对闪光灯进行同步引闪。 如果相机有景深预视按钮,按下该按钮将会进行1秒钟的连续闪光,这种现象称之为造型闪光。您可以通过造型闪光查看被摄体上的光影效果及照明平衡,不管是无线拍摄还是普通闪光拍摄,都可以进行造型闪光。 请勿连续触发10次以上造型闪光。如果连续进行10次造型闪光,请让闪光灯至少冷却10分钟,以防止闪光灯头过热或损坏。 - EOS 300和B型相机不支持造型闪光。 在低亮度或低对比度的拍摄情况下,闪光灯内置的自动对焦辅助灯将开启,使自动对焦更容易。当对焦困难时,红色辅助对焦灯亮起;当对焦准确,辅助对焦灯自动熄灭。 如想关闭自动辅助对焦功能,在C.Fn设置“AF”至“OFF”。 - 用户在使用时,如发现辅助对焦灯未亮起,是因为相机已经处于准确对焦状态。 通过将闪光灯头指向墙壁或天花板,闪光在照亮被摄体前被墙面反射。这可以减轻被摄物体背后的阴影,获得更自然的摄影效果。称之为反射闪光。 旋转闪光灯头来设置反射方向。 - 如果墙壁或天花板太远,反射闪光可能太弱并导致曝光不足。 - 墙壁或天花板应该是平坦的、白色的以利于高效的反射。如果反射表面不是白色的,照片将出现偏色。 使用眼神光板,您可以在被摄体的眼睛中创建眼神光以使面部表情更加生动。 1 将闪光灯头向上旋转90°。 2 拉出广角散光板,同时弹出眼神光板。 推入广角散光板。 - 仅推入广角散光板。 - 按照反射闪光中相同的步骤进行。 请将闪光灯头向前指然后向上旋转90度。如果左右旋转闪光灯头就不会产生眼神光。 - 要获得最好的眼神光效果,被摄体不能处于相机1.5米/4.9英尺以内。 该闪光灯有两种变焦方式:自动变焦和手动变焦。可以设置闪光覆盖范围以匹配20-200毫米的镜头焦距。自动变焦时,焦距会随相机变焦镜头的改变而变化,以提供最佳闪光效果。同样,使用内置的广角散光板,闪光覆盖范围可以扩展为14毫米广角镜头。 手动变焦时,按下 - 转动调节旋钮更改闪光覆盖范围。 - 在显示 < A> 状态下,将自动设置闪光覆盖范围。 - 如果手动设置闪光覆盖范围,确保其覆盖镜头焦距,这样照片就不会出现阴影边缘。 拉出广角散光板并将其置于闪光灯头上。闪光覆盖范围将扩展至14毫米。 - 同时弹出眼神光板。请推回眼神光板。 - 电池电量低时,电池符号<会闪烁,此时请更换电池。 请对照以下图表本机应用栏,使用自定义功能来完成设置。 长按< Zm/C.Fn >背光/自定义按钮2秒或更长,直到显示C.Fn菜单。右上角“Ver x.x”表示软件版本号。 选择自定义功能符号。 旋转调节旋钮设置自定义功能符号。 更改设置。 按 < SET > 设置按钮,自定义功能编号闪烁。 设置自定义功能后按下 在C.Fn状态下,长按“Clear”按钮2秒直至出现“OK”,表示重置C.Fn的参数。 将闪光灯安装在EOS相机上,可以通过相机控制闪光灯。具体请参照相机使用说明。 - 设置闪光灯说明 根据闪光模式的不同,可设置不同的功能。 - 闪光灯自定义功能 C.Fn-00, C.Fn-01, C.Fn-03, C.Fn-04, C.Fn-08, C.Fn-10, C.Fn-20, C.Fn-22, 共8个。 闪光功能自定义画面 闪光C.Fn设置画面 * 画面为EOS-1D Mark III 的画面。 如果已经使用闪光灯设置了闪光曝光补偿,则无法用相机设置闪光曝光补偿,要用相机进行设置时,首先将闪光灯的闪光曝光补偿设置为“0”。 激活热保护功能的连续闪光次数: 高速同步模式下,激活热保护功能的连续闪光次数: - 为了保证设备安全的工作,系统时刻进行预防保护,以下提示符号供您参考: 规格参数 如果遇到问题,请参阅此故障排除指南。 - 闪光灯的内置电池耗尽。 →如果闪光灯LCD屏幕上< □>显示并闪烁,表明需要更换电池。 - 闪光灯和相机的电子触点变脏。 →请清洁触点。 - < >图标或< >图标未出现在相机取景器中。 →请等待闪光灯充电完成,闪光灯准备就绪指示灯亮起。 →如果闪光灯准备就绪指示灯已经亮起,相机取景器中的<↓>图标或<↓>图标仍未亮起,请检查热靴连接,确保闪光灯可靠地装配在相机热靴上。 →若等待较长时间,闪光灯准备就绪指示灯一直没有亮起,请检查电池是否有电。如果电量低(闪光灯屏幕上电池电压不足图标闪烁),请更换电池。 - 作为从属单元在60分钟(或者选择30分钟)无任何操作时,闪光灯会进入休眠状态。 →可按机身任意按键唤醒。 - 使用高速同步。 一使用高速同步,有效的闪光范围会更小。确保被摄体位于显示的有效闪光范围内。 - 闪光灯使用手动曝光模式。 →改为ETTL模式或修改闪光输出功率设置。 - 相机镜头焦距超出闪光灯的覆盖范围。 →请检查闪光灯当前的覆盖焦距。本产品的灯头变焦范围是中画幅系统的20-200mm,您可以尝试拉出广角闪光板,以扩大闪光范围。 本机通过USB插座可进行固件升级。软件最新公告及说明将会发布在官方网站上。 注:本品出厂不配USB升级线,请另行购买。普通的USB线可使用,本产品USB口为Micro USB接口。 本机可兼容以下佳能EOS系列的相机型号: This TT685C camera flash applies to Canon EOS series cameras and is compatible with E-TTL II autoflash. With this E-TTL II compatible flash, your shooting will become simpler. You can easily achieve a correct flash exposure even in complex light-changing environments. This camera flash features: • GN60 (m ISO 100, @200mm). 22 steps from 1/1 to 1/128. ▲ Always keep this product dry. Do not use in rain or in damp conditions. Electronic Camera Flash 39 Foreword 40 Warning 43 Name of Parts Body Control Panel Dot-matrix LCD Panel LCD Panel in Five Modes What's in the Box of TT685C? Separately Sold Accessories 47 Attaching to a Camera FEC (Flash Exposure Compensation) FEB (Flash Exposure Bracketing) FEL: Flash Exposure Lock High-Speed Sync 51 M: Manual Flash Wireless Settings Master Unit's Flash OFF Setting the Communication Channel Wireless ID Settings ETTL: Fully Automatic Wireless Flash Shooting ETTL: Use the Wireless Flash Shooting of Flash Ratio M: Wireless Flash Shooting with Manual Flash Multi: Wireless Flash Shooting with Manual Flash Gr: Shooting with a Different Flash Mode for Each Group 64 Wireless Flash Shooting: Optic Transmission Wireless Settings Master Unit's Flash OFF Setting the Communication Channel ETTL: Fully Automatic Wireless Flash Shooting ETTL: Use the Wireless Flash Shooting of Flash Ratio M: Wireless Flash Shooting with Manual Flash Multi: Wireless Flash Shooting with Manual Flash 71 Other Applications Wireless Control Function Sync Triggering Modeling Flash Auto Focus Assist Beam Bounce Flash Creating a Catchlight ZOOM: Setting the Flash Coverage and Using the Wide Panel Low Battery Indicator 74 C.Fn: Setting Custom Functions Sync Cord Jack Hotshoe ON/OFF Power Switch <⚡> Test Button / Flash Ready Indicator (1)E-TTL Autoflash - The display will only show the settings currently applied. (2)M Manual Flash (3)Multi Flash (4) Radio Transmission Shooting/Optic Transmission Shooting • LCD Panel in Five Modes • Optical Transmission: As a Master Unit • Optical Transmission: As a Slave Unit • 2.4G Radio Transmission: As a Master Unit • 2.4G Radio Transmission: As a Slave Unit The product can be used in combination with the following accessories sold separately, so as to achieve best photography effects: X1C TTL wireless flash trigger, FT-16S power & trigger control, Mini softbox, White & Silver reflector, Honeycomb, Color gels, Snoot, etc. 1 Attach the Camera Flash. - Slip the camera flash's mounting foot into the camera's hotshoe all the way. 2 Secure the Camera Flash. - Rotate the lock ring on the mounting foot until it locks up. 2 Detach the Camera Flash. - Rotate the lock ring on the mounting foot until it is loosened. Use ON/OFF Power Switch to power the flash unit on or off. Turn off if it will not be used for an extended period of time. Setting as a master flash, it will turn the power off automatically after a certain period (approx. 90 seconds) of idle use. Pressing the camera shutter halfway or pressing any flash button will wake up the flash unit. Setting as a slave flash, it will enter sleep mode after a certain period (adjustable, 60 minutes by default) of idle use. Pressing any flash button will wake it up. C.Fn Disabling Auto Power Off function is recommended when the flash is used off camera. (C.Fn-APO, Page 74) Slave Auto Power Off Timer is set to 60 minutes by default. Another option "30 minutes" is available. (C.Fn-Sv APOT, Page 74) This flash has three flash modes: E-TTL, Manual (M), and Multi (Stroboscopic). In E-TTL mode, the camera and the flash will work together to calculate the correct exposure for the subject and the background. In this mode, multiple TTL functions are available: FEC, FEB, FEL, HSS, second curtain sync, modeling flash, control with the camera's menu screen. * Press < MODE > Mode Selection Button and three flash modes will display on the LCD panel one by one with each pressing. Press < MODE > Mode Selection Button to enter E-TTL mode. The LCD panel will display. With FEC function, this flash can adjust from -3 to +3 in 1/3rd stops. It is useful in situations where minor adjusting of the TTL system is needed based on the environment. Setting FEC: Press Function Button 2 < . The icon < and flash exposure compensation amount will be highlighted on the LCD panel. Set the flash exposure compensation amount. Press < SET > button again to confirm the setting. You can take three flash shots while automatically changing the flash output for each shot from -3 to +3 in 1/3rd stops. The camera will record three images with different exposures: one exposed according to camera calculations, one over-exposed and another under-exposed. Over and under exposure amount is user adjustable. This function helps get correct exposure especially in shooting moving objects or when environmental lights are complex. 1 Press function button 3 < FEB >. The icon < 📋 > and the exposure bracketing amount will be highlighted on the LCD panel. 2 Set the flash exposure compensation amount. 3 Press < SET > button again to confirm the setting. Then your FEC and FEB settings are displayed on the LCD panel. - FEB will be cancelled after three photos are taken. C.Fn You can prevent the FEB from being cancelled automatically after three photos are taken. (C.Fn-FEB ACL, Page 74) C.Fn The FEB shooting sequence can be changed. (C.Fn-FEB, Page 74) FEL can lock the correct flash exposure setting for any part of the scene. With 1 Focus the subject. - If the subject is too far away and underexposure, the < > icon will blink in the viewfinder. Move closer to the subject and try the FE lock again. High Speed Sync (FP flash) enables the flash to synchronize with all camera shutter speeds. This is convenient when you want to use aperture priority for fill-flash portraits. 1 Press Function Button 2
< SYNC > so that < 🔊> is displayed. 2 Check that < 📋> is displayed in the viewfinder. If you set a shutter speed that is the same as or slower than the camera's maximum flash sync speed, < 2m> will not be displayed in the viewfinder. With a slow shutter speed, you can create a light train following the subject. The flash fires right before the shutter closes. Press function button 4 < SYNC > button so that < ▶> is displayed on the LCD panel. The flash output is adjustable from 1/1 full power to 1/128th power in 1/3rd stop increments. To obtain a correct flash exposure, use a hand-held flash meter to determine the required flash output. 1 Press < MODE > button so that < M > is displayed. 2 Turn the Select Dial to choose a desired flash output amount. The following table makes it easier to see how the stop changes in terms of f/stop when you increase or decrease the flash output. For example, when you decrease the flash output to 1/2, 1/2-0.3, or 1/2-0.7, and then increase the flash output to more than 1/2, 1/2+0.3, 1/2+0.7, and 1/1 will be displayed. Figures displayed when reducing flash output level→ < Figures displayed when increasing flash output level In M manual flash mode, press Press - S1 and S2 optic triggering is only available in M manual flash mode. With stroboscopic flash, a rapid series of flashes is fired. It can be used to capture a multiple images of a moving subject in a single photograph. You can set the firing frequency (number of flashes per sec. expressed as Hz), the number of flashes, and the flash output. 1 Press 2 Turn the Select Dial to choose a desired flash output. 3 Set the flash frequency and flash times. - Press < MULTI > button to select the item (blinks). - Turn the Select Dial to set the number and press < Hz > button again to confirm. The next item to be set will blink. - After you finish the setting, press During stroboscopic flash, the shutter remains open until the firing stops. Use the formula below to calculate the shutter speed and set it with the camera. For example, if the number of flashes is 10 and the firing frequency is 5 Hz, the shutter speed should be at least 2 seconds. To avoid overheating and deteriorating the flash head, do not use stroboscopic flash more than 10 times in succession. After 10 times, allow the camera flash to rest for at least 15 minutes. If you try to use the stroboscopic flash more than 10 times in succession, the firing might stop automatically to protect the flash head. If this happens, allow at least 15 minutes' rest for the camera flash. - Stroboscopic flash is most effective with a highly reflective subject against a dark background. • Using a tripod and a remote control is recommended. Maximum Stroboscopic Flashes: If the number of flashes is displayed as “--”, the maximum number of flashes will be as shown in the following table regardless of the flash frequency. Using a flash (master/slave) with a radio transmission wireless shooting function make it easy to shoot with advanced wireless multiple flash lighting, in the same way as E-TTL II autoflash shooting. The basic relative position and operation range are as shown in the picture. You can then perform wireless E-TTL II autoflash shooting just by setting the master unit to Positioning and Operation Range (Example of wireless flash shooting) • Autoflash Shooting with One Slave Unit You can divide the slave units into two or three groups and perform E-TTL II autoflash while changing the flash ratio (factor). In addition, you can set and shoot with a different flash mode for each firing group, for up to 5 groups. • Auto Shooting with Two Slave Groups • Auto Shooting with Three Slave Groups - Shooting with a Different Flash Mode set for Each Group * The flash mode settings are indicated only as an example Wireless shooting using radio transmission has advantages over wireless shooting using optic transmission, such as being less affected by obstacles, and not having to point the slave unit's wireless sensor toward the master unit. The main functional differences are as follows: - There are four flash modes in this wireless radio transmission: TTL, M, Multi and Gr. Choose one of those modes by pressing the MODE Button. → To adjust the channel CH setting on the flash trigger (add 10+ channels) and use the channel which is not disturbed. Or turn off the other 2.4G equipment in working. →Please downgrade the flash power output. If the flash is in TTL mode, please try to change it to M mode(a preflash is needed in TTL mode). →Please turn on the "close distance wireless mode" on the flash trigger (<0.5m): X1 series: press the test button and hold on, then turning it on until the flash ready indicator blinks for 2 times.
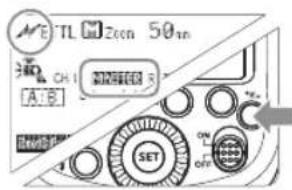
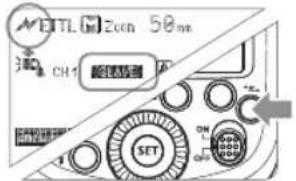
XPro series: Set the C.Fn-DIST to 0-30m. →Please replace the battery(the flash trigger is recommended to use 1.5V disposable alkaline battery). You can switch between normal flash and wireless flash. For normal flash shooting, be sure to set the wireless setting to OFF. Press < z> button so that < (φ) > or < MASTER > are displayed on the LCD panel. Press < *z> button so that < (φ)> or < SLAVE > are displayed on the LCD panel. When the master unit is set to OFF, only the slave units will fire a flash. 1 Press Function Button 4 so that 2 Press Function Button 1 < : The master unit flash firing is ON. < : The master unit flash firing is OFF. - Even if the master unit flash firing is disabled, it still fires a preflash to transmit wireless signals. If there are other wireless flash systems nearby, you can change the channel IDs to prevent signal interference. The channel IDs of the master unit and the slave unit(s) must be set to the same. 1 Press Function Button 4 so that 2 Press Function Button 1 so that 3 Press the Change the wireless channels and wireless ID to avoid interference for it can only be triggered after the wireless IDs and channels of the master unit and the slave unit are set to the same. Press the
- 使用高速同步,快门速度越高,有效的闪光范围就越小。
- 要恢复普通闪光,再次按下图标会消失。
- 无法设置频闪闪光。
- 连续高速同步闪光15次后,闪光灯热保护功能可能会被激活。
第二帘快门同步

闪光模式:M 手动闪光

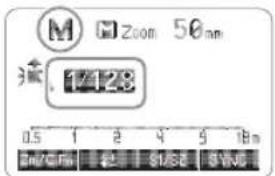
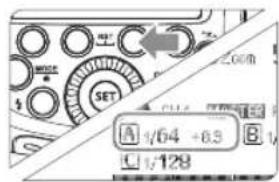
显示闪光输出
1/1-0.3 1/1-0.7 1/2-0.3 1/2-0.7 1/41 ...... 1/2+0.7 1/2+0.3 1/4+0.7 1/4+0.3 21/1 S1光控单元设置
S2光控单元设置
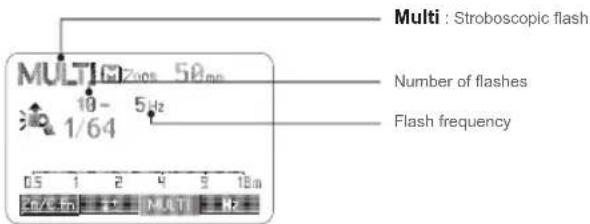
闪光模式:Multi 频闪闪光
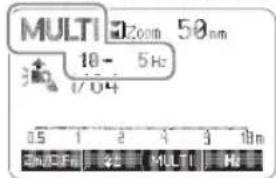

计算快门速度
闪光次数/闪光频率=快门速度
闪光输出\闪 Hz 1 2 3 4 5 6-7 8-9 1/4 7 6 5 4 4 3 3 1/8 14 14 12 10 8 6 5 1/16 30 30 30 20 20 20 10 1/32 60 60 60 50 50 40 30 1/64 90 90 90 80 80 70 60 1/128 100 100 100 100 100 90 80 闪光输出\闪 Hz 10 11 12-14 15-19 20-50 60-199 1/4 2 2 2 2 2 2 1/8 4 4 4 4 4 4 1/16 8 8 8 8 8 8 1/32 20 20 20 18 16 12 1/64 50 40 40 35 30 20 1/128 70 70 60 50 40 40 闪光输出 1/4 1/8 1/16 1/32 1/64 1/128 闪光次数 2 4 8 12 20 40 无线闪光拍摄:无线电(2.4G)传输
无线多重闪光拍摄
神牛2.4G无线漏闪原因及解决办法
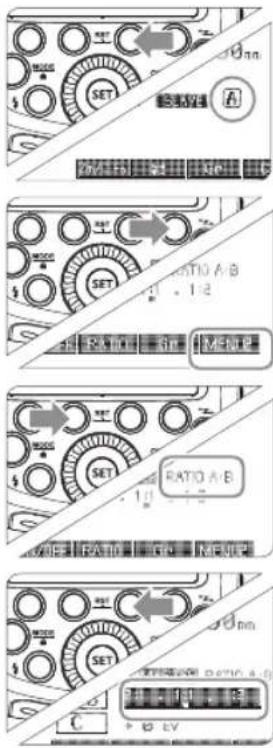
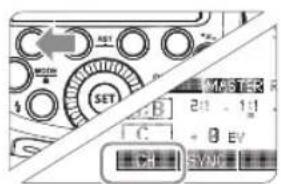
功能 无线电传输 光学传输 传输距离 100m 15m 频道 1~32 1~4 A/B/C功率 OFF, 1/128~1/1 1/128~1/1 受干扰程度 难 易 组别 A/B/C/D/E A/B/C 1、无线设置
2、主控单元禁用
3、设置通讯频道
4、无线ID设置
5、ETTL: 全自动无线闪光拍摄
1 设置主控单元。
设置从属单元。
检查传输频道。
4 定位相机和闪光灯。
将闪光模式设为
natural_image
Technical diagram showing a mechanical assembly with concentric circles and a central circular component labeled 'SET' (no readable text or symbols)
6 检查闪光灯是否准备就绪。
7 检查操作。

使用多个从属单元的自动闪光拍摄
natural_image
Illustration of a dog standing on a platform with three camera equipment nearby (no text or symbols)
使用全自动无线闪光
关于主控单元
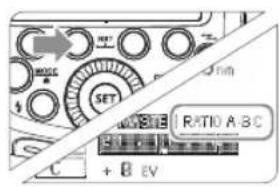
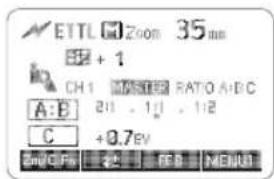
6、ETTL: 使用闪光光比的无线多重闪光拍摄
用两个从属组进行自动闪光拍摄
1 设定从属单元的闪光组。
设定
设为
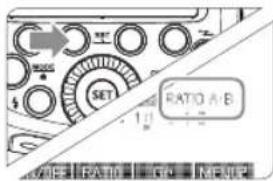
4 设定闪光光比。
拍摄照片。
用三个从属组进行自动闪光拍摄

1 设定从属组别 < C> 。
设为
根据需要设置闪光曝光补偿
从属单元控制
ID=A ID=A ID=A
- 如果在闪光组C直接朝向主被摄体的状态下拍摄,可能会导致曝光过度。
- 在某些支持E-TTL自动闪光的EOS胶卷相机上,不能以闪光光比设置进行多重闪光无线拍摄。
7、M:手动无线闪光拍摄
2 设定闪光组数量。
设定
设定
8、Multi:手动无线闪光拍摄
9、Gr:为各组设定不同的闪光模式进行拍摄

1 将闪光模式设为
设定从属单元的闪光组。
设定闪光模式。
4 设定闪光输出或闪光曝光补偿量
5 拍摄照片 • 各从属
无线闪光拍摄:光学传输

1、无线设置
2、主控单元禁用

3、设置通讯频道
4、ETTL: 全自动无线闪光拍摄

1 设置主控单元。
2 设置从属单元。
检查传输频道。
4 定位相机和闪光灯。
将闪光模式设为
6 检查闪光灯是否准备就绪。
7 检查操作。
使用多个从属单元的自动闪光拍摄
natural_image
Illustration of a dog standing on a platform with three camera equipment nearby (no text or symbols)
使用全自动无线闪光
关于主控单元
5、ETTL: 使用闪光光比的无线多重闪光拍摄
用两个从属组进行自动闪光拍摄


1 设定从属单元的闪光组。
2 设定
设为
4 设定闪光光比。
拍摄照片。
用三个从属组进行自动闪光拍摄
1 设定从属组别 < C> 。
2 设为
根据需要设置闪光曝光补偿
从属单元控制

ID=A
ID=A
ID=A
- 如果在闪光组C直接朝向主被摄体的状态下拍摄,可能会导致曝光过度。
- 在某些支持E-TTL自动闪光的EOS胶卷相机上,不能以闪光光比设置进行多重闪光无线拍摄。
6、M:手动无线闪光拍摄
2 设定闪光组数量。
设定
设定
7、Multi:手动无线闪光拍摄
其他应用
外置无线控制功能
同步插孔触发
造型闪光
自动辅助对焦灯
位置 有效范围 中央 0.6~10米/2.0~32.8英尺 边缘 0.6~5米/2.0~16.4英尺 反射闪光
创建眼神光
natural_image
Illustration of a closed suitcase with mesh pattern and a handle, no text or symbols present
natural_image
Diagram showing a device with a screen and a grid, no text or symbols present
ZOOM:设置闪光覆盖范围并使用广角散光板
natural_image
Technical line drawing of a mechanical component with a meshed internal structure (no text or symbols)
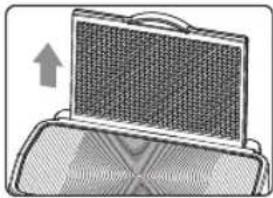
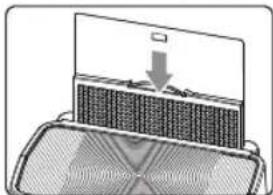
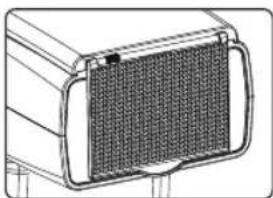
使用广角散光板


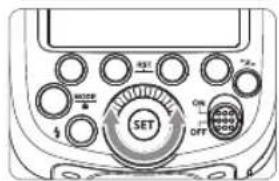
C.Fn:设置自定义功能
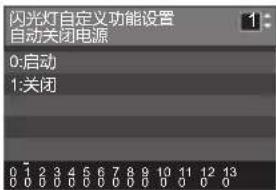
自定义功能符号 功能 设置符号 设置和说明 对应相机C.Fn编号 m/ft 距离指示显示 m 米 C.Fn-00 ft 英寸 APO 自动关闭电源 ON 启动 C.Fn-01 OFF 关闭 FEB ACL 闪光包围曝光自动取消 ON 启动 C.Fn-03 OFF 关闭 FEB 闪光包围曝光顺序 0→→+ C.Fn-04 →0→+ AF 自动对焦辅助光闪光 ON 启动 C.Fn-08 OFF 关闭 Sv APOT 从局单元自动关闭电源计时器 60min 60分钟 C.Fn-10 30min 30分钟 BEEP 蜂鸣器 ON 启动 C.Fn-20 OFF 关闭 LIGHT 背光点亮时间 12sec 12秒后自动熄灭 C.Fn-22 OFF 一直熄灭 ON 一直点亮 LCD 液晶屏对比度 0~9 10个级别 ID 无线ID OFF 关闭 01-99 选择01-99任意一个数字打开 Sv LED 无线LED提示灯 OFF 关闭 ON 打开
用相机菜单控制闪光灯
清除所有闪光灯自定义功能
- 如果用相机和闪光灯设置闪光曝光补偿以外的闪光灯自定义功能和闪光灯功能设置,最后所进行的设置将生效。保护功能
1. 热保护
功率 次数 1/1 30 1/2 +0.7 40 1/2 +0.3 50 1/2 60 1/4(+0.3,+0.7) 100 1/8(+0.3,+0.7) 200 1/16(+0.3,+0.7) 300 1/32(+0.3,+0.7) 500 1/64(+0.3,+0.7) 1000 1/128(+0.3,+0.7) 功率 次数 1/1 15 1/2(+0.3,+0.7); 20 1/4(+0.3,+0.7) 30 1/8(+0.3,+0.7); 1/16(+0.3,+0.7) 40 1/32(+0.3,+0.7); 1/64(+0.3,+0.7); 50 1/128(+0.3,+0.7); 2. 其他保护
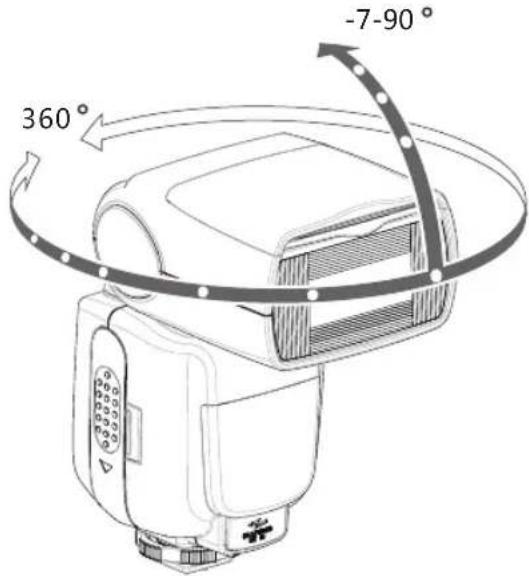
LCD显示 警示内容 E1 闪光灯回电系统出现问题,无法回电引闪,请重新开机,如无法解决请维修 E2 设备内温度过高,请停止引闪10分钟 E3 闪光灯管两端电压过高,请维修 E9 固件升级有误,请进行正确固件升级 型号 TT685C ·类型 兼容相机 Canon EOS相机(E-TTL II自动闪光) 闪光指数(1/1档位;200mm焦距) 60(m ISO 100)190(feet ISO 100) 闪光覆盖范围 20-200毫米(使用广角散光板为14毫米) ·自动变焦(自动设置适合镜头焦距和图像尺寸的闪光覆盖范围) ·手动变焦 ·闪光灯头旋转/倾斜,水平0~360°,垂直-7°~90°(反射闪光) 闪光持续时间 1/300秒-1/20000秒 ·曝光控制 曝光控制系统 E-TTL II自动闪光、手动闪光 闪光曝光补偿(FEC) 手动,闪光包围曝光:在±3档间以1/3档为增量调节(可以组合使用手动闪光曝光补偿和闪光包围曝光) 闪光曝光锁定(FEL) 使用按钮或*按钮 同步方式 高速同步(最高1/8000秒),前帘同步,后帘同步 频闪闪光 具备(次数:100次;199Hz) ·无线闪光(光学传输和无线电2.4G传输) 无线功能 主控单元,从属单元,关闭 可控制从属单元组 光学:A,B,C 2.4G:A,B,C,D,E 传输范围(约) 光学 室内:12~15米/39.4~49.2英尺室外:8~10米/26.2~32.8英尺接收角度:水平±40°,垂直±30° 2.4G 100m 频道 光学 4组:1,2,3,4 2.4G 32组:1~32 从属单元状态指示灯 两红灯同时亮起 造型闪光 使用相机的景深预视按钮进行闪光 ·自动对焦辅助光 有效范围(约) 中央:0.6-10米/边缘:0.6-5米 ·电源 AA型电池 镍氢电池(推荐)或LR6类型碱性电池*4节 回电时间 约0.1-2.6秒(松下eneloop镍氢电池),闪光灯准备就绪,LED红色指示灯亮起 全功率闪光次数 约230次(2500mA镍氢电池) 节能 闪光灯在无人操作90秒左右将会自动关闭电源。设置为从属单元时60分钟进入休眠状态。 ·同步触发方式 热靴,3.5mm同步线,无线控制插座 ·色温 5600±200 ·尺寸 体积 64*76*190 mm 净重(不含电池) 410g 重量(含电池) 530g 故障排除指南
闪光灯不充电。
→以正确的方向安装电池。闪光灯不闪光。
→将闪光灯的固定座牢固地安装在相机上。电源自动关闭。
→半按快门按钮或机身任意按键唤醒。自动变焦不工作。
→将闪光灯的固定座牢固地安装在相机上。闪光曝光不足或过度。
→使用闪光曝光锁定(FEL)。相片出现暗角或者被摄物体只有局部能照亮。
固件升级
兼容相机列表
1DX 5D Mark III 5D Mark II 6D 7D 60D 50D 40D 30D 650D 600D 550D 500D 450D 400D Digital 注:
维护保养
Foreword
Thank you for purchasing this product.
- Fully support Canon E-TTL II camera flash. Workable as Master or Slave unit in a wireless flash group.
- Use dot-matrix LCD panel to make clear and convenient operations.
- With built-in 2.4GHz wireless remote system to support transmitting and receiving.
- Provided multiple functions, include HSS (up to 1/8000s), FEC, FEB, etc.
- Use optional FT-16S to adjust flash parameters & trigger the flash.
- Stable consistency and color temperature with good even lighting.
- Support with firmware upgrade.
Warning
Do not disassemble. Should repairs become necessary, this product must be sent to an authorized maintenance center.
Keep out of reach of children.
Stop using this product if it breaks open due to extrusion, falling or strong hit. Otherwise, electric shock may occur if you touch the electronic parts inside it.
Do not fire the flash directly into the eyes (especially those of babies) within short distances. Otherwise visual impairment may occur.
Do not use the flash unit in the presence of flammable gases, chemicals and other similar materials. In certain circumstance, these materials may be sensitive to the strong light emitting from this flash unit and fire or electromagnetic interference may result.
Do not leave or store the flash unit if the ambient temperature reads over 50°C. Otherwise the electronic parts may be damaged.
▲ Turn off the flash unit immediately in the event of malfunction.THINKLITE
Thinklite TTL Camera Flash
Conventions used in this Manual
The Caution symbol gives supplemental information.
The Note symbol indicates a warning to prevent shooting problem.Contents
47 Power Management
48 Flash Mode—E-TTL Autoflash
Second-Curtain Sync
52 Multi: Stroboscopic Flash
53 Wireless Flash Shooting: Radio (2.4G) Transmission
75 Control with the Camera's Menu Screen
76 Protection Function
77 Technical Data
78 Troubleshooting
79 Firmware Upgrade
79 Compatible Camera Models
79 MaintenanceName of Parts
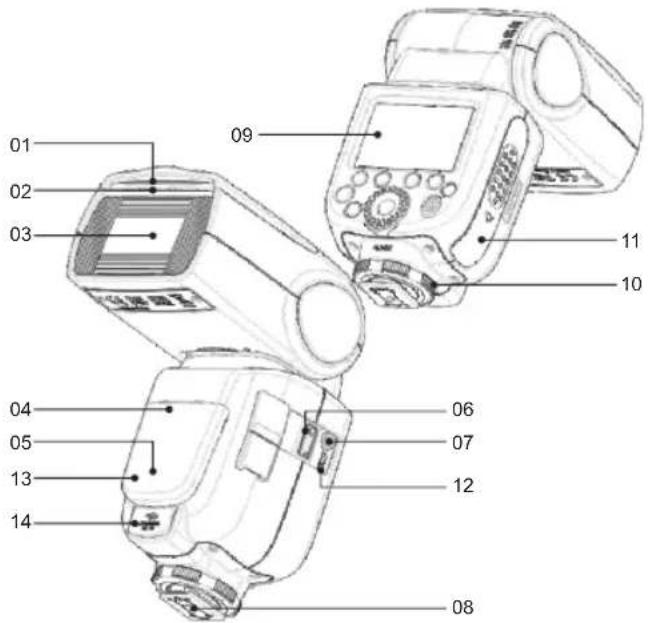
- Body

- Control Panel
- LCD Panel

• What's in the Box of TT685C?
• Separately Sold Accessories
natural_image
Collection of photography equipment including flashlights, telephones, and a color filter (no visible text or symbols)
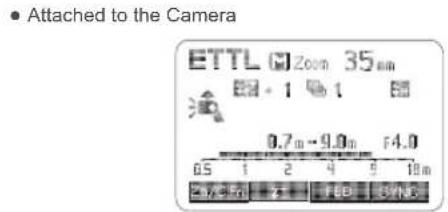
Attaching to a Camera
natural_image
Three-step diagram showing mechanical assembly steps with arrows indicating motion (no text or symbols)
Power Management


Flash Mode—E-TTL Autoflash
ETTL Mode

FEC: Flash Exposure Compensation


FEB: Flash Exposure Bracketing
• FEB can be used with FEC and FEL.FEL: Flash Exposure Lock
12 Press the
High-Speed Sync
- With high-speed sync, the faster the shutter speed, the shorter the effective flash range.
- To return to normal flash, press
- Multi flash mode cannot be set in high-speed sync mode.
- Over-temperature protection may be activated after 15 consecutive high-speed sync flashes.Second-Curtain Sync

M: Manual Flash
3 Press < SET > button again to confirm the setting.
Flash Output Range
1/1-0.3 1/1-0.7 1/2-0.3 1/2-0.7 1/41 ...... 1/2+0.7 1/2+0.3 1/4+0.7 1/4+0.3 21/1 Optic S1 Secondary Unit Setting
Optic S2 Secondary Unit Setting
Multi: Stroboscopic Flash

Calculating the Shutter Speed
Number of Flashes / Flash Frequency = Shutter Speed
- A flash output of 1/1 and 1/2 cannot be set for stroboscopic flash.
- Stroboscopic flash can be used with "buLb".
- If the number of flashes is displayed as “--”, the firing will continue until the shutter closes or the battery is exhausted. The number of flashes will be limited as shown by the following table.Flash output\Hz 1 2 3 4 5 6-7 8-9 1/4 7 6 5 4 4 3 3 1/8 14 14 12 10 8 6 5 1/16 30 30 30 20 20 20 10 1/32 60 60 60 50 50 40 30 1/64 90 90 90 80 80 70 60 1/128 100 100 100 100 100 90 80 Flash output\Hz 10 11 12-14 15-19 20-50 60-199 1/4 2 2 2 2 2 2 1/8 4 4 4 4 4 4 1/16 8 8 8 8 8 8 1/32 20 20 20 18 16 12 1/64 50 40 40 35 30 20 1/128 70 70 60 50 40 40 Flash Output 1/4 1/8 1/16 1/32 1/64 1/128 Number of Flashes 2 4 8 12 20 40 Wireless Flash Shooting: Radio (2.4G) Transmission
Wireless Multiple Flash Shooting
Function Radio Transmission Optic Transmission Distance 100m 15m Channel 1~32 1~4 A/B/C Power OFF, 1/128~1/1 1/128~1/1 To be Disturbed Hard Easy Group A/B/C/D/E A/B/C 

The Reason & Solution of Not Triggering in Godox 2.4G Wireless
1. Wireless Settings
Master Unit Setting
Slave Unit Setting
2. Master Unit's Flash OFF

3. Setting the Communication Channel
4. Wireless ID Settings
- 深圳市神牛摄影器材有限公司
- 前言
- 感谢您购买神牛产品。
- 迅丽TTL机顶闪光灯
- Thinklite TTL Camera Flash
- - 标配物品
- 装卸闪光灯
- 安装闪光灯。
- FEB(闪光包围曝光)
- 第二帘快门同步
- 闪光模式:M 手动闪光
- 显示闪光输出
- S1光控单元设置
- S2光控单元设置
- 闪光模式:Multi 频闪闪光
- 计算快门速度
- 闪光次数/闪光频率=快门速度
- 无线闪光拍摄:无线电(2.4G)传输
- 无线多重闪光拍摄
- 神牛2.4G无线漏闪原因及解决办法
- 1、无线设置
- 2、主控单元禁用
- 3、设置通讯频道
- 4、无线ID设置
- 5、ETTL: 全自动无线闪光拍摄
- 设置主控单元。
- 设置从属单元。
- 检查传输频道。
- 定位相机和闪光灯。
- 将闪光模式设为。
- 检查闪光灯是否准备就绪。
- 检查操作。
- 使用多个从属单元的自动闪光拍摄
- 使用全自动无线闪光
- 关于主控单元
- 6、ETTL: 使用闪光光比的无线多重闪光拍摄
- 用两个从属组进行自动闪光拍摄
- 设定从属单元的闪光组。
- 设定显示。
- 设为。
- 设定闪光光比。
- 拍摄照片。
- 用三个从属组进行自动闪光拍摄
- 设定从属组别 < C> 。
- 根据需要设置闪光曝光补偿
- 从属单元控制
- 7、M:手动无线闪光拍摄
- 设定闪光模式
- 8、Multi:手动无线闪光拍摄
- 9、Gr:为各组设定不同的闪光模式进行拍摄
- 将闪光模式设为。
- 设定从属单元的闪光组。
- 设定闪光模式。
- 设定闪光输出或闪光曝光补偿量
- 拍摄照片 • 各从属
- 无线闪光拍摄:光学传输
- 4、ETTL: 全自动无线闪光拍摄
- 设置从属单元。
- 5、ETTL: 使用闪光光比的无线多重闪光拍摄
- 设定显示。
- 设为。 - 按照前一页步骤2和步
- 6、M:手动无线闪光拍摄
- 7、Multi:手动无线闪光拍摄
- 其他应用
- 外置无线控制功能
- 同步插孔触发
- 造型闪光
- 自动辅助对焦灯
- 反射闪光
- 创建眼神光
- ZOOM:设置闪光覆盖范围并使用广角散光板
- 使用广角散光板
- C.Fn:设置自定义功能
- 用相机菜单控制闪光灯
- 清除所有闪光灯自定义功能
- 保护功能
- 热保护
- 其他保护
- 故障排除指南
- 闪光灯不充电。
- 闪光灯不闪光。
- 电源自动关闭。
- 自动变焦不工作。
- 闪光曝光不足或过度。
- 相片出现暗角或者被摄物体只有局部能照亮。
- 固件升级
- 兼容相机列表
- 注:
- 维护保养
- Foreword
- Thank you for purchasing this product.
- Warning
- THINKLITE
- Conventions used in this Manual
- Contents
- Name of Parts
- - Body
- - Control Panel
- - LCD Panel
- • What's in the Box of TT685C?
- • Separately Sold Accessories
- Attaching to a Camera
- Power Management
- Flash Mode—E-TTL Autoflash
- ETTL Mode
- FEC: Flash Exposure Compensation
- FEB: Flash Exposure Bracketing
- FEL: Flash Exposure Lock
- High-Speed Sync
- Second-Curtain Sync
- M: Manual Flash
- Flash Output Range
- Optic S1 Secondary Unit Setting
- Optic S2 Secondary Unit Setting
- Multi: Stroboscopic Flash
- Calculating the Shutter Speed
- Number of Flashes / Flash Frequency = Shutter Speed
- Wireless Flash Shooting: Radio (2.4G) Transmission
- Wireless Multiple Flash Shooting
- The Reason & Solution of Not Triggering in Godox 2.4G Wireless
- Wireless Settings
- Master Unit Setting
- Slave Unit Setting
- Master Unit's Flash OFF
- Setting the Communication Channel
- Wireless ID Settings
- ETTL: Fully Automatic Wireless Flash Shooting
- Using Automatic Wireless Flash with a Single Slave Unit
- Master Unit Setting
- Slave Unit Setting
- Check the communication channel.
- Position the camera and flashes.
- Set the master unit's flash mode to .
- Check that the flash is ready.
- Check the flash operation.
- Using Automatic Wireless Flash with Multiple Slave Units
- Using Fully Automatic Wireless Flash
- About Master Unit
- ETTL: Use the Wireless Shooting of Flash Ratio
- Auto Flash Shooting with Two Slave Unit
- Auto Flash Shooting with Three Slave Unit
- About Slave Group Control
- M: Wireless Flash Shooting with Manual Flash
- Setting Flash Mode
- Multi: Wireless Flash Shooting with Manual Flash
- Gr: Shooting with a Different Flash Mode for Each Group
- Set the flash mode
- Set the flash output and flash exposure compensation amount.
- Take the picture • Each slave unit
- Wireless Flash Shooting: Optic Transmission
- ETTL: Fully Automatic Wireless Flash Shooting
- Check the flash operation. • Press the master unit's
- ETTL: Use the Wireless Shooting of Flash Ratio
- Setting the slave group .
- Setting .
- Setting flash exposure compensation.
- M: Wireless Flash Shooting with Manual Flash
- Setting the flash mode to .
- Setting the number of flash groups.
- Setting flash output.
- Taking the picture.
- Setting the slave unit.
- Setting flash mode to . Press button so
- Multi: Wireless Flash Shooting with Manual Flash
- Setting stroboscopic flash.
- Other Applications
- Wireless Control Function
- Sync Triggering
- Modeling Flash
- Auto Focus Assist Beam
- Bounce Flash
- Creating a Catchlight
- ZOOM: Setting the Flash Coverage and Using the Wide Panel
- Using the Wide Panel
- Low Battery Warning
- C.Fn: Setting Custom Functions
- Control with the Camera's Menu Screen
- Clear All Flash Custom Functions
- Protection Function
- Over-Temperature Protection
- Other Protections
- Troubleshooting
- The Camera Flash cannot be charged.
- The Camera Flash does not fire.
- The power turns off by itself.
- Auto zoom does not work.
- The flash exposure is underexposed or overexposed.
- Photos have dark corners or only parts of the target subject are illuminated.
- Firmware Upgrade
- Compatible Camera Models
- Maintenance
- Statement
Brand : GODOX
Model : TT685
Category : Flash