
TS312S - Loudspeaker ALTO - Free user manual and instructions
Find the device manual for free TS312S ALTO in PDF.


| Product Type | TS3 Series Amplified Speaker |
| Model | TS312S |
| Brand | Alto Professional |
| Dimensions (approx.) | 376 x 330 x 391 mm (14.8 x 13.0 x 15.4 in) |
| Weight (approx.) | 17.3 kg (38.1 lb) |
| Power Supply | Mains (power cable included) |
| Audio Inputs | 2 combo XLR/TRS (6.35 mm) inputs for line or microphone sources |
| Audio Output | 1 XLR Mix Out for connecting another speaker |
| Controls | Individual volume per input, Contour switch (+3 dB bass/treble), ground lift switch |
| Indicators | Power (on), Signal/Limit (green solid/flashing, red if limiting) |
| Protection | Electronic peak limiter (red LED) |
| Main Functions | Amplified sound reproduction for PA, live performance, playback |
| Mounting | Socket for tripod-type stand (follow safety instructions) |
| Care and Cleaning | Disconnect before cleaning; use a dry cloth; do not expose to moisture |
| Safety | Do not use with grille removed; check support; avoid prolonged exposure to high sound levels |
| Spare Parts and Repairability | Replaceable fuse (lift tab); contact technical support for any repairs |
| Box Contents | Speaker, power cable, user guide, safety instructions and warranty |
| General Information | Full manual available in PDF format at altoprofessional.com |
Frequently Asked Questions - TS312S ALTO
User questions about TS312S ALTO
0 question about this device. Answer the ones you know or ask your own.
Ask a new question about this device
Download the instructions for your Loudspeaker in PDF format for free! Find your manual TS312S - ALTO and take your electronic device back in hand. On this page are published all the documents necessary for the use of your device. TS312S by ALTO.
USER MANUAL TS312S ALTO
User Guide (English)
Introduction
Thank you for purchasing the TS3 Series loudspeaker. At Alto Professional, performance and reliability mean as much to us as they do to you. That's why we design our equipment with only one mind—to make your performance the best it can be.
Box Contents
TS3 Series Loudspeaker
Power Cable
User Guide
Safety & Warranty Manual
Support
For the latest information about this product (system requirements, compatibility information, etc.) and product registration, visit altoprofessional.com.
For additional product support, visit altoprofessional.com/support.
Important Safety Precautions
Please note: Alto Professional and inMusic are not responsible for the use of its products or the misuse of this information for any purpose. Alto Professional and inMusic are not responsible for the misuse of its products caused by avoiding compliance with inspection and maintenance procedures. Please also refer to the included safety and warranty manual for more information.

Caution: To reduce the risk of electric shock, do not connect a TS3 loudspeaker to a power outlet while the grille is removed.
Stand-Mounting
• Always install loudspeakers in accordance with applicable electrical and building codes.
- Install the loudspeaker according to its maximum weight. Check the specifications of your stand or pole to ensure it can support the loudspeaker's weight. Also, observe all safety precautions specified by the manufacturer.
- Do not mount multiple loudspeakers on the same stand or pole.
- Always verify that the stand or pole is on a flat, level, and stable surface. Also, fully extend the legs of tripod-style stands, and ensure its legs do not present a trip hazard.
- Inspect the stand (or pole and associated hardware) before each use and do not use equipment with worn, damaged, or missing parts.
- Always be cautious in windy, outdoor conditions. You may need to place additional weight (e.g., sandbags) on stand's base to improve stability. Do not attach banners or similar items to any part of a loudspeaker system. Such attachments could act as a sail and topple the system.
- Unless you are confident that you can handle the loudspeaker's weight, ask another person to help you lift it onto the stand or pole.
- Make sure your cables are out of the way of performers, production crew, and audience so they will not trip over them, pulling the loudspeaker off the stand or pole.
Sound Level
Permanent hearing loss may be caused by exposure to extremely high noise levels. The U.S. Occupational Safety and Health Administration (OSHA) has specified permissible exposures to certain noise levels. According to OSHA, exposure to high sound pressure levels (SPL) in excess of these limits may result in hearing loss. When using equipment capable of generating high SPL, use hearing protection while such equipment is under operation.
| Hours per day | SPL (dB) | Example |
| 8 | 90 | Small |
| 6 | 92 | Train |
| 4 | 95 | Subway |
| 3 | 97 | High-level |
| 2 100 Classical music concert | ||
| 1.5 | 102 | Riveting |
| 1 | 105 | Machine |
| 0.5 | 110 | Airport |
| 0.25 or less 115 Rock concert | ||
gig
train
des
machine
fact
Setup
Volume Control
The TS3 Series loudspeaker accepts both line-level and mic-level audio sources. Before connecting your audio source, turn the Volume knob to the minimum position (fully counter-clockwise).
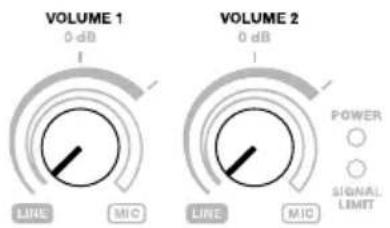
Line-Level Audio Source
When using an audio source such as a mixer, CD/MP3 player or audio preamp, follow the outer/Line level band indicator.
If the Signal Limit LED is on, do not advance the Volume knob any further. Doing so may damage your TS3 loudspeaker.
In most circumstances, you will not need to turn the volume beyond 0 dB.
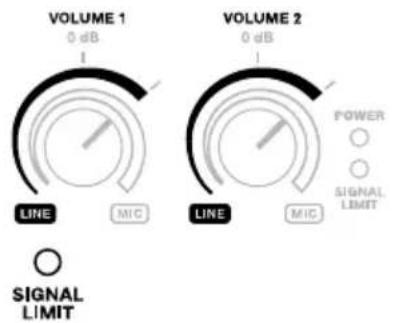
If your audio source has unusually low output, you may turn the Volume knob past 0 dB, but not past the Signal Limit indicator (as explained above).


Mic-Level Audio Source
Important: If you are using an instrument with active preamp, treat the instrument as a line-level audio source (as explained above).
When using a microphone or instrument audio source, follow the inner/Mic level band indicator.
Because the mic and instrument level is typically lower than a line level, you can use the full rotation of the Volume knob.
As you turn up the Volume knob, please observe the Signal Limit indicator. If the Signal Limit LED is on, do not advance the Volume knob any further. Doing so may damage your TS3 loudspeaker.

gauge
| VOLUME | LINE | MIC | |--------|------|-----| | VOLUME 1 | 0 dB | 0 dB | | VOLUME 2 | 0 dB | 0 dB |Examples
Items not listed under Introduction > Box Contents are sold separately.
Note: These examples show the rear panel used by the TS310, TS312, and TS315 models, though all four models in the TS3 Series have the same input and output.
Example A: One Loudspeaker
Connect a dynamic microphone to the Input 1 using an XLR or 1/4" (6.35 mm) TRS cable. Connect a guitar with an active pickup to the Input 2 using a 1/4" (6.35 mm) TS or TRS cable (see your guitar's documentation for cable requirements). For Input 2, do not turn the Volume knob past the 0 dB position.
Note: When using the TS3 Series loudspeaker with a guitar, we recommend using one with active pickups rather than passive pickups. If you use a guitar with passive pickups, connect it to an external preamp or direct input (DI) box, and connect the line-level output to the loudspeaker.
Also, use dynamic microphones with the TS3 Series loudspeaker rather than condenser microphones. If you use a microphone that requires +48V of phantom power, connect it to an external phantom power supply before connecting it to the loudspeaker.

Example B: Two Loudspeakers
Connect the left and right output of your DJ mixer, controller, etc. to Input 1 of each loudspeaker using XLR or 1/4" (6.35 mm) TRS cables. Do not turn the Volume knobs past the 0 dB position.
Tip: To send the same mix to both TS3 Series loudspeakers, connect both channels of your DJ mixer, controller, etc. to the Input 1 and Input 2 of one loudspeaker, and then connect that loudspeaker's Mix Out to the Input 1 of the other loudspeaker. Both TS3 Series loudspeakers will then play identical summed mono mixes.

Example C: Two Loudspeakers + Two Extensions
Connect each of your mixer's main outputs to Input 1 on each TS3 loudspeaker. Connect the Mix Out of each TS3 loudspeaker to an input of each extension loudspeaker. Do not turn any of the Volume knobs past the 0 dB position.

flowchart
graph TD
    A["Microphones"] --> B["Extension Loudspeaker"]
    A --> C["Extension Loudspeaker"]
    A --> D["Extension Loudspeaker"]
    A --> E["Extension Loudspeaker"]
    A --> F["Extension Loudspeaker"]
    A --> G["Extension Loudspeaker"]
    A --> H["Mixer"]
    A --> I["Power"]
    style A fill:#f9f,stroke:#333
    style B fill:#ccf,stroke:#333
    style C fill:#ccf,stroke:#333
    style D fill:#ccf,stroke:#333
    style E fill:#ccf,stroke:#333
    style F fill:#ccf,stroke:#333
    style G fill:#ccf,stroke:#333
    style H fill:#cfc,stroke:#333
    style I fill:#cfc,stroke:#333
Features
Rear Panel
-
AC Input: Use the included power cable to connect this input to a power outlet. Make sure the Power Switch is set to off when connecting or disconnecting the cable.
-
Fuse: If the unit's fuse is broken, lift this tab to replace the fuse. Replace it with a fuse with an appropriate rating (printed under the unit's power cable input). Using a fuse with an incorrect rating can damage the unit and/or fuse.
Note: On the TS308 model, the fuse is located next to the power switch rather than the AC input.
-
Power Switch: Use this switch to power the loudspeaker on or off. Make sure the Volume knob minimum (counterclockwise) position before turning it on.
-
Power LED: This LED lights up when the loudspeaker is on.
-
Volume: Turn this knob to adjust the loudspeaker's volume.
When using an audio source such as a mixer, CD/MP3 player or audio preamp, follow the outer/Line level band indicator. In most circumstances, you will not need to turn the volume beyond 0 dB. If your audio source has unusually low output, you may turn the Volume knob past 0 dB, but not past the Signal Limit indicator.
When using a microphone or instrument audio source, follow the inner/Mic level band indicator. Because the mic and instrument level is typically lower than a line level, you can use the full rotation of the Volume knob.
Please see Setup > Volume Control to learn more.
-
Input: Use a standard XLR or 1/4" (6.35 mm) cable (not included) to connect your audio source to this input.
-
Mix Out: Use a standard XLR cable (not included) to connect this output to the input of another loudspeaker (i.e., another TS3 loudspeaker).
-
Signal/Limit LED: This LED lights up green when an audio signal is sent to the loudspeaker—it flashes at lower levels and lights solidly at higher levels. The LED lights up red when output limit/protection is active—if the LED is lit red continuously, reduce the volume of your audio source.
-
Contour: Engage (depress) this button to emphasize low and high frequencies by +3 dB. Disengage (raise) the switch for a flatter response for live performance or for maximum output.
-
Ground Switch: Engage (depress) this switch to reduce hum or noise.

Mic-Level Audioquelle
Technical Specifications
Specifications are subject to change without notice.
TS308
| Output Power | 2000 watts (peak, 1300 LF + 700 HF), 1000 watts (continuous, 650 LF + 350 HF) |
| Drivers | Low-Frequency: 8.0" (203 mm) driver, 2.5" (65 mm) high-temperature voice coilHigh-Frequency: 1.4" (35 mm) neodymium driver with precision waveguide |
| Crossover Frequency | 2.5 kHz |
| Maximum SPL | 129 dB (peak), 126 dB (continuous) (dB-SPL @ 1 m) |
| Frequency Response | 62 Hz - 20 kHz (+3 dB) |
| Frequency Range | 52 Hz - 22 kHz (-10 dB) |
| Horn Coverage | 90° horizontal x 60° vertical (nominal) |
| Equalization | Contour switch with low- and high-frequency +3 dB boost |
| Connectors | (2) XLR+1/4" (6.35 mm) TRS combo inputs(1) XLR output (Link)(1) IEC power cable input |
| Controls | Power switch, (2) volume control knobs (1 per input), contour switch, ground-lift switch |
| Indicators | (2) power LEDs (1 front panel, 1 rear panel), clip limiter LED |
| Power | Connection: IECVoltage: 100 V~, 110-120 V~, 220-240 V~, 50/60 Hz, switchableFuse: 100-120V T10AL AC250V, or 220-240V T5AL AC250VConsumption: 800 W |
| Protection | Electronic clip, thermal and transducer overdrive protection |
| Enclosure | Trapezoidal, injection-molded, polypropylene with perforated steel grille |
| Mounting/Installation | Standard 36 mm pole socket, wall or ceiling mount with TSB810 bracket, suspended with integral M6 points, wedge monitor |
| Dimensions (height x width x depth) | 17.1" x 10.1" x 9.6"434 x 256 x 245 mm |
| Weight | 20.2 lb.9.2 kg |
TS310
| Output Power | 2000 watts (peak, 1300 LF + 700 HF), 1000 watts (continuous, 650 LF + 350 HF) |
| Drivers | Low-Frequency: 10.0" (254 mm) driver, 2.5" (65 mm) high-temperature voice coilHigh-Frequency: 1.4" (35 mm) neodymium driver with precision waveguide |
| Crossover Frequency | 2.5 kHz |
| Maximum SPL | 129 dB (peak), 126 dB (continuous) (dB-SPL @ 1 m) |
| Frequency Response | 54 Hz - 20 kHz ( ± 3 dB) |
| Frequency Range | 48 Hz - 22 kHz (-10 dB) |
| Horn Coverage | 90° horizontal x 60° vertical (nominal) |
| Equalization | Contour switch with low- and high-frequency +3 dB boost |
| Connectors | (2) XLR+1/4" (6.35 mm) TRS combo inputs(1) XLR output (Link)(1) IEC power cable input |
| Controls | Power switch, (2) volume control knobs (1 per input), contour switch, ground-lift switch |
| Indicators | (2) power LEDs (1 front panel, 1 rear panel), clip limiter LED |
| Power | Connection: IECVoltage: 100 V~, 110–120 V~, 220–240 V~, 50/60 Hz, switchableFuse: 100–120V T10AL AC250V, or 220–240V T5AL AC250VConsumption: 800 W |
| Protection | Electronic clip, thermal and transducer overdrive protection |
| Enclosure | Trapezoidal, injection-molded, polypropylene with perforated steel grille |
| Mounting/Installation | Standard 36 mm pole socket, wall or ceiling mount with TSB810 bracket, suspended with integral M10 points, wedge monitor |
| Dimensions (height x width x depth) | 20.6" x 12.6" x 11.8"524 x 320 x 300 mm |
| Weight | 26.1 lb.11.8 kg |
TS312
| Output Power | 2000 watts (peak, 1300 LF + 700 HF), 1000 watts (continuous, 650 LF + 350 HF) |
| Drivers | Low-Frequency: 12.0" (305 mm) driver, 3.0" (76 mm) high-temperature voice coilHigh-Frequency: 1.4" (35 mm) neodymium driver with precision waveguide |
| Crossover Frequency | 2.0 kHz |
| Maximum SPL | 131 dB (peak), 128 dB (continuous) (dB-SPL @ 1 m) |
| Frequency Response | 53 Hz - 20 kHz ( ± 3 dB) |
| Frequency Range | 46 Hz - 22 kHz (-10 dB) |
| Horn Coverage | 90° horizontal x 60° vertical (nominal) |
| Equalization | Contour switch with low- and high-frequency +3 dB boost |
| Connectors | (2) XLR+1/4" (6.35 mm) TRS combo inputs(1) XLR output (Link)(1) IEC power cable input |
| Controls | Power switch, (2) volume control knobs (1 per input), contour switch, ground-lift switch |
| Indicators | (2) power LEDs (1 front panel, 1 rear panel), clip limiter LED |
| Power | Connection: IECVoltage: 100 V~, 110–120 V~, 220–240 V~, 50/60 Hz, switchableFuse: 100–120V T10AL AC250V, or 220–240V T5AL AC250VConsumption: 800 W |
| Protection | Electronic clip, thermal and transducer overdrive protection |
| Enclosure | Trapezoidal, injection-molded, polypropylene with perforated steel grille |
| Mounting/Installation | Standard 36 mm pole socket, wall or ceiling mount with TSB125 bracket, suspended with integral M10 points, wedge monitor |
| Dimensions (height x width x depth) | 23.8" x 13.9" x 13.8"605 x 354 x 350 mm |
| Weight | 35.9 lb.16.3 kg |
TS315
| Output Power | 2000 watts (peak, 1300 LF + 700 HF), 1000 watts (continuous, 650 LF + 350 HF) |
| Drivers | Low-Frequency: 15.0" (381 mm) driver, 3.0" (76 mm) high-temperature voice coilHigh-Frequency: 1.4" (35 mm) neodymium driver with precision waveguide |
| Crossover Frequency | 2.0 kHz |
| Maximum SPL | 134 dB (peak), 131 dB (continuous) (dB-SPL @ 1 m) |
| Frequency Response | 50 Hz - 20 kHz (-3 dB) |
| Frequency Range | 43 Hz - 22 kHz (-10 dB) |
| Horn Coverage | 90° horizontal x 60° vertical (nominal) |
| Equalization | Contour switch with low- and high-frequency +3 dB boost |
| Connectors | (2) XLR+1/4" (6.35 mm) TRS combo inputs(1) XLR output (Link)(1) IEC power cable input |
| Controls | Power switch, (2) volume control knobs (1 per input), contour switch, ground-lift switch |
| Indicators | (2) power LEDs (1 front panel, 1 rear panel), clip limiter LED |
| Power | Connection: IECVoltage: 100 V~, 110-120 V~, 220-240 V~, 50/60 Hz, switchableFuse: 100-120V T10AL AC250V, or 220-240V T5AL AC250VConsumption: 800 W |
| Protection | Electronic clip, thermal and transducer overdrive protection |
| Enclosure | Trapezoidal, injection-molded, polypropylene with perforated steel grille |
| Mounting/Installation | Standard 36 mm pole socket, wall or ceiling mount with TSB125 bracket, suspended with integral M10 points, wedge monitor |
| Dimensions (height x width x depth) | 25.7" x 16.6" x 15.4"652 x 421 x 392 mm |
| Weight | 41.3 lb.18.8 kg |
Trademarks & Licenses
Alto Professional is a trademark of inMusic Brands, Inc., registered in the U.S. and other countries. All other product names, company names, trademarks, or trade names are those of their respective owners.
altoprofessional.com
- User Guide (English)
- Introduction
- Box Contents
- Support
- Important Safety Precautions
- Stand-Mounting
- Sound Level
- Setup
- Volume Control
- Line-Level Audio Source
- Mic-Level Audio Source
- Examples
- Example A: One Loudspeaker
- Example B: Two Loudspeakers
- Example C: Two Loudspeakers + Two Extensions
- Features
- Rear Panel
- Mic-Level Audioquelle
- Technical Specifications
- Trademarks & Licenses
- altoprofessional.com
Brand : ALTO
Model : TS312S
Category : Loudspeaker