
LC1C - Camera EZVIZ - Free user manual and instructions
Find the device manual for free LC1C EZVIZ in PDF.


| Brand | EZVIZ |
| Model | LC1C |
| Product Type | Security Camera with LED Light |
| Power Supply | Mains (100-240 V AC, 50/60 Hz) |
| Connectivity | Wi-Fi 2.4 GHz |
| Storage | micro SD card (sold separately) |
| Light Tilt Angle | 180° (vertical) |
| Light Rotation Angle | 360° (horizontal) |
| Camera Rotation Angle | 360° |
| Motion Detection | Passive Infrared Detector (PIR) |
| Recommended Installation Height | 3 m (10 ft) |
| Recommended Camera Angle | 22° downward |
| Mobile App | EZVIZ (iOS and Android) |
| LED Indicator | Red and blue (status indicators) |
| Reset | Button held for 5 seconds |
| Warranty | 2 years |
| Maintenance | Clean with a soft, dry cloth |
| Installation Safety | Turn off the circuit breaker before installation |
| Box Contents | Camera with light, screw kit, quick start guide |
| Weight | Approximately 0.5 kg (estimated) |
Frequently Asked Questions - LC1C EZVIZ
User questions about LC1C EZVIZ
0 question about this device. Answer the ones you know or ask your own.
Ask a new question about this device
Download the instructions for your Camera in PDF format for free! Find your manual LC1C - EZVIZ and take your electronic device back in hand. On this page are published all the documents necessary for the use of your device. LC1C by EZVIZ.
USER MANUAL LC1C EZVIZ
Scan the QR code with the EZVIZ App to add the device to your account. Please keep it for further reference.
COPYRIGHT © Hangzhou EZVIZ Software Co., Ltd.. ALL RIGHTS RESERVED.
Any and all information, including, among others, wordings, pictures, graphs are the properties of Hangzhou EZVIZ Software Co., Ltd. (hereinafter referred to as "EZVIZ"). This user manual (hereinafter referred to as "the Manual") cannot be reproduced, changed, translated, or distributed, partially or wholly, by any means, without the prior written permission of EZVIZ. Unless otherwise stipulated, EZVIZ does not make any warranties, guarantees or representations, express or implied, regarding to the Manual.
About this Manual
The Manual includes instructions for using and managing the product. Pictures, charts, images and all other information hereinafter are for description and explanation only. The information contained in the Manual is subject to change, without notice, due to firmware updates or other reasons. Please find the latest version in the EZVIZ™ website (http://www.ezvizlife.com).
Revision Record
New release – January, 2019
Trademarks Acknowledgement
EZVIZ™, 📋™, and other EZVIZ's trademarks and logos are the properties of EZVIZ in various jurisdictions. Other trademarks and logos mentioned below are the properties of their respective owners.
Legal Disclaimer
TO THE MAXIMUM EXTENT PERMITTED BY APPLICABLE LAW, THE PRODUCT DESCRIBED, WITH ITS HARDWARE, SOFTWARE AND FIRMWARE, IS PROVIDED "AS IS", WITH ALL FAULTS AND ERRORS, AND EZVIZ MAKES NO WARRANTIES, EXPRESS OR IMPLIED, INCLUDING WITHOUT LIMITATION, MERCHANTABILITY, SATISFACTORY QUALITY, FITNESS FOR A PARTICULAR PURPOSE, AND NON-INFRINGEMENT OF THIRD PARTY. IN NO EVENT WILL EZVIZ, ITS DIRECTORS, OFFICERS, EMPLOYEES, OR AGENTS BE LIABLE TO YOU FOR ANY SPECIAL, CONSEQUENTIAL, INCIDENTAL, OR INDIRECT DAMAGES, INCLUDING, AMONG OTHERS, DAMAGES FOR LOSS OF BUSINESS PROFITS, BUSINESS INTERRUPTION, OR LOSS OF DATA OR DOCUMENTATION, IN CONNECTION WITH THE USE OF THIS PRODUCT, EVEN IF EZVIZ HAS BEEN ADVISED OF THE POSSIBILITY OF SUCH DAMAGES.
TO THE MAXIMUM EXTENT PERMITTED BY APPLICABLE LAW, IN NO EVENT SHALL EZVIZ'S TOTAL LIABILITY FOR ALL DAMAGES EXCEED THE ORIGINAL PURCHASE PRICE OF THE PRODUCT.
EZVIZ DOES NOT UNDERTAKE ANY LIABILITY FOR PERSONAL INJURY OR PROPERTY DAMAGE AS THE RESULT OF PRODUCT INTERRUPTION OR SERVICE TERMINATION CAUSED BY: A) IMPROPER INSTALLATION OR USAGE OTHER THAN AS REQUESTED; B) THE PROTECTION OF NATIONAL OR PUBLIC INTERESTS; C) FORCE MAJEURE; D) YOURSELF OR THE THIRD PARTY, INCLUDING WITHOUT LIMITATION, USING ANY THIRD PARTY'S PRODUCTS, SOFTWARE, APPLICATIONS, AND AMONG OTHERS.
REGARDING TO THE PRODUCT WITH INTERNET ACCESS, THE USE OF PRODUCT SHALL BE WHOLLY AT YOUR OWN RISKS. EZVIZ SHALL NOT TAKE ANY RESPONSIBILITES FOR ABNORMAL OPERATION, PRIVACY LEAKAGE OR OTHER DAMAGES RESULTING FROM CYBER ATTACK, HACKER ATTACK, VIRUS INSPECTION, OR OTHER INTERNET SECURITY RISKS; HOWEVER, EZVIZ WILL PROVIDE TIMELY TECHNICAL SUPPORT IF REQUIRED.
SURVEILLANCE LAWS AND DATA PROTECTION LAWS VARY BY JURISDICTION. PLEASE CHECK ALL RELEVANT LAWS IN YOUR JURISDICTION BEFORE USING THIS PRODUCT IN ORDER TO ENSURE THAT YOUR USE CONFORMS TO THE APPLICABLE LAW. EZVIZ SHALL NOT BE LIABLE IN THE EVENT THAT THIS PRODUCT IS USED WITH ILLEGITIMATE PURPOSES.
IN THE EVENT OF ANY CONFLICTS BETWEEN THE ABOVE AND THE APPLICABLE LAW, THE LATTER PREVAILS.
Regulatory Information
FCC Information
This device complies with Part 15 of the FCC Rules. Operation is subject to the following two conditions:
(1) This device may not cause harmful interference, and
(2) This device must accept any interference received, including interference that may cause undesired operation.
Note: This product has been tested and found to comply with the limits for a Class B digital device, pursuant to Part 15 of the FCC Rules. These limits are designed to provide reasonable protection against harmful interference in a residential installation. This product generates, uses, and can radiate radio frequency energy and, if not installed and used in accordance with the instructions, may cause harmful interference to radio communications. However, there is no guarantee that interference will not occur in a particular installation. If this product does cause harmful interference to radio or television reception, which can be determined by turning the equipment off and on, the user is encouraged to try to correct the interference by one or more of the following measures:
—Reorient or relocate the receiving antenna.
—Increase the separation between the equipment and receiver.
-Connect the equipment into an outlet on a circuit different from that to which the receiver is connected.
—Consult the dealer or an experienced radio/TV technician for help.
Please take attention that changes or modification not expressly approved by the party responsible for compliance could void the user's authority to operate the equipment.
This equipment should be installed and operated with a minimum distance 20cm between the radiator and your body.

EU Conformity Statement
This product and - if applicable - the supplied accessories too are marked with "CE" and comply therefore with the applicable harmonized European standards listed under the Radio Equipment Directive 2014/53/EU, the EMC Directive 2014/30/EU, the RoHS Directive 2011/65/EU, the Low Voltage Directive 2014/35/EU.

2012/19/EU (WEEE directive): Products marked with this symbol cannot be disposed of as unsorted municipal waste in the European Union. For proper recycling, return this product to your local supplier upon the purchase of equivalent new equipment, or dispose of it at designated collection points. For more information see: www.recyclethis.info.

2006/66/EC and its amendment 2013/56/EU (battery directive): This product contains a battery that cannot be disposed of as unsorted municipal waste in the European Union. See the product documentation for specific battery information. The battery is marked with this symbol, which may include lettering to indicate cadmium (Cd), lead (Pb), or mercury (Hg). For proper recycling, return the battery to your supplier or to a designated collection point. For more information see: www.recyclethis.info.
EC DECLARATION OF CONFORMITY
Hereby, Hangzhou EZVIZ Software Co., Ltd. declares that the radio equipment type [CS-LC1C] is in compliance with Directive 2014/53/EU.
The full text of the EC DECLARATION OF CONFORMITY is available at the following web link:
http://www.ezvizlife.com/declaration-of-conformity.
Safety Instruction
CAUTION: THE BLUE LIGHT DAMAGE OF THIS PRODUCT TO THE EYES IS CLASSIFIED AS CATEGORY 1. DO NOT OBSERVE THE LIGHT IN SHORT DISTANCE. DO NOT TURN ON THE LIGHT DURING ASSEMBLY, INSTALLATION AND MAINTENANCE, IF MUST, PLEASE FULLY PROTECT EYES BY WEARING PROTECTIVE EYEWEAR.
GENERAL: All ELECTRICAL CONNECTIONS MUST BE IN ACCORDANCE WITH LOCAL AND NATIONAL ELECTRICAL CODE (N.E.C) STANDARDS. IF YOU ARE UNFAMILIAR WITH PROPER ELECTRICAL WIRING CONNECTIONS OBTAIN THE SERVICES OF A QUALIFIED ELECTRICIAN.
WARNING-TO HELP PREVENT THE POSSIBILITY OF ELECTRICAL SHOCK, THE USE OF RUBBER SOLE SHOES IS RECOMMENDED. EXERCISE CARE, USE WORK GLOVES WHEN HANDLING THE FIXTURE TO AVOID CUTS OR ABRASIONS.
Due to the product shape and dimension, the name and address of the importer/manufacturer are printed on the package.
Customer Service
For more information, please visit www.ezvizlife.com.
Need help? Please visit "www.ezvizlife.com/inter/page/contact-us" for our local contact details.
COPYRIGHT © Hangzhou EZVIZ Software Co., Ltd. ALLE RECHTE VORBEHALTEN.
http://www.ezvizlife.com/declaration-of-conformity.
Sicherheitshinweis
http://www.ezvizlife.com/declaration-of-conformity.
natural_image
Line drawing of a mechanical device with two views (top and side), no text or symbols presentSecurity Light Camera Screw Kit Quick Start Guide
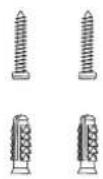
Security Light Camera

Name Description
Light Adjustment Knob (Tilt)
Loosen the adjustment knob and tilt the light up to 180° . Tighten the adjustment knob when you have the light in the position you want.
Light Adjustment Collar (Rotation)
Loosen the adjustment collar and rotate the light up to 360° . Tighten the adjustment collar when you have the light in the position you want.
Camera Adjustment Collar
Loosen the adjustment collar and rotate the camera up to 360°. Tighten the adjustment collar when you have the camera in the position you want.
Micro SD Card (sold separately) Initialize the card in the EZVIZ app before using it.
Reset Button Hold for 5 seconds to restart and reset all parameters to default.
PIR With the PIR (Passive Infrared), the device can detect a human body, animals, or other objects.

Get the EZVIZ app
- Connect your mobile phone to Wi-Fi using your 2.4GHz network.
- Search for "EZVIZ" in App Store or Google Play™.
- Download and install the EZVIZ app.
- Launch the app, and register an EZVIZ user account.
Installation
• Installation height affects motion detection, security light camera recommended installation height: 3 m (10 feet) above the ground.
- Camera recommended setting angle: 22 degree as shown below.

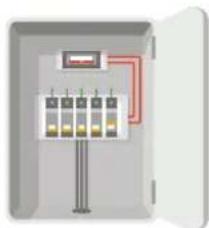
Step 1 Shut off the electricity at the breaker that controls security light's circuit.
- If you don't know where your breaker is or how to turn off power to your floodlight circuit, consult with a licensed electrician.
- Keep the breaker off at any time during the installation process.
natural_image
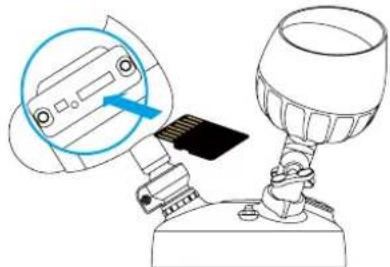
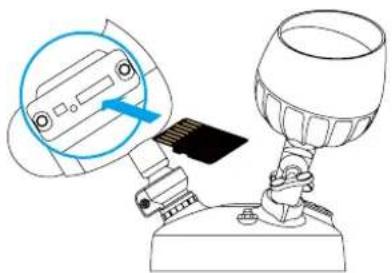
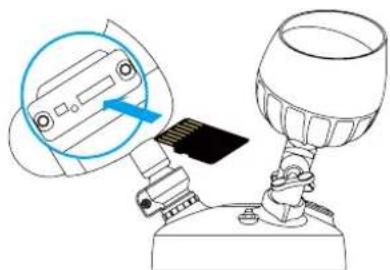
Illustration of an open electrical control box with four vertical panels and a red circuit line (no text or symbols)Step 2 Install Micro SD Card (Optional).
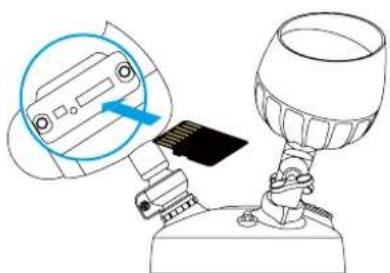
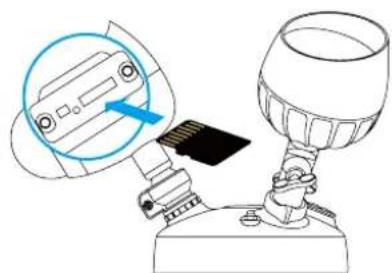
- Remove the cover on the side of the camera.
- Insert a micro SD card (sold separately) into the slot until a click.
- Place the cover back on.

natural_image
Diagram showing a robotic arm interacting with a wine glass, no text or symbols presentAfter installing the micro SD card, you should initialize the card in the EZVIZ app before using it. For detailed operation, refer to page 5: Initialize Micro SD Card.
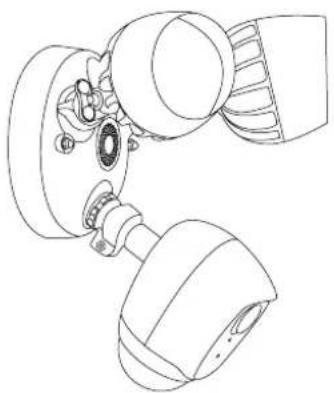
Step 3 Separate the mounting bracket from the security light camera.
EN
- Unscrew the 2 base screw caps.
- Pull the security light camera off the mounting bracket, and unplug the wire connector from the bracket.
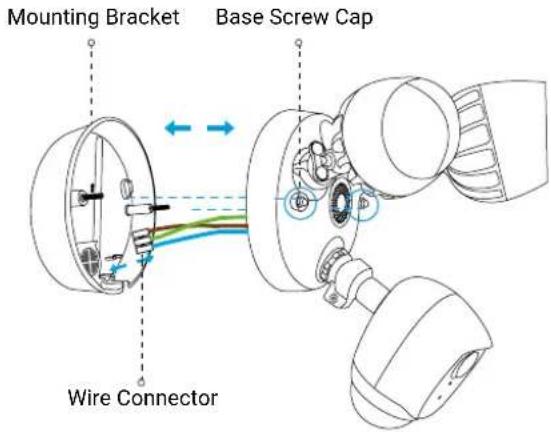
- After separating the mounting bracket from the camera, the resulting picture is shown as below.
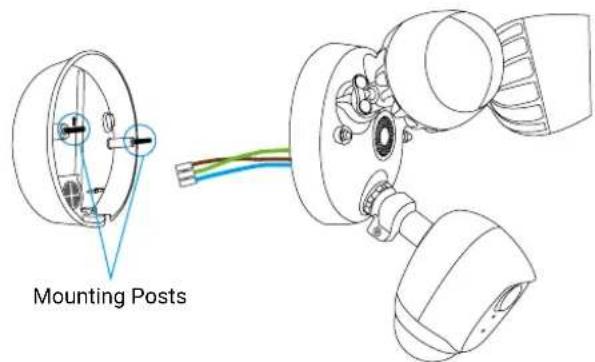
Keep the mounting posts stay in the bracket.
Step 4 Install the mounting bracket.
- When installing the mounting bracket, make sure the logo (UP) faces upward. - Make sure the wall/ceiling is strong enough to withstand three times the weight of the security light camera.
The security light camera can be mounted on the wall or ceiling. Here we take wall mounting as an example.
1. Pick a clean and flat surface.
2. Drill two holes on the wall and insert anchors.
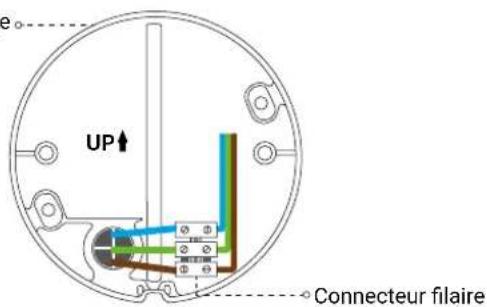
3. Take the wires from the wall through the rubber of the mounting bracket.
4. Fix the mounting bracket to the wall with mounting screws.
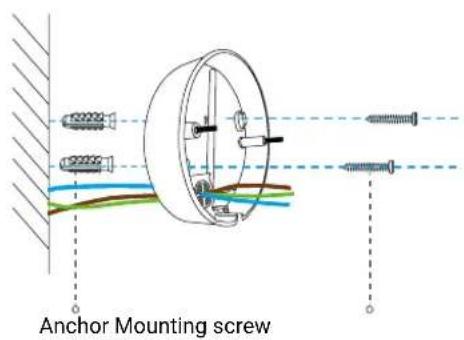

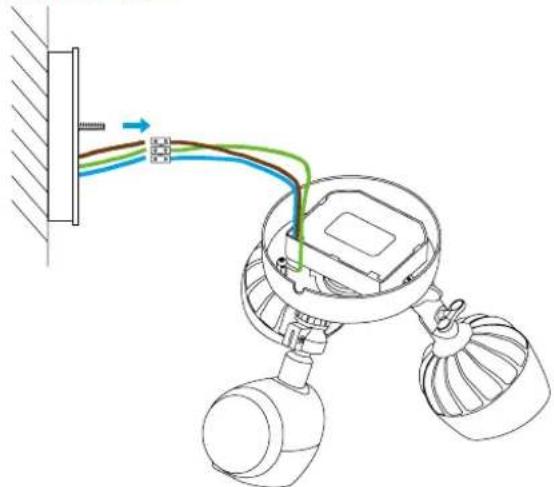
Step 5 Connect the wires.
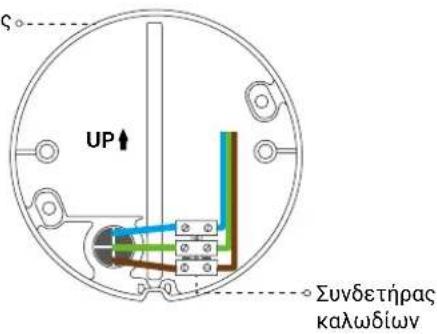
Follow the steps to connect the wires from your wall to the wires on your security camera, as shown in the figure below.
1. Attach the ground (or yellow-green) wire from your wall to the yellow-green wire on your security light camera.
2. Attach the hot (or brown) and neutral (or blue) wires from your wall to the brown and blue wires on your security light camera respectively.
3. Secure them using screwdriver (sold separately).
Figure: Connect the Wires
natural_image
Diagram of a wall-mounted lamp with wires and components, no text or symbols presentWires from your wall Connect to Matching Wire on Camera
Yellow-green-Ground Yellow-green
Brown-Hot Brown
Blue-Neutral Blue
Step 6 Snap the wire connector into place.
After securing the wires, snap the wire connector into the base of the mounting bracket.

natural_image
Technical diagram of a mechanical assembly with labeled components and directional arrows (no text or symbols)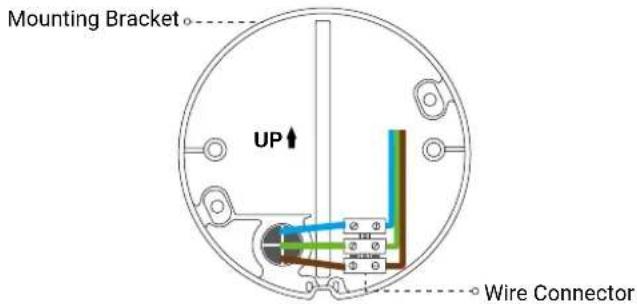
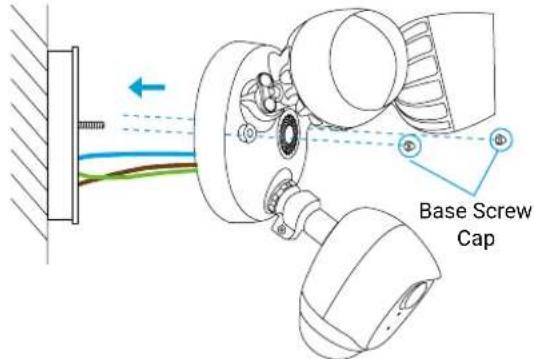
Step 7 Place security light camera on the bracket.
Align the mounting posts with the holes on security light camera and press together, securing the base screw caps.
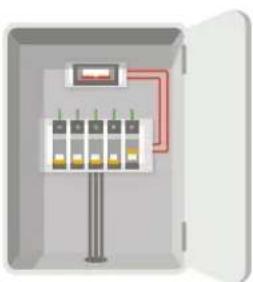
Step 8 Restore power at the breaker.
Turn on power to your security light's circuit.
natural_image
Illustration of an open electrical control box with four vertical test tubes and a red circuit board (no text or symbols)Step 9 Confirm the security light camera has power
EN
- After restoring power, the security light camera will be ready for setup when the lights are on and the LED indicator on the front of the camera fast flashes blue.
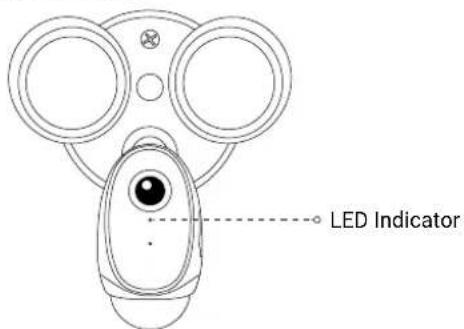
LED Indicator Status
Red
• Solid Red: Camera is starting up.
- Slow-flashing Red: Wi-Fi connection has failed.
- Fast-flashing Red: Camera exception (e.g. Micro SD card error).
Blue
- Solid Blue: Video is being viewed or played back in EZVIZ App.
- Slow-flashing Blue: Camera is running properly.
- Fast-flashing Blue: Camera is ready for Wi-Fi connection.
Add a security light camera to EZVIZ
- Log in the EZVIZ app.
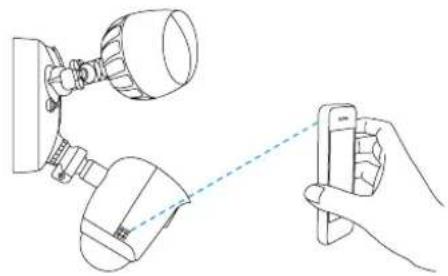
- From the EZVIZ app Home screen, tap "+" on the upper-right hand corner to go to the scan QR code interface.

natural_image
Line drawing showing a hand holding a smartphone next to a wall-mounted device with a bulb and connector (no text or symbols)- Scan the QR Code on the security light camera.
- Follow the EZVIZ app wizard to finish Wi-Fi configuration.
• If you want to change your security light camera's Wi-Fi, press and hold the reset button for 5s and repeat this part.
- The security light camera works with 2.4GHz Wi-Fi signals. If you have a dual-band router with separate 2.4GHz and 5GHz networks, make sure your phone is connected to the 2.4GHz one.
- If your Wi-Fi network signal is less than 50% where you want to install the security light camera, a Wi-Fi signal extender is recommended to boost the signal at the installation point.
Initialize Micro SD Card
- In the EZVIZ app, check the memory card status by tapping on the Storage Status in the Device Settings interface.
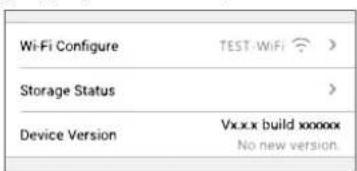
- If the memory card status displays as Uninitialized, tap to initialize it. The status will then change to Normal.
For detailed information, please visit www.ezvizlife.com.
Lieferumfang
natural_image
Technical line drawing of a mechanical device with two views (top and side), no text or symbols present.natural_image
Illustration of an open electrical control box with multiple switches and a red circuit line (no text or symbols)Schritt 2 MicroSD-Karte installieren (optional)
natural_image
Illustration of a device being held by a lamp, showing the lamp and its internal components (no text or symbols present)natural_image
Technical line drawing of a lamp fixture with wiring and components, no text or symbols presentDE
natural_image
Technical diagram of a mechanical assembly showing a circular component with internal colored wires and a separate view of a mechanical housing (no text or symbols present)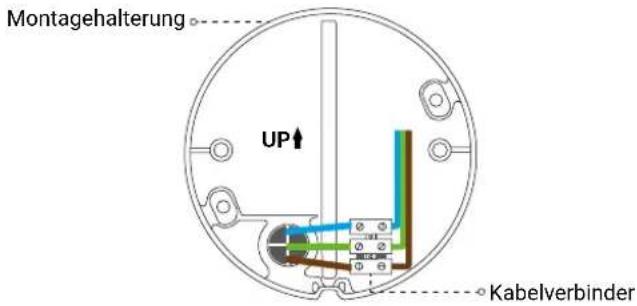
natural_image
Illustration of an open electrical control box with multiple panels and wiring (no text or symbols)natural_image
Line drawing showing a wall-mounted lamp connected to a hand holding a smartphone (no text or symbols present)natural_image
Technical line drawing of a mechanical device with two views (top and side), no text or symbols present.natural_image
Illustration of an open electrical control panel with three vertical indicator lights and a red circuit line (no text or symbols)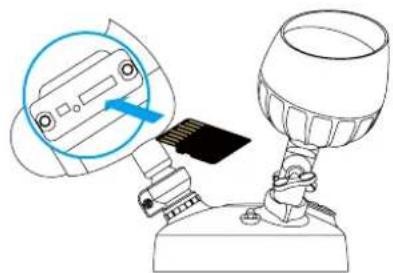
natural_image
Illustration of a robotic arm holding a wine glass lamp, with a magnified inset showing the device (no text or symbols present)natural_image
Diagram of a lamp fixture with wiring and components, no text or symbols presentnatural_image
Technical diagram of a mechanical assembly with labeled components and directional arrows (no text or symbols)Soporte de montaje

natural_image
Illustration of an open electrical control box with multiple panels and wiring (no text or symbols)Indicador LED Estado
Rojo
natural_image
Line drawing showing a hand holding a smartphone connected to a wall-mounted device (no text or symbols present)natural_image
Illustration of an open electrical control box with three vertical panels and a red circuit line (no text or symbols)natural_image
Illustration of a robotic arm holding a wine glass with a magnified inset showing the internal components (no text or symbols present)natural_image
Diagram of a wall-mounted lamp with two bulbs and wiring, showing connections without any text or symbolsFil chaud marron Marron
natural_image
Technical diagram of a mechanical assembly showing a circular component with internal wiring and a separate view of a mechanical component (no text or symbols present)Support de montage
natural_image
Illustration of an open electrical control panel with three vertical conductors and a digital display (no text or symbols)natural_image
Line drawing showing a wall-mounted lamp connected to a smartphone via a hand gesture (no text or symbols)natural_image
Technical line drawing of a mechanical device with two views (top and side), no text or symbols present.natural_image
Illustration of an open electrical control panel with multiple switches and wiring (no text or symbols)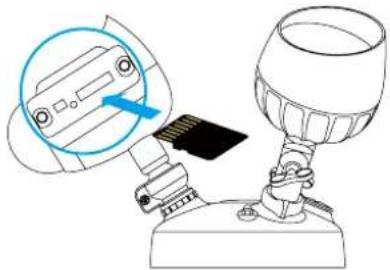
natural_image
Illustration of a hand holding a flash bulb with a close-up view of the device (no text or symbols present)natural_image
Diagram of a wall-mounted lamp with two fans and wiring, showing connection to a wall (no text or symbols)natural_image
Technical diagram of a mechanical assembly showing a pipe connection and a close-up view of internal components (no text or symbols)natural_image
Illustration of an open electrical control box with three vertical panels and a red circuit line (no text or symbols)natural_image
Line drawing showing a wall-mounted lamp connected to a hand holding a smartphone (no text or symbols present)natural_image
Technical line drawing of a smart air conditioner unit with screw base (no text or symbols)NL
natural_image
Illustration of an open electrical control box with multiple switches and a red circuit line (no text or symbols)natural_image
Diagram showing a robotic arm interacting with a wine glass (no text or symbols present)natural_image
Diagram of a wall-mounted lamp with two bulbs and wiring, showing connection to a wall (no text or symbols)natural_image
Technical diagram of a mechanical assembly showing a circular component with internal wiring and a separate motor assembly (no text or labels)
natural_image
Illustration of an open electrical enclosure with a control panel and red circuit lines (no text or symbols)natural_image
Line drawing showing a wall-mounted lamp connected to a handheld device via a dashed line (no text or symbols)natural_image
Technical line drawing of a mechanical device with two views (top and side), no text or symbols present.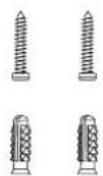
natural_image
Illustration of an open electrical control box with multiple switches and a digital display (no text or symbols)natural_image
Diagram showing a robotic arm interacting with a wine glass, highlighting a blue arrow (no text or symbols present)natural_image
Technical diagram of a mechanical assembly with springs, screws, and colored wires (no text or labels)natural_image
Diagram of a wall-mounted lamp with two actuators and wiring, showing connections without any text or symbols.natural_image
Technical diagram of a mechanical assembly with labeled components and directional arrows (no text or symbols)
natural_image
Illustration of an open electrical control box with multiple panels and wiring (no text or symbols)natural_image
Line drawing showing a hand holding a smartphone connected to a wall-mounted device (no text or symbols present)natural_image
Technical line drawing of a mechanical device with two views (top and side), no text or symbols present.
GR
natural_image
Electrical enclosure diagram showing three panels with red wiring and a central indicator (no text or symbols)
natural_image
Diagram showing a device being inserted into a bottle, with no visible text or symbolsnatural_image
Diagram of a wall-mounted lamp with two actuators and colored wires, no text or symbols presentnatural_image
Technical diagram showing a mechanical assembly with a circular component and a separate view of a device with internal wiring (no text or symbols)Βραχίονας στήριξης
natural_image
Illustration of an open electrical control panel with multiple terminals and a red circuit line (no text or symbols)natural_image
Line drawing showing a hand holding a smartphone with a close-up of its cable, alongside a wall-mounted device (no text or symbols present)natural_image
Technical line drawing of a mechanical device with two views (top and side), no text or symbols present.
natural_image
Illustration of an open electrical control panel with multiple switches and a red circuit line (no text or symbols)Krok 2 Vložte kartu micro SD (volitelné)

natural_image
Diagram showing a device being inserted into a wine glass (no text or symbols present)natural_image
Diagram of a wall-mounted lamp with wiring and components, no text or symbols presentnatural_image
Technical diagram showing a mechanical assembly with a circular component and a close-up of a connected pipe or valve (no text or symbols present)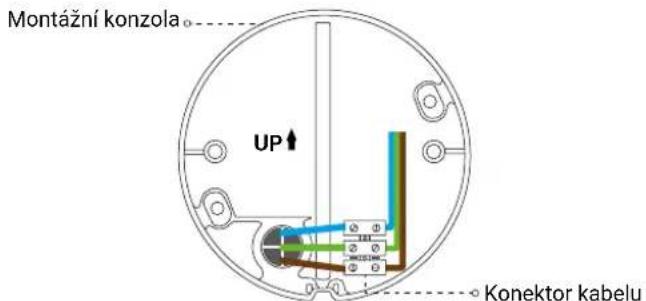
natural_image
Illustration of an open electrical control box with multiple panels and wiring (no text or symbols)natural_image
Line drawing showing a hand holding a smartphone connected to a wall-mounted device (no text or symbols present)CZ
NO
Trinn 1 Slå av strømmen som styrer kretsen til overvåkingskameraet med sikringen.
natural_image
Illustration of an open electrical control box with three vertical panels and a red circuit board (no text or symbols)Trinn 2 Monter microSD-kortet (valgfritt).
natural_image
Diagram showing a robotic arm interacting with a wine glass lamp, with a magnified inset highlighting the device (no text or symbols present)Når du har montert microSD-kortet, må du initialisere kortet i EZVIZ-appen før du kan bruke det. Se side 55 for å få mer informasjon: Initialiser microSD-kort.
natural_image
Diagram of a wall-mounted lamp with wires and connectors, showing wiring connections without any text or symbols.natural_image
Technical diagram of a mechanical assembly showing a pipe connection with colored wires and a separate view of a component (no text or symbols)
natural_image
Illustration of an open electrical control panel with multiple switches and a digital display (no text or symbols)Trinn 9 Bekreft at overvåkingskameraet med lyskastere har strøm
natural_image
Line drawing showing a hand holding a smartphone with a close-up of the camera lens (no text or symbols)- Skann QR-koden du finner på overvåkingskameraet med lyskastere.
- Følg veiviseren i EZVIZ-appen for å fullføre Wi-Fi-konfigurasjonen.
natural_image
Technical line drawing of a mechanical device with two views (top and side), no text or symbols present.natural_image
Illustration of an open electrical control panel with multiple switches and a digital display (no text or symbols)Steg 2 Installera micro SD-kort (tillval).
natural_image
Illustration of a robotic arm interacting with a wine glass (no text or symbols present)natural_image
Diagram of a lamp fixture with wiring and components, no text or symbols presentnatural_image
Technical diagram showing a mechanical assembly with a circular component and a separate view of a mechanical assembly (no text or symbols present)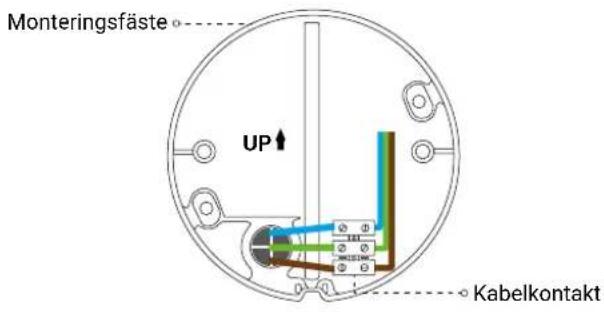
natural_image
Illustration of an open electrical control box with multiple panels and wiring (no text or symbols)natural_image
Line drawing showing a wall-mounted lamp connected to a hand holding a smartphone (no text or symbols present)SW
natural_image
Technical line drawing of a mechanical device with two views (top and side), no text or symbols present.natural_image
Illustration of an open electrical control box with three vertical panels and a red circuit line (no text or symbols)DK
Trin 2 Installér mikro SD-kort (valgfrit).
natural_image
Diagram showing a robotic arm interacting with a wine glass (no text or symbols present)natural_image
Diagram of a wall-mounted lamp with wires and connectors, showing wiring connections without any text or symbols.natural_image
Technical diagram of a mechanical assembly showing a pipe connection and housing components (no text or labels)Monteringsbeslag

DK
natural_image
Illustration of an open electrical control box with multiple panel switches and a red circuit breaker (no text or symbols)natural_image
Line drawing of a wall-mounted lamp and a hand holding a smartphone (no text or symbols)natural_image
Technical line drawing of a mechanical device with two views (top and side), no text or symbols present.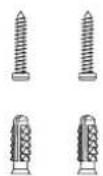
natural_image
Illustration of an open electrical control panel with three vertical buttons and a red circuit line (no text or symbols)natural_image
Illustration of a robotic arm holding a wine glass with a blue arrow pointing to the device (no text or symbols present)natural_image
Diagram of a wall-mounted lamp with two fans and wiring, showing connection to a wall (no text or symbols)natural_image
Technical diagram showing a mechanical assembly with a circular component and a separate exploded view of a device (no text or symbols present)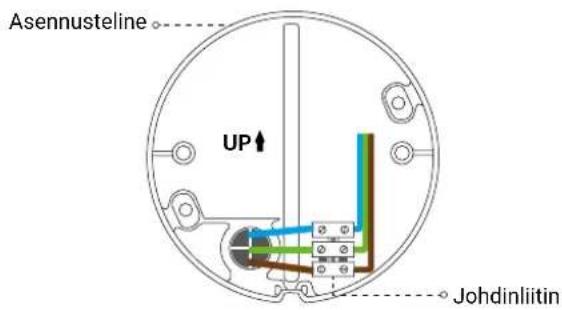
natural_image
Illustration of an open electrical control box with four vertical panels and a red circuit line (no text or symbols)natural_image
Line drawing showing a hand holding a wall-mounted device connected to a wall-mounted lamp (no text or symbols present)FI
natural_image
Technical line drawing of a smart home security camera with screw base and connector (no text or symbols)natural_image
Illustration of an open electrical control panel with multiple buttons and a red circuit line (no text or symbols)PT
natural_image
Illustration of a robotic arm interacting with a wine glass (no text or symbols present)natural_image
Diagram of a wall-mounted lamp with colored wires and components, no text or symbols presentnatural_image
Technical diagram of a mechanical assembly showing a pipe connection and a close-up view of a component (no text or symbols)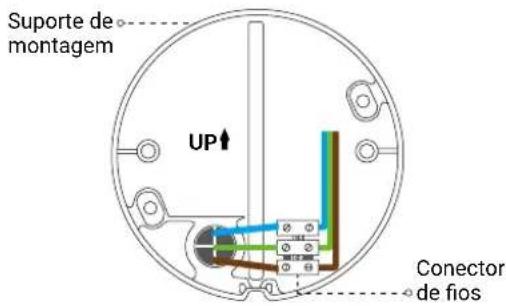
natural_image
Illustration of an open electrical control box with multiple outlets and a red circuit line (no text or symbols)natural_image
Line drawing showing a hand holding a wall-mounted device connected to a wall-mounted fixture (no text or symbols present)natural_image
Line drawing of a mechanical device with two views (top and side), no text or symbols presentnatural_image
Illustration of an open electrical control box with multiple terminals and a red circuit line (no text or symbols)Pasul 2 Instalați cardul Micro SD (opțional).
natural_image
Illustration of a robotic arm interacting with a wine glass (no text or symbols present)natural_image
Diagram of a wall-mounted lamp with wires and connectors, showing wiring connections without any text or symbols.natural_image
Technical diagram of a mechanical assembly showing a circular component with internal wiring and a separate view of a mechanical assembly (no text or symbols present)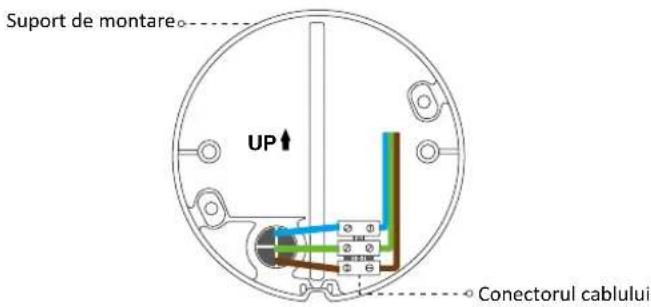
natural_image
Illustration of an open electrical control box with multiple switches and wiring (no text or symbols)natural_image
Diagram showing a hand holding a smartphone next to a wall-mounted lamp and a mechanical device (no text or symbols present)natural_image
Illustration of an open electrical control panel with multiple switches and a red circuit line (no text or symbols)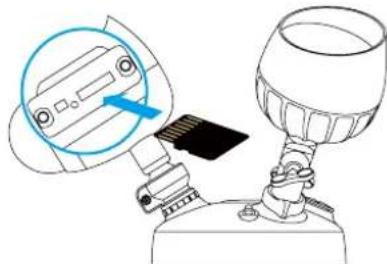
natural_image
Illustration of a device being inserted into a lamp (no text or symbols visible)natural_image
Diagram of a wall-mounted lamp with wires and connectors, showing wiring connections without any text or symbols.natural_image
Technical diagram of a mechanical assembly with exploded view and close-up of internal components (no text or symbols)
natural_image
Illustration of an open electrical control box with multiple panels and a red circuit board (no text or symbols)natural_image
Diagram showing a hand holding a smartphone with a close-up of its cable, alongside a wall-mounted device (no text or symbols present)Thank you for purchasing Hangzhou EZVIZ Software Co., Ltd. ("EZVIZ") products. This limited warranty ("warranty") gives you, the original purchaser of the EZVIZ product, specific legal rights. You may also have other legal rights that vary by state, province or jurisdiction. This warranty applies only to the original purchaser of the product. "Original purchaser" means any consumer having purchased the EZVIZ product from an authorized seller. The disclaimers, exclusions, and limitations of liability under this warranty will not apply to the extent prohibited by applicable law. No distributor, reseller, agent, or employee is authorized to make any modification, extension, or addition to this warranty.
Your EZVIZ product is warranted for a period of two (2) years from the date of purchase against defects in materials and workmanship, or such longer period as may be required by law in the country or state where this product is sold, when used normally in accordance with user manual.
You can request warranty service by contacting our Customer Service.
For any defective EZVIZ products under warranty, EZVIZ will, at its option, (i) repair or replace your product free of charge; (ii) exchange your product with a functional equivalent product; or (iii) refund the original purchase price, provided you provide the original purchase receipt or copy, a brief explanation of the defect, and return the product in its original packaging. At EZVIZ's sole discretion, repair or replacement may be made with a new or refurbished product or components. This warranty does not cover the shipping cost, insurance, or any other incidental charges incurred by you in returning the product. Except where prohibited by applicable law, this is your sole and exclusive remedy for breach of this warranty. Any product that has either been repaired or replaced under this warranty will be covered by the terms of this warranty for the longer of ninety (90) days from the date of delivery or the remaining original warranty period.
This warranty does not apply and is void:
- If the warranty claim is made outside the warranty period or if the proof of purchase is not provided;
- For any malfunction, defect, or failure caused by or resulting from the evidence of impact; mishandling; tampering; use contrary to the applicable instruction manual; incorrect power line voltage; accident; loss; theft; fire; flood; or other Acts of God; shipping damage; or damage resulting from repairs performed by unauthorized personnel;
- For any consumable parts, such as batteries, where the malfunction is due to the normal aging of the product;
- Cosmetic damage, including but not limited to scratches, dents, and broken plastic on ports;
- Any software, even if packaged or sold with EZVIZ hardware;
- For any other damages free from defects in material or workmanship;
- Routine cleaning, normal cosmetic and mechanical wear and tear.
Please do not hesitate to contact your seller or our Customer Service, with any questions.
EINGESCHRÄNKTE GARANTIE


- About this Manual
- Revision Record
- Trademarks Acknowledgement
- Legal Disclaimer
- Regulatory Information
- FCC Information
- EC DECLARATION OF CONFORMITY
- Safety Instruction
- Customer Service
- Sicherheitshinweis
- Security Light Camera
- Name Description
- Get the EZVIZ app
- Installation
- Step 1 Shut off the electricity at the breaker that controls security light's circuit.
- Step 2 Install Micro SD Card (Optional).
- Step 3 Separate the mounting bracket from the security light camera.
- EN
- Step 4 Install the mounting bracket.
- Step 5 Connect the wires.
- Step 6 Snap the wire connector into place.
- Step 7 Place security light camera on the bracket.
- Step 8 Restore power at the breaker.
- Step 9 Confirm the security light camera has power
- LED Indicator Status
- Add a security light camera to EZVIZ
- Initialize Micro SD Card
- Schritt 2 MicroSD-Karte installieren (optional)
- Indicador LED Estado
- Rojo
- Krok 2 Vložte kartu micro SD (volitelné)
- Trinn 1 Slå av strømmen som styrer kretsen til overvåkingskameraet med sikringen.
- Trinn 2 Monter microSD-kortet (valgfritt).
- Trinn 9 Bekreft at overvåkingskameraet med lyskastere har strøm
- Steg 2 Installera micro SD-kort (tillval).
- Trin 2 Installér mikro SD-kort (valgfrit).
- FI
- Pasul 2 Instalați cardul Micro SD (opțional).
- EINGESCHRÄNKTE GARANTIE
Brand : EZVIZ
Model : LC1C
Category : Camera