
LC200 - Video Conferencing System Lumens - Free user manual and instructions
Find the device manual for free LC200 Lumens in PDF.


| Product Type | Video Conferencing System / CaptureVision Station |
| Model Number | LC200 |
| Input Ports | 4x HDMI In, 4x Line/Mic In (Line In for audio), 1x USB 3.0 (front), 1x USB 2.0, 1x Ethernet, 1x RS-232/RS-485 |
| Output Ports | 2x HDMI Out (HDMI 1 MultiView, HDMI 2 Program), 1x Line Out |
| Power Supply | DC 12V, included power adapter and power cord |
| Recording Modes | MP4 Mixed Video, Original Source, Customized Mode; supports up to 12 hours recording |
| Streaming Protocols | RTMP, RTMPS, RTP, RTSP, YouTube, Facebook Live, Twitch, Smashcast |
| Supported Frame Rates | 30 fps or 60 fps system frame rate |
| Video Resolutions | Full HD 1920x1080, HD 1280x720, SD 640x480 |
| Storage | Internal SATA HDD (915 GB capacity shown in manual), external USB drive support |
| Network Connectivity | Ethernet 10/100/1000, DHCP or static IP |
| Control Interfaces | Front panel buttons, USB keyboard/mouse, RS-232/RS-485, web interface, optional LC-RC01 remote control panel |
| Input Signal Sources | Up to 4 HDMI sources, plus IP cameras and network streams; total up to 4 channels |
| Special Features | Picture in Picture (PIP), Picture by Picture (PBP), multi-channel layouts, custom overlays, timestamp, camera PTZ control |
| File Management | Upload, download, delete, playback, backup to FTP/NAS/WebDAV |
| Safety Certifications | FCC Class A, IC Class A, KC Class A |
| Weight (approx.) | Not specified in manual; estimate ~2 kg |
| Dimensions (approx.) | Not specified in manual; estimate ~300 x 200 x 100 mm |
| Cleaning Instructions | Disconnect cables, wipe with dry cloth; do not use alcohol or volatile solvents |
| Spare Parts / Repair | Refer servicing to licensed personnel; no user-serviceable parts inside |
Frequently Asked Questions - LC200 Lumens
User questions about LC200 Lumens
0 question about this device. Answer the ones you know or ask your own.
Ask a new question about this device
Download the instructions for your Video Conferencing System in PDF format for free! Find your manual LC200 - Lumens and take your electronic device back in hand. On this page are published all the documents necessary for the use of your device. LC200 by Lumens.
USER MANUAL LC200 Lumens
CaptureVision Station
User Manual - English

[Important]
To download the latest version of Quick Start Guide, multilingual user manual, software, or driver, etc., please visit Lumens https://www.MyLumens.com/support
Table of Contents
Copyright Information ......2
Chapter 1 Safety Instructions ....3
Chapter 2 Package Contents....4
Chapter 3 Product Overview....5
3.1 Front panel....5
3.2 Rear panel....5
3.3 RS-232/RS-485 I/O pin description 6
Chapter 4 Instruction for installation....7
4.1 Product connection diagram....7
Chapter 5 Function Description ....8
5.1 Real-time operation menu....8
5.2 Parameter setting....9
5.3 Director....26
5.4 File management....31
Chapter 6 Troubleshooting....35
Addendum 1 37
Supplier's Declaration of Conformity 47 CFR § 2.1077 Compliance Information ....38
Copyrights © Lumens Digital Optics Inc. All rights reserved.
Lumens is a trademark that is currently being registered by Lumens Digital Optics Inc.
Copying, reproducing or transmitting this file is not allowed if a license is not provided by Lumens Digital Optics Inc. unless copying this file is for the purpose of backup after purchasing this product.
In order to keep improving the product, the information in this file is subject to change without prior notice.
To fully explain or describe how this product should be used, this manual may refer to names of other products or companies without any intention of infringement.
Disclaimer of warranties: Lumens Digital Optics Inc. is neither responsible for any possible technological, editorial errors or omissions, nor responsible for any incidental or related damages arising from providing this file, using, or operating this product.
Always follow these safety instructions when using the product:
1 Operation
1.1 Please use the product in the recommended operating environment, away from water or source of heat.
1.2 Do not place product in tilted position or unstable trolley, stand or table.
1.3 Please clean the dust on the power plug prior to usage. Do not insert the product's power plug into a multiplug to prevent sparks or a fire.
1.4 Do not block the slots and openings in the case of this product. They provide ventilation and prevent the product from overheating.
1.5 Do not open or remove covers, otherwise it may expose you to dangerous voltages and other hazards. Refer all servicing to licensed service personnel.
1.6 Unplug the product from the wall outlet and refer servicing to licensed service personnel when the following situations happen:
■ If the power cords are damaged or frayed.
If liquid is spilled into the product or the product has been exposed to rain or water.
2 Storage
2.1 Do not place the product where the cord can be stepped on as this may result in fraying or damage to the lead or the plug.
2.2 Unplug the product during thunderstorms or if it is not going to be used for an extended period.
2.3 Do not place the product or accessories on top of vibrating equipment or heated objects.
3 Cleaning
3.1 Disconnect all the cables prior to cleaning and wipe the surface with a dry cloth. Do not use alcohol or volatile solvents for cleaning.
4 Batteries (for products or accessories with batteries)
4.1 When replacing batteries, please only use similar or the same type of batteries
4.2 When disposing of batteries or products, please adhere to the relevant instructions in your country or region for disposing of batteries or products
■ FCC Warning
This equipment has been tested and found to comply with the limits for a Class A digital device, pursuant to part 15 of the FCC Rules. These limits are designed to provide reasonable protection against harmful interference when the equipment is operated in a commercial environment.
Notice :
The changes or modifications not expressly approved by the party responsible for compliance could void the user's authority to operate the equipment.
IC Warning
This digital apparatus does not exceed the Class A limits for radio noise emissions from digital apparatus as set out in the interference-causing equipment standard entitled “Digital Apparatus,” ICES-003 of Industry Canada.
Operation of this equipment in a residential environment could cause radio interference.
■ KC Warning
This equipment is Industrial (Class A) electromagnetic wave suitability equipment and seller or user should take notice of it, and this equipment is to be used in the places except for home.
Chapter 2 Package Contents
| LC200 | Power Adapter | Power Cord |
| Appearance may vary depending on country/region | ||
| Quick Installation Guide | RS-232/RS-485 Connector (x2) | Mounting Metal Plate (x2) |
| Quick Installation Guide | ||
| M3x6 Flat Head Screw(x4) |
3.1 Front panel

3.2 Rear panel

| No | Name | Function Descriptions |
| 1 | RECORD | 1. Start/Stop recording2. Press and hold for 3 seconds: Pause Recording |
| 2 | SNAPSHOT | Capture a single photo |
| 3 | STREAM | On/Off image streaming |
| 4 | Single Channel | Display a single channel screen |
| 5 | PIP | Switch to PIP display |
| 6 | PBP | Switch to PBP display |
| 7 | Three Channel | Switch to three-channel display |
| 8 | Customize | Customize layout display |
| 9 | USB 3.0 Port | USB hard disk interface for storage |
| 10 | Switch Channel | Switches between signal sources |
| 11 | Channel 1 ~ 3 | Quickly switch to CH1/CH2/CH3 signal sources |
| 12 | Line In (4 CH) | Line In / Mic In audio input |
| 13 | HDMI In (4 CH) | HDMI signal source input |
| 14 | Line Out | Allows line audio out to amplifier transfer |
| 15 | HDMI 2 Program | Main screen output, display the recording or streaming screen and layout |
| 16 | HDMI 1 MultiView | Operation interface output; display the device parameter setting menu and image management |
| 17 | USB 2.0 Port | Connect USB keyboard/mouse device operation menu |
| 18 | RS-232/RS-485 Port | Control the device through RS-232/RS-485 |
| 19 | Ethernet | Connecting to LAN |
| 20 | DC IN 12 V | DC 12 V power connector |
| 21 | Power | On/Off the device power |
3.3 RS-232/RS-485 I/O pin description
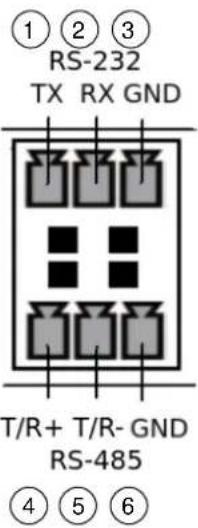
RS-232
| Pin NO. | Function |
| 1 | TX+ |
| 2 | RX- |
| 3 | GND |
RS-485
| Pin NO. | Function |
| 4 | T/R+ |
| 5 | T/R- |
| 6 | GND |
4.1 Product connection diagram

flowchart
graph TD
    A["Microphone"] --> B["Line/MIC device Audio In"]
    C["Amplifier"] --> D["Line In 4"]
    D --> E["Line In 2"]
    E --> F["Line In 2"]
    F --> G["Line In 1"]
    G --> H["HDMI output"]
    I["Display (Program)"] --> J["HDMI 2 Program"]
    K["Display (MultiView)"] --> L["HDMI 1 MultiView"]
    M["Router"] --> N["LAN"]
    O["Power Cord"] --> P["Power Supply"]
    Q["Input"] --> R["HDMI Source Input"]
    S["IP Camera"] --> T["Document Camera"]
    U["Box Camera"] --> V["Computer"]
    W["Speaker"] --> X["Audio Output"]
    Y["External Keyboard/Mouse"] --> Z["USB Control"]
    AA["Environment Control Equipment"] --> AB["RS-232/RS-485 Control"]
5.1 Real-time operation menu
Connect the HDMI1 MultiView output to the display panel to show the real-time operation menu
Connect the keyboard/mouse through the USB port and use the keyboard/mouse to select the menu settings

| No | Icon | Name | Function Descriptions |
| 1 |  | Parameter setting | Perform the system network setting, recording/streaming compress setting |
| 2 |  | Casting Management | Input signal source selection, audio management, recording/streaming control, output version selection, and network video camera control |
| 3 |  | File management | Conduct the video file content management, including the following functions: Upload, download, delete, replay video files |
| 4 |  | About | Display the current firmware version and relevant production information of LC200 |
| 5 | NA | Device IP | When connecting to the router, the current assigned device IP address will be displayed |
5.2 Parameter setting
This Section provides descriptions of the web-based interface to control the display items. HDMI MultiView only provides items of [System Settings] and [Video Settings].
5.2.1 System Settings
5.2.1.1 System Settings
You may set up the device's basic information, initial date and time, and others here.
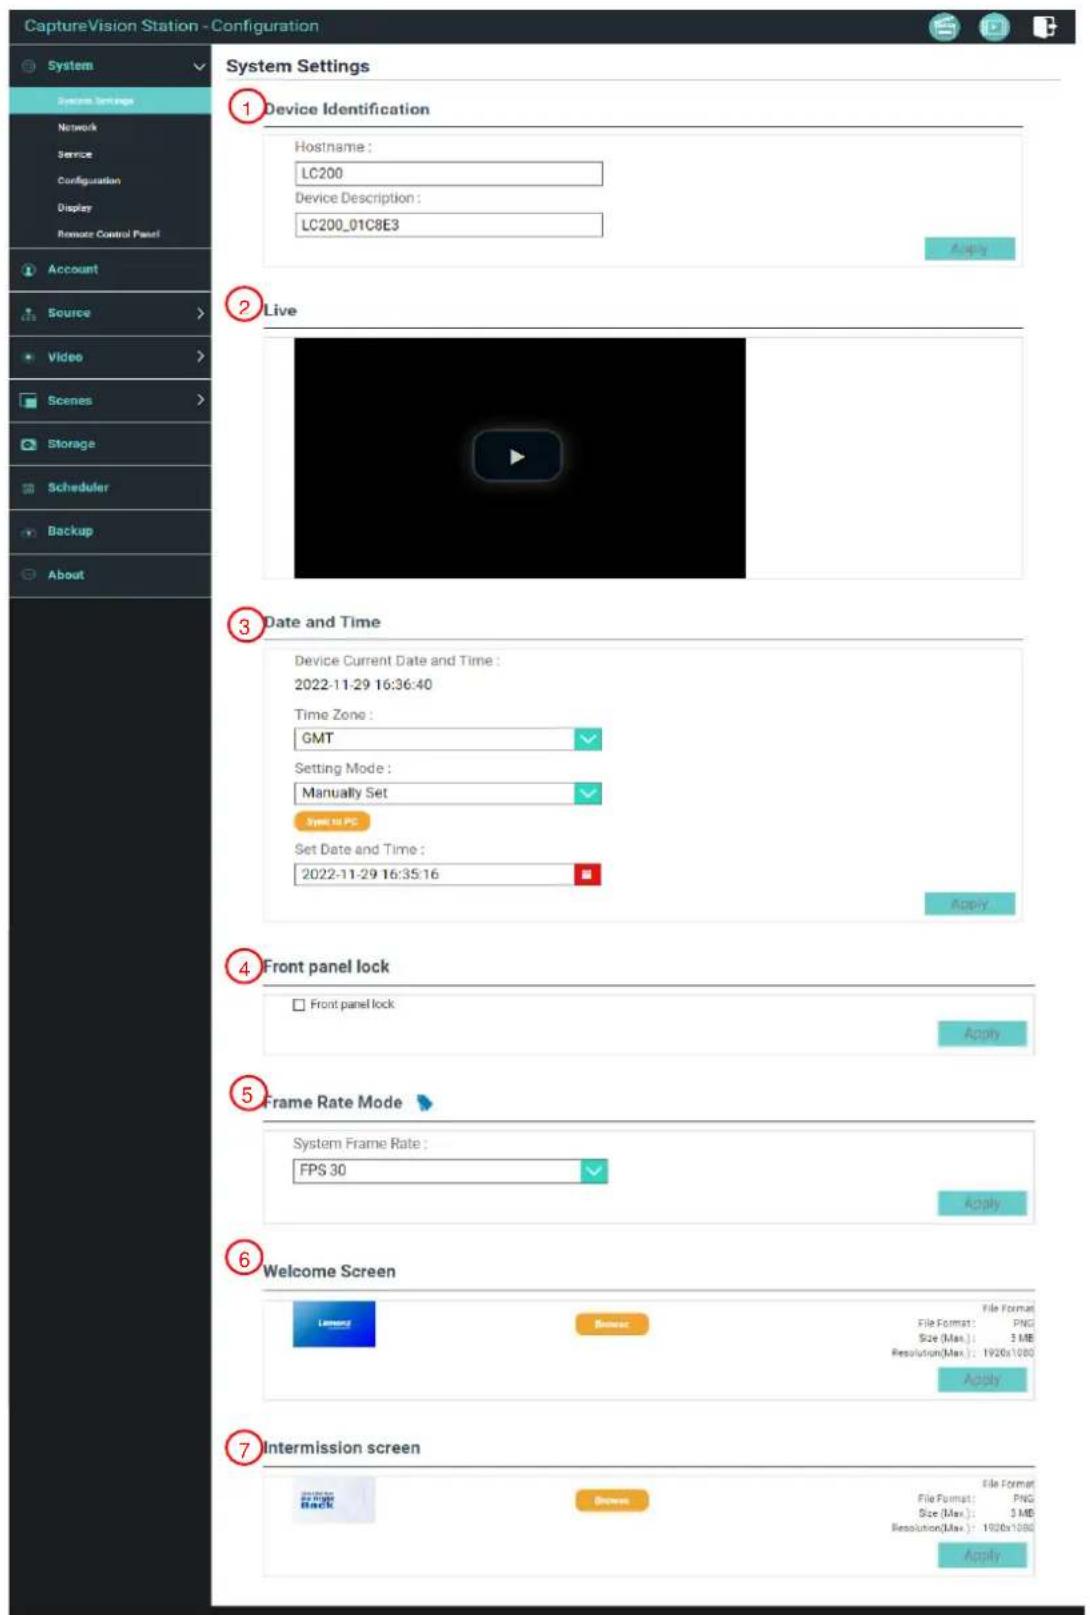
| No | Item | Function Descriptions |
| 1 | DeviceIdentification | Defines the device name and device description for LC200※Display name only accepts English characters and numbers |
| 2 | Live | Displays the real-time PGM screen |
| 3 | Date & Time | LC200 supports different time zone setting. It can synchronize time with NTP service (default) and manual setup■ Time Zone: Select the correct time zone according to current location■ Configuration Mode:➢ NTP service: Synchronize time with a network server➢ Manual Setup: Set time manually |
| 4 | Front Panel Lock | Select to enable Front Panel Lock➢ Even though LC200 is rebooted, it will remain locked.To disable this function, please log in to the web page to uncheck this item. |
| 5. | Frame Rate Mode | You can configure the output frame rate at 30/60 fps※If the frame rate setting of LC200 is 60 fps➢ Up to 2 network image inputs are supported➢ Recording can only be Movie Mode➢ Streaming video compression format is the same as recording |
| 6. | Welcome Image | You can customize a welcome image for LC2001 Click [Browse] and select a file to upload. Once done, a thumbnail will be generated※File format:➢ File format: PNG➢ File Size (Max.): 3 MB➢ Resolution Size (Max.): 1920 x 10802 Click [Apply] to save this change. If you need to select another file, click [Cancel] and reselect a file |
| 7. | Intermissionscreen | Users can change the image files➢ File format: PNG➢ File Size (Max.): 3MBResolution Size (Max.): 1920 x 1080 |
[Remark] You can select different system frame rates in the frame rate mode that affects the supported recording mode and network streaming number. Please refer to the following restrictions on use.
| System Frame Rate | Supported Recording Mode | Streaming Video Compression Settings | Network Streaming (IP) | MultiView signal source selection limits | PGM Maximum Split-screen Quantity | |
| Maximum number of streams supported | Maximum frame rate supported | |||||
| FPS30 | Mixed Video / Original Source | Full HD 30 FPS HD 30 FPS SD 30 FPS | 3 streams | Full HD 30 FPS | IP + HDMI = 4 channels IP ≤ 3 (only CH1~3 available for selection) | 4 channels |
| FPS60 | Mixed Video | Full HD 60 FPS | 2 streams | Full HD 60 FPS | IP + HDMI = 4 channels IP ≤ 2 (only CH1~2 available for selection) | 2 channels |
5.2.1.2 Network
The factory reset of LC200 is DHCP. The IP address is assigned by the connecting LAN router. If you want to use a static IP address, please configure the connection here.

Network
Network Settings

| No | Item | Function Descriptions |
| 1 | Ethernet Setting | ■ DHCP: Dynamic IP address as default■ Static IP: Configure static IP address according to the network and manually enter network informationSelect and fill in required network setting information and click [Apply] to save the settings※The system will restart after changing network setting. Please connect and log in again |
5.2.1.3 Services

Service

Master Firmware
Master Firmware Version :
v4.5.0.13
Update

Slave Firmware
Slave Firmware Version :
v19.7.26
Update

Service Data
Export the log file to your computer
Description :

Export

Reset
Reset to factory default

Except the network settings
Reset

Restart Device
Restart
| No | Item | Function Descriptions |
| 1 | Main Firmware | Main firmware information and updateClick [Update] and select the main firmware file to update |
| 2 | Secondary Firmware | Secondary firmware information and updateClick [Update] and select the secondary firmware file to update |
| 3 | Service History | Saves system log files to user's computer1 Enter file name2 Click [Export] to export system log files※The length of file name must be between 0 ~ 16 characters.{}')'&@~~$%'|,':?<>*V#; symbols, and space are forbidden |
| 4 | Reset | Restores LC200 to factory reset※Check [Keep Network Settings] and the network settings will be remained |
| 5 | Restart the device | Restart the LC200 |
5.2.1.4 Setting File
You can export the configuration files of the device to a computer, and import the configuration files to another device to apply the same configuration.
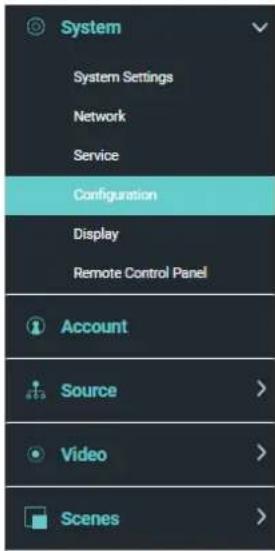

| No | Item | Function Descriptions |
| 1 | Export | Export the current configuration of LC200 as a configuration file |
| 2 | Import | Import the exported configuration files from a LC200 to another LC200 |
5.2.1.5 Display Settings
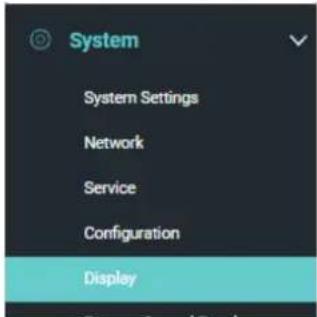
Display
Output Resolution
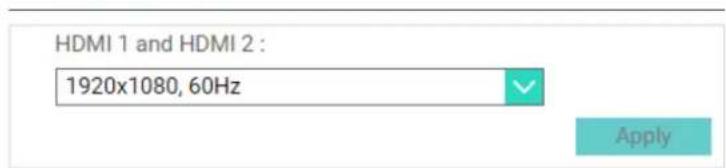
| No | Item | Function Descriptions |
| 1 | Output Resolution | Select a HDMI output resolution on LC200 |
5.2.1.6 Remote control panel

Remote Control Panel
Information
| Model Name | FW Version | Connected |
| No | Item | Function Descriptions |
| 1 | Remote control panel | Display the connection information of LC-RC01 extension control panel (optional).When there is no connection, a blank screen appears |
5.2.2 Account
You can manage accounts for 3 kinds of user mode here: modify the user name and password to [System Management], [Director], and [Content Management].

| No | Item | Username/Password | Function Descriptions |
| 1 | System Management | admin / admin | Sets up the permission of main system management |
| 2 | Director | director / director | Manages playback and changes simple basic image settings and the permission of Director |
| 3 | Content Management | video / video | Views the permission of file storage and playback |
5.2.3 Video Source
5.2.3.1 Network Device Management

| No | Item | Function Descriptions |
| 1 | Network Camera | 1 Click [Refresh] and automatically scan the network cameras in the same LAN2 Click [Login Verification] and enter login information to connect the camera Lumens Network CameraAccount: adminPassword: 99993 Once the status display “OK”, indicating that the image can be set under the signal source input selection. Lumens Network CameraAccount: adminPassword: 99993 Once the status display “OK”, indicating that the image can be set under the signal source input selection. |
| 2 | Network Streaming | 1 Click [Add]2 Enter the network streaming name and URL, and then click [Apply] 3 The newly added network streaming name will be displayed in the list 3 The newly added network streaming name will be displayed in the list |
5.2.3.2 Video communication source management
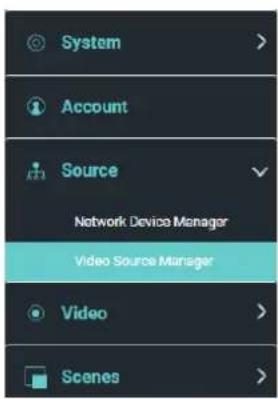
Video Source Manager
| ID | Source | Information | Source Name | Edit | Delete |
| 1 | HDMI1 | N/A | HDMI1 | ||
| 2 | HDMI2 | N/A | HDMI2 | ||
| 3 | HDMI3 | N/A | HDMI3 | ||
| 4 | HDMI4 | N/A | HDMI4 |
| No | Item | Function Descriptions |
| 1 | Video communication source management | Display the video communication source information for users to edit the source name and order |
5.2.4 Video Settings
5.2.4.1 Record Settings
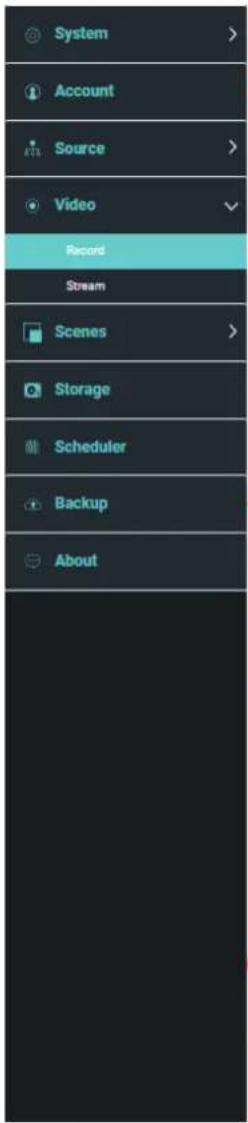

| No | Item | Function Descriptions |
| 1 | Encoder Settings | Recording Mode: You can select MP4 Mixed Video Mode and MP4 Mixed Video/ Original Source Mode/ Customized ModeMixed Video Mode: Only record the single PGM 4-channel mixed video.Original Source Mode: Can record the single PGM 4-channel mixed video and 4 signal original sourceCustomized Mode: Select which channels should be recorded.You can choose individual channels (1-4) or the PGM mixed video.Encoder Settings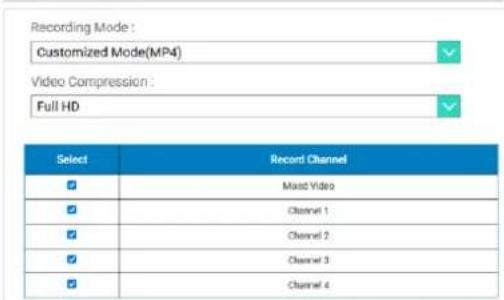 Encode Profile: 7 default encoding formats are available to be selected by resolutions and average bitrate (Please refer to the instructions of Encode Profile). You can also set user-defined image quality.Preferentially record to front USB hard drive: Videos or pictures will be preferentially recorded to the USB flash drive which has already been connected to the front USB port.(This function can only be activated when in MP4 Mixed Video Mode)Loop Recording: Enabling the cycle record function can prevent recording error when storage device is full. Encode Profile: 7 default encoding formats are available to be selected by resolutions and average bitrate (Please refer to the instructions of Encode Profile). You can also set user-defined image quality.Preferentially record to front USB hard drive: Videos or pictures will be preferentially recorded to the USB flash drive which has already been connected to the front USB port.(This function can only be activated when in MP4 Mixed Video Mode)Loop Recording: Enabling the cycle record function can prevent recording error when storage device is full. |
| 2 | Audio Settings | Audio Delay Adjustment: 0 ~ 600 msAudio source: Set the audio source for Channel recording filesThe selection ofnonPGM Audio may increase CPU loading. Users may check out CPU information on the Director page of real-time operation menu under MultiView |
| 3 | Video File Name Setting | Customizes the prefix name of video file |
■ Instruction on Encode Profile
| Name | Video Resolution/ABR | Description |
| Full HD | 1080p / 4 Mbps | Dynamic scene; Large film site; Local drive recording |
| Internet Full HD | 1080p / 3 Mbps | General scene, Medium film site, Local drive recording |
| HD | 720p / 2 Mbps | Static scene, Small film site, Local drive recording |
| Internet HD | 720p / 1.5 Mbps | LAN director |
| SD | 480p / 800 kbps | Static scene, LAN director |
| Mobile network SD | 480p / 500 kbps | Director via mobile device |
| User-Defined | Click [ ] to open Custom (as shown in the following figure). Once done, click “Save”. | |
5.2.4.2 Streaming Settings
You may change the streaming settings here. Related settings must follow the streaming protocol and the settings recommended by server system support.

| No | Item | Function Descriptions |
| 1 | Encoder Settings | Encode Profile: 7 default encoding formats are available to be selected by resolutions and average bitrate (Please refer to5.2.4.1for the instructionsof Encode Profile in Record Settings). You can also set user-defined image quality. |
| 2 | Streaming Settings | ■ Streaming 1 / Streaming 2 / Streaming 3: You can customize 3 podcast addresses of network streamingSupported streaming type: RTMP / RTMPS / RTP / Youtube / Youtube_Gaming / Facebook Live / Twitch / Smashcast ■ Real Time Streaming Protocol (RTSP): You can customize the real time streaming route of LC200Default RTSP location:rtsp://LC200 IP address:554/pgm ■ Real Time Streaming Protocol (RTSP): You can customize the real time streaming route of LC200Default RTSP location:rtsp://LC200 IP address:554/pgm |
5.2.5 Scene
5.2.5.1 Scene
LC200 provides 5 overlay styles, 5 background images, and 5 scenes. You can also add your own styles.

| No | Item | Function Descriptions |
| 1 | Overlay | Select and delete overlay style. You can upload files to apply.Click [ ] and select a desired file from the window. Check the preview image and file name, and click [Apply] to start uploading and applying this overlay style. Click [Delete] to cancel the upload.※File format:➢PNG format➢Supported size: (a) 1920 x 136(b) 1080 x 240(c) 800 x 320(d) 640 x 400 |
| 2 | Background Image | Select and delete background image. You can upload files to apply.Click [ ] and select a desired file from the window. Check the preview image and file name, and click [Apply] to start uploading and applying this background image. Click [Delete] to cancel the upload.※File format:➢PNG format➢Supported size: 1920 x 1080 |
| 3 | Scene | Scene is the integration of “Overlay,” “Background Image,” and “Recording Layout,” which provides the scene made of different background images, layout, and overlay style. You can customize the layout content in 30 scenes.Click [ ] to open scene settings. Enter the scene name and select the required overlay, layout, and background image. Once done, click “Apply”. |
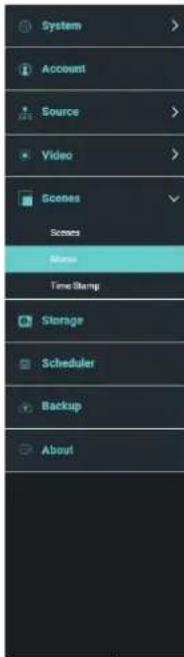
5.2.5.2 Macro
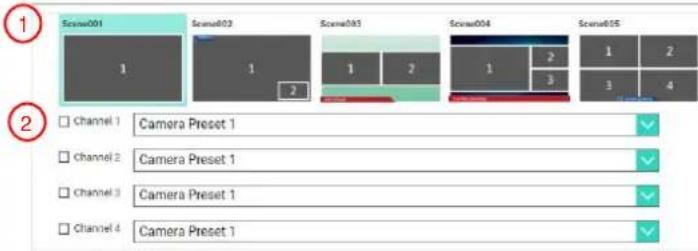
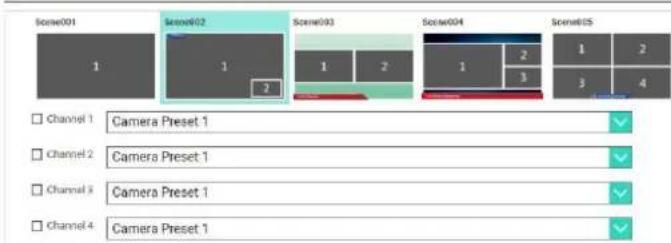
When used together with LC-RC01 extension control panel (optional), Macro can set scenes and camera preset position.
Macro [1 \~ 3] settings correspond to [1 \~ 3] keys on the extension control panel
Macro Settings
Macro 1
Macro 2
| No | Item | Function Descriptions |
| 1 | Scene Selection | Select a scene to be set. Each supports up to 30 sets of scene■ If the overlay style of the scene needs to be change, please refer to |
| 2 | Camera Preset Position Setting | Set/Cancel [Camera Preset Position]. Each supports up to 9 sets of camera preset position selectionAfter checking the box, the Marco will preset the settings of the network camera on Channel 1 ~ 4 |
5.2.5.3 Time Stamp
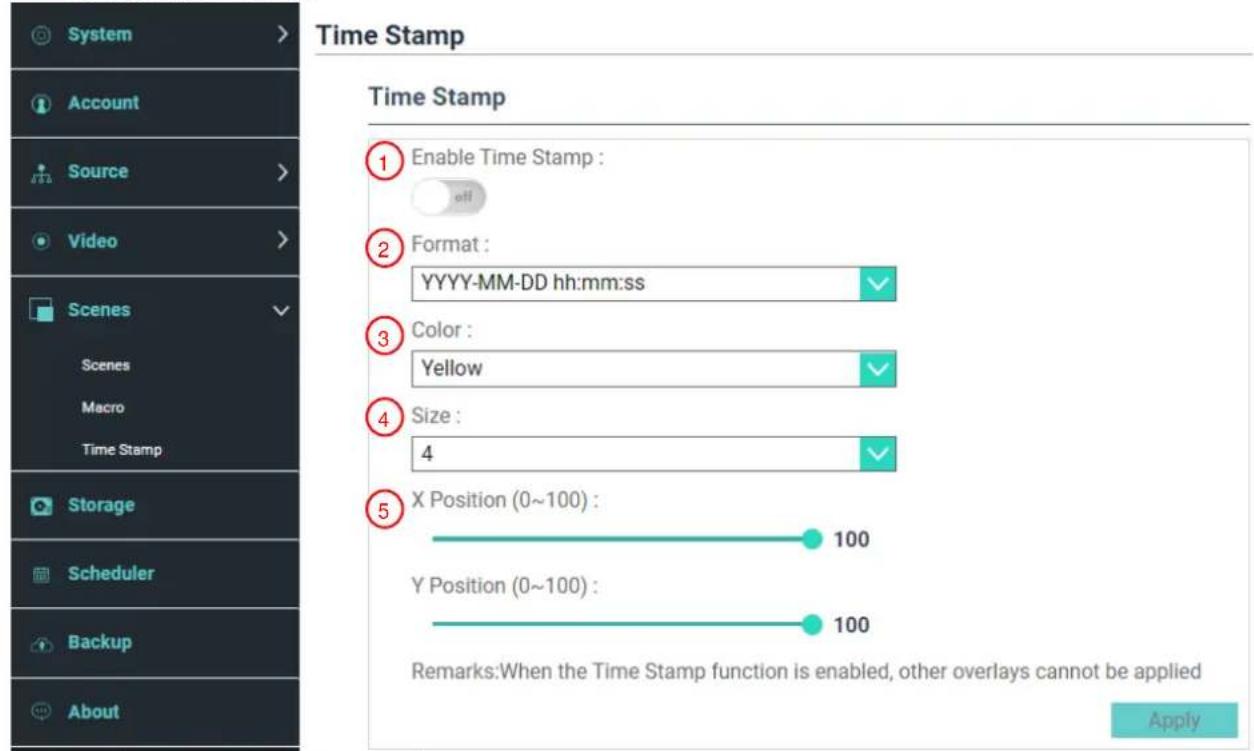
| No | Item | Function Descriptions |
| 1 | Enable Time Stamp | Turn on/off Time StampWhen the Time Stamp function is enabled, other overlays cannot be applied |
| 2 | Format | Time display format |
| 3 | Color | Color setting |
| 4 | Size | Font size setting |
| 5 | X / Y Position (0 ~ 100) | X: Time Stamp display position (left and right) in the PGM screen0: The leftmost / 100: The rightmostY: Time Stamp display position (up and down) in the PGM screen0: Top / 100: Bottom |
5.2.6 Storage Settings
You can set up recording storage, cycle recording, display hard drive information and NAS setting here.
![System Account Source Video Scenes Storage 1 Record Disk Settings Local Storage: Internal (SATA HDD) Loop Recording: 2 Disk Information Interface Disk Name Manufacturer Capacity Free Space Format SATA Internal (SATA HDD) ATA WDC WD100FZX 232 915.09 GB 150.33 GB 3 Automatically Delete Files Settings Daily Check Time: 60 24 - Hour Clock Delete Files Older Than [Storage Days]: 27 Storage Days (1-18) 4 NAS settings Mount: Protocol: CIFS / SMB Address: 0.0.0.0 Port: 445 Folder: SAMBA Domain name: Username: Password: Options: defaults SMB Version: SMB2 Apply](/content/2026/05/882747/images/7a89a9131dabba8ab6f9e3450da1f79ecad3ec7fc77345fcb2cebbb58476e256.jpg)
| No | Item | Function Descriptions |
| 1 | Recording Hard Drive Setting | Local storage: Click drop-down menu and select local storage hard driveFormats supported: exFAT/ FAT32/ NTFS |
| 2 | Hard Drive Information | Display hard drive information, free space, and capacity. Click “Format” to clear the internal storage devices. Confirm if you want to format the hard drive in the pop-up dialog and click “Confirm” to delete all video files. |
| 3 | Automatically Delete Files | Enter the time in the Daily Check Time section to specify when the files will be checked for expiration. The system will automatically delete any recorded files that exceed the number of days set in the Storage Days section. |
| 4 | NAS setting | Enable NAS mounting and related settings.It is required to go to Backup Setting>Upload Setting>Mode to select NAS. After recording, the video can be uploaded to NAS |
5.2.7 CMS Settings
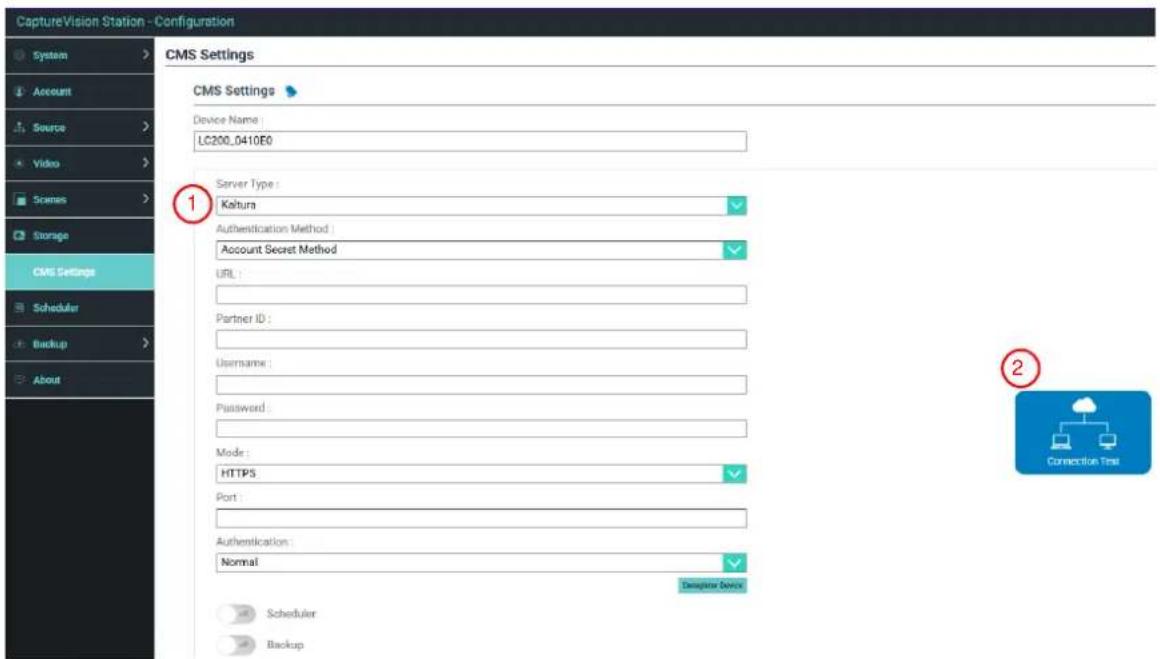
| No | Item | Function Descriptions |
| 1 | CMS Settings | 1. Server Type: Kaltura / Panopto / OpencastChoose the desired server type, then enter the login information to enable the LC100 to synchronize scheduling data with the corresponding server.2. Connection Test:Click [Connection Test]to verify if the current configuration successfully establishes a connection.For detailed configuration support, please contact Lumens technical support. |
5.2.8 Schedule Setting

| No | Item | Function Descriptions |
| 1 | Schedule Setting | Click [On/Off] : Enables/Disables schedule functionClick [Calendar] : Check the current schedule status:Reset schedule source and replace the current scheduleSchedule SourceImporting calendar manually:You can import iCalendar files (e.g. Outlook or Google Calendar)Click [Import] and select custom scheduled video fileOnly files in .ics format can be importedImporting calendar periodicallyYou can synchronize schedules from network servers (e.g. Google Calendar)Please refer to the videos of How to series on LumensTM YouTube channel for related application settings |
| 2 | Cancel Recording | Click [Stop] to stop the current scheduled recording |
| 3 | Stand by and Wake up | Enable/disable the scheduled standby and wake-up functions. Set the scheduled time after the functions are enabled. |
5.2.9 Backup Setting
LC200 provides auto backup service which can upload videos to a designated location automatically. You can set the upload destination and test the connection here.

| No | Item | Function Descriptions |
| 1 | Backup Setting | ■ Backup Type: Back up after recording / Schedule daily backup■ Mode: FTP / NAS / SFTP / USB storage / WebDAVTo select NAS, please go toStorage Settings >NAS Setting to enable mounting and related settings.■ Connection Test: Click [Connection Test]to verify if the current configuration successfully establishes a connection.Please refer to the videos of How to series on LumensTM YouTube channel for related application settings |
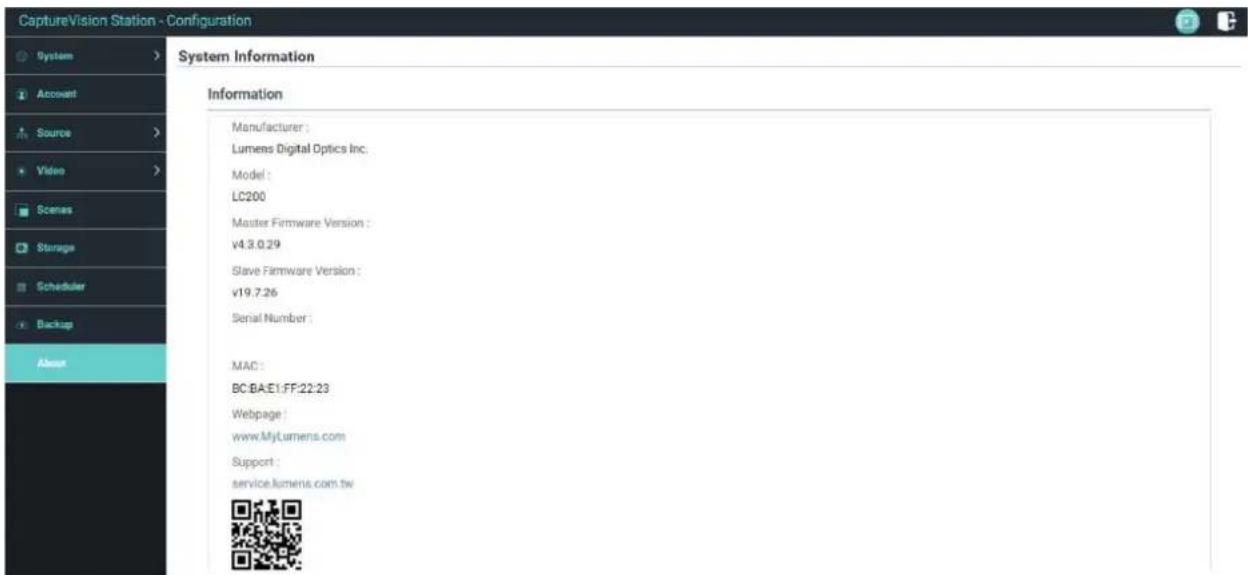
5.2.10 About
LC200 Device-related Information: Firmware version, device serial number, and technical support link
5.3 Director
LC200 is built in Director, which allows you to monitor recording and preview the output video from streaming director.
Three login methods below are available:
■ Select online Director from the HDMI1 MultiView real-time operation menu

■ When login the web page, select the online Director icon at the upper right corner on the configuration setting page
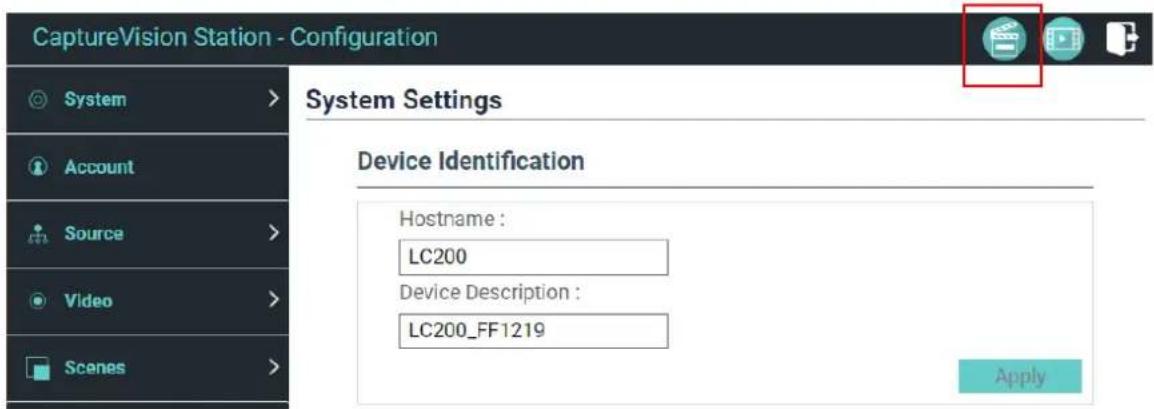
■ When login the web page, use the online Director authority account

Online Director related feature description as below:
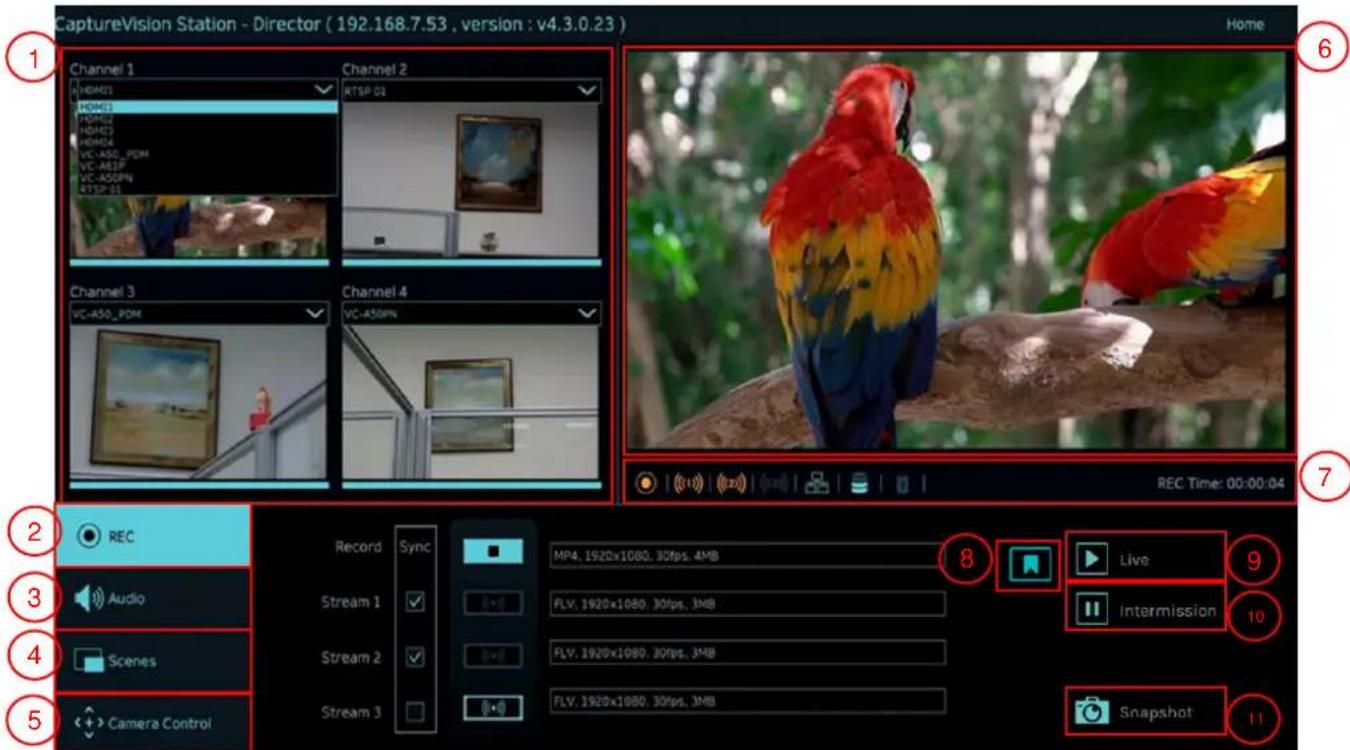
| No | Item | Function Descriptions |
| 1 | Channel Signal Selection | The drop-down menu of image sources includes 4-channel HDMI source, IP camera, or streaming image |
| 2 | REC Record Setting | Start or stop recording; also select whether to synchronously stream or not |
| 3 | Audio Source Management | Manage the input and output audio source; adjust the audio volume of the recording |
| 4 | Scenes Layout Setting | Fast select the recording layout, or customize the background and scene style |
| 5 | Camera Control | Provide the IP video camera PTZ control or simple function settings |
| 6 | Main Screen Output | Display the layout of current output screens |
| 7 | Recording Progress Bar | Display information of the current status of recording/streaming, such as hard drive capacityPlease refer to5.3.1 Status Icon Descriptionfor details |
| 8 | Index | Timestamp can be added after the recording starts |
| 9 | Live | Switch to live image |
| 10 | Intermission | Switch to intermission image |
| 11 | Snapshot | Take a snapshot |
5.3.1 Icon Description of Status Display Bar
| Off | On | Error | Pause | |
| Network |  |  |  | |
| Record |  |  |  | II |
| Streaming 1 / 2 / 3 |  Off Off |  On On |  Fail to write in Fail to write in | Storage is full |
| Hard Drive |  |  |  |  |
| USB Device |  |  |  | [YZ3B] |
| HDCP | Operation Invalid | Snapshot Fail | ||
| Others |  | [28AD] |  |
5.3.2 REC Record
Setting

| No | Item | Function Descriptions |
| 1 | Recording while Streaming | Check stream(s) and click recording buttonart streaming and recording function |
| 2 | Enable/Stop/Pause Recording | [6ZZD][7CB7]  |
| 3 | Single-channel Streaming Button | Streams right away without starting recording function |
5.3.3 Audio Source
Management

| No | Item | Function Descriptions |
| 1 | Volume Control | Adjust the volume of audio input |
| 2 | Audio Volume scale | Display current audio volume scale |
| 3 | Mute Button | Mute audio output |
| 4 | Audio Source Setting | Select a audio source |
5.3.4 Scenes Layout Setting

| No | Item | Function Descriptions |
| 1 | Scenes | Scenes page is the integration of “Overlay,” “Background Image,” and “Recording Layout,” which can perform a series of scene change according to your needs. |
| 2 | Layout | Apply a different layout to highlight the screen focus of different channels.Click a desired layout style to apply. |
| 3 | Overlay | Select a desired style to apply |
| 4 | Background | Display the background images supported by “Director” system. Click the thumbnail to apply |

| No | Item | Function Descriptions |
| 1 | Camera | Select a desired camera to control |
| 2 | Preset Setting and Call | Click number keys to perform preset settings and calls |
| 3 | Direction Control Panel | Move the center point to control the shooting direction※Web pages do not support trackball controls. Please use arrow keys to adjust the screen direction |
| 4 | Zoom In/Zoom Out | Zooms in/out the lens |
| 5 | Focus Setting | Set up auto or manual focus |
| 6 | Tracking Setting | Turn on/off the tracking function※ This function can only track cameras. |
| 7 | PTZ Speed Setting | Set up the moving speed of Pan Tilt Zoom |
5.3.6 USB/Wireless Keyboard Function
Under the director page, some functions can support USB/ wireless keyboard to control LC200
■ Numeric Keys
| Key | Function Descriptions |
| Enter | Start Recording |
| 0 | Stop Recording |
| 1 ~ 9 | Call theme 1 ~ 9 |
| * | Start Push |
| / | Stop Push |
| - | Reduce PGM audio input volume |
| + | Increase PGM audio input volume |
| . Del | Turn on/off PGM audio input |
■ Other buttons
| Key | Function Descriptions |
| F1 | Macro 1 |
| F2 | Macro 2 |
| F3 | Macro 3 |
| L | Switch to the next template |
| S | Switch to the next theme |
| O | Switch to the next overlay |
| B | Switch to the next background |
| M | Turn on/off PGM audio input |
| C | Capture a single photo (JPEG file) |
| Space | Stop Recording |
5.4 File management
LC200 provides file management feature which can perform the following functions via the file management interface: Upload, download, delete, replay video files and editing recording information.

| No | Item | Function Descriptions |
| 1 | Preview Screen | Click desired video files to play and control on the Preview screen |
| 2 | Program Screen | Display the Director screen or switch to synchronize with the Preview screen |
| 3 | Screen Switch Button | Switch the Program screen to the LIVE Director screen or the Preview screen |
| 4 | Discovery | You can search recording video files by selecting date period on the calendar |
| 5 | Display Mode Switch | Video view mode. You can switch to thumbnail mode or list mode |
| 6 | Folder Display | Display the recording video folders |
| 7 | Video File Display | Display the files in the video folder |
| 8 | File Management | Delete, backup or copy recording video to an external USB flash drive |
5.4.1 Webpage Interface
The default page after accessing LC200 web page is system setting page. Click the
video management icon on the top-right corner to access video management page.
■ Video management

| No | Item | Function Descriptions |
| 1 | Video Management | Click to access the video management page |
| 2 | Photo Management | Click to access the the picture management page |
| 3 | System Settings | Click to access the system setting page※ Caution:Log in the web page with admin/admin to display system setting subpageIf you log in the web page with video/video, you will not find the system setting subpage and you can only manage videos and photos |
| 4 | Online Director | Click to enter the Online Director page |
| 5 | Logout | Click this icon to log out the web page interface |
| 6 | File Management | Upload, download and delete the checked video files |
| 7 | Hard Drive Status Display | Display the used space and the capacity of the current hard drive |
| 8 | Video File Display | List information, including the file names of recording videos, thumbnails, capacity, and date |
■ File Management Description
Uploading
Check the thumbnails of the videos to upload. Click [ ] and the videos will be uploaded to the location set in Upload Settings. Please refer to [System Management/Upload Settings] for related settings.
Upload Status Description:
| Icon | Upload Status | Icon | Upload Status |
 | Videos are uploaded successfully |  | Videos are queued for upload |
 | Fail to upload videos |  | Videos are uploading |
Download
Check the thumbnails of the videos to download. Click [ ] and the videos will be saved as MP4 video files and datasets.
If only video files are needed, you can click the video thumbnails and access video playback page to download the video files only.
Delete
Check the thumbnails of the videos to delete. Click [ ] and the video files will be deleted for good.
■ Video Playback
Right-click video to preview the video, edit the related content data, and download the video file and dataset

| No | Item | Function Descriptions |
| 1 | Video Control Window | Play back and control recording videos |
| 2 | Video Content | Edit and modify video content |
| 3 | Video File and Dataset | Select the video files or datasets to download |
| 4 | Download Button | Click this button to download the checked video files or datasets |
| 5 | Apply Button | After editing and modifying the video content, click this button to apply |
■ Photo Management
You can manage the photo files captured by pressing SNAPSHOT. Folders will be named with the shooting date automatically; all photos shot in the same date will be stored in the same folder.
Just like Video Management, you can also upload, download, and delete photos in Photo Management subpage.

This chapter describes problems you may encounter while using LC200. If you have questions, please refer to related chapters and follow all the suggested solutions. If the problem still occurred, please contact your distributor or the service center.
| No. | Problems | Solutions |
| 1. | Boot without power signal | Make sure you have plugged in the power cord |
| 2. | No image output | 1. Check the power2. Check if the input/output device cables are loose3. Replace the cables and make sure they are not faulty4. Make sure if the signal source connects to the device correctly5. Confirm whether the machine is in standby mode. Tap any key on the LC200 panel to wake the machine (*Note 1)6. Check if HDCP is activated on the video output of the source. If it is, the LC200 cannot display the video input. |
| 3. | The panel keys are not responding | The panel become non-functional when logging into the system |
| 4. | LC200 cannot perform camera control after connecting to a camera | Please make sure the dial setting of Camera Address Selector is 0. LC200 cannot identify camera correctly if it is not 0  |
| 5. | You cannot log in the web page administration interface if you forget the password | If you forget the default password, please press the panel concurrentlySnapshot -  ch Channel butt [YG44]on the panel at the same time for 5 seconds to restore the factory reset ch Channel butt [YG44]on the panel at the same time for 5 seconds to restore the factory reset |
| 6. | Webpage login failed | 1. Confirm whether the machine is in standby mode. Tap any key on the LC200 panel to wake the machine (*Note 1)2. Please confirm whether the password is correct. If you forget your password, please refer to Troubleshooting #5 |
| 7. | Selections of network streaming can not be more than 3 channels. | You can select different system frame rates in the frame rate mode that affects the supported recording mode and network streaming number. Please refer 5.2.1.1 System Settings for the restrictions on use of the system frame rate |
| 8. | Layout Editor software cannot edit the layout | Firmware version 4.4.0.19 or later. When exporting files from LC200, please only click the Layout selection for exportConfigurationExportAll ConfigurationDisplayRecord, Stream, Storage, and BackupScenesLayoutExport |
| 9. | LC200 cannot find the camera | 1. Please link to the webpage of the camera to make sure that [Setting] > [Video] > [Camera ID] / [Location] in the webpage uses only English letters or numbers. LC200 cannot find the machine if you use special characters and space.2. When the LC200 is connected to a switch and the switch IGMPfunction is on, it will not be able to search for cameras in the local area network. Please disable the IGMP function first and then search for cameras again. |
| 10. | Maximum recording time LC200 supports | The recording time LC200 supports is up to 12 hours. 24/7 recording is not supported |
*Note 1: Standby Mode: Applicable to firmware version 4.4.0.19 or later. Enable through the RS232/TCP command.
■ Frequently used port No.
| Port No. | Description |
| 1935/TCP | Applicable for RTMP podcast to most platforms, such as YouTube, Vimeo, Twitch |
| 80/TCP | Applicable for RTMP podcast to Periscope |
| 443/TCP | Applicable for RTMPS podcast to Facebook |
| 1935/TCP1936/TCP | Applicable for RTMP podcast to LinkedIn |
| 2935/TCP2396/TCP | Applicable for RTMPS podcast to LinkedIn |
| 443/TCP (HTTPS) | Applicable to built-in HTTPS platforms with safety certification, such as YouTube, Facebook, Ustream, Livestream, Twitch |
| 53/UDP (DNS) | Applicable to services of changing DNS IP address |
Supplier's Declaration of Conformity 47 CFR § 2.1077 Compliance Information
Manufacturer : Lumens Digital Optics Inc.
Product Name : LC200
Model Number : CaptureVision Station
Responsible Party – U.S. Contact Information
Supplier : Lumens Integration, Inc.
4116 Clipper Court, Fremont, CA 94538, United States
e-mail : support@mylumens.com
FCC Compliance Statement
This device complies with Part 15 of the FCC Rules. Operation is subject to the following two conditions: (1) This device may not cause harmful interference, and (2) this device must accept any interference received, including interference that may cause undesired operation.

- CaptureVision Station
- Table of Contents
- Copyright Information ......2
- Chapter 1 Safety Instructions ....3
- Chapter 2 Package Contents....4
- Chapter 3 Product Overview....5
- Chapter 4 Instruction for installation....7
- Chapter 5 Function Description ....8
- Chapter 6 Troubleshooting....35
- Addendum 1 37
- Supplier's Declaration of Conformity 47 CFR § 2.1077 Compliance Information ....38
- Operation
- Storage
- Cleaning
- Batteries (for products or accessories with batteries)
- ■ FCC Warning
- IC Warning
- ■ KC Warning
- Front panel
- Rear panel
- RS-232/RS-485 I/O pin description
- Product connection diagram
- Real-time operation menu
- Parameter setting
- System Settings
- System Settings
- Network
- Network
- Network Settings
- Services
- Service
- Master Firmware
- Slave Firmware
- Service Data
- Reset
- Restart Device
- Setting File
- Display Settings
- Display
- Remote control panel
- Remote Control Panel
- Account
- Video Source
- Network Device Management
- Video communication source management
- Video Settings
- Record Settings
- Streaming Settings
- Scene
- Scene
- Macro
- Time Stamp
- Storage Settings
- Schedule Setting
- Backup Setting
- About
- Director
- Icon Description of Status Display Bar
- REC Record
- Setting
- Audio Source
- Management
- Scenes Layout Setting
- USB/Wireless Keyboard Function
- File management
- Webpage Interface
- ■ File Management Description
- Uploading
- Download
- Delete
- ■ Video Playback
- ■ Photo Management
- Supplier's Declaration of Conformity 47 CFR § 2.1077 Compliance Information
- Responsible Party – U.S. Contact Information
- FCC Compliance Statement
Brand : Lumens
Model : LC200
Category : Video Conferencing System