
nanoKONTROL2 - Blender KORG - Free user manual and instructions
Find the device manual for free nanoKONTROL2 KORG in PDF.


| Product Type | USB MIDI Controller / Mixer |
| Brand | Korg |
| Model | nanoKONTROL2 |
| Dimensions (W x D x H) | 315 x 80 x 25 mm (12.4 x 3.1 x 1.0 in) |
| Weight | 0.4 kg (0.88 lb) |
| Power Supply | USB bus powered (5V, 500mA) |
| Connection | USB Type B (1.5m cable included) |
| MIDI Interface | USB-MIDI, class compliant (no driver needed on macOS/Windows) |
| Number of Faders | 9 (60mm, assignable) |
| Number of Knobs | 9 (rotary encoders) |
| Number of Buttons | 27 (including mute, solo, rec, transport, markers, track selection) |
| Assignable Controls | All faders, knobs, and buttons can be assigned to MIDI CC or note messages |
| Compatibility | Windows 7+, macOS 10.8+, iOS (via Camera Connection Kit), Linux |
| DAW Integration | Pre-mapped for Cubase, Logic, GarageBand, Ableton Live, FL Studio, etc. |
| Main Functions | Channel volume, pan, mute, solo, record arm, transport control, marker navigation, track selection |
| Additional Features | Scene memory (4 scenes), key trigger pads (optional), assignable footswitch input (not included) |
| Maintenance | Wipe with dry cloth; avoid liquids and extreme temperatures |
| Safety | Do not disassemble; avoid shock and heat; keep away from moisture |
| Spare Parts / Repairability | Not user-serviceable; contact Korg support for repairs |
| Package Contents | nanoKONTROL2 unit, USB cable, user manual, software download card |
Frequently Asked Questions - nanoKONTROL2 KORG
User questions about nanoKONTROL2 KORG
0 question about this device. Answer the ones you know or ask your own.
Ask a new question about this device
Download the instructions for your Blender in PDF format for free! Find your manual nanoKONTROL2 - KORG and take your electronic device back in hand. On this page are published all the documents necessary for the use of your device. nanoKONTROL2 by KORG.
USER MANUAL nanoKONTROL2 KORG
What is the KORG KONTROL Editor? 3
Operating requirements .... 3
Installation....4
Installation for Windows users....4
Installation for Mac users....4
Startup ....5
Starting the KORG KONTROL Editor 5
Device select screen....6
Show only connected devices....6
Link to the software bundle download site....6
Taktile, micro & nano series MIDI controllers ....7
Main screen 7
Items on the screen and their function 7
Basic operation....8
Other operations....8
Editing scene data 9
What are scene data and scene sets? 9
Writing scene data into your Korg MIDI controller 9
Global data setting screen 10
Items on the screen and their functions....10
Preference settings....11
MIDI ports....11
Other 11
File Management....12
File menu 14
Edit menu....14
Send menu....15
Help menu....15
SQ-64 Poly Sequencer....16
Project tab....16
Scale tab 17
Control tab....18
Global tab....19
Preference settings....20
MIDI ports 20
Other 20
File menu 21
Edit menu....21
Communication menu 22
Help menu....23
Troubleshooting....24
Software won't start up 24
Can't transfer data 24
Can't save global data in a file....24
- Mac, Mac logo and macOS are trademarks of Apple Inc., registered in the U.S. and other countries.
- Windows 10 are trademarks of Microsoft Corporation in the US and other countries.
- All product names and company names are the trademarks or registered trademarks of their respective owners.
- Specifications and appearance are subject to change without notice for improvement.
Introduction
Thank you for purchasing a Korg product.
To help you get the most out of your new instrument, please read this manual carefully.
What is the KORG KONTROL Editor?
The KORG KONTROL Editor lets you edit the parameters in your Korg MIDI controller, or SQ-64 Poly Sequencer, and save the settings on your computer.
Caution
Do not disconnect your device while the KORG KONTROL Editor is running.
Do not use your device or the KORG KONTROL Editor while any data is being transmitted.
Operating requirements
Windows
Operating system Microsoft Windows 10 or later.
Mac
Operating system macOS Big Sur or later.
An internet connection is required for bundled software validation.
Installation
Installation for Windows users
Proceed as follows to install the software in Windows.
- Double-click "KONTROL_Editor_Installer.exe" to start the installation process.
- The KORG KONTROL Editor Installer screen will appear. Follow the on-screen instructions to install the software.
Installation for Mac users
Proceed as follows to install the software in Mac.
- Copy the "KORG KONTROL Editor" folder to the "Applications" folder.
Startup
Starting the KORG KONTROL Editor

In order to use KORG KONTROL Editor with a USB connection on Windows, you must download the Korg USB-MIDI Driver from the Korg website and install it as described in the accompanying documentation. (http://www.korg.com/)
If you are using a wireless connection, do not connect the device to a computer using a USB cable.
- Use a USB cable to connect your Korg MIDI controller or SQ-64 Poly Sequencer to your computer.
- In the "KORG KONTROL Editor" folder, select "KORG KONTROL Editor" to begin.
Mac The "KORG KONTROL Editor" folder is located in the "Applications" folder.
Windows 10 The "KORG KONTROL Editor" folder is located in the taskbar "Start"- "All apps"- "KORG."
- A list of connected Korg MIDI controllers will be displayed. Please select the controller whose settings you would like to edit for. Scene data will be automatically loaded from the selected device.
Device select screen
Here you can select the device that you want to edit.
From this screen, you can also display a screen that enables you to obtain the bundled software license.
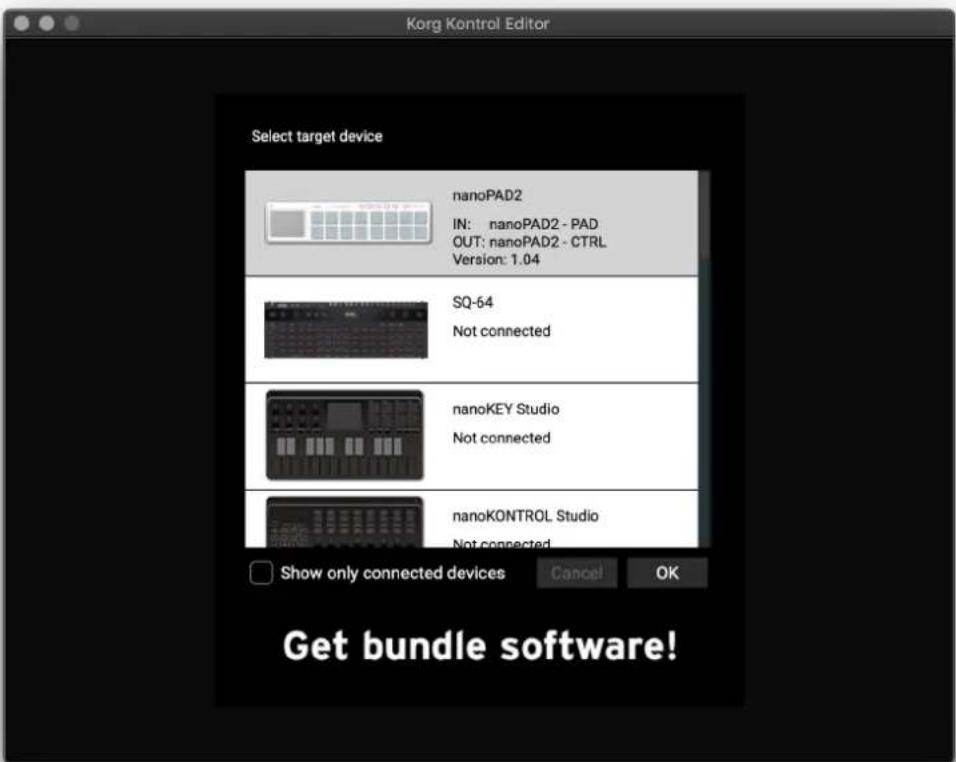
If this is the device whose parameter settings you want to edit, click the OK button.
Show only connected devices
The KORG KONTROL Editor allows you to edit the parameters of a device that is not connected. To do so, un-check the "Show only connected devices" check box.
Select this check box if you want to only see the devices that are connected.
Note If the preference setting "Specify MIDI ports manually" is on, you won't be able to set the "Show only connected devices" option.
Link to the software bundle download site
You can display a screen that enables you to obtain a license for software that may be bundled with your Korg product.
Use this screen if any software is bundled with the Korg product.
Note Have a KORG Software Bundle Code ready to obtain the license.
Full functionality is not guaranteed with all computers that satisfy these system requirements.
Taktile, micro & nano series MIDI controllers
Main screen
The main screen is where you can edit your device's scene data.
SCENE button GLOBAL button
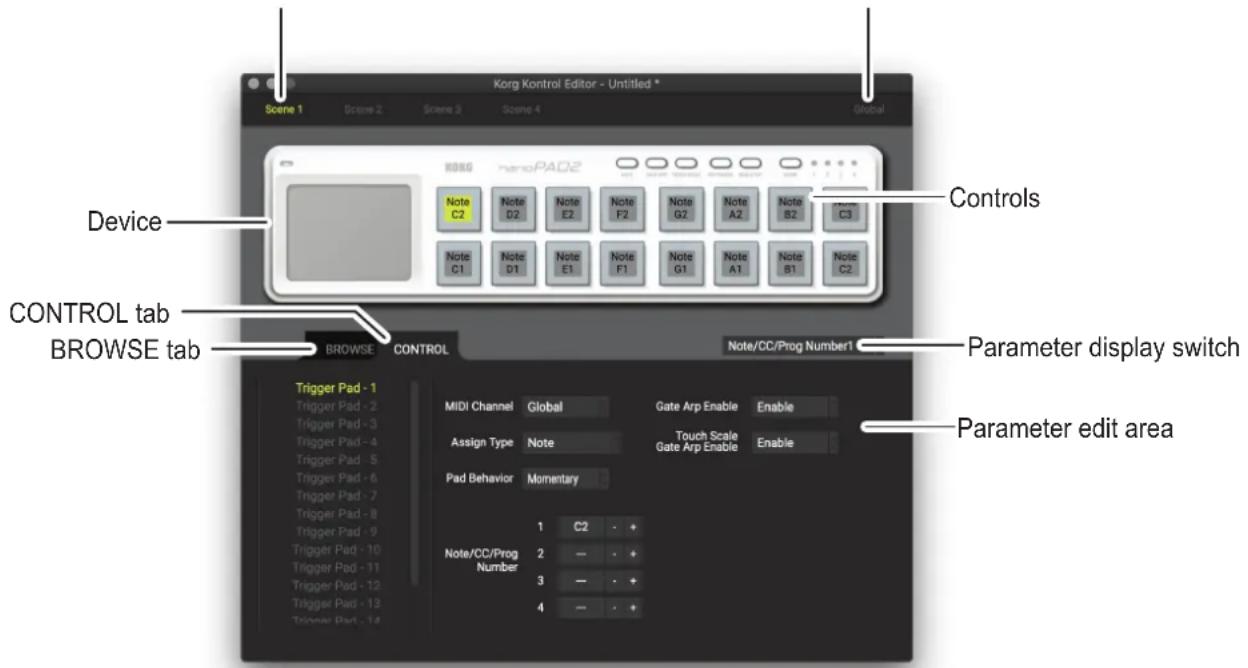
Items on the screen and their function
Device
This area shows an image of the device that you selected in the device select screen.
SCENE button
Click the SCENE button of the scene that you want to edit.

This button may not be displayed, depending on the selected device.
GLOBAL button
Click the GLOBAL button to access the global data edit screen.
On the global data edit screen, you can set, transfer, save or load data.

This button may not be displayed, depending on the selected device.
Parameter display switch
This lets you switch the parameters that are shown over each control in the device image.
Parameter edit area
This area enables you to view and edit the parameters of the selected control.
Controls
This area shows the parameters that you selected using the parameter display switch. If you've selected a parameter that the control does not have, this will indicate “--”. When you click this, the parameters of the control will appear in the parameter display area.
Switching the BROWSE / CONTROL tabs
BROWSE tab
This shows the folder hierarchy of your computer's hard disk.
From the folder and file tree, you can select a scene set file and load it.
CONTROL tab
This lists the controls.
When you click in the control list, the parameters of that control will appear in the parameter edit area.
Basic operation
Here's the basic procedure for editing in the main screen.
- If your device has more than one scene, the SCENE buttons are displayed. Select the scene that you want to edit.
- Click a control in the device image or in the control list of the CONTROL tab.
- The parameters of the selected control are shown in the parameter edit area. Edit the parameters here.
note For details on each parameter, refer to the owner's manual of your Korg MIDI controller.
Other operations
Cut, Copy, Paste, Clear
You can edit the settings for the SCENE buttons and the controls in the CONTROL tab, by performing "Cut," "Copy,"
“Paste,” and “Clear” operations from the “Edit” menu.
Drag and drop
You can exchange the setting for the SCENE buttons and the controls in the CONTROL tab by dragging and dropping.
To copy the settings, drag and drop while holding down the Ctrl key (macOS: Option key).
Undoing the most recent operation
By selecting the "Undo" command from the "Edit" menu you can undo the previous operation.
Redoing an undone operation
By selecting the "Redo" command from the "Edit" menu you can return to the state prior to executing the "Undo" command.
Editing scene data
Here's how to edit scene data in the main screen.
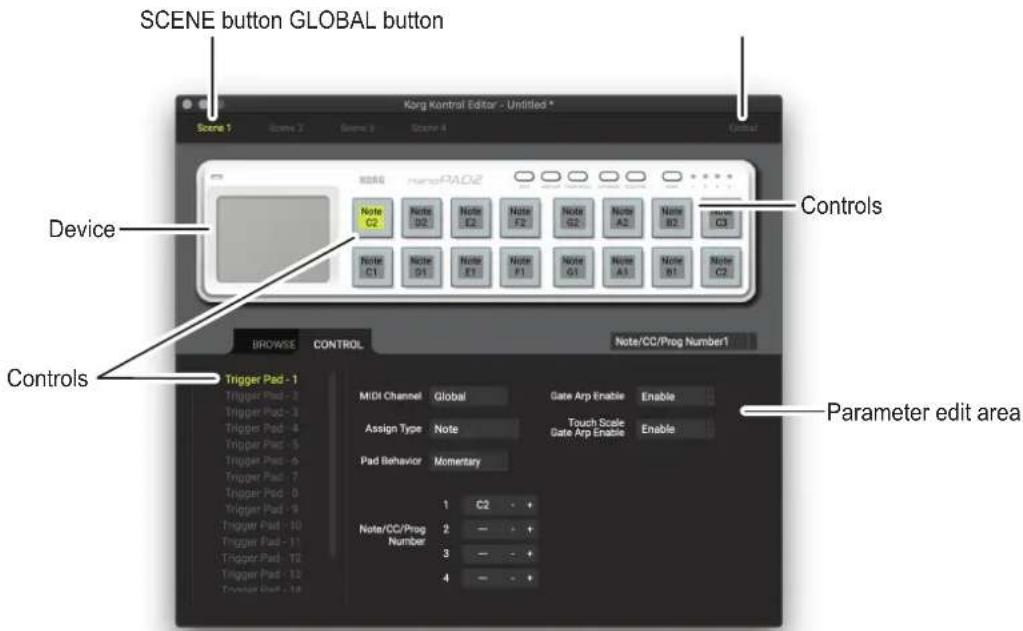
- SCENE buttons will be displayed if the device has more than one scene. Click the scene that you want to edit.
- In the screen, click the control that you want to edit.
- The parameters of the selected control are shown in the parameter edit area in the lower right pane. This is where you can edit the parameters.
What are scene data and scene sets?
Parameters are assigned to the controls (sliders, knobs, X-Y pad, etc.) of a Korg MIDI controller. These parameter assignments are collectively called “scene data.”
Some Korg MIDI controllers have more than one scene; a collection of these scenes is called a "scene set."
Writing scene data into your Korg MIDI controller
In order for the parameters that you've edited in the KORG KONTROL Editor to be reflected in your Korg MIDI controller, you'll need to write the edited scene data into the Korg MIDI controller. Here's how:
From the "Send" menu, choose "Write Scene Data." A confirmation dialog box will appear, then click the OK button. Do not use your Korg MIDI controller or the KORG KONTROL Editor while any data is being transmitted.
Global data setting screen
Here is where you can edit your device's global data.
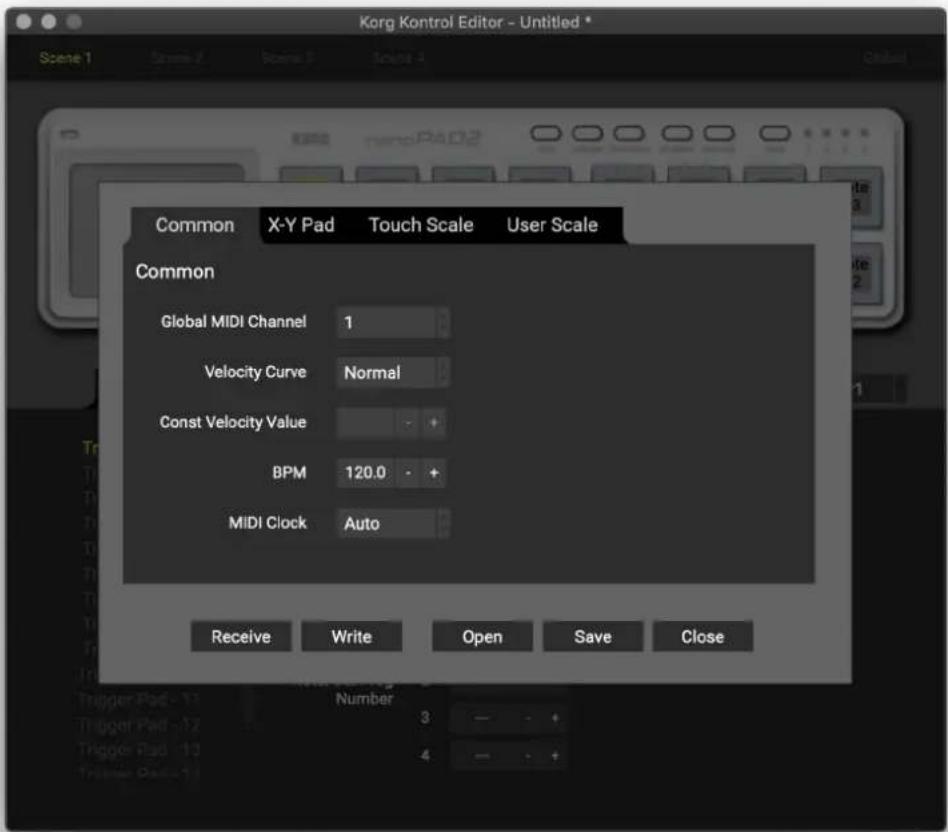
Items on the screen and their functions
Parameter setting area
This area enables you to set global parameters.
note For more information on the global parameters, refer to the owner's manual for your Korg MIDI controller.
Receive button
This lets you load global data from the Korg MIDI controller.
Write button
Click this button to write edited global data to the Korg MIDI controller.
Open button
Click this button to load a global data file.
Save button
Click this button to save edited global data as a global data file with a new name.
Close button
Click this button to close the global data setting screen and return to the main screen.
Preference settings
Choose "Preferences ..." from the "Edit" menu to access the Preferences dialog box.
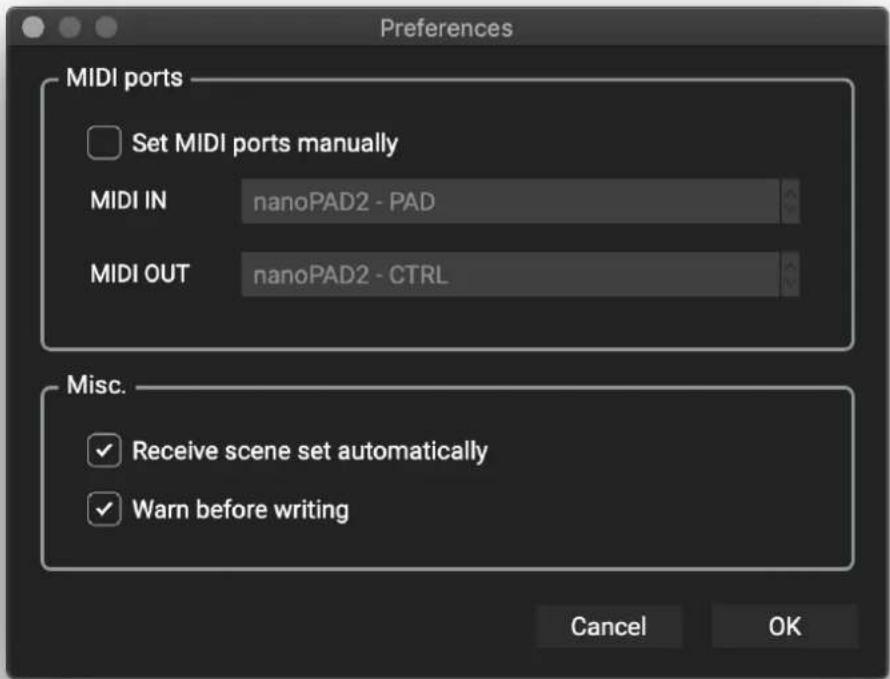
MIDI ports
Set MIDI ports manually
Turn this on if you want to specify the MIDI ports manually instead of using automatic device detection.
If this setting is on, use the MIDI IN and MIDI OUT fields to specify the ports where your Korg MIDI controller is connected.
MIDI IN
Specify the MIDI IN port where your Korg MIDI controller is connected.
MIDI OUT
Specify the MIDI OUT port where your Korg MIDI controller is connected.
Other
Receive data from device automatically
If this setting is off, data will not be automatically loaded from your Korg MIDI controller when the main screen for the device is shown.
Warn before writing
If this setting is off, a warning dialog box will not appear when writing data to your Korg MIDI controller.
File Management
The following data can be transferred between the KORG KONTROL Editor and your Korg MIDI controller.
| Displayed device name | Type Content Extension | ||
| nanoKEY | Scene data | All parameters that can be set on the nanoKEY, such as the velocity curve and MIDI channel. | nanokey_data |
| nanoPAD | Scene data | All parameters in one nanoPAD scene, such as trigger pads and X-Y pad. | nanopad_data |
| Scene set | Parameters for four scenes.(not including global parameters) | nanopad_set | |
| Global data | The nanoPAD's global parameters, such as the global MIDI channel and velocity curve. | nanopad_glob | |
| nanoKONTROL | Scene data | All parameters in one nanoKONTROL scene, such as the sliders and buttons. | nktrl_data |
| Scene set | Parameters for four scenes. nktrl_set | ||
| nanoKEY2 | Scene data | All parameters that can be set on the nanoKEY2, such as the velocity curve and MIDI channel. | nanokey2_data |
| nanoPAD2 | Scene data | All parameters in one scene, such as the trigger pad's MIDI channel and note number. | nanopad2_data |
| Scene set | Parameters for four scenes.(not including global parameters) | nanopad2_set | |
| Global data | The nanoPAD2's global parameters, such as the global MIDI channel and velocity curve. | nanopad2_glob | |
| nanoKONTROL2 | Scene data | All parameters that can be set on the nanoKONTROL2, such as sliders and buttons. | nktrl2_data |
| microKEY-25 | Scene data | All parameters that can be set on the microKEY-25,such as the velocity curve and MIDI channel. | microkey25_data |
| microKEY-37/61 | Scene data | All parameters that can be set on the microKEY-37/61, such as the velocity curve and MIDI channel. | microkey_data |
| microKEY2-25 Air | Scene data | All parameters that can be set on the microKEY2-25 Air, such as the velocity curve and MIDI channel. | microkey25air_data |
| microKEY2-37/49/61microKEY2-37/49/61 Air | Scene data | All parameters that can be set on the microKEY2-37/49/61 or microKEY2-37/49/61 Air, such as the velocity curve and MIDI channel. | microkey2_data |
| Displayed device name | Type | Content Extension | |
| taktile-25/49TRITON taktile-25/49 | Scene data | All parameters that one scene of taktile/TRITON taktile holds such as sliders, buttons, trigger pads or touch pads. | |
| Scene set | Parameters for 16 scenes.(not including global parameters) | ||
| Global data | taktile/TRITON taktile global parameters, such as the global MIDI channel and velocity curve. | ||
| nanoKEY Studio | Scene data | All parameters that one scene of nanoKey Studio holds such as knobs, trigger pads or touch pads. | |
| Scene set | Parameters for 8 scenes.(not including global parameters) | ||
| Global data | nanoKey Studio global parameters, such as the global MIDI channel and velocity curve. | ||
| nanoKONTROL Studio | Scene data | All parameters that one scene of nanoKontrol Studio holds such as sliders or buttons. | |
| Scene set | Parameters for 5 scenes.(not including global parameters) | ||
| Global data | nanoKontrol Studio global parameters, such as wireless connection settings and power saving settings. | ||
| Keystage | Scene data | All parameters held in one scene of the Keystage, such as arpeggiator and knobs. | |
| Scene set | Parameters for 16 scenes.(not including global parameters) | ||
| Global data | Keystage global parameters, such as the user chords and power saving settings. | ||
File menu
Select device
Opens the device select screen.
New
Creates a new scene set for the device that is currentry selected.
note For devices that do not feature multiple scenes, use this command to make new scene data.
Open
Loads a scene set file. If you select a file for a device other than the one selected in the main screen, the main screen for the device of the selected file will appear.
note For devices that do not feature multiple scenes, use this command to load scene data.
Save
Saves the edited scene set by overwriting the existing scene set file.
note For devices that do not feature multiple scenes, use this command to save scene data to an existing file.
Save As
Saves the edited scene set as a new file with the name you specify.
note For devices that do not feature multiple scenes, use this command to save scene data as a new file.
Load Scene Data
Loads a scene data file into the edited scene.
note This command is unavailable for devices that do not feature multiple scenes.
Save Scene Data
Saves the edited scene as a scene data file.
note This command is unavailable for devices that do not feature multiple scenes.
End
Close the KORG KONTROL Editor.
Edit menu
Undo
Returns to the state prior to the previous operation.
Redo
Returns to the state prior to executing the Undo command.
Cut
Cuts the selected scene data or control parameter.
Copy
Copies the selected scene data or control parameter.
Paste
Pastes the cut or copied content to the selected scene data or control parameter.
Clear
Clears the selected scene data or control parameter.
Preferences
Displays the Preferences dialog box.
Send menu
Load Scene Set
Loads the scene set from your Korg MIDI controller.
Write Scene Set
Writes the edited scene set to your Korg MIDI controller.
Load Scene Data
Loads the scene data of the scene that's currently selected in the KORG KONTROL Editor from your Korg MIDI controller.
Write Scene Data
Writes the scene data of the scene that's currently selected in the KORG KONTROL Editor to your Korg MIDI controller.
Help menu
About
Displays the software version of the KORG KONTROL Editor.
SQ-64 Poly Sequencer
The KORG KONTROL Editor lets you easily manage projects, custom scales, MIDI control mappings and global settings on the SQ-64 Poly Sequencer. A dedicated user interface for each of these is provided in separate tabs. Refer to the following sections for detailed information about each of them.
Project tab
The project tab allows to rename projects as well copy or move porjects from and to different storage locations on the device.
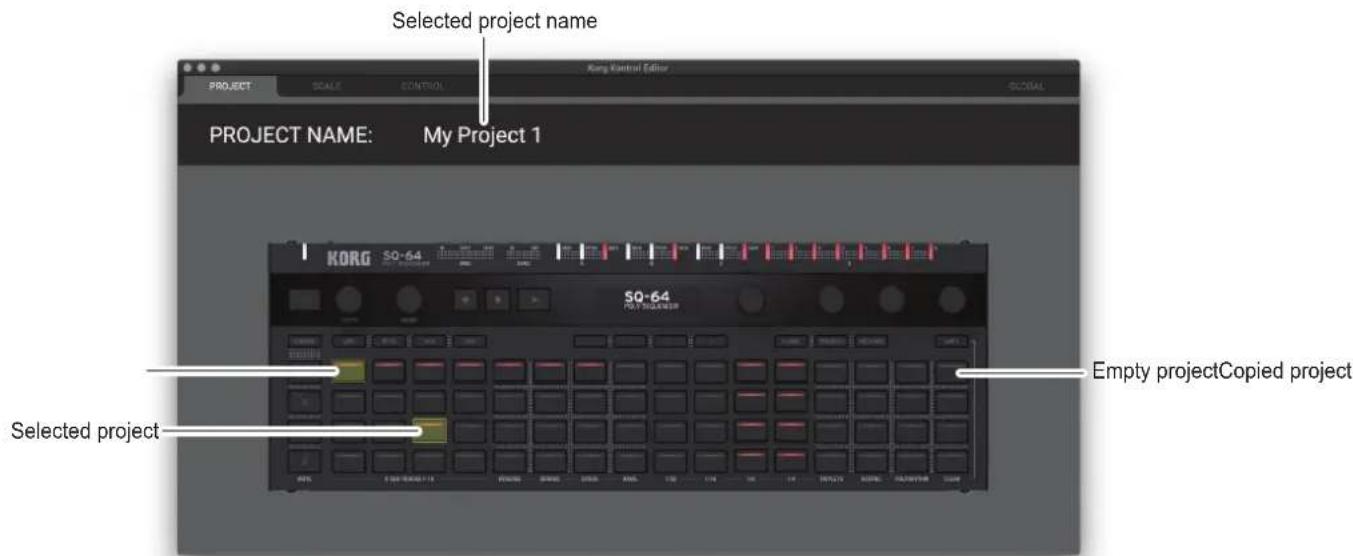
Renaming Projects
Select the pad corresponding to the project you want to rename and double click its name at the top of the screen. Type in the desired name, and press enter.
Copying Projects
Select the pad corresponding to the project you want to copy. then press CTRL+C (macOS: COMMAND+C) to copy it. Select the pad corresponding to the destination where you want to copy your project, then press CTRL+V (macOS: COMMAND+V). The projects can also be copied by clicking and dragging a pad on top of another one.
Clearing Projects
Select the pad corresponding to the project you want to clear, and press the BACKSPACE key.
Scale tab
The scale tab allows to edit custom scales on the SQ-64 Poly Sequencer.
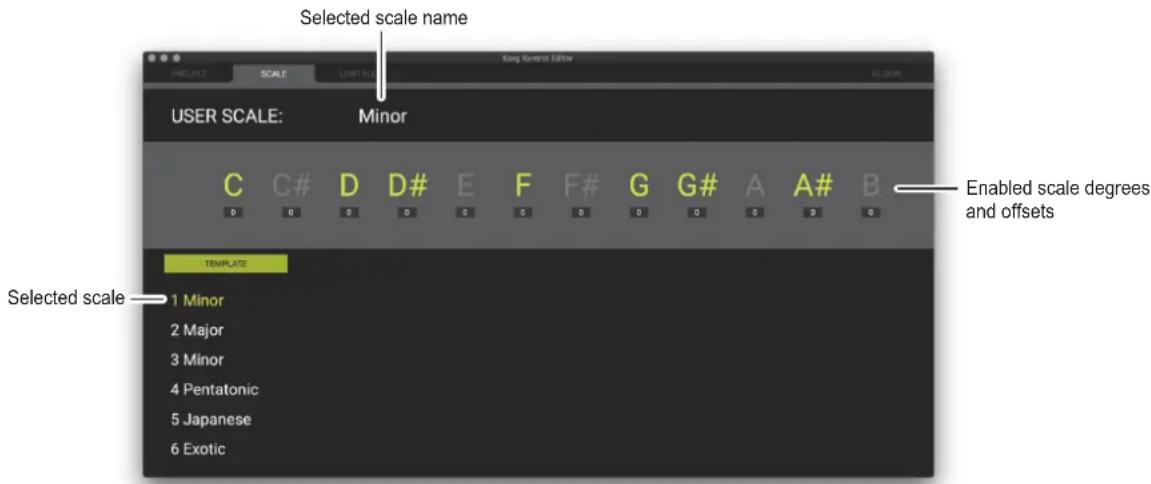
Editing scales
Select the custom scale index you wish to edit at the bottom of the screen. Click the notes you want to enable/disable, and optionally set an offset in cents (-50 to +49) using the text box below the note.
note Microtuning offsets will only be applied when the scale is used for pitch CV outputs on the device.
Double click the name of the scale to rename it to your liking, and press ENTER.
Loading template scales
Select the custom scale index in which you wish to load the template scale. Click the template button and select the desired template from the list.
Control tab
The Control tab allows to edit MIDI control mappings on the SQ-64 Poly Sequencer.
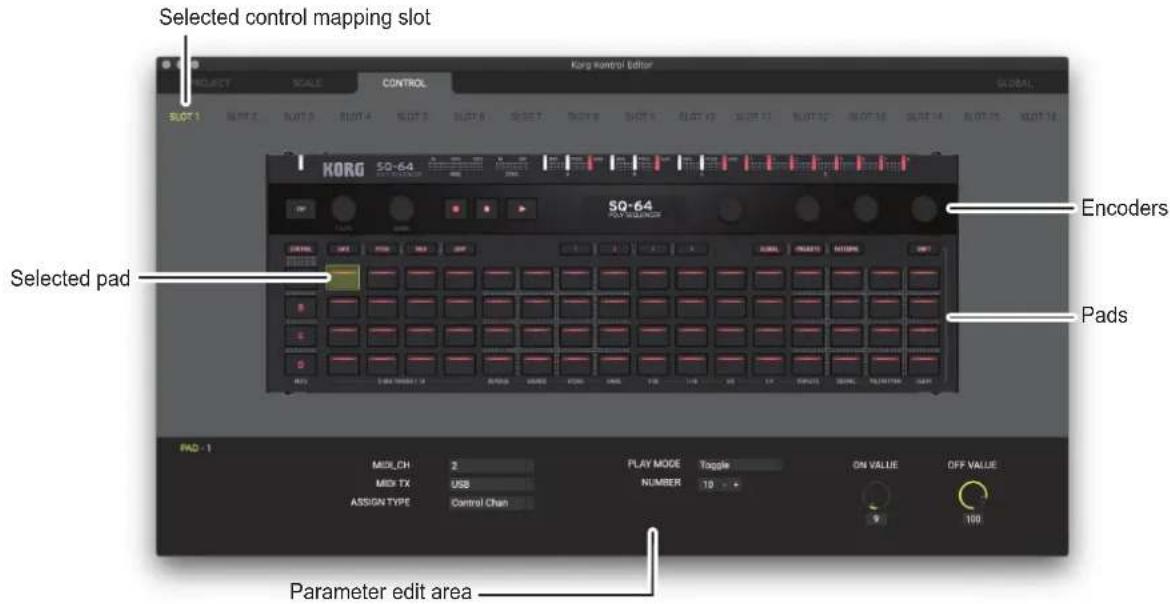
Selecting control mappings
The SQ-64 Poly Sequencer can hold 16 different MIDI control mappings. Click the slot buttons at the top of the screen to select the control mapping you wish to edit.
Editing pad mappings
Select one or more of the 64 pads. The available control assignment options will appear at the bottom of the screen. Note When selecting multiple pads, only the common control assignments will be shown.
Editing encoder mappings
Select one or more of the four encoders. The encoders controls are organized into four banks, the current bank can be changed by clicking the 1, 2, 3, 4 pads or the Bank 1, 2, 3, 4 buttons at the bottom of the screen. The available control assignment options will appear at the bottom of the screen.
note When selecting multiple encoders, only the common control assignments will be shown.
Copying pad and encoder mappings
Select a pads or an encoder. Press CTRL+C (macOS: COMMAND+C) to copy the mappings. Select the destination pad or encoder, and press CTRL+V (macOS: COMMAND+V) to paste the mappings.
Global tab
The Global tab allows to edit global settings on the SQ-64 Poly Sequencer.
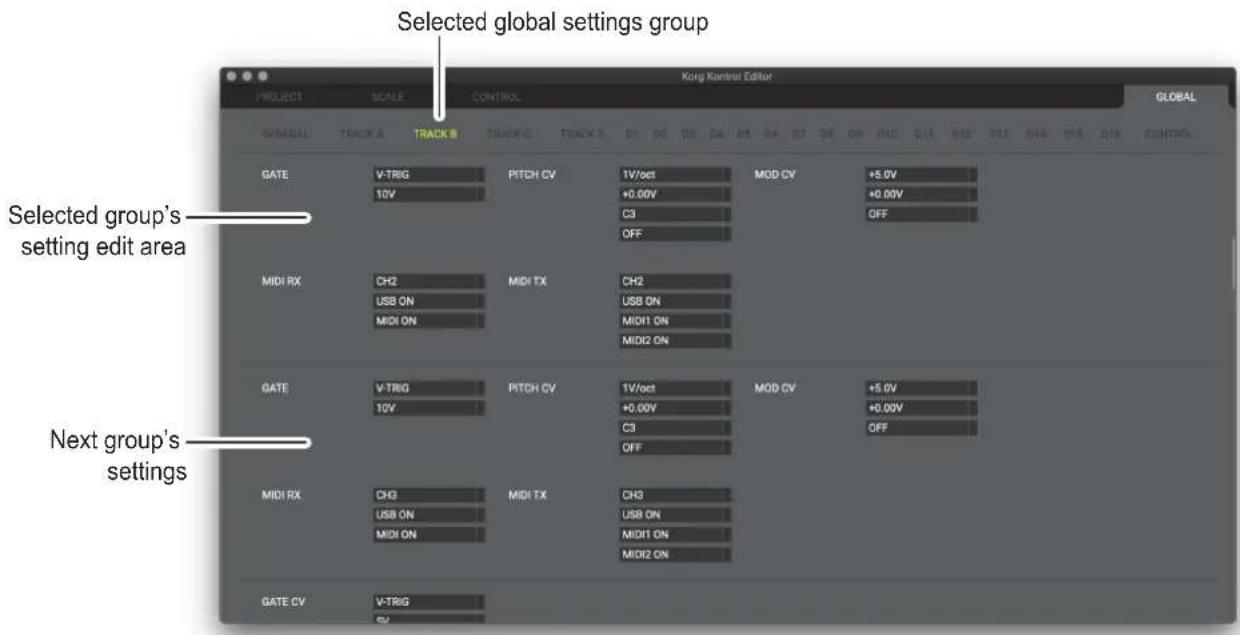
Selecting global settings groups
Click on the desired group name at the top of the screen. The page will automatically scroll to that group's settings location.
Preference settings
Choose "Preferences ..." from the "Edit" menu to access the Preferences dialog box.
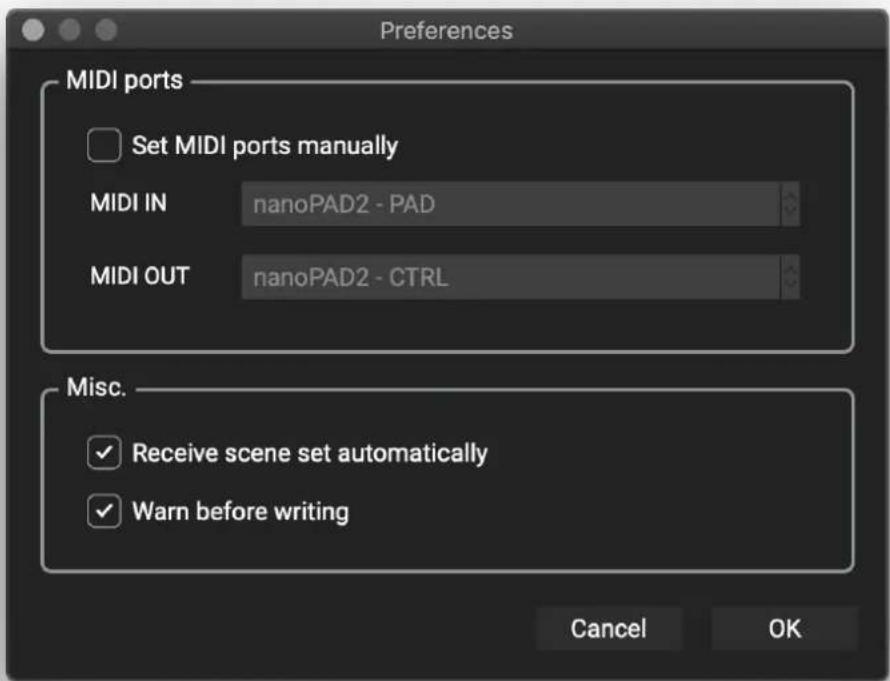
MIDI ports
Set MIDI ports manually
Turn this on if you want to specify the MIDI ports manually instead of using automatic device detection.
If this setting is on, use the MIDI IN and MIDI OUT fields to specify the ports where your SQ-64 Poly Sequencer is connected.
MIDI IN
Specify the MIDI IN port where your SQ-64 Poly Sequencer is connected.
MIDI OUT
Specify the MIDI OUT port where your SQ-64 Poly Sequencer is connected.
Other
Receive data from device automatically
If this setting is off, data will not be automatically loaded from your SQ-64 Poly Sequencer when the main screen for the device is shown.
Warn before writing
If this setting is off, a warning dialog box will not appear when writing data to your SQ-64 Poly Sequencer.
File menu
Select device
Opens the device select screen.
New
Creates a blank SQ-64 Poly Sequencer workspace.
Open
Loads an SQ-64 Poly Sequencer workspace file. (*.sq64 files)
Save
Saves the current SQ-64 Poly Sequencer workspace.
Save As
Saves the current SQ-64 Poly Sequencer workspace as a new file with a specified name.
Load Project File (Project tab only)
Loads a project from file into the currently selected project location.
Save Current Project (Project tab only)
Saves the currently selected project to a new file with a specified name.
Load Scale File (Scale tab only)
Loads a scale from file into the currently selected scale location.
Save Current Scale (Scale tab only)
Saves the currently selected scale to a new file with a specified name.
Load Control Mapping File (Control tab only)
Loads a control mapping from file into the currently selected control mapping slot.
Save Current Control Mapping (Control tab only)
Saves the currently selected control mapping slot to a new file with a specified name.
Edit menu
Undo
Returns to the state prior to the previous operation.
Redo
Returns to the state prior to executing the Undo command.
Cut
Cuts the selected data.
Copy
Copies the selected data.
Paste
Pastes the cut or copied content to the selected location.
Clear
Clears the selected data
Reset All Project (Project tab only)
Reset all project data to default values.
Reset Current Project (Project tab only)
Resets the currently selected project to default values.
Reset All Scales (Scale tab only)
Reset all scale data to default values.
Reset Current Scale (Scale tab only)
Resets the currently selected scale to default values.
Reset All Control Mappings (Control tab only)
Reset all control mapping slots to default values.
Reset Current Control Mapping (Control tab only)
Resets the currently selected control mapping slot to default values.
Preferences
Displays the Preferences dialog box.
Communication menu
Receive All
Receive all workspace data (projects, scales, control mappings and global settings) from the SQ-64 Poly Sequencer.
Write All
Write all workspace data (projects, scales, control mappings and global settings) to the SQ-64 Poly Sequencer.
Receive All Projects (Project tab only)
Receive all project data from the SQ-64 Poly Sequencer.
Write All Projects (Project tab only)
Write all project data to the SQ-64 Poly Sequencer.
Receive Current Project (Project tab only)
Receive currently selected project data from the SQ-64 Poly Sequencer.
Write Current Project (Project tab only)
Write currently selected project data to the SQ-64 Poly Sequencer.
Receive All Scales (Scale tab only)
Receive all scale data from the SQ-64 Poly Sequencer.
Write All Scales (Scale tab only)
Write all scale data to the SQ-64 Poly Sequencer.
Receive Current Scale (Scale tab only)
Receive currently selected scale data from the SQ-64 Poly Sequencer.
Write Current Scale (Scale tab only)
Write currently selected scale data to the SQ-64 Poly Sequencer.
Receive All Control Mappings (Control tab only)
Receive all control mapping data from the SQ-64 Poly Sequencer.
Write All Control Mappings (Control tab only)
Write all control mapping data to the SQ-64 Poly Sequencer.
Receive Current Control Mapping (Control tab only)
Receive currently selected control mapping slot data from the SQ-64 Poly Sequencer.
Write Current Control Mapping (Control tab only)
Write currently selected control mapping slot data to the SQ-64 Poly Sequencer.
Help menu
About
Displays the software version of the KORG KONTROL Editor.
Troubleshooting
Software won't start up
- Make sure that your computer meets the operating requirements.
- Check whether other applications might be running.
If other applications are running, the KORG KONTROL Editor might be unable to start up, or might be unable to transfer data. If you're unable to start up, close all other applications and try again.
- If another USB device is connected, the KORG KONTROL Editor might be unable to start up, or might be unable to transfer data. If you're unable to start up or unable to transfer data, disconnect the other USB device from your computer and try again.
Can't transfer data
- Make sure that the Korg MIDI controller, or SQ-64 Poly Squencer has been detected by the connected computer. If you are using Windows, go to the Control Panel, open "Hardware and Sounds" → "Device Manager," and check the "Sound, Video, and Game Controllers" tab. When using Mac, please check the "MIDI Studio" window. Start "Applications" → "Utilities" → "Audio MIDI Setup" in order. Select "Display MIDI window" from the "Window" menu to open the "MIDI Studio" window.
- If you are using a USB connection on Windows, make sure that the latest Korg USB-MIDI Driver is installed. You can download the latest Korg USB-MIDI driver from the Korg website. http://www.korg.com/
- If you're specifying the MIDI ports manually, make sure that the MIDI port settings are correct.
- If you're using a wireless connection, and the computer is far away from the Korg MIDI controller, it might be unable to transfer data. Place the Korg MIDI controller closer to your computer.
- If the Korg MIDI controller is using batteries, it might be unable to transfer data if you use a wireless connection when the batteries are low. Replace the batteries and try again.
- If you are using a wireless connection, do not connect the Korg MIDI controller to a computer using a USB cable. If the Korg MIDI controller is connected to a computer through both a USB and a wireless connection, it will not function properly.
Can't save global data in a file
- Global data for taktile, micro & nano series MIDI controllers will not be included in a scene set file if you try to save it by selecting "Save" or "Save As..." from the menu. To save the global data, use the SAVE button on the global data setting screen to save it into a global data file. For the SQ-64 Poly Sequencer, global data is included when saving the whole workspace using "Save" or "Save As...".
KORG INC.
4015-2 Yanokuchi, Inagi-City, Tokyo 206-0812 JAPAN
©2008KORG INC.
- Installation....4
- Startup ....5
- Taktile, micro & nano series MIDI controllers ....7
- SQ-64 Poly Sequencer....16
- Troubleshooting....24
- Introduction
- What is the KORG KONTROL Editor?
- Caution
- Operating requirements
- Windows
- Mac
- Installation
- Installation for Windows users
- Installation for Mac users
- Startup
- Starting the KORG KONTROL Editor
- Device select screen
- Show only connected devices
- Link to the software bundle download site
- Taktile, micro & nano series MIDI controllers
- Main screen
- Items on the screen and their function
- Device
- SCENE button
- GLOBAL button
- Parameter display switch
- Parameter edit area
- Controls
- Switching the BROWSE / CONTROL tabs
- BROWSE tab
- CONTROL tab
- Basic operation
- Other operations
- Cut, Copy, Paste, Clear
- Drag and drop
- Undoing the most recent operation
- Redoing an undone operation
- Editing scene data
- What are scene data and scene sets?
- Writing scene data into your Korg MIDI controller
- Global data setting screen
- Items on the screen and their functions
- Parameter setting area
- Receive button
- Write button
- Open button
- Save button
- Close button
- Preference settings
- MIDI ports
- Set MIDI ports manually
- MIDI IN
- MIDI OUT
- Other
- Receive data from device automatically
- Warn before writing
- File Management
- File menu
- Select device
- New
- Open
- Save
- Save As
- Load Scene Data
- Save Scene Data
- End
- Edit menu
- Undo
- Redo
- Cut
- Copy
- Paste
- Clear
- Preferences
- Send menu
- Load Scene Set
- Write Scene Set
- Write Scene Data
- Help menu
- About
- SQ-64 Poly Sequencer
- Project tab
- Renaming Projects
- Copying Projects
- Clearing Projects
- Scale tab
- Editing scales
- Loading template scales
- Selecting control mappings
- Editing pad mappings
- Editing encoder mappings
- Copying pad and encoder mappings
- Global tab
- Selecting global settings groups
- Load Project File (Project tab only)
- Save Current Project (Project tab only)
- Load Scale File (Scale tab only)
- Save Current Scale (Scale tab only)
- Load Control Mapping File (Control tab only)
- Save Current Control Mapping (Control tab only)
- Communication menu
- Receive All
- Write All
- Troubleshooting
- Software won't start up
- Can't transfer data
- Can't save global data in a file
- KORG INC.
Brand : KORG
Model : nanoKONTROL2
Category : Blender