
MR-1 - Blender KORG - Free user manual and instructions
Find the device manual for free MR-1 KORG in PDF.


| Product Type | Personal Blender |
| Brand | Korg |
| Model | MR-1 |
| Power | 300 W |
| Voltage | AC 120 V, 60 Hz |
| Capacity | 500 ml (17 oz) |
| Material | Stainless steel blades, BPA-free Tritan jar |
| Dimensions (H x W x D) | 25 x 15 x 15 cm |
| Weight | 1.2 kg |
| Cord Length | 90 cm |
| Speed Settings | 2 speeds + pulse |
| Safety Features | Auto shut-off when jar is removed, non-slip base |
| Cleaning | Dishwasher-safe jar and lid; wipe base with damp cloth |
| Maintenance | Regular blade sharpening recommended after 100 uses |
| Spare Parts | Replacement jar, blade assembly, and seal ring available |
| Repair | Authorized service centers; user-replaceable parts with instructions |
| Warranty | 2 years limited warranty |
Frequently Asked Questions - MR-1 KORG
User questions about MR-1 KORG
0 question about this device. Answer the ones you know or ask your own.
Ask a new question about this device
Download the instructions for your Blender in PDF format for free! Find your manual MR-1 - KORG and take your electronic device back in hand. On this page are published all the documents necessary for the use of your device. MR-1 by KORG.
USER MANUAL MR-1 KORG
Using the unit in the following locations can result in a malfunction.
- In direct sunlight
- Locations of extreme temperature or humidity
• Excessively dusty or dirty locations - Locations of excessive vibration
- Close to magnetic fields
Power supply
Please connect the designated AC adapter to an AC outlet of the correct voltage. Do not connect it to an AC outlet of voltage other than that for which your unit is intended.
Interference with other electrical devices
Radios and televisions placed nearby may experience reception interference. Operate this unit at a suitable distance from radios and televisions.
Handling
To avoid breakage, do not apply excessive force to the switches or controls.
Care
If the exterior becomes dirty, wipe it with a clean, dry cloth. Do not use liquid cleaners such as benzene or thinner, or cleaning compounds or flammable polishes.
Keep this manual
After reading this manual, please keep it for later reference.
Keeping foreign matter out of your equipment
Never set any container with liquid in it near this equipment. If liquid gets into the equipment, it could cause a breakdown, fire, or electrical shock.
Be careful not to let metal objects get into the equipment. If something does slip into the equipment, unplug the AC adapter from the wall outlet. Then contact your nearest Korg dealer or the store where the equipment was purchased.
THE FCC REGULATION WARNING (for U.S.A.)
This equipment has been tested and found to comply with the limits for a Class B digital device, pursuant to Part 15 of the FCC Rules. These limits are designed to provide reasonable protection against harmful interference in a residential installation. This equipment generates, uses, and can radiate radio frequency energy and, if not installed and used in accordance with the instructions, may cause harmful interference to radio communications. However, there is no guarantee that interference will not occur in a particular installation. If this equipment does cause harmful interference to radio or television reception, which can be determined by turning the equipment off and on, the user is encouraged to try to correct the interference by one or more of the following measures:
- Reorient or relocate the receiving antenna.
- Increase the separation between the equipment and receiver.
- Connect the equipment into an outlet on a circuit different from that to which the receiver is connected.
- Consult the dealer or an experienced radio/TV technician for help.
Unauthorized changes or modification to this system can void the user's authority to operate this equipment.
CE mark for European Harmonized Standards
CE mark which is attached to our company's products of AC mains operated apparatus until December 31, 1996 means it conforms to EMC Directive (89/336/EEC) and CE mark Directive (93/68/EEC).
And, CE mark which is attached after January 1, 1997 means it conforms to EMC Directive (89/336/EEC), CE mark Directive (93/68/EEC) and Low Voltage Directive (73/23/EEC).
Also, CE mark which is attached to our company's products of Battery operated apparatus means it conforms to EMC Directive (89/336/EEC) and CE mark Directive (93/68/EEC).
Handling of the internal hard disk
Do not apply physical shock to this device. In particular, you must never move this device or apply physical shock while the power is turned on. This can cause part or all of the data on disk to be lost, or may damage the hard disk or interior components.
When this device is moved to a location where the temperature is radically different, water droplets may condense on the hard disk. If the device is used in this condition, it may malfunction, so please allow several hours to pass before operating the device.
Do not turn the power on and off repeatedly. This may damage the MR-1.
This device begins to access the hard disk immediately after the power is turned on.
Never turn off the power while the HDD access indicator is lit or blinking. Doing so can cause all or part of the data on hard disk to be lost, or may cause malfunctions such as hard disk damage.
If the hard disk has been damaged due to incorrect operation, power failure, or accidental interruption of the power supply, a fee may be charged for replacement even if this device is still within its warranty period.
Data handling
Incorrect operation or malfunction may cause the contents of memory to be lost, so we recommend that you save important data on a CD or other media. Please be aware that Korg will accept no responsibility for any damages which may result from loss of data.
Also, when digitally recording copyrighted audio material from a DAT or CD etc., you must obtain permission for use. Please be aware that Korg will accept no responsibility for any copyright violations which may occur through your use of this product.
COPYRIGHT WARNING
This professional device is intended only for use with works for which you yourself own the copyright, for which you have received permission from the copyright holder to publicly perform, record, broadcast, sell, and duplicate, or in connection with activities which constitute "fair use" under copyright law. If you are not the copyright holder, have not received permission from the copyright holder, or have not engaged in fair use of the works, you may be violating copyright law, and may be liable for damages and penalties. If you are unsure about your rights to a work, please consult a copyright attorney. KORG TAKES NO RESPONSIBILITY FOR ANY INFRINGEMENT COMMITTED THROUGH USE OF KORG PRODUCTS.
Contents
Introduction 6
Features 6
Connection example 6
Parts of the MR-1 7
Front and side panels 7
Top panel 8
Screens and operations 9
Level meter screen and menu list (MENU) screen 9
Selecting parameters and setting values---- 9
Basic operation 10
- Power and usage---- 10
Using the AC adaptor 10
Using the rechargeable battery 10
-
Connecting your monitor equipment 12
-
Turning the power on/off 12
Turning the power on 12
Turning the power off 12
- Playing back the demo project 13
Playing back 13
Pausing 13
Stopping playback 13
Searching for a desired location during playback 13
-
The level meter screen---- 14
-
Recording 15
Selecting your recording device 15
Selecting the recording format 16
Manually adjusting the recording level 16
Starting and stopping recording 17
- Other playback/record operations 18
Selecting and playing back a project/file 18
Using the Auto Gain Control mode 19
Using marks within a project 21
8. Other general operations 24
Changing the meter peak hold and the counter mode 24
Editing the project/file name 24
Conserving battery power 26
Setting the date and time 28
Protecting a project 29
Deleting a project/file 29
Viewing details about the project/file 30
Other functions 31
Play mode 31
Play list (PLAY LIST) 33
Creating a play list 33
Viewing a play list 34
Editing a play list 34
Record mode 36
Project recording format (New Project Type) 36
Settings when WAV (BWF) is selected 37
Recording time for each format (per 1Gbyte) 37
System settings (SYSTEM) 38
LCD Contrast 38
Device information (Device Info) 38
Formatting the hard disk (Format) 39
Updating the system (Load System) 40
DSD output filter settings (DSD Filter) 41
Using the MR-1 with your computer 42
USB mode 42
Hard disk structure and files 44
Using the AudioGate software 46
Appendix 48
Troubleshooting 48
Various messages 49
Execution messages 49
Error messages 49
Confirmation messages 51
Serious error messages 51
Specifications 52
Index----54
Introduction
Thank you for purchasing the Korg MR-1 1-bit mobile recorder. In order to take full advantage of your new equipment, please read this manual carefully and use the product as directed. When you've read the manual, keep it safe for future reference.
Features
The MR-1 is an ultra-high audio quality stereo portable recorder that can record and play back formats such as CD (16-bit/44.1 kHz), DVD audio (24-bit/192 kHz), and SACD (Super Audio CD) (1-bit/2.8 MHz).
The MR-1 has a built-in rechargeable battery, so it can easily be used to make high-quality field recordings. Of course, an AC adaptor is also included for extended recording or when using the MR-1 in a fixed location.
The recorded data can be copied to your computer via USB, and data files can be copied from your computer to the MR-1 for listening.
The MR-1 includes Korg's "AudioGate" format conversion software, so you can use a computer to convert audio files to different file formats.
Connection example
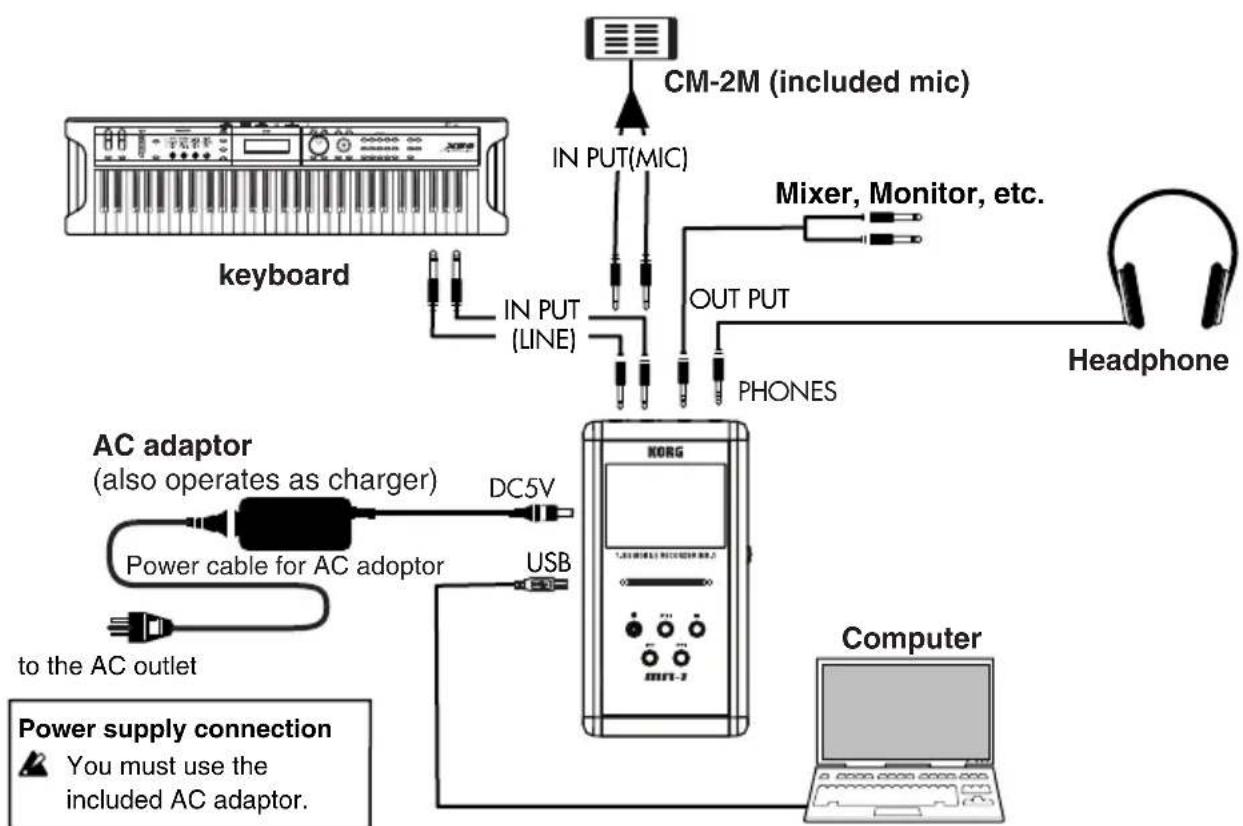
flowchart
graph TD
    A["CM-2M (included mic)"] --> B["IN PUT(MIC)"]
    B --> C["IN PUT (LINE)"]
    C --> D["AC adaptor"]
    D --> E["DC5V"]
    D --> F["Power cable for AC adopter"]
    F --> G["USB"]
    G --> H["to the AC outlet"]
    H --> I["Computer"]
    I --> J["Headphone"]
    B --> K["Mixer, Monitor, etc."]
    B --> L["OUT PUT"]
    B --> M["PHONES"]
    style A fill:#f9f,stroke:#333
    style J fill:#ccf,stroke:#333
    style I fill:#cfc,stroke:#333
Parts of the MR-1
Front and side panels
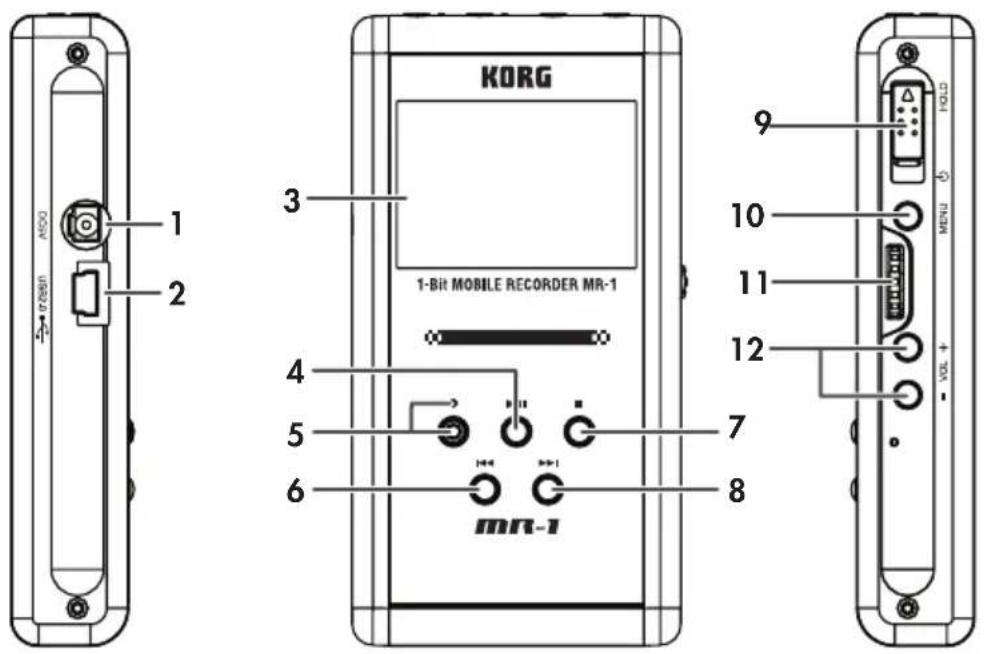
1. DC 5V connector
Connect the included AC adaptor here (also used for charging the battery).
2. USB connector
This lets you use a USB cable to connect the MR-1 to your computer.
3. Display
The display shows the level meters and counter during recording and playback, and can also show information about the project ( p.13) or file, and parameter settings.
4. Playback/Pause button
This button starts recording or playback. During recording or playback, you can press this button to pause (temporarily halt).
5. Record button / Record LED
Press this button to enter record-ready mode; the record LED will blink slowly. During recording, the record LED will blink rapidly.
6. Rewind button
Use this button to select a project ( p.13) or file, or to rewind.
7. Stop button
This button stops recording or playback.
8. Fast-forward button
Use this button to select a project ( p.13) or file, or to fast-forward.
9. Power button (with Hold function)
This turns the power on/off (shutdown). By sliding this button to the HOLD position, you can prevent accidental operation from occurring when you inadvertently touch the buttons or the P-dial.
10. Menu button
This button accesses the menu list (MENU) screen, allowing you to choose the information or parameters that will be displayed. Each time you press this, you will alternate between the level meter screen and the menu screen. You can also use this button to return from an editing screen to the previous screen.
11. P-dial
This is a dial with a push-switch function. For more about how to operate it, refer to "Screens and operations" on the next page.
12. Volume buttons
These adjust the volume of the headphone jack.
Top panel
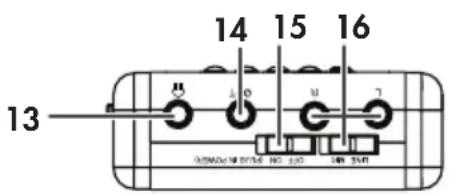
13. Headphone jack (stereo mini)
You can connect a set of headphones here.
14. Output jack (stereo mini)
The audio is sent out from this jack.
15. Mic power switch
This switch supplies power (+3V) when using a plug-in power type mic. Turn this on if you're using the included mic (CM-2M).

You must leave this off if you've connected a line input or a dynamic type mic. Leaving this switch on could damage your mic or line input device.
16. Input switch / Input jacks L, R
Select either the MIC (mic input) or LINE (line input) position as appropriate for the device that's connected to input jacks L and R.
You can use either balanced or unbalanced devices ( p.15).
Screens and operations
Level meter screen and menu list (MENU) screen
When you power-on the MR-1, the display will show the level meter screen.
When the display shows the level meter screen, pressing the menu button will show the menu list (MENU) screen which lets you proceed to various types of settings or informational screen. You'll use the P-dial from this screen to make various settings.
When the display shows the menu list (MENU) screen, pressing the menu button will take you back to the level meter screen. In this way, pressing the menu button will alternate between the menu list (MENU) screen and the level meter screen.
When the display shows the level meter screen, pressing the P-dial will show the meter setting screen. Here you can specify what will be shown in the level meter screen. When you've finished making settings, press the menu button to return to the level meter screen.
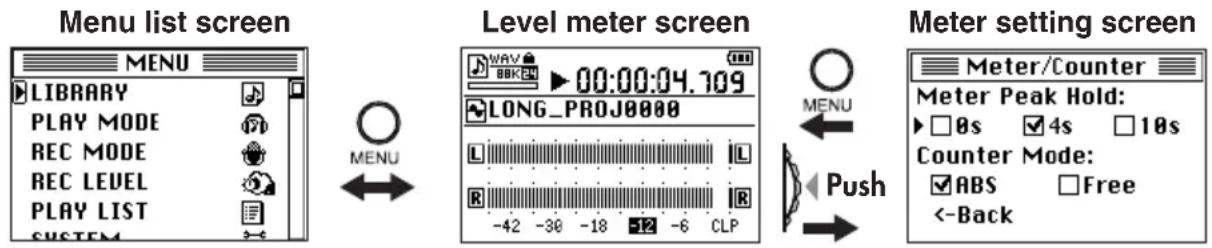
Selecting parameters and setting values
On the MR-1, you select parameters and set values by turning and pushing the P-dial. The item you've selected by turning the P-dial is shown in the screen by the movement of the selection icon "☐" or "▶".
"■" indicates that an additional setting screen will appear when you press the P-dial.
To select parameters and set values, you will turn the P-dial to move this selection icon or modify the value, and then press the P-dial to confirm the modified value. On the MR-1, we'll tell you to "use the P-dial to select and confirm" the item you're setting.
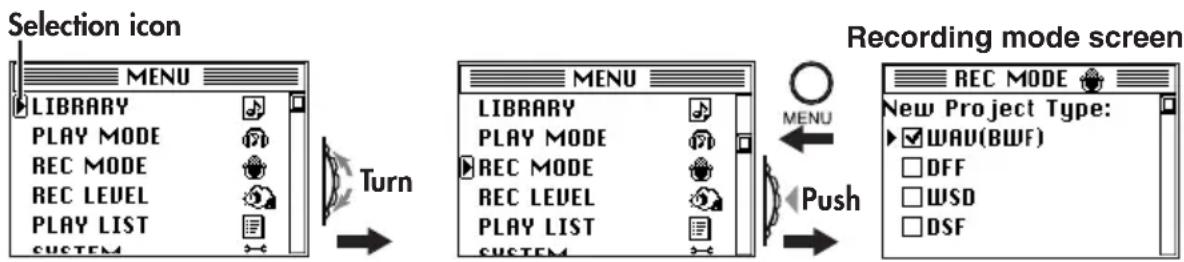
flowchart
graph LR
    A["Selection icon"] --> B["MENU"]
    B --> C["LIBRARY"]
    C --> D["PLAY MODE"]
    D --> E["REC MODE"]
    E --> F["REC LEVEL"]
    F --> G["PLAY LIST"]
    G --> H["SYSTEM"]
    I["Turn"] --> J["Recording mode screen"]
    J --> K["REC MODE"]
    K --> L["New Project Type:"]
    L --> M["WAV(BWF)"]
    M --> N["□DFF"]
    M --> O["□WSD"]
    M --> P["□DSF"]
Depending on the parameter, selecting and confirming an item may cause a further setting screen to appear, or may cause a check mark to appear in a check box.
If you've made a setting in a further setting screen, you can press the menu button to return to the previous screen.
Basic operation
1. Power and usage
The MR-1 contains a rechargeable battery that is convenient for mobile or outdoor use. If you're in a location where AC power is available, you can also use the MR-1 with the included AC adaptor.
Note If the AC adaptor is connected, recharging will begin regardless of whether the power is on or off. Recharging will end automatically when the battery is full.
Using the AC adaptor
Plug the power cable of the included AC adaptor into an AC outlet. Connect the DC plug of the AC adaptor to the DC 5V connector.
Using the rechargeable battery
The MR-1 contains a rechargeable battery. When you purchase the MR-1, the battery is not charged; you'll need to charge the battery before you can use it.
Law requires that the lithium ion rechargeable battery inside the MR-1 be recycled. If you wish to discard the MR-1, please send it to the dealer from whom you purchased it.
Recharging the battery
Connect the included AC adaptor (plugged into an AC outlet) to the DC5V connector.
Note Recharging will occur even if the MR-1 is powered-off. However if you want to view the status of recharging while it occurs, you'll need to turn the power on. In either case, recharging will end automatically when the battery is full.
Note If you set the MR-1's date and time ( p.28), the recorded files will have the correct date and time stamp. However, if you leave the MR-1 sitting for two or three days and the rechargeable battery does not have enough power to turn on the MR-1, the date and time settings will need to be reset after recharging the battery.
Remaining battery indication
The battery icon in the level meter screen indicates the approximate remaining battery capacity, and whether the battery is being recharged.
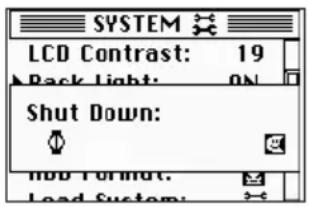
If you continue playback or recording without using the AC adaptor even though the low battery indication is shown, the shutdown screen will appear automatically when the battery capacity is exhausted, and the power will turn off after several seconds.
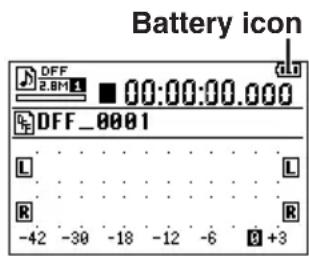
Battery full: Recharging is complete (the battery capacity is sufficient)
Battery mid: Prepare to recharge (the battery capacity is diminishing)
Battery low: Recharging is required (the battery will soon be exhausted)
Battery empty: Recharge immediately (automatic shutdown will occur very soon)
While operating or recharging with the AC adaptor
Note Even if you're using the AC adaptor, the battery icon will indicate the remaining battery capacity.
Operating time with the rechargeable battery
Due to the nature of the battery, temperature and humidity can affect the available operating time. The intervals between recording and playback and the format of the project or file will also have an effect.
Continuous recording/playback time
2.5 (WAV: 16-bit/44.1kHz) — 2 (DFF, DSF, WSD) hours
*With backlight off, temperature 20°C, humidity 50%
Rechargeable battery lifespan
The rechargeable battery is a consumable item. If the time until the battery low indication appears is much shorter than it used to be, the battery may have reached the end of its life. The rechargeable battery is not user-replaceable.
Please contact your dealer to have the battery replaced (a fee will be charged).
If you use the MR-1 in extremely low-temperature conditions ( 0^ C or below), the battery low indicator may appear sooner, but this is a temporary condition.
2. Connecting your monitor equipment
Connect stereo headphones to the headphone jack. Use the volume buttons to adjust the volume. If you're connecting the MR-1 to a monitor system, connect your stereo cable (mini) to the OUTPUT.

Connecting headphones won't cut the sound from the output jacks.

If you're recording from a mic, we recommend that you monitor through headphones to reduce the risk of acoustic feedback.
3. Turning the power on/off
The MR-1 contains an internal hard drive, and is a precision device comparable to a computer. You must observe the following procedure when turning the MR-1 on or off.
Turning the power on
Slide the power button down. After the opening screen, the level meter screen will appear.
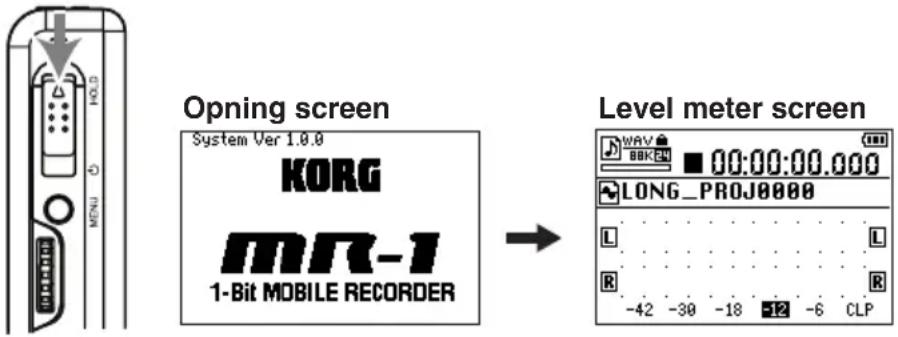
If the MR-1 is running on its battery and the power won't turn on, there is not enough remaining battery capacity. Please connect the AC adaptor to charge the battery.

When using the AC adaptor, charging occurs automatically unless the battery is already full.
Turning the power off
Slide the power button down and hold it for two seconds or longer. The shutdown screen will appear, and several seconds later the power will turn off automatically.
Auto shutdown function
After you've stopped the recorder and a certain length of time elapses without any operations being performed, the shutdown screen will appear automatically and then the power will turn off several seconds later ( p.27).
4. Playing back the demo project
The MR-1 contains a high-quality demo project that was recorded in DFF(DSDIFF) format. Here's how to play back this project.
What is a project?
When you record on the MR-1, two files are created; an audio file and a project file (containing protection data and markers, etc.). These two files are collectively called a "project," and can be operated on the MR-1 as if they were a single audio file. (→p.44 "Hard disk structure and files")
Playing back
When you've turned on the power, make sure that the demo project name is shown in the upper part of the level meter screen, and press the play/pause button.
The demo project recorded on the MR-1 will play back.
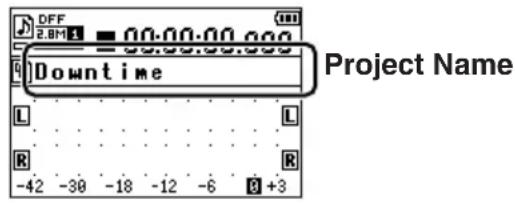
Note If something other than the demo project is shown, select the demo project as described in "Selecting and playing back a project/file" (p.18).
Pausing
During playback, press the play/pause button to pause at that location. When you press the play/pause button once again, playback will resume from that location.
Stopping playback
During playback, press the stop button.
If you then press the play/pause button, playback will start from the beginning of the currently selected project/file.
Searching for a desired location during playback
During playback, you can hold down the rewind button to rewind while listening to the sound.
You can hold down the fast-forward button to fast-forward while listening to the sound.
Note If you assign marks to a project, you'll be able to move quickly to a desired point (→p.21).
5. The level meter screen
When you turn on the power, the level meter screen is shown in the display. When the menu list (MENU) screen is shown, you can also access the level meter screen by pressing the menu button.
This screen shows information such as the MR-1's operating status and recording/playback format.
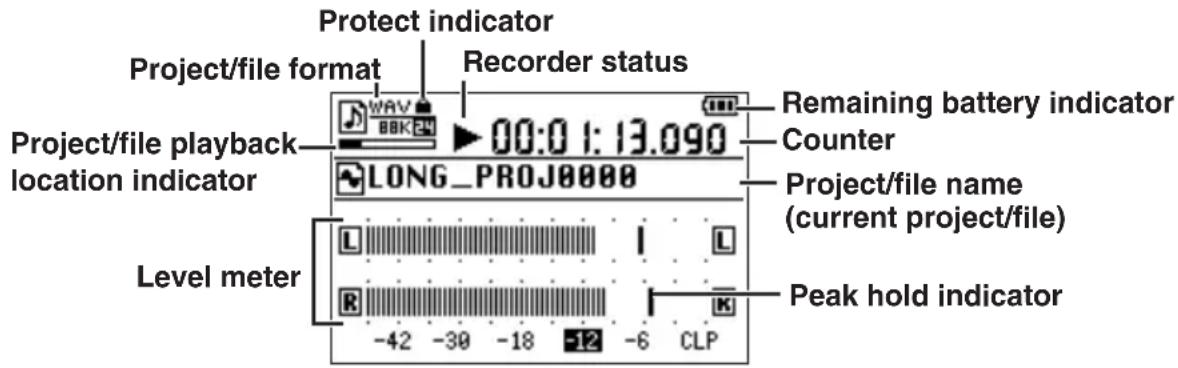
Protect indicator
A lock symbol is shown if the current project is protected. Nothing is shown if the protect setting is off ( p.29).
Project/file format
This shows the format of the current project/file ( p.36).
Recorder status
The current status of the recorder is shown using symbols such as record (●), play (▶), or stop (■).
Remaining battery indicator
This icon shows the amount of battery charge remaining.
Project/file playback location indicator
This is a graphical indication of the approximate position of the current counter value compared to the overall length of the current project/file.
Level meter
This shows the audio input level or monitor level.
Counter
The counter shows either the current location (as elapsed time since the beginning of the recording), or the remaining amount of time that can be recorded ( p.24).
Project/file name (current project/file)
This shows the name of the currently selected project/file.
Peak hold indicator
When you're adjusting the audio input level or monitor level, it may be helpful to lengthen the "Meter Peak Hold" setting in the Meter/Counter screen ( p.24).
6. Recording
When you record on the MR-1, date and time information is automatically added to the file so that you can manage your projects more easily.

If you set the date and time on the MR-1 ( p.28), the date and time will be correct. However, if the rechargeable battery does not have enough power to turn the MR-1 on and you let it sit for a few days, the date and time settings will be reset, so you'll need to set them correctly after recharging the battery.
Selecting your recording device
In addition to using the included mic (CM-2M) for convenient recording, you can record via a commercially-available mic, or connect high output level devices such as keyboards or audio equipment and record them.
Use stereo mini-plugs if you're connecting balanced devices to the input jacks, or monaural mini-plugs if you're connecting unbalanced devices.
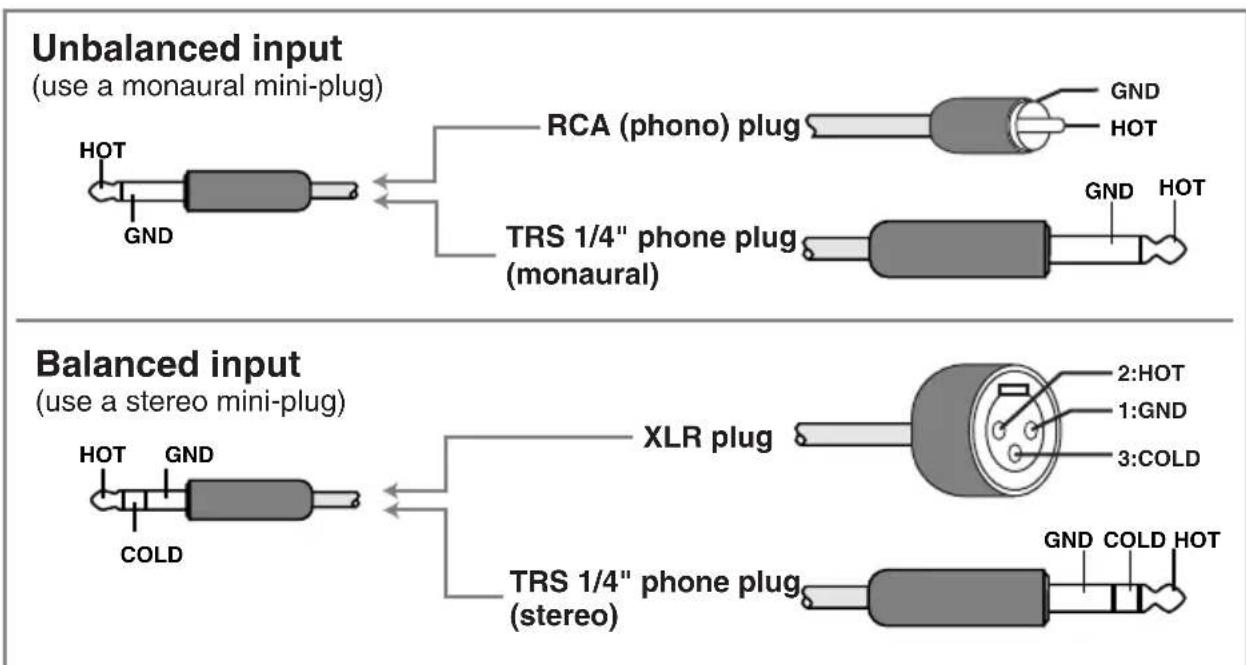
Recording using the mic inputs
Set the input switch to MIC. If the level is too low even after you've adjusted the gain ( p.16), you may need to use a mic preamp (sold separately).
Using the included mic (CM-2M)
Connect the white-banded mic plug to the L input jack, and the black-banded mic plug to the R input jack. You may use the included clip stand as needed. Since the included mic is plug-in power compatible, turn on the plug-in power switch when using it
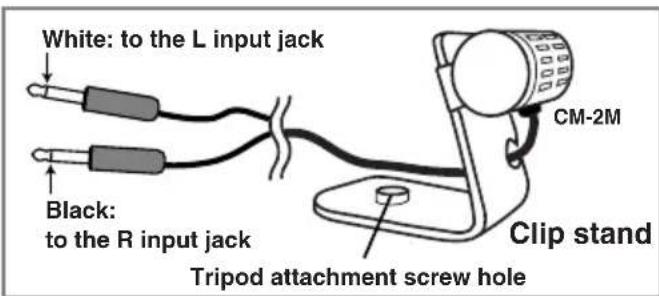
Recording using the line inputs
Set the input switch to LINE. If the level is too low even after you've adjusted the gain ( p.16), set the input switch to MIC.
Selecting the recording format
Here's how to select the recording format. Each time you record, a new project will be created in the recording format you've selected.

The default setting is WAV 16-bit 44.1 kHz.
- Press the menu button, and in the menu list, use the P-dial to select and confirm "REC MODE."
The record mode (REC MODE) setting screen will appear.
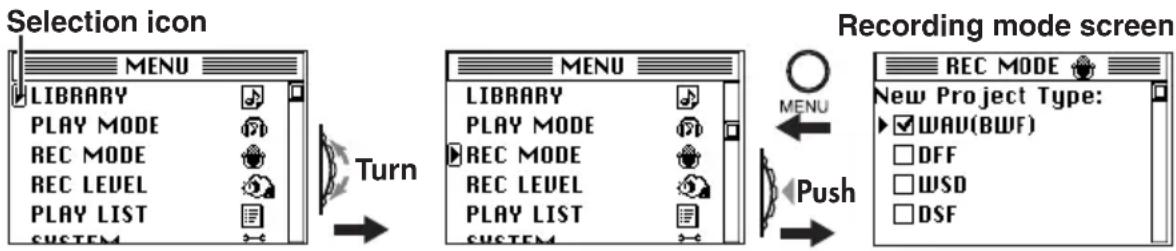
flowchart
graph LR
    A["Selection icon"] --> B["MENU"]
    B --> C["LIBRARY"]
    C --> D["PLAY MODE"]
    D --> E["REC MODE"]
    E --> F["REC LEVEL"]
    F --> G["PLAY LIST"]
    G --> H["SYSTEM"]
    I["Turn"] --> J["Menu"]
    J --> K["LIBRARY"]
    K --> L["PLAY MODE"]
    L --> M["REC MODE"]
    M --> N["REC LEVEL"]
    N --> O["PLAY LIST"]
    O --> P["SYSTEM"]
    Q["Recording mode screen"] --> R["REC MODE"]
    R --> S["New Project Type: ✓WAV(BWF) □DFF □WSD □DSF"]
    S --> T["Menu"]
    T --> U["Push"]
- Use the P-dial to select and confirm the Project Type.
A check mark will appear in the check box for the project type you selected and confirmed. You can choose from WAV (BWF), DFF, DSF, and WSD. For details on each type, refer to "Project recording format" (p.36).
- If you checked WAV (BSF), use the P-dial to select and confirm the desired Wav Format: fs/bit setting (bit depth and sampling frequency).
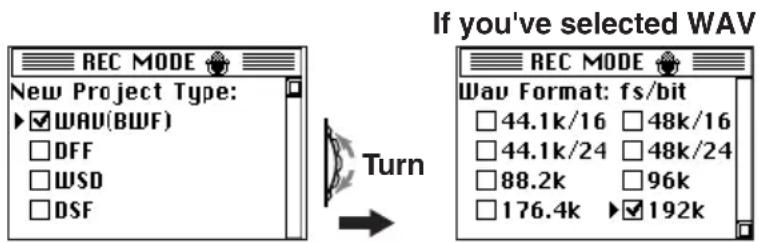
- When you've finished setting the recording mode, press the menu button to return to the menu list screen, and then press the menu button once again to return to the level meter screen.
Manually adjusting the recording level
Here's how to adjust the recording level with the Gain Control mode/Input Gain set to Manual. When the MR-1 is shipped from the factory, the Input Gain is set to Manual. If you want to use the Auto function (Gain Control mode set to Auto) and adjust the Auto gain settings, refer to "Changing the Auto recording level settings" (p.19).
- Press the record button to enter record-ready mode.
The record LED will blink slowly.
- Press the menu button, and in the menu list, use the P-dial to select and confirm "REC LEVEL."
The recording level (REC LEVEL) setting screen will appear.
- Make sure that the screen indicates Input Gain: (Manual).
If this is not shown, turn the P-dial to select the appropriate screen.
- Use the P-dial to select and confirm InL Gain.
The selection icon will change from "▶" to "◀", and the input jack L gain value will be highlighted.
- Use the P-dial to select the gain value while you watch the level meter, and then press the P-dial (or menu button). You have now finished setting the gain for input jack L.
The selection icon will change from "▶" to "▶". Adjust the gain so that the level does not exceed "0".

flowchart
graph LR
    A["MENU"] --> B["PLAY MODE"]
    B --> C["REC MODE"]
    C --> D["REC LEVEL"]
    D --> E["PLAY LIST"]
    E --> F["SYSTEM"]
    G["INPUT Gain:(Manual)"] --> H["InL Gain: 0.0dB"]
    H --> I["InR Gain: 0.0dB"]
    I --> J["L"]
    J --> K["R"]
    K --> L["-42 -30 -18 -52 -6 -3 0"]
    M["INPUT Gain:(Manual)"] --> N["InL Gain: -7.0dB"]
    N --> O["InR Gain: 0.0dB"]
    O --> P["L"]
    P --> Q["R"]
    Q --> R["-42 -30 -18 -52 -6 -3 0"]
    S["Push"] --> T["->"]
    U["->"] --> V["->"]
    W["->"] --> X["->"]
-
In the same way, use theP-dial to select and confirm the gain setting for input jack R.
-
When you've finished setting the recording levels, press the menu button to return to the menu list screen, and then press the menu button once again to return to the level meter screen.
Starting and stopping recording
Each time you record on the MR-1, a folder is created containing an audio file and a settings file, collectively called a "project." The folder is named automatically ( p.45).
You can edit this name after you've finished recording ( p.24).
Operations on the MR-1 will handle the entire project folder just as if it were an audio file.
- To start recording from record-ready mode, press the play/pause button.
The record LED will change from blinking slowly to blinking rapidly.
- To pause recording, press the play/pause button (the record LED will blink slowly); to resume recording, press the play/pause button once again (the record LED will blink rapidly).
A new project is not created if you pause during recording; the recording will still be a single project.
- When you're finished recording, press the stop button.
The record LED will go dark.
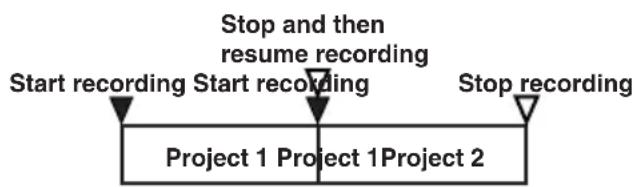
flowchart
graph TD
    A["Start recording"] --> B["Start recording"]
    B --> C["Stop and then resume recording"]
    C --> D["Stop recording"]
    D --> E["Project 1 Project 1Project 2"]
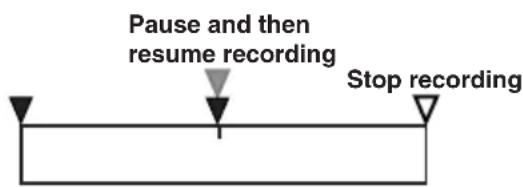
flowchart
graph TD
    A["Pause and then resume recording"] --> B["Stop recording"]
7. Other playback/record operations
Selecting and playing back a project/file
You can use the rewind and fast-forward buttons or the P-dial to select the project/file that you want to play. However if the playback mode ( p.31) is set to "Current Proj/File", you can not use the rewind/fast-forward buttons to select the project/file.
Note When you turn on the power, the most recently selected project/file will be selected.
Selecting a project/file using the rewind & fast-forward buttons
During playback or while stopped, you can press the rewind button to select the project/file that precedes the currently selected one, or the fast-forward button to select the next project/file.
Selecting a project/file using the P-dial
- Press the menu button, and in the menu (MENU) screen, use the P-dial to select and confirm "LIBRARY."
The library select (LIBRARY) screen will appear.
- The selection icon is shown at "Current Proj/File."
If you want to select a project/file other than the currently selected project/file, use the P-dial to select and confirm one of the other folders.

Inside the "MR_PROJ" folder are other folders that organize the files recorded on the MR-1 by their format. Select and confirm a folder to choose a project inside that folder.
The "AUDIO" folder contains audio files that were created on a device other than the MR-1.

flowchart
graph LR
    A["Current Proj/File"] --> B["MR_PROJ"]
    B --> C["AUDIO"]
    C --> D["Push"]
    D --> E["WAV_PROJ"]
    E --> F["OFF_PROJ"]
    F --> G["WSD_PROJ"]
    G --> H["DSF_PROJ"]
    H --> I["Push"]
    I --> J["LONG_PROJ0000"]
    J --> K["LONG_PROJ0001"]
    K --> L["LONG_PROJ0002"]
    L --> M["LONG_PROJ0003"]
    M --> N["LONG_PROJ0004"]
    N --> O["LONG_PROJ0005"]
    O --> P["Push"]
- The selection icon is shown at the currently selected project/file. Use the P-dial to select and confirm the desired project/file.
The display will show the editing screen for the current file.

- Press the play button to begin playing the selected project/file.
Alternatively, you can begin playback by using the P-dial to select and confirm "Play Now" in the file edit screen.
Using the Auto Gain Control mode
The Manual setting is convenient if you are able to predict the audio level of the source you're recording. However, you may want to use the Auto setting if the audio level will be changing significantly, or if you intentionally want to limit the dynamic range.
The Auto setting will automatically adjust the recording level with the L and R inputs linked.
- Press the menu button, and in the menu list, use the P-dial to select and confirm "REC LEVEL."
The recording level (REC LEVEL) setting screen will appear.
-
Turn the P-dial to select and confirm the Gain Control Mode "Auto" setting.
-
If you want to change the auto settings, use the P-dial to select and confirm Auto control setting.
The auto setting (Auto control setting) screen will appear.

flowchart
graph LR
    A["MENU"] --> B["MANU"]
    B --> C["REC LEVEL"]
    C --> D["Gain Control Mode: Manual ▶ Auto Auto control setting"]
    D --> E["Push/Pull"]
    E --> F["REC LEVEL"]
    F --> G["Gain Control Mode: Manual ▶ Auto Auto control setting"]
    G --> H["Turn"]
- Use the P-dial to select and confirm the settings.
At this time, the selection icon will change from "▶" to "B", and the value of the setting will be highlighted.
- Turn the P-dial to select the desired value, and then press the P-dial (press the menu button) to confirm it.
The selection icon will change from "▼" to "▼".
Note Even if the Gain Control Mode is set to "Manual," you will still be able to select and confirm the various Auto control setting items. Your settings will take effect when you select and confirm "Auto."

6. When you've finished making settings, press the menu button to return to the recording level (REC LEVEL) setting screen.
Alternatively, you can return by using the P-dial to select and confirm "<- Back" in the screen.
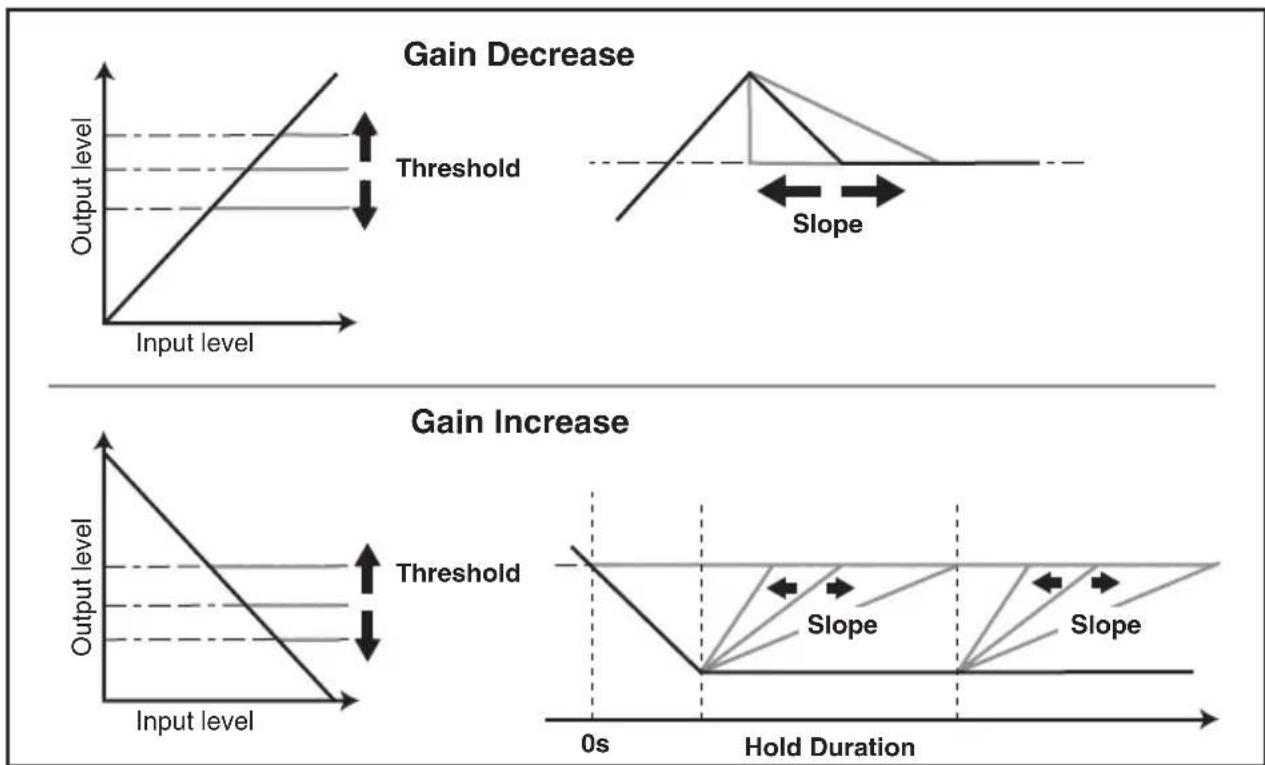
line
| Input Level | Gain Decrease Threshold | Gain Increase Threshold | |-------------|--------------------------|--------------------------| | 0 | 0 | 0 | | >0 | >0 | <0.5 |Gain Decrease (Gain Reduction)
Threshold
(-24.0 ... 0.0 dB, OFF/ Forty-nine steps in 0.5 dB increments: default setting is OFF) When the incoming signal exceeds the specified threshold value, the gain will be reduced so that the input signal is below that threshold value.
Slope
(-24.0 ... -0.5 dB/s. Forty-eight steps in 0.5 dB increments: default setting is 6.0 dB/s) This specifies the time (envelope setting) over which the gain is adjusted when the above Threshold value is exceeded.
Gain Increase
Threshold
(OFF, -36.0 ... 0.0 dB/ Seventy-two steps in 0.5 dB increments: default setting is -36.0 dB)
Hold
(1 ... 30s/ Thirty steps in 1-second increments: default setting is 10s) If the input signal does not exceed the Threshold value for the duration specified by the Hold setting, the input gain will be raised according to the Slope setting.
Slope
(0.5 ... +24.0 dB/s. Forty-eight steps in 0.5 dB increments: default setting is +6.0 dB/s) This specifies how the gain will be adjusted when the Threshold value is exceeded.
Using marks within a project
If you've made an extended recording, such as of a live performance or a practice session, you can move between songs or to a desired location by moving while you listen to the sound or by fast-forwarding or rewinding according to the counter time.
However, the MR-1 also lets you add marks to a project during recording or playback, and use the rewind and fast-forward buttons to rapidly move between these marks during playback.
Adding a mark
To add a mark, simply press the record button during recording or playback.
You can add up to 100 marks, and edit them later.

Markers are automatically added at the beginning of the project, and at locations at which you resume recording after you pause recording.

You can only add marks to a project that was recorded on the MR-1.
Viewing the mark list
Here's how to view a list showing the marks in a project in the order of their time location.
- Press the menu button, and in the menu list (MENU) screen, use the P-dial to select and confirm "LIBRARY."
The library select (LIBRARY) screen will appear.
- Use the P-dial to select and confirm the project whose mark list you want to see. (Refer to "Selecting and playing back a project/file," p.18)
The project/file edit screen will appear.

- In the project/file edit screen, use the P-dial to select and confirm "Mark List."
The mark list (Mark List) screen will appear.
Using marks to move
- Press the menu button, and in the menu list (MENU) screen, use the P-dial to select and confirm "PLAY MODE."
The playback mode select (PLAY MODE) screen will appear.
-
Use the P-dial to select and confirm "Current Proj/File" as the playback mode.
-
Press the menu button, and in the menu list (MENU) screen, use the P-dial to select and confirm "LIBRARY."
The library select (LIBRARY) screen will appear.
- Select and confirm a project that contains marks.
Now you can move to the locations where you added the marks.
Regardless of the screen shown in the display, you can press the rewind or fast-forward button during playback to move to the time location of the previous or next mark.
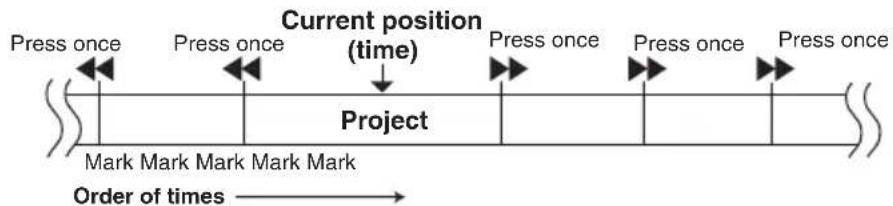
flowchart
graph LR
    A["Press once"] --> B["Current position (time)"]
    B --> C["Project"]
    C --> D["Mark Mark Mark Mark Mark"]
    D --> E["Order of times"]
    style A fill:#f9f,stroke:#333
    style B fill:#ccf,stroke:#333
    style C fill:#cfc,stroke:#333
    style D fill:#fcc,stroke:#333
    style E fill:#ffc,stroke:#333
If you've selected something other than "Current Proj/File" (→p.31) as the play mode (play Current Folder, PlayList, Shuffle, etc.), you can't use the rewind or fast-forward buttons to move between marks.
Editing marks
You can edit the time locations of the marks shown in the mark list (Mark List) screen, or delete unwanted marks.
You can edit the marks even of a project whose Protect setting is on, but they will revert to their unedited state when you select a different project or turn off the power.
- In the mark list (Mark List) screen, use the P-dial to select and confirm the mark that you want to edit.
The mark edit select (Mark Edit) screen will appear.
To return to the mark list (Mark List) screen, press the menu button (or use the P-dial to select and confirm "<- Back" in the screen).
- Use the P-dial to select and confirm the item you want to edit.
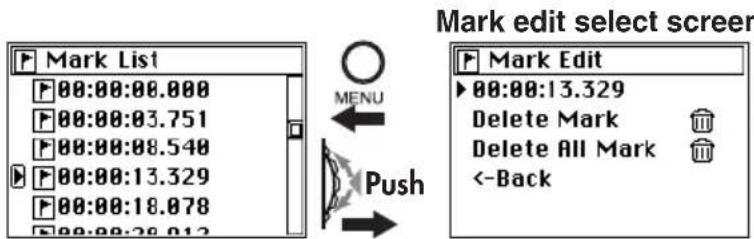
Editing the time location of a mark
- When you use the P-dial to select and confirm the time location of a mark, you'll be able to edit it.
The selection icon will change from "▶" to "◀".
- The highlighted place will change each time you press the P-dial.
By pressing the P-dial when the last place is highlighted, you can exit from editing the time location; to continue editing the time location, simply press the P-dial once again.
- To change the digits of the highlighted place, turn the P-dial to specify the value and press the P-dial to confirm it.
Repeat these steps to specify the time location for the mark.
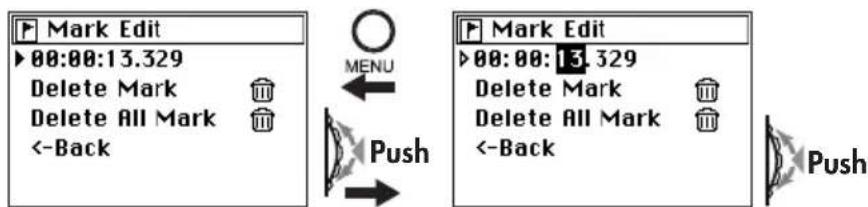
When you've finished making settings, press the P-dial several times to return to the Mark Edit screen.
Deleting a mark (Delete Mark)
- When you use the P-dial to select and confirm "Delete Mark," a dialog screen will ask you to confirm the deletion.
- Use the P-dial to select and confirm [Yes].
If you decide not to delete the mark, use the P-dial to select and confirm [No] (or press the menu button), and you'll return to the mark edit select (Mark Edit) screen.
- The screen will indicate "Working..." and the mark will be deleted. When deletion is finished, the screen will indicate "Complete."
- Press the P-dial (or press the menu button) to return to the mark list (Mark List) screen.

flowchart
graph TD
    A["00:00:13.329"] --> B["Delete Mark"]
    B --> C["Delete All Mark"]
    C --> D["<-Back"]
    E["MENU"] --> F["Push"]
    G["Push"] --> H["Next Step"]
    I["Mark Edit"] --> J["Delete Mark"]
    J --> K["Are You Sure?"]
    K --> L["[No"]] --> M["->[Yes"]]
    M --> N["Next Step"]
    O["Mark Edit"] --> P["Delete Mark Completed."]
    P --> Q["->[Exit"]]
Deleting all marks (Delete All Mark)
- When you use the P-dial to select and confirm "Delete All Mark," a dialog screen will ask you to confirm the deletion.
- Use the P-dial to select and confirm [Yes].
If you decide not to delete the marks, use the P-dial to select and confirm [No] (or press the menu button), and you'll return to the mark edit select (Mark Edit) screen.
- The screen will indicate "Working..." and the marks will be deleted. When deletion is finished, the display will indicate "Complete."
- Press the P-dial (or press the menu button) to return to the mark list (Mark List) screen.

flowchart
graph LR
    A["00:00:13.329 Delete Mark Delete All Mark <-Back"] --> B["MENU"]
    B --> C["Push Push"]
    C --> D["Mark Edit Delete All Mark Are You Sure? [No"] ▶[Yes]]
    D --> E["Exit"]
- Verify that all marks have been deleted, and press the menu button to return to the project/file edit screen.
8. Other general operations
Changing the meter peak hold and the counter mode
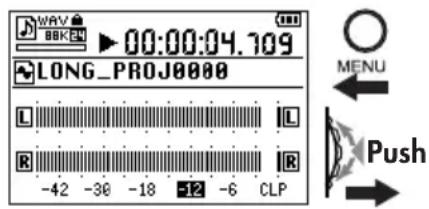
- From the level meter screen, press the P-dial.
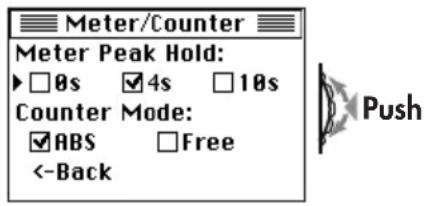
The meter/counter (Meter/Counter) screen will appear.
- Use the P-dial to select and confirm "Meter Peak Hold" (peak indicator hold time).
A check mark will appear in the hold time check box you selected (0 seconds, 4 seconds, 10 seconds).
- Use the P-dial to select and confirm "Counter Mode" (counter display mode).
A check mark will appear in the mode check box you selected.
ABS: The location is shown as an absolute time, with 0 (zero) as the point at which recording began for the file.
Free: The remaining recordable time is displayed, as calculated from the current file format ( p.36) and the amount of space remaining on the hard disk.
- When you've finished making settings, press the menu button to return to the level meter screen.
You can also confirm and return by using the P-dial to select and confirm "<-Back" in the screen.
Editing the project/file name
You can specify a name of up to sixteen characters, using uppercase alphabetical characters A-Z, lowercase alphabetical characters a--z, numerals 0--9, and the following symbols.
![! # $ % & ' ( ) + , - ÷ [ ] ^ _ ` { } ~](/content/2026/05/820877/images/6c24313ca955662bebdfef00b15d4f94858e8c7e13952634ee58e245228dd1fe.jpg)
You can't edit the name of a project that's protected.
- Press the menu button, and in the menu list (MENU) screen, use the P-dial to select and confirm "LIBRARY."
The library select (LIBRARY) screen will appear.
- Use the P-dial to select and confirm the project/file whose name you want to edit. (See "Selecting and playing back a project/file," p.18)
If you want to edit the name of the currently selected project/file, simply press the P-dial twice to confirm.

- The project/file edit screen will appear, with the currently selected project/file name shown at the top.
- Use the P-dial to select and confirm "Rename."
The name editing screen will appear.
Project/file edit screen
![R_PROJ\WAU_PROJ\ Play Now Rename Delete Add to Play List Details Protect MENU Push 0 PROJ 0 01 [◀][▶] [DEL] [INS] [A/a] ABCDEFGHIJKLMNOPQRSTUVWXYZ 0123456789 [CANCEL] [OK] Push 0 PROJ 0 01 [◀][▶] [DEL] [INS] [A/a] ABCDEFGHIJKLMNOPQRSTUVWXYZ OPQRSTUYWXYZ 0123456789 [CANCEL] [OK] Push](/content/2026/05/820877/images/b569d2af93ec06e507903db43c76ea6fe98409f11d80c3852b67c0b2fd3dd717.jpg)
- Use [◀] or [▶] to move to the position of the character you want to edit (highlighted), and use the P-dial to confirm.
- The character will be selected and highlighted. Use the P-dial to select and confirm the desired character.
[DEL]---- Deletes the currently highlighted character and moves the subsequent characters toward the left.
[INS]---- Inserts a space at the highlighted location.
[A/a]---- Switches between uppercase and lowercase characters, and symbols.
Repeat these steps to edit the name.
- When you've finished editing the name, use the P-dial to select (highlight) and confirm [OK]. You will return to the file edit select screen.
If you use the P-dial to select (highlight) and confirm [Cancel], the changes you made will be discarded when you return to the project/file edit select screen.
Conserving battery power
If you're using with the MR-1 operating on battery power, you can reduce power consumption by turning off unneeded circuitry.
Backlight setting
You can turn the backlight off if you're using the MR-1 in a brightly lit location, or make it automatically turn off a set period of time after the most recent operation.
- Press the menu button, and in the menu list (MENU) screen, use the P-dial to select and confirm "SYSTEM."
The system setting (SYSTEM) screen will appear.
- Use the P-dial to select and confirm "Back Light."
The selection icon will change from "▶" to "◀", and the value will be highlighted.
- Turn the P-dial to specify the amount of time until the backlight will turn off.
If this is "OFF," the backlight will not turn on. If this is "ON," the backlight will always remain on.
To turn the backlight on, select "ON" in the same way.

flowchart
graph LR
    A["PLAY MODE"] --> B["RECELEMENT"]
    B --> C["RECELLEVEL"]
    C --> D["PLAY LIST"]
    D --> E["SYSTEM"]
    E --> F["USB MODE"]
    G["2006/10/27 12:18"] --> H["LCD Contrast: 8"]
    H --> I["Back Light: 5sec"]
    I --> J["AutoShutdown: 5min"]
    J --> K["LED: ON"]
    K --> L["HDD Format: 📋"]
    M["2006/10/27 12:18"] --> N["LCD Contrast: 8"]
    N --> O["Back Light: OFF"]
    O --> P["AutoShutdown: 5min"]
    P --> Q["LED: ON"]
    Q --> R["HDD Format: 📋"]
- Press the P-dial (or the menu button) to complete the backlight setting.
The selection icon will change from "▶" to "▼". Alternatively, you can press the P-dial to complete the setting.
Auto shutdown setting
If no operations have been performed for the length of time you specify here, the shutdown screen will appear automatically, and the power will turn off several seconds after that. This will prevent the battery from running down in the event you forget to turn off the power.
- Press the menu button, and in the menu list (MENU) screen, use the P-dial to select and confirm "SYSTEM."
The system setting (SYSTEM) screen will appear.
- Use the P-dial to select and confirm "AutoShutDown."
The selection icon will change from "▶" to "▶", and the setting will be highlighted.
- Turn the P-dial to specify the time until when the power will turn off.
If this is set "OFF" the power will stay on; Auto shutdown will not occur.

- Press the P-dial (or the menu button) to complete the Auto shutdown setting.
The selection icon will change from "▶" to "▶".
LED setting
Normally, the recording LED will light while recording, but you can reduce the power consumption even further by turning this LED function off.
- Press the menu button, and in the menu list (MENU) screen, use the P-dial to select and confirm "SYSTEM."
The system setting (SYSTEM) screen will appear.
- Use the P-dial to select "LED."
The selection icon will change from "▶" to "▼", and the setting will be highlighted.
- Turn the P-dial to select "OFF."
To turn the LED back on again, perform the same operation to select "ON."

- Press the P-dial (or the menu button) to complete the LED setting.
The selection icon will change from "▶" to "▶".
Setting the date and time
If you set the MR-1's date and time, the recorded files will have the correct date and time stamp. Here's how to set the internal clock.
- Press the menu button, and in the menu list (MENU) screen, use the P-dial to select and confirm "SYSTEM."
The system setting (SYSTEM) screen will appear.
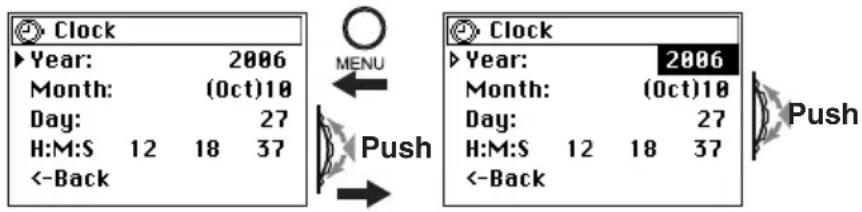
- Use the P-dial to select and confirm the date and time indication in the top line.
The date and time setting (Clock) screen will appear.

- Use the P-dial to select and confirm "Year."
The selection icon will change from "▶" to "▼", and the year indication will be highlighted.
- Turn the P-dial to select the year, and press the P-dial (or the menu button) to confirm.
The selection icon will change from "▶" to "▼".
-
In the same way, use the P-dial to select and confirm the "Month," "Day," "Hour," "Minute," and "Sec."
-
When you've finished making settings, press the menu button to return to the system setting (SYSTEM) screen.
Alternatively, you can return by using the P-dial to select and confirm "<-Back" in the screen.
If you leave the MR-1 sitting for two or three days and the rechargeable battery does not have enough power to turn on the MR-1, the date and time setting will be reset. After recharging, you'll need to make this setting again. If the date and time have been reset, a message will remind you to make the setting.
The time will continue to advance while you're setting it.
Protecting a project
Here's how to protect a project. If you edit the name or delete or edit the mark settings of a project that is protected, these settings will revert to their original state when you select another project or turn off the power. A protected project is indicated by a lock icon displayed in the project/file information field (the top line) of the level meter screen.

You can't protect an audio file that was recorded by a device other than the MR-1 (such files will be located in the AUDIO folder).
- Press the menu button, and in the menu list (MENU) screen, use the P-dial to select and confirm "LIBRARY."
The library select (LIBRARY) screen will appear.
- Use the P-dial to select and confirm the project whose Protect setting you want to change. (See "Selecting and playing back a project/file," p.18)
If you want to protect the currently selected project, simply press the P-dial twice to confirm.
-
The project/file edit screen will appear, with the name of the project you just selected shown at the top.
-
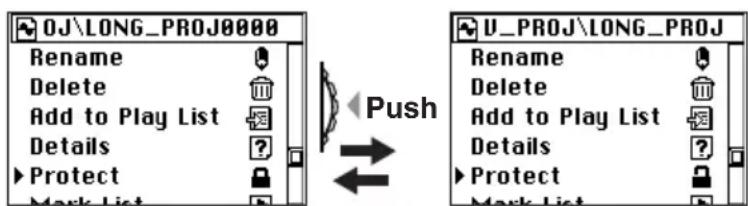
Turn the P-dial to move the selection icon to "Protect."
-
Each time you press the P-dial, the setting will alternate between protecting (and un-protecting) the project.
-
When you've finished making the setting, press the menu button to return to the library select (LIBRARY) screen.
Deleting a project/file
Here's how to delete a file. Once you've deleted a file, it cannot be recovered, so use this operation with care.

You can't delete a project that's protected.
- Press the menu button, and in the menu list (MENU) screen, use the P-dial to select and confirm "LIBRARY."
The library select (LIBRARY) screen will appear.
- Use the P-dial to select and confirm the project/file that you want to delete. (See "Selecting and playing back a project/file," p.18)
To delete the currently selected project/file, simply press the P-dial twice.
- The project/file edit screen will appear, with the name of the currently selected and confirmed project/file shown at the time.
4. Use the P-dial to select and confirm "Delete."
A dialog screen will ask you to confirm the Delete operation.

flowchart
graph TD
    A["Play Now"] --> B["Rename"]
    B --> C["Delete"]
    C --> D["Add to Play List"]
    D --> E["Details"]
    E --> F["Protect"]
    G["Menu"] --> H["Push"]
    I["Delete Proj/File Are You Sure? [No"] ▶[Yes]] --> J["Push"]
    K["Long_PROJ0000"] --> L["Delete Proj/File Completed. ▶[Exit"]]
5. Use the P-dial to select and confirm [Yes].
If you decide not to delete, use the P-dial to select and confirm [No] (or press the menu button), and you'll return to the file edit screen.
6. The screen will indicate "Working...", and deletion will begin. When it ends, the screen will indicate "Complete."
7. Press the P-dial (or press the menu button) to return to the library select (LIBRARY) screen.
Viewing details about the project/file
Here's how to view detailed information about the project/file, such as the audio format, song time, and file size.
1. Press the menu button, and in the menu list (MENU) screen, use the P-dial to select and confirm "LIBRARY."
The library select (LIBRARY) screen will appear.
2. Use the P-dial to select and confirm the project/file whose detailed information you want to view. (See "Selecting and playing back a project/file," p.18)
If you want to view information for the currently selected project/file, simply press the P-dial twice.
3. The file edit screen will appear, with the name of the currently selected file in the top line.
4. Use the P-dial to select and confirm "Detail."
Details about the project/file will be displayed.
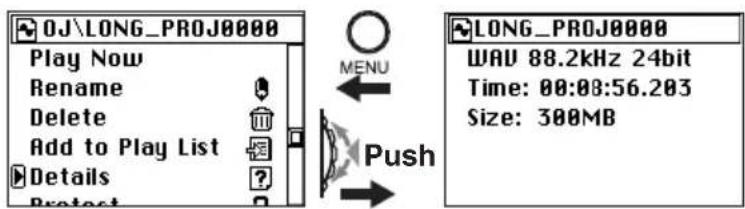
5. When you've finished viewing the details, press the menu button to return to the project/file edit screen.
Other functions
Play mode
The MR-1 provides three play modes, as well as shuffle and repeat play settings.
To select these mode, use "PLAY MODE" in the menu list (MENU) screen.
Current Proj/File (play only one project/file)
In this mode, only the single project/file you select will play. (See "Selecting and playing back a project/file," p.18)
When the selected file has finished playing, playback will stop automatically.
This is the only mode in which you can use marks to move within the song during playback ( p.21).
Current Folder (play the contents of a folder)
In this mode, each project/file in the folder that contains the current project/file will be played in the order it appears in the library select screen list.
When each project/file in the folder has finished playing, playback will stop automatically.
PlayList (play the contents of a list)
In this mode, the contents of the play list you create ( p.33) will be played.
When playback reaches the end of the play list, it will stop automatically.
Shuffle (shuffle playback)
If you select this option, the project/file playback order will be shuffled (randomized).
When playback ends, the order will automatically be shuffled, and then playback will continue. If you press the stop button and then press the play button, playback will continue from the beginning of the same project/file.
This setting is valid for the "Current Folder" or "PlayList" play modes.
Note If you enable "Shuffle", the "Repeat" setting is disabled. Conversely if you enable "Repeat", the "Shuffle" setting is disabled.
Repeat (repeat playback)
If you select this option, playback will be repeated. This setting is valid for all play modes. Playback according to the selected mode will continue until you press the stop button.
Note If you enable "Repeat", the "Shuffle" setting is disabled. Conversely if you enable "Shuffle", the "Repeat" setting is disabled.
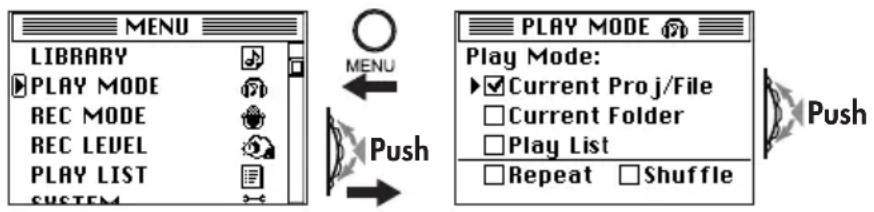
- Press the menu button, and in the menu list (MENU) screen, use the P-dial to select and confirm "PLAY MODE."
The play mode select (PLAY MODE) screen will appear.
- Use the P-dial to select and confirm the playback method you want to use.
A check will appear in the check box of the play mode you selected and confirmed.
flowchart
graph LR
    A["MENU"] --> B["PLAY MODE"]
    B --> C["Play Mode: Current Proj/File Current Folder Play List Repeat Shuffle"]
    C --> D["Push"]
    D --> E["Menu"]
    E --> F["Play List"]
- If you want to use shuffle play, check the "Shuffle" check box.
If the play mode is "Current Proj/File," this option is invalid even if it is checked. - If you want playback to repeat, check the "Repeat" check box.
- Press the menu button to return to the menu list (MENU) screen.
- When you press the play button, playback will begin, using the mode you selected.
Play list (PLAY LIST)
Creating a play list
After creating a play list, you can select "Play List" as the play mode, and the projects/files will be played in the order specified by the list. The repeat and shuffle settings of the Play Mode can affect the playback of the PlayList. You can store up to one hundred play lists.
Here's how to create a play list.
- Press the menu button, and in the menu list (MENU) screen, use the P-dial to select and confirm "LIBRARY."
The library select (LIBRARY) screen will appear. - Use the P-dial to select and confirm the project/file you want to add to the play list.
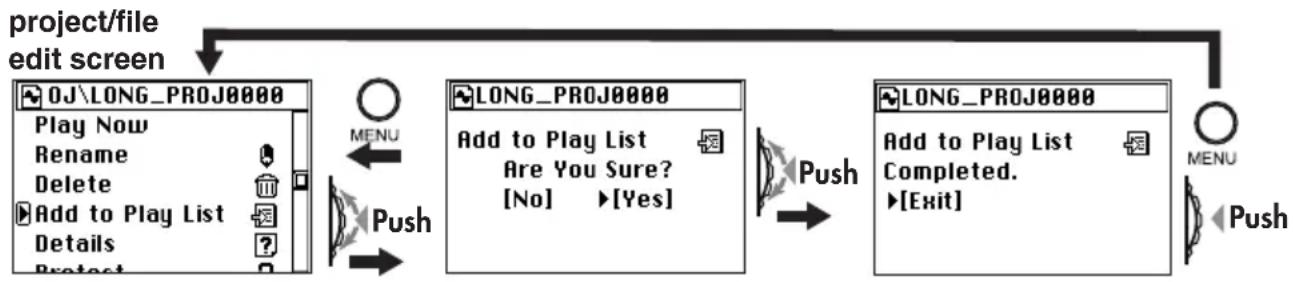
- The name of the project/file you selected and confirmed will appear in the project/file edit screen displayed above.
- Turn the P-dial to move the selection icon to "Add to Play List."
flowchart
graph TD
    A["project/file edit screen"] --> B["File Edit Screen"]
    B --> C["Menu"]
    B --> D["Push"]
    C --> E["Add to Play List Are You Sure? [No"] ▶[Yes]]
    D --> F["Push"]
    E --> G["Add to Play List Completed. ▶[Exit"]]
    F --> H["Menu"]
    H --> I["Push"]
- Press the P-dial; a message will ask "Add to Play List: Are you sure?"
- Use the P-dial to select and confirm [Yes].
If you decide not to add the project/file, use the P-dial to select and confirm [No] (or press the menu button); you will return to the file edit screen.
- The screen will indicate "Working...", and when processing is finished will indicate "Complete..."
The added project/file will be added to the end of the play list. If you want to change the order, refer to "Editing a play list" (p.34).
- Press the P-dial (or press the menu button) to return to the project/file edit screen.
- If you want to add another project/file, press the menu button and repeat steps 2--9.
You can also use this procedure to add a project/file to a play list you created earlier.
Viewing a play list
Here's how to view the contents of a play list.
Press the menu button, and in the menu list (MENU) screen, use the P-dial to select and confirm "PLAY LIST."
The play list (PLAY LIST) screen will appear.
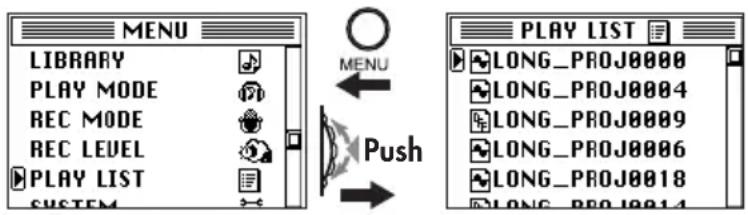
Editing a play list
In the play list (PLAY LIST) screen (see above), select the file you want to edit and then select the item you want to edit.
Play Now
Here's how to select a project/file from the list, and start playback.
- In the PLAY LIST screen, use the P-dial to select and confirm the project/file whose order you want to change.
- The play list edit screen will appear, with the name of the project/file you selected and confirmed shown at the top.
- Use the P-dial to select and confirm "PlayNow"; the project/file shown at the top will begin playing.
In the play list screen, you can also press the play button to start playback of the project/file indicated by the selection icon.
Change Order
Here's how to change the order of a project/file in the list.
- From the play list (PLAY LIST) screen, use the P-dial to select and confirm the project/file whose order you want to change.
-
The play list edit screen will appear, with the name of the selected and confirmed project/file shown at the top.
-
Use the P-dial to select and confirm "Change Order."

flowchart
graph TD
    A["PLAY LIST"] --> B["LONG_PROJ0000"]
    B --> C["LONG_PROJ0004"]
    C --> D["LONG_PROJ0009"]
    D --> E["LONG_PROJ0006"]
    E --> F["LONG_PROJ0018"]
    F --> G["LONG_PROJ0014"]
    G --> H["MENU"]
    H --> I["Push"]
    I --> J["LONG_PROJ0000"]
    J --> K["Play Now"]
    K --> L["Change Order"]
    L --> M["Remove from List"]
    M --> N["Remove All"]
    N --> O["<-Back"]
    O --> P["Menu"]
    P --> Q["LONG_PROJ0004"]
    Q --> R["LONG_PROJ0009"]
    R --> S["LONG_PROJ0008"]
    S --> T["LONG_PROJ0006"]
    T --> U["LONG_PROJ0018"]
    U --> V["LONG_PROJ0014"]
    V --> W["Push"]
- The Move icon will appear in the play list (PLAY LIST) screen.
- Turn the P-dial to move the project/file to the desired position, and then press the dial to confirm.
The play list (PLAY LIST) screen will show the new order.
If you press the menu button before you confirm, you will return to the play list edit screen.
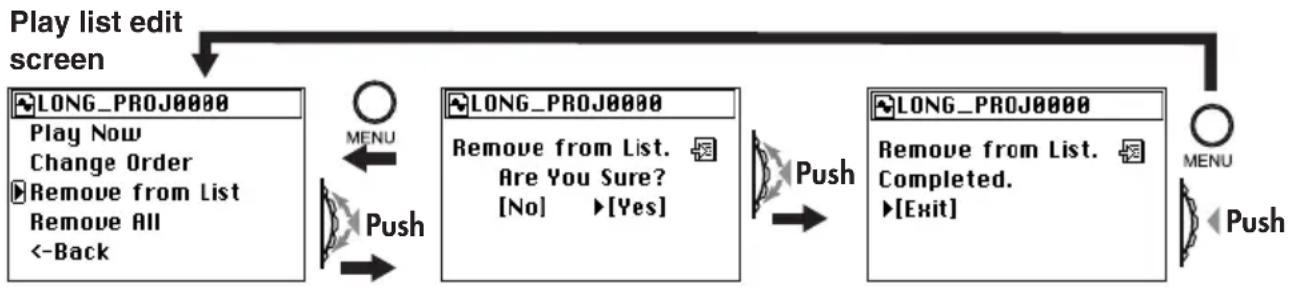
Remove From List
Here's how to remove the selected project/file from the play list.
This will not delete the project/file itself. If you later decide to add the project/file to the play list, you can use the Add to Play List operation to do so.
- In the play list (PLAY LIST) screen, use the P-dial to select and confirm the project/file that you want to remove from the list.
- The play list edit screen will appear, with the name of the selected and confirmed project/file shown at the top.
- Use the P-dial to select and confirm "Remove From List."
flowchart
graph TD
    A["Play list edit screen"] --> B["LONG_PROJ0000"]
    B --> C["Play Now Change Order Remove from List Remove All <-Back"]
    C --> D["MENU"]
    D --> E["Push"]
    E --> F["LONG_PROJ0000 Remove from List. Are You Sure? [No"] ▶[Yes]]
    F --> G["Push"]
    G --> H["LONG_PROJ0000 Remove from List. Completed. ▶[Exit"]]
    H --> I["MENU"]
    I --> J["Push"]
- A dialog message of "Remove From List. Are you sure?" will appear in the screen.
- Use the P-dial to select and confirm [Yes].
If you decide not to remove the project/file, use the P-dial to select and confirm [No] (or press the menu button), and you will return to the play list edit screen.
- The screen will indicate "Working...", and will then indicate "Complete" when the project/file has been removed.
- Press the P-dial (or press the menu button) to return to the play list edit screen.
- If you want to remove another project/file, press the menu button and repeat steps 1--7.
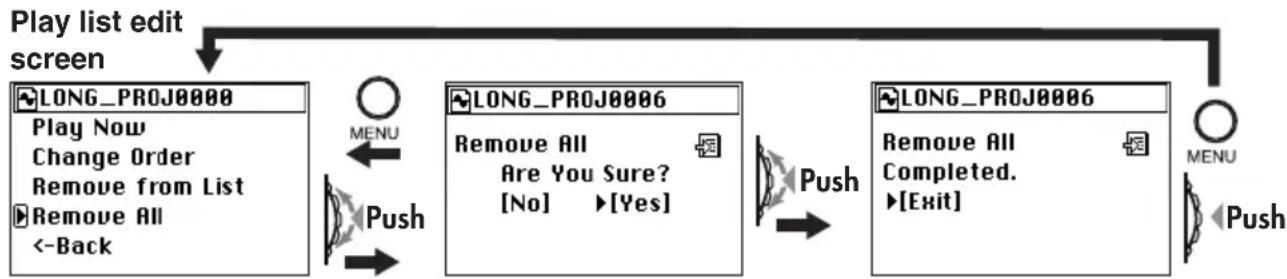
Remove All
Here's how to remove all projects/files from the play list.

This will not delete the projects/files themselves.
- In the play list (PLAY LIST) screen, use the P-dial to select and confirm any project/file.
- The play list edit screen will appear.
- Use the P-dial to select and confirm "Remove All."
- The screen dialog will ask "Remove All. Are you sure?"
flowchart
graph TD
    A["Play list edit screen"] --> B["LONG_PROJ0000"]
    B --> C["Play Now Change Order Remove from List Remove All ←Back"]
    C --> D["MENU"]
    D --> E["Push"]
    E --> F["LONG_PROJ0006"]
    F --> G["Remove All Are You Sure? [No"] ▶[Yes]]
    G --> H["Push"]
    H --> I["LONG_PROJ0006"]
    I --> J["Remove All Completed. ▶[Exit"]]
    J --> K["MENU"]
    K --> L["Push"]
- Use the P-dial to select and confirm [Yes].
If you decide not to execute this operation, use the P-dial to select and confirm [No] (or press the menu button), and you will return to the play list edit screen.
-
The screen will indicate "Working...", and will then indicate "Complete" when the project/file has been removed.
-
Press the P-dial (or press the menu button) to return to the play list screen.
-
Verify that the entire list has been deleted, and press the menu button to return to the menu list screen.
Record mode
Here you can make various settings related to recording.
Press the menu button, and in the menu list (MENU) screen, use the P-dial to select and confirm "REC MODE."
You can make the following settings from the record mode (REC MODE) screen.
Project recording format (New Project Type)
WAV (BWF)
This is an uncompressed linear PCM multi-bit audio file format. The sampling frequency and bit-depth are selected by the PCM Format settings described below.
The name is an abbreviation of Wave File Format (file extension .wav). This format is compatible with the Broadcast Wave Format (file extension .wav) used for broadcast audio.
A higher sampling rate and bit depth allows higher-quality recording, but will require more hard disk space.
DFF (DSDIFF)
This is a 1-bit audio file format widely used in professional audio devices for SACD (Super Audio CD) production.
The name stands for Direct Stream Digital Interchange File Format (file extension .dff).
DSF
This is a 1-bit audio file format used in some "VAIO" personal computers made by Sony. The name stands for DSD Stream File (file extension .dsf).
WSD
This is a 1-bit audio file format defined by the "1-bit Audio Consortium." The name stands for Wideband Single-bit Data (file extension .wsd).
Settings when WAV (BWF) is selected
If you select WAV (BWF), you can also select the sampling frequency and bit depth. At sampling frequencies of 88.2 kHz and higher, the bit depth will always be 24.

For DFF, DSF, and WSD, the sampling frequency is 2.8224 MHz.
Recording time for each format (per 1Gbyte)
The following table shows the approximate recording time available in each format per 1 Gbyte of hard disk capacity.
| Format | Recordable time | Format | Recordable time |
| WAV 44.1kHz/16bit 90 minutes | WAV 176.4kHz/24bit 15 minutes | ||
| WAV 44.1kHz/24bit 60 minutes | WAV 192kHz/24bit 13 minutes | ||
| WAV 48kHz/16bit 85 minutes | DFF 22 minutes | ||
| WAV 48kHz/24bit 55 minutes | DSF 22 minutes | ||
| WAV 88.2kHz/24bit 30 minutes | WSD 22 minutes | ||
| WAV 96kHz/24bit 25 minutes |
System settings (SYSTEM)
Here you can make various system settings for the MR-1 itself.
Press the menu button to access the menu list (MENU) screen. Then use the P-dial to select and confirm "SYSTEM" and make the desired settings.
The "Back Light," "AutoShutDown," and "LED" settings are explained in "Conserving battery power" (p.26), and the "Clock" setting is explained in "Setting the date and time" (p.28).
LCD Contrast
Here you can set the LCD contrast. Higher settings will make the black portions of the display darker. Adjust the value for best visibility.
- In the system setting (SYSTEM) screen, use the P-dial to select and confirm "LCD Contrast."
The selection icon will change from "▶" to "◀", and the value will be highlighted.
- Turn the P-dial, and the contrast will change along with the value.

- When you've adjusted the contrast for best visibility, press the P-dial (or the menu button) to complete the setting.
The selection icon will change from "b" to "b".
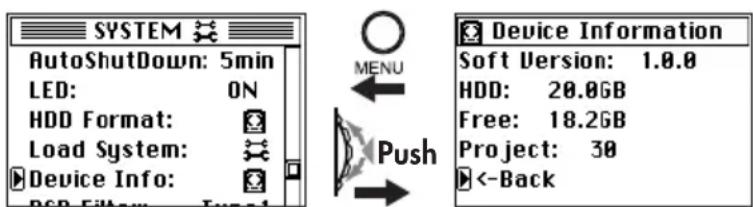
Device information (Device Info)
Here you can view the version of the MR-1's system software, the total capacity of the hard disk, the free capacity, and the number of recorded projects/files.
- In the system setting (SYSTEM) screen, use the P-dial to select and confirm "DeviceInfo."
The information (Device Information) screen will appear.
- When you've finished viewing the information, press the P-dial (or the menu button) to return to the system setting (SYSTEM) screen.
Formatting the hard disk (Format)
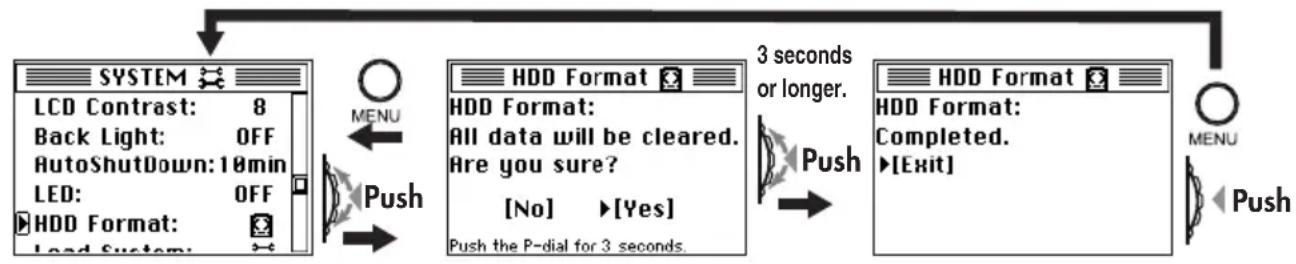
Here's how to format the MR-1's hard disk.
You should only perform this operation if you want to erase all of the data saved on the hard disk, or if the message "Drive Error." appears frequently.
All data will be erased from the hard disk when you execute this operation, so you should use it with caution.
Before executing this operation, you should make a backup of any data you want to keep. (→p.42 "Using the MR-1 with your computer")

If a power failure or similar accident occurs during formatting, the MR-1 may become inoperable. If this occurs, please contact Korg customer service.
- Press the menu button, and in the menu list (MENU) screen, use the P-dial to select and confirm "SYSTEM."
The system setting (SYSTEM) screen will appear.
-
Use the P-dial to select and confirm "Format."
-
A dialog message of "HDD Format : Are you sure?" will appear in the screen.
flowchart
graph TD
    A["SYSTEM"] --> B["LCD Contrast: 8"]
    B --> C["Back Light: OFF"]
    C --> D["AutoShutdown: 10min"]
    D --> E["LED: OFF"]
    E --> F["HDD Format: <br>Load System:"]
    F --> G["Menu"]
    G --> H["Push"]
    H --> I["HDD Format: <br>HDD Format: <br>All data will be cleared.<br>Are you sure?<br>[No"] ▶[Yes]
Push the P-dial for 3 seconds.]
    I --> J["Push"]
    J --> K["HDD Format: <br>HDD Format: <br>Completed.<br>▶[Exit"]]
    K --> L["Menu"]
    L --> M["Push"]
    M --> N["Push"]
    style A fill:#f9f,stroke:#333
    style N fill:#ccf,stroke:#333
-
Use the P-dial to select [Yes], and continue holding it for three seconds or longer. If you decide not to format the hard disk, use the P-dial to select and confirm [No] (or press the menu button); you will return to the system setting (SYSTEM) screen.
-
The screen will indicate "Working...", and when formatting is finished the indication will change to "Complete."
-
Press the P-dial (or press the menu button) to return to the system setting (SYSTEM) screen.
Updating the system (Load System)
You can download the latest version of the MR-1 operating system file from the Korg website (www.korg.com). For details on the procedure, refer to the Korg website.
Preparing for the update
Use a USB cable to connect the MR-1 to your computer (see "Using the MR-1 with your computer," p.42), and copy the downloaded system file to the root folder of MR-1's hard disk.
Update procedure
We recommend that you use the AC adaptor as the power supply when loading the system.
If a power failure or similar accident occurs while loading the system, the MR-1 may become inoperable. If this occurs, please contact Korg customer service.
- Press the menu button, and in the menu list (MENU) screen, use the P-dial to select and confirm "SYSTEM."
The system setting (SYSTEM) screen will appear.
-
Use the P-dial to select and confirm "Load System."
-
A dialog message of "Load System: Are you sure?" will appear in the screen.

flowchart
graph LR
    A["SYSTEM"] --> B["Back Light: OFF"]
    B --> C["AutoShutdown: 10min"]
    C --> D["LED: OFF"]
    D --> E["HDD Format: ✓"]
    E --> F["Load System: ✓"]
    F --> G["Device Info: ✓"]
    G --> H["Menu"]
    I["Load System"] --> J["Upgrading the system. Are you sure?"]
    J --> K["[No"] ▶[Yes]]
    K --> L["Push"]
    L --> M["Load System: Completed. System will shut down. ✓[OK"]]
    M --> N["Menu"]
    O["Push"] --> P["Push"]
- Use the P-dial to select and confirm [Yes].
The screen will indicate "Load System: Working..." and the system will be loaded.
-
When the system has finished loading, the display will indicate "System will shut down. [OK]"
-
Press the P-dial (or press the menu button); the MR-1 will shut down and the power will turn off.
-
Slide the power button to turn on the power; the MR-1 will start up with the newly loaded system.
If the update fails, a message will appear. Make a note of the contents, and take the appropriate action ( p.49 "Various messages").
DSD output filter settings (DSD Filter)
When playing back a 1-bit project/file, you can select one of three types of signal processing filter that will be used.
By default, the standard Type 1 filter is used.
Type 1: -3.0 dB @ 50 kHz (standard), -18.0 dB @ 100 kHz
Type 2: -3.0 dB @ 70 kHz, -9.8 dB @ 100 kHz
Type 3: -3.0 dB @ 60 kHz, -17.0 dB @ 100 kHz
- Press the menu button, and in the menu list (MENU) screen, use the P-dial to select and confirm "SYSTEM."
The system setting (SYSTEM) screen will appear.
- Use the P-dial to select and confirm "DSD Filter."
The selection icon will change from "▶" to "▶", and the value of the setting will be highlighted.

flowchart
graph LR
    A["MENU"] -->|MENU| B["SYSTEM"]
    B -->|Push| C["Switch"]
    C --> D["SYSTEM"]
    D -->|Push| E["Switch"]
    style A fill:#f9f,stroke:#333
    style B fill:#ccf,stroke:#333
    style C fill:#cfc,stroke:#333
    style D fill:#fcc,stroke:#333
    style E fill:#ffc,stroke:#333
- Turn the P-dial to select the desired filter type, and then press the P-dial (or press the menu button) to complete the setting.
The selection icon will change from "▶" to "▶".
Using the MR-1 with your computer
You can use the MR-1 as a USB 2.0 mass storage class device.
This lets you copy files from the MR-1 to your computer, or copy files (WAV, DSDIFF, etc.) from your computer into the MR-1.
There are limitations on the audio files that the MR-1 can recognize ( p.44).
You must use the included AC adaptor when entering USB mode
USB mode
In this mode, the MR-1 will be detected by your computer as an external hard disk. The MR-1 won't operate as a recorder while it is in USB mode.
Entering USB mode
1. Connect the MR-1 to your computer.
Windows users (Windows Me/2000 or later)
Use a USB cable to connect the MR-1's USB connector to your computer's USB connector. Make sure that the connector is oriented correctly, and insert it all the way.
Press the menu button, and from the menu list (MENU) screen, use the P-dial to select and confirm "USB MODE."
Note The MR-1 will start up in USB mode if the USB cable is connected when you turn on the power.
Macintosh users (Mac OS 9.0.4 or later)
With the MR-1 powered-off, connect the USB cable to the Macintosh. Make sure that the connector is oriented correctly, and insert it all the way.
When you power-on the MR-1, it will automatically enter USB mode.
2. The USB mode (USB MODE) screen will appear.

flowchart
graph LR
    A["MENU"] --> B["REC MODE"]
    B --> C["REC LEVEL"]
    C --> D["PLAY LIST"]
    D --> E["SYSTEM"]
    E --> F["USB MODE"]
    G["USB Mode"] --> H["USB Slave Mode"]
    H --> I["Please connect to PC."]
    I --> J["Waiting"]
    J --> K["CANCEL is available."]
    L["USB Mode"] --> M[">>> USB Slave Mode <<<<"]
    M --> N[">>> Don't disconnect <<<<"]
    N --> O[">>> USB cable. <<<<"]
    O --> P["▶[Exit"]]
While this screen is displayed, you must not disconnect the USB cable or turn the power of your computer on or off.
3. A drive named "Local disk (\*:)" (or "Unspecified name") will be added to your computer.
When you connect the MR-1 to your computer for the first time, the device driver will be installed automatically.
4. Save data on your computer.
When you open the "Local disk (*:)" (or "Unspecified name") that appeared on your computer in step 3, the contents of the MR-1's hard disk will be displayed.
Copy the desired data onto your computer. You can also copy data from your computer into the MR-1's hard disk.

Don't disconnect the USB cable while a file is being transferred.
Exiting USB mode
1. Disconnect the MR-1 from your computer.
Windows users (Windows Me/2000 or later)
Left-click the icon shown in the right side of your computer's taskbar.
In the menu that appears, left-click "Safely remove USB mass storage device (drive name)."
Verify that a message indicating "You may safely remove the USB mass storage device" is displayed. In Windows
Me, "USB mass storage device" is shown as "USB disk."
Macintosh users (Mac OS 9.0.4 or later)
Drag the drive from the desktop into the "Trash," or choose "Trash" from the "File" menu.
2. Press the P-dial (or the menu key) to return to the menu list (MENU) screen.
After returning to the menu list (MENU) screen, disconnect the USB cable.
Transferring files
The files you record on the MR-1 are saved in automatically-created project folders for each recording format (WAV, DFF, DSF, WSD) within the MR_PROJ folder. You can back-up your files by copying these folders to your computer.
These folders contain the following two files.
- Audio data files (.wav/.dff/.dsf/.wsd): These files contain the recorded audio
- Project data files (.prj): These files contain information such as project settings and marks

Do not change the names of these two files. Doing so may make them unplayable on the MR-1.
To restore data that you previously backed-up, copy the files into the folder for the appropriate recording format.
If you want to transfer audio data (.wav/.dff/.dsf/.wsd) created on your computer or other device, copy it into the AUDIO folder.
Hard disk structure and files
Supported audio files
Stereo files are used for all recording formats that can be selected on the MR-1 ( p.36)
Supported folders and file names
FAT32 file system format. Long file names are supported, double-byte characters (e.g., Japanese) are not supported.
Folder/file structure
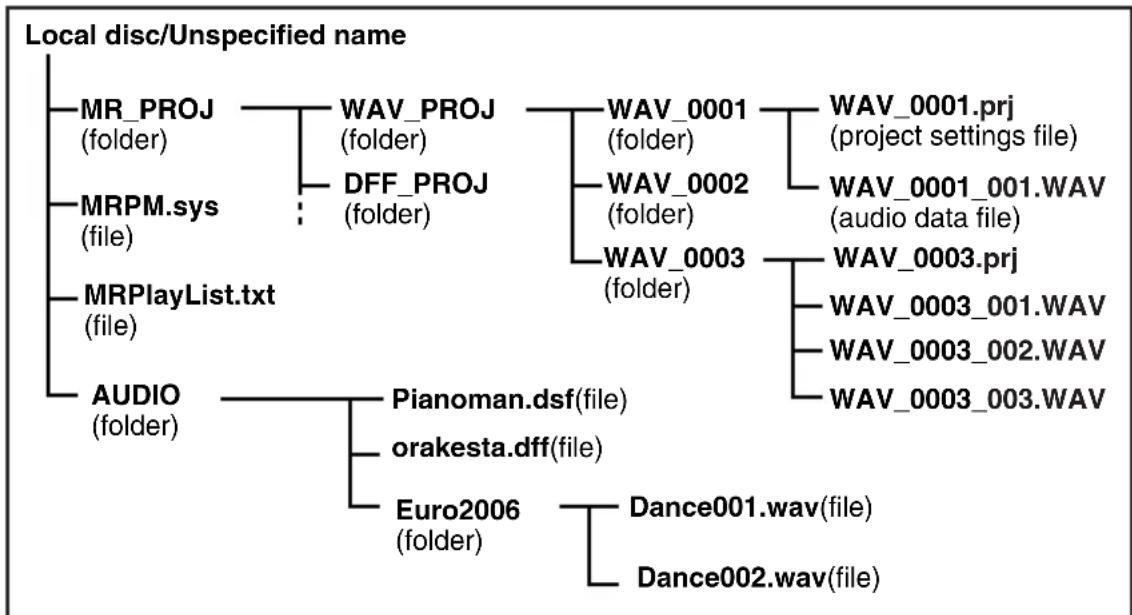
flowchart
graph TD
    A["Local disc/Unspecified name"] --> B["MR_PROJ (folder)"]
    A --> C["MRPM.sys (file)"]
    A --> D["MRPlayList.txt (file)"]
    A --> E["AUDIO (folder)"]
    B --> F["WAV_PROJ (folder)"]
    B --> G["DFF_PROJ (folder)"]
    F --> H["WAV_0001 (folder)"]
    F --> I["WAV_0002 (folder)"]
    F --> J["WAV_0003 (folder)"]
    H --> K["WAV_0001.prj (project settings file)"]
    I --> L["WAV_0001_001.WAV (audio data file)"]
    J --> M["WAV_0003.prj"]
    E --> N["Pianoman.dsf(file)"]
    E --> O["orakesta.dff(file)"]
    E --> P["Euro2006 (folder)"]
    P --> Q["Dance001.wav(file)"]
    P --> R["Dance002.wav(file)"]
MR\_PROJ folder
This folder contains the folders for each format recorded by the MR-1.
Don't use your computer to delete or rename the MR_PROJ folder. If you do so, the MR-1 will no longer recognize the files you created.
WAV\_PROJ, DFF\_PROJ, DSF\_PROJ, WSD\_PROJ folders
For each format, a maximum of two hundred project folders can be created within each of these folders.
The MR-1 is only able to edit recorded files that are inside these folders.
Up to 200 project files can be recognized within a folder. If there are more than 200 project folders, they can be recognized by connecting a computer in USB mode.
The maximum number of project folders that can be created will be limited by the space remaining on the hard disk.
Don't use your computer to delete or rename folders or files in these folders. This may make it impossible to recognize the projects or files you created.
Audio data you created on your computer or other device will not be recognized if you place it in these project folders.
MRPM.sys
This file contains settings used by the system. There must be one and only one such file. Do not move or delete it.
Never delete or rename this file.
MRPlayList.txt
This file contains a play list.
Do not rename this file.
WAV\_0001 folder (project folder)
This folder is created for each project you record. The numerical portion of the folder name will be incremented, starting with 0001. The first three alphabetical characters will depend on the recording format. Operations on the MR-1 apply to the project recorded in this project folder. Renaming the project will rename the project folder, and the name of the project setting file within the folder will also be renamed automatically.
WAV\_0001
Recording number
A number from 0001 to 9999 assigned automatically to each recording in a format folder, in sequential order
Format identification symbol WAV(BWF), DSDIFF, DSF, WSD
Note If you use your computer to rename a project folder, you must also spy the same name for the project setting file (***.prj) within that folder.
Files inside the WAV\_0001 folder (project folder)
WAV\_0001.prj (project settings file)
This is a file specific to the MR-1, containing information (protect setting, mark data, etc.) for each recorded project. Only one file with this extension (.prj) can exist in each project folder.
WAV\_0001\_001.wav (audio data file: wav)
These are stereo audio data files. The extension (.wav) will depend on the recording format.
When the file is recorded, the file name and the extension will be as follows.
WAV\_0001\_001.wav-
Project name (This will not be updated even if you rename.)
The file is divided (into a maximum of ninety nine files), with this area being "1" if the file size is 1 GB or less, and "1", "2" ... etc. if the size is greater than 1 GB. Even if the file size is less than 1 GB, the file will be divided if you pause during recording.
Recording format extension
WAV(BWF)---.wav
DSDIFF----.dff
DSF----.dsf
WSD----.wsd
AUDIO folder
This folder is used to hold audio data that was created on your computer or another device. You cannot edit these files on the MR-1, but you can add them to a play list and play them. You can create up to four levels within a folder, but the MR-1 is able to recognize only up to a total of two hundred folders and files within this folder.
You must not rename this folder.
Using the AudioGate software
The audio files of a project recorded on the MR-1 can be copied to your computer. Then you can use the "AudioGate" audio format conversion application on the included CD to convert the audio file format; as well as edit, divide, or join audio files.
For details, install the software from the included CD and refer to the AudioGate operating manual (PDF).
Installing AudioGate
Contents of the CD-ROM
The included CD-ROM contains the following items.
- "AudioGate" format conversion application
• AudioGate operating manual (PDF) - Software license agreement (PDF)
Please read before use
- All copyrights to this software are the property of Korg Corporation.
- A license agreement for the software of this product is included separately. You must read this software license agreement before you install the software. Your installation of this software will be taken to indicate your acceptance of this agreement.
Operating requirements
Windows XP
Supported operating systems
Microsoft Windows XP Home Edition/Professional Edition Service Pack 1 or later
Supported computers
CPU:Intel Pentium III /1 GHz or better
RAM:256 MB or more
A USB port that meets the operating requirements of Microsoft Windows XP
Mac OS X
Supported operating systems
Mac OS X 10.3.9 or later
Supported computers
CPU:Apple G4/800 MHz or better
RAM:256 MB or more
A USB port that meets the operating requirements of Mac OS X
Windows XP users
In order to install or uninstall software in Windows XP, you must have Administrator privileges. For details, consult your system administrator.
- Insert the included CD-ROM into the CD-ROM drive of your computer.
Normally, the "AudioGate Application Installer" will start up automatically.
If your computer is set so that the installer will not start up automatically, double-click "KorgSetup.exe" in the CD-ROM.
- Follow the on-screen instructions to proceed with the installation.
- When you've finished installing AudioGate, exit the installer.
Mac OS X users
- Insert the included CD-ROM into the CD-ROM drive of your computer.
- In the CD-ROM, double-click the AudioGate installer (.pkg) to start up the installer.
- Follow the on-screen instructions to proceed with the installation.
- When you've finished installing AudioGate, exit the installer.
Appendix
Troubleshooting
Power does not turn on
- Is the AC adaptor connected correctly?
- Does the rechargeable battery have sufficient remaining capacity?
• Did you hold down the power button?
Nothing appears in the display
- Is the contrast adjusted correctly? ( p.38)
Display is dark
- Is the backlight set to "OFF"? (→p.26)
No sound
- Is the MR-1 and the connected equipment powered-on? (→p.12)
- Are the amp or headphone connections incorrect?
Can't hear the playback
- Is the volume set to "0"?
Can't hear the audio input
- Are the recording settings correct?
• Is the recording level raised? - Make sure that audio is being input.
In the level meter screen, verify that the level meters are moving.
Can't record
• Is the recording level too low?
- Is there sufficient hard disk space remaining?
→ Set the counter display to "Free" and check the remaining time available for recording.
(→p.24)
The recording is interrupted
• Could the MR-1 have been bumped while recording?
- Could the MR-1 have been in a location subject to continuous vibration (such as near a motor or a bass amp) while recording?
Nothing happens when you press a button
- In some cases, the buttons may be less responsive while the recording is operating, such as during playback or recording.
→ Hold down the button until the action occurs.
- Is the power button set to HOLD?
USB
Your computer does not detect the MR-1
- Is the USB cable connected correctly? ( p.42)
→ Re-connect the cable..
Can't release the MR-1 from your computer
- The procedure will depend on the operating system of your computer. (→p.42)
When you connect the MR-1, you are asked to install software or a device driver
- Does the MR-1 support the version of the operating system your computer is running? ( p.42)
Various messages
The message dialog box will disappear when you press the P-dial.
Execution messages
Completed
- The operation has been successfully completed.
Working...
- The operation is being carried out. Please wait until this message disappears.
Error messages
Cannot execute.
- This operation cannot be performed at this time.
Check Sum Error.
- The system could not be loaded.
→Try the operation once again from the beginning. If this message appears again, please contact customer service.
Disk too busy.
- Repeated actions of recording, writing, and deleting will gradually decrease the amount of contiguous free space on the hard disk, causing files to be saved in a fragmented state during recording. This message will appear when access to the drive has slowed down due to such problems.
→Back up your important files, format the hard disk, and then restore your files back onto the hard disk.
Alternatively, delete unneeded files to increase the amount of free space, and then connect the MR-1 to your computer in USB mode and optimize the drive. It is effective to use software of a type that optimizes the free space.
Drive Error.
- An error occurred while accessing the drive.
→Use USB mode to connect the MR-1 to your computer and execute the Check Drive command.
If this error message appears even after you've executed Check Drive, format the drive.
Drive Full.
- There is insufficient remaining capacity on the drive.
→Delete unneeded projects/files.
Failed to write System File.
- The system update has failed.
→It is possible that the MR-1 has malfunctioned. Please contact customer service.
Memory Full.
- You attempted to register more than 100 marks. No further marks can be registered.
→Delete unneeded marks before registering other marks.
Not supported file.
- This file format is not supported.
→Check the file formats that are supported.
Please enter name.
- There is no project name (the name consists only of spaces).
→Please enter a valid project name (one or more alphabetical character, numeral, or symbol).
Protected Project.
- The operation cannot be executed because the project is protected.
→Turn off the project protect setting.
Project Name Error. Delete illegal folder.
- An identically named project/file already exists.
→Rename the project/file. Alternatively, use USB mode to delete the project/file and the directory of the same name.
System File Error.
- The system file required for "Load System" does not exist, or the length of the file does not match.
→Check the system file and re-save it.
Time Limit.
- The maximum continuous recording time is 6 hours. No further continuous recording is possible.
Warning: Bad fragmentation. Should be optimized.
- This message will appear when you enter record-ready mode if there is a possibility that the "Disk too busy." error might occur during recording because of insufficient contiguous free space on the hard disk.
Normally, a minimum of ten minutes of contiguous free space will be allocated if there is ten minutes or more free capacity; if there is less than ten minutes of free capacity, as much as exists will be allocated.
It is not necessarily the case that the "Disk too busy." error will always occur if this warning appears, but we recommend that you take the following actions.
→Back up your important files, format the hard disk, and then restore your files back onto the hard disk.
Alternatively, delete unneeded files to increase the amount of free space, and then connect the MR-1 to your computer in USB mode and optimize the drive. It is effective to use software of a type that optimizes the free space.
Confirmation messages
Info : # # # # #
- This will appear if there is information to be conveyed to the user.
→Press the menu button or the P-dial to continue operations.
Serious error messages
Fatal : # # # # #
- This will appear if the MR-1 itself has a problem or malfunction.
→ If this type of message appears, make a note of the text in "# # # # #" and contact customer service.
Specifications
Operating conditions: +5 ... +35 °C (no condensation)
Main sections
< Recorder section >
Number of tracks : 2 tracks
: 2 tracks simultaneous playback / 2 tracks simultaneous recording
Recording formats : PCM audio format
WAV format (extension .wav), BWF compliant
44.1 kHz @ 16/24-bit, 48 kHz @ 16/24-bit
88.2 kHz @ 24-bit, 96 kHz @ 24-bit
176.4 kHz @ 24-bit, 192 kHz @ 24-bit
: 1-bit audio format 2.8 MHz @ 1-bit
DSDIFF format (extension .dff), DSF (extension .dsf),
WSD (extension .wsd)
Recording : Maximum 30 hours @ 44.1 kHz/16-bit (for 20 Gbyte hard disk)
: Maximum continuous recording 5 hours 59 minutes 59 seconds 999
Number of projects: Recognizes a maximum of 200 for each format
Mark points : 100 points per project *No mark names
USB functionality : Connect to computer via USB 2.0, usable as FAT32 USB external drive
Song editing : Rename, Delete, Protect
< General >
Display : 160 x 104 pixel, LCD with backlight
Power supply : Included AC adaptor,
internal rechargeable battery (lithium ion polymer)
Power consumption: 2.15 W
Dimensions: 64 mm (W) × 120 mm (D) × 24 mm (H)
: 2.52" (W) x 4.72" (D) x 0.94" (H)
Weight : 200g /0.44lbs (without battery)
Main specifications
Frequency : 10 Hz ... 20 kHz ± 1 dB @ Fs 44.1 kHz / 48 kHz
response 10 Hz ... 40 kHz ± 1 dB @ Fs 88.2 kHz / 96 kHz / 176.4 kHz / 192 kHz
10 Hz ... 100 kHz (1-bit)
S/N : 90 dB (typical) @ IHF-A
THD+N : 0.018 % (typical), 20 Hz ... 20 kHz
A/D conversion : 24-bit, 64/128x oversampling
D/A conversion : 24-bit, 128x oversampling
Connector : Mini phone jacks
Input impedance : 10 kΩ
Nominal level : LINE -6 dBV, MIC -39 dBV
Maximum level: LINE +6 dBV, MIC -27 dBV
Source impedance : 600 Ω
Supported operating systems: Windows Me, 2000, or later Mac OS 9.0.4 or later
Included items
AC adaptor (also operates as charger), owner's manual (this document), protective case, stereo mic(CM-2M), clip stand, CD-ROM ("AudioGate" audio file conversion application)
Demo project
Downtime
performed by Will Champlin
copyright Will Champlin 2006
www.willchamplin.com
www.myspace.com/willchamplin
* Appearance and specifications are subject to change without notice.
Index
Menu list screen
MENU
LIBRARY 18
PLAY MODE 31
REC MODE 16,36
REC LEVEL 16
PLAY LIST 33
PlayNow 34
Change Order 34
Remove From List ---- 35
Remove All 36
SYSTEM 38
2006/12/01 28
LCDContrast 38
Backlight---- 26
AutoShutDown ---- 12, 27
LED 27
Format 39
Load System 40
Device Info 38
DSD Filter 41
USB MODE 42
Project/file edit screen
LIBRARY
Project/File
Remame 24
Protect 29
Delee 29
Add to Play List ---- 33
Detail 30
Mark list 21
Meter/counter screen
METER
Meter/Counter
Meter Peak Hold 24
Counter Mode 24
Mark edit select screen
Mark List
Mark Edit
00:00:00.000 22
Delete Mark 23
Delete All Mark 23
A
AUDIO folder---- 45
Auto Gain Control 19
Auto shutdown 12, 27
B
Backlight 26
C
Computer 42
Conserving battery power ---- 26
Counter 14,24
D
Date and time---- 28
Delete 29
Detail 30
Device information 38
DSD Filter 41
E
Error messages---- 49
F
Format 39
L
LCD contrast 38
LED setting---- 27
M
Mark 21
Mic input 15
P
Peak hold 14,24
Play list 33
Play mode 31
Playback 13, 18
Project 13
Project/file name 24
Protect 14,29
R
Record mode 36
Recordable time 37
Recording 15
Recording format ---- 16, 36
Recording level 16, 19
Rename---- 24
Repeat 31
S
Shuffle 31
Supported audio files 44
Supported file names 44
System settings 38
T
Troubleshooting 48
U
Updating the system 40
USB mode 42
IMPORTANT NOTICE TO CONSUMERS
This product has been manufactured according to strict specifications and voltage requirements that are applicable in the country in which it is intended that this product should be used. If you have purchased this product via the internet, through mail order, and/or via a telephone sale, you must verify that this product is intended to be used in the country in which you reside.
WARNING: Use of this product in any country other than that for which it is intended could be dangerous and could invalidate the manufacturer's or distributor's warranty.
Please also retain your receipt as proof of purchase otherwise your product may be disqualified from the manufacturer's or distributor's warranty.
- Power supply
- Interference with other electrical devices
- Handling
- Care
- Keep this manual
- Keeping foreign matter out of your equipment
- THE FCC REGULATION WARNING (for U.S.A.)
- CE mark for European Harmonized Standards
- Handling of the internal hard disk
- Data handling
- COPYRIGHT WARNING
- Contents
- Introduction 6
- Basic operation 10
- Other general operations 24
- Other functions 31
- Play mode 31
- Play list (PLAY LIST) 33
- Record mode 36
- System settings (SYSTEM) 38
- Using the MR-1 with your computer 42
- Appendix 48
- Troubleshooting 48
- Various messages 49
- Specifications 52
- Index----54
- Introduction
- Features
- Connection example
- Parts of the MR-1
- Front and side panels
- DC 5V connector
- USB connector
- Display
- Playback/Pause button
- Record button / Record LED
- Rewind button
- Stop button
- Fast-forward button
- Power button (with Hold function)
- Menu button
- P-dial
- Volume buttons
- Top panel
- Headphone jack (stereo mini)
- Output jack (stereo mini)
- Mic power switch
- Input switch / Input jacks L, R
- Screens and operations
- Level meter screen and menu list (MENU) screen
- Selecting parameters and setting values
- Basic operation
- Power and usage
- Using the AC adaptor
- Using the rechargeable battery
- Recharging the battery
- Remaining battery indication
- Operating time with the rechargeable battery
- Rechargeable battery lifespan
- Connecting your monitor equipment
- Turning the power on/off
- Turning the power on
- Turning the power off
- Auto shutdown function
- Playing back the demo project
- What is a project?
- Playing back
- Pausing
- Stopping playback
- Searching for a desired location during playback
- The level meter screen
- Protect indicator
- Project/file format
- Recorder status
- Remaining battery indicator
- Project/file playback location indicator
- Level meter
- Counter
- Project/file name (current project/file)
- Peak hold indicator
- Recording
- Selecting your recording device
- Recording using the mic inputs
- Using the included mic (CM-2M)
- Recording using the line inputs
- Selecting the recording format
- Manually adjusting the recording level
- Starting and stopping recording
- Other playback/record operations
- Selecting and playing back a project/file
- Selecting a project/file using the rewind & fast-forward buttons
- Selecting a project/file using the P-dial
- Using the Auto Gain Control mode
- When you've finished making settings, press the menu button to return to the recording level (REC LEVEL) setting screen.
- Gain Decrease (Gain Reduction)
- Threshold
- Slope
- Gain Increase
- Hold
- Using marks within a project
- Adding a mark
- Viewing the mark list
- Using marks to move
- Editing marks
- Editing the time location of a mark
- Deleting a mark (Delete Mark)
- Deleting all marks (Delete All Mark)
- Other general operations
- Changing the meter peak hold and the counter mode
- Editing the project/file name
- Project/file edit screen
- Conserving battery power
- Backlight setting
- Auto shutdown setting
- LED setting
- Setting the date and time
- Protecting a project
- Deleting a project/file
- Use the P-dial to select and confirm "Delete."
- Use the P-dial to select and confirm [Yes].
- The screen will indicate "Working...", and deletion will begin. When it ends, the screen will indicate "Complete."
- Press the P-dial (or press the menu button) to return to the library select (LIBRARY) screen.
- Viewing details about the project/file
- Press the menu button, and in the menu list (MENU) screen, use the P-dial to select and confirm "LIBRARY."
- Use the P-dial to select and confirm the project/file whose detailed information you want to view. (See "Selecting and playing back a project/file," p.18)
- The file edit screen will appear, with the name of the currently selected file in the top line.
- Use the P-dial to select and confirm "Detail."
- When you've finished viewing the details, press the menu button to return to the project/file edit screen.
- Other functions
- Play mode
- Current Proj/File (play only one project/file)
- Current Folder (play the contents of a folder)
- PlayList (play the contents of a list)
- Shuffle (shuffle playback)
- Repeat (repeat playback)
- Play list (PLAY LIST)
- Creating a play list
- Viewing a play list
- Editing a play list
- Play Now
- Change Order
- Remove From List
- Remove All
- Record mode
- Project recording format (New Project Type)
- WAV (BWF)
- DFF (DSDIFF)
- DSF
- WSD
- Settings when WAV (BWF) is selected
- Recording time for each format (per 1Gbyte)
- System settings (SYSTEM)
- LCD Contrast
- Device information (Device Info)
- Formatting the hard disk (Format)
- Updating the system (Load System)
- Preparing for the update
- Update procedure
- DSD output filter settings (DSD Filter)
- Using the MR-1 with your computer
- USB mode
- Entering USB mode
- Connect the MR-1 to your computer.
- Windows users (Windows Me/2000 or later)
- Macintosh users (Mac OS 9.0.4 or later)
- The USB mode (USB MODE) screen will appear.
- A drive named "Local disk (\*:)" (or "Unspecified name") will be added to your computer.
- Save data on your computer.
- Exiting USB mode
- Disconnect the MR-1 from your computer.
- Press the P-dial (or the menu key) to return to the menu list (MENU) screen.
- Transferring files
- Hard disk structure and files
- Supported audio files
- Supported folders and file names
- MR\_PROJ folder
- WAV\_PROJ, DFF\_PROJ, DSF\_PROJ, WSD\_PROJ folders
- MRPM.sys
- MRPlayList.txt
- WAV\_0001 folder (project folder)
- WAV\_0001
- Recording number
- Files inside the WAV\_0001 folder (project folder)
- WAV\_0001.prj (project settings file)
- WAV\_0001\_001.wav (audio data file: wav)
- WAV\_0001\_001.wav-
- Recording format extension
- AUDIO folder
- Using the AudioGate software
- Installing AudioGate
- Contents of the CD-ROM
- Please read before use
- Operating requirements
- Windows XP
- Supported operating systems
- Supported computers
- Mac OS X
- Windows XP users
- Mac OS X users
- Appendix
- Troubleshooting
- Power does not turn on
- Nothing appears in the display
- Display is dark
- No sound
- Can't hear the playback
- Can't hear the audio input
- Can't record
- The recording is interrupted
- Nothing happens when you press a button
- USB
- Various messages
- Execution messages
- Completed
- Working...
- Error messages
- Cannot execute.
- Check Sum Error.
- Disk too busy.
- Drive Error.
- Drive Full.
- Failed to write System File.
- Memory Full.
- Not supported file.
- Please enter name.
- Protected Project.
- Project Name Error. Delete illegal folder.
- System File Error.
- Time Limit.
- Warning: Bad fragmentation. Should be optimized.
- Confirmation messages
- Info : # # # # #
- Serious error messages
- Fatal : # # # # #
- Specifications
- Main sections
- < Recorder section >
- < General >
- Main specifications
- Included items
- Demo project
- Index
- Menu list screen
- MENU
- LIBRARY
- Project/File
- Meter/counter screen
- METER
- Meter/Counter
- Mark edit select screen
- Mark List
- Mark Edit
- A
- B
- C
- D
- E
- F
- L
- M
- P
- R
- S
- T
- U
- IMPORTANT NOTICE TO CONSUMERS
Brand : KORG
Model : MR-1
Category : Blender