
Osmo Mobile 2 - Camera Tripod DJI - Free user manual and instructions
Find the device manual for free Osmo Mobile 2 DJI in PDF.


| Product Type | 3-Axis Handheld Gimbal Stabilizer |
| Brand | DJI |
| Model | Osmo Mobile 2 |
| Dimensions (Folded) | 295 × 113 × 72 mm |
| Weight | 485 g |
| Battery Type | 18650 LiPo |
| Battery Capacity | 2600 mAh |
| Battery Energy | 18 Wh |
| Charging Time | 2 hours (at 2A) |
| Max Run Time | 15 hours |
| Mobile Phone Width Range | 58.6 – 85 mm |
| Mobile Phone Thickness | ≤ 8.9 mm |
| Maximum Load | 240 g |
| Stabilization Axes | 3-axis (Pan, Tilt, Roll) |
| Max Controllable Speed | 120°/s |
| Wireless Connectivity | Bluetooth Low Energy 4.0 |
| Gimbal Modes | Follow, Free, Upright, Underslung, Flashlight, Portrait |
| Key Functions | ActiveTrack, Timelapse, Hyperlapse, Motionlapse, Pano, SmoothTrack |
| App Support | DJI GO (iOS 10.0+, Android 4.4+) |
| Charging Port | Micro USB |
| USB Port | Yes (for charging mobile phone) |
| Operating Temperature | 0° to 40° C |
| Charging Temperature | 5° to 40° C |
| Package Contents | Osmo Mobile 2, Micro USB Cable, User Manual |
Frequently Asked Questions - Osmo Mobile 2 DJI
User questions about Osmo Mobile 2 DJI
0 question about this device. Answer the ones you know or ask your own.
Ask a new question about this device
Download the instructions for your Camera Tripod in PDF format for free! Find your manual Osmo Mobile 2 - DJI and take your electronic device back in hand. On this page are published all the documents necessary for the use of your device. Osmo Mobile 2 by DJI.
USER MANUAL Osmo Mobile 2 DJI
natural_image
Line drawing of a handheld device with multiple lenses and a control panel (no text or symbols)
Searching for Keywords
Search for keywords such as "battery" and "install" to find a topic. If you are using Adobe Acrobat Reader to read this document, press Ctrl+F on Windows or Command+F on Mac to begin a search.

Navigating to a Topic
View a complete list of topics in the table of contents. Click on a topic to navigate to that section.

Printing this Document
This document supports high resolution printing.
Using this Manual
Legend

Important Hints and Tips
Download the DJI GO App
Scan the QR code to the right or search for 'DJI GO' on the App Store or Google Play. The Android version of DJI GO is compatible with Android v4.4 and later. The iOS version of DJI GO is compatible with iOS v10.0 and later.

Contents
Using this Manual 2
Legend 2
Download the DJI GO App 2
Introduction 4
Charging the Osmo Mobile 2 5
Mounting and Balancing a Mobile Phone 5
Mounting the Mobile Phone Horizontally 5
Mounting the Mobile Phone Vertically 7
Using the Osmo Mobile 2 8
Controls and Operations 8
Operation Modes 11
DJI GO App 13
Installing the DJI GO App 13
Connecting to the DJI GO App 13
Key Pages 14
Updating the Firmware 17
How to Update 17
Specifications 18
Introduction
Equipped with 3-axis stabilization and SmoothTrack technology, the OSMO™ Mobile 2 turns your mobile phone into a smart motion camera by stabilizing it during movement. Its light and ergonomic design puts seamlessly smooth video creation at your fingertips.
A mobile phone can be mounted to the Osmo Mobile 2 either horizontally or vertically. It is easy to use and in Follow mode allows you to position your phone by hand. Features such as ActiveTrack, Timelapse, and Pano are available through the DJI GO app.
At a Glance
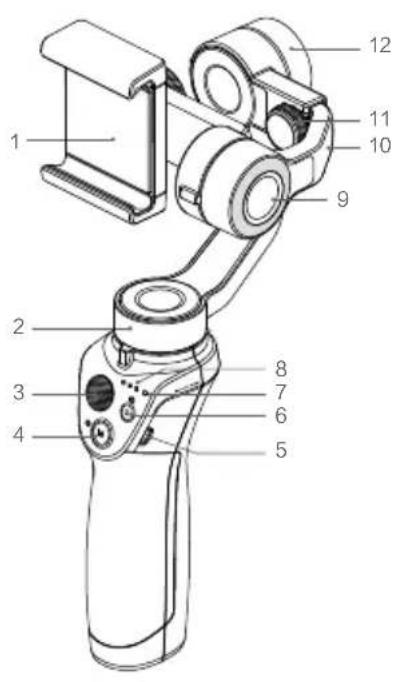
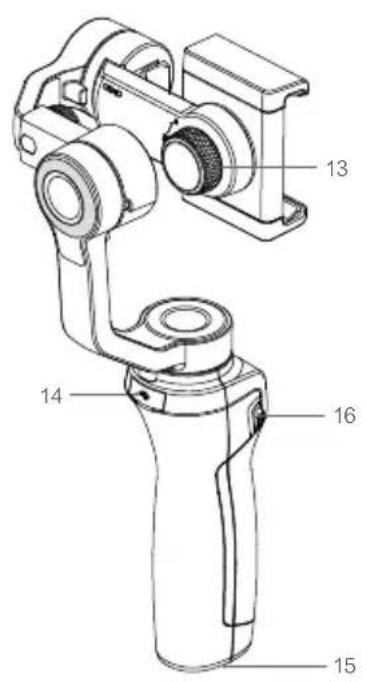
-
Mobile Phone Holder
-
Pan Motor
-
Joystick
-
Power/Mode Button
-
Charging Port (Micro USB)
-
Shutter/Record Button
-
System Status LED
-
Battery Level Indicators
-
Tilt Motor
-
Adjustable Arm
-
Balance Adjustment Knob
-
Roll Motor
-
Holder Lock Knob
-
USB Port
-
1/4"-20 UNC Port
-
Zoom Slider
* Mobile phone not included.
Charging the Osmo Mobile 2
To charge the Osmo Mobile 2, connect a USB adapter (not included) to the Charging port using the provided power cable. During charging the battery level indicators blink to indicate the current battery level. The battery is fully charged when the battery level indicators turn solid white. With the battery fully charged, the Osmo Mobile 2's max run-time is 15 hours*. It is recommended to use a USB charger of 5V/2A and above. If the current of the charger is less than 5V/2A, please make sure it meets the USB BC 1.2 standard. Otherwise, it may cause damage.
Charging Time: 2 hours (when charging at 2 A)
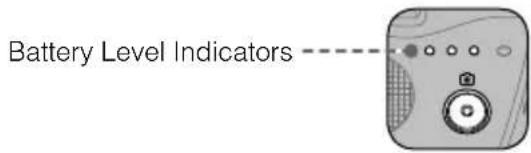
* Max run-time was tested with the gimbal balanced and held steadily. This value should be taken for reference only.
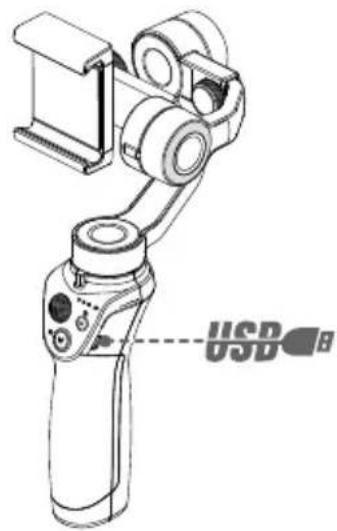
Mounting and Balancing a Mobile Phone
Only mount and balance a mobile phone while the Osmo Mobile 2 is powered off.
Mounting the Mobile Phone Horizontally
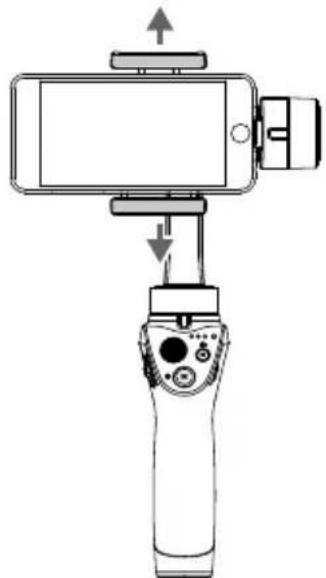
- Place the mobile phone in the mobile phone holder while pulling the sides of the holder outwards, then release the sides of the holder so they hold phone in place. It is recommended that you position the mobile phone close to the tilt motor.
natural_image
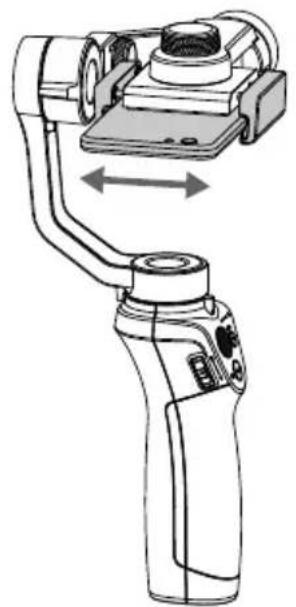
Line drawing of a handheld device with a scroll, showing no text or symbols- Turn the mobile phone over (so that it is facing downwards) and adjust the position of the phone (in the holder) to balance the tilt axis. The tilt axis is balanced if the mobile phone remains level when released.
natural_image
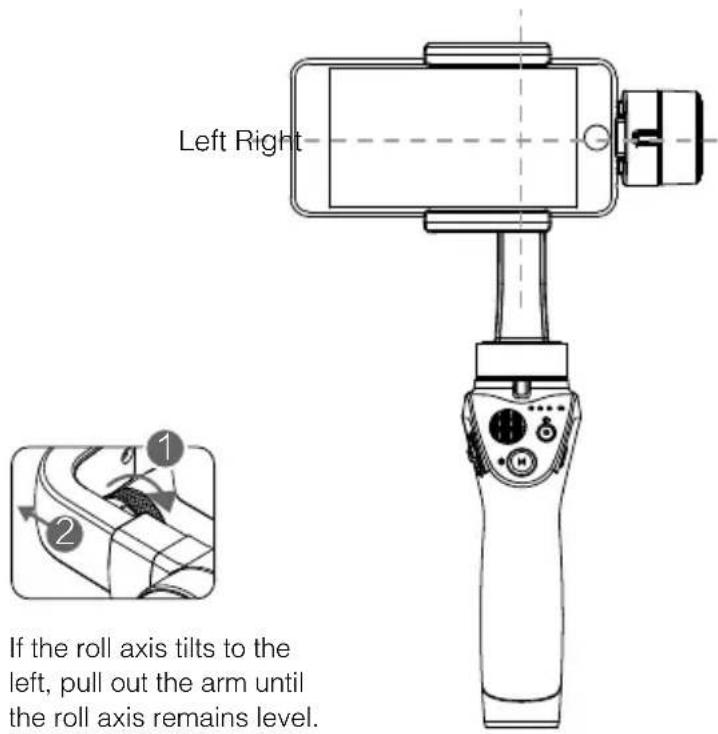
Technical line drawing of a mechanical device with no visible text or symbols- Adjust roll axis balance by loosening the Balance Adjustment knob and pulling out the Adjustable Arm. The roll axis is balanced if the mobile phone remains level when released.
Mounting the Mobile Phone Vertically
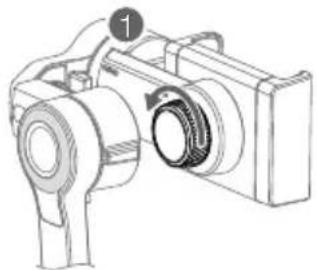
- To mount the mobile phone vertically, loosen the Holder Lock knob and rotate the mobile phone holder 90 degrees.
natural_image
Line drawing of a camera with labeled component (no text or symbols)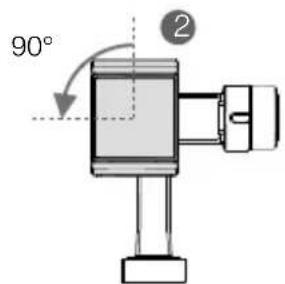
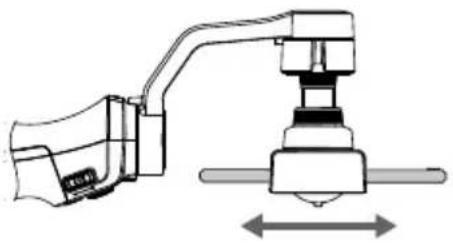
- Place the mobile phone in the mobile phone holder while pulling the sides of the holder outwards, then release the sides of the holder so they hold the phone in place. Hold the Osmo Mobile 2 horizontally and adjust the position of the phone (in the holder) to balance the tilt axis. The tilt axis is balanced if the mobile phone remains level when released.
natural_image
Mechanical assembly diagram showing a lever and shaft assembly (no text or symbols)- Adjust roll axis balance by either loosening the Balance Adjustment knob and stretching the Adjustable Arm or by adjusting the position of the mobile phone holder. The roll axis is balanced if the mobile phone remains level when released.
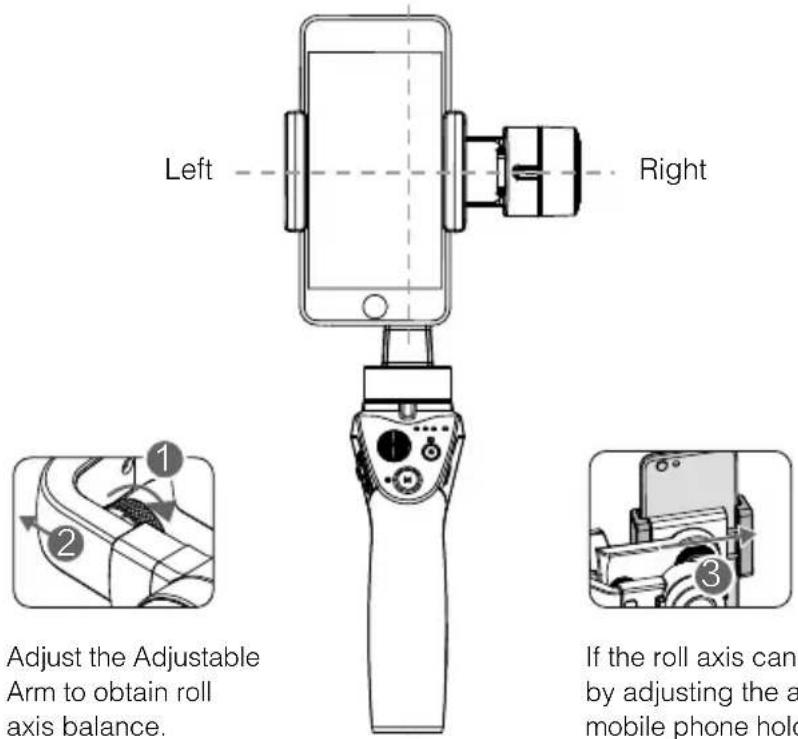
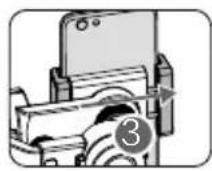
If the roll axis cannot be balanced by adjusting the arm, pull the mobile phone holder left to balance.

- Ensure the mobile phone is properly installed in the holder and the system is balanced before each use. Make sure the mobile phone is flush with the holder and the Balance Adjustment knob and Holder Lock knob are tightened before use.
- It is important to balance the mobile phone in order to achieve optimal performance. The Osmo Mobile 2 should only be balanced when powered off.
Using the Osmo Mobile 2
Controls and Operations
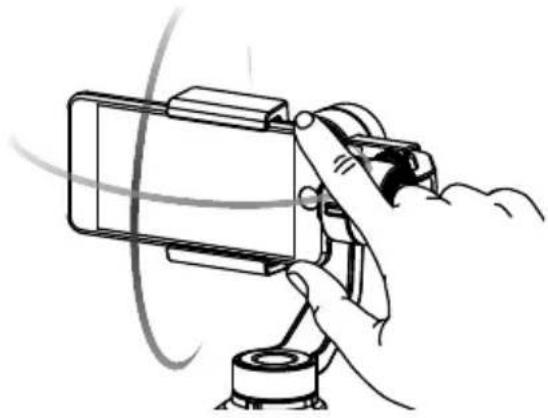
The buttons on the handle allow fine control over the gimbal and mobile phone. The gimbal converts joystick movements into smooth pan and tilt transitions, and uses SmoothTrack technology to reduce the impact of natural vibrations. In Follow mode the mobile phone can also be positioned directly by hand.
natural_image
Line drawing of a hand holding a camera mounted on a tripod (no text or symbols)1. Power/Mode Button
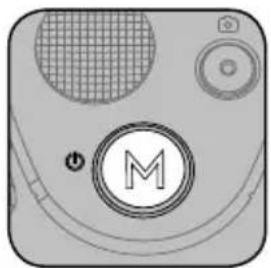
Press and hold the Power/Mode button for 1.5 seconds to power the Osmo Mobile 2 on/off. With the Osmo Mobile 2 powered off, press the Power/Mode button once to check the battery level. The current battery level will be displayed on the battery level indicators.
natural_image
Illustration of a stylized electronic device with a circular button labeled 'M' and surrounding circular elements (no readable text or symbols)
- Hold the Osmo Mobile 2 steady and upright while it is starting up.
• The Osmo Mobile 2 starts up in Follow mode each time it is powered on.
With the Osmo Mobile 2 powered on:
- Press the Power/Mode button once to switch the gimbal mode. The Osmo Mobile 2 will switch to Free mode from Follow mode. In Free mode the mobile phone stays in its current position regardless of handle movements. Press the Power/Mode button again to return to Follow mode.
- Press the Power/Mode button twice quickly to center the mobile phone.
- Press the Power/Mode button three times quickly to switch between the mobile phone's front and rear cameras.

- You cannot switch between front and rear cameras while recording video.
- Tracking will stop if you switch between front and rear cameras while using ActiveTrack.
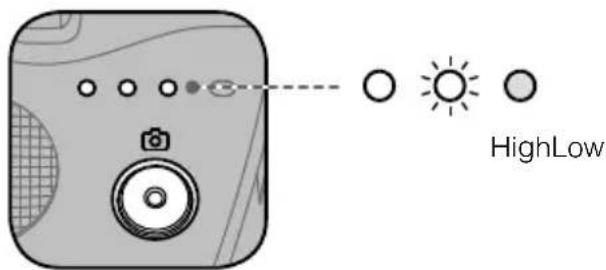
2. Battery Level Indicators
With the Osmo Mobile 2 powered off, press the Power/Mode button once to check the battery level.
| Battery Level Indicators | |||
| ○: LED is on. | ○: LED is blinking. | : LED is off. | |
| LED1 LED2 | LED3 Battery Level* | ||
| ○ | 67% - 100% | ○ | |
| 34% - 66% | ○ | ○ | |
| 16% - 33% | ○ | ○ | |
| ☀️ | 1% - 15% | ○ | |
| ○ 0% | ○ | ○ | |
* Battery level indications should be taken for reference only.
3. System Status LED
Indicates the current system status of the Osmo Mobile 2.
| LED State Description | ||
| [6V8S] — Solid green | The Osmo Mobile 2 is functioning normally or firmware upgrade was successful | |
 ...... Blinking green ...... Blinking green | The Osmo Mobile 2 is initializing or taking photos | |
 — Solid yellow — Solid yellow | The gimbal is locked or re-centered | |
 ...... Blinking yellow ...... Blinking yellow | The gimbal is not functioning normally | |
| [3C4A] ...... Blinking red | Recording | |
| [6T7K] G ...... Blinking red and green | Firmware is being upgraded | |
 — Solid red — Solid red | Firmware upgrade failed | |

If the System Status LED blinks yellow a gimbal error has occurred. Press the Power/Mode button twice quickly to try to re-center the mobile phone.
4. Joystick
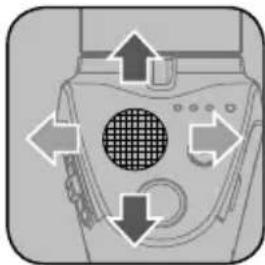
Move vertically to tilt the mobile phone. Move horizontally to pan the mobile phone. Joystick control direction can be set in the DJI GO app.
natural_image
Diagram of a washing machine with directional arrows indicating motion (no text or symbols)5. Shutter/Record Button
Press the Shutter/Record button once to start or stop recording, or to take a photo. (To switch between photo and video modes tap the Photo/Video switch in the DJI GO app). Press and hold the Shutter/Record button for burst capture (available on iOS only).
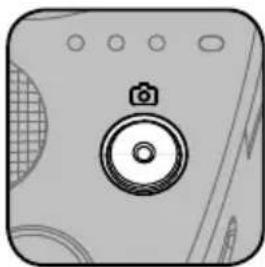
natural_image
Illustration of a camera with a circular lens and textured background (no text or symbols)6. Zoom Slider
Push up/down to zoom in/out.
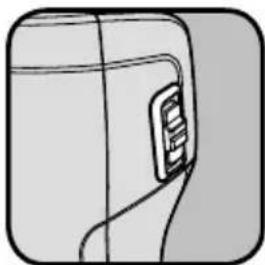
natural_image
Simple line drawing of a device with a handle and curved panel (no text or symbols)7. Charging Port (Micro USB)
Charge the Osmo Mobile 2 by connecting a USB adapter to this port. Refer to the Charging section for more information.
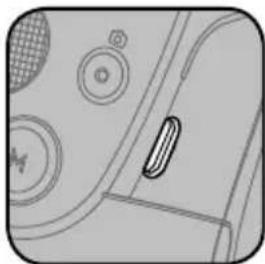
natural_image
Close-up of a car interior panel with circular buttons and a handle (no text or symbols visible)8. USB Port
The USB port can be used to charge mobile phones.
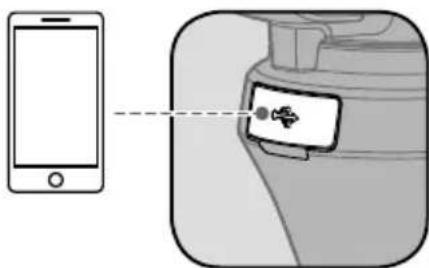
Connect the USB port to your mobile phone using a standard Micro USB cable. If the Osmo Mobile 2 is powered on charging will start. If the Osmo Mobile 2 is powered off press the Power/Mode button once to start charging.

The Osmo Mobile 2 cannot charge mobile phones while being charged itself. Do not connect the USB port to a mobile phone while charging the Osmo Mobile 2.
Operation Modes
The figures below depict the operation modes when using the Osmo Mobile 2 with a mobile phone mounted horizontally; the same operation modes apply when using with a mobile phone mounted vertically.
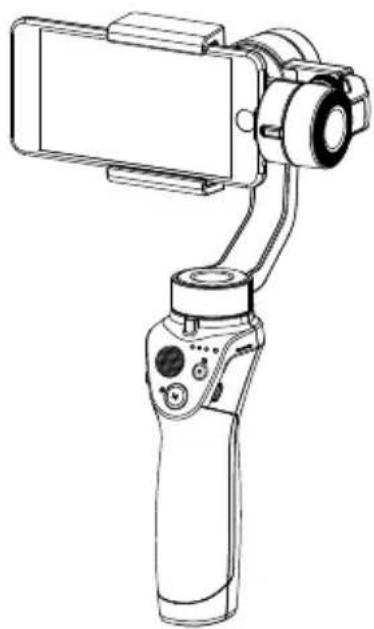
Upright Mode
Upright mode can be used without any user input. In this mode, press the Power/Mode button twice quickly to center the mobile phone.
natural_image
Line drawing of a hand pump device with a mounted device (no text or symbols)Underslung Mode
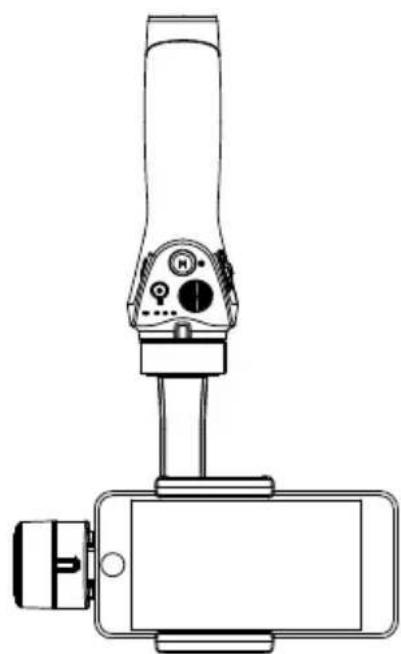
Holding the Osmo Mobile 2 upside down will cause it to enter Underslung mode, in which the mobile phone can easily capture images from a lower position.
natural_image
Line drawing of a handheld device with a vertical screen and control panel (no text or symbols)Flashlight Mode
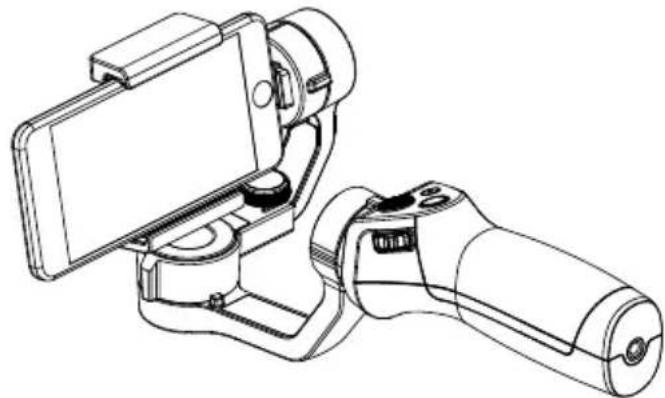
Rotate the Osmo Mobile 2 forward 90 degrees to go from Upright mode to Flashlight mode. To make the mobile phone vertical press the Power/Mode button twice quickly. In Flashlight mode, pushing the joystick up and down tilts the gimbal and pushing the joystick left and right has no effect.
natural_image
Technical line drawing of a handheld device with attached sensor and actuator components (no text or symbols)
With a mobile phone mounted vertically, do not center the mobile phone in Flashlight mode if doing so will cause the end of the mobile phone to collide with the gimbal.
Portrait Mode
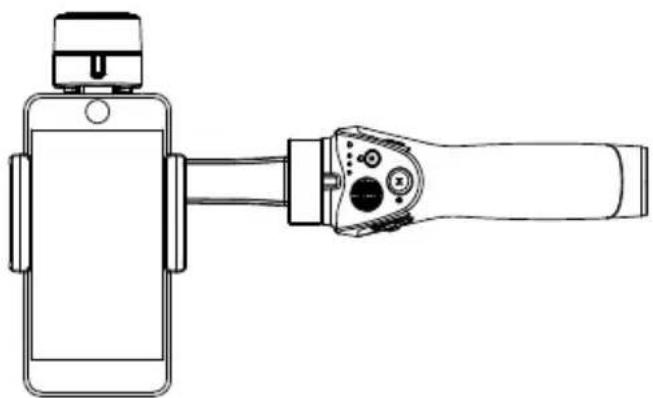
Rotate the Osmo Mobile 2 to the left or right by 30 degrees to go from Upright mode to Portrait mode. ActiveTrack is disabled when using Portrait mode.
natural_image
Line drawing of a smartphone mounted on a handheld device (no text or symbols)
- Due to sensor noise the handle may vibrate slightly when the gimbal is moving. This phenomenon is normal and does not affect shooting stability.
- In Follow mode, to ensure the gimbal can be centered quickly and resume tracking the center function centers the mobile phone to within ± 1.5^ of the true center. The joystick can be used to fine-tune the mobile phone position after using the center function.
DJI GO App
Watch a live HD video feed on your mobile screen through the DJI GO app. The app also allows you to use the ActiveTrack, Timelapse, and Pano functions, or configure camera and gimbal settings in just a few taps.
Installing the DJI GO App
Download the DJI GO app as described in the Using this Manual section and install it on your mobile phone.
Connecting to the DJI GO App
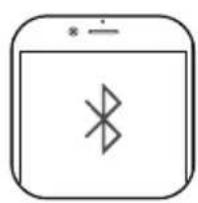
- Enable Bluetooth and turn off portrait orientation lock on your mobile phone to allow horizontal screen display.
- Power on the Osmo Mobile 2. Do not touch the gimbal and hold the Osmo Mobile 2 still and upright while it is starting up.
natural_image
Simple line icon of a smartphone with a Bluetooth symbol inside, no text or labels present.



-
Lanuch the DJI GO app. If you are using the Osmo Mobile 2 for the first time, follow the on-screen instructions to activate it. You will need to log in to your DJI account through an Internet connection.
-
Enter Camera view. If the mobile phone is successfully connected to the Osmo Moblie 2, Camera view gives a real-time display of what the camera is capturing.

There will be a tutorial on how to use your Osmo Mobile 2 after entering Camera view.

The gimbal will stop working if you answer a call.
Key Pages
Equipment > Camera
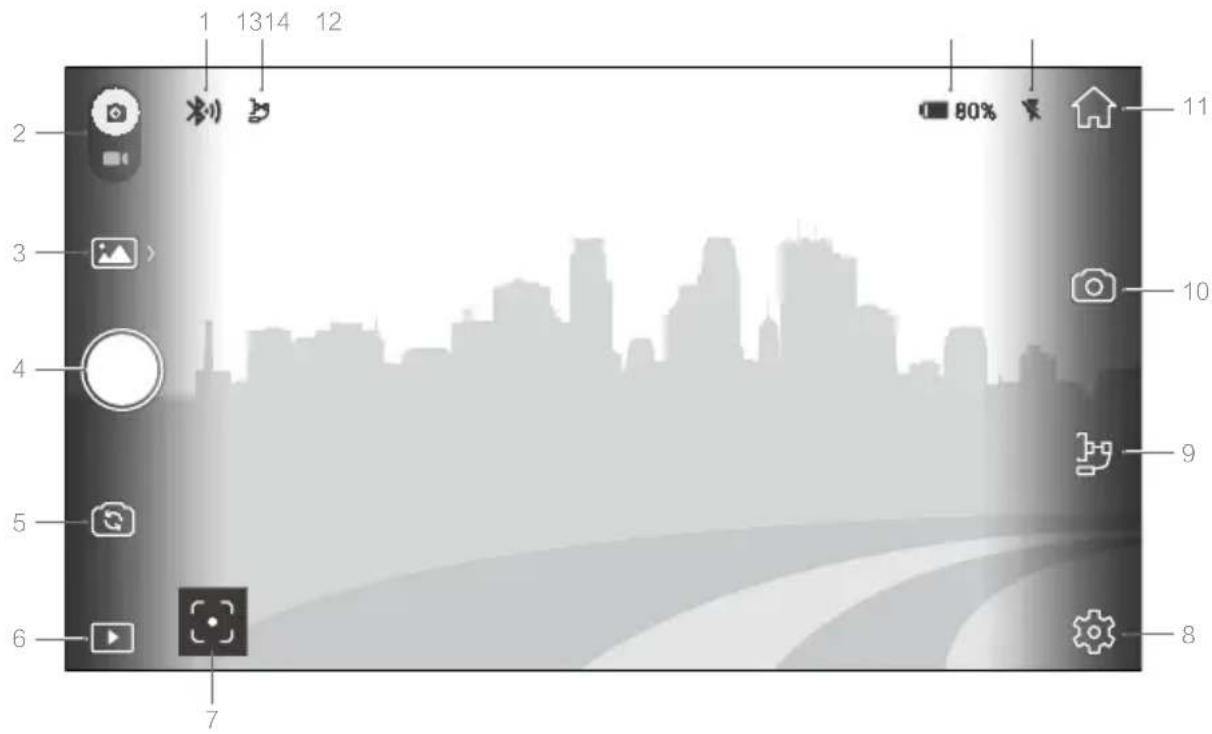
1. Connection Status
Indicates the status of the connection between the DJI GO app and the Osmo Mobile 2.
2. Photo/Video Switch
Slide to switch between photo and video modes.
3. Photo/Video Modes

Current Photo Mode
- Single shot, 2s, 5s, or 10s intervals, or HDR (not available on some Android mobile devices).

Current Video Mode
- Standard: Normal video based on your camera settings.
- Slow Motion: Tap to start or stop slow motion video recording (available on iOS only).
- Timelapse: Select photo capture intervals and capture duration to start recording a timelapse. The gimbal motor will be locked for greater stability.
- Hyperlapse: Select photo capture intervals and capture duration to start recording a hyperlapse. The gimbal will stabilize automatically to smooth image capture.
- Motionlapse: Use up to 5 camera positions to create a moving timelapse.

Keep the Osmo Mobile 2 stable when shooting a timelapse or motionlapse by placing it on a stable surface or support.
4. Shutter/Record Button

Tap to start or stop recording, or take a photo.
5. Front/Rear Camera Switch

Tap to switch between your phone's front and rear cameras.
6. Playback
Tap to view photos and videos.
7. Metering Mode/ActiveTrack
Tap to switch between Metering mode and ActiveTrack.
Metering Mode
- Tap on the screen for auto focus and metering, and swipe up or down to adjust the exposure.
- Tap and hold on the screen to lock the current exposure setting. Tap again to unlock.
ActiveTrack - Mark an object on your screen to track it as it moves. Tap the Record button to start recording. To adjust framing of the subject being tracked, use the Joystick.

Recording and ActiveTrack will stop if you answer a call.
8. Settings
Tap to set the camera or gimbal settings, check the device information, or start livestreaming to social media platforms.
Camera
Adjust video resolution settings (phone dependent), Panorama quality, and reset camera settings here.
Gimbal
• Horizontal Calibration
Adjust positive and negative values to bring the horizon to level if it is skewed.
- Auto Calibration
Reduces drift caused by nearby magnetic interference or human error. Do not touch the gimbal and hold the Osmo Mobile 2 still and upright during calibration.

With a mobile phone mounted vertically auto calibration is not supported.
- Joystick Control Direction
Tilt and pan axis can be controlled simultaneously by setting the Joystick control direction to Free. - Invert Joystick Left/Right Operation
Inverts left and right joystick directions, so that pushing right turns the phone left and vice versa. - Invert Joystick Up/Down Operation
Inverts up and down joystick directions, so that pushing the joystick up tilts the phone down and vice versa.
General
Displays the firmware version and device name.
Live
Livestream to live social network platforms such as YouTube live or Facebook live.
9. Gimbal Preferences
Tap to enter the gimbal preferences screen.
Scene Mode
SmoothTrack speed varies depending on the scene mode. In Sport mode, it is higher, while in Walk mode it is lower.
Tilt Axis Lock
Locks the tilt axis at the current angle when enabled.
10. Camera Preferences
Set the video resolution and flash status, and enable beautification effects or on-screen composition grids. Enable Manual Adjustment for ISO, Shutter Speed and White Balance control (currently available on iOS only).
11. Home
Tap to navigate to the home screen.
12. Flash Status
Displays the current status of the flash.
13. Battery Level
Displays the current battery level of the Osmo Mobile 2.
14. Gimbal Mode
Displays the current gimbal mode (Follow or Free).
Zooming
Put two fingers on the screen and move them apart to zoom in or move them together to zoom out. Note that zooming is only available in Metering mode.
Editor
View, edit and share your masterpieces all in one place. The Editor has a range of simple but powerful tools that let you edit your videos and photos before sharing them online minutes after they are captured.
Once you log in with a DJI account you are able to conveniently upload and share your creations. The saved photos and videos can be uploaded to Skypixel (www.skypixel.com) and shared on social networks such as Facebook, Twitter, WeChat Moments, and Sina Weibo.
Skypixel
You can view and share photos and videos here.
Me
If you already have a DJI account, you can participate in forum discussions, and visit the DJI online store here. You can also tap ⚙️ and go to Reset Beginner Guide to have the tutorial launch next time you open the app and go to Camera view.
Updating the Firmware
Use the DJI GO App to update the Osmo Mobile 2 firmware. It takes approximately 10 minutes to complete an update.
How to Update
Ensure that the battery has at least 30% charge before starting an update. Connect the Osmo Mobile 2 to your mobile device and then launch the DJI GO app. You will be reminded if a new firmware update is available. To start updating, connect your mobile device to the Internet and follow the on-screen instructions.
Do not exit the DJI GO app during the update process. Pay attention to on-screen prompts. The System Status Indicator will become solid green once the firmware update has completed successfully. Restart the Osmo Mobile 2 and DJI GO app after updating. If an update is unsuccessful, retry.
Specifications
| General | |
| Name OSMO MOBILE 2 | |
| Model OM170 | |
| Dimensions 295×113×72 mm (folded) | |
| Weight 485 g | |
| Power Consumption 1.2 W (when steady and balanced) | |
| Controllable Range | Pan: ±160°; Tilt: ±155°(with the mobile phone mounted horizontally) |
| Mechanical Range Pan: ±170°; Roll: -90° to +70°; Tilt: ±170° | |
| Max Controllable Speed 120 °/s | |
| Mobile Phone Width Range 58.6 to 85 mm | |
| Mobile Phone Thickness ≤ 8.9 mm | |
| Maximum Load 240 g | |
| Wireless | |
| Mode Bluetooth Low Energy 4.0 | |
| Transmitter Power (EIRP) < 1 dBm | |
| Battery | |
| Type 18650 LiPo | |
| Capacity 2600 mAh | |
| Energy 18 Wh | |
| Voltage 7.2 V | |
| Charging Temperature | 41° to 104° F (5° to 40° C) |
| Operating Temperature | 32° to 104° F (0° to 40° C) |
This content is subject to change.
Download the latest version from https://www.dji.com/osmo-mobile-2
If you have any questions about this document, please contact DJI by sending a message to DocSupport@dji.com.
OSMO is a trademark of DJI.
Copyright © 2018 DJI All Rights Reserved.
- Searching for Keywords
- Navigating to a Topic
- Printing this Document
- Using this Manual
- Legend
- Download the DJI GO App
- Contents
- Using this Manual 2
- Introduction 4
- Charging the Osmo Mobile 2 5
- Mounting and Balancing a Mobile Phone 5
- Using the Osmo Mobile 2 8
- DJI GO App 13
- Updating the Firmware 17
- Specifications 18
- Introduction
- At a Glance
- Charging the Osmo Mobile 2
- Mounting and Balancing a Mobile Phone
- Mounting the Mobile Phone Horizontally
- Mounting the Mobile Phone Vertically
- Using the Osmo Mobile 2
- Controls and Operations
- Power/Mode Button
- Battery Level Indicators
- System Status LED
- Joystick
- Shutter/Record Button
- Zoom Slider
- Charging Port (Micro USB)
- USB Port
- Operation Modes
- Upright Mode
- Underslung Mode
- Flashlight Mode
- Portrait Mode
- DJI GO App
- Installing the DJI GO App
- Connecting to the DJI GO App
- Key Pages
- Equipment > Camera
- Connection Status
- Photo/Video Switch
- Photo/Video Modes
- Shutter/Record Button
- Front/Rear Camera Switch
- Playback
- Metering Mode/ActiveTrack
- Settings
- Camera
- Gimbal
- General
- Live
- Gimbal Preferences
- Scene Mode
- Tilt Axis Lock
- Camera Preferences
- Home
- Flash Status
- Battery Level
- Gimbal Mode
- Zooming
- Editor
- Skypixel
- Me
- Updating the Firmware
- How to Update
- Download the latest version from https://www.dji.com/osmo-mobile-2
Brand : DJI
Model : Osmo Mobile 2
Category : Camera Tripod