
Osmo Mobile 3 - Camera Tripod DJI - Free user manual and instructions
Find the device manual for free Osmo Mobile 3 DJI in PDF.


| Product Type | Smartphone Gimbal (3-axis stabilizer) |
| Brand | DJI |
| Model | Osmo Mobile 3 |
| Dimensions (Folded) | 157 x 130 x 46 mm |
| Weight | 405 g |
| Battery Capacity | 2450 mAh lithium-ion (built-in) |
| Battery Life | Up to 15 hours (typical) |
| Charging Time | Approx. 2.5 hours via USB-C |
| Mechanical Range (Pan) | ±162.5° |
| Mechanical Range (Roll) | ±170° |
| Mechanical Range (Tilt) | ±85° |
| Max Payload | 230 g (typical smartphone) |
| Compatible Phone Width | 58-88 mm |
| Wireless Connectivity | Bluetooth 5.0, USB-Serial |
| Features | ActiveTrack 3.0, Gesture Control, Sport Mode, Story Modes |
| Spotlight | Smart Follow & Gesture Capture |
| Zoom | Slide Zoom via trigger |
| Cleaning | Wipe with a soft, dry cloth; avoid solvents |
| Safety | Do not expose to water or extreme temperatures; keep away from strong magnets |
| Spare Parts & Repairability | Battery is non-user-replaceable; service by DJI authorized centers |
| General Information | Designed for vlogging, live streaming, and casual video; foldable design |
Frequently Asked Questions - Osmo Mobile 3 DJI
User questions about Osmo Mobile 3 DJI
0 question about this device. Answer the ones you know or ask your own.
Ask a new question about this device
Download the instructions for your Camera Tripod in PDF format for free! Find your manual Osmo Mobile 3 - DJI and take your electronic device back in hand. On this page are published all the documents necessary for the use of your device. Osmo Mobile 3 by DJI.
USER MANUAL Osmo Mobile 3 DJI
natural_image
Line drawing of a handheld device with a smartphone mounted on top, showing no text or symbols.
Searching for Keywords
Search for keywords such as "battery" and "install" to find a topic. If you are using Adobe Acrobat Reader to read this document, press Ctrl+F on Windows or Command+F on Mac to begin a search.

Navigating to a Topic
View a complete list of topics in the table of contents. Click on a topic to navigate to that section.

Printing this Document
This document supports high resolution printing.
Using this Manual
Legend

Important Hints and Tips
Download the DJI Mimo App
Scan the QR code or search for "DJI Mimo" on the App Store or Google Play.


The Android version of DJI Mimo is compatible with Android v6.0 and later. The iOS version of DJI Mimo is compatible with iOS v10.0 and later.
Contents
Using this Manual 2
Legend 2
Download the DJI Mimo App 2
Introduction 4
Overview 4
Getting Started 5
Charging 5
Mounting and Balancing a Mobile Phone 5
Using Osmo Mobile 3 6
Controls and Operations 6
Operation Modes 9
DJI Mimo App 10
Updating the Firmware 13
Maintenance 14
Specifications 14
After-Sales Information 15
Introduction
Equipped with 3-axis stabilization, OSMO™ Mobile 3 turns your mobile phone into a camera that can deliver a stabilized and super-smooth image. The foldable design makes Osmo Mobile 3 easy to transport and store. Lightweight and ergonomic, Osmo Mobile 3 puts seamlessly smooth video creation at your fingertips.
Osmo Mobile 3 is easy to use and the mobile phone can be manually adjusted by hand in Follow mode. Get creative with features such as Story mode, ActiveTrack™ 3.0, Hyperlapse, Timelapse, and Pano that are available through the DJI Mimo app.
Overview
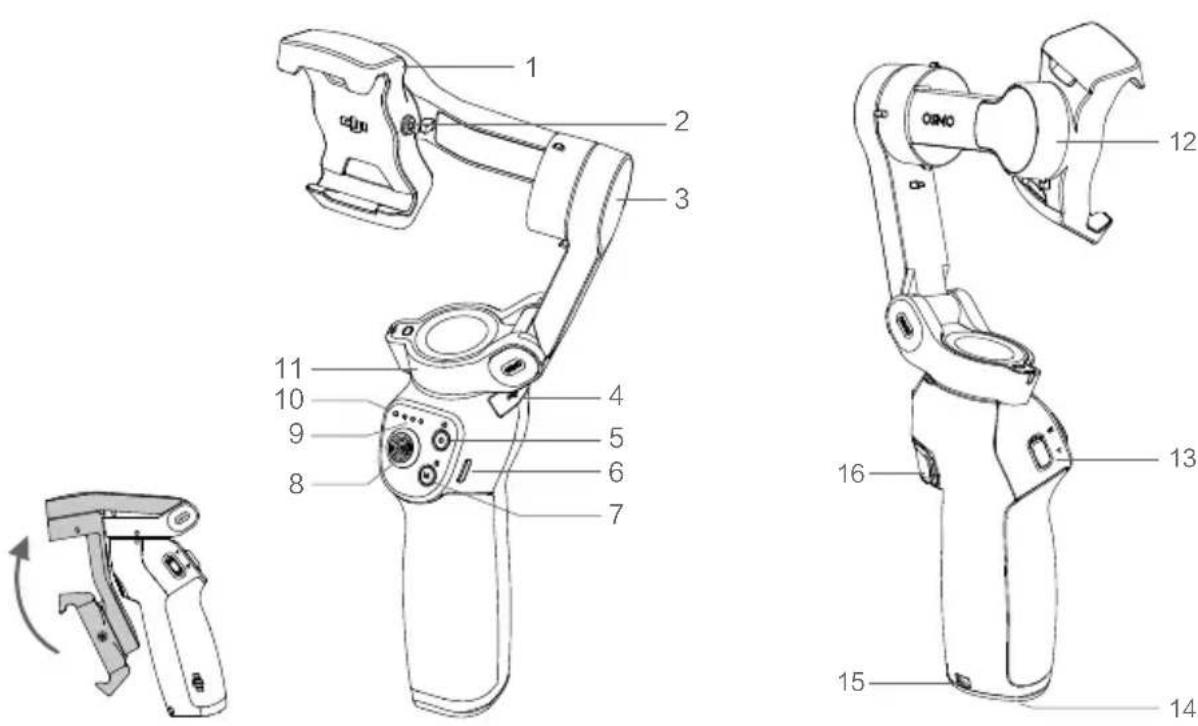
- Mobile Phone Holder
- M3×0.5 Screw Hole*
- Tilt Motor
- USB-A Port
- Shutter/Record Button
- USB-C Charging Port
- M Button**
-
Joystick
-
Battery Level Indicators
-
LED Status Indicator
- Pan Motor
- Roll Motor
- Zoom Slider
- 1/4"-20 UNC Port
- Lanyard Hole
- Trigger
Getting Started
Charging
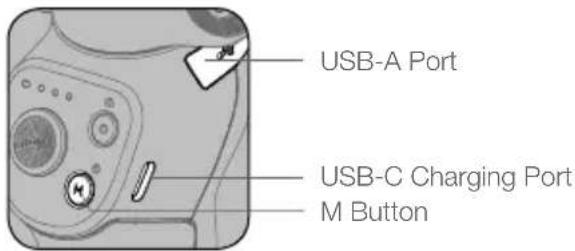
- To charge Osmo Mobile 3, connect a USB adapter (not included) to the charging port using the power cable (included). The battery is fully charged when the battery level indicators turn off.
Charging time: 2.5 hours (when using a 10 W charger)
Max. runtime: 15 hours*
- Connect your mobile phone to the USB-A port. If Osmo Mobile 3 is powered on, the mobile phone will begin to charge. If Osmo Mobile 3 is powered off, press the M button once to start charging.
* Max. runtime was tested with the gimbal balanced and held steadily. This value should be taken as a reference only.
Mounting and Balancing a Mobile Phone
Only mount and balance a mobile phone while Osmo Mobile 3 is powered off.
- Make sure the phone holder is vertical before mounting a mobile phone.
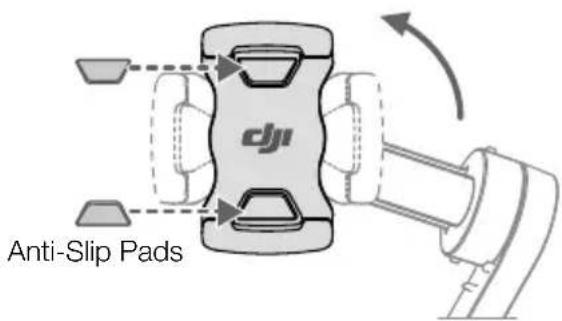
If required, use the anti-slip pads (included) to secure the mobile phone in the phone holder.
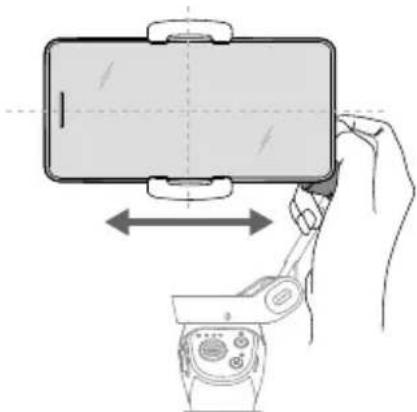
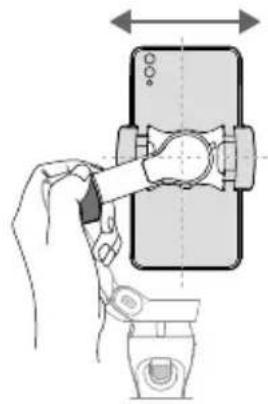
- Hold the tilt motor and move the mobile phone left or right until the mobile phone remains balanced when released.
natural_image
Illustration of a hand holding a smartphone with a wrist strap, showing the left side of the screen and right side of the device (no text or symbols present)- Hold the tilt motor and move the phone holder left or right until the mobile phone remains balanced when released.
natural_image
Illustration of a hand holding a smartphone with a wrist strap, showing mechanical adjustment (no text or symbols)
- Make sure the mobile phone is properly installed and balanced on the holder of Osmo Mobile 3 before each use.
- Mount your mobile phone before powering on Osmo Mobile 3. Osmo Mobile 3 will enter standby mode when no mobile phone is detected.
Using Osmo Mobile 3
Controls and Operations
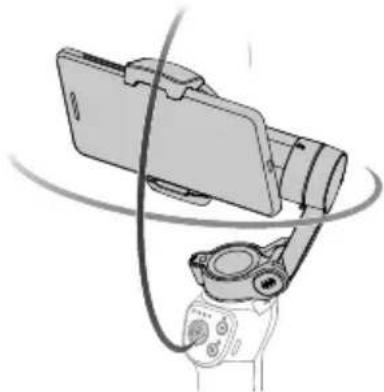
The buttons on the handle allow greater control over the gimbal and mobile phone. The gimbal converts joystick movements into smooth pan and tilt transitions, and reduces the impact of natural vibrations. In Follow mode, the mobile phone can be adjusted by hand.
natural_image
Diagram of a handheld device with attached cable and control panel (no text or symbols)1. M Button
Press and hold to power on. After powering on, press and hold until you hear a beep to enter or exit standby mode. Press and hold until you hear two beeps to power off.
When powered off, press once to check the battery level. When powered on, press to switch between photo and video mode or enter or exit the quick menu.
Press twice to switch between landscape and portrait mode.*
Press three times to enter or exit standby mode.
* Landscape and portrait mode can also be switched by adjusting the phone holder directly.
2. Shutter Button
Press once to take a photo or start or stop recording. Press and hold for burst shooting when in photo mode.
3. Battery Level Indicators
Indicates the battery level of Osmo Mobile 3. With Osmo Mobile 3 powered off, press the M button once to check the battery level.
4. System Status LED
Indicates the current status of Osmo Mobile 3.
| Blinking Pattern Descriptions | |
| Solid yellow Bluetooth disconnected | |
| Solid green Bluetooth connected | |
| Pulses yellow or green Standby mode | |
| Blinks red and green alternatively Firmware update required or firmware update failed | |
| Solid red | Gimbal abnormality (such as temperature is too low or too high, battery is over discharged) |
5. Joystick
Move vertically to tilt the mobile phone. Move horizontally to pan the mobile phone. The joystick control direction can be set in DJI Mimo.
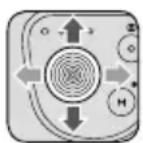
When using ActiveTrack 3.0, move the joystick to adjust the camera view.
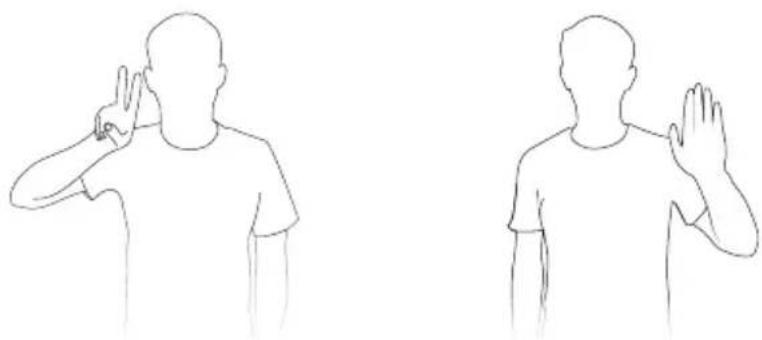
ActiveTrack 3.0: ActiveTrack 3.0 has been optimized for tracking human subjects with a head and shoulder model along with face detection using deep learning algorithms. The subject will remain in the center of the camera view. The default position is the center of the camera view. Users can also adjust the camera view manually. There are three ways to use ActiveTrack 3.0:
a. Drag a box on the screen in the camera view in DJI Mimo. A green box around the subject indicates ActiveTrack 3.0 is successfully enabled. Tap the X icon on the top corner to stop tracking.
b. Enable One-press ActiveTrack in DJI Mimo, and press the trigger once to start or stop ActiveTrack 3.0.
c. Enable Gesture Control in DJI Mimo, and then perform a palm or V gesture for one to two seconds when facing the camera. The back camera will detect the nearest head and shoulders and start to track the subject. The front camera will detect the nearest face and start to track the subject.
natural_image
Two line drawings of a person in different poses, one covering face and hand gesture, the other with raised hands (no text or symbols)The differences between the head and shoulder tracking and face track are that head and shoulder tracking supports 360^ tracking while face tracking does not. Also, the detection range of the camera are different. The detection range between the back camera and the gesture is 0.5 to 3 m, and the distance between the front camera and the gesture is 0.5 to 2 m.
Note that ActiveTrack 3.0 may increase the power consumption and the temperature of the mobile phone. See the DJI Mimo App section for more information.
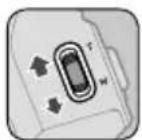
6. Zoom Slide
Push up or down to zoom in or out. Push the slider to the T position to enlarge the subject and push the slider to the W position to shrink.
7. Trigger
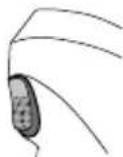
Press and hold to enter lock mode. In lock mode, the gimbal will not follow the handle movements. Release to exit lock mode.
When ActiveTrack 3.0 is enabled in DJI Mimo, press once to start or stop ActiveTrack 3.0.
Press twice to recenter the gimbal. When using ActiveTrack 3.0, the gimbal will recenter to the center of the camera view.
Press three times to switch between front and back cameras.
Press once, and then press and hold to enter Sport mode. Release to exit. In Sport mode, the follow speed of the gimbal increases for capturing quick movements.
8. USB-C Charging Port
Charge Osmo Mobile 3 by connecting a USB adapter to this port. Refer to the Charging section for more information.
9. USB-A Port
The USB-A port can be used to charge mobile phones.
10. 1/4"-20 UNC Port
The 1/4"-20 UNC port can be used to attach a tripod.
11. Lanyard Hole
The lanyard hole can be used to attach a wrist strap.
12. Combination Operation
Press the M button, shutter button, and trigger simultaneously to reset the Bluetooth connection.

Osmo Mobile 3 will be powered off automatically if there is no operation for 10 minutes in standby mode.
Operation Modes
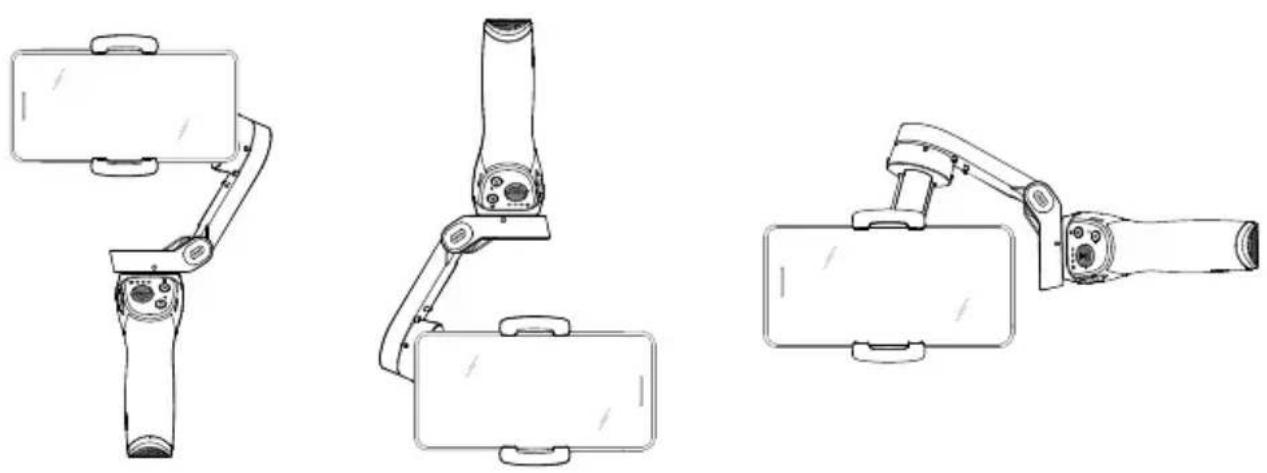
The figures below depict the operation modes when using Osmo Mobile 3 in landscape mode. The same operation modes apply when used in portrait mode.
Upright Mode
Upright mode can be used without any further user input. In this mode, press the M button twice quickly to center the mobile phone.
Underslung Mode
Hold Osmo Mobile 3 upside down to enter Underslung mode, in which the mobile phone can easily capture images from a lower position.
Side Grip Mode
Rotate Osmo Mobile 3 to the right or left by 90° to go from Upright to Side Grip mode.
natural_image
Three technical line drawings of a handheld device with articulated arms and a rectangular base (no text or symbols)Upright Mode Underslung Mode Side Grip Mode

- Due to sensor noise, the handle may vibrate slightly when the gimbal is moving. This phenomenon is normal and does not affect shooting stability.
- Note that in Follow mode, to make sure the gimbal can be centered quickly and resume tracking, the mobile phone will be within ± 3^ of the true center after re-centering. The joystick can be used to fine-tune the position of the mobile phone.
DJI Mimo App
Watch a live HD video feed on your mobile screen through the DJI Mimo app. The app also allows you to use Story mode, Hyperlapse, Timelapse, ActiveTrack 3.0, and Pano, or configure camera and gimbal settings in just a few taps.
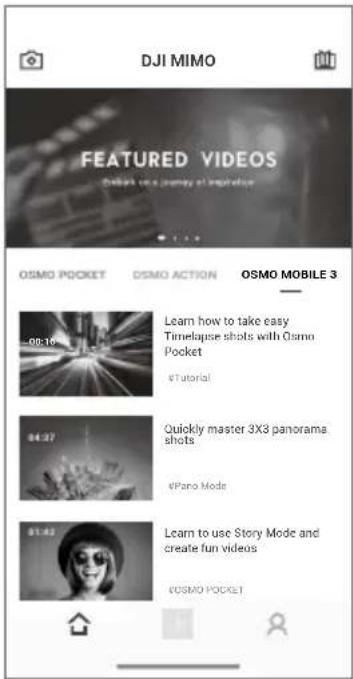
Camera View: tap to connect to Osmo Mobile 3. Once connected, DJI Mimo enters camera view.
Home: tap to return to home.
+ Edit: tap to edit photos or video from Osmo Mobile 3 or import and edit from a mobile device.
Profile: register or log in to a DJI account. View works and settings, check likes and followers, send messages to other users, and connect with the DJI Store.
Academy: tap to watch tutorials and manuals.
Connecting to the DJI Mimo App
- Power on Osmo Mobile 3.
- Enable Bluetooth on the mobile phone, and connect the device with an OM3 prefix name in DJI Mimo.
- When using Osmo Mobile 3 for the first time, activation is required using DJI Mimo. Follow the instructions to activate.
- Enter camera view after activation is complete.

When connected via Bluetooth, Osmo Mobile 3 is able to control the camera of the mobile phone without DJI Mimo. This feature is available with a mobile phone which supports camera control using the volume button.
DJI Mimo App Settings
Camera View
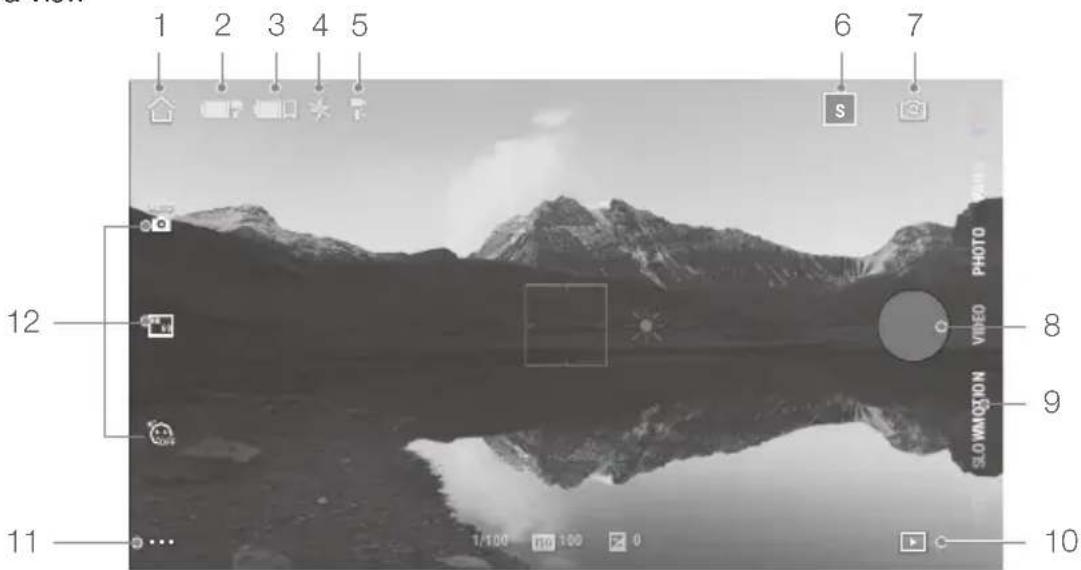
- Home
合: Tap to return to home page.
- Gimbal Battery Level
: Displays the current battery level of the gimbal.
- Mobile Phone Battery Level
: Displays the current battery level of the mobile phone.
- Flash
: Displays the flash status.
- Gimbal Mode
: Displays the current gimbal mode: Follow, Tilt Locked, and FPV.
- Story Mode
s : Story mode provides several templates for recording video. When you are finished shooting, a video will be generated automatically according to the selected shooting template.
- Front/Back Camera Switch
: lap to switch between the front and back cameras of your mobile phone.
- Shutter Button
: ▶ up to take a photo or to start or stop recording video.
- Shooting Mode
Scroll to select the shooting mode. Choose between Hyperlapse, Timelapse, Slow Motion, Video, Photo, Pano, and Story mode.
Hyperlapse: enable to shoot a Timelapse photo while moving the mobile phone. Tap the shutter button to begin.
Timelapse: there are two types of Timelapse, Position and Path. After selecting the Timelapse, tap the settings at the top of the screen. For Position Timelapse, set the interval and duration time and start to shoot. For Path Timelapse, up to four positions can be selected, and then the gimbal will travel through the positions in order.
Slow Motion: tap to shoot video at 8x slow motion. Only available on iOS devices.
Video: tap to shoot a normal video. Press and hold for burst shooting.
Photo: tap to take a single shot or interval photo.
Pano: tap to take a 3x3 or 180° panorama photo.
Story: Refer to Number 6 for more information about Story mode.
10. Playback
: Tap to preview photos and videos.
11. Settings •••
: Shooting Mode Settings
Shooting Mode Settings
Hyperlapse Flash, White Balance, Grid, One-press ActiveTrack
Timelapse Flash, White Balance, Grid
Slow Motion Flash, White Balance, Grid, One-press ActiveTrack
Video Flash, White Balance, Grid, One-press ActiveTrack, Gesture Control
Photo Flash, White Balance, Grid, One-press ActiveTrack, Gesture Control
Pano Flash, White Balance, Grid, Save Unstitched Pano Photos
Gimbal Settings
Follow Mode:
a. Follow: pan and tilt axes follow.
b. Tilt Locked: only the pan axis follows.
c. FPV: pan, tilt, and roll axes follow.
Sport Mode Switch: tap to enable or disable Sport mode.
Zoom Speed: tap to set the zoom speed when using the zoom slider.
Joystick Speed: tap to set the maximum speed when controlling the joystick. There are Fast, Medium, and Slow options.
Joystick Control Direction: choose from Free and Horiz/Vert. Free enables the gimbal to be controlled in 360°. Horiz/Vert enables the gimbal to be controlled in a horizontal or vertical direction.
Invert Pan Control: after enabling this feature, the pan axis movement direction is the reverse of the joystick direction.
Invert Tilt Control: after enabling this feature, the tilt axis movement direction is the reverse of the joystick direction.
Press M Button: define the feature when pressing the M button once. Select from switching between photo and video mode or enter or exit the quick menu.
Gimbal Auto Calibration: reduces drift caused by nearby magnetic interference or human error. Do not touch the gimbal and hold Osmo Mobile 3 still and upright during calibration.
General Settings
Device Management, Device Name, Firmware Version, and SN.
12. Camera Settings
Shooting Mode Settings
Hyperlapse Resolution and FPS*, Speed, ISO, Shutter, and EV*
Timelapse Resolution and FPS*, Speed, ISO, Shutter, and EV*
Slow Motion ISO, Shutter, and EV*
Video Glamour Effects**, Resolution and FPS*, Speed, ISO, Shutter, and EV*
Photo Glamour Effects, Count Down, ISO, Shutter, and EV*
Pano 3×3 and 180° Pano, ISO, Shutter, and EV*
* FPS, ISO, Shutter, and EV settings are only available for iOS devices.
** When enabling Glamour Effects, the video resolution is set to 720p.
Zooming
Place two fingers on the screen and move them apart to zoom in or move them together to zoom out. Note that zooming is only available when using the back camera of your mobile phone.
Updating the Firmware
Use the DJI Mimo app to update the Osmo Mobile 3 firmware. It takes approximately three minutes to complete an update.
How to Update
Before starting an update, make sure that the battery level is at least 15% (at least two battery level indicators lit). Connect Osmo Mobile 3 to your mobile device and launch DJI Mimo. You will be prompted if a new firmware update is available. To start updating, connect your mobile device to the internet and follow the on-screen instructions.
Do not exit DJI Mimo while updating the firmware. Pay attention to on-screen prompts. The LEDs status indicator will blink green and red alternatively and become solid green once the firmware update has completed successfully.
If an update is unsuccessful, restart Osmo Mobile 3 and DJI Mimo, and reconnect the Bluetooth, and then retry.
Maintenance
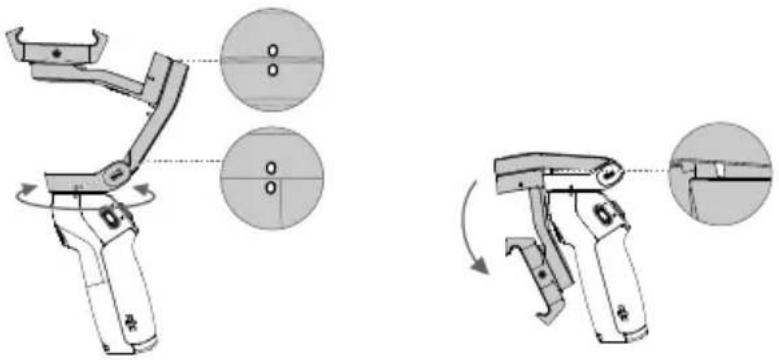
Osmo Mobile 3 is designed to be folded for easier storage and transportation. Ensure to fold the Osmo Mobile 3 when it is powered off.
Rotate the pan and tilt axis to align with the marks on the gimbal, and then fold Osmo Mobile 3. Note that the hole on the pan motor should be matched with the marker on the arm.
Press the M button to power off Osmo Mobile 3. Osmo Mobile 3 will enter storage mode and can be folded.
Specifications
| Name OSMO MOBILE 3 | |
| Model OF100 | |
| Dimensions | Unfolded: 285×125×103 mmFolded: 157×130×46 mm |
| Weight 405 g | |
| Consumption 1.2 W (steady and balanced status) | |
| Mechanical Range | Pan: -162.5° to 170.3°Roll: -85.1° to 252.2°Tilt: -104.5° to 235.7° |
| Max Controllable Speed 120°/s | |
| Compatible Phones | Weight: 200 ± 30 gDimension:Diagonal ≤ 180 mm (or ≤ 7.08 in)Thickness ≤ 9.5 mmWidth: 62-88 mm |
| Mode Bluetooth Low Energy 5.0 | |
| Transmitter Power (EIRP) ≤4 dBm | |
| Operation Frequency 2.400-2.4835 GHz | |
| Battery Type 18650 Li-ion | |
| Capacity 2450 mAh | |
| Energy 17.64 Wh | |
| Voltage 7.2 V | |
| Charging Temperature 5° to 40°C (41° to 104°F) | |
| Operating Temperature 0° to 40°C (32° to 104°F) | |
Charging Time 2.5 hours (Measured with a 10W charger)
Operating Time 15 hours (Under ideal conditions with the gimbal fully balanced)
After-Sales Information
Visit https://www.dji.com/support to learn more about after-sales service policies, repair services, and support.

For online support, please scan this code with Facebook Messenger
This content is subject to change.
Download the latest version from
www.dji.com/osmo-mobile-3
OSMO is a trademark of DJI.
Copyright © 2019 DJI OSMO All Rights Reserved.
- Searching for Keywords
- Navigating to a Topic
- Printing this Document
- Using this Manual
- Legend
- Download the DJI Mimo App
- Contents
- Using this Manual 2
- Introduction 4
- Getting Started 5
- Using Osmo Mobile 3 6
- Updating the Firmware 13
- Maintenance 14
- Specifications 14
- After-Sales Information 15
- Introduction
- Overview
- Getting Started
- Charging
- Mounting and Balancing a Mobile Phone
- Using Osmo Mobile 3
- Controls and Operations
- M Button
- Shutter Button
- Battery Level Indicators
- System Status LED
- Joystick
- Zoom Slide
- Trigger
- USB-C Charging Port
- USB-A Port
- 1/4"-20 UNC Port
- Lanyard Hole
- Combination Operation
- Operation Modes
- Upright Mode
- Underslung Mode
- Side Grip Mode
- DJI Mimo App
- Connecting to the DJI Mimo App
- DJI Mimo App Settings
- Playback
- Settings •••
- Shooting Mode Settings
- Gimbal Settings
- General Settings
- Camera Settings
- Zooming
- Updating the Firmware
- How to Update
- Maintenance
- After-Sales Information
Brand : DJI
Model : Osmo Mobile 3
Category : Camera Tripod