
XSlate R12 - Tablet Xplore - Free user manual and instructions
Find the device manual for free XSlate R12 Xplore in PDF.


| Product Type | Rugged Tablet PC |
| Brand | Xplore |
| Model | XSlate R12 |
| Operating System | Windows 10 64-bit / Windows 8.1 Pro 64-bit / Windows 7 Professional 64-bit (depending on configuration) |
| Processor | Intel Core i7-7500U (2.7 GHz up to 3.5 GHz) or Intel Core i5-6200U (2.3 GHz up to 2.8 GHz) |
| Memory | 8 GB DDR4 2100 MHz SDRAM |
| Storage | 128 GB / 256 GB / 512 GB SSD |
| Display | 12.5" Full-HD (1920x1080), 800 nit, Corning Gorilla Glass 4, capacitive 10-point touch, Wacom digitizer pen input, anti-smudge/anti-reflective |
| Graphics | Intel HD Graphics 520 |
| Dimensions | 12.93 x 8.17 x 0.75 in (328.5 x 207.5 x 19 mm) |
| Weight | 2.9 lbs (1.34 kg) |
| Battery | Hot-swappable Lithium-Ion, 45 WHr, up to 9 hours, charge time 2.5 hours (on/off) |
| Durability | MIL-STD-810G tested (multiple 4' drops), IP54 (water/dust resistant), Class I Division 2 for hazardous locations, magnesium-alloy frame, rubberized enclosure |
| Cameras | Front: 2 MP web camera; Rear: 8 MP autofocus documentation camera (BMP, JPG, TIFF) |
| Wireless | Intel Dual Band Wireless-AC 8260 Wi-Fi + Bluetooth 4.2, optional 4G LTE (Sierra Wireless), GPS |
| Ports | 1x USB 3.0, HDMI, 3.5 mm audio I/O, docking connector, Micro-SD, Micro-SIM (3FF), optional RS232 & RJ45 via dongle |
| Security | Integrated fingerprint reader, TPM 2.0, optional CAC/Smart Card reader, security button (Ctrl+Alt+Del) |
| Pen | R12-Series digitizer pen with replaceable tip, pen tether anchor, stored in pen bay |
| Accessories (Optional) | SlateMate module (barcode scanner, HF RFID, serial port), companion keyboard (Bluetooth), Y-cable (RS232 and Ethernet), docking station |
| Operating Temperature | -10°C to 55°C (14°F to 131°F) |
| Storage Temperature | -30°C to 70°C (-22°F to 158°F) |
| Battery Maintenance | Condition monthly: discharge below 20% then fully charge; store at 20-40% charge; replace tip every 90 days (30 days in dirty environments) |
| Warranty | 3-year standard coverage, extended warranties available |
Frequently Asked Questions - XSlate R12 Xplore
User questions about XSlate R12 Xplore
0 question about this device. Answer the ones you know or ask your own.
Ask a new question about this device
Download the instructions for your Tablet in PDF format for free! Find your manual XSlate R12 - Xplore and take your electronic device back in hand. On this page are published all the documents necessary for the use of your device. XSlate R12 by Xplore.
USER MANUAL XSlate R12 Xplore
© 2003–2016 Xplore Technologies Corporation of America. All rights reserved.
This document contains information protected by copyright. No part of this document may be reproduced in any form without written consent from Xplore Technologies® Corporation.
The information in this document is provided "as is" and is subject to change without notice. Xplore Technologies is not liable for errors or omissions in this document.
Xplore, Motion by Xplore, View Anywhere, and QuickNav are trademarks or registered trademarks of Xplore Technologies Corporation of America in the U.S.A. and other countries.
Acrobat is a registered trademark of Adobe Systems Incorporated.
Bluetooth is a registered trademark owned by the Bluetooth SIG, Inc., U.S.A. and licensed to Xplore Technologies Corporation of America.
Intel, Intel Atom, Core, vPro, and Centrino are trademarks or registered trademarks of Intel Corporation or its subsidiaries in the United States and other countries.
Windows, Windows Journal, and Skype and other marks are trademarks or registered trademarks of Microsoft Corporation.
Corning and Gorilla Glass are registered trademarks of Corning Incorporated.
Qualcomm, Gobi, and Gobi 5000 are trademarks or registered trademarks of Qualcomm Incorporated.
Wi-Fi is a registered trademark of the Wi-Fi Alliance.
Kensington and MicroSaver are registered trademarks of the Kensington Technology Group.
HDMI, the HDMI logo, and High-Definition Multimedia Interface are trademarks of HDMI Licensing LLC in the United States and other countries.
This product incorporates copy protection technology that is protected by U.S. and foreign patents, including patent numbers 5,315,448 and 6,836,549, and other intellectual property rights. The use of the Macrovision copy protection technology in the product must be authorized by Rovi Corporation. Reverse engineering or disassembly is prohibited.
Xplore Technologies Corporation of America has made every effort to identify trademarked properties and owners on this page. All brands and product names used in this document are for identification purposes only and may be trademarks or registered trademarks of their respective companies.
The warranties for Xplore and Motion by Xplore products are set forth in the express limited warranty statements accompanying such products. Nothing in this document constitutes an additional warranty.
The Xplore and Motion by Xplore products and services may be covered by one or more patent-protected inventions. Additional patents may also be pending. For more information, see this site: https://www.xploretech.com/us/patents
The end user may access only one language version of the operating system.
Overview of the XSLATE R12 Tablet....8
Front 8
Back 9
Back with Battery Removed....10
Right Side 10
Left Side....11
Pen 11
Starting Your XSLATE R12 Tablet....12
Powering Up the Tablet 12
Locking and Unlocking Your Tablet....12
Locking the Tablet....12
Unlocking the Tablet....12
Using Sleep Mode....12
Putting the Tablet in Sleep Mode 12
Waking up the Tablet from Sleep Mode 12
Using the Battery....13
Checking Battery Power....13
Removing and replacing the Battery 14
Removing the Battery 14
Inserting the External Battery 15
Long-term Battery Storage....16
Disposing of Used Batteries 16
XSLATE R12 Tablet Application....16
Tablet Center....16
Opening the Tablet Center....16
Adjusting Pen Options....17
Adjusting Touch....18
Configuring the Tablet PC Settings 18
Setting up the Display 18
Setting the Display Options 19
Configuring the Tablet Functions Buttons....20
Configuring the Menus for Left or Right Handed 21
Setting up Wireless Connections 21
Connection to a Wi-Fi Network....21
Temporarily Switching Off Wireless Devices....22
Connecting to a Mobile Broadband Network 22
Inserting a SIM Card 23
Setting Up Mobile Broadband....23
Advanced Information....24
Power Settings 24
Changing the Power Plan....25
Changing What Happens When the Power Button Is Pressed 25
Configuring Advanced Power Settings....26
Compass 26
Location Services....26
Showing the Map....27
Entering Text by Keyboard 27
Using the Windows On-screen Keyboards 27
Making a Keyboard Appear When Tapping in a Text Field 28
Accessing the Full On-screen Keyboard 29
After Displaying This Keyboard 29
Keeping the Icon on the Taskbar....29
Entering Text by Handwriting....29
Using the Cameras 30
The Web Camera....30
The Documentation Camera....30
Camera Software....30
Using the Fingerprint Reader 31
Creating a PIN....31
Setting Up the Fingerprint Reader....31
Fingerprint Reader Tips....31
Using the SlateMate Module (Optional) 31
Barcode Scanner....32
Using the Barcode Scanner 32
Using the RFID Reader 33
Configuring Bluetooth for use with XSLATE R12 Companion Keyboard (Optional) 34
Managing Bluetooth Devices....34
Installing the Y-Cable (Optional)....35
Locating the Serial Number 35
Caring for Your XSLATE R12 35
General Care 36
Caring for the Display 36
Caring for the Pen....36
Replacing the Pen Tip....36
Cleaning the Fingerprint Reader 37
Caring for the Tablet Battery 37
Troubleshooting....37
Power Issues 37
Battery Issues 38
Display Issues....39
Touch or Pen Issues....40
Port and Connector Issues....41
Network Issues 41
Wi-Fi Issues 42
Bluetooth Issues 42
Bluetooth Wireless Tips....43
Audio Issues....44
System Issues 44
XSLATE R12 Spec Sheet Information 45
Important Information
Before you use the XSLATE R12 (referred to as the tablet), read these safety instructions and the operation instructions in this guide.
Failure to observe all these instructions voids the Limited Warranty and may lead to suspension or denial of services to the offender, or legal action, or both.
Follow any special regulations governing the use of the tablet and, if radio-enabled, always switch it off in areas where radio devices are forbidden or when the radio device can cause interference or danger.
Always follow any safety laws and regulations pertaining to the use of cell phones and two way radios, because these laws and regulations typically apply to the use of the wireless enabled tablet.
Observe all restrictions on the use of radio equipment in fuel depots (fuel storage and distribution areas), chemical plants, and wherever blasting operations are in progress or in any area in which restrictions on radio transmissions are imposed. When flying in an aircraft, turn off the tablet PC prior to take-off and landing. As of this writing, the FAA has approved the use of personal electronic devices on commercial aircraft when flying above 10,000ft (3,048m). The tablet PC should only be turned on only when directed by the flight crew members as FAA regulations are subject to change.
Operating the wireless-enabled tablet may interfere with the functioning of inadequately protected medical devices such as pacemakers. Consult a physician or the manufacturer of the medical device if you have any questions.
Radio signals from your tablet will not affect the operation of most modern equipment, but certain electronic equipment, including automotive systems, may not be shielded against radio signals from your tablet. Check with the manufacturer of your motor vehicle or the manufacturer's representative to determine whether using the tablet will present any safety issues.
Avoid using the tablet in any environment that requires your full attention, such as when driving a vehicle. If you need to use your tablet while driving, have a passenger use it for you or find a safe location to halt your vehicle.
WARNING: Use tablet only within the following environments:
- Ambient temperatures between -25°C to 40°C .
- Oxygen concentration of not greater than 21% by volume.
• A pressure of 80 kPa (0.8 bar) to 110 kPa (1.1 bar)
WARNING: Use only battery types specified in this guide. Using any other type of battery can be dangerous and can disable the tablet. Do not drop or mishandle the batteries, immerse them in water, or subject them to high heat. Doing so could increase the risk of explosion or leakage, and possibly cause injury. The lithium-ion batteries used in this equipment contain material that is hazardous to your health. If battery contents come in contact with the eyes, IMMEDIATELY flush the affected area with clean water for 15 minutes and have someone else summon medical attention for you. Unaffected persons should assist the affected individual in the vital first flushing of the eyes. RECHARGING THE
BATTERY MUST ONLY BE CARRIED OUT IN A NON-HAZERDOUS AREA USING THE SUPPLIED AC ADAPTOR. The definition of hazardous areas can be found in Standard EN 60079-10.
WARNING: When operating the tablet in a known explosive environment do not remove or replace the battery while the circuit is live. Before removing the battery verify that the area is known to be free of ignitable concentrations of flammable substances. EXPLOSION HAZARD – DO NOT DISCONNECT WHILE CIRCUIT IS LIVE UNLESS AREA IS KNOWN TO BE NON-HAZERDOUS. AVERISSEMENT – RISQUE D'EXPLOSION. NE PAS DÉBRANCHER TANT QUE LE CIRCUIT EST SOUS TENSION, À MOINS QU'IL NE S'AGISSE D'UN EMPLACEMENT NON DANGEREUX.
WARNING: EXPLOSION HAZARD - DO NOT REPLACE THE BATTERY UNLESS POWER HAS BEEN SWITCHED OFF ANDTHE AREA IS KNOWN TO BE NON-HAZARDOUS; AVERTISSEMENT - RISQUE D'EXPLOSION - COUPER LE COURANT OU S'ASSURER QUE L'EMPLACEMENT EST DESIGNE NON DANGEREUX AVANT DE REPLACER LE BATTERY.
WARNING: EXPLOSION HAZARD - SUBSTITUTION OF COMPONENTS MAY IMPAIR SUITABILITY FOR CLASS I, DIVISION 2; AVERTISSEMENT - RISQUE D'EXPLOSION - LA SUBSTITUTIOND E COMPOSANTSP EUTR ENDRE CE MATERIEL INACCEPTABLE POUR LES EMPLACEMENTS DE CLASSE I, DIVISION 2;
WARNING: EXPLOSION HAZARD - DO NOT DISCONNECT EQUIPMENT UNLESS POWER HAS BEEN SWITCHED OFF AND THE AREA IS KNOWN TO BE NON-HAZARDOUS. AVERTISSEMENT - RISQUE D'EXPLOSION - AVANT DE DECONNECTER L'EQUIPEMENT, COUPER LE COURANT OU S'ASSURER QUE L'EMPLACEMENT EST DESIGNE NON DANGEREUX.
WARNING: EXPLOSION HAZARD – DO NOT USE ANY DOCK OR OTHER ACCESSORY OR ATTACHMENT WHEN IN A KNOWN HAZARDOUS AREA. AVERTISSEMENT - RISQUE D'EXPLOSION - N'UTILISEZ JAMAIS DOCK OU TOUT AUTRE ACCESSOIRE OU ATTACHMENT QUAND DANS UNE ZONE DANGEREUSE CONNUE.
WARNING: Do not use any dock or any other accessory or attachment that is not manufactured or supplied by Xplore or an authorized Xplore accessories supplier. Use of any accessory or attachment that is not supplied or approved for use with the tablet by Xplore is not permitted because it may cause hazards. Only use the approved XSLATE R12 AC adapter shipped with your tablet. (P/N 0432-03JR0MC) Do NOT use any other adapter because it may cause intermittent contact and not charge correctly.
Operate the tablet only from Xplore approved power sources. Route power supply cords so that they are not likely to be walked on or pinched by items placed upon or against them. Pay particular attention to cords at plugs and convenience receptacles, and at the point where cords exit from the tablet or its dock. Do not overload wall outlets, extension cords, or integral convenience receptacles because this can cause fire or electric shock.
Unplug the tablet and refer the tablet and dock for service to qualified service personnel if any of the following conditions occur:
- The power supply cord or plug is damaged.
- The tablet does not operate normally when you follow the instructions in this book.
- The tablet exhibits a distinct change in performance.
Adjust only controls for which there are instructions in this book. An improper adjustment of other controls can result in damage and may require extensive work by a qualified technician to restore the tablet or dock to normal operation.
ENERGY STAR®

This PC is ENERGY STAR ® compliant. The power management settings enabled by default on this PC have been selected for compliance with the current ENERGY STAR requirements. For optimal energy savings, ENERGY STAR recommends that sleep mode is entered within 30 minutes of user inactivity, and the display is turned off within 15 minutes of user inactivity.
The default power management settings on this PC are:
- Go into sleep mode within ____15 minutes of inactivity.
- Turn off the display within ____ 5 minutes of inactivity.
Move the mouse or press any key on the XSLATE R12 Companion keyboard to wake this computer from Sleep mode.
To learn more about effective power management for computers and the financial savings potential, energy savings potential, and environmental benefits, please visit www.energystar.gov/powermanagement.
To learn more about how your organization can benefit by reducing the energy consumption of their IT equipment, please visit the Low Carbon IT Campaign website.
Getting Started
Overview of the XSLATE R12 Tablet
The following photos show the buttons, slots and ports on the XSLATE R12 Tablet PC.
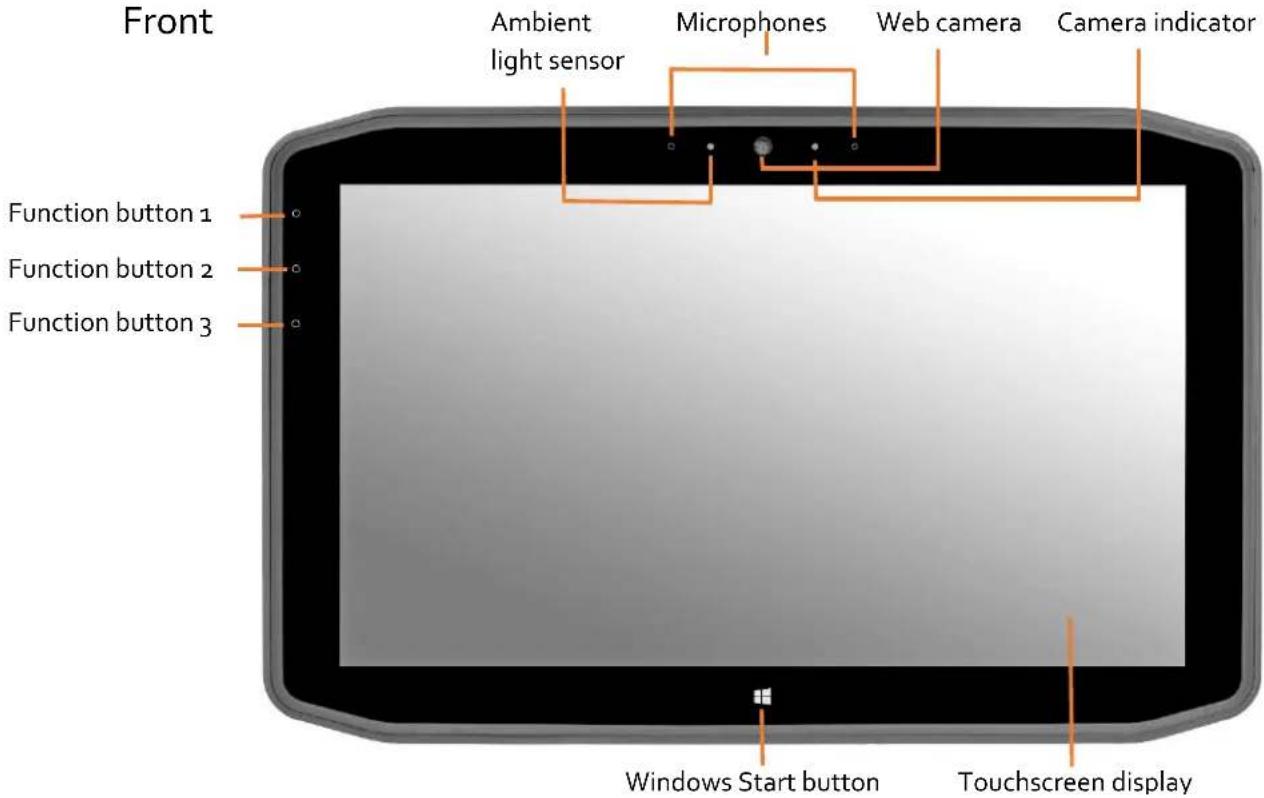
| Function button 1 | Press to display the Tablet Center; press and hold for Windows® Journal. |
| Function button 2 | Press this button for the xCapture ProTM application. Press and hold to display the Pictures directory. |
| Function button 3 | Press for Tablet PC settings or barcode scanner (if equipped with SlateMate). Press and hold for on-screen keyboard. |
| Ambient light sensor | Measures the light in your environment and can automatically adjust the brightness of the display. |
| Microphones | Front array microphones that optimize sound detection for speech recognition and voice recording. |
| Web camera | Interact with people online, stream video, or capture color images with a 2MP web camera. |
| Camera indicator | This light indicates that the web or documentation camera is active. |
| Windows Start button | Opens the Windows Start screen or the Windows desktop. |
| Touchscreen display | Use your finger or pen to access all the functions of the XSLATE R12 display. |
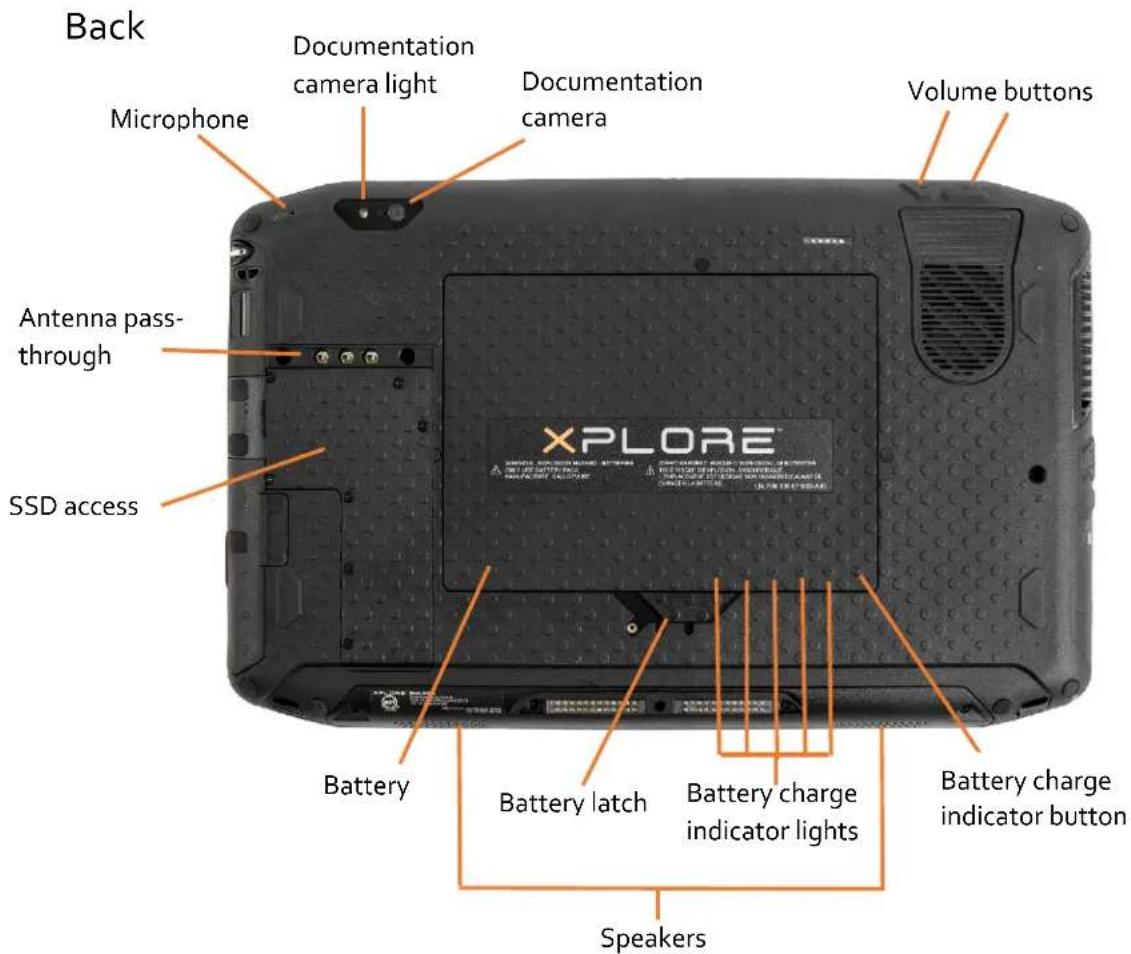
| Microphone | Used for detecting sound when the documentation camera is in use. |
| Documentation camera light | Provides light for the documentation camera. |
| Documentation camera | 8MP autofocus camera that takes photos in BMP, JPG, and TIFF formats. |
| Volume buttons | Use to adjust volume up or down. |
| Battery | Powers the tablet when it is not plugged in or docked. |
| Battery latch | Releases the battery. |
| Battery charge indicator lights | Indicate the level of battery charge. |
| Battery charge indicator button | Press to view charge indicator lights. |
| Speakers | Use for listening to audio. |
| Antenna pass-through | Use to connect to an external antenna |
| SSD access | Provides access to the SSD |
Back with Battery Removed
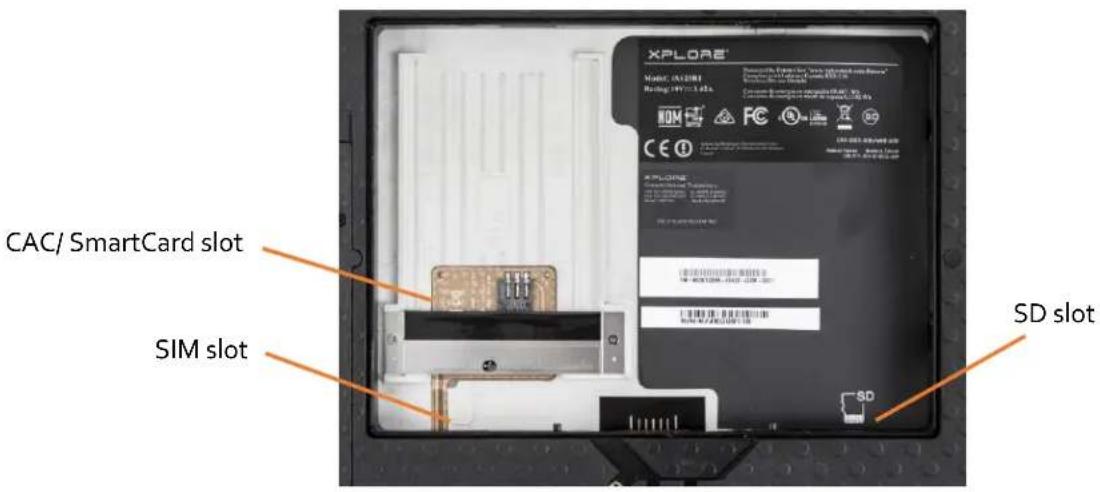
| CAC/ SmartCard slot | CAC (Common Access Card) / SmartCard |
| SIM slot | Required for some mobile broadband networks. If required, your cellular network carrier provides the SIM card. Contacts inserted facing down. |
| SD slot | Use with an SD memory card. Contacts inserted facing up. |
Right Side

| Power adapter port | Connect the power adapter. |
| Audio in/out port | Supports external stereo speakers, a stereo headset, or a stereo headset with microphone using standard TRS or TRRS 3.5 mm plug. |
| USB 3.0 port | Connect a USB device. |
| HDMI port | Connect digital audio/video devices. |
| Expansion input port | Port used to connect the Y cable (sold separately) |
| Fingerprint reader | Scan your fingerprints for added security. |
| Pen bay | Store the pen when not in use. |
| Pen tether anchor | Loop a pen tether through this attach point to keep your pen with the tablet. |
Left Side
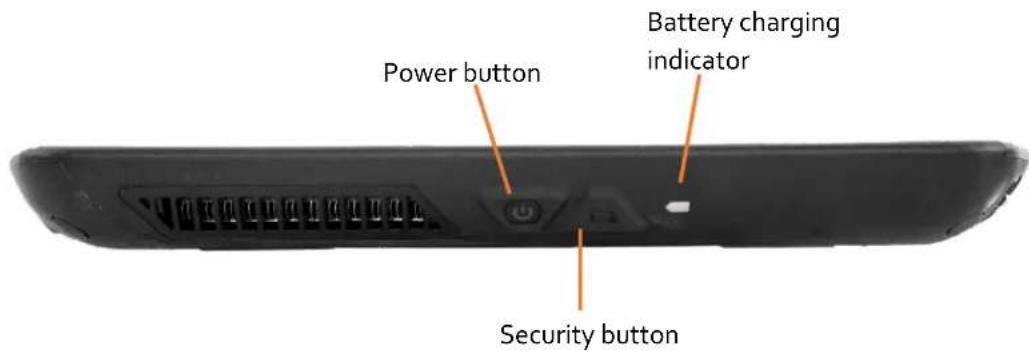
| Power button | Turns the tablet on and off. |
| Security button | Use to log on to or lock the tablet. Equivalent to Ctrl+Alt+Del on a keyboard. |
| Battery charging indicator | This light indicates the battery charging status: green for fully charged, amber for low or charging. |
Pen
The XSLATE R12 Tablet PC supports touch with your finger or the included R12-Series digitizer pen.
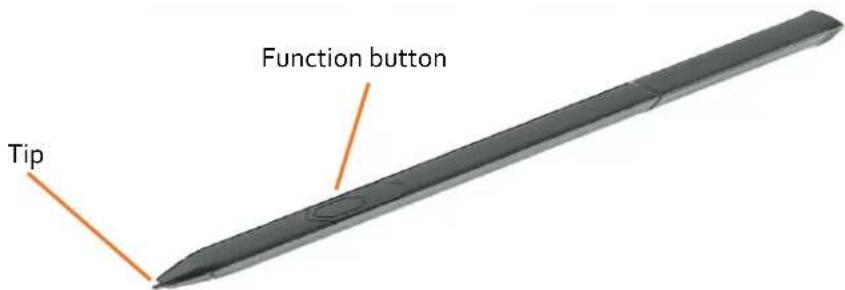
NOTE: Additional pens can be purchased on the Xplore website. Accessories
NOTE: This guide assumes the user has working knowledge of the various Windows® Operating Systems.
Starting Your XSLATE R12 Tablet
This section is for powering and setting up your tablet.
Powering Up the Tablet
- Plug the provided power adapter and cord into the port. (Only use an Xplore approved power adapter. (P/N 0432-03JR0MC) Do NOT use any other adapter because it may cause intermittent contact and not charge correctly.)
Power adapter port

- Check to ensure that the battery charging indicator is amber to indicate that the battery is charging.
- Keep the tablet on AC power until the battery is fully charged. (Indicatory will turn green.) You can use the tablet while it is charging, but fully charge it before unplugging.
- Press and release the Power button on the left side to turn it on.
Locking and Unlocking Your Tablet
Locking the Tablet
- Press the Security button 📄 on the left side of the tablet and a menu display.
- If the XSLATE R12 Companion keyboard is attached, you can also, press Ctrl+Alt+Del.
- Tap Lock.
Unlocking the Tablet
- Press the Security button or Ctrl+Alt+Del on the XSLATE R12 Companion keyboard
- Enter your password to unlock the tablet, if enabled.
Using Sleep Mode
Use Sleep mode when you will not be using the tablet for a short period of time. It will conserve battery life, but still allow you to quickly resume your work.
Putting the Tablet in Sleep Mode
- Save your files. (Not required, but good business practice.)
- Press and release the Power button. While in Sleep mode, the Power button blinks.
Waking up the Tablet from Sleep Mode
- Press and release the Power button and resume activity.
NOTE: If you have security enabled, you need to unlock the tablet.
Using the Battery
The XSLATE R12 includes a high-capacity Lithium-ion battery that fits into the back of the unit. Battery life varies by configurations, applications in use, utilized features and the operating conditions. Maximum battery capacity decreases with time and use.
DANGER: To avoid personal injury, handle the battery with care. Don't open, puncture, short, or expose it to fire or water. Keep the battery in an environment with ambient temperature of less than 104°F (40°C) . Only use the approved XSLATE R12 AC adapter shipped with your tablet. (P/N 0432-03JR0MC) Do NOT use any other adapter because it may cause intermittent contact and not charge correctly.
Checking Battery Power
The power indicator changes appearance, depending on whether the Tablet is plugged in or running on battery.
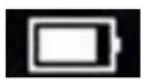
Batter

Battery
Saver
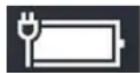
Plugged In
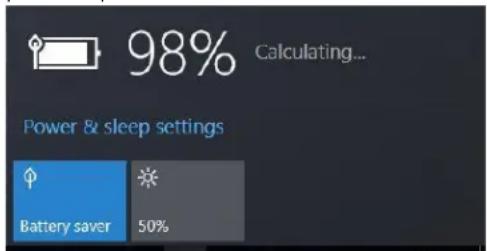
- In the Windows notification area, tap the power indicator to display the remaining charge and power options.
- On the back of the tablet, press the button to the right of the lights to view the charge level.

The five lights on the back of the tablet battery also indicate the current level of charge, from one light (20% charged) to five lights (fully charged). The lights are green when running on battery and they are amber when the tablet is charging.
Removing and replacing the Battery
Before you remove the battery, ensure that the tablet is plugged in, turned off, in Hibernate or Sleep mode. If you are hot-swapping the battery, you can do that while the tablet is on and running on battery power. Hot-swapping refers to changing out the current battery in the tablet with another battery while the tablet is still on and not plugged into AC power. You have one minute to replace the battery before the system goes into Sleep mode.
Removing the Battery
- With the back of the unit facing you, hold and slide the battery latch to the left.
- Insert your finger under the finger grip and lift up to remove the battery from the battery compartment.

Inserting the External Battery
- Place the tabbed end of the battery into the top of the battery compartment.
- Press the battery down until it locks into place. (Battery contacts should be facing you, on the side of the latch.)

Long-term Battery Storage
Don't store any batteries with a full charge, because this can cause a permanent loss of charging capacity. For long-term storage, ensure that the charge level is between 20% and 40% (two contiguous LEDs illuminated), and remove the battery from the tablet. Check stored batteries every 90 days to determine the charge status. If only one LED or no LED is illuminated, recharge the batteries to a level between 20% and 40%.
For optimum care, store the battery in a cool, dry environment. Never expose the battery to temperatures above 60° C ( 140° F)
Note: In storage, the batteries will self-discharge at a rate of 10% of the total capacity per month.
Disposing of Used Batteries
A Lithium-ion (Li-ion) battery should be disposed of at a hazardous materials recycling center when no longer serviceable.
XSLATE R12 Tablet Application
Your tablet includes an Xplore™ application to help you configure your XSLATE® R12 to fit your needs.
(This document describes how to manage Windows 10 settings. If you are using Windows 7 or Windows 8.1, please reference the R12 user guide with their respective operating system.)
Tablet Center
You can use the Tablet Center to access and configure the most commonly used Windows 10 settings.
Opening the Tablet Center
- Tap on the Start button and scroll down to see the Xplore application icon. (Start button can be found in the bottom left or the Windows Home button in the middle bottom of the tablet.)

- On the Windows 10 Start screen, locate and tap the Tablet Center tile. Xplore Tablet Center Tip: The Tablet Center can be accessed by tapping the Function button 1, if it has not been reprogrammed.
The Tablet Center is organized into categories in the left pane. The pane to the right displays information about your tablet and gives you access to the settings.

You can view and set the following configuration options in the Tablet Center application. The four highlighted rectangles on the right panel are selectable.
| Pen and Touch | Provides access to Windows® Pen and Touch configuration options. |
| Tablet PC Settings | Use these settings to configure your display, button actions, and set left and right handed options. |
| Wireless Settings | Allows you to view, configure and connect to available wireless networks. |
| Advanced | Allows you to view all system information for your Tablet. |
Adjusting Pen Options
- To change pen settings, tap Pen and Touch.
- Select the Pen Option tab.
Note: You can adjust the Double-tap and the Press and Hold settings, but no the Single-click.
- Tap Double-tap or Press and Hold.
- Tap the Settings button and use the form that appears to adjust the settings.
Adjusting Touch
- To change touch actions, tap Pen and Touch.
- Select the Touch tab.
- Tap Double-tap or Press and Hold.
- Tap the Settings button and use the form that appears to adjust the settings.
Configuring the Tablet PC Settings
Setting up the Display
You can set up the display for pen or touch. You can do this for multiple screens.
- Open the Tablet Center.

- In the Tablet Center form with right pane.
Tablet
highlighted in the left pane, tap Tablet PC Settings in the The Tablet Settings form opens.
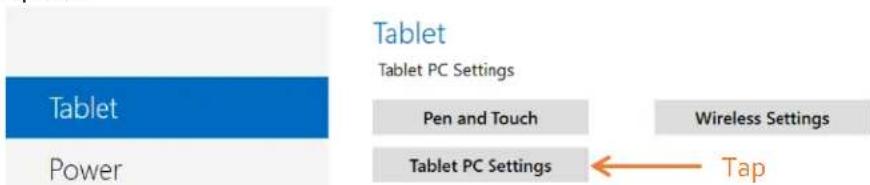
- Make sure the Display tab is selected. (The Display tab is default.)
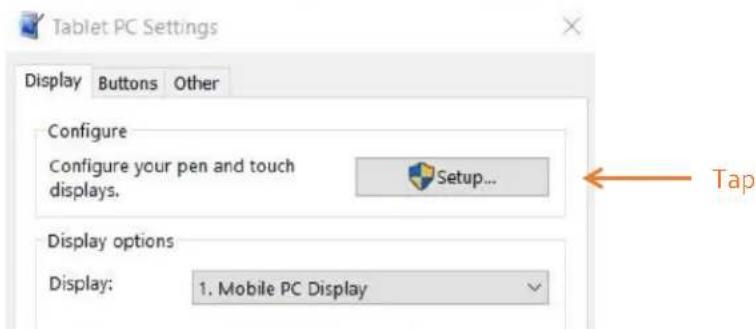
- Tap Setup next to Configure your pen and touch displays.
This setting is useful for assigning pen or touch to the appropriate display when one or more displays are connected to the tablet.
A form asks you which type of screen you want to configure. (For example, If you have an external monitor that you use with touch, whereas you use the pen on the tablet.)
- Tap Pen Input or Touch Input, depending on the type of input you want to use on the display as follows:
a) If you select Pen Input, then the next step asks you to tap the screen with the pen to identify it as the pen input screen.
b) If you select Touch Input, then the next step asks you to tap the screen with the pen to identify it as the touchscreen.
- Click OK in the Display tab or choose another option from the form.
Setting the Display Options
- In the Display tab, you can configure display options (for your screen). Select the available displays from the list in the Display options field.
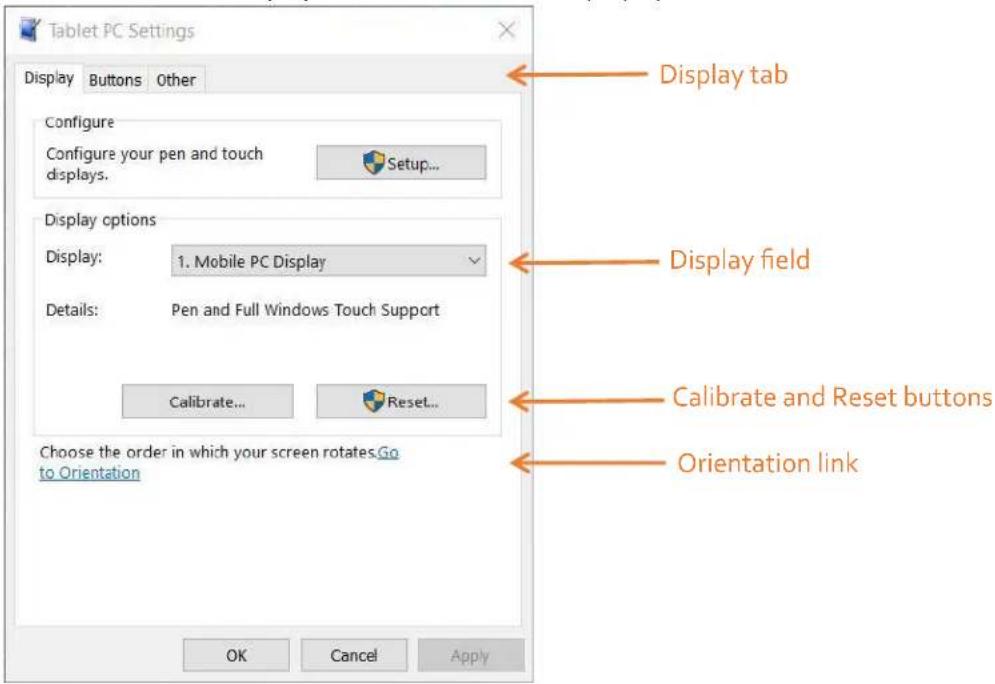
- Tap to Calibrate button to configure touch and pen input options, or tap Reset to reset the options to the default settings.
- To adjust the screen orientation sequence setting tap the Go to Orientation like and choose the order in which your screen rotates.
a) Choose the preferences from the lists.
b) Click OK to confirm them and return to the Display tab of the Tablet PC Settings.
Configuring the Tablet Functions Buttons
You can configure the three function buttons on the front of the tablet. Each has two functions.

-
Open the Tablet Center.
-
In the Tablet Center form with in the right pane.
Tablet
highlighted in the left pane, tap
Tablet PC Settings
The Tablet PC Settings form opens.
- In the Tablet PC Settings form, tap the Buttons tab.

Use this tab to configure the Functions buttons.
- Select the primary or secondary orientation for which you want to change the button settings from the Button settings for drop-down list.
Tip: You can configure different button setting for different orientations.
- Select the button to change.
The currently selected button is shown in red on the form.
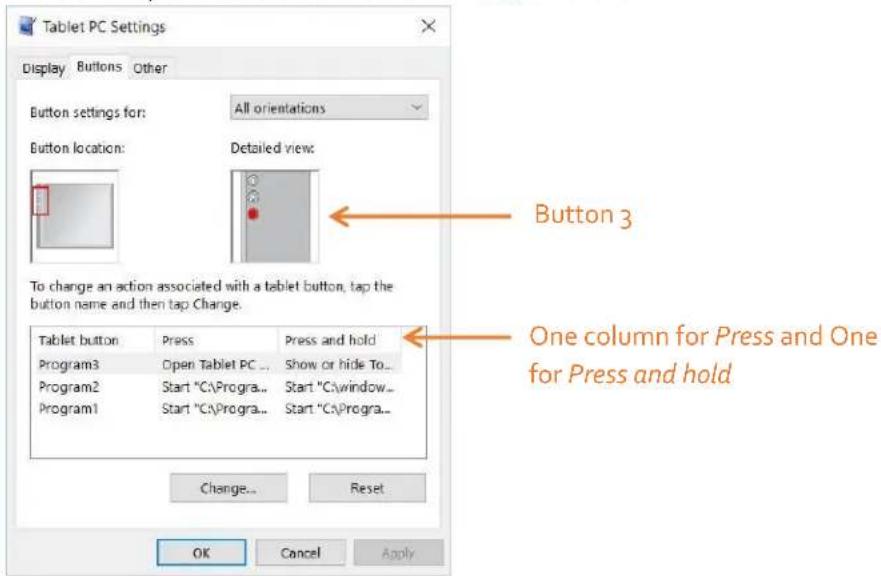
-
Tap Change.
-
Select the appropriate action for the button.
- For some actions, you must enter more information, such as the location of the program to start. You can select an action for Press and another for Press and Hold.
- Click OK to confirm the changes you have made.
- To reset the buttons to their default values, tap the Reset button on the Buttons tab.
- Click OK to close the Buttons form when you are done.
Configuring the Menus for Left or Right Handed
Use the Other tab to choose the hand you use for your tablet.
- To select the left-or right-handed option, tap the Other tab in the Tablet PC Settings window.

-
Select right-handed or left-handed.
-
Click OK.
Setting up Wireless Connections
The wireless settings in the Tablet Center provide you with access to the Windows® Networks menu, where you can view and connect to available mobile broadband, and Wi-Fi® networks. You can also turn Airplane mode on or off in this menu, which disables all wireless communication on the Tablet PC
Connection to a Wi-Fi Network
- Open the Tablet Center.

- Tap Wireless Settings.
Wireless Settings
The Windows Network & Internet form opens.
The list of available wireless networks displayed in the Wi-Fi pane on the right.

- Tap your network.
a. To use this network on a regular basis, select Connect automatically.
b. Tap the Connect button and enter the network security key when prompted.
Temporarily Switching Off Wireless Devices
Check with your airline for exact rules on using your Tablet PC and Wi-Fi while traveling. If required, you can disable all of your wireless devices using the Tablet Center.

- To turn off the wireless devices in your tablet, open the Tablet Center.
- Tap Wireless Settings on the Tablet screen.
- In the left pane, tap Airplane mode.
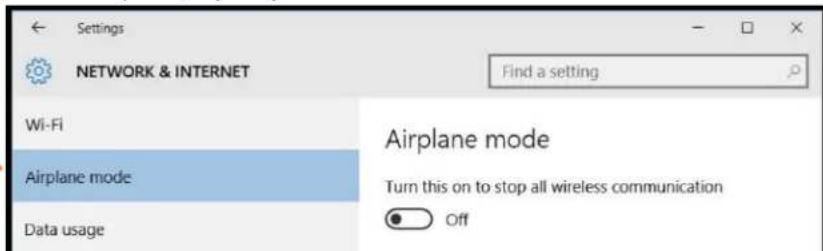
- In the right pane, turn On Airplane mode.
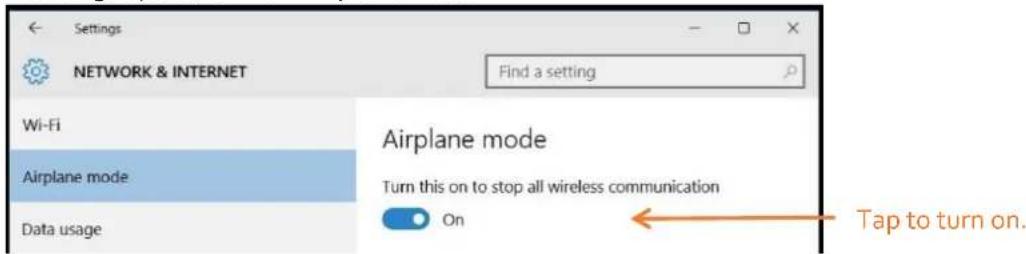
When the switch is On, the wireless devices are turned off.
- Turn Airplane mode Off to resume the use of wireless devices on your tablet.
Connecting to a Mobile Broadband Network
Important: Before you can connect to a mobile broadband network, you must have an active account with a cellular network provided and a SIM card in your tablet for mobile broadband access.
Inserting a SIM Card
- Ensure your tablet is turned off.
- Remove the battery.
- Insert a SIM card into the SIM card slot in the battery bay. Ensure that the contacts are facing down.

Setting Up Mobile Broadband
Turn on the Tablet and the SIM card will be detected according to your cellular provider.
- Open the Tablet Center.

- Tap Wireless Settings.
Wireless Settings
The Windows Network & Internet menu opens.
- Tap Cellular in the left pane if it is not already highlighted.

- Tap your mobile broadband provider.

-
If you want to connect automatically in the future, select the Connect automatically check box.
-
Tap Connect.
-
If prompted, enter the access point name (APN) or access string, the user name, and the password. (You can find these in the information that came with the device or with your mobile broadband service.) You should now have access to the internet.
Tip: To view options and settings for the mobile broadband network, press and hold your pen or your finger on the network name until a square appears. Select from the pop-up menu.
Advanced Information
You can view system information by using the Advanced settings tab in the Tablet Center.
System Information lists categories in the left pane and details about each category in the right pane. The categories include:
- System Summary
Displays general information about your computer and the operating system, such as the computer name and the manufacturer, the type of basic input/output system (BIOS) your computer uses, and the amount of memory that is installed.
- Hardware Resources
Displays advanced details about your computer hardware and is intended for IT professionals.
- Components
Displays information about disk drives, sound devices, modems, and other components installed on your computer.
- Software Environment
Displays information about drivers, network connections, and other program-related details.
Power Settings
Use the Power pane for these tasks:
- Turn off power for unused devices or features to extend battery life.
- Choose a power plan.
- Change how the power button functions when on battery power or when plugged in.
- Advanced settings to customize a power plan for your Tablet PC.
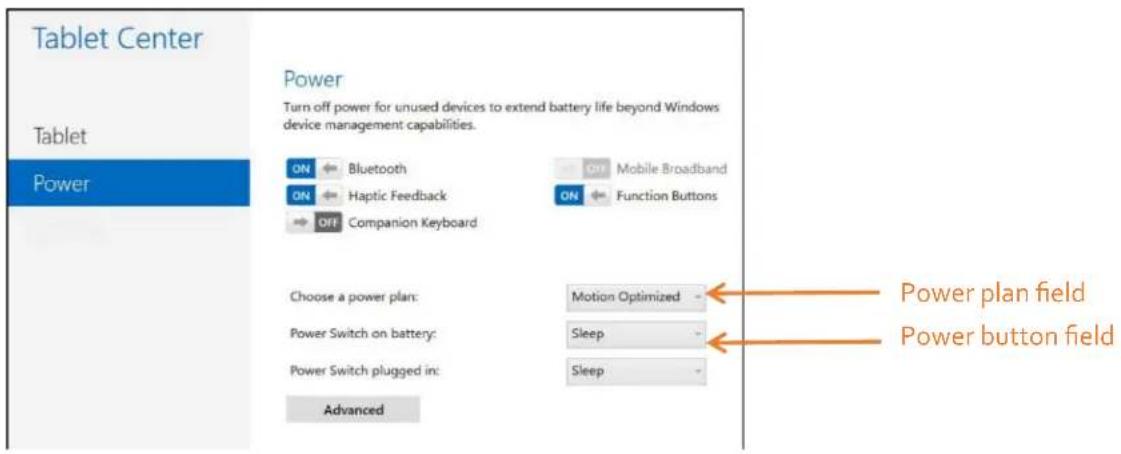
Changing the Power Plan
In the Power pane of the Tablet Center, tap the drop-down menu besides Choose a power plan and select the power plan you want.
- Setting the power plan to Power Saver reduces the performance of the tablet while saving power.
• There are other power plans to choose from as shown on the Power menu.
When you press and release the power button, the tablet can go into one of the following modes:
- Sleep –The tablet pauses all activity immediately and quickly resumes when awakened. This saves power when you are away from your tablet for a short time. However, you will lose unsaved data if there's a power failure.
- Hibernate –The tablet saves the contents of memory to the drive and shuts down. Press the power button to restore the desktop exactly as you left it.
- Shut down – The tablet shuts down. Pressing the power button reboots the tablet.
By default, the tablet goes to sleep when you press and release the power button. To wake up your tablet, press and release the power button again. You can put the tablet in Hibernate mode or shut it down completely from the Start menu.
You can change how the power button behaves when it is pressed either to hibernate or to shut down the tablet. You can set the behavior individually, depending on whether the tablet is running on battery or plugged in.
Changing What Happens When the Power Button Is Pressed
- Tap the drop-down menu beside the Power switch on battery and select the action the power button performs when your Tablet is on battery power.
- Tap the drop-down menu beside the Power switch plugged in and select the action the power button performs when your Tablet is plugged into AC power.
Configuring Advanced Power Settings
The Advanced settings in the Tablet Center's Power screen provide you with access to Windows Power Options menu, where you can create your own power plan, customize the power plan for the tablet, adjust the screen brightness, set a password on wake-up, choose when to turn off the display, and change when the Tablet PC sleeps. You can also turn off these functions: XSLATE R12 Companion keyboard, Bluetooth, mobile broadband, and function buttons on the tablet.
- In the Tablet Center, tap the Power category in the left pane, tap Advanced in the right pane.

The Power menu options are displayed.
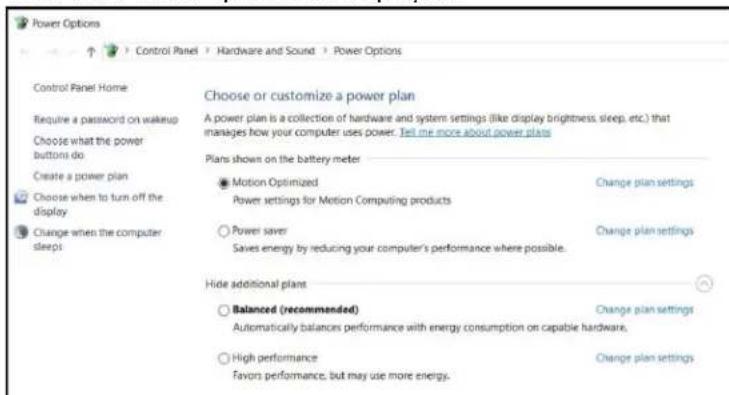
- Choose or customize a power plan, or select a task from the left pane for more settings.
Compass
The on-screen compass displays the direction of the magnetic north pole relative to the orientation of the tablet. Additionally, the compass accuracy status is displayed; if the compass needs to be calibrated, you will see a notification alerting you to calibrate the compass. To calibrate the compass, tap Calibrate Compass and follow the on-screen instructions.
Location Services
Location Services provides information about the current position of the tablet—latitude, longitude,
heading, and accuracy. Accuracy provides two pieces of information: the number shown gives an approximate radius of accuracy in meters. For example, "55.0m" means that the position shown is accurate within 55 meters. Adjacent to that number, in parentheses, is a phrase that defines the source of the current position fix. This source will be one of the following:
- Cellular
- Satellite
• Wi-Fi - IP Address
- Unknown
Showing the Map
When you tap Show Map, Internet Explorer opens and you see the location of your Tablet in Bing Maps.
NOTE: You need an active Internet connection to view current map data.
Entering Text by Keyboard
You can use different methods to enter text with your tablet. You can use an on-screen touch keyboard or the handwriting panel. There are several keyboards in Windows 10.
Using the Windows On-screen Keyboards
- To open the default on-screen keyboard, choose one of these actions:
a. Tap in a text field or other area where you can type.
b. Tap the Keyboard icon in the Windows notification area of the taskbar.
The default on-screen keyboard appears.
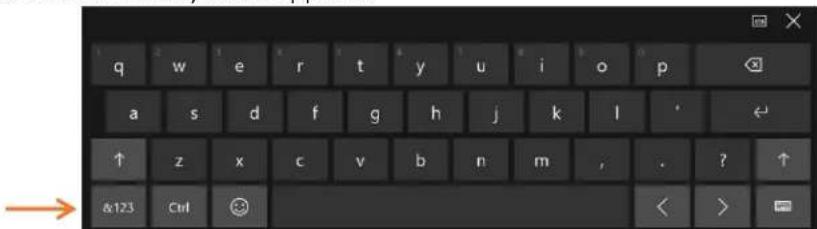
- Tap the &123 key in the lower left corner of the default keyboard, to switch to the keyboard that includes the numbers keypad, punctuation, and symbols.

- You can access a second numeric symbol keyboard by tapping the keys on the left side.
Tap these keys to switch between the two numeric and symbol keyboards.

![Tab • € £ μ ½ 1 2 3 < [ ] { } 4 5 6 = | | 11 " - ^ 7 8 9 &123 Ctrl < > Space 0 .](/content/2026/05/881817/images/054cae01de1cae2615df7f7323f190b14b4b37008097ea2c8c1154bf14849536.jpg)
- To switch back to the default keyboard (alphabetic), tap the &123 key.
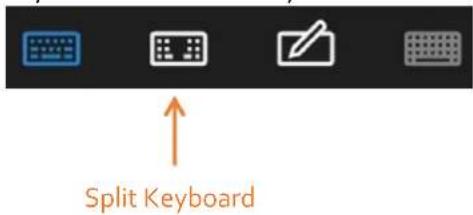
- When you have a keyboard on the screen, you can tap the keyboard icon in the lower right corner of that keyboard to display a menu for switching to different keyboards and also for language preferences.
- You can also switch to a split keyboard that lets you view the center of the screen. Tap the split keyboard icon on the Keyboard Preference menu.
Making a Keyboard Appear When Tapping in a Text Field
To make an on-screen keyboard pop up when you tap in a text field, follow this procedure.
- Tap Settings in the Start menu, or swipe left from the right edge of the screen and tap All Settings.
- Tap on Devices icon.

- In the Devices menu, tap Typing.

- In the Typing menu, scroll to the end of the right pane.
- Turn the last button to ON.
Show the touch keyboard or handwriting panel when not in tablet mode and there's no keyboard attached

On
Now when you tap in the text entry field, a keyboard will appear automatically.
Accessing the Full On-screen Keyboard
There is also a keyboard that has more keys like an external keyboard. To activate this keyboard, follow these steps:
- Swipe left from the right edge of the screen and tap All Settings.
- Tap Ease of Access on the Settings menu.
- Tap Keyboard in the left pane.
- Tap to activate the on-screen keyboard.

The full on-screen keyboard appears.
![Home PgUp Nav Tab q w e r t y u i o p [ ] Del End PgOn MyUp Caps a s d f g h j k l : Enter Insert Pause My On Shift z x c v b n m < > ? / Shift Print Scr Ctrl Fn Ctrl Alt Alt Ctrl < ✓ > Options Help Fade](/content/2026/05/881817/images/687b877f2ce9ddbbe005a9993b1cb8674657d7e7154b00ea6048965ea6d5549c.jpg)
After Displaying This Keyboard
- To minimize this keyboard but keep it available during your session, tap the Minimize button in the upper right of the keyboard.
- To reopen it after you minimize it, tap its icon, in the taskbar to bring it up again.
- To close it, tap the Close button, X.
Keeping the Icon on the Taskbar
To make the icon permanently available, do the following steps:
- When the icon is on the taskbar, press and hold the icon (right-click of a mouse).
- Select Pin to taskbar.
The full keyboard icon stays on the taskbar even after you shut down the tablet.
Entering Text by Handwriting
In addition to keyboards, you can enter text by writing with the tablet pen on the handwriting panel.
- In the lower right corner of the keyboard, tap the Keyboard icon to change the keyboard.
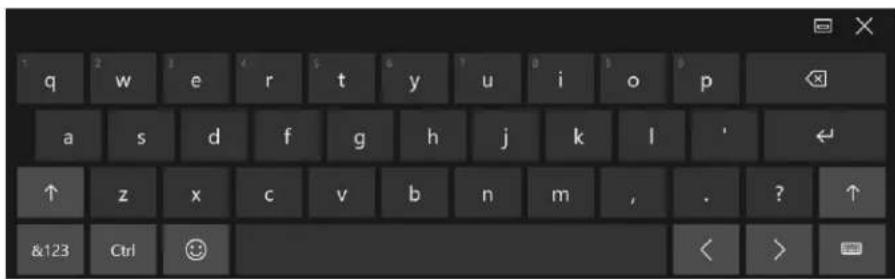
The Keyboard Preference menu appears and you can choose a keyboard or set a language preferences for language-specific keyboards.


Use the pen to begin writing in the handwriting panel. Your handwriting is converted to text.
Tip: The more you write, the more accurately Windows software detects your handwriting style.
Using the Cameras
Your R12 tablet includes both web and documentation cameras.
The Web Camera
The web camera on the front of your tablet is a 2 MP camera that supports color images and streaming video. You can use the web camera for web-based video communication applications.
The Documentation Camera
You can use the 8 MP documentation camera on the back of the tablet to take pictures in BMP, JPG, and TIFF formats.
Camera Software
The R12 includes the xCapture Pro™ application that lets you shoot, save, edit, email, print and copy your photos with both cameras. Please reference the xCapture Pro™ user guide at the following location: xCapture_UG_Book_EN.pdf
Using the Fingerprint Reader
You can use the fingerprint reader to log into the Tablet by scanning your fingerprint instead of entering a password. This feature provides an additional level of security for the tablet.
Note: You need to have a password for logging into your system before setup.
Creating a PIN
To use the fingerprint reader, you need to create a PIN.
- Swipe left from the right edge of the screen and tap All Settings.
- Tap Accounts.
- In the left pane, tap Sign-in options.
- In the right pane of the Sign-in options, under Pin, tap Add.
- Enter your PIN and tap OK. (The PIN is user created.)
Setting Up the Fingerprint Reader
After you have a PIN, the Windows Hello section of the Sign-in options is enabled.
- In the Windows Hello section under Fingerprint, tap Set up.
- Tap Get Started.
- Enter you PIN.
- Scan your finger on the fingerprint reader a few times. The message provides instructions.
- Tap Close.
Next time you log in, you can use your PIN or use your finger on the reader.
Fingerprint Reader Tips
- Be consistent. Hold your finger and scan at the same angle each time.
- The scanner is bidirectional. You can move your finger from right to left or left to right.
- Wait for prompt before you swipe.
- Swiping too quickly or too slowly can make a capture unsuccessful.
- When scanning, press hard enough to fully contact the sensor.
- Rub your fingers together to stimulate the natural skin oils so your fingerprint is easier to detect.
Using the SlateMate Module (Optional)
The XSLATE R12-Series SlateMate® option is factory-installed module consisting of a barcode scanner (BCS), high-frequency RFID ready (HF RFID), and a serial port. Two configurations are available.
• 3-in-1 module (BCS, HF RFID Reader, and Serial Port)
• 2-in-1 module (HF RFID Reader, and Serial Port)

Barcode Scanner
The R12 barcode scanner supports several different types of barcodes.
The following barcode symbologies are enabled by default:
| Aztec | UPC-A |
| Code 128 | UPC-E |
| GS1-128 | EAN-8 |
| Code 39 | EAN-13 |
| Interleaved 2 of 5 | PDF417 |
| Micro PDF417 | QR Code |
The EasySet software is loaded on the system if you purchased the barcode scanner.
Using the Barcode Scanner
- In the tablet, open the application software that is going to receive the barcode data and put the insertion point in the appropriate field of that software.
-
Aim the scanner lens at the barcode.
-
Press and release Function button 3. Ensure that the scan beam covers the entire barcode. (The best scans are typically from six to seven inches from the barcode.)

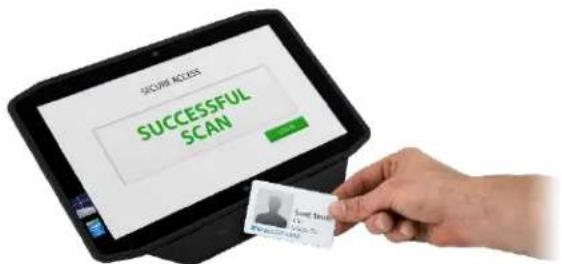
If the scan is successful, the data appears in the application and you hear the confirmation beep.
Using the RFID Reader
-
Open the Xplore RFID Demo (MCRIFD.exe) utility or the RFID scanning application installed by you system administrator.
-
Hold the RFID tag and ensure that the tag is 1-1.5 inches (25-40mm) from the RFID antenna scan area.
-
If you are using the Xplore RFID Demo utility, tap Refresh UID and Tag Data. If you are using another application, please use according to the documentation.
The Tablet will beep to indicate a successful scan.
Configuring Bluetooth for use with XSLATE R12 Companion Keyboard (Optional)
You need to use Bluetooth ® to connect to the XSLATE R12 Companion keyboard and other Bluetooth enabled devices.
Managing Bluetooth Devices
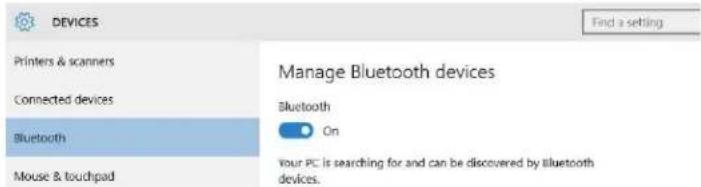
- Swipe in from the right side of the screen and tap All Settings.

You can also tap the Windows Start button and tap Settings.

- Tap the Devices icon.

Devices
- Tap Bluetooth in the left pane.
-
Tap the Bluetooth slider to turn it On.
-
As your tablet discovers the Bluetooth devices that are turned on, you can tap them and tap Pair to begin the pairing process.
-
To make sure that your tablet is visible to other devices, scroll down to the bottom of the pane and tap More Bluetooth options.
-
Check the box called Allow Bluetooth devices to find this PC.
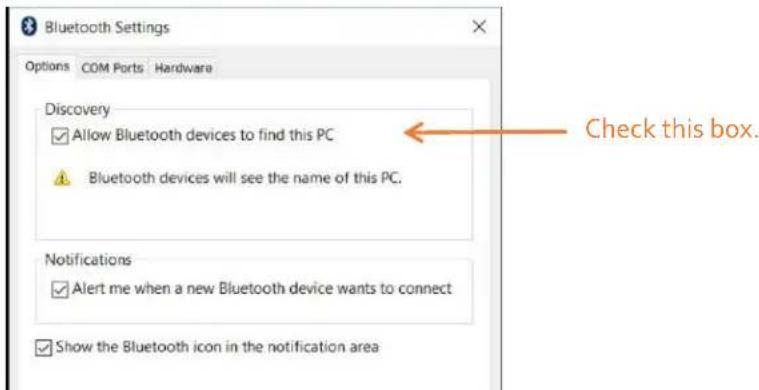
- Click OK.
Installing the Y-Cable (Optional)
You can purchase a Y-Cable that provides a RS232 True Serial Port and RJ45 Gigabit Ethernet Port.
Accessories
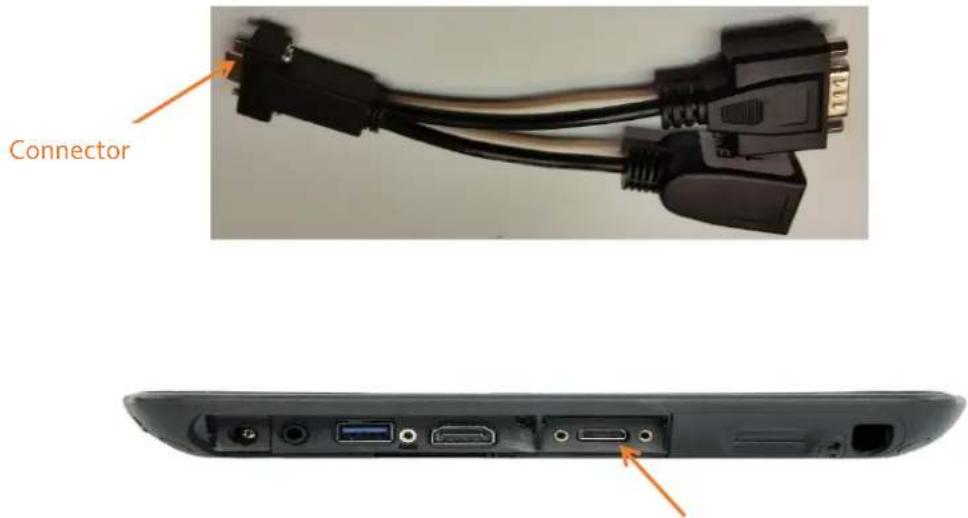
Perform the following steps to install the Y-Cable:
Expansion input port
- Remove the two screws and the cover to the Expansion input port.
- Align the connector to the Expansion input port and plug in.
- Secure the Y-Cable with the two screws that are provided with the cable.
Locating the Serial Number
You can locate the serial number for your R12 in these places:
- White label underneath the battery, which is located on the back of the tablet. The number begins with "S/N."
- Tablet Center – Select the Tablet panel. The serial number is listed in the System Serial Number field.
- Windows Start menu—right-click (press and hold) the Windows Start icon on the taskbar, lift your finger, and tap System. The system window appears. The serial number is part of the model field and is designated by S/N.
- BIOS setup utility.
Caring for Your XSLATE R12
Proper care and maintenance will keep your XSLATE R12 Tablet PC working and in good condition.
WARNING: Follow the guidelines listed below when caring for your XSLATE R12 Tablet PC and its components. Improper use can damage the Tablet PC and its components and void the warranty.
General Care
- Protect the Tablet PC from exposure to extreme temperatures, shock, liquids, and strong magnetic fields.
- Do not place heavy objects on top of the Tablet PC.
- If you're storing the tablet for a long time, unplug the power adapter and remove the battery after partially discharging it.
- You can open the SSD compartment, but do not open the complete case. Opening the case will void your warranty.
Caring for the Display
Following these suggestions to keep your display clean:
• Clean fingerprints and smudges from the display surface by wiping it with the cloth provided.
- If liquid is spilled on the display, wipe it up immediately with a soft cloth like the one provided with the tablet.
- Use only the R12 pen or your finger to write on the display. Any other object could damage the display surface.
- Protect the display surface from unnecessary contact by using a case when transporting the Tablet PC.
- Cover the display with a protective display film. You can also purchase protective display films as well as protective cases from the Accessories page.
- Avoid exposing the display to direct sunlight for long periods of time.
Caring for the Pen
If you use a digitizer pen with your tablet:
- Store the digitizer pen in the pen holder when not in use.
- Avoid storing the pen vertically on its tip. It can damage the pen-to-digitizer function.
- Keep the pen away from any liquid because the pen contains electronic components that could be damaged when wet.
- In certain environments, particles or debris can stick to the pen tip or the Tablet PC display. Make sure you wipe off the pen with a soft cloth to avoid scratching the display.
- If you'll be working in harsher environments, we recommend that you purchase the Rugged Digitizer Pen for your XSLATE R12, which is available for purchase from the Accessories page.
- Change the tips regularly, especially if you drop the pen onto a rough surface that could damage the tip or embed debris in it. Damaged pen tips can scratch the display.
Replacing the Pen Tip
Pen tips eventually wear down or get damaged, so the pen includes extra tips and a tool for replacing them.
Typically, change the pen tip every 90 days. If you use the pen in a dirty or dusty environment, change the pen tip every 30 days. Particles can become embedded in the pen tip and scratch the display.
- Grasp the old tip with the replacement tool. Use the notch on the ring to grab the tip.
- Pull the old tip out of the pen.
- Insert a new tip by placing the flat end of the pen tip in first.
- Apply slight pressure to push the tip into place.
Cleaning the Fingerprint Reader
Under normal circumstances, you should clean the fingerprint reader once a month, or whenever necessary.
To clean the fingerprint reader, gently rub the sensor surface with the cloth that is included with the tablet or any microfiber cloth.
WARNING: Don't use bleach, solvents, or abrasives. Don't spray or pour any liquid directly on the sensor.
Caring for the Tablet Battery
To maximize the performance of the battery, condition the battery once a month. To condition it, run the tablet on battery power until the battery's charge level drops below 20%. Then use AC power until it is fully charged.
Troubleshooting
XSLATE R12 Tablet PCs are thoroughly tested for performance and quality, but occasionally issues can still occur. If you don't find the information you're looking for in this section, go to Xplore Support.
NOTE: Enterprise users should contact their support organization for assistance with resolving tablet, application, or connectivity issues.
Power Issues
The tablet does not shut down.
An application might have stopped responding. Use the Task Manager to manually stop the application.
- Press the Security button on the left side of the tablet frame.
- Select the application that isn't responding.
- Tap End task.
Shutting down the tablet
You can also press and hold the power button for five seconds to force the tablet to shut down. However, this isn't recommended. Use it as a last resort.
If the tablet does not shut down after holding the power switch for five seconds, follow this procedure.
- Unplug the power adapter.
- Remove the battery.
- Press the Volume+, Power, and Security buttons simultaneously.
- Replace the battery and restart the Tablet PC.
The Tablet will not enter Hibernate mode.
Hibernate mode might not be enabled. Enable hibernation by adjusting the power button behavior from the Tablet Center.
The Tablet does not return from Hibernate mode while on battery power.
The battery might be depleted. Plug the Tablet PCs power adapter into an AC outlet and into the Tablet PC.
The power button is blinking but nothing is happening.
The tablet is in Sleep mode. Press the Power button to wake up the tablet.
- To power off the tablet completely, you can press and hold the power button for about five seconds. However, this isn't recommended.
- To power off the tablet under normal conditions, press the Windows Start button.tap Power, and select Shut down.
The display goes black while the Tablet PC is still turned on.
The possibilities include:
- The tablet might have turned off the display to save power. To restore the display, tap the screen with your finger or the pen.
- The tablet might have gone into Sleep mode. Press and hold the Power button for about one second.
- The tablet might have gone into low-battery Hibernation mode. In Hibernation mode, the power status light is off. Plug the tablet in to AC power, then press and hold the power button for about one second.
Battery Issues
The battery doesn't last very long (less than four hours).
- Hot or cold conditions can adversely affect the battery charge. Use AC power if you are operating the tablet in these conditions.
- Accessory devices such as a DVD player and applications can drain the battery more quickly. Remove the accessory devices or use AC power if possible.
You can use the Tablet Center to enable the Power Saver Plan.
- Open the Tablet Center.
- Tap Power.
- Select Power Saver from the list of the power plan choices.
Other Tips for Batteries
- Condition the battery once a month by using the tablet on battery power and allowing the battery charge to drop below 20% before connecting the battery to AC power.
- The battery might be weakening. Use a different battery if possible.
Display Issues
When I disconnect an external monitor, the desktop area is larger than the Tablet PC display.
The tablet might have expanded the desktop beyond the display area of the Tablet PC display when it was connected to the external monitor.

- Tap Search next to the Start button
- In the Search field, enter Projector
- Select Project to a second screen from the list of the search results.
- Select the PC screen only option.
The display resolution might not match the native resolution of the LCD screen. You can use other display resolutions, but you get the best display quality when the display resolution matches the native resolution of the screen.
For more information on setting screen resolution:
- Tap Search next to the Start button.
- In the Search field, enter Change resolution
- Tap Change the screen resolution.
The display is too dim.
The display brightness might be set too low. Use the Tablet Center to brighten the display.
- Open the Tablet Center.
- Tap Power.
- Tap Advanced.
- Move the brightness slider to the desired level.
The display is unreadable or distorted.
The screen resolution and color quality might not be set correctly. Use Windows Display Properties to reset the display settings.
- Open the Control Panel by pressing and holding (right-clicking) the Windows Start button and selecting Control Panel from the pop-up list.
- Tap Appearance and Personalization.
- Tap Adjust screen resolution under Display.
- Change the resolution until the display appears normal. The display driver might have been removed or became corrupted.
- Click OK.
Use the Windows Device Manager to reinstall the driver.
- Tap Search next to the Start button.
- In the search field, enter driver
- Select Update device drivers from the search results.
- In the Device Manager window, expand Display adapters.
- Select the device.
- Press and hold (right-click) and tap Update Driver Software.
- Follow the on-screen instructions.
Touch or Pen Issues
The Tablet PC doesn't respond to the pen I am using.
- Use only the XSLATE R12-Series pen with the tablet or the Rugged Digitizer pen on the Accessories site. The Tablet PC might not respond to other digitizer pens.
When I add an external display, touch input doesn't appear on the display.
Configuring touch settings on the display.
- Open the Tablet Center and highlight Tablet on the left pane.
- Tap Tablet PC Settings.
- Tap the Display tab.
- Tap Setup next to Configure your pen and touch displays.
- Tap Pen input or Touch input, depending upon the type of input you want to use on the display.
- Follow the on-screen instructions.
The pen function button does not work
- You might not be pressing the button early enough. Try pressing and holding the pen function button before you touch the pen to the display surface.
The pen function button might be disabled.
- To enable it, open the Tablet Center.
- Tap Pen and Touch.
- Tap the Pen Options tab.
- Select the check box besides Use the Pen button as a right-click equivalent.
The pointer on the screen does not align with the pen.
The pen might need calibration.
- Open the Tablet Center.
- Tap Tablet PC Settings.
- Tap the Display tab.
- Tap the Setup beside Configure your pen and touch displays.
- Tap Pen Input.
- Follow the on-screen instructions.
Port and Connector Issues
The tablet does not recognize a USB device.
- Windows might take a short time to recognize the USB device. Wait a few moments to see if the device is recognized.
- The device might not be connected properly. Check the connection and make sure that it is inserted properly into the USB port.
- The correct driver might not be included with Windows 10. Check the manufacturer's web site for a current driver.
The R12 is in its dock, but the tablet does not recognize any accessory devices.
- The R12 Tablet PC might not be fully seated in the dock. Remove it from the dock and then seat it in the dock again.
Network Issues
The wireless adapter keeps connecting even when not desired.
Disable the desired wireless adapter from the Tablet Center.
- Open the Tablet Center.
- Tap the Wireless Settings button in the Tablet Center. The Windows Network & Internet menu opens.
- Tap the wireless network you want to disable and tap Disconnect.
I cannot connect to a wired Ethernet network.
To connect to an Ethernet network, your R12 must be connected to an XSLATE R12-Series Docking Station. The Ethernet port for the R12 is on the back of the dock.
- The connection might be loose. Remove the Ethernet cable and reconnect it.
- The Ethernet network might be experiencing problems. Check with someone near you to determine if he or she has network access.
- Replace the Ethernet cable.
Wi-Fi Issues
Your R12 might not have located a Wi-Fi network.
- Open the Tablet Center and tap Wireless Settings.
- Make sure that the switch for Wi-Fi is On.
- Select the network that you want from the list of available networks.
- You might not have access to the network. Obtain a user name and password from a network administrator.
- The security settings in your tablet might prevent a connection. For example, the network might not be broadcasting the network name (SSID) or encryption might be required. Check with your system administrator.
Bluetooth Issues
I cannot connect to a Bluetooth device.
Make sure that Bluetooth power is on.
- Open the Tablet Center, and tap Power in the left pane
- Make sure that the switch beside Bluetooth is On.
Power is now on for Bluetooth connections.
Bluetooth - Close the Tablet Center.

Make sure that your tablet is discoverable by other Bluetooth devices.
- Swipe in from the right side of the screen and tap All Settings.
- Tap the Devices tile in the Settings menu.
- Tap Bluetooth in the left pane of the screen.
- Make sure that the Bluetooth switch is On.
- Check to see if you can now connect.
Make sure that the other device is discoverable.

Note: Your Bluetooth device might be out of range. The Bluetooth devices are designed for short-range communication and can connect at distances up to 33 feet (10 meters). Also check the battery charge level on the device.
No other Bluetooth device can detect the R12 tablet.
Make sure that your R12 is visible to Bluetooth devices by using the Bluetooth Settings form.
Shortcut: If you have a Bluetooth icon on your taskbar, you can press and hold it and then tap Open Settings to access the Bluetooth Settings form.
- To make your Tablet PC visible to other devices, tap the Windows Start button in the lower left of the screen.
-
Tap Settings on the Start menu.
-
Tap Devices on the Settings menu.
- Tap Bluetooth in the left pane
- At the bottom of the right pane, tap More Bluetooth options.
- Turn on the check box labeled Allow Bluetooth devices to find this PC.

Bluetooth Wireless Tips
Xplore Technologies® and its Bluetooth® partners have worked to ensure a positive experience with this technology and to ensure Bluetooth interoperability. In doing so, we have found the following issues:
- Interference
If you're running Bluetooth and Wi-Fi® at the same time, interference can affect the Bluetooth performance. This is most noticeable if:
- You try to transfer large amounts of data, such as with file transfers.
-Several Bluetooth devices are operating in an office simultaneously.
- Speech Recognition
Bluetooth audio has not been fully developed for speech recognition. Therefore, for speech recognition, we recommend that you not use a Bluetooth wireless headset.
- Disconnection
Some Bluetooth devices disconnect when they go into power-saving mode. Most devices automatically reconnect when they become active again.
- Incompatible drivers
If you attempt to install other wireless headset or other audio drivers, such as Bluetooth or USB, over the Tablet PC audio drivers, a malfunction of the Tablet PC audio system might occur, because the drivers might not be compatible.
- Interoperability
If you are having issues with interoperability of Bluetooth devices, contact the manufacturer of your Bluetooth device and check its compatibility with the Bluetooth software installed on your Tablet PC.
- Security
Bluetooth devices use a passkey to create a secure connection between the Tablet PC and the Bluetooth device. Although the passkey exchange helps to secure your data, Bluetooth wireless technology shouldn't be considered completely secure.
Audio Issues
No sound is coming from the built-in or external speakers.
- Ensure that nothing is connected to the audio in/out port. Connecting headphones or external speakers disables the built-in speaker.
- The volume might be set too low or muted. Swipe in from the right, tap the speaker icon, and adjust the volume setting. You can also use the volume buttons on top of the Tablet PC to turn the volume up or down.
- The integrated audio components might have been overwritten. If you install a third-party audio device (such as a USB or Bluetooth device), the integrated audio might stop working. If this happens, reinstall the audio drivers. After you install these, if you still have issues with audio, contact your system administrator or service provider.
System Issues
The tablet seems to be operating slower than usual.
- Reboot the tablet.
- The hard drive might be full or nearly full. You can free up space on your drive. Type disk cleanup in the search field and then select Free up disk space on this PC from the search results.
- Unlike a traditional hard disk drive (HDD), a solid state drive (SSD), such as the one installed in the R12, does not perform better with traditional HDD defragmentation. Using traditional defragmentation simply adds unnecessary wear to the SSD. It is recommended that you disable any automatic or scheduled defragmentation utilities on your tablet.
I want to make my tablet run faster.
- Change the Power plan to High Performance from the Tablet Center.
These setting can be accessed from the Power screen. In the Choose a power plan field, choose High Performance. - Adjust your Windows performance settings. Type performance in the search field and then select Adjust the appearance and performance of Windows.
XSLATE R12 Spec Sheet Information
PROCESSOR / CACHE
- Intel Core i7-7500U
- i7-7500U, 2.7 GHz with turbo frequency to 3.5 GHz, 4 MB SmartCache, 2 cores (4 threads)
- Intel Core i5-6200U
- 15-6200U, 2.3GHz with turbo frequency to 2.8 GHz, 3MB SmartCache, 2 cores (4 threads)
OPERATING SYSTEM
- Windows® 10 64-bit
- Windows® 8.1 Pro 64-bit
○ Available on i5-6200U only - Windows® 7 Professional 64-bit
○ Available on i5-6200U only
DURABILITY
- MIL-STD-810G tested
○ Multiple 4' Drops
• Class I Division 2 for Hazardous Locations - IP54 (Water, dust and splash resistant)
- Corning® Gorilla® Glass 4
• Magnesium-alloy internal frame - Rubberized enclosure
DISPLAY
• 12.5" Wide Viewing Angle Display
• Full-HD Resolution (1920 x 1080)
• 800 Nit Display Brightness
• Anti-Smudge + Anti-Reflective View Anywhere Display
• Capacitive 10-Point Touch
• Wacom Digital Pen Input
• Intel Display Power Saving Technology (DPST)
- Ambient Light Sensor
GRAPHICS
• Intel HD Graphics 520
AUDIO CONTROLLER
- Intel® High Definition Audio
• Realtek® HD Codec
SYSTEM MEMORY
• 8 GB DDR4 2100 MHz SDRAM memory
SYSTEM STORAGE
• 128 GB SSD
• 256 GB SSD
- 512 GB SSD
INTEGRATED COMMUNICATIONS
- Intel® Dual Band Wireless-AC 8260 Wi-Fi plus Bluetooth® 4.2
- Optional Internal Wireless (1 expansion slot)
- Sierra Wireless EM7455 (NA and EU) 4G LTE with GNSS (GPS + GLONASS + Beidou) or
- Sierra Wireless EM7430 (APAC) 4G LTE with GNSS (GPS + GLONASS + Beidou) or
- Navisys Technology GE-730/u-blox 7 GPS with SBAS (WAAS, EGNOS and MSAS)
AUDIO
• RealTek noise cancellation
• Multi-directional array microphone
- 3 microphones (2 front facing array mic's and 1 rear facing mic)
• 2 Integrated speakers
I/O PORTS
- Docking connector
- USB 3.0 port
- 3mm Audio I/O jack
- HDMI port
- Micro-SD Card Slot
• Micro-SIM Card Slot (3FF) - Optional RS232 True Serial Port via Dongle
- Optional RJ45 Gigabit Ethernet Port via Dongle
EMBEDDED I/O
• 8.o Megapixel camera (rear-facing)
• 2.0 Megapixel camera (front-facing)
- Optional 1D/2D Barcode Reader via SlateMate®
- Optional 13.56 HF RFID with read/write capability via SlateMate®
• 9 Axis MEMS sensor (Accelerometer, eCompass, Gyroscope)
SECURITY
• Integrated Fingerprint Reader
• TCG Trusted Platform Module (TPM) 2.0
- Optional Integrated CAC / Smart Card Reader
DIMENSIONS
• 12.93" × 8.17" × .75" (328.5 mm × 207.5 mm × 19 mm)
WEIGHT
• 2.9 lbs. (1.34 kg)
BATTERY
- Battery life over 9 hours
- Hot swappable Lithium Ion Standard battery with 45 WHr capacity
BATTERY CHARGE TIME
• 2.5 hours (Tablet PC on/off)
POWER SUPPLY
- Input Voltage: 19V with AC Adapter
- 5.5 mm x 1.7 mm barrel jack
WARRANTY
• 3-year standard coverage included
- Extended Warranty & xDefend Programs Available. Please Contact Sales or Visit Warranties for Further Information.
STANDARDS
- ACPI 5.0 compliant
- UEFI BIOS
SOFTWARE
• xCapture Pro™ by Xplore® Camera App
- RFID Sample Reader
- Barcode Reader
• Xplore Dashboard (Windows 7)
- Know Your Tablet (Windows 8.1)
- Pen and Touch Enabled BIOS Setup
- Infineon TPM 2.0
• Xplore Tablet Center (Windows 8.1)
• Microsoft Office - Trial Version (Windows 10)
ENVIRONMENTAL
- Tested to MIL-STD-810G Standards
- Operating Temperature: -10 °C to 55 °C / 14 °F to 131 °F
- Storage Temperature: -30 °C to 70 °C / -22 °F to 158 °F
- Transit Drop - Operating: 4' (1.22 M) Drop Direct to Plywood over Concrete while System is Operating, 26 Drops
- Vibration: Minimum Integrity Non-operating, US Highway Truck and Composite Wheel Operating
- Shock: 20G Operating, 40G Non-Operating
• Humidity: 23 °C to 60 °C / 73 °F to 140 °F, 95% Non-Condensing, 10 Days
• Water Proofness: Fig 506.5, 140L/hr, per sq/m, 15 Minutes - Wind Driven Rain: Fig 506.5, 40 MPH Wind, 30 Minutes Per Side
- Blowing Sand: 20M/S, rate 1.1g/m3 (+/-.3g) at High Temperature of 60 °C
- Blowing Dust: Velocity 8.9M/s Dust Concentration 3.9 g/m 3 at High Temperature of 60 °C
• Temperature Shock: -30 °C to 70 °C / -22 °F to 158 °F within 15 Minutes - Contamination by Fluids: 50/50 Solution of Water and Bleach, 50/50 Solution of Water and Hydrogen Peroxide, Diesel Fuel, Mineral Based Oil, Lysol Disinfectant, Denatured Alcohol, Isopropyl Alcohol
- Altitude: 40,000 ft. (12,192 M) Operating, 50,000 ft. (15,240m) Non-Operating
IEC INGRESS TESTING
• IEC (60529) Ingress Tested to an IP54 Standard
REGULATORY
THIS INFORMATION TECHNOLOGY EQUIPMENT IS SUITABLE FOR USE IN CLASS I, DIVISION 2, GROUPS C, AND D T5 OR NON-HAZARDOUS LOCATIONS ONLY; AVERTISSEMENT - CET ÉQUIPMENT INFORMATIQUE CONVIENT À UNE UTILISATION AUX EMPLACEMENTS DE CLASSE I, DIVISION 2, GROUPES A, B, C, ET D T5 OU AUX EMPLACEMENTS NON DANGEREUX SEULEMENT.
Hazardous location minimum and maximum temperatures, -20°C to 40°C .
PRODUCT SAFETY
• UL/CSA 60950-1, 2nd Ed.
- IEC/EN 60950-1:
• AS/NZS 60950-1, 2nd ED.
• LVD Directive 2014/35/EU
• NOM 019
• ANSI/ISA 12.12.01 (Hazardous Location)
SAR
• FCC OET 65 Supplement C
• CAN/CSA RSS-102
- ESTA EN50392
ENVIRONMENT
• California Proposition 65
• California Energy Commission, Battery Charging Systems
• RoHS 2 Directive 2011/65/EU
• WEEE Directive 2012/19/EU
• Battery Waste Directive 2013/56/EU
• EN 62623:2013 (ErP Lot 3 / Lot 26)
• NMX -1-122-NYCE-2006 (Mexico Energy Consumption)
EMC
• EMC Directive 2014/30/EU
• FCC Part 15 B, Class B
• CAN/CSA ICES -003, Class B
• EN55022 (CISPR 22), Class B
- EN55024 (CISPR 24)
- EN61000-3-2
- EN61000-3-3

- IMPORTANT INFORMATION
- ENERGY STAR®
- GETTING STARTED
- OVERVIEW OF THE XSLATE R12 TABLET
- LEFT SIDE
- PEN
- STARTING YOUR XSLATE R12 TABLET
- POWERING UP THE TABLET
- LOCKING AND UNLOCKING YOUR TABLET
- LOCKING THE TABLET
- UNLOCKING THE TABLET
- USING SLEEP MODE
- PUTTING THE TABLET IN SLEEP MODE
- WAKING UP THE TABLET FROM SLEEP MODE
- USING THE BATTERY
- CHECKING BATTERY POWER
- REMOVING AND REPLACING THE BATTERY
- REMOVING THE BATTERY
- INSERTING THE EXTERNAL BATTERY
- LONG-TERM BATTERY STORAGE
- DISPOSING OF USED BATTERIES
- XSLATE R12 TABLET APPLICATION
- TABLET CENTER
- OPENING THE TABLET CENTER
- ADJUSTING PEN OPTIONS
- ADJUSTING TOUCH
- CONFIGURING THE TABLET PC SETTINGS
- SETTING UP THE DISPLAY
- SETTING THE DISPLAY OPTIONS
- CONFIGURING THE TABLET FUNCTIONS BUTTONS
- CONFIGURING THE MENUS FOR LEFT OR RIGHT HANDED
- SETTING UP WIRELESS CONNECTIONS
- CONNECTION TO A WI-FI NETWORK
- TEMPORARILY SWITCHING OFF WIRELESS DEVICES
- CONNECTING TO A MOBILE BROADBAND NETWORK
- INSERTING A SIM CARD
- SETTING UP MOBILE BROADBAND
- ADVANCED INFORMATION
- POWER SETTINGS
- CHANGING THE POWER PLAN
- CHANGING WHAT HAPPENS WHEN THE POWER BUTTON IS PRESSED
- CONFIGURING ADVANCED POWER SETTINGS
- COMPASS
- LOCATION SERVICES
- SHOWING THE MAP
- ENTERING TEXT BY KEYBOARD
- USING THE WINDOWS ON-SCREEN KEYBOARDS
- 4 5 6
- MAKING A KEYBOARD APPEAR WHEN TAPPING IN A TEXT FIELD
- ACCESSING THE FULL ON-SCREEN KEYBOARD
- AFTER DISPLAYING THIS KEYBOARD
- KEEPING THE ICON ON THE TASKBAR
- ENTERING TEXT BY HANDWRITING
- USING THE CAMERAS
- THE WEB CAMERA
- THE DOCUMENTATION CAMERA
- CAMERA SOFTWARE
- USING THE FINGERPRINT READER
- CREATING A PIN
- SETTING UP THE FINGERPRINT READER
- FINGERPRINT READER TIPS
- USING THE SLATEMATE MODULE (OPTIONAL)
- BARCODE SCANNER
- USING THE BARCODE SCANNER
- USING THE RFID READER
- CONFIGURING BLUETOOTH FOR USE WITH XSLATE R12 COMPANION KEYBOARD (OPTIONAL)
- MANAGING BLUETOOTH DEVICES
- INSTALLING THE Y-CABLE (OPTIONAL)
- ACCESSORIES
- LOCATING THE SERIAL NUMBER
- CARING FOR YOUR XSLATE R12
- GENERAL CARE
- CARING FOR THE DISPLAY
- CARING FOR THE PEN
- REPLACING THE PEN TIP
- CLEANING THE FINGERPRINT READER
- CARING FOR THE TABLET BATTERY
- TROUBLESHOOTING
- POWER ISSUES
- THE TABLET DOES NOT SHUT DOWN
- SHUTTING DOWN THE TABLET
- THE TABLET WILL NOT ENTER HIBERNATE MODE
- THE TABLET DOES NOT RETURN FROM HIBERNATE MODE WHILE ON BATTERY POWER
- THE POWER BUTTON IS BLINKING BUT NOTHING IS HAPPENING
- THE DISPLAY GOES BLACK WHILE THE TABLET PC IS STILL TURNED ON
- BATTERY ISSUES
- THE BATTERY DOESN'T LAST VERY LONG (LESS THAN FOUR HOURS)
- OTHER TIPS FOR BATTERIES
- DISPLAY ISSUES
- THE DISPLAY IS TOO DIM
- THE DISPLAY IS UNREADABLE OR DISTORTED
- USE THE WINDOWS DEVICE MANAGER TO REINSTALL THE DRIVER
- TOUCH OR PEN ISSUES
- THE TABLET PC DOESN'T RESPOND TO THE PEN I AM USING
- WHEN I ADD AN EXTERNAL DISPLAY, TOUCH INPUT DOESN'T APPEAR ON THE DISPLAY
- THE PEN FUNCTION BUTTON DOES NOT WORK
- PORT AND CONNECTOR ISSUES
- THE TABLET DOES NOT RECOGNIZE A USB DEVICE
- NETWORK ISSUES
- I CANNOT CONNECT TO A WIRED ETHERNET NETWORK
- WI-FI ISSUES
- BLUETOOTH ISSUES
- I CANNOT CONNECT TO A BLUETOOTH DEVICE
- BLUETOOTH WIRELESS TIPS
- INTERFERENCE
- SPEECH RECOGNITION
- DISCONNECTION
- INCOMPATIBLE DRIVERS
- AUDIO ISSUES
- NO SOUND IS COMING FROM THE BUILT-IN OR EXTERNAL SPEAKERS
- SYSTEM ISSUES
- THE TABLET SEEMS TO BE OPERATING SLOWER THAN USUAL
- I WANT TO MAKE MY TABLET RUN FASTER
- XSLATE R12 SPEC SHEET INFORMATION
- PROCESSOR / CACHE
- OPERATING SYSTEM
- DURABILITY
- DISPLAY
- GRAPHICS
- AUDIO CONTROLLER
- SYSTEM MEMORY
- SYSTEM STORAGE
- INTEGRATED COMMUNICATIONS
- AUDIO
- I/O PORTS
- EMBEDDED I/O
- SECURITY
- DIMENSIONS
- WEIGHT
- BATTERY
- BATTERY CHARGE TIME
- POWER SUPPLY
- WARRANTY
- STANDARDS
- SOFTWARE
- ENVIRONMENTAL
- IEC INGRESS TESTING
- REGULATORY
- PRODUCT SAFETY
- SAR
- ENVIRONMENT
- EMC
Brand : Xplore
Model : XSlate R12
Category : Tablet