iX104C5 - Tablet Xplore - Free user manual and instructions
Find the device manual for free iX104C5 Xplore in PDF.


| Product Type | Rugged Tablet |
| Model | iX104C5 |
| Brand | Xplore |
| Display Size | 10.4 inches |
| Display Type | TFT LCD, sunlight readable (1000 nits) |
| Resolution | 1024 x 768 pixels |
| Touchscreen | Capacitive multi-touch, glove mode, optional active stylus |
| Processor | Intel Core i5-7Y57 |
| RAM | 8 GB |
| Storage | 256 GB SSD |
| Operating System | Windows 10 Professional |
| Battery | Hot-swappable Li-Ion, 7.4V, 5000 mAh |
| Weight | Approx. 1.5 kg (3.3 lbs) |
| Dimensions (W x D x H) | 250 x 200 x 25 mm |
| Ingress Protection | IP65 rated (dust-tight, water jets) |
| Drop Spec | 4 feet (1.2 m) to concrete |
| Operating Temperature | -20°C to 60°C |
| Connectivity | WiFi 802.11ac, Bluetooth 4.2, GPS, 4G LTE (optional) |
| Ports | USB 3.0 (x2), HDMI, audio jack, docking connector, microSD card slot |
| Cameras | Front 2 MP, Rear 5 MP with autofocus |
| Security | TPM 2.0, optional fingerprint reader |
| Cleaning Instructions | Clean with a soft, lint-free cloth slightly dampened with water. Do not use solvents or abrasive cleaners. |
| Spare Parts Availability | Batteries, stylus, adapters, and docking stations available from Xplore authorized partners |
| Warranty | Standard 3-year warranty (extendable) |
Frequently Asked Questions - iX104C5 Xplore
User questions about iX104C5 Xplore
0 question about this device. Answer the ones you know or ask your own.
Ask a new question about this device
Download the instructions for your Tablet in PDF format for free! Find your manual iX104C5 - Xplore and take your electronic device back in hand. On this page are published all the documents necessary for the use of your device. iX104C5 by Xplore.
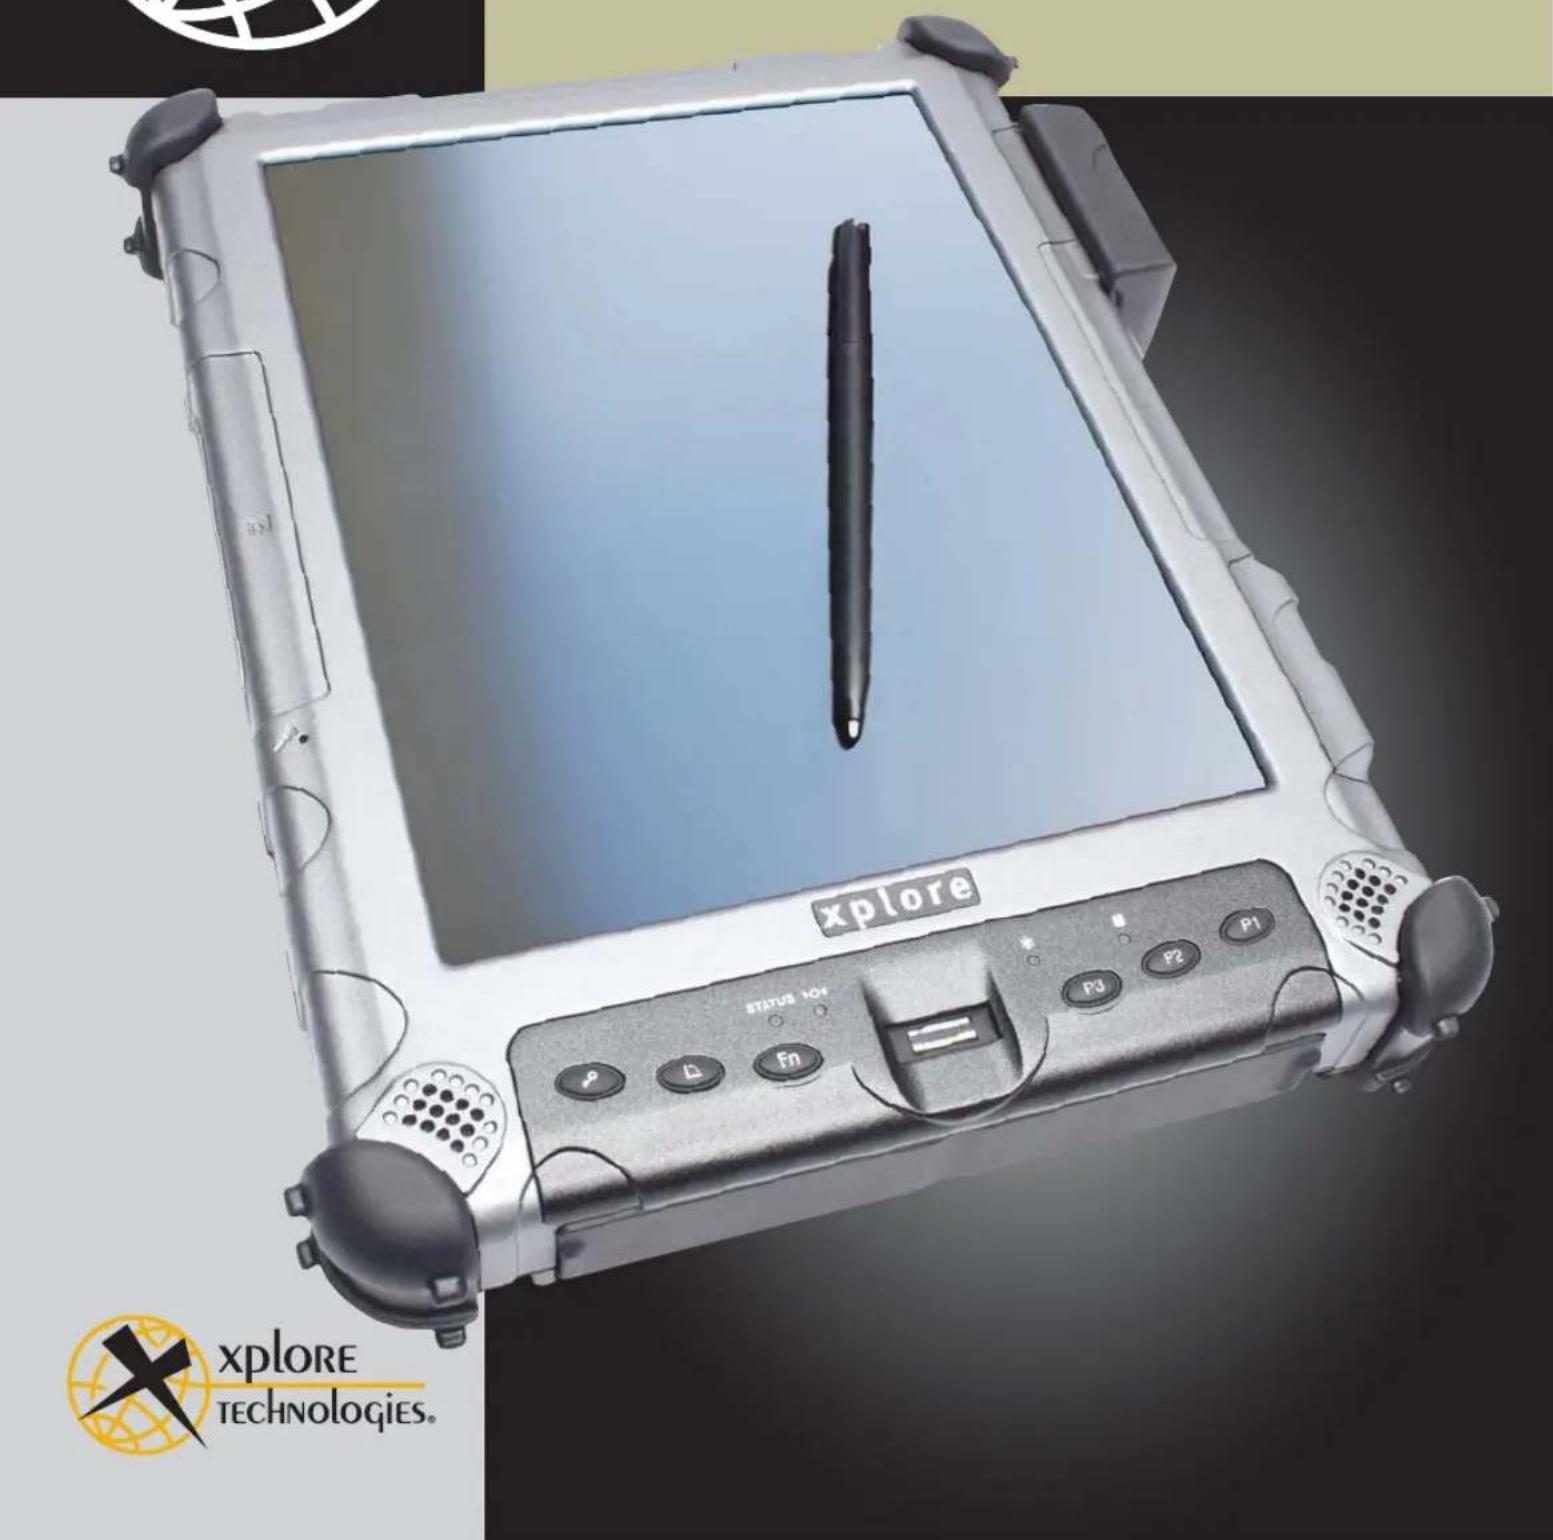
USER MANUAL iX104C5 Xplore
iX104C5 USER'S HANDBOOK

xplore TECHNOLOGIES.
Contents
Welcome 11
About your computer 12
Package contents 13
Optional accessories.... 13
Contacting Xplore - service and questions. 15
1 Getting Started 17
Front view.... 17
Back view 18
Left side view 19
Right side view 20
Bottom view 21
Top view 21
LED indicators 22
Quick-start guide.... 24
Application, Windows, and hot keys 24
2Using the Tablet 27
Turning on the computer.... 27
Turning off the computer 28
Using the Reset switch. 28
Suspending and resuming operation 29
Suspending operation.... 30
Resuming operation 31
Using the pen.... 32
Using the digitizer to perform mouse functions.... 33
Changing the pen double-click speed 33
Positioning the pen and pen tether 34
Using the fingerprint scanner 36
Changing the screen orientation 37
Adjusting the screen brightness.... 38
Enabling automatic backlight control 39
Optimizing screen settings for outdoor use 39
Docking the tablet 40
Connecting devices 41
Connecting to a local area network 41
Connecting USB-compatible devices 41
Connecting an external microphone 42
Adjusting microphone volume 42
Connecting a headphone or speakers 43
Adjusting headphone or speaker volume 43
Connecting a monitor or projection panel (optional).... 44
Activating the monitor or projection panel. 44
Connecting a device to the serial port (standard). 45
Connecting an XPL expansion module 45
Using the battery 46
Charging the battery pack 46
If you do not have an external battery charger 46
If you have an external battery charger 47
Removing and installing the battery 47
Removing the battery 47
Installing the battery 49
Discarding batteries 49
Using power options 50
Displaying power options 50
Checking battery power status.... 50
Selecting a power plan 51
Selecting power options 52
Selecting Power (On/Off)/Backlight(On/Off)/Sleep/Resume button options. 53
Tips for conserving battery power 54
Accessing the Solid State Drive (SSD) cartridge 55
Re-installing the drive carrier 56
Accessing the MicroSD and SIM compartment 57
Programming hot keys 58
Programming hot keys to start applications, open documents, or go to a website 59
Programming hot keys to perform pre-defined functions 63
Programming hot keys to perform other key functions 65
3Maintaining the Tablet 69
Caring for the tablet. 69
Checking power cords and connectors.... 69
Protecting the computer from damage.... 69
Preventing the computer from overheating 70
Storing the computer 71
Caring for the display screen 71
Protecting the display screen 71
When to replace the pen 72
Calibrating the digitizer. 73
ATroubleshooting 75
BUsing BIOS and AOS Functions 77
Disabling the Auto Power feature.... 78
Enabling automatic LCD backlight control 78
CGlossary 79
Xplore Technologies ® has made every effort to ensure the accuracy and completeness of this document; however, because ongoing development efforts are made to continually improve the capabilities of our products, we cannot guarantee the accuracy of the contents of this document. We disclaim liability for errors, omissions, or future changes herein.
Trademarks
Xplore and the Xplore logo are registered trademarks of Xplore Technologies Corp.; iX104, iX104C5, iX104C5 Lite, and iX104C5 Dual Mode are trademarks of Xplore Technologies Corp. Kensington and MicroSaver are registered trademarks of the Kensington Technology Group. Microsoft is a registered trademark of Microsoft Corporation. Windows 7, Windows XP Professional, and Windows XP Tablet PC Edition are trademarks of Microsoft Corporation. MicroSD is registered trademark of the Personal Computer Memory Card International Association. Intel and iCore, are registered trademarks of Intel Corporation. Wi-Fi is a trademark of the Wireless Ethernet Compatibility Alliance (WECA). ISODAMP is a registered trademark of Aearo Company.
All other brands, product names, company names, trademarks and service marks used herein are property of their respective companies.
Copyright
Copyright © 2003-2011 Xplore Technologies Corp. All rights reserved. No part of this publication may be copied, reproduced, or translated, without the prior written consent of Xplore Technologies. No part of this publication may be stored or transmitted in any electronic form without the prior consent of Xplore Technologies. Any unauthorized use is a violation of copyright laws.
Publication information
PN: 95-01097, Rev. A January 2011
Declaration of conformity
DECLARATION OF CONFORMITY according to FCC Part 15, IC ICES-003, and RTT&E directives
Responsible Party Name: Xplore Technologies Corp.
Address: 14000 Summit Drive, Suite 900, Austin, Texas 78728
Telephone: 512.336.7797
Declares that product: Model Series: iX104C5 complies with Part 15 of the FCC Rules.
This device complies with Part 15 of the FCC rules. Operation is subject to the following two conditions: (1) This device may not cause harmful interference, and, (2) This device must accept any interference received, including interference that may cause undesired operation.
WARNING
Changes or modifications to this unit not expressly approved by the party responsible for compliance may void the user's authority to operate this equipment.
For more information about FCC rules and their applicability to the iX104, see Appendix E, “Agency Notices.”
Warranty information
The iX104C5 is backed by a standard 36-month International Limited Warranty. An extended International Limited Warranty is available. Check the service kit included with your computer for warranty terms and conditions.
Important safety information
Before you use the iX104C5 (referred to as the tablet), read these safety instructions and the operation instructions in this handbook.
Failure to observe all these instructions voids the Limited Warranty and may lead to suspension or denial of services to the offender, or legal action, or both.
Follow any special regulations governing the use of the tablet and, if radio-enabled, always switch it off in areas where radio devices are forbidden or when the radio device can cause interference or danger.
Always follow any safety laws and regulations pertaining to the use of cell phones and two-way radios, because these laws and regulations typically apply to the use of the wireless-enabled tablet.
Observe all restrictions on the use of radio equipment in fuel depots (fuel storage and distribution areas), chemical plants, and wherever blasting operations are in progress or in any area in which restrictions on radio transmissions are imposed.
Switch off the tablet when in an aircraft. The tablet is not FAA-approved for use on aircraft. The effect of the use of the tablet in aircraft is unknown. Using the tablet in an aircraft may affect aircraft instrumentation, communication, and performance; may disrupt the network; and may be illegal.
Operating the wireless-enabled tablet may interfere with the functioning of inadequately protected medical devices such as pacemakers. Consult a physician or the manufacturer of the medical device if you have any questions.
Radio signals from your tablet will not affect the operation of most modern equipment, but certain electronic equipment, including automotive systems, may not be shielded against radio signals from your tablet. Check with the manufacturer of your motor vehicle or the manufacturer's representative to determine whether using the tablet will present any safety issues.
Avoid using the tablet in any environment that requires your full attention, such as when driving a vehicle. If you need to use your tablet while driving, have a passenger use it for you or find a safe location to halt your vehicle.

WARNING
Use only battery types specified in this handbook. Using any other type of battery can be dangerous and can disable the tablet.

WARNING
When operating the tablet in a known explosive environment do not remove or replace the battery while the circuit is live. Before removing the battery verify that the area is known to be free of ignitable concentrations of flammable substances.

WARNING
Do not use any dock or any other accessory or attachment that is not manufactured or supplied by Xplore or an authorized Xplore accessories supplier. Use of any accessory or attachment that is not supplied or approved for use with the tablet by Xplore is not permitted because it may cause hazards.
Operate the tablet only from the type of power source indicated on the marking label. (See page 46 for more information about the battery and power supply.) Route power supply cords so that they are not likely to be walked on or pinched by items placed upon or against them. Pay particular attention to cords at plugs and convenience receptacles, and at the point where cords exit from the tablet or its dock. Do not overload wall outlets, extension cords, or integral convenience receptacles because this can cause fire or electric shock.
Unplug the tablet and refer the tablet and dock for service to qualified service personnel if any of the following conditions occur:
■The power supply cord or plug is damaged.
■ The tablet or dock does not operate normally when you follow the instructions in this book.
■ The tablet or dock exhibits a distinct change in performance.
Adjust only controls for which there are instructions in this book. An improper adjustment of other controls can result in damage and may require extensive work by a qualified technician to restore the tablet or dock to normal operation.

CAUTION
Avoid prolonged physical contact with the exposed metal surfaces on the front and back of the tablet. While the tablet may not feel hot to the touch, if you maintain physical contact with the tablet for a long time (for example, if you rest the tablet on your lap for a long time), your skin may suffer low-heat injury. In addition, be careful when you remove a PC card that has been used for a long time, because the card may be hot.
Welcome
Welcome to the Xplore Technologies® iX104C5™ tablet PC, the rugged tablet designed, tested, and manufactured to meet the environmental and physical real-world challenges faced by today's mobile workers. Based on years of experience in rugged mobile applications, the iX104C5 is designed to withstand the abuses of everyday wear and tear.
Advanced technology, innovative design, and a rugged case are just a few highlights of your iX104C5 system.

Tablet with enhanced performance antenna
Note: This handbook assumes that you have basic experience using computers and Microsoft® Windows®.
About your computer
The iX104C5 is a high-performance tablet PC that runs on Microsoft Windows 7 32-bit and 64-bit operating systems.
You can use any of the following methods to control the tablet:
■Special, enhanced pen (included with the tablet)
■Your finger
■Any suitable pointing device
Note: In this handbook, all information applies to all models unless otherwise noted.
All iX104C5 tablets have been engineered and tested to meet Military Standards for Environmental Extremes (MIL STD 810G). Your tablet includes the following features that make it exceptionally rugged and durable:
■Durable, long-lasting, rigid magnesium enclosure
■Interior and exterior multi-layer magnesium structure
■Bumper system and gasket protection mechanisms
■Specialized drive technology
■Removable, dual, Solid State Drive (SSD) cartridge
■ Integrated, protected wireless LAN and WAN antennas for dual mode operation
■Locked-in-place memory, cables, and connectors
■Proprietary thermal management system
Package contents
Check to make sure your package includes the following items:
■Quick Start Guide
■Battery pack
■Power cord
■AC adapter
■Pen (attached to tablet)
■Pen tether (attached to tablet)
■iX104C5 tablet PC
■Warranty information kit
■Operating System Recovery Guide
Optional accessories
Your package also includes any optional accessories you ordered.
Docking options
■xStand Desktop Docking Station
■xDock Vehicle Docking Station
Carrying cases
■Shoulder cases
■Portfolio case
■Dockable case
Memory
■2, 4, or 8 GB RAM
■40, 80, or more GB Solid State Drive (SSD)
Power options
■AC adapter with U.S. cord
■Weight-reduced battery pack (56 watt hours)
■Extended life battery pack (68.5 watt hours)
■Auto adapter (cigarette lighter adapter)
Additional accessories
■Top-mounted Fast-Lock GPS II Pro (submeter accuracy)
■Non-rugged USB optical disk drive
■USB rugged, backlit keyboard (83-key)
■Replaceable drive cartridges
■Active stylus
Contacting Xplore – service and questions
Note: To troubleshoot problems (including wireless and GPS problems), before you call, read the FAQ page of the Xplore Technologies Web site. Go to http://www.xploretech.com; then select Customer Support; then FAQ.
If you purchased your tablet from an authorized Xplore dealer, contact the dealer for service and support.
If you purchased your tablet directly from Xplore, use any of the following methods to contact Xplore for service and support:
Web site http://www.xploretech.com
E-mail customersupport@xploretech.com
Toll free 1-866-296-8541, extension 222
Fax 1-512-336-7791
Before you contact Xplore, have the following information ready so that the customer support representative can quickly provide a solution:
Product name: iX104C5
Product serial number
Purchase date
Conditions under which the problem occurred
Any error messages that were displayed
Type of device connected, if any
1 Getting Started
This chapter gives you an overview of your tablet and includes a quick-start guide to tablet keys.
Front view
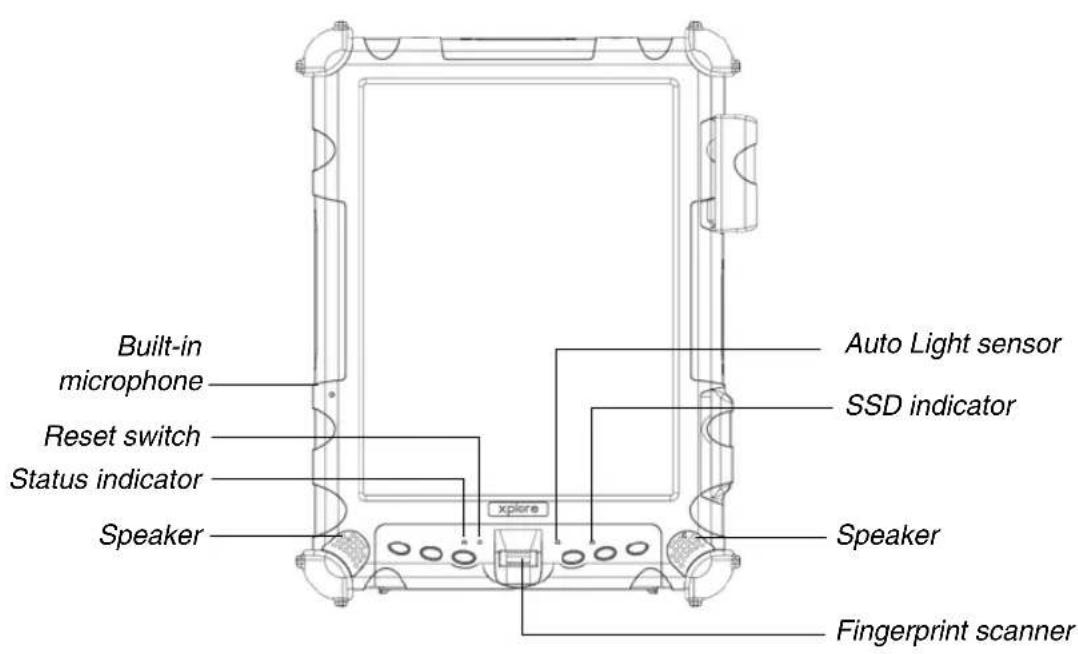
Built-in microphone Enables you to input mono audio with noise cancellation. (See page 42.)
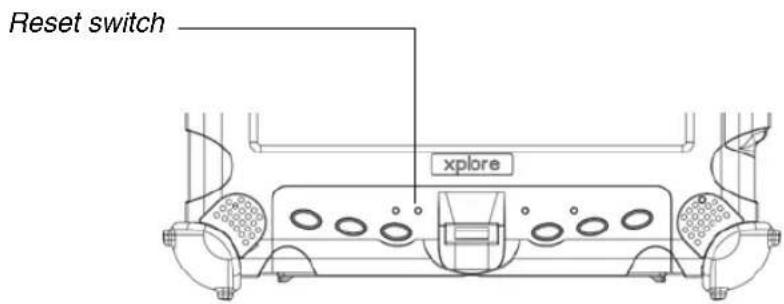
Reset switch Enables you to turn off the computer when using the Power (On/Off)/Backlight (On/Off)/Resume key is not effective. (See page 28.)
Status indicator Indicates the computer status (on, off, etc.). (See page 22.)
Speakers Enable you to listen to stereo audio files. Sealed to provide protection from the environment.
Chapter 1. Getting Started
Back view
Auto Light sensor Detects ambient light conditions.
SSD indicator Indicates hard drive activity. (See page 22.)
Fingerprint scanner Enables you to use fingerprint verification features. (See page 36.)
Back view

Fan cover Plastic cover over the thermal transfer bay that manages heat movement out of the computer.
| Antenna covers | For optional wireless LAN and WAN models, protect and secure the radio antennas (accessible by authorized service personnel only). |
| Pen | The main device you use to enter data and control applications (instead of a mouse or a keyboard). Also called the stylus. See “Using the pen” on page 32. |
Pen holder Provides a place to secure the pen when you are not using it.
Battery release latch Provides access to the battery.
Battery lock button Secures the battery inside the tablet.
Removable battery pack Powers the computer when AC power is unavailable.
Digital camera 3-mega-pixel, auto-focus camera for taking color or black-and-white image or video.
SSD carrier User-accessible drive carrier for SSD storage.
Left side view
Power On/Off, Backlight On/Off, Sleep/Resume button ____
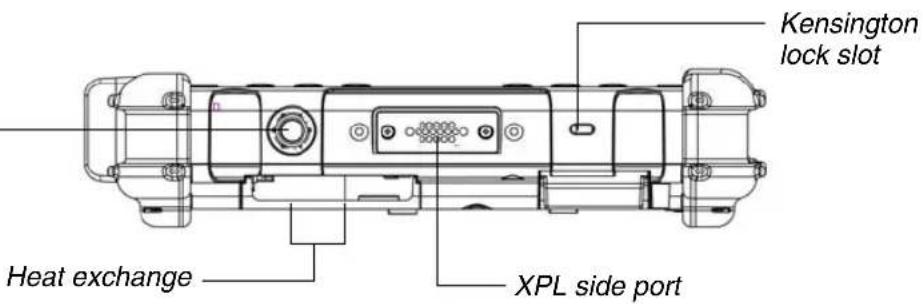
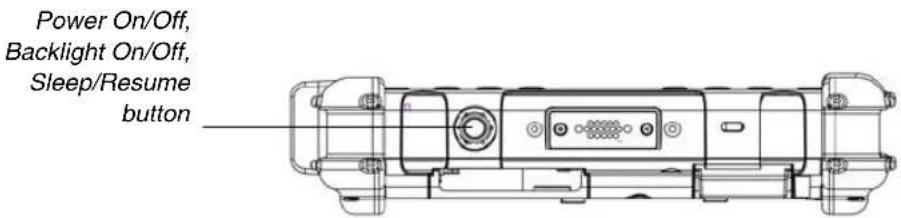
Power On/Off, Press to power computer. Press and hold for more than 4 seconds to force Backlight On/Off, power off. Sleep/Resume button
Momentarily press to toggle the backlight on or off.
Heat exchange Helps prevent the computer from overheating by forcing heat away from the computer. (Do not block the vents.)
XPL side port Permits connection of special devices made expressly for the iX104C5.
Kensington™ lock slot Connector for the optional Kensington MicroSaver™ or equivalent compatible security cable. Note: Contact your reseller for information about the Kensington security cable.
Right side view
Right side view

The connectors on the right side of the computer are located behind the outer doors.
| Power connector For the AC adapter or optional auto adapter. (See “Optional accessories” on page 13.) | |
| USB 2.0 ports | For Universal Serial Bus devices (compliant with USB Standard Revision 2.0).Note: The optional Office and Vehicle Docks include additional USB ports. See “Optional accessories” on page 13. |
| Headphone connector For stereo headphones or speakers. | |
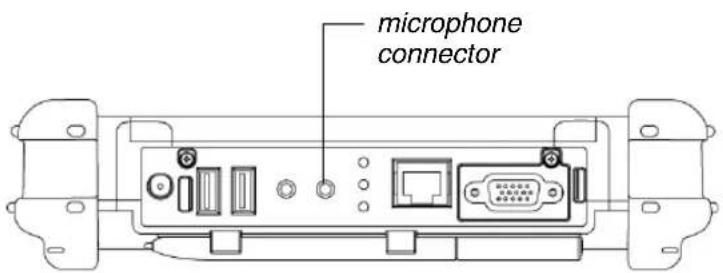
| Microphone connector For an external microphone. | |
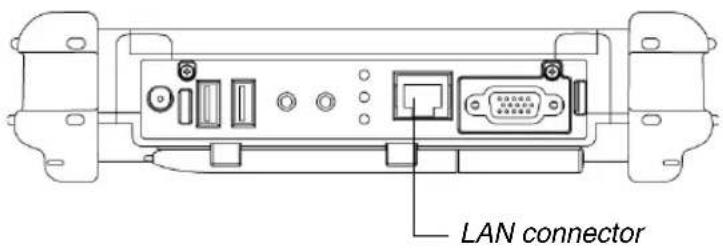
| LAN connector | For connecting a standard RJ-45 connector to the tablet's internal local area network (LAN) card |
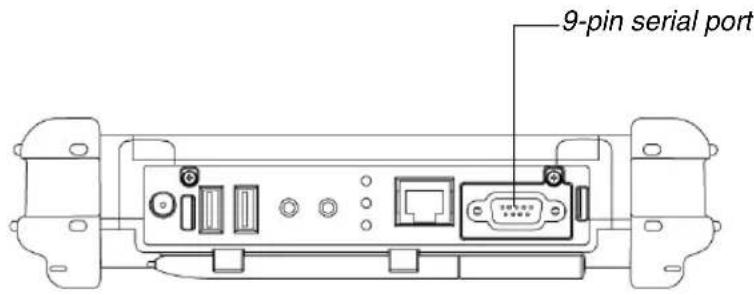
| 9-pin serial connector or optional external monitor connector | Serial connector for connecting terminals or other devices that use the RS-232, RS-422, or RS-485 data transfer standard, or an optional connector for an external monitor or projection panel. |
Bottom view

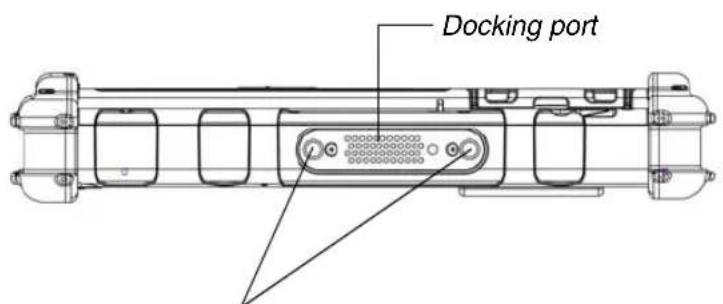
Docking connector
Enables you to connect the optional xStand Desktop Docking Station or xDock Vehicle Docking Stations.
Guide pin receptacles Help assure a secure connection of the optional xStand or xDock.
Note: See "Optional accessories" on page 13.
Top view

Bumpers Fabricated from rugged material. Raised to help protect the computer from damage.
XPL expansion port
A port that permits connection of special devices made expressly for the iX104C5.
LED indicators
The LED indicator lights show the status of system functions.
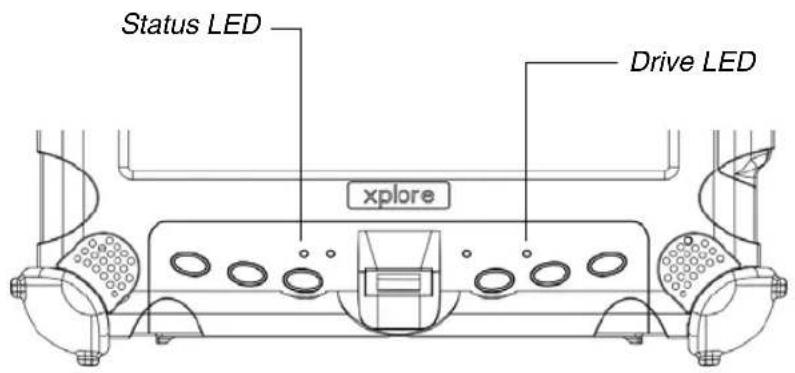
The following table defines the various LED states.
Table 1 Status LED indicator
| Mode/State LED State Meaning | ||
| On state | green, continuous | The computer is on, ready for use, and functioning normally. The battery is fully charged. |
| Charging green, blinking The AC adapter is plugged in and the battery is charging. | ||
| Off state off (no light) The computer is off. | ||
| Sleep mode green, breathing The computer is on and is in Sleep mode. | ||
| Thermal control blue, blinking The computer is on and is in Warm-up mode, with the LCD and backlight off. After the system has warmed to a safe level, the LCD and backlight turn on. | ||
| On red, blinking The computer is powered on, running on battery power, and the charge level in the battery has reached a minimum warning state. Plug the computer into an AC/DC power source or install a charged battery. | ||
| On red, continuous The computer is on, running on battery power, and the charge level in the battery has reached a critical state. Plug the computer into an AC/DC power source or install a charged battery.orThe computer has encountered a fault and is not operating normally. Contact your computer support personnel, such as your help desk.orThe computer is off and you have inserted a battery that is at the critical low level and is incapable of running the computer. | ||
Quick-start guide
This section is a quick guide to using the main features of your tablet. (See Chapter 2 for detailed information.)
Application, Windows, and hot keys

Table 2 Main keys
To define a function, see "Programming hot keys" on page 58.
In the default configuration, the P3 key puts the computer in Sleep mode and the Power button shuts down the computer. To change these settings, see page 50.
| Press this key... To perform this function | |
 | Log on after resuming operation from power management, powering on, or locking. After logging on, launch Windows Task Manager. |
 | Rotate screen orientation between portrait (vertical) and landscape (horizontal). |
 | Use in combination with another key to perform various functions. (See page 25.) |
 | Fingerprint scanner. |
 | Display the Start menu. |
 | Open Internet Explorer, or perform a user-definable function. |
 | Put the computer in Sleep mode. |
Table 3 Function mode keys
| Press these keys... To perform this function | ||
 |  | unction: Send video display to a monitor or projection panel connected to the computer (and back to the computer again). You can program this key combination to perform a different function. (See “Programming hot keys to start applications, open documents, or go to a website” on page 59.) |
 |  | r disable Airplane mode, which toggles wireless radios on/off. |
 |  | n toggle. |
2 Using the Tablet
This chapter contains detailed instructions for using the tablet.
Turning on the computer
- Make sure the computer is off.
When the computer is off, the Status LED is off.

-
Make sure the battery is charged or that the computer is plugged in to an external power source.
-
Press the Power On/Off, Backlight On/Off, Sleep/Resume button.
Turning off the computer
When the computer is in Sleep mode, the Status LED is breathing green.
- If the computer is in Sleep mode, press the Power On/Off, Backlight On/Off, Sleep/Resume button to resume operation. (See page 30 for information about Sleep mode.)

- Make sure the battery is charged or that the computer is plugged in to an external power source.
- Save your work and close all programs.
- From the Windows Start menu, click Turn Off Computer.
- The Turn off computer dialog box opens.
- Click Turn Off or press the Power button continuously for more than 4 seconds.
Using the Reset switch
Use the Reset switch only if you cannot turn off the computer by any other means, because you may lose unsaved data.
If the computer does not seem to be accepting input and you cannot turn it off by using the method described in “Turning off the computer,” press the Reset switch. (Use the stylus or a similar instrument to press the switch).
Suspending and resuming operation
For more information, see "Checking battery power status" on page 50.
To conserve battery power when you do not want to turn off the computer or when you need to install a charged battery pack, put the computer into Sleep mode. (You can suspend operation without closing any programs or Windows.)
When you suspend operation:
■Programs that are running stop (but do not close).
■Active data is saved.
■The system enters one of the following low-power modes:
- Sleep (Suspend-to-RAM) mode – The Status LED light is breathing green. Active data is saved in RAM and most other components are turned off.
Although the computer uses very little power when in Sleep mode, eventually the battery's power does run out. If you do not plan to use the computer for an extended period of time, turn the computer off or put it in Hibernation mode instead of Sleep mode.
- Hibernation mode – Active data is saved on the SSD and power usage is reduced to the same level as when the computer is turned off. In Hibernation mode, there is no danger of losing data if battery power is lost.
Notes:
If you have set your computer to turn power off (in the Power Options utility in Windows Control Panel), you cannot suspend operation. To change power settings, see "Selecting Power (On/Off)/Backlight(On/Off)/Sleep/Resume button options" on page 53.
In the default configuration, the P3 key puts the computer in Sleep mode and the Power button shuts down the computer. To change these settings, see “Programming hot keys to perform pre-defined functions” on page 63.
Suspending and resuming operation
If your computer is connected to a network, the network may automatically log you off after a period of inactivity while system operation is suspended. Contact your help desk or system administrator to learn your log-off time limit.
Suspending operation
In order to suspend operation, the Sleep option must be enabled in Windows Power Options. See "Selecting Power (On/Off)/Backlight(On/Off)/Sleep/Resume button options" on page 53.
Use one of the following methods to suspend operation:
Method 1
Press the P3 key.

Method 2
- Press the Windows Start button; then press the right arrow next to the Shutdown button.
- Press Sleep.
When operation is suspended, the Status LED displays a breathing green light.


Resuming operation
To resume operation when the computer is in Sleep mode, press the Power On/Off, Backlight On/Off, Suspend/Resume button.
Note: Press the button only once.
Power On/Off, Backlight On/Off, Sleep/Resume button
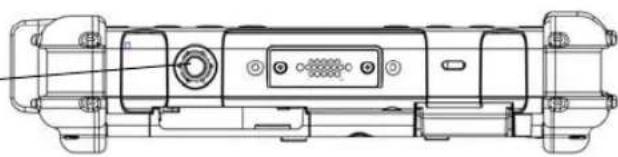
Approximately 20 seconds later, the computer resumes normal operation. When the Status LED displays a continuous green light, you can begin using the computer.
Using the pen
You can use any of the following methods to select items and to navigate through programs.
■ Auto-Sense mode: Use either the multifunction pen or your finger interchangeably. The computer distinguishes between the two input modes and automatically adjusts accordingly. This is the tablet's default state.
- Digitizer mode: Use only the special multifunction pen provided with the computer.
For more information, see “Programming hot keys to perform predefined functions” on page 63.
WARNING
Do not use items such as a ball point pen or a screwdriver that can damage the tablet. Damage caused by using an item not provided with the tablet is not covered by the tablet warranty.
Note: During the first use of the tablet, or if the action you are trying to perform does not occur when you use the pen or your finger to touch the screen, calibrate the digitizer as described in "Calibrating the digitizer" on page 73.
Using the digitizer to perform mouse functions
To perform this function... Do this
| Select an object(left button click). | Tap the pen tip once on the object. |
| Perform a double-click. Quickly tap the pen tip twice on the object. | |
| Perform a right-click. Hold the pen or your finger directly on the object for 1 second. | |
| Move or drag an object. Place the pen tip or your finger on the object; then continue to hold the pen tip or your finger against the screen as you move the pen or your finger. | |
Changing the pen double-click speed
The pen double-click speed is in sync with the mouse double-click speed. To change the speed, follow the instructions below.
- Click the Windows Start button.
- Click the Control Panel option.
- In the Control Panel window, select Hardware and Sound > Set up your Pen and Tablet.
- Drag the slider to a faster or slower speed.
Using the pen
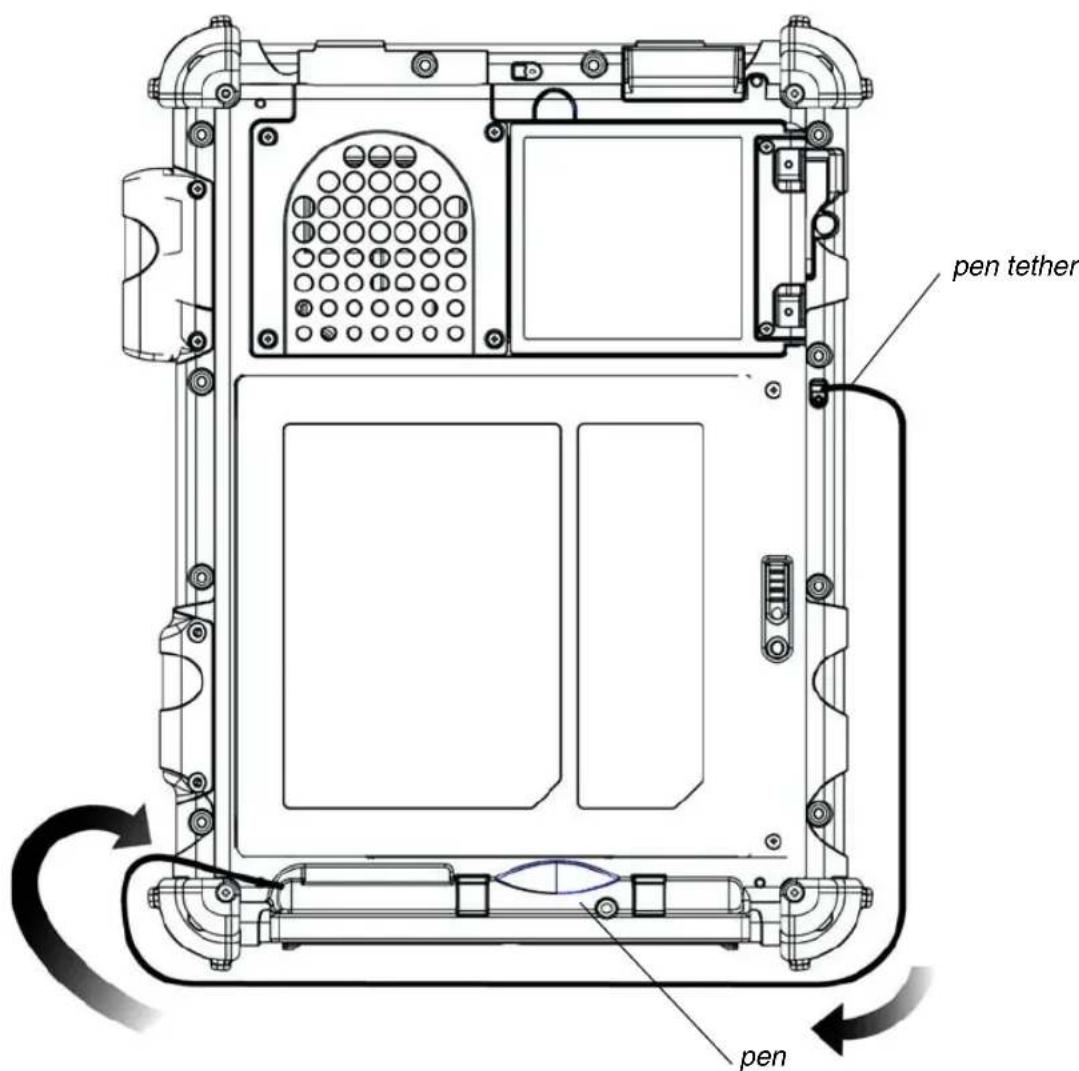
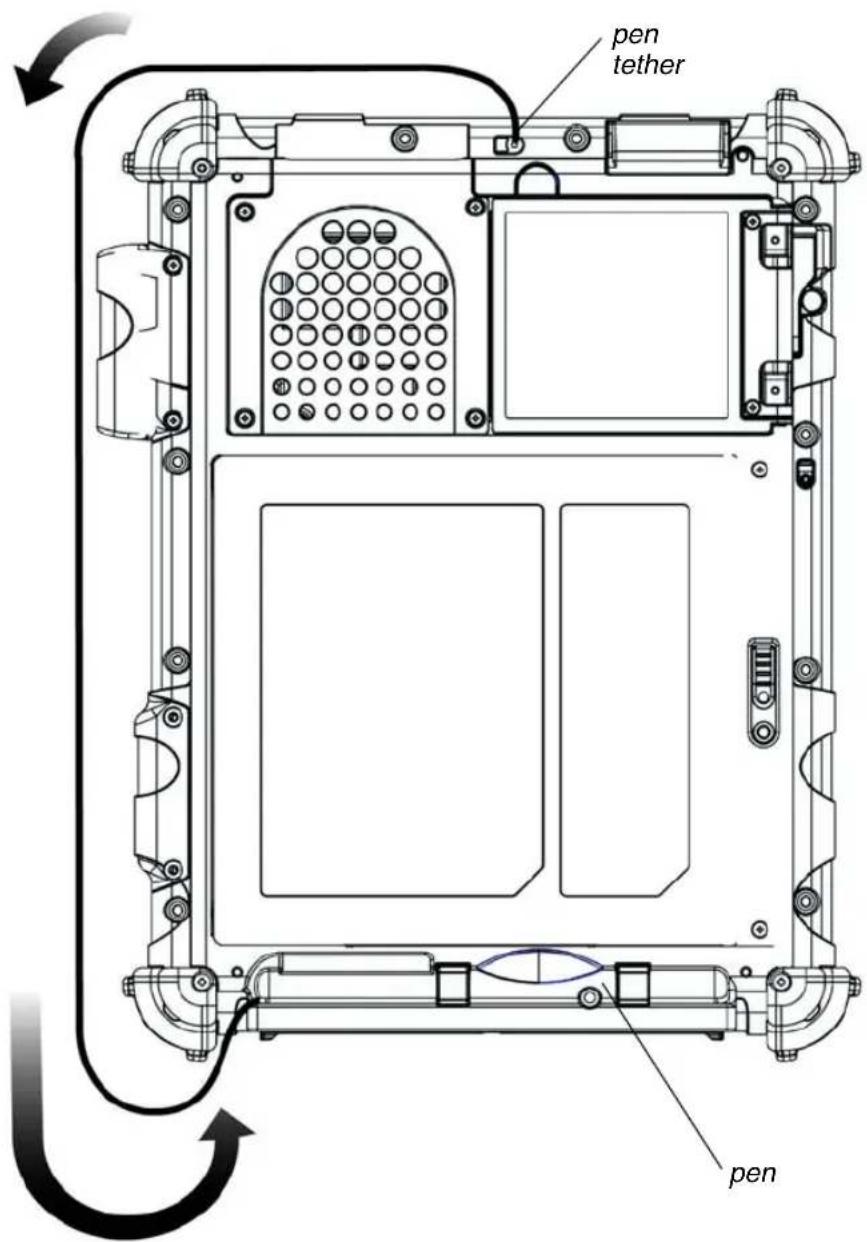
Positioning the pen and pen tether
The pen tether helps prevent the loss of your pen. The following illustrations show how to position the pen and pen tether.
Tether anchored at the bottom
Using the pen
Tether anchored on the side
Using the fingerprint scanner
The fingerprint scanner and the associated Protector Suite 2009 software enable you to use fingerprint verification to protect the security of your data.

The first step for using fingerprint verification is to enroll your fingerprint to create an association between your username, password, and fingerprint.
After fingerprint enrollment you will be able to:
■Use your fingerprint as part of computer login security.
■Register Web pages and Windows applications to use your fingerprint instead of passwords.
■Launch applications by swiping your finger the sensor.
■ Store confidential information in an encrypted form in a protected folder.
To launch the Enrollment Wizard, select:
Start > All Programs > Protector Suite > Control Center >
User Enrollment and follow the wizard's instructions.
For more information about using the fingerprint scanner, see the Protector Suite 2009 User's Guide PDF included on your hard disk in the Protector Suite 2009 folder.
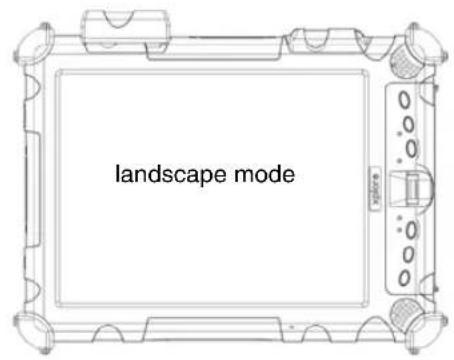
Changing the screen orientation

To rotate the screen orientation from portrait (vertical) to landscape (horizontal) mode or from landscape to portrait mode, press the screen rotation key.

Adjusting the screen brightness
Use either of the following methods to adjust the screen brightness:
Method 1
- Click Start.
- Open the Control Panel.
- In the Hardware and Sound area, select Adjust commonly used mobility settings. Use the Brightness slider to adjust the brightness.

Method 2

- In the Windows tasbar, click the power management icon; then select Adjust screen brightness.
- Move the slider bar (located at the bottom of the window) to change the screen brightness.

Enabling automatic backlight control
When the Auto Light sensor is enabled, the computer automatically controls the amount of backlight sent to the screen to provide optimum brightness for the lighting conditions in which you are working.

To enable automatic backlight control, see page 78.
Optimizing screen settings for outdoor use
- Click Start > Control Panel > Appearance and Personalization > Personalization > Change desktop background.
- In the My Themes area, select High Contrast White.
- Click the Back button.
- Click Display.
- Click Medium - 125% to enlarge the icon size; then click Apply.
- Click Adjust Resolution. Make sure the screen resolution setting is 1024 by 768 pixels; then click OK.
Docking the tablet
If you have the optional xStand office dock or xDock vehicle dock, connect it to the tablet at the docking port. (See the iX104 Docking Stations Handbook.)
Guide pin receptacles
Connecting devices
Refer to the following subsections for information about connecting external devices to your computer.
Note: If the device you want to use does not appear to be working with your computer, the device may need to be enabled in the computer's configuration program. Contact your local help desk or Xplore reseller.
Connecting to a local area network
Connect a local area network (LAN) cable's RJ-45 connector to the internal LAN interface card. (See your network system administrator for more information.)
Connecting USB-compatible devices
Connect any USB-compatible devices to the computer's USB ports.

Connecting devices
Connecting an external microphone
Adjusting microphone volume
If necessary, adjust the volume of the microphone as follows:
- Press the Windows Start key; then open the Control Panel.
- Select Hardware and Sound; then select Sound.
- Select the Recording tab.
- Select Microphone; then select Properties.
- Select the Levels tab.
- Adjust the microphone volume or boost.
- Click OK.
Connecting a headphone or speakers

Adjusting headphone or speaker volume

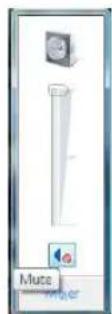
-
Click the audio icon in the Status area of the Windows taskbar. The volume control area opens.
-
If the Mute button indicates that sound is muted, click the button to turn on the sound.
-
Move the slider bar up or down to increase or decrease the volume.
Connecting devices
Connecting a monitor or projection panel (optional)

Activating the monitor or projection panel
If your tablet includes the optional monitor/projection panel connector, you can change the video output as follows:
To change the video output to the monitor or projection panel:
Press the Fn-P1 key combination.
To change the video output back to the computer:

Press the Fn-P1 key combination again.
Connecting a device to the serial port (standard)
If your tablet includes the standard serial port, you can connect a terminal or other device that uses the RS-232, RS-422, or RS-485 data transfer standard.
Connecting an XPL expansion module


Tablet with optional GPS II
Using the battery
You can recharge, remove, and replace the battery pack.
Charging the battery pack
If you do not have an external battery charger
Follow these steps to charge the battery while it is installed in the computer:
- Connect a power source, such as an AC adapter or cigarette lighter adapter, to the power connector on the computer.
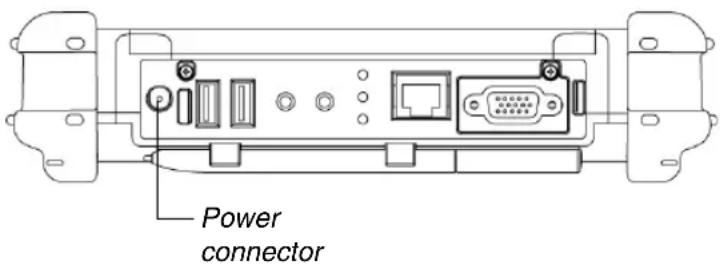
If the battery charge is below 95%, the battery begins charging and the Status LED flashes green. (If the battery charge is higher than 95%, the battery will not charge, preventing battery overcharge.)
- Check the level of charge. (See “Checking battery power status” on page 50.)
The charging process continues until the battery charge reaches 100%.
Table 4 shows the approximate time required to charge the battery level to 100%.
Table 4 Approximate battery charge time
Battery pack capacity Charge time Battery pack P/N
| 55 watt hours (7600 mAh) 1.5 hours 11-01018 |
| 68.5 watt hours (9250 mAh) 2.5 hours 11-01019 |
If you have an external battery charger
- Remove the battery pack (see page 47).
- Use the external battery charger to charge the battery.
- Install the battery (see page 49).
Removing and installing the battery
You can remove the battery and use an (optional) external charger to charge it.
Removing the battery
1. To swap with a charged battery:
Use one of the methods described in “Suspending operation” on page 30 to suspend operation.
If a charged battery is not available:
Save your work and close all running programs; then shut down the computer or put the computer in Hibernation mode (see “Suspending operation” on page 30).
Note: To avoid losing unsaved data, wait until the computer has completed switching to Hibernation mode before removing the battery.
Using the battery
- Use the stylus or a pen to depress the battery lock button. The battery release latch returns to its original position.

- Pull the battery away from the computer and remove it.
Note: After removing the battery, you must replace the battery or connect the computer to an external power supply within 3 to 5 minutes or the computer completely loses power.
Installing the battery
- Orient the battery with the slides in the empty battery tray.

-
Slide the battery into the tray and press it firmly until it is seated.
-
Slide the battery release latch to its original position.
The lock button pops back into the locked position, securing the battery in place.
Discarding batteries
Dispose of batteries in accordance with your local government regulations. Under federal, state, or local law, it may be illegal to put batteries in the trash. Contact your system administrator, municipal waste disposal department/provider for information.
Using power options
Displaying power options

On the Windows taskbar, click the battery icon; then select More power options. The Power Options window opens.
Checking battery power status

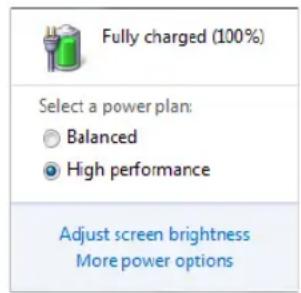
On the Windows taskbar, click the battery icon.
The following window opens, displaying the percentage of power remaining in the battery:
Selecting a power plan

- On the Windows taskbar, click the battery icon.
The following window opens:

- Select one of the following power plans: (select More power options in necessary)
Balanced – Balance between computer performance and battery life.
Power Saver – Longer battery life and lower performance.
High performance – Higher performance and shorter battery life.
Using power options
Selecting power options

-
On the Windows taskbar, right-click the battery icon.
-
Select Power Options.
The following window opens.

-
Under the selected power plan, press Change plan settings.
-
Select the power options you want to use.
Selecting Power (On/Off)/Backlight(On/Off)/Sleep/Resume button options
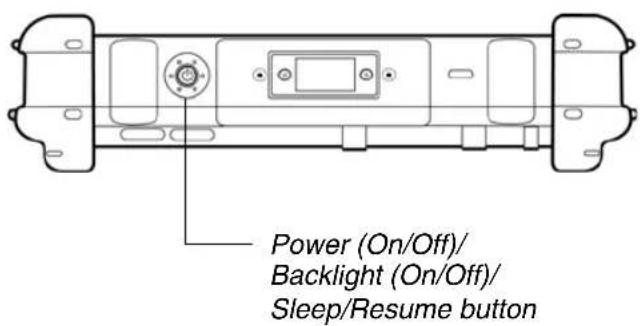
To change what happens when you press the button:

-
On the Windows taskbar, right-click the battery icon.
-
Select Power Options.
The following window opens.
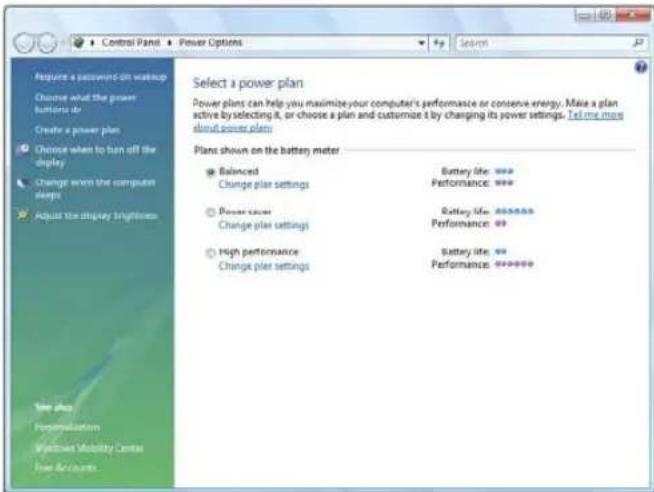
-
Press Choose what the power buttons do.
-
Select the options you want to use.
Using power options
Tips for conserving battery power
The following tips help you extend the life of your battery by conserving battery power:
■ Use an external power source such as the AC or auto adapter whenever available.
■Suspend operation if you know that you will not be using the system for a while. (See page 30.)
■If you do not plan to use the computer for an extended period of time, turn it off.
■ Adjust power options to automatically conserve power. (See page 52.)
- Adjust the display brightness to no brighter than necessary for comfortable viewing. The display can consume a large portion of the computer's power. (See page 38.)
■ Set the LCD Brightness range to “Power Saving” in the BIOS Setup Utility. (See page 77.)
Accessing the Solid State Drive (SSD) cartridge
When you install a new storage drive, follow the instructions in this section to access the hard drive carrier.
WARNING Failure to follow this procedure can result in damage to the case and the cover, which is not covered under the Xplore Technologies warranty. Xplore recommends that you use an approved Xplore Technologies service center for this procedure.
-
Turn off the computer.
-
Remove all power from the unit, including batteries and other power sources such as power supplies, cigarette lighter adapters, and mobile power sources.
-
Pinch the two center pins with one hand while pushing down on the lever with the other. The drive carrier will pop up (like the battery) and permit removal.
Note: Your drive carrier may have two screws installed. If so, remove them before you exchange the drive carrier.
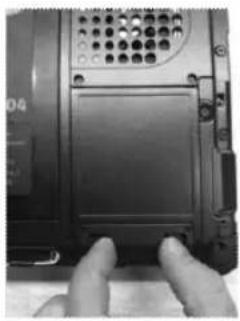


Accessing the Solid State Drive (SSD) cartridge
Re-installing the drive carrier
- Insert the drive with smooth edge into the bay at a slight angle.
- Press down until the carrier clicks into place, while pinching the two center pins.
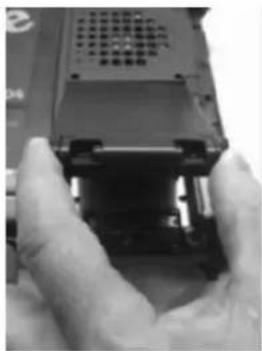
- If your machine had the screws in place, re-attach them. Note: Do not use power tools.
Accessing the MicroSD and SIM compartment
Note: This compartment can handle most MicroSD and SIM cards.
When you install a MicroSD or SIM card, follow the instructions in this section to access the compartment.
WARNING Failure to follow this procedure can result in damage to the case and the cover, which is not covered under the Xplore Technologies warranty. Xplore recommends that you use an approved Xplore Technologies service center for this procedure.
- Turn off the computer.
- Remove all power from the unit, including batteries and other power sources such as power supplies, cigarette lighter adapters, and mobile power sources.
- Remove the battery. (See "Removing and installing the battery" on page 47.)
- Lift up on the D-ring and turn it clockwise 1/4 of a rotation. Once the lock is disengaged lift the door to open the compartment.

Opening the compartment Installing a MicroSD card
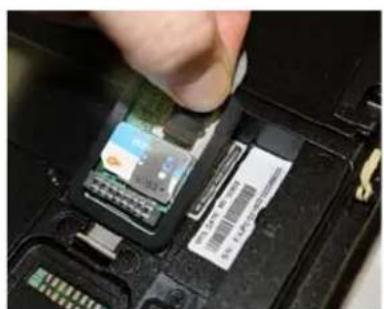

Installing a SIM card
Programming hot keys
Xplore pre-programs the P1, P2, and P3 hot keys and Function mode hot key combinations to perform certain functions by default. However, you can program them to perform different functions, as described in this section.
Table 5 Programmable hot keys
| Key Default function | |
| P1 | Opens the Start menu. |
| P2 | Starts Internet Explorer. |
| P3 | Puts the computer in Sleep mode. |
Table 6 Programmable Function mode hot key combinations
| Key combination Default function | ||
| Fn | P1 | Sends video display to a monitor or projection panel. |
| Fn | Airplane mode toggle. | |
| Fn | Bluetooth toggle. | |
Programming hot keys to start applications, open documents, or go to a website

- In the Status area of the Windows taskbar, click the iX104C5 Configuration icon.
The Launch Button QuickShow dialog box opens.

- Click the Configure button.
The Panel Control Center window opens.

Programming hot keys
- Click the Change button next to the key or key combination you want to program.
The following options appear:
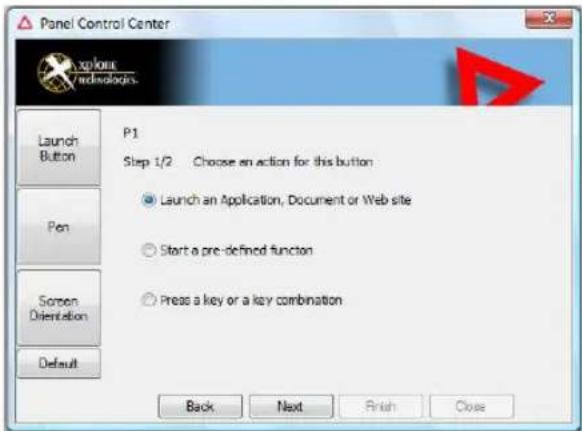
- Click Launch an Application, Document or Web site.
The following options appear:

5. To start an application:
a. Click Launch an Application.
b. Press Browse to find the application you want the hot key or Function mode hot key combination to start (for example: word.exe, notepad.exe, excel.exe).
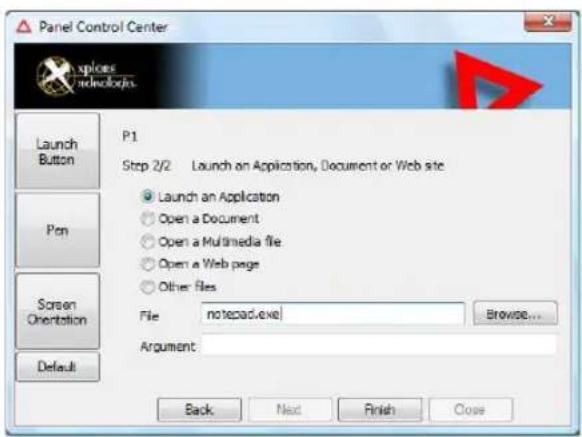
c. Click Change.
6. To open a document:
a. In the Click Open a Document.
b. Press Browse to find the document you want the hot key or Function mode hot key combination to open. (For example: spreadsheet.xls, airports.doc, wiringdiagram.jpg)
c. Click Change.
Programming hot keys
7. To open a multimedia file:
a. Click Open a Multimedia file.
b. Press Browse to find the name of the multimedia file you want the hot key or Function mode hot key combination to open. (For example: 911training.dir, demo.ppt)
c. Click Change.
8. To open a Web page:
a. Click Open a Web page.
b. Press Browse to find the URL of the Web page you want the hot key or Function mode hot key combination to open. (For example: http://www.xploretech.com)
c. Click Change.
- Program more hot keys, or click Close to close the Panel Control Center window.
Programming hot keys to perform pre-defined functions

- In the Status area of the Windows taskbar, click the iX104C5 Configuration icon.
The Launch Button QuickShow dialog box opens.
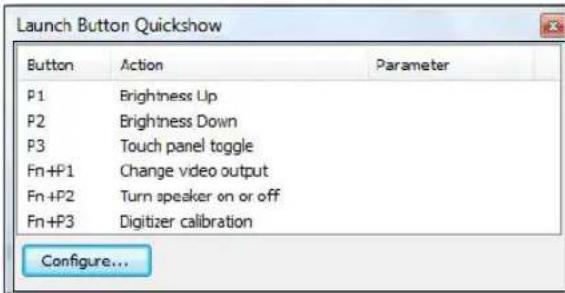
- Click the Configure button.
The Panel Control Center window opens.

- Next to the key or key combination you want to program, click the Change button.
Programming hot keys
The following options appear:

- Click Start a pre-defined function.
- In the Function selection drop-down list, select an option.

- Program more hot keys, or click Close to close the Panel Control Center window.
Programming hot keys to perform other key functions

- In the Status area of the Windows taskbar, click the iX104C5 Configuration icon.
The Launch Button QuickShow dialog box opens.
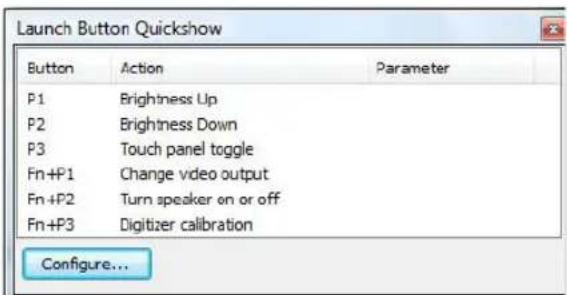
- Click the Configure button.
The Panel Control Center window opens.
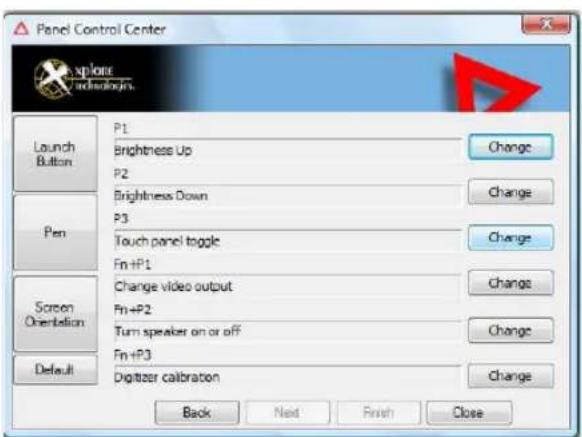
- Next to the key or key combination you want to program, click the Change button.
Programming hot keys
The following options appear:

4. Click Press a key or key combination.
The following options appear:

5. If you want the hot key or hot key combination to perform the function of a single key:
a. If the Ctrl, Alt, or Shift boxes are checked, uncheck them.
b. Click the key you want the hot key or hot key combination to perform. (For example: F6, G, or Caps Lock)
If you want the hot key or hot key combination to perform the function of a key combination:
a. Check the Ctrl, Alt, or Shift box.
b. From the drop-down list, select the additional key, or click the key on the keyboard.
Examples
To cause the hot key to perform the print screen function (Alt-Print Scrn): Check the Alt check box; then select PrtScr from the drop-down list.
To cause the hot key to perform the paste function (Ctrl-V): Check the Ctrl check box; then click the V key.
- Program more hot keys, or click Close to close the Panel Control Center window.
3 Maintaining the Tablet
This chapter provides instructions for maintaining your tablet.
Caring for the tablet
This section provides information about how to keep your tablet in top working condition.
Checking power cords and connectors
Check AC and DC power cords and power connectors periodically for damage. Replace the power cord immediately if you find any damage.
Protecting the computer from damage
■Your computer is designed to sustain a multiple-axis drop to a non-yielding surface. Do not intentionally drop the computer, because the cumulative effects of multiple drops may damage the computer.
■Do not place heavy objects on the computer.
■Do not disassemble the computer.
- Keep the computer at least 5 inches (13 centimeters) away from any electrical appliance that generates a strong magnetic field, such as a motor, magnet, TV, refrigerator, or large audio speakers.
Caring for the tablet
Preventing the computer from overheating
The computer monitors its internal temperature. As the internal temperature approaches the tolerable limits of heat-sensitive components, system functions are automatically limited or turned off to prevent damage.
To prevent the computer from overheating, do not obstruct the computer's air vents.

Storing the computer
You can store the computer in the Off state for about 30 days with a fully charged battery installed. After this period, recharge the battery or replace it with a charged battery.
If you intend to store the computer for more than 30 days, remove the battery pack and keep it in a cool place.
Caring for the display screen
To clean the display screen, dampen a soft cotton cloth with water and gently wipe the screen surface.
Note: Do not use isopropyl alcohol to clean the screen. Alcohol may damage the surface of the screen.
Protecting the display screen
The screen protector is a durable, replaceable writing surface that protects the display screen from abrasion.
To obtain additional screen protectors, check with your reseller, or go to the Xplore Web site at www.xploretech.com for ordering information. Additional information about installation is included with the screen protectors.
When to replace the pen
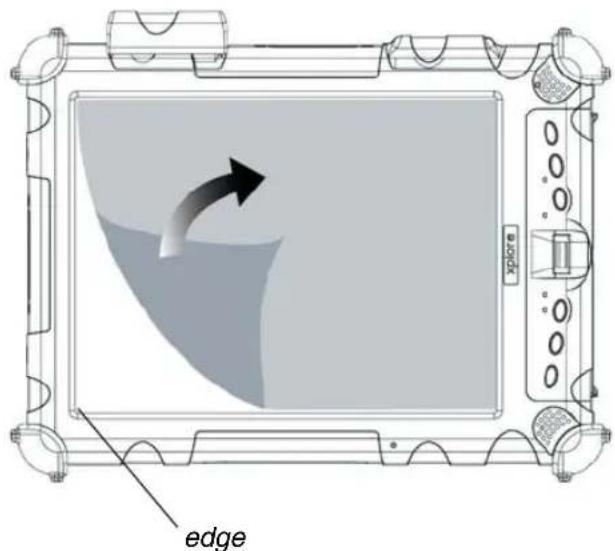
Removing the screen protector
Slide your fingernail under the edge of the screen protector and pull the protector away from the screen.
Installing a new screen protector
Follow the instructions included with your screen protector replacement kit.
Note: If a screen protector is already installed on the display screen, remove it before installing the new screen protector.
When to replace the pen
With use, the pen tip may become worn and can scratch the screen. If your pen exhibits one of the following problems, replace the pen:
■The pen does not move freely across the screen.
■The pen does not perform as expected.
Calibrating the digitizer
Calibrating the digitizer adjusts the cursor position on the screen relative to the position of the pen tip or finger. Calibrate the digitizer to adjust the distance error between where the pen or finger is actually touching the screen and where the computer is registering the pen or finger touch.
You may need to calibrate the digitizer in the following situations:
■You are using the computer for the first time.
■The previous user of the computer writes with the opposite hand or at a different pen angle.
■The computer has not been used for some time.
■The computer has been serviced.
- From the Start menu, select Control Panel.
The Control Panel opens.
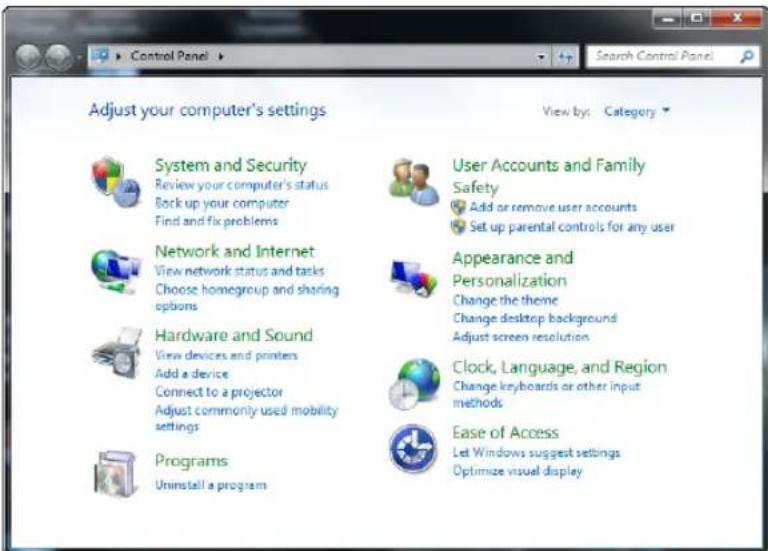
Calibrating the digitizer
2. Select Hardware and Sound.
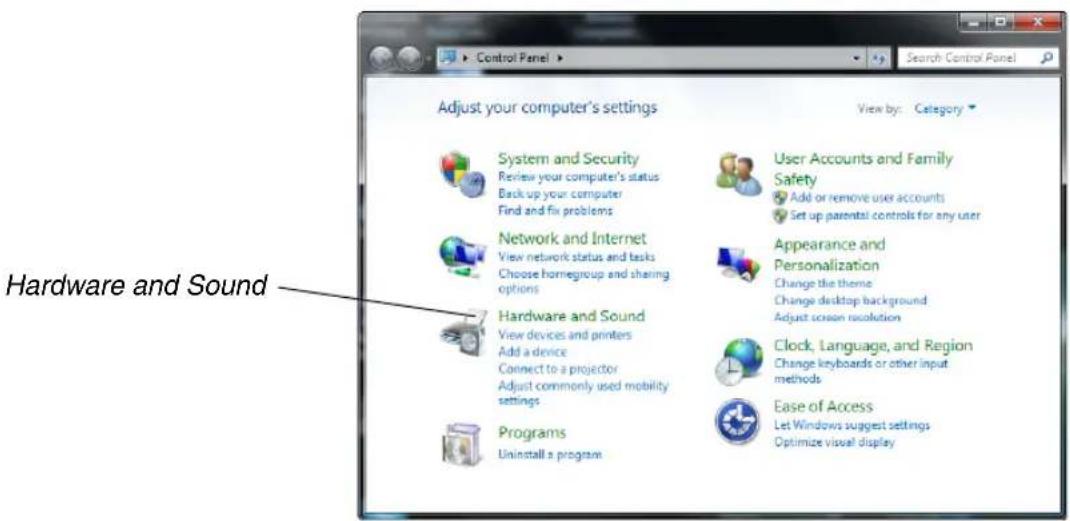
3. In the Tablet PC Settings area, select Calibrate the screen for pen or touch input; then follow the instructions that appear on the screen..

Table 7 contains solutions to some problems. If you cannot solve the problem by taking the actions described, contact your local help desk or your reseller for further assistance.
Table 7 Troubleshooting
| Problem Possible cause and solution | |
| Computer will not start. | The battery may be defective or discharged to a critically low level. Connect an external power supply (such as the AC adapter) or install a charged battery. See “Using the battery” on page 46.Internal components may be above or below the acceptable operating range (below -20°C or above 60°C). After the temperature returns to safe operating range the computer will start. |
| The computer will not resume operation after being suspended. | The battery may be defective or discharged to a critically low level. When the battery reaches a critically low level, the computer is forced into Sleep mode to avoid a total system power failure. Connect an external power supply (such as the AC adapter) or install a charged battery. See “Using the battery” on page 46.The computer may be at the critical thermal limit. To avoid damage to heat-sensitive components, the computer enters Sleep mode when the computer operates above 60°C. Operation automatically resumes when the computer cools to below 60°C. Move the computer to a cooler location. |
| The Status LED is red, continuous. • The computer is on, running under battery power, and the charge level in the battery has reached a critical level. Plug the computer into an AC/DC power source or install a charged battery.The system has encountered a fault and is preventing normal operation. Contact your local help desk. | |
| The Status LED is red, blinking. The computer is powered on, running under battery power, and the charge level in the battery is at a minimum warning level. Plug the computer into an AC/DC power source or install a charged battery. | |
| Display screen is blank or difficult to read. | Confirm that the computer is on (the Power icon is displayed continuously in the Status area).The brightness may be set too low, causing the screen to appear too dark. To change system brightness, press the Fn and Start keys to open the Xplore menu and adjust the brightness. (See page 25.)An external monitor may be selected. Press the Fn and P1 keys to select the computer display screen. (See page 25.)The video time-out may have expired. Tap the display screen to reactivate the display.Note: This is a normal, power-saving feature.If the Status light is blinking red, the computer is in Sleep mode because the temperature is below -20°C or above 60°C. When the temperature returns to a safe operating range, the display screen automatically comes back on. If possible, move the computer to a warmer or cooler location.If the Status light is continually yellow, the computer is in Sleep or Hibernate mode. Press the Power On/Off key to resume. |
| Cursor is not tracking the pen. Calibrate the pen. See “Calibrating the digitizer” on page 73. | |
| Computer is not responding to the pen. | Connect an external USB keyboard to the computer. If the computer does not respond to the external keyboard, the application or operating system may have been corrupted. Press the Reset key. (See page 28.) If the system responds to a keyboard but not to the pen, contact your local help desk or reseller for further assistance. |
| Headphone or speaker volume is too low. | The volume may be in Mute mode or set too low. Follow the instructions in “Adjusting headphone or speaker volume” on page 43.Make sure the volume control in your audio software is set to an audible level. |
| An external device is not working with the computer. | The device may need to be enabled in the computer's configuration program (BIOS Setup). Contact your local help desk or reseller. |
B
Using BIOS and AOS Functions
Note: Each button has its own blue-light LED. No matter which button you press, every blue-light LED is on for about 3 seconds, then off. When in Shifted mode, all blue-light LEDs flicker.
This appendix explains how to use the application and navigation buttons with the Basic Input-Output System (BIOS) program and the Advanced Operating System (AOS) Options menu.
Note: These functions are typically for use only by your system administrator or by authorized service technicians.
Table 8 Using BIOS and AOS functions
| In Shifted Mode | |||
| Button BIOS Key Function BIOS Key Function | |||
 | F1 continues message. Up Arrow Navigate up through computer is booting, press the P2 button and follow the instructions that appear on the screen. | Multi Boot options and BIOS menus. | |
 | Down Arrow Navigate down through Multi Boot options and BIOS menus. | ||
 | F8 Prompt Windows to select Safe mode. | Right Arrow Navigate to the right. | |
 | F11 (Lock Fn) | • Press for less than one second for F11 function.• Press longer to enable Shifted mode. | Release FunctionPress once to exit Shifted mode. |
 | F12 | Enter Multi Boot mode. | F4 Change a BIOS setup value. |
 | Ctrl+Alt+Del | Reboot. | Enter Enter. |
Disabling the Auto Power feature
Note: When the tablet is in the docking station, it will shut down or go into Hibernation or Sleep mode the same as it does when not in the docking station.
When Auto Power is enabled, the tablet automatically turns on if you dock it and the following conditions exist:
■The tablet is off or in Hibernation or Sleep mode.
The dock or the tablet is connected to an external power source (including power applied when a vehicle's ignition is started).
If you dock the tablet and the tablet is off and no power is present, the tablet turns on as soon as power is applied.
To disable the Auto Power feature:
- When the computer is booting, press the P2 button to access the BIOS Setup Utility.
- Select the Advanced tab.
- Disable the Dock with Auto Power On option.
Enabling automatic LCD backlight control
When the LCD backlight control is in manual mode, the ambient light sensor is disabled and the computer does not automatically control the screen brightness.
Follow these steps to enable automatic LCD backlight control:
- When the computer is booting, press the P2 button to start the BIOS Setup Utility.
- Select the Main tab.
- In the LCD Backlight Control drop-down list, select Automatic.
- Click OK.
C Glossary
Adapter. A device that provides an interface between two dissimilar electronic devices. For example, the AC adapter modifies the power from a wall outlet for use by the computer.
Advanced Power Management (APM). A facility consisting of one or more layers of software that support power management. The APM software interface enables applications, operating systems, device drivers, and the APM BIOS to work together to reduce power consumption.
Alternating Current (AC). Electric current that reverses its direction of flow at regular intervals.
Analog signal. A signal with characteristics such as amplitude and frequency that vary in proportion to (are an analog of) the value to be transmitted. Voice communications are analog signals.
Application. A program that performs specific tasks on your computer, such as word processing or creating spreadsheets.
BIOS. Programs that contain such basic hardware operations as an interaction with diskette drives, hard disk drives, and the memory.
Board. A circuit board. An internal card containing electronic components called chips, which perform a specific function or increase the capabilities of the system.
Boot. To load a program or operating system into system memory.
Bits Per Second (BPS). In serial transmission, the instantaneous bit speed with which a device or channel transmits a character.
Card. Synonym for board; see board.
Compact Disk-Read Only Memory (CD-ROM). Stores data on metal-plated plastic discs.
Compatibility. 1. The ability of one computer to accept and process data in the same method as another computer without modifying the data or the media upon which it is being transferred. 2. The ability of one device to connect or communicate with another system or component.
Configuration. The specific combination of hardware components of the computer, and their operating status. The configuration of your computer includes pre-defined memory, type and speed of microprocessor, type of and size of hard disk drive, etc.
Default. The preset parameter value automatically selected by the computer when you or a program do not provide instructions.
Device driver. A program that controls communication between a specific peripheral device (such as a printer or the pen/stylus) and the computer.
Disk drive. The physical device that enables the computer to read from, and write to, a disk.
Display. An image-producing device used to view computer output.
Double-click. To press and release the pen/stylus twice within a time frame you define, without moving the pointer off the choice.
Hardware. The physical electronic and mechanical components of a computer system. typically, the computer itself, CPU, memory, etc.
Hertz. A unit of wave frequency that equals one cycle per second.
Interface. 1. Hardware and/or software components used specifically to connect one computer or device to another. 2. To physically connect one system or device to another to exchange information. 3. The point of contact between user, the computer, and the program (for example, the pen/stylus or a menu).
JBOD. Two drives that appear in Window as two drives, Drive C and Drive D.
Kilobyte (KB). A unit of 1024 bytes measuring storage space, typically in memory or on storage media such as a diskette or hard disk drive.
Local area network (LAN). Assembly of separate computers into an integrated network that connects the various computers together and to common devices such as printers and fax machines.
Light Emitting Diode (LED). A semiconductor device that emits light when a current is applied.
Liquid Crystal Display (LCD). liquid crystal sealed between two sheets of glass coated with transparent conducting material. Applying a voltage between the glass sheets darkens the liquid crystal to provide contrast to lighted portions of the display.
Megabyte (MB). A unit of data storage equal to 1024 kilobytes.
Megahertz (MHz). a unit of wave frequency that equals 1 million cycles per second.
Modem. A device that connects your computer to a telephone line, allowing it to communicate with another computer at another location.
Pen. See stylus.
Peripheral device. An input/output device that is external to the central processor and/or main memory such as a printer or scanner.
Pixel. Picture elements (tiny dots) that compose a screen image.
Port. The electrical connection through which the computer sends and receives data to and from devices or other computers.
Program. A set of instructions a computer can execute to tell the system what to do and how to do it.
RAID 0. Two drives appear in Windows as one larger drive (two 80GB drives appear as one 160GB drive).
RAID 1. One drive has information mirrored to a duplicate drive. For example, information from one 80GB drive is mirrored to another 80GB drive. The two drives appear in Windows as a single drive.
Random Access Memory (RAM). A hardware component of your computer that temporarily stores active program code and data.
Reset. The act of hard stopping/shutting down the operating system.
Resolution. The number of pixels displayed on the screen. A higher resolution provides greater clarity and allows more information to be displayed on the screen at once.
Restart. Resetting a computer without turning it off (also called warm boot or soft reset).
Resume. The act of returning the computer to an active, operational state.
Read Only Memory (ROM). The portion of your computer's memory that contains permanent instructions, and which cannot be modified.
Sleep mode. A power conservation mode in which electrical current is removed from most components of the computer.
Solid State Drive (SSD). A sealed mass storage device used for storage and fast retrieval of programs and data. The SSD is contained in a drive cartridge for easy removal.
Status Indicator (LED). a light above the LCD screen which indicates the current status of a particular device or hardware component.
Stylus. A writing instrument. For pen computers, the stylus is used to interface with the LCD and digitizer.
Subscriber Identity Module (SIM). A smart card inside a GSM (Global System for Mobile communications) cellular device that encrypts voice and data transmissions and stores data about the specific user so that the user can be identified and authenticated by the network supplying the phone service. A SIM can be moved from one device to another and/or different SIMS can be inserted into any GSM radio.
Universal Serial Bus (USB). A serial interface that enables communication between devices and the computer.
Physical
| Dimensions 11.20" x 8.25" x 1.6" (WxHxD)283.9mm x 209.3mm x 40.8mm |
| Weight 5.25 lbs. (2.38 kgs)* |
Processing
| CPU | Intel® i7® Core 620UE processor – Ultra Low Voltage |
| Chip set Intel QM57 | |
| Processor speed 1.06 GHz* | |
* Varies according to your computer's configuration.
Memory/storage
| Main RAM • 1GB – 8GB DDR | III RAM (2GB standard)• 144-pin SODIMM modules |
| RAM options 2GB, 4 GB, 8GB | DDR III (optional) |
| L2 Cache 4MB smart cache | |
| BIOS ROM 8Mbit (FWH) | |
| Storage 40GB SSD, or 80GB | SSD, single or dual forRAID 0/1 and JBOD support |
* Varies according to your computer's configuration.
Display
| Display • Color LCD | Active Digital Sensor and Pen (iX104C5 and Resistive Touch Panel (iX104C5 Dual Mode)32-bit True color10.4” TFT XGA (1024x768), 16M colorsBrightness: 100 levels (min.)Viewing Angle:- Horizontal: 30 degrees (min.)- Vertical: 10 degrees (min.)- Contrast Ratio: Typ. 600:1, Min 100:1 |
| VRAM Intel i7 delivers low-power, high-performance 3D/2D graphics, video, and display capabilities, Intel HD graphics with Dynamic Frequency delivers graphics performance boost to graphics-intensive applications. | |
Interface
| Wireless Radio Bays • One full mini-PCI Express slot for WWAN (3G)• One half mini-PCI Express slot for WiFi |
| Integrated Interfaces • DC-in• USB (2) 2.0• Microphone Jack• Headset Jack• L A N ( R J - 4 5 )• 9-pin serial port)oroptional 15-pin D-SUB connector for external VGA monitor |
| KeyPad / User Controls • Application buttons with primary and secondary functions• Power On/Off/Suspend/Resume button• Emergency Shutoff/Reset button |
| Audio • Realtec ACC 262• On-board microphone with noise cancellation• On-board integrated stereo speakers (1W each) |
| Status Indicators Power, Charge/DC-in, Warning |
Power
| Main Battery • 10 cell 11-010 | 19Removable Lithium Ion7.4V @ 9250mAh (68.5 Whr)Warm-swappableRecharge time: 2.5 hours (100%)Life: Up to 6.5 hours. (Battery life is dependent on operating system, power management, and applications in use.)Suspend life: Min. 6 daysOff state: Approximately 90 days |
| Optional Spare Battery • 8 cell | 11-01018Removable Lithium Ion7.4C @ 7600mAh (55 Whr)Warm-swappableRecharge time: 2.5 hoursLife: Up to 4.5 hours. (Battery life is dependent on operating system, power management, and applications in use.)Suspend life: Min. 5 daysOff state: Approximately 30 days(IP65 only) |
| Bridge Battery • 6-cell Li Ion, | 45mAhLife: (with Suspend-to-RAM on bridge battery only): 3 to 5 minutes from full charge |
| AC Adapter Auto-sensing 100 | -240V, supplying 19 VDC, with a current of 3.42 A |
Environmental
| Temperature • Operating: | -7° to 140°F (-20° to 60°C) (iX104C5M minimum is -49°F,-45°C)• Storage:-40° to 167°F (-40° to 75°C) |
| Humidity 0% to 95% non-condensing | |
| Shock/Drop Four-foot drop to | concrete, all surfaces, edges and corners |
| Vibration 0.04g^2/Hz, 20 Hz - | 1000 Hz-6dB/octave 1000 Hz - 2000 Hz |
| Enclosure Class Blowing rain: | 4"/hr, 40 mph wind andMIL-STD-810G Method 506.5 Procedure 1Ingress protection:IEC (60529) ingress tested to an IP67 standardSand and dust:Particle size < 149 μm, 10 ± 7 g/m3 particle density 1.5 m/sto 8.9 m/s wind speedMIL-STD-810G Method 506.5 Procedure 1Salt Fog:5% saline for 48 hr (12 hr wet, 12 hr dry, 2 cycles)MIL-STD-810G Method 506.5Contamination by fluids:Detergents, brake fluid, aromatic hydrocarbonsMIL-STD-810G Method 506.5Solar radiation:1120 W/m2 (355 Btu/ft2/hr) UVB @ 50°C, 7x24 hr cyclesMIL-STD-810G Method 506.5 |
Agency approvals
| EMC • CFR 47, FCC part 15B, IC ICES-003• European Union Directive 2004/108/EC RTT&E |
| Safety • TUV Bauart, RoHS, 2002/95/EC, WEEE• IEC600950-1 2nd Ed., EN60950-1 2nd Ed.,UL60950-1 2nd Ed.• ETL Listed: ANSIISA-12.12.01-2007, C22.2 No. 213• UL1604 |
Operating system
| Operating Systems • Microsoft Windows 7 Professional – English, 32- and 64-bit |

FCC notices
This device complies with Part 15 of the FCC Rules. Operation is subject to the following two conditions: (1) this device may not cause harmful interference, and (2) this device must accept any interference received, including interference that may cause undesired operation.
Modifications not expressly approved by Xplore Technologies could void this user's authority to operate the equipment.
Note: This equipment has been tested and found to comply with the limits for a Class B digital device, pursuant to Part 15 of the FCC Rules. These limits are designed to provide reasonable protection against harmful interference in a residential installation. This equipment generates, uses and can radiate radio frequency energy and, if not installed and used in accordance with the instructions, may cause harmful interference to radio communications.
However, there is no guarantee that interference will not occur in a particular installation. If this equipment does cause harmful interference to radio or television reception, which can be determined by turning the equipment off and on, the user is encouraged to try to correct the interference by one or more of the following measures:
- Reorient or relocate the receiving antenna.
- Increase the separation between the equipment and receiver.
- Connect the equipment into an outlet on a circuit different from that to which the receiver is connected.
- Consult the dealer or an experienced radio/TV technician for help.
RF exposure
Tests for SAR are conducted using standard operating positions specified by the FCC with the tablet PC transmitting at its highest certified power level in all tested frequency bands. Although the SAR is determined at the highest certified power level, the actual SAR level of the tablet PC while operating can be well below the maximum value. This is because the tablet PC is designed to operate at multiple power levels so as to use only the power required to reach the network. In general, the closer you are to a wireless base station antenna, the lower the power output.
Before a tablet PC model is available for sale to the public, it must be tested and certified to the FCC that it does not exceed the limit established by the government-adopted requirement for safe exposure. The tests are performed in positions and locations (e.g., worn on the body) as required by the FCC for each model. (Body-worn measurements may differ among tablet PC models, depending upon available accessories and FCC requirements). While there may be differences between the SAR levels of various tablet PCs and at various positions, they all meet the government requirement for safe exposure.
This device was evaluated and shown to comply with FCC SAR guidelines. Avoid covering or holding antennas when transmitting. Antenna locations are shown in the following figure.

Health and Safety Information
Exposure to Radio Frequency (RF) Signals
Your wireless tablet PC is a radio transmitter and receiver. It is designed and manufactured not to exceed the emission limits for exposure to radio frequency (RF) energy set by the Federal Communications Commission of the U.S. Government as well as the RTT&E directive. These limits are part of comprehensive guidelines and establish permitted levels of RF energy for the general population. The guidelines are based on the safety standards previously set by both U.S. and international standards bodies:
■ American National Standards Institute (ANSI) IEEE. C95.1-1992
■ National Council on Radiation Protection and Measurement (NCRP). Report 86. 1986
■ International Commission on Non-Ionizing Radiation Protection (ICNIRP) 1996
■ Ministry of Health (Canada), Safety Code 6. The standards include a substantial safety margin designed to assure the safety of all persons, regardless of age and health.
■European Union RTT&E Directive for SAR
The exposure standard for wireless mobile tablet PCs employs a unit of measurement known as the Specific Absorption Rate, or SAR. The SAR limit set by the FCC is 1.6W/kg. The SAR limit set by the RTT&E is 2.0W/kg.
Note: In the U.S. and Canada, the SAR limit for mobile tablet PCs used by the public is 1.6 watts/kg (W/kg) averaged over 1 gram of tissue. In Europe the SAR limit for mobile table PCs used by the public is 2.0 watts/kg (W/kg) averaged over 10 grams of tissue. The standard incorporates a substantial margin of safety to give additional protection for the public and to account for any variations.
DOC (Industry Canada Notices)
Notice to Users of Radio and Television
This Class B digital apparatus meets all requirements of Canadian Interference-Causing Equipment Regulations per the ICES-003
Notice to Users of the Canadian Telephone Network
Notice: This equipment meets the applicable Industry Canada Terminal Equipment Technical Specifications. This is confirmed by the registration number. The abbreviation, IC, before the registration number signifies that registration was performed based on a Declaration of Conformity indicating that Industry Canada technical specifications were met. It does not imply that Industry Canada approved the equipment.
Before connecting this equipment to a telephone line the user should ensure that it is permissible to connect this equipment to the local telecommunication facilities. The user should be aware that compliance with the certification standards does not prevent service degradation in some situations.
Repairs to telecommunication equipment should be made by a Canadian authorized maintenance facility. Any repairs or alterations not expressly
approved by Xplore or any equipment failures may give the telecommunication company cause to request the user to disconnect the equipment from the telephone line.
Notice: The Ringer Equivalence Number (REN) for this terminal equipment is 0.0. The REN assigned to each terminal equipment provides an indication of the maximum number of terminals allowed to be connected to a telephone interface. The termination on an interface may consist of any combination of devices subject only to the requirement that the sum of the Ringer Equivalence Numbers of all the devices does not exceed five.
UL Notice
This unit requires an AC adapter to operate. Use only UL Listed Class 2 Adapters with an output rating of 19 VDC, with a current of 3.75 A. AC Adapter output polarity:

For authorized repair technicians only
WARNING For continuing
For continued protection against risk of fire, replace only with the same type and rating fuse.
WARNING Danger of e
Danger of explosion if Lithium (clock) battery is incorrectly replaced. Replace only with the same equivalent type recommended by the manufacturer. Dispose of used batteries according to the manufacturer's instruction.
System disposal

M.E.R.C. √t
Mercury Education & Reduction Campaign
In the event of system disposal, observe the following information regarding proper procedures in the State of Vermont.
The liquid crystal display (LCD) lamps used in this system contain mercury. In the event of system disposal, be sure to follow local guidelines.
Index
A
air flow vents, location 19
ambient light sensor, location 17
antenna covers, location 18
Auto Light sensor, disabling 39
Auto Power feature, disabling 78
B
battery pack
charge time 47
charging 46
checking the charge 46
conserving power 54
installing 49
location 18
removing 47
battery release latch, location 18
BIOS Setup Utility, using 77
C
convection air flow cover, location 18
D
digitizer
calibrating 73
using to perform mouse functions 33
double-click, performing with pen 33
dragging and dropping, performing with pen 33
H
headphone connector, location 20
headphone volume, adjusting 43
headphone, connecting 43
Hibernation mode
description 29
hot keys, programming 59
|
Internet Explorer, starting 25
iX104
accessories 13
preventing overheating 70
protecting from damage 69
storing 71
K
Kensington lock slot, location 19
keys
Ctrl-Alt-Del 25
description 25
Ctrl-Alt-Delete
location 24
descriptions 25
Function
description 25
location 24
Function mode hot key combinations
default functions 58
descriptions 25
P1
default function 58
location 24
P2
default function 58
description 25
location 24
P3
location 24
Power On/Off/Sleep/Resume
location 53
programming hot keys 58, 59
to perform other key functions 65
to perform pre-defined functions 63
keys (continued)
quick-start diagram 24
Screen Rotation
description 25
location 24
Secure Attention Sequence (SAS) 24
L
LAN connector, location 20
LCD backlight
disabling automatic control 39
enabling manual control 78
LEDs 22
Status LED meanings 22
left button click, performing with pen 33
local area network (LAN), connecting to 41
logging on 25
M
microphone
connecting external 42
connector location 20
location 17
volume, adjusting 42
monitor
activating 44
connecting 44
sending video display to 25
mouse functions, performing 33
P
pen
double-click speed, changing 33
dragging and dropping 33
holder, location 18
location 18
performing a double-click 33
performing a right-click 33
performing left button click 33
positioning in holder 34
replacing 72
tether, using 34
Power (On/Off)/Backlight (On/Off)/Sleep/Resume
key, location 19, 53
power connector, location 20
power use, managing 50
projection panel
activating 44
connecting 44
sending video display to 25
Q
quick-start guide 24
R
Reset switch
location 17
using 28
resuming operation 31
right-click, performing with pen 33
RJ-45 connector 20
S
screen
landscape mode 25
portrait mode 25
protecting 71
screen orientation
changing 37
landscape 37
portrait 37
screen protector
installing 72
removing 72
replacing 72
serial port
compatible devices 45
location 45
Sleep mode
ending 31
starting 30
Sleep mode, description 29
speaker volume, adjusting 43
speakers
connecting 43
location 17
storing the computer 71
support, contacting 15
suspending operation 30
T
troubleshooting 75
turning off the computer 28
turning on the computer 27
U
USB port, location 20
USB-compatible device, connecting 41
V
video output
changing from monitor to computer 44
changing to monitor 44
volume
adjusting headphone 43
adjusting microphone 42
adjusting speaker 43
W
Windows Task Manager, launching 25
X
XPL expansion module, connecting 45
XPL port 19, 21
Xplore Technologies, contacting 15
95-01097
Rev A

- IX104C5 USER'S HANDBOOK
- CONTENTS
- WELCOME 11
- 1 GETTING STARTED 17
- 2USING THE TABLET 27
- 3MAINTAINING THE TABLET 69
- ATROUBLESHOOTING 75
- BUSING BIOS AND AOS FUNCTIONS 77
- CGLOSSARY 79
- TRADEMARKS
- COPYRIGHT
- PUBLICATION INFORMATION
- DECLARATION OF CONFORMITY
- WARNING
- WARRANTY INFORMATION
- IMPORTANT SAFETY INFORMATION
- CAUTION
- WELCOME
- ABOUT YOUR COMPUTER
- PACKAGE CONTENTS
- OPTIONAL ACCESSORIES
- DOCKING OPTIONS
- CARRYING CASES
- MEMORY
- POWER OPTIONS
- ADDITIONAL ACCESSORIES
- CONTACTING XPLORE – SERVICE AND QUESTIONS
- 1 GETTING STARTED
- FRONT VIEW
- CHAPTER 1. GETTING STARTED
- BACK VIEW
- LEFT SIDE VIEW
- RIGHT SIDE VIEW
- BOTTOM VIEW
- TOP VIEW
- LED INDICATORS
- QUICK-START GUIDE
- 2 USING THE TABLET
- TURNING ON THE COMPUTER
- TURNING OFF THE COMPUTER
- USING THE RESET SWITCH
- SUSPENDING AND RESUMING OPERATION
- NOTES
- SUSPENDING OPERATION
- METHOD 1
- METHOD 2
- RESUMING OPERATION
- USING THE PEN
- USING THE DIGITIZER TO PERFORM MOUSE FUNCTIONS
- CHANGING THE PEN DOUBLE-CLICK SPEED
- POSITIONING THE PEN AND PEN TETHER
- USING THE FINGERPRINT SCANNER
- CHANGING THE SCREEN ORIENTATION
- ADJUSTING THE SCREEN BRIGHTNESS
- ENABLING AUTOMATIC BACKLIGHT CONTROL
- OPTIMIZING SCREEN SETTINGS FOR OUTDOOR USE
- DOCKING THE TABLET
- CONNECTING DEVICES
- CONNECTING TO A LOCAL AREA NETWORK
- CONNECTING USB-COMPATIBLE DEVICES
- CONNECTING AN EXTERNAL MICROPHONE
- ADJUSTING MICROPHONE VOLUME
- CONNECTING A HEADPHONE OR SPEAKERS
- ADJUSTING HEADPHONE OR SPEAKER VOLUME
- CONNECTING A MONITOR OR PROJECTION PANEL (OPTIONAL)
- ACTIVATING THE MONITOR OR PROJECTION PANEL
- CONNECTING A DEVICE TO THE SERIAL PORT (STANDARD)
- USING THE BATTERY
- CHARGING THE BATTERY PACK
- IF YOU DO NOT HAVE AN EXTERNAL BATTERY CHARGER
- IF YOU HAVE AN EXTERNAL BATTERY CHARGER
- REMOVING AND INSTALLING THE BATTERY
- REMOVING THE BATTERY
- TO SWAP WITH A CHARGED BATTERY
- IF A CHARGED BATTERY IS NOT AVAILABLE
- INSTALLING THE BATTERY
- DISCARDING BATTERIES
- USING POWER OPTIONS
- DISPLAYING POWER OPTIONS
- CHECKING BATTERY POWER STATUS
- SELECTING A POWER PLAN
- SELECTING POWER OPTIONS
- SELECTING POWER (ON/OFF)/BACKLIGHT(ON/OFF)/SLEEP/RESUME BUTTON OPTIONS
- TIPS FOR CONSERVING BATTERY POWER
- ACCESSING THE SOLID STATE DRIVE (SSD) CARTRIDGE
- RE-INSTALLING THE DRIVE CARRIER
- ACCESSING THE MICROSD AND SIM COMPARTMENT
- PROGRAMMING HOT KEYS
- PROGRAMMING HOT KEYS TO START APPLICATIONS, OPEN DOCUMENTS, OR GO TO A WEBSITE
- TO START AN APPLICATION
- TO OPEN A DOCUMENT
- TO OPEN A MULTIMEDIA FILE
- TO OPEN A WEB PAGE
- PROGRAMMING HOT KEYS TO PERFORM PRE-DEFINED FUNCTIONS
- PROGRAMMING HOT KEYS TO PERFORM OTHER KEY FUNCTIONS
- CLICK PRESS A KEY OR KEY COMBINATION
- IF YOU WANT THE HOT KEY OR HOT KEY COMBINATION TO PERFORM THE FUNCTION OF A SINGLE KEY
- EXAMPLES
- 3 MAINTAINING THE TABLET
- CARING FOR THE TABLET
- CHECKING POWER CORDS AND CONNECTORS
- PROTECTING THE COMPUTER FROM DAMAGE
- PREVENTING THE COMPUTER FROM OVERHEATING
- STORING THE COMPUTER
- CARING FOR THE DISPLAY SCREEN
- PROTECTING THE DISPLAY SCREEN
- REMOVING THE SCREEN PROTECTOR
- INSTALLING A NEW SCREEN PROTECTOR
- WHEN TO REPLACE THE PEN
- CALIBRATING THE DIGITIZER
- SELECT HARDWARE AND SOUND
- IN THE TABLET PC SETTINGS AREA, SELECT CALIBRATE THE SCREEN FOR PEN OR TOUCH INPUT; THEN FOLLOW THE INSTRUCTIONS THAT APPEAR ON THE SCREEN
- B
- USING BIOS AND AOS FUNCTIONS
- DISABLING THE AUTO POWER FEATURE
- ENABLING AUTOMATIC LCD BACKLIGHT CONTROL
- C GLOSSARY
- FCC NOTICES
- RF EXPOSURE
- HEALTH AND SAFETY INFORMATION
- EXPOSURE TO RADIO FREQUENCY (RF) SIGNALS
- DOC (INDUSTRY CANADA NOTICES)
- NOTICE TO USERS OF RADIO AND TELEVISION
- NOTICE TO USERS OF THE CANADIAN TELEPHONE NETWORK
- UL NOTICE
- FOR AUTHORIZED REPAIR TECHNICIANS ONLY
- WARNING FOR CONTINUING
- WARNING DANGER OF E
- SYSTEM DISPOSAL
- INDEX
- A
- C
- D
- H
- K
- L
- M
- P
- Q
- R
- S
- T
- U
- V
- W
- X
Brand : Xplore
Model : iX104C5
Category : Tablet