
Alchemy DDP-2 - Hi-Fi System ELAC - Free user manual and instructions
Find the device manual for free Alchemy DDP-2 ELAC in PDF.


| Product Type | Preamplifier / DAC / Streamer |
| Brand | ELAC |
| Model | Alchemy DDP-2 |
| Dimensions (HxWxD) | 2 x 17.5 x 15 inches (5.08 x 44.45 x 38.1 cm) |
| Weight | 6.35 kg |
| Power Supply | 108-120 V~, 1.6 A / 200-240 V~, 0.8 A |
| Digital Inputs | USB, 2x coaxial, 2x optical, AES/EBU, 2x I2S (Alchemy and HDMI) |
| Analog Inputs | 1x XLR balanced, 2x RCA unbalanced |
| Analog Outputs | 1x XLR balanced variable, 1x RCA variable, 1x RCA fixed |
| Headphone Output | Yes, mini-jack connector |
| Streaming | Ethernet, Wi-Fi, Bluetooth, Roon Ready, Spotify Connect (coming soon) |
| Sampling Rate | PCM up to 384 kHz, DSD via DoP |
| Signal-to-Noise Ratio | >110 dB (digital and analog) |
| Distortion THD+N | <0.01% (digital), <0.001% (analog) |
| Frequency Response | 10 Hz - 20 kHz ±0.2 dB |
| Features | Volume control, balance, 4 digital filters, resolution enhancement, oversampling, polarity |
| Maintenance | Clean with a soft, dry cloth. Do not use chemical products. |
| Safety | Do not open the device. Disconnect before cleaning. Use on a stable surface. |
Frequently Asked Questions - Alchemy DDP-2 ELAC
User questions about Alchemy DDP-2 ELAC
0 question about this device. Answer the ones you know or ask your own.
Ask a new question about this device
Download the instructions for your Hi-Fi System in PDF format for free! Find your manual Alchemy DDP-2 - ELAC and take your electronic device back in hand. On this page are published all the documents necessary for the use of your device. Alchemy DDP-2 by ELAC.
USER MANUAL Alchemy DDP-2 ELAC
- Please read and follow these safety instructions.
- Keep them safe for future reference.
- Observe all warnings on the preamplifier and in the manual. Please check the amplifier for damage before use. The amplifier must be in perfect working condition. Damaged parts may lead to personal injury.
2. Use only as directed
- Connect the preamplifier according to the instructions in the manual.
3. Location
• Install the preamplifier on a level surface only
- When choosing the location of the preamplifier do not place them in locations that are:
• In direct sunlight
- Very humid
- Prone to vibrations
• Exceptionally hot or cold
WARNING! Please ensure the product is perfectly stable to avoid injury from tip-over. Do not install the preamplifier near any heat sources such as radiators, heating valves, stoves, or other apparatus that produce heat, or in areas where there is a risk of explosion.
- Do not block any ventilation openings. Install in accordance with the instructions.
- Do not install the preamplifier in a closed rack or in a closed cupboard.
- Do not put burning candles on or near the preamplifier.
- Do not install the preamplifier near transformers because electromagnetic stray fields can cause hum noise.
- In combination with certain materials / lacquers / material surfaces, anti-slip feet may cause colored imprints on the surfaces.
4. Overload
- Extreme overload of the device due to very high volume may cause damage to individual components. Because of the possible danger, you should never leave the amplifier under extreme overload conditions unattended.
5. Service
- DANGER! Do not open the amplifier because there may be dangerous voltages inside. Servicing to be carried out by qualified service personnel only.
- Servicing is required when the amplifier has been damaged in any way, such as damage to the power supply cord or the plug, or when liquid has been spilled or objects have fallen onto the amplifier, the amplifier has been exposed to rain or moisture, does not operate normally, or has been dropped. To reduce the risk of electric shock, do not open the amplifier. Servicing should be carried out by qualified service personnel only.

6. Cleaning
NOTE: Clean only with soft, smooth cloth or with dust brush. Do not use scouring agents, alcohol, benzene, furniture polish or other agents for cleaning! Modern furniture is often coated with multiple varnishes and plastics which can be treated with chemical agents. Some of these agents contain substances which degrade or soften the rubber feet. Therefore we advise that you place an anti-slip mat underneath the amplifier.
7. Volume
• CAUTION! Continuous high volume may cause severe damage to your hearing. Please listen responsibly.
8. Disposal
- The packaging is made from recyclable materials. Dispose of this in an environmentally friendly manner. At end of life dispose of the preamplifier as e-waste. The amplifier must be recycled in accordance with local legislation. Ask your local government for further information on recycling as the device contains valuable raw materials.
Philosophy
Thank you for purchasing this ELAC product.
Since the time we started (1926), ELAC has always striven to achieve the very best.
Your new ELAC amplifier is built to the highest standards using high-quality components that are carefully constructed to deliver the best-in-class sound quality. They are developed by a passionate group of individuals whose sole purpose is to bring a new dimension of sound quality into your home. Enjoy!
Before Use
Avoid damage to the amplifier and other components:
- Carefully unbox the amplifier to avoid physically damaging your preamplifier.
Remote Control
![POWER MUTE VOL+ [<< PLAY / PAUSE >] VOL- INPUT< INPUT> BAL L BAL R UP SAMPLE FILTER ELAE ALCHEMY SERIES](/content/2026/05/881214/images/9d478eddf949975a91899a2413a9d71200db005283f2d2fdbc5126eb81af03ea.jpg)
Power: The power button will cycle the power on and off
Mute: Mutes all audio coming from the preamplifier
VOL + : Increases the volume
VOL - : Decreases the volume
<<: For Future Media Control Use
: For Future Media Control Use
Play/Pause: For Future Media Control Use
INPUT< : Cycles through the inputs going left
INPUT>: Cycles through the inputs going right
BAL L: Changes the Audio Balance towards the left speaker
BAL R: Changes the Audio Balance towards the right speaker
UP SAMPLE: Turns the Up Sample Feature On/Off
FILTER: Cycles through the 4 Filter Presets
Controls and Indicators
- POWER Button—Used to power the preamplifier on and off
- Headphone Jack—Use this jack to listen to music privately using headphones. Music will muted from the variable audio outputs when selected (Fixed level outputs will still be active)
- MUTE Indicator — This LED will illuminate when the MUTE function is active
- Headphone Indicator—This LED will illuminate when headphones are connected to the headphone jack
- MUTE Button—Used to activate the MUTE Function which will disable all output of the preamp when active
- Headphone Output Selector—This button will activate the headphone output when selected. Music will muted from the variable audio outputs when selected (Fixed level outputs will still be active)
- Left Navigation Button—Mimics pressing the selector knob to enter the menus and rotating the knob left one click.
- Select Button—Mimics pressing the selector knob, except under certain conditions if you have entered the menu using the knob
- Right Navigation Button—Mimics pressing the selector knob to enter the menus and rotating the knob right one click.
- OLED Display—Use to display information for setup and usage
- Volume Control and Selector Knob—Used to control volume, inputs and various other adjustments
- Balanced Audio Output—Used to connect the DDP-2 to an amplifier using Balanced XLR connections
- Analog Input 1—Used to connect an analog source using unbalanced RCA connections
- Analog Input 2—Used to connect an analog source using unbalanced RCA connections
- FIXED Output—Used to connect to another device that will provide volume control to an amplifier
- Variable Output—Used to connect to a power amplifier using unbalanced RCA connections
- Analog Balanced Input—Used to connect to a balanced XLR based source
- I²S Digital Input 2—Used to connect HDMI based I²S sources
- I²S Digital Input 1—Used to connect to Mini-DIN Based (Alchemy Standard) I²S Source
- AES Digital Input—Used to connect to a Balanced AES Digital Source
- COAX Digital Input 2—Used to connect a Digital source using a coaxial connector
- COAX Digital Input 1 — Used to connect a Digital source using a coaxial connector
- Optical Digital Input 2—Used to connect a Digital source using a optical connector
- Optical Digital Input 2—Used to connect a Digital source using a optical connector
- USB Asynchronous Input—Used to connect a USB Asynchronous based source (See website for PC driver)
- 12 Volt Trigger In/Out— Used when you want to power on/off another device when the DDP-2 is powered on/off
- Ethernet Port—Used to connect the DDP-2 to your home network for control and music playback from 3rd party services/devices
- AC Inlet—Used to connect the DDP-2 to your homes main power

ELAC Alchemy DDP-2 Preamplifier | www.elac.com | Page 4
Wiring the Analog Inputs and Outputs
The DDP-2 can accept 3 analog inputs (one balanced pair via XLR and two pairs of single ended RCAs.) There are several types of analog outputs. Two are the expected variable type (i.e. volume controlled; one balanced pair via XLR and one pair of single ended RCAs.) There is also a fixed-gain output which can be used in a home-theater application, or if one wants to use the DDP-2 digital section separately from its analog section. See the below rear panel diagrams.
Once again, please try to use the very best cables you can, and opt for the balanced connection if you can, especially if you intend to use longer cable lengths.
It is important to practice good cable hygiene while wiring the DDP-2 inputs and outputs. That means try to keep each signal type grouped together (power, digital, analog) and, if they need to cross, you should try to do that at right angles to minimize any interaction between them.

Wiring the Digital Inputs
The DDP-2 can support a total of 8 digital inputs (USB, two-Coaxial (RCA), two optical, AES/EBU, and two I²S formats) plus those available via the media player which can be accessed over the ethernet or wireless connection. For top performance, please use the best connection cables you have available. Digital cables ARE different from audio cables, and the DDP-2 is good enough to let you appreciate the difference.

Connecting to your Home Network
In order to access our Discovery services (ROON, Spotify Connect, or Bluetooth streaming), or to check for or install software updates, an internet connection must be provided by the Ethernet port. It is possible to use DDP-2 internal WiFi connection to do these things, but the initial connection must be wired, after which one can change to wireless. To access the wireless internet connection, please see additional DDP-2 instructions at www.elac.com.
Powering on and Controlling the DDP-2
Initial Power On
Press the POWER button to turn DDP-2 on.
At initial power on the DDP-2 will go through a brief warmup period during which it will be in mute. The Alchemy Logo will be displayed on the front display as the unit warms up.
The screen will go blank just before DDP-2 unmutes and restores the last known status condition of all functions. You will hear a number of relay clicks, which is normal.
The Indicators
There are two LEDs on the front of DDP-2. The first one indicates when the DDP-2 has been placed in MUTE mode, the other when the HEADPHONE output has been selected (which shuts off the variable line outputs, but not the fixed output.)
The Controls
Following the two LEDs there are five buttons with the following functionality –
- MUTE toggles the mute relays for all outputs (including fixed), shutting off the sound completely. The MUTE LED comes on when engaged. Pressing the button again will UNMUTE the DDP-2 and extinguish the LED.
- PHONES engages the headphone output, shutting off the sound from the level controlled (but not fixed) outputs completely. The HEADPHONE LED comes on when engaged. Pressing the button again will turn off the headphones and LED and turn the variable outputs back on.
- “<” mimics pressing the selector knob to enter the menus, rotating the selector knob left one click, except under certain conditions if you have entered the menu using the knob.
- SELECT mimics pressing the selector knob, except under certain conditions if you have entered the menu using the knob.
- “>” mimics pressing the selector knob to enter the menus and rotating the selector knob right one click, except under certain conditions if you have entered the menu using the knob.
To the right of the display window is the selector knob.
During normal operation this is your volume knob. Turning it left reduces the playing volume and brings the numbers in the display closer to minimum (00.0). Turning it right increases the playing volume and brings the numbers in the display closer to maximum (99.5)
Pressing the knob brings up the input selection and settings menus. After 5 seconds of inactivity the menus exit and the status screen automatically returns.
Front Panel Display
Status Screen
Under normal operating conditions the display will show the current status of the DDP-2

- The upper left corner will indicate the selected input.
- The lower left corner show the type of signal the DDP-2 is receiving, either by indicating the sample rate, DSD, MQA, status, NO LOCK if the signal is invalid or not present, or ANALOG if not a digital input.
- The upper right corner, for digital inputs it tells you which digital filter is selected (F1-F4)
- In the lower right corner, for digital inputs, if resolution enhancement is selected or not.
Selecting Inputs
Pressing and rotating the knob (or the similar buttons) will scroll through all available selections, plus bring you to setup and feature screens.

Rotate the knob until you reach the input you want to use, then press the knob or enter button to select it. The order of inputs is as follows, along with any needed explanations:
- USB – Type B input from an enabled Type A computer or media player output
• COAX 1 – 75 Ohm terminated and transformer isolated RCA jack for S/Pdif input - COAX 2 – 75 Ohm terminated and transformer isolated RCA jack for S/Pdif input
- OPTICAL 1 – Galvanically isolated “toslink”-type plastic optical fiber
• OPTICAL 2 – Galvanically isolated “toslink”-type plastic optical fiber - AES/EBU – 110 Ohm terminated and transformer isolated XLR jack for AES/EBU input
- I²S ALCHEMY – our original standard for communicating I2S bus signals over 5-pin minidin
- I ^2 S HDMI – a newer implementation of differential I2S signals over an HDMI cable
- I ^2 S–D1 -One of three user-defined outputs from the internal streamer (see instructions)
- I²S–D2 -One of three user-defined outputs from the internal streamer (see instructions)
- I²S–D3 -One of three user-defined outputs from the internal streamer (see instructions)
- BALANCED – Balanced analog input over XLR jack terminated with 100K Ohm load
- RCA-1 – Single ended analog audio input over RCA jack terminated with 100K Ohm load
- RCA-2 – Single ended analog audio input over RCA jack terminated with 100K Ohm load
Control and Setup
Menu Selections
Rotating past the Input selections will get you to four menu setup items. Press ENTER and rotate the knob or use the buttons to change the setting. Note that these settings are stored PER INPUT and will be recalled the next time this input is selected:
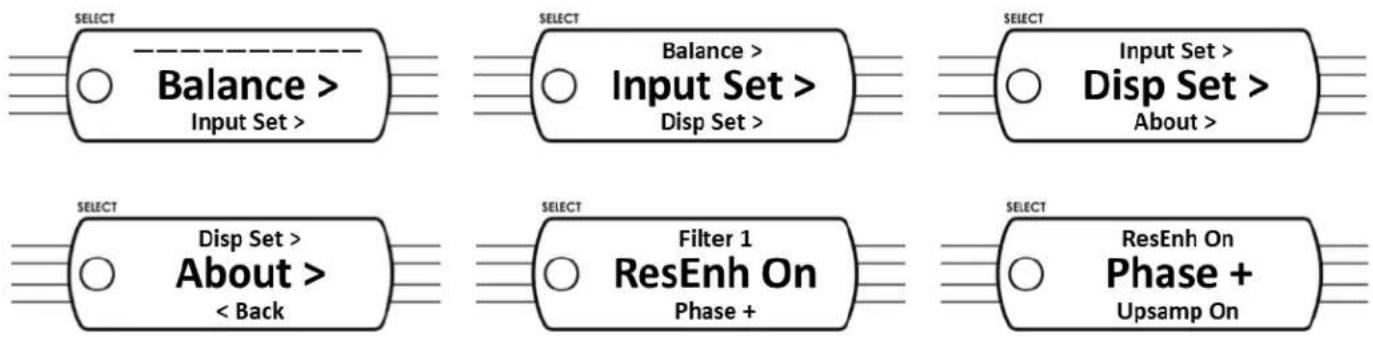
flowchart
graph LR
    A["SELECT"] --> B["Balance > Input Set >"]
    C["SELECT"] --> D["Balance > Input Set > Disp Set >"]
    E["SELECT"] --> F["Input Set > Disp Set > About >"]
    G["SELECT"] --> H["Disp Set > About > < Back"]
    I["SELECT"] --> J["Filter 1 ResEnh On Phase +"]
    K["SELECT"] --> L["ResEnh On Phase + Upsamp On"]
Balance—Shifts the selected input balance Left or Right up to 9.5db from center, or off (---)

Input Set—Brings up the following sub-menu for this specific selected input FILTER 1/2/3/4 – Selects one of 4 digital output filters
F1: Linear phase, fast roll-off
F2: Linear phase, slow roll-off
F3: Minimum phase, fast roll-off
F4: Minimum phase, slow roll-off (apodizing)
ResEnh on/off—Selects if resolution enhancement is to be applied or not

Phase +/- - Selects positive or negative output polarity

Upsamp on/off—Selects if upsampling to the highest available sample rate will be applied

ELAC Alchemy DDP-2 Preamplifier | www.elac.com | Page 8
Control and Setup
DISP SET—Sets if and when the display screen goes off after using any function, the choices are 10Min, 5 Min, 60 Sec, 15 Sec, & OFF. Using any control will wake up the display, although the first press (or turn) will be ignored.

ABOUT—Displays the following status screen about your DDP-2
Controls: Software Version Number
DSP: Software Version Number
Front Panel: Software Version Number
OS: Software Version Number
ETH: Displays the assigned I/P address for the Ethernet connection
WiFi: Displays the assigned I/P address for the WiFi connection
STREAMING SETUP
ROON
Your DDP-2 is what is called a ROON ENDPOINT. This means that any ROON CORE or SERVER will see the DDP-2 as an audio location it can stream to. Of course we recommend the ELAC DISCOVERY series of products as your ROON server, but there are many others, plus you can use your computer. Just remember, that however you decide to do it, the ROON server and the DDP-2 must be connected to the same network, preferably over the Ethernet connection. A wireless connection may be used, but we only suggest that if a wired connection is inconvenient or unavailable. Wired connections are capable of higher speed and tend to be much more reliable and less susceptible to interference, dropouts and other disturbances.
After connecting your ROON server and powering up, you will see the DDP-2 has three available endpoints named I2S-D1, I2S-D2 & I2S-D3. You may pick any or all of these as your ROON endpoint. If you pick multiple endpoints then you can send independent streams to each of them, as desired. Once you have your endpoint(s) selected you can start playing. Select the appropriate input on DDP-2 to play that stream. If you selected to play independent streams, then selecting each on the DDP-2 will give you the stream you selected.
Please visit www.elac.com for the most up-to-date features, firmware and user guides
FIRMWARE UPDATES
To check for or perform a firmware update please navigate to the About Page and write down the IP address for the DDP-2 (Please note that the DDP-2 must be connected to your home network to perform a firmware update). Enter the IP address for the DDP-2 into a web browser on your home computer or tablet and select firmware update.
SPECIFICATIONS
| Digital Inputs USB, (2) COAXIAL, (2) OPTICAL, AES/EBU, (2) I2S (ALCHEMY & HDMI) | |
| Streaming Inputs ETHERNET, BLUETOOTH, WIFI | |
| Supported Services PCM, DSD, DoP, ROON endpoint, Spotify Connect (Coming Soon,MQA (Coming Soon) | |
| Frequency response (digital) 10hz-20khz +/- 0.2dB | |
| Nominal THD+N (digital) <0.01% | |
| Signal-to-noise ratio (1 kHz) (digital) >110dB | |
| Sample Rates 44.1, 48. 88.2, 96, 176.4, 192, 352.8, 384KHz | |
| Output Voltage (digital) 7.0V RMS @0dBFs | |
| Analog Inputs XLR BALANCED, (2) RCA UNBALANCED | |
| Input impedance RCA=18K, XLR=36K | |
| Frequency response (analog) 10hz-20khz +/- 0.2dB | |
| Nominal THD+N (analog) <0.001% | |
| Signal-to-noise ratio (1 kHz) (analog) | >110dB |
| Output Voltage (analog) | >10.0V RMS |
| Crosstalk (L-to-R or R-to-L) | >110dB 10-1K, >80dB 1K-20K |
| Gain | 12dB (input dependent) |
| Output impedance | 50 Ohms |
| Analog Outputs | XLR BALANCED, (1) RCA UNBALANCED (fixed gain) (1) RCA UNBALANCED (variable) |
| Available finishes | Black |
| Dimensions (HxWxD) | 2" x 17.5" x 15" including jacks |
| Weight | 14 lbs |
ELAC Americas Inc.
North America Limited Liability Warranty
Passive Speakers (No built-in amplifier)
ELAC Americas INC. warrants to the original purchaser that this product be free from defects and or workmanship for a period of 3 (Three) years from the original date of purchase. During this time period, repair or replacement of parts will be free of charge to the original owner (See below limitations). Shipping to and return from the repair center will be the responsibility of the original purchaser.
Powered Subwoofers
ELAC Americas INC. warrants to the original purchaser that this product be free from defects and or workmanship for a period of 3 (Three) years on the cabinet and speaker driver and 1 (One) year on the amplifier from the original date of purchase. During this time period, repair or replacement of parts will be free of charge to the original owner (See below limitations). Shipping to and return from the repair center will be the responsibility of the original purchaser.
Electronics (Including Wireless Speakers)
ELAC Americas INC. warrants to the original purchaser that this product be free from defects and or workmanship for a period of 1 (One) years from the original date of purchase. During this time period, repair or replacement of parts will be free of charge to the original owner (See below limitations). Shipping to and return from the repair center will be the responsibility of the original purchaser.
B-Stock (Reconditioned/Open Box) Product Warranty
ELAC Americas INC. warrants to the original purchaser that this product be free from defects and or workmanship, unless otherwise stated in product description, for a period of 90 days from the original date of purchase. During this time period, repair or replacement of parts will be free of charge to the original owner (See below limitations). Shipping to and return from the repair center will be the responsibility of the original purchaser.
Limitations
Warranty begins on the date of original purchase from an authorized ELAC Americas Inc. dealer.
Product is warranted only if used in home applications within the max power rating specified in this manual. Commercial use of this product is not warranted.
- Product that has been modified or altered in anyway will not be warranted.
- Product that has been abused or subjected to faulty equipment will not be warranted.
- Products with defaced or removed serial numbers will not be warranted.
If service is required
In the event that service is required, please contact ELAC America at 888-541-0996 or at customerservice@elac.us to arrange for service or replacement. You will be responsible to provide proof of purchase (Copy or original sales receipt). Shipping to and from our repair center will be the responsibility of the original purchaser.
Warranty Outside of North America
This warranty applies to products purchased in the United States and Canada. For warranty claims outside of North America please contact the local dealer/distributor in the country of purchase.
ELAC
Alchemy™

DDP-2 PREAMP/DAC/STREAMER
OPERATING INSTRUCTIONS
- Use only as directed
- Location
- Overload
- Service
- Cleaning
- Volume
- Disposal
- Philosophy
- Before Use
- Remote Control
- Controls and Indicators
- Wiring the Analog Inputs and Outputs
- Wiring the Digital Inputs
- Connecting to your Home Network
- Powering on and Controlling the DDP-2
- Initial Power On
- The Indicators
- The Controls
- Front Panel Display
- Status Screen
- Selecting Inputs
- Control and Setup
- Menu Selections
- STREAMING SETUP
- ROON
- FIRMWARE UPDATES
- ELAC Americas Inc.
- North America Limited Liability Warranty
- Passive Speakers (No built-in amplifier)
- Powered Subwoofers
- Electronics (Including Wireless Speakers)
- B-Stock (Reconditioned/Open Box) Product Warranty
- Limitations
- If service is required
- Warranty Outside of North America
- ELAC
- Alchemy™
Brand : ELAC
Model : Alchemy DDP-2
Category : Hi-Fi System