USER MANUAL Prestige 500 RSIB Napoleon
Grills illustrated in this manual may differ from model purchased.
We Want Your Feedback!
Visit Napoleon.com to write a review

Apply Serial Number
CONGRATULATIONS ON YOUR
NAPOLEON® GRILL!
You've Just Upgraded Your Grilling Game.
OUR GOAL IS TO MAKE YOUR GRILLING EXPERIENCE BOTH MEMORABLE AND SAFE.
Please read this Owner's Manual before using the appliance to avoid property damage, personal injury, or death.
Remove all packaging material, promotional labels and cards from the grill before use.
USE OUTDOORS IN A WELL-VENTILATED SPACE.


IF YOU SMELL GAS:
- Shut off gas to the appliance.
- Extinguish any open flame.
- Open lid.
- If odor continues, keep away from the appliance and immediately call your gas supplier, or fire department.

WARNING! ⚠️DANGER!
Do not try to light this appliance without reading the "LIGHTING" instructions section of this manual.
Do not store or use gasoline, or other flammable liquids or vapors in the vicinity of this or any other appliance.
An L.P. (propane) cylinder not connected for use must not be stored in the vicinity of this or any other appliance.
If the information in these instructions is not followed exactly, a fire or explosion may result and cause property damage, personal injury, or death.

Alert adults and children about the hazard of hot surface temperatures.

Supervise young children near the grill.
NOTICE TO INSTALLER: Leave these instructions with the grill owner for future reference.
NOTICE TO CONSUMER: Keep these instructions for future reference.
Welcome to NAPOLEON®
Safety First

WARNING! WARNING!
This grill should be installed in conformity with local codes. In absence of local codes, install to the current Natural Gas and Propane Installation Code CSA B149.1 in Canada, or the National Fuel Gas Code ANSI Z223.1/NFPA 54 in the United States.
If a rotisserie motor is used, it must be electrically grounded in accordance with local codes. If an external electrical source is utilized, the appliance must also be grounded in accordance with local codes. In absence of local codes, follow the current Canadian Electrical Code CSA C22.1 in Canada, or the National Electrical Code NSI/NFPA 70 in the United States.

WARNING!
Operation
Leak test this grill before each use, annually and when any gas components are replaced.
Follow the lighting instructions carefully. Do not let the cord hang over the edge of a table. Do not use this grill for purposes other than intended.
Do not operate this grill with a damaged cord, plug, or after the grill malfunctions or has been damaged in any manner. Contact NAPOLEON for repair.

WARNING!
Installation & Assembly
Assemble this grill exactly as instructed in the Assembly Guide. If the grill was assembled in-store, review the assembly instructions to ensure it is done correctly. This grill is not intended to be installed in or on boats or installed in or on recreational vehicles.
Perform the required Leak Test before operating the grill. Do not modify this grill under any circumstances. Allow grill to cool before installing or removing parts.
Do not use a cylinder that is not equipped with a QCC1 type connection. Only use the pressure regulator and hose assembly supplied with this grill or replacement parts specifically recommended by NAPOLEON.

Turn off gas at the propane cylinder or natural gas supply valve. Disconnect the hose between the propane cylinder and grill. Remove the propane cylinder and store outdoors in a well-ventilated space away from children.
Unplug from the outlet when not in use and before cleaning. DO NOT store propane cylinders in a building, garage, shed, or any other enclosed space. Disconnect the natural gas hook-up from the supply when storing the grill indoors.
Place dust cap on cylinder valve outlet whenever the cylinder is not in use. Only install the type of dust cap on the cylinder valve outlet that is provided with the cylinder valve. Other types of caps or plugs may result in leakage of propane.

WARNING!
California Proposition 65
This product can expose you to chemicals including soot, which are known to the State of California to cause cancer, and chemicals including carbon monoxide, which are known to the State of California to cause birth defects or other reproductive harm. For more information go to www.p65warnings.ca.gov.
CONTENTS
Welcome to NAPOLEON ® ! 3
Full System Features 5
Getting Started 6
Additional Safe Operating Practices 6
Locating Your Grill 7
Gas Connections 8
Leak Test 10
Operation 11
Lighting Your Grill 11
Grilling Instructions 13
How to Use the Rotisserie 15
The Grilling Experience Checklist 16
Refer to this list every time you grill 16
How to Season Cast Iron Cooking Grids (if equipped) 16
Quick Start Instructions 17
Napoleon Connectivity 18
ACCU-PROBE ® Cook Assist 20
Display Operation 21
System Monitoring 22
Safeguards 23
Clearance 23
Storage 23
Infrared Grilling Guide 24
Cleaning Instructions 25
Maintenance Instructions 28
Recommendations 28
Combustion Air Adjustment 28
Stainless In Harsh Environments 29
Troubleshooting 31
Compliance 35
Warranty 36

The grills illustrated in this Owner's Manual may differ from the model you purchased. Featured model: P500VX
Getting Started

DANGER! Advises of a hazard that could result in a fire, explosion, death or serious physical injury.

WARNING! Advises of a hazard that could result in minor physical injury or property damage.

Wear protective gloves.

Wear safety glasses.

CAUTION! Hot surface.

Important Information.

Do not smoke while performing a gas leak test. Sparks or flames will cause a fire, explosion, damage to property, serious physical injury, or death.

Never use an open flame to check for gas leaks. Sparks or flames will cause a fire, explosion, damage to property, serious physical injury, or death.

Immediately shut off the gas supply and disconnect.
Additional Safe Operating Practices
- Do not route the hose underneath the drip pan. Maintain proper hose clearance to the bottom of the unit.
- Ensure sear plates are positioned properly according to sear plate installation instructions.
- Burner controls must be off when turning the gas cylinder valve on.
- Do not light burners with the lid closed.
- Do not operate the rear burner(s) with the main burners.
- Do not close the side burner lid when operating or hot.
- Do not deep fry food on the side burner.
- Do not adjust the cooking grids when operating or hot.
- Do not move the appliance during use.
• Turn off the gas supply at the source after use.
- Do not modify the appliance.
- Maintenance should only be done when the grill is cool.
- Do not store lighters, matches or any other combustibles inside the enclosure or condiment tray.
- Keep all electrical supply cords and fuel supply hoses away from all heated surfaces.
-
Clean the grease tray, drip pan, and sear plates regularly to avoid build-up and grease fires.
-
Keep the infrared burner and main burner venturi tubes free from spider webs and other obstructions by inspecting and cleaning it regularly.
- Do not allow cold water (rain, sprinkler, hose etc.) to contact the heated grill. An immediate temperature change will chip the porcelain and crack the ceramic burners.
- Do not use a pressure washer to clean any part of the grill.
- Do not locate this grill where it can be exposed to high winds, especially when the wind can come from directly behind the grill.
- Ensure a safe distance from flammable constructions when using the appliance.
- Never cover more than 75% of the cooking surface with solid metal.
- This appliance must be kept away from flammable materials while in use.
- Always maintain proper clearances to combustibles: 27" (68.6cm) to the rear of the appliance, and 7" (17.8cm) to the sides.
- The minimum ambient operating temperature for safe use of the appliance is 0 °F (-17.8 °C).

WARNING!

BE CAREFUL!
The lid of the grill and the entire firebox can become very hot when in use.
Locating Your Grill
It is important when selecting a location for your gas grill to ensure clearances to adjacent combustibles are met. This appliance is intended for installation on an outdoor patio or in your yard.
- This appliance shall only be used in an above ground open-air situation with natural ventilation, without stagnant areas, where gas leakage and products of combustion are rapidly dispersed by wind and natural convection.
- Do not use in a building, garage, or any other enclosed area.
- Do not incorporate the appliance into any built-in or slide-in construction. Do not obstruct any cylinder enclosure ventilation openings.
- Do not obstruct any cylinder enclosure ventilation openings.
Any enclosure in which the appliance is used shall comply with one of the following:
- An appliance is considered to be outdoors if installed with shelter no more inclusive than with walls on three sides, but with no overhead cover. (Fig 1)
» All openings must be permanently open.
» Sliding doors, garage doors, windows, or screened openings are not considered as permanent openings.
- An appliance is considered to be outdoors if installed with shelter no more inclusive than within a partial enclosure that includes an overhead cover and no more than two sidewalls.
» The sidewalls may be parallel, as in a breezeway, or at right angles to each other. (Fig 2 & Fig 3)
» All openings must be permanently open.
» Sliding doors, garage doors, windows, or screened openings are not considered as permanent openings.
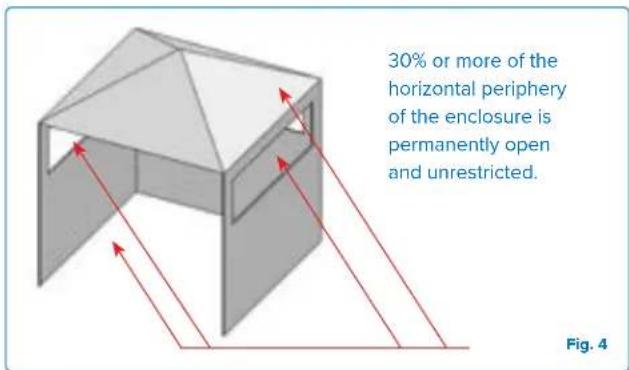
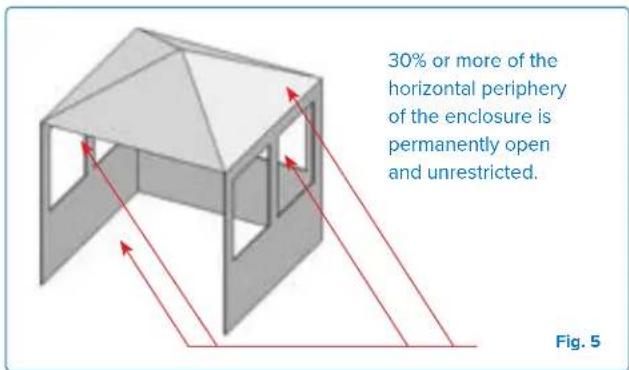
- An appliance is considered to be outdoors if installed with shelter no more inclusive than within a partial enclosure that includes an overhead cover and three sidewalls, as long as 30% or more of the horizontal periphery of the enclosure is permanently open. (Fig 4 & Fig 5)
» All openings must be permanently open.
» Sliding doors, garage doors, windows, or screened openings are not considered as permanent openings.


Gas Connections
To a Propane Cylinder: Option 1
Only use a 20 lb. (9.1 kg) propane cylinder constructed and marked in accordance with the Specifications for LP gas Cylinders of the U.S. Department of Transportation (D.O.T.) or the Standard for Cylinders, Spheres and Tubes for Transportation of Dangerous Goods and Commission, CAN/CSA-B339, as applicable.
Only use a gas pressure regulator specified by Napoleon. The regulator must supply a pressure of 11 inches water column (0.39 psi) and have a QCC1 type fitting.
The cylinder connection device must be compatible with the connection for this outdoor appliance.
The propane cylinder must have:
- A shutoff valve with a QCC1 connection.
• A safety relief device.
• A collar to protect the valve.
• A listed Overfill Protection Device.
Hook-up and Installation
- Check the cylinder for dents or rust, and have it inspected by your propane supplier.
- Never use a cylinder with a damaged valve.
- Place the cylinder in its designated area on the bottom shelf.
- Ensure the gas regulator hose has no kinks.
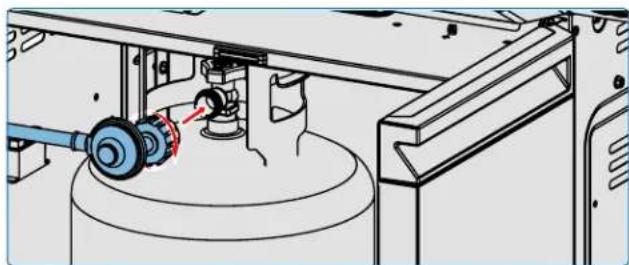
- Remove the cap or plug from the cylinder fuel valve.
- Insert the black QCC1 regulator nipple onto the QCC1 fuel valve. Hand tighten to right. Do not use tools.
- Ensure the hose does not contact with the drip pan or any high temperature surfaces of the grill because it will melt and cause a fire.
- Leak test all joints prior to operating the grill. See "Leak Test".
- The cylinder must be mounted so that the pressure relief valve outlet is not oriented toward the normal operating position of the user.


NOTE: Inspect the LP gas cylinder valve seal for cracks, wear, or deterioration each time the cylinder is replaced or refilled.
Any LP gas cylinder showing signs of damage or deterioration, including visible cracks and pitting, must be returned unused to the seller.


WARNING!
- Do not store a spare gas cylinder under or near the appliance.
- Do not use a gas cylinder that is more than 80% full.
- Follow all specifications and instructions precisely to prevent fire, explosion, property damage, personal injury, or death.
- Disconnect the grill and its individual shutoff valve from the gas supply piping system during any pressure testing in excess of 1/2 psi (3.5 kPa).
To a House Gas Supply Line: Option 2
Quick Disconnect
- Do not install the quick disconnect in an upward direction.
- A readily accessible manual shut-off valve must be installed upstream of the quick disconnect, and as close to it as possible.
- Connect the flared end of the hose to the fitting on the end of the manifold tube or flex tube (if applicable).
- Tighten using two wrenches. Do not use thread sealer or pipe dope.
- Leak test all joints prior to operating the gas grill. See "Leak Test".

WARNING!
- Close the individual shtutoff valve to isolate the grill from the gas supply piping system during any pressure testing equal to or less than 1/2 Psi (3.5 kPa).
- Check the hose for evidence of excessive abrasion, melting, cuts or cracks. If the hose is damaged, it must be replaced with an assembly specifically recommended by NAPOLEON.

BE CAREFUL!
The lid of the grill and the entire firebox can become very hot when in use.
Leak Test
Why and When to Leak Test?
A leak test confirms no gas is escaping after you connect the hose to the gas supply.
Each time the tank is refilled and reinstalled, ensure that there are no leaks in the fitting where the regulator connects to the tank.
Leak test this grill before use, annually, and when any gas components are replaced.
If you Find a Leak
- Tighten any loose joints.
- If the leak cannot be stopped, immediately shut off the gas supply and disconnect the grill.
- Have the grill inspected by a certified installer, or dealer.
- Do not use the grill until the leak has been fixed.
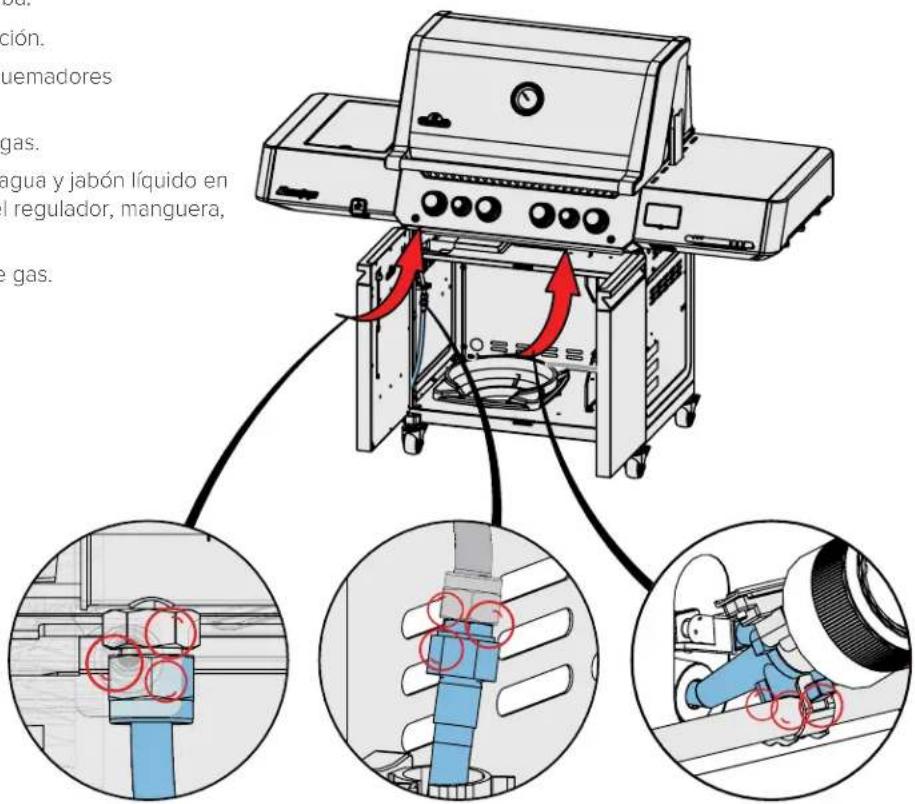
Leak Test Steps
- Do not smoke while performing the test.
- Remove all sources of ignition.
- Turn all burner controls to the off position.
- Turn the gas supply valve on.
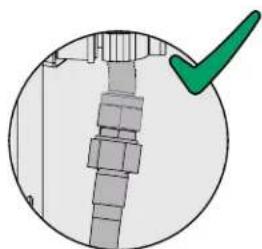
- Brush a half-and-half solution liquid soap and water onto all joints and connections of the regulator, hose, manifolds, and valves.
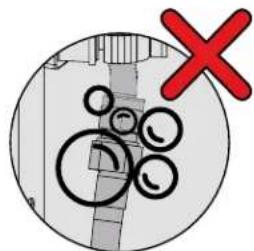
- Bubbles indicate a gas leak.
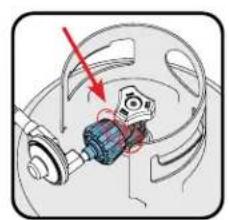


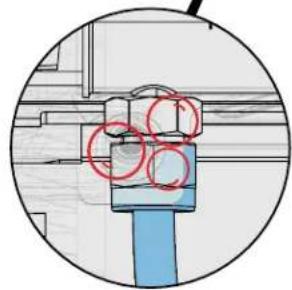

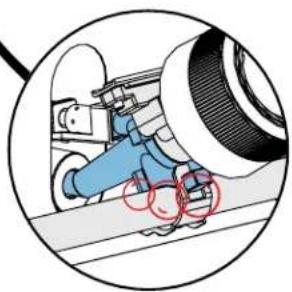


DANGER!
- Never use an open flame to check for gas leaks. Sparks or flames will cause a fire, explosion, damage to property, serious physical injury, or death.
- Only use the pressure regulator and hose assembly supplied with the grill, or one in conformity with local codes.
Operation
Lighting Your Grill
Remove warming rack and run the main burners on high for 30 minutes. It is normal for the grill to emit an odor the first time it is lit. This odor is caused by the "burn-off" of internal paints and lubricants used in the manufacturing process and will not occur again.

WARNING!
- Do not operate the rear or side burner while performing a Burn-Off.
Main Burner Lighting
- Open grill lid.
- Push and slowly turn any main burner knob counter clockwise to HIGH position until pilot lights. Continue to push down on the control knob until the burner lights and then release.
- If the pilot does not light – immediately turn the control knob clockwise to the OFF position. Repeat step 2.
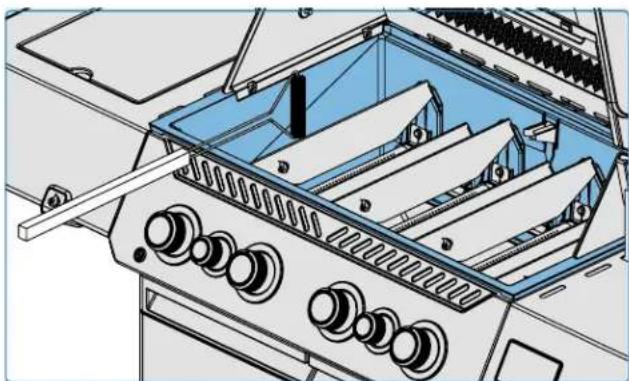
- If the pilot and burner will not light in 5 seconds – turn the control knob clockwise to the OFF position. Wait 5 minutes for gas to dissipate. Repeat steps 2 and 3, or light with a match. (Fig. 6).

WARNING!
- Do not use the rear burner while operating the main burner.
Rear Burner Lighting (if equipped)
- Open grill lid.
- Remove warming rack.
- Push and slowly turn rear burner knob counter clockwise to HIGH position.
- Press and hold igniter button until the burner lights, or light by match.
- If the burner will not light – turn burner control knob clockwise to the OFF position. Wait 5 minutes. Repeat step 3 and 4. (Fig. 6).
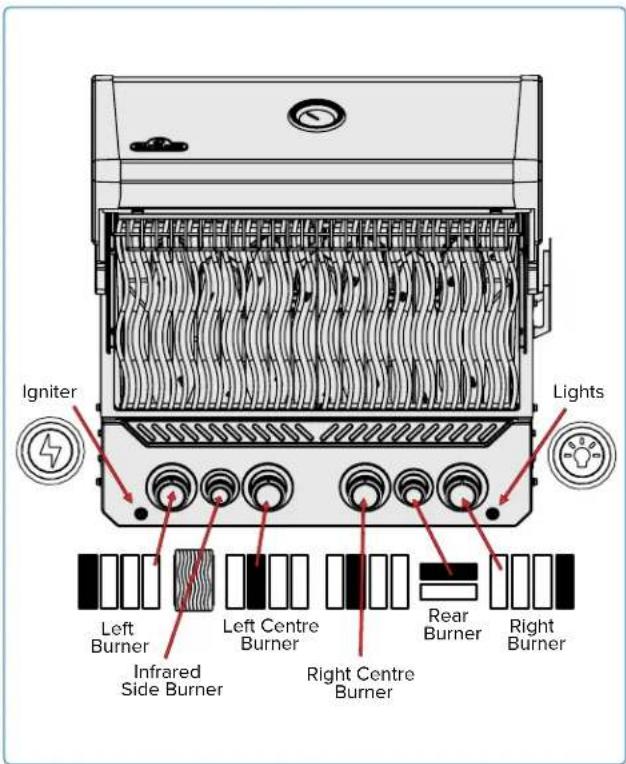

Fig. 6
Side Burner Lighting (if equipped)
- Open burner cover.
- Push and slowly turn side burner knob counter clockwise to HIGH position.
- Press and hold igniter button until the burner lights, or light by match.
- If the burner will not ignite within 5 seconds – turn burner control knob clockwise to the OFF position. Wait 5 minutes. Repeat step 2 and 3. (Fig. 7).
Lighting with a Match
- Clip the match into the supplied lighting rod.
- Insert the lit match through the cooking grids and sear plates.
- While turning the corresponding burner knob to high. (Fig. 8).

Fig. 7

Fig. 8

WARNING!
- Ensure all burner controls are in the OFF position before slowly turning on gas supply valve.
• Follow the lighting instructions carefully.
• Make sure the lid of the grill is OPEN while igniting.
- Do not adjust the cooking grids while the grill is hot, or operating.
- Regularly clean grease out of the entire unit, including the grease tray and the sear plates, to avoid build-up and grease fires.

Grilling Instructions
Main Burner Use
- Preheat the grill before searing food by operating all main burners on high with the lid closed for approximately 10 minutes.
- Food cooked for only a short time such as fish and vegetables can be grilled with the lid open.
- Grilling with the lid closed ensures higher and consistent temperatures that cook meat more evenly and can reduce cooking times.
- The cooking grids can be oiled before preheating to reduce sticking when grilling lean meat such as chicken breast, or pork.
- Food that takes longer than 30 minutes such as roasts can be cooked indirectly with the burner lit opposite the food. See Indirect Grilling.
- Trim excess fat off meat to prevent flare-ups, or reduce the temperature of the grill.
- Flare ups – move food away from the flames and reduce the heat. Leave the lid open.
Direct Grilling
This method is often used for searing, or food cooked for only a short time such as hamburgers, steaks, chicken, or vegetables.
Place food on the cooking grids directly over the heat. Sear meat first to trap-in the juices and flavor. Lower the grill temperature to finish cooking to your preference.

Indirect Grilling
This method uses lower temperatures and circulates heat around the food cooking it slowly and evenly. Use this method to cook larger cuts of meat, or food prone to flare-ups such as roast, chicken, or turkey.
Turn one or more burners on and place food on the cooking grid where there is no flame, or burner on.
Grilling at a lower temperature and slower cooking time results in more tender meats.
Monitoring Grill Temperatures
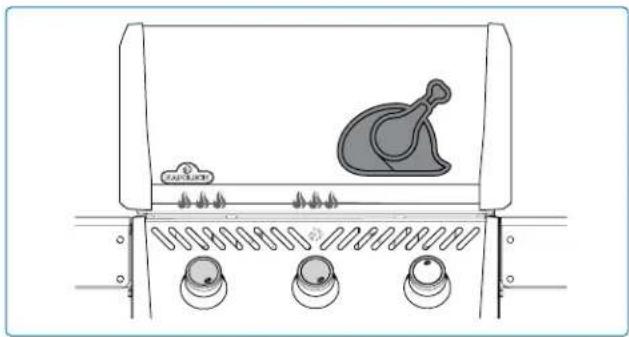
Some models are equipped with two temperature indicators. A lid-mounted gauge indicates the air temperature within the cooking enclosure and is the preferred reference for the indirect cooking method. A base-mounted sensor measures the temperature at the cooking grids and is the preferred reference for the direct cooking method. While optimized airflow throughout the cooking enclosure maximizes heating rates and temperature uniformity, several factors influence temperature readings, including:
Food and Accessories Placement
- Large food items or cookware accessories, such as griddles and planchas, can trap heat over top of the cooking grid temperature sensor. This may lead to elevated sensor readings while also reducing lid temperature gauge readings as heat is directed elsewhere.
Burners in Operation
- Temperature readings are affected by burner settings, as well as the base-mounted sensor's proximity to grill burners which are in operation.

DANGER!

GRILLING PRO TIP!
Use a thermometer to check the internal temperature of meat to ensure it is cooked perfectly.
Time Elapsed
- The temperature indicators have different response times and may initially display varied readings as the appliance heats up. However, similar readings will be achieved once internal temperatures have stabilized.
For best results, utilize the temperature sensor feature along with the lid temperature gauge to fully compare the cooking environment against your target range. Allow time for temperatures to stabilize and adjust burner control settings accordingly.
Infrared Main Burner Use (if equipped)
Follow the "Main Burner Lighting" Instructions and operate on high for 5 minutes with the lid closed or until the ceramic burners glow red.
Cook the food directly on the grid(s) following the directions on the "Infrared Grilling Guide". Food can be seared on the infrared burner and then transferred to the main burners of the grill to finish cooking over direct or indirect heat, depending on your taste and preference.
Flame Side Burner (if equipped)
The flame side burner can be used like a stove top to make gravy or soups. The maximum pot or pan diameter is 10" (25 cm). Be sure your grill is in a location protected from the wind, or the performance of the side burner will be affected.
Infrared Side Burner (if equipped)
To operate, follow the "Side Burner Lighting" instructions. The infrared heat provides an even cooking area for searing food when it's set to high. Some side burner models have a height-adjustable cooking grid. The maximum recommended pot or pan diameter is 10" (25 cm).
Grilling at Night (if applicable)
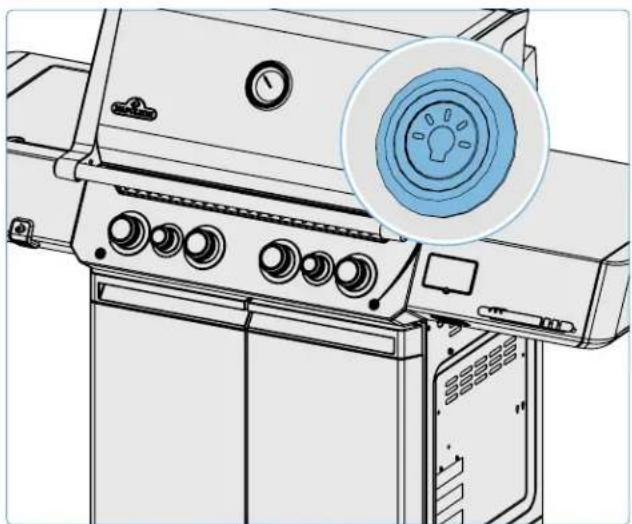
Illuminate the control knobs by pushing the light bulb icon on the control panel. When a burner is operating, the corresponding knob will glow red, while the rest will remain blue.
Wind Guard
Keep your grill cooking smoothly in windy conditions up to 10 mph (16 km/h). Designed to attach easily to your grill, this guard acts like a shield against gusts of wind, helping to maintain consistent heat for evenly cooked meals. Just adjust it to fit your grill, and you're ready to grill with confidence, no matter the weather. The guard can be folded and tucked away under the side burner lid for easy storage when the side burner is not in use.

NOTE: The wind guard must be installed when using the side burner. This enhances safety and reduces cooking times.


WARNING!
- Do not leave food unattended on any lit burners.
- Keep the lid open if main infrared burner is set on high to prevent accidentally burning food.

GRILLING PRO TIP!
Turn the grill perpendicular to the wind direction to minimize its effects.
How to Use the Rotisserie
Assembling Your Rotisserie Kit (if equipped)
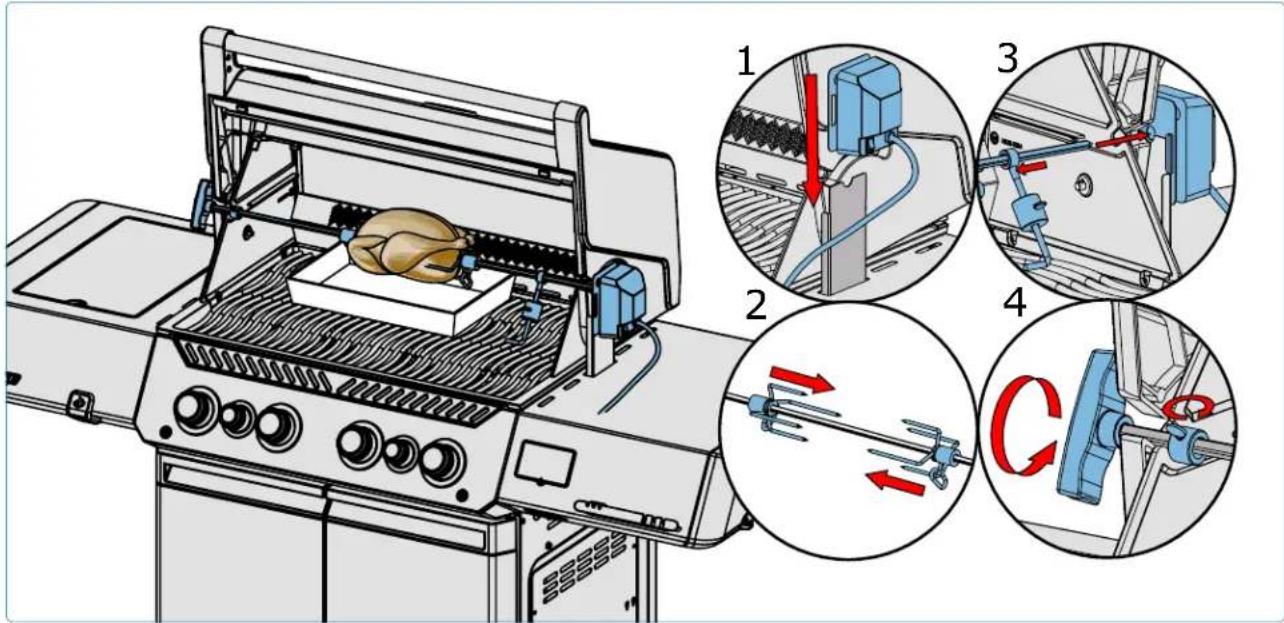
Note: Remove the warming rack prior to using the rear burner and spit rod. Extreme heat will damage the warming rack. Install the rotisserie motor on the side of the grill using the mounting bracket(s). Some models have pre-mounted brackets.
- Once the bracket has been fastened to the grill, slide the rotisserie motor onto the bracket.
- Slide the first rotisserie fork just past the middle of the spit rod and tighten into place. Thread the meat onto the spit rod and push the meat into the fork. Slide the second rotisserie fork on the opposite end of the spit rod and push the fork into the meat until secure. Tighten the fork into place.
-
Carefully insert the pointed end of the spit rod into the rotisserie motor and set the opposite end across the hangers. The heavy side of the meat will naturally hang down to balance the load.
-
Slide the stop bushing onto the spit rod until it is past the inside of the hood. This will secure the side to side movement of the spit rod.
-
Tighten the stop bushing and spit rod handle. Place a metal dish under the meat to collect the drippings.


IMPORTANT! Always wear gloves when handling components of the grill.
Tips about using the Rotisserie:
- Operate the rear burner on high until the meat browns. Reduce heat. Keep lid closed.
- Use a thermometer to check the internal temperature of the meat.
- Roasts and poultry should brown on the outside and stay tender on the inside.
• Use drippings to baste and make gravy.
- A 3-pound chicken takes approximately 1 1/2 hours on medium to high.
- Be mindful of your rolisserie motor capacity (15lb.). Never overload your equipment.
- Be sure to always set an evenly balanced load on your rotisserie.
How to cook multiple chickens
Tie or skewer wings to the body of the chickens.
- Slide rotisserie fork onto spit rod.
- Thread first chicken onto spit rod until it is held into place by the rotisserie fork. Tighten.
- Thread next 2 chickens onto spit rod so all the chickens are close together.
- Slide second rotisserie fork onto spit rod and push into chicken until all 3 chickens are squeezed together tightly. Tighten.
The Grilling Experience Checklist
Refer to this list every time you grill

Read Owner's Manual
Be sure to have read the owner's manual and all the safety instructions.

Clean grease tray
Always ensure you clean the grease tray prior to grilling to avoid fires and flare-ups.

Check the hose
Ensure the grill is off and cool. Check the hose for evidence of excessive abrasions, or cuts. Have the hose replaced before use if the hose is damaged.

Preheat and clean grids
Coat the grids with vegetable shortening and preheat your grill to burn off excess residue and prevent sticking. Clean cast iron grids with a brass wire brush and stainless steel grids with a stainless brush. See "Cleaning Instructions".

NOTE: Stainless steel cooking grids are corrosion resistant and require less maintenance than cast iron grids.

Prep area
Make sure everything you need while grilling such as your utensils, seasonings, sauces, and dishes are within your reach. Don't leave your food unattended, or it could burn.

Flip once and do not peek
Try not to open the lid and peek too much, or heat will escape and throw your temperature and cooking times off. Flip your food only once, especially steak and chicken.

Leave space
Leave some space on the grill and between food, so you have room to move food around if you need to.

Use a thermometer
Use a thermometer to ensure food is cooked thoroughly. Follow the appropriate temperatures guidelines for all types of meat, especially poultry.

GRILLING PRO TIP!
Discover inspiring recipes and grilling techniques in Napoleon's cookbooks or visit www.napoleon.com

GRILLING PRO TIP!
Always preheat the grill before cooking to burn off leftover residue and prevent food from sticking to the grate.

OIL AND FAT SUGGESTION!
Grapeseed Oil
Sunflower Oil
Soybean Oil
Extra Virgin Olive Oil
Canola Oil
If not available, select an oil or fat that has a high smoke point. Do not use salted fats like butter or margarine.

CAUTION!
How to Season Cast Iron Cooking Grids (if equipped)
This procedure MUST be done prior to first use and repeated every 3-4 uses to keep grids looking new.
- Remove cast iron grids from the grill.
- Wash grids with warm soapy water and soft cloth. Pat dry and allow grids to completely dry.
- Apply fat/oil evenly using a silicone brush on both sides.
- Preheat appliance to 350 °F - 400 °F (176 °C - 204 °C).
-
Install cooking grids and cook for 30 minutes.
-
Apply a second even coat of fat/oil on cooking grids, and keep cooking for 30 more minutes.
- Grids are now seasoned.

NOTE: If rust has formed on the cast iron grids, remove the rust with scouring pad or brass brush and repeat the seasoning process.
Quick Start Instructions
1
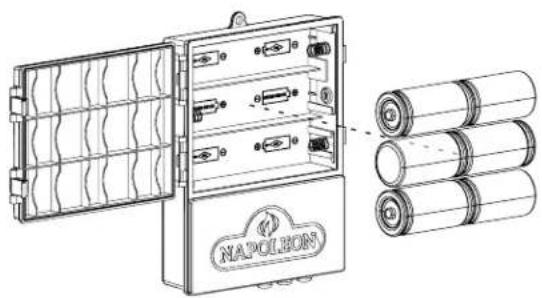
Insert the batteries into the compartment.
2
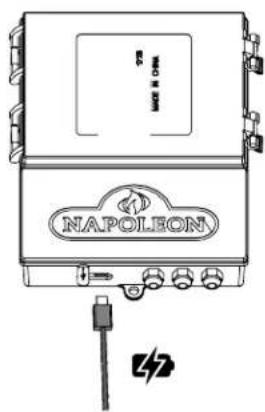
Alternatively, the device can be powered using a direct supply through the USB Type C port. To do this, use a 5V 1A adapter. It is recommended to remove the batteries if using direct supply to prevent corrosion and prolong battery life.
3

Ensure your device is turned on.
4

Remove the protective plastic and plug one or more probes into your appliance.
5

When using meat probes, ensure that the tip of the probe is inserted into the thickest section of the food, avoiding bones or fat.
6

Follow the instructions in the next section to connect to the Napoleon Home App. Enjoy your meal!
Napoleon Connectivity
NAPOLEON HOME APP
HOW DOES IT WORK?
Access your appliance remotely by downloading the Napoleon Home
App from the App Store or Google Play.
In order to access the app, you will be required to create an account by following the instructions listed within the app (see below for details).

By pairing your appliance to the
Napoleon Home App via Wi-Fi, you gain control to all modes and functions of the appliance.
All notifications and alarms are sent through the app to keep you connected with ease.


Scan this QR code for direct access to the Napoleon Home App website.

LET'S GET STARTED

Register

Register an account with the Napoleon Home App OR sign-in using your Facebook, Google, or Apple account information.

Create

Enter user information and create a password for the account.
Select the country in which the appliance is located.

Almost there
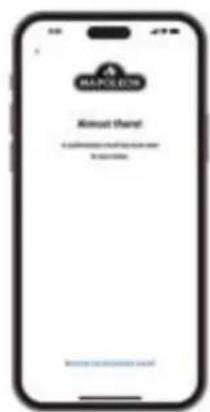
The information entered in Step 3 will be registered to the Napoleon
Home App and a confirmation will be sent to the email provided.

Confirm

Open email inbox and select the confirmation link. Note: The confirmation link must be opened on the device that the Napoleon Home App is installed on.

Re-confirm

If no email is found, click "Re-Send Confirmation Link" and check junk folder.
ADDING A DEVICE

Power On
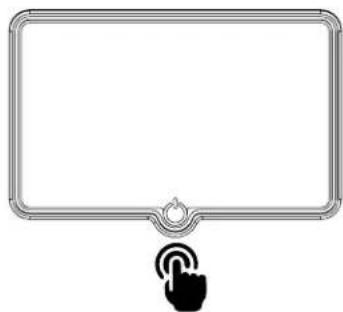
Ensure your device is turned on.
To finalize initial pairing with your smart device, press down on your display for 10 seconds until it restarts.

Add Device
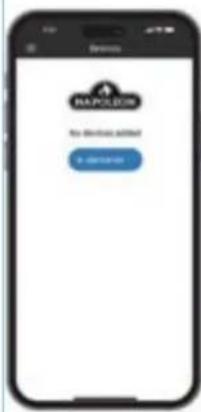
Select "Add Device" and accept the permissions.


Search


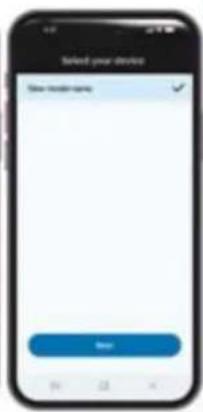
Search for devices and select the device from the list.

Network Connection


Select the Wi-Fi network and enter your credentials.

Add Nickname

Enter a custom name for your device, or proceed with default name provided.

Success

You are now connected.
ACCU-PROBE ® Cook Assist
Confidently tend to the grill and your guests while using the integrated ACCU-PROBE technology. Monitor internal grill temperature. Easily program your food type, target temperature, and cooking time using your smart device with the Napoleon Home App.
You will receive notifications on your device when your food is cooked to perfection. ACCU-PROBE ® supports both Wi-Fi and Bluetooth ® connectivity. If your default Wi-Fi is not available, the Bluetooth ® function allows you to connect to ACCU-PROBE ® with ease. The device must be initially provisioned using Wi-Fi, then only Bluetooth ® will be available.
See "Quick Start Instructions" and "Napoleon Home App" sections for more information on getting connected. Download the Napoleon Home App and enjoy smart cooking.
Any use of such marks and logos as indicated are owned by the respective owners and any such use by Wolf Steel Ltd. is under license: Bluetooth ® by Bluetooth SIG, Inc. Other trademarks and trade names are those of the respective owners: Android ™ and Google Play ™ are trademarks of Google Inc.; Apple, iPhone ® , and the Apple App Store is a trademark of Apple Inc.; iOS is a trademark or registered trademark of Cisco Inc.
Compatible Devices
The Napoleon Home App is designed to work with a wide range of Android and iOS devices. Device compatibility is not guaranteed due to numerous different models and manufacturing standards.
Display Overview

Display Operation

| Function Action Duration Description | | |
| Paring Mode Press and hold 10 seconds | | When the system restarts, the Napoleon logo will appear. The Wi-Fi and Bluetooth' icons will flash, indicating that the device is in pairing (Access Point mode). You will need to provision the device again using the Napoleon Home App.This process should be completed when the display is active. If the display is off or in display timeout, continue to press and hold the button until Access Point Mode is reached. |
| Display On/Off Press and hold 3 seconds | | The Napoleon logo will appear, accompanied by an audible alert. The display will cycle on or off, depending on its current status. |
| Wake-up Display(On Battery Power Only) | Single tap N/A | | After awakening, the display will seamlessly return to its previous state. |
| TemperatureUnit Change | Single tap N/A Toggle between Celsius and Fahrenheit. |
In Winter Conditions
For the best experience in winter conditions, use the control panel button to toggle the display on or off. This allows for functionality without the need to remove gloves. Simply long-press the control panel button for more than 3 seconds.

NOTE: The display turns off after 5 minutes of inactivity, returning to default brightness when prompted by user action. If any activity occurs during this time, the 5-minute period resets.
System Monitoring
Safety Glow
Illuminate the control knobs by pushing the light bulb icon on the control panel. When a burner is operating, the corresponding knob will glow red, while the rest will remain blue. In order to conserve battery life, the knobs glowing blue will turn off after 1 hour by default, while the rest will remain red. The shutoff time of 1 hour for battery powered operation can be adjusted within the app. When using a USB power source, the shutoff timer for the lights will be cancelled.

Low Battery
Monitor the battery level status through the app and display. When the system draws power from a battery source, flashing knobs indicate low battery. The system transmits an alert to your device and will shut down once the battery is nearly depleted. Replace the batteries as necessary. The following indicators represent the approximate levels of charge remaining in the batteries:

Green – Full Orange – 50% Red - Low

Temperature Alerts
The system can provide audible alerts when target temperatures have been reached. The display will indicate which probes have a target temperature set.

Timer Alerts
The display will indicate when a timer has been set. The system can provide audible alerts when a timer has ended.

Propane Tank Scale
The system can continuously monitor the propane remaining in the tank and provide the status at a quick glance.

Green - 100% Orange - 50% Red - 20%

Flashing Red – Low
Zero the Scale
Before calibrating:
- Remove the empty tank from the scale. Press the designated button to initiate zero tare.
- Wait 20 seconds for the taring process.
- Place the new tank on the scale after zero tare completion.
Select the Tank
- Launch the Napoleon Home App.
- Navigate to the tank scale section.
Select Tank and Region:
- Select "New Tank Scale."
- Choose your region (North America, Europe or Custom).
- For North America, default tank weights are selected.
• For Europe, select from the list of available tanks specifications.

Custom Tank (Optional):
- If you choose custom tank, input the empty tank weight and its full weight. This ensures precise measurements.
» Empty Tank Weight (lbs/kg): Enter the weight of the empty tank.
» Full Tank Weight (lbs/kg): Enter the weight of the full tank.
- Ensure accurate values before proceeding with placing tank in the holder.


NOTE: It may take about 1 minute to get the data updated to the app.
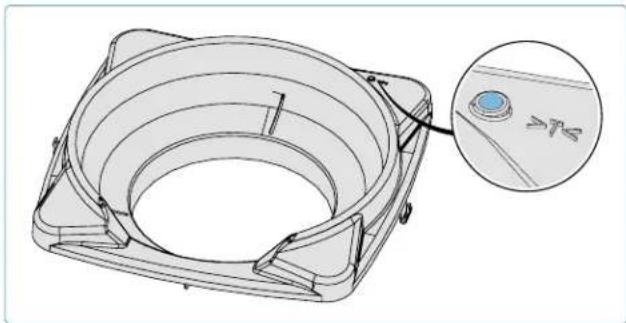
Safeguards
- Avoid high humidity or extreme temperatures.
- Avoid long exposure to direct sunlight or strong ultraviolet light.
- Do not disassemble or try to repair the unit on your own.
- Do not expose the unit or its accessories to flammable liquids, gases, or other explosives.
• Probes can operate from -4° F ( -20° C) to 572° F ( 300° C).
- Probe cords can operate from -4°F (-20°C) to 716°F (380°C).
- IMPORTANT: Do not allow the probes to be directly exposed to flames or temperatures exceeding 572°F (300 °C).
- For accurate readings, insert the probes into the center of meat, ideally before it is placed on the grill.
- IMPORTANT: Point the tips of the probes downward but do not allow the tips to touch the cooking grids. Also try to ensure that probes do not touch the body of the grill.
- Place meat on the side of the grill closest to the thermometer.
- Position the cord at a high exit point so the cord stays sufficiently above the cooking grids when the lid is closed.
• Alternatively, probe handles may be positioned under the lid seal. Ensure the sides of the grill do not exceed the highest probe operating temperature.
- When using more than one probe, colored probe rings can help identify the number of each probe. Place each ring around the probe tip and push until it reaches the base holder.
Clearance
- Check that the cooking area does not exceed the maximum temperature and cords are not kinked or frayed by closed doors or lids.
- First check the cord clearance at ambient temperature with the lid closed. Examine the cord for any severe kinking or bending. Then turn the grill ON and check for hot spots where the cord may make surface contact.
Storage
- Use the probe storage provisions on the side shelf when preparing to cook. Unplug the probes and bring them indoors when not in use to protect them from the elements.


WARNING!
• After cooking, do not return the probes to the holder until they cool off.
Infrared Grilling Guide
| Food Control Knob Setting Cooking Time Suggestions | |
 Steak 1 inch (2.54 cm) thick. Steak 1 inch (2.54 cm) thick. | HIGH 2 minutes each side. | Rare - 4 minutes | Ask for marbled fat in cut. Fat is a natural tenderizer and keeps meat juicy. |
| HIGH to MEDIUM High heat 2 minutes each side then turn to medium heat. | Medium - 6 minutes |
| Well Done - 8 minutes |
 Hamburger 1⁄2 inch (1.27 cm) thick Hamburger 1⁄2 inch (1.27 cm) thick | HIGH 2 minutes each side. | Rare - 4 minutes | Keep patties all the same thickness for equal cooking times. Patties 1 inch thick or more should be grilled using indirect heat. |
| HIGH 2 1⁄2 minutes each side. | Medium - 5 minutes |
| HIGH 3 minutes each side. | Well Done - 6 minutes |
 Chicken Chicken | HIGH, MEDIUM, LOW 2 minutes each side then medium-low to low heat. | 20 - 25 minutes | Slice joint connecting the thigh and leg 3⁄4 through for the meat to lie flat on the burner and cook evenly. |
 Pork Chops Pork Chops | MEDIUM 6 minutes each side | Choose thick cuts for more tender meat. Trim off excess fat. |
 Spare Ribs Spare Ribs | HIGH to LOW High for 5 minutes then low until finished. | 20 minutes each side turning often | Choose lean meaty ribs. Grill until meat pulls easily from the bone. |
 Lamb Chops Lamb Chops | HIGH to MEDIUM High for 5 minutes then Medium until finished. | 15 minutes each side | Choose thick cuts for more tender meat. Trim off excess fat. |
 Hot dogs Hot dogs | MEDIUM to LOW 4 - 6 minutes | Select larger wieners and slit lengthwise before grilling. |
Cleaning Instructions
First Time Use
- Wash grids by hand with water and mild dish soap to remove any residue from the manufacturing process. DO NOT wash in a dishwasher.
- Rinse thoroughly with hot water and dry completely with a soft cloth to prevent moisture from entering the cast iron.
Cast Iron Grids
- Season your grids to add a protective coating to prevent corrosion See Grilling Tips – How to Season your Cast Iron Cooking Grids.
Stainless Steel Grids
- Stainless steel cooking grids can be cleaned by preheating the grill and using a wire brush to remove residue.
- Stainless steel grids will permanently discolor from regular use because of high temperatures when grilling.
Infrared Side Burner
- Most drippings and food particles that fall on the infrared burner surface incinerates immediately because of the high intensity heat.
- Do not clean the ceramic tile with a wire brush.
- Do not use water or other liquids to clean the burner. An immediate change in temperature will cause cracking of the ceramic tile.
• Light burner and operate on high for 5-10 minutes to remove any left-over residue.
Inside of the Grill
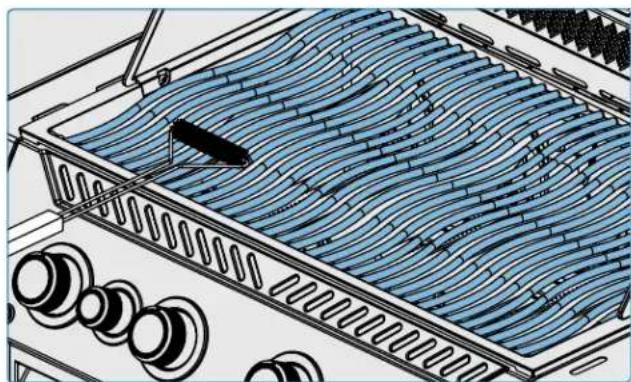
- Remove the cooking grids.
- Use a brass wire brush to clean loose debris from the sides and underneath the lid.
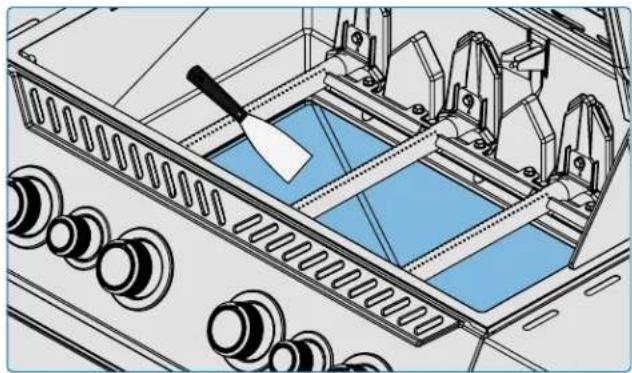
- Scrape the sear plates with a putty knife or scraper. Use a wire brush to remove the ash.
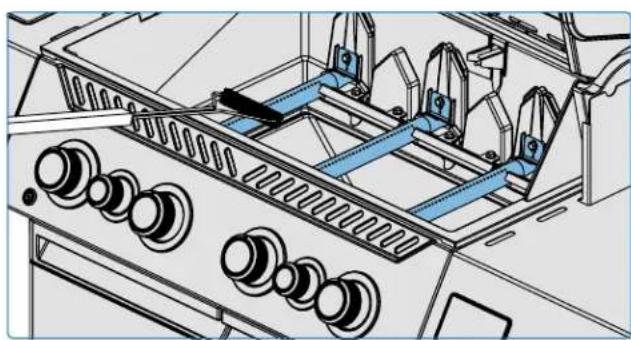
- Remove the sear plates and brush debris from the burners with a wire brush.
- Sweep debris from inside the grill into the drip pan.


DANGER!
• Always wear protective gloves and safety glasses when cleaning your grill.
• Accumulated grease is a fire hazard.
- Cleaning should only be done when the grill is cool to avoid the possibility of burns.
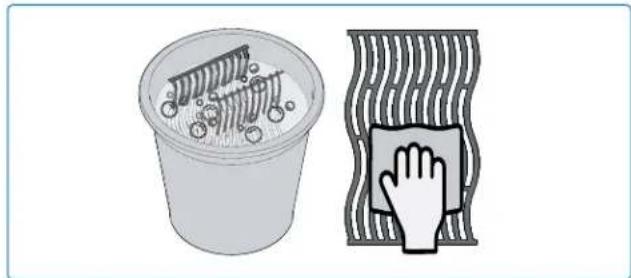

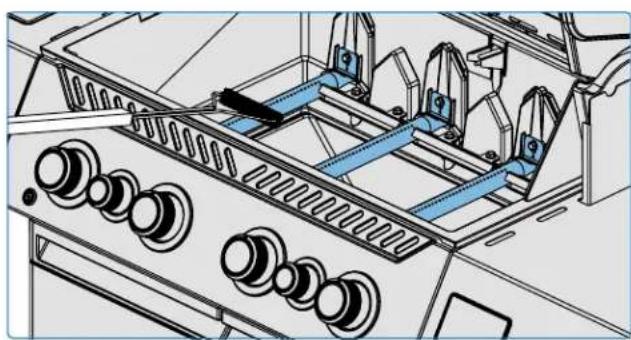
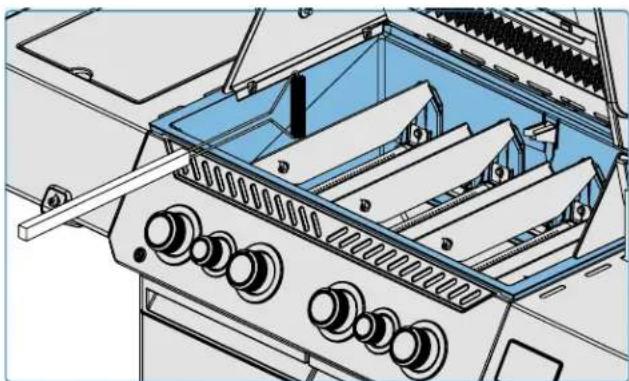
Drip Pan
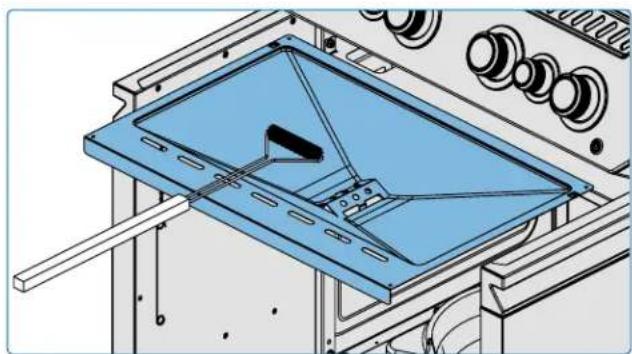
Every grill head, side burner and drop-in burner have a corresponding drip pan. It is easily accessible through doors or openings.
- Grease and excess drippings collect in the drip pan located beneath the grill and accumulate in the disposable grease tray below the drip pan (if applicable).
- Only use Napoleon approved liners on the drip pan. Never use aluminum foil, sand or any other unapproved material. This can prevent grease from flowing properly.
- Clean frequently to avoid grease build-up – approximately every 4-5 uses.
Cleaning steps:
- Slide the drip pan from the grill to access the disposable grease tray or to clean the drip pan.
- Scrape the drip pan out with a putty knife or scraper.
- Replace the disposable grease tray every 2-4 weeks depending on grill usage (if applicable).
- See your Napoleon Grill dealer for supplies.
Control Panel
ONLY use warm soapy water. Text is printed directly on the control panel and will gradually rub off if abrasive or stainless steel cleaners are used. Proper cleaning of the control panel will ensure the text remains dark and legible.
Aluminum Castings
Clean with warm soapy water. Aluminum doesn't rust, but high temperatures and weathering can cause oxidization on the surface of the castings that look like white spots.
See "Maintenance Instructions" for more information on how to prevent oxidized aluminum.
Outside Grill Surface
- Only use a non-abrasive cleaner.
Abrasive cleaners or steel wool will scratch the finish.
• Always wipe in the direction of the grain.
- Handle porcelain enamel components with care.
- The baked-on enamel finish is glass-like and will chip if struck.
Stainless steel parts discolor overtime when heated and will turn a golden or brown hue. This is normal and won't affect the performance of the grill.



WARNING!
- Ensure all burners are turned off and grill is cool before cleaning. Do not use oven cleaner to clean any part of the grill.
- Do not put cooking grids or any other parts of the grill in a self-cleaning oven to clean. Clean the grill
in an area where cleaning solution won't harm decks, lawns, or patios.
- Barbecue sauce and salt can be corrosive and will cause rapid deterioration of the grill components unless cleaned regularly.
Insect Screen and Burner Ports
Spiders and insects are attracted to small enclosed spaces.
Napoleon has equipped the burner with an insect screen on the air shutter. This reduces the likelihood of insects building nests inside the burner, but doesn't eliminate the problem.
A nest or web can cause the burner flame to burn a soft yellow or orange and cause a fire or flashback at the air shutter underneath the control panel.
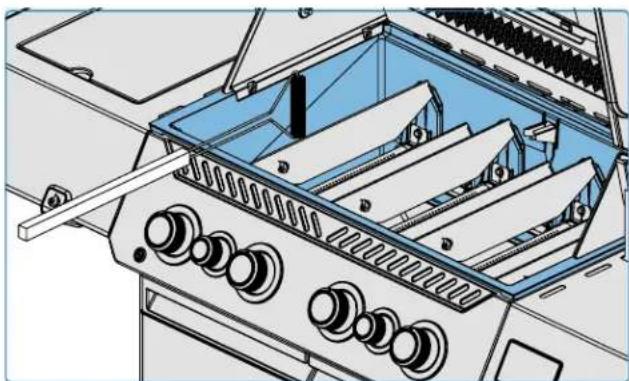
- Remove the screw (s) that attaches the burner to the back wall of the grill. Slide the burner back and upwards to remove. (Fig.9)
- Clean the inside of the burner using a flexible venturi tube brush or, for delicate areas, a soft bristled brush to gently remove debris.
- Shake loose debris from the burner through the gas inlet.
-
Check the burner ports and valve orifices for blockages: burner ports can close over time because of cooking debris and corrosion.
-
Use an open paper clip or drill bit to clean the burner ports. While this can be done with the burner attached, it is easier if removed from the grill.
- Do not flex the drill bit when drilling the ports because the drill bit will break.
- This drill bit is for burner ports NOT for brass orifices that regulate the gas flow to the burner.
- Do not enlarge the holes.
- Ensure the insect screen is clean, tight, and free of any lint or other debris.
- Reverse the procedure to reinstall the burner.
- Ensure the valve enters the burner when installing.
- Replace sear plate mount and tighten screws to complete re-installation.
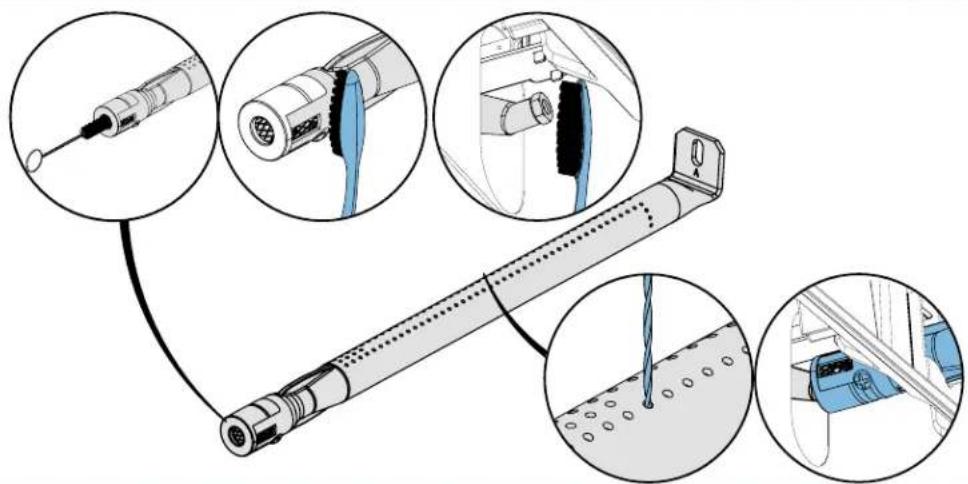
Fig. 9
Temperature Probes
- Clean the probes before using for the first time.
- Hand wash the metal portion of probes and dry thoroughly after each use. Do not wash in a dishwasher.
- Probes are rust-proof and corrosion resistant. Do not use any chemicals or cleaning solutions to clean the probes except mild soap.
NOTE: The probe jacks, probe cables, and display unit are water resistant but should not be left in the rain. The appliance should never be immersed in water.

DANGER!
- It is very important the valve/orifice enters the burner tube when reinstalling the burner after cleaning and before lighting your grill, or a fire or explosion could occur.
- Avoid unprotected contact with hot surfaces.
- Do not use abrasive cleaners or steel wool on any painted, porcelain, or stainless steel parts of your grill because it will scratch the finish.

SAFETY FIRST!
Always wear protective gloves and safety glasses when servicing your grill.
Maintenance Instructions
Recommendations
This grill should be thoroughly inspected and serviced annually by a qualified service person.
- Do not obstruct the flow of ventilation and combustion air.
- Keep the cylinder enclosure ventilation openings located on the side of the cart or enclosure and front and back of the bottom shelf clear from debris.
Combustion Air Adjustment

IMPORTANT! This must be done by a qualified gas installer.
- The air shutter is factory set and should not require adjusting under normal conditions. Adjustments might be required under extreme field conditions.
- The flames of the air shutter will be dark blue, tipped with light blue and occasionally yellow when adjusted correctly.
- Too little air flow to the burner will produce soot and lazy yellow flames.
- Too much air flow to the burner will cause flames to lift erratically and cause igniting difficulties.

Adjusting the Air Shutter
- Remove cooking grids and sear plates. Leave lid open.
- You may have to open the cabinet door or remove the top drawer (if equipped) to access the air shutter screw located at the mouth of the burner.
- Remove the back cover to adjust rear tube burner air shutter.
- Loosen air shutter lock screw and open or close air shutter as required.
- Light the burners on high.
- Visually inspect burner flames.
- Turn burners off, tighten locking screws, and replace removed parts when shutters are set correctly.
- Ensure insect screens are installed.

NOTE: Infrared burners have no air adjustment.
| Air Shutter Settings |
| Model Type of Gas Main Burner | Rear Tube Burner |
| P500V(X) | Propane * 1/4" (6 mm) * 1/16" (2 mm) |
| Natural Gas * 1/8" (3 mm) * Fully closed |
| P665V(X) | Propane * 1/4" (6 mm) * 1/16" (2 mm) |
| Natural Gas * 1/8" (3 mm) * Fully closed |
| * Each side of the air shutter |

WARNING!
- Keep the grill away from combustible materials, gasoline, and other flammable vapors and liquids.

WE WANT TO HELP!
Contact the Napoleon customer solutions department for recommended replacement parts 1-866-820-8686.
Stainless In Harsh Environments
Stainless steel oxidizes or stains in the presence of chlorides and sulfides, especially in coastal regions, warm and highly humid areas, and around pools and hot tubs. These stains look like rust, but they can be easily removed or prevented. Wash stainless and chrome surfaces every 3-4 weeks. Clean with warm soapy water.
Burner Maintenance
- Extreme heat and a corrosive environment can cause surface corrosion to occur even though the burner is made from heavy wall 304 stainless steel.
Maintenance and Protection of Infrared Burners
Your infrared burners are designed to provide a long service life, but you must be careful to prevent cracking of their ceramic surfaces. Fractures will cause the burners to malfunction.

IMPORTANT! Damage resulting from by failure to follow these instructions is NOT covered by your grill warranty.
Door Adjustment
The appliance cart doors can be adjusted if they are uneven.
- Locate the adjustment bracket at the top of the door.
- Using a screwdriver, turn the door adjustment screw clockwise to raise the door, or counterclockwise to lower it.
- After one or two turns of the screwdriver, open and close the door and check alignment at the top of the doors.
- If necessary, repeat these steps until the doors are aligned.
Clearance Ventilation of Hot Air
- Hot air must have a way to escape the grill for the burners to function properly.
- The burners can become deprived of oxygen if the hot air is not allowed to escape causing them to back-flash. The ceramic can crack if this occurs repeatedly.
Steps to Avoid Damaging Ceramic Surfaces
- Never douse a flame or control flare-ups with water.
- Do not allow cold water (rain, sprinkler, hose etc.) to come in contact with hot ceramic burners. An immediate change in temperature will cause cracking of the ceramic tile.
- A ceramic burner that becomes wet before use will create steam when operated later and produce pressure that will crack the ceramic.
- Repeated soaking of the ceramic can cause it to swell and expand producing pressure that will make the ceramic crack and crumble.
- Inspect the ceramic for possible water soaking if you find standing water in the grill. Remove the burner if the ceramic is wet. Turn it upside down to drain the excess water. Bring ceramic indoors to dry thoroughly.
- Do not allow hard objects to impact the burner. Take care when inserting or removing cooking grids and using accessories.


DANGER!
- Turn off gas at the source and disconnect the unit before servicing.
- Maintenance should only be done when the grill is cool to avoid the possibility of burns.
- A leak test must be performed annually and when any component of the gas train is replaced, or when the smell of gas is present.

SAFETY FIRST!
Never cover more than 75% of any main or side burner cooking surface with any solid metal (e.g. griddles or pans)
Leveling Your Appliance
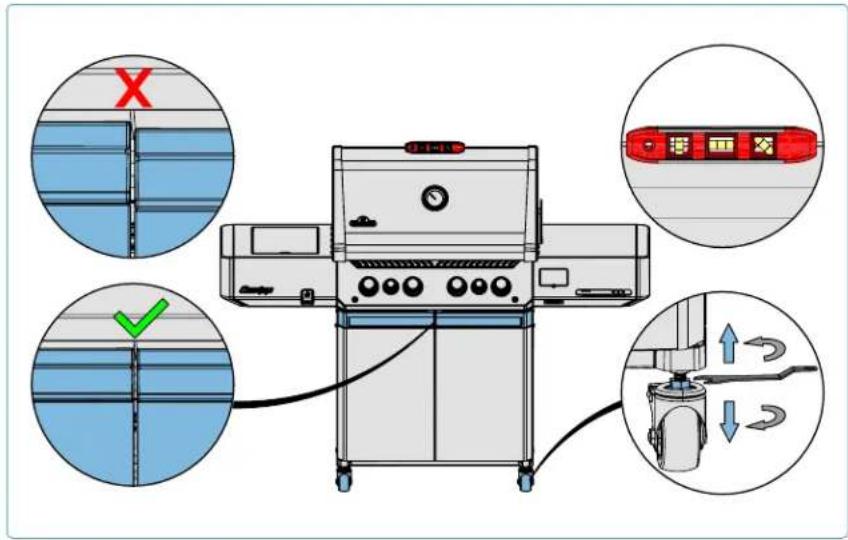
Adjustable casters assist with leveling the appliance.
- Engage the wheel brakes on the casters opposite to the one being adjusted.
- Carefully lift and support the appropriate side of the appliance base to allow the caster to rotate freely.
- Loosen the retaining nut at the top of the caster stem.
- Use a wrench to rotate the bottom caster stem nut counterclockwise to lower that corner of the appliance, or clockwise to raise it.
- Once the desired height is reached, tighten the retaining nut against the appliance base to secure the caster in its new position. Repeat this procedure on the remaining casters until the grill is level and fully supported on each corner.

WARNING!
- Only elevate one side of the appliance at a time. Do not tilt the appliance forward or backward.
Troubleshooting
Lighting Problems
- Main, rear or side burners will not light with the igniter, but will light with a match.
- Burners will not cross light each other.
| Possible causes Solution |
| Main Burner | JETFIRETM outlet is dirty or clogged. Clean JETFIRE | TM outlet with a soft bristle toothbrush. |
| Dirty or corroded cross light brackets. Clean or replace as required. |
| Rear and Side Burners | Dead battery, or installed incorrectly. Replace with premium heavy- duty battery. |
| Loose electrode wire or switch terminal wires. | Check electrode wire is firmly pushed onto the terminal on the back of the igniter. Check the lead wires from the module to the ignition switch (if equipped) are firmly pushed onto their respective terminals. |
| Lifting flames on burner. | Close air shutter according to “Maintenance Instructions”-Combustion Air Adjustment section in this Owner's Manual.IMPORTANT! This must be done by a qualified gas installer. |
Noises and Flare-ups
- Humming regulator.
- Excessive flare-ups and uneven heat.
| Possible causes Solution |
| Normal humming noise on hot days. | This isn't a defect. It's caused by internal vibrations in the regulator and doesn't affect the performance or safety of the grill. Humming regulators WILL NOT be replaced. |
| The cylinder valve was opened too quickly. Open cylinder valve slowly. |
| Sear plates installed incorrectly. | Ensure sear plates are installed with holes towards the front, and the slots on the bottom. See Assembly Instructions Guide. |
| Improper heating. Preheat grill with all main burners on high for 10 to 15 minutes. |
| Excessive grease and ash build on sear plates and in drip pan. | Clean sear plates and drip pan regularly. Do not line pan with aluminum foil. Refer to "Cleaning Instructions". |

WE WANT TO HELP!
Napoleon is here to ensure your grilling experience is memorable. Contact us if you require additional help.

REGISTER YOUR GRILL!
Go to Napoleon.com or your Assembly Guide for replacement parts instructions.
Peeling Paint
- Paint appears to be peeling inside lid or hood.
| Possible causes Solution |
| Grease build-up on inside surfaces. | This is not a defect. The finish on the lid and hood is porcelain or stainless steel and will not peel. The peeling is caused by hardened grease, which dries into paint-like shards, that flake off. Regular cleaning will prevent this. See "Cleaning instructions". |
Gas Flow
- Low heat or low flame when valve is turned to high.
-
Burners burn with yellow flame, accompanied by the smell of gas.
-
Flames lift away from burner, accompanied by the smell of gas, and possible lighting difficulties.
- Burner output on HIGH, but setting is LOW. Rumbling noise and fluttering blue flame at burner surface.
| Possible causes Solution |
| Propane – improper lighting procedure. | Ensure lighting procedure is followed carefully. All gas valves must be in the OFF position when the tank valve is turned on. Turn tank on slowly to allow pressure to equalize. See Operation – "Lighting Instructions". |
| Natural gas – undersized supply line. Pipe must be sized according to installation code. |
| Leaking gasket surrounding the ceramic tile, or a weld failure in the burner housing. | Allow burner to cool and inspect very closely for cracks. Contact your authorized Napoleon dealer to order replacement burner assembly if any cracks are found. |
| Both gas propane and natural gas – improper preheating. | Preheat grill with both main burners on high for 10 to 15 minutes. |
| Possible spider web or other debris. | Thoroughly clean nest or webs out of your burner orifice by removing it and following instructions in this manual.See "Leak Test". |
| Improper air shutter adjustment. | Open or close air shutter slightly according to this manual.See "Maintenance Instructions".IMPORTANT! This must be done by a qualified gas installer. |
| Lack of gas. Check gas level in propane cylinder. | |
| Supply hose is pinched. Reposition supply hose as necessary. |
| Propane regulator in low flow state. | Turn the burners off and close the tank valve, wait 5 minutes before fully re-opening the valve, allow a few seconds for the pressure to equalize before following the Lighting Instructions to start the grill. Ensure igniting procedure is followed carefully every time you cook. All gas valves must be OFF when the tank valve is turned on. Always open the tank valve slowly. |
Infrared Burner Flashes Back
- During operation the burner abruptly makes a loud whoosh sound, followed by a continuous blow-torch type sound and grows dim or has a large flame on start up.
| Possible causes Solution |
| Ceramic tiles overloaded with grease drippings and build-up. Ports are clogged. | Turner burner OFF and allow to cool for at least 2 minutes.Reignite burner and burn on HIGH for at least 5 minutes,or until the ceramic tiles are evenly glowing red. |
| Burner overheated because inadequate ventilation.Too much grill surface covered by griddle or pan. | Ensure no more than 75% of the grill surface is covered by objectsor accessories. Turn burner OFF and allow to cool for at least 2minutes. Reignite. |
| Leaking gasket surrounding the ceramic tile,or a weld failure in the burner housing. | Allow burner to cool and inspect very closely for cracks. Contactyour authorized Napoleon dealer to order replacement burnerassembly if any cracks are found. |
| Improper heating. Preheat grill with both main burners on high for 10 to 15 minutes. |
| Excessive grease and ash build on sear platesand in drip pan. | Clean sear plates and drip pan regularly. Do not line pan withaluminum foil. Refer to "Cleaning Instructions". |
Pairing the App with the Appliance
- On the display, always ensure that the Bluetooth * and Wi-Fi logo icon is flashing, indicating it is ready to pair with a smart device.
| App Problem Possible Causes / Solution |
| The app is not installed or is not properly installed. | Connect to Internet via Wi-Fi and download the app from the Apple App Store or Google Play".Follow prompts to automatically install and open the app.Check the app icon on home screen.Uninstall and reinstall app if needed (see "Napoleon Home App" for more details).Expand app permissions. |
| The app is installed but shows a screen with a "probe is not connected" text. | Ensure probes are properly inserted into the slots on your appliance.Maximize receptivity by facing the display on the appliance with the smart device in close range.Completely close the app and restart it (be familiar with your device's basic operations and settings).Close out any unnecessary programs on the smart device that may be consuming memory. |
| The app worked before, but the device name is not listed in the app device list. | App is not searching or not able to find the device.Click "Try Again" on the "no devices found" page or hit the back button on the "devices found" page to restart scan.Turn the display off and on by holding the power button for 5 seconds. Ensure Bluetooth 1 is activated in the mobile smart device settings.Bring the smart device close to the display unit.Refresh the memory cache by closing and reopening the app.Ensure your device's location setting is turned on.Wait between 30 and 60 seconds between steps. |
| The appliance lost the connection while in operation and shows a "connection lost" page. | Try to locate cause of frequency interference or physical obstruction.Ensure both the appliance and smartphone have internet access, and Bluetooth 2 is enabled on your smartphone.Toggle the display unit off and on.Force close and reopen the app as a last resort. |
| The alarms are not working. | Check the device connection.Check appropriate sounds or notifications are turned on in your smart device settings.Check that alarm (or vibrate) notification is selected in the Napoleon Home App. |
| The appliance will not connect to Wi-Fi. | The appliance only supports the 2.4GHz Wi-Fi band. Check your router settings. Ensure your router is broadcasting in 2.4GHz. Some routers have the ability to broadcast in multiple bands. Check your router's settings to ensure the 2.4GHz band is enabled.Other electronic devices can interfere with the Wi-Fi signal. Try moving the device away from electronics that might be causing interference. |
Product Name Model Number FCC ID IC ID
PRESTIGE P500VX - P665VX VA8-P665VXRSIBPSS 7114A-P665VXRSI
This device complies with Part 15 of the FCC Rules. Operation is subject to the following two conditions:
- The device may not cause harmful interference.
- The device must accept any interference received, including interference that may cause undesired operation. Changes or modifications not expressly approved by the party responsible for compliance could void the user's authority to operate the equipment.
FCC Compliance:
This equipment has been tested and found to comply with the limits for a Class B digital device, pursuant to Part 15 of the FCC Rules. These limits are designed to provide reasonable protection against harmful interference in a residential installation. This equipment generates, uses, and can radiate radio frequency energy and, if not installed and used in accordance with the instructions, may cause harmful interference to radio communications. However, there is no guarantee that interference will not occur in a particular installation.
If this equipment does cause harmful interference to radio or television reception, which can be determined by turning the equipment off and on, the user is encouraged to try to correct the interference by one or more of the following measures:
- Reorient or relocate the receiving antenna.
- Increase the separation between the equipment and receiver.
- Connect the equipment into an outlet on a circuit different from that to which the receiver is connected.
- Consult the dealer or an experienced radio/TV technician for help.
This equipment has been tested and found to comply with the limits for a Class A digital device, pursuant to Part 15 of the FCC Rules. These limits are designed to provide reasonable protection against harmful interference when the equipment is operated in a commercial environment. This equipment generates, uses, and can radiate radio frequency energy and, if not installed and used in accordance with the instruction manual, may cause harmful interference to radio communications. Operation of this equipment in a residential area is likely to cause harmful interference, in which case the user will be required to correct the interference at his/her own expense.
This equipment complies with FCC radiation exposure limits set forth for an uncontrolled environment. End user must follow the specific operating instructions for satisfying RF exposure compliance. This transmitter must not be co-located or operating in conjunction with any other antenna or transmitter. The mobile device is designed to meet the requirements for exposure to radio waves established by the Federal Communications Commission (USA). These requirements set a SAR limit of 1.6 W/kg averaged over one gram of tissue. The highest SAR value reported under this standard during product certification for use when properly worn on the body is 0.515 W/kg.
This equipment complies with FCC radiation exposure limits set forth for an uncontrolled environment. This equipment should be installed and operated with a minimum distance of 20cm between the radiator & your body. This transmitter must not be co-located or operating in conjunction with any other antenna or transmitter.
ISED Canada Statement:
This device contains license-exempt transmitter(s)/receiver(s) that comply with Innovation, Science and Economic Development Canada's license-exempt RSS(s). Operation is subject to the following two conditions:
- This device may not cause interference; and
- This device must accept any interference, including interference that may cause undesired operation of the device.
Radio Equipment Directive:
Hereby, Napoleon declares that the radio equipment type PRESTIGE P500VX - P665VX is in compliance with Directive 2014/53/EU.
Radiation Exposure: This equipment complies with Canada radiation exposure limits set forth for an uncontrolled environment.
RF Exposure Statement:
To maintain compliance with IC's RF Exposure guidelines. This equipment should be installed and operated with minimum distance of 20cm the radiator your body.
This device and its antenna(s) must not be co-located or operation in conjunction with any other antenna or transmitter.
NAPOLEON®
LIMITED LIFETIME WARRANTY
FOR PRESTIGE ® , PRESTIGE PRO ™ AND BUILT-IN SERIES MODELS
Napoleon products are designed with superior components and materials and are assembled by trained craftsmen who take great pride in their work. The burner and valve assembly are leak tested and test-fi red at a quality test station. This grill has been thoroughly inspected by a qualified technician before packaging and shipping to ensure that you, the customer, receive the quality product you expect from Napoleon.

Thank you for purchasing a Napoleon product. Napoleon (Wolf Steel Ltd, Barrie, ON, Canada) warrants that the components in your new Napoleon product will be free from defects in material and workmanship from the date of purchase, for a period of 15 years.
Hood......Lifetime
Stainless Steel Lid Lifetime
Porcelain Enamel Lid....Lifetime
Aluminum Castings ......Lifetime
Stainless Steel Cooking Grids......Lifetime
Stainless Steel Tube Burners ....Lifetime
Stainless Steel Sear Plates 15 Years
Porcelain Enamel Cast Iron Grids 15 Years
Stainless Steel Infrared Rotisserie 15 Years
Infrared Bottom/Side Burner 15 Years
Electrical Components 3 Years
All Other Parts 15 Years
Conditions and limitations:
This Limited Warranty creates a warranty period as specified in the aforementioned table, for products purchased through an authorized Napoleon dealer, and entitles the original purchaser (or gift recipient in the case where a new product is given as a gift) to the specified coverage in respect of any component replaced within the warranty period, either by Napoleon or an authorized Napoleon dealer, to replace a component of such product that has failed in normal private use as a result of a manufacturing defect. This warranty does not cover accessories or bonus items.
For greater certainty, “normal private use” of a product means that the product: has been installed (where applicable) by a licensed, authorized service technician or contractor, in accordance with the installation instructions included with the product and all local and national building and fire codes; has been properly cleaned and maintained according to the instructions; and has not been used as a communal amenity or in a commercial application. In the case of use in communal or commercial applications (where approved), the warranty is reduced to a period of two (2) years.
Similarly, "failure" does not include: damage caused by over-fi ring, blow outs caused by environmental conditions such as strong winds or inadequate ventilation, scratches, dents, corrosion, deterioration of painted and plated fi nishes, discoloration caused by heat, abrasive or chemical cleaners or UV exposure, chipping of porcelain enameled parts, or damages caused by misuse, accident, hail, grease fi res, lack of cleaning and maintenance, hostile environments such as salt or chlorine, alterations, abuse, neglect or parts installed from other manufacturers. If you live in a coastal area, or have your product located near a pool or hot tub, maintenance includes regular washing and rinsing of the exterior surfaces as outlined in the accompanying owner's manual, in order to prevent surface corrosion.
Should deterioration of parts occur to the degree of non-performance (rusted through or burnt through) within the duration of the warranted coverage, a replacement part will be provided. Parts replaced under this warranty are warranted only for the balance of the period specified in the aforementioned table.
NAPOLEON®
LIMITED LIFETIME WARRANTY
FOR PRESTIGE®, PRESTIGE PRO™ AND BUILT-IN SERIES MODELS
The replacement component is the sole responsibility of Napoleon defined by this warranty; in no event will Napoleon be responsible for installation, labor or any other costs or expenses related to the re-installation of a warranted part, for any incidental, consequential or indirect damages, or for any handling and transportation charges or export duties.
The use and/or installation of parts on your Napoleon product that are not genuine Napoleon parts will void this warranty, and any damages that result hereby are not covered by this warranty. Any conversion of a gas grill not authorized by Napoleon and performed by a Napoleon authorized service technician will void this warranty.
This warranty is provided in addition to any rights aff orded to you by local laws. These and other statutory rights remain unaff ected by this warranty provision. Accordingly, this warranty imposes no obligation upon Napoleon to keep parts in stock. Based on the availability of parts,
Napoleon may at its discretion discharge all obligations by providing a customer a prorated credit towards a new product. Napoleon may from time to time update the design of its products. Nothing contained in this warranty shall be construed as obligating Napoleon to incorporate such design updates into previously manufactured products, nor shall such updates be construed as an admission that previous designs were defective.
Registering your Napoleon product confi rms your warranty coverage, will expedite any warranty claims you may need to make, and provides a link between you and Napoleon in case we ever need to contact you. When making warranty claims, Napoleon representatives may request from you the bill of sale or copy, together with a serial number and a model number. Napoleon reserves the right to have its representative inspect any product or part prior to honoring any warranty claim. You must contact Napoleon Customer Service or an authorized Napoleon dealer to obtain the benefit of the warranty coverage.
Notes
Notes
NAPOLEON®
CELEBRATING OVER 40 YEARS
OF DELIVERING HOME COMFORT PRODUCTS



NAPOLEON® products are protected by one or more U.S. and Canadian and/or foreign patents or patents pending.
Address Phone Online
Wolf Steel Ltd. Canada Email: grills@napoleon.com
103 Miller Drive, Crittenden, Kentucky, USA 41030
7200 Trans Canada Highway,
Montreal, Quebec H4T 1A3


1-866-820-8686
Website: www.napoleon.com24 Napoleon Road

N415-0800

Raccordement et installation


AVERTISSEMENT!


STOP

DANGER!
Fig. 6
Fig. 7
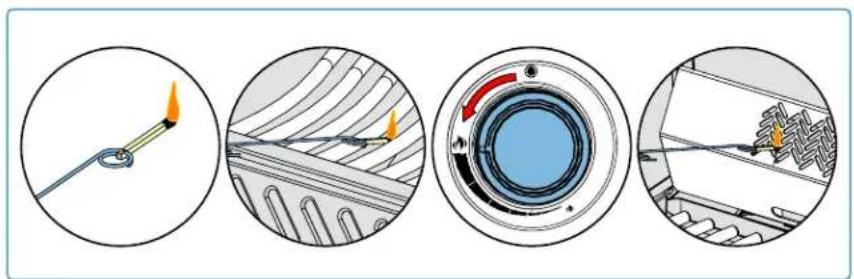
Fig. 8

AVERTISSEMENT!
Cuisson indirecte

AVERTISSEMENT!
Assurez-vous que votre appareil est allumé.
To finalize initial pairing with your smart device, press down on your display for 10 seconds until it restarts.

Ajouter un appareil


Sécurité

AVERTISSEMENT!




DANGER!
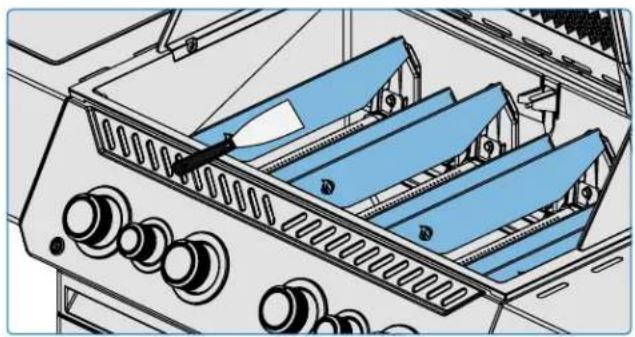


Fig. 9

LA SÉCURITÉ AVANT TOUT!

AVERTISSEMENT!



NAPOLEON® products are protected by one or more U.S. and Canadian and/or foreign patents or patents pending.




iADVERTENCIA!



¡PELIGRO!
Fig. 6
Fig. 7
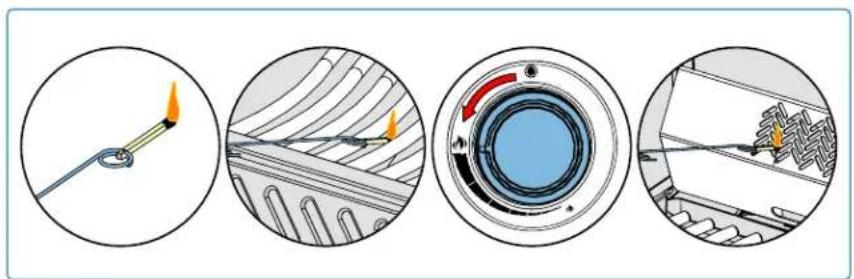
Fig. 8

iADVERTENCIA!
Asado indirecto

iADVERTENCIA!



¡ADVERTENCIA!
Bandeja de goteo


Fig. 9
Sondas de temperatura


¡PELIGRO!

¡ADVERTENCIA!



NAPOLEON® products are protected by one or more U.S. and Canadian and/or foreign patents or patents pending.