
Music 7000 DAB+ - Radio GRUNDIG - Free user manual and instructions
Find the device manual for free Music 7000 DAB+ GRUNDIG in PDF.


| Product type | DAB+ / FM Radio |
| Brand | Grundig |
| Model | Music 7000 DAB+ |
| Mains power | 230 V~, 50/60 Hz |
| Power consumption | Operation < 6 W, Standby < 1 W |
| Battery power | 4 x LR14 batteries (1.5 V, size C) not supplied |
| Weight | Approximately 0.8 kg |
| Frequency bands | DAB/DAB+: 174.928 – 239.200 MHz; FM: 87.5 – 108 MHz |
| Audio output power | 1 W (10% THD, DIN 45324) |
| Settings | Volume, tone, presets (10 stations) |
| Main functions | DAB+ and FM, auto scan, alarm, sleep timer, DRC (Dynamic Range Control), RDS, auto/manual clock |
| Inputs / Outputs | 3.5 mm headphone jack, USB port (firmware update), telescopic antenna |
| Display | Screen for station info, clock, settings |
| Maintenance and cleaning | Clean with a clean, dry cloth; do not use detergents |
| Safety | Do not open the casing; protect from water splashes; do not place objects with open flames; do not obstruct ventilation slots |
| Batteries and environment | Remove used batteries; do not dispose of with household waste; comply with local regulations |
| Repairability | Software update via USB port; reset possible; do not attempt repairs yourself |
| General information | Compliant with EU directives 2014/53, 2009/125, 2011/65; declaration of conformity available at www.grundig.com |
Frequently Asked Questions - Music 7000 DAB+ GRUNDIG
User questions about Music 7000 DAB+ GRUNDIG
0 question about this device. Answer the ones you know or ask your own.
Ask a new question about this device
Download the instructions for your Radio in PDF format for free! Find your manual Music 7000 DAB+ - GRUNDIG and take your electronic device back in hand. On this page are published all the documents necessary for the use of your device. Music 7000 DAB+ by GRUNDIG.
USER MANUAL Music 7000 DAB+ GRUNDIG
natural_image
Black musical note symbol on white background (no text or numbers)Music 7000 DAB+
DE - EN - FR
DEUTSCH 04-15
ENGLISH 16-26
FRANÇAIS 27-39
FM 87,5 ...108,0 MHz
natural_image
Black electronic device with attached cable and plug, no visible text or symbolsnatural_image
Diagram showing battery charging process with two batteries and a plastic housing (no text or symbols)Please read this user manual first!
Dear Valued Customer,
Thank you for preferring this Grundig appliance. We hope that you get the best results from your appliance which has been manufactured with high quality and state-of-the-art technology. For this reason, please read this entire user manual and all other accompanying documents carefully before using the appliance and keep it as a reference for future use. If you handover the appliance to someone else, give the user manual as well. Follow the instructions by paying attention to all the information and warnings in the user manual.
Remember that this user manual may also apply to other models. Differences between models are explicitly described in the manual.
Meanings of the Symbols
Following symbols are used in various sections of this user manual:

Important information and useful hints about usage.

WARNING: Warnings against dangerous situations concerning the security of life and property.
■ This device is designed for the playback of audio signals.
Any other use is expressly prohibited.
■ Make sure the device is protected from dripping or splashing water.
- Do not place any vessels such as vases on the device. These may be knocked over and spill fluid on the electrical components, thus presenting a safety risk.
- Do not place any naked flames such as candles on the device.
■ Only use the device in a moderate climate.
■ Ensure that the device is adequately ventilated by placing it at least 10 cm from any other object. Do not cover the device with newspapers, table cloths, curtains, etc.
If malfunctions occur due to static electricity charges or fast transient (burst), reset the device. To do this, pull out the power plug and connect it again after a few seconds.
- When deciding where to place the device, please note that furniture surfaces are covered by various types of varnish and plastic, most of which contain chemical additives. These additives can corrode the device supports, leaving residues on the furniture surfaces which can be difficult or impossible to remove.
- Do not use any cleaning agent, as this may damage the casing. Clean the device with a clean, dry cloth.
■ Never open the device casing. The manufacturer will not accept any liability for damage resulting from improper handling.
■ Make sure the power plug is freely accessible.
Note, prolonged listening at loud volumes with the earphones can damage your hearing.
Technical data
This device is noise-suppressed according to the applicable EU directives. This product fulfils the European directives 2014/53/EU, 2009/125/EC and 2011/65/EU.
You can find the CE declaration of conformity for the device in the form of a pdf file on the Grundig Homepage
www.grundig.com/downloads/doc.
The type plate is located on the bottom of the device.
Power supply: 230 V\~, 50/60 Hz
Max. power consumption:
Operating < 6 W, Stand-by < 1 W
Output:
DIN 45324, 10% THD 1 W
Frequency band:
DAB/DAB+ 174.928 ... 239.200 MHz
FM 87.5 ... 108.0 MHz
Dimension and weight:
B x H x T 247 x 127 x 68 mm
Weight approx. 0.8 kg
Technical and design modifications reserved.
Compliance with the WEEE Directive and Disposing of the Waste Product:
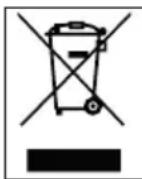
This product complies with EU WEEE Directive (2012/19/EU). This product bears a classification symbol for waste electrical and electronic equipment (WEEE).
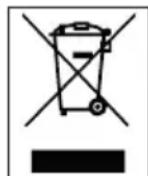
This symbol indicates that this product shall not be disposed with other household wastes at the end of its service life. Used device must be returned to official collection point for recycling of electrical and electronic devices. To find these collection systems please contact to your local authorities or retailer where the product was purchased. Each household performs important role in recovering and recycling of old appliance. Appropriate disposal of used appliance helps prevent potential negative consequences for the environment and human health.
Compliance with RoHS Directive
The product you have purchased complies with EU RoHS Directive (2011/65/EU). It does not contain harmful and prohibited materials specified in the Directive.
Package information

Packaging materials of the product are manufactured from recyclable materials in accordance with our National Environment Regulations. Do not dispose of the packaging materials together with the domestic or other wastes. Take them to the packaging material collection points designated by the local authorities.
OVERVIEW
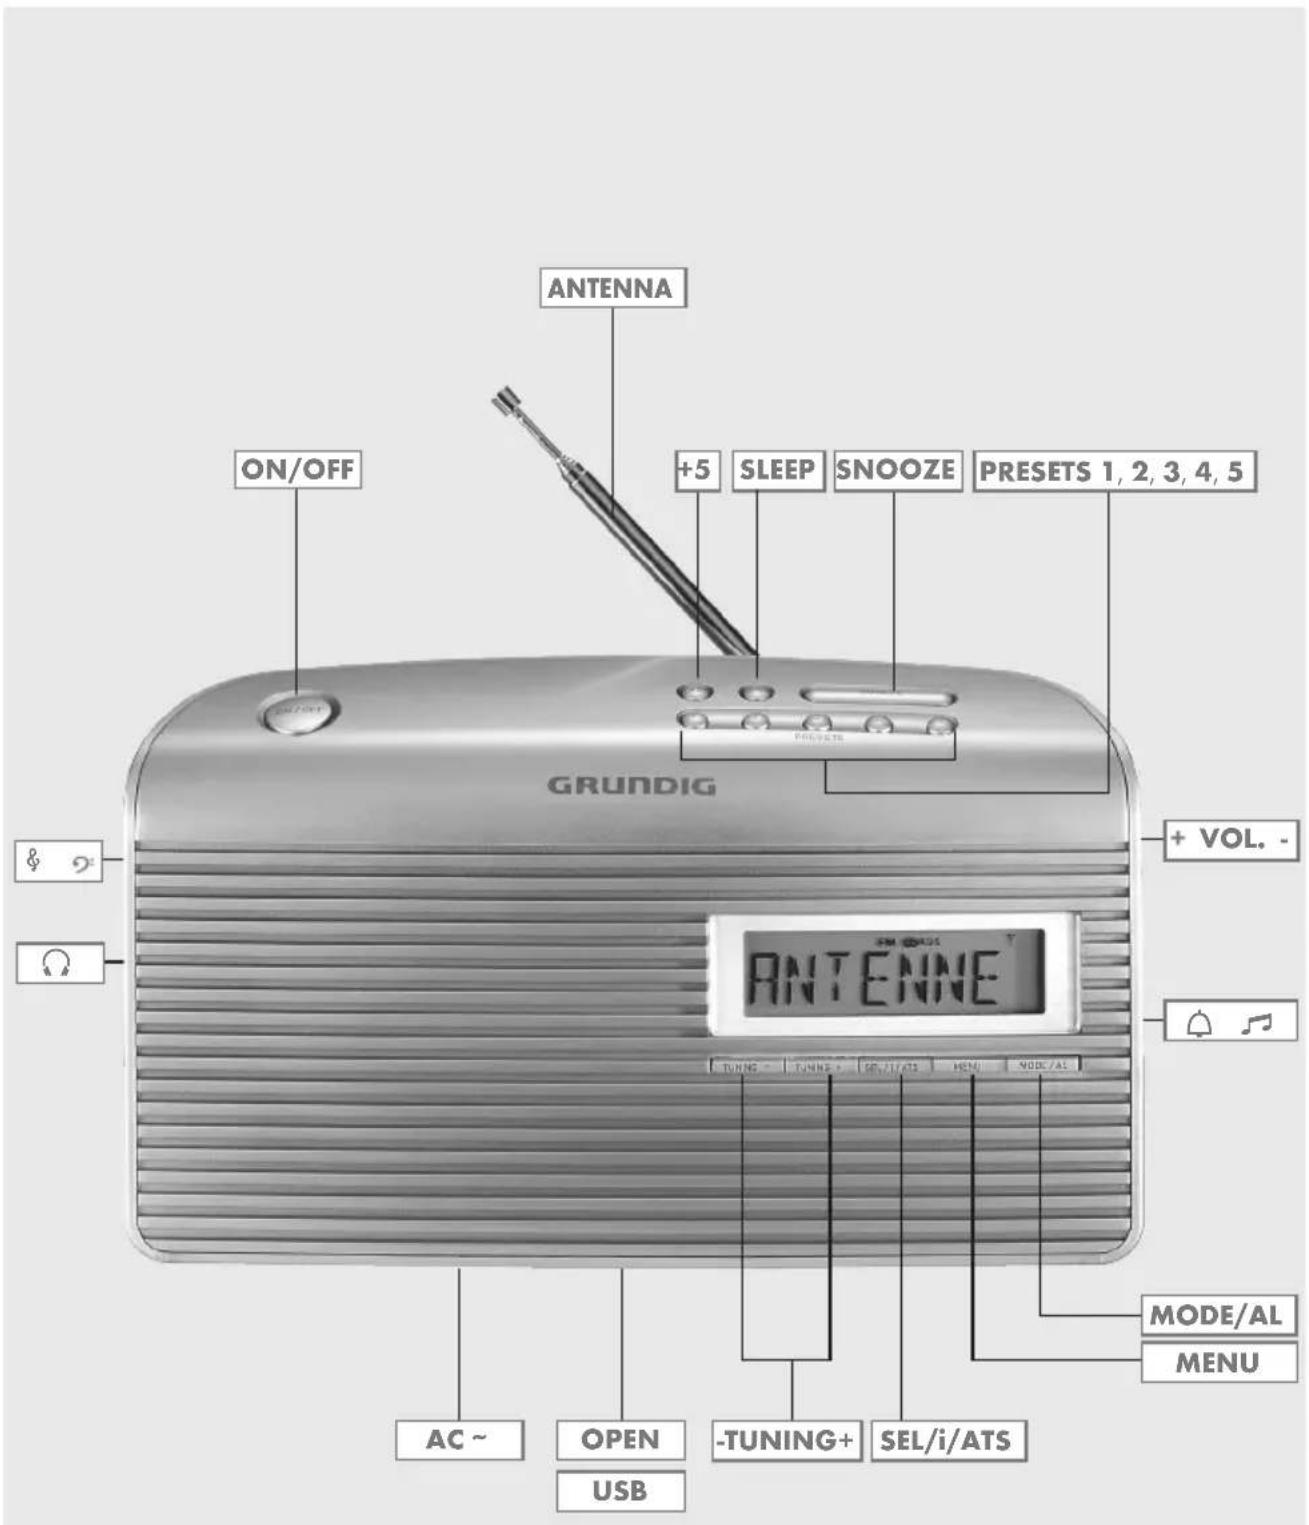
See the figure on page 3.
ON/OFF Switches the device on and off.
ANTENNA Telescopic antenna.
+ 5 Activates the second level of preset buttons 1 to 5.
SLEEP Sets the sleep timer
SNOOZE Interrupts the alarm function (Snooze).
PRESETS Preset buttons for storing and 1, 2, 3, 4, 5 selecting radio stations.
+ VOL. – Adjusts the volume.


Switches between signal sound and radio program for alarm mode.
MODE/AL In radio mode: selects the audio sources DAB radio or FM radio; In standby mode: activates the alarm function; ends alarm stand-by.
MENU Opens the menu.
SEL/i/ATS Confirms settings.
Displays information on the radio stations.
In DAB mode: press and hold down, starts the auto tuning for DAB radio stations.
- TUNING
TUNING +
In DAB mode: select DAB
radio stations from the program list.
In FM mode: tunes FM radio stations.
Select menu options.
In the „System“ menu: for setting the time and the alarm time.

OPEN
Battery compartment cover.
USB
USB socket for upgrading the software of the device.
AC \~
Connection socket for power cable supplied.

Earphone socket (3.5 mm stereo plug).
Mono playback via earphones.
Caution:
■ Excessive sound pressure from the earphones can cause hearing loss.

Adjusts the tone

Handle.
Mains operation
Check that the mains voltage on the type plate (on the bottom of the device) corresponds to your local mains supply. If this is not the case, contact your specialist dealer.
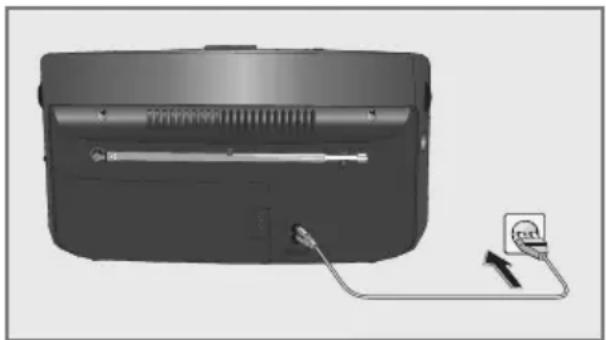
1 Plug the mains cable supplied into the »AC\~« socket on the device.
natural_image
Black electronic device with attached cable and plug, no visible text or symbols2 Plug the mains cable into the socket (230V \~, 50/60 Hz).
Note:
If there are batteries in the device, these are switched off automatically during mains operation.
Caution:
■ The device is connected to the mains with the power cable. Pull out the power cable when you want to completely disconnect the device from the mains.
■ Unplug the mains plug to disconnect the device from the mains. Make sure the power plug is easily accessible during operation and not hindered by other objects.
Battery operation
You can also operate the device using standard batteries (not supplied). In this case, you must disconnect the mains power cable.
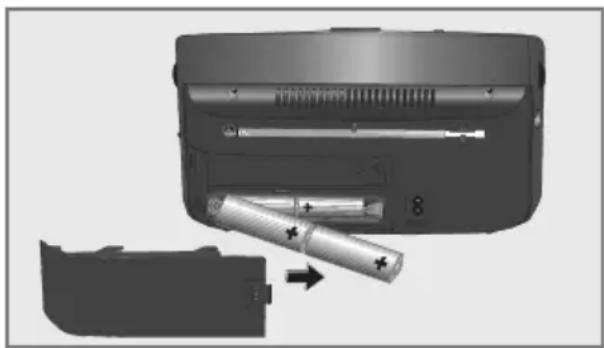
1 Open the battery compartment by pressing the marked area and pushing sidewards the cover.
natural_image
Diagram showing battery insertion into a device casing, with no visible text or symbols2 Insert four batteries (4 x 1.5V, Type IEC, AM 2, LR 14, C size) according to the polarity marked on the battery compartment.
3 Close the battery compartment.
Notes:
- Do not expose the batteries to extreme heat, caused for example by direct sunlight, heaters or fire.
■ Remove the batteries when they are flat or when you know that the device will not be used for a long period of time. When the batteries are low, a battery symbol appears and flashes in the display. This function does not work when the power cable is plugged into the device.
■ No liability is accepted for damage resulting from leaking batteries.
Environmental note:
■ Batteries, including those which contain no heavy metal, must not be disposed of with household waste. Please dispose of used batteries in an environmentally sound manner. Observe the legal regulations which apply in your area.
Tuning and storing radio stations (DAB and FM) – first installation
When the device is switched on for the first time or after factory reset, the Auto Tuning System will start to scan the whole DAB bandwidth and store in the program list.
The device will then scan the FM waveband and store the first 10 radio stations as presets 1 to 10.
The time is updated automatically.
1 Press »ON/OFF« to switch on the device.
- The automatic station search starts, searches and stores the radio stations.
- After the automatic scan, the device switches to standby, the current time lights up.
Tuning and storing DAB radio stations – after a removal
You can activate the Auto Tuning System again. That is reasonable, if you will use the device in another place or search new DAB radio stations.
1 Press »ON/OFF« to switch on the device.
- Display: the name of the radio station, e.g. »«.
2 Start the automatic station search by pressing and holding down »SEL/i/ATS«.
- Display: »«.
- The automatic station search starts, searches and stores the radio stations.
Note:
- You can also activate the automatic scan from the menu.
Open the menu with »MENU« and press »SEL/i/ATS« to confirm.
Select the option »« with »- TUNING +« and confirm by pressing »SEL/i/ATS«.
Select the option »« with »- TUNING +« and confirm by pressing »SEL/i/ATS« (display: »«).
Select »« with »- TUNING +« and start the automatic station search by pressing »SEL/i/ATS«.
Storing DAB radio stations to presets
After the automatic station search, all radio stations will be stored in the program list. You can store your favored radio stations on presets 1 to 10.
1 Select DAB radio stations with »- TUNING +«.
- Display: the name of the radio station, the radio station will be activated in 1 second.
2 For storing the DAB radio station on a preset, press and hold down the required preset button »1« to »5«, until »« appears.
Note:
■ Press »+5« and the required preset button »1« to »5« for presets 6 to 10.
Programming DAB radio stations – manually
1 Select the audio sources DAB radio with »MODE/AL«.
2 Open the menu with »MENU«.
- Display: »«.
3 Press »SEL/i/ATS«.
- Display: e.g. »« (frequency and channel of a DAB radio station).
4 Select the desired frequency/channel with »- TUNING« or »TUNING +«.
5 Press »SEL/i/ATS« to confirm the frequency/channel.
- Display: the signal strength, the DAB radio stations will be stored in the program list.
6 Press »MENU« to end the setting.
Programming FM radio stations – manually
1 Select the audio sources FM radio with »MODE/AL«.
2 Open the menu with »MENU«.
- Display: »«, then the name or the frequency of the FM radio station.
3 Press and hold down »- TUNING« or »TUNING +« to search the desired radio station.
- The automatic station search starts, and stops at the next station with a strong signal;
or
briefly pressing »- TUNING« or »TUNING +« until you have found the frequency you want.
- The frequency changes in steps of 50 kHz.
4 To store the FM radio station on a preset, press and hold down the required preset button »1« to »5«, until »« appears.
Press »+5« and the required preset button »1« to »5« for presets 6 to 10.
Note:
■ The device normally scans for FM radio stations which are strong enough to get good reception. To scan radio stations with weak signal:
Open the menu »« with »MENU« and confirm with »SEL/i/ATS«.
Select the option »« with »- TUNING +« and confirm by pressing »SEL/i/ATS«.
- Switch back to normal sensitivity by repeating the setting and choosing the option »«.
Setting the clock format (12 or 24 hours)
1 Press »ON/OFF« to switch on the device. - Display: e.g. »«.
2 Open the menu with »MENU«.
3 Select the option »« with »- TUNING +« and confirm by pressing »SEL/i/ATS«.
4 Select the option »« with »- TUNING +« and confirm by pressing »SEL/i/ATS«. - Display: »«.
5 Press »SEL/i/ATS« again and select the desired clock format (12 or 24 hours) with »- TUNING +«.
6 Press »SEL/i/ATS« to confirm setting.
7 Press »MENU« to end the setting.
Updating the time – automatically
The device will normally update the time automatically, when a time signal is received. You can select from which source (DAB or FM) the update starts or you can disable this function.
1 Press »ON/OFF« to switch on the device.
- Display: e.g. »«.
2 Open the menu with »MENU«.
3 Select the option »« with »- TUNING +« and confirm by pressing »SEL/i/ATS«.
4 Select the option »« with »- TUNING +« and confirm by pressing »SEL/i/ATS«.
- Display: »«.
5 Select the option »« with »- TUNING +« and confirm by pressing »SEL/i/ATS«.
- Display: »«.
6 Select the desired option (Any, DAB or FM) with »- TUNING +«; or select the option »«, if you want to disable the update.
7 Press »SEL/i/ATS« to confirm setting.
8 Press »MENU« to end the setting.
Updating the time – manually
1 Press »ON/OFF« to switch on the device.
- Display: e.g. »«.
2 Open the menu with »MENU«.
3 Select the option »« with »- TUNING +« and confirm by pressing »SEL/i/ATS«.
4 Select the option »« with »- TUNING +« and confirm by pressing »SEL/i/ATS«.
- Display: »«.
5 Select the option »« with »- TUNING +« and confirm by pressing »SEL/i/ATS«.
- Display: e.g. »«.
6 Set the hours with »- TUNING +« and confirm by pressing »SEL/i/ATS«.
7 Set the minutes with »- TUNING +« and confirm by pressing »SEL/i/ATS«.
8 Set the day with »- TUNING +« and confirm by pressing »SEL/i/ATS«.
9 Set the month with »- TUNING +« and confirm by pressing »SEL/i/ATS«.
10 Set the year with »- TUNING +«.
11 Press »SEL/i/ATS« to confirm setting.
- Display: »«.
12 Press »MENU« to end the setting.
General functions
Switching on and off
1 Press »ON/OFF« to switch the device on and off.
Adjusting the volume
1 Adjust the volume using »+ VOL. -«.
Adjusting the tone
1 Adjust the tone using »& 2«.
DAB mode
For the best DAB reception, it is sufficient to extend the telescopic antenna and direct it accordingly.
Selecting the input source DAB
1 Select the audio sources DAB radio with »MODE/AL«. - Display: »0A8«, then the name of a DAB radio station.
Selecting stored stations
1 Select the station you want using the preset buttons »1, 2, 3, 4, 5« (presets 1 to 5) or using »+ 5« and the preset buttons »1, 2, 3, 4, 5« (presets 6 to 10); or select the desired station by pressing »- TUNING +«.
Displaying DAB station information
1 To display information on the current DAB station, press »SEL/i/ATS« repeatedly. - The following display appears in succession: Information from the provider (e.g. to the actual broadcast, the title of the song, the e-mail address), the signal strength, the genre, the current frequency, reference to signal interference (at optimum signal display »ERR: 0«) the bit rate, the broadcasting format, the current time and date.
Setting Dynamic Range Control (DRC) for DAB stations
When you activate Dynamic Range Control, you can hear lower sounds better in a loud environment.
1 Open the menu with »MENU«.
2 Select the option »ORC« with »- TUNING +« and confirm by pressing »SEL/i/ATS«.
- Display: »ORC OFF«.
3 Select the option "DRC LOW" or "DRC HIGH" with »-TUNING +« and confirm by pressing »SEL/i/ATS«.
4 Press »MENU« to end the display.
Note:
■ The DAB station must support DRC.
FM mode
For the best FM reception, it is sufficient to extend the telescopic antenna and direct it accordingly.
Selecting the input source FM
1 Select the audio sources FM radio with »MODE/AL«. - Display: »FM«, then the frequency of a FM radio station.
Selecting stored stations
1 Select the station you want using the preset buttons »1, 2, 3, 4, 5« (presets 1 to 5) or using »+ 5« and the preset buttons »1, 2, 3, 4, 5« (presets 6 to 10).
Displaying RDS station informations
RDS (Radio Data System) is an information system which is transmitted additionally by most FM stations.
Notes:
- It may take some time before all RDS information is available.
■ GRUNDIG has no influence on the correctness of such information.
1 Press »SEL/i/ATS« repeatedly.
- The following display appears in succession: radio text (if offered), station type (PTY), name of the radio station, the current time and date.
Note:
■ The alarm function is only available during mains operation, it is disabled during battery use.
Setting the alarm times
1 Press »ON/OFF« to switch on the device.
- Display: e.g. »BS AKT«.
2 Open the menu with »MENU«.
3 Select the option »SYSTEM« with »- TUNING +« and confirm by pressing »SEL/i/ATS«.
4 Select the option »ALARM« with »- TUNING +« and confirm by pressing »SEL/i/ATS«.
- Display: »ALARM« flash.
5 Press »SEL/i/ATS«, select Timer On (»ON«) with »- TUNING +« and confirm by pressing »SEL/i/ATS«.
- Display: e.g. »6 : 00 AM«.
6 Set the hours with »- TUNING +« and confirm by pressing »SEL/i/ATS«.
7 Set the minutes with »- TUNING +« and confirm by pressing »SEL/i/ATS«.
8 Select the desired alarm day (Daily, Once, Weekends or Weekdays (Mo - Fr)) with »-TUNING +«.
Notes:
If the alarm is set to „Once“ continue with step 9.
■ Otherwise, end settings with step 12.
9 Set the day with »- TUNING +« and confirm by pressing »SEL/i/ATS«.
10 Set the month with »- TUNING +« and confirm by pressing »SEL/i/ATS«.
11 Set the year with »- TUNING +«.
12 Press »SEL/i/ATS« to end the setting. - Display: »SAVEO«.
Alarm with signal tone
1 Set the alarm signal tone (» 🔊 «) using » 🔊 ♩️« to position » 🔊 «. - Display: » 🔊 «.
- The alarm goes on with a signal tone at the set time.
Alarm with radio station
1 Select the radio alarm (»♪«) using »♡♪« to position »♪«.
- Display: »♪«. - The radio switches on to the last listened radio station at the set alarm time
Interrupting the alarm
1 Press »SNOOZE« while the alarm is sounding.
- Display: » 🔒 « or »♪« flash. - The alarm (signal tone or radio) stops. - The alarm goes on again in 5-minute intervals (the total alarm time is 90 minutes).
Cancelling alarm stand-by
1 Press »ON/OFF« while the alarm is sounding.
- Display: the current time and » 🔊« or »♪«. - The alarm (signal tone or radio) stops, but the alarm function remains activated for the next day at the same time.
Activating and deactivating the alarm
1 Press »ON/OFF« to switch off the device.
2 Press »MODE/AL« to deactivate the alarm stand-by.
- The set alarm time is saved
3 Press »MODE/AL« to reactivate the alarm stand-by.
The device has a sleep timer which switches off in radio mode at a preset time. It is possible to adjust the sleep time between 10 and 90 minutes in 10 minute increments.
Select the switch-off time for the sleep timer
1 Press »ON/OFF« to switch on the device.
- Display: e.g. »BS AKT«.
2 Open the menu with »MENU«.
3 Select the option »SYSTEM« with »-TUNING+« and confirm by pressing »SEL/i/ATS«.
4 Select the option »SLEEP« with »- TUNING +« and confirm by pressing »SEL/i/ATS«.
- Display: »OFF«.
5 Set the switch-off time with »- TUNING +« and confirm by pressing »SEL/i/ATS«.
- Display: »◀« and the switch-off time.
Notes:
■ To check the remaining switch-off time press briefly »SLEEP«.
- You can set the switch-off time also by pressing »SLEEP« (in 10 minutes increments).
Switch off the sleep timer
1 To switch off the sleep timer earlier, select in the menu »SLEEP« the option »OFF« with »-TUNING +«.
- Display: »/disappears.
Select software version
1 Open the menu with »MENU«.
2 Select the option »SYSTEM« with »-TUNING+« and confirm by pressing »SEL/i/ATS«.
3 Select the option »SW VER« with »- TUNING +« and confirm by pressing »SEL/i/ATS«.
- Display: actual software version.
4 Press »MENU« to end the display.
Delete the program list for DAB radio stations
If you move to a different part of the country, some of the radio stations which were listed may no longer be available.
1 Open the menu with »MENU«.
2 Select the option »PRUNE« with »- TUNING +« and confirm by pressing »SEL/i/ATS«.
- A safety confirmation is displayed.
3 Select the option »Y« (Yes) with »TUNING +«.
Note:
■ To cancel the function select the option »//« (No) with »- TUNING«.
4 Press »SEL/i/ATS« to confirm setting.
- Display: »RESTART«.
5 Press »MENU« to end the setting.
- In the program list you will find only available radio stations.
Deleting all settings (Reset)
This function enables you to reset all the custom settings back to the default settings. All settings are lost when you do this.
1 Open the menu with »MENU«.
2 Select the option »SYSTEM« with »- TUNING +« and confirm by pressing »SEL/i/ATS«.
3 Select the option »RESET« with »- TUNING +« and confirm by pressing »SEL/i/ATS«.
- A safety confirmation is displayed.
4 Select the option »Y« (Yes) with »TUNING +«.
Note:
■ To cancel the function select the option »/« (No) with »- TUNING«.
5 Press »SEL/i/ATS« to confirm setting.
- Display: »RESTART«.
Software Update
You can install the latest version of the software, if available.
1 Connect the device to a PC by means of the socket located in the battery compartment.
2 Open the menu with »MENU«.
3 Select the option »SYSTEM« with »- TUNING +« and confirm by pressing »SEL/i/ATS«.
4 Select the option »UPGRADE« with »- TUNING +« and confirm by pressing »SEL/i/ATS«
- A confirmation message is displayed.
5 Select the option » ^U « (Yes) with »- TUNING +«.
Note:
■ To cancel the function select the option »//« (No) with »-TUNING +«.
6 Confirm with »SEL/i/ATS«.
- Display: »WRITING«.
7 Start the update program on the PC.
8 Once the software is updated successfully, remove the device from the PC.
FM 87.5 ... 108.0 MHz
Dimension et poids:
L×H×P 247×127×68 mm
INFORMATIONS RELATIVES A LA SECURITE \_\_\_\_
natural_image
Black electronic device with attached cable and plug, no visible text or symbolsnatural_image
Diagram showing a battery inside a device with an open lid and a separate battery stack (no text or symbols visible)- Please read this user manual first!
- Meanings of the Symbols
- Technical data
- Compliance with the WEEE Directive and Disposing of the Waste Product:
- Compliance with RoHS Directive
- Package information
- OVERVIEW
- - TUNING
- TUNING +
- OPEN
- USB
- AC \~
- Caution:
- Mains operation
- Note:
- Battery operation
- Notes:
- Environmental note:
- Tuning and storing radio stations (DAB and FM) – first installation
- Tuning and storing DAB radio stations – after a removal
- Storing DAB radio stations to presets
- Programming DAB radio stations – manually
- Programming FM radio stations – manually
- Setting the clock format (12 or 24 hours)
- Updating the time – automatically
- Updating the time – manually
- General functions
- Switching on and off
- Adjusting the volume
- Adjusting the tone
- DAB mode
- Selecting the input source DAB
- Selecting stored stations
- Displaying DAB station information
- Setting Dynamic Range Control (DRC) for DAB stations
- FM mode
- Selecting the input source FM
- Displaying RDS station informations
- Setting the alarm times
- Alarm with signal tone
- Alarm with radio station
- Interrupting the alarm
- Cancelling alarm stand-by
- Activating and deactivating the alarm
- Select the switch-off time for the sleep timer
- Switch off the sleep timer
- Select software version
- Delete the program list for DAB radio stations
- Deleting all settings (Reset)
- Software Update
- Dimension et poids:
- INFORMATIONS RELATIVES A LA SECURITE \_\_\_\_
Brand : GRUNDIG
Model : Music 7000 DAB+
Category : Radio