
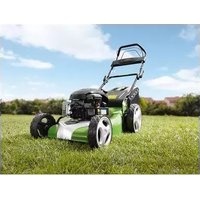
FBME 575 A1 - Lawn mower FLORABEST - Free user manual and instructions
Find the device manual for free FBME 575 A1 FLORABEST in PDF.


| Product Type | Walk-behind Lawn Mower |
| Model | FBME 575 A1 |
| Brand | Florabest |
| Power Source | Petrol (Gasoline) |
| Engine Displacement | 575 cc |
| Cutting Width | 46 cm (18 inches) |
| Cutting Height Adjustment | Central lever, 6 positions (25-75 mm) |
| Grass Bag Capacity | 60 L |
| Drive Type | Self-propelled (rear wheel drive) |
| Starter Type | Recoil start |
| Weight | Approx. 32 kg |
| Overall Dimensions (L x W x H) | Approx. 88 x 50 x 60 cm |
| Fuel Tank Capacity | 1.2 L |
| Mulching Function | Yes (with mulching plug) |
| Side Discharge | Included |
| Handlebar Type | Folding, height-adjustable |
| Safety Features | Operator presence control, blade brake, engine kill switch |
| Recommended Maintenance | Clean after use, check oil, sharpen blade, replace air filter |
| Warranty | 2 years |
Frequently Asked Questions - FBME 575 A1 FLORABEST
User questions about FBME 575 A1 FLORABEST
0 question about this device. Answer the ones you know or ask your own.
Ask a new question about this device
Download the instructions for your Lawn mower in PDF format for free! Find your manual FBME 575 A1 - FLORABEST and take your electronic device back in hand. On this page are published all the documents necessary for the use of your device. FBME 575 A1 by FLORABEST.
USER MANUAL FBME 575 A1 FLORABEST
PETROL LAWNMOWER / BENZIN-RASENMÄHER FBME 575 A1
GB IE NI
DE AT CH
IAN 297536

GB IE NI
Before reading, unfold the page containing the illustrations and familiarise yourself with all functions of the device.
DE AT CH
GB / IE / NI Translation of the original instructions Page 7
natural_image
Disassembled automotive components including a motor, battery pack, and car chassis (no text or symbols visible)


natural_image
Close-up of a hand using a tool to adjust or install a mechanical component, no visible text or symbols.
natural_image
Close-up of a mechanical assembly with hoses and a valve, no visible text or symbols
natural_image
Technical illustration of a mechanical device with a circular base and labeled component '16' (no readable text or symbols beyond the label)
natural_image
Top-down view of a small electric motor with visible wheels and control panel (no text or symbols)Content
Introduction 8
Intended use 8
General description ......8
Delivery contents 8
Summary 9
Functional description .....8
Safety equipment 9
Technical specifications......10
Symbols and icons ......11
Symbols on the device .....11
Symbols on the engine....11
Symbol on the battery and charger. 12
Symbols on the 5l jerry can......12
Symbols in the manual .....12
Safety instructions......13
Initial operation....20
Mounting the grip rod 20
Assembling the grass collection box....21
Installing/removing the grass collection box 22
Installing/removing the mulching plug....22
Installing/removing the side discharge chute....23
Filling with engine oil and checking the oil level....23
Filling with petrol 24
Charging electric starter battery.....25
Installing electric starter battery.....26
Operation 27
Starting and stopping the engine....27
Drive control 28
Setting the required function .....29
Mowing 29
Working instructions ......29
General working instructions ..... 29
Setting cutting height...... 29
Emptying the grass collection box......30
Cleaning and maintenance .....30
Cleaning and general maintenance work 31
Cleaning/replacing the air filter ..... 31
Maintaining the spark plug 31
Changing the engine oil 32
Washing the deck....32
Checking/sharpening/replacing the
blade.... 32
Adjusting the carburettor 33
Storage 33
General storage instructions 33
Fold up device 33
Storage during the winter break ..... 33
Disposal/environmental protection ....34
Maintenance intervals ......35
Troubleshooting 36
Guarantee 37
Repair service ....38
Service-center 38
Importer 38
Translation of the original EC declaration of conformity .....75
Introduction
Congratulations on the purchase of your new device. With it, you have chosen a high quality product.
During production, this machine has been checked for quality and subjected to a final inspection. The functionality of your machine is therefore guaranteed.

The operating instructions constitute part of this product. They contain important information on safety, use and disposal.
Before initial use, please read these operating instructions and the Briggs & Stratton instruction manual carefully in order to avoid incorrect handling.
Use the product only as described and for the applications specified. Keep this manual safely and in the event that the product is passed on, hand over all documents to the third party.
Intended use
The machine is intended only for mowing lawns and grass areas in domestic use.
This machine is not suitable for commercial use. Commercial use will invalidate the guarantee.
Any use other than specifically permitted in these instructions may result in damage to the machine and represent a serious risk to the user.
The machine is intended for use by adults. Children or other people who are unfamiliar with the operating instructions must not use the machine.
The operator or user is responsible for accidents or damage to other persons or their property.
General description

The illustration of the principal functioning parts can be found on the front and back foldout pages.
Delivery contents (Fig. B)
Carefully unpack the appliance and check that it is complete. Dispose of the packaging material correctly.
- 1 pc petrol lawn mower
- 1 pc electric start battery
- 1 pc battery charger
- 1 set grass collection box parts
- 1 pc side discharge chute
- 1 pc mulching plug
- 2 pcs quick-release clamps
- 1 pc spare spark plug
- 1 pc spark plug wrench /
- screwdriver
- 1 pc 5 l jerry can
- 1 pc operating instruction
- 1 pc Briggs & Stratton operating instruction
Summary (Fig. A)
1 Upper handle
2 Blade control bar
3 Drive control bar
4 Electric starter push key
5 Lower handle
6 Bowden cable
7 Cable clip-1
8 Oil tank cap/dipstick
9 Electric starter battery
10 Electric starter battery release button
11 Fuel tank cap
12 Air filter box
13 Air filter (not shown)
14 Deck wash male coupling
15 Muffler guard
16 Spark plug connector
17 Spark plug (not shown)
18 Front carry handle
19 Front bumper
20 Front wheel
21 Side discharge deflector
22 Deflector safety lever
23 Side discharge chute
24 Electric starter cable
25 Height adjustment handle
26 Rear wheel
27 Lower handle fixing bracket
28 Rear deflector
29 Grass collection box
30 Grass collection box lower handle (not shown)
31 Cable clip-2
32 Grass collection box upper handle
33 Grass fill level indicator
34 Quick-release clamp
35 Battery charger
36 Mulching plug
37 5 | jerry can
38 Spark plug wrench bar / screw driver
39 Spark plug wrench socket
40 Spare spark plug
41 Grass collection box tongue
42 Right grass collection box housing
43 Left grass collection box housing
44 Grass collection box cover
45 Battery fuel gauge button
46 Cable tension bolt kit
47 Notches for height adjustment
Functional description
The machine is driven by a powerful 4-stroke engine (Briggs & Stratton 575IS series) with electric starter.
The device has 3 functions, collection, mulching and side discharge. It is equipped with a high quality steel deck, a grass collection box, and a foldable grip handle.
Safety equipment (Fig. A)
Blade control bar (2)
The machine stops when the safety blade control bar is released.
Electric starter battery (9)
Remove the starter battery to prevent unauthorized use. Before any maintenance, also take out the spark plug connector.
Muffler guard (15)
Prevent hands or combustible materials from coming into contact with the hot exhaust pipe.
Side discharge deflector (21)
Protects the operator from flung-out debris and from accidentally touching the blades while mulching or using rear discharge.
Rear deflector (28)
Protects the operator from flung-out debris and from accidentally touching the blades while mowing without grass collection box.
Technical specifications
Engine....4-stroke B&S575IS
Engine size....150 cm 3 (cc)
Power input.....2.2 kW (3HP) @ 2900 min -1
Blade rotation speed( n0 )... max.2900 min -1
Blade torque.... 45 Nm
Petrol tank volume 0.8 l
Octane rating 95-98
Engine oil tank volume 0.47 l
Spark plug ....Champion XC92YC
Cutting circle.... 460 mm
Cutting height ...... 7-stage, 25\~75 mm
Grass collection box volume 60 l
Side discharge Yes
Mulching Yes
Self-propelled....Yes
front / rear Wheel.....∅ 200 mm / 280 mm
Jerry can 51
Weight (incl. accessories) 35.5 kg
Sound pressure level
(LPA) 81.0 dB(A); K=3.0 dB(A)
Sound power level ( LWA )
measured .....94.2 dB(A); K=1.79 dB(A)
guaranteed 96 dB(A)
Vibration at the handle
(ah)....6,67/5,69 m/s²; K=1.5 m/s²
Charger:
Model number......IS12C-593562
Rated Input voltage and current
...100 - 240V \~ (AC), 50 / 60 Hz, 0.8 A
Rated Output voltage and current
12.45V ---, 2 A
Protection class ...... II

Electric starter battery:
Model number......IS12B - 593560
Battery type...... Lithium-Ion
Rated voltage 10.8 V ---
Battery capacity 1.15 Ah
Rated Energy 12.4 Wh
Charging time......approx. 50 min
Noise and vibration values have been determined according to the standards and regulations mentioned in the declaration of conformity.
Technical and optical changes can be carried out in the course of further development without notice. All dimensions, references and information of this instruction manual are therefore without guarantee.
Legal claims, which are made on the basis of the instruction manual, cannot thus be considered as valid.
The stated vibration emission value was measured in accordance with a standard testing procedure and may be used to compare one power tool to another.
The stated vibration emission value may also be used for a preliminary exposure assessment.

Warning:
The vibration emission value may differ during actual use of the power tool from the stated value depending on the manner in which the power tool is used.
Safety precautions aimed at protecting the user should be based on estimated exposure under actual usage conditions (all parts of the operating cycle are to be considered, including, for example, times during which the power tool is turned off and times when the tool is turned on but is running idle).
Symbols and icons
Symbols on the device

Attention!
Read the instruction manual.

Fill level indicator open: Grass collection box empty

Fill level indicator closed: Grass collection box full
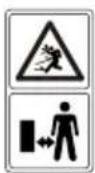
Risk of injury from parts being flung out.
Keep bystanders away from the equipment.

Risk of injury from sharp blades.
Keep feet and hands away.
Caution – risk of injury!
Before maintenance work, switch off the engine and take out the spark plug connector.

Caution – toxic fumes!
Do not operate the equipment in enclosed areas.

Information of the acoustic power level LWA in dB.
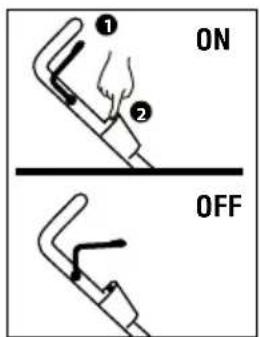
Switch device on (ON): Pull up safety blade control bar and press electric starter push key
Switch device off (OFF): Release safety blade control bar
Symbols on the engine


Attention!
Read the instruction manual.

Caution - petrol is flammable!
Allow the engine to cool for at least 2 min. before refuelling.

Toxic fume hazard.

Caution – hot surfaces!
Risk of burning.

Note on the petrol filler:
Not suitable for E85-mixtures.

Caution! Before starting, check the oil level.

Check the oil level!
Symbol on the battery and charger

Protection Class II (Double insulated)

Direct Current

Alternating Current

For indoor use only

Dispose the appliance according to the regulation and requirement of local council

Remove key/battery pack

Read the instruction manual. Charge Battery Pack

Do not dispose of batteries in your normal domestic waste!
Symbols on the 5l jerry can

Highly flammable!

Hazardous to health!

Dangerous!

Dangerous to the environment!
Symbols in the manual

Warning symbols with information on damage and injury prevention.

Instruction symbols (the instruction is explained at the place of the exclamation mark) with information on preventing damage.

Help symbols with information on improving tool handling.
Safety instructions
This section deals with the basic safety procedures when working with the equipment.

WARNING! Read all of the safety instructions and directions. Failure to observe the safety instructions and directions may result in electric shock, fire and/or serious injury.
General safety instrucitons
- Read the operating instructions carefully. Familiarise yourself with the controls and with the correct use of the equipment.
- In case of uncertainties, allow yourself to be given instruction concerning the use of the device and prohibited operations. - Pay attention, be aware of what you are doing
and take the utmost care when working. Do not use the device if you are tired or ill or you are under the influence of drugs, alcohol or other medication. A moment of inattention whilst using the device can result in serious injuries.
- This appliance may be used by children aged 8 years and above and by persons with limited physical, sensory or mental capabilities or lack of experience and knowledge, provided that they are under supervision or have been told how to use the appliance safely and are aware of the potential risks. Children must not use the appliance as a plaything. Cleaning and user maintenance tasks may not be carried out by children unless they are supervised.
• Children should be supervised to ensure that
GB IE NI
they do not play with the appliance.
- Do not allow children or other people who are unfamiliar with the operating instructions to use the equipment. Local regulations may set a minimum age for the user.
- Do not mow whilst whilst people, especially children, or animals are nearby. If distracted, you may lose control of the equipment.
- The operator or user is responsible for accidents or damage to other persons or their property.
- Observe noise control and local regulations.
Preparatory measures
- When mowing, always wear slip resistant shoes and long trousers. Do not mow barefoot or in light sandals. Loose clothing, jewellery or long hair can become caught in moving parts. Wearing suitable clothing reduces the risk of injury.
- Check the area on which the equipment is to be used and remove all objects (stones, sticks, wires, toy) that could be caught and flung out.
- Warning: Petrol is highly flammable.
Fire or explosions can result in serious burns:
- Keep petrol only in containers intended for this purpose;
- Only refuel outdoors and do not smoke whilst refuelling;
- Fill with petrol before starting the running or the equipment is hot:
- If petrol is spilled, do not attempt to start the engine. Instead, remove the equipment from the surface on which the petrol has been spilled. Avoid any ignition attempt until the petrol fumes have evaporated;
- For reasons of safety, replace petrol damaged.
- Replace defective mufflers.
• Before use, always carry
out a visual inspection to check whether the cutting tools, mounting bolts and entire cutting unit are worn or damaged. To avoid imbalance, only replace worn or damaged tools and bolts in sets.
- Ensure that all start interlocking devices and push-buttons work correctly. Check them regularly, as instructed in the chapter "Cleaning and maintenance".
- Manipulating or disengaging any safety systems or devices is strictly forbidden.
- Before use, always check the electric starter battery, do not use damaged battery. Risk of fire.
• Take care with equipment that has several cutting tools, as the movement of one blade may result in rotation of other blades.
- Charge the electric starter battery using only the charger included or recommended by us. There
is a danger of fire if other types of charger are used.
- Only use the supplied electric starter battery. The use of other battery units may lead to the danger of injury or fire.
- Use only replacement parts and accessories supplied and recommended by the manufacturer. The use of parts from other manufacturers may result in injuries and will result in immediate invalidation of the guarantee.
Handling
- Engine exhaust can contain carbon monoxide, a poisonous gas that can kill people in minutes. It invisible and has no smell or taste. If you start to feel sick, dizzy, or week while using this product, shut off the engine and get to fresh air right away. See a doctor, you may have carbon monoxide poisoning.
GB IE NI
- Do not run the combustion engine in enclosed spaces, in which dangerous carbon monoxide can collect.
- Mow only in daylight or with good artificial lighting. An until working area can result in accidents.
- If possible, avoid using the equipment on wet grass.
• Always ensure secure positioning, particularly on hillsides, landfills, ditches or dykes.
This will give you better control of the equipment in unexpected situations.
- Always work across the slope, never upwards or downwards. - Take particular care when changing the direction of travel on the slope. - Do not mow on excessively steep slopes (max. 10°).
- Run the equipment only at walking speed or self-propelled speed.
• Take particular care when turning the equipment around or pulling it towards you.
- Stop the cutting tool if the equipment has to be tipped up for transportation over a surface other than grass and when moving the equipment from and to the surface to be mown.
- Do not use the equipment with damaged safety equipment or guards or with no safety equipment attached, e.g. side discharge deflector and / or rear deflector.
This ensures that the equipment remains safe.
- Do not tamper with or disable the machine safety systems or features. Risk of injury.
- Do not change the engine regulator setting and do not overrun it. This may damage the equipment.
- Before starting the engine, disengage all cutting tools and drives.
- Before starting the engine, check the electric starter battery capacity, charge the battery full after each use.
- Start or operate the start switch with care and in accordance with the manufacturer's insturctions. Ensure sufficient space between feet and the cutting tool. Risk of injury.
- When starting or activating the engine, do not tip the equipment unless the equipment has to be lifted for this procedure. In this case, tip the equipment only as far as is absolutely necessary and lift only the side that is away from the user.
- Do not start the engine when standing in front of the ejection channel.
- Switch on the engine in accordance with the instructions and only if your feet are a safe distance away from the cutting tools.
- Do not place hands or feet under rotating parts. Always keep away from the ejection opening. A moment of carelessness when using the equipment may result in serious injury.
- Do not leave or carry the equipment when the engine is running.
- Switch off the engine, remove the electric starter battery, take out the spark plug cable and ensure that all moving parts are still:
- Before releasing blockages or removing obstructions in the ejection channel; - Before checking, cleaning or working on the equipment; - If a foreign body is struck. Look for damage to the equipment and carry out the necessary repairs before restarting and working with the equipment; - If the equipment starts to vibrate unusually strongly, an immediate check is required.
- Switch off the engine, remove the electric starter battery take out the spark plug cable and ensure that all moving parts are still:
GB IE NI
- When leaving the equipment;
- Before refuelling;
- Do not leave the equipment unattended in the workplace.
- Do not work with equipment that is damaged or incomplete or has been converted without the approval of the manufacturer.
Using machines for applications other than those intended may result in dangerous situations.
- Do not work with the device if there is a risk of lightning strike. Danger of electric shock.
Charger
- Only use supplied charger to charge the electric starter battery. Do not use the supplied charger to charge generic batteries.
- Keep battery and charger dry. Avoid exposing battery and charger to rain or wet conditions.
- Do not operate charger
with damaged plug or cord. If the supply cord is damaged, it must be replaced by the manufacturer, its service agent or similarly qualified persons in order to avoid a hazard.
- Do not operate charger if it has received a sharp blow, been dropped, or otherwise damaged in any way.
- Charger is not serviceable. Do not disassemble charger, or attempt service.
- To reduce risk of electric shock, unplug charger from outlet before cleaning.
- Never place any object into the battery contacts. Do not short circuit. Risk of fire.
- The charger is not intended for use by persons (including children) with reduced physical, sensor or mental capabilities, or lack of experience
and knowledge, unless they have been given supervision or instruction concerning use of the charger by a person responsible for their safe
- Children should be supervised to ensure that they do not play with the charger.
Maintenance and storage:
- Ensure that all nuts, bolts and screws are tightened firmly and the equipment is in safe working condition. Many accidents are caused by poorly maintained equipment.
- Do not keep the equipment with petrol in the tank inside a building in which petrol fumes could potentially come into contact with open fire or sparks.
- Allow the engine to cool before placing the equipment in enclosed spaces. Risk of fire.
• To avoid the risk of fire, keep on engine, exhaust
and area around the fuel tank free of grass, leaves or leaking grease (oil).
- Keep the electric starter battery and charger in a dry place out of reach of children. Charge the battery full before long term storage.
- Check the grass catcher regularly for wear or loss of function.
- For reasons of safety, replace worn or damaged parts. Replace defective silencers.
- If the fuel tank is to be drained, do this outdoors.
- Handle your equipment with care. Keep the tools sharp and clean to enable you to work better and more safely. Follow the maintenance directions.
- Do not attempt to repair the equipment yourself unless you are trained to do so.
Any work not specified in these instructions is to be carried out only by customer service centres authorised by us.
GB IE NI
- Keep the equipment in a dry place and out of reach of children. Machines are dangerous if used by inexperienced people.
- Secure the machine during transport to prevent loss of fuel, damage or injuries.
Initial operation

Caution! Risk of injury from rotating blades. Carry out work on the equipment only when the blade is switched off and stationary.

Observe the included Briggs & Stratton instruction manual.
Before starting the device, you must - remove all transport safety devices,
- fold up the grip rod and lock the quick-release clamp,
- fill in motor oil,
- fill in petrol,
- assemble the electric starter battery,
- remove the mulching plug if necessary,
- mount the grass catcher if necessary,
- set the cutting height if necessary,
- assemble the side discharge chute if necessary.
Mounting the grip rod (Fig. A, C, D)

Always protect the Bowden cable (6) and electric starter cable (24) from being pinched.
-
Remove the mower from the box. Remove all transport securing devices. Observe local disposal regulations. We recommend retaining the box for later use.
-
There are two mounting holes on the lower handle's fixing bracket (27). Fold the lower handle backwards until the notches on the handle are aligned with the desired hole. Lock the lower handle (5) in position by fixing it with the two quick-release clamps (34). To do so, press the quick-release clamp towards the handle's tube.
-
Assemble the upper handle (1) onto the lower handle (5) by quick-release clamps (34).
Choose the upper hole in the lower handle (5) for a slightly longer overall length.
-
Fasten the bowden cable (6) to the lower handle (5) by cable clip-1 (7).
-
Fasten the electric starter cable (24) to the lower handle (5) and upper handle (1) by cable clip-2 (31).
Assembling the grass collection box (Fig. A, E)
-
Assemble the grass collection box tongue (41) on the right grass collection box housing (42) and fix it by screw from outside using supplied screw driver (38).
-
Put the left collection box housing (43) together with the right one and use the screw to connect.
-
Insert the grass collection box upper handle (32) into grass collection box cover (44) and use screw to fix.
-
Put the grass collection box cover (44) on the grass collection box housing and connect both sides by clicking the clips, and tighten all screws to fix.
Installing/removing the grass collection box (Fig. A, E)

Caution! Do not operate the machine with the grass collection box or rear deflector installed incompletely. Risk of injury!
Assembling the grass collection box.
- Lift the rear deflector (28)
- If the mulching plug (36) is installed, remove it.
- Hold the grass collection box upper handle (32) and insert the grass collection box (29) onto the hooks
- Release the rear deflector (28) to secure the grass collection box (29) in position.
- To remove the grass collection box (29), reverse the steps above.
Installing/removing the mulching plug (Fig. A, I)

Caution! The blade is sharp, contacting the blade can result in serious personal injury.
Caution! Stop the machine and make sure the blade has stopped completely.
- Lift the rear deflector (28).
-
Insert the mulching plug (36) into the rear discharge chute until the latch at the bottom is aligned with the respective hole in the chute. Push down the plug until it locks in place with an audible "click".
Verify secure installation. -
Release the rear deflector (28) to cover the mulching plug (36).
-
To remove the mulching plug (36), hold the mulching plug by its
handle. Squeeze the handle to unlock the latch. Lift the mulching plug slightly before pulling it out.
Installing/removing the side discharge chute (Fig. A, J)

Caution! The blade is sharp, contacting the blade can result in serious personal injury.
Caution! Stop the machine and make sure the blade has stopped completely.
-
Lift the deflector safety lever (22) to release and lift the side discharge deflector (21)
-
Slide two hooks of side discharge chute (23) under hinge pin on side discharge deflector assembly.
-
Release the side discharge deflector (21) to secure the chute (23) in position.
-
To remove the side discharge chute (23), reverse the steps above.
Filling with engine oil and checking the oil level (Fig. A, G)

Place the equipment on a level base.
Check the oil level every time before mowing and add oil before the lower marking point is reached.
-
Make sure the engine is level and clean the oil fill area of any debris.
-
Unscrew the oil tank cap/dipstick (8) and wipe with a clean cloth.
-
Reinstall the dipstick (8) and tighten, remove the dipstick (8) and check the oil level. The correct oil level should be at the top of the full indicator on the dipstick (8).
-
If the oil level is low, slowly pour oil into the tank. Do not overfill. The
GB IE NI
oil tank holds 0.47 l oil. Use brand oil SAE30.
- Wait one minute after adding oil. Then, recheck the oil level to make sure it is within specifications.
- Wipe off any split oil. Reinstall the oil tank cap/ dipstick (8) and close tightly.
Filling with petrol (Fig. A, H)


Warning - petrol is flammable and hazardous to health
- Keep petrol in containers intended for this purpose.
- Only refuel outdoors and never with the engine running or when the machine is hot.
- Do not smoke whilst refuelling.
- Avoid skin contact and inhalation of the fumes.
- Remove spilt petrol.
- Keep petrol away from
sparks, open flames and other ignition sources.
- Open the filler cap carefully to allow excess pressure to escape.
- Dispose of leftover petrol in an environmentally friendly way (see "Disposal / Environmental Protection").

- Do not use petrol/oil mixtures.
- Use normal or super unleaded petrol.
- Only use clean, fresh petrol.
-
Do not store petrol for extended periods or time. Evaporation of volatile portions or additives will reduce its quality.
-
Stop the machine and let the engine cool at least 2 minutes before removing the fuel tank cap (11).
-
Clean the fuel tank cap (11) area of any dirt and debris. Remove the fuel tank cap (11).
-
Fill the fuel tank with fuel. To allow for expansion of the fuel, do not fill above the bottom of the fuel tank neck.
- Wipe off any fuel residues and reinstall the fuel tank cap (11).
Charging electric starter battery (Fig. A, K)

Warning! Improper use of battery and charger can result in an electrical shock and fire.

Warning! Keep battery charger and pack dry. Avoid exposing battery pack and charger to rain or wet conditions.

Warning! To reduce the risk of electrical shock, do not allow water to flow into AC plug.
-
Connect battery charger (35) to electrical outlet.
-
Slide the electric starter battery (9) into the battery charger bay until it locks with an audible "click".
- Understand the status LEDs:
- Red light - battery pack is charging normally
- Green light - battery pack is fully charged
- Flashing red light - battery pack is either too hot or cold and will not accept a charge. Charging will begin automatically once battery has cooled down to acceptable levels. We recommend protecting the charger from direct sunlight and other heat sources.
- Flashing red and green lights -
Charging error. Please disconnect and try again. If the problem persists, please contact customer service.
GB IE NI
-
Completely charging a depleted battery will take about one hour.
-
Press the electric starter battery release button (10) to remove the battery pack from the charger.
-
Disconnect the battery charger from the electrical outlet
Installing electric starter battery (Fig. A, K, L)

Warning! Improper use of battery and charger can result in an electrical shock and fire.

Warning! Keep battery pack dry. Avoid exposing battery pack to rain or wet conditions.

Warning! Do not short circuit. Never place any object into the battery pack terminals.
-
Make sure the blade control bar (2) is released.
-
The battery bay is located on top of the engine.
Slide in the electric starter battery (9) until it locks with an audible "click". Verify it is securely installed.
-
To check the electric starter battery (9) connection without starting the engine,
-
take out the spark plug connector,
- ensure oil level is OK,
- pull back on the blade control bar (2) and hold it against the upper handle (1),
- and briefly press the electric starter push key (4),
Reconnect spark plug connector afterwards.

New battery can be sleep mode.
Recharge it for 10 seconds to wake up.
- To check the battery charge level, first remove it from the engine by pressing the release button (10). When pressing the battery charge button (45), the display will show the current charge level:
- four lights: Remaining charge above 78 %, sufficient for about 70 engine start cycles - three lights: Remaining charge above 75 %, sufficient for about 40 engine start cycles
- two lights: Remaining charge above 33 %, sufficient for about 20 engine start cycles
- one light: Remaining charge above 10 %, sufficient for about 5 engine start cycles
- flashing light: Remaining charge below 10 %, possibly insufficient for a single engine start cycles
Operation

A certain level of noise exposure caused by this device is unavoidable.
Rearrange noise-intensive works to times approved and specified for this purpose. Comply with the rest periods and reduce the work period down to the minimum.
For your personal protection and the protection of people near by, suitable hearing protection must be worn.
Starting and stopping the engine (Fig. A, K, L)

Warning! Petrol is flammable.
Start the engine at least 3 m away from the filling location. There is a risk of fire.

Start the equipment on a sturdy, level base, if possible not in long grass. Ensure that the cutting tool is touching neither objects nor the ground.

For your safety: Stand behind the device when starting it.

Check the petrol and oil levels regularly (see "initial operation") and refill in time.

Improper use of battery and charger can result in an electrical shock or fire.
POISONOUS GAS HAZARD.
GB IE NI
Engine start (Fig. A, K, L)
- Check the engine oil.
- Check the electric starter battery (9) capacity. At least 2 lights should remain.
Note: To wake up a new battery, a first time quick charge of approximately 10 seconds is required.
-
Install the electric starter battery (9) on the engine. Make sure battery pack is securely installed.
-
Pull the blade control bar (2) back and hold it against the upper handle (1).
-
Press the electric starter push key (4) to start the engine. Release the electric starter push key (4) once the engine started.
Note: To extend the life of the starter, use short starting cycles, 5 seconds maximum.
- If the engine failed to start, release the electric starter push key (4) and wait one minute minimum before trying again.

If the electric starter battery (9) overheats, all four charge indicator LEDs will flash rapidly for 10 seconds. Remove the battery from the engine and allow it to cool down.
Never engage the drive system when starting the engine.
Engine stop (Fig. A)
- Release the blade control bar(2) to stop the engine.
- Remove the electric starter battery (9) to prevent unauthorized use.

Keep the battery pack dry. Avoid exposing battery pack to rain or wet conditions.
Keep the battery pack in a safe place out of the reach of children.
Blade stop device (Fig. A)

The blade is sharp. Touching the blade can result in serious personal injury.
- Release the blade control bar (2) to switch off the engine and engage the motor brake.
- The blade will stop within 7 seconds.
Drive control (Fig. A, M)
- Press the drive control bar (3) against the upper handle (1) and hold it to switch on the wheel drive. The mower will propel itself forward. The designed speed is approximately 3.6 km/h or 1 m/s.
- Release the drive control bar (3) to switch off the wheel drive.
- If the mower does not propel itself properly, you will need to adjust the bowden cable tension bolt kit (46):
- Loosen the locking nut (a)
- Hold the upper bolt (b) and turn the stop nut (c) clockwise to shorten the cable, counterclockwise to lengthen the cable.
- Tighten the locking nut (a) once the self-propelled function is ready.
The self-propelled speed can change on slopes.
Setting the required function (Fig. A, I, J)

Stop the machine and make sure the blade has stopped completely. Then remove the electric starter battery.
This machine has 3 functions, collection, mulching and side discharge, which can be converted by changing accessories. Please see the following chart for detail.
| Mulching plug | Side discharge chute | Grass collection box | |
| Collection | x | x | √ |
| Mulching | √ | x | x |
| Side discharge | √ | √ | x |
Note: √: installed x: uninstalled
Collection: The mower will transport all cuttings into the collection box.
Mulching: The cuttings are further chopped into very small clippings. The mower will leave them on the grass, where they will fertilize the lawn.
Side discharge: The cuttings will be expelled to the side of the machine.
Mowing (Fig. A, I, J, L)
- Set the required function and the cutting height.
- Start the engine (see "Engine start") Push the machine forward to mow the grass. Alternatively, use the drive system for convenient mowing. machine will propel itself when drive control bar (3) is held against the upper handle (1).
Working instructions
General working instructions
- As far as possible, mow the lawn when it is dry in order to protect the turf.
- Set the cutting height such that the machine is not overloaded.
- Run the machine at walking speed or self- ropelled speed in lines that are as straight as possible. For best results, the lines should always overlap by a few centimetres.
- Do not move backwards.
- On slopes, always work across the slope.
- If the blade comes into contact with a foreign body, switch off the engine immediately. Wait until the blade is stationary and check the equipment for damage. Restart work only if the equipment is undamaged.
- Switch off the machine during longer breaks and for transportation. Always wait until the blade is stationary.
- Clean the machine after each use, as described in the "cleaning and maintenance" chapter.
Setting cutting height (Fig. A, N)

Stop the machine and make sure the blade has stopped completely.
The central height adjustment has seven possible settings: 25 - 32 - 40 - 48 - 57 - 67 - 75 mm. To adjust:
GB IE NI
- Pull the height adjustment handle (25) free of the notches for height adjustment (47).
- Move the height adjustment handle (25) forward or backward to the desired position.
- Let the height adjustment handle (25) snap back into the notches for height adjustment (47).
The recommended cutting height is around 30 – 45 mm for an ornamental lawn and around 40 – 65 mm for a utility lawn.

Select a greater cutting height for the first cut of the season.
Emptying the grass collection box (Fig. A, F)
Grass fill level indicator
The grass fill level indicator (33) attached to the top of the grass collection box (29) shows when the grass collection box is full.

Grass fill level indicator (33) open: Grass collection box has free space.

Grass fill level indicator (33) closed: Grass collection box full.
- Stop the engine and wait until the blade is stationary.
- Lift the rear deflector (28) and remove the grass collection box (29).
- Carry the box to your grass disposal site and upend it. For easy emptying, hold the box at its upper handle (32) and lower handle (30).
Cleaning and maintenance

Have any repair and maintenance work not described in these instructions carried out by a specialist workshop. Use only original replacement parts. Risk of accidents! Carry out maintenance and cleaning work strictly with the engine switched off and spark plug connectors removed. Risk of injury! Allow the equipment to cool before any maintenance and cleaning work. Elements of the engine are hot. Risk of burning!

Wear gloves when handling the blade.

For cleaning and maintenance work, also observe the Briggs & Stratton instruction manual supplied.

We recommend contacting an authorised Briggs & Stratton dealer for maintenance work on the engine.
Cleaning and general maintenance work (Fig. A, O)
Remove the grass collection box. Fold the upper handle (1) and tilt the machine back for cleaning and maintenance jobs at the bottom side so that the spark plug faces upwards. Make sure that a second person holds the machine because there is a danger of tipping backwards.

Do not tilt the machine sideways or forwards. Operating fluids could leak out and the engine could be damaged.
- Always keep the equipment clean. To clean, use a soft brush or cloth but no corrosive cleaning agents or solvents. Do not use water to clean the engine as it could contaminate the fuel system.
- After mowing, remove plant remains that are stuck to the equipment by using a piece of wood or plastic. Clean the engine's vent holes, ejection hole and blade area especially. Do not use hard or pointed objects, which could damage the equipment.
- Oil the wheels from time to time.
- Before each use, check the lawnmower for obvious defects such as loose, worn or damaged parts. Check that all nuts bolts and screws are sitting firmly.
- Check covers and guards (15, 21, 28) for damage and that they are sitting correctly. Replace if necessary.
Cleaning/replacing the air filter (Fig. A, P)

Do not operate the equipment without the air filter. Otherwise dust and dirt will get into the engine and damage to the machine.
- Remove the electric starter battery (9).
- Remove the spark plug connector (16) (see "Maintaining the Spark Plug").
- Open the air filter box (12) and take out the air filter (13).
- If excessively dirty, gently tap the air filter on hard surface to loosen and remove debris.
- To install, place the air filter in the air filter box (9) and reclose it.
Maintaining the spark plug (Fig. A, Q)

A worn spark plug or a spark gap that is too large will result in a reduction of engine performance.
- Disconnect the spark plug connector (16) from the spark plug (17) by simultaneously pulling and turning.
- Unscrew the spark plug (17) anticlockwise using the enclosed spark plug wrench (39).
- Check the spark gap using a feeler gauge (available from specialist shops). The spark gap must be between 0.7-0.8 mm.
- If necessary, adjust the gap by carefully bending the ground electrode on the spark plug.
- Clean the spark plug with a wire brush.
- Insert the cleaned and adjusted spark plug or replace a damaged spark plug with a new one. Use a torque of 20 Nm, determined with a torque wrench.
Changing the engine oil (Fig. A, S)

Change the engine oil with the petrol tank empty and the engine warm. Use a suitable gasoline hand pump to empty the fuel tank. Alternatively, arrange the refueling so that the remaining gasoline is spent during operation.

- Change the engine oil for the first time after around 5 operating hours then every 50 operating hours or annually. - Used oil is a hazardous waste product and must be disposed of properly. Dispose of the used oil in an ecofriendly manner (see "Disposal/ Environmental protection").
-
Remove the electric starter battery (9).
-
Remove the spark plug connector (16) (see "Maintaining the Spark Plug").
-
Open the oil tank cap/dipstick (8) pump out the motor oil with an oil pump or drain the oil from the top oil fill tube by keeping the spark plug end of the engine up.
-
Refill with engine oil (see "Initial Operation").
Washing the deck (Fig. A, L, R)
Using a coupling on the deck, the unit allows spraying water on the blade while the engine is running. This will clean the blade and the underside from grass and debris.
-
Bring the machine to a level area and near your garden hose.
-
Stop the engine, remove the grass collection box (29) and close rear discharge deflector (28). Keep the side discharge deflector (21) closed.
-
Attach the garden hose with female coupling to the deck wash male coupling (14) on the left side of deck.
-
Turn the tap water on.
-
Start and run the engine for minimum two minutes to rinse the deck bottom thoroughly.
-
Stop the engine.
-
Turn the tap water off and detach the garden hose.
-
Restart and run the engine for minimum two minutes to dry the deck bottom thoroughly.
Checking/sharpening/ replacing the blade

Only allow specialist companies to install and dismantle the blade.

Wear gloves when handling the blade.
- Remove the electric starter battery (9).
- Take off the spark plug connector (16) and check the blade for wear and damage.
- Always have a blunt blade resharpened by a specialist. An check for imbalances is required after sharpening, to ensure the blade is running true. Imbalances can damage the engine.
- Always have a specialist workshop change a damaged or imbalanced blade.

Incorrect installation can result in serious injury.
Adjusting the carburettor
The carburettor has been preset in the factory for optimum performance. If readjustments are required, have the adjustments made by a specialist workshop.
Storage
General storage instructions

Do not store the equipment with a full collection box. The grass may start fermenting, creating excessive heat. Risk of fire.
- Remove the electric starter battery (9) and keep it in a cool, dry place out of the reach of children.
- Disconnect the charger and store in a cool, dry area.
- Clean and service the equipment before storage.
- Allow the engine to cool before storing the equipment in enclosed areas.
- Use suitable and authorised containers for storing fuel.
- Keep the equipment in a dry place that is protected from dust and out of reach of children.
- Do not wrap the equipment in nylon bags as damp and mould could form.
Fold up the device (Fig. A, T)
For space-saving storage, the grip rod can be folded twice.
- Remove the grass collection box (29).
- Open the quick-release clamp (34) on the upper handle (1) and the lower handle (5).
- Fold both handles down again. The Bowden cable (6) and electric starter cable (24) must not be jammed when you do this.
Storage during the winterbreak

Non-observance of the storage instructions may cause starting problems or permanent damage as a result of fuel residues in the carburettor.
- Start the engine and allow it to run until it stops due to running out of petrol.
- Change the oil (see "changing the engine oil").
• Preserve the engine: - Unscrew the spark plug (17) (see "cleaning and maintenance");
- Pour a tablespoon of engine oil through the spark plug hole into the engine compartment;
- Pull back on the blade control bar (2) and hold it against the upper handle (1). Slowly crank the engine several times to distribute the oil inside the cylinder.;
- Screw the spark plug (17) tight.
- Dispose of used oil and petrol residues in an ecofriendly manner (see "Disposal/environmental protection").
GB IE NI

There is no need to drain the petrol tank if a fuel stabiliser is added to the petrol (see Briggs & Stratton instruction manual).
Disposal/ environmental protection
- Return the tool, accessories and packaging to a recycling centre when you have finished with them.
- Carefully drain the petrol and oil tanks and take your equipment to a recycling centre. The plastic and metal parts that are used can be separated by type and thus recycled.
- Take used oil and petrol residues to a disposal point. Do not pour them into the sewer system or down the drain.
-
Ask our Service-Center for details.
-
Defective units returned to us will be disposed of for free.
- Do not throw cut grass in the dustbin but rather compost it or spread it under bushes and trees as a mulch layer.
- Battery chemicals are toxic and corrosive. Never burn or incinerate discarded or used battery packs as they may explode.
- Used and discarded battery packs will likely still carry a small electrical charge and should be handled with care. Always dispose of discarded or used battery packs according to local regulations.
European Directive 2012/19/EU requires that worn-out power tools be collected separately and recycled in an environmentally compatible manner.
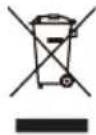
Electrical appliances must not be disposed of with the domestic waste.
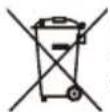
Do not dispose of batteries in your normal domestic waste!
Defective or worn-out rechargeable batteries must be recycled according to Directive 2006/66/EC. Take the battery pack and/or appliance to a nearby collection facility. Please consult your local authorities regarding suitable disposal of worn-out power tools/battery packs.
Maintenance intervals
Regularly carry out the maintenance work listed in the "maintenance intervals" table. Regular maintenance prolongs the life of the equipment. It also gives optimum cutting performance and avoids accidents.
| Maintenance Work(See "cleaning and maintenance") | Before After After | 1st5 Hrs. | After8 Hrs. | After50Hrs. | Annual | |
| Work | ||||||
| Check and tighten screws, nuts and bolts | √ | |||||
| Check the engine oil level/petrol level and refill with engine oil/petrol if required | √ | √ | ||||
| Clean operating elements / the area around the silencer | √ | √ | ||||
| Clean the finger protectionb | √ | |||||
| Change the engine oil | √√√ | |||||
| Replace the air filtera | √ | |||||
| Clean/adjust the spark plug Replace the spark plug | √ | √ | ||||
| Check the silencer and spark catcherb | √ | √ | ||||
| Clean the air cooling systema,b | √ | |||||
| Charge the electric starter battery | √ | |||||
a Replace more often if there is a high level of dust or heavy dirt
b See Briggs & Stratton instruction manual
Troubleshooting
| Problem Possible | Cause Fault Correction | |
| Engine does not start | Too little petrol in the tank Fill with petrol | |
| Electric starter battery is empty | Charge the battery (see "charging the electric starter battery") | |
| Incorrect starting sequence | Follow the instructions for starting the engine (see "operation") | |
| Spark plug cable (16) not put on correctly Sooted spark plug | Attach the spark plug connector Clean, adjust or replace the spark plug (see "cleaning and maintenance") | |
| Incorrectly adjusted carburettor mix | Have the carburettor adjusted by a specialist workshop | |
| Engine starts but equipment does not run at full power | Dirty air filter (13) | Replace the air filter (see "cleaning and maintenance") |
| Incorrectly adjusted carburettor mix | Have the carburettor adjusted by a specialist workshop | |
| Engine splutters, stops | Incorrectly adjusted carburettor mix | Have the carburettor adjusted by a specialist workshop |
| Sooted spark plug (17) | Clean, adjust or replace the spark plugs (see "cleaning and maintenance") | |
| Engine overheats | Ventilation holes blocked | Clean the ventilation slot |
| Incorrect spark plug (17) | Change the spark plug | |
| Too little engine oil in the engine | Fill with engine oil (see "initial operation") | |
| Engine smokes | Dirty air filter (13) | Replace the air filter (see "Cleaning and Maintenance") |
| Too little engine oil in the engine | Fill with engine oil (see "initial operation") | |
| Output unsatisfactory or engine labouring | Grass too short or too long | Change the cutting height (see "setting the cutting height") |
| Blade blunt | Have the blade sharpened or replaced by a specialist workshop | |
| Blade blocked with grass, grass collection box full, ejection channel blocked | Remove the grass (see "cleaning and maintenance") | |
| Blade does not turn | Blade blocked with grass Remove the grass | |
| Blade not installed correctly | Have the blade installed by a specialist workshop | |
| Abnormal noises, rattling or vibrations | Blade not installed correctly | Have the blade installed by a specialist workshop |
| Blade damaged | ||
Guarantee
Dear Customer,
This equipment is provided with a 3-year guarantee from the date of purchase.
Please note any different guarantee conditions for the motor and read the enclosed operating instructions from motor manufacturer "Briggs & Stratton" carefully. This guarantee does not affect your legal guarantee rights.
In case of defects, you have statutory rights against the seller of the product. These statutory rights are not restricted by our guarantee presented below.
Terms of guarantee
The term of the guarantee begins on the date of purchase. Please retain the original receipt. This document is required as proof of purchase.
If a material or manufacturing defect occurs within three years of the date of purchase of this product, we will repair or replace – at our choice – the product for you free of charge. This guarantee requires the defective equipment and proof of purchase to be presented within the three-year period with a brief written description of what constitutes the defect and when it occurred.
If the defect is covered by our guarantee, you will receive either the repaired product or a new product. No new guarantee period begins on repair or replacement of the product.
Guarantee period and statutory
Claims for defects
The guarantee period is not extended by the guarantee service. This also applies for replaced or repaired parts. Any damages and defects already present at the time of purchase must be reported immediately after unpacking. Repairs arising after expiry of the guarantee period are chargeable.
Guarantee cover
The equipment has been carefully produced in accordance with strict quality guidelines and conscientiously checked prior to delivery.
The guarantee applies for all material and manufacturing defects. This guarantee does not extend to cover product parts that are subject to normal wear and may therefore be considered as wearing parts (e.g. cutting unit, carbon brush, air filter, starter rope) or to cover damage to breakable parts (e.g. switches).
This guarantee shall be invalid if the product has been damaged, used incorrectly or not maintained. Precise adherence to all of the instructions specified in the operating manual is required for proper use of the product. Intended uses and actions against which the operating manual advises or warns must be categorically avoided. The product is designed only for private and not commercial use. The guarantee will be invalidated in case of misuse or improper handling, use of force, or interventions not undertaken by our authorised service branch.
Processing in case of guarantee
To ensure quick handling of you issue, please follow the following directions:
- Please have the receipt and identification number (IAN 297536) ready as proof of purchase for all enquiries.
- Please find the item number on the rating plate.
- Should functional errors or other defects occur, please initially contact the service department specified below by telephone or by e-mail. You will then receive further information on the
GB IE NI
processing of your complaint.
- After consultation with our customer service, a product recorded as defective can be sent postage paid to the service address communicated to you, with the proof of purchase (receipt) and specification of what constitutes the defect and when it occurred. In order to avoid acceptance problems and additional costs, please be sure to use only the address communicated to you. Ensure that the consignment is not sent carriage forward or by bulky goods, express or other special freight. Please send the equipment inc. all accessories supplied at the time of purchase and ensure adequate, safe transport packaging.
Repair service
For a charge, repairs not covered by the guarantee can be carried out by our service branch, which will be happy to issue a cost estimate for you.
We can handle only equipment that has been sent with adequate packaging and postage.
Attention: Please send your equipment to our service branch in clean condition and with an indication of the defect.
Equipment sent carriage forward or by bulky goods, express or other special freight will not be accepted.
We will dispose of your defective devices free of charge when you send them to us.
Service-center
The responsible "Briggs & Stratton" service is responsible for motor problems on your lawn mower.
GB Service Great Britain
Sertronics GmbH
Ostring 60
D-66740 Saarlouis-Fraulautern
Germany
Email: gapo-service-gb@sertronics.de
Tel: 0044 2036300345
Fax: 0049 21529603111
IE Service Ireland
Sertronics GmbH
Ostring 60
D-66740 Saarlouis-Fraulautern
Germany
Email: gapo-service-ie@sertronics.de
Tel: 0035314372338
Fax: 0049 21529603111
IAN 297536
Importer
Please note that the following address is not a service address. Please initially contact the service centre specified above.
Ga-Po Vertrieb GmbH
47906 Kempen, Germany
Inhalt
Einleitung......40
Bestimmungsgemäße
Verwendung......40
Allgemeines......40
(LPA) 81,0 dB(A); K=3,0 dB(A)
Last Information Update


- PETROL LAWNMOWER / BENZIN-RASENMÄHER FBME 575 A1
- Content
- Introduction 8
- Intended use 8
- General description ......8
- Technical specifications......10
- Symbols and icons ......11
- Safety instructions......13
- Initial operation....20
- Operation 27
- Working instructions ......29
- Cleaning and maintenance .....30
- Storage 33
- Disposal/environmental protection ....34
- Maintenance intervals ......35
- Troubleshooting 36
- Guarantee 37
- Repair service ....38
- Service-center 38
- Importer 38
- Translation of the original EC declaration of conformity .....75
- Introduction
- Intended use
- General description
- Delivery contents (Fig. B)
- Summary (Fig. A)
- Functional description
- Safety equipment (Fig. A)
- Blade control bar (2)
- Electric starter battery (9)
- Muffler guard (15)
- Side discharge deflector (21)
- Rear deflector (28)
- Technical specifications
- Warning:
- Symbols and icons
- Symbols on the device
- Symbols on the engine
- Symbol on the battery and charger
- Symbols on the 5l jerry can
- Symbols in the manual
- Safety instructions
- General safety instrucitons
- GB IE NI
- Preparatory measures
- Handling
- Charger
- Maintenance and storage:
- Initial operation
- Mounting the grip rod (Fig. A, C, D)
- Assembling the grass collection box (Fig. A, E)
- Installing/removing the grass collection box (Fig. A, E)
- Installing/removing the mulching plug (Fig. A, I)
- Installing/removing the side discharge chute (Fig. A, J)
- Filling with engine oil and checking the oil level (Fig. A, G)
- Filling with petrol (Fig. A, H)
- Warning - petrol is flammable and hazardous to health
- Charging electric starter battery (Fig. A, K)
- Installing electric starter battery (Fig. A, K, L)
- Operation
- Starting and stopping the engine (Fig. A, K, L)
- Engine start (Fig. A, K, L)
- Engine stop (Fig. A)
- Blade stop device (Fig. A)
- Drive control (Fig. A, M)
- Setting the required function (Fig. A, I, J)
- Mowing (Fig. A, I, J, L)
- Working instructions
- General working instructions
- Setting cutting height (Fig. A, N)
- Emptying the grass collection box (Fig. A, F)
- Grass fill level indicator
- Cleaning and maintenance
- Cleaning and general maintenance work (Fig. A, O)
- Cleaning/replacing the air filter (Fig. A, P)
- Maintaining the spark plug (Fig. A, Q)
- Changing the engine oil (Fig. A, S)
- Washing the deck (Fig. A, L, R)
- Checking/sharpening/ replacing the blade
- Adjusting the carburettor
- Storage
- General storage instructions
- Fold up the device (Fig. A, T)
- Storage during the winterbreak
- Disposal/ environmental protection
- Maintenance intervals
- Guarantee
- Terms of guarantee
- Guarantee period and statutory
- Claims for defects
- Guarantee cover
- Processing in case of guarantee
- Repair service
- Service-center
- GB Service Great Britain
- IE Service Ireland
- IAN 297536
- Importer
- Ga-Po Vertrieb GmbH
- Inhalt
Brand : FLORABEST
Model : FBME 575 A1
Category : Lawn mower