
12 V Car Adaptor - Car Charger ULTIMATE SPEED - Free user manual and instructions
Find the device manual for free 12 V Car Adaptor ULTIMATE SPEED in PDF.


| Product type | 12 V Car Charger |
| Brand | Ultimate Speed |
| Model | 12 V Car Adaptor |
| Dimensions (L x H x D) | Approx. 8.6 x 3.3 x 4 cm |
| Cable length | Approx. 90.5 cm |
| Input voltage | 12 V, max. 6.3 A |
| Output voltage (12 V sockets) | 12 V, 6.3 A |
| Output voltage (USB port) | 5 V, 1.0 A |
| Maximum load | 75.6 W (6.3 A including USB) |
| Number of sockets | 2 female 12 V sockets + 1 USB port |
| Control | ON/OFF switch |
| Mounting | Adhesive pads included |
| Package contents | 1 adaptor, 2 adhesive pads, 1 instruction manual |
| Cleaning | Soft, dry cloth (no liquids) |
| Replaceable fuse | No (integrated fuse not replaceable) |
| Permitted use | 12 V vehicles (not 24 V systems) |
| Warranty | Not specified |
Frequently Asked Questions - 12 V Car Adaptor ULTIMATE SPEED
User questions about 12 V Car Adaptor ULTIMATE SPEED
0 question about this device. Answer the ones you know or ask your own.
Ask a new question about this device
Download the instructions for your Car Charger in PDF format for free! Find your manual 12 V Car Adaptor - ULTIMATE SPEED and take your electronic device back in hand. On this page are published all the documents necessary for the use of your device. 12 V Car Adaptor by ULTIMATE SPEED.
USER MANUAL 12 V Car Adaptor ULTIMATE SPEED
12 V CAR ADAPTOR
GB IE
12 V CAR ADAPTOR
Operation and Safety Notes
SE
FORDONSADAPTER 12 V
GB/IE Operation and Safety Notes Page 4
| FI Käyttö- ja turvaohjeet Sivu 14 | |||
| SE Bruksanvisning och säkerhetsanvisningar Sidan 24 | |||
| DK Brugs- og sikkerhedsanvisninger Side 34 | |||
| FR / BE Instructions d’utilisation et consignes de sécurité Page 44 | |||
| NL/BE | Bedienings- en veiligheidsinstructies | Pagina | 55 |
| DE/AT/CH | Bedienungs- und Sicherheitshinweise | Seite | 66 |
Intended Use...... Page 5
Description of Parts ...... Page 5
Scope of Delivery ...... Page 5
Technical data...... Page 6
Safety Information ...... Page 6
Start-up procedure
Assembling the car adapter ...... Page 9
Using the car adapter...... Page 11
Cleaning and maintenance...... Page 12
Disposal...... Page 13
12 V Car adaptor
- Intended Use
The product is designed to connect additional devices (fans, heated seat covers, coolers) in a car. The car adapter has two 12 Volt connections and one USB connection. The device is intended for use in cars only. The product is not intended to be used for commercial purposes.
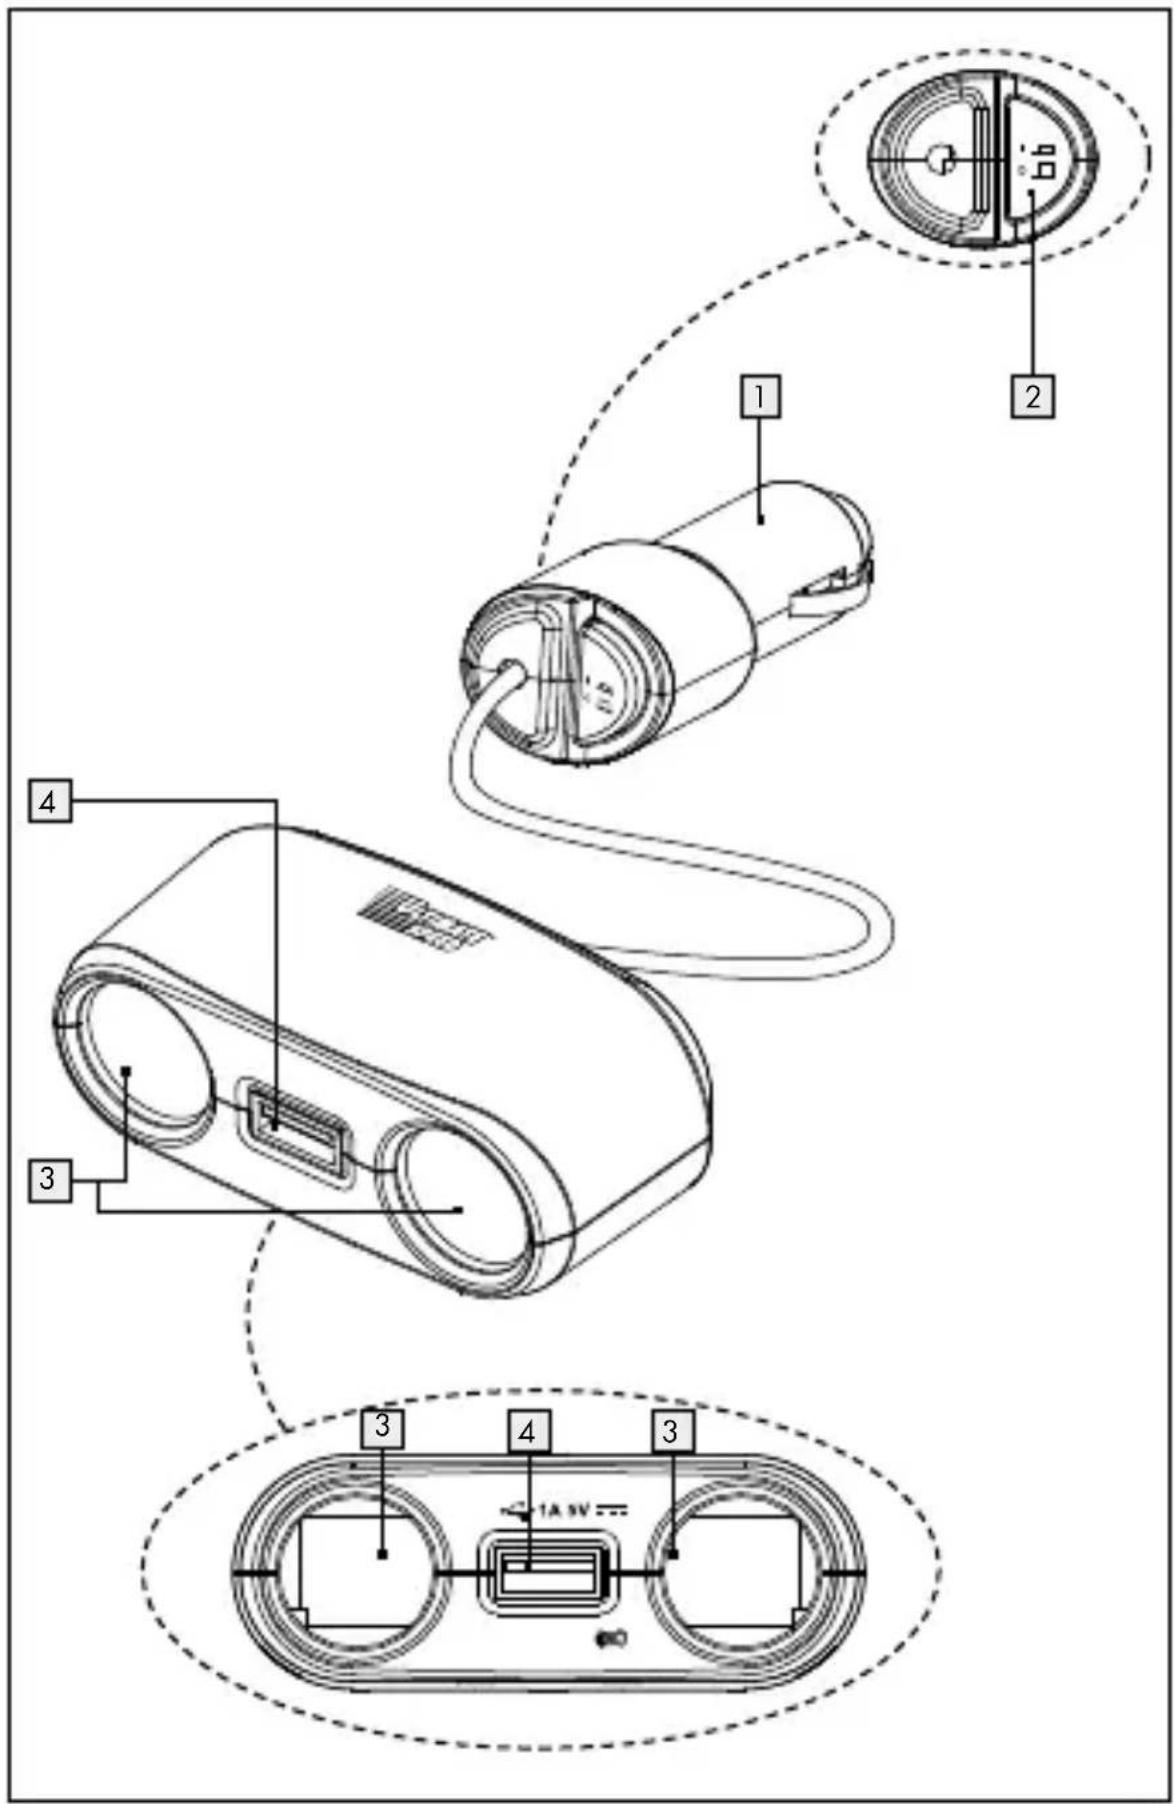
● Description of Parts
12-Volt connector plug (for cigarette lighter)
2 ON/OFF-switch
3 12-Volt connector socket
4 USB port
- Scope of Delivery
1 x Car adaptor 12 V
2 x Adhesive pad
1 x Directions for use
● Technical data
Input voltage: 12 V, max. 6.3 A
Output voltage
12-Volt connector
sockets: 12 V
= 6.3A
USB port: 5 V
= 1.0 ~A
Max. capacity:
75.6 W, 6.3 A (incl. USB port)
Long connecting
cable: approx. 90.5 cm
Dimensions: approx. 8.6 x 3.3 x 4 cm
(w x h x d)

Safety Information


natural_image
Simple line drawing of a person standing with arms raised (no text or symbols)Always keep children away from this product. This product is not a toy.
This device is not a toy and should not be played by children. Children are not able to understand the dangers that can occur when handling this device.
This appliance can be used by children aged from 8 years and above and persons with reduced physical, sensory or mental capabilities or lack of experience and knowledge if they have been given supervision or instruction concerning use of the appliance in a safe way and understand the hazards involved. Children shall not play with the appliance. Cleaning and user maintenance shall not be made by children without supervision.
- Only use the product with a 12-Volt connection. Never connect it to a 24-Volt on-board power supply.
■ Every time you connect the device, check first that the device and connecting cable are not damaged.
■ Never plug in several car adapters in a row.
- Do not use the device if you find any damage.
Please consult a specialist electrician if you discover any damage or problems with the device, or for the performance of repairs to the device.
■ Never open any part of the electrical equip-
ment or insert any objects into the same.
■ Do not try to repair the device yourself.
The device must be kept away from water or other liquids.
Do not touch the 12-Volt connector plug 1, the 12-Volt connector sockets 3 or the USB port 4 with damp hands.
■ Protect the connecting cable from sharp edges, mechanical strain and hot surfaces.
Do not pull on the connecting cable of the connected device or on the cable of the car adapter. Always use the connector plug to pull the connected device or the car adapter out of the socket.
■ Do not expose the device to
- extreme temperatures,
- strong vibrations,
- heavy mechanical loads,
- direct sunlight,
- moisture.
Otherwise there is a danger that the device will be damaged.

CAUTION! RISK OF ACCIDENT! Position
the car adapter in such a way that the connecting cable cannot hinder the driver.

CAUTION! RISK OF ACCIDENT! Make sure that the device cannot slip while driving.
Before doing any work on the car adapter or on the devices connected to it, remove the connector plugs from the sockets.
■ Never insert a cigarette lighter into one of the 12-Volt connector sockets 3. Failure to comply with this can lead to the device being damaged.
■ The fuse cannot be replaced.
- Start-up procedure
- Assembling the car adapter
⚠️ CAUTION! RISK OF ACCIDENT! Assemble the car adapter in such a way that it cannot slip while driving and so that it does not hinder the driver.
Note: Make sure that you connect the car adapter in such a way that the connecting cable can reach as far as the connector sockets of the cigarette lighter.
Note: Make sure that the subsurface on which you would like to mount the car adapter is free of dirt and grease and does not warm up. You may have to clean the subsurface. A dirty or greasy subsurface can reduce the effectiveness of the adhesive pads.
Note: Mount the car adapter in such a way that it is not subject to direct sunlight. Otherwise the adhesive strength of the adhesive pad may diminish.
☐ Remove the protective foil from one side of the adhesive pads.
☐ Place the adhesive pads onto the lower side of the car adapter.
☐ Remove the adhesive foil from the other side of the adhesive pad.
☐ Place the car adapter on the place you wish to have it and gently press it down.
Note: You should only use the product 24 hours after installation. After 24 hours the adhesive pads have reached their optimum degree of adhesion. After installation do not change the position of the adhesive pads.
Otherwise the adhesion of the adhesive pads may be restricted.

CAUTION! DANGER OF ACCIDENT!
Check that the car adapter is still firmly in place at regular intervals.
- Using the car adapter
☐ Remove the cigarette lighter from the connector socket.
☐ Plug the 12-Volt connector plug 1 into the connector socket of the cigarette lighter.
Note: Turn the 12-Volt connector plug if need be so that the contacts of the connector socket and the 12-Volt connector plug 1 lie on top of each other.
☐ Now insert the connector plug of the device you wish to attach into the 12-Volt connector socket 3 or the USB port 4.
Note: Please ensure that the additional device is switched off when you connect it to the vehicle adapter.

CAUTION! RISK OF DAMAGE TO
PROPERTY! The max. load for all devices
attached to the car adapter is 6.3 A. Do not load more than that onto the car adapter.
Note: You must comply with the directions for use of each manufacturer.
☐ Press the ON / OFF switch 2 in order to turn the vehicle adapter on.
☐ Switch on the devices you have plugged into the car adapter.
☐ Turn the additional connected devices off when you are no longer using them.
☐ Press the ON / OFF switch 2 in order to turn the vehicle adapter off.
☐ Disconnect the attached devices from the 12-Volt connector socket 3 or the USB port 4 when you are no longer using them.
● Cleaning and maintenance
☐ The device should only be cleaned on the outside with a soft dry cloth.
☐ Under no circumstances should you use liquids or detergents, as these will damage the device.

Disposal

natural_image
Abstract black and white circular logo with curved arrows (no text or symbols)The packaging is made entirely of recyclable materials, which you may dispose of at local recycling facilities.
Contact your local refuse disposal authority for more details of how to dispose of your worn-out product.

To help protect the environment, please dispose of the product properly when it has reached the end of its useful life and not in the household waste. Information on collection points and their opening hours can be obtained from your local authority.
EMC €
natural_image
Simple line drawing of a person holding an umbrella (no text or symbols)natural_image
Abstract black and white circular logo with curved arrow design (no text or symbols)natural_image
Symbol of a trash bin with crossed lines indicating no waste or discharge (no text or numbers present)natural_image
Symbol of a trash bin crossed out by a horizontal line, with no text or numbers present.natural_image
Simple line drawing of a person standing with arms raised, no text or symbols presentnatural_image
Symbol of a trash bin with crossed lines indicating no waste or discharge (no text or numbers present)natural_image
Warning symbol: black exclamation mark inside a triangle (no text or numbers)natural_image
Simple line drawing of a person standing with arms raised (no text or symbols)natural_image
Symbol of a trash bin with crossed lines indicating no waste or discharge (no text or numbers present)natural_image
Simple line drawing of a human figure with arms raised (no text or symbols)natural_image
Symbol of a trash bin with crossed lines indicating no waste or discharge (no text or numbers present)Sicherheitshinweise

natural_image
Simple line drawing of a human figure with arms raised (no text or symbols)natural_image
Abstract black and white circular logo with curved arrows (no text or symbols)natural_image
Pure electrical circuit symbol for a lamp (no text or labels)Last Information Update
Tietojen tila · Informationsstatus
Tilstand af information · Version


- V CAR ADAPTOR
- FORDONSADAPTER 12 V
- Start-up procedure
- - Intended Use
- ● Description of Parts
- - Scope of Delivery
- ● Technical data
- Safety Information
- CAUTION! RISK OF ACCIDENT! Position
- - Start-up procedure
- - Assembling the car adapter
- CAUTION! DANGER OF ACCIDENT!
- - Using the car adapter
- CAUTION! RISK OF DAMAGE TO
- ● Cleaning and maintenance
- Disposal
- EMC €
- Sicherheitshinweise
Brand : ULTIMATE SPEED
Model : 12 V Car Adaptor
Category : Car Charger