
AV8805 - Hi-Fi System MARANTZ - Free user manual and instructions
Find the device manual for free AV8805 MARANTZ in PDF.


| Product Type | AV Pre Tuner (Preamp/Processor) |
| Dimensions (W x H x D) | 17.3 x 7.4 x 16.2 in (440 x 188 x 412 mm) |
| Weight | 28.2 lb (12.8 kg) |
| Power Consumption | 50 W (standby: 0.2 W) |
| Supported Audio Formats | Dolby Atmos, DTS:X, Auro-3D, Dolby TrueHD, DTS-HD Master Audio, PCM up to 192 kHz/24-bit, DSD up to 5.6 MHz |
| Video Processing | 4K 60Hz passthrough and upscaling, HDR10, HLG, Dolby Vision, BT.2020, HDCP 2.2 |
| HDMI Inputs/Outputs | 8 inputs (1 front), 3 outputs (2 main, 1 zone) |
| Amplifier Channels | 13.1-channel preamp outputs (XLR and RCA) |
| Audio Features | Current feedback amplifier, Audyssey MultEQ XT32, Sub EQ HT, LFC, Dynamic EQ, Dynamic Volume |
| Network Features | Ethernet, Wi-Fi, Bluetooth, AirPlay, HEOS multi-room, Internet radio, Spotify Connect, DLNA |
| Setup & Calibration | Setup Assistant with on-screen guide, Audyssey automatic speaker calibration (microphone included) |
| Zone Support | 3 zones (HDMI zone 2, analog zone 2/3) |
| Remote Control | Backlit remote with learning capability, programmable codes |
| Energy Saving | Auto standby, HDMI passthrough in standby, low standby power |
| Maintenance & Cleaning | Wipe with soft, dry cloth; avoid solvents; periodic firmware updates via network |
| Safety | Built-in protection circuits; do not block ventilation; use provided power cord |
| Spare Parts & Repairability | Contact authorized Marantz service center; consumables like remote batteries are user-replaceable |
| General Information | Marantz AV8805, 2017 model, premium AV preamp with advanced room correction and multi-room audio |
Frequently Asked Questions - AV8805 MARANTZ
User questions about AV8805 MARANTZ
0 question about this device. Answer the ones you know or ask your own.
Ask a new question about this device
Download the instructions for your Hi-Fi System in PDF format for free! Find your manual AV8805 - MARANTZ and take your electronic device back in hand. On this page are published all the documents necessary for the use of your device. AV8805 by MARANTZ.
USER MANUAL AV8805 MARANTZ
Contents Connections Playback Settings Tips Appendix

natural_image
Vertical arrangement of electronic devices with no visible text or symbolsmarantz®
AV Pre Tuner
AV8805
Owner's Manual
Front panel D
Rear panel Re
Index



Contents Connections Playback Settings Tips Appendix
Accessories 8 Inserting the batteries 9 Operating range of the remote control unit 9
Features 10 High quality sound 10 High performance 12 Easy operation 16
Part names and functions 17 Front panel 17 Display 22 Rear panel 26 Remote control unit 30
Connections
Speaker installation 35
Connecting a power amp 44
Before connecting a power amp 44
Speaker configuration and "Amp Assign" settings 49
Connecting 5.1-channel speakers 51
Connecting 7.1-channel speakers 52
Connecting 9.1-channel speakers 57
Connecting 13.1-channel speakers 66
Connecting 15.1-channel speakers 71
Connecting 11.1-channel speakers: Bi-amp connection of front speakers 77
Connecting 11.1-channel speakers: Second pair of front speakers 78
Connecting a TV 79 Connection 1 : TV equipped with an HDMI connector and compatible with the ARC (Audio Return Channel) 80 Connection 2 : TV equipped with an HDMI connector and incompatible with the ARC (Audio Return Channel) 81 Connection 3 : TV equipped without an HDMI connector 82 Connecting a playback device 83 Connecting a set-top box (Satellite tuner/cable TV) 85 Connecting a DVD player or Blu-ray Disc player 86 Connecting a video camcorder or game console 87 Connecting a turntable 88 Connecting a device with a multi-channel output connector 89 Connecting a USB memory device to the USB port 90 Connecting an FM/AM antenna 91 Connecting to a home network (LAN) 93 Wired LAN 93 Wireless LAN 94 Connecting an external control device 95 REMOTE CONTROL jacks 95 DC OUT jacks 96 Connecting the power cord 97
Front panel D
Rear panel Re
Index
2



Contents Connections Playback Settings Tips Appendix
Playback
| Basic operation | 99 |
| Turning the power on | 99 |
| Selecting the input source | 99 |
| Adjusting the volume | 100 |
| Turning off the sound temporarily (Muting) | 100 |
| Playback a DVD player/Blu-ray Disc player | 100 |
| Playing a USB memory device | 101 |
| Playing files stored on USB memory devices | 102 |
| Listening to music on a Bluetooth device | 105 |
| Playing music from Bluetooth device | 106 |
| Pairing with other Bluetooth devices | 108 |
| Reconnecting to this unit from a Bluetooth device | 109 |
| Listening to FM/AM broadcasts | 110 |
| Listening to FM/AM broadcasts | 111 |
| Tuning in by entering the frequency (Direct Tune) | 112 |
| Changing the tune mode (Tune Mode) | 113 |
| Tuning in to stations and presetting them automatically (Auto Preset Memory) | 113 |
| Presetting the current broadcast station (Preset Memory) | 114 |
| Listening to preset stations | 114 |
| Specify a name for the preset broadcast station (Preset Name) | 115 |
| Skipping preset broadcast stations (Preset Skip) | 116 |
| Cancelling Preset Skip | 117 |
| Listening to Internet Radio | 118 |
| Listening to Internet Radio | 119 |
| Playing back files stored on a PC or NAS | 120 |
| Playing back files stored on a PC or NAS | 121 |
| Getting the HEOS App | 124 |
| HEOS Account | 125 |
| Playing from streaming music services | 126 |
| Listening to the same music in multiple rooms | 129 |
| AirPlay function | 133 |
| Playing songs from your iPhone, iPod touch or iPad | 134 |
| Playing iTunes music with this unit | 134 |
| Perform iTunes playback operations with the remote control unit of this unit | 135 |
| Spotify Connect function | 136 |
| Playing Spotify music with this unit | 136 |
Front panel D
Rear panel Re
Index
3



Contents Connections Playback Settings Tips Appendix
Convenience functions 137
Adding to HEOS Favorites 138
Playing back HEOS Favorites 138
Deleting a HEOS Favorites 139
Adjusting the audibility of dialog and vocals (Dialog Enhancer) 139
Adjusting the volume of each channel to match the input source (Channel Level Adjust) 140
Adjusting the tone (Tone) 141
Displaying your desired video during audio playback (Video Select) 142
Adjusting the picture quality for your viewing environment (Picture Mode) 143
Playing the same music in all zones (All Zone Stereo) 144
Selecting a sound mode 145
Selecting a sound mode 146
Direct playback 147
Pure Direct playback 147
Auto surround playback 148
Description of sound mode types 149
Sound mode that can be selected for each input signal 153
HDMI Control function 157
Setting procedure 157
Smart Menu function 158
Sleep timer function 160
Using the sleep timer 161
Smart select function 162
Calling up the settings 163
Changing the settings 164
Panel lock function 165
Disabling all key button operations 165
Disabling all button operations except VOLUME 165
Canceling the Panel lock function 166
Remote lock function 167
Disabling the sensor function of the remote control unit 167
Enabling the remote sensor function 167
Switches light illumination on/off 168
Playback in ZONE2/ZONE3 (Another room) 169
Connecting ZONE 169
Playback in ZONE2/ZONE3 172
Front panel D
Rear panel Re
Index
4



Contents Connections Playback Settings Tips Appendix
Settings
| Menu map | 174 |
| Menu operations | 178 |
| Audio | 179 |
| Subwoofer Level Adjust | 179 |
| Bass Sync | 179 |
| Surround Parameter | 180 |
| M-DAX | 184 |
| Audio Delay | 185 |
| Volume | 186 |
| Audyssey® | 187 |
| Graphic EQ | 190 |
| Video | 192 |
| Picture Adjust | 192 |
| HDMI Setup | 194 |
| Output Settings | 199 |
| Analog Video Out | 202 |
| On Screen Display | 203 |
| 4K Signal Format | 204 |
| TV Format | 205 |
| Inputs | 206 |
| Input Assign | 206 |
| Source Rename | 208 |
| Hide Sources | 209 |
| Source Level | 209 |
| Input Select | 210 |
| Speakers | 211 |
| Audyssey® Setup | 211 |
| Procedure for speaker settings (Audyssey® Setup) | 213 |
| Error messages | 219 |
| Retrieving Audyssey® Setup settings | 221 |
| Manual Setup | 222 |
| Amp Assign | 222 |
| Speaker Config. | 230 |
| Distances | 236 |
| Levels | 237 |
| Crossovers | 238 |
| Bass | 239 |
| Front Speaker | 240 |
| 2ch Playback | 240 |
Front panel D
y Rear panel Re
Index
5



Contents Connections Playback Settings Tips Appendix
| Network | 243 |
| Information | 243 |
| Connection | 243 |
| Wi-Fi Setup | 244 |
| Settings | 246 |
| Network Control | 248 |
| Friendly Name | 248 |
| Diagnostics | 249 |
| HEOS Account | 250 |
| You have not signed in | 250 |
| You have already signed in | 250 |
| General | 251 |
| Language | 251 |
| ZONE2 Setup / ZONE3 Setup | 251 |
| Zone Rename | 254 |
| Smart Select Names | 254 |
| Trigger Out 1 / Trigger Out 2 | 254 |
| Auto Standby | 255 |
| Front Display | 256 |
| Firmware | 257 |
| Information | 260 |
| Usage Data | 261 |
| Save & Load | 262 |
| Setup Lock | 262 |
| Operating external devices with the remote control unit | 263 |
| Registering preset codes | 264 |
| Operating devices | 268 |
| Checking registered preset codes | 271 |
| Initializing registered preset codes | 271 |
| Operating learning function | 272 |
| Remembering remote control codes from other devices | 273 |
| Delete saved remote control codes | 274 |
| Setting the back light | 275 |
| Disabling the backlight | 275 |
| Turning the backlight on | 275 |
| Specifying the zone used with the remote control unit | 276 |
Front panel D
Rear panel Re
Index
6


Contents Connections Playback Settings Tips Appendix
Tips
| Tips | 278 |
| Troubleshooting | 280 |
| Power does not turn on / Power is turned off | 281 |
| Operations cannot be performed through the remote control unit | 282 |
| Display on this unit shows nothing | 282 |
| No sound comes out | 283 |
| Desired sound does not come out | 284 |
| Sound is interrupted or noise occurs | 286 |
| No video is shown on the TV | 287 |
| The menu screen is not displayed on the TV | 289 |
| AirPlay cannot be played back | 290 |
| USB memory devices cannot be played back | 291 |
| Bluetooth cannot be played back | 292 |
| The Internet radio cannot be played back | 293 |
| Music files on PC or NAS cannot be played back | 294 |
| Various online services cannot be played | 295 |
| The HDMI Control function does not work | 295 |
| Cannot connect to a wireless LAN network | 296 |
| When using HDMI ZONE2, the devices does not function properly | 297 |
| Update/upgrade error messages | 298 |
| Resetting factory settings | 299 |
| Resetting network settings | 300 |
Appendix
| About HDMI | 301 |
| Video conversion function | 304 |
| Playing back a USB memory devices | 306 |
| Playing back a Bluetooth device | 307 |
| Playing back a file saved on a PC or NAS | 308 |
| Playing back Internet Radio | 309 |
| Personal memory plus function | 309 |
| Last function memory | 309 |
| Sound modes and channel output | 310 |
| Sound modes and surround parameters | 312 |
| Types of input signals, and corresponding sound modes | 315 |
| Explanation of terms | 318 |
| Trademark information | 328 |
| Specifications | 330 |
| Index | 335 |
| License | 338 |
Front panel D
Rear panel Re
Index
7



Contents Connections Playback Settings Tips Appendix
Thank you for purchasing this Marantz product.
To ensure proper operation, please read this owner's manual carefully before using the product.
After reading this manual, be sure to keep it for future reference.
Accessories
Check that the following parts are supplied with the product.
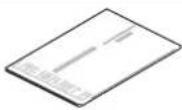 | 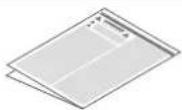 | 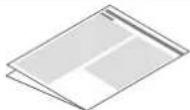 Notes on radioSafety InstructionsQuick Start Guide (for USA/for CANADA) Notes on radioSafety InstructionsQuick Start Guide (for USA/for CANADA) |  |  Cable labelsWarranty Cable labelsWarranty |
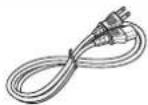 | 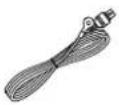 | 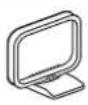 AM loop antennaFM indoor antennaPower cord Sound microphone AM loop antennaFM indoor antennaPower cord Sound microphone | 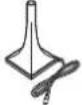 | 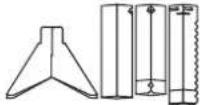 Sound calibration microphone stand Sound calibration microphone stand |
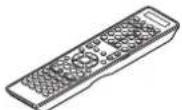 Remote control unit (RC039SR) Remote control unit (RC039SR) |  R03/AAA batteries External antennas for Bluetooth/wireless connectivity R03/AAA batteries External antennas for Bluetooth/wireless connectivity | 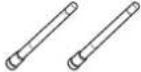 | ||
Front panel D
Rear panel Re
Index
8



Contents
Connections Playback Settings Tips Appendix
Inserting the batteries
1 Remove the rear lid in the direction of the arrow and remove it.
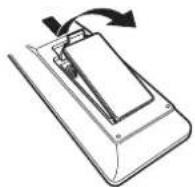
2 Insert two batteries correctly into the battery compartment as indicated.
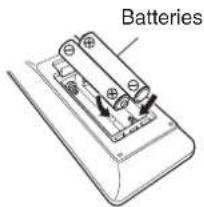
3 Put the rear cover back on.
Front panel D
Rear panel Re
Index
9
NOTE
• To prevent damage or leakage of battery fluid:
- Do not use a new battery together with an old one.
- Do not use two different types of batteries.
- Remove the batteries from the remote control unit if it will not be in use for long periods.
- If the battery fluid should leak, carefully wipe the fluid off the inside of the battery compartment and insert new batteries.
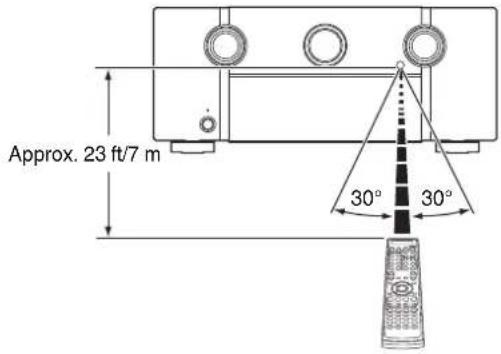
Operating range of the remote control unit
Point the remote control unit at the remote sensor when operating it.



Contents
Connections Playback Settings Tips Appendix
Features
High quality sound
• Current feedback amplifier
This unit uses a high-speed current feedback amplifier circuit for its preamplifier so that signals from a Blu-ray Disc player and other equipment that support high-definition audio formats can be amplified with high fidelity. The high-speed current feedback amplifier also reproduces a natural sound space.
• Dolby Atmos (p. 319)
This unit is equipped with a decoder that supports Dolby Atmos audio format. The placement or movement of sound is accurately reproduced by the addition of overhead speakers, enabling you to experience an incredibly natural and realistic surround sound field.
• DTS:X (p. 322)
This unit is equipped with the DTS:X decoder technology. DTS:X brings the home theater experience to new heights with its immersive object based audio technology which removes the bounds of channels. The flexibility of objects allows for sound to be scaled large or small and moved around the room with greater accuracy than ever before leading to a richer immersive audio experience.
• DTS Virtual:X (p. 322)
DTS Virtual:X technology features DTS's proprietary virtual height and virtual surround processing to deliver an immersive sound experience from any type of input source (stereo to 7.1.4 channel) and speaker configuration.
- Audyssey LFC™ (Low Frequency Containment) (p. 189)
Audyssey LFC ^™ solves the problem of low frequency sounds disturbing people in neighboring rooms or apartments. Audyssey LFC ^™ dynamically monitors the audio content and removes the low frequencies that pass through walls, floors and ceilings. It then applies psychoacoustic processing to restore the perception of low bass for listeners in the room. The result is great sound that no longer disturbs the neighbors.
- Discrete subwoofers and Audyssey Sub EQ HT™ (p. 212)
The unit has two subwoofer output capability and can adjust the level and delay for each subwoofer individually. Audyssey Sub EQ HT™ makes the integration seamless by first compensating for any level and delay differences between the two subwoofers and then applying Audyssey MultEQ® XT32 to both subwoofers together for improved deep bass response and detail.
Front panel D
Rear panel Re
Index
10



Contents
Connections Playback Settings Tips Appendix
• Auro-3D
This unit is equipped with an Auro-3D decoder.
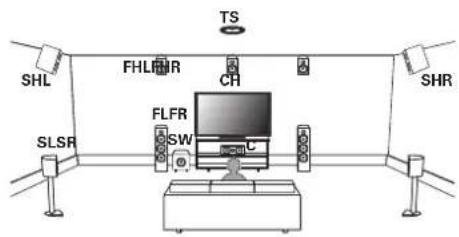
With Auro-3D, Front Height (FHL + FHR), Surround Height (SHL + SHR), Center Height (CH/optional) and Top Surround (TS/optional) are added to a conventional 5.1-channel system to achieve a natural and realistic sound field that is three-dimensional and fully immersive.
You will be able to fully enjoy Auro-3D playback if you properly place the speakers for Auro-3D.
■ Auro-3D playback
■ Dolby Atmos playback
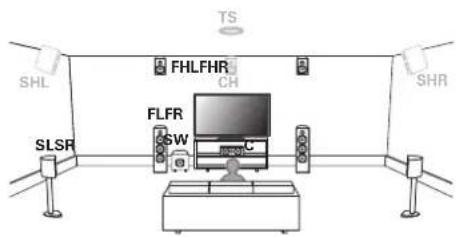

- Auro-3D does not support a Dolby Atmos configuration using Top Front, Top Middle or Top Rear speakers.
But it is possible to support both an Auro-3D and Dolby Atmos by adding Front Height and Rear Height speakers* to a 5.1 configuration.
*For an optimum Auro-3D experience Surround Height speakers are strongly recommended.
Front panel D
Rear panel Re
Index
11



Contents
Connections Playback Settings Tips Appendix
High performance
• 4K 60Hz input/output supported

flowchart
graph LR
    A["4K 60p\n4:4:4"] --> B["Device"]
    B --> C["4K 60p\n4:4:4"]
    C --> D["Computer"]
When 4K Ultra HD (High Definition) is used, an input/output speed of 60 frames per second (60p) is achieved for video signals. When connected to 4K Ultra HD and 60p video signal input compatible TV, you can enjoy the sense of realism only available from high-definition images, even when viewing fast-moving video.
This unit also supports image processing for 4K 60p, 4:4:4 and 24-bit videos. By processing the video at the original resolution, this unit lets you enjoy flawless, high-definition picture quality.
This unit also supports HDR (High Dynamic Range) and BT.2020 wide color gamut.
- HDCP 2.2
This unit is compatible with HDCP 2.2 copyright protection standard.
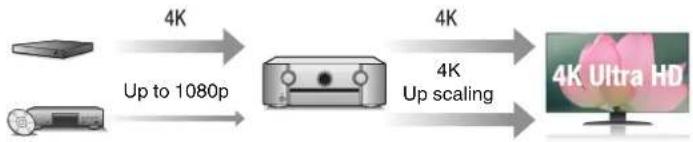
- Digital video processor upscales analog video signals (SD resolution) to HD (720p/1080p) and 4K (图 p. 201)
flowchart
graph LR
    A["Device"] -->|4K Up to 1080p| B["Monitor"]
    C["Radio"] -->|4K Up scaling| D["4K Ultra HD Display"]
This unit is equipped with a 4K video upscaling function that allows analog video or SD (Standard Definition) video to be output via HDMI at 4K (3840 × 2160 pixels) resolution. This function enables the device to be connected to a TV using a single HDMI cable, and produces high definition images for any video source.
• Equipped with HDMI ZONE2 output (p. 169)
The ZONE2 multi-room output includes an HDMI output that lets you enjoy a different A/V source in that room, with another program playing in the main room.
Front panel D
Rear panel Re
Index
12


Contents
Connections Playback Settings Tips Appendix
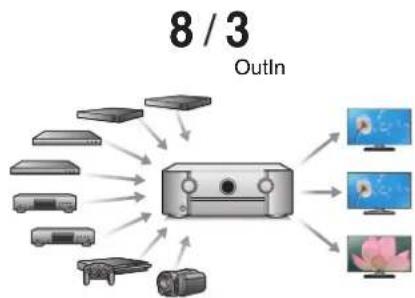
- HDMI connections enable connection to various digital AV devices (8 inputs, 3 outputs)
flowchart
graph TD
    A["Device 1"] --> C["Central Device"]
    B["Device 2"] --> C
    D["Device 3"] --> C
    E["Device 4"] --> C
    F["Device 5"] --> C
    G["Device 6"] --> C
    H["Device 7"] --> C
    I["Device 8"] --> C
    C --> J["OutIn"]
For connection to a broad range of digital sources, this unit features 8 HDMI inputs, including 1 on the front panel that lets you quickly and conveniently connect a camcorder, game console or other HDMI-equipped device. There are dual HDMI outputs for the main room, and a third HDMI output for another room.
- The device is equipped with a AirPlay® function in addition to network functions such as Internet radio etc. (p. 133)
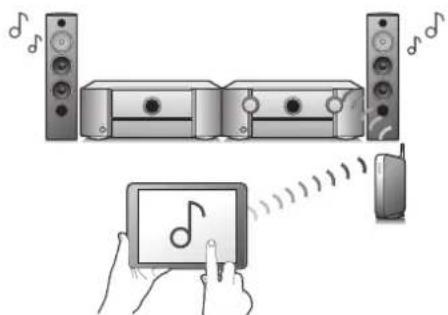
You can enjoy a wide variety of content, including listening to Internet Radio, playing audio files stored on your PC.
This unit also supports Apple AirPlay which lets you stream your music library from an iPhone®, iPad®, iPod touch® or iTunes®.
- Playback of DSD and FLAC files via USB and networks
This unit supports the playback of high resolution audio formats such as DSD (5.6 MHz) and FLAC 192 kHz files. It provides high quality playback of high resolution files.
Front panel D
Rear panel Re
Index
13



Contents
Connections Playback Settings Tips Appendix
- Wireless connection with Bluetooth devices can be carried out easily (p. 105)
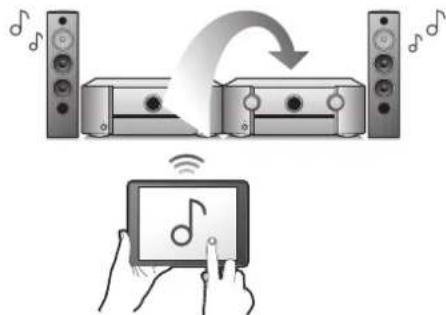
You can enjoy music simply by connecting wirelessly with your smartphone, tablet, PC, etc.
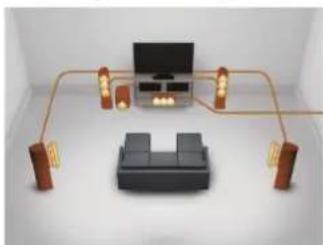
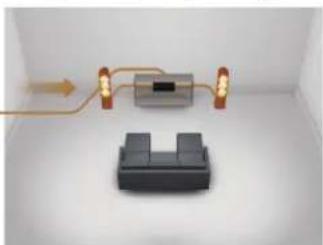
• Multi-Room audio (p. 144)
【MAIN ZONE】
natural_image
Interior view of a smart home or audio equipment setup with TV, speakers, and connected devices (no visible text or symbols)【ZONE2】/【ZONE3】
natural_image
3D diagram showing a device connected to a wall-mounted sensor or sensor unit (no text or symbols visible)You can select and play back the respective inputs in MAIN ZONE, ZONE2 and ZONE3.
In addition, when the All Zone Stereo function is used, the music being played back in MAIN ZONE can be enjoyed in all the zones at the same time. This is useful when you want to let the BGM propagate throughout the whole house.
• Energy-saving design
This unit is equipped with an auto-standby function that automatically turns off the power supply when the unit is not in use. This helps reduce unnecessary power use.
Front panel D
Rear panel Re
Index
14



Contents
Connections Playback Settings Tips Appendix
- Compatible with the "Marantz 2016 AVR Remote" App* for performing basic operations of the unit with an iPad, iPhone or Android™ devices (Google, Amazon Kindle Fire)
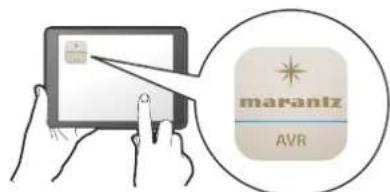
Along with many new features, the graphics and user interface have been completely overhauled. The new app gives you full control of the AVR as well as access to its setup menu for detailed adjustments from your phones or tablets. "Marantz 2016 AVR Remote" App also gives you quick access to the receiver's status display, option menus, Marantz Blu-ray Disc player control, and online owner's manual for your convenience.
* Download the appropriate "Marantz 2016 AVR Remote" App for your iOS or Android devices. This unit needs to be connected to the same LAN or Wi-Fi (wireless LAN) network that the iPhone or iPod touch is connected to.
• HEOS provides streaming music from your favorite online music sources
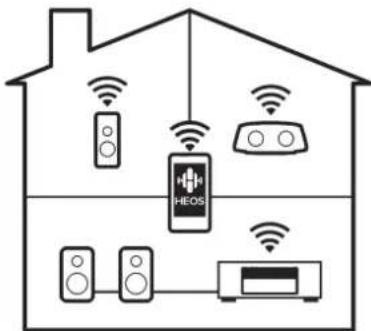
HEOS wireless multi-room sound system that enables you to enjoy your favorite music anywhere and everywhere around your home. By utilizing your existing home network and the HEOS App (available for iOS, Android and Amazon devices), you can explore, browse, and play music from your own music library or from many online streaming music services.
When multiple HEOS devices are connected to the same network, HEOS devices can be grouped to play back the same music on all devices simultaneously, or different music can be played on each separate HEOS device.
Front panel D
Rear panel Re
Index
15


Contents Connections Playback Settings Tips Appendix
Easy operation
- "Setup Assistant" provides easy-to-follow setup instructions First select the language when prompted. Then simply follow the instructions displayed on the TV screen to set up the speakers, network, etc.
- Easy to use Graphical User Interface This unit is equipped with a Graphical User Interface for improved operability.
Front panel D
Rear panel Re
Index
16


Contents
Connections Playback Settings Tips Appendix
Part names and functions
Front panel
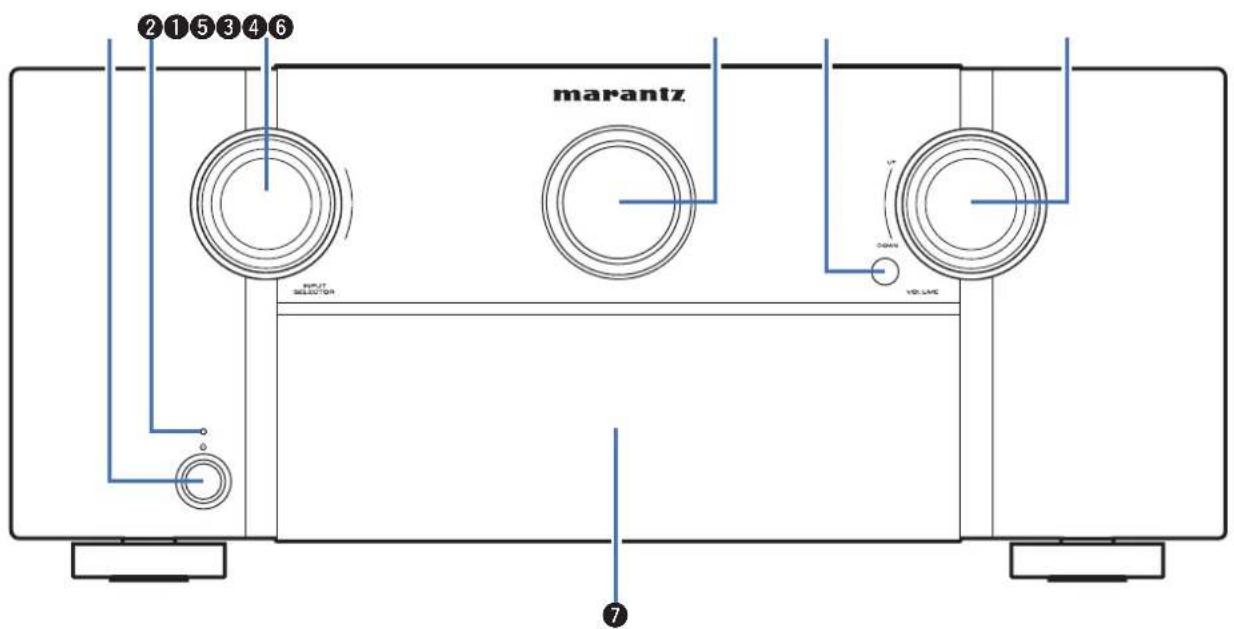
For details, see the next page.
Front panel D
Rear panel Rel
Index
17



Contents
Connections Playback Settings Tips Appendix
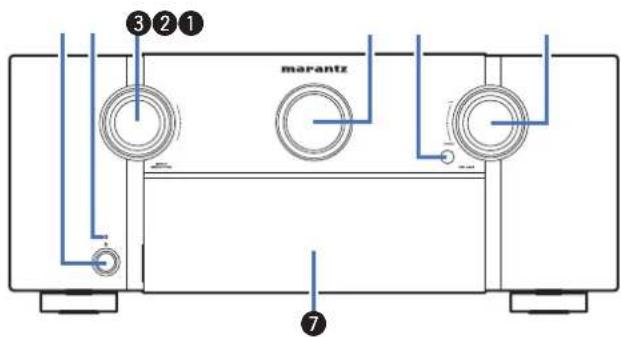
① Power operation button (⏻)
Used to turn the power of the MAIN ZONE (room where this unit is located) on/off (standby). (p. 99)
② Power indicator
This is lit as follows according to the power status:
- Off: Power on
• Red: Normal standby -
Orange:
-
When "HDMI Pass Through" is set to "On" (1 p. 194)
- When "HDMI Control" is set to "On" (p. 196)
- When "Network Control" is set to "Always On" (p. 248)
③ INPUT SELECTOR knob
This selects the input source. (p. 99)
④ Main display
This displays various pieces of information. (p. 22)
⑤ Remote control sensor
This receives signals from the remote control unit. (p. 9)
6 VOLUME knob
This adjusts the volume level. (p. 100)
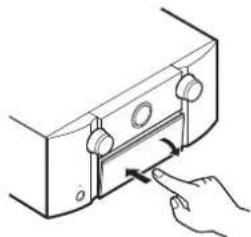
⑦ Door
When you are using buttons and/or connectors behind the door, press the bottom of the door to open it. Be careful not to catch your fingers when closing the door.
natural_image
Line drawing of a hand inserting a small component into a device (no text or symbols)Front panel D
y Rear panel Re
Index
18



Contents
Connections Playback Settings Tips Appendix
With the door open
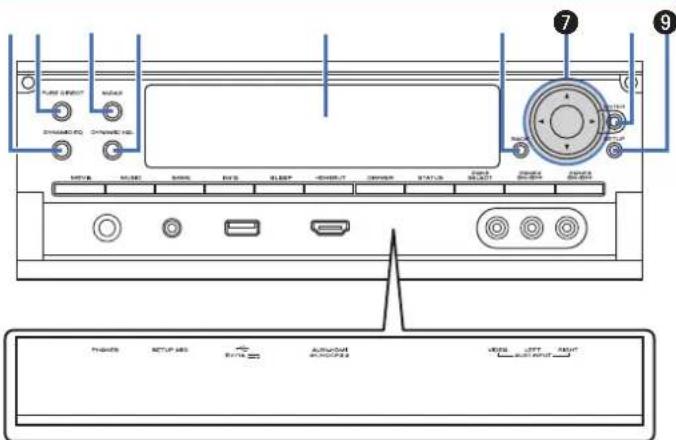
① DYNAMIC EQ button
This switches the Dynamic EQ settings. (p. 188)
② PURE DIRECT button/indicator
This switches the sound mode between Direct, Pure Direct and Auto. (p. 147 - 148)
This lights when the Pure Direct mode is selected as the sound mode.
③ M-DAX button/indicator
This enables the M-DAX mode. (p. 184) This lights when the M-DAX mode is selected
4 Dynamic Volume button (DYNAMIC VOL)
This switches the Dynamic Volume settings. (p. 189)
⑤ Sub display
This displays various pieces of information. (p. 24)
6 BACK button
This returns to the previous screen.
⑦ Cursor buttons (△▽◀▷)
These select items.
8 ENTER button
This determines the selection.
9 SETUP button
This displays the menu on the TV screen. (p. 178)
Front panel D
y Rear panel Re
Index
19



Contents Connections Playback Settings Tips Appendix
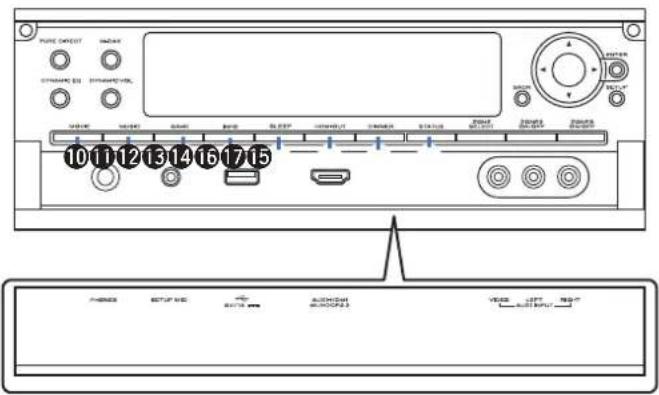
⑩ MOVIE button
This switches the sound mode to "Movie". (☐ p. 146)
11 MUSIC button
This switches the sound mode to "Music". (K 146)
⑫ GAME button
This switches the sound mode to "Game". (1 p. 146)
⑬ Information button (INFO)
This displays the status information on the TV screen. (p. 261)
14 SLEEP button
This sets the sleep timer. (p. 160)
15 HDMI OUT button
This sets the HDMI monitor output. (p. 194)
⑯ DIMMER button
Each press of this switches the brightness of the display. (p. 256)
⑰ STATUS button
Each press of this switches the status information that is shown on the display.
Front panel D
y Rear panel Re
Index
20


Contents
Connections Playback Settings Tips Appendix
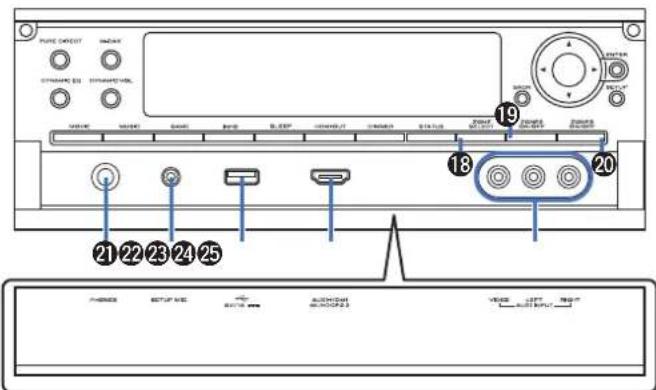
18 ZONE SELECT button
These switch the zone (MAIN ZONE, ZONE2, ZONE3) that is operated through the remote control unit. (☐ p. 172, 178)
⑲ ZONE2 ON/OFF button
This turns the power of ZONE2 on/off. (☐ p. 172)
⑳ ZONE3 ON/OFF button
This turns the power of ZONE3 on/off. (p. 172)
⑳ Headphones jack (PHONES)
This is used to connect headphones.
When the headphones are plugged into this jack, audio will no longer be output from the connected speakers or from the PRE OUT connectors.
NOTE
- To prevent hearing loss, do not raise the volume level excessively when using headphones.
22 SETUP MIC jack
This is used to connect the supplied Sound calibration microphone. (p. 214)
②3 USB port (←)
This is used to connect USB storages (such as USB memory devices). (p. 90)
24 AUX1-HDMI connector
This is used to connect HDMI output compatible devices such as video camcorders and game consoles. (P. 87)
25 AUX1 INPUT connectors
Used to connect analog output compatible devices such as video camcorders and game consoles. (17 p. 87)
Front panel D
y Rear panel Re
Index
21


Contents Connections Playback Settings Tips Appendix
Display
■ Main display
The input source name, sound mode, setting values and other information are displayed here.
Standard display
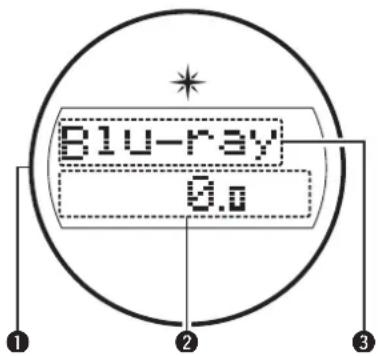
① Light illumination
When the power to this device is switched on, the surrounding area is lit blue. The settings can be changed so the light does not switch on. (167 p. 168)
② Volume indicator
③ Input source indicator
The currently selected input source name is displayed. If the input source name has been changed using "Source Rename" in the menu, the input source name after the change is displayed. (129 p. 208)
□ Tuner display
These light up according to the reception conditions when the input source is set to "Tuner".
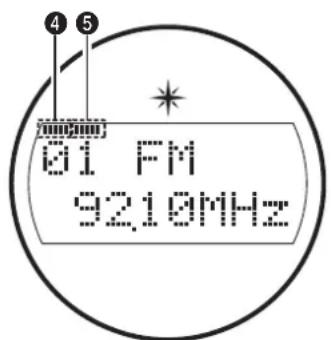
4 Lights up when the broadcast is properly tuned in.
⑤ In the FM mode, this lights up when receiving stereo broadcasts.
Front panel D
y Rear panel Re
Index
22


Contents Connections Playback Settings Tips Appendix
Sleep timer indicator
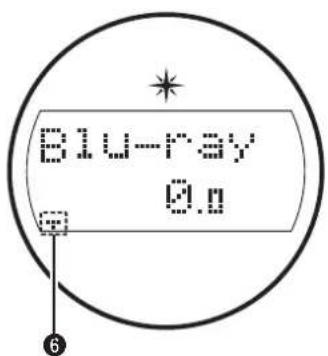
⑥ This lights when the sleep mode is selected. (p. 160)
☐ ZONE2/ZONE3 power on display
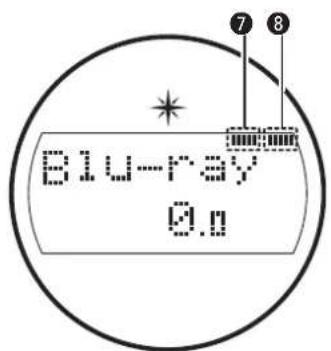
⑦ This lights up when ZONE2 (another room) power is turned on. (p. 172)
8 This lights up when ZONE3 (another room) power is turned on. (p. 172)
Front panel D
y Rear panel Re
Index
23


Contents Connections Playback Settings Tips Appendix
Sub display
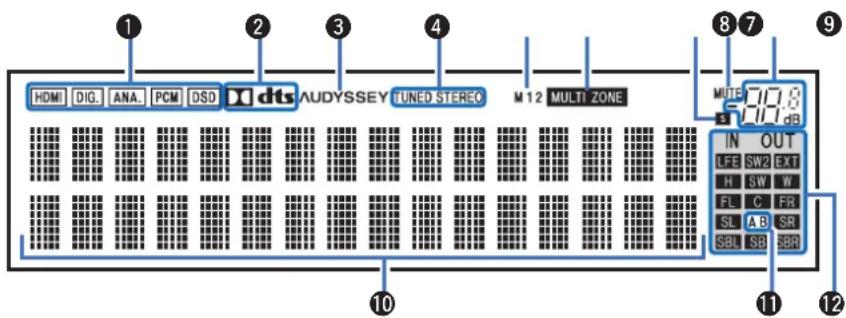
① Input signal indicators
The respective indicator will light corresponding to the input signal. (125 p. 210)
② Decoder indicators
These light when Dolby or DTS signals are input or when the Dolby or DTS decoder is running.
③ Audyssey® indicator
This lights when "MultEQ® XT32", "Dynamic EQ", "Dynamic Volume" or "Audyssey LFC™" has been set up. (187)
④ Tuner reception mode indicators
These light up according to the reception conditions when the input source is set to "Tuner".
TUNED: Lights up when the broadcast is properly tuned in. STEREO: Lights up when receiving FM stereo broadcasts.
⑤ Monitor output indicator
These light according to the HDMI monitor output setting. When set to "Auto(Dual)", the indicators light according to connection status.
⑥ MULTI ZONE indicator
This lights up when ZONE2 or ZONE3 (another room) power is turned on. (p. 172)
Front panel D
y Rear panel Re
Index
24


Contents Connections Playback Settings Tips Appendix
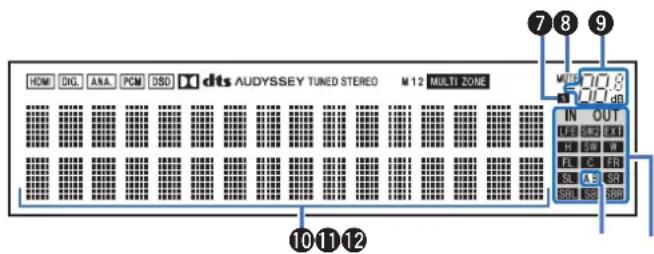
⑦ Sleep timer indicator
This lights when the sleep mode is selected. (p. 160)
8 MUTE indicator
This blinks while the sound is muted. (p. 100)
9 Volume indicator
10 Information display
The input source name, sound mode, setting values and other information are displayed here.
⑪ Front speaker indicator
This lights according to the setting of the front A and B speakers.
⑫ Input/output signal channel indicators
The channel for input/output signals is displayed according to the setting configured for "Channel Indicators". (17 p. 256)
- When "Channel Indicators" is set to "Output" (Default) These light when audio signals are being output from the speakers.
- When "Channel Indicators" is set to "Input" These light corresponding to the channels that include the input signals.
When playing HD Audio sources, the EXT indicator lights when a signal from an extension channel (a channel other than the front, center, surround, surround back, front height, front wide or LFE channel) is input.
Front panel D
y Rear panel Re
Index
25


Contents
Connections Playback Settings Tips Appendix
Rear panel
For details, see the next page.
Front panel D
Rear panel
Remote
26
Index


Contents
Connections
Playback
Settings
Tips
Appendix
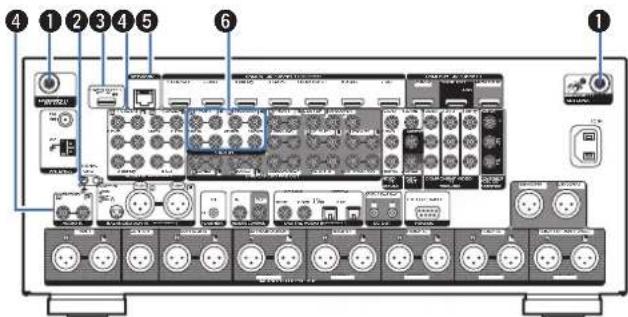
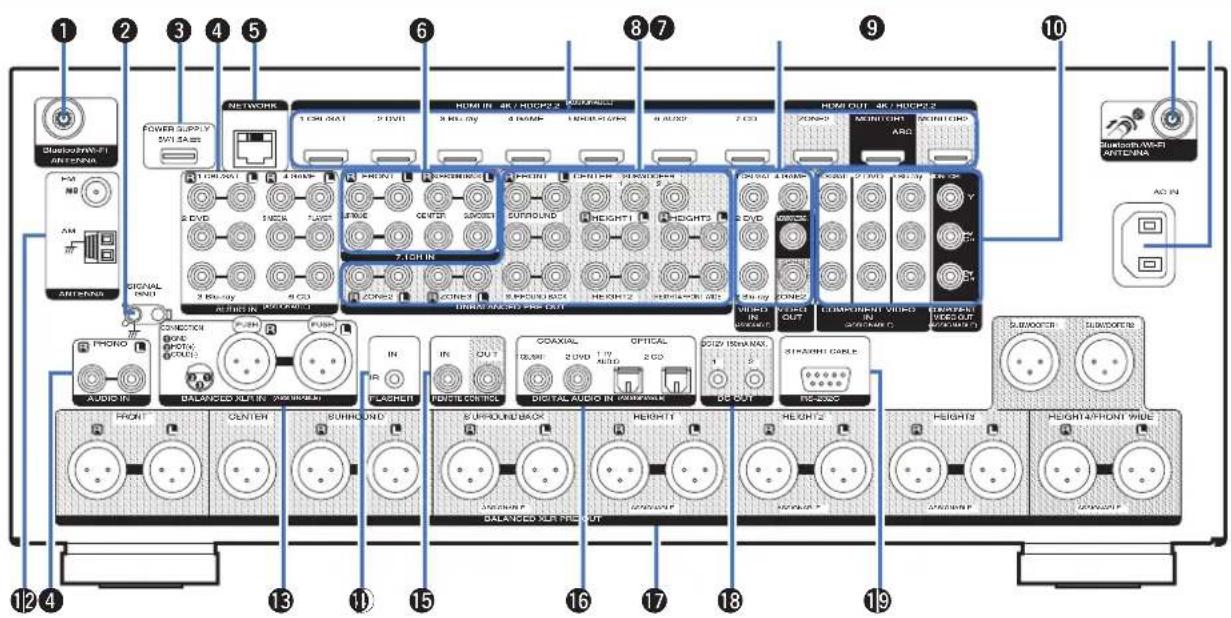
① Bluetooth/wireless LAN antenna connectors
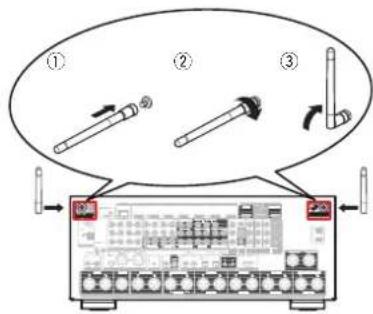
Used to connect the included external antennas for Bluetooth/wireless connectivity when connecting to a network via wireless LAN, or when connecting to a handheld device via Bluetooth. (p. 94)
① Place the external antennas for Bluetooth/wireless connectivity evenly over the screw terminal of rear.
② Turn clockwise until the antennas is fully connected.
③ Rotate the antenna upwards for best reception.
Front panel
Display
Rear panel
27
Remote
Index

② SIGNAL GND terminal
Used to connect a ground wire for the turntable. (p. 88)
③ USB port (POWER SUPPLY)
Can be used to power streaming media players, etc.

- Use a device's supplied AC adapter when a power supply of 5 V/1.5 A or more is required.
- Connect to the USB port on the front panel to play content from a USB memory device.
④ Analog audio connectors (AUDIO)
Used to connect devices equipped with analog audio connectors.
- "Connecting a set-top box (Satellite tuner/cable TV)" (p. 85)
- "Connecting a DVD player or Blu-ray Disc player" (p. 86)
- "Connecting a turntable" (p. 88)
⑤ NETWORK connector
Used to connect to a LAN cable when connecting to a wired LAN network. (123 p. 93)
6 7.1-channel input connectors (7.1CH IN)
Used to connect to a device that has multi-channel audio output connectors. (17 p. 89)
Contents
Connections Playback Settings Tips Appendix
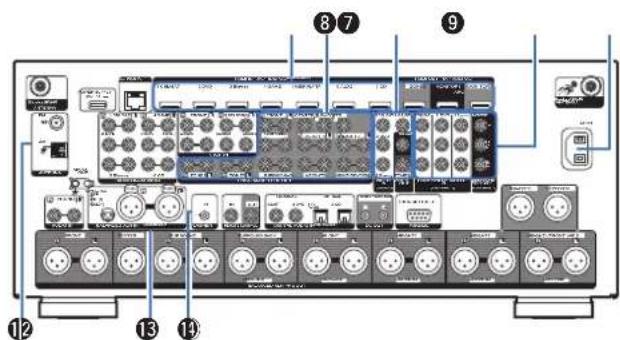
⑦ HDMI connectors
Used to connect devices equipped with HDMI connectors.
- "Connection 1: TV equipped with an HDMI connector and compatible with the ARC (Audio Return Channel)" (p. 80)
- "Connection 2: TV equipped with an HDMI connector and incompatible with the ARC (Audio Return Channel)" (p. 81)
- "Connecting a set-top box (Satellite tuner/cable TV)" (1 p. 85)
- "Connecting a DVD player or Blu-ray Disc player" (19 p. 86)
⑧ UNBALANCED RCA PRE OUT connectors
Used to connect a power amp with UNBALANCED RCA input connectors. (P. 46)
⑨ Video connectors (VIDEO)
Used to connect devices equipped with video connectors.
- "Connection 3: TV equipped without an HDMI connector" (p. 82)
- "Connecting a set-top box (Satellite tuner/cable TV)" (p. 85)
- "Connecting a DVD player or Blu-ray Disc player" (p. 86)
⑩ Component video connectors (COMPONENT VIDEO)
Used to connect devices equipped with component video connectors.
- "Connection 3: TV equipped without an HDMI connector" (195 p. 82)
- "Connecting a set-top box (Satellite tuner/cable TV)" (p. 85)
- "Connecting a DVD player or Blu-ray Disc player" (p. 86)
⑪ AC inlet (AC IN)
Used to connect the power cord. (p. 97)
⑫ FM/AM antenna terminals (ANTENNA)
Used to connect FM antennas and AM loop antennas. (p. 91)
⑬ BALANCED XLR IN connectors
Used to connect devices equipped with BALANCED XLR output connectors. (p. 84)
14 FLASHER IN jack
Used when using a control BOX or other such control devices to control this unit.
Front panel D
Rear panel Re
Index



Contents Connections Playback Settings Tips Appendix
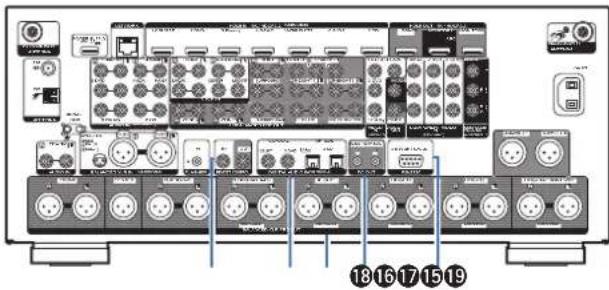
⑮ REMOTE CONTROL jacks
Used to connect infrared receivers/transmitters in order to operate this unit and external devices from a different room. (p. 95)
⑯ Digital audio connectors (DIGITAL AUDIO)
Used to connect devices equipped with digital audio connectors.
- "Connection 2: TV equipped with an HDMI connector and incompatible with the ARC (Audio Return Channel)" (p. 81)
- "Connection 3: TV equipped without an HDMI connector" (p. 82)
- "Connecting a set-top box (Satellite tuner/cable TV)" (1 p. 85)
- "Connecting a DVD player or Blu-ray Disc player" (p. 86)
17 BALANCED XLR PRE OUT connectors
Used to connect a power amp with BALANCED XLR input connectors. (12 p. 44)
18 DC OUT jacks
Used to connect devices equipped with the trigger function. (15 p. 96)
⑲ RS-232C connector
Used to connect home automation controller devices fitted with RS-232C connectors. Consult the owner's manual of the home automation controller for more information about serial control of this unit.
Perform the operation below beforehand.
① Turn on the power of this unit.
② Turn off the power of this unit from the external controller.
③ Check that the unit is in the standby mode.
NOTE
- Do not touch the inner pins of the connectors on the rear panel. Electrostatic discharge may cause permanent damage to the unit.
Front panel D
y Rear panel Re
Index
29



Contents
Connections Playback Settings Tips Appendix
Remote control unit
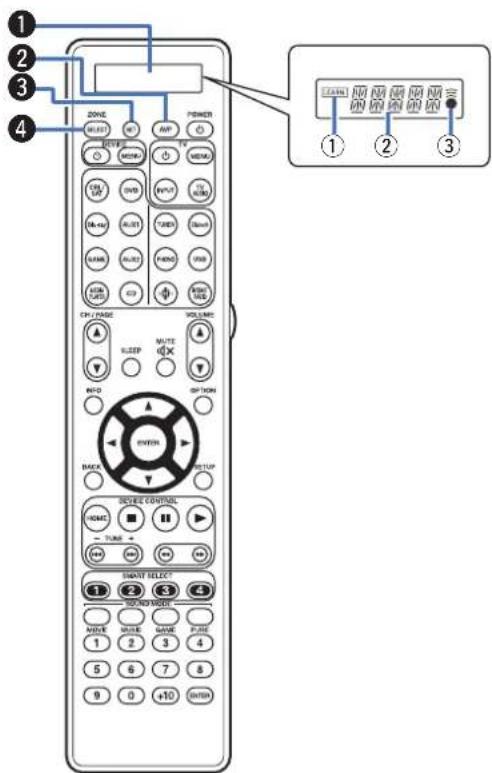
① Display
① LEARN indicator
This is lit when setting the learning function for the remote control unit.
(127 p. 272)
② Information display
- This displays "AVP" when operating this unit.
- This displays the input source name when operating an external device.
- This displays "TV" when operating TV.
③ indicator
This is lit when signals are sent from the remote control unit.
② AVP operation button
When preset codes are registered to the remote control unit, press this button and then operate the menu on the unit.
③ SET button
This is used for various settings on the remote control unit. (p. 263-276)
④ ZONE SELECT button
These switch the zone (MAIN ZONE, ZONE2, ZONE3) that is operated through the remote control unit. (p. 172, 178)
Front panel D
Rear panel Re
Index
30


Contents
Connections Playback Settings Tips Appendix
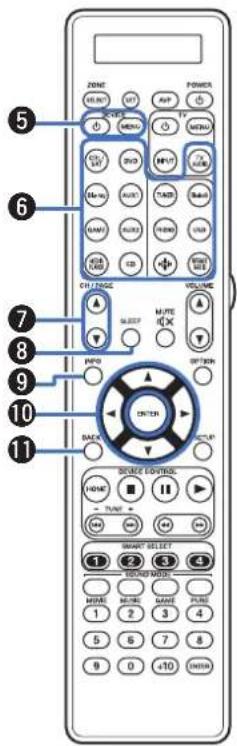
⑤ Device operation buttons (DEVICE ⏻ / DEVICE MENU)
These turn the power of external devices on/off and call up menus. Preset codes need to be registered in order to use these buttons. ( p. 263)
⑥ Input source select buttons
These select the input source.
- "Selecting the input source" (p. 99)
- "Playback in ZONE2/ZONE3" (p. 172)
⑦ Channel/page search buttons (CH/PAGE ▲▼)
These select radio stations registered to presets or switch pages. ( p. 114)
8 SLEEP button
This sets the sleep timer. (p. 160)
⑨ Information button (INFO)
This displays the status information on the TV screen. (p. 261)
⑩ Cursor buttons (△▽◀▶)
These select items.
⑪ BACK button
This returns to the previous screen.
Front panel D
Rear panel Re
Index
31


Contents
Connections Playback Settings Tips Appendix
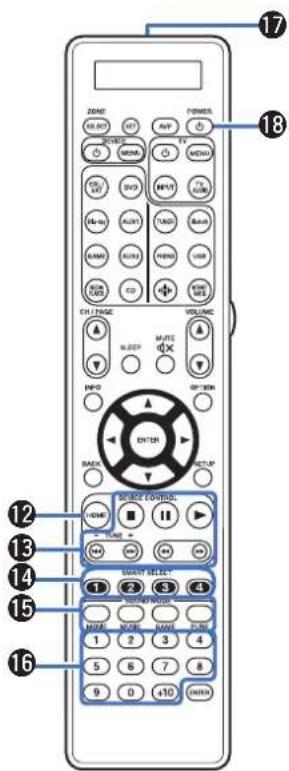
12 HOME button
This takes you to the Home screen (Top screen) when the input source is "HEOS Music". (p. 102)
⑬ System buttons
These perform playback related operations.
Tuning up / Tuning down buttons (TUNE +, -)
These select either FM broadcast or AM broadcast. (p. 111)
⑭ SMART SELECT buttons (1 - 4)
These call up settings registered to each button, such as input source, volume level and sound mode settings. (p. 162)
15 SOUND MODE buttons
These select the sound mode. (p. 145)
16 Number buttons
These enter numbers into the unit. (p. 111)
⑰ Remote control signal transmitter
This transmits signals from the remote control unit. (10 p. 9)
18 POWER button (⏻)
This turns the power on/off.
• "Turning the power on" (p. 99)
• "Playback in ZONE2/ZONE3" (p. 172)
Front panel D
Rear panel Re
Index
32



Contents
Connections Playback Settings Tips Appendix
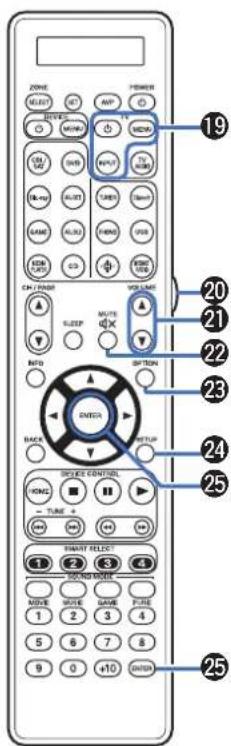
19 TV operation buttons (TV ⏻ / TV MENU / TV INPUT)
These turn the TV power on/off, switch the TV input and call up menus.
Preset codes need to be registered in order to use these buttons.
( p. 268)
20 Light button
This turns on the backlight for approx. 2 seconds. (p. 275)
②1 VOLUME buttons (▲▼)
These adjust the volume level.
- "Adjusting the volume" (p. 100)
- "Adjusting the volume (ZONE2/ZONE3)" (p. 173)
22 MUTE button (×)
This mutes the output audio.
• "Turning off the sound temporarily (Muting)" (p. 100)
• "Turning off the sound temporarily (Muting) (ZONE2/
ZONE3)" (p. 173)
②3 OPTION button
This displays the option menu on the TV screen.
24 SETUP button
This displays the menu on the TV screen. (p. 178)
25 ENTER button
This determines the selection.
Front panel D
Rear panel Re
Index
33



Contents
ctions
ettings Tips Appendix
Contents
Speaker installation 35
Connecting a power amp 44
Connecting a TV 79
Connecting a playback device 83
Connecting a USB memory device to the USB port 90
Connecting an FM/AM antenna 91
Connecting to a home network (LAN) 93
Connecting an external control device 95
Connecting the power cord 97
NOTE
- Do not plug in the power cord until all connections have been completed. However, when the "Setup Assistant" is running, follow the instructions in the "Setup Assistant" (page 9 in the separate "Quick Start Guide") screen for making connections. (During "Setup Assistant" operation, the input/output connectors do not conduct current.)
- Do not bundle power cords together with connection cables. Doing so can result in noise.
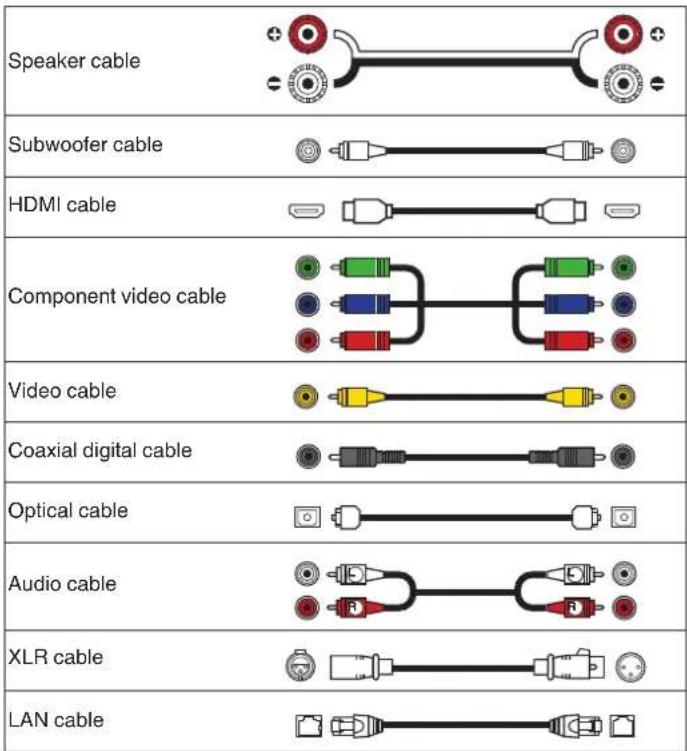
■ Cables used for connections
Provide necessary cables according to the devices you want to connect.
Front panel D
Rear panel Re
In
34


Contents
ctions
ettings Tips Appendix
Speaker installation
Determine the speaker system depending on the number of speakers you are using and install each speaker and subwoofer in the room. Speaker installation is explained using this example of a typical installation.
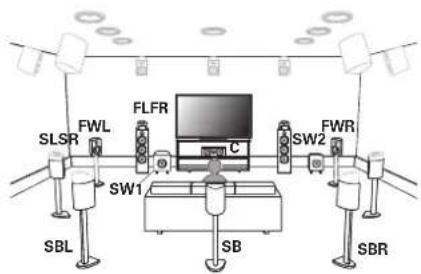
| FL/FR(Front speaker left/right): | Place the FRONT left and right speakers an equal distance from the main listening position. The distance between each speaker and your TV should also be the same. |
| C(Center speaker): | Place the CENTER speaker in between the front speakers and above or below your TV. |
| SL/SR(Surround speaker left/right): | Place the SURROUND left and right speakers an equal distance to the left and right sides of the main listening position. If you don't have surround back speakers, move the surround speakers slightly behind your listening position. |
| SBL/SBR(Surround back speaker left/right): | Place the SURROUND BACK left and right speakers an equal distance from the main listening position and directly behind the main listening position. When using a single surround back speaker (SB), place it directly behind the listening position. |
| FWL/FWR(Front wide speaker left/right): | Place the FRONT WIDE left and right speakers outside of the front left and right speakers so that there is an equal distance between all front speakers. |
| SW 1/2(Subwoofer): | Place the SUBWOOFER at a convenient location near the front speakers. If you have two subwoofers, place them asymmetrically across the front of your room. |
Front panel D
Rear panel Re
Index
35


Contents
ctions
ettings Tips Appendix
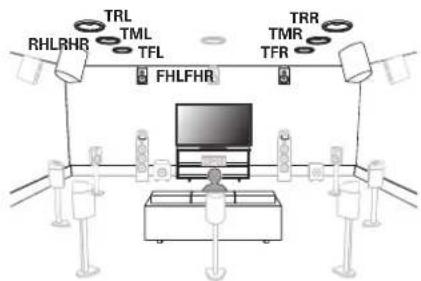
flowchart
graph TD
    A["RHLRHR"] --> B["FHLFHR"]
    C["TRL"] --> B
    D["TML"] --> B
    E["TFL"] --> B
    F["TRR"] --> B
    G["TMR"] --> B
    H["TFR"] --> B
    B --> I["Person"]
    style B fill:#f9f,stroke:#333
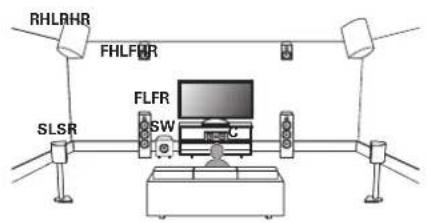
| FHL/FHR(Front height speaker left/right): | Place the FRONT HEIGHT left and right speakers directly above the front speakers. Mount them as close to the ceiling as possible and aim them towards the main listening position. |
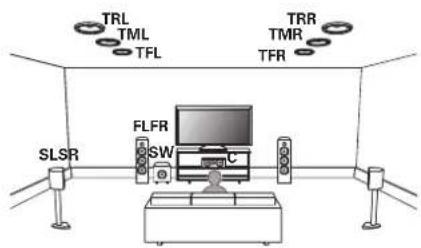
| TFL/TFR(Top front speaker left/right): | Mount the TOP FRONT left and right speakers on the ceiling slightly in front of your main listening position and aligned with the left and right front speakers. |
| TML/TMR(Top middle speaker left/right): | Mount the TOP MIDDLE left and right speakers directly above the main listening position and aligned with the left and right front speakers. |
| TRL/TRR(Top rear speaker left/right): | Mount the TOP REAR left and right speakers on the ceiling slightly behind your main listening position and aligned with the left and right front speakers. |
| RHL/RHR(Rear height speaker left/right): | Place the REAR HEIGHT left and right speakers directly behind the main listening position. Mount them as close to the ceiling as possible and aligned with the left and right front speakers. |
Front panel D
Rear panel Re
Index
36


Contents
ctions
ettings Tips Appendix
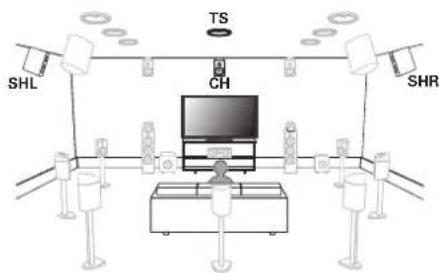
| SHL/SHR(Surround height speaker left/right): | Place the SURROUND HEIGHT left and right speakers directly above the surround speakers. |
| CH(Center height speaker): | Place the CENTER HEIGHT speaker directly above the center speaker. Mount them as close to the ceiling as possible and aim them towards the main listening position. |
| TS(Top surround speaker): | Place the TOP SURROUND speaker directly above the main listening position and aligned with the center channel speaker. |

- For the best Auro-3D experience Surround Height speakers are recommended, however you may substitute Rear Height speakers from a Dolby Atmos speaker setup in place of Surround Height speakers.
Front panel D
Rear panel Re
Index
37


Contents
Connections
ayback Settings Tips Appendix
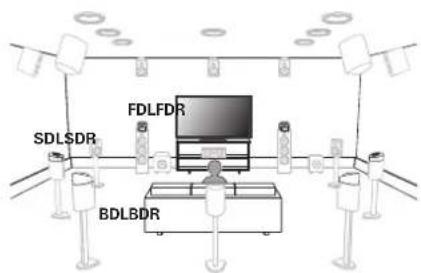
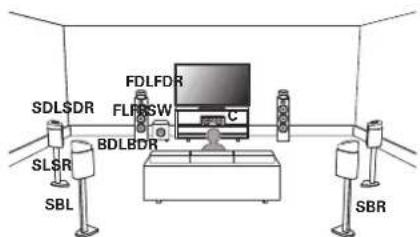
| FDL/FDR(Front Dolby speaker left/right): | Place the FRONT Dolby Atmos Enabled speaker on the front speaker. For a Dolby Atmos Enabled integrated with a front speaker, place the Dolby Atmos Enabled speaker instead of the front speaker. |
| SDL/SDR(Surround Dolby speaker left/right): | Place the SURROUND Dolby Atmos Enabled speaker on the surround speaker. For a Dolby Atmos Enabled speaker integrated with a surround speaker, place the Dolby Atmos Enabled speaker instead of the surround speaker. |
| BDL/BDR(Back Dolby speaker left/right): | Place the BACK Dolby Atmos Enabled speaker on the surround back speaker. For a Dolby Atmos Enabled speaker integrated with a surround back speaker, place the Dolby Atmos Enabled speaker instead of the surround back speaker. |
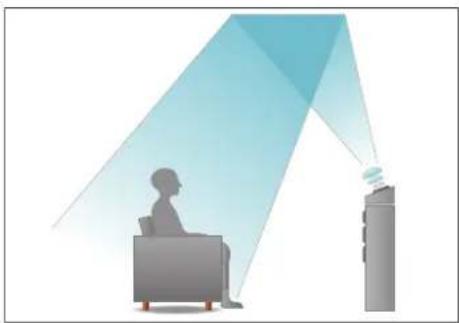
About Dolby Atmos Enabled speakers
Dolby Atmos Enabled speakers reflect the sound off the ceiling to allow the sound to come from over your head by using a special upward-pointing speaker that is placed on the floor.
You can enjoy the Dolby Atmos 3D sound even in an environment where speakers cannot be installed on the ceiling.
natural_image
Illustration of a person sitting on a couch facing a device emitting a light beam, with no visible text or symbols.Front panel D
Rear panel Re
Index
38


Contents
ctions
ettings Tips Appendix

- This unit is compatible with Dolby Atmos and DTS:X which offers an even wider and deeper surround sensation.
- Dolby Atmos is not supported in a 5.1-channel or less speaker configuration.
- DTS:X can be selected regardless of the speaker configuration.
- Auro-3D recommends adding FRONT HEIGHT and SURROUND HEIGHT speakers to a 5.1 speaker configuration. Optionally, you may substitute REAR HEIGHT, Dolby Atmos Enabled speakers instead of FRONT HEIGHT and SURROUND HEIGHT speakers for Dolby Atmos, DTS.X and Auro-3D playback.
- Use the illustration below as a guide for how high each speaker should be installed. The height does not need to be exactly the same.
Top middle / Top surround speaker Surround height speaker
![Top front speaker Top rear speaker Front height / Center height speaker • Point slightly downwards Front speaker Front wide speaker [Rear height speaker • Point slightly downwards] *1 30° - 45° *2 30° - 55° *3 65° - 100° *4 125° - 150° *5 135° - 150° [Viewed from the side] Surround back speaker Surround speaker *1 *2 *3 *4 *5](/content/2026/05/879353/images/44f64c51633c97ef287540aa2f9e2769700863b8c57bcc86d9bd672f5edda914.jpg)
Height speakers layout
![FHL FHRCH FL TFL C FR TFR TML SL TS TMLR SR TRL TRR SHR RHLRHR [Viewed from the top]](/content/2026/05/879353/images/a7928a88d27b064b1479c9e4c239571c6fdeadeb36d145c17d57409bba91a711.jpg)

- For the best Auro-3D experience Surround Height speakers are recommended, however you may substitute Rear Height speakers from a Dolby Atmos speaker setup in place of Surround Height speakers.
Front panel D
Rear panel Re
Index
39



Contents
Connections
yback Settings Tips Appendix
■ When 7.1-channel speakers are installed using surround back speakers
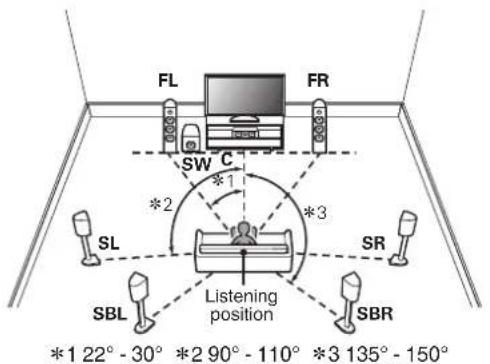

- When using a single surround back speaker, place it directly behind the listening position.
■ When 9.1-channel speakers are installed using front wide speakers
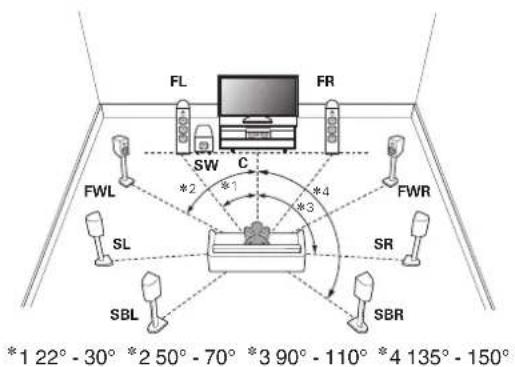
Front panel D
Rear panel Rel
Index
40



Contents
Connections
yback Settings Tips Appendix
■ When 5.1-channel speakers are installed
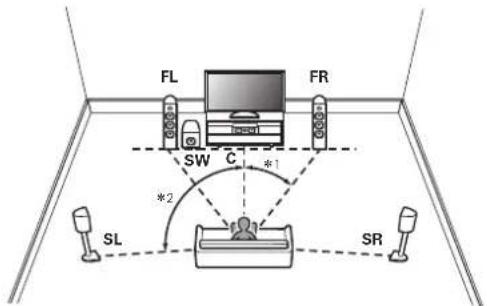
*1 22° - 30° *2 120°
■ Layout including height speakers and ceiling speakers
☐ Height speaker layout example
Combination of 5.1-channel layout and front height/rear height/center height speakers.
Front panel D
Rear panel Re
Index
41

Contents
Connections
yback Settings Tips Appendix
☐ Ceiling speaker layout example
Combination of 5.1-channel layout and top front/top middle/top rear speakers.
☐ Dolby Atmos Enabled speaker layout example
Combination of 7.1-channel layout and front Dolby/surround Dolby/back Dolby speakers.
Front panel D
Rear panel Re
Index
42



Contents
ctions
ettings Tips Appendix
☐ Auro-3D layout example
Combination of 5.1-channel speakers with front height/surround height/center height/top surround speakers.
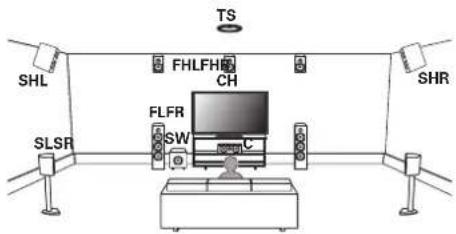

- For the best Auro-3D experience Surround Height speakers are recommended, however you may substitute Rear Height speakers from a Dolby Atmos speaker setup in place of Surround Height speakers.
Front panel D
Rear panel Re
Index
43


Contents
ctions
ettings Tips Appendix
Connecting a power amp
Before connecting a power amp
- Connect a power amp (sold separately) to the PRE OUT connector of this unit.
- This unit has UNBALANCED RCA PRE OUT connector and BALANCED XLR PRE OUT connector. Connect to the correct connector for your power amp. If your power amp has both connectors, connect to either of them.
- Connect the speakers to the power amp.
- For details on speaker connections, see the Owner's Manual for the power amp.
- This section shows how to make a 13.1-channel connection. For how to make other speaker connections, see page 49.
[AV8805 BALANCED XLR PRE OUT connector PIN arrangement]
![MARANTZ AV8805 - [AV8805 BALANCED XLR PRE OUT connector PIN arrangement] - 1](/content/2026/05/879353/images/b8ffc2a76e17224f3d0359606b3e371a6b21b9ff3f2bccd361cf4f4e49abdde1.jpg)
① GND (Ground)
② HOT (+)
③ COLD (-)
The PIN arrangement in this device uses the European method.
In the USA method, ② is COLD, and ③ is HOT.
When connecting a device that utilizes the USA type of PIN arrangement, replace the ② and ③ plugs on one side of the balanced cable.
NOTE
- Do not short the HOT and GND or COLD and GND for use.
- Disconnect this unit's power plug from the power outlet before connecting the speakers.
Also, turn off the power amp and subwoofer.
Front panel D
Rear panel Re
Index
44



| Contents | Connections | Playback | Settings | Tips | Appendix |
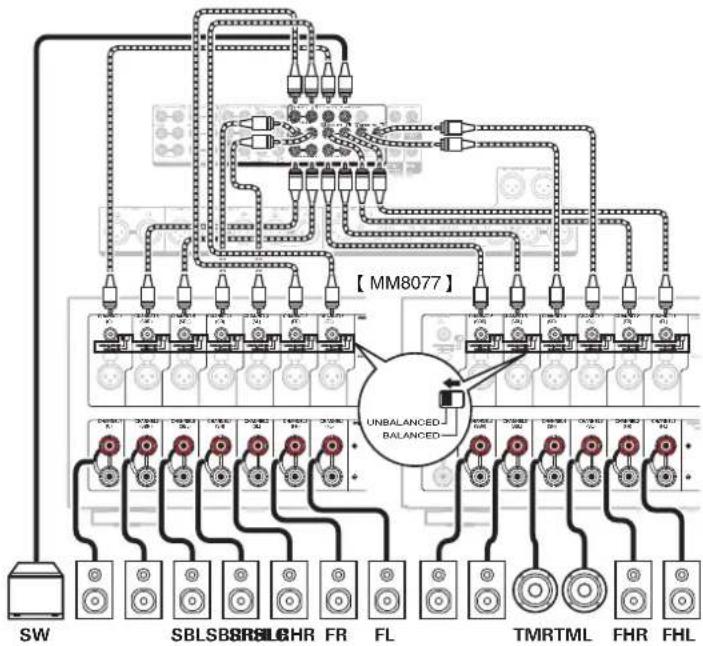
■ Example of connections to Marantz MM8077 and MM7025 power amps
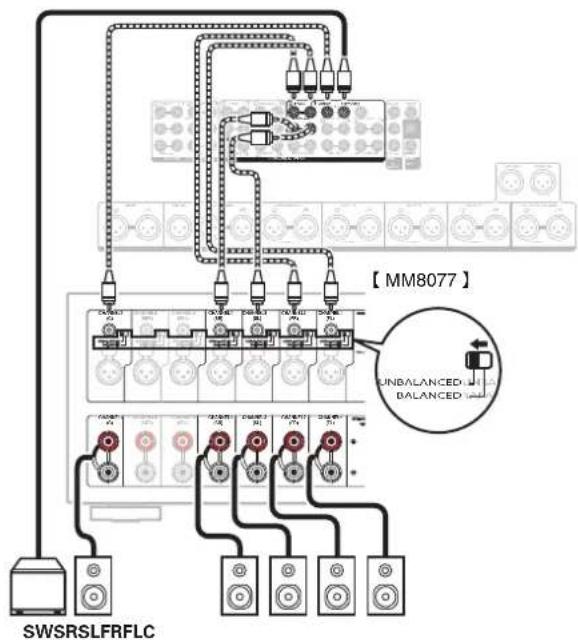
□ Connecting the UNBALANCED RCA PRE OUT connector
When using UNBALANCED RCA connectors for connection, set the input change switch to "UNBALANCED" on MM8077.
flowchart
graph TD
    A["SW"] --> B["Relays"]
    B --> C["MM8077"]
    C --> D["TL"]
    D --> E["TL"]
    E --> F["TL"]
    F --> G["TL"]
    G --> H["TL"]
    H --> I["TL"]
    I --> J["TL"]
    J --> K["TL"]
    K --> L["TL"]
    L --> M["TL"]
    M --> N["TL"]
    N --> O["TL"]
    O --> P["TL"]
    P --> Q["TL"]
    Q --> R["TL"]
    R --> S["TL"]
    S --> T["TL"]
    T --> U["TL"]
    U --> V["TL"]
    V --> W["TL"]
    W --> X["TL"]
    X --> Y["TL"]
    Y --> Z["TL"]
    Z --> AA["TL"]
    AA --> AB["TL"]
    AB --> AC["TL"]
    AC --> AD["TL"]
    AD --> AE["TL"]
    AE --> AF["TL"]
    AF --> AG["TL"]
    AG --> AH["TL"]
    AH --> AI["TL"]
    AI --> AJ["TL"]
    AJ --> AK["TL"]
    AK --> AL["TL"]
    AL --> AM["TL"]
    AM --> AN["TL"]
    AN --> AO["TL"]
    AO --> AP["TL"]
    AP --> AQ["TL"]
    AQ --> AR["TL"]
Front panel
Display
Rear panel
45
Remote
Index


flowchart
graph LR
    A["Contents"] --> B["Connections"]
    B --> C["Playback"]
    C --> D["Settings"]
    D --> E["Tips"]
    E --> F["Appendix"]
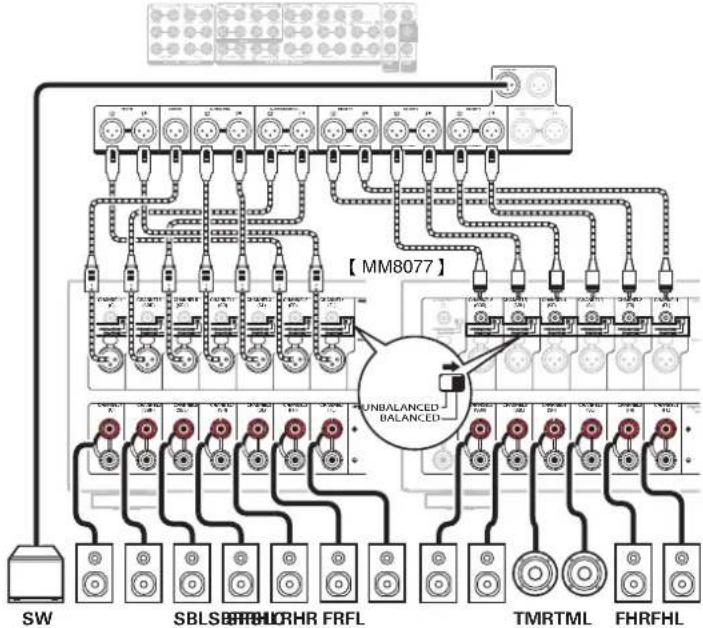
☐ Connecting the BALANCED XLR PRE OUT connector
When using BALANCED XLR connectors for connection, set the input change switch to "BALANCED" on MM8077.
flowchart
graph TD
    A["SW"] --> B["Relays"]
    B --> C["MM8077"]
    C --> D["Unbalanced Balanced"]
    D --> E["TLR"]
    E --> F["TMRTML"]
    E --> G["FHRFHL"]
    B --> H["SBLS"]
    B --> I["HRL"]
    B --> J["FRFL"]
    C --> K["TLR"]
    C --> L["TMRTML"]
    C --> M["FHRFHL"]
    style D fill:#f9f,stroke:#333
    style E fill:#ccf,stroke:#333
    style F fill:#cfc,stroke:#333
    style G fill:#cfc,stroke:#333
    style H fill:#fcc,stroke:#333
    style I fill:#fcc,stroke:#333
    style J fill:#fcc,stroke:#333
    style K fill:#fcc,stroke:#333
    style L fill:#fcc,stroke:#333
    style M fill:#fcc,stroke:#333
Front panel
Display
Rear panel
46
Remote
Index

| Contents | Connections | Playback | Settings | Tips | Appendix |
■ About the cable labels (supplied) for channel identification
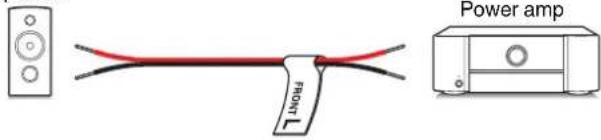
Attach the cable label corresponding to each speaker to each speaker cable.
This makes it easier to connect the speakers to the power amp.
| Channel Color | |
| FRONT L White | |
| FRONT R | |
| CENTER | |
| SURROUND L Light Blue | |
| SURROUND R Blue | |
| SURROUND BACK L Beige | |
| SURROUND BACK R | |
| FRONT WIDE L Light Yellow | |
| FRONT WIDE R Yellow | |
| FRONT HEIGHT L Light Yellow | |
| FRONT HEIGHT R Yellow | |
| TOP FRONT L Light Yellow | |
| TOP FRONT R Yellow | |
| TOP MIDDLE L Light Yellow | |
| TOP MIDDLE R Yellow | |
| TOP REAR L | Light Yellow |
| TOP REAR R | Yellow |
| Channel Color | |
| SURROUND HEIGHT L | Light Yellow |
| SURROUND HEIGHT R | Yellow |
| REAR HEIGHT L Light Yellow | |
| REAR HEIGHT R | Yellow |
| TOP SURROUND | Light Yellow |
| CENTER HEIGHT Yellow | |
| FRONT DOLBY L | Light Yellow |
| FRONT DOLBY R | Yellow |
| SURROUND DOLBY L | Light Yellow |
| SURROUND DOLBY R | Yellow |
| BACK DOLBY L Light Yellow | |
| BACK DOLBY R Yellow | |
| SUBWOOFER1 | Black |
| SUBWOOFER2 | Black |
Front panel
Display
Rear panel
47
Remote
Index

Contents
ctions
ettings Tips Appendix
Refer to the table and attach the label to each speaker cable.
[How to attach the cable labels]
Speaker
Front panel D
Rear panel Re
Index
48


Contents
Connections
ayback Settings Tips Appendix
Speaker configuration and "Amp Assign" settings
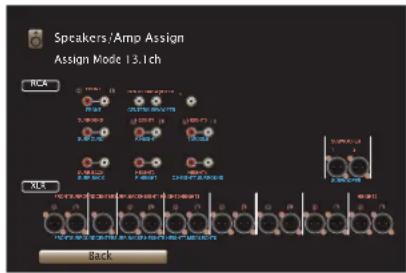
This system configuration plays back 13-channels. You can create speaker systems such as a bi-amp connection by changing the "Amp Assign" settings. Perform "Amp Assign" settings to suit the speaker configuration to be installed. (r _2 p. 222)
| Playback speaker in MAIN ZONE “Amp Assign” settings Connection page | ||
| 5.1-channel playback 13.1ch (Default) 51 | — | |
| 7.1-channel playback 13.1ch (Default) 52 | — | |
| 9.1-channel playback 13.1ch (Default) 57 | — | |
| 13.1-channel playback 13.1ch (Default) 66 | — | |
| 13.1-channel playback (Dolby Atmos and Auro-3D) 13.1ch (Default) 71 | — | |
| 11.1-channel playback (bi-amp connection of front speakers) 11.1ch (Bi-Amp) 77 | — | |
| 11.1-channel playback + second pair of front speakers 11.1ch + Front B 78 | — | |
The sound mode that can be selected varies according to the speaker configuration. See "Sound modes and channel output" (p. 310) for the sound modes that are supported.
The following pages provide basic connection examples.
Front panel D
Rear panel
Remote
49
Index


Contents
Connections
ayback Settings Tips
Appendix
Refer to the example connection for "Example connection for the Auro-3D 9.1-channel system" (p. 64) when playing Auro-3D with a 9.1-channel system using the basic 5.1-channel system and the front height and surround height speakers.
Also refer to the connection example for "Example connection for the Auro-3D 13.1-channel system" (127 p. 70) when playing Auro-3D with a 13.1-channel system by adding the Surround Back, Top Surround and Center Height speakers.

- In addition to the connections described in p.51 - 78, this unit allows for various speaker connections with the "Amp Assign" setting. Also refer to the menu screen in "View Terminal Config." on the "Amp Assign" setting screen, which shows how to make connections in your environment.
Front panel
Display
Rear panel
50
Remote
Index

Contents
Connections
Playback
Settings
Tips
Appendix
Connecting 5.1-channel speakers
This serves as a basic 5.1-channel surround system.
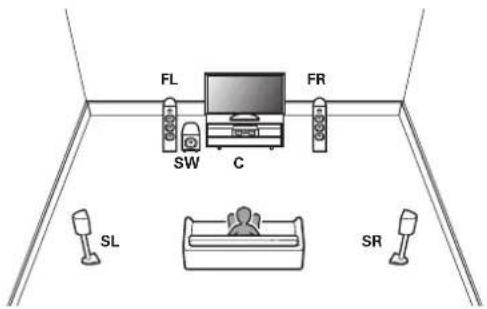
[Example] UNBALANCED RCA connector connection
Connecting 7.1-channel speakers
■ Example connections when using surround back speakers
This 7.1-channel surround system is the same as a basic 5.1-channel system but with surround back speakers.
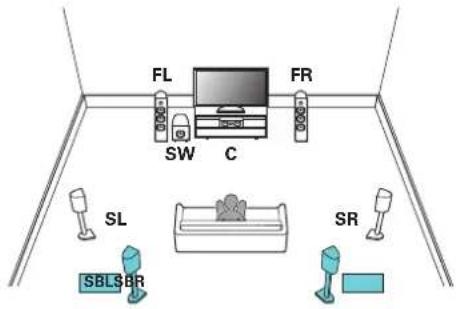

- Set "Floor" - "Layout" to "5ch & SB" in the menu when connecting in this configuration. (17 p. 223)
[Example] UNBALANCED RCA connector connection
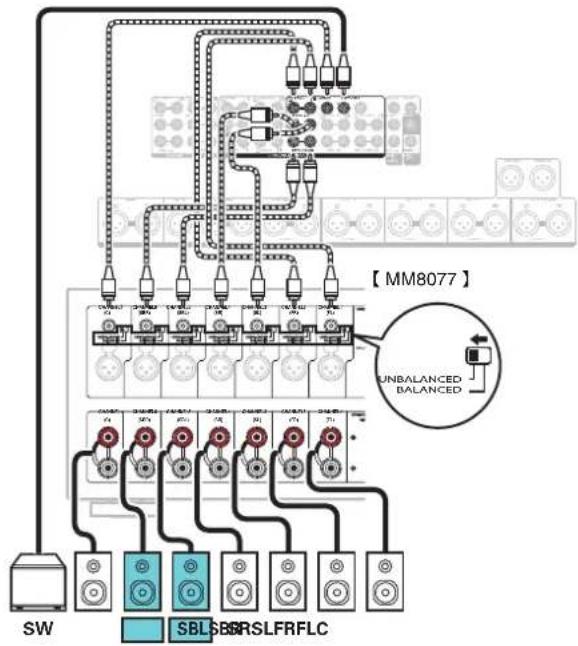
- When using a single surround back speaker, connect it to the SURROUND BACK L terminal.
Front panel
Display
Rear panel
52
Remote
Index

Contents
Connections
Playback
Settings
Tips
Appendix
■ Example connections when using front wide speakers
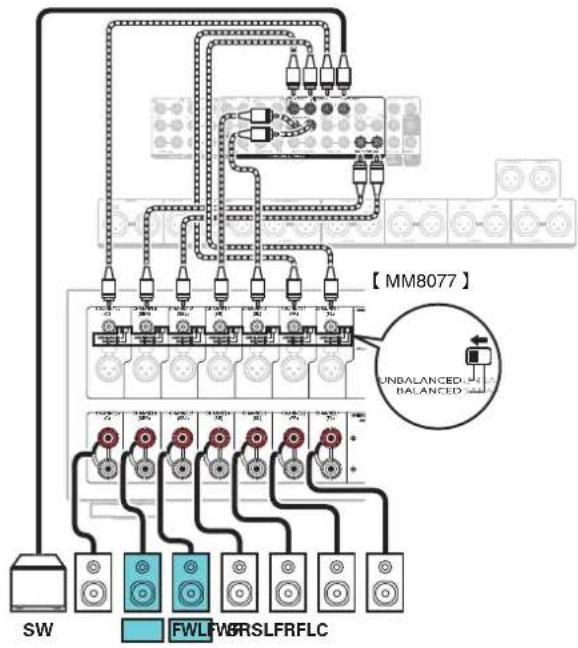
This 7.1-channel surround system is the same as a basic 5.1-channel system but with front wide speakers.
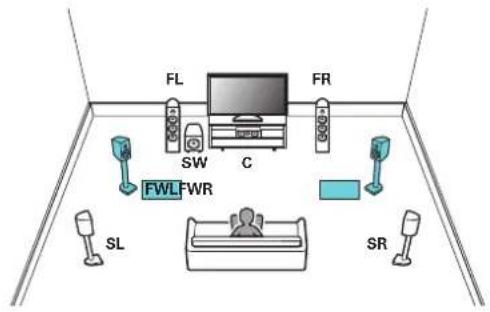

- Set "Floor" - "Layout" to "5ch & FW" in the menu when connecting in this configuration. (17 p. 223)
[Example] UNBALANCED RCA connector connection
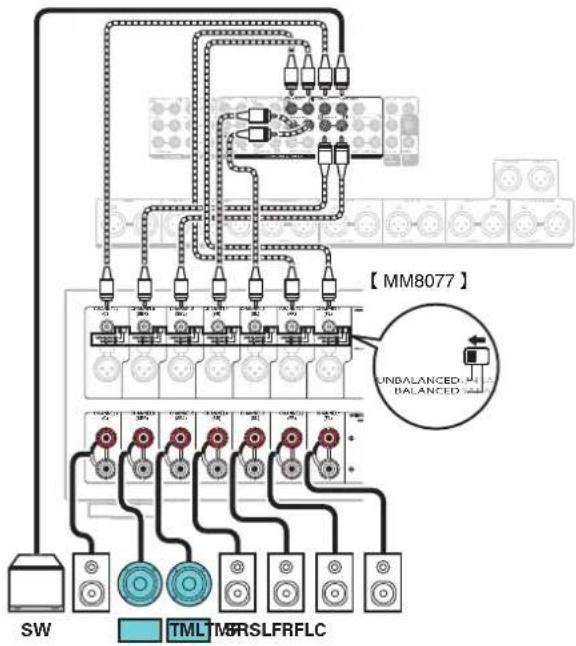
This 7.1-channel surround system is the same as a basic 5.1-channel system but with ceiling speakers.
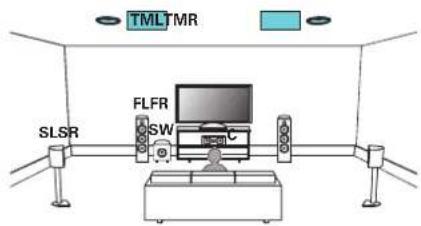

- Set "Floor" - "Layout" to "5ch" and "Height Sp" to "2ch" in the menu when connecting in this configuration. (Kp. 223)
- The top front or top rear speakers can be connected instead of the top middle speakers. In this case, set the ceiling speakers to be connected under "Height" - "Layout" in the menu. (Kp. 225)
[Example] UNBALANCED RCA connector connection
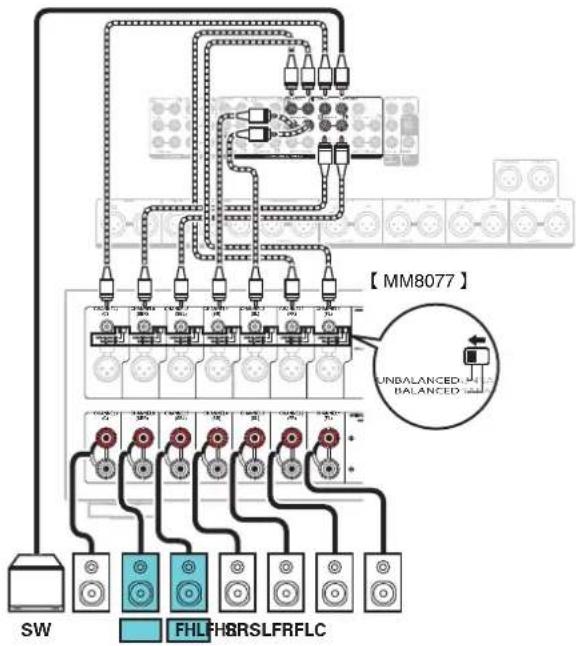
This 7.1-channel surround system is the same as a basic 5.1-channel system but with front height speakers.
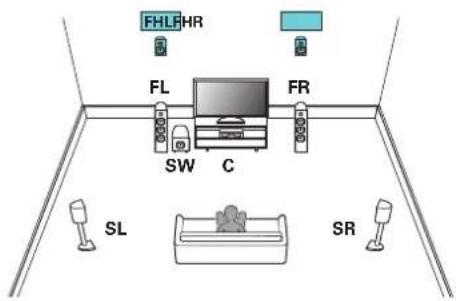

- Set "Floor" - "Layout" to "5ch" and "Height Sp" to "2ch" in the menu when connecting in this configuration. (P. 223)
- The rear height speakers can be connected instead of the front height speakers. In this case, set the height speakers to be connected under "Height" - "Layout" in the menu. (p. 225)
[Example] UNBALANCED RCA connector connection
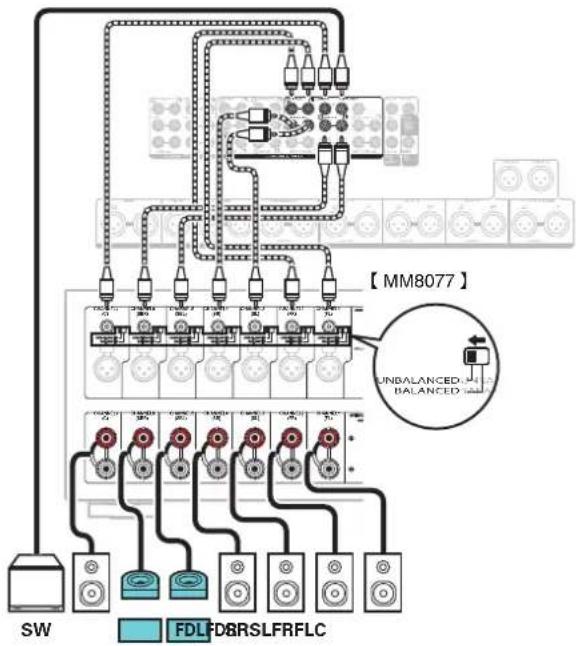
This 7.1-channel surround system is the same as a basic 5.1-channel system but with front Dolby speakers.
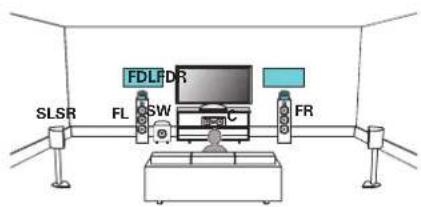

- Set "Floor" - "Layout" to "5ch" and "Dolby Sp" to "2ch" in the menu when connecting in this configuration. (1 p. 223)
- The surround Dolby speakers can be connected instead of the front Dolby speakers. In this case, set the Dolby Atmos Enabled speakers to be connected under "Height" - "Layout" in the menu. (p. 225)
[Example] UNBALANCED RCA connector connection
Connecting 9.1-channel speakers
■ Example connection when using surround back and front wide speakers
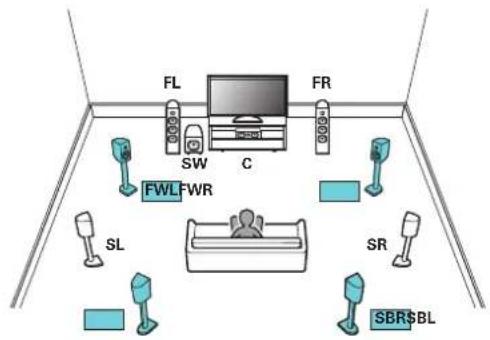

- Set "Floor" - "Layout" to "5ch & SB & FW" in the menu when connecting in this configuration. (1 p. 223)
[Example] UNBALANCED RCA connector connection
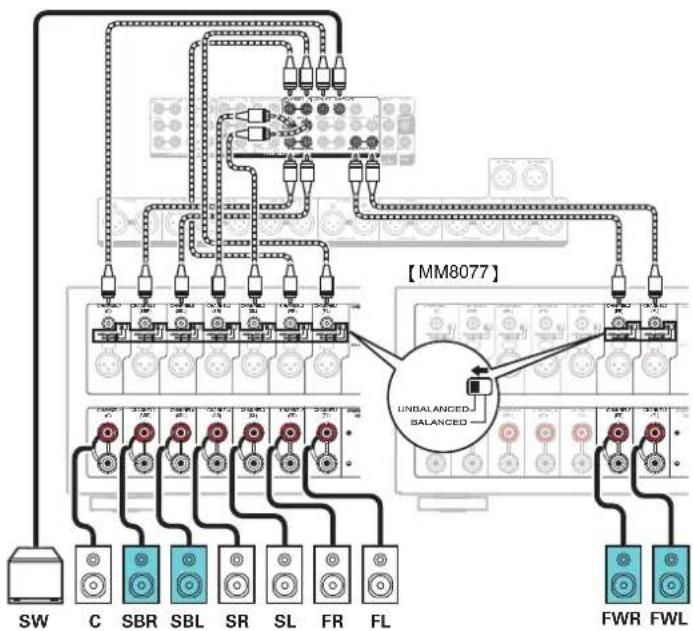
flowchart
graph TD
    A["SW"] --> B["C"]
    B --> C["SBR"]
    C --> D["SBL"]
    D --> E["SR"]
    E --> F["SL"]
    F --> G["FR"]
    G --> H["FL"]
    H --> I["FWR"]
    I --> J["FWL"]
    J --> K["UNBALANCED-BALANCED"]
    K --> L["MM8077"]
    style L fill:#f9f,stroke:#333,stroke-width:2px
    style K fill:#ccf,stroke:#333,stroke-width:2px
Front panel
Display
Rear panel
57
Remote
Index


flowchart
graph LR
    A["Contents"] --> B["Connections"]
    B --> C["Playback"]
    C --> D["Settings"]
    D --> E["Tips"]
    E --> F["Appendix"]
■ Example connection when using one set of ceiling speakers
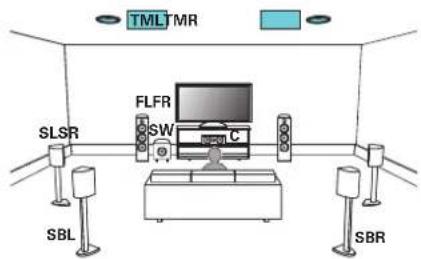

- Set "Floor" - "Layout" to "5ch & SB" and "Height Sp" to "2ch" in the menu when connecting in this configuration. (p. 224)
[Example] UNBALANCED RCA connector connection
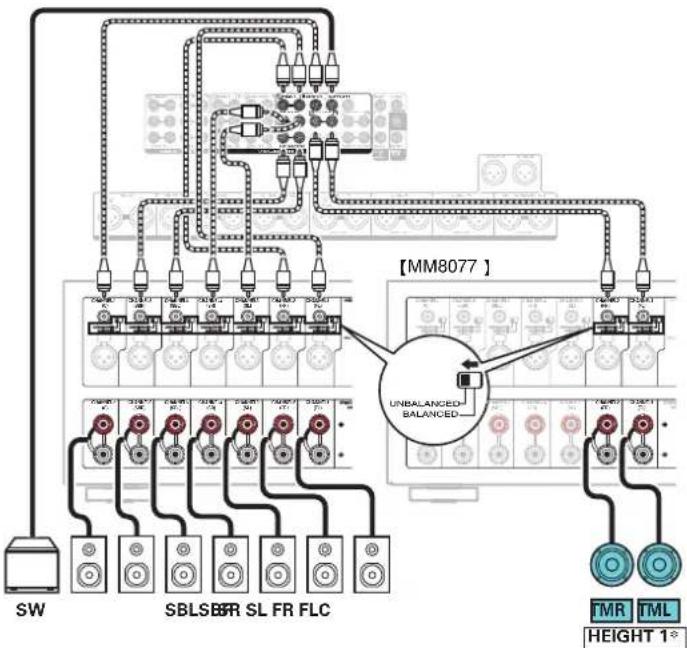
flowchart
graph TD
    A["SW"] --> B["Relays"]
    B --> C["MM8077"]
    C --> D["Balance Panel"]
    D --> E["MR"]
    D --> F["TML"]
    D --> G["HEIGHT 1°"]
    style A fill:#f9f,stroke:#333
    style B fill:#ccf,stroke:#333
    style C fill:#cfc,stroke:#333
    style D fill:#fcc,stroke:#333
    style E fill:#ffc,stroke:#333
    style F fill:#cfc,stroke:#333
    style G fill:#fcc,stroke:#333
* The top front or top rear speakers can be connected instead of the top middle speakers. In this case, set the ceiling speakers to be connected under "Height" - "Layout" in the menu. (P p. 225)
Front panel
Display
Rear panel
58
Remote
Index


flowchart
graph LR
    A["Contents"] --> B["Connections"]
    B --> C["Playback"]
    C --> D["Settings"]
    D --> E["Tips"]
    E --> F["Appendix"]
■ Example connection when using two sets of ceiling speakers
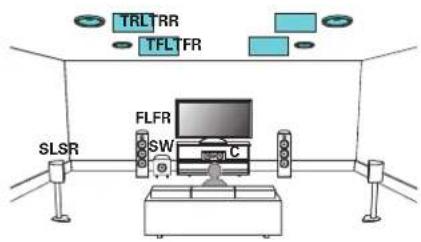

- Set "Floor" - "Layout" to "5ch" and "Height Sp" to "4ch" in the menu when connecting in this configuration. (1 p. 223)
[Example] UNBALANCED RCA connector connection
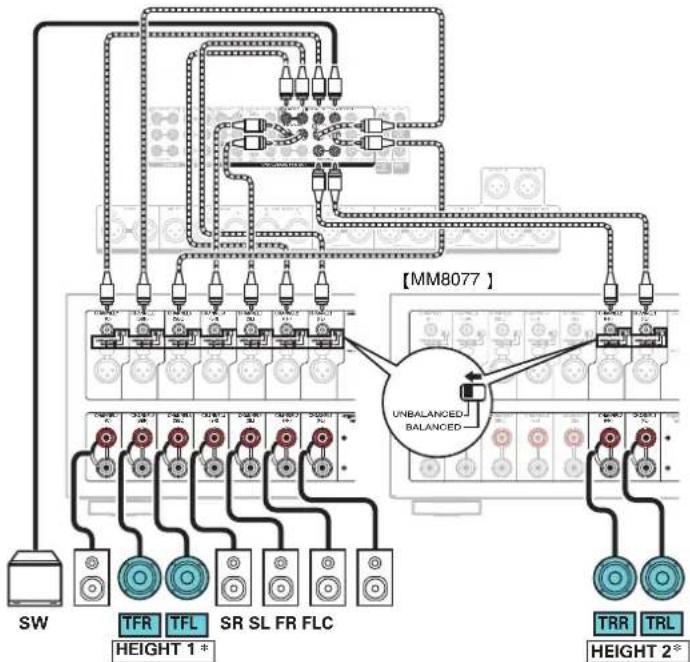
flowchart
graph TD
    A["SW"] --> B["TFR"]
    A --> C["TFL"]
    A --> D["SR SL FR FLC"]
    A --> E["TRR"]
    A --> F["TRL"]
    B --> G["HEIGHT 1*"]
    C --> H["HEIGHT 2*"]
    D --> I["UNBALANCED BALANCED"]
    E --> I
    F --> I
    G --> J["Motor"]
    H --> J
    I --> J
    style J fill:#f9f,stroke:#333,stroke-width:2px
* You can change the combination of the HEIGHT1 and HEIGHT2 channels in the settings. (1 p. 72)
Front panel
Display
Rear panel
59
Remote
Index


flowchart
graph LR
    A["Contents"] --> B["Connections"]
    B --> C["Playback"]
    C --> D["Settings"]
    D --> E["Tips"]
    E --> F["Appendix"]
■ Example connection when using one set of height speakers
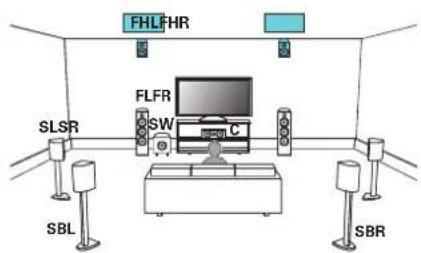

- Set "Floor" - "Layout" to "5ch & SB" and "Height Sp" to "2ch" in the menu when connecting in this configuration. (p. 224)
[Example] UNBALANCED RCA connector connection
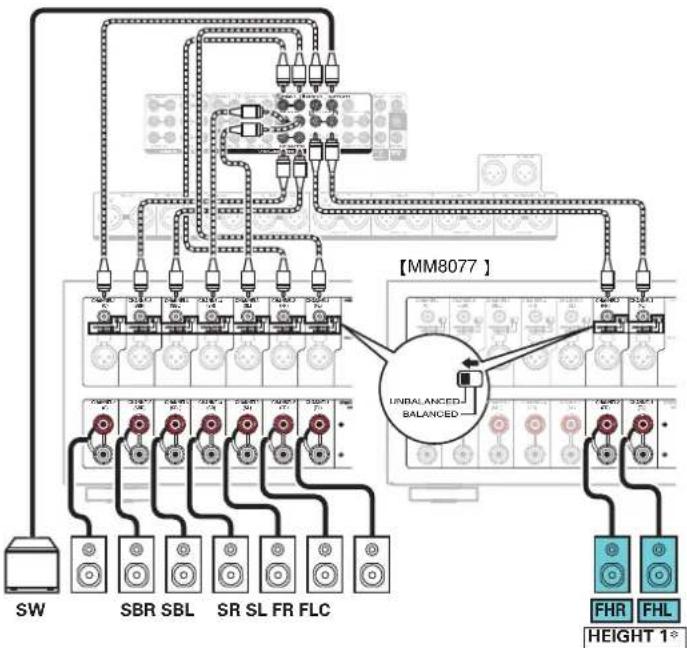
flowchart
graph TD
    A["SW"] --> B["SBR"]
    A --> C["SBL"]
    A --> D["SR SL FR FLC"]
    B --> E["Ground"]
    C --> E
    D --> E
    E --> F["MM8077 Bus"]
    F --> G["UNBALANCED BALANCED"]
    G --> H["FHR"]
    G --> I["FHL"]
    H --> J["HEIGHT 1°"]
    I --> J
    style F fill:#f9f,stroke:#333
    style G fill:#ccf,stroke:#333
* The rear height speakers can be connected instead of the front height speakers. In this case, set the height speakers to be connected under "Height" - "Layout" in the menu. (p. 225)
Front panel
Display
Rear panel
60
Remote
Index


flowchart
graph LR
    A["Contents"] --> B["Connections"]
    B --> C["Playback"]
    C --> D["Settings"]
    D --> E["Tips"]
    E --> F["Appendix"]
■ Example connection when using two sets of height speakers
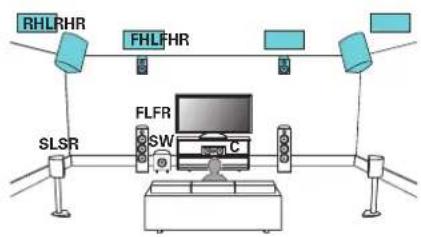
flowchart
graph TD
    A["RHL"] --> B["FHL"]
    C["SLSR"] --> D["FLFR"]
    E["SW"] --> F["C"]
    G[" "] --> H[" "]

- Set "Floor" - "Layout" to "5ch" and "Height Sp" to "4ch" in the menu when connecting in this configuration. (1 p. 223)
[Example] UNBALANCED RCA connector connection
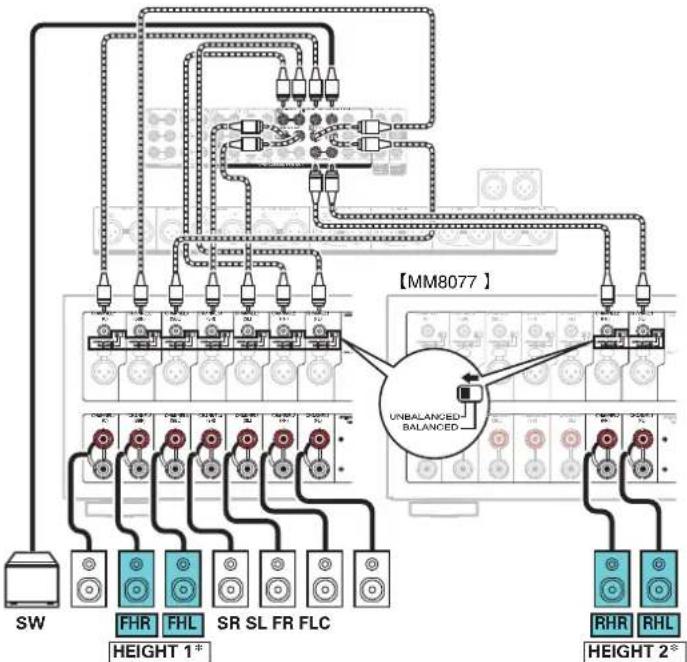
flowchart
graph TD
    A["SW"] --> B["FHR"]
    A --> C["FHL"]
    A --> D["SR SL FR FLC"]
    B --> E["HEIGHT 1*"]
    C --> F["HEIGHT 2*"]
    D --> G["HEIGHT 1*"]
    E --> H["UNBALANCED BALANCED"]
    F --> H
    G --> H
    H --> I["MM8077"]
    style H fill:#f9f,stroke:#333,stroke-width:2px
* You can change the combination of the HEIGHT1 and HEIGHT2 channels in the settings. (1 p. 72)
Front panel
Display
Rear panel
61
Remote
Index


flowchart
graph LR
    A["Contents"] --> B["Connections"]
    B --> C["Playback"]
    C --> D["Settings"]
    D --> E["Tips"]
    E --> F["Appendix"]
■ Example connection when using one set of Dolby Atmos Enabled speakers
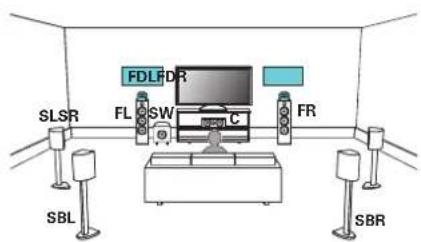

- Set "Floor" - "Layout" to "5ch & SB" and "Dolby Sp" to "2ch" in the menu when connecting in this configuration. (1 p. 223, 224)
[Example] UNBALANCED RCA connector connection
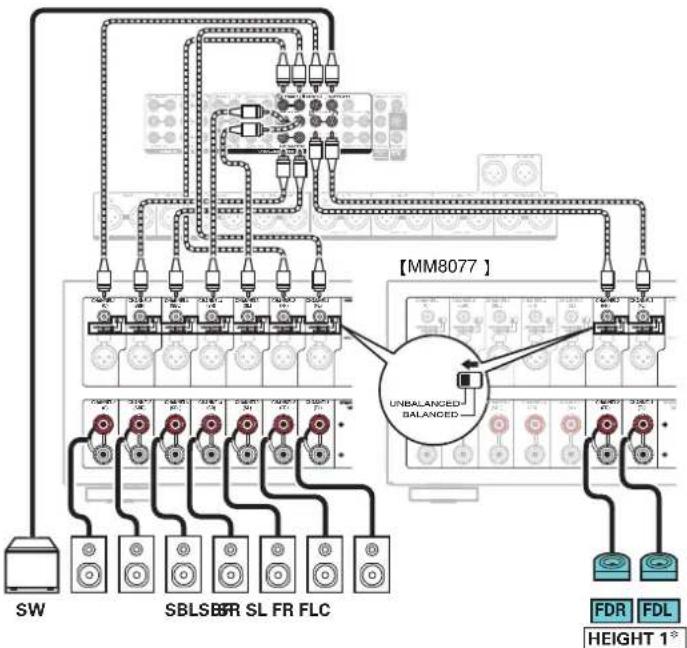
flowchart
graph TD
    A["SW"] --> B["SBLSB"]
    B --> C["FR SL"]
    C --> D["FDL"]
    D --> E["Height 1°"]
    E --> F["UNBALANCED BALANCED"]
    F --> G["MM8077"]
    G --> H["Power Supply"]
    style A fill:#f9f,stroke:#333
    style B fill:#ccf,stroke:#333
    style C fill:#cfc,stroke:#333
    style D fill:#fcc,stroke:#333
    style E fill:#cff,stroke:#333
    style F fill:#ffc,stroke:#333
    style G fill:#fcf,stroke:#333
* The surround Dolby or back Dolby speakers can be connected instead of the front Dolby speakers. In this case, set the Dolby Atmos Enabled speakers to be connected under "Height" - "Layout" in the menu. (12p. 225)
Front panel
Display
Rear panel
62
Remote
Index


flowchart
graph LR
    A["Contents"] --> B["Connections"]
    B --> C["Playback"]
    C --> D["Settings"]
    D --> E["Tips"]
    E --> F["Appendix"]
■ Example connection when using two sets of Dolby Atmos Enabled speakers
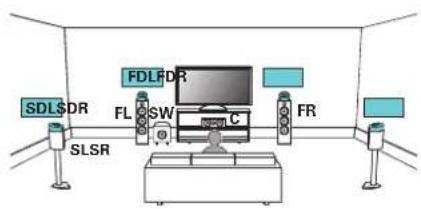

- Set "Floor" - "Layout" to "5ch" and "Dolby Sp" to "4ch" in the menu when connecting in this configuration. (p. 223, 224)
[Example] UNBALANCED RCA connector connection
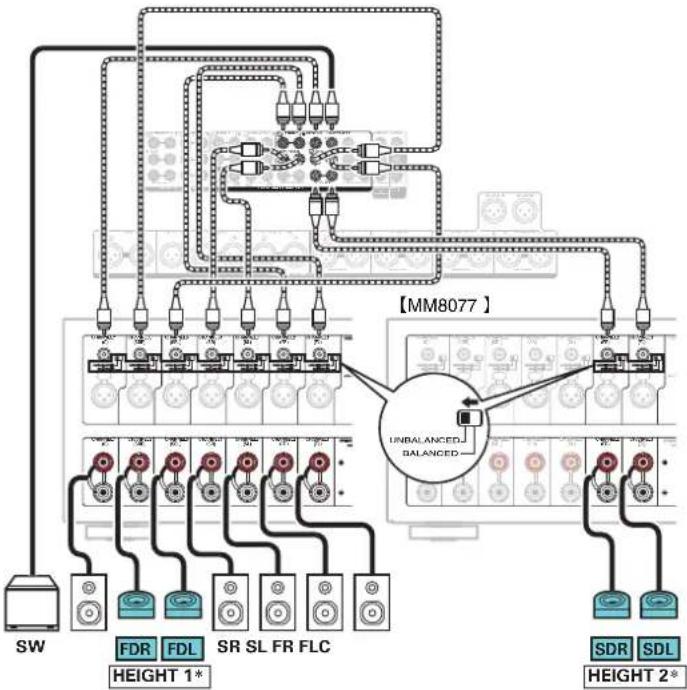
flowchart
graph TD
    A["SW"] --> B["FDR"]
    A --> C["FDL"]
    A --> D["SR SL FR FLC"]
    A --> E["SDR"]
    A --> F["SDL"]
    B --> G["HEIGHT 1*"]
    C --> H["HEIGHT 2*"]
    D --> I["HEIGHT 1*"]
    E --> J["HEIGHT 2*"]
    F --> K["HEIGHT 2*"]
    L["INFLUER"] --> M["UNBALANCED BALANCED"]
    M --> N["External Circuit"]
    style M fill:#f9f,stroke:#333,stroke-width:2px
    style N fill:#ccf,stroke:#333,stroke-width:2px
* You can change the combination of the HEIGHT1 and HEIGHT2 channels in the settings. (I-9 p. 72)
Front panel
Display
Rear panel
63
Remote
Index

Contents
Connections
Playback
Settings
Tips
Appendix
■ Example connection for the Auro-3D 9.1-channel system
This speaker configuration is optimized for Auro-3D playback.
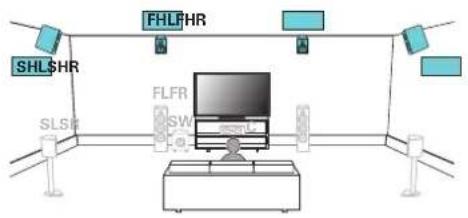

- Set "Floor" - "Layout" to "5ch" and "Height Sp" to "4ch" in the menu when connecting in this configuration. (127 p. 223) Next, set "Height" - "Front Layout" to "Front Height" and "Rear Layout" to "Surr Height". (127 p. 226)
[Example] UNBALANCED RCA connector connection
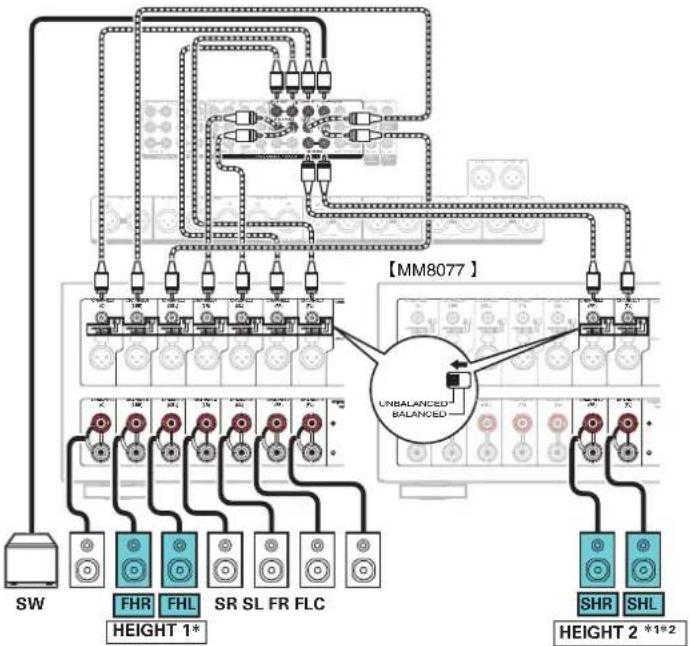
flowchart
graph TD
    A["SW"] --> B["FHR"]
    A --> C["FHL"]
    A --> D["SR SL FR FLC"]
    A --> E["SHR"]
    A --> F["SHL"]
    B --> G["HEIGHT 1*"]
    C --> H["HEIGHT 2 *1*2"]
    D --> I["UNBALANCED BALANCED"]
    E --> I
    F --> I
    I --> J["External Circuit"]
    style I fill:#f9f,stroke:#333,stroke-width:2px
    style J fill:#ccf,stroke:#333,stroke-width:2px
*1 You can change the combination of the HEIGHT1 and HEIGHT2 channels in the settings. (1 p. 72)
*2 For the best Auro-3D experience Surround Height speakers are recommended, however you may substitute Rear Height speakers from a Dolby Atmos speaker setup in place of Surround Height speakers.
Front panel
Display
Rear panel
64
Remote
Index

Contents
Connections
Playback
Settings
Tips
Appendix
Channels output from the HEIGHT1, HEIGHT2 RCA connectors and HEIGHT1, HEIGHT2 XLR connectors can be changed to the following patterns according to the speaker systems being used.
Set this from "Amp Assign" in the menu. (☐ p. 222)
| Combination of height speakers to be used Connected connectors | ||||
| Number of height/ceiling speakers | Number of Dolby Speakers | Combination pattern | HEIGHT1 RCA and HEIGHT1 XLR | HEIGHT2 RCA and HEIGHT2 XLR |
| 2 speakers None | Front Height Front Height - | |||
| Top Front Top Front - | ||||
| Top Middle Top Middle - | ||||
| Top Rear Top Rear - | ||||
| Rear Height Rear Height - | ||||
| None 2 speakers | Front Dolby Front Dolby - | |||
| Surround Dolby Surround Dolby - | ||||
| Back Dolby | Back Dolby | - | ||
| 4 speakers None | Front Height & Top Middle | Front Height | Top Middle | |
| Front Height & Top Rear | Front Height | Top Rear | ||
| Front Height & Rear Height * | Front Height | Rear Height | ||
| Front Height & Surr. Height | Front Height | Surr. Height | ||
| Top Front & Top Rear Top Front | Top Rear | |||
| Top Front & Rear Height | Top Front | Rear Height | ||
| Top Middle & Rear Height | Top Middle | Rear Height | ||
| 2 speakers | 2 speakers | Front Dolby & Top Rear | Front Dolby | Top Rear |
| Front Dolby & Rear Height | Front Dolby | Rear Height | ||
| Front Height & Surr. Dolby | Front Height | Surround Dolby | ||
| Top Front & Surr. Dolby | Top Front | Surround Dolby | ||
| None | 4 speakers | Front Dolby & Surround Dolby | Front Dolby | Surround Dolby |
* For the best Auro-3D experience Surround Height speakers are recommended, however you may substitute Rear Height speakers from a Dolby Atmos speaker setup in place of Surround Height speakers.
Front panel
Display
Rear panel
65
Remote
Index

Contents
Connections
Playback
Settings
Tips
Appendix
Connecting 13.1-channel speakers
■ Example connection when using three sets of ceiling speakers
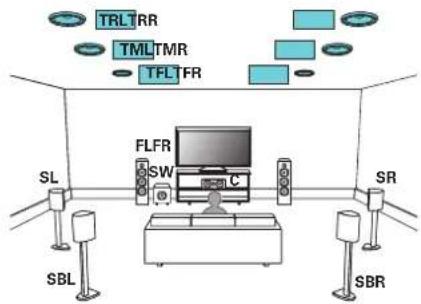

- Set "Floor" - "Layout" to "5ch & SB" and "Height Sp" to "6ch" in the menu when connecting in this configuration. (17 p. 224)
[Example] UNBALANCED RCA connector connection
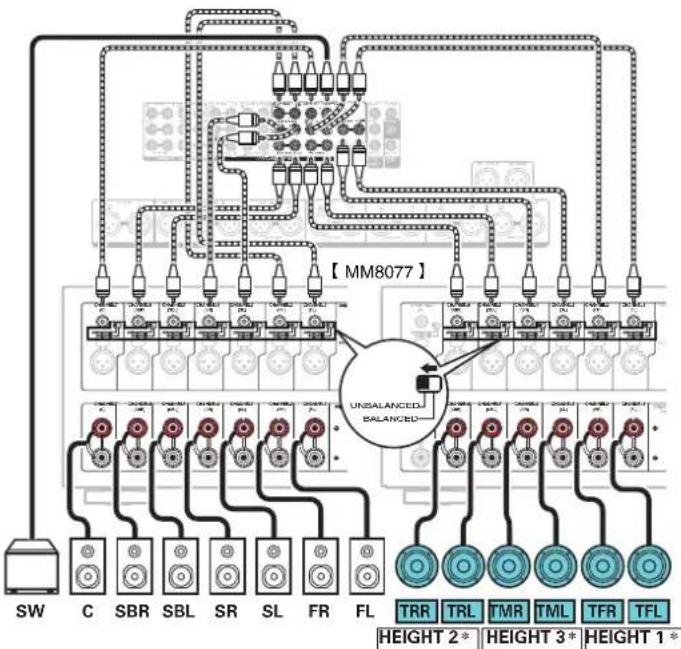
flowchart
graph TD
    A["SW"] --> B["C"]
    B --> C["SBR"]
    C --> D["SBL"]
    D --> E["SR"]
    E --> F["SL"]
    F --> G["FR"]
    G --> H["FL"]
    H --> I["TRR"]
    H --> J["TRL"]
    H --> K["TMR"]
    H --> L["TML"]
    H --> M["TFR"]
    H --> N["TFL"]
    style A fill:#f9f,stroke:#333
    style I fill:#bbf,stroke:#333
    style J fill:#bbf,stroke:#333
    style K fill:#bbf,stroke:#333
    style L fill:#bbf,stroke:#333
    style M fill:#bbf,stroke:#333
    style N fill:#bbf,stroke:#333
    subgraph "MM8077"
        direction TB
        A --> B --> C --> D --> E --> F --> G --> H --> I --> J --> K --> L --> M --> N
        direction TB
        B --> C --> D --> E --> F --> G --> H --> I --> J --> K --> L --> M --> N
        direction TB
        C --> D --> E --> F --> G --> H --> I --> J --> K --> L --> M --> N
        direction TB
        D --> E --> F --> G --> H --> I --> J --> K --> L --> M --> N
        direction TB
        A -.->|UNBALANCED BALANCED| B
        style A fill:#f9f,stroke:#333
    style B fill:#bbf,stroke:#333
    style C fill:#bbf,stroke:#333
    style D fill:#bbf,stroke:#333
    style E fill:#bbf,stroke:#333
    style F fill:#bbf,stroke:#333
    style G fill:#bbf,stroke:#333
    style H fill:#bbf,stroke:#333
    style I fill:#bbf,stroke:#333
    style J fill:#bbf,stroke:#333
    style K fill:#bbf,stroke:#333
    style L fill:#bbf,stroke:#333
    style M fill:#bbf,stroke:#333
* You can change the combination of the HEIGHT1, HEIGHT2 and HEIGHT3 channels in the settings. (p. 72)
Front panel
Display
Rear panel
66
Remote
Index


flowchart
graph LR
    A["Contents"] --> B["Connections"]
    B --> C["Playback"]
    C --> D["Settings"]
    D --> E["Tips"]
    E --> F["Appendix"]
■ Example connection when using two sets of height speakers and one set of ceiling speakers
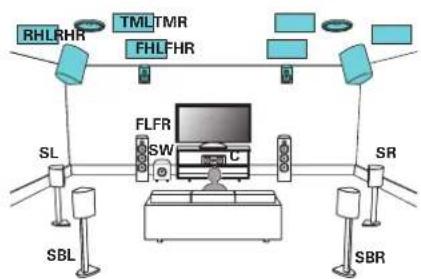
flowchart
graph TD
    RHLRHR --> TMLTMR
    TMLTMR --> FHLFHR
    FHLFHR --> SBR
    SL --> SBL
    SBR --> SBR
    TMLTMR --> C
    FHLFHR --> C
    C --> TV
    TV --> C
    C --> SW
    SW --> C
    C --> CSW
    CSW --> CSW
    CSW --> CSW
    CSW --> CSW
    CSW --> CSW
    CSW --> CSW
    CSW --> CSW

- Set "Floor" - "Layout" to "5ch & SB" and "Height Sp" to "6ch" in the menu when connecting in this configuration. (p. 224)
[Example] UNBALANCED RCA connector connection
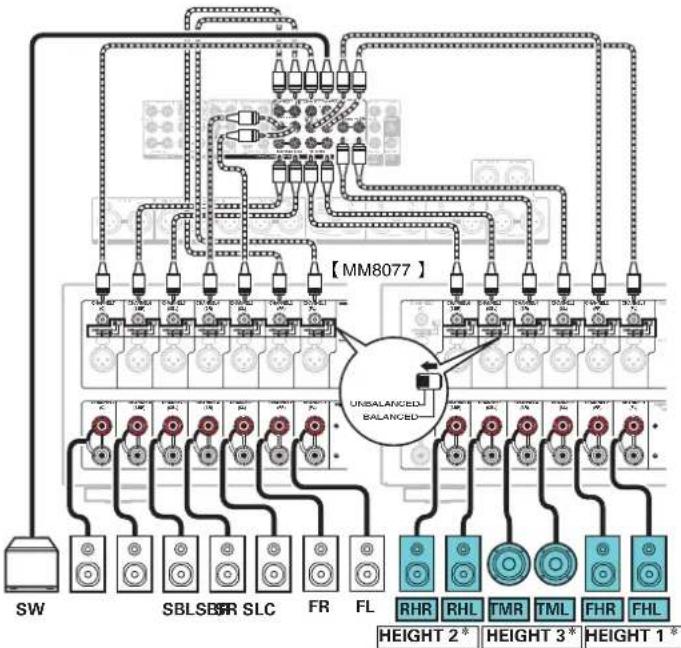
flowchart
graph TD
    A["SW"] --> B["Relays"]
    B --> C["SLC"]
    C --> D["FR"]
    D --> E["FL"]
    E --> F["RHR"]
    E --> G["RHL"]
    E --> H["TMR"]
    E --> I["TML"]
    E --> J["FHR"]
    E --> K["FHL"]
    style A fill:#f9f,stroke:#333
    style B fill:#ccf,stroke:#333
    style C fill:#cfc,stroke:#333
    style D fill:#fcc,stroke:#333
    style E fill:#cff,stroke:#333
    style F fill:#ffc,stroke:#333
    style G fill:#ffc,stroke:#333
    style H fill:#ffc,stroke:#333
    style I fill:#ffc,stroke:#333
    style J fill:#ffc,stroke:#333
    style K fill:#ffc,stroke:#333
    subgraph "MM8077"
        L["SW"] --> M["Relays"]
        M --> N["SLC"]
        N --> O["FR"]
        O --> P["FL"]
        P --> Q["RHR"]
        P --> R["RHL"]
        P --> S["TMR"]
        P --> T["TML"]
        P --> U["FHR"]
        P --> V["FHL"]
        W["Height 2*"] --> X["UL"]
        Y["Height 3*"] --> Z["UL"]
        AA["Height 1*"] --> AB["UL"]
    end
    subgraph "Unbalanced Balanced"
        AC["UL"] --> AD["UL"]
        AE["UL"] --> AF["UL"]
        AG["UL"] --> AH["UL"]
        AI["UL"] --> AJ["UL"]
        AK["UL"] --> AL["UL"]
        AM["UL"] --> AN["UL"]
        AO["UL"] --> AP["UL"]
        AQ["UL"] --> AR["UL"]
        AS["UL"] --> AT["UL"]
        AU["UL"] --> AV["UL"]
        AW["UL"] --> AX["UL"]
* You can change the combination of the HEIGHT1, HEIGHT2 and HEIGHT3 channels in the settings. (p. 72)
Front panel
Display
Rear panel
67
Remote
Index


flowchart
graph LR
    A["Contents"] --> B["Connections"]
    B --> C["Playback"]
    C --> D["Settings"]
    D --> E["Tips"]
    E --> F["Appendix"]
■ Example connection when using two sets of height speakers and one set of front wide speakers
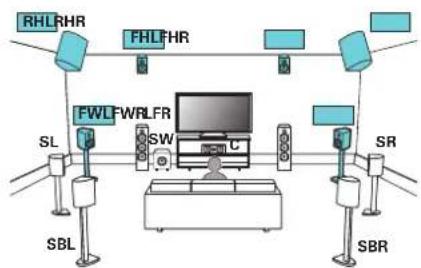
flowchart
graph TD
    A["RHLRHR"] --> B["FHLFHR"]
    C["SL"] --> D["SBL"]
    E["SW"] --> F["C"]
    G["SBR"] --> H["SBR"]
    I["SR"] --> J["TV"]

- Set "Floor" - "Layout" to "5ch & SB & FW" and "Height Sp" to "4ch" in the menu when connecting in this configuration. (r.p. 223)
[Example] UNBALANCED RCA connector connection
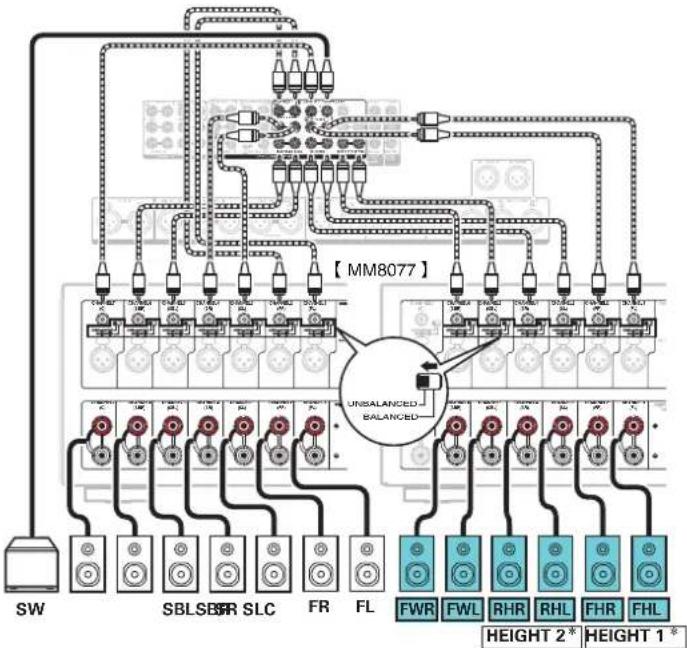
flowchart
graph TD
    A["SW"] --> B["SBLSBFR SLC"]
    B --> C["FR"]
    C --> D["FL"]
    D --> E["FWR"]
    D --> F["FWL"]
    D --> G["RHR"]
    D --> H["RHL"]
    D --> I["FHR"]
    D --> J["FHL"]
    K["Height 2*"] --> L["UNBALANCED BALANCED"]
    M["Height 1*"] --> L
    L --> N["MM8077 Busbar"]
    style L fill:#f9f,stroke:#333,stroke-width:2px
    style N fill:#ccf,stroke:#333,stroke-width:2px
* You can change the combination of the HEIGHT1 and HEIGHT2 channels in the settings. (1 p. 72)
Front panel
Display
Rear panel
68
Remote
Index


flowchart
graph LR
    A["Contents"] --> B["Connections"]
    B --> C["Playback"]
    C --> D["Settings"]
    D --> E["Tips"]
    E --> F["Appendix"]
■ Example connection when using three sets of Dolby Atmos Enabled speakers
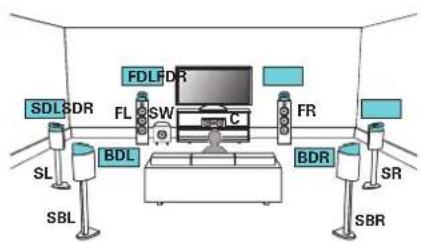
flowchart
graph TD
    A["SL"] --> B["SBL"]
    C["SDL"] --> D["SDR"]
    E["BDL"] --> F["BDL"]
    G["FL"] --> H["SW"]
    I["FDL"] --> J["FDR"]
    K["FR"] --> L["C"]
    M["BDR"] --> N["SBR"]
    O["SR"] --> P["SBR"]

- Set "Floor" - "Layout" to "5ch & SB" and "Dolby Sp" to "6ch" in the menu when connecting in this configuration. (p. 223, 224)
[Example] UNBALANCED RCA connector connection
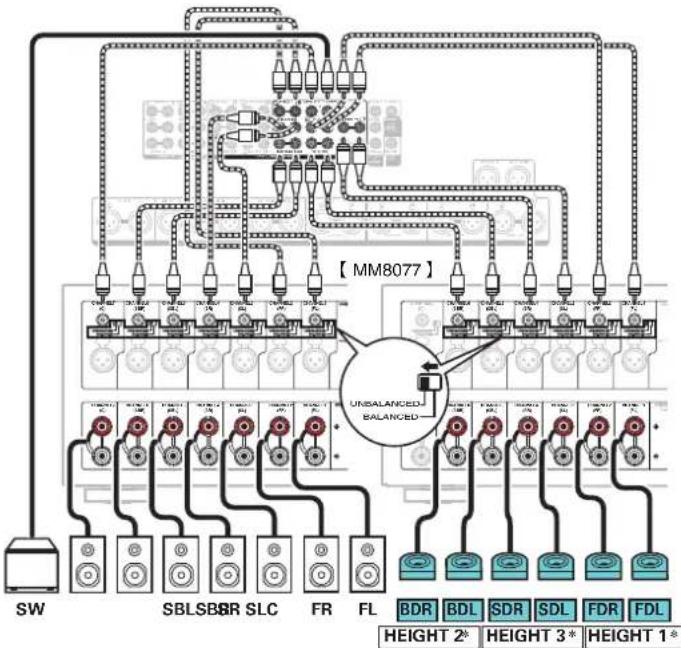
flowchart
graph TD
    A["SW"] --> B["SBLSB"]
    B --> C["SR SLC"]
    C --> D["FR FL"]
    D --> E["BSR"]
    E --> F["BDL"]
    F --> G["SDR"]
    G --> H["SDL"]
    H --> I["FDR"]
    I --> J["FDL"]
    J --> K["HEIGHT 2*"]
    J --> L["HEIGHT 3*"]
    J --> M["HEIGHT 1*"]
    N["MSM8077"] --> O["UNBALANCED BALANCED"]
    O --> P["Power Supply"]
    style O fill:#f9f,stroke:#333,stroke-width:2px
    style P fill:#ccf,stroke:#333,stroke-width:2px
* You can change the combination of the HEIGHT1, HEIGHT2 and HEIGHT3 channels in the settings. (p. 72)
69



Contents
Connections
Playback
Settings
Tips
Appendix
■ Example connection for the Auro-3D 13.1-channel system
This speaker configuration is optimized for Auro-3D playback.
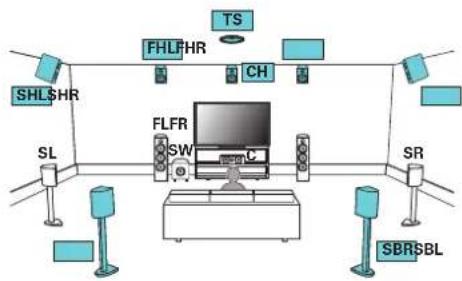
flowchart
graph TD
    TV["TV"] -->|FHLFHR| Media["Media Unit"]
    Media -->|TS| Media1["Media Unit"]
    Media -->|CH| Media2["Media Unit"]
    Media -->|SHLSHR| Media3["Media Unit"]
    Media -->|SL| Media4["Media Unit"]
    Media -->|SW| Media5["Media Unit"]
    Media -->|C| Media6["Media Unit"]
    Media -->|SR| Media7["Media Unit"]
    Media -->|SBRSBL| Media8["Media Unit"]

- Set "Floor" - "Layout" to "5ch & SB" and "Height Sp" to "6ch" in the menu when connecting in this configuration. (P. 224) Next, set "Height" - "Front Layout" to "Front Height & Center Height" and "Middle Layout" to "Surr. Height & Top Surround". (P. 226)
[Example] UNBALANCED RCA connector connection
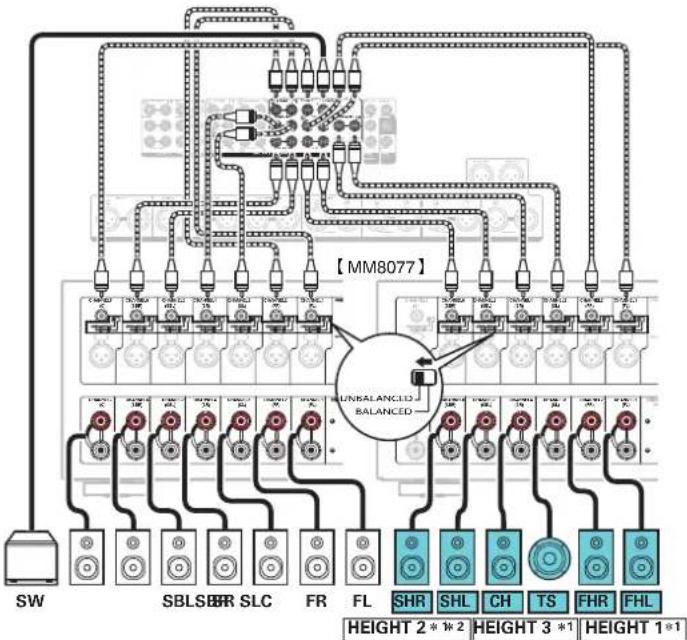
flowchart
graph TD
    A["SW"] --> B["SLC"]
    B --> C["FR"]
    C --> D["FL"]
    D --> E["SHR"]
    E --> F["SHL"]
    F --> G["CH"]
    G --> H["TS"]
    H --> I["FHR"]
    I --> J["FHL"]
    J --> K["HEIGHT 1*1"]
    K --> L["HEIGHT 2*1*2"]
    L --> M["UNBALANCED BALANCED"]
    M --> N["Power Supply"]
    style M fill:#f9f,stroke:#333,stroke-width:2px
    style N fill:#ccf,stroke:#333,stroke-width:2px
*1 You can change the combination of the HEIGHT1, HEIGHT2 and HEIGHT3 channels in the settings. (125 p. 72)
*2 For the best Auro-3D experience Surround Height speakers are recommended, however you may substitute Rear Height speakers from a Dolby Atmos speaker setup in place of Surround Height speakers.
Front panel
Display
Rear panel
70
Remote
Index

Contents
Connections
Playback
Settings
Tips
Appendix
Connecting 15.1-channel speakers
This system can connect with up to 15.1-channel speakers and simultaneously play up to 13.1-channels for Dolby Atmos and Auro-3D playback. Use the Front Height, Top Middle or Rear Height speakers for Dolby Atmos playback. Use the Front Height, Rear Height, Center Height or Top Surround speakers for Auro-3D playback.
■ Example connection
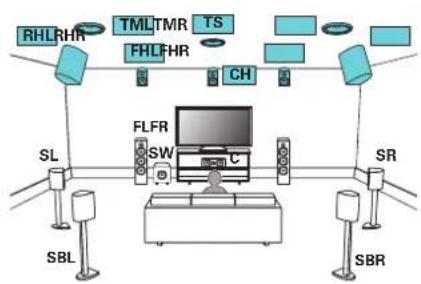
flowchart
graph TD
    RHLRHR --> TMLTMR
    TMLTMR --> TS
    FHLFHR --> CH
    CH --> SBR
    SL --> FLFR
    FLFR --> SW
    SW --> C
    SBR --> SR
    SBL --> FLFR
    FLFR --> C
- Set "Floor" - "Layout" to "5ch & SB" and "Height Sp" to "8ch" in the menu when connecting in this configuration. (T p. 224)
[Example] UNBALANCED RCA connector connection
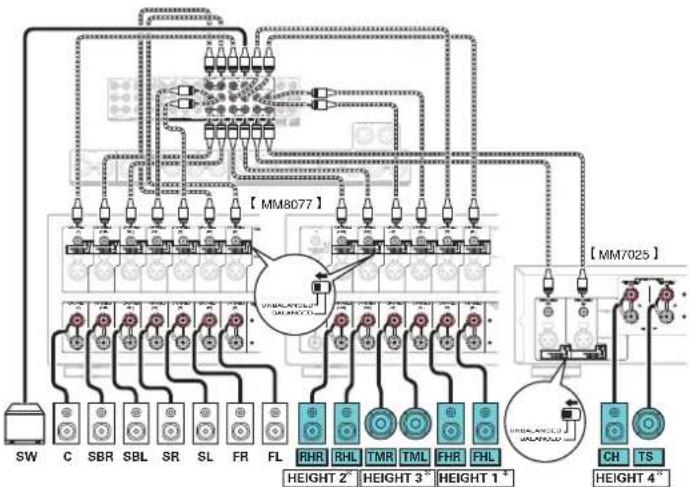
flowchart
graph TD
    A["SW"] --> B["C"]
    B --> C["SBR"]
    C --> D["SBL"]
    D --> E["SR"]
    E --> F["SL"]
    F --> G["FR"]
    G --> H["FL"]
    H --> I["RHR"]
    I --> J["RHL"]
    J --> K["TMR"]
    K --> L["TML"]
    L --> M["FHR"]
    M --> N["FHL"]
    N --> O["HEIGHT 1*"]
    O --> P["WEHALCANCE WIREFLOOD"]
    P --> Q["CH"]
    Q --> R["TS"]
    R --> S["HEIGHT 4*"]
    T["MM8077"] --> U["Power Supply"]
    V["MM7025"] --> W["Power Supply"]
* Use Surround Height speakers for optimal Auro-3D playback. Install Rear Height speakers instead of Surround Height speakers to enjoy both Auro-3D and Dolby Atmos with 13.1-channel playback.
Front panel
Display
Rear panel
71
Remote
Index

Contents
ctions
ettings Tips
Appendix
| Combinations of height speakers to be used | Connected pre-out connectors | ||||||
| Number of height / ceiling speakers | Number of Dolby Speakers | Combination pattern HEIGHT | 1 HEIGHT 2 HEIGHT 3 | HEIGHT 4/ FRONT WIDE*1 | |||
| 2ch | 2ch None | Front Height Front Height --- | |||||
| Top Front Top Front --- | |||||||
| Top Middle Top Middle --- | |||||||
| Top Rear Top Rear --- | |||||||
| Rear Height Rear Height --- | |||||||
| None 2ch | Front Dolby Front Dolby --- | ||||||
| Surround Dolby | Surround Dolby | --- | |||||
| Back Dolby*2 | Back Dolby | --- | |||||
Front panel
Display
Rear panel
72
Remote
Index

Contents
Connections
Playback
Settings
Tips
Appendix
| Combinations of height speakers to be used | Connected pre-out connectors | ||||||
| Number of height / ceiling speakers | Number of Dolby Speakers | Combination pattern HEIGHT | 1 HEIGHT 2 HEIGHT 3 | HEIGHT 4/ FRONT WIDE*1 | |||
| 4ch | 2ch 2ch | Front Dolby & Top Rear Front | Dolby Top Rear - - | ||||
| Front Dolby & Rear Height Front | Dolby Rear Height - - | ||||||
| Front Height & Surr. Dolby Front | Height Surround | Dolby - - | |||||
| Front Height & Back Dolby*2 | Front Height Back Dolby - - | ||||||
| Top Front & Surr. Dolby Top | Front Surround Dolby - - | ||||||
| Top Front & Back Dolby*2 | Top Front Back Dolby - - | ||||||
| 4ch None | Front Height & Top Middle Front | Height Top | Middle | - - | |||
| Front Height & Top Rear | Front Height Top | Rear - - | |||||
| Front Height & Rear Height*3 | Front Height | Rear Height - - | |||||
| Front Height & Surr. Height | Front Height | Surr. Height - - | |||||
| Top Front & Top Rear | Top Front | Top Rear - - | |||||
| Top Front & Rear Height | Top Front Rear | Height - - | |||||
| Top Middle & Rear Height | Top Middle | Rear Height - - | |||||
| None 4ch | Front Dolby & Surr. Dolby | Front Dolby | Surround Dolby - - | ||||
| Front Dolby & Back Dolby*2 | Front Dolby | Back Dolby - - | |||||
Front panel
Display
Rear panel
73
Remote
Index

Contents
ctions
ettings Tips Appendix
| Combinations of height speakers to be used | Connected pre-out connectors | ||||||
| Number of height / ceiling speakers | Number of Dolby Speakers | Combination pattern HEIGHT | 1 HEIGHT 2 HEIGHT 3 | HEIGHT 4/ FRONT WIDE*1 | |||
| 5ch 5ch None | Front Height & Rear Height & Top Surround*3 | Front Height Rear Height L: Top Surround - | |||||
| Front Height & Surr. Height & Top Surround | Front Height Surr. Height L: Top Surround - | ||||||
| Front Height & Rear Height & Center Height*3 | Front Height Rear Height R: Center Height - | ||||||
| Front Height & Surr. Height & Center Height | Front Height Surr. Height R: Center Height - | ||||||
Front panel D
Rear panel Re
Index
74



Contents
Connections
Playback
Settings
Tips
Appendix
| Combinations of height speakers to be used | Connected pre-out connectors | ||||||
| Number of height / ceiling speakers | Number of Dolby Speakers | Combination pattern HEIGHT | 1 HEIGHT 2 HEIGHT 3 | HEIGHT 4/ FRONT WIDE*1 | |||
| 6ch | 6ch None | Front Height & Surr. Height & Rear Height*4 | Front Height Rear Height Surr. Height - | ||||
| Front Height & Rear Height & Top Surround & Center Height*3 | Front Height Rear Height | L: Top Surround R: Center Height | - | ||||
| Front Height & Surr. Height & Top Surround & Center Height | Front Height Surr. Height | L: Top Surround R: Center Height | - | ||||
| Front Height & Top Middle & Rear Height*3*5 | Front Height Rear Height Top Middle - | ||||||
| Top Front & Top Middle & Top Rear*5 | Top Front Top Rear Top Middle - | ||||||
| 4ch 2ch | Front Height & Surr. Dolby & Rear Height*3 | Front Height Rear Height Surround Dolby - | |||||
| Top Front & Surr. Dolby & Top Rear | Top Front Top Rear Surround Dolby - | ||||||
| 2ch 4ch | Front Height & Surr. Dolby & Back Dolby*2 | Front Dolby Back Dolby Surround Dolby - | |||||
| Front Dolby & Top Middle & Back Dolby*2 | Front Dolby Back Dolby Top Middle - | ||||||
| Front Dolby & Surr. Dolby & Rear Height | Front Dolby Rear Height Surround Dolby - | ||||||
| None 6ch | Front Dolby & Surr. Dolby & Back Dolby*2 | Front Dolby Back Dolby Surround Dolby - | |||||
Front panel
Display
Rear panel
75
Remote
Index

Contents
Connections
ayback Settings Tips Appendix
| Combinations of height speakers to be used | Connected pre-out connectors | ||||||
| Number of height / ceiling speakers | Number of Dolby Speakers | Combination pattern HEIGHT | 1 HEIGHT 2 HEIGHT 3 | HEIGHT 4/ FRONT WIDE*1 | |||
| 7ch | 7ch None | Front Height & Top Middle & Rear Height & Top Surround*3 | Front Height Rear Height Top Middle L: Top Surround | ||||
| Front Height & Top Middle & Rear Height & Center Height*3 | Front Height Rear Height Top Middle R: Center Height | ||||||
| 5ch 2ch | Front Height & Surr. Dolby & Rear Height & Top Surround*3 | Front Height Rear Height Surround Dolby L: Top Surround | |||||
| Front Height & Surr. Dolby & Rear Height & Center Height*3 | Front Height Rear Height Surround Dolby R: Center Height | ||||||
| 8ch | 8ch None | Front Height & Top Middle & Rear Height & Top Surround & Center Height*3 | Front Height Rear Height Top Middle | L: Top Surround R: Center Height | |||
| 6ch 2ch | Front Height & Surr. Dolby & Rear Height & Top Surround & Center Height*3 | Front Height Rear Height Surround Dolby | L: Top Surround R: Center Height | ||||
*1 Connect to the HEIGHT4/FRONT WIDE RCA connectors or HEIGHT4/FRONT WIDE XLR connectors to use Front Wide speakers. Set "Floor" - "Layout" in the menu to "5ch & FW" or "5ch & SB & FW".
*2 This combination can be selected when using Surround Back speakers.
*3 For the best Auro-3D experience Surround Height speakers are recommended, however you may substitute Rear Height speakers from a Dolby Atmos speaker setup in place of Surround Height speakers.
*4 Use 2 sets of Height speakers in the appropriate sound modes for Dolby Atmos, DTS:X or Auro-3D playback.
Use the Front Height and Rear Height speakers for Dolby Atmos or DTS:X playback.
Use the Front Height and Surround Height speakers for Auro-3D playback.
*5 This combination can be selected when "Floor" - "Layout" in the menu to "5ch" or "5ch & SB". (1 p. 224)
Front panel D
Rear panel
Remote
76
Index


Contents
Connections
Playback
Settings
Tips
Appendix
Connecting 11.1-channel speakers: Bi-amp connection of front speakers
This system plays back 11.1-channels. You can use the bi-amp connection for front speakers. Bi-amp connection is a method to connect separate amplifiers to the tweeter terminal and woofer terminal of a speaker that supports bi-amplification. This connection enables back EMF (power returned without being output) from the woofer to flow into the tweeter without affecting the sound quality, producing a higher sound quality.
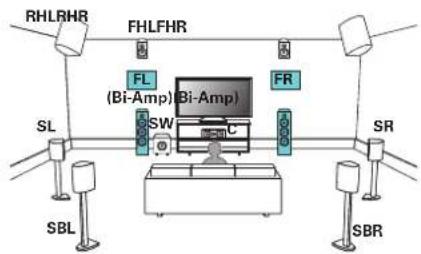
flowchart
graph TD
    A["RHLRHR"] --> B["FHLFHR"]
    B --> C["FL (Bi-Amp)"]
    C --> D["SW"]
    D --> E["C"]
    E --> F["FR"]
    F --> G["SBR"]
    G --> H["SR"]
    H --> I["SBL"]
    I --> J["SL"]
    C --> K["(Bi-Amp)"]
    K --> L["Bi-Amp"]
NOTE
- When making bi-amp connections, be sure to remove the short-circuiting plate or wire between the speaker's woofer and tweeter terminals.
[Example] UNBALANCED RCA connector connection
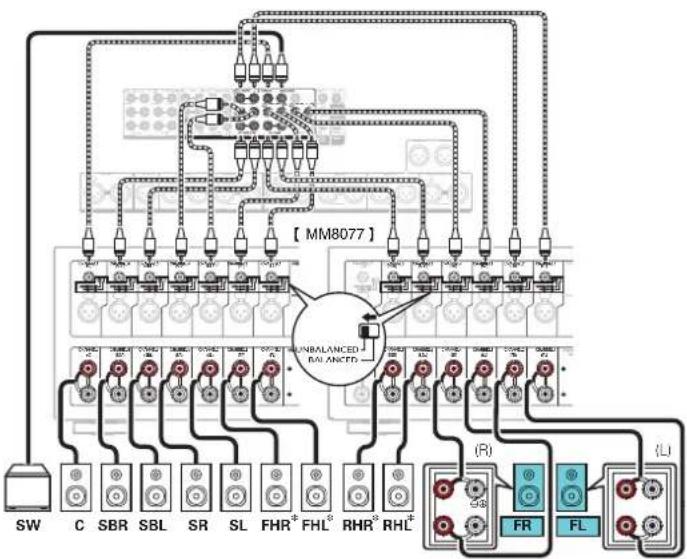
flowchart
graph TD
    A["SW"] --> B["C"]
    B --> C["SBR"]
    C --> D["SBL"]
    D --> E["SR"]
    E --> F["SL"]
    F --> G["FHR*"]
    G --> H["FHL*"]
    H --> I["RHR*"]
    I --> J["RHL*"]
    J --> K["(R)"]
    K --> L["FR"]
    L --> M["FL"]
    M --> N["(L)"]
    N --> O["UNBALANCED BALANCED"]
    O --> P["[MM8077"]]
    P --> Q["Power Supply"]
    style O fill:#f9f,stroke:#333,stroke-width:2px
    style P fill:#ccf,stroke:#333,stroke-width:2px
* The height speakers, ceiling speakers and Dolby Atmos Enabled speakers can be connected to the HEIGHT1 and HEIGHT2 RCA connectors or HEIGHT1 and HEIGHT2 XLR connectors. Set the speaker to be connected from "Height" in the menu. (17 p. 225)
Front panel
Display
Rear panel
77
Remote
Index

Contents
Connections
Playback
Settings
Tips
Appendix
Connecting 11.1-channel speakers: Second pair of front speakers
This system enables switching playback between front speakers A and B as desired.
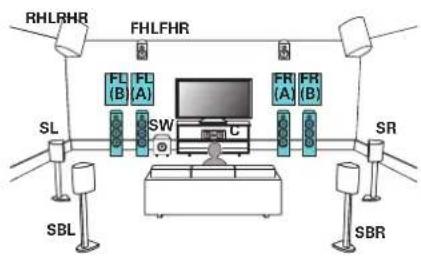
flowchart
graph TD
    A["RHLRHR"] --> B["FHLFHR"]
    B --> C["FL (B)"]
    B --> D["FL (A)"]
    B --> E["SW"]
    B --> F["FR (A)"]
    B --> G["FR (B)"]
    C --> H["SL"]
    D --> I["SBL"]
    E --> J["SBR"]
    F --> K["C"]
    G --> L["SBR"]
    K --> M["Central Monitor"]
    L --> M
    M --> N["Main Panel"]
[Example] UNBALANCED RCA connector connection
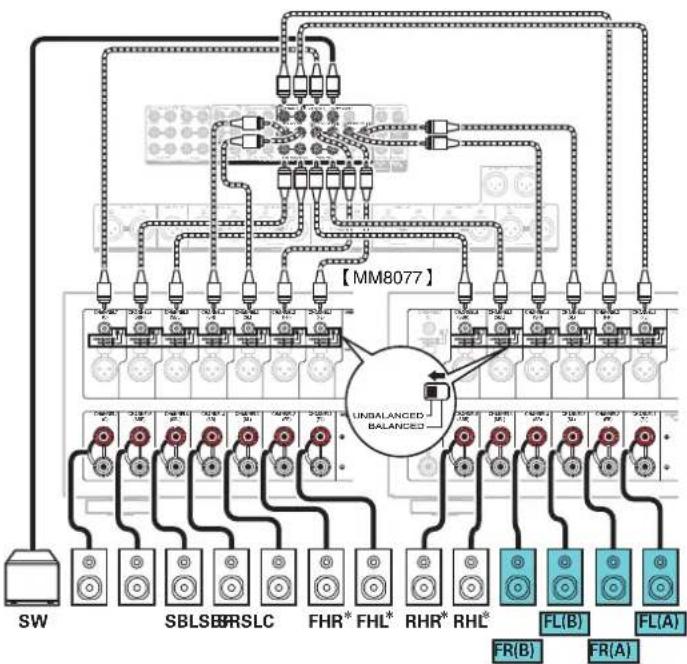
flowchart
graph TD
    A["SW"] --> B["Relays"]
    B --> C["FL(A)"]
    B --> D["FL(B)"]
    B --> E["FL(R)"]
    B --> F["FHR*"]
    B --> G["FHL*"]
    B --> H["RHR*"]
    B --> I["RHL*"]
    B --> J["SBLSB"]
    B --> K["SBLSC"]
    B --> L["SBLSB*"]
    B --> M["SBLSB*"]
    B --> N["SBLSB*"]
    B --> O["SBLSB*"]
    B --> P["SBLSB*"]
    B --> Q["SBLSB*"]
    B --> R["SBLSB*"]
    B --> S["SBLSB*"]
    B --> T["SBLSB*"]
    B --> U["SBLSB*"]
    B --> V["SBLSB*"]
    B --> W["SBLSB*"]
    B --> X["SBLSB*"]
    B --> Y["SBLSB*"]
    B --> Z["SBLSB*"]
    B --> AA["SBLSB*"]
    B --> AB["SBLSB*"]
    B --> AC["SBLSB*"]
    B --> AD["SBLSB*"]
    B --> AE["SBLSB*"]
    B --> AF["SBLSB*"]
    B --> AG["SBLSB*"]
    B --> AH["SBLSB*"]
    B --> AI["SBLSB*"]
    B --> AJ["SBLSB*"]
    B --> AK["SBLSB*"]
    B --> AL["SBLSB*"]
    B --> AM["SBLSB*"]
    B --> AN["SBLSB*"]
    B --> AO["SBLSB*"]
    B --> AP["SBLSB*"]
    B --> AQ["SBLSB*"]
    B --> AR["SBLSB*"]
    B --> AS["SBLSB*"]
    B --> AT["SBLSB*"]
    B --> AU["SBLSB*"]
    B --> AV["SBLSB*"]
    B --> AW["SBLSB*"]
    B --> AX["SBLSB*"]
    B --> AY["SBLSB*"]
    B --> AZ["SBLSB*"]
    B --> BA["SBLSB*"]
    B --> BB["SBLSB*"]
    B --> BC["SBLSB*"]
    B --> BD["SBLSB*"]
    B --> BE["SBLSB*"]
    B --> BF["SBLSB*"]
    B --> BG["SBLSB*"]
    B --> BH["SBLSB*"]
    B --> BI["SBLSB*"]
    B --> BJ["SBLSB*"]
    B --> BK["SBLSB*"]
    B --> BL["SBLSB*"]
    B --> BM["SBLSB*"]
    B --> BN["SBLSB*"]
    B --> BO["SBLSB*"]
    B --> BP["SBLSB*"]
    B --> BQ["SBLSB*"]
    B --> BR["SBLSB*"]
    B --> BS["SBLSB*"]
    B --> BT["SBLSB*"]
    B --> BU["SBLSB*"]
    B --> BV["SBLSB*"]
    B --> BW["SBLSB*"]
    B --> BX["SBLSB*"]
    B --> BY["SBLSB*"]
    B --> BZ["SBLSB*"]
    B --> CA["SBLSB*"]
    B --> CB["SBLSB*"]
    B --> CC["SBLSB*"]
    B --> CD["SBLSB*"]
    B --> CE["SBLSB*"]
    B --> CF["SBLSB*"]
    B --> CG["SBLSB*"]
    B --> CH["SBLSB*"]
    B --> CI["SBLSB*"]
    B --> CJ["SBLSB*"]
    B --> CK["SBLSB*"]
    B --> CL["SBLSB*"]
    B --> CM["SBLSB*"]
    B --> CN["SBLSB*"]
    B --> CO["SBLSB*"]
    B --> CP["SBLSB*"]
    B --> CQ["SBLSB*"]
    B --> CR["SBLSB*"]
    B --> CS["SBLSB*"]
    B --> CT["SBLSB*"]
    B --> CU["SBLSB*"]
    B --> CV["SBLSB*"]
    B --> CW["SBLSB*"]
    B --> CX["SBLSB*"]
    B --> CY["SBLSB*"]
    B --> CZ["SBLSB*"]
    B --> DA["SBLSB*"]
    B --> DB["SBLSB*"]
    B --> DC["SBLSB*"]
    B --> DD["SBLSB*"]
    B --> DE["SBLSB*"]
    B --> DF["SBLSB*"]
    B --> DG["SBLSB*"]
    B --> DH["SBLSB*"]
    B --> DI["SBLSB*"]
    B --> DJ["SBLSB*"]
    B --> DK["SBLSB*"]
* The height speakers, ceiling speakers and Dolby Atmos Enabled speakers can be connected to the HEIGHT1 and HEIGHT2 RCA connectors or HEIGHT1 and HEIGHT2 XLR connectors. Set the speaker to be connected from "Height" in the menu. (25 p. 225)
Front panel
Display
Rear panel
78
Remote
Index


flowchart
graph LR
    A["Contents"] --> B["Actions"]
    B --> C["Playback Settings"]
    C --> D["Tips Appendix"]
    D --> E["End"]
Connecting a TV
Connect a TV to this unit so that the input video is output to the TV. You can also enjoy audio from the TV on this unit.
How to connect a TV depends on the connectors and functions equipped on the TV.
ARC (Audio Return Channel) function plays TV audio on this unit by sending the TV audio signal to this unit via HDMI cable.
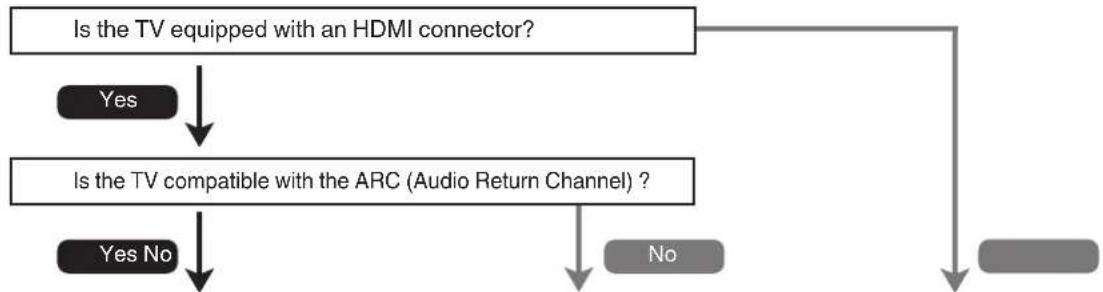
flowchart
graph TD
    A["Is the TV equipped with an HDMI connector?"] -->|Yes| B["Is the TV compatible with the ARC (Audio Return Channel) ?"]
    B -->|Yes No| C["No"]
    B --> D["No"]
"Connection 1 : TV equipped with an HDMI connector and compatible with the ARC (Audio Return Channel)" (p. 80)
"Connection 2 : TV equipped with an HDMI connector and incompatible with the ARC (Audio Return Channel)" (p. 81)
"Connection 3 : TV equipped without an HDMI connector" (p. 82)


79


Contents
ctions
ttings Tips Appendix
Connection 1 : TV equipped with an HDMI connector and compatible with the ARC (Audio Return Channel)
Use an HDMI cable to connect a TV that is compatible with the ARC function to this unit. Set "HDMI Control" to "On" when using a TV that supports the ARC function. (p. 196)
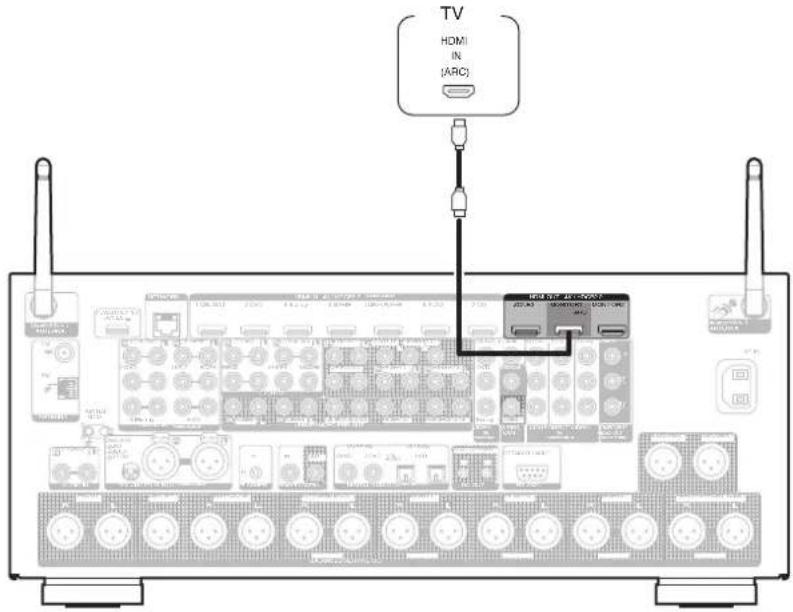

- When using the ARC function, connect to the HDMI MONITOR 1 connector.
Front panel D
Rear panel Re
Index
80


Contents
Connections
yback Settings Tips Appendix
Connection 2 : TV equipped with an HDMI connector and incompatible with the ARC (Audio Return Channel)
Use an HDMI cable to connect the TV to this unit.
To listen to audio from TV on this unit, use an optical cable to connect the TV to this unit.
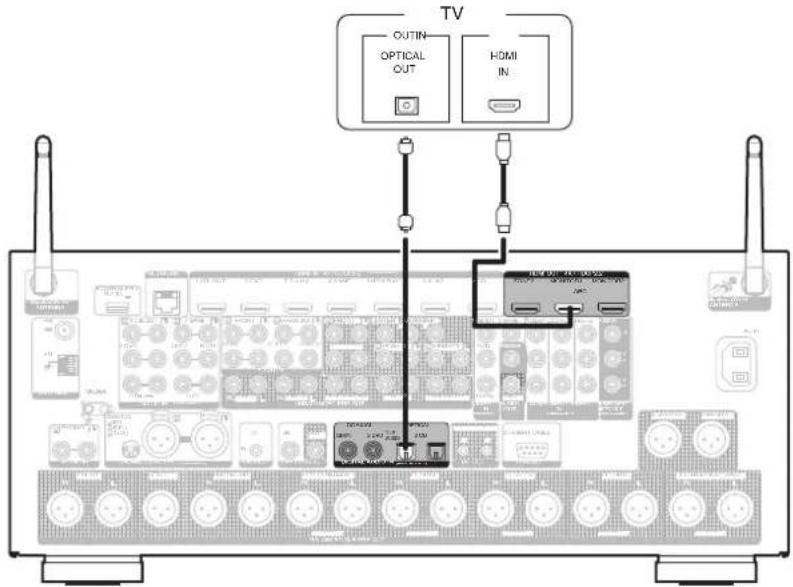
Front panel D
Rear panel Re
Index
81


| Contents | Connections | Playback | Settings | Tips | Appendix |
Connection 3 : TV equipped without an HDMI connector
Use a component video or a video cable to connect the TV to this unit.
To listen to audio from TV on this unit, use an optical cable to connect the TV to this unit.
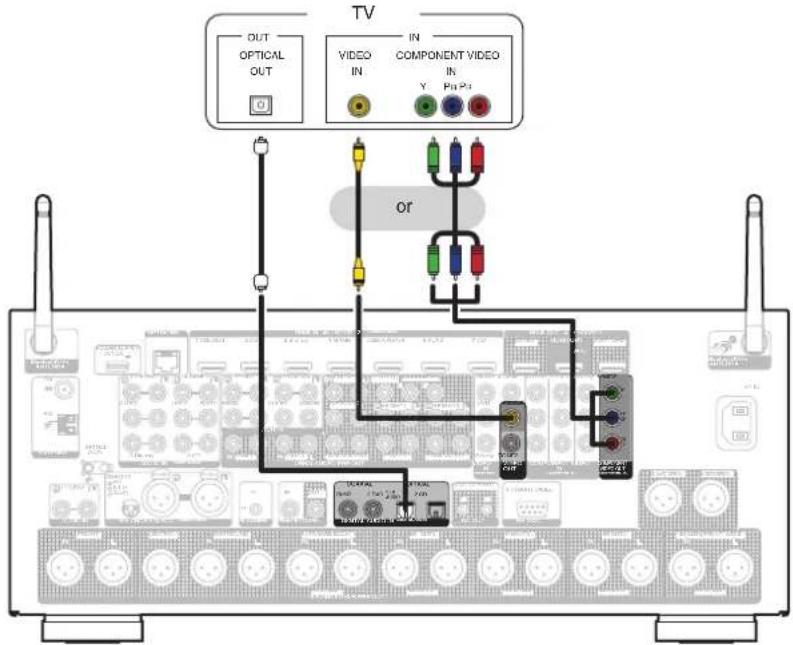
Front panel
Display
Rear panel
82
Remote
Index

Contents
ctions
ettings Tips Appendix
Connecting a playback device
This unit is equipped with three types of video input connectors (HDMI, component video and composite video) and three types of audio input connectors (HDMI, digital audio and audio).
Select input connectors on this unit according to the connectors equipped on the device you want to connect.
If the device connected to this unit is equipped with an HDMI connector, it is recommended to use HDMI connections.
In the HDMI connection, audio and video signals can be transmitted through a single HDMI cable.
- "Connecting a set-top box (Satellite tuner/cable TV)" (p. 85)
- "Connecting a DVD player or Blu-ray Disc player" (p. 86)
- "Connecting a video camcorder or game console" (1 p. 87)
- "Connecting a turntable" (p. 88)
- "Connecting a device with a multi-channel output connector" (p. 89)

- Connect devices to this unit as indicated by the input sources printed on the audio/video input connectors of this unit.
- The source that is assigned to the HDMI IN, DIGITAL AUDIO IN, COMPONENT VIDEO IN, VIDEO IN and AUDIO IN connectors can be changed. See "Input Assign" on how to change the input source assigned to the input connectors. (17 p. 206)
- To play back audio signals that are input to this unit on a TV connected via HDMI, set in the menu "HDMI Audio Out" to "TV". (12 p. 194)
- To enjoy content that is copyright protected by HDCP 2.2, use a playback device and TV compatible with HDCP 2.2 only.
Front panel D
Rear panel Re
Index
83



Contents
ctions
ettings Tips Appendix
☐ Connecting the BALANCED XLR IN connector
This unit is equipped with BALANCED XLR IN connectors. Use these connectors if your device has an XLR connector as an audio output connector. When using BALANCED XLR IN connectors, assign "XLR" for "Input Assign" – "ANALOG". (125 p. 207) By default, these connectors are disabled.
[AV8805 BALANCED XLR IN connector PIN arrangement]

① GND (Ground)
② HOT (+)
③ COLD (−)
Front panel D
Rear panel Re
Index
84



Contents
Connections
Playback
Settings
Tips
Appendix
Connecting a set-top box (Satellite tuner/cable TV)
This explanation uses the connection with a satellite tuner/cable TV STB as an example.
Select the input connectors on this unit to match the connectors on the device that you want to connect to.
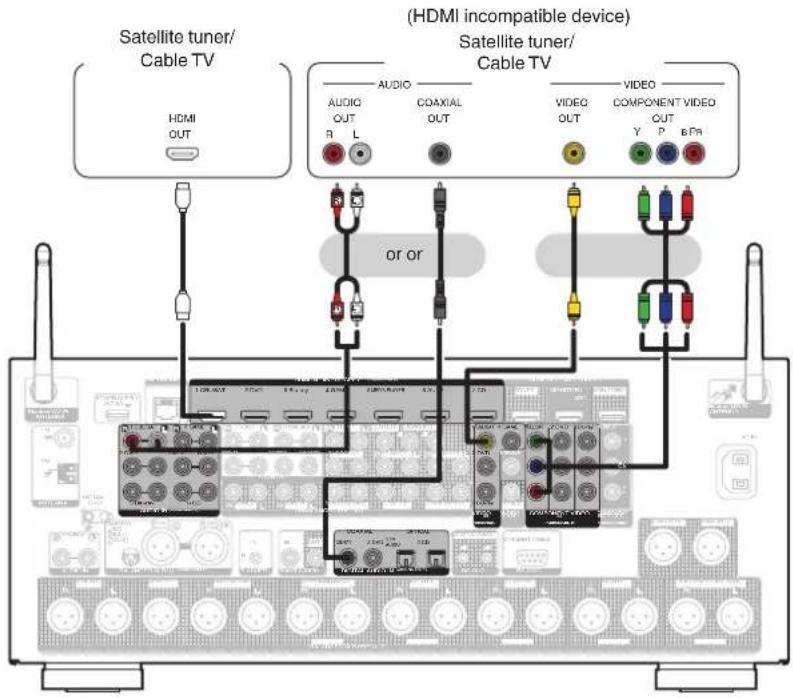
Front panel
Display
Rear panel
85
Remote
Index

Contents
Connections
Playback
Settings
Tips
Appendix
Connecting a DVD player or Blu-ray Disc player
This explanation uses the connection with a DVD player or Blu-ray Disc player as an example.
Select the input connectors on this unit to match the connectors on the device that you want to connect to.
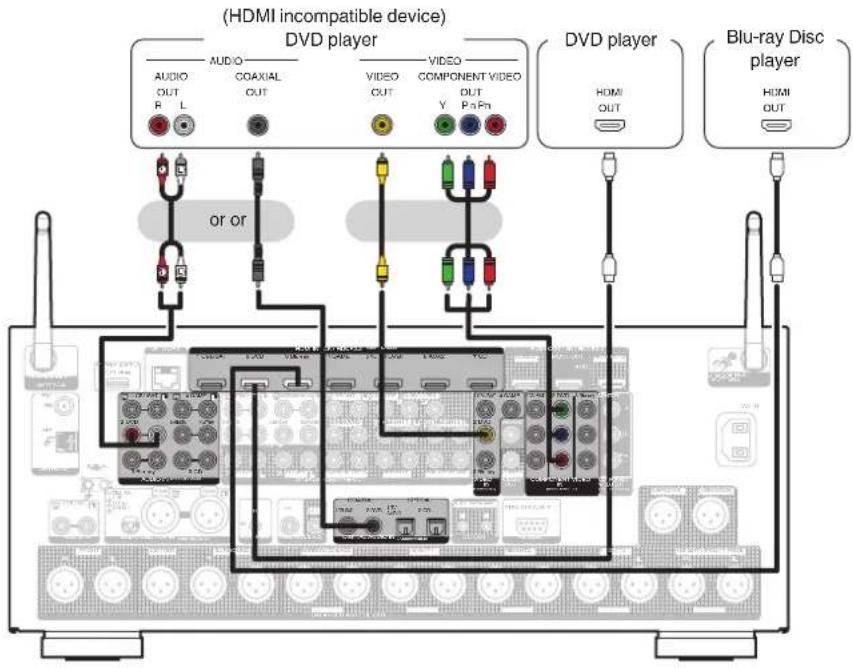
Front panel
Display
Rear panel
86
Remote
Index

Contents
Connections
ayback Settings Tips Appendix
Connecting a video camcorder or game console
This explanation uses the connection with a video camcorders as an example. Connect a playback device to this unit, such as a video camcorder or game console.
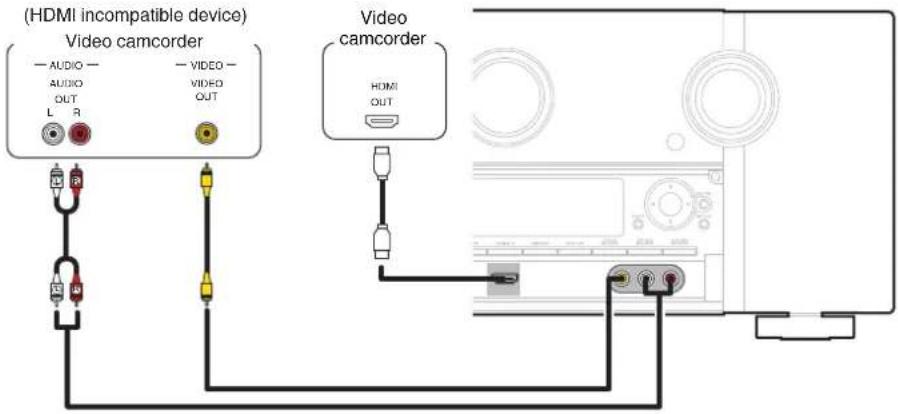
Front panel D
Rear panel Re
Index
87


Contents
Connections
ayback Settings Tips Appendix
Connecting a turntable
This unit is compatible with turntables equipped with a moving magnet (MM) phono cartridge. When you connect to a turntable with a low output moving coil (MC) cartridge, use a commercially available MC head amp or a step-up transformer.
If you set this unit's input source to "Phono" and you accidentally increase the volume without having a turntable connected, you may hear a hum noise from the speakers.
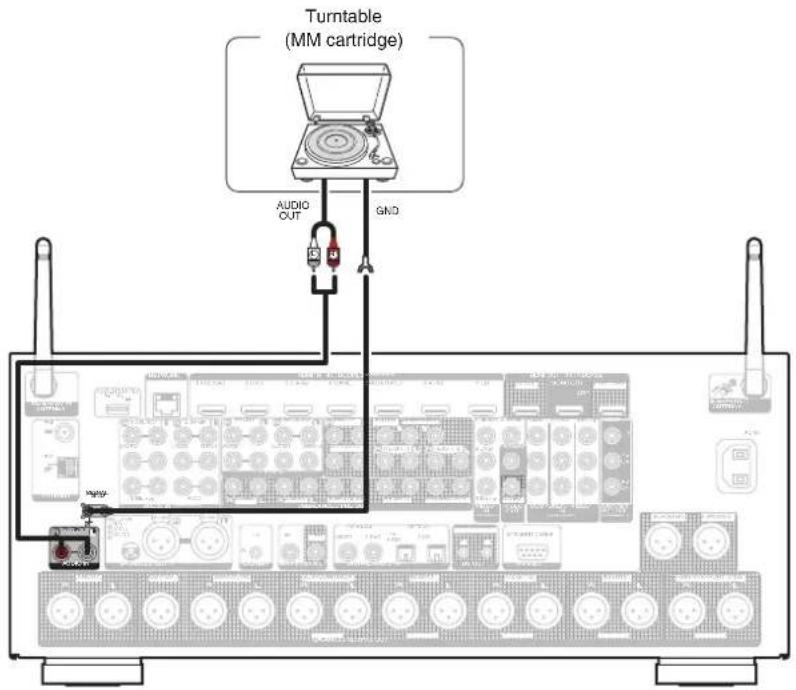
NOTE
- The earth terminal (SIGNAL GND) of this unit is not for safety grounding purposes. If this terminal is connected when there is a lot of noise, the noise can be reduced. Note that depending on the turntable, connecting the ground line may have the reverse effect of increasing noise. In this case, it is not necessary to connect the ground line.
Front panel D
Rear panel Re
Index
88



Contents
Connections
yback Settings Tips Appendix
Connecting a device with a multi-channel output connector
You can connect this unit to an external device fitted with multi-channel sound audio output connectors to enjoy music and video.
To play analog signals input from 7.1CH IN connectors, set "Input Mode" to "7.1CH IN". (p. 210)
Devices with a multi-channel output connector
(Blu-ray Disc player, DVD player, External decoder etc.)
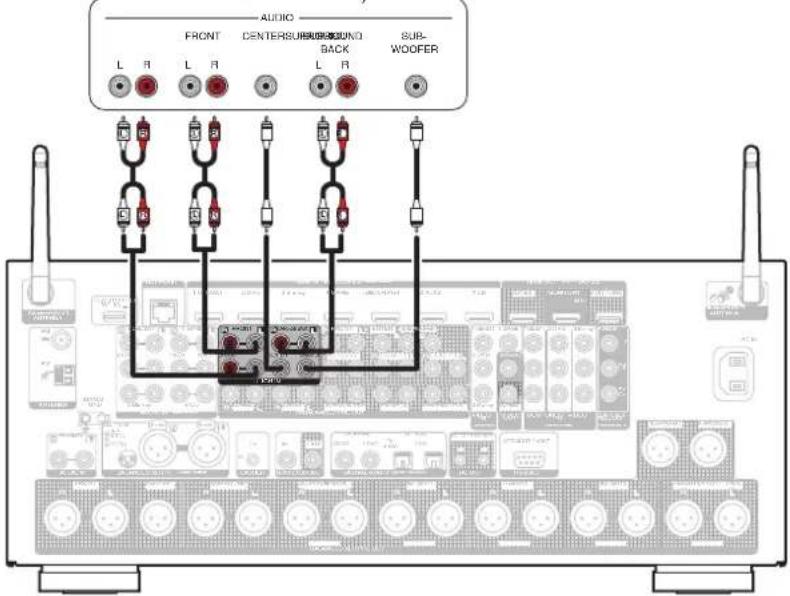

- The video signal can be connected in the same way as a Blu-ray Disc player/DVD player. (17 p. 86)
Front panel D
Rear panel Re
Index
89


Contents
ctions
ettings Tips Appendix
Connecting a USB memory device to the USB port
Connect to the USB port on the front panel of this device to play music files saved to a USB memory device.
For operating instructions see "Playing a USB memory device" (p. 101).
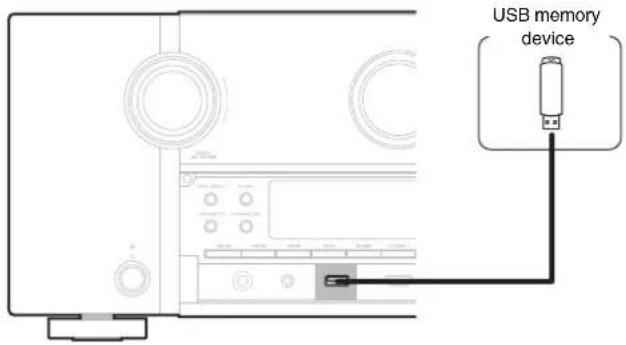

- Marantz does not guarantee that all USB memory devices will operate or receive power. When using a portable USB hard disk drive (HDD) which came with an AC adapter, use that device's supplied AC adapter.
- The USB port on the rear panel can only be used to supply power (5 V/1.5 A). It cannot be used to play music files. (p. 27)
NOTE
• USB memory devices will not work via a USB hub.
- It is not possible to use this unit by connecting the unit's USB port to a PC via a USB cable.
- Do not use an extension cable when connecting a USB memory device. This may cause radio interference with other devices.
Front panel D
Rear panel Re
Index
90


Contents
Connections
ayback Settings Tips Appendix
Connecting an FM/AM antenna
Connect the antenna, tune in to a broadcast and then move the antenna to the location where there is least noise. Then use tape, etc. to fix the antenna in this location. ("Listening to FM/AM broadcasts" (p. 110))

- If you are unable to receive a good broadcast signal, we recommend installing an outdoor antenna. For details, inquire at the retail store where you purchased the unit.
NOTE
- Make sure the AM loop antenna lead terminals do not touch metal parts of the panel.
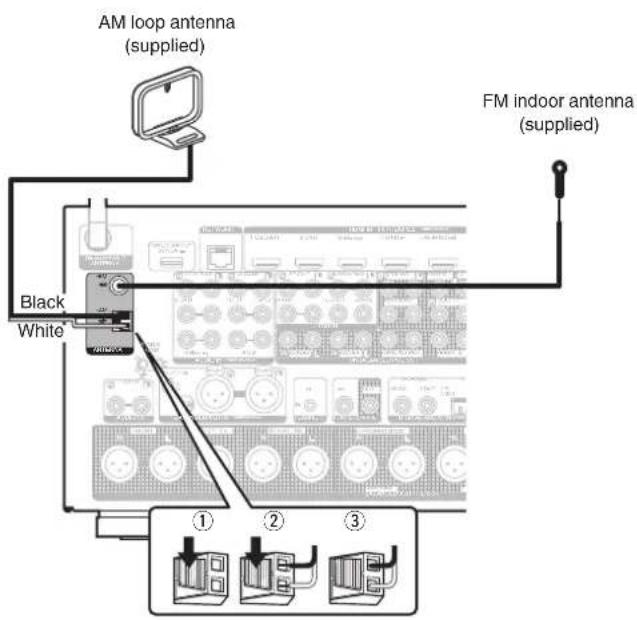
Front panel D
Rear panel Re
Index
91



Contents
Connections
ayback Settings Tips Appendix
■ Using the AM loop antenna
Suspending on a wall
Suspend directly on a wall without assembling.
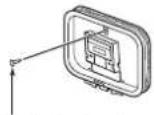
Nail, tack, etc.
Standing alone
Use the procedure shown above to assemble.
When assembling, refer to "AM loop antenna assembly".
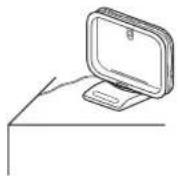
■ AM loop antenna assembly
1 Put the stand section through the bottom of the loop antenna from the rear and bend it forward.
2 Insert the projecting part into the square hole in the stand.
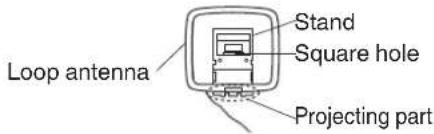
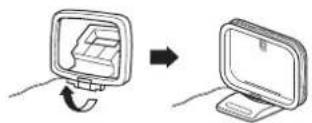
Front panel D
Rear panel Re
Index
92



Contents
Connections
ayback Settings Tips Appendix
Connecting to a home network (LAN)
This unit can connect to a network using a wired LAN or wireless LAN.
You can connect this unit to your home network (LAN) to enable various types of playback and operations as described below.
- Playback of network audio such as Internet Radio and from your media server(s)
- Playback of streaming music services
• Using the Apple AirPlay function
• Operation on this unit via the network
• Operation with the HEOS wireless multi-room sound system - Firmware Update
For connections to the Internet, contact an ISP (Internet Service Provider) or a computer shop.
Wired LAN
To make connections via wired LAN, use a LAN cable to connect the router to this unit as shown in the figure below.
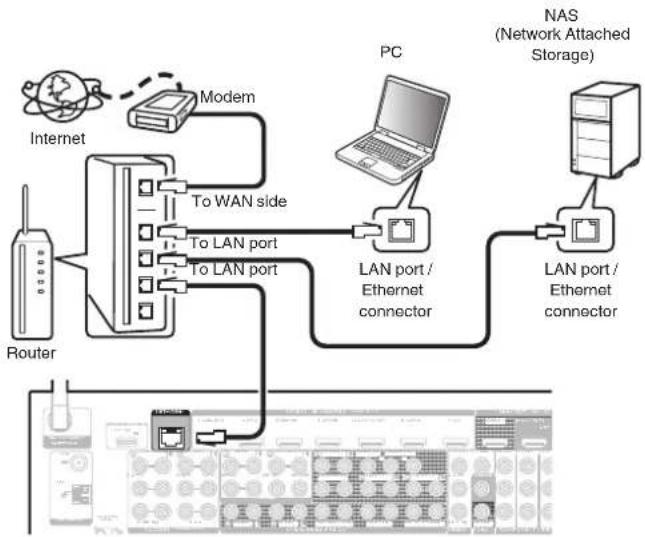
flowchart
graph TD
    A["Internet"] -->|Modem| B["To WAN side"]
    B --> C["To LAN port"]
    C --> D["To LAN port"]
    D --> E["LAN port / Ethernet connector"]
    E --> F["PC"]
    F --> G["NAS (Network Attached Storage)"]
    G --> H["LAN port / Ethernet connector"]
    H --> I["Router"]
    I --> J["Internet"]
Front panel D
Rear panel Re
Index
93


Contents
ctions
ttings Tips Appendix
Wireless LAN
When connecting to the network via wireless LAN, connect the external antennas for Bluetooth/wireless connectivity connection to the rear panel and stand them upright.
See "Wi-Fi Setup" on how to connect to a wireless LAN router. (K 244)
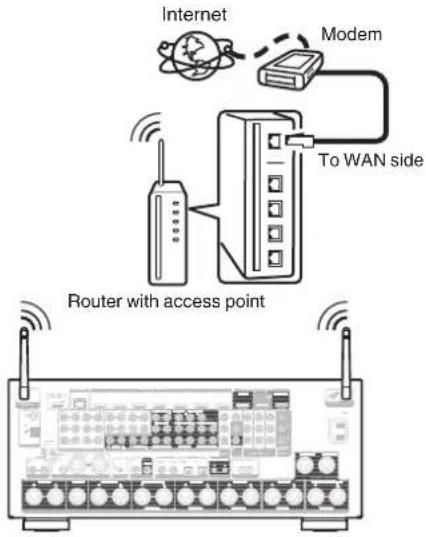

- When using this unit, we recommend you use a router equipped with the following functions:
• Built-in DHCP server
This function automatically assigns IP addresses on the LAN.
- Built-in 100BASE-TX switch
When connecting multiple devices, we recommend a switching hub with a speed of 100 Mbps or greater.
- Only use a shielded STP or ScTP LAN cable (readily available at electronics stores). (CAT-5 or greater recommended)
- The normal shielded-type LAN cable is recommended.
If a flat-type cable or unshielded-type cable is used, other devices could be affected by noise.
- When using this unit connected to a network with no DHCP function, configure the IP address, etc. in "Network". (1 p. 243)
NOTE
- The types of routers that can be used depend on the ISP. Contact your ISP or a computer shop for details.
- This unit is not compatible with PPPoE. A PPPoE compatible router is required if your contracted line is not set using PPPoE.
- Do not connect a NETWORK connector directly to the LAN port / Ethernet connector on your computer.
- Various online services may be discontinued without prior notice.
Front panel D
Rear panel Re
Index
94


Contents
Connections
Playback
Settings
Tips
Appendix
Connecting an external control device
REMOTE CONTROL jacks
■ Performing operations by RC on this unit without visual contact
You can connect an external IR receiver to the REMOTE CONTROL connectors to perform operations on this unit with the supplied remote control unit without visual contact. This might be necessary if the unit is hidden in a cupboard or corner, so you can't directly point with the remote control unit to the device.
To do this, disable the remote control signal receiving function ("Remote lock function" (p. 167)).
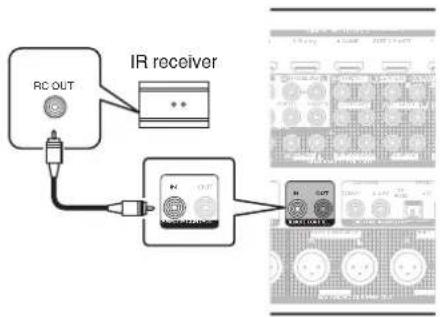
flowchart
graph TD
    A["IR receiver"] --> B["RC OUT"]
    A --> C["Device 1"]
    A --> D["Device 2"]
NOTE
- When the remote control signal receiving function is disabled, you can not perform operations with the remote control unit.
Front panel
Display
Rear panel
95
Remote
Index

Contents
Connections
ayback Settings Tips Appendix
DC OUT jacks
When a device with DC IN jack is connected, the connected device's power on/standby can be controlled through linked operation to this unit. The DC OUT jack outputs a maximum 12 V DC/150 mA electrical signal.
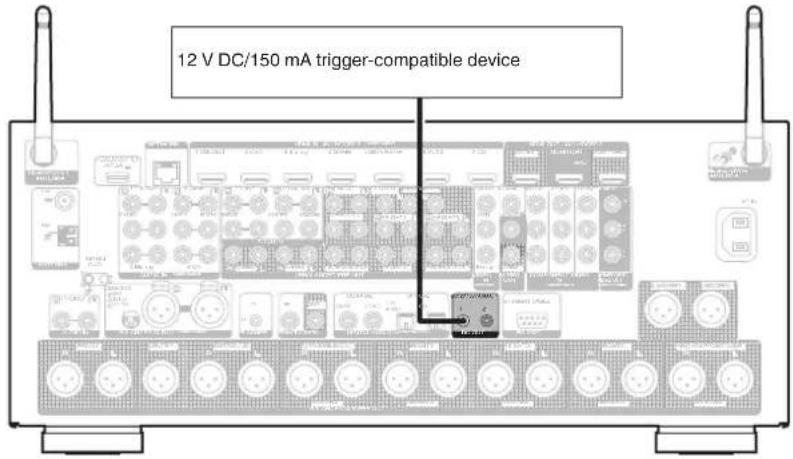
NOTE
- Use a monaural mini-plug cable for connecting the DC OUT jacks. Do not use a stereo mini-plug cable.
- If the permissible trigger input level for the connected device is larger than 12 V DC/150 mA, or has shorted, the DC OUT jack cannot be used. In this case, turn off the power to the unit, and disconnect it.
Front panel D
Rear panel Re
Index
96

Contents
Connections
ayback Settings Tips Appendix
Connecting the power cord
After completing all the connections, insert the power plug into the power outlet.
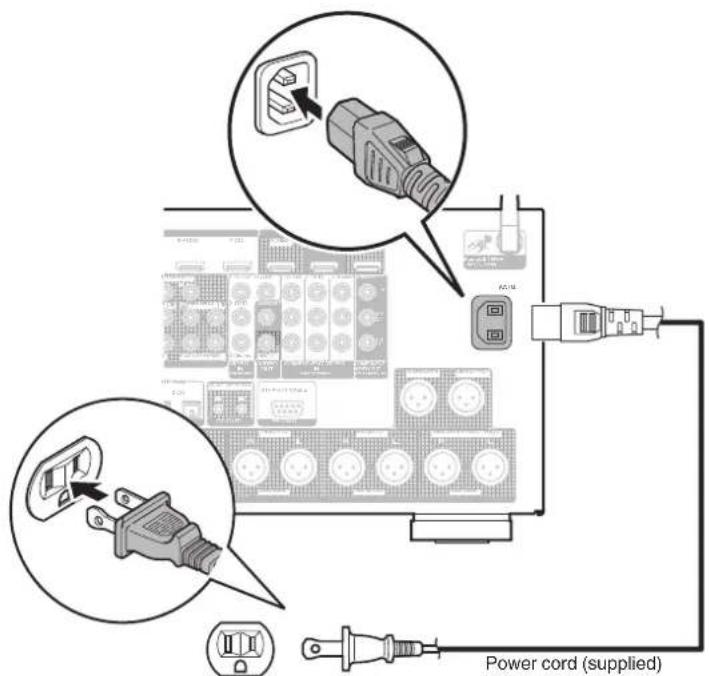
To household power outlet (AC 120 V, 60 Hz)
Front panel D
Rear panel Re
Index
97



Contents
Connections
Playback
Settings
Tips
Appendix
Contents
Basic operation
| Turning the power on 99 |
| Selecting the input source 99 |
| Adjusting the volume 100 |
| Turning off the sound temporarily (Muting) 100 |
| Selecting a sound mode 145 |
Playback a device
| Playing a DVD player/Blu-ray Disc player 100 |
| Playing a USB memory device 101 |
| Listening to music on a Bluetooth device 105 |
| Listening to FM/AM broadcasts 110 |
Playback network audio/service
| Listening to Internet Radio 118 |
| Playing back files stored on a PC or NAS 120 |
| Getting the HEOS App 124 |
| AirPlay function 133 |
| Spotify Connect function 136 |
Convenience functions
| Convenience functions 137 | |
| HDMI Control function 157 | |
| Smart Menu function | 158 |
| Sleep timer function 160 | |
| Smart select function | 162 |
| Panel lock function | 165 |
| Remote lock function | 167 |
| Switches light illumination on/off | 168 |
Other functions
| Playback in ZONE2/ZONE3 (Another room) | 169 |
Front panel
Display
Rear panel
98
Remote
Index

Contents Connections
Setti
ngs Tips Appendix
Basic operation
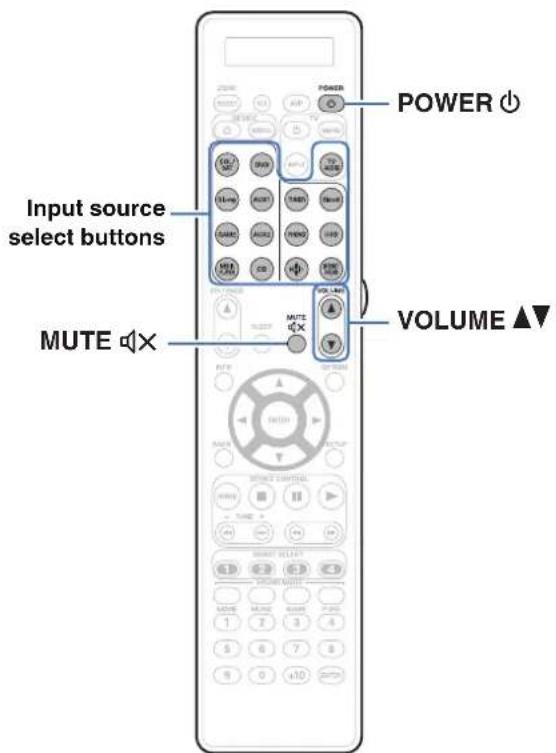
Front panel D
Rear panel Re
Index
99


Turning the power on
1 Press POWER ⏻ to turn on power to the unit.

- You can press the input source select button when the unit is in standby mode to turn on the power.
- You can also switch the power to standby by pressing ⏻ on the main unit.
Selecting the input source
1 Press the input source select button to be played back. The desired input source can be selected directly.

- You can also select the input source by turning INPUT SELECTOR on the main unit.
Contents Connections
Setti
Adjusting the volume
1 Use VOLUME ▲▼ to adjust the volume.

- The variable range differs according to the input signal and channel level setting.
- You can also adjust the master volume by turning VOLUME on the main unit.
Turning off the sound temporarily (Muting)
1 Press MUTE 📄X.
- "MUTE" appears on the display.
• 📄X appears on the TV screen.

- The sound is reduced to the level set at "Mute Level" in the menu. (p. 186)
- To cancel mute, either adjust the sound volume or press MUTE 📁X again.
Playback a DVD player/Blu-ray Disc player
The following describes the procedure for playing DVD player/Blu-ray Disc player.
1 Prepare for playback.
① Turn on the power of the TV, subwoofer and player.
② Change the TV input to the input of this unit.
2 Press POWER ⏻ to turn on power to the unit.
3 Press DVD or Blu-ray to switch an input source for a player used for playback.
4 Play the DVD player or Blu-ray Disc player.
■ Surround playback (p. 145)
Front panel D
Rear panel Re
Index
100


Contents
Connections
back
Appendix
Playing a USB memory device
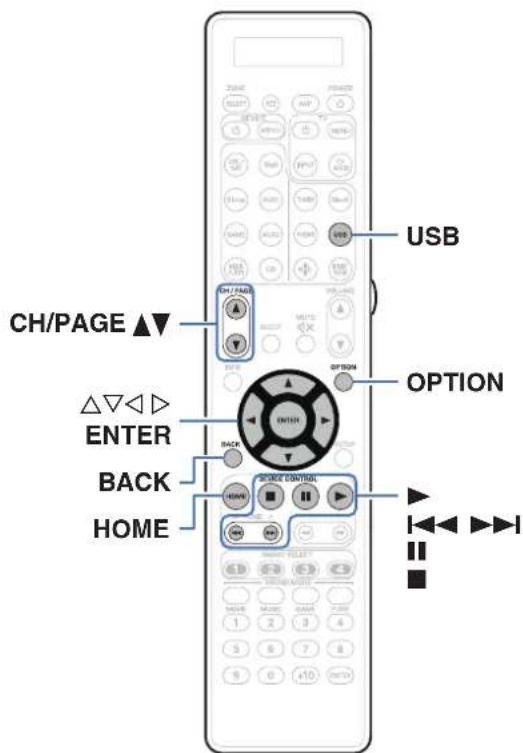
- Playing back music files stored on a USB memory device.
- Only USB memory devices conforming to mass storage class standards can be played on this unit.
- This unit is compatible with USB memory devices in "FAT16" or "FAT32" format.
- The audio format types and specifications supported by this unit for playback are as follows.
See "Playing back a USB memory devices" (p. 306) for details. - WMA
• MP3 - WAV
- MPEG-4 AAC
- FLAC
- Apple Lossless
• DSD
Front panel D
Rear panel Rel
Index
101



Contents
Connections
pack
Appendix
Playing files stored on USB memory devices
1 Insert a USB memory device into the USB port.
2 Press USB to switch the input source to "USB".
3 Select the name of this unit.
4 Browse the music on your USB memory device and select something to play.

- When you select something to play you will be asked how you want to queue up your music.
| Play Now: | Inserts the item into the queue after the currently playing track and plays the selected item immediately. |
| Play Now & Replace Queue: | Clears the queue and plays the selected item immediately. |
| Play Next: | Inserts the item into the queue after the current song and plays it when the current song ends. |
Add to End of Queue: Adds the item to the end of the queue.
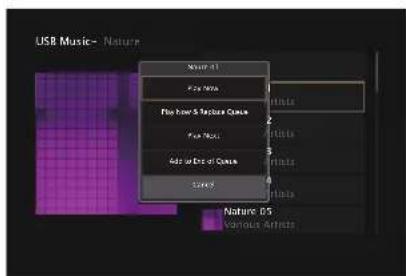
Front panel D
Rear panel Re
Index
102


Contents Connections
Setti
5 Use △▽ to select the "Play Now" or "Play Now & Replace Queue", then press ENTER.
Playback starts.
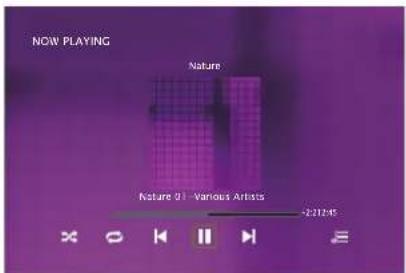
| Operation buttons | Function |
| ▶ | Playback |
| II | Pause |
| ■ | Stop |
| I◀◀▶▶ | Skip to previous track / Skip to next track |
| CH/PAGE ▲▼ | Switch to the previous page/next page in the list display |
| HOME Go to Home screen | |

- When an MP3 music file includes album art data, the album art can be displayed while playing the file.
NOTE
- Note that Marantz will accept no responsibility whatsoever for any problems arising with the data on a USB memory device when using this unit in conjunction with the USB memory device.
Front panel D
Rear panel Re
Index
103


Contents Connections
Setti
■ Operations accessible through the option menu
- "Adjusting the audibility of dialog and vocals (Dialog Enhancer)" (p. 139)
- "Adjusting the volume of each channel to match the input source (Channel Level Adjust)" (p. 140)
- "Adjusting the tone (Tone)" (p. 141)
- "Displaying your desired video during audio playback (Video Select)" (p. 142)
- "Playing the same music in all zones (All Zone Stereo)" (p. 144)
Front panel D
Rear panel Re
Index
104


Contents Connections
Setti
ngs Tips Appendix
Listening to music on a Bluetooth device
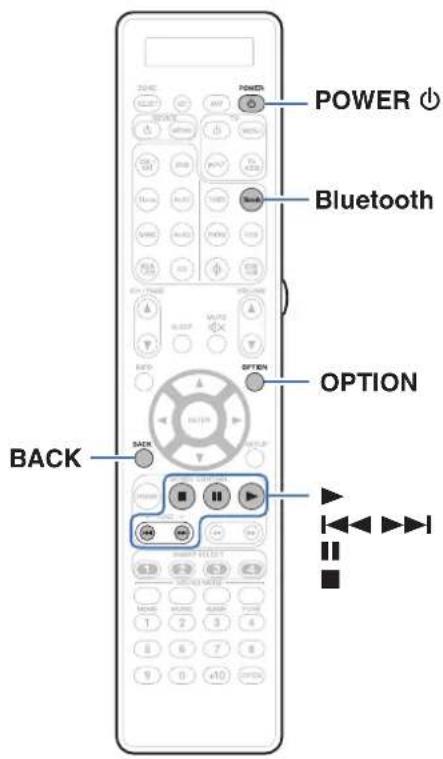
Music files stored on Bluetooth devices such as smartphones, digital music players, etc. can be enjoyed on this unit by pairing and connecting this unit with the Bluetooth device.
Communication is possible up to a range of about 98.4 ft/30 m.
NOTE
- To play back music from a Bluetooth device, the Bluetooth device needs to support the A2DP profile.
Front panel D
Rear panel Rel
Index
105



Contents
Connections
back
Appendix
Playing music from Bluetooth device
In order to enjoy music from a Bluetooth device on this unit, the Bluetooth device must first be paired with this unit.
Once the Bluetooth device has been paired, it does not need to be paired again.
1 Prepare for playback.
① Connect the supplied external antennas for Bluetooth/wireless connectivity to the Bluetooth/wireless LAN antenna connectors on the rear panel. (p. 27)
② Press POWER ⏻ to turn on power to the unit.
2 Press Bluetooth.
When using for the first time, the unit will go into the pairing mode automatically and "Pairing..." will appear on the display of the unit.
3 Activate the Bluetooth settings on your mobile device.
4 Select this unit when its name appears in the list of devices displayed on the screen of the Bluetooth device.
Connect to the Bluetooth device while "Pairing" is being displayed on the display of the unit.
Perform the connection with the Bluetooth device close to the unit (about 3.3 ft/1 m).
5 Play music using any app on your Bluetooth device.
- The Bluetooth device can also be operated with the remote control of this unit.
- The next time the Bluetooth button is pressed on the remote control unit, this unit automatically connects to the last Bluetooth device that was connected.
Front panel D
Rear panel Re
Index
106


Contents Connections
Setti
Operation buttons Function
| ▶ | Playback |
| II | Pause |
| ■ | Stop |
| I◀◀▶▶I | Skip to previous track / Skip to next track |

- Press STATUS on this unit during playback to switch the display between Title name, Artist name, Album name, etc.
Front panel D
Rear panel Re
Index
107


Contents
Connections
back
Appendix
Pairing with other Bluetooth devices
Pair a Bluetooth device with this unit.
1 Activate the Bluetooth settings on your mobile device.
2 Press and hold Bluetooth on the remote control unit for at least 3 seconds.
This unit will go into the pairing mode.
3 Select this unit when its name appears in the list of devices displayed on the screen of the Bluetooth device.

- This unit can be paired with a maximum of 8 Bluetooth devices. When a 9th Bluetooth device is paired, it will be registered in place of the oldest registered device.
- You can also enter pairing mode by pressing the OPTION button when the Bluetooth playback screen is displayed and selecting "Pairing Mode" from the displayed option menu.
NOTE
- To operate the Bluetooth device with the remote control of this unit, the Bluetooth device needs to support the AVRCP profile.
- The remote control of this unit is not guaranteed to work with all Bluetooth devices.
- Depending on the type of Bluetooth device, this unit outputs audio that is coupled to the volume setting on the Bluetooth device.
■ Operations accessible through the option menu
- "Pairing with other Bluetooth devices" (p. 108)
- "Adjusting the audibility of dialog and vocals (Dialog Enhancer)" (19 p. 139)
- "Adjusting the volume of each channel to match the input source (Channel Level Adjust)" (12p. 140)
- "Adjusting the tone (Tone)" (p. 141)
- "Displaying your desired video during audio playback (Video Select)" (p. 142)
- "Playing the same music in all zones (All Zone Stereo)" (p. 144)
Front panel D
Rear panel Re
Index
108


Contents
Connections
back
Appendix
Reconnecting to this unit from a Bluetooth device
After pairing is completed, the Bluetooth device can be connected without performing any operations on this unit.
This operation also needs to be performed when switching the Bluetooth device for playback.
1 If a Bluetooth device is currently connected, deactivate the Bluetooth setting of that device to disconnect it.
2 Activate the Bluetooth setting of the Bluetooth device to be connected.
3 Select this unit from the Bluetooth device list on your Bluetooth device.
4 Play music using any app on your Bluetooth device.

- The screen automatically switches to the "Bluetooth" playback screen if a Bluetooth device is connected while the power of this unit is on.
- When the "Network Control" setting of this unit is set to "Always On" and a Bluetooth device is connected with the unit in the standby state, the power of the unit will be turned on automatically. (iF p. 248)
Front panel D
Rear panel Re
Index
109


Contents Connections
Setti
ngs Tips Appendix
Listening to FM/AM broadcasts
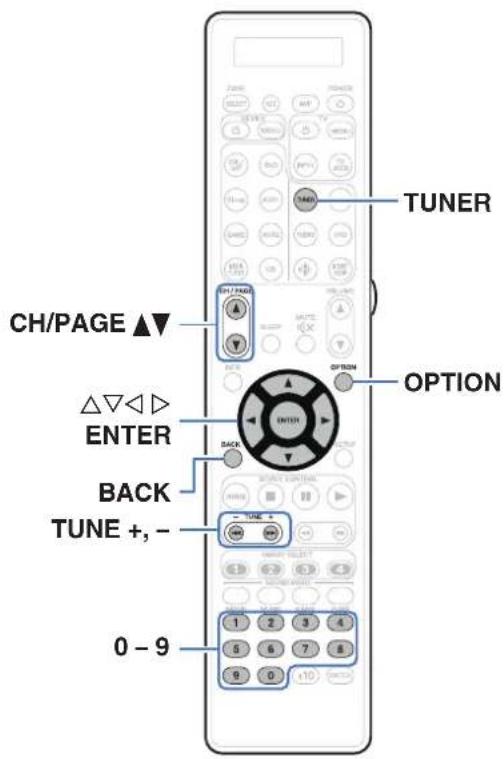
You can use the built-in tuner of this unit to listen to FM broadcasts and AM broadcasts.
Make sure the FM antenna and AM loop antenna are connected to this unit first.
Front panel D
Rear panel Rel
Index
110


Listening to FM/AM broadcasts
1 Connect the antenna. ("Connecting an FM/AM antenna" (p. 91))
2 Press TUNER to switch the input source to "Tuner".
[TV screen]
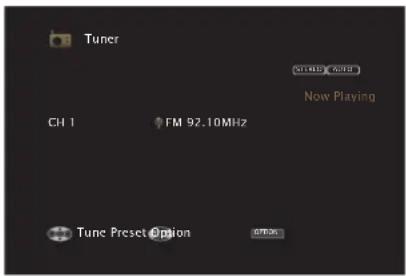
【Display of this unit】
01 FM 9210MHz
3 Press OPTION.
The option menu screen is displayed.
4 Use to select “FM/AM”, then press ENTER.
This displays the reception band input screen.
5 Use ◀▷ to select "FM" or "AM", then press ENTER.
FM: When listening to an FM broadcast.
AM: When listening to an AM broadcast.
6 Press TUNE + or TUNE – to select the station you want listen to.
Scanning is performed until it finds an available radio station. When it finds a radio station, it stops the scan automatically and tunes in.

- The modes for receiving FM broadcasts consists of "Auto" mode that automatically searches available broadcast stations and "Manual" mode that lets you tune in using buttons to change the frequency. The default setting is "Auto". You can also use "Direct Tune" to tune in by entering the frequency directly. In "Auto" mode, you cannot tune in to radio stations if the reception is not good. If this is the case, then use the "Manual" mode or "Direct Tune" mode to tune in.
Operation buttons Function
TUNE +, – Selects the radio station (up/down)
| CH/PAGE ▲▼ | Selects preset radio stations |
| △▽ | Selects the radio station (up/down) |
| ◀▷ | Selects preset radio stations |
| 0 - 9 | Preset channel selection /Direct frequency tuning |
Front panel D
Rear panel Re
Index
111


Contents
Connections
back
Appendix
■ Operations accessible through the option menu
- "Tuning in by entering the frequency (Direct Tune)" (p. 112)
- "Changing the tune mode (Tune Mode)" (p. 113)
- “Tuning in to stations and presetting them automatically (Auto Preset Memory)” (p. 113)
- "Presetting the current broadcast station (Preset Memory)" (p. 114)
- "Specify a name for the preset broadcast station (Preset Name)" (p. 115)
- "Skipping preset broadcast stations (Preset Skip)" (p. 116)
- "Adjusting the audibility of dialog and vocals (Dialog Enhancer)" (p. 139)
- "Adjusting the volume of each channel to match the input source (Channel Level Adjust)" (p. 140)
- "Adjusting the tone (Tone)" (☐ p. 141)
- "Displaying your desired video during audio playback (Video Select)" (p. 142)
- "Playing the same music in all zones (All Zone Stereo)" (p. 144)
Tuning in by entering the frequency (Direct Tune)
You can enter the receiving frequency directly to tune in.
1 Press OPTION when the input source is "Tuner". The option menu screen is displayed.
2 Use to select “Direct Tune”, then press ENTER.
The screen that lets you enter the frequency is displayed.
3 Use or 0 - 9 to select a number and press ▷.
• If is pressed, the immediately preceding input is cancelled.
4 Repeat step 3 and enter the frequency of the radio station you want to hear.
5 When setting is completed, press ENTER.
The preset frequency is tuned in.
Front panel D
Rear panel Re
Index
112


Changing the tune mode (Tune Mode)
You can change the mode for tuning into FM and AM broadcasts. If you cannot tune in automatically with "Auto" mode, change the mode to "Manual" and tune in manually.
1 Press OPTION when the input source is "Tuner". The option menu screen is displayed.
2 Use to select “Tune Mode”, then press ENTER.
3 Use ◀▷ to select the tune mode, then press ENTER.
| Auto: | Automatically search for and tune to a receivable radio station. |
| Manual: | Manually change the frequency one step at a time each time the button is pressed. |
Tuning in to stations and presetting them automatically (Auto Preset Memory)
A maximum of 56 radio stations can be automatically preset.
1 Press OPTION when the input source is "Tuner".
The option menu screen is displayed.
2 Use to select “Auto Preset Memory”, then press ENTER.
3 Press ENTER.
The unit starts to tune in to radio stations automatically and preset them.
- When presetting is completed, "Completed" is displayed for about 5 seconds and the option menu screen turns off.

- The preset memory is overwritten.
Front panel D
Rear panel Re
Index
113



Presetting the current broadcast station (Preset Memory)
Your favorite broadcast stations can be preset so that you can tune them in easily.
Up to 56 stations can be preset.
1 Tune in the broadcast station you want to preset. ("Listening to FM/AM broadcasts" (p. 111))
2 Press OPTION.
The option menu screen is displayed.
3 Use to select “Preset Memory”, then press ENTER.
The list of already preset channels is displayed.
4 Use or 0 - 9 to select the channel you want to preset, then press ENTER.
The current broadcast station that is preset.
- To preset other stations, repeat steps 1 to 4.
| Channel Default settings | |
| 1 – 8 | 92.10 / 92.30 / 92.50 / 92.70 / 93.10 / 93.50 / 93.70 / 94.10 MHz |
| 9 – 16 | 94.30 / 94.50 / 94.70 / 94.90 / 95.10 / 95.30 / 95.50 / 95.70 MHz |
| 17 – 24 | 98.10 / 98.30 / 98.50 / 98.70 / 98.90 / 99.10 / 100.10 / 100.30 MHz |
| 25 – 32 | 100.50 / 100.70 / 100.90 / 101.10 / 101.30 / 101.50 / 101.70 / 101.90 MHz |
| 33 – 40 | 103.10 / 103.30 / 103.50 / 103.70 / 103.90 / 104.10 / 104.30 / 104.50 MHz |
| 41 – 48 | 104.70 / 104.90 / 105.10 / 105.30 / 105.50 / 105.70 / 105.90 / 106.10 MHz |
| 49 – 56 | 106.30 / 106.50 / 106.70 / 106.90 / 107.10 / 107.30 / 107.50 / 107.90 MHz |
Listening to preset stations
1 Use CH/PAGE ▲▼ or 0 - 9 to select the desired preset channel.
Front panel D
y Rear panel Re
Index
114

Specify a name for the preset broadcast station (Preset Name)
You can set the name to the preset broadcast station or change it. Up to 8 characters can be input.
1 Press OPTION when the input source is "Tuner". The option menu screen is displayed.
2 Use to select “Preset Name”, then press ENTER.
The “Preset Name” screen is displayed.
3 Use ◀▷ to select the group of the broadcast station you want to name.
4 Use to select the broadcast station you want to name, then press ENTER.
5 Use to select a name label, then press ENTER.
The screen that lets you edit the Preset Name is displayed.
- If you select "Set Defaults", then the unit returns to displaying the frequency.
6 Enter the characters, then press "OK".
7 Press OPTION to return to the previous screen.
Front panel D
Rear panel Re
Index
115


Skipping preset broadcast stations (Preset Skip)
Perform auto preset memory to save all the broadcasting stations that can be received in the memory. Selecting a broadcast station becomes easier by skipping unnecessary memories.
1 Press OPTION when the input source is "Tuner".
The option menu screen is displayed.
2 Use to select “Preset Skip”, then press ENTER.
The "Preset Skip" screen is displayed.
3 □ To set the stations you want to skip by groups
① Use ◀ ▷ to select the group of broadcast stations you want to skip.
② Press to select “Set No.* - * to Skip”, then press ENTER. Skip all the broadcast stations that are included in the selected group “*-*”.
(* is the selected group number.)
☐ To set the stations you want to skip by stations
① Use ◀▷ to select the group of broadcast stations you want to skip.
② Use to select the broadcast station you want to skip.
③ Use ◀ ▷ to select "Skip".
The station you selected is not displayed.
4 Press OPTION to return to the previous screen.
Front panel D
Rear panel Re
Index
116


Contents Connections
Setti
ngs Tips Appendix
Cancelling Preset Skip
1 While the "Preset Skip" screen is displayed, use ◀ to select a group containing a broadcast station to cancel the skip for.
2 Use to select a broadcast station to cancel the skip for.
3 Use ◀▷ to select "On".
The skip is cancelled.
NOTE
- "Preset Skip" cannot be cancelled for groups.
Front panel D
Rear panel Re
Index
117


Contents Connections
Setti
ngs Tips Appendix
Listening to Internet Radio
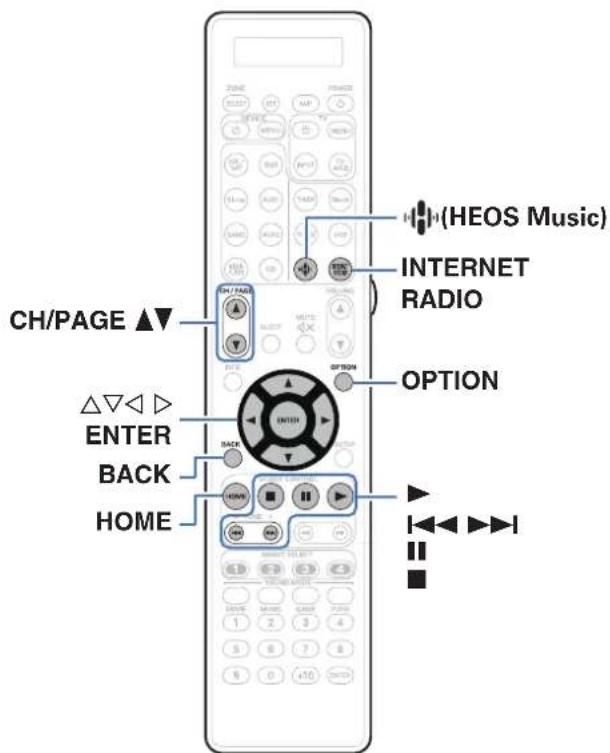
- Internet Radio refers to radio broadcasts distributed over the Internet. Internet Radio stations from around the world can be received.
- The Internet Radio station list on this unit the database service provided by TuneIn Radio service.
- The audio format types and specifications supported by this unit for playback are as follows.
See "Playing back Internet Radio" (p. 309) for details.
• WMA
- MP3
- MPEG-4 AAC
Front panel D
Rear panel Re
Index
118



Contents
Connections
back
Appendix
Listening to Internet Radio
1 Press INTERNET RADIO.
- You can also press “ ^1 ” (HEOS Music). Use to select “Tuneln Internet Radio”, then press ENTER.
2 Select the station you want to play.
| Operation buttons Function | |
| ▶ | Playback |
| II * | Pause |
| ■ | Stop |
| |◀◀▶▶| * | Skip to previous track / Skip to next track |
| CH/PAGE ▲▼ | Switch to the previous page/next page in the list display |
| HOME Go to Home screen | |
* Enabled when playing Podcasts.

- The display switches between track title and radio station name etc. each time the main unit's STATUS is pressed.
NOTE
- The radio station database service may be suspended or be otherwise unavailable without notice.
■ Operations accessible through the option menu
- "Adding to HEOS Favorites" (p. 138)
- “Adjusting the audibility of dialog and vocals (Dialog Enhancer)” (p. 139)
- "Adjusting the volume of each channel to match the input source (Channel Level Adjust)" (125 p. 140)
- "Adjusting the tone (Tone)" (p. 141)
- "Displaying your desired video during audio playback (Video Select)" (14 p. 142)
- "Playing the same music in all zones (All Zone Stereo)" (p. 144)
Front panel D
Rear panel Re
Index
119



Contents Connections
Setti
ngs Tips Appendix
Playing back files stored on a PC or NAS
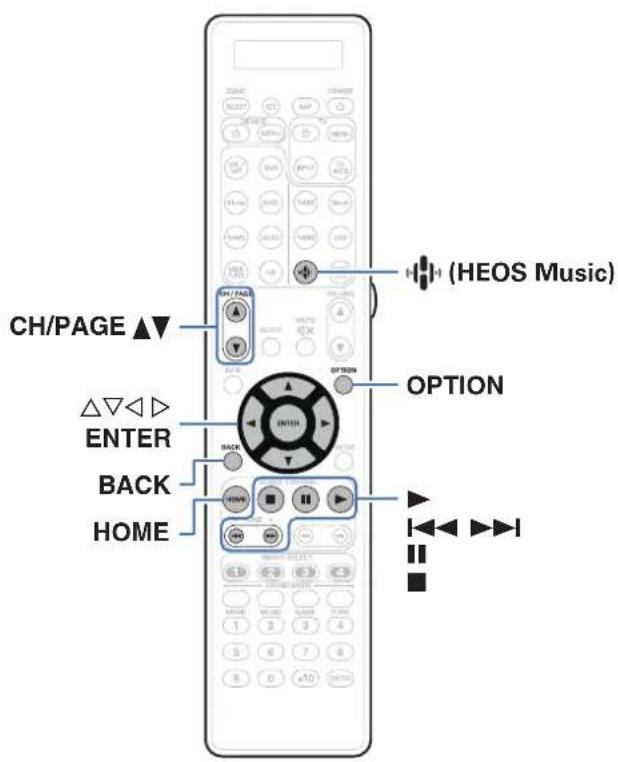
- This unit can play back music files and playlists (m3u, wpl) from DLNA compatible servers including PCs and NAS devices on your network.
- Supported file formats: For details, see "Playing back a file saved on a PC or NAS" (p. 308).
• WMA
• MP3
• WAV
- MPEG-4 AAC
- FLAC
- Apple Lossless
• DSD
Front panel D
Rear panel Re
Index
120



Contents
Connections
back
Appendix
Playing back files stored on a PC or NAS
Use this procedure to play music files or playlists stored on DLNA files servers on your local network.
1 Press (HEOS Music).
2 Use to select “Music Servers”, then press ENTER.
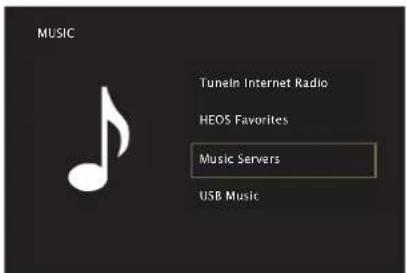
3 Select the name of your networked PC or NAS (Network Attached Storage) server.
4 Browse the music on your PC/NAS and select something to play.

- When you select something to play you will be asked how you want to queue up your music.
| Play Now: | Inserts the item into the queue after the currently playing track and plays the selected item immediately. |
| Play Now & Replace Queue: | Clears the queue and plays the selected item immediately. |
| Play Next: | Inserts the item into the queue after the current song and plays it when the current song ends. |
Add to End of Queue: Adds the item to the end of the queue.
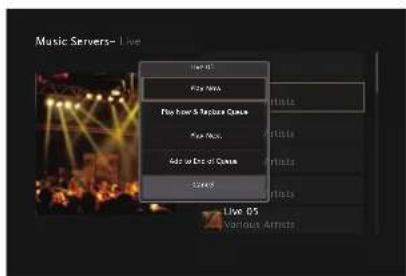
Front panel D
Rear panel Rel
Index
121


Contents Connections
Setti
ngs Tips Appendix
5 Use △▽ to select the "Play Now" or "Play Now & Replace Queue", then press ENTER.
Playback starts.
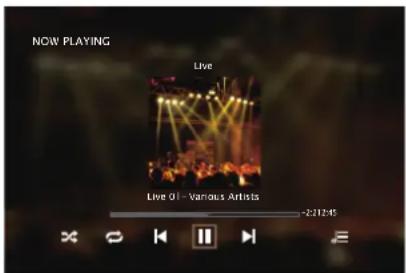
| Operation buttons | Function |
| ▶ | Playback |
| II | Pause |
| ■ | Stop |
| I◀◀▶▶I | Skip to previous track / Skip to next track |
| CH/PAGE ▲▼ | Switch to the previous page/next page in the list display |
| HOME Go to Home screen | |
Front panel D
Rear panel Re
Index
122


Contents Connections
Setti
■ Operations accessible through the option menu
- "Adjusting the audibility of dialog and vocals (Dialog Enhancer)" (p. 139)
- "Adjusting the volume of each channel to match the input source (Channel Level Adjust)" (p. 140)
- "Adjusting the tone (Tone)" (p. 141)
- "Displaying your desired video during audio playback (Video Select)" (p. 142)
- "Playing the same music in all zones (All Zone Stereo)" (p. 144)
Front panel D
Rear panel Re
Index
123


Contents Connections
Setti
ngs Tips Appendix
Getting the HEOS App
You can use many online music streaming services from the HEOS App. Depending upon your geographical location, there are several options to choose from.
Download the HEOS App for iOS or Android by searching App Store, Google Play store or Amazon Appstore for "HEOS".



Front panel D
Rear panel Re
Index
124


HEOS Account
HEOS Accounts can be registered in "HEOS Account" (p. 250) in the menu of this unit or by tapping "Music" tab - "Settings" icon in the HEOS App.
■ What is a HEOS Account?
A HEOS Account is master account or "keychain" for managing all of your HEOS music services with one single username and password.
■ Why do I need a HEOS Account?
With the HEOS Account you just have to enter your music services login names and passwords one time. This allows you to easily and quickly use multiple controller apps on different devices.
You just log into your HEOS Account on any device and you will have access to all of your associated music services, play history and custom playlists, even if you are at a friend's house listening to music on their HEOS system.
■ Signing up for a HEOS Account
You will be instructed to signup for a HEOS Account the first time you try to access any music service from the main "Music" menu of the HEOS App.
■ Changing your HEOS Account
1 Tap the "Music" tab.
2 Select the Settings icon ⚙️ in the upper left corner of the screen.
3 Select "HEOS Account".
4 Change your location, change your password, delete your account or sign out of your account.
Front panel D
Rear panel Re
Index
125


Contents
Connections
back
Appendix
Playing from streaming music services
A music service is an online music company that provides access to vast music collections via free and/or paid subscriptions. Depending upon your geographical location, there are several options to choose from.
■ Selecting a room/device
1 Tap the "Rooms" tab, and select "AV8805" if there are multiple HEOS devices.

- Tap the Pencil icon ☑ at the top right to switch edit mode. You can change the displayed name.
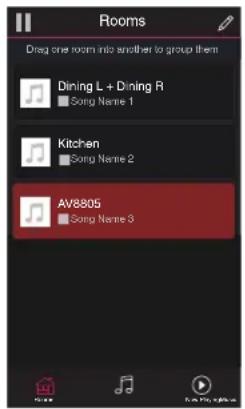
Front panel D
Rear panel Re
Index
126


Contents
Connections
pack
Appendix
■ Selecting the music track or station from music sources
1 Tap the "Music" tab and select a music source.

- All music services displayed may not be available in your location.
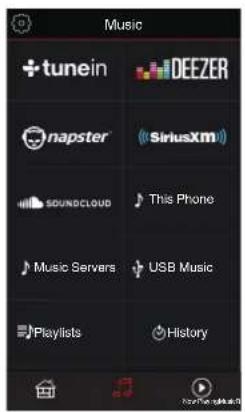
Front panel D
Rear panel Re
Index
127


Contents
Connections
back
Appendix
2 Browse the music to play.
After selecting a music track or radio station the app will automatically change to the "Now Playing" screen.

- When you select a music track to play you will be asked how you want to queue up your music.
| Play Now: | Inserts the item into the queue after the currently playing track and plays the selected item immediately. |
| Play Now & Replace Queue: | Clears the queue and plays the selected item immediately. |
| Play Next: | Inserts the item into the queue after the current song and plays it when the current song ends. |
Add to End of Queue: Adds the item to the end of the queue.

- When you select a radio station the following items are displayed.
Play Now: Plays the selected item immediately.
Add to HEOS Favorites: Adds to HEOS Favorites.
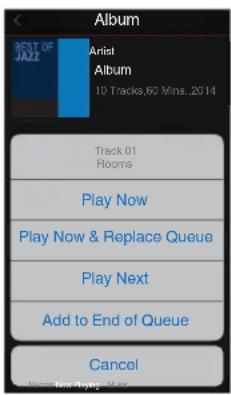
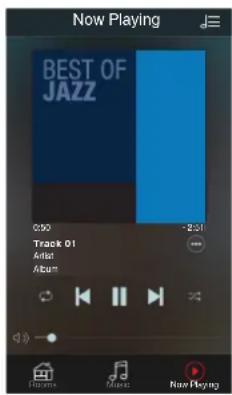
Front panel D
Rear panel Re
Index
128



Contents
Connections
back
Appendix
Listening to the same music in multiple rooms
The HEOS system is a true multi-room audio system that automatically synchronizes audio playback between multiple HEOS devices so that the audio coming from different rooms is perfectly in sync and always sounds amazing! You can easily add up to 32 HEOS devices to your HEOS system. You can join or group up to 16 individual HEOS devices into a group of HEOS devices that function as if they were a single HEOS device.
■ Grouping rooms
1 Press and hold your finger on room that is not playing music.
2 Drag it into the room that is playing music (indicated by the red outline) and lift your finger.
3 The two rooms will be grouped together into a single device group and both rooms will be playing the same music in perfect sync.

- When audio from the device connected to this unit is played back in a group, only 2-channel PCM input from the HDMI, digital or analog terminals can be played back.
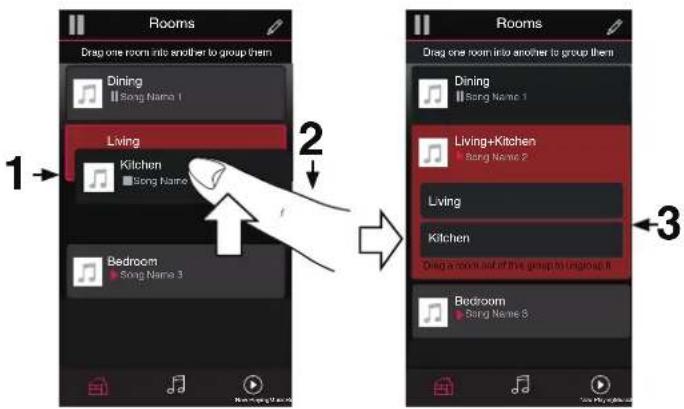
Front panel D
Rear panel Re
Index
129


Contents
Connections
back
Appendix
■ Ungrouping rooms
1 Press and hold your finger on room that you want to remove from the group.
2 Drag it out of the group and lift your finger.
NOTE
- You can not remove the first room that started playing the music before grouping.
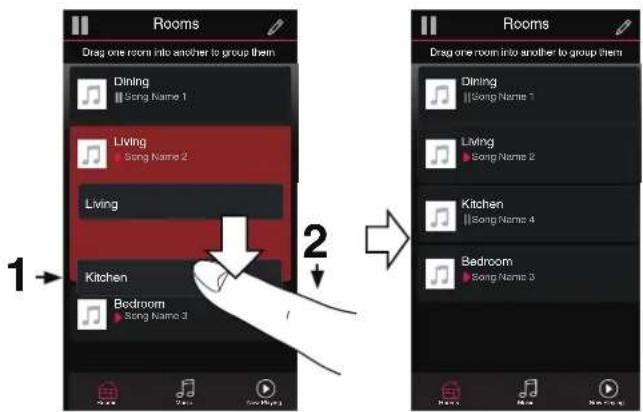
Front panel D
Rear panel Re
Index
130


Contents
Connections
back
Appendix
■ Grouping all rooms (party mode)
You can easily group 16 rooms together into Party Mode by using a "pinch" gesture.
1 Place two fingers on the screen over the list of rooms.
2 Quickly pinch your two fingers together and release.
3 All of your rooms will be joined together and begin playing the same music in perfect sync.
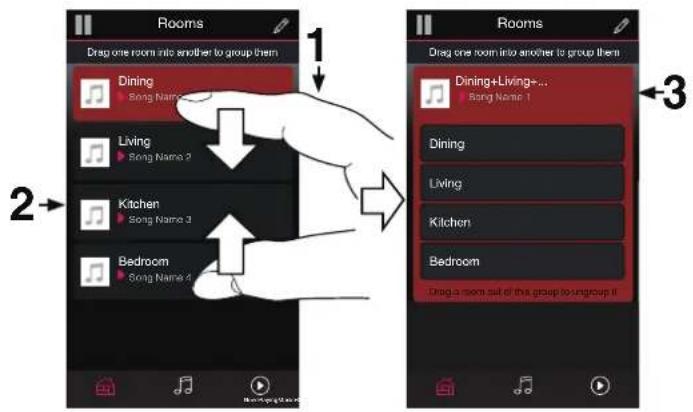
Front panel D
Rear panel Re
Index
131


Contents
Connections
back
Appendix
■ Ungrouping all rooms
You can easily ungroup all of your rooms and exit Party Mode by using a "spread" gesture.
1 Place two fingers close together on the screen over list of rooms.
2 Quickly spread your two fingers apart from each other and release.
3 All of your rooms will be ungrouped.
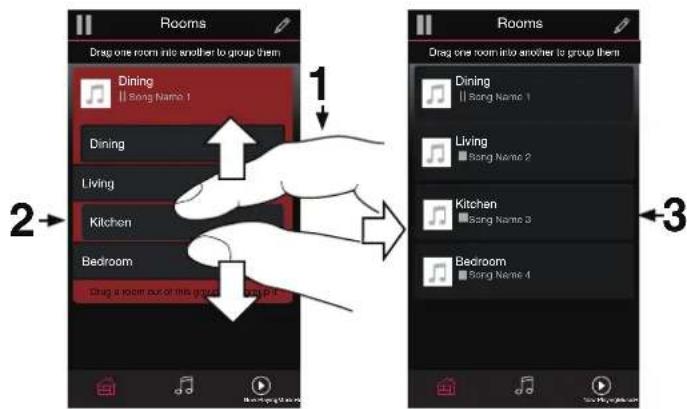
Front panel D
Rear panel Re
Index
132



Contents Connections
Setti
ngs Tips Appendix
AirPlay function
Music files stored on your iPhone, iPod touch, iPad or iTunes can be played on this unit via the network.

- Source input will be switched to "HEOS Music" when AirPlay playback is started.
- You can stop AirPlay playback by choosing other input source.
• To see song and artist names together, press STATUS on the main unit. - For information about how to use iTunes, also see the Help for iTunes.
- The screen may differ depending on the OS and software versions.
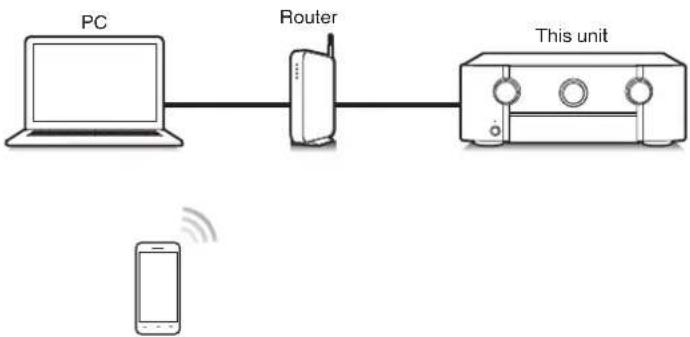
flowchart
graph LR
    PC["PC"] --> Router["Router"]
    Router --> ThisUnit["This unit"]
    ThisUnit --> PC
    style PC fill:#f9f,stroke:#333
    style Router fill:#ccf,stroke:#333
    style ThisUnit fill:#cfc,stroke:#333
Front panel D
Rear panel Re
Index
133


Contents
Connections
back
Appendix
Playing songs from your iPhone, iPod touch or iPad
If you update your "iPhone/iPod touch/iPad" to iOS 4.2.1 or later, you can stream music stored in your "iPhone/iPod touch/iPad" directly to this unit.
1 Connect your iPhone, iPod touch or iPad Wi-Fi to the same network as this unit.
- For details, see your device's manual.
2 Play the song on your iPhone, iPod touch or iPad.
AirPlay icon is displayed on the iPhone, iPod touch or iPad screen.
3 Tap the AirPlay icon.
[Example] iOS 10
[Example] iOS 9
4 Select the speaker (devices) you want to use.
Playing iTunes music with this unit
1 Install iTunes 10, or later, on a Mac or Windows PC that is connected to the same network as this unit.
2 Turn this unit ON.
Set "Network Control" to "Always On" for this unit. (p. 248)
NOTE
- When "Network Control" is set to "Always On", the unit consumes more standby power.
3 Start iTunes and click the AirPlay icon to select the main unit.
[Example] iTunes
4 Choose a song and click play in iTunes. The music will stream to this unit.
Front panel D
Rear panel Re
Index
134


Contents Connections
Setti
NOTE
- In playback using the AirPlay function, the sound is output at the iPhone, iPod touch, iPad or iTunes volume setting level. You should turn down the iPhone, iPod touch, iPad or iTunes volume prior to playback and then adjust it to a suitable level.
Perform iTunes playback operations with the remote control unit of this unit
With this unit's remote control unit, you can perform iTunes song play, pause, and auto search (cue) operations.
1 Select the "Edit" - "Preferences..." in the iTunes menu.
2 Select "Devices" in the iTunes setting window.
3 Check "Allow iTunes audio control from remote speakers", and then click "OK".

- This does not need to be set if using version 12 or later of iTunes.
Front panel D
Rear panel Re
Index
135


Contents Connections
Setti
ngs Tips Appendix
Spotify Connect function
Spotify is the world's most popular streaming service. If you subscribe to Spotify Premium, you can control your new speaker with your phone or tablet. Because Spotify is built-in to your speaker, you can still take calls or use other apps - the music never stops.
For information on how to set up and use Spotify Connect please visit www.spotify.com/connect
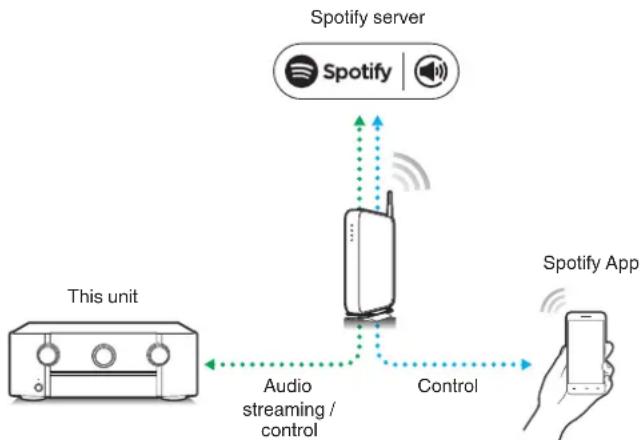
flowchart
graph TD
    A["Spotify server"] --> B["Spotify"]
    B --> C["Control"]
    C --> D["Spotify App"]
    E["This unit"] --> F["Audio streaming / control"]
    F --> C
Playing Spotify music with this unit
Download the "Spotify App" onto your Android or iOS device beforehand. To play a Spotify track in this unit, you need to register in the Spotify premium account first.
1 Connect the Wi-Fi settings of the iOS or Android device in the same network as this unit.
2 Launch the Spotify App.
3 Play back the Spotify track.
4 Tap the Spotify icon Ⓜ to select the unit.
The music will stream to this unit.
Front panel D
Rear panel Re
Index
136


Contents Connections
Setti
ngs Tips Appendix
Convenience functions
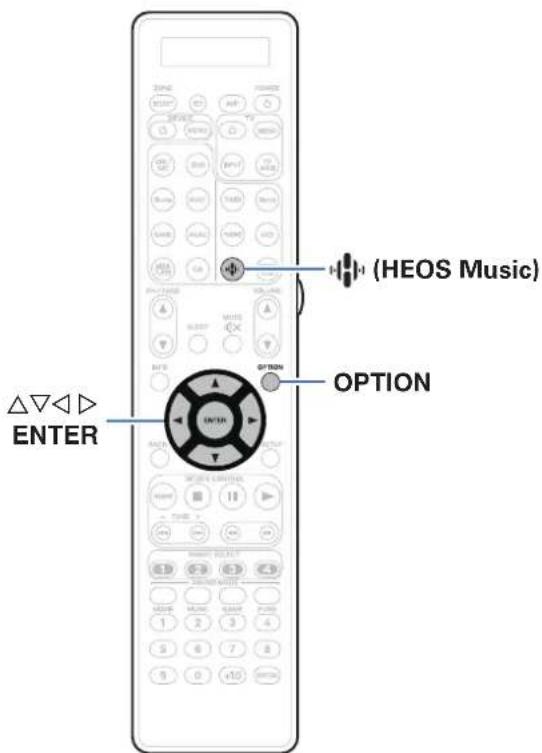
- This section explains how to use convenient functions that can be used for each input source.
• These functions can only be set in the MAIN ZONE.
Front panel D
Rear panel Re
Index
137



Contents Connections
Setti
Adding to HEOS Favorites
1 While content is playing, press OPTION.
The option menu screen is displayed.
2 Use to select “Add to HEOS Favorites”, then press ENTER.
Playing back HEOS Favorites
1 Press (HEOS Music).
2 Use to select “HEOS Favorites”, then press ENTER.
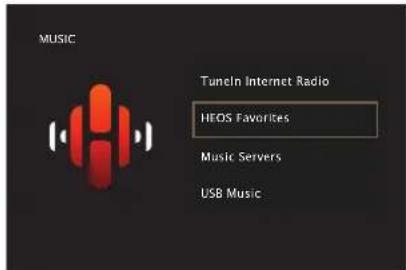
3 Browse the content and select something to play.
Front panel D
Rear panel Re
Index
138


Contents
Connections
pack
Appendix
Deleting a HEOS Favorites
1 While the HEOS Favorites content list is displayed, use to select the item you want to remove from HEOS Favorites, then press OPTION.
2 Use to select “Remove from HEOS Favorites”, then press ENTER.
Adjusting the audibility of dialog and vocals (Dialog Enhancer)
This function adjusts the center channel frequency band to enhance the dialog in the movies and vocals in music for easier listening.
1 Press OPTION.
An option menu screen is displayed.
- When the input source is "HEOS Music", an option menu for online music is displayed. Select "AVP Options...", then press ENTER.
2 Use to select “Dialog Enhancer”, then press ENTER.
The "Dialog Enhancer" screen is displayed.
3 Use ◀▷ to select your favorite enhancement effect.
Off
(Default):
Does not enhance the dialog or vocals.
Low / Medium / High: Enhances the dialog and vocals.
4 Press ENTER.

- "Dialog Enhancer" settings are stored for each source.
- This cannot be set when the sound mode is set to "Direct", "Virtual" or "Pure Direct".
- This cannot be set when the input mode is set to "7.1CH IN".
Front panel D
Rear panel Re
Index
139


Adjusting the volume of each channel to match the input source (Channel Level Adjust)
The volume of each channel can be changed while listening to music. You can set this for each input source.
1 Press OPTION.
An option menu screen is displayed.
- When the input source is "HEOS Music", an option menu for online music is displayed. Select "AVP Options...", then press ENTER.
2 Use to select “Channel Level Adjust”, then press ENTER.
The "Channel Level Adjust" screen is displayed.
3 Use to select the channel that you wish to adjust.
4 Use ◀▷ to adjust the volume.
-12.0 dB - +12.0 dB (Default: 0.0 dB)
5 Use △▽◀▷ to select "Exit", then press ENTER.

- Select "Reset" and press ENTER if you want to restore the adjustment values of the various channels to "0.0 dB" (Default).
- Headphone volume can be adjusted when a headphone is connected.
- "Channel Level Adjust" settings are stored for each input source.
- You can only set this for speakers that output audio. In addition, you cannot set this when in the menu "HDMI Audio Out" is set to "TV". (p. 194)
Front panel D
Rear panel Re
Index
140



Contents Connections
Setti
ngs Tips Appendix
Adjusting the tone (Tone)
Adjusts the tonal quality of the sound.
1 Press OPTION.
An option menu screen is displayed.
- When the input source is "HEOS Music", an option menu for online music is displayed. Select "AVP Options...", then press ENTER.
2 Use to select “Tone”, then press ENTER.
The "Tone" screen is displayed.
3 Use ◀▷ to set the tone control function to on/off.
On: Allow tone adjustment (bass, treble).
Off
(Default):
Playback without tone adjustment.
4 Select "On" in step 3 and press to select the sound range to be adjusted.
Bass: Adjust bass.
Treble: Adjust treble.
5 Use ◀▶ to adjust the tone, then press ENTER.
-6 dB - +6 dB (Default : 0 dB)

- "Tone" settings are stored for each input source.
- This cannot be set when the sound mode is set to "Direct" or "Pure Direct".
- This item cannot be set when "Dynamic EQ" is set to "On". (p. 188)
- You cannot set this when no audio signal is input or in the menu "HDMI Audio Out" is set to "TV". (1 p. 194)
- This cannot be set when the input mode is set to "7.1CH IN".
Front panel D
Rear panel Re
Index
141


Displaying your desired video during audio playback (Video Select)
This unit can display video from a different source on TV during audio playback. You can set this for each input source.
□ Supported input sources:
CD\* / Tuner / HEOS Music / Phono
* This cannot be set when any of the HDMI, component video or video connectors are assigned.
1 Press OPTION.
An option menu screen is displayed.
- When the input source is "HEOS Music", an option menu for online music is displayed. Select "AVP Options...", then press ENTER.
2 Use to select “Video Select”, then press ENTER.
The "Video Select" screen is displayed.
3 Use ◀▷ to select the Video Select mode.
Off
Disable Video Select mode.
(Default):
On: Enable Video Select mode.
4 If you selected "On" in step 3, press and select "Source".
5 Use ◀▷ to select the input source for video you want to play back, then press ENTER.

- "Video Select" settings are stored for each input source.
Front panel D
y Rear panel Re
Index
142


Adjusting the picture quality for your viewing environment (Picture Mode)
☐ Supported input sources : CBL/SAT / DVD / Blu-ray / Game / AUX1 / AUX2 / Media Player / CD* / TV Audio*
* You can set the picture mode when an HDMI, component video or video connector is assigned.
1 Press OPTION.
An option menu screen is displayed.
2 Use to select “Picture Mode”, then press ENTER.
The “Picture Mode” screen is displayed.
3 Use ◀▷ to select the picture mode.
| Off(Default): | No picture quality adjustment is done with this unit. |
| Standard: | The standard mode suited for most living room viewing environments. |
| Movie: | A mode suited for watching movies in a dark room such as a theater room. |
| Vivid: | A mode that makes graphic images for games, etc. brighter and more vivid. |
| Streaming: | A mode suited for low bit rate video sources. |
| ISF Day: | A mode suited for watching movies in a bright room during the day. |
| ISF Night: | A mode suited for watching movies in a dark room at night. |
| Custom: | Adjusts the picture quality manually. |
4 Press ENTER.

- "Picture Mode" settings are stored for each input source.
Front panel D
y Rear panel Re
Index
143


Playing the same music in all zones (All Zone Stereo)
You can play back the music being played back in MAIN ZONE simultaneously in ZONE2 and ZONE3 (another rooms). It is useful when you want to enjoy the same music at the same time in multiple rooms during home party or when you want to play back the same BGM in the entire house.
1 Press OPTION.
An option menu screen is displayed.
- When the input source is "HEOS Music", an option menu for online music is displayed. Select "AVP Options...", then press ENTER.
2 Use to select “All Zone Stereo”, then press ENTER.
The "All Zone Stereo" screen is displayed.
3 Select "Start", then press ENTER.
- The input sources for ZONE2 and ZONE3 are switched to the same input source as for MAIN ZONE, and playback starts in the All Zone Stereo mode.
- When you do not want ZONE2 or ZONE3 to participate in All Zone Stereo, press ENTER to clear the check mark and then press "Start".
■ Stopping the All Zone Stereo mode
1 During playback in All Zone Stereo mode, press OPTION.
An option menu screen is displayed.
- When the input source is "HEOS Music", an option menu for online music is displayed. Select "AVP Options...", then press ENTER.
2 Use to select “All Zone Stereo”, then press ENTER.
3 Select "Stop", then press ENTER.

- The All Zone Stereo mode is canceled even when the power supply of the MAIN ZONE is turned off.
- In the All Zone Stereo mode, only the "Multi Ch Stereo" and "Stereo" sound modes can be selected.
- When "HDMI Audio Out" is set to "TV", the All Zone Stereo mode is not available. (15 p. 194)
- When "Input Mode" is set to other than "7.1CH IN", the All Zone Stereo mode is available. (125 p. 210)
Front panel D
Rear panel Re
Index
144



Contents Connections
Setti
ngs Tips Appendix
Selecting a sound mode
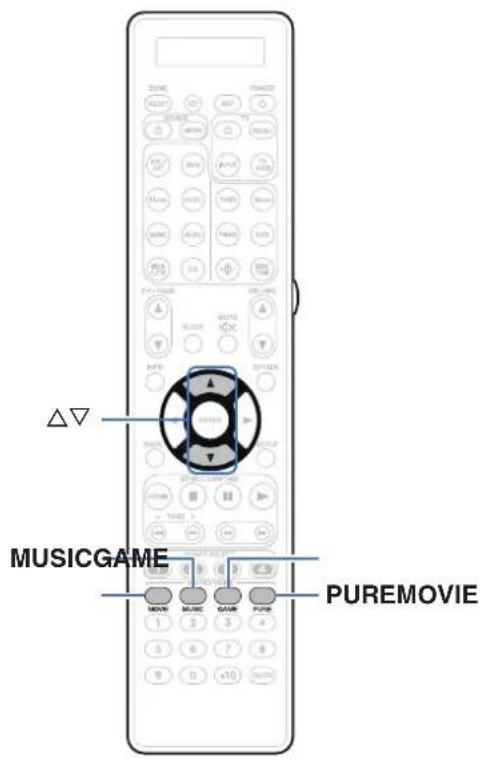
This unit allows you to enjoy various kinds of surround and stereo playback modes.
Disc formats such as Blu-ray Disc and DVD, as well as being supported by digital broadcasting, and even by streaming movies and music from internet-based subscription services.
This unit supports playback of almost all of these multi-channel audio formats. It also supports surround playback of audio formats other than multi-channel audio such as 2-channel stereo audio.

- For audio formats recorded on a disc, see the disc jacket or label.
Front panel D
Rear panel Re
Index
145



Contents
Connections
back
Appendix
Selecting a sound mode
1 Press MOVIE, MUSIC or GAME to select a sound mode.
| MOVIE : | Switches to the sound mode suitable for enjoying movies and TV programs. |
| MUSIC : | Switches to the sound mode suitable for enjoying music. |
| GAME : | Switches to the sound mode suitable for enjoying games. |

- The MOVIE, MUSIC, or GAME button memorizes the last sound mode selected for its button. Pressing MOVIE, MUSIC, or GAME recalls the same sound mode as the one selected at the previous playback.
- If the content played back does not support the previously selected sound mode, the most appropriate sound mode for the content is automatically selected.
- This can also be set by pressing MOVIE, MUSIC or GAME on the main unit.
■ Switching the sound mode
- Press MOVIE, MUSIC or GAME to display a list of the sound modes that can be selected. Each time you press MOVIE, MUSIC or GAME, the sound mode changes.
- While the list is displayed, you can also use to select a sound mode.
- Try out various sound modes and enjoy sound mode in your favorite mode.

- Please set the surround mode to Dolby Atmos/Surround when playing back Dolby Atmos encoded content. Dolby Atmos/Surround delivers the optimum playback experience from Blu-ray and streaming sources encoded with Dolby Atmos as well as channel based content. The default setting of this receiver is Dolby Atmos/Surround.
[Example] When MOVIE is pressed
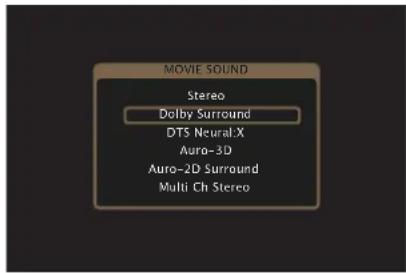
Front panel D
Rear panel Re
Index
146



Contents
Connections
back
Appendix
Direct playback
Sound recorded in source is played as is.
1 Press PURE to select "Direct".
Direct playback begins.

- While DSD signals are played back, "DSD Direct" is displayed.
- This can also be set by pressing PURE DIRECT on the main unit.
Pure Direct playback
This mode is for playback with higher sound quality than in Direct playback mode.
This mode turns off the main unit display and analog video circuit. Doing so suppresses noise sources that affect sound quality.
1 Press PURE to select "Pure Direct".
The display goes dark, and Pure Direct playback begins. The PURE DIRECT indicator lights.

- In Direct and Pure Direct sound modes, the following items cannot be adjusted.
• Dialog Enhancer (p. 139)
- Tone (p. 141)
• M-DAX (1 p. 184)
- MultEQ ^ XT32 (p. 187)
• Dynamic EQ (p. 188)
• Dynamic Volume (p. 189)
• Graphic EQ (p. 190)
- This can also be set by pressing PURE DIRECT on the main unit.
NOTE
- Video signals are only output when HDMI signals are played in the Pure Direct mode.
- When the Pure Direct mode has been selected, the display turns off after about 5 seconds.
Front panel D
Rear panel Re
Index
147


Contents Connections
Setti
ngs Tips Appendix
Auto surround playback
This mode detects the type of input digital signal, and automatically selects the corresponding mode for playback.
Perform stereo playback when the input signal is PCM. When the input signal is Dolby Digital or DTS, the music is played back according to the respective channel number.
1 Press PURE to select "Auto".
Auto surround playback begins.

- This can also be set by pressing PURE DIRECT on the main unit.
Front panel D
Rear panel Re
Index
148


Contents
Connections
back
Appendix
Description of sound mode types
Dolby sound mode
| Sound mode type Description | |
| Dolby Atmos* | Please select this mode to play back the contents encoded with Dolby Atmos. If you have selected a different sound mode previously, please select again this mode for Dolby Atmos content play back. It decodes Dolby Atmos content and its positioning data in real time and outputs audio from the appropriate speakers, creating natural audio images regardless of the speaker layout. Use ceiling speakers and Dolby Atmos Enabled speakers to realize a three-dimensional sound field. |
| Dolby TrueHD Please select this mode to play back the contents encoded with Dolby TrueHD at 192kHz/96kHz. | |
| Dolby Digital Plus Please select this mode to play back the contents encoded with Dolby Digital Plus. | |
| Dolby Digital Please select this mode to play back the contents encoded with Dolby Digital. | |
* This mode is not supported in a 5.1-channel or less speaker configuration.
Front panel D
y Rear panel Re
Index
149


Contents
Connections
back
Appendix
DTS sound mode
| Sound mode type Description | |
| DTS Surround This mode can be selected when playing sources recorded in DTS. | |
| DTS ES Dscrt6.1*1 | This mode is suitable for playing discs recorded in DTS-ES.The surround back channel added using the discrete method is played as an independent channel.Since all channels are independent, the 360-degree spacial expressiveness and sound localization are enhanced. |
| DTS ES Mtrx6.1*1 | This mode is suitable for playing discs recorded in DTS-ES.The surround back channel added to the surround-left and surround-right channels by a matrix encoder at software recording time is decoded by this unit's matrix decoder and played from each channel (surround left, surround right, surround back). |
| DTS 96/24 This mode can be selected when playing sources recorded in DTS 96/24. | |
| DTS-HD This mode can be selected when playing sources recorded in DTS-HD. | |
| DTS Express This mode can be selected when playing sources recorded in DTS Express. | |
| DTS:X This mode can be selected when playing back content encoded with DTS:X.It decodes DTS:X content and its positioning data in real time and outputs audio from the appropriate speakers, creating natural audio images regardless of the speaker layout. Use height speakers to realize a three-dimensional sound field. | |
| DTS Neural:X | This mode uses DTS Neural:X Upmixer to extend various sources to natural and realistic multi channels for playback.Use height speakers such as front height speakers to realize a three-dimensional sound field. |
| DTS Virtual:X*2*3 | This mode uses DTS Virtual:X with virtual height and virtual surround processing to realize a three-dimensional sound field when the height speakers are not used. |
*1 This can be selected when "Speaker Config." - "Surr. Back" is not set to "None". (rD p. 231)
*2 This can be selected when Height, Ceiling and Dolby Atmos Enabled speakers are not being used.
*3 It cannot be selected when the input signal is Dolby Digital, Dolby Digital Plus, Dolby TrueHD or Dolby Atmos.
Front panel D
Rear panel Re
Index
150



Contents Connections
Settings Tips Appendix
Auro-3D sound mode
| Sound mode type Description | |
| Auro-3D | This mode uses an Auro-3D decoder to create three-dimensional audio output using the Height Channel. It is ideal for playback of signals encoded as Auro-3D with a Height Channel. If signals not encoded as Auro-3D are input, an Upmixer called the Auro-Matic is used to create highly realistic three-dimensional audio output. |
| Auro-2D Surround | This mode uses an Auro-3D decoder to create Surround Sound without a Height Channel. It is ideal for playback of signals encoded as Auro-3D without a Height Channel. If signals not encoded as Auro-3D are input, an Upmixer called the Auro-Matic is used to output Surround Sound. |
PCM multi-channel sound mode
| Sound mode type Description | |
| Multi Ch In This mode can be selected when playing multi-channel PCM/DSD sources. |
Original sound mode
| Sound mode type Description | |
| Multi Ch Stereo This mode is for enjoying stereo sound from all speakers. | |
| Virtual This mode lets you experience an expansive surround sound effect when playing back through just the front (L/R) speakers only, and when listening with stereo headphones. |
Front panel D
Rear panel Re
Index
151



Contents Connections
Setti
ngs Tips Appendix
Auto sound mode
| Sound mode type Description | |
| Auto | In this mode, the type of digital signal input, such as Dolby Digital, Dolby TrueHD, Dolby Digital Plus, Dolby Digital EX, Dolby Atmos, DTS, DTS-HD, DTS:X, DTS-ES, PCM (multi-channel) is detected, and the playback mode switches automatically to the corresponding mode.If the input signal is analog or PCM (2-channel), stereo playback is used. For Dolby Digital or DTS, the music is played back according to the respective channel number. |
Stereo sound mode
| Sound mode type Description | |
| Stereo This mode plays 2-channel | annel stereo audio with no additional surround sound processing.Sound is output from the front left and right speakers, and subwoofer if connected.When multi-channel signals are inputted, they are mixed down to 2-channel audio and are played back with no additional surround sound processing. |
Direct sound mode
| Sound mode type Description | |
| Direct This mode plays back audio as recorded in the source. | |
| Pure Direct This mode plays back an even higher quality sound than the “Direct” mode.The following circuits are stopped in order to further improve sound quality.• Display indicator circuit of the main body (display will go off.)• The analog video input/output switcher and processor is disabled. |
Front panel D
Rear panel Re
Index
152



Contents Connections
Setti
ngs Tips Appendix
Sound mode that can be selected for each input signal
- The following sound modes can be selected using the MOVIE, MUSIC and GAME buttons.
- Adjust the sound field effect with the menu "Surround Parameter" to enjoy surround sound the way you like it. (p. 180)
*1 2-channel also includes analog input.
*2 This mode plays back 2-channel sources in 5.1, 7.1, 9.1, 11.1 or 13.1-channel playback. It cannot be selected when headphones are used or when the speaker configuration is front speakers only.
*3 This mode plays back 2-channel sources in 5.1, 7.1, 9.1 or 11.1-channel playback. It cannot be selected when headphones are used or when the speaker configuration is front speakers only.
*4 It cannot be selected when headphones are used, or when a speaker configuration with any height speakers is used.
*5 It cannot be selected when the input signal is Dolby Digital, Dolby Digital Plus, Dolby TrueHD or Dolby Atmos.
*6 It cannot be selected when headphones are used, or when a speaker configuration without front height or front Dolby Atmos Enabled speakers is used.
*7 It cannot be selected when headphones are used, or when only front speakers are used.
*8 This cannot be selected when headphones are used.
Front panel D
Rear panel Re
Index
153


Contents
Connections
Playback
Settings
Tips
Appendix
| Input signal | Sound mode | MOVIE button | MUSIC button | GAME button | |
| Multi-channel *9 | Stereo | ○ | ○ | ○ | |
| Dolby Digital | Dolby Digital *8 ○ | ○ | |||
| Dolby Digital + Dolby Surround *8 ○ | ○ | ○ | |||
| Dolby Digital + Neural:X *8 ○ | ○ | ○ | |||
| Dolby Digital Plus | Dolby Digital Plus *8 ○ | ○ | |||
| Dolby Digital Plus + Dolby Surround *8*11 | ○ | ○ | ○ | ||
| Dolby Digital Plus + Neural:X *8 ○ | ○ | ○ | |||
| Dolby Atmos *8*11 ○ | ○ | ○ | |||
| Dolby TrueHD | Dolby TrueHD *8 ○ | ○ | |||
| Dolby TrueHD + Dolby Surround *8*10 ○ | ○ | ○ | |||
| Dolby TrueHD + Neural:X *8 ○ | ○ | ○ | |||
| Dolby Atmos *8*11 ○ | ○ | ○ | |||
| Dolby Atmos | Dolby Atmos *8 ○ | ○ | |||
| DTS | DTS Surround *8 ○○○ | ||||
| DTS ES Dscrt 6.1 *8 ○ | ○ | ○ | |||
| DTS ES Mtrx 6.1 *8 ○ | ○ | ○ | |||
| DTS 96/24 *8 | ○ | ○ | |||
| DTS + Dolby Surround *8 | ○ | ○ | |||
| DTS + Neural:X *8 | ○ | ○ | |||
| DTS + Virtual:X *4 | ○ | ○ | |||
*4 It cannot be selected when headphones are used, or when a speaker configuration with any height speakers is used.
*8 This cannot be selected when headphones are used.
*9 The sound mode that can be selected differs depending on the audio format of the input signal and the number of channels. For details, see "Types of input signals, and corresponding sound modes" (1: p. 315).
*10 This can be selected when the input signal does not contain Dolby Atmos.
*11 This can be selected when the input signal contains Dolby Atmos.
Front panel
Display
Rear panel
154
Remote
Index

Contents
Connections
Playback
Settings
Tips
Appendix
| Input signal | Sound mode | MOVIE button | MUSIC button | GAME button | |
| DTS-HD / DTS Express | DTS-HD HI RES *8 ○○○ | ||||
| DTS-HD MSTR *8 ○○○ | |||||
| DTS Express *8 ○○○ | |||||
| DTS-HD + Dolby Surround *8 ○ | ○ | ○ | |||
| DTS-HD + Neural:X *8 ○○○ | |||||
| DTS-HD + Virtual:X *4 ○○○ | |||||
| DTS:X | DTS:X *8 ○○○ | ||||
| DTS:X MSTR *8 ○○○ | |||||
| DTS:X + Virtual:X *4 ○○○ | |||||
| PCM multi-channel | Multi Ch In *8 ○ | ○ | |||
| Multi Ch In 7.1 *8 ○ | ○ | ||||
| Multi In + Dolby Surround *8 ○ | ○ | ○ | |||
| Multi In + Neural:X *8 | ○ | ○ | ○ | ||
| Multi In + Virtual:X *4 | ○ | ○ | ○ | ||
| Multi-channel *9 | Auro-3D *6 | ○ | ○ | ○ | |
| Auro-2D Surround *7 | ○ | ○ | ○ | ||
| Multi Ch Stereo *8 | ○ | ○ | ○ | ||
| Virtual | ○ | ○ | ○ | ||
*4 It cannot be selected when headphones are used, or when a speaker configuration with any height speakers is used.
*6 It cannot be selected when headphones are used, or when a speaker configuration without front height or front Dolby Atmos Enabled speakers is used.
*7 It cannot be selected when headphones are used, or when only front speakers are used.
*8 This cannot be selected when headphones are used.
*9 The sound mode that can be selected differs depending on the audio format of the input signal and the number of channels. For details, see "Types of input signals, and corresponding sound modes" (1 p. 315).

- Only "Stereo" and "Virtual" can be selected when headphones are used.
Front panel
Display
Rear panel
155
Remote
Index


flowchart
graph LR
    A["Contents"] --> B["Connections"]
    B --> C["Back Settings Tips Appendix"]
■ Views on the display
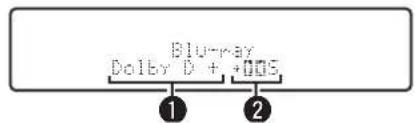
① Shows a decoder to be used.
- In the case of the Dolby Digital Plus decoder, "Dolby D+" is displayed.
② Shows a decoder that creates sound output.
- "005" indicates that the Dolby Surround decoder is being used.

156


HDMI Control function
A recent addition to the HDMI standard is CEC (Consumer Electronics Control), which allows control signals from one device to communicate with another device via the HDMI cable connection.
Setting procedure
1 Enable the HDMI Control function of this unit.
Set "HDMI Control" to "On". (p. 196)
2 Turn the power on for all the devices connected by HDMI cable.
3 Set the HDMI Control function for all devices connected by HDMI cable.
- Please consult the operating instructions for the connected devices to check the settings.
- Carry out steps 2 and 3 should any of the devices be unplugged.
4 Switch the television input to the HDMI input connected to this unit.
5 Switch the input source of this unit to check that video from the player connected by HDMI is played back correctly.
6 When you turn the TV's power to standby, check that the power of this unit also goes to standby.
NOTE
- Some functions may not operate depending on the connected TV or player. Check the owner's manual of each device for details beforehand.
- The HDMI ZONE2 function is not compatible with the HDMI Control function.
- When the HDMI ZONE2 function is used with "HDMI Control" in the menu set to "On", the HDMI ZONE2 function may not fully work.
Front panel D
Rear panel Re
Index
157


Contents Connections
Setti
ngs Tips Appendix
Smart Menu function
This function can be used to configure the settings of this unit, select an input source and set Tuner and Internet Radio stations using the TV remote control.
1 Enable the HDMI Control function of this unit and the TV. (p. 196)
2 Set "Smart Menu" to "On" on this unit. (p. 198)
3 Select "AV Receiver" in a TV menu such as "Input"* or "Operate Connected HDMI Device"*.
The Smart Menu of this unit is displayed on the TV.
- This unit can be operated with the TV remote control while the Smart Menu is displayed.
* The selection method differs depending on your TV.
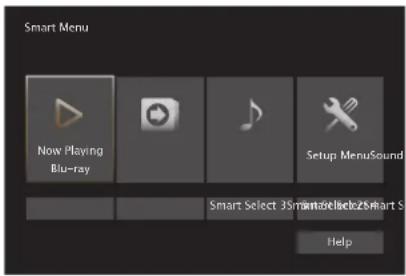
Now Playing
Enjoy content from the input source currently selected on this unit.
Source
Switch the input of this unit.
If you select "HEOS Music" or "Tuner", you can continue to operate this unit using the TV remote control.
Sound Mode
Change the sound mode of this unit.
You can select from the following three sound modes.
| Surround: | Surround sound playback according to the input signal. |
| Stereo: Stereo playback. | |
| Multi Ch Stereo: Multi-channel stereo playback. | |
Front panel D
Rear panel Re
Index
158


Contents
Connections
back
Appendix
Setup Menu
Displays a setup menu for configuring the settings of this unit.
Smart Select
Calls up the SMART SELECT items registered to this unit.
NOTE
- If the "HDMI Control" or "Smart Menu" settings have been changed, always reset the power to connected devices after the change.
- The Smart Menu function may not work properly depending on the specifications of your TV. In this case, set "Smart Menu" to "Off". (198 p. 198)
Front panel D
Rear panel Re
Index
159



flowchart
graph LR
    A["Contents Connections"] --> B["Settings Tips Appendix"]
    B --> C["End"]
Sleep timer function
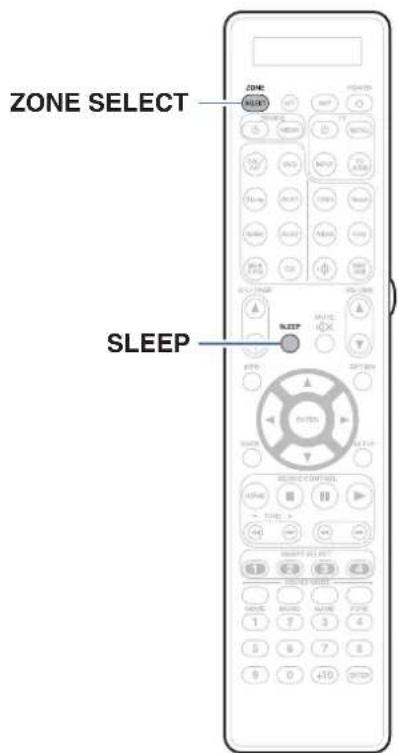
You can have the power automatically switched to standby once a set time has elapsed. This is convenient for viewing and listening while going to sleep. The sleep timer function can be set for each zone.





Contents Connections
Setti
ngs Tips Appendix
Using the sleep timer
1 Press ZONE SELECT to switch "MAIN", "ZONE2" or "ZONE3".
The button for the selected zone is lit.
2 Press SLEEP and display the time you want to set.
- The sleep timer indicator lights up on the display and the sleep timer starts.
- You can set the sleep timer in the range from 10 to 120 minutes in steps of 10 minutes.
- Checking the remaining time
Press SLEEP when the sleep timer is in operation.
The remaining time appears on the display.
■ To cancel the sleep timer
Press SLEEP to select "Off".
The sleep timer indicator on the display turns off.

- The sleep timer setting is canceled when the unit switches to standby mode.
NOTE
- The sleep timer function cannot turn off the power of devices connected to this unit. To turn off the power of those connected devices, set up sleep timers on the connected devices themselves.
Front panel D
Rear panel Re
Index
161



Contents Connections
Setti
ngs Tips Appendix
Smart select function
ZONE SELECT
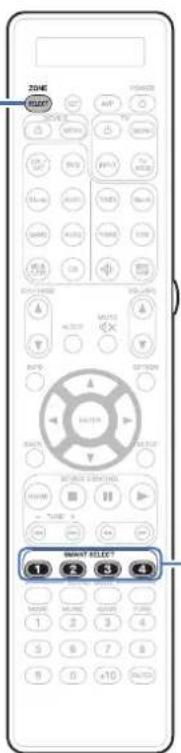
Settings such as the input source, volume level and sound mode can be registered to the SMART SELECT 1 - 4 buttons.
You can simply press one of the registered SMART SELECT buttons in subsequent playbacks to switch to the group of saved settings in a batch. By saving frequently used settings at the SMART SELECT 1 - 4 buttons, you will always be able to easily call up the same playback environment. The Smart Select function can be memorized for each zone.
Front panel D
Rear panel Re
Index
162



Contents Connections
Setti
ngs Tips Appendix
Calling up the settings
1 Press ZONE SELECT to switch "MAIN", "ZONE2" or "ZONE3".
The button for the selected zone is lit.
2 Press SMART SELECT.
The Smart Select settings registered to the button you pressed are called up.
- The default settings for the input source and volume are as shown below.
[MAIN ZONE] / [ZONE2] / [ZONE3]
| Button Input source Volume | |
| SMART SELECT 1 CBL/SAT 40 | |
| SMART SELECT 2 Blu-ray 40 | |
| SMART SELECT 3 Media Player 40 | |
| SMART SELECT 4 HEOS Music 40 |
Front panel D
Rear panel Re
In
163


Contents
Connections
back
Appendix
Changing the settings
1 Set the items below to the settings you want to register.
The following settings from ① to ⑨ can be memorized for MAIN ZONE, and settings ① and ② can be memorized for ZONE2 and ZONE3.
① Input source (p. 99)
② Volume (p. 100)
③ Sound mode (p. 145)
④ Audyssey (Audyssey MultEQ ^® XT32, Audyssey Dynamic EQ ^® , Audyssey Dynamic Volume ^® , Audyssey LFC ^TM ) (p. 187)
⑤ "M-DAX" (p. 184)
⑥ "Adjusting the volume of each channel to match the input source (Channel Level Adjust)" (1 p. 140)
⑦ "Displaying your desired video during audio playback (Video Select)" (1 p. 142)
⑧ “Adjusting the picture quality for your viewing environment (Picture Mode)” (p. 143)
⑨ "HDMI Video Output" (p. 199)

- Press and hold SMART SELECT while a radio station is being received is being played back with any of the following sources, the current radio station is memorized.
- Tuner / Internet Radio Station
2 Press ZONE SELECT to switch "MAIN", "ZONE2" or "ZONE3".
The button for the selected zone is lit.
3 Press and hold the desired SMART SELECT until "Smart* Memory", "Z2 Smart* Memory" or "Z3 Smart* Memory" appears on the display.
The current settings will be memorized.
* is displayed the number for the SMART SELECT button you pressed.
■ Changing the Smart Select Name
The MAIN ZONE Smart Select name displayed on the TV screen or display of this unit can be changed to a different name.
For the name change method, see "Smart Select Names" (p. 254).
Front panel D
Rear panel Re
Index
164

Contents Connections
Setti
ngs Tips Appendix
Panel lock function
To prevent accidental operation of this unit, you can disable operation of the buttons on the front panel.
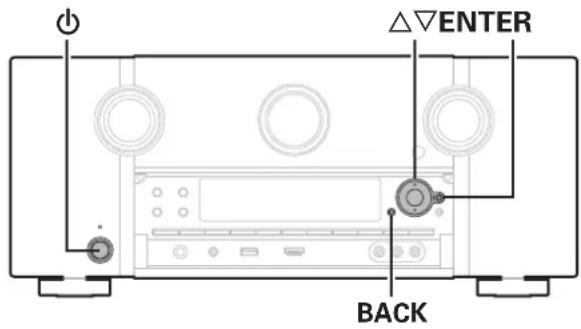
Disabling all key button operations
1 Press ⏻ while you press and hold BACK and ENTER with the unit in standby mode.
2 Use to select "FP/VOL LOCK On".
3 Press ENTER to enter the setting.
All button operations except ⏻ are disabled.
Disabling all button operations except VOLUME
1 Press ⏻ while you press and hold BACK and ENTER with the unit in standby mode.
2 Use to select "FP LOCK On".
3 Press ENTER to enter the setting.
All button operations except ⏻ and VOLUME are disabled.
Front panel D
Rear panel Re
Index
165



Contents Connections
Setti
Canceling the Panel lock function
1 Press ⏻ while you press and hold BACK and ENTER with the unit in standby mode.
2 Use to select "FP LOCK *Off".
(* The currently set mode.)
3 Press ENTER to enter the setting.
The Panel lock function is canceled.

- Even when the Panel lock function is set, you can operate the unit using the remote control unit.
Front panel D
Rear panel Re
Index
166


Remote lock function
When connecting an IR receiver, enable the Remote lock function. When the function is enabled, you can not perform operations with the remote control unit.
By default, this function is disabled.
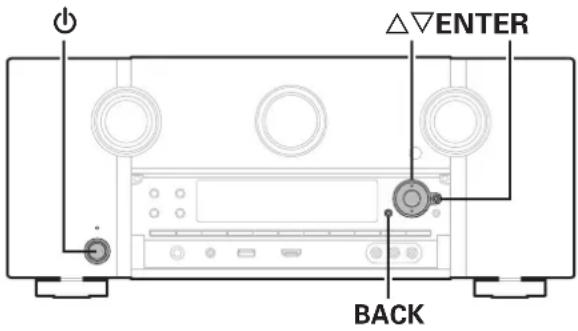
Disabling the sensor function of the remote control unit
1 Press ⏻ while you press and hold BACK and ENTER with the unit in standby mode.
2 Use to select “RC LOCK On”.
3 Press ENTER to enter the setting.
The infrared light receiving function is disabled.
Enabling the remote sensor function
1 Press ⏻ while you press and hold BACK and ENTER with the unit in standby mode.
2 Use to select "RC LOCK *Off".
(* The currently set mode.)
3 Press ENTER to enter the setting.
Infrared light receiving function on the main unit is enabled.
Front panel D
Rear panel Re
Index
167



Contents Connections
Setti

Switches light illumination on/off
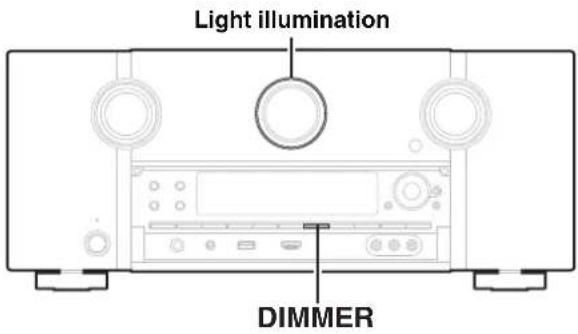
You can switch the light illumination around the main display on or off. The default setting is "On".
1 Press and hold DIMMER on the main unit for 3 seconds.
- Carry out the same procedure if you want to change the settings again.
Front panel D
Rear panel Re
Index
168



Playback in ZONE2/ZONE3 (Another room)
You can operate this unit to enjoy video and audio in a room (ZONE2 and ZONE3) that is different from the room where this unit is placed (MAIN ZONE). You can simultaneously play back the same source in both the MAIN ZONE, ZONE2 and ZONE3. You can also play back separate sources in the MAIN ZONE, ZONE2 and ZONE3.
Connecting ZONE
You can use the following two methods to play back video and audio in ZONE2 and ZONE3.
- "Connection through the HDMI ZONE2 connector" (p. 169)
- "Connection through the video output connector and external power amplifiers" (p. 170)
■ Connection 1 : Connection through the HDMI ZONE2 connector
When a TV is connected to the HDMI ZONE2 OUT connector, you can play back a video or audio from the device connected to the HDMI 1 - 7 IN connector in ZONE2 (HDMI ZONE2 function).
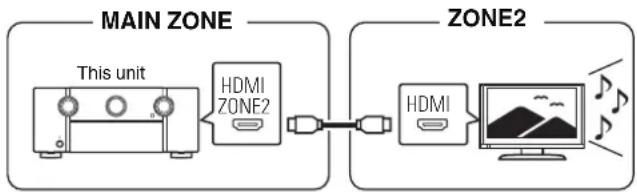
flowchart
graph LR
    A["This unit"] --> B["HDMI ZONE2"]
    B --> C["+"]
    C --> D["HDMI"]
    D --> E["Monitor with mountain image"]
    F["ZONE2"] --> G["+"]
    G --> H["+"]
    H --> I["+"]
    I --> J["+"]
    J --> K["+"]

- When a TV is connected to the HDMI ZONE2 OUT connector, and the MAIN ZONE and ZONE2 are set to the same input source, the MAIN ZONE audio may be mixed down to 2-channel audio.
Front panel D
y Rear panel Re
Index
169



flowchart
graph LR
    A["Contents"] --> B["Connections"]
    B --> C["Playback"]
    C --> D["Settings"]
    D --> E["Tips"]
    E --> F["Appendix"]
■ Connection 2 : Connection through the video output connector and external power amplifiers
The audio signals of this unit's ZONE2 and ZONE3 audio output connectors are played on the ZONE2 and ZONE3 power amplifiers.
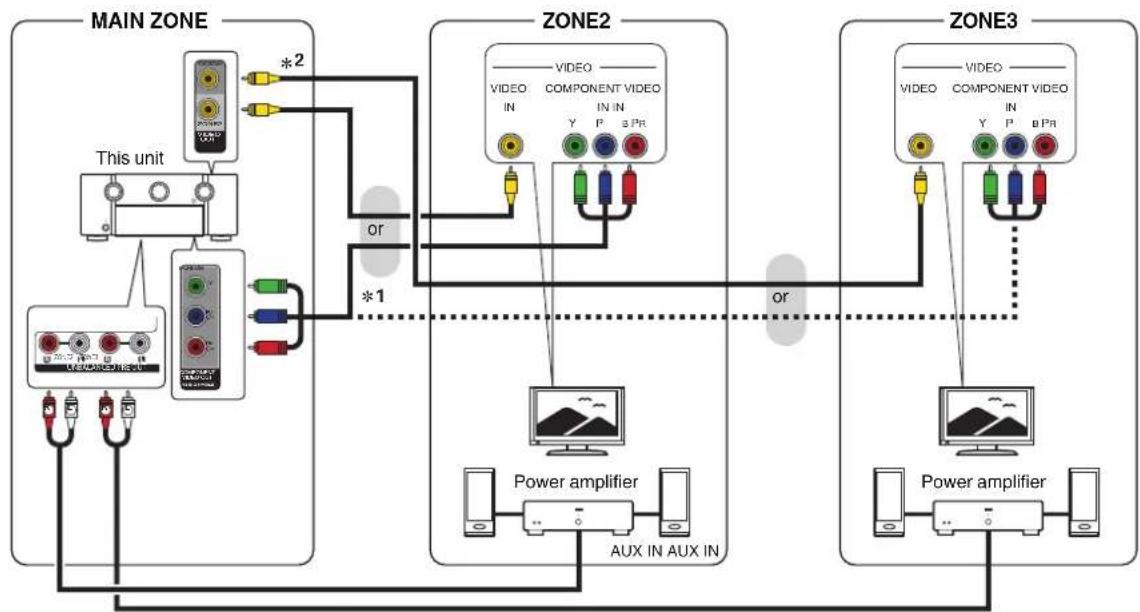
flowchart
graph TD
    A["MAIN ZONE"] -->|*2| B["This unit"]
    A -->|*1| C["ZONE2"]
    C --> D["VIDEO IN"]
    C --> E["COMPONENT VIDEO IN"]
    C --> F["Power amplifier"]
    C --> G["AUX IN AUX IN"]
    C --> H["Power amplifier"]
    H --> I["ZONE3"]
    I --> J["VIDEO IN"]
    I --> K["COMPONENT VIDEO IN"]
    I --> L["Power amplifier"]
    style A fill:#f9f,stroke:#333
    style C fill:#ccf,stroke:#333
    style I fill:#cfc,stroke:#333
*1 Set "ZONE2" or "ZONE3" for "Analog Video Out" - "Component" in the menu to enable use of the MAIN ZONE component video output terminal for ZONE2 or ZONE3. (178 p. 202)
*2 Set "ZONE3" for "Analog Video Out" - "Video" in the menu to enable use of the MAIN ZONE video output terminal for ZONE3. (1 p. 202)
Front panel
Display
Rear panel
170
Remote
Index

Contents Connections
Setti
ngs Tips Appendix

- The analog audio signal and the 2-channel PCM signal input from HDMI connector or digital connectors (OPTICAL/COAXIAL) can be played back in ZONE2.
- If you want to play back HDMI signals other than 2-channel PCM in ZONE2, set "HDMI Audio" to "PCM". (1 p. 251)
2-channel PCM signals are output from a device connected to the input source selected for ZONE2 and can be played back in ZONE2. In this case, the MAIN ZONE audio will also be converted to 2-channel PCM signals if the MAIN ZONE and ZONE2 are set to the same input source. However, depending on the playback device, the playback signal may not be converted to PCM even if this setting is configured. - The analog audio signal and the 2-channel PCM signal input from digital connectors (OPTICAL/COAXIAL) can be played back in ZONE3.
- The menu screen is not output in ZONE2 and ZONE3.
Front panel D
Rear panel Re
Index
171


Contents
Connections
back
Appendix
Playback in ZONE2/ZONE3
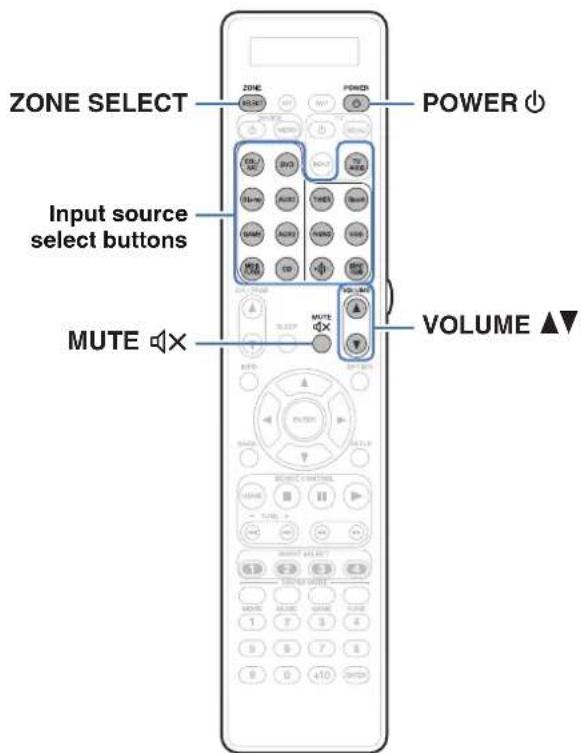
1 Press ZONE SELECT to switch "ZONE2" or "ZONE3".
2 Press POWER ⏻ to turn on the ZONE2 or ZONE3 power.
The multi zone power indicator on the display lights.
- Power in ZONE2 or ZONE3 can be turned on or off by pressing ZONE2 ON/OFF or ZONE3 ON/OFF on the main unit.
3 Press the input source select button to select the input source to be played.
The audio signal of the selected source is output to ZONE2 or ZONE3.
- You can also select ZONE2 or ZONE3 as the input source by pressing ZONE SELECT and then turning the INPUT SELECTOR.
Front panel D
Rear panel Re
Index
172



Contents
Connections
back
Appendix
■ Adjusting the volume (ZONE2/ZONE3)
Use VOLUME ▲▼ to adjust the volume.
- At time of purchase, "Volume Limit" is set to "70 (-10 dB)". (P. 253)

- Turn VOLUME after pressing ZONE SELECT on the main unit to adjust the volume.
■ Turning off the sound temporarily (Muting) (ZONE2/ZONE3)
Press MUTE 📄X.
The sound is reduced to the level set at "Mute Level" in the menu. (p. 253)
- To cancel mute, either adjust the sound volume or press MUTE 📄X again.
Front panel D
y Rear panel Re
Index
173


Contents
Connections
Playback
Settings
Tips
Appendix
Menu map
When using menu operations, connect this unit to a TV and operate this unit while viewing the TV.
The recommended settings are configured for this unit by default. You can customize this unit based on your existing system and your preferences.
| Setting items | Detailed items Description Page | ||
 Audio Audio | Subwoofer Level Adjust Adjusts the subwoofer channel volume for all input sources. 179 | — | |
| Bass Sync | Adjusts the phase shift when there is a delay in the bass (LFE) recorded on a disc. | 179 | |
| Surround Parameter Adjusts surround sound parameters. 180 | — | ||
| M-DAX Expands the low and high frequency components of compressed audio content such as MP3 files to enable richer audio playback. | 184 | ||
| Audio Delay Compensates for incorrect timing between video and audio. 185 | — | ||
| Volume Sets the MAIN ZONE (room where the unit is located) volume setting. 186 | — | ||
| Audyssey | Makes Audyssey MultEQ® XT32, Audyssey Dynamic EQ®, Audyssey Dynamic Volume® and Audyssey LFCTM settings. | 187 | |
| Graphic EQ Uses the graphic equalizer to adjust the tone of each speaker. 190 | — | ||
 Video Video | Picture Adjust | Adjusts picture quality. | 192 |
| HDMI Setup | Makes settings for HDMI Audio Out, HDMI Pass Through and HDMI Control settings. | 194 | |
| Output Settings | Makes settings for video output. | 199 | |
| Analog Video Out | Selects the zone that uses component video output and video output. | 202 | |
| On Screen Display | Configures the on-screen display settings. | 203 | |
| 4K Signal Format | Set the 4K signal format when the TV or playback device is 4K compatible. | 204 | |
| TV Format | Sets the video signal format to be output for the TV you are using. | 205 | |
Front panel
Display
Rear panel
174
Remote
Index

Contents
Connections
Playback
Settings
Tips
Appendix
| Setting items Detailed items Description Page | |||
 Inputs Inputs | Input Assign Changes input connector assignment. 206 | — | |
| Source Rename Changes the display name for input source. 208 | — | ||
| Hide Sources Removes from the display input sources that are not used. 209 | — | ||
| Source Level Adjusts the playback level of the audio input. 209 | — | ||
| Input Select Sets the audio input mode. 210 | — | ||
 Speakers Speakers | Audyssey® Setup | The acoustic characteristics of the connected speakers and listening room are measured and the optimum settings are made automatically. | 211 |
| Manual Setup | Sets up the speakers manually or changes Audyssey® Setup settings. | 222 | |
 Network Network | Information Displays network information. 243 | — | |
| Connection Selects whether to connect the home network to a wireless LAN or a wired LAN. 243 | — | ||
| Settings | Used for manually setting the IP address. | 246 | |
| Network Control | Enables network communication in standby power mode. | 248 | |
| Friendly Name | The “Friendly Name” is the name of this unit displayed on the network. You can change the Friendly Name according to your preferences. | 248 | |
| Diagnostics | Used to check the network connection. | 249 | |
Front panel
Display
Rear panel
175
Remote
Index

| Contents | Connections | Playback | Settings | Tips | Appendix |
| Setting items Detailed items Description Page | |||
 HEOS Account HEOS Account | [When the user is signed out the HEOS Account] | ||
| I have a HEOS Account Selects to sign in. 250 | — | ||
| Create Account Creates new | HEOS Account. 250 | — | |
| Forgot Password | If you forgot your password, we'll send you an email with instructions about how to reset it. | 250 | |
| [When the user is signed in the HEOS Account] | |||
| Signed in As Displays your HEOS Account. 250 | — | ||
| Change Location Selects your location. 250 | — | ||
| Change Password Changes your HEOS Account Password. 250 | — | ||
| Delete Account Deletes your HEOS Account. 250 | — | ||
| Sign Out Sign out of your HEOS Account. 250 | — | ||
Front panel
Display
Rear panel
176
Remote
Index

Contents
Connections
Playback
Settings
Tips
Appendix
| Setting items Detailed items Description Page | |||
 General General | Language Changes the language of the display on the TV screen. 251 | — | |
| ZONE2 Setup/ZONE3 Setup | Makes settings for audio playback with ZONE2 and ZONE3. 251 | — | |
| Zone Rename Changes the display title of each zone to one you prefer. 254 | — | ||
| Smart Select Names Changes the Smart Select Name display title to one you prefer. 254 | — | ||
| Trigger Out 1/Trigger Out 2 | Select the conditions for activating trigger out function. 254 | — | |
| Auto Standby Configures the | Auto Standby energy-saving functions. 255 | — | |
| Front Display Makes settings related to the display on this unit. 256 | — | ||
| Firmware Checks for the latest firmware information about updates and upgrades, updates the firmware, and sets up the notification message display. | 257 | ||
| Information | Shows information about this unit settings, input signals, etc. | 260 | |
| Usage Data | Selects whether or not to send anonymous usage data to Marantz. | 261 | |
| Save & Load | Save and restore device settings by using a USB memory device. | 262 | |
| Setup Lock | Protects settings from inadvertent changes. | 262 | |
 Setup Assistant Setup Assistant | Begin Setup... | Performs basic installation/connections/settings from the beginning according to the guidance indicated on the TV screen. | Page 9 of the separate manual“Quick Start Guide” |
| Language Select | Sets individual setting items according to the guidance displayed on the TV screen. | ||
| Speaker Setup | |||
| Speaker Calibration | |||
| Network Setup | |||
| TV Audio Connection | |||
| Input Setup | |||
| Mobile Apps | |||
Front panel
Display
Rear panel
177
Remote
Index

Contents
Connections Playback
Tips Appendix
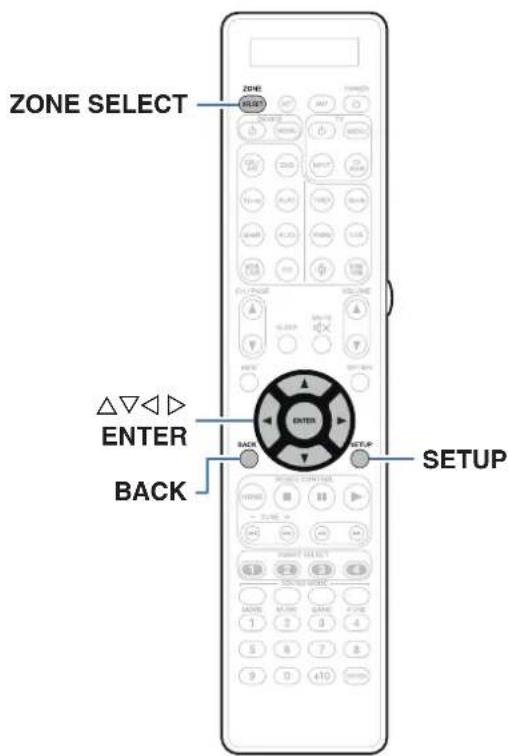
Menu operations
1 Press ZONE SELECT to switch "MAIN".
2 Press SETUP.
The menu is displayed on the TV screen.
3 Use △▽▷ to select the menu to be set or operated, then press ENTER.
4 Use ◀ ▷ to change to desired setting.
5 Press ENTER to enter the setting.
• To return to the previous item, press BACK.
- Exiting the menu, press SETUP while the menu is displayed. The menu display disappears.
Front panel D
Rear panel Rel
Index
178


Contents Connections Playback
Tips Appendix
Audio
Make audio-related settings.
Subwoofer Level Adjust
Adjusts the subwoofer channel volume for all input sources.
■ Subwoofer 1 / Subwoofer 2
Adjusts the volume for the subwoofer 1 or subwoofer 2 channel.
-12.0 dB - +12.0 dB (Default: 0.0 dB)
Bass Sync
For contents recorded in multi-channel such as Blu-ray discs, the recorded low frequency effects (LFE) may be out of synch and delayed. This function corrects such a delay of low frequency effects (LFE).
0 ms - 16 ms (Default : 0 ms)

- How low frequency effects (LFE) are delayed differ according to the disc. Set this to the desired value.
- "Bass Sync" settings are stored for each input source.
- This can be set when the LFE signal is included in the input signal.
- This cannot be set when the sound mode is "Direct" or "Pure Direct".
- This cannot be set when the input mode is set to "7.1CH IN".
Front panel D
Rear panel Re
Index
179


Contents Connections Playback
Tips Appendix
Surround Parameter
You can adjust the surround audio sound field effects to match your preferences.
The items (parameters) that can be adjusted depend on the signal being input and the currently set sound mode. For details on the adjustable parameters, see "Sound modes and surround parameters" (p. 312).

- Some setting items cannot be set while playback is stopped. Make the settings during playback.
- "Surround Parameter" settings are stored for each sound mode.
Cinema EQ
Gently softens the upper treble range of movie soundtracks to reduce possible harshness and improve clarity.
| On: | “Cinema EQ” is used. |
| Off(Default): | “Cinema EQ” is not used. |
■ Loudness Management
This sets whether to output as specified in "Dynamic Compression" or output directly without compressing the dynamic range of audio recorded in the disc.
| On(Default): | Outputs are given based on enabling the settings made in “Dynamic Compression” and Dialogue normalization function. |
| Off: | “Dynamic Compression” settings and Dialogue normalization are disabled, and the signals on the disc are output as is. |

- "Loudness Management" can be set when Dolby Digital, Dolby Digital Plus, Dolby TrueHD and Dolby Atmos signal is input.
Front panel D
Rear panel Re
Index
180



Contents Connections Playback
Tips Appendix
■ Dynamic Compression
Compress dynamic range (difference between loud and soft sounds).
| Auto: | Automatic dynamic range compression on/off control according to source. |
| Low / Medium / High: These set the compression level. | |
| Off: | Dynamic range compression is always off. |

- "Dynamic Compression" can be set when Dolby Digital, Dolby Digital Plus, Dolby TrueHD, Dolby Atmos or DTS signal is input.
- The default setting is "Off". When the input signal is the Dolby TrueHD or Dolby Atmos source, the default setting is "Auto".
- "Auto" cannot be set when inputting a DTS signal.
■ Dialog Control
Adjust the volume of dialog in movies, vocals in music, etc. so these can be heard more easily.
0 - 6 (Default : 0)

- This can be set when a DTS:X signal that is compatible with the Dialog Control function is input.
■ Low Frequency Effects
Adjust the low frequency effects level (LFE).
☐ When "Input Mode" is set other than to "7.1CH IN"
-10 dB - 0 dB (Default: 0 dB)
☐ When "Input Mode" is set to "7.1CH IN"
0 dB / +5 dB / +10 dB / +15 dB (Default: +10 dB)

- For proper playback of the different sources, we recommend setting to the values below.
• Dolby Digital sources: 0 dB
• DTS movie sources: 0 dB
• DTS music sources: -10 dB
Front panel D
Rear panel Re
Index
181



Contents Connections Playback
Tips Appendix
■ Center Spread
Center Spread expands the center channel signal to left and right front speakers to create a wider frontal audio image for the listener. It is optimized and designed primary for playback of stereo music content.
On: Use "Center Spread".
Off
(Default):
Do not use "Center Spread".

- You can set this when sound mode is "Dolby Surround".
■ DTS Neural:X
DTS Neural:X Expands the non-object based audio signals and optimizes them for your speaker configuration.
On
(Default):
Use "DTS Neural:X".
Off: Do not use "DTS Neural:X".

- You can set this when sound mode is "DTS:X" or "DTS:X MSTR".
■ Auro-Matic 3D Preset
Selects the Auro-Matic 3D Preset for fine tuning the Auro-3D experience to specific audio material.
| Small: | “Small” is ideal for pop and chamber music or movies with a lot of dialog. (e.g. comedy) |
| Medium (Default): | “Medium” is best used on jazz music or typical movies and TV shows. |
| Large: | “Large” is ideal for recordings that were recorded in large spaces. (e.g. orchestral recordings or action movies with big explosions.) |
| Speech: | “Speech” is ideal for recordings which are mostly dialog (e.g. news broadcast), and that have virtually no inherent spatial information. |

- You can set this when the sound mode is set to Auro-3D.
- This cannot be set if the input signal contains Auro-3D signals containing a Height channel.
Front panel D
Rear panel Re
Index
182


Contents
Connections Playback
Tips Appendix
■ Auro-Matic 3D Strength
Changes the level of the up-mixed channels in relation to the original input signal.
The value ranges from 1 (no up-mixing) to 16 (Maximum level, providing maximum effect).
1 - 16 (Default:10)

- You can set this when the sound mode is set to Auro-3D.
- This cannot be set if the input signal contains Auro-3D signals containing a Height channel.
Speaker Select
Makes settings for the speakers outputting sound.
Floor: Plays back without height speakers.
Floor & Height
(Default):
Plays back with height speakers.

- This can be set when the sound mode is the original sound mode.
Subwoofer
Turn subwoofer output on and off.
On
The subwoofer is used.
(Default):
Off: The subwoofer is not used.

- You can set this when the sound mode is "Direct" or "Stereo" and in the menu "Subwoofer Mode" is set to "LFE+Main". (1 p. 239)
Set Defaults
The "Surround Parameter" settings are returned to the default settings.
Front panel D
Rear panel Re
Index
183



M-DAX
Compressed audio formats such as MP3, WMA (Windows Media Audio) and MPEG-4 AAC reduce the amount of data by eliminating signal components that are hard for the human ear to hear. The "M-DAX" function generates the signals eliminated upon compression, restoring the sound to conditions near those of the original sound before compression. It also restores the original bass characteristics for a rich and expanded tonal range.
■ Mode
| High: | Optimized mode for compressed sources with very weak highs (64 kbps and under). |
| Medium: | Apply suitable bass and treble boost for all compressed sources (96 kbps and under). |
| Low: | Optimized mode for compressed sources with normal highs (96 kbps and over). |
| Off: Do not use “M-DAX”. | |

• The M-DAX indicator lights.
- This item can be set with analog signals or PCM signal (Sample Rate = 44.1/48 kHz) is input.
- This item default setting for "HEOS Music" is "Low". All others are set to "Off".
- This cannot be set when the sound mode is set to "Direct" or "Pure Direct".
- This cannot be set when the input mode is set to "7.1CH IN".
- "M-DAX" settings are stored for each input source.
- This can also be set by pressing M-DAX on the main unit.
Front panel D
Rear panel Re
Index
184


Contents Connections Playback
Tips Appendix
Audio Delay
Compensates for incorrect timing between video and audio.

- Audio Delay for game mode can be set when "Video Mode" is set to "Auto" or "Game". (1 p. 200)
- "Audio Delay" settings are stored for each input source.
- This cannot be set when the input mode is set to "7.1CH IN".
■ Auto Lip Sync
Automatically adjusts the audio processing time to compensate for delays in audio/video timing from TV compatible with Auto Lip Sync.
On
(Default):
Correct automatically.
Off: Do not correct automatically.

- Automatic correction may not be performed depending on the specifications of your TV even when "Auto Lip Sync" is set to "On".
Front panel D
Rear panel Re
Index
185
Adjust
The timing mismatch between the picture and sound needs to be corrected manually.
0 ms - 500 ms (Default : 0 ms)

- You can also finely adjust the delay correction value set by "Auto Lip Sync".
- Adjust for game mode can be set when "Video Mode" is set to "Auto" or "Game". (p. 200)

Contents Connections Playback
Tips Appendix
Volume
Set the MAIN ZONE (room where the unit is located) volume setting.
Scale
Set how volume is displayed.
| 0 - 98(Default): | Display in the range 0 (Min) to 98. |
| -79.5 dB - 18.0 dB: | Display ---dB (Min), in the range -79.5 dB to 18.0 dB. |

- "Scale" settings are reflected in all the zones.
Limit
Make a setting for maximum volume.
60 (-20 dB) / 70 (-10 dB) / 80 (0 dB)
Off (Default)

- The dB value is displayed when the "Scale" setting is “-79.5 dB - 18.0 dB”. (12 p. 186)
Power On Level
Define the volume setting that is active when the power is turned on.
| Last (Default): | Use the memorized setting from the last session. |
| Mute: | Always use the muting on condition when power is turned on. |
1 - 98 (-79 dB - 18 dB) : The volume is adjusted to the set level.

- The dB value is displayed when the "Scale" setting is “-79.5 dB - 18.0 dB”. (p. 186)
Mute Level
Set the amount of attenuation when muting is on.
| Full(Default): | The sound is muted entirely. |
| -40 dB : The sound is attenuated by 40 dB down. | |
| -20 dB : The sound is attenuated by 20 dB down. | |
Front panel D
Rear panel Re
Index
186


Audyssey®
Set Audyssey MultEQ ^® XT32, Audyssey Dynamic EQ ^® , Audyssey Dynamic Volume ^® and Audyssey LFC ^™ . These can be selected after Audyssey ^® Setup has been performed.
For additional information on Audyssey technology, please see "Explanation of terms" (p. 318).

- "MultEQ® XT32", "Dynamic EQ", "Reference Level Offset", "Dynamic Volume", "Audyssey LFC™" and "Containment Amount" settings are stored for each input source.
- When the sound mode is in the "Direct" or "Pure Direct" mode, "MultEQ® XT32", "Dynamic EQ", "Dynamic Volume" and "Audyssey LFC™" settings cannot be configured.
- When the sound mode is in "DTS Virtual:X" or sound mode that have "+Virtual:X" in the sound mode name, "Dynamic EQ", "Dynamic Volume" and "Audyssey LFC™" settings cannot be configured.
- This cannot be set when the input mode is set to "7.1CH IN".
■ MultEQ® XT32
MultEQ ^® XT32 compensates for both time and frequency characteristics of the listening area based on Audyssey ^® Setup measurement results. Selection is done from three types of compensation curves. We recommend the “Reference” setting.
| Reference (Default): | Selects the default calibrated setting with a slight roll off at high frequencies, which is optimized for movies. |
| L/R Bypass: | Selects the reference setting, but bypasses MultEQ® XT32 on the front left and right speakers. |
| Flat: | Selects the calibrated setting which is optimized for small rooms where your listening position is closer to the speakers. |
| Off: | Do not use “MultEQ® XT32”. |

- When using headphones, "MultEQ® XT32" is automatically set to "Off".
Front panel D
Rear panel Re
Index
187


Contents Connections Playback
Tips Appendix
■ Dynamic EQ
Solves the problem of deteriorating sound quality as volume is decreased by taking into account human perception and room acoustics.
Works with MultEQ ^® XT32.
On
Use "Dynamic EQ".
(Default):
Off: Do not use "Dynamic EQ".

- When the menu "Dynamic EQ" setting is "On", it is not possible to do "Tone" adjustment. (19 p. 141)
- This can be set by pressing DYNAMIC EQ on the main unit.
■ Reference Level Offset
Audyssey Dynamic EQ ^® is referenced to the standard film mix level. It makes adjustments to maintain the reference response and surround envelopment when the volume is turned down from 0 dB. However, film reference level is not always used in music or other non-film content. Dynamic EQ Reference Level Offset provides three offsets from the film level reference (5 dB, 10 dB, and 15 dB) that can be selected when the mix level of the content is not within the standard. Recommended setting levels for content are shown below.
| 0 dB (Film Reference) (Default): | Optimized for content such as movies. |
| 5 dB : | Select this setting for content that has a very wide dynamic range, such as classical music. |
| 10 dB : | Select this setting for jazz or other music that has a wider dynamic range. This setting should also be selected for TV content as that is usually mixed at 10 dB below film reference. |
| 15 dB : | Select this setting for pop/rock music or other program material that is mixed at very high listening levels and has a compressed dynamic range. |

- Setting is enabled when "Dynamic EQ" is "On". (18 p. 188)
Front panel D
Rear panel Re
Index
188


Contents Connections Playback
Tips Appendix
■ Dynamic Volume
Solves the problem of large variations in volume level between TV, movies and other content (between quiet passages and loud passages, etc.) by automatically adjusting to the user's preferred volume setting.
Works with MultEQ ^® XT32.
| Heavy: | Most adjustment to softest and loudest sounds. |
| Medium: | Medium adjustment to loudest and softest sound. |
| Light: | Least adjustment to loudest and softest sounds. |
| Off(Default): | Do not use “Dynamic Volume”. |

- If "Dynamic Volume" is set to "Yes" in "Audyssey® Setup", the setting is automatically changed to "Medium". (I p. 211)
- This can be set by pressing DYNAMIC VOLUME on the main unit.
Audyssey LFC™
Adjusts the low frequency band to prevent bass and vibration from being conveyed to neighboring rooms.
Works with MultEQ® XT32.
On: Use "Audyssey LFC™".
Off (Default): Do not use "Audyssey LFC™".
■ Containment Amount
Adjusts the amount of low frequency containment. Use higher settings if you have close neighbors.
1 - 7 (Default : 4)

- This can be set when "Audyssey LFC™" in the menu is set to "On".
Front panel D
Rear panel Re
Index
189


Contents Connections Playback
Tips Appendix
Graphic EQ
Uses the graphic equalizer to adjust the tone of each speaker.

- Speakers for which "Graphic EQ" can be set differ according to the sound mode.
- This can be set when "MultEQ® XT32" setting is "Off". (p. 187)
- This cannot be set when the sound mode is set to "Direct" or "Pure Direct".
- If you are using headphones, you can set the equalizer for headphones. (p. 190)
- This cannot be set when the input mode is set to "7.1CH IN".
■ Graphic EQ / Headphone EQ
Set whether to use the graphic equalizer or not.
| On: | Use the graphic equalizer. |
| Off(Default): | Do not use the graphic equalizer. |

- "Headphone EQ" is set in the menu when headphones are used.
■ Speaker Selection
Select whether to adjust tones for individual speakers or for all speakers.
All: Adjust all speaker tones together.
| Left/Right(Default): | Adjust the left and right speaker tones together. |
Each: Adjust the tone for each speaker.
■ Adjust EQ
Adjust tonal balance for each frequency band.
- Select the speaker.
- Select the adjustment frequency band.
63 Hz / 125 Hz / 250 Hz / 500 Hz / 1 kHz / 2 kHz / 4 kHz / 8 kHz / 16 kHz - Adjust the level.
-20.0 dB - +6.0 dB (Default: 0.0 dB)

- Front Dolby, Surround Dolby and Back Dolby speakers can only be set when 63 Hz/125 Hz/250 Hz/500 Hz/1 kHz.
Front panel D
Rear panel Re
Index
190


Contents Connections Playback
Tips Appendix
■ Curve Copy
Copy the Flat correction curve created in Audyssey ^® Setup.

- "Curve Copy" is displayed after Audyssey® Setup has been performed.
- "Curve Copy" cannot be used when using headphones.
Set Defaults
The "Graphic EQ" settings are returned to the default settings.
Front panel D
Rear panel Rel
Index
191


Contents Connections Playback
Tips Appendix
Video
Make video-related settings.
Picture Adjust
Picture quality can be adjusted.

- This can be set when the "Video Conversion" setting is "On". (10 p. 200)
- This can be set when "HDMI", "COMP" or "VIDEO" is assigned for each input source. (17 p. 207)
- "Contrast", "Brightness", "Saturation", "Noise Reduction" and "Enhancer" can be set when "Picture Mode" is set to "Custom". (19 p. 192)
- "Picture Adjust" settings are stored for each input source.
- "Picture Adjust" cannot be set when 4K signals are input.
Picture Mode
Select the desired picture mode according to the video content and your viewing environment.
| Standard: | The standard mode suited for most living room viewing environments. |
| Movie: | A mode suited for watching movies in a dark room such as a theater room. |
| Vivid: | A mode that makes graphic images for games, etc. brighter and more vivid. |
| Streaming: | A mode suited for low bit rate video sources. |
| ISF Day: | A mode suited for watching movies in a bright room during the day. |
| ISF Night: | A mode suited for watching movies in a dark room at night. |
| Custom: Adjusts the picture quality manually. | |
| Off(Default): | No picture quality adjustment is done with this unit. |
Front panel D
Rear panel Re
Index
192


Contents Connections Playback
Tips Appendix

- The two special adjustment modes, "ISF Day" and "ISF Night", should be used by a certified technician to adjust the color calibration to match the installation conditions.
We recommend that the settings and adjustments be carried out by an ISF-certified technician. - These settings can also be configured using "Picture Mode" in the option menu. (12 p. 192)
Contrast
Adjust picture contrast.
$$ - 5 0 - + 5 0 (\text { Default }: 0) $$
Brightness
Adjust picture brightness.
$$ - 5 0 - + 5 0 (\text { Default }: 0) $$
Saturation
Adjust picture chroma level (color saturation).
$$ - 5 0 - + 5 0 (\text { D e f a u l t }: 0) $$
Noise Reduction
Reduce overall video noise.
Low / Medium / High / Off (Default : Off)
■ Enhancer
Emphasize picture sharpness.
$$ 0 - + 1 2 (\text {Default:} 0) $$
Front panel D
Rear panel Re
Index
193


HDMI Setup
Make settings for HDMI Audio Out, HDMI Pass Through and HDMI Control settings.
NOTE
- When "HDMI Pass Through" and "HDMI Control" is set to "On", it consumes more standby power. ("HDMI Pass Through" (127p. 194), "HDMI Control" (127p. 196)) If you are not using this unit for an extended period, it is recommended that you unplug the power cord from the power outlet.
■ HDMI Audio Out
Select HDMI audio output device.
| AVP(Default): | Play back through speakers connected to power amp. (Audio is output from the PRE OUT connector on this unit.) |
| TV: | Play back through TV connected to the unit. |

- When the HDMI Control function is activated, priority is given to the TV audio setting. (Kp. 157)
- When the power of this unit is on and "HDMI Audio Out" is set to "TV", audio is output as 2-channel from the HDMI OUT connector.
■ Vertical Stretch
Sets whether video signals are vertically stretched or not.
| On: Stretches video signals vertically. | |
| Off(Default): | Does not stretch video signals vertically. |

- "Vertical Stretch" can be set when "i/p Scaler" is set to anything other than "Off". (127 p. 200)
■ HDMI Pass Through
Selects how this unit will transmit HDMI signals to the HDMI output in standby power mode.
| On(Default): | Transmits the selected HDMI input through this unit's HDMI output when this unit is in standby power mode. |
| Off: | No HDMI signals are transmitted through this unit's HDMI output in standby power mode. |
Front panel D
Rear panel Re
Index
194


Contents Connections Playback
Tips Appendix
■ Pass Through Source
Sets the HDMI connector that inputs HDMI signals when in standby.
| Last: | The most recently used input source will go into standby mode. |
| CBL/SAT / DVD / Blu-ray / Game / Media Player / CD* / AUX1 / AUX2(Default : CBL/SAT): | Pass through the selected input source. |
*“Pass Through Source” can be set when any of the HDMI connectors is assigned to “CD” for the input source in the “Input Assign” setting. (p. 206)

- "Pass Through Source" can be set when "HDMI Control" is set to "On" or "HDMI Pass Through" is set to "On". ("HDMI Pass Through" (p. 194), "HDMI Control" (p. 196))
■ RC Source Select
Set whether to allow this unit to be turned on by the input source select button on the remote control when this unit is on standby.
| Power On + Source (Default): | The power of this unit is turned on and the input source changes. |
| Source Select Only: | The HDMI input source changes while this unit is on standby. The power display of this unit blinks when the input source select button of the remote control is pressed. |

- "RC Source Select" can be set when "HDMI Control" is set to "On" or "HDMI Pass Through" is set to "On". ("HDMI Pass Through" (p. 194), "HDMI Control" (p. 196))
Front panel D
Rear panel Re
Index
195


Contents Connections Playback
Tips Appendix
HDMI Control
You can link operations with devices connected to HDMI and compatible with HDMI Control.
On: Use HDMI Control function.
Off
(Default):
Do not use HDMI Control function.

- If using the HDMI Control function, connect a TV compatible with HDMI control to the HDMI MONITOR 1 connector.
- Please consult the operating instructions for each connected device to check the settings.
- Refer to "HDMI Control function" for more information about the HDMI Control function. (r ^25 p. 157)
NOTE
- If the "HDMI Control" settings have been changed, always reset the power to connected devices after the change.
ARC
On the TV connected to the HDMI MONITOR 1 connector, set whether to receive sound from the TV via HDMI.
On: Use ARC function.
Off
(Default):
Do not use ARC function.

- You can adjust the volume of this unit using the TV remote control.
- If using this function, use a TV compatible with ARC (Audio Return Channel) and enable the HDMI Control function of the TV.
- When "HDMI Control" is set to "On", the "ARC" settings automatically switch "On". (125 p. 196)
NOTE
- If the "ARC" settings have been changed, always reset the power to connected devices after the change.
Front panel D
Rear panel Re
Index
196


Contents Connections Playback
Tips Appendix
TV Audio Switching
Sets automatic switching to the "TV Audio" input when a TV connected via HDMI sends an appropriate CEC control command to this unit.
| On(Default): | Select the “TV Audio” input automatically when receiving a command from the TV. |
| Off: | Do not select the “TV Audio” input automatically when receiving a command from the TV. |

- "TV Audio Switching" can be set when "HDMI Control" is set to "On". (196 p. 196)
Power Off Control
Links the power standby of this unit to external devices.
| All(Default): | If power to a connected TV is turned off independently of the input source, power to this unit is automatically set to standby. |
| Video: | With an input source being selected that is assigned either “HDMI”, “COMP” or “VIDEO”, when you turn the power of the TV off, power to this unit is automatically set to standby. (ICP p. 207) |
Off: This unit does not link with power to a TV.

- "Power Off Control" can be set when "HDMI Control" is set to "On". (12 p. 196)
Front panel D
Rear panel Re
Index
197


Contents
Connections Playback
Tips Appendix
Power Saving
If "TV Speaker" is set as the audio output setting of your TV, this unit is automatically set to standby mode to reduce power consumption.
This function is activated in the following cases.
- When "TV Audio" is selected as the input source of this unit
- When playing content from a device connected by HDMI
On: Use Power Saving function.
Off
(Default):
Do not use Power Saving function.

- "Power Saving" can be set when "HDMI Control" is set to "On". (17 p. 196)
Smart Menu
This function can be used to configure the settings of this unit, select an input source and set Tuner and Internet Radio stations using the TV remote control.
On: Use Smart Menu function.
Off: Do not use Smart Menu function.

- "Smart Menu" can be set when "HDMI Control" is set to "On". (p. 196)
NOTE
- If the "Smart Menu" settings have been changed, always reset the power to connected devices after the change.
- The Smart Menu function may not work properly depending on the specifications of your TV. In this case, set "Smart Menu" to "Off".
Front panel D
Rear panel Re
Index
198


Output Settings
Makes settings for video output.

- This can be set when "HDMI", "COMP" or "VIDEO" is assigned for each input source. (1 p. 207)
- "Resolution", "Progressive Mode" and "Aspect Ratio" can be set when "i/p Scaler" is set to anything other than "Off". ("Resolution" (17 p. 201), "Progressive Mode" (17 p. 201), "Aspect Ratio" (17 p. 202))
- "Output Settings" cannot be set when 4K signals are input.
- "Video Conversion", "i/p Scaler", "Resolution", "Progressive Mode" and "Aspect Ratio" settings are stored for each input source. ("Video Conversion" (1p. 200), "i/p Scaler" (1p. 200), "Resolution" (1p. 201), "Progressive Mode" (1p. 201), "Aspect Ratio" (1p. 202))
■ HDMI Video Output
Select the HDMI monitor connector to be used.
| Auto(Dual)(Default): | The presence of a TV connected to the HDMI MONITOR 1 or HDMI MONITOR 2 connector is detected automatically, and that TV connection is used. |
| Monitor 1: | A TV connected to the HDMI MONITOR 1 connector is always used. |
| Monitor 2: | A TV connected to the HDMI MONITOR 2 connector is always used. |

- If both the HDMI MONITOR 1 and HDMI MONITOR 2 connectors are connected and "Resolution" is set to "Auto", the signals are output with a resolution that is compatible with both TVs. (IF p. 201) When the "Resolution" setting in the menu is not set to "Auto", set the resolution in "Video" - "HDMI Monitor 1" and "HDMI Monitor 2" to one that is compatible with both TVs. (IF p. 260)
- You can check which resolutions are compatible with your TV in "HDMI Monitor 1" and "HDMI Monitor 2". (1 p. 260)
- When connecting multiple Dolby Vision TVs, the signal will only be optimal for one TV. A TV connected to the HDMI MONITOR 1 connector has priority.
Front panel D
Rear panel Re
Index
199

Contents Connections Playback
Tips Appendix
Video Mode
Configure the video processing method to match the type of video content.
| Auto(Default): | Process video automatically based on the HDMI content information. |
| Game: | Always process video for game content.Minimize the video delay when the video is delayed compared to the button operations on the controller of the game console. |
| Movie: | Perform image processing that is suitable for contents other than games. |

- If "Video Mode" is set to "Auto", the mode is switched according to the input contents.
■ Video Conversion
The input video signal is converted automatically in conjunction with the connected TV. (1 p. 304)
| On(Default): | The input video signal is converted. |
| Off: The input video signal is not converted. | |
■ i/p Scaler
Set the video input signal to be subjected to i/p Scaler processing. i/p Scaler will convert the resolution of the input video signal to the value set in "Resolution". (1 p. 201)
| Analog(Default): | Use i/p (interlace-to-progressive) scaler function for analog video signals. |
| Analog & HDMI: | Use i/p Scaler function for analog and HDMI video signal. |
| HDMI: | Use i/p Scaler function for HDMI video signals. |
| Off: Do not use i/p Scaler function. | |
Front panel D
Rear panel Re
Index
200



Contents Connections Playback
Tips Appendix
Resolution
Set the output resolution. You can set "Resolution" separately for HDMI output of the analog video input and HDMI input.
| Auto(Default): | The resolution supported by the TV connected to the HDMI MONITOR OUT connector is detected automatically and the appropriate output resolution is set. |
| 480p/576p / 1080i /720p / 1080p /1080p:24Hz /4K / 4K (60/50) : | Set the output resolution. |

- When "i/p Scaler" is set to "Analog & HDMI", the resolution of both the analog video input signal and HDMI input signal can be set. (p. 200)
- When set to "1080p:24Hz", you can enjoy film-like pictures for film sources (in 24 Hz). For video sources and mixed sources, we recommend setting the resolution to "1080p".
- It is not possible to convert a 50 Hz signal into 1080p/24Hz. It is output at a resolution of 1080p/50Hz.
■ Progressive Mode
Set an appropriate progressive conversion mode for the source video signal.
| Auto(Default): | The video signal is automatically detected and the appropriate mode is set. |
Video: Select mode suitable for video playback.
| Video and Film: | Select mode suitable for video and 30-frame film material playback. |

- This item can be set when "i/p Scaler" is set to anything other than "Off". (rF p. 200)
Front panel D
Rear panel Re
Index
201



Contents Connections Playback
Tips Appendix
■ Aspect Ratio
Set the aspect ratio for the video signals output to the HDMI.
| 16:9(Default): | Output at 16:9 aspect ratio. |
| 4:3 : | Output at 4:3 aspect ratio with black bars on the sides of a 16:9 TV screen. (except for 480p/576p output) |

- This item can be set when "i/p Scaler" is set to anything other than "Off". (17 p. 200)
Analog Video Out
Selects the zone that uses component video output and video output.
■ Component
Selects the zone that uses component video output.
MAIN ZONE (Default): Used in the MAIN ZONE.
ZONE2: Used in the ZONE2.
ZONE3: Used in the ZONE3.
Video
Selects the zone that uses video output.
MAIN ZONE (Default): Used in the MAIN ZONE.
ZONE3: Used in the ZONE3.
Front panel D
Rear panel Re
Index
202


Contents Connections Playback
Tips Appendix
On Screen Display
Select the on-screen display user interface preferences.
Volume
Sets where to display the volume level.
Bottom
(Default):
Display at the bottom.
Top: Display at the top.
Off: Turn display off.

- When the master volume display is hard to see when superimposed text (closed captioning) or movie subtitles are present, set to "Top".
Info
Displays status of operation temporarily when the input source is switched.
On
(Default):
Turn display on.
Off: Turn display off.
Now Playing
Sets the display time for the playback display when the input source is "HEOS Music" or "Tuner".
| Always On (Default): | Show display continuously. |
| Auto Off: | Show display for 30 seconds after operation. |
Front panel D
Rear panel Re
Index
203



Contents Connections Playback
Tips Appendix
4K Signal Format
Set the 4K signal format to be played back by this unit when the TV or playback device connected to this unit is HDMI 4K (60Hz/50Hz) signal compatible.
■ 4K Signal Format
Set the format of the 4K signal played back by this unit.
| Standard(Default): | Select if your TV and playback devices support standard 4K 60p 4:2:0 8 bit video signals. |
| Enhanced: | Select if your TV, playback devices, and cables support high quality 4K 60p 4:4:4, 4:2:2 or 4K 60p 4:2:0 10 bit video signals. |
【Relation between the "4K Signal Format" setting and supported resolutions】
| Support Resolution | Color Space | Pixel Depth | 4K Signal Format | |
| Enhanced | Standard (Default) | |||
| 4K 24p, 4K 30p, 4K 25p | RGB / YCbCr 4:4:4 | 8 bit | √ | √ |
| 10,12 bit | √ | - | ||
| YCbCr 4:2:2 | 12 bit | √ | √ | |
| 4K 60p, 4K 50p | YCbCr 4:2:0 8 | bit | √ | √ |
| 10,12 bit | √ | - | ||
| RGB / YCbCr 4:4:4 | 8 bit | √ | - | |
| YCbCr 4:2:2 | 12 bit | √ | - | |
Front panel D
Rear panel Re
Index
204


Contents Connections Playback
Tips Appendix

- When setting this to "Enhanced", we recommend using a "Premium High Speed HDMI Cable" or "Premium High Speed HDMI Cable with Ethernet" that has an "HDMI Premium Certified Cable" label attached to the product package.
- When this setting is "Enhanced", configure the television or playback device settings to match this setting.
- When this setting is "Enhanced", video may not be output correctly depending on the connected playback device or HDMI cable. In this case, change this setting to "Standard".
- "Custom" is displayed for the setting item if our service engineers or custom installers has configured the HDMI signal format for this unit.
- "4K Signal Format" can also be set by the following procedure. However, the menu screen is not displayed. Watch the display while configuring the setting.
- Press and hold the main unit's STATUS and ZONE SELECT at the same time for at least 3 seconds.
"*Video Format" appears on the display. - Use or on the main unit.
"4K Format:" appears on the display. - Use the main unit's ◀ or ▷ and select the 4K Signal Format.
- Press the main unit's ENTER to complete the setting.
TV Format
Set the video signal format to be output for the TV you are using.
Format
NTSC
(Default):
Select NTSC output.
PAL: Select PAL output.

- "Format" can also be set by the following procedure. However, the menu screen is not displayed. Following the display content to make the setting.
- Press and hold the main unit's STATUS and ZONE SELECT at the same time for at least 3 seconds.
"*Video Format" appears on the display. - Use the main unit's ◀ or ▷ and set the video signal format.
- Press the main unit's ENTER to complete the setting.
NOTE
- When a format other than the video format of the connected TV is set, the picture will not be displayed properly.
Front panel D
Rear panel Re
Index
205


Contents
Connections
Playback
Settings
Tips
Appendix
Inputs
Perform settings related to input source playback.
You do not have to change the settings to use the unit. Make settings when needed.
Input Assign
By making connections as indicated by the input sources printed on the audio/video input connectors of this unit, you can just press one of the input source select buttons to easily play back audio or video from a connected device.
Please change the assignment of the HDMI input connector, digital audio input connector, analog audio input connector, component video input connector and video input connector when connecting an input source that differs from that printed to the audio/video input connectors of this unit.
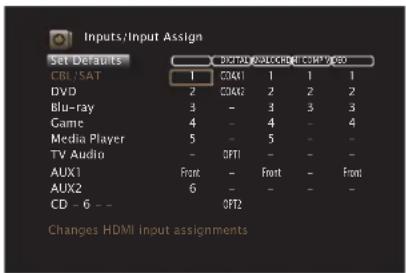

- By default, each item is set as follows.
| Input source | Input connector | ||||
| HDMI DIGITAL ANALOG COMP | VIDEO | ||||
| CBL/SAT 1 COAX1 | 1 1 | 1 | |||
| DVD | 2 COAX2 2 2 | 2 | |||
| Blu-ray | 3 | - | 3 | 3 | 3 |
| Game | 4 | - | 4 | - | 4 |
| Media Player | 5 | - | 5 | - | - |
| TV Audio | - | OPT1 | - | - | - |
| AUX1 | Front | - | Front | - | Front |
| AUX2 | 6 | - | - | - | - |
| CD | - | OPT2 | 6 | - | - |
☐ TV set top box/satellite users please note
When using the digital audio output on a TV/satellite box:
To play the video signal assigned to "HDMI" combined with the audio signal assigned at "Input Assign" - "DIGITAL", you will also need to select "Digital" in the "Input Mode". (p. 210)
Front panel
Display
Rear panel
206
Remote
Index

Contents Connections Playback
Tips Appendix
HDMI
Set this to change the HDMI input connectors assigned to the input sources.
| 1/2/3/4/5/6/7/Front: | Assign an HDMI input connector to the selected input source. |
| - : | Do not assign an HDMI input connector to the selected input source. |

- When "HDMI Control" or "ARC" is set to "On" in the menu, "HDMI" cannot be assigned to "TV Audio". ("HDMI Control" (1p. 196), "ARC" (1p. 196))
DIGITAL
Set this to change the digital audio input connectors assigned to the input sources.
| COAX1 (Coaxial) / COAX2 / OPT1 (Optical) / OPT2: | Assign a digital audio input connector to the selected input source. |
| - : | Do not assign a digital audio input connector to the selected input source. |
ANALOG
Set this to change the analog audio input connectors assigned to the input sources.
| 1/2/3/4/5/6/Front/XLR: | Assign a analog audio input connector to the selected input source. |
| - : | Do not assign a analog audio input connector to the selected input source. |
COMP (Component video)
Set this to change the component video input connectors assigned to the input sources.
| 1/2/3: | Assign the component video input connector to the selected input source. |
| -: | Do not assign a component video input connector to the selected input source. |
Front panel D
Rear panel Re
Index
207



Contents Connections Playback
Tips Appendix
VIDEO
Set this to change the composite video input connectors assigned to the input sources.
| 1 / 2 / 3 / 4 / Front: | Assign the video input connector to the selected input source. |
| - : | Do not assign a video input connector to the selected input source. |
Set Defaults
The "Input Assign" settings are returned to the default settings.
Source Rename
Change the display name for input source.
This is convenient when the name of your device and the input source name of this unit are different. You can change the name to suit your needs. When the renaming is completed, the name is displayed on this unit's display and on the menu screen.
CBL/SAT / DVD / Blu-ray /
Game / Media Player /
TV Audio / CD / Phono /
AUX1 / AUX2:
| Set Defaults: | The "Source Rename" settings are returned to the default settings. |

- Up to 12 characters can be input.
Front panel D
Rear panel Re
Index
208



Contents Connections Playback
Tips Appendix
Hide Sources
Remove from the display input sources that are not used.
Show
Use this source.
(Default):
Hide: Do not use this source.
Source Level
This function corrects the playback level of the selected input source's audio input.
Make this setting if there are differences in the input volume levels between the different sources.
Source Level
☐ When the input source is set to "HEOS Music" or "Tuner"
-12 dB - +12 dB (Default : 0 dB)
■ Analog Inputs / Digital Inputs
☐ When the input source is set other than to "HEOS Music" or "Tuner"
-12dB - +12dB (Default : 0dB)

- The analog input level can be adjusted independently for input sources for which "ANALOG" is assigned at "Input Assign". (p. 206)
- The digital input level can be adjusted independently for input sources for which "DIGITAL" is assigned at "Input Assign". (12p. 206)
- "Source Level" settings are stored for each input source.
Front panel D
Rear panel Re
Index
209


Contents Connections Playback
Tips Appendix
Input Select
Set the audio input mode of each input source.
The input modes available for selection may vary depending on the input source.

- "Input Select" settings are stored for each input source.
■ Input Mode
Set the audio input modes for the different input sources.
It is normally recommended to set the audio input mode to "Auto".
| Auto(Default): | Automatically detect input signal and perform playback. |
HDMI: Play only signals from HDMI input.
Digital: Play only signals from digital audio input.
Analog: Play only signals from analog audio input.
| 7.1CH IN: | Only signals input from the 7.1CH IN connector will be played back. |

- When digital signals are properly input, the DIG indicator lights on the display. If the DIG indicator does not light, check "Input Assign" and the connections. (r p. 206)
- If "HDMI Control" is set to "On" and a TV compatible with the ARC is connected via the HDMI MONITOR 1 connectors, the input mode whose input source is "TV Audio" is fixed to ARC.
- The sound mode cannot be set if the input mode is set to "7.1CH IN".
Front panel D
Rear panel Re
Index
210


Contents
Connections Playback
Tips Appendix
Speakers
The acoustic characteristics of the connected speakers and listening room are measured and the optimum settings are made automatically. This is called "Audyssey® Setup".
You do not have to perform Audyssey ^® Setup when you have already performed "Speaker Calibration" in "Setup Assistant".
To set up the speakers manually, use "Manual Setup" on the menu. (p. 222)
Audyssey® Setup
To perform measurement, place the Sound calibration microphone in multiple locations all around the listening area. For best results, we recommend you measure in six or more positions, as shown in the illustration (up to eight positions).
When measuring the second and subsequent positions, install the Sound calibration microphone within 2 ft (60 cm) of the first measurement position (main listening position).

- If you perform Audyssey® Setup, Audyssey MultEQ® XT32, Audyssey Dynamic EQ®, Audyssey Dynamic Volume® and Audyssey LFC™ functions are enabled. (ET p. 187)
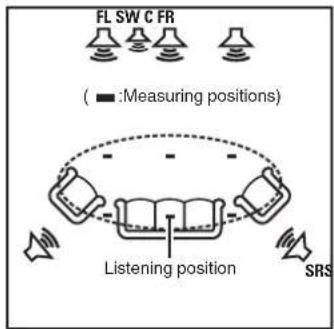
FL Front speaker (L)
FR Front speaker (R)
C Center speaker
SW Subwoofer
SL Surround speaker (L)
SR Surround speaker (R)
Front panel D
Rear panel Re
Index
211



Contents
Connections Playback
Tips Appendix
■ About the main listening position
The main listening position is the position where listeners would normally sit or where one would normally sit alone within the listening environment. Before starting Audyssey® Setup, place the Sound calibration microphone in the main listening position.
Audyssey MultEQ ^® XT32 uses the measurements from this position to calculate speaker distance, level, polarity, and the optimum crossover value for the subwoofer.
■ About Audyssey Sub EQ HT™
Audyssey Sub EQ HT ^™ makes the integration of dual subwoofers seamless by first compensating for any level and delay differences between the two subwoofers and then applying Audyssey MultEQ ^® XT32 to both subwoofers together.
To run Audyssey Sub EQ HT™ you must select "Measure (2 spkrs)" in "Channel Select". (p. 214).
NOTE
- Make the room as quiet as possible. Background noise can disrupt the room measurements. Close windows and turn off the power on electronic devices (radios, air conditioners, fluorescent lights, etc.). The measurements could be affected by the sounds emitted by such devices.
- During the measurement process, place cell phones outside the listening room. Cell phone signals could disrupt the measurements.
- Do not stand between the speakers and Sound calibration microphone or allow obstacles in the path while the measurements are being made. Also, install the Sound calibration microphone at least 20 inches (50 cm) away from the wall. Failure to do so will result in inaccurate readings.
- During the measurement process, audible test tones will come from the speakers and subwoofer(s), but this is part of normal operation. If there is background noise in the room, these test signals will increase in volume.
- Operating VOLUME ▲▼ on the remote control unit or VOLUME on the main unit during the measurements will cancel the measurements.
- Measurement cannot be performed when headphones are connected. Unplug the headphones before performing Audyssey® Setup.
Front panel D
Rear panel Re
Index
212



Contents Connections Playback
Tips Appendix
Procedure for speaker settings (Audyssey® Setup)
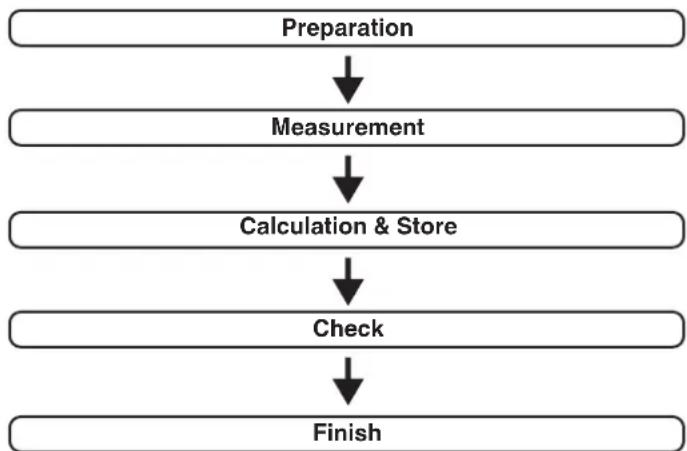
flowchart
graph TD
    A["Preparation"] --> B["Measurement"]
    B --> C["Calculation & Store"]
    C --> D["Check"]
    D --> E["Finish"]
1 Attach the Sound calibration microphone to the supplied microphone stand or own tripod and install it at the main listening position.
When installing the Sound calibration microphone, point the tip of the microphone toward the ceiling and adjust the height to match the height of the ears of a listener in a seated position.
2 If using a subwoofer capable of the following adjustments, set up the subwoofer as shown below.
☐ When using a subwoofer with a direct mode
Set the direct mode to "On" and disable the volume adjustment and crossover frequency setting.
☐ When using a subwoofer without a direct mode
Make the following settings:
• Volume : 12 o'clock position
• Crossover frequency : Maximum/Highest Frequency
- Low pass filter : Off
- Standby mode : Off
Front panel D
Rear panel Re
Index
213



3 Connect the Sound calibration microphone to the SETUP MIC jack of this unit.
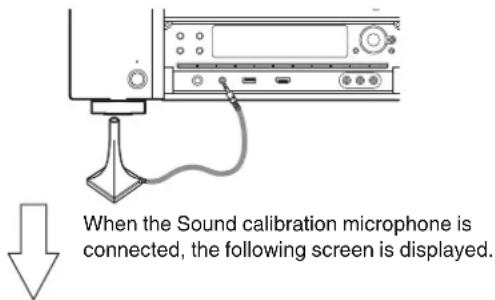
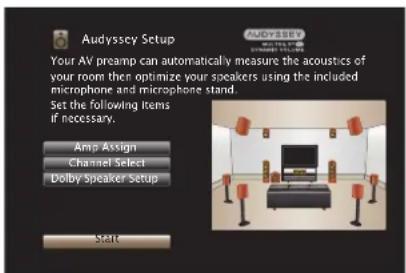
4 Select "Start", then press ENTER.
Audyssey ^® Setup can also make the following settings.
- Amp Assign
The signals output from the SURROUND BACK, HEIGHT1, HEIGHT2, HEIGHT3 and HEIGHT4/FRONT WIDE PRE OUT connectors can be switched in accordance with your speaker environment. ("Amp Assign" (p. 222))
- Channel Select
If channels that are not to be used are set in advance, measurement for the set channels is skipped, and measuring time can be reduced. You can also change the number of surround back speakers and subwoofer.
• Dolby Speaker Setup
Set the distance between the Dolby Atmos Enabled speaker and the ceiling.
This can be set when using the Front Dolby Atmos Enabled, Surround Dolby Atmos Enabled or Back Dolby Atmos Enabled speaker.
5 Follow the instructions on the screen display and press "Next" to proceed further.
Front panel D
Rear panel Re
Index
214

Contents Connections Playback
Tips Appendix
6 When the following screen is displayed, select "Begin Test" and then press ENTER.
Start the measurement of the first position.
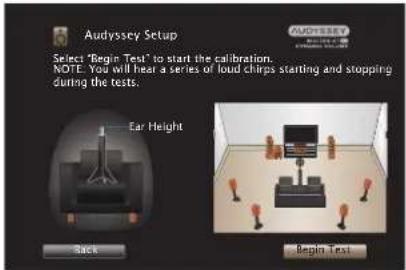
• Measurement requires several minutes.
NOTE
- If "Caution!" is displayed on TV screen:
- Go to "Error messages" (p. 219). Check any related items, and perform the necessary procedures.
- If the volume level for the subwoofer is not appropriate, an error message is displayed. See "Subwoofer level error message and how to adjust" (tF p. 220).
7 When the detected speaker is displayed, select "Next" and then press ENTER.
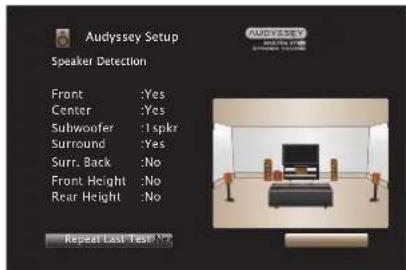
Front panel D
Rear panel Re
Index
215


Contents Connections Playback
Tips Appendix
8 Move the Sound calibration microphone to position 2, select "Continue", then press ENTER.
The measurement of the second position starts.
Measurements can be made in up to eight positions.
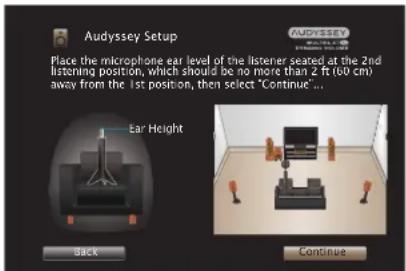
□ Stopping Audyssey® Setup
① Press BACK to display the popup screen.
② Press ◀ to select "Yes", then press ENTER.
9 Repeat step 8, measuring positions 3 to 8.

- To skip measuring the fourth and subsequent listening position, press ◀ to select "Complete" and press ENTER to proceed to step 11.
10 Select "Continue", then press ENTER.
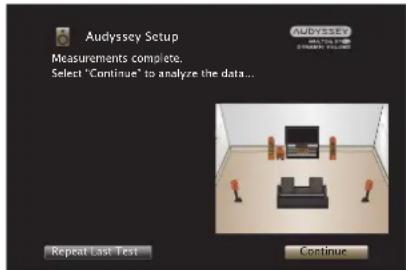
Start the analysis and storage of the measurement results.
- Analysis takes several minutes to complete. The more speakers and measurement positions that there are, the more time it takes to perform the analysis.
NOTE
- When the measurement results are being saved, make sure the power is not turned off.
Front panel D
Rear panel Re
Index
216


11 Perform the settings for Audyssey Dynamic EQ ^® and Audyssey Dynamic Volume ^® .
The following screen is displayed during the analysis. Configure the settings as preferred.
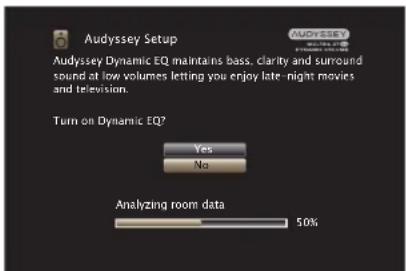
- Dynamic EQ corrects the frequency response in consideration of the audio characteristics of the room and human hearing ability so that sound can be heard even at low volume.
This is recommended when using the unit with the volume turned down, e.g. when enjoying a movie or TV program in the middle of the night. - Dynamic Volume adjusts the output volume to the optimal level while constantly monitoring the level of the audio input to the unit. Optimal volume control is performed automatically without any loss in the dynamism and clarity of the sound when, for example, the volume suddenly increases for commercials shown during television programs.
12 When the analysis and storage ends, unplug the Sound calibration microphone from the SETUP MIC jack on the main unit and then press "Next".
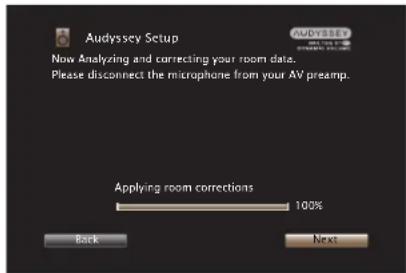
Front panel D
Rear panel Re
Index
217


Contents
Connections Playback
Tips Appendix
13 Select "Details" and press ENTER to verify the measurement results.
- Subwoofers may measure a greater reported distance than the actual distance due to added electrical delay common in subwoofers.
NOTE
- Do not change the speaker connection or subwoofer volume after Audyssey® Setup. If these are changed, run Audyssey® Setup again in order to configure the optimum equalizer settings.
Front panel D
Rear panel Re
Index
218


Contents Connections Playback
Tips Appendix
Error messages
An error message is displayed if Audyssey® Setup could not be completed due to speaker placement, the measurement environment, etc. If an error message is displayed, check the relevant items and perform the necessary measures. Be sure to turn off the power before checking speaker connections.
| Examples Error details | Measures | |
| No speakers found. | Sound calibration microphone is not detected.Not all speakers could be detected. | Connect the included Sound calibration microphone to the SETUP MIC jack of this unit.Check the speaker connections. |
| Ambient noise is too high or level is too low | There is too much noise in the room.Speaker or subwoofer sound is too low. | Either turn off any device generating noise or move it away.Perform again when the surroundings are quieter.Check the speaker installation and the direction in which the speakers are facing.Adjust the subwoofer's volume. |
| Front R : None | The displayed speaker could not be detected. | Check the connections of the displayed speaker. |
| Front R : Phase | The displayed speaker is connected with the polarity reversed. | Check the polarity of the displayed speaker.For some speakers, this error message may be displayed even if the speaker is properly connected. If you are sure the connection is correct, press to select “Ignore”, then press ENTER. |
Front panel D
y Rear panel Re
Index
219



Contents Connections Playback
Tips Appendix
■ Subwoofer level error message and how to adjust
The optimal level of each subwoofer channel for Audyssey® Setup measurement is 75 dB.
During subwoofer level measurement, an error message is displayed when one level of subwoofers is outside the 72 - 78 dB range.
When using a subwoofer with built-in amplifier (active type), adjust the subwoofer volume so that the subwoofer level is within the 72 to 78 dB range.
[Error message]
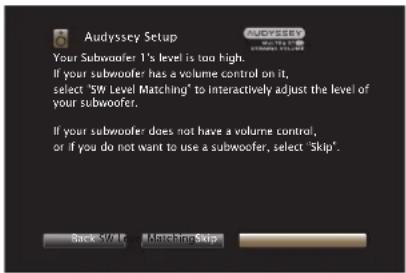
1 Select "SW Level Matching" and then press ENTER.
2 Adjust the volume control on your subwoofer so that the measured level is within the 72 to 78 dB range.
3 When the measured level is within the 72 to 78 dB range, select "Next" and then press ENTER.
- If you use two subwoofers, the second subwoofer's adjustment will be started. Repeat the operation from step 2, 3.
Front panel D
Rear panel Re
Index
220



Contents
Connections Playback
Tips Appendix
Retrieving Audyssey® Setup settings
If you set "Restore..." to "Restore", you can return to Audyssey® Setup measurement result (value calculated at the start by MultEQ® XT32) even when you have changed each setting manually.
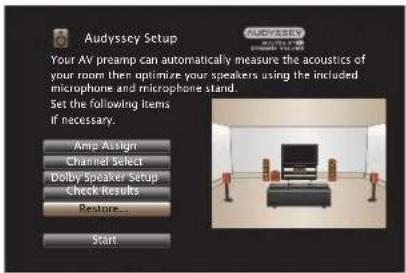
Front panel D
Rear panel Re
Index
221



Contents Connections Playback
Tips Appendix
Manual Setup
Perform when setting the speakers manually or when changing settings made in Audyssey® Setup.
- If you add or remove a speaker after performing Audyssey® Setup, you will no longer be able to select Audyssey MultEQ® XT32, Audyssey Dynamic EQ® or Audyssey Dynamic Volume®. (p. 187)
- "Manual Setup" can be used without changing the settings. Please set if necessary.
Amp Assign
You can change the Pre Amplifier assignment according to your speaker system.
Assign Mode
Select how to use the Pre Amplifier.
You need to configure the detailed settings for the speaker configuration in accordance with the selected mode. Select Assign Mode configure the corresponding detailed settings.
| 13.1ch(Default): | All Pre Amplifiers of this unit are used for MAIN ZONE.You can connect speakers for up to 15.1-channels for MAIN ZONE.The pre-out output automatically switches for playing back up to 13.1-channels in accordance with the input signal and sound mode when 15.1-channel speakers are installed. |
| 11.1ch (Bi-Amp): | The Pre Amplifier of this unit is assigned to 2-channels for creating bi-amp connections with the front speaker.You can connect speakers for up to 11.1-channels for MAIN ZONE. |
| 11.1ch + Front B: | The Pre Amplifier of this unit is assigned to 2-channels for connecting to the second front speaker.You can switch between the desired combination of front speakers A and front speakers B.Switch the front speaker using the “Front Speaker” setting. (p. 240) |
Front panel D
Rear panel Re
Index
222

Contents Connections Playback
Tips Appendix
■ Pre-out for Bi-Amp / Pre-out for Front B
When “Assign Mode” is set to “11.1ch (Bi-Amp)” or “11.1ch + Front B” in the menu, select the PRE OUT connectors used for bi-amp or second pair front speakers.
| HEIGHT 2 : | The assigned channels are output from the HEIGHT2 PRE OUT connectors. Up to one pair of height, ceiling, and Dolby Atmos Enabled channels can be used. |
| HEIGHT 3 (Default) : | The assigned channels are output from HEIGHT3 PREOUT connectors. Up to two pairs of height, ceiling, and Dolby Atmos Enabled channels can be used. The front wide channel cannot be used. |
| SURROUND BACK: | The assigned channels are output from the SURROUND BACK PRE OUT connectors. The surround back channel cannot be used. |
Floor
Layout
Select the floor speakers location.
| 5ch & SB & FW: | This layout combines a surround back or front wide speaker with the basic 5-channel layout. |
| 5ch & SB (Default): | This layout combines a surround back speaker with the basic 5-channel layout. |
| 5ch & FW: | This layout combines a front wide speaker with the basic 5-channel layout. |
| 5ch : | This is a basic 5-channel layout that uses front speakers, center speakers and surround speakers. |
Front panel D
Rear panel Re
Index
223


Contents Connections Playback
Tips Appendix
Height
Height Sp
Select the number of the height speakers and ceiling speakers used in MAIN ZONE.
None: Uses no height and ceiling speakers.
| 2ch: | Uses a set of (two) height speakers or ceiling speakers. |
| 4ch(Default): | Uses two sets of (four) height speakers or ceiling speakers. |
5ch: Uses five height or ceiling speakers.
6ch: Uses six height or ceiling speakers.
7ch: Uses seven height or ceiling speakers.
8ch: Uses eight height or ceiling speakers.

- Select the "5ch" setting or higher when using Top Surround or Center Height speakers.
Dolby Sp
Select the number of the Dolby Atmos Enabled speakers used in MAIN ZONE.
| None (Default): | Uses no Dolby Atmos Enabled speakers. |
| 2ch: | Uses a set of (two) Dolby Atmos Enabled speakers. |
| 4ch: | Uses two sets of (four) Dolby Atmos Enabled speakers. |
| 6ch: | Uses three sets of (six) Dolby Atmos Enabled speakers. |
Front panel D
Rear panel Re
Index
224


| Contents | Connections | Playback | Settings | Tips | Appendix |

Layout
Set the speaker layout when installing 1 set (2-channels) of Height, Ceiling or Dolby Atmos Enabled speakers.
The layouts that can be selected differ depending on the combinations of "Assign Mode" and "Floor" - "Layout" in the menu. ("Assign
Mode" (p. 222), "Floor" - "Layout" (p. 223)
| Settings AUDIO OUT connectors | ||||||
| Height Sp Dolby | Sp Layout HEIGHT | 1 HEIGHT 2 HEIGHT | 3 | HEIGHT 4/FRONT WIDE | ||
| None None - - - - | ||||||
| 2ch None | Front Height Front Height - - - | |||||
| Top Front Top Front - - - | ||||||
| Top Middle Top Middle - - - | ||||||
| Top Rear Top Rear - - - | ||||||
| Rear Height | Rear Height | - - - | ||||
| None 2ch | Front Dolby | Front Dolby | - - - | |||
| Surround Dolby | Surround Dolby | - - - | ||||
| Back Dolby * | Back Dolby | - - - | ||||
* This can be selected when using Surround Back speakers. Set "Floor" - "Layout" in the menu to "5ch & SB" or "5ch & SB & FW". (1 p. 223)
Front panel
Display
Rear panel
225
Remote
Index

Contents
Connections
Playback
Settings
Tips
Appendix
☐ Front Layout / Middle Layout / Rear Layout
Set the speaker layout when installing 2 sets (4-channels) or more of Height, Ceiling or Dolby Atmos Enabled speakers.
The layouts that can be selected differ depending on the combinations of "Assign Mode" and "Floor" - "Layout" in the menu. ("Assign Mode" (p. 222), "Floor" - "Layout" (p. 223))
| Settings AUDIO OUT connectors | |||||||||
| Height Sp | Dolby Sp | NOTE Front | Layout | Middle Layout | Rear Layout | HEIGHT 1 HEIGHT | 2 HEIGHT 3 | HEIGHT 4/ FRONT WIDE | |
| 2ch 2ch | Front Dolby - | Top Rear Front Dolby Top Rear - | |||||||
| Front Dolby - | Rear Height Front Dolby Rear Height - | ||||||||
| Front Height - | Surround Dolby | Front Height | Surround Dolby | - | - | ||||
| Front Height - | Back Dolby*1 | Front Height | Back Dolby - | ||||||
| Top Front - | Surround Dolby | Top Front | Surround Dolby | - | - | ||||
| Top Front - | Back Dolby*1 | Top Front Back Dolby - | |||||||
| 4ch None | Front Height - | Top Middle Front | Height Top Middle - | ||||||
| Front Height - | Top Rear | Front Height | Top Rear - | ||||||
| Front Height - | Rear Height*2 | Front Height | Rear Height - | ||||||
| Front Height - | Surr. Height | Front Height | Surr. Height - | ||||||
| Top Front - | Top Rear | Top Front | Top Rear - | ||||||
| Top Front - | Rear Height | Top Front | Rear Height - | ||||||
| Top Middle - | Rear Height | Top Middle | Rear Height - | ||||||
Front panel
Display
Rear panel
226
Remote
Index

Contents
Connections
Playback
Settings
Tips
Appendix
| Settings AUDIO OUT connectors | |||||||||
| Height Sp | Dolby Sp | NOTE Front | Layout | Middle Layout | Rear Layout | HEIGHT 1 HEIGHT | 2 HEIGHT 3 | HEIGHT 4/ FRONT WIDE | |
| None 4ch | Front Dolby - | Surround Dolby | Front Dolby | Surround Dolby | - | - | |||
| Front Dolby - | Back Dolby*1 | Front Dolby Back Dolby -- | |||||||
| 5ch None | Front Height Top Surround | Rear Height*2 | Front Height Rear Height | L: Top Surround | - | ||||
| Front Height | Surr. Height & Top Surround | None Front | Height Surr. Height | L: Top Surround | - | ||||
| Front Height & Center Height | None | Rear Height*2 | Front Height Rear Height | R: Center Height | - | ||||
| Front Height & Center Height | Surr. Height None Front Height | Surr. Height | R: Center Height | - | |||||
| 6ch None | *3 | Front Height Surr. Height Rear Height Front Height Rear Height | Surr. Height - | ||||||
| Front Height & Center Height | Top Surround Rear Height Front | Height Rear Height | L: Top Surround R: Center Height | - | |||||
| Front Height & Center Height | Surr. Height & Top Surround | None Front | Height Surr. Height | L: Top Surround R: Center Height | - | ||||
| *4 | Front Height | Top Middle | Rear Height | Front Height | Rear Height | Top Middle | - | ||
| Top Front | Top Middle | Top Rear | Top Front | Top Rear | Top Middle | - | |||
Front panel
Display
Rear panel
227
Remote
Index

Contents
Connections
Playback
Settings
Tips
Appendix
| Settings AUDIO OUT connectors | |||||||||
| Height Sp | Dolby Sp | NOTE Front | Layout | Middle Layout | Rear Layout | HEIGHT 1 HEIGHT | HEIGHT 2 HEIGHT 3 | HEIGHT 4/ FRONT WIDE | |
| 4ch 2ch | Front Height | Surround Dolby | Rear Height Front | Front Height Rear | Height | Surround Dolby | - | ||
| Top Front | Surround Dolby | Top Rear Top Front Top Rear | Surround Dolby | - | |||||
| 2ch 4ch | Front Height | Surround Dolby | Back Dolby*1 | Front Height Back Dolby | Surround Dolby | - | |||
| Front Dolby Top Middle | Back Dolby*1 | Front Dolby Back Dolby Top Middle - | |||||||
| Front Dolby | Surround Dolby | Rear Height Front Dolby Rear | Height | Surround Dolby | - | ||||
| None 6ch | Front Dolby | Surround Dolby | Back Dolby*1 | Front Dolby Back Dolby | Surround Dolby | - | |||
| 7ch None | *5 | Front Height | Top Middle & Top Surround | Rear Height Front Height Rear | Height Top Middle | L: Top Surround | |||
| Front Height & Center Height | Top Middle Rear Height Front | Height Rear Height Top Middle | R: Center Height | ||||||
| 5ch 2ch | *5 | Front Height | Surr. Dolby & Top Surround | Rear Height Front Height Rear | Height | Surround Dolby | L: Top Surround | ||
| Front Height & Center Height | Surround Dolby | Rear Height Front Height Rear | Height | Surround Dolby | R: Center Height | ||||
Front panel
Display
Rear panel
228
Remote
Index

Contents Connections Playback
Tips Appendix
| Settings AUDIO OUT connectors | |||||||||
| Height Sp | Dolby Sp | NOTE Front Layout | Middle Layout | Rear Layout | HEIGHT 1 HEIGHT | 2 HEIGHT 3 | HEIGHT 4/ FRONT WIDE | ||
| 8ch None | *5 | Front Height & Center Height | Top Middle & Top Surround | Rear Height | Front Height Rear | Height Top Middle | L: Top Surround R: Center Height | ||
| 6ch 2ch | *5 | Front Height & Center Height | Surr. Dolby & Top Surround | Rear Height | Front Height Rear | Height | Surround Dolby | L: Top Surround R: Center Height | |
*1 This can be selected when using Surround Back speakers.
*2 For the best Auro-3D experience Surround Height speakers are recommended, however you may substitute Rear Height speakers from a Dolby Atmos speaker setup in place of Surround Height speakers.
*3 Use 2 sets of Height speakers in the appropriate sound modes for Dolby Atmos, DTS:X or Auro-3D playback. Use the Front Height and Rear Height speakers for Dolby Atmos or DTS:X playback. Use the Front Height and Surround Height speakers for Auro-3D playback.
*4 This can be set when "Floor" - "Layout" is set to "5ch" or "5ch & SB". (p. 223)
*5 This combination cannot be selected when Front Wide speakers are being used.
■ View Terminal Config.
This shows how to connect the PRE OUT connectors for your “Amp Assign” setting on the menu screen.
Front panel D
Rear panel
Remote
229
Index

Speaker Config.
Select whether or not speakers are present, playback capacity for low bass frequencies and speaker size.

- When speakers for which you assigned Height1 in "Amp Assign" are set to "None", "None" is automatically set for Height2, Height3 and Height4.
- When speakers for which you assigned Height2 in "Amp Assign" are set to "None", "None" is automatically set for Height3 and Height4.
Front
Set the front speaker size.
| Large(Default): | Use a large speaker that can adequately play back very low bass frequencies. |
| Small: | Use a small speaker that has inadequate playback capacity for very low bass frequencies. |

- When "Subwoofer" is set to "No", "Front" is automatically set to "Large".
- When "Front" is set to "Small", you cannot set speakers other than "Front" to "Large".
Center
Set the presence and size of the center speaker.
| Large: | Use a large speaker that can adequately play back very low bass frequencies. |
| Small (Default): | Use a small speaker that has inadequate playback capacity for very low bass frequencies. |
| None: | Select when a center speaker is not connected. |
Subwoofer
Set the presence of a subwoofer.
| 2 spkrs: | Use two subwoofers. |
| 1 spkr(Default): | Use only one subwoofer. |
| None: | Select when a subwoofer is not connected. |

- When "Subwoofer" is set to "None" and you set "Front" to "Small", "Subwoofer" is automatically set to "1 spkr".
Front panel D
Rear panel Re
Index
230


Contents Connections Playback
Tips Appendix
■ Surround
Set the presence and size of the surround speakers.
| Large: | Use a large speaker that can adequately play back very low bass frequencies. |
| Small(Default): | Use a small speaker that has inadequate playback capacity for very low bass frequencies. |
| None: | Select when the surround speakers are not connected. |

- When "Surround" is set to "None", "Surr. Back", "Front Wide", "Surround Dolby" and "Back Dolby" are automatically set to "None".
■ Surr. Back
Set the presence, size and number of surround back speakers.
| Large: | Use a large speaker that can adequately play back very low bass frequencies. |
| Small (Default): | Use a small speaker that has inadequate playback capacity for very low bass frequencies. |
| None: | Select when the surround back speakers are not connected. |
| 2 spkrs(Default): | Use two surround back speakers. |
| 1 spkr: | Use only one surround back speaker.Connect to the L terminal to SURROUND BACK when this setting is selected. |

- When "Surr. Back" is set to "None" or "1 spkr", "Back Dolby" is automatically set to "None".
Front panel D
Rear panel Re
Index
231



Contents Connections Playback
Tips Appendix
Front Wide
Set the presence and size of the front wide speakers.
| Large: | Use a large speaker that can adequately play back very low bass frequencies. |
| Small(Default): | Use a small speaker that has inadequate playback capacity for very low bass frequencies. |
| None: | Select when the front wide speakers are not connected. |
Front Height
Set the presence and size of the front height speakers.
| Large: | Use a large speaker that can adequately play back very low bass frequencies. |
| Small (Default): | Use a small speaker that has inadequate playback capacity for very low bass frequencies. |
| None: | Select when the front height speakers are not connected. |
Front Dolby
Set the presence and size of the front Dolby speakers.
| Large: | Use a large speaker that can adequately play back very low bass frequencies. |
| Small (Default): | Use a small speaker that has inadequate playback capacity for very low bass frequencies. |
| None: | Select when the front Dolby speakers are not connected. |
Top Front
Set the presence and size of the top front speakers.
| Large: | Use a large speaker that can adequately play back very low bass frequencies. |
| Small (Default): | Use a small speaker that has inadequate playback capacity for very low bass frequencies. |
| None: | Select when the top front speakers are not connected. |
Front panel D
Rear panel Re
Index
232


Contents Connections Playback
Tips Appendix
Top Middle
Set the presence and size of the top middle speakers.
| Large: | Use a large speaker that can adequately play back very low bass frequencies. |
| Small(Default): | Use a small speaker that has inadequate playback capacity for very low bass frequencies. |
| None: | Select when the top middle speakers are not connected. |
■ Surround Dolby
Set the presence and size of the surround Dolby speakers.
| Large: | Use a large speaker that can adequately play back very low bass frequencies. |
| Small (Default): | Use a small speaker that has inadequate playback capacity for very low bass frequencies. |
| None: | Select when the surround Dolby speakers are not connected. |
Top Rear
Set the presence and size of the top rear speakers.
| Large: | Use a large speaker that can adequately play back very low bass frequencies. |
| Small (Default): | Use a small speaker that has inadequate playback capacity for very low bass frequencies. |
| None: | Select when the top rear speakers are not connected. |
■ Surr. Height
Set the presence and size of the surround height speakers.
| Large: | Use a large speaker that can adequately play back very low bass frequencies. |
| Small (Default): | Use a small speaker that has inadequate playback capacity for very low bass frequencies. |
| None: | Select when the surround height speakers are not connected. |

- When "Front Height" is set to "None", "Surr. Height" is automatically set to "None".
Front panel D
Rear panel Re
Index
233



Contents Connections Playback
Tips Appendix
Rear Height
Set the presence and size of the rear height speakers.
| Large: | Use a large speaker that can adequately play back very low bass frequencies. |
| Small(Default): | Use a small speaker that has inadequate playback capacity for very low bass frequencies. |
| None: | Select when the rear height speakers are not connected. |
■ Back Dolby
Set the presence and size of the back Dolby speakers.
| Large: | Use a large speaker that can adequately play back very low bass frequencies. |
| Small (Default): | Use a small speaker that has inadequate playback capacity for very low bass frequencies. |
| None: | Select when the back Dolby speakers are not connected. |

- When speakers for which you assigned Height1 in "Amp Assign" are set to "None", "None" is automatically set for Height2, Height3 and Height4.
Front panel D
Rear panel Re
Index
234


Contents Connections Playback
Tips Appendix
■ Center Height
Set the presence and size of the center height speaker.
| Large: | Use a large speaker that can adequately play back very low bass frequencies. |
| Small(Default): | Use a small speaker that has inadequate playback capacity for very low bass frequencies. |
| None: | Select when the center height speaker is not connected. |

- When "Surr. Height" or "Rear Height" is set to "None", "Center Height" is automatically set to "None".
- When "Center" is set to "None", "Center Height" is automatically set to "None".
■ Top Surround
Set the presence and size of the top surround speaker.
| Large: | Use a large speaker that can adequately play back very low bass frequencies. |
| Small (Default): | Use a small speaker that has inadequate playback capacity for very low bass frequencies. |
| None: | Select when the top surround speaker is not connected. |

- When "Surr. Height" or "Rear Height" is set to "None", "Top Surround" is automatically set to "None".
Front panel D
Rear panel Re
Index
235


Contents Connections Playback
Tips Appendix
Distances
Set distance from listening position to speakers.
Measure beforehand the distance from the listening position to each speaker.
Unit
Set the unit of distance.
Feet (Default)
Meters
Step
Set the minimum variable width of the distance.
1 ft / 0.1 ft (Default: 1 ft)
0.1 m / 0.01 m
■ Set the distance
0.0 ft - 60.0 ft / 0.00 m - 18.00 m

- The speakers that can be selected differ depending on the "Amp Assign" and "Speaker Config." settings. ("Amp Assign" (p. 222), "Speaker Config." (p. 230))
- Default settings:
Front L / Front R / Center / Subwoofer 1 / Subwoofer 2 / F. Wide L / F. Wide R / F. Height L / F. Height R / Front Dolby L / Front Dolby R / Center Height: 12.0 ft (3.60 m) Speakers other than the above: 10.0 ft (3.00 m) - Set the difference in the distance between the speakers to less than 20.0 ft (6.00 m).
Front panel D
Rear panel Re
Index
236


Contents
Connections Playback
Tips Appendix
■ Dolby Speaker Setup
Set the distance between the Dolby Atmos Enabled speaker and the ceiling.
3.0 ft - 11.0 ft / 0.90 m - 3.30 m (Default: 6.0 ft / 1.80 m)

- This can be set when "Front Dolby", "Surround Dolby" or "Back Dolby" is set to "Large" or "Small" in "Speaker Config.".
Set Defaults
The "Distances" settings are returned to the default settings.
Levels
Set the volume of the test tone to be the same at the listening position when it is output from each speaker.
■ Test Tone Start
A test tone is output from the selected speaker.
While listening to the test tone, adjust the volume output from the selected speaker.
-12.0 dB - +12.0 dB (Default : 0.0 dB)

- The set "Levels" are reflected in all sound modes.
- If you wish to adjust the channel level for each input source, carry out the settings in "Channel Level Adjust". (T p. 140)
- When headphones are connected to the PHONES connector on this unit, you cannot set "Levels".
Set Defaults
The "Levels" settings are returned to the default settings.
Front panel D
Rear panel Re
Index
237



Contents
Connections Playback
Tips Appendix
Crossovers
Set in accordance with the lower limit frequency of the base frequencies that can be played back through each speaker. See the speaker manual for information concerning speaker crossover frequency.
■ Speaker Selection
Selects how to set the crossover frequency.
| All(Default): | Sets the same crossover frequency for all speakers. |
| Individual: | Selects the crossover points for each speaker individually. |
■ Set the crossover frequency
40 Hz / 60 Hz / 80 Hz / 90 Hz / 100 Hz / 110 Hz / 120 Hz / 150 Hz / 200 Hz / 250 Hz (Default: 80 Hz)

- "Crossovers" can be set when the "Subwoofer Mode" setting is "LFE+Main", or when you have a speaker that is set to "Small". (12 p. 239)
- The default crossover frequency is "80 Hz", which will work best with the widest variety of speakers. We recommend setting to a higher frequency that the crossover frequency when small speakers are used. For example, set to "250 Hz" when the frequency range of the speakers is 250 Hz – 20 kHz.
- Sound below the crossover frequency is cut off from the output of the speakers set in "Small". This cut off bass frequency is output from the subwoofer or front speakers.
- The speakers that can be set when "Individual" is selected differ depending on to the "Subwoofer Mode" setting. (1 p. 239)
- When "LFE" is selected, speakers set to "Small" at "Speaker Config." can be set. If the speakers are set to "Large", "Full Band" is displayed and the setting cannot be made. (p. 230)
- When "LFE+Main" is selected, speakers can be set regardless of the "Speaker Config." setting. (19 p. 230)
Front panel D
Rear panel Re
Index
238


Contents Connections Playback
Tips Appendix
Bass
Set subwoofer and LFE signal range playback.
Subwoofer Mode
Select low range signals to be reproduced by subwoofer.
| LFE(Default): | The low range signal of the channel set to “Small” speaker size is added to the LFE signal output from the subwoofer. |
| LFE+Main: | The low range signal of all channels is added to the LFE signal output from the subwoofer. |

- "Subwoofer Mode" can be set when "Speaker Config." - "Subwoofer" in the menu is set to other than "None". (129 p. 230)
- Play music or a movie source and select the mode offering the strongest bass.
- If "Speaker Config." - "Front" and "Center" are set to "Large", and "Subwoofer Mode" is set to "LFE", no sound may be output from the subwoofers, depending on the input signal or selected sound mode. (1p. 230) Select "LFE+Main" if you want the bass signals to always be produced from the subwoofer.
LPF for LFE
Set LFE signal playback range. Set this when you want to change the playback frequency (low pass filter point) of the subwoofer.
80 Hz / 90 Hz / 100 Hz / 110 Hz / 120 Hz / 150 Hz / 200 Hz / 250 Hz (Default: 120 Hz)
Front panel D
Rear panel Re
Index
239


Contents Connections Playback
Tips Appendix
Front Speaker
Set the front speaker A/B to use for every sound mode.
A
Front speaker A is used.
(Default):
B : Front speaker B is used.
A+B : Both front speakers A and B are used.

- This can be set when "Assign Mode" is set to "11.1ch + Front B". (1) p. 222
2ch Playback
Select the method for setting the speakers used in the 2-channel direct and stereo playback modes.
Setting
Select the method for setting the speakers used in the 2-channel direct and stereo playback modes.
| Auto(Default): | The settings in “Speakers” are applied.(p. 211) |
| Manual: | Set the speakers for 2-channel playback.Make the following settings: |
Front
Set the size of the front speakers for 2-channel playback.
| Large(Default): | Use a large speaker that can adequately play back very low bass frequencies. |
| Small: | Use a small speaker that has inadequate playback capacity for very low bass frequencies. |

- When "Speaker Config." - "Subwoofer" in the menu is set to "None", "Large" is automatically set. (p. 230)
Front panel D
Rear panel Re
Index
240



Contents Connections Playback
Tips Appendix
Subwoofer
Set the presence of a subwoofer.
| Yes(Default): | Use a subwoofer. |
| No: | Select when a subwoofer is not connected. |

- When "Speaker Config." - "Subwoofer" in the menu is set to "None", No is automatically set. (p. 230) If the "Front" setting is "Small", the setting is automatically "Yes".
SW Mode
Select low range signals to be reproduced by subwoofer.
| LFE(Default): | When “2ch Playback” - “Front” is set to “Large”, only LFE signals are output from the subwoofer. Also, when “2ch Playback” - “Front” is set to “Small”, the front channel low range signals are added to the LFE signals and output from the subwoofer. |
| LFE+Main: | The front channel low range signal is added to the LFE signal output from the subwoofer. |

- This can be set when "2ch Playback" - "Subwoofer" is set to "Yes".
Front panel D
Rear panel Re
Index
241



Contents Connections Playback
Tips Appendix
Crossover
Set the maximum frequency of the bass signal output from each channel to the subwoofer.
40 Hz / 60 Hz / 80 Hz / 90 Hz / 100 Hz / 110 Hz / 120 Hz / 150 Hz / 200 Hz / 250 Hz (Default: 80 Hz)

- This can be set when "2ch Playback" - "Subwoofer" is set to "Yes".
- When "2ch Playback" - "Front" is set to "Large" and "SW Mode" is set to "LFE", "Full Band" is displayed and this cannot be set.
■ Distance FL / Distance FR
Set distance from main listening position to speaker.
0.0 ft - 60.0 ft (Default: 12.0 ft) / 0.00 m - 18.00 m (Default: 3.60 m)

- Set the difference in the distance between the speakers to less than 20.0 ft (6.00 m).
Level FL / Level FR
Adjust the level of each channel.
-12.0 dB - +12.0 dB (Default: 0.0 dB)
Front panel D
Rear panel Re
Index
242

Contents Connections Playback
Tips Appendix
Network
To use this unit by connecting it to a home network (LAN), you must configure network settings.
If you set up your home network (LAN) via DHCP, set "DHCP" to "On". (Use the default setting.) This allows this unit to use your home network (LAN).
When assigning an IP address to each device manually, you need to assign an IP address to this unit using the "IP Address" settings, and enter
information about your home network (LAN) such as the gateway address and subnet mask, etc.
Information
Display network information.
Friendly Name / Connection / SSID / DHCP / IP Address / MAC Address (Ethernet) / MAC Address (Wi-Fi) / Wi-Fi signal strength
Connection
Choose whether to connect the home network to a wireless LAN or a wired LAN.
When connecting to the network using wired LAN, select "Wired (Ethernet)" after connecting a LAN cable.
When connecting to the network using wireless LAN, select "Wireless (Wi-Fi)" and configure the "Wi-Fi Setup". (127 p. 244)
Connect Using
Select the method for connecting to the home network (LAN).
Wired (Ethernet): Use a LAN cable to connect to a network.
Wireless (Wi-Fi) (Default): Use the wireless LAN (Wi-Fi) function to connect to a network.
Front panel D
Rear panel Re
Index
243


Contents Connections Playback
Tips Appendix
Wi-Fi Setup
Connect to a wireless LAN (Wi-Fi) router.
The router can be connected in the following ways. Select the connection method to suit your home environment.
■ Scan Networks
Select the network you wish to connect to from the list of possible networks shown on the TV screen.
- Select the network you wish to connect to from the list of wireless networks.
Select "Rescan" if the network cannot be found.
- Enter your password and select "OK".
■ Use iOS Device
Use your iOS device (iPhone/iPod/iPad) to connect to the network. By connecting your iOS device to this unit using Wi-Fi, the unit can be automatically connected to the same network as your device.
- Select "Use iOS Device" on the TV screen.
- Check that your iOS device is connected to the wireless LAN (Wi-Fi) router and select "Marantz AV8805" from "SET UP NEW AIRPLAY SPEAKER..." at the bottom of the Wi-Fi configuration screen of your iOS device.
- Tap "Next" on the screen of the iOS device.

- The iOS device firmware version needs to support iOS 7 or later.
Front panel D
Rear panel Re
Index
244



Contents Connections Playback
Tips Appendix
WPS Router
Use a WPS-compatible router to connect using the push button method.
- Select "Push Button" on the TV screen.
- Switch to the WPS mode by pressing the WPS button of the router you wish to connect to.
- The time for pressing the button varies depending on the router.
- Select "Connect" on the TV screen within 2 minutes.
■ Manual
Enter the name (SSID) and password of the network you wish to connect to.
- Set the following items.
| SSID: | Input the name of the wireless network (SSID). |
| Security: | Select the encryption method according to the encryption setting of the access point you are using. |
Password: Input the password.
- Select "Connect" at the end of the setting.
Front panel D
Rear panel Re
Index
245


Contents
Connections Playback
Tips Appendix

- The wireless LAN (Wi-Fi) settings of this unit can also be configured from a PC or tablet that supports wireless LAN connection.
- Press and hold the DIMMER and ZONE SELECT buttons on the main unit for at least 3 seconds when the power of the unit is on.
- Connect the wireless LAN of the PC or tablet used to "Marantz AV8805" when the message "Connect your Wi-Fi device to Wi-Fi network called "Marantz AV8805"" appears in the display.
- Start up the browser and enter "192.168.1.16/Settings/" in the URL.
- Use the browser to enter the settings, select "Connect" and then exit the settings.
- The Default key of this unit is fixed at "1". Set Default key of the router to "1" to use.
Settings
Configure the IP address.
- If you are using a broadband router (DHCP function), the information required for network connection such as the IP address will be automatically configured since the DHCP function is set to "On" in the default settings of this unit.
- Set up the IP Address, Subnet Mask, Default Gateway and DNS server information only when assigning a fixed IP address or when connecting to a network without DHCP function.
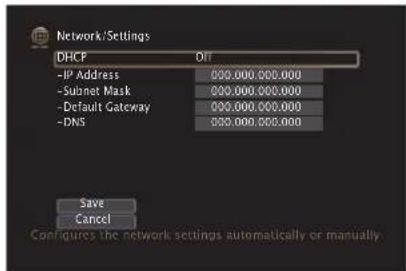
Front panel D
Rear panel Re
Index
246


Contents
Connections Playback
Tips Appendix
DHCP
Selects how to connect to the network.
| On(Default): | Configure the network settings automatically from your router. |
Off: Configure the network settings manually.
IP Address
Set the IP address within the ranges shown below.
- The Network Audio function cannot be used if other IP addresses are set.
CLASS A: 10.0.0.1 - 10.255.255.254
CLASS B: 172.16.0.1 - 172.31.255.254
CLASS C: 192.168.0.1 - 192.168.255.254
Subnet Mask
When connecting an xDSL modem or connector adapter directly to this unit, input the subnet mask indicated in the documentation supplied by your provider. Normally input "255.255.255.0".
■ Default Gateway
When connected to a gateway (router), input its IP address.
DNS
Enter the DNS address indicated in the documentation supplied by your provider.

- If you cannot connect to the Internet, recheck the connections and settings. (p. 93)
- If you do not understand about Internet connection, contact your ISP (Internet Service Provider) or the store from which you purchased your computer.
Front panel D
Rear panel Re
Index
247



Contents
Connections Playback
Tips Appendix
Network Control
Enables network communication in standby power mode.
Off In Standby: Suspend network function during standby.
Always On (Default):
Network is on during standby. Main unit operable with a network compatible controller.

- When using the Marantz 2016 AVR Remote App or HEOS App, use with the "Network Control" setting set to "Always On".
NOTE
- When "Network Control" is set to "Always On", the unit consumes more standby power.
Friendly Name
The Friendly Name is the name of this unit displayed on the network. You can change the Friendly Name according to your preferences.
■ Friendly Name
Selects Friendly Name from the list.
When you select "Other", you can change the Friendly Name according to your preferences.
Home Theater /Living Room / Family Room / Guest Room / Kitchen / Dining Room / Master Bedroom / Bedroom / Den / Office / Other

- Up to 30 characters can be input.
- The default Friendly Name on first use is "Marantz AV8805".
■ Set Defaults
Restores Friendly Name, which you had changed, to the default setting.
Front panel D
Rear panel Re
Index
248



Contents Connections Playback
Tips Appendix
Diagnostics
Used to check the network connection.
■ Physical Connection
Checks the physical LAN port connection.
OK
| Error: | The LAN cable is not connected. Check the connection. |

- When connected using a wireless LAN, "Connection Wireless (Wi-Fi)" will be displayed.
Router Access
Checks the connection from this unit to the router.
OK
| Error: | Failed to communicate with the router.Check the router settings. |
Internet Access
Checks whether this unit has access to the Internet (WAN).
| OK | |
| Error: | Failed to connect to the Internet. Check the Internet connection environment or router settings. |
Front panel D
Rear panel Re
Index
249


Contents
Connections Playback
Tips Appendix
HEOS Account
Make HEOS Account-related settings.
HEOS Account is needed in order to use HEOS Favorites.
The menu displayed differs depending on the status of the HEOS Account.
You have not signed in
I have a HEOS Account
If you already have a HEOS Account, enter the current account name and password to sign in.
■ Create Account
If you do not have a HEOS Account, create a new HEOS Account.
■ Forgot Password
If you have forgotten the password, an email explaining how to reset the password will be sent.
You have already signed in
■ Signed in As
The currently signed in HEOS Account is displayed.
■ Change Location
Change the regional settings for the signed in HEOS Account.
■ Change Password
Change the password for the signed in HEOS Account.
Delete Account
Delete the signed in HEOS Account.
■ Sign Out
Sign out from the HEOS Account.
Front panel D
Rear panel Re
Index
250


Contents Connections Playback
Tips Appendix
General
Make various other settings.
Language
Set the language for display the menu on the TV screen.
English / Français / Español (Default: English)

- "Language" can also be set up by the following operation. However, the menu screen is not displayed. Watch the display while configuring the settings.
- Press and hold the main unit's STATUS and ZONE SELECT at the same time for at least 3 seconds.
"*Video Format" appears on the display. - Use or on the main unit twice.
"*GUI Language" appears on the display. - Use the main unit's ◀ or ▷ and set the language.
- Press the main unit's ENTER to complete the setting.
ZONE2 Setup / ZONE3 Setup
Makes settings for audio playback with ZONE2 and ZONE3.

- Values set for "Volume Limit" and "Power On Volume" are displayed according to the setting specified for the volume "Scale". (186 p. 186)
Bass
Adjust bass.
-10dB - +10dB (Default : 0dB)
Treble
Adjust treble.
-10dB - +10dB (Default : 0dB)
■ High Pass Filter
Make settings for cutting the low range to reduce distortion in the bass.
On: The low range is attenuated.
Off (Default): The low range is not attenuated.
Front panel D
Rear panel Re
Index
251


Contents Connections Playback
Tips Appendix
Lch Level
Adjust the left channel output level.
-12 dB - +12 dB (Default : 0 dB)
Rch Level
Adjust the right channel output level.
-12 dB - +12 dB (Default : 0 dB)
Channel
Set whether to playback in stereo or monaural.
Stereo
(Default):
Stereo playback.
Mono: Monaural playback.
■ HDMI Audio (ZONE2 only)
Selects the audio signal format for playing an HDMI source in ZONE2.
| Through (Default): | The HDMI audio signal is passed through this unit to the device in ZONE2. |
| PCM: | The HDMI audio signal input into this unit is converted to a PCM signal that can be output from the ZONE2 PRE OUT connectors. |
Volume Level
Set the volume output level.
| Variable(Default): | Volume can be adjusted. |
| 1 – 98(-79 dB – 18 dB): | Volume is fixed at the desired level. The volume cannot be adjusting using the remote control unit. |

- The dB value is displayed when the "Scale" setting is “-79.5 dB - 18.0 dB”. (p. 186)
Front panel D
y Rear panel Re
Index
252


Contents Connections Playback
Tips Appendix
Volume Limit
Make a setting for maximum volume.
60 (-20 dB) / 70 (-10 dB) / 80 (0 dB)
(Default : 70 (-10 dB))
Off: Do not set a maximum volume.

- This can be set when "Volume Level" is set to "Variable". (10 p. 252)
- The dB value is displayed when the "Scale" setting is “-79.5 dB - 18.0 dB”. (123 p. 186)
Power On Volume
Define the volume setting that is active when the power is turned on.
| Last (Default): | Use the memorized setting from the last session. |
| Mute: Always mute when power is turned on. | |
| 1 – 98 (-79 dB – 18 dB): | The volume is adjusted to the set level. |

- This can be set when "Volume Level" is set to "Variable". (17 p. 252)
- The dB value is displayed when the "Scale" setting is “-79.5 dB - 18.0 dB”. (12p. 186)
Mute Level
Set the amount of attenuation when muting is on.
Full
The sound is muted entirely.
(Default):
-40 dB : The sound is attenuated by 40 dB down.
-20 dB : The sound is attenuated by 20 dB down.
Front panel D
Rear panel Re
Index
253


Contents Connections Playback
Tips Appendix
Zone Rename
Change the display title of each zone to one you prefer.
| Set Defaults: | The default setting is restored for the edited zone name. |

- Up to 10 characters can be input.
Smart Select Names
Change the smart select name that appears on the TV screen to one you prefer.
Smart Select 1 / Smart Select 2 / Smart Select 3 / Smart Select 4
| Set Defaults: | The default setting is restored for the edited smart select name. |

- Up to 16 characters can be input.
Trigger Out 1 / Trigger Out 2
Select the conditions for activating trigger out.
For details about how to connect the DC OUT jacks, see "DC OUT jacks" (p. 96).
☐ When setting for zone (MAIN ZONE / ZONE2 / ZONE3)
Trigger out is activated through linkage to the power of the zone set to "On".
☐ When setting for input source
Activate trigger out when the input source set to "On" is selected.
☐ When setting for HDMI monitor
Activate trigger out when the HDMI monitor set to "On" is selected.
On: Activate trigger on this mode.
---: Do not activate trigger on this mode.
Front panel D
Rear panel Re
Index
254


Contents Connections Playback
Tips Appendix
Auto Standby
Set so the unit power automatically switches to standby.
MAIN ZONE
Sets the time for switching to auto standby when there are no audio or video signals input into this unit.
Before the unit enters standby mode, "Auto Standby" is displayed on the unit display and the menu screen.
| 60 min: | The unit goes into standby after 60 minutes. |
| 30 min: | The unit goes into standby after 30 minutes. |
| 15 min: | The unit goes into standby after 15 minutes. |
| Off(Default): | The unit does not go into standby automatically. |
ZONE2 / ZONE3
When there are no operations for a certain period of time as set here, the power is automatically shut off even if there is audio or video input.
| 8 hours: | Switches ZONE2/ZONE3 the standby state after about 8 hours. |
| 4 hours: | Switches ZONE2/ZONE3 to the standby state after about 4 hours. |
| 2 hours: | Switches ZONE2/ZONE3 to the standby state after about 2 hours. |
| Off(Default): | Does not automatically switch ZONE2/ZONE3 to the standby state. |
Front panel D
Rear panel Re
Index
255


Contents Connections Playback
Tips Appendix
Front Display
Makes settings related to the display on this unit.
Dimmer
Adjust the display brightness of this unit.
Bright
(Default):
Normal display brightness.
Dim: Reduced display brightness.
Dark: Very low display brightness.
Off: Turns the display off.

- You can also adjust the display by pressing DIMMER on the main unit.
■ Channel Indicators
Sets whether to use the input signal display or output signal display for the channel indication on the display.
| Input: | Uses the input signal display for the channel indication on the display. |
| Output (Default): | Uses the output signal display for the channel indication on the display. |
Front panel D
Rear panel Re
Index
256


Contents Connections Playback
Tips Appendix
Firmware
Checks for the latest firmware information about updates and upgrades, updates the firmware, and sets up the notification message display for upgrades.
■ Check for Update
Check for firmware updates.
The firmware can be updated if a firmware update has been released.
| Update Now: | Execute the update process. When the update starts, the menu screen is shut down. During the update, the progress is shown on the display. |
Update Later: Update later.

- This unit automatically retries updating if updating fails. If an update still cannot be performed, an "Update Error" message appears in the display. See "Troubleshooting" – "Update/upgrade error messages" for information on update error messages. (12) p. 298
Check the conditions according to the message and try the update again. - This menu cannot be selected when "Allow Update" is set to "Off".
■ Auto-Update
Turns on Automatic Updates so that futures updates are automatically downloaded and installed when this unit is in standby mode.
Auto-Update
This unit will automatically update to the newest firmware when in standby mode.
On: Turns on Automatic Updates.
Off
(Default):
Turns off Automatic Updates.
Time Zone
Change the time zone.
Set the time zone that matches the area where you live.

- This menu cannot be selected when "Allow Update" is set to "Off".
Front panel D
Rear panel Re
Index
257



Contents Connections Playback
Tips Appendix
Allow Update
Enable or disable updates and upgrades for this unit.
| On(Default): | Enables this unit to receive updates and upgrades. |
| Off: | Prevents this unit from receiving update and upgrade. |

- This setting causes Incompatibilities between this unit and HEOS App.
■ Upgrade Notification
When the latest Upgrade firmware is available, a notification message is displayed on the TV screen at power on.
The notification message is displayed for about 40 seconds when the power is turned on.
On
Display upgrade message.
(Default):
Off: Do not display upgrade message.

- This menu cannot be selected when "Allow Update" is set to "Off".
Front panel D
Rear panel Re
Index
258


■ Add New Feature
Display new features that can be downloaded to this unit and perform an upgrade.
Upgrade Package: Display the items to be upgraded.
| Upgrade Status: | Display a list of the additional functions provided by the upgrade. |
| Upgrade: | Execute the upgrade process.When the upgrade starts, the menu screen is shut down. During the upgrade, the amount of upgrade time which has elapsed is displayed. |

- Information regarding the "Update" function and "Add New Feature" will be announced on the Marantz website each time related plans are defined. See the Marantz website for details about upgrades.
- When the procedure is complete, "Registered" is displayed in this menu and upgrades can be carried out. If the procedure has not been carried out, "Not Registered" is displayed.
The ID number shown on this screen is needed when carrying out the procedure.
The ID number can also be displayed by pressing and holding the main unit's ◀ and SETUP for at least 3 seconds.
- If the upgrade is not successful, "Upgrade Error" message appears in the display. See "Troubleshooting" – "Update/upgrade error messages" for information on upgrade error messages. (1 p. 298)
Check the settings and network environment and then perform the upgrade again. - This menu cannot be selected when "Allow Update" is set to "Off".
Notes concerning use of "Update" and "Add New Feature"
- In order to use these functions, you must have the correct system requirements and settings for an Internet connection. (12 p. 93)
- Do not turn off the power until updating or upgrading is completed.
- Approximately 1 hour is required for the updating/upgrading procedure to be completed.
- Once updating/upgrade starts, normal operations on this unit cannot be performed until updating/upgrading is completed. Furthermore, there may be cases where backup data is reset for the parameters, etc., set on this unit.
- If the update or upgrade fails, press and hold the ⏻ on the main unit for more than 5 seconds, or remove and re-insert the power cord. After about 1 minute, "Please wait" appears on the display and update restarts. If the error continues, check the network environment.
Front panel D
Rear panel Re
Index
259


Contents Connections Playback
Tips Appendix
Information
Show information about this unit settings, input signals, etc.
Audio
Show the audio information for MAIN ZONE.
Sound Mode: The currently set sound mode.
Input Signal: The input signal type.
| Format: | The number of input signal channels (presence of front, surround, LFE). |
| Sample Rate: The input signal's sampling frequency. | |
| Offset: | The dialogue normalization correction value. |
| Flag: | This is displayed when inputting signals including a surround back channel.“MATRIX” is displayed with DTS-ES Matrix input signals, “DISCRETE” with DTS-ES Discrete signals. |
Video
Show the HDMI input/output signals and HDMI monitor information for MAIN ZONE.
HDMI Signal Info.
Resolution / Color Space / Pixel Depth
HDMI Monitor 1 / HDMI Monitor 2
Interface / Resolutions
ZONE
Show information about current settings.
| MAIN ZONE: | This item shows information about settings for MAIN ZONE. The information displayed differs according to the input source. |
| ZONE2/3: | This item shows information about settings for ZONE2 and ZONE3. |
■ Firmware
Version: Displays information for the current firmware.
DTS Version: Displays the current DTS version.
Front panel D
Rear panel Re
Index
260



Contents Connections Playback
Tips Appendix
Notifications
Displays and sets notifications.
Also, sets whether or not to display the notification when the power is turned on.
Notification Alerts
| On(Default): | Notification messages are displayed. |
| Off: Notification messages are not displayed. | |

- Press INFO on the remote control unit to display current source name, volume, sound mode name, and other information at the bottom of the screen.
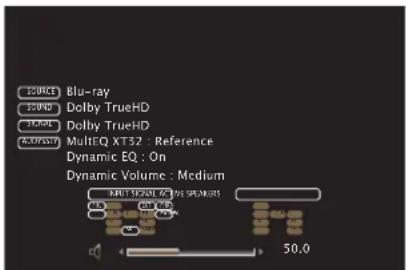
Usage Data
To help us improve our products and customer service, Marantz collects anonymous information about how you use this unit (such as frequently used input sources and sound modes and speaker settings). Marantz will never provide any information we collect to third parties.
| Yes: | Provide information on the operating status of this unit. |
| No: | Do not provide information on the operating status of this unit. |
Front panel D
Rear panel Re
Index
261


Contents Connections Playback
Tips Appendix
Save & Load
Save and restore device settings by using a USB memory device.

- Use a USB memory device that has at least 128 MB of free space and is formatted to FAT32. Data may not Save/Load correctly to some USB memory devices.
- It may take up to 10 minutes for data to Save/Load. Do not turn off the power until the process is complete.
■ Save Configuration
Current unit settings are stored on the USB memory device. When the settings are saved correctly, "Saved" appears on the display and the file "config.avr" is created on the USB memory device.

- Do not change the file name of the created file. Doing so will prevent the file from being recognized as a settings file when restoring.
Load Configuration
Settings saved on the USB memory device are restored. When the saved settings are restored correctly, "Loaded" appears on the display and the unit automatically restarts.
Setup Lock
Protect settings from inadvertent changes.
Lock
On: Turn protection on.
Off
(Default):
Turn protection off.

- When cancelling the setting, set "Lock" to "Off".
NOTE
- When "Lock" is set to "On", no setting items are displayed except for "Setup Lock".
Front panel D
Rear panel Re
Index
262


Contents Connections Playback
Tips Appendix
Operating external devices with the remote control unit
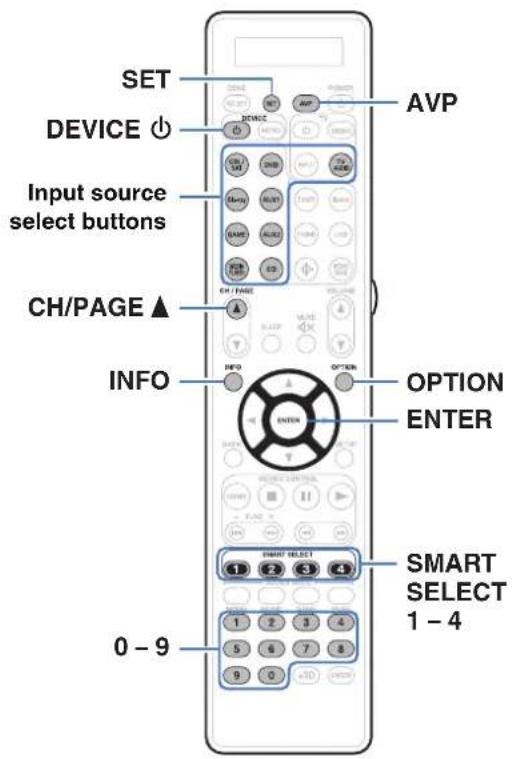
When preset codes are registered in the included remote control unit, it can then be used to operate any devices you have, such as DVD players or TVs made by different manufacturers.




Contents Connections Playback
Tips Appendix
Registering preset codes
There are two methods for registering preset codes; the simple method for registering preset codes of Marantz players, the method for registering the preset numbers of other manufacturers' devices, and the method for experimenting with preset codes one by one for registration.
• "Registering Marantz players" (p. 264)
- "Registering by entering preset numbers" (p. 265)
- "Experimenting with preset codes one by one for registration" (17 p. 266)
■ Registering Marantz players
Use the following simple method to register the preset codes of Marantz Blu-ray Disc players, DVD players and CD players.
☐ Registering Blu-ray Disc players
1 Press and hold down Blu-ray and OPTION until "OK" indicator on the remote control display is flashing, then release.
☐ Registering DVD players
1 Press and hold down DVD and OPTION until "OK" indicator on the remote control display is flashing, then release.
☐ Registering CD players
1 Press and hold down CD and OPTION until "OK" indicator on the remote control display is flashing, then release.
Front panel D
Rear panel Re
Index
264


Contents Connections Playback
Tips Appendix
☐ Registering multiple players at the same time
1 Press and hold down the SMART SELECT 1 - 4 and OPTION until "OK" indicator on the remote control display is flashing, then release.
| Devices to be registered at the same time | Press and hold down the buttons | ||
| Blu-ray Disc player | DVD player | CD player | |
| √ | √ | SMART SELECT 1 and OPTION | |
| √ | √ | SMART SELECT 2 and OPTION | |
| √ | √ | SMART SELECT 3 and OPTION | |
| √ √ √ | SMART SELECT 4 and OPTION | ||
NOTE
- Depending on the model and year of manufacture of your device, some buttons may not operate. In this case, try "Registering by entering preset numbers" (p. 265).
■ Registering by entering preset numbers
The following table shows the device groups that can be registered for each of the input source select buttons. Check the preset number of the device you want to register beforehand in the "Remote Control Preset Codes" file. http://manuals.marantz.com/AV8805/preset/AV8805PresetCodes.pdf
| Button Device groups that can be registered | |
| CBL/SAT | CBL/SAT group |
| Blu-ray | BD/DVD group |
| GAME | CBL/SAT group, BD/DVD group, Audio group |
| MEDIA PLAYER | CBL/SAT group |
| DVD | BD/DVD group |
| AUX1 | CBL/SAT group, BD/DVD group, Audio group |
| AUX2 | CBL/SAT group, BD/DVD group, Audio group |
| CD | Audio group |
| TV AUDIO | TV group |
Front panel D
Rear panel Re
Index
265


Contents Connections Playback
Tips Appendix
1 Press and hold down the input source select button that you want to register the preset code to and SET until "PRSET" indicator on the remote control display is flashing, then release.
2 Enter the preset number (4 digits) listed for the device in the Preset Code Table using the number buttons (0 - 9) on the remote control.

- Some manufacturers use more than one type of preset code. Preset codes to change the number and verify correct operation.
- If the device does not operate even when the preset code is registered, use the learning function. Remote codes for different devices can be remembered for use by the Marantz remote control included with this device. (127 p. 272)
NOTE
- Depending on the model and year of manufacture of your device, some buttons may not operate.
■ Experimenting with preset codes one by one for registration
1 Switch the power on of the device for which you want to set the preset code.
2 Press and hold down the input source select button that you want to register the preset code to and SET until "PRSET" indicator on the remote control display is flashing, then release.
3 Aim the remote control at the appliance and slowly alternate between pressing CH/PAGE ▲ and DEVICE ⊙ for the appliance.
The preset code is shown in the remote control display.
4 Stop when the appliance turns off.
5 Press ENTER once to lock in the code.
Front panel D
Rear panel Re
Index
266



Contents Connections Playback
Tips Appendix

- Some manufacturers use more than one type of remote control code. Preset codes to change the number and verify correct operation.
- If the device does not operate even when the preset code is registered, use the learning function. Remote codes for different devices can be remembered for use by the Marantz remote control included with this device. (157 p. 272)
NOTE
- Depending on the model and year of manufacture of your device, some buttons may not operate.
Front panel D
Rear panel Re
Index
267


Contents Connections Playback
Tips Appendix
Operating devices
To operate an external device, press the input source button registered with the preset code, followed by one of the buttons in the following tables.

- When operating an external device, the display on the remote control unit shows the input source name.
- The "TV" indicator lights when the TV is being operated.
- To operate the menu of this unit, press AVP before operating the unit. The "AVP" indicator lights when this unit is being operated.
☐ TV group (TV) operation
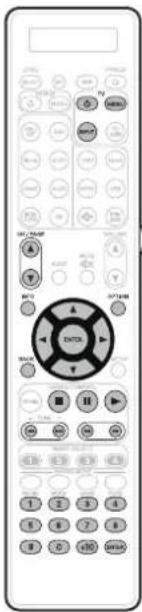
Operation buttons Function
TV ⏻ TV power on/off
TV INPUT Switch TV input
TV MENU TV menu
CH/PAGE ▲▼ Switch channels (up/down)
INFO Information
OPTION Sub menu, Option
△ ▽ ◀ ▷ Cursor operation
ENTER(Cursor) Enter
BACK Back
Skip chapter
▶ Playback
◀◀▶▶ Fast-reverse / Fast-forward
II Pause
■ Stop
0 - 9, +10 Channel selection

- TV ⏻ and TV INPUT buttons can be operated at any time without pressing the TV button.
Front panel D
Rear panel Re
Index
268



Contents Connections Playback
Tips Appendix
DVD group
(DVD player / DVD recorder) operation
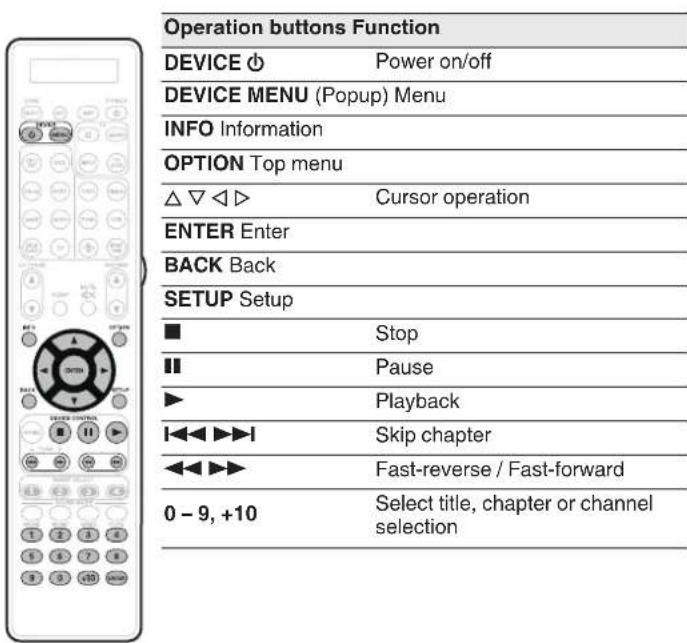
□ CD group
(CD player / CD recorder) operation
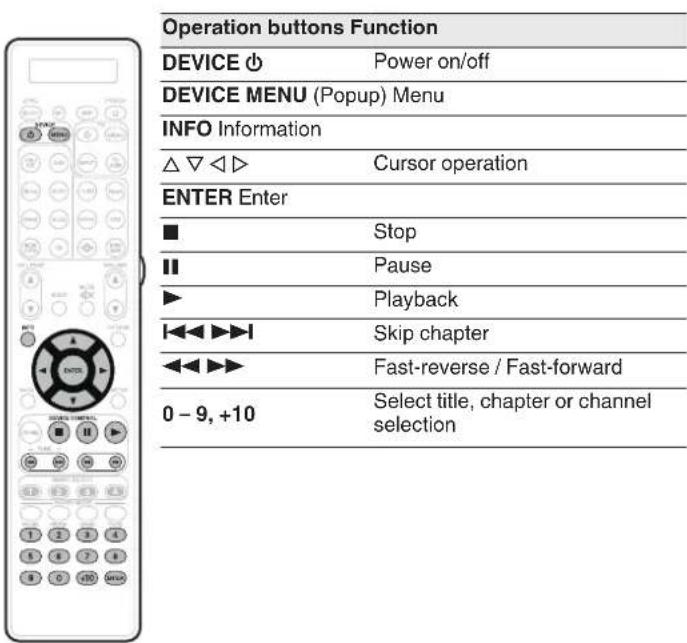

- Depending on the device, the DEVICE ⏻ button only performs the power-on operation.


269



Contents Connections Playback
Tips Appendix
CBL/SAT group
(Set top box for satellite (SAT)/cable TV (CBL)/Media player/IP TV) operation
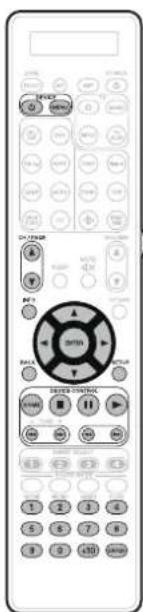
Operation buttons Function
DEVICE
Power on/off
DEVICE MENU Menu
CH/PAGE ▲▼
Switch channels (up/down)
INFO Information
△ ▽ ◁ ▷
Cursor operation
ENTER Enter
BACK Back
SETUP Setup
HOME Home menu
■ Stop
II Pause
▶ Playback
Skip chapter
◀◀▶▶ Fast-reverse / Fast-forward
0 - 9, +10 Channel selection
BD group
(Blu-ray Disc player) operation
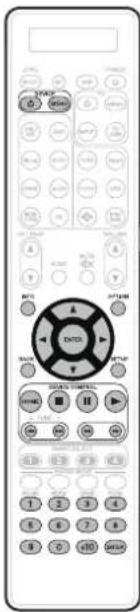
Operation buttons Function
DEVICE ⏻ Power on/off
DEVICE MENU (Popup) Menu
INFO Information
OPTION Top menu
△ ▽ ◀ ▷ Cursor operation
ENTER Enter
BACK Back
SETUP Setup
HOME Home menu
■ Stop
II Pause
▶ Playback
Skip chapter
◀◀▶▶ Fast-reverse / Fast-forward
0 - 9, +10 Select title, chapter or channel selection

- Depending on the device, the DEVICE ⏻ button only performs the power-on operation.
Front panel D
Rear panel Re
Index
270


Contents Connections Playback
Tips Appendix
Checking registered preset codes
1 Press and hold an input source select button for which you want to check the preset code and the SET button until the display on the remote control unit shows "PRSET".
2 Press INFO.
The set code is shown for 3 seconds in the remote control display.
Initializing registered preset codes
1 Press and hold down AVP and OPTION until "OK" indicator on the remote control display is flashing, then release.
Front panel D
Rear panel Re
Index
271


Contents Connections Playback
Tips Appendix
Operating learning function
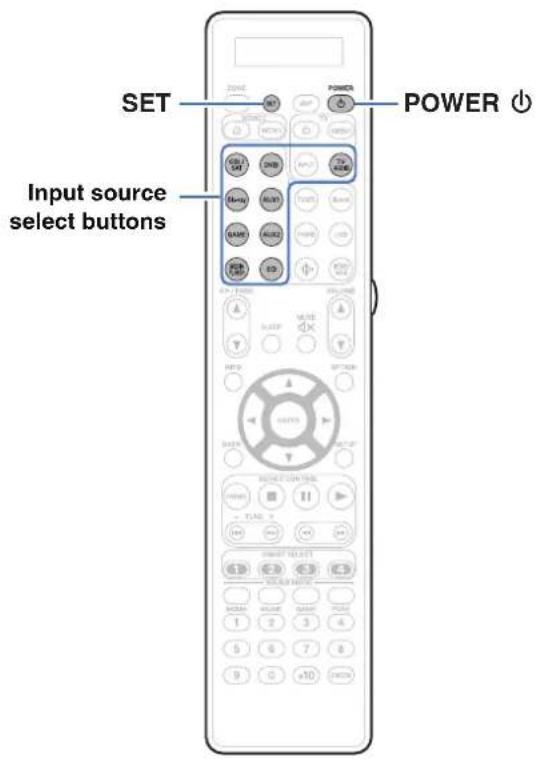
If the device does not operate even when the preset code is registered, use the learning function. Remote codes for different devices can be remembered for use by the Marantz remote control included with this device.
Front panel D
Rear panel Re
Index
272



Remembering remote control codes from other devices
1 Place the Marantz remote control and remote control from the other device approximately 5 cm apart, with the remote control signal transmission sections facing each other.
2 Press and hold SET until the LEARN indicator blinks.
3 Press input source select buttons to select the input source.
The input source is shown in the remote control display.
4 Select the button to be learned.
LEARN indicator lights up.
5 Press and hold the button that you want to register on the other remote control until "OK" is displayed on the Marantz remote control display.
- If "NG" is shown on the remote control display, perform step 4 again.
6 Repeat steps 4 and 5 to learn other buttons for the same input source.
7 When programming of the remote control unit is completed, press SET.
The LEARN indicator turns off, and the remote control unit exits learn mode.

- There are some remote control units that cannot be programmed, or even if they can be programmed, they may not operate correctly. If this happens, use the remote control unit supplied with the AV equipment to operate it.
- If the remote control memory becomes full, "FULL" is shown on the remote control display. If you want to learn the code, you should erase other learned button.
NOTE
- The learning function is unavailable for all ZONE SELECT, SET, AVP, POWER 0; VOLUME ▲▼, SMART SELECT, SOUND MODE and input source select buttons in any mode.
- If no buttons are pressed for approximately 1 minutes while in the LEARN mode, the remote control unit automatically exits from the LEARN mode.
Front panel D
Rear panel Re
Index
273



Delete saved remote control codes
Codes can be erased in three ways: by buttons, sources, and by all memory contents.
■ Delete remote control codes for each button
1 Press and hold SET until the LEARN indicator blinks.
2 Press input source select buttons to select the input source you want to delete.
The input source is shown in the remote control display.
3 Press and hold POWER ⏻ and press the learned button to be erased twice.
"ERASE" is shown in the remote control display.
4 Press SET.
• The LEARN indicator turn off.
■ Delete remote control codes for each input source
1 Press and hold SET until the LEARN indicator blinks.
2 Press and hold POWER ⏻ and press the learned input source select buttons to be erased twice.
"ERASE" is shown in the remote control display.
3 Press SET.
• The LEARN indicator turn off.
■ Delete remote control codes for all input sources
1 Press and hold SET until the LEARN indicator blinks.
2 Press and hold POWER ⏻ and press AVP twice.
"ERASE" is shown in the remote control display.
3 Press SET.
• The LEARN indicator turn off.
Front panel D
Rear panel Re
Index
274


Contents Connections Playback
Tips Appendix
Setting the back light
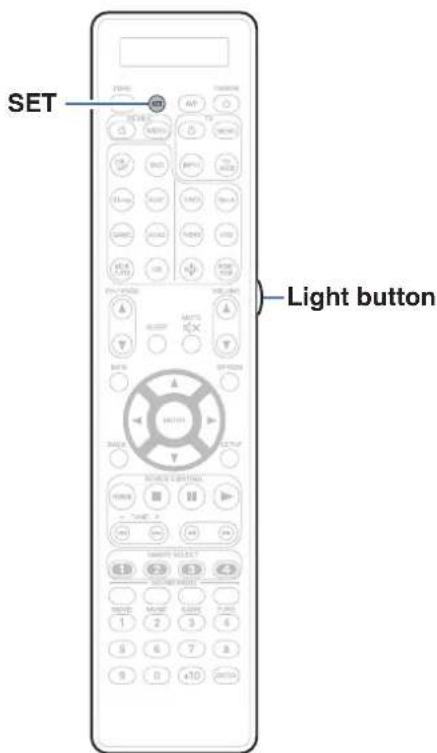
You can turn off the backlight of the remote control unit.
- Backlight is set on in the factory settings.
Disabling the backlight
1 Press and hold both SET and Light button until "OFF" indicator flashes twice.
Turning the backlight on
1 Press and hold both SET and Light button until "ON" indicator flashes twice.
Front panel D
Rear panel Re
Index
275


Contents Connections Playback
Tips Appendix
Specifying the zone used with the remote control unit
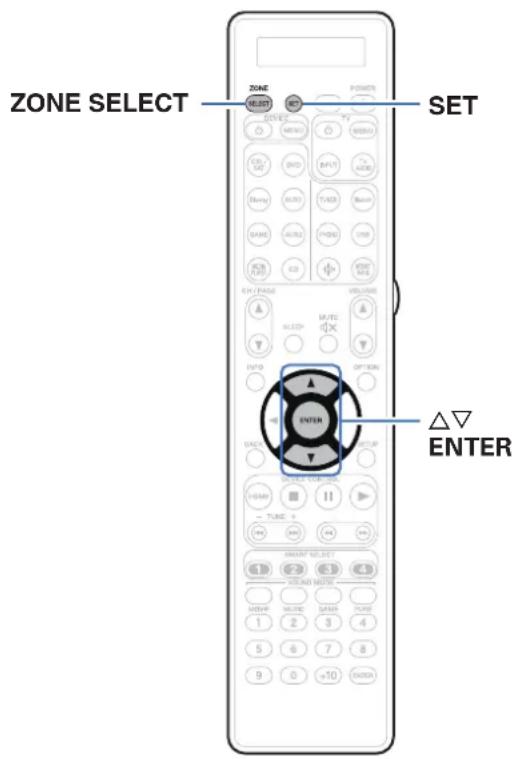
When the ZONE SELECT is pressed, only the set zone can be operated with the remote control unit.
This is useful for preventing mistaken operation.
- The factory setting is "M23".
1 Press and hold ZONE SELECT and SET for at least 3 seconds.
2 Use to set the zone to be used and press ENTER.
"SET" flashes four times on the remote control unit and the normal operation mode is restored.
| Remote control unit display | Zone to be used |
| M MAIN ZONE only | |
| M2 MAIN ZONE / ZONE2 | |
| M23 | MAIN ZONE / ZONE2 / ZONE3 |
Front panel D
Rear panel Re
Index
276



Contents
Connections
Playback
Settings
Tips
Appendix
Contents
Tips
| I want the volume not to become too loud by mistake 278 |
| I want to keep the volume at the same level when I turn the power on 278 |
| I want to have the subwoofer always output audio 278 |
| I want to make human voices in the movies clearer 278 |
| I want to keep bass and clarity during playback at a lower volume level 278 |
| I want to automatically adjust the volume level difference in content such as TV and movies 278 |
| I want to set the optimized listening environment after changing the configuration/position of the speakers or changing a speaker to a new one 279 |
| I want to combine a desired video with the current music 279 |
| I want to skip unused input sources 279 |
| I want to enjoy the same music in all zones at the home party, etc. 279 |
| I want to minimize the delay in video signals when I'm playing a game on my game console 279 |
| I want to operate this unit using the TV remote control 279 |
Troubleshooting
| Power does not turn on / Power is turned off 281 | |
| Operations cannot be performed through the remote control unit 282 | |
| Display on this unit shows nothing 282 | |
| No sound comes out 283 | |
| Desired sound does not come out | 284 |
| Sound is interrupted or noise occurs | 286 |
| No video is shown on the TV | 287 |
| The menu screen is not displayed on the TV | 289 |
| AirPlay cannot be played back | 290 |
| USB memory devices cannot be played back | 291 |
| Bluetooth cannot be played back | 292 |
| The Internet radio cannot be played back | 293 |
| Music files on PC or NAS cannot be played back | 294 |
| Various online services cannot be played | 295 |
| The HDMI Control function does not work | 295 |
| Cannot connect to a wireless LAN network | 296 |
| When using HDMI ZONE2, the devices does not function properly | 297 |
| Update/upgrade error messages | 298 |
Front panel
Display
Rear panel
277
Remote
Index

Contents
Connections Playback Settings
Appendix
Tips
I want the volume not to become too loud by mistake
- Set the volume upper limit for "Volume Limit" in the menu beforehand. This prevents children or others from increasing the volume too much by mistake. You can set this for each zone. ("Volume" (p. 186), "Volume Limit" (p. 253))
I want to keep the volume at the same level when I turn the power on
- By default, the volume setting when power was previously set to standby on this unit is applied at next power on with no change. To use a fixed volume level, set the volume level at power on for "Power On Volume" in the menu. You can set this for each zone. ("Volume" (p. 186), "Power On Volume" (p. 253))
I want to have the subwoofer always output audio
- Depending on the input signals and sound mode, the subwoofer may not output audio. When “Subwoofer Mode” in the menu is set to “LFE+Main”, you can have the subwoofer always output audio. (p. 239)
I want to make human voices in the movies clearer
- Select a setting that makes the dialog easier to hear in the option menu "Dialog Enhancer". (p. 139)
I want to keep bass and clarity during playback at a lower volume level
- Set “Dynamic EQ” in the menu to “On”. This setting corrects the frequency characteristics to allow you to enjoy clear sound without the bass being lost even during playback at a lower volume level. (p. 188)
I want to automatically adjust the volume level difference in content such as TV and movies
- Set “Dynamic Volume” in the menu. Volume level changes (between quiet scenes and loud scenes) in TV shows or movies are automatically adjusted to your desired level. (p. 189)
Front panel D
Rear panel Re
Index
278



Contents
Connections Playback Settings
Appendix
I want to set the optimized listening environment after changing the configuration/position of the speakers or changing a speaker to a new one
- Perform Audyssey® Setup. This automatically makes the optimized speaker settings for the new listening environment. (p. 211)
I want to combine a desired video with the current music
- Set "Video Select" in the option menu to "On". You can combine the current music with your desired video source from a Set-top Box or DVD, etc. while listening to music from the Tuner, CD, Phono, HEOS Music, USB or Bluetooth. (127 p. 142)
I want to skip unused input sources
- Set unused input sources for "Hide Sources" in the menu. This allows you to skip unused input sources when turning the INPUT SELECTOR knob on this unit. (rF p. 209)
I want to enjoy the same music in all zones at the home party, etc.
- Set "All Zone Stereo" in the option menu to "Start". You can simultaneously play back music in another room (ZONE2, ZONE3) that is played back in MAIN ZONE. (p. 144)
I want to minimize the delay in video signals when I'm playing a game on my game console
- When the video is delayed against button operations with the controller on the game console, set "Video Mode" in the menu to "Game". (K 200)
I want to operate this unit using the TV remote control
- Select "AV Receiver" in a TV menu such as "Input"* or "Operate Connected HDMI Device"*. The Smart Menu of this unit is displayed on the TV. This Smart Menu can be operated using the remote control of your TV.
* The selection method differs depending on your TV. See the owner's manual of your TV for details.
Front panel D
y Rear panel Re
Index
279


Contents Connections Playback Settings
Appendix
Troubleshooting
If a problem should arise, first check the following:
- Are the connections correct?
- Is the set being operated as described in the owner's manual?
- Are the other devices operating properly?

- If steps 1 to 3 above do not improve the problem, restarting the device may improve the problem.
Continue pressing the ⏻ button on the unit until "Restart" appears in the display, or remove and re-insert the power cord of the unit.
If this unit does not operate properly, check the corresponding symptoms in this section.
If the symptoms do not match any of those described here, consult your dealer as it could be due to a fault in this unit. In this case, disconnect the power immediately and contact the store where you purchased this unit.
Front panel D
Rear panel Re
Index
280



Contents
Connections Playback Settings
Appendix
Power does not turn on / Power is turned off
Power does not turn on.
- Check whether the power plug is correctly inserted into the power outlet. (p. 97)
Power automatically turns off.
- The sleep timer is set. Turn on the power again. (p. 160)
- "Auto Standby" is set. "Auto Standby" is triggered when there is no operation for a set amount of time. To disable "Auto Standby", set "Auto Standby" on the menu to "Off". (125)
The power to this unit does not turn off when you press the Power operation button. "ZONE2 On" or "ZONE3 On" appears on the display.
- Power in either ZONE2 or ZONE3 is on. To turn off the power of this unit (standby), press the ZONE2 ON/OFF or ZONE3 ON/OFF button on the main unit or press the ZONE SELECT button on the remote control and select a zone before pressing the POWER ∅ button.
The power to this unit does not turn off when you press the Power operation button. "HEOS On" appears on the display.
- A HEOS device on the same network is playing an input source from this unit. Stop playback on the HEOS device when turning this unit off (setting it to standby). The power of this unit will turn off automatically after around 20 minutes.
Front panel D
y Rear panel Re
Index
281



Contents
Connections Playback Settings
Appendix
Operations cannot be performed through the remote control unit
Operations cannot be performed through the remote control unit.
- Batteries are worn out. Replace with new batteries. (p. 9)
- Operate the remote control unit within a distance of about 23 ft/7 m from this unit and at an angle of within 30^ . (1-5 p. 9)
- Remove any obstacle between this unit and the remote control unit.
- Insert the batteries in the proper direction, checking the and marks. (1) p. 9)
- The set's remote control sensor is exposed to strong light (direct sunlight, inverter type fluorescent bulb light, etc.). Move the set to a place in which the remote control sensor will not be exposed to strong light.
- The operation target zone does not correspond to the zone setting specified on the remote control unit. Press ZONE SELECT to select the zone to operate. (178)
- The remote control unit operating mode is used to operate other devices. Press AVP to set the operating mode to AVP. (p. 268)
- When using a 3D video device, the remote control unit of this unit may not function due to effects of infrared communications between units (such as TV and glasses for 3D viewing). In this case, adjust the direction of units with the 3D communications function and their distance to ensure they do not affect operations from the remote control unit of this unit.
Display on this unit shows nothing
Display is off.
- Set "Dimmer" on the menu to something other than "Off". (☐ p. 256)
- When the sound mode is set to "Pure Direct", the display is off. (p. 147)
Front panel D
Rear panel Re
Index
282



Contents
Connections Playback Settings
Appendix
No sound comes out
No sound comes out of speakers.
- Check the connections for all devices. (☐ p. 44)
- Insert connection cables all the way in.
- Check that input connectors and output connectors are not reversely connected.
- Check cables for damage.
- Check the speaker connections and configurations. (p. 49)
- Check the connections for PRE OUT connectors. (☐ p. 44)
- Check whether the audio device power is turned on. (p. 79)
- Check that a proper input source is selected. (19 p. 99)
- Adjust the volume. (p. 100)
- Cancel the mute mode. (p. 100)
- Check the digital audio input connector setting. (p. 206)
- Check the digital audio output setting on the connected device. On some devices, the digital audio output is set to off by default.
- When a headphone is plugged into the PHONES jack on the main unit, sound is not output from the PRE OUT connector.
No sound comes out when using the DVI-D connection.
- When this unit is connected to a device equipped with a DVI-D connector, no sound is output. Make a separate audio connection.
No sound comes out of a TV that is connected via HDMI.
- Audio signals input to 7.1CH IN connectors on this unit cannot be output to the TV.
Front panel D
Rear panel Re
Index
283


Contents
Connections Playback Settings
Appendix
Desired sound does not come out
The volume does not increase.
- The maximum volume is set too low. Set the maximum volume using "Limit" on the menu. (P. 186)
- Appropriate volume correction processing is performed according to the input audio format and settings, so the volume may not reach the upper limit.
No sound comes out with the HDMI connection.
- Check the connection of the HDMI connectors. (p. 80)
- When outputting HDMI audio signals from the speakers of a power amp connected to this unit, set "HDMI Audio Out" in the menu to "AVP". To output from the TV, set it to "TV". (12) p. 194
- When using the HDMI Control function, check that the audio output is set to the AV amplifier on the TV. (17 p. 157)
No sound comes out of a specific speaker.
- Check that PRE OUT cables and speaker cables are properly connected.
- Check that a selection other than "None" is set for the "Speaker Config." setting in menu. (p. 230)
- Check the "Assign Mode" setting in the menu. (p. 222)
- When the sound mode is "Stereo" and "Virtual", audio is only output from the front speakers and subwoofer.
No sound is produced from subwoofer.
- Check the subwoofer connections.
- Turn on the subwoofer's power.
- Set "Speaker Config." - "Subwoofer" in the menu to "1 spkr" or "2 spkrs". (p. 230)
- When "Speaker Config." - "Front" in the menu is set to "Large", depending on the input signal and the sound mode, no sound may be output from the subwoofer. (p. 230)
- When no subwoofer audio signal (LFE) is included in the input signals, no sound may be output from the subwoofer. (P. 239)
- You can make the subwoofer always output sound by setting the "Subwoofer Mode" to "LFE+Main". (p. 239)
DTS sound is not output.
- Check that the digital audio output setting on the connected device is set to "DTS".
Front panel D
Rear panel Re
Index
284


Contents
Connections Playback Settings
Appendix
Dolby Atmos, Dolby TrueHD, DTS-HD, Dolby Digital Plus audio is not output.
• Make HDMI connections. (p. 85)
- Check the digital audio output setting on the connected device. On some devices, "PCM" is set by default.
DTS Neural:X mode cannot be selected.
- DTS Neural:X cannot be selected when using the headphones.
Dolby Surround mode cannot be selected.
- Dolby Surround cannot be selected when using the headphones.
Sound modes other than "Stereo" or "Direct" cannot be selected.
- Only "Stereo" or "Direct" can be selected for the sound mode if Headphone:X signals are input.
Audyssey MultEQ ^® XT32, Audyssey Dynamic EQ ^® , Audyssey Dynamic Volume ^® and Audyssey LFC ^™ cannot be selected.
- These cannot be selected when you have not performed Audyssey® Setup. (p. 211)
- Switch to a sound mode other than "Direct" or "Pure Direct". (p. 147)
- Audyssey Dynamic EQ®, Audyssey Dynamic Volume® and Audyssey LFC™ cannot be selected when sound mode is “DTS Virtual:X” or sound mode that have “+ Virtual:X” in the sound mode name.
• These cannot be selected when using the headphones.
"M-DAX" cannot be selected.
- Check that an analog signal or PCM signal (Sample Rate = 44.1/48 kHz) is input. For playback of multichannel signals such as Dolby Digital or DTS surround, "M-DAX" cannot be used. (p. 184)
- Switch to a sound mode other than "Direct" or "Pure Direct". (125 p. 147)
No audio is output from PRE OUT for ZONE2/ZONE3.
- In ZONE2/ZONE3, the audio can be played back when signals input from digital connectors (OPTICAL/COAXIAL) are in 2ch PCM format.
- In ZONE2, the audio can be played back when signals input from the HDMI connector are in 2ch PCM format. To play back the audio in ZONE2 irrespective of the input signal format, set "HDMI Audio" in the menu to "PCM". Depending on the played back device, the audio may not be played back even with this setting. In that case, set the audio format to "PCM (2ch)" on the played back device. (17 p. 252)
- When listening to audio from a Bluetooth device in ZONE2/ZONE3, remove any obstructions between the Bluetooth device and this unit and use it within a range of about 98.4 ft/30 m.
Front panel D
Rear panel Re
Index
285



Contents
Connections Playback Settings
Appendix
Sound is interrupted or noise occurs
During playback from the Internet radio or USB memory device, sound is occasionally interrupted.
- When the transfer speed of the USB memory device is slow, sound may occasionally be interrupted.
- The network communication speed is slow or the radio station is busy.
When making a call on iPhone, noise occurs in audio output on this unit.
- When making a call, keep a distance of 0.7 ft/20 cm or longer between iPhone and this unit.
Noise often occurs in FM/AM broadcasting.
- Change the antenna orientation or position. (自 p. 91)
- Separate the AM loop antenna from the unit.
- Use an outdoor antenna. (p. 91)
- Separate the antenna from other connection cables. (1) p. 91
The sounds appear to be distorted.
- Lower the volume. (1 p. 100)
Sound cuts out when using Wi-Fi connection.
- The frequency band used by the wireless LAN is also used by microwave ovens, cordless telephones, wireless game controllers and other wireless LAN devices. Using such devices at the same time as this unit may cause sound to cut out due to electronic interference. Sound cut out can be improved using the following methods. (127 p. 93)
- Install devices that cause interference away from this unit.
- Turn off the power supply to devices that cause interference.
- Change the settings of the router channel to which this unit is connected to. (See the instruction manual of the wireless router for details on how to change the channel.)
- Switch to a wired LAN connection.
- Particularly when you play back large music files, depending on your wireless LAN environment, the playback sound may be interrupted. In this case, make the wired LAN connection. (p. 244)
Front panel D
Rear panel Re
Index
286


Contents
Connections Playback Settings
Appendix
No video is shown on the TV
No picture appears.
- Check the connections for all devices. (☐ p. 80)
- Insert connection cables all the way in.
- Check that input connectors and output connectors are not reversely connected.
- Check cables for damage.
- Match the input settings to the input connector of the TV connected to this unit. (p. 206)
- Check that the proper input source is selected. (1章 p. 99)
- Check the video input connector setting. (p. 206)
- Check that the resolution of the player corresponds to that of the TV. (195 p. 260)
- Check whether the TV is compatible with copyright protection (HDCP). If connected to a device not compatible with HDCP, video will not be output correctly. (p. 303)
• To enjoy content that is copyright protected by HDCP 2.2, use a playback device and TV compatible with HDCP 2.2 only. - The HDMI signal cannot be converted to an analog signal. Use analog connections. (p. 304)
- To play back a 4K (60/50Hz) video, use a “High Speed HDMI Cable” or an “High Speed HDMI Cable with Ethernet”. In order to achieve a higher fidelity for 4K (60/50Hz) videos, it is recommended to use a “Premium High Speed HDMI Cables” or an “Premium High Speed HDMI Cables with Ethernet” that has an HDMI Premium Certified Cable label on the product package.
No video is shown on the TV with the DVI-D connection.
- With the DVI-D connection, on some device combinations, devices may not function properly due to the copy guard copyright protection (HDCP). (1 p. 303)
Front panel D
Rear panel Re
Index
287


Contents Connections Playback Settings
Appendix
No video from an input source such as a game console is shown on the TV.
- When special video signals are input from a game console, etc., the Video Conversion function may not function. Connect the input connector to the monitor output connector of the same type.
While the menu is being displayed, no video is shown on the TV.
- The video being played will not appear in the background of the menu when the menu is operated during playback of the following video signals.
- Some images of 3D video contents
- Computer resolution images (example: VGA)
- Video with an aspect ratio other than 16:9 or 4:3
- 4K video
- Some kind of HDR signals
When using HDMI ZONE2, the video output in MAIN ZONE is interrupted.
- When ZONE2 is operated with the same input source selected for MAIN ZONE and ZONE2, video in MAIN ZONE may be interrupted.
Front panel D
y Rear panel Re
Index
288



Contents
Connections Playback Settings
Appendix
The menu screen is not displayed on the TV
The menu screen or status information screen is not displayed on the TV.
- The menu screen is only displayed on this unit and a TV connected with an HDMI cable. If this unit is connected to a TV using a different video output connector, operate while watching the display on this unit.
- The status information will not appear on the TV when the following video signals are being played.
- Some images of 3D video content
- Computer resolution images (example: VGA)
- Video with an aspect ratio other than 16:9 or 4:3
- Some kind of HDR signals
- When a 2D video is converted to a 3D video on the TV, the menu screen or status information screen is not displayed properly. (p. 261)
- In the pure direct playback mode, the menu screen or status information is not displayed. Switch to a sound mode other than the pure direct mode. (125 p. 146)
- Set the "TV Format" setting in the menu to a selection that is appropriate for the TV. (10 p. 205)
Front panel D
Rear panel Re
Index
289


Contents
Connections Playback Settings
Appendix
AirPlay cannot be played back
The AirPlay icon is not displayed on iTunes / iPhone / iPod touch / iPad.
- This unit and PC / iPhone / iPod touch / iPad are not connected to the same network (LAN). Connect it to the same LAN as this unit. (p. 93)
- The firmware on iTunes / iPhone / iPod touch / iPad is not compatible with AirPlay. Update the firmware to the latest version.
Audio is not output.
- The volume on iTunes / iPhone / iPod touch / iPad is set to the minimum level. The volume on iTunes / iPhone / iPod touch / iPad is linked with the volume on this unit. Set a proper volume level.
- The AirPlay playback is not performed, or this unit is not selected. Click the AirPlay icon on the iTunes / iPhone / iPod touch / iPad screen and select this unit. (p. 134)
Audio is interrupted during the AirPlay playback on iPhone / iPod touch / iPad.
- Quit the application running in the background of the iPhone/iPod touch/iPad, and then play using AirPlay.
- Some external factors may be affecting the wireless connection. Modify the network environment by taking measures such as shortening the distance from the wireless LAN access point.
iTunes cannot be played back through the remote control unit.
- Enable the “Allow iTunes audio control from remote speakers” setting on iTunes. Then, you can perform playback, pause, and skip operations through the remote control unit.
Front panel D
Rear panel Re
Index
290



Contents
Connections Playback Settings
Appendix
USB memory devices cannot be played back
USB memory device is not recognized.
- Disconnect and reconnect the USB memory device. (p. 90)
- Mass storage class compatible USB memory devices are supported.
- This unit does not support a connection through a USB hub. Connect the USB memory device directly to the USB port.
- The USB memory device must be formatted to FAT16 or FAT32.
- Not all USB memory devices are guaranteed to work. Some USB memory devices are not recognized. When using a type of portable hard disc drive compatible with the USB connection that requires power from an AC adapter, use the AC adapter that came with the drive.
Files on the USB memory device are not displayed.
- Files of a type not supported by this unit are not displayed. (p. 101)
- This unit is able to display files in a maximum of eight folder layers. A maximum of 5000 files (folders) can also be displayed for each layer. Modify the folder structure of the USB memory device.
- When multiple partitions exist on the USB memory device, only files on the first partition are displayed.
iOS and Android devices are not recognized.
- The USB port of this unit does not support playback from iOS and Android devices.
Files on a USB memory device cannot be played.
- Files are created in a format that is not supported by this unit. Check the formats supported by this unit. (p. 306)
- You are attempting to play a file that is copyright protected. Files that are copyright protected cannot be played on this unit.
- Playback may not be possible if the album art file size exceeds 2 MB.
Front panel D
Rear panel Re
Index
291



Contents
Connections Playback Settings
Appendix
Bluetooth cannot be played back
Bluetooth devices cannot be connected to this unit.
- The Bluetooth function in the Bluetooth device has not been enabled. See the Owner's Manual of the Bluetooth device to enable the Bluetooth function.
- Bring the Bluetooth device near to this unit.
- The Bluetooth device cannot connect with this unit if it is not compatible with the A2DP profile.
- Turn the power of the Bluetooth device off and on again, and then try again.
The sound is cut off.
- Bring the Bluetooth device near to this unit.
- Remove obstructions between the Bluetooth device and this unit.
• To prevent electromagnetic interference, locate this unit away from microwave ovens, wireless LAN devices and other Bluetooth devices. - Reconnect the Bluetooth device.
Front panel D
Rear panel Re
Index
292


Contents
Connections Playback Settings
Appendix
The Internet radio cannot be played back
A list of broadcasting stations is not displayed.
- The LAN cable is not properly connected, or the network is disconnected. Check the connection status. (p. 93)
- Perform the network diagnostic mode.
Internet Radio cannot be played.
- The selected radio station is broadcasting in a format that is not supported by this unit. Formats that can be played back in this unit are MP3, WMA and AAC. (127 p. 309)
- The firewall function is enabled on the router. Check the firewall setting.
- The IP address is not properly set. (☐ p. 246)
- Check the power of the router is on.
- To obtain the IP address automatically, enable the DHCP server function on the router. Also, set the DHCP setting to "On" on this unit. (p. 246)
- To obtain the IP address manually, set the IP address on this unit. (p. 246)
- Some radio stations broadcast silently during some time period. In this case, no audio is output. Wait for a while and select the same radio station, or select another radio station. (12 p. 119)
- The selected radio station is not in service. Select a radio station in service.
Cannot connect to favorite radio stations.
- Radio station is not currently in service. Register radio stations in service.
Front panel D
Rear panel Re
Index
293


Contents
Connections Playback Settings
Appendix
Music files on PC or NAS cannot be played back
Files stored on a computer cannot be played.
- Files are stored in a non-compatible format. Record in a compatible format. (p. 308)
- Files that are copyright protected cannot be played on this unit.
- The USB port of this unit cannot be used for connection to a computer.
- Media sharing settings on the server or NAS do not allow this unit. Change the settings to allow this unit. For details, see the owner's manual of the server or NAS.
Server is not found, or it is not possible to connect to the server.
- The computer's or router's firewall is activated. Check the computer's or router's firewall settings.
- Computer's power is not turned on. Turn on the power.
- Server is not running. Launch the server.
- IP address of this unit is wrong. Check the IP address of this unit. (1 p. 243)
Music files on PC cannot be played back.
• Even if PC is connected to the USB port on this unit, music files on it cannot be played back. Connect PC to this unit through the network. (p. 93)
Files on PC or NAS are not displayed.
- Files of a type not supported by this unit are not displayed. (p. 308)
Music stored on a NAS cannot be played.
- If you use a NAS in conformity with the DLNA standard, enable the DLNA server function in the NAS setting.
- If you use a NAS that does not conform with the DLNA standard, play the music via a PC. Set Windows Media Player's media sharing function and add NAS to the selected play folder.
- If connection is restricted, set audio equipment as the connection target.
Front panel D
Rear panel Re
Index
294



Contents
Connections Playback Settings
Appendix
Various online services cannot be played
Various online services cannot be played.
- The online service may have been discontinued.
The HDMI Control function does not work
The HDMI Control function does not work.
- Check that "HDMI Control" in the menu is set to "On". (☐ p. 196)
- You cannot operate devices that are not compatible with the HDMI Control function. In addition, depending on the connected device or the settings, the HDMI Control function may not work. In this case, operate the external device directly. (p. 157)
- Check that the HDMI Control function setting is enabled on all devices connected to this unit. (图 p. 157)
- When you make connection related changes such as connecting an additional HDMI device, the link operation settings may be initialized. Turn off this unit and devices connected via HDMI, and turn them on again. (157)
- The HDMI MONITOR 2 connector is not compatible with the HDMI Control function. Use the HDMI MONITOR 1 connector to connect to the TV. (17 p. 80)
Front panel D
Rear panel Re
Index
295


Contents
Connections Playback Settings
Appendix
Cannot connect to a wireless LAN network
Cannot connect to the network.
- The network name (SSID), password and encryption setting have not been set up correctly. Configure the network settings according to the setting details of this unit. (p. 245)
- Shorten the distance from the wireless LAN access point and remove any obstructions to improve access first before re-connecting again. Place the unit away from microwave ovens and other network access points.
- Configure the access point channel settings away from channels that are being used by other networks.
- This unit is not compatible with WEP (TSN).
Cannot connect to a WPS Router.
- Check that the WPS mode of the router is operating.
- Press the WPS button on the router and then press the "Connect" button displayed on the TV within 2 minutes.
- A router/settings that are compatible with WPS 2.0 standards are required. Set the encryption time to "None", "WPA-PSK (AES)" or WPA2-PSK (AES). (127 p. 245)
- If the router encryption method is WEP/WPA-TKIP/WPA2-TKIP, you cannot connect by using the WPS button on the router. In this case, use the "Scan Networks" or "Manual" method to connect.
Cannot connect to the network using iPhone/iPod touch/iPad.
- Update the iPhone/iPod touch/iPad firmware to the latest version.
- When configuring the settings via a wireless connection, iOS 7 or later needs to be supported.
Front panel D
Rear panel Re
Index
296



Contents
Connections Playback Settings
Appendix
When using HDMI ZONE2, the devices does not function properly
When using MAIN ZONE, video output is interrupted in HDMI ZONE2.
- With the same input source selected for MAIN ZONE and ZONE2, when you operate MAIN ZONE, video may be interrupted in HDMI ZONE2.
When using HDMI ZONE2, no video or audio is output from the TV in ZONE2.
- Check that the power is on for ZONE2. (☐ p. 172)
- Check the input source for ZONE2. (p. 172)
- The AUX1-HDMI connector on the front panel does not support the HDMI ZONE2 function.
- In ZONE2, playback is only possible when the input signals are HDMI signals.
- When the TV does not support the input audio format, audio is not output. Set the audio format to "PCM" on the playback device. Alternatively, set "ZONE2 Setup" - "HDMI Audio" in the menu to "PCM". (p. 252)
- When the TV is not compatible with the resolution of the input video, no video is output. Set the output resolution on the playback device to a resolution that is compatible with the TV.
When using HDMI ZONE2, MAIN ZONE audio is played back as PCM.
- When the same input source is selected for MAIN ZONE and ZONE2, the audio format is limited according to the specifications of the TV in ZONE2.
Front panel D
Rear panel Re
Index
297


Contents Connections Playback Settings
Appendix
Update/upgrade error messages
If an update/upgrade is interrupted or fails, an error message appears.
| Display Description | |
| Connection failed. Please check your network, then try again. | The network connection is unstable.Connection to the server failed.Check your network environment and try the update again. |
| Update failed. Please check your network, then try again. | The download of the firmware failed.Check your network environment and try the update again. |
| Upgrade failed. Please check your network, then try again. | The download of the firmware failed.Check your network environment and try the upgrade again. |
| Please check your network, unplug and reconnect the power cord, and try again. | The update failed.Press and hold the ⏻ on the main unit for more than 5 seconds, or remove and re-insert the power cord.The update restarts automatically. |
| Please contact customer service in your area. This unit may be broken.Contact our Customer Service Center in your area. | |
Front panel D
Rear panel Re
Index
298


Contents Connections Playback Settings
Appendix
Resetting factory settings
If the indicators are incorrect or the unit cannot be operated, restarting the unit may improve the problem. We recommend restarting the unit before returning the settings to the default settings. (p. 280)
If the operations are not improved by restarting the unit, follow the steps below.
Various settings are reset to the factory default values. Make settings again.
GAME
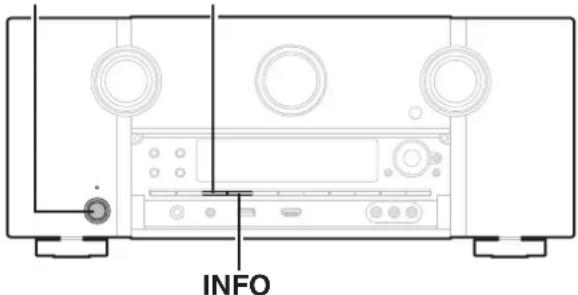
1 Turn off the power using ⏻.
2 Press ⏻ while simultaneously pressing GAME and INFO.
3 Remove your fingers from the two buttons when "Initialized" appears on the display.

- Before returning the settings to the default settings, use the "Save & Load" function from the menu to save and restore the details of various settings configured on the unit. (p. 262)
Front panel D
Rear panel Re
Index
299



Contents Connections Playback Settings
Appendix
Resetting network settings
If network contents cannot be played or the unit cannot connect to the network, restarting the unit may improve the problem. We recommend restarting the unit before returning the settings to the default settings. (165 p. 280)
If the operations are not improved by restarting the unit, follow the steps below.
Network settings are reset to the factory default values. Make settings again.
However, the menu "Amp Assign", "Speaker Config." and "Video" settings are not reset.
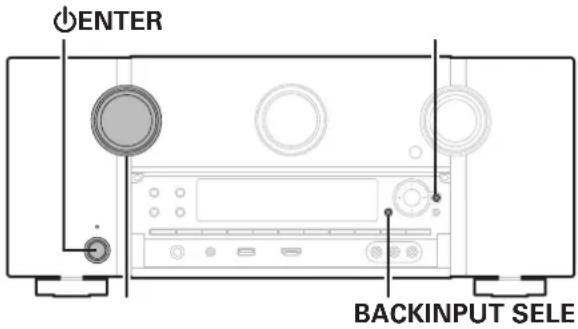
1 Press ⏻ to turn on power to the unit.
2 Turn INPUT SELECTOR to select "HEOS Music".
3 Press and hold the main unit's BACK and ENTER at the same time for at least 3 seconds.
4 Remove your fingers from the two buttons when "Network Reset..." appears on the display.
5 "Completed" is shown in the display when reset is complete.

- Before returning the settings to the default settings, use the "Save & Load" function from the menu to save and restore the details of various settings configured on the unit. (iF p. 262)
NOTE
- Do not turn the power off until reset is complete.
Front panel D
Rear panel Re
Index
300


Contents
Connections Playback Settings Tips
About HDMI
HDMI is an abbreviation of High-Definition Multimedia Interface, which is an AV digital interface that can be connected to a TV or amplifier. With the HDMI connection, high definition video and high quality audio formats adopted by Blu-ray Disc players (Dolby Digital Plus, Dolby TrueHD, DTS-HD, DTS-HD Master Audio) can be transmitted, which is not possible with the analog video transmission. Furthermore, in the HDMI connection, audio and video signals can be transmitted through a single HDMI cable, while in conventional connections it is necessary to provide audio and video cables separately for connection between devices. This allows you to simplify the wiring configuration that tends to be quite complex in a home theater system. This unit supports the following HDMI functions.
- Deep Color
An imaging technology supported by HDMI. Unlike RGB or YCbCr, which uses 8 bits (256 shades) per color, it can use 10 bits (1024 shades), 12 bits (4096 shades), or 16 bits (65536 shades) to produce colors in higher definition. Both devices linked via HDMI must support Deep Color.
• x.v.Color
This function lets HDTVs display colors more accurately. It enables display with natural, vivid colors. "x.v.Color" is trademark of Sony Corporation.
• 3D
This unit supports input and output of 3D (3 dimensional) video signals of HDMI. To play back 3D video, you need a TV and player that provide support for the HDMI 3D function and a pair of 3D glasses.
• 4K
This unit supports input and output of 4K (3840 x 2160 pixels) video signals of HDMI.
- Content Type
It automatically makes settings suitable for the video output type (content information).
- Adobe RGB color, Adobe YCC601 color
The color space defined by Adobe Systems Inc. Because it is a wider color space than RGB, it can produce more vivid and natural images.
- sYCC601 color
Each of these color spaces defines a palette of available colors that is larger than the traditional RGB color model.
Front panel D
Rear panel Re
Index
301



Contents
Connections Playback Settings Tips
- Auto Lip Sync
This function can automatically correct delay between the audio and video.
Use a TV that is compatible with the Auto Lip Sync function.
- HDMI Pass Through
Even when the power to this unit is set to standby, signals input from the HDMI input connector are output to a TV or other device that is connected to the HDMI output connector.
- HDMI Control
If you connect the unit and an HDMI Control function compatible TV or player with an HDMI cable and then enable the HDMI Control function setting on each device, the devices will be able to control each other.
- Power off link
This unit power off can be linked to the TV power off step.
• Audio output destination switching
From the TV, you can switch whether to output audio from the TV or the AV pre tuner.
• Volume adjustment
You can adjust this unit's volume in the TV volume adjustment operation.
- Input source switching
You can switch this unit input sources through linkage to TV input switching.
When playing the player, this unit input source switches to the source for that player.
• ARC (Audio Return Channel)
This function transmits audio signals from the TV to this unit through the HDMI cable and plays back the audio from the TV on this unit based on the HDMI Control function.
If a TV without the ARC function is connected via HDMI connections, video signals of the playback device connected to this unit are transmitted to the TV, but this unit can not play back the audio from the TV. If you want to enjoy surround audio for TV program, a separate audio cable connection is required.
In contrast, if a TV with the ARC function is connected via HDMI connections, no audio cable connection is required. Audio signals from the TV can be input to this unit through the HDMI cable between this unit and the TV. This function allows you to enjoy surround playback on this unit for the TV.
Front panel D
Rear panel Re
Index
302



Contents Connections Playback Settings Tips
■ Supported audio formats
| 2-channel Linear PCM | 2-channel, 32 kHz – 192 kHz, 16/20/24 bit |
| Multi-channel Linear PCM | 7.1-channel, 32 kHz – 192 kHz, 16/20/24 bit |
| Bitstream | Dolby Digital / DTS / Dolby Atmos / Dolby TrueHD / Dolby Digital Plus / DTS:X / DTS-HD Master Audio / DTS-HD High Resolution Audio / DTS Express |
| DSD 2-channel – | 5.1-channel, 2.8 MHz |
■ Supported video signals
- 480i
- 480p
- 576i
- 576p
- 720p 60/50Hz
- 1080i 60/50Hz
• 1080p 60/50/24Hz • 4K 60/50/30/25/24 Hz
Copyright protection system
In order to play back digital video and audio such as BD video or DVD video via HDMI connection, both this unit and the TV or player must to support the copyright protection system known as HDCP (High-bandwidth Digital Content Protection System). HDCP is copyright protection technology comprised of data encryption and authentication of the connected AV devices. This unit supports HDCP.
- If a device that does not support HDCP is connected, video and audio are not output correctly. Read the owner's manual of your television or player for more information.

- When connecting this unit to a device that is compatible with the Deep Color, 4K and ARC functions, use a "High Speed HDMI cable with Ethernet" that bears the HDMI logo.
Front panel D
y Rear panel Re
Index
303



flowchart
graph LR
    A["Contents"] --> B["Connections Playback Settings Tips"]
    B --> C["End"]
Video conversion function
This unit automatically converts the input video signals as shown in the diagram before outputting them to the TV.
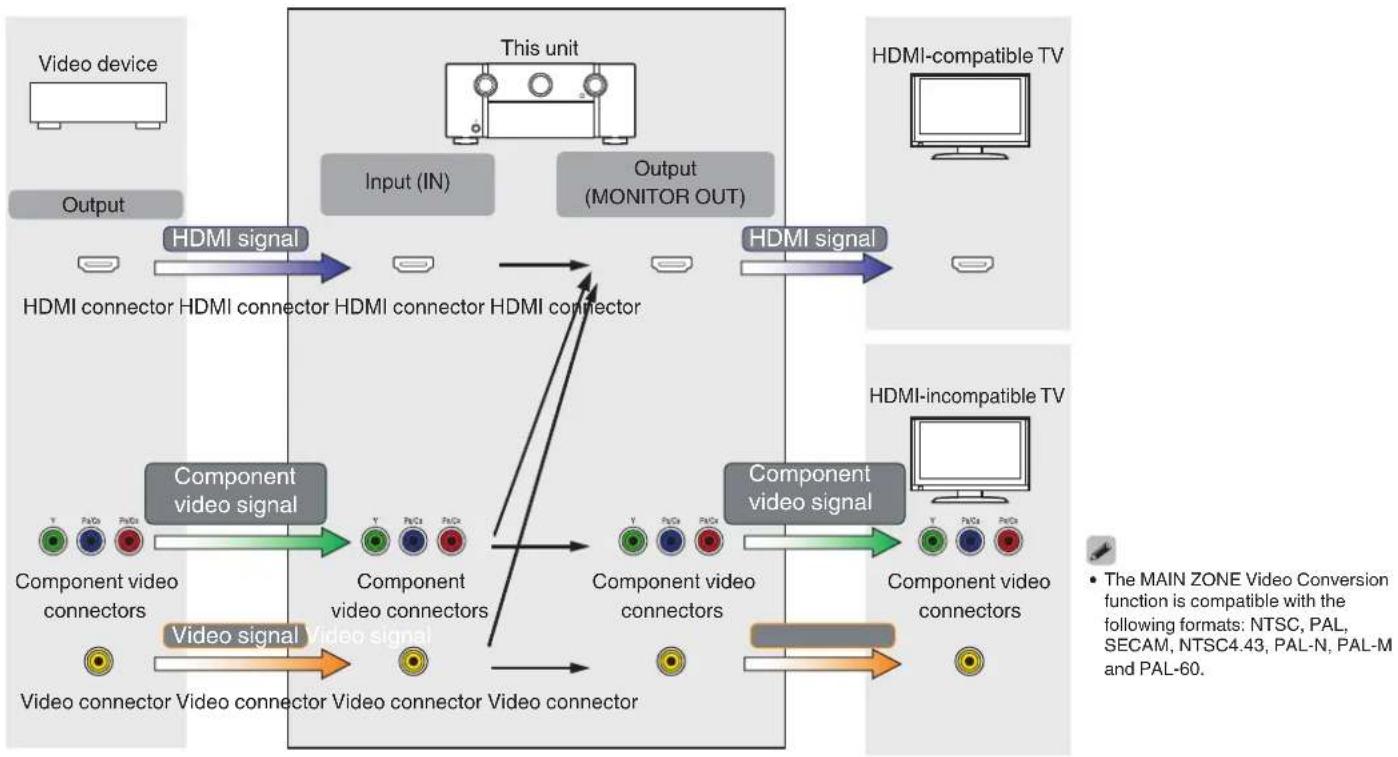
flowchart
graph TD
    A["Video device"] --> B["Output"]
    B --> C["This unit"]
    C --> D["Input (IN)"]
    C --> E["Output (MONITOR OUT)"]
    D --> F["HDMI signal"]
    E --> G["HDMI signal"]
    F --> H["Component video signal"]
    G --> I["Component video signal"]
    H --> J["Component video connectors"]
    I --> K["Component video connectors"]
    J --> L["Video connector Video connector Video connector Video connector"]
    K --> M["Video connector Video connector Video connector Video connector"]
    L --> N["Video signal"]
    M --> O["Video signal"]
    N --> P["Video signal"]
    O --> Q["Video signal"]
    P --> R["Video signal"]
    Q --> S["Video signal"]
    R --> T["Video signal"]
    S --> U["Video signal"]
    T --> V["Video signal"]
    U --> W["Video signal"]
    V --> X["Video signal"]
    W --> Y["Video signal"]
    X --> Z["Video signal"]
    Y --> AA["Video signal"]
    Z --> AB["Video signal"]
    style A fill:#f9f,stroke:#333
    style C fill:#ccf,stroke:#333
    style E fill:#ccf,stroke:#333
    style F fill:#cfc,stroke:#333
    style G fill:#cfc,stroke:#333
    style H fill:#fcc,stroke:#333
    style I fill:#fcc,stroke:#333
    style J fill:#fcc,stroke:#333
    style K fill:#fcc,stroke:#333
    style L fill:#fcc,stroke:#333
    style M fill:#fcc,stroke:#333
    style N fill:#fcc,stroke:#333
    style O fill:#fcc,stroke:#333
    style P fill:#fcc,stroke:#333
    style Q fill:#fcc,stroke:#333
    style R fill:#fcc,stroke:#333
    style S fill:#fcc,stroke:#333
    style T fill:#fcc,stroke:#333
    style U fill:#fcc,stroke:#333
    style V fill:#fcc,stroke:#333

Contents
Connections
Playback
Settings
Tips
Appendix
This unit can convert the input video signals to the resolution that is set for "Resolution" in the menu before outputting them to the TV. (p. 201)
| Input signal\Output signal | HDMI | ||||||||
| 480i/576i | 480p/576p 720p | 1080i | 1080p | 1080p 24Hz | 4K 30/25/24Hz | 4K 60/50Hz | |||
| HDMI | 480i/576i | √ | √ | √ | √ | √ | √ | √ | |
| 480p/576p | √ | √ | √ | √ | √ | √ | |||
| 720p | √ | √ | √ | √ | √ | √ | |||
| 1080i | √ | √ | √ | √ | √ | √ | |||
| 1080p 24Hz | √ | √ | √ | √ | |||||
| 1080p | √ | √ | √ | √ | |||||
| 4K 30/25/24Hz | √ | ||||||||
| 4K 60/50Hz | √* | ||||||||
| Component Video | 480i/576i | √ | √ | √ | √ | √ | √ | √ | |
| 480p/576p | √ | √ | √ | √ | √ | √ | |||
| 720p | √ | √ | √ | √ | √ | √ | |||
| 1080i | √ | √ | √ | √ | √ | √ | |||
| Video | 1080p | √ | √ | √ | √ | ||||
| 480i/576i | √ | √ | √ | √ | √ | √ | √ | ||
* The HDMI connector on the front panel supports YCbCr 4:2:0 format only.
Front panel
Display
Rear panel
305
Remote
Index

Contents
Connections
Playback
Settings
Tips
Appendix
Playing back a USB memory devices
- This unit is compatible with MP3 ID3-Tag (Ver. 2) standard.
- This unit can show the artwork that was embedded by using MP3 ID3-Tag Ver. 2.3 or 2.4.
- This unit is compatible with WMA META tags.
- If the image size (pixels) of an album artwork exceeds 500 × 500 (WMA/MP3/Apple Lossless/DSD) or 349 × 349 (MPEG-4 AAC), then music may not be played back properly.
■ Compatible formats
| Sampling frequency Channel Bit rate Extension | ||||
| WMA*1 | 32/44.1/48 kHz 2-channel 48 – 192 kbps .wma | |||
| MP3 32/44.1/48 kHz 2-channel | 32 – 320 kbps .mp3 | |||
| WAV | 32/44.1/48/88.2/96/176.4/192 kHz | 2-channel – .wav | ||
| MPEG-4 AAC*1 | 32/44.1/48 kHz 2-channel 16 – 320 kbps .aac/.m4a/.mp4 | |||
| FLAC | 32/44.1/48/88.2/96/176.4/192 kHz | 2-channel – .flac | ||
| Apple Lossless*2 | 32/44.1/48/88.2/96/192 kHz | 2-channel – .m4a | ||
| DSD 2.8/5.6 MHz 2-channel – .dsf/.diff | ||||
*1 Only files that are not protected by copyright can be played on this unit.
Content downloaded from pay sites on the Internet are copyright protected. Also, files encoded in WMA format when ripped from a CD, etc. on a computer may be copyright protected, depending on the computer's settings.
*2 The Apple Lossless Audio Codec (ALAC) decoder is distributed under the Apache License, Version 2.0 (http://www.apache.org/licenses/LICENSE-2.0).
Front panel
Display
Rear panel
306
Remote
Index

Contents
Connections Playback Settings Tips
■ Maximum number of playable files and folder
The limits on the number of folders and files that can be displayed by this unit are as follows.
| Item\Media | USB memory device |
| Memory capacity FAT16 : 2 GB, FAT32 : 2 TB | |
| Number of folder directory levels *1 | 8 levels |
| Number of folders 500 | |
| Number of files*2 | 5000 |
*1 The limited number includes the root folder.
*2 The allowable number of files may differ according to the USB memory device capacity and the file size.
Playing back a Bluetooth device
This unit supports the following Bluetooth profile.
- A2DP (Advanced Audio Distribution Profile): When a Bluetooth device that supports this standard is connected, monaural and stereo sound data can be streamed at a high quality.
- AVRCP (Audio/Video Remote Control Profile): When a Bluetooth device that supports this standard is connected, the Bluetooth device can be operated from this unit.
■ About Bluetooth communications
Radio waves broadcast from this unit may interfere with the operation of medical devices. Make sure you turn off the power of this unit and Bluetooth device in the following locations as radio wave interference may cause malfunctions.
- Hospitals, trains, aircraft, petrol kiosks and places where flammable gases are generated
• Near automatic doors and fire alarms
Front panel D
Rear panel Re
Index
307



Contents
Connections
Playback
Settings
Tips
Appendix
Playing back a file saved on a PC or NAS
- This unit is compatible with MP3 ID3-Tag (Ver. 2) standard.
- This unit can show the artwork that was embedded by using MP3 ID3-Tag Ver. 2.3 or 2.4.
- This unit is compatible with WMA META tags.
- If the image size (pixels) of an album artwork exceeds 500 × 500 (WMA/MP3/WAV/FLAC/Apple Lossless/DSD) or 349 × 349 (MPEG-4 AAC), then music may not be played back properly.
- A server or server software compatible with distribution in the corresponding formats is required to play music files via a network.
For playing mentioned audio formats via a network a server software, for example Twonky Media Server or jRiver Media Server, needs to be installed on your computer or NAS for full support. There are other server software available too. Please check supported formats.
■ Specifications of supported files
| Sampling frequency Channel Bit rate Extension | ||||
| WMA*1 | 32/44.1/48 kHz 2-channel 48 – 192 kbps .wma | |||
| MP3 32/44.1/48 kHz 2-channel | 32 – 320 kbps .mp3 | |||
| WAV | 32/44.1/48/88.2/96/176.4/192 kHz | 2-channel – .wav | ||
| MPEG-4 AAC*1 | 32/44.1/48 kHz 2-channel 16 – 320 kbps .aac/.m4a/.mp4 | |||
| FLAC | 32/44.1/48/88.2/96/176.4/192 kHz | 2-channel – .flac | ||
| Apple Lossless*2 | 32/44.1/48/88.2/96/192 kHz | 2-channel – .m4a | ||
| DSD 2.8/5.6 MHz 2-channel – | .dsf/.diff | |||
*1 Only files that are not protected by copyright can be played on this unit.
Content downloaded from pay sites on the Internet are copyright protected. Also, files encoded in WMA format when ripped from a CD, etc. on a computer may be copyright protected, depending on the computer's settings.
*2 The Apple Lossless Audio Codec (ALAC) decoder is distributed under the Apache License, Version 2.0 (http://www.apache.org/licenses/LICENSE-2.0).
Front panel
Display
Rear panel
308
Remote
Index

Contents Connections Playback Settings Tips
Playing back Internet Radio
■ Playable broadcast station specifications
| Sampling frequency | Bit rate | Extension | |
| WMA 32/44.1/48 kHz | 48 – 192 kbps | .wma | |
| MP3 32/44.1/48 kHz | 32 – 320 kbps | .mp3 | |
| MPEG-4 AAC 32/44.1/48 kHz | 16 – 320 kbps | .aac/.m4a/.mp4 |
Personal memory plus function
The most recently used settings (input mode, HDMI output mode, sound mode, tone control, channel level, MultEQ ^® XT32, Dynamic EQ, Dynamic Volume, M-DAX and audio delay, etc.) are saved for each input source.

- "Surround Parameter" settings are stored for each sound mode.
Last function memory
This function stores the settings which were made before going into the standby mode.
Front panel D
Rear panel Re
Index
309


Contents
Connections
Playback
Settings
Tips
Appendix
Sound modes and channel output
○ This indicates the audio output channels or surround parameters that can be set.
© This indicates the audio output channels. The output channels depend on the settings of "Speaker Config.". (p. 230)
*1 - *13: "Sound modes and channel output" (p. 311)
Front panel
Display
Rear panel
310
Remote
Index

Contents Connections Playback Settings Tips
*1 The applicable sound mode includes "Dolby Surround" and sound modes that have "+Dolby Surround" in the sound mode name.
*2 Audio can be played through a maximum of 11-channels when 11 speakers or more (excluding the subwoofer) are installed.
*3 The applicable sound mode includes "DTS Neural:X" and sound modes that have "+Neural:X" in the sound mode name.
*4 The applicable sound mode includes "DTS Virtual:X" and sound modes that have "+Virtual:X" in the sound mode name.
*5 A signal for each channel contained in an input signal is output as audio.
*6 Audio is output when "Subwoofer Mode" in the menu is set to "LFE+Main". (p. 239)
*7 Audio is not output when "Speaker Config." - "Surr. Back" in the menu is set to "1 spkr". (T p. 231)
*8 For the best Auro-3D experience Surround Height speakers are recommended, however you may substitute Rear Height speakers from a Dolby Atmos speaker setup in place of Surround Height speakers.
*9 This is output if an Auro-3D.
*10 This is output if an Auro-3D signal is input and the input signal contains Top Surround.
*11 For the best Auro-3D experience Front Height and Surround Height speakers are recommended, however you may substitute Dolby Atmos Enabled speakers.
*12 Audio is output from the speakers specified in the "Surround Parameter" – "Speaker Select" settings. (p. 183)
*13 Audio is not output when connecting to the HEIGHT 4/FRONT WIDE pre-out connector to use the Center Height or Top Surround speaker.
Front panel D
Rear panel Re
Index
311



Contents
Connections Playback Settings Tips
Sound modes and surround parameters
*1 - *9: "Sound modes and surround parameters" (p. 314)
Front panel
Display
Rear panel
312
Remote
Index

Contents
Connections Playback Settings Tips
*1, *7, *8, *10 - *17: "Sound modes and surround parameters" (p. 314)
Front panel D
Rear panel Re
In
313


Contents
Connections Playback Settings Tips
*1 During playback in Pure Direct mode, the surround parameters are the same as in Direct mode.
*2 This item can be selected when a Dolby Digital, Dolby Digital Plus, Dolby TrueHD or Dolby Atmos signal is played.
*3 This item can be selected when a Dolby Digital, Dolby Digital Plus, Dolby TrueHD, Dolby Atmos, DTS:X or DTS signal is played.
*4 This item can be selected when a DTS:X signal that is compatible with the Dialog Control function is input.
*5 This item can be selected when a Dolby Digital or DTS signal or DVD-Audio is played.
*6 This item can be selected when Height, Ceiling or Dolby Atmos Enabled speakers are used.
*7 This setting is available when "Subwoofer Mode" in the menu is set to "LFE+Main". (1 p. 239)
*8 This item can be set when "Front" is set to "Small" or "Subwoofer Mode" is set to "LFE+Main". (p. 230, 239)
*9 This can be set if the input signal does not contain an Auro-3D signal or if the input Auro-3D signal does not contain Front Height channels.
*10 This item cannot be set when "Dynamic EQ" is set to "On". (p. 188)
*11 This item cannot be set when "Subwoofer" in the menu is set to "None". (r.p. 230)
*12 This item cannot be set when Audyssey® Setup (Speaker Calibration) has not been performed.
*13 This item cannot be selected when a DTS:X format with a sampling frequency of over 48 kHz is input.
*14 This item cannot be set when "MultEQ® XT32" in the menu is set to "Off". (p. 187)
*15 This item cannot be set when sound mode is "DTS Virtual:X" or sound mode that have "+Virtual:X" in the sound mode name.
*16 This item can be set when the input signal is analog, PCM 48 kHz or 44.1 kHz.
*17 This can be set when the LFE signal is included in the input signal.
Front panel D
Rear panel Re
Index
314



Contents
Connections Playback Settings Tips
Types of input signals, and corresponding sound modes
● This indicates the default sound mode.
○ This indicates the selectable sound mode.
| Sound mode | NOTE | 2-channel signal | Multi-channel signal | ||||||||||||||||
| Dolby Digital (+/HD) | DTS (-HD) | Analog / PCM | DSD (Super Audio CD) | Dolby Atmos | Dolby TrueHD | Dolby Digital Plus | Dolby Digital (EX) | DTS:X | DTS-HD | DTS Express | DTS ES Dscrt6.1 | DTS ES Mtrx6.1 | DTS Auto-3D | PCM multi-channel | DSD (Super Audio CD) | ||||
| Direct | |||||||||||||||||||
| Direct | ○ | ○ | ○ | * | 2 ○ | ○ | ○ | ○ | ○ | ○ | ○ | ○ | ○ | ○ | ○ | ○ | |||
| DSD Direct | ○ | ○ | |||||||||||||||||
| Pure Direct | |||||||||||||||||||
| Pure Direct | ○ | ○ | ○ | ○ | ○ | ○ | ○ | ○ | ○ | ○ | ○ | ○ | ○ | ○ | ○ | ||||
| DSD Pure Direct | ○ | ○ | |||||||||||||||||
| Stereo | |||||||||||||||||||
| Stereo | ○ | ○ | ● | ● | ○ | ○ | ○ | ○ | ○ | ○ | ○ | ○ | ○ | ○ | ○ | ○ | |||
| Dolby Surround | |||||||||||||||||||
| Dolby Atmos | *1 ● | ○*3 ○ | ○*4 | ||||||||||||||||
| Dolby TrueHD | ○*5 ○ | ||||||||||||||||||
| Dolby Digital + | ○ | ||||||||||||||||||
| Dolby Digital | ● | ● | ● | ○ | * | 4 | |||||||||||||
| Dolby (D+) (HD) + Dolby Surround | ○ | ○ | ○ | ○ | * | 4 | |||||||||||||
| Dolby (D+) (HD) + Neural:X | |||||||||||||||||||
| Dolby Surround | ● | ○ | ○ | ○ | |||||||||||||||
*1 - *5 : "Types of input signals, and corresponding sound modes" (p. 317)
Front panel
Display
Rear panel
315
Remote
Index

Contents
Connections
Playback
Settings
Tips
Appendix
*6 - *17: "Types of input signals, and corresponding sound modes" (p. 317)
Front panel
Display
Rear panel
316
Remote
Index

Contents
Connections Playback Settings Tips
*1 This item can be selected when using any of the Surround Back, Front Height, Top Front, Top Middle, Top Rear, Rear Height, Front Dolby, Surround Dolby or Back Dolby speaker.
*2 The default sound mode for the AirPlay playback is "Direct".
*3 This can be selected when the Dolby Atmos signal contains the Dolby TrueHD signal.
*4 This item can be selected if the Auro-3D signal contains Dolby TrueHD.
*5 This can be selected when the Dolby Atmos signal contains the Dolby Digital Plus signal.
*6 This can be selected when the Dolby Atmos signal contains the Dolby TrueHD or Dolby Digital Plus signal.
*7 This item can be selected when surround back speakers are used.
*8 This item cannot be selected when a DTS(-HD) format with a sampling frequency of over 48 kHz is input.
*9 This item cannot be selected when a DTS:X format with a sampling frequency of over 48 kHz is input.
*10 This item cannot be selected when the input signal is Dolby Digital, Dolby Digital Plus, Dolby TrueHD or Dolby Atmos.
*11 This item cannot be selected if the sampling frequency of the input signal is 32 kHz.
*12 This item can be selected when the input signal is DTS-HD Master Audio.
*13 This item can be selected if the Auro-3D signal contains DTS-HD Master Audio.
*14 This item can be selected when the input signal is DTS-HD Hi Resolution.
*15 This item can be selected when the input signal is DTS 96/24.
*16 This item can be selected if the Auro-3D signal contains Multi Channel PCM.
*17 This item can be selected when the input signals contain surround back signals.
Front panel D
Rear panel Re
Index
317



Contents
Connections Playback Settings Tips
Explanation of terms
Audyssey
Audyssey Dynamic EQ ^®
Audyssey Dynamic EQ ^® solves the problem of deteriorating sound quality as volume is decreased by taking into account human perception and room acoustics.
Audyssey Dynamic EQ ^® works in tandem with Audyssey MultEQ ^® XT32 to provide well-balanced sound for every listener at any volume level.
Audyssey Dynamic Volume®
Dynamic Volume solves the problem of large variations in volume level between television programs, commercials, and between the soft and loud passages of movies. Audyssey Dynamic EQ ^® is integrated into Dynamic Volume so that as the playback volume is adjusted automatically, the perceived bass response, tonal balance, surround impression, and dialog clarity remain the same.
Audyssey LFC™ (Low Frequency Containment)
Audyssey LFC ^™ solves the problem of low frequency sounds disturbing people in neighboring rooms or apartments. Audyssey LFC ^™ dynamically monitors the audio content and removes the low frequencies that pass through walls, floors and ceilings. It then applies psychoacoustic processing to restore the perception of low bass for listeners in the room. The result is great sound that no longer disturbs the neighbors.
Audyssey MultEQ® XT32
Audyssey MultEQ ^® XT32 is a room equalization solution that calibrates any audio system so that it can achieve optimum performance for every listener in a large listening area. Based on several room measurements, MultEQ ^® XT32 calculates an equalization solution that corrects for both time and frequency response problems in the listening area and also performs a fully automated surround system setup.
Front panel D
Rear panel Re
Index
318



Contents
Connections Playback Settings Tips
Auro-3D
Auro-3D®
The Auro-3D ^® technology suite is a groundbreaking new audio technology that combines height-based listening formats with powerful creative tools to deliver an unrivaled three-dimensional sound experience. Auro-3D ^® is the general format name for Sound in 3D and its related speaker lay-outs.
Auro-Matic®
Auro-Matic® up-mixing technology software is a unique creative tool that transforms legacy Mono, Stereo and Surround content into a natural 3D or 2D listening experience.
Dolby
Dolby Atmos
Introduced first in the cinema, Dolby Atmos brings a revolutionary sense of dimension and immersion to the Home Theater experience. Dolby Atmos is an adaptable and scalable object based format that reproduces audio as independent sounds (or objects) that can be accurately positioned and move dynamically throughout the 3 dimensional listening space during playback. A key ingredient of Dolby Atmos is the introduction of a height plane of sound above the listener.
Dolby Atmos Stream
Dolby Atmos content will be delivered to your Dolby Atmos Enabled AV pre tuner via Dolby Digital Plus or Dolby TrueHD on Blu-ray Disc, downloadable files and streaming media. A Dolby Atmos stream contains special metadata that describes the positioning of sounds within the room. This object audio data is decoded by a Dolby Atmos AV pre tuner and scaled for optimum playback through Home Theater speaker systems of every size and configuration.
Front panel D
Rear panel Re
Index
319



Contents
Connections Playback Settings Tips
Dolby Digital
Dolby Digital is a multi-channel digital signal format developed by Dolby Laboratories.
A total of 5.1-channels are played: 3 front channels ("FL", "FR" and "C"), 2 surround channels ("SL" and "SR") and the "LFE" channel for low frequency effects.
Because of this, there is no crosstalk between channels and a realistic sound field with a “three-dimensional” feeling (sense of distance, movement and positioning) is achieved. This delivers a thrilling surround sound experience in the home.
Dolby Digital Plus
Dolby Digital Plus is an improved Dolby Digital signal format that is compatible with up to 7.1-channels of discrete digital sound and also improves sound quality thanks to extra data bit rate performance. It is upwardly compatible with conventional Dolby Digital, so it offers greater flexibility in response to the source signal and the conditions of the playback device.
Dolby Surround
Dolby Surround is a next generation surround technology that intelligently up mixes stereo; 5.1 and 7.1 content for playback through your surround speaker system. Dolby Surround is compatible with traditional speaker layouts, as well as Dolby Atmos enabled playback systems that employ in-ceiling speakers or products with Dolby speaker technology.
Dolby Speaker Technology (Dolby Atmos Enabled speakers)
A convenient alternative to speakers built into the ceiling, Dolby Atmos Enabled speakers employ the ceiling above you as a reflective surface for reproducing audio in the height plane above the listener. These speakers feature a unique upward firing driver and special signal processing. These features can be built into a conventional speaker or standalone speaker module. The features minimally impact the overall speaker footprint while providing an immersive listening experience during Dolby Atmos and Dolby Surround playback.
Dolby TrueHD
Dolby TrueHD is a high definition audio technology developed by Dolby Laboratories, using lossless coding technology to faithfully reproduce the sound of the studio master.
This format provides the facility to support up to 8 audio channels with a sampling frequency of 96 kHz/24 bit resolution and up to 6 audio channels with a sampling frequency of 192 kHz/24 bit resolution.
Front panel D
Rear panel Re
Index
320



Contents
Connections Playback Settings Tips
DTS
Dialog Control
Gives you control of the listening experience. You can lift the dialog out from the background sounds when clarity and intelligibility are desired. This requires that content has been authored to support Dialog Control.
DTS
This is an abbreviation of Digital Theater System, which is a digital audio system developed by DTS. DTS delivers a powerful and dynamic surround sound experience, and is found in the world's finest movie theaters and screening rooms.
DTS 96/24
DTS 96/24 is a digital audio format enabling high sound quality playback in 5.1-channels with a sampling frequency of 96 kHz and 24 bit quantization on DVD-Video.
DTS Digital Surround
DTS ^™ Digital Surround is the standard digital surround format of DTS, Inc., compatible with a sampling frequency of 44.1 or 48 kHz and up to 5.1-channels of digital discrete surround sound.
DTS-ES™ Discrete 6.1
DTS-ES ^™ Discrete 6.1 is a 6.1-channel discrete digital audio format adding a surround back (SB) channel to the DTS digital surround sound. Decoding of conventional 5.1-channel audio signals is also possible according to the decoder.
DTS-ES™ Matrix 6.1
DTS-ES™ Matrix 6.1 is a 6.1-channel audio format that inserts a surround back (SB) channel to the DTS digital surround sound through matrix encoding. Decoding of conventional 5.1-channel audio signals is also possible according to the decoder.
DTS Express
DTS Express is an audio format supporting low bit rates (max. 5.1-channels, 24 to 256 kbps).
DTS-HD
This audio technology provides higher sound quality and enhanced functionality than the conventional DTS and is adopted as an optional audio for Blu-ray Disc.
This technology supports multi-channel, high data transfer speed, high sampling frequency, and lossless audio playback. Maximum 7.1-channels are supported in Blu-ray Disc.
Front panel D
Rear panel Re
Index
321



Contents Connections Playback Settings Tips
DTS-HD High Resolution Audio
DTS-HD High Resolution Audio is an improved version of the conventional DTS, DTS-ES and DTS 96/24 signals formats, compatible with sampling frequencies of 96 or 48 kHz and up to 7.1-channels of discrete digital sound. High data bit rate performance provides high quality sound. This format is fully compatible with conventional products, including conventional DTS digital surround 5.1-channel data.
DTS-HD Master Audio
DTS-HD Master Audio is a lossless audio format created by Digital Theater System (DTS). This format provides the facility to support up to 8 audio channels with a sampling frequency of 96 kHz/24 bit resolution and up to 6 audio channels with a sampling frequency of 192 kHz/24 bit resolution. It is fully compatible with conventional products, including conventional DTS digital surround 5.1-channel data.
DTS:X
DTS:X produces a hemisphere of audio, where flyovers as well as ambient backgrounds become truly enveloping. DTS:X objects enable audio to move smoothly from one speaker to any other creating life-like realism.
DTS Neural:X
Enables an immersive audio experience for older content. DTS Neural:X can upmix your stereo, 5.1 or 7.1 content to take full advantage of all speakers in your surround sound system.
DTS Virtual:X
DTS Virtual:X allows you to enjoy multi-dimensional sound regardless of room size, layout, or speaker configuration.
Front panel D
Rear panel Re
Index
322



Contents
Connections Playback Settings Tips
Audio
Apple Lossless Audio Codec
This is a codec for lossless audio compression method developed by Apple Inc. This codec can be played back on iTunes, iPod or iPhone. Data compressed to approximately 60 – 70 % can be decompressed to exactly the same original data.
Bass Sync
Audio sources such as BD and DVD inherently have time delay between the bass components of the satellite channel and the LFE channel. This function adjusts such a delay for reproducing (replaying) richer bass sound during playback. This function is by default set to 0 msec. Since the delay varies according to the title, play back the audio source and adjust to the most effective value for playback. For some audio sources that are played back, this function may have little effect.
FLAC (Free Lossless Audio Codec)
FLAC stands for Free lossless Audio Codec, and is a lossless free audio file format. Lossless means that the audio is compressed without any loss in quality.
The FLAC license is as shown below.
Copyright (C) 2000, 2001, 2002, 2003, 2004, 2005, 2006, 2007, 2008, 2009 Josh Coalson
Redistribution and use in source and binary forms, with or without modification, are permitted provided that the following conditions are met:
- Redistributions of source code must retain the above copyright notice, this list of conditions and the following disclaimer.
- Redistributions in binary form must reproduce the above copyright notice, this list of conditions and the following disclaimer in the documentation and/or other materials provided with the distribution.
- Neither the name of the Xiph.org Foundation nor the names of its contributors may be used to endorse or promote products derived from this software without specific prior written permission.
Front panel D
Rear panel Re
Index
323



Contents
Connections Playback Settings Tips
THIS SOFTWARE IS PROVIDED BY THE COPYRIGHT HOLDERS AND CONTRIBUTORS "AS IS" AND ANY EXPRESS OR IMPLIED WARRANTIES, INCLUDING, BUT NOT LIMITED TO, THE IMPLIED WARRANTIES OF MERCHANTABILITY AND FITNESS FOR A PARTICULAR PURPOSE ARE DISCLAIMED. IN NO EVENT SHALL THE FOUNDATION OR CONTRIBUTORS BE LIABLE FOR ANY DIRECT, INDIRECT, INCIDENTAL, SPECIAL, EXEMPLARY, OR CONSEQUENTIAL DAMAGES (INCLUDING, BUT NOT LIMITED TO, PROCUREMENT OF SUBSTITUTE GOODS OR SERVICES; LOSS OF USE, DATA, OR PROFITS; OR BUSINESS INTERRUPTION) HOWEVER CAUSED AND ON ANY THEORY OF LIABILITY, WHETHER IN CONTRACT, STRICT LIABILITY, OR TORT (INCLUDING NEGLIGENCE OR OTHERWISE) ARISING IN ANY WAY OUT OF THE USE OF THIS SOFTWARE, EVEN IF ADVISED OF THE POSSIBILITY OF SUCH DAMAGE.
LFE
This is an abbreviation of Low Frequency Effect, which is an output channel that emphasizes low frequency effect sound. Surround audio is intensified by outputting 20 Hz to 120 Hz deep bass to the system subwoofer(s).
MP3 (MPEG Audio Layer-3)
This is an internationally standardized audio data compression scheme, using the “MPEG-1” video compression standard. It compresses the data volume to about one eleventh its original size while maintaining sound quality equivalent to a music CD.
MPEG (Moving Picture Experts Group), MPEG-2, MPEG-4
These are the names for digital compression format standards used for the encoding of video and audio. Video standards include "MPEG-1 Video", "MPEG-2 Video", "MPEG-4 Visual", "MPEG-4 AVC". Audio standards include "MPEG-1 Audio", "MPEG-2 Audio", "MPEG-4 AAC".
WMA (Windows Media Audio)
This is audio compression technology developed by Microsoft Corporation.
WMA data can be encoded using Windows Media ^® Player.
To encode WMA files, only use applications authorized by Microsoft Corporation. If you use an unauthorized application, the file may not work properly.
Sampling frequency
Sampling involves taking a reading of a sound wave (analog signal) at regular intervals and expressing the height of the wave at each reading in digitized format (producing a digital signal).
The number of readings taken in one second is called the “sampling frequency”. The larger the value, the closer the reproduced sound is to the original.
Front panel D
Rear panel Re
Index
324



Contents Connections Playback Settings Tips
Speaker impedance
This is an AC resistance value, indicated in (ohms).
Greater power can be obtained when this value is smaller.
Dialogue normalization function
This function operates automatically during playback of Dolby Digital, Dolby Digital Plus, Dolby TrueHD, Dolby Atmos, DTS or DTS-HD sources. It automatically corrects the standard signal level for individual program sources.
Dynamic range
The difference between the maximum undistorted sound level and the minimum discernible level above the noise emitted by the device.
Downmix
This function converts the number of channels of surround audio to a lower number of channels and plays back according to the system's configuration.
Video
ISF
ISF (Imaging Science Foundation) is an organization that certifies video technicians who are then qualified to carry out calibration and adjustment to match the installation conditions. It also sets quality standards for the optimization of device video performance.
Progressive (sequential scanning)
This is a scanning system of the video signal that displays 1 frame of video as one image. Compared to the interlace system, this system provides images with less flickering and jagged edges.
Front panel D
Rear panel Re
Index
325



Contents Connections Playback Settings Tips
Network
AirPlay
AirPlay sends (plays) contents recorded in iTunes or on an iPhone/iPod touch/iPad to a compatible device via the network.
WEP Key (network key)
This is key information used for encrypting data when conducting data transfer. On this unit, the same WEP key is used for data encryption and decryption, so the same WEP key must be set on both devices in order for communications to be established between them.
Wi-Fi®
Wi-Fi Certification assures tested and proven interoperability by the Wi-Fi Alliance, a group certifying interoperability among wireless LAN devices.
WPA (Wi-Fi Protected Access)
This is a security standard established by the Wi-Fi Alliance. In addition to the conventional SSID (network name) and WEP key (network key), it also uses a user identification function and encrypting protocol for stronger security.
WPA2 (Wi-Fi Protected Access 2)
This is a new version of the WPA established by the Wi-Fi Alliance, compatible with more secure AES encryption.
WPA-PSK/WPA2-PSK (Pre-shared Key)
This is a simple authentication system for mutual authentication when a preset character string matches on the wireless LAN access point and client.
Network Names (SSID: Service Set Identifier)
When forming wireless LAN networks, groups are formed to prevent interference, data theft, etc. These groups are based on “SSID (network names)”. For enhanced security, a WEP key is set so that communication is unavailable unless both the “SSID” and the WEP key match. This is suitable for constructing a simplified network.
Front panel D
Rear panel Re
Index
326



Contents
Connections Playback Settings Tips
Others
HDCP
When transmitting digital signals between devices, this copyright protection technology encrypts the signals to prevent content from being copied without authorization.
MAIN ZONE
The room where this unit is placed is called the MAIN ZONE.
Pairing
Pairing (registration) is an operation that is required in order to connect a Bluetooth device to this unit using Bluetooth. When paired, the devices authenticate each other and can connect without mistaken connections occurring.
When using Bluetooth connection for the first time, you need to pair this unit and the Bluetooth device to be connected.
Protection circuit
This is a function to prevent damage to devices within the power supply when an abnormality such as an overload, excess voltage occurs or over temperature for any reason.
Front panel D
Rear panel Re
Index
327


Trademark information
Made for

iPod

iPhone

iPad

"Made for iPod," "Made for iPhone," and "Made for iPad" mean that an electronic accessory has been designed to connect specifically to iPod, iPhone, or iPad, respectively, and has been certified by the developer to meet Apple performance standards.
Apple is not responsible for the operation of this device or its compliance with safety and regulatory standards.
Please note that the use of this accessory with iPod, iPhone, or iPad may affect wireless performance.
AirPlay, iPad, iPhone, iPod touch, and Retina are trademarks of Apple Inc., registered in the U.S. and other countries.
iPad Pro, iPad Air, iPad mini, and Lightning are trademarks of Apple Inc.
- Individual users are permitted to use iPhone, iPod, iPod classic, iPod nano, iPod shuffle, and iPod touch for private copy and playback of non-copyrighted contents and contents whose copy and playback is permitted by law. Copyright infringement is prohibited by law.
AUDYSSEY
MULTEQ XT32
DYNAMIC VOLUME
AUDYSSEY
LFC
Manufactured under license from Audyssey Laboratories™. U.S. and foreign patents pending. Audyssey MultEQ® XT32, Audyssey Dynamic EQ®, Audyssey Dynamic Volume® and Audyssey LFC™ are registered trademarks of Audyssey Laboratories.
AURO3D® AUDIO
Manufactured under license from Auro Technologies.
Auro-3D ^® and the related symbols are registered trademarks of Auro Technologies. All materials contained in this work are protected by copyright law and may not be reproduced, distributed, transmitted, displayed, published or broadcast without the prior written permission of Auro Technologies NV or in case of third party materials, the owner of that content. You may not alter or remove any trademark, copyright or other notice from copies of the content.
Auro Technologies: mail info@auro-technologies.com, phone +32-(0)-14314343, fax +32-(0)-14321224, www.auro-technologies.com
Front panel D
y Rear panel Re
Index
328


Contents Connections Playback Settings Tips

Bluetooth
The Bluetooth® word mark and logos are registered trademarks owned by Bluetooth SIG, Inc. and any use of such marks by D&M Holdings Inc. is under license. Other trademarks and trade names are those of their respective owners.

DOLBY
ATMOS
COMPATIBLE
DOLBY
VISION
Manufactured under license from Dolby Laboratories. Dolby, Dolby Atmos, Dolby Surround, Dolby Vision, and the double-D symbol are trademarks of Dolby Laboratories.


For DTS patents, see http://patents.dts.com. Manufactured under license from DTS, Inc. DTS, the Symbol, DTS and the Symbol together, DTS:X, the DTS:X logo, Virtual:X, and the DTS Virtual:X logo are registered trademarks and/or trademarks of DTS, Inc. in the United States and/or other countries. © DTS, Inc. All Rights Reserved.

HIGH DEFINITION MULTIMEDIA INTERFACE
The terms HDMI and HDMI High-Definition Multimedia Interface, and the HDMI Logo are trademarks or registered trademarks of HDMI Licensing LLC in the United States and other countries.
This item incorporates copy protection technology that is protected by U.S. patents and other intellectual property rights of Rovi Corporation. Reverse engineering and disassembly are prohibited.

CERTIFIED
The Wi-Fi CERTIFIED logo is a registered trademark of the Wi-Fi Alliance.
Wi-Fi Certification provides assurance that the device has passed the interoperability test conducted by the Wi-Fi Alliance, a group that certifies interoperability among wireless LAN devices.
Front panel D
Rear panel Re
Index
329



Specifications
■ Audio section
- Analog
Input sensitivity: Unbalanced RCA input : 200 mV
Balanced XLR input : 400 mV
Frequency response: 10 Hz – 100 kHz — +1, -3 dB (Direct mode)
S/N: 105 dB (IHF-A weighted, Direct mode)
Distortion: 0.005 % (20 Hz – 20 kHz) (Direct mode)
Rated output: Unbalanced RCA pre-output: 1.2 V
Balanced XLR pre-output: 2.4 V
- Digital
D/A output: Rated output — 2 V (at 0 dB playback)
Total harmonic distortion — 0.008 % (1 kHz, at 0 dB)
S/N ratio — 102 dB
Dynamic range — 100 dB
Digital input: Format — Digital audio interface
- Phono equalizer
Input sensitivity: 2.5 mV
RIAA deviation: ±1 dB (20 Hz to 20 kHz)
S/N: 74 dB (IHF-A weighted, with 5 mV input)
Distortion factor: 0.03 % (1 kHz, 3 V)
Front panel D
y Rear panel Re
In
330



Contents Connections Playback Settings Tips
■ Video section
- Standard video connectors
Input/output level and impedance: 1 Vp-p, 75 Ω/ohms
Frequency response: 5 Hz – 10 MHz — 0, -3 dB
• Color component video connector
Input/output level and impedance: Y signal — 1 Vp-p, 75 Ω/ohms
P_B/C_B signal — 0.7 Vp-p, 75 Ω/ohms
P_R/C_R signal — 0.7 Vp-p, 75 Ω/ohms
Frequency response: 5 Hz – 60 MHz — 0, -3 dB
■ Tuner section
[FM] [AM]
(Note: V at 75 /ohms, 0 dBf = 1 x 10^-15 W)
Reception frequency range: 87.5 MHz – 107.9 MHz 520 kHz – 1710 kHz
Effective sensitivity: 1.2 μV (12.8 dBf) 18 μV
50 dB sensitivity: MONO - 2.8 μV (20.2 dBf)
S/N ratio: MONO - 70 dB (IHF-A weighted, Direct mode)
STEREO - 67 dB (IHF-A weighted, Direct mode)
Distortion: MONO - 0.7 % (1 kHz)
STEREO - 1.0 % (1 kHz)
Front panel
Display
Rear panel
331
Remote
Index
![MARANTZ AV8805 - [FM] [AM] - 1](/content/2026/05/879353/images/3a2a68084db8da0c557b790761de65b88502076caf2e328ed72b6cc307e8ac87.jpg)
Contents Connections Playback Settings Tips
■ Wireless LAN section
Network type (wireless LAN standard): Conforming to IEEE 802.11a/b/g/n
(Wi-Fi® compliant) *1
Security: WEP 64 bit, WEP 128 bit
WPA/WPA2-PSK (AES)
WPA/WPA2-PSK (TKIP)
Used frequency range: 2.4 GHz, 5 GHz
*1 The Wi-Fi® CERTIFIED Logo and the Wi-Fi CERTIFIED On-Product Logo are registered trademarks of the Wi-Fi Alliance.
Front panel D
Rear panel Re
Index
332


Contents
Connections Playback Settings Tips
Bluetooth section
Communications system: Bluetooth Specification Version 3.0 + EDR (Enhanced Data Rate)
Transmission power: Bluetooth Specification Power Class 1
Maximum communication range: Approx. 98.4 ft/30 m in line of sight *2
Used frequency range: 2.4 GHz
Modulation scheme: FHSS (Frequency-Hopping Spread Spectrum)
Supported profiles: A2DP (Advanced Audio Distribution Profile) 1.2
AVRCP (Audio Video Remote Control Profile) 1.5
Corresponding codec: SBC
Transmission range (A2DP): 20 Hz – 20,000 Hz
*2 The actual communication range varies depending on the influence of such factors as obstructions between devices, electromagnetic waves from microwave ovens, static electricity, cordless phones, reception sensitivity, antenna performance, operating system, application software etc.
General
Power supply: AC 120 V, 60 Hz
Power consumption: 90 W
Power consumption in standby mode: 0.2 W *
Power consumption in CEC standby mode: 0.5 W
* When "Network Control" in the menu is set to "Off In Standby" and "HDMI Pass Through" is set to "Off". For purposes of improvement, specifications and design are subject to change without notice.
Front panel D
Rear panel Re
Index
333



Contents Connections Playback Settings Tips
■ Dimensions (Unit : in. (mm))
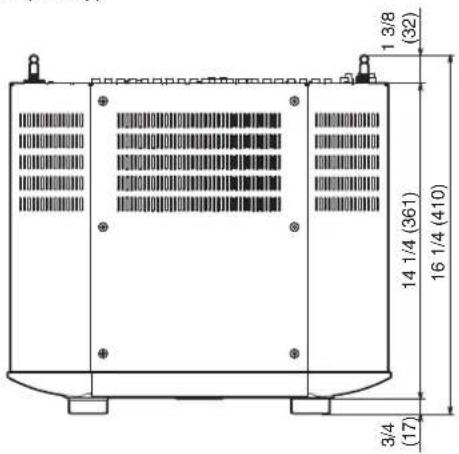
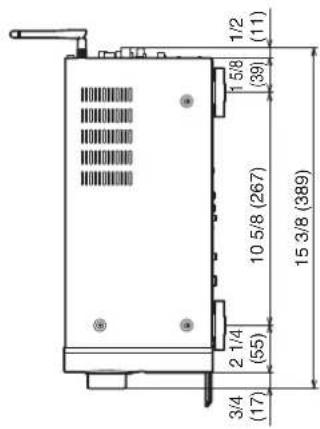
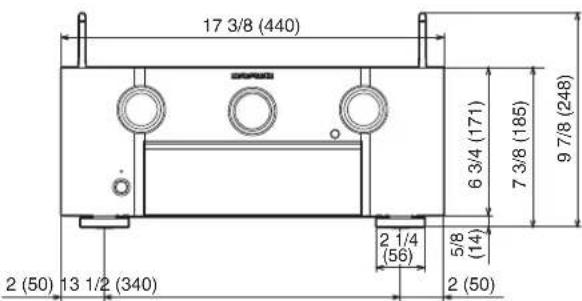
■ Weight: 30 lbs 3 oz (13.7 kg)
Front panel D
Rear panel Re
Index
334


Contents
Connections Playback Settings Tips
Index
Numerics
11.1-channel 77,78
13.1-channel 66
15.1-channel 71
3D 301
4K 301
5.1-channel 41,51
7.1-channel 40,52
9.1-channel 57
A
AirPlay 133
All Zone Stereo 144
Audio formats 303, 306, 308, 309
Audio settings 174, 179
Audyssey Dynamic EQ® 318
Audyssey Dynamic Volume® 318
Audyssey LFC™ 318
Audyssey MultEQ® XT32 318
Audyssey settings 187, 213
Audyssey Sub EQ HT™ 212
Audyssey® Setup 211
Auto sound mode 148
Auto Standby 255
Front panel D
Rear panel Re
B
Bi-amp 77
Bluetooth device 106
Blu-ray Disc player 86,100
C
Cable TV 85
D
Direct sound mode 152
Display 22
Dolby Atmos 319
Dolby sound mode 149, 320
DTS sound mode 150,321
DVD player 86,100
E
External control device 95
F
Firmware Update 257
FM/AM antenna 91, 111
Front panel 17
G
Game console 87
General settings 177,251
H
HDCP 303
HDMI Control 157, 196
HEOS Account 125,250
HEOS Favorites 138
1
Input Assign 206
Input settings 175, 206
Input signal 315
Input source 99
Internet Radio 118
L
Listening position 211
Index
335


Contents
Connections Playback Settings Tips
M
M-DAX 184
Menu map 174
Muting 100
N
NAS 120
Network settings 243
0
Original sound mode 151
P
Pairing 106, 108
PC 120
PCM multi-channel sound mode 151
Picture Mode 192
Power amp connection 44
Protection circuit 327
Pure direct 147
Q
Queue 102, 121, 128
R
Rear panel 26
Remote control unit 30
Resetting factory settings 299
Resetting network settings 300
S
Satellite tuner 85
Set-top box 85
Setup Assistant 177
Sleep timer 160
Smart select 162
Sound mode 146, 310, 312
Speaker settings 175, 211
Spotify 136
Stereo sound mode 152
T
Tips 278
Troubleshooting 280
TV 80, 81, 82
U
USB memory device 90, 101
V
Video camcorder 87
Video Conversion 200, 304
Video Select 142
Video settings 174, 192
Volume 100,140
Front panel D
Rear panel Re
Index
336


Contents Connections Playback Settings Tips
W
Wi-Fi settings 244
Wired LAN 93,243
Wireless LAN 94,244
Z
ZONE2/ZONE3 169
Front panel D
Rear panel Re
Index
337


Contents Connections Playback Settings Tips
License
■ License information for the software used in the unit
About GPL (GNU-General Public License), LGPL (GNU Lesser General Public License) License
This product uses GPL/LGPL software and software made by other companies.
After you purchase this product, you may procure, modify or distribute the source code of the GPL/LGPL software that is used in the product.
Marantz provides the source code based on the GPL and LPGL licenses at the actual cost upon your request to our customer service center. However, note that we make no guarantees concerning the source code. Please also understand that we do not offer support for the contents of the source code.
This section describes software license used for this unit. To maintain the correct content, the original (English) is used.
GPL
| Open Source Used Version | |
| bridge-utils 2.8 | |
| busybox 1.21.1 | |
| ebtables 2.0.10-4 | |
| Linux kernel 3.10.74 | |
| mtd-utils 1.4.3 | |
| ntfs-3g_ntfsprogs 2011.4.12 | |
| ntpclient 2007 | |
| u-boot 2015.01 | |
| wireless-tools version 29 | |
Front panel D
Rear panel Re
Index
338


Contents
Connections Playback Settings Tips
LGPL
| Open Source Used Version | |
| ffmpeg 0.8.3 | |
| glibc 2.9 | |
| libmms 0.6.2 | |
□ curl-7.24.0
COPYRIGHT AND PERMISSION NOTICE
Copyright (c) 1996 - 2014, Daniel Stenberg, daniel@haxx.se All rights reserved.
Permission to use, copy, modify, and distribute this software for any purpose with or without fee is hereby granted, provided that the above copyright notice and this permission notice appear in all copies. THE SOFTWARE IS PROVIDED "AS IS", WITHOUT WARRANTY OF ANY KIND, EXPRESS OR IMPLIED, INCLUDING BUT NOT LIMITED TO THE WARRANTIES OF MERCHANTABILITY, FITNESS FOR A PARTICULAR PURPOSE AND NONINFRINGEMENT OF THIRD PARTY RIGHTS. IN NO EVENT SHALL THE AUTHORS OR COPYRIGHT HOLDERS BE LIABLE FOR ANY CLAIM, DAMAGES OR OTHER LIABILITY, WHETHER IN AN ACTION OF CONTRACT, TORT OR OTHERWISE, ARISING FROM, OUT OF OR IN CONNECTION WITH THE SOFTWARE OR THE USE OR OTHER DEALINGS IN THE SOFTWARE.
Except as contained in this notice, the name of a copyright holder shall not be used in advertising or otherwise to promote the sale, use or other dealings in this Software without prior written authorization of the copyright holder.
☐ e2fsprogs-libs-1.40.8/lib/uuid
Redistribution and use in source and binary forms, with or without modification, are permitted provided that the following conditions are met:
- Redistributions of source code must retain the above copyright notice, and the entire permission notice in its entirety, including the disclaimer of warranties.
- Redistributions in binary form must reproduce the above copyright notice, this list of conditions and the following disclaimer in the documentation and/or other materials provided with the distribution.
- The name of the author may not be used to endorse or promote products derived from this software without specific prior written permission.
THIS SOFTWARE IS PROVIDED "AS IS" AND ANY EXPRESS OR IMPLIED WARRANTIES, INCLUDING, BUT NOT LIMITED TO, THE IMPLIED WARRANTIES OF MERCHANTABILITY AND FITNESS FOR A PARTICULAR PURPOSE, ALL OF WHICH ARE HEREBY DISCLAIMED. IN NO EVENT SHALL THE AUTHOR BE LIABLE FOR ANY DIRECT, INDIRECT, INCIDENTAL, SPECIAL, EXEMPLARY, OR CONSEQUENTIAL DAMAGES (INCLUDING, BUT NOT LIMITED TO, PROCUREMENT OF SUBSTITUTE GOODS OR SERVICES; LOSS OF USE, DATA, OR PROFITS; OR BUSINESS INTERRUPTION) HOWEVER CAUSED AND ON ANY THEORY OF LIABILITY, WHETHER IN CONTRACT, STRICT LIABILITY, OR TORT (INCLUDING NEGLIGENCE OR OTHERWISE) ARISING IN ANY WAY OUT OF THE USE OF THIS SOFTWARE, EVEN IF NOT ADVISED OF THE POSSIBILITY OF SUCH DAMAGE.
Front panel D
Rear panel Re
Index
339

Contents
Connections Playback Settings Tips
□ expat-2.0.1
Copyright (c) 1998, 1999, 2000 Thai Open Source Software Center Ltd and Clark Cooper
Copyright (c) 2001, 2002, 2003, 2004, 2005, 2006 Expat maintainers.
Permission is hereby granted, free of charge, to any person obtaining a copy of this software and associated documentation files (the "Software"), to deal in the Software without restriction, including without limitation the rights to use, copy, modify, merge, publish, distribute, sublicense, and/or sell copies of the Software, and to permit persons to whom the Software is furnished to do so, subject to the following conditions:
The above copyright notice and this permission notice shall be included in all copies or substantial portions of the Software.
THE SOFTWARE IS PROVIDED "AS IS", WITHOUT WARRANTY OF ANY KIND, EXPRESS OR IMPLIED, INCLUDING BUT NOT LIMITED TO THE WARRANTIES OF MERCHANTABILITY, FITNESS FOR A PARTICULAR PURPOSE AND NONINFRINGEMENT.
IN NO EVENT SHALL THE AUTHORS OR COPYRIGHT HOLDERS BE LIABLE FOR ANY CLAIM, DAMAGES OR OTHER LIABILITY, WHETHER IN AN ACTION OF CONTRACT, TORT OR OTHERWISE, ARISING FROM, OUT OF OR IN CONNECTION WITH THE SOFTWARE OR THE USE OR OTHER DEALINGS IN THE SOFTWARE.
getopt
http://cvsweb.netbsd.org/bsdweb.cgi/src/lib/libc/stdlib/
Copyright (c) 1987, 1993, 1994 The Regents of the University of California. All rights reserved.
Redistribution and use in source and binary forms, with or without modification, are permitted provided that the following conditions are met:
- Redistributions of source code must retain the above copyright notice, this list of conditions and the following disclaimer.
- Redistributions in binary form must reproduce the above copyright notice, this list of conditions and the following disclaimer in the documentation and/or other materials provided with the distribution.
- Neither the name of the University nor the names of its contributors may be used to endorse or promote products derived from this software without specific prior written permission.
THIS SOFTWARE IS PROVIDED BY THE REGENTS AND CONTRIBUTORS "AS IS" AND ANY EXPRESS OR IMPLIED WARRANTIES, INCLUDING, BUT NOT LIMITED TO, THE IMPLIED WARRANTIES OF MERCHANTABILITY AND FITNESS FOR A PARTICULAR PURPOSE ARE DISCLAIMED. IN NO EVENT SHALL THE REGENTS OR CONTRIBUTORS BE LIABLE FOR ANY DIRECT, INDIRECT, INCIDENTAL, SPECIAL, EXEMPLARY, OR CONSEQUENTIAL DAMAGES (INCLUDING, BUT NOT LIMITED TO, PROCUREMENT OF SUBSTITUTE GOODS OR SERVICES; LOSS OF USE, DATA, OR PROFITS; OR BUSINESS INTERRUPTION) HOWEVER CAUSED AND ON ANY THEORY OF LIABILITY, WHETHER IN CONTRACT, STRICT LIABILITY, OR TORT (INCLUDING NEGLIGENCE OR OTHERWISE) ARISING IN ANY WAY OUT OF THE USE OF THIS SOFTWARE, EVEN IF ADVISED OF THE POSSIBILITY OF SUCH DAMAGE.
Front panel D
Rear panel Re
Index
340



Contents
Connections Playback Settings Tips
□ jQuery
Copyright 2014 jQuery Foundation and other contributors http://jquery.com/
Permission is hereby granted, free of charge, to any person obtaining a copy of this software and associated documentation files (the "Software"), to deal in the Software without restriction, including without limitation the rights to use, copy, modify, merge, publish, distribute, sublicense, and/or sell copies of the Software, and to permit persons to whom the Software is furnished to do so, subject to the following conditions:
The above copyright notice and this permission notice shall be included in all copies or substantial portions of the Software. THE SOFTWARE IS PROVIDED "AS IS", WITHOUT WARRANTY OF ANY KIND, EXPRESS OR IMPLIED, INCLUDING BUT NOT LIMITED TO THE WARRANTIES OF MERCHANTABILITY, FITNESS FOR A PARTICULAR PURPOSE AND NONINFRINGEMENT. IN NO EVENT SHALL THE AUTHORS OR COPYRIGHT HOLDERS BE LIABLE FOR ANY CLAIM, DAMAGES OR OTHER LIABILITY, WHETHER IN AN ACTION OF CONTRACT, TORT OR OTHERWISE, ARISING FROM, OUT OF OR IN CONNECTION WITH THE SOFTWARE OR THE USE OR OTHER DEALINGS IN THE SOFTWARE.
libpcap-1.4.0
License: BSD
Redistribution and use in source and binary forms, with or without modification, are permitted provided that the following conditions are met:
- Redistributions of source code must retain the above copyright notice, this list of conditions and the following disclaimer.
- Redistributions in binary form must reproduce the above copyright notice, this list of conditions and the following disclaimer in the documentation and/or other materials provided with the distribution.
- The names of the authors may not be used to endorse or promote products derived from this software without specific prior written permission.
THIS SOFTWARE IS PROVIDED "AS IS" AND WITHOUT ANY EXPRESS OR IMPLIED WARRANTIES, INCLUDING, WITHOUT LIMITATION, THE IMPLIED WARRANTIES OF MERCHANTABILITY AND FITNESS FOR A PARTICULAR PURPOSE.
Front panel D
Rear panel Re
Index
341



Contents Connections Playback Settings Tips
libtar-1.2.11
Copyright (c) 1998-2003 University of Illinois Board of Trustees Copyright (c) 1998-2003 Mark D. Roth
All rights reserved
Developed by: Campus Information Technologies and Educational Services, University of Illinois at Urbana-Champaign
Permission is hereby granted, free of charge, to any person obtaining a copy of this software and associated documentation files (the "Software"), to deal with the Software without restriction, including without limitation the rights to use, copy, modify, merge, publish, distribute, sublicense, and/or sell copies of the Software, and to permit persons to whom the Software is furnished to do so, subject to the following conditions:
- Redistributions of source code must retain the above copyright notice, this list of conditions and the following disclaimers.
- Redistributions in binary form must reproduce the above copyright notice, this list of conditions and the following disclaimers in the documentation and/or other materials provided with the distribution.
- Neither the names of Campus Information Technologies and Educational Services, University of Illinois at Urbana-Champaign, nor the names of its contributors may be used to endorse or promote products derived from this Software without specific prior written permission.
THE SOFTWARE IS PROVIDED "AS IS", WITHOUT WARRANTY OF ANY KIND, EXPRESS OR IMPLIED, INCLUDING BUT NOT LIMITED TO THE WARRANTIES OF MERCHANTABILITY, FITNESS FOR A PARTICULAR PURPOSE AND NONINFRINGEMENT.
IN NO EVENT SHALL THE CONTRIBUTORS OR COPYRIGHT HOLDERS BE LIABLE FOR ANY CLAIM, DAMAGES OR OTHER LIABILITY, WHETHER IN AN ACTION OF CONTRACT, TORT OR OTHERWISE, ARISING FROM, OUT OF OR IN CONNECTION WITH THE SOFTWARE OR THE USE OR OTHER DEALINGS WITH THE SOFTWARE.
□ mDNS 320.10.80
The majority of the source code in the mDNSResponder project is licensed under the terms of the Apache License, Version 2.0, available from: http://www.apache.org/licenses/LICENSE-2.0
To accommodate license compatibility with the widest possible range of client code licenses, the shared library code, which is linked at runtime into the same address space as the client using it, is licensed under the terms of the “Three-Clause BSD License”.
The Linux Name Service Switch code, contributed by National ICT Australia Ltd (NICTA) is licensed under the terms of the NICTA Public Software Licence (which is substantially similar to the “Three-Clause BSD License”, with some additional language pertaining to Australian law).
Front panel D
Rear panel Re
Index
342



Contents
Connections Playback Settings Tips
□ mongoose
https://github.com/cesanta/mongoose/
Copyright (c) 2004-2013 Sergey Lyubka
Permission is hereby granted, free of charge, to any person obtaining a copy of this software and associated documentation files (the "Software"), to deal in the Software without restriction, including without limitation the rights to use, copy, modify, merge, publish, distribute, sublicense, and/or sell copies of the Software, and to permit persons to whom the Software is furnished to do so, subject to the following conditions:
The above copyright notice and this permission notice shall be included in all copies or substantial portions of the Software.
THE SOFTWARE IS PROVIDED "AS IS", WITHOUT WARRANTY OF ANY KIND, EXPRESS OR IMPLIED, INCLUDING BUT NOT LIMITED TO THE WARRANTIES OF MERCHANTABILITY, FITNESS FOR A PARTICULAR PURPOSE AND NONINFRINGEMENT. IN NO EVENT SHALL THE AUTHORS OR COPYRIGHT HOLDERS BE LIABLE FOR ANY CLAIM, DAMAGES OR OTHER LIABILITY, WHETHER IN AN ACTION OF CONTRACT, TORT OR OTHERWISE, ARISING FROM, OUT OF OR IN CONNECTION WITH THE SOFTWARE OR THE USE OR OTHER DEALINGS IN THE SOFTWARE.
openssl-1.0.0d
Copyright (c) 1998-2011 The OpenSSL Project. All rights reserved.
Redistribution and use in source and binary forms, with or without modification, are permitted provided that the following conditions are met:
- Redistributions of source code must retain the above copyright notice, this list of conditions and the following disclaimer.
- Redistributions in binary form must reproduce the above copyright notice, this list of conditions and the following disclaimer in the documentation and/or other materials provided with the distribution.
-
All advertising materials mentioning features or use of this software must display the following acknowledgment: "This product includes software developed by the OpenSSL Project for use in the OpenSSL Toolkit. (http://www.openssl.org/)
-
The names "OpenSSL Toolkit" and "OpenSSL Project" must not be used to endorse or promote products derived from this software without prior written permission. For written permission, please contact openssl-core@openssl.org.
-
Products derived from this software may not be called "OpenSSL" nor may "OpenSSL" appear in their names without prior written permission of the OpenSSL Project.
-
Redistributions of any form whatsoever must retain the following acknowledgment: "This product includes software developed by the OpenSSL Project for use in the OpenSSL Toolkit (http://www.openssl.org/)
Front panel D
Rear panel Re
Index
343



Contents
Connections Playback Settings Tips
THIS SOFTWARE IS PROVIDED BY THE OpenSSL PROJECT "AS IS" AND ANY EXPRESSED OR IMPLIED WARRANTIES, INCLUDING, BUT NOT LIMITED TO, THE IMPLIED WARRANTIES OF MERCHANTABILITY AND FITNESS FOR A PARTICULAR PURPOSE ARE DISCLAIMED. IN NO EVENT SHALL THE OpenSSL PROJECT OR ITS CONTRIBUTORS BE LIABLE FOR ANY DIRECT, INDIRECT, INCIDENTAL, SPECIAL, EXEMPLARY, OR CONSEQUENTIAL DAMAGES (INCLUDING, BUT NOT LIMITED TO, PROCUREMENT OF SUBSTITUTE GOODS OR SERVICES; LOSS OF USE, DATA, OR PROFITS; OR BUSINESS INTERRUPTION) HOWEVER CAUSED AND ON ANY THEORY OF LIABILITY, WHETHER IN CONTRACT, STRICT LIABILITY, OR TORT (INCLUDING NEGLIGENCE OR OTHERWISE) ARISING IN ANY WAY OUT OF THE USE OF THIS SOFTWARE, EVEN IF ADVISED OF THE POSSIBILITY OF SUCH DAMAGE.
This product includes cryptographic software written by Eric Young (eay@cryptsoft.com). This product includes software written by Tim Hudson (tjh@cryptsoft.com).
portmap-6.0
Copyright (c) 1990 The Regents of the University of California.
- All rights reserved.
- Redistribution and use in source and binary forms, with or without modification, are permitted provided that the following conditions are met:
- Redistributions of source code must retain the above copyright notice, this list of conditions and the following disclaimer.
- Redistributions in binary form must reproduce the above copyright notice, this list of conditions and the following disclaimer in the documentation and/or other materials provided with the distribution.
- A II advertising materials mentioning features or use of this software must display the following acknowledgement: This product includes software developed by the University of California, Berkeley and its contributors.
- Neither the name of the University nor the names of its contributors may be used to endorse or promote products derived from this software without specific prior written permission.
- THIS SOFTWARE IS PROVIDED BY THE REGENTS AND CONTRIBUTORS "AS IS" AND ANY EXPRESS OR IMPLIED WARRANTIES, INCLUDING, BUT NOT LIMITED TO, THE IMPLIED WARRANTIES OF MERCHANTABILITY AND FITNESS FOR A PARTICULAR PURPOSE ARE DISCLAIMED. IN NO EVENT SHALL THE REGENTS OR CONTRIBUTORS BE LIABLE FOR ANY DIRECT, INDIRECT, INCIDENTAL, SPECIAL, EXEMPLARY, OR CONSEQUENTIAL DAMAGES (INCLUDING, BUT NOT LIMITED TO, PROCUREMENT OF SUBSTITUTE GOODS OR SERVICES; LOSS OF USE, DATA, OR PROFITS; OR BUSINESS INTERRUPTION) HOWEVER CAUSED AND ON ANY THEORY OF LIABILITY, WHETHER IN CONTRACT, STRICT LIABILITY, OR TORT (INCLUDING NEGLIGENCE OR OTHERWISE) ARISING IN ANY WAY OUT OF THE USE OF THIS SOFTWARE, EVEN IF ADVISED OF THE POSSIBILITY OF SUCH DAMAGE.
Front panel D
Rear panel Re
Index
344



Contents
Connections Playback Settings Tips
pstdint.h-0.1.12
- BSD License:
• Copyright (c) 2005-2011 Paul Hsieh - All rights reserved.
-
Redistribution and use in source and binary forms, with or without modification, are permitted provided that the following conditions are met:
-
Redistributions of source code must retain the above copyright notice, this list of conditions and the following disclaimer.
- Redistributions in binary form must reproduce the above copyright notice, this list of conditions and the following disclaimer in the documentation and/or other materials provided with the distribution.
- The name of the author may not be used to endorse or promote products derived from this software without specific prior written permission.
- THIS SOFTWARE IS PROVIDED BY THE AUTHOR "AS IS" AND ANY EXPRESS OR IMPLIED WARRANTIES, INCLUDING, BUT NOT LIMITED TO, THE IMPLIED WARRANTIES OF MERCHANTABILITY AND FITNESS FOR A PARTICULAR PURPOSE ARE DISCLAIMED.
- IN NO EVENT SHALL THE AUTHOR BE LIABLE FOR ANY DIRECT, INDIRECT, INCIDENTAL, SPECIAL, EXEMPLARY, OR CONSEQUENTIAL DAMAGES (INCLUDING, BUT NOT LIMITED TO, PROCUREMENT OF SUBSTITUTE GOODS OR SERVICES; LOSS OF USE, DATA, OR PROFITS; OR BUSINESS INTERRUPTION) HOWEVER CAUSED AND ON ANY THEORY OF LIABILITY, WHETHER IN CONTRACT, STRICT LIABILITY, OR TORT (INCLUDING NEGLIGENCE OR OTHERWISE) ARISING IN ANY WAY OUT OF THE USE OF THIS SOFTWARE, EVEN IF ADVISED OF THE POSSIBILITY OF SUCH DAMAGE.
□ rl78flash 2000.3.1
License
[EMPTY]
The MIT License (MIT)
Copyright (c) 2012 Maxim Salov
Permission is hereby granted, free of charge, to any person obtaining a copy of this software and associated documentation files (the "Software"), to deal in the Software without restriction, including without limitation the rights to use, copy, modify, merge, publish, distribute, sublicense, and/or sell copies of the Software, and to permit persons to whom the Software is furnished to do so, subject to the following conditions:
The above copyright notice and this permission notice shall be included in all copies or substantial portions of the Software. THE SOFTWARE IS PROVIDED "AS IS", WITHOUT WARRANTY OF ANY KIND, EXPRESS OR IMPLIED, INCLUDING BUT NOT LIMITED TO THE WARRANTIES OF MERCHANTABILITY, FITNESS FOR A PARTICULAR PURPOSE AND NONINFRINGEMENT. IN NO EVENT SHALL THE AUTHORS OR COPYRIGHT HOLDERS BE LIABLE FOR ANY CLAIM, DAMAGES OR OTHER LIABILITY, WHETHER IN AN ACTION OF CONTRACT, TORT OR OTHERWISE, ARISING FROM, OUT OF OR IN CONNECTION WITH THE SOFTWARE OR THE USE OR OTHER DEALINGS IN THE SOFTWARE.
Front panel D
Rear panel Re
Index
345



Contents
Connections Playback Settings Tips
□ sqlite 2003.5.7
SQLite Copyright
SQLite is in the
Public Domain
All of the code and documentation in SQLite has been dedicated to the public domain by the authors. All code authors, and representatives of the companies they work for, have signed affidavits dedicating their contributions to the public domain and originals of those signed affidavits are stored in a firesafe at the main offices of Hwaci. Anyone is free to copy, modify, publish, use, compile, sell, or distribute the original SQLite code, either in source code form or as a compiled binary, for any purpose, commercial or non-commercial, and by any means.
The previous paragraph applies to the deliverable code and documentation in SQLite - those parts of the SQLite library that you actually bundle and ship with a larger application. Some scripts used as part of the build process (for example the "configure" scripts generated by autoconf) might fall under other open-source licenses. Nothing from these build scripts ever reaches the final deliverable SQLite library, however, and so the licenses associated with those scripts should not be a factor in assessing your rights to copy and use the SQLite library.
All of the deliverable code in SQLite has been written from scratch. No code has been taken from other projects or from the open internet. Every line of code can be traced back to its original author, and all of those authors have public domain dedications on file. So the SQLite code base is clean and is uncontaminated with licensed code from other projects.
□ strlcpy.c, v1.11
• Copyright (c) 1998 Todd C. Miller Todd.Miller@courtesan.com
- Permission to use, copy, modify, and distribute this software for any purpose with or without fee is hereby granted, provided that the above copyright notice and this permission notice appear in all copies.
- THE SOFTWARE IS PROVIDED "AS IS" AND THE AUTHOR DISCLAIMS ALL WARRANTIES WITH REGARD TO THIS SOFTWARE INCLUDING ALL IMPLIED WARRANTIES OF MERCHANTABILITY AND FITNESS. IN NO EVENT SHALL THE AUTHOR BE LIABLE FOR ANY SPECIAL, DIRECT, INDIRECT, OR CONSEQUENTIAL DAMAGES OR ANY DAMAGES WHATSOEVER RESULTING FROM LOSS OF USE, DATA OR PROFITS, WHETHER IN AN ACTION OF CONTRACT, NEGLIGENCE OR OTHER TORTIOUS ACTION, ARISING OUT OF OR IN CONNECTION WITH THE USE OR PERFORMANCE OF THIS SOFTWARE.
□ taglib-1.5
copyright : (C) 2002 - 2008 by Scott Wheeler
email : wheeler@kde.org
"The contents of this file are subject to the Mozilla Public License Version 1.1 (the "License"); you may not use this file except in compliance with the License. You may obtain a copy of the License at http://www.mozilla.org/MPL/
Software distributed under the License is distributed on an "AS IS" basis, WITHOUT WARRANTY OF ANY KIND, either express or implied. See the License for the specific language governing rights and limitations under the License.
Front panel D
Rear panel Re
Index
346



Contents
Connections Playback Settings Tips
□ tinyxml 2002.4.3
www.sourceforge.net/projects/tinyxml
This software is provided 'as-is', without any express or implied warranty. In no event will the authors be held liable for any damages arising from the use of this software.
Permission is granted to anyone to use this software for any purpose, including commercial applications, and to alter it and redistribute it freely, subject to the following restrictions:
- The origin of this software must not be misrepresented; you must not claim that you wrote the original software. If you use this software in a product, an acknowledgment in the product documentation would be appreciated but is not required.
- Altered source versions must be plainly marked as such, and must not be misrepresented as being the original software.
- This notice may not be removed or altered from any source distribution.
Tremor
http://wiki.xiph.org/index.php/Tremor
Copyright (c) 2002, Xiph.org Foundation
Redistribution and use in source and binary forms, with or without modification, are permitted provided that the following conditions are met:
- Redistributions of source code must retain the above copyright notice, this list of conditions and the following disclaimer.
- Redistributions in binary form must reproduce the above copyright notice, this list of conditions and the following disclaimer in the documentation and/or other materials provided with the distribution.
- Neither the name of the Xiph.org Foundation nor the names of its contributors may be used to endorse or promote products derived from this software without specific prior written permission.
THIS SOFTWARE IS PROVIDED BY THE COPYRIGHT HOLDERS AND CONTRIBUTORS "AS IS" AND ANY EXPRESS OR IMPLIED WARRANTIES, INCLUDING, BUT NOT LIMITED TO, THE IMPLIED WARRANTIES OF MERCHANTABILITY AND FITNESS FOR A PARTICULAR PURPOSE ARE DISCLAIMED. IN NO EVENT SHALL THE FOUNDATION OR CONTRIBUTORS BE LIABLE FOR ANY DIRECT, INDIRECT, INCIDENTAL, SPECIAL, EXEMPLARY, OR CONSEQUENTIAL DAMAGES (INCLUDING, BUT NOT LIMITED TO, PROCUREMENT OF SUBSTITUTE GOODS OR SERVICES; LOSS OF USE, DATA, OR PROFITS; OR BUSINESS INTERRUPTION) HOWEVER CAUSED AND ON ANY THEORY OF LIABILITY, WHETHER IN CONTRACT, STRICT LIABILITY, OR TORT (INCLUDING NEGLIGENCE OR OTHERWISE) ARISING IN ANY WAY OUT OF THE USE OF THIS SOFTWARE, EVEN IF ADVISED OF THE POSSIBILITY OF SUCH DAMAGE.
Front panel D
Rear panel Re
Index
347



Contents
Connections Playback Settings Tips
□ zlib
http://www.zlib.net/
zlib.h -- interface of the 'zlib' general purpose compression library version 1.2.3, July 18th, 2005
Copyright (C) 1995-2004 Jean-loup Gailly and Mark Adler
This software is provided ‘as-is’, without any express or implied warranty. In no event will the authors be held liable for any damages arising from the use of this software.
Permission is granted to anyone to use this software for any purpose, including commercial applications, and to alter it and redistribute it freely, subject to the following restrictions:
- The origin of this software must not be misrepresented; you must not claim that you wrote the original software. If you use this software in a product, an acknowledgment in the product documentation would be appreciated but is not required.
- Altered source versions must be plainly marked as such, and must not be misrepresented as being the original software.
- This notice may not be removed or altered from any source distribution.
Jean-loup Gailly jloup@gzip.org, Mark Adler madler@alumni.caltech.edu
☐ The Spotify software is subject to third party licenses found here:
www.spotify.com/connect/third-party-licenses
Front panel D
Rear panel Re
Index
348


www.marantz.com
You can find your nearest authorized distributor or dealer on our website.
marantz® is a registered trademark.
3520 10559 00AMA
Copyright © 2017 D&M Holdings Inc. All Rights Reserved.
- marantz®
- Contents Connections Playback Settings Tips Appendix
- Connections
- Playback
- Convenience functions 137
- Selecting a sound mode 145
- HDMI Control function 157
- Smart Menu function 158
- Sleep timer function 160
- Smart select function 162
- Panel lock function 165
- Remote lock function 167
- Switches light illumination on/off 168
- Playback in ZONE2/ZONE3 (Another room) 169
- Accessories
- Inserting the batteries
- NOTE
- Operating range of the remote control unit
- Features
- High quality sound
- • Current feedback amplifier
- • Dolby Atmos (p. 319)
- • DTS:X (p. 322)
- • DTS Virtual:X (p. 322)
- - Audyssey LFC™ (Low Frequency Containment) (p. 189)
- - Discrete subwoofers and Audyssey Sub EQ HT™ (p. 212)
- Contents
- Connections Playback Settings Tips Appendix
- • Auro-3D
- Front panel D
- Rear panel Re
- Index
- High performance
- - HDCP 2.2
- • Equipped with HDMI ZONE2 output (p. 169)
- Easy operation
- Part names and functions
- ① Power operation button (⏻)
- ② Power indicator
- ③ INPUT SELECTOR knob
- ④ Main display
- ⑤ Remote control sensor
- VOLUME knob
- ⑦ Door
- y Rear panel Re
- Display
- ■ Main display
- Standard display
- ① Light illumination
- ② Volume indicator
- ③ Input source indicator
- □ Tuner display
- Sleep timer indicator
- ☐ ZONE2/ZONE3 power on display
- Sub display
- ① Bluetooth/wireless LAN antenna connectors
- ② SIGNAL GND terminal
- ③ USB port (POWER SUPPLY)
- ④ Analog audio connectors (AUDIO)
- ⑤ NETWORK connector
- 7.1-channel input connectors (7.1CH IN)
- ⑦ HDMI connectors
- ⑧ UNBALANCED RCA PRE OUT connectors
- ⑨ Video connectors (VIDEO)
- ⑩ Component video connectors (COMPONENT VIDEO)
- ⑪ AC inlet (AC IN)
- ⑫ FM/AM antenna terminals (ANTENNA)
- ⑬ BALANCED XLR IN connectors
- FLASHER IN jack
- ⑮ REMOTE CONTROL jacks
- ⑯ Digital audio connectors (DIGITAL AUDIO)
- BALANCED XLR PRE OUT connectors
- DC OUT jacks
- ⑲ RS-232C connector
- Remote control unit
- ① Display
- ② AVP operation button
- ③ SET button
- ④ ZONE SELECT button
- ■ Cables used for connections
- Speaker installation
- About Dolby Atmos Enabled speakers
- ctions
- ettings Tips Appendix
- ■ When 7.1-channel speakers are installed using surround back speakers
- ■ When 9.1-channel speakers are installed using front wide speakers
- ☐ Ceiling speaker layout example
- ☐ Dolby Atmos Enabled speaker layout example
- ☐ Auro-3D layout example
- Connecting a power amp
- Before connecting a power amp
- [AV8805 BALANCED XLR PRE OUT connector PIN arrangement]
- ■ Example of connections to Marantz MM8077 and MM7025 power amps
- □ Connecting the UNBALANCED RCA PRE OUT connector
- ☐ Connecting the BALANCED XLR PRE OUT connector
- ■ About the cable labels (supplied) for channel identification
- Speaker configuration and "Amp Assign" settings
- ayback Settings Tips
- Appendix
- Front panel
- Rear panel
- Remote
- Connecting 5.1-channel speakers
- Connecting 7.1-channel speakers
- ■ Example connections when using surround back speakers
- ■ Example connections when using front wide speakers
- Connecting 9.1-channel speakers
- ■ Example connection when using surround back and front wide speakers
- ■ Example connection when using one set of ceiling speakers
- ■ Example connection when using two sets of ceiling speakers
- ■ Example connection when using one set of height speakers
- ■ Example connection when using two sets of height speakers
- ■ Example connection when using one set of Dolby Atmos Enabled speakers
- ■ Example connection when using two sets of Dolby Atmos Enabled speakers
- ■ Example connection for the Auro-3D 9.1-channel system
- Connecting 13.1-channel speakers
- ■ Example connection when using three sets of ceiling speakers
- ■ Example connection when using three sets of Dolby Atmos Enabled speakers
- ■ Example connection for the Auro-3D 13.1-channel system
- Connecting 15.1-channel speakers
- ■ Example connection
- Connecting 11.1-channel speakers: Bi-amp connection of front speakers
- Connecting 11.1-channel speakers: Second pair of front speakers
- Connecting a TV
- Connection 1 : TV equipped with an HDMI connector and compatible with the ARC (Audio Return Channel)
- Connection 2 : TV equipped with an HDMI connector and incompatible with the ARC (Audio Return Channel)
- Connection 3 : TV equipped without an HDMI connector
- Connecting a playback device
- ☐ Connecting the BALANCED XLR IN connector
- Connecting a set-top box (Satellite tuner/cable TV)
- Connecting a DVD player or Blu-ray Disc player
- Connecting a video camcorder or game console
- Connecting a turntable
- Connecting a device with a multi-channel output connector
- Connecting a USB memory device to the USB port
- Connecting an FM/AM antenna
- ■ Using the AM loop antenna
- ■ AM loop antenna assembly
- Connecting to a home network (LAN)
- Wired LAN
- Wireless LAN
- Connecting an external control device
- REMOTE CONTROL jacks
- ■ Performing operations by RC on this unit without visual contact
- DC OUT jacks
- Connecting the power cord
- Basic operation
- Turning the power on
- Press POWER ⏻ to turn on power to the unit.
- Selecting the input source
- Press the input source select button to be played back. The desired input source can be selected directly.
- Adjusting the volume
- Use VOLUME ▲▼ to adjust the volume.
- Turning off the sound temporarily (Muting)
- Press MUTE 📄X.
- Playback a DVD player/Blu-ray Disc player
- Prepare for playback.
- Press POWER ⏻ to turn on power to the unit.
- Press DVD or Blu-ray to switch an input source for a player used for playback.
- Play the DVD player or Blu-ray Disc player.
- ■ Surround playback (p. 145)
- Playing a USB memory device
- Playing files stored on USB memory devices
- Browse the music on your USB memory device and select something to play.
- Use △▽ to select the "Play Now" or "Play Now & Replace Queue", then press ENTER.
- ■ Operations accessible through the option menu
- Listening to music on a Bluetooth device
- Playing music from Bluetooth device
- Press Bluetooth.
- Activate the Bluetooth settings on your mobile device.
- Select this unit when its name appears in the list of devices displayed on the screen of the Bluetooth device.
- Play music using any app on your Bluetooth device.
- Pairing with other Bluetooth devices
- Reconnecting to this unit from a Bluetooth device
- Listening to FM/AM broadcasts
- Tuning in by entering the frequency (Direct Tune)
- Changing the tune mode (Tune Mode)
- Tuning in to stations and presetting them automatically (Auto Preset Memory)
- Presetting the current broadcast station (Preset Memory)
- Listening to preset stations
- Specify a name for the preset broadcast station (Preset Name)
- Use to select a name label, then press ENTER.
- Enter the characters, then press "OK".
- Press OPTION to return to the previous screen.
- Skipping preset broadcast stations (Preset Skip)
- ☐ To set the stations you want to skip by stations
- Press OPTION to return to the previous screen.
- Cancelling Preset Skip
- Listening to Internet Radio
- Press INTERNET RADIO.
- Select the station you want to play.
- Playing back files stored on a PC or NAS
- Browse the music on your PC/NAS and select something to play.
- Getting the HEOS App
- HEOS Account
- ■ What is a HEOS Account?
- ■ Why do I need a HEOS Account?
- ■ Signing up for a HEOS Account
- ■ Changing your HEOS Account
- Playing from streaming music services
- ■ Selecting a room/device
- ■ Selecting the music track or station from music sources
- Tap the "Music" tab and select a music source.
- back
- Browse the music to play.
- Listening to the same music in multiple rooms
- ■ Grouping rooms
- ■ Ungrouping rooms
- ■ Grouping all rooms (party mode)
- ■ Ungrouping all rooms
- AirPlay function
- Playing songs from your iPhone, iPod touch or iPad
- Playing iTunes music with this unit
- Perform iTunes playback operations with the remote control unit of this unit
- Spotify Connect function
- Playing Spotify music with this unit
- Convenience functions
- Adding to HEOS Favorites
- Playing back HEOS Favorites
- Deleting a HEOS Favorites
- Adjusting the audibility of dialog and vocals (Dialog Enhancer)
- Press OPTION.
- Use to select “Dialog Enhancer”, then press ENTER.
- Use ◀▷ to select your favorite enhancement effect.
- Press ENTER.
- Adjusting the volume of each channel to match the input source (Channel Level Adjust)
- Use to select “Channel Level Adjust”, then press ENTER.
- Use to select the channel that you wish to adjust.
- Use ◀▷ to adjust the volume.
- Use △▽◀▷ to select "Exit", then press ENTER.
- Adjusting the tone (Tone)
- Use to select “Tone”, then press ENTER.
- Use ◀▷ to set the tone control function to on/off.
- Select "On" in step 3 and press to select the sound range to be adjusted.
- Use ◀▶ to adjust the tone, then press ENTER.
- Displaying your desired video during audio playback (Video Select)
- □ Supported input sources:
- CD\* / Tuner / HEOS Music / Phono
- Use to select “Video Select”, then press ENTER.
- Use ◀▷ to select the Video Select mode.
- Adjusting the picture quality for your viewing environment (Picture Mode)
- Playing the same music in all zones (All Zone Stereo)
- Use to select “All Zone Stereo”, then press ENTER.
- Select "Start", then press ENTER.
- ■ Stopping the All Zone Stereo mode
- During playback in All Zone Stereo mode, press OPTION.
- Select "Stop", then press ENTER.
- Selecting a sound mode
- Press MOVIE, MUSIC or GAME to select a sound mode.
- ■ Switching the sound mode
- Direct playback
- Press PURE to select "Direct".
- Pure Direct playback
- Press PURE to select "Pure Direct".
- Auto surround playback
- Press PURE to select "Auto".
- Description of sound mode types
- Sound mode that can be selected for each input signal
- ■ Views on the display
- HDMI Control function
- Setting procedure
- Smart Menu function
- Now Playing
- Source
- Sound Mode
- Setup Menu
- Smart Select
- Sleep timer function
- Using the sleep timer
- Press ZONE SELECT to switch "MAIN", "ZONE2" or "ZONE3".
- Press SLEEP and display the time you want to set.
- - Checking the remaining time
- ■ To cancel the sleep timer
- Smart select function
- ZONE SELECT
- Calling up the settings
- Press SMART SELECT.
- Changing the settings
- Set the items below to the settings you want to register.
- ■ Changing the Smart Select Name
- Panel lock function
- Disabling all key button operations
- Disabling all button operations except VOLUME
- Canceling the Panel lock function
- Remote lock function
- Disabling the sensor function of the remote control unit
- Enabling the remote sensor function
- Switches light illumination on/off
- Press and hold DIMMER on the main unit for 3 seconds.
- Playback in ZONE2/ZONE3 (Another room)
- Connecting ZONE
- ■ Connection 1 : Connection through the HDMI ZONE2 connector
- ■ Connection 2 : Connection through the video output connector and external power amplifiers
- Contents Connections
- Setti
- ngs Tips Appendix
- ■ Adjusting the volume (ZONE2/ZONE3)
- ■ Turning off the sound temporarily (Muting) (ZONE2/ZONE3)
- Menu map
- Menu operations
- Audio
- Subwoofer Level Adjust
- ■ Subwoofer 1 / Subwoofer 2
- Bass Sync
- Surround Parameter
- Cinema EQ
- ■ Loudness Management
- Contents Connections Playback
- Tips Appendix
- ■ Dynamic Compression
- ■ Dialog Control
- ■ Low Frequency Effects
- ☐ When "Input Mode" is set other than to "7.1CH IN"
- ☐ When "Input Mode" is set to "7.1CH IN"
- ■ Center Spread
- ■ DTS Neural:X
- ■ Auro-Matic 3D Preset
- ■ Auro-Matic 3D Strength
- Speaker Select
- Subwoofer
- Set Defaults
- M-DAX
- Audio Delay
- ■ Auto Lip Sync
- Adjust
- Volume
- Scale
- Limit
- Power On Level
- Mute Level
- Audyssey®
- ■ MultEQ® XT32
- ■ Dynamic EQ
- ■ Reference Level Offset
- ■ Dynamic Volume
- Audyssey LFC™
- ■ Containment Amount
- Graphic EQ
- ■ Graphic EQ / Headphone EQ
- ■ Speaker Selection
- ■ Adjust EQ
- ■ Curve Copy
- Video
- Picture Adjust
- Picture Mode
- Contrast
- Brightness
- Saturation
- Noise Reduction
- ■ Enhancer
- HDMI Setup
- ■ HDMI Audio Out
- ■ Vertical Stretch
- ■ HDMI Pass Through
- ■ Pass Through Source
- ■ RC Source Select
- HDMI Control
- ARC
- TV Audio Switching
- Power Off Control
- Power Saving
- Smart Menu
- Output Settings
- ■ HDMI Video Output
- Video Mode
- ■ Video Conversion
- ■ i/p Scaler
- Resolution
- ■ Progressive Mode
- ■ Aspect Ratio
- Analog Video Out
- ■ Component
- On Screen Display
- Info
- 4K Signal Format
- ■ 4K Signal Format
- TV Format
- Format
- NTSC
- Inputs
- Input Assign
- ☐ TV set top box/satellite users please note
- HDMI
- DIGITAL
- ANALOG
- COMP (Component video)
- Source Rename
- Hide Sources
- Source Level
- Input Select
- ■ Input Mode
- Speakers
- Audyssey® Setup
- ■ About the main listening position
- ■ About Audyssey Sub EQ HT™
- Connect the Sound calibration microphone to the SETUP MIC jack of this unit.
- Select "Start", then press ENTER.
- Follow the instructions on the screen display and press "Next" to proceed further.
- When the following screen is displayed, select "Begin Test" and then press ENTER.
- When the detected speaker is displayed, select "Next" and then press ENTER.
- Move the Sound calibration microphone to position 2, select "Continue", then press ENTER.
- □ Stopping Audyssey® Setup
- Repeat step 8, measuring positions 3 to 8.
- Select "Continue", then press ENTER.
- Perform the settings for Audyssey Dynamic EQ ® and Audyssey Dynamic Volume ® .
- When the analysis and storage ends, unplug the Sound calibration microphone from the SETUP MIC jack on the main unit and then press "Next".
- Select "Details" and press ENTER to verify the measurement results.
- Error messages
- ■ Subwoofer level error message and how to adjust
- Retrieving Audyssey® Setup settings
- Manual Setup
- Amp Assign
- Assign Mode
- ■ Pre-out for Bi-Amp / Pre-out for Front B
- Floor
- Layout
- Height
- Height Sp
- Dolby Sp
- ☐ Front Layout / Middle Layout / Rear Layout
- ■ View Terminal Config.
- Speaker Config.
- Front
- Center
- ■ Surround
- ■ Surr. Back
- Front Wide
- Front Height
- Front Dolby
- Top Front
- Top Middle
- ■ Surround Dolby
- Top Rear
- ■ Surr. Height
- Rear Height
- ■ Back Dolby
- ■ Center Height
- ■ Top Surround
- Distances
- Unit
- Step
- ■ Set the distance
- ■ Dolby Speaker Setup
- Levels
- ■ Test Tone Start
- Crossovers
- ■ Set the crossover frequency
- Bass
- Subwoofer Mode
- LPF for LFE
- Front Speaker
- 2ch Playback
- Setting
- SW Mode
- Crossover
- ■ Distance FL / Distance FR
- Level FL / Level FR
- Network
- Information
- Connection
- Connect Using
- Wi-Fi Setup
- ■ Scan Networks
- ■ Use iOS Device
- WPS Router
- ■ Manual
- Connections Playback
- Settings
- DHCP
- IP Address
- Subnet Mask
- ■ Default Gateway
- DNS
- Network Control
- Friendly Name
- ■ Friendly Name
- ■ Set Defaults
- Diagnostics
- ■ Physical Connection
- Router Access
- Internet Access
- You have not signed in
- I have a HEOS Account
- ■ Create Account
- ■ Forgot Password
- You have already signed in
- ■ Signed in As
- ■ Change Location
- ■ Change Password
- Delete Account
- ■ Sign Out
- General
- Language
- ZONE2 Setup / ZONE3 Setup
- Treble
- ■ High Pass Filter
- Lch Level
- Rch Level
- Channel
- ■ HDMI Audio (ZONE2 only)
- Volume Level
- Volume Limit
- Power On Volume
- Zone Rename
- Smart Select Names
- Trigger Out 1 / Trigger Out 2
- Auto Standby
- MAIN ZONE
- ZONE2 / ZONE3
- Front Display
- Dimmer
- ■ Channel Indicators
- Firmware
- ■ Check for Update
- ■ Auto-Update
- Auto-Update
- Time Zone
- Allow Update
- ■ Upgrade Notification
- ■ Add New Feature
- Notes concerning use of "Update" and "Add New Feature"
- ZONE
- ■ Firmware
- Notifications
- Usage Data
- Save & Load
- ■ Save Configuration
- Load Configuration
- Setup Lock
- Lock
- Operating external devices with the remote control unit
- Registering preset codes
- ■ Registering Marantz players
- ☐ Registering Blu-ray Disc players
- ☐ Registering multiple players at the same time
- Press and hold down the SMART SELECT 1 - 4 and OPTION until "OK" indicator on the remote control display is flashing, then release.
- ■ Registering by entering preset numbers
- Operating devices
- ☐ TV group (TV) operation
- Operation buttons Function
- DVD group
- □ CD group
- CBL/SAT group
- BD group
- Checking registered preset codes
- Initializing registered preset codes
- Operating learning function
- Remembering remote control codes from other devices
- Delete saved remote control codes
- Setting the back light
- Disabling the backlight
- Turning the backlight on
- Specifying the zone used with the remote control unit
- Tips
- I want the volume not to become too loud by mistake
- I want to keep the volume at the same level when I turn the power on
- I want to have the subwoofer always output audio
- I want to make human voices in the movies clearer
- I want to keep bass and clarity during playback at a lower volume level
- I want to automatically adjust the volume level difference in content such as TV and movies
- Troubleshooting
- Power does not turn on / Power is turned off
- Power does not turn on.
- Power automatically turns off.
- Operations cannot be performed through the remote control unit
- Operations cannot be performed through the remote control unit.
- Display on this unit shows nothing
- Display is off.
- No sound comes out
- No sound comes out of speakers.
- No sound comes out when using the DVI-D connection.
- No sound comes out of a TV that is connected via HDMI.
- Desired sound does not come out
- The volume does not increase.
- No sound comes out with the HDMI connection.
- No sound comes out of a specific speaker.
- No sound is produced from subwoofer.
- DTS sound is not output.
- Connections Playback Settings
- Sound is interrupted or noise occurs
- No video is shown on the TV
- No picture appears.
- No video is shown on the TV with the DVI-D connection.
- Contents Connections Playback Settings
- The menu screen is not displayed on the TV
- The menu screen or status information screen is not displayed on the TV.
- AirPlay cannot be played back
- Audio is not output.
- USB memory devices cannot be played back
- USB memory device is not recognized.
- Files on the USB memory device are not displayed.
- iOS and Android devices are not recognized.
- Files on a USB memory device cannot be played.
- Bluetooth cannot be played back
- Bluetooth devices cannot be connected to this unit.
- The sound is cut off.
- The Internet radio cannot be played back
- A list of broadcasting stations is not displayed.
- Internet Radio cannot be played.
- Cannot connect to favorite radio stations.
- Music files on PC or NAS cannot be played back
- Files stored on a computer cannot be played.
- Server is not found, or it is not possible to connect to the server.
- Music files on PC cannot be played back.
- Files on PC or NAS are not displayed.
- Music stored on a NAS cannot be played.
- Various online services cannot be played
- The HDMI Control function does not work
- Cannot connect to a wireless LAN network
- Cannot connect to the network.
- Cannot connect to a WPS Router.
- Cannot connect to the network using iPhone/iPod touch/iPad.
- When using HDMI ZONE2, the devices does not function properly
- Update/upgrade error messages
- Resetting factory settings
- Resetting network settings
- About HDMI
- - Deep Color
- • x.v.Color
- • 3D
- • 4K
- - Content Type
- - Adobe RGB color, Adobe YCC601 color
- - sYCC601 color
- Connections Playback Settings Tips
- - Auto Lip Sync
- - HDMI Pass Through
- - HDMI Control
- • ARC (Audio Return Channel)
- Contents Connections Playback Settings Tips
- ■ Supported video signals
- Copyright protection system
- Video conversion function
- Playing back a USB memory devices
- ■ Maximum number of playable files and folder
- Playing back a Bluetooth device
- ■ About Bluetooth communications
- Playing back a file saved on a PC or NAS
- Playing back Internet Radio
- Personal memory plus function
- Last function memory
- Sound modes and channel output
- Sound modes and surround parameters
- Types of input signals, and corresponding sound modes
- Explanation of terms
- Audyssey
- Audyssey Dynamic EQ ®
- Audyssey Dynamic Volume®
- Audyssey LFC™ (Low Frequency Containment)
- Audyssey MultEQ® XT32
- Auro-3D
- Auro-3D®
- Auro-Matic®
- Dolby
- Dolby Atmos
- Dolby Atmos Stream
- Dolby Digital
- Dolby Digital Plus
- Dolby Surround
- Dolby Speaker Technology (Dolby Atmos Enabled speakers)
- Dolby TrueHD
- DTS
- Dialog Control
- DTS 96/24
- DTS Digital Surround
- DTS-ES™ Discrete 6.1
- DTS-ES™ Matrix 6.1
- DTS Express
- DTS-HD
- DTS-HD High Resolution Audio
- DTS-HD Master Audio
- DTS:X
- DTS Neural:X
- DTS Virtual:X
- Apple Lossless Audio Codec
- FLAC (Free Lossless Audio Codec)
- LFE
- MP3 (MPEG Audio Layer-3)
- MPEG (Moving Picture Experts Group), MPEG-2, MPEG-4
- WMA (Windows Media Audio)
- Sampling frequency
- Speaker impedance
- Dialogue normalization function
- Dynamic range
- Downmix
- ISF
- Progressive (sequential scanning)
- AirPlay
- WEP Key (network key)
- Wi-Fi®
- WPA (Wi-Fi Protected Access)
- WPA2 (Wi-Fi Protected Access 2)
- WPA-PSK/WPA2-PSK (Pre-shared Key)
- Network Names (SSID: Service Set Identifier)
- Others
- HDCP
- Pairing
- Protection circuit
- Trademark information
- AURO3D® AUDIO
- Bluetooth
- CERTIFIED
- Specifications
- ■ Audio section
- ■ Video section
- ■ Tuner section
- [FM] [AM]
- ■ Wireless LAN section
- Bluetooth section
- ■ Dimensions (Unit : in. (mm))
- ■ Weight: 30 lbs 3 oz (13.7 kg)
- Numerics
- A
- B
- C
- D
- E
- F
- G
- H
- 1
- L
- M
- N
- 0
- P
- Q
- R
- S
- T
- U
- V
- W
- Z
- License
- ■ License information for the software used in the unit
- LGPL
- □ curl-7.24.0
- ☐ e2fsprogs-libs-1.40.8/lib/uuid
- □ expat-2.0.1
- getopt
- □ jQuery
- libpcap-1.4.0
- libtar-1.2.11
- □ mDNS 320.10.80
- □ mongoose
- openssl-1.0.0d
- portmap-6.0
- pstdint.h-0.1.12
- □ rl78flash 2000.3.1
- □ sqlite 2003.5.7
- □ strlcpy.c, v1.11
- □ taglib-1.5
- □ tinyxml 2002.4.3
- Tremor
- □ zlib
- ☐ The Spotify software is subject to third party licenses found here:
Brand : MARANTZ
Model : AV8805
Category : Hi-Fi System