
VS3002 - Hi-Fi System MARANTZ - Free user manual and instructions
Find the device manual for free VS3002 MARANTZ in PDF.


| Product Type | Video Selector (HDMI Switcher) |
| Brand | Marantz |
| Model | VS3002 |
| HDMI Inputs | 6 (HDMI v1.3b, single link) |
| HDMI Outputs | 2 (HDMI v1.3b, single link) |
| Control Interfaces | RS-232C, Flasher In, Remote Control In/Out (RC-5) |
| Auto Input Function | Yes, detects cable connection/disconnection and device power on/off |
| Emphasis Function | Yes, reduces noise in video/audio signals |
| Remote Link Function | Yes, compatible with select Marantz amps and projectors |
| Key Lock Function | Yes, locks front panel buttons (hold AUTO button 3 seconds) |
| Power Requirements (USA) | AC 120V 60Hz |
| Power Requirements (Europe) | AC 230V 50/60Hz |
| Power Requirements (Japan) | AC 100V 50/60Hz |
| Power Consumption | 5 W (0.8 W in standby) |
| Dimensions (W x H x D) | 440 x 78 x 340 mm (17.3 x 3.1 x 13.4 in) |
| Weight | 3.2 kg (7.1 lbs) |
| Operating Temperature | 5 to 35°C (41 to 95°F), no condensation |
| Storage Temperature | -20 to 60°C (-4 to 140°F), no condensation |
| Included Accessories | AC power cord (USA/Europe/Japan), remote controller (lithium battery CR2025), user manual, warranty card |
| Cleaning | Wipe with soft damp cloth; mild detergent if needed; avoid solvents |
| Safety | Do not expose to rain/moisture; unplug during lightning; use only recommended attachments |
| Repairability | Refer servicing to qualified personnel; no user-serviceable parts inside |
| Regulatory Compliance | FCC Part 15 Class B, Canadian ICES-003, EMC and Low Voltage directives |
Frequently Asked Questions - VS3002 MARANTZ
User questions about VS3002 MARANTZ
0 question about this device. Answer the ones you know or ask your own.
Ask a new question about this device
Download the instructions for your Hi-Fi System in PDF format for free! Find your manual VS3002 - MARANTZ and take your electronic device back in hand. On this page are published all the documents necessary for the use of your device. VS3002 by MARANTZ.
USER MANUAL VS3002 MARANTZ
The lightning flash with arrowhead symbol within an equilateral triangle is intended to alert the user to the presence of uninsulated “dangerous voltage” within the product’s enclosure that may be of sufficient magnitude to constitute a risk of electric shock to persons.

The exclamation point within an equilateral triangle is intended to alert the user to the presence of important operating and maintenance (servicing) instructions in the literature accompanying the product.
WARNING
TO REDUCE THE RISK OF FIRE OR ELECTRIC SHOCK, DO NOT EXPOSE THIS APPLIANCE TO RAIN OR MOISTURE.
CAUTION: TO PREVENT ELECTRIC SHOCK, MATCH WIDE BLADE OF PLUG TO WIDE SLOT, FULLY INSERT.
ATTENTION: POUR EVITER LES CHOCS ELECTRIQUES, INTRODUIRE LA LAME LA PLUS LARGE DE LA FICHE DANS LA BORNE CORRESPONDANTE DE LA PRISE ET POUSSER JUSQU'AU FOND.
NOTE:
This equipment has been tested and found to comply with the limits for a Class B digital device, pursuant to Part 15 of the FCC Rules. These limits are designed to provide reasonable protection against harmful interference in a residential installation. This equipment generates, uses and can radiate radio frequency energy and, if not installed and used in accordance with the instructions, may cause harmful interference to radio communications. However, there is no guarantee that interference will not occur in a particular installation. If this equipment does cause harmful interference to radio or television reception, which can be determined by tuning the equipment off and on, the user is encouraged to try to correct the interference by one or more of the following measures:
- Reorient or relocate the receiving antenna.
- Increase the separation between the equipment and receiver.
- Connect the equipment into an outlet on a circuit different from that to which the receiver is connected.
- Consult the dealer or an experienced radio/TV technician for help.
NOTE:
Changes or modifications not expressly approved by the party responsible for compliance could void the user's authority to operate the equipment.
IMPORTANT SAFETY INSTRUCTIONS
READ BEFORE OPERATING EQUIPMENT
This product was designed and manufactured to meet strict quality and safety standards. There are, however, some installation and operation precautions which you should be particularly aware of.
- Read Instructions
All the safety and operating instructions should be read before the product is operated. - Retain Instructions
The safety and operating instructions should be retained for future reference. - Heed Warnings
All warnings on the product and in the operating instructions should be adhered to. - Follow Instructions
All operating and use instructions should be followed. - Cleaning
Unplug this product from the wall outlet before cleaning. Do not use liquid cleaners or aerosol cleaners. Use a damp cloth for cleaning. - Attachments
Do not use attachments not recommended by the product manufacturer as they may cause hazards. - Water and Moisture
Do not use this product near water-for example, near a bath tub, wash bowl, kitchen sink, or laundry tub, in a wet basement, or near a swimming pool, and the like. -
Accessories
Do not place this product on an unstable cart, stand, tripod, bracket, or table.
The product may fall, causing serious injury to a child or adult, and serious damage to the product. Use only with a cart, stand, tripod, bracket, or table recommended by the manufacturer, or sold with the product. Any mounting of the product should follow the manufacturer's instructions, and should use a mounting accessory recommended by the manufacturer. -
A product and cart combination should be moved with care. Quick stops, excessive force, and uneven surfaces may cause the product and cart combination to overturn.

- Ventilation
Slots and openings in the cabinet are provided for ventilation and to ensure reliable operation of the product and to protect it from overheating, and these openings must not be blocked or covered. The openings should never be blocked by placing the product on a bed, sofa, rug, or other similar surface. This product should not be placed in a built-in installation such as a bookcase or rack unless proper ventilation is provided or the manufacturer's instructions have been adhered to.
- Power Sources
This product should be operated only from the type of power source indicated on the marking label. If you are not sure of the type of power supply to your home, consult your product dealer or local power company. For products intended to operate from battery power, or other sources, refer to the operating instructions.
- Grounding or Polarization
This product may be equipped with a polarized alternating current line plug (a plug having one blade wider than the other). This plug will fit into the power outlet only one way. This is a safety feature. If you are unable to insert the plug fully into the outlet, try reversing the plug. If the plug should still fail to fit, contact your electrician to replace your obsolete outlet. Do not defeat the safety purpose of the polarized plug.
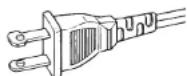
AC POLARIZED PLUG
13. Power-Cord Protection
Power-supply cords should be routed so that they are not likely to be walked on or pinched by items placed upon or against them, paying particular attention to cords at plugs, convenience receptacles, and the point where they exit from the product.
14. Protective Attachment Plug
The product is equipped with an attachment plug having overload protection. This is a safety feature.
See Instruction Manual for replacement or resetting of protective device. If replacement of the plug is required, be sure the service technician has used a replacement plug specified by the manufacturer that has the same overload protection as the original plug.
15. Outdoor Antenna Grounding
If an outside antenna or cable system is connected to the product, be sure the antenna or cable system is grounded so as to provide some protection against voltage surges and built-up static charges. Article 810 of the National Electrical Code, ANSI/NFPA 70, provides information with regard to proper grounding of the mast and supporting structure, grounding of the lead-in wire to an antenna-discharge unit, size of grounding conductors, location of antenna discharge unit, connection to grounding electrodes, and requirements for the grounding electrode. See Figure 1.
16. Lightning
For added protection for this product during a lightning storm, or when it is left unattended and unused for long periods of time, unplug it from the wall outlet and disconnect the antenna or cable system.
This will prevent damage to the product due to lightning and power-line surges.
17. Power Lines
An outside antenna system should not be located in the vicinity of overhead power lines or other electric light or power circuits, or where it can fall into such power lines or circuits. When installing an outside antenna system, extreme care should be taken to keep from touching such power lines or circuits as contact with them might be fatal.
18. Overloading
Do not overload wall outlets, extension cords, or integral convenience receptacles as this can result in a risk of fl re or electric shock.
19. Object and Liquid Entry
Never push objects of any kind into this product through openings as they may touch dangerous voltage points or short-out parts that could result in a fire or electric shock. Never spill liquid of any kind on the product.
20. Servicing
Do not attempt to service this product yourself as opening or removing covers may expose you to dangerous voltage or other hazards. Refer all servicing to qualified service personnel.
21. Damage Requiring Service
Inplug this product from the wall outlet and refer servicing to qualified service personnel under the following conditions:
a. When the power-supply cord or plug is damaged.
b. If liquid has been spilled, or objects have fallen into the product.
c. If the product has been exposed to rain or water.
d. If the product does not operate normally by following the operating instructions. Adjust only those controls that are covered by the operating instructions as an improper adjustment of other controls may result in damage and will often require extensive work by a qualified technician to restore the product to its normal operation.
e. If the product has been dropped or damaged in any way, and
f. When the product exhibits a distinct change in performance this indicates a need for service.
22. Replacement Parts
When replacement parts are required, be sure the service technician has used replacement parts specified by the manufacturer or have the same characteristics as the original part. Unauthorized substitutions may result in fire, electric shock, or other hazards.
23. Safety Check
Upon completion of any service or repairs to this product, ask the service technician to perform safety checks to determine that the product is in proper operating condition.
24. Wall or Ceiling Mounting
The product should be mounted to a wall or ceiling only as recommended by the manufacturer.
25. Heat
The product should be situated away from heat sources such as radiators, heat registers, stoves, or other products (including amplifiers) that produce heat.
FIGURE 1
EXAMPLE OF ANTENNA GROUNDING AS PER NATIONAL ELECTRICAL CODE, ANSI/NFPA 70
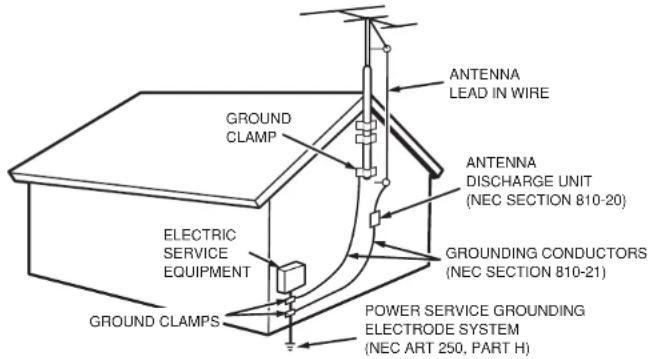
NEC - NATIONAL ELECTRICAL CODE
This Class B digital apparatus complies with Canadian ICES-003.
DECLARATION OF CONFORMITY
This device complies with Part 15 of the FCC rules. Operation is subject to the following conditions: (1) This device may not cause harmful interference, and (2) this device must accept any interference received, including interference that may cause undesired operation.
U.S. Responsible Party: Marantz America, Inc.
100 Corporate Drive,
Mahwah, NJ, 07430, U.S.A.
TEL: 630-741-0300
Type of Product: Video Selector
Model:
VS3002
VS_070912U1
ENGLISH
WARRANTY
For warranty information, contact your local Marantz distributor.
RETAIN YOUR PURCHASE RECEIPT
Your purchase receipt is your permanent record of a valuable purchase. It should be kept in a safe place to be referred to as necessary for Insurance purposes or when corresponding with Marantz.
IMPORTANT
When seeking warranty service, it is the responsibility of the consumer to establish proof and date of purchase. Your purchase receipt or invoice is adequate for such proof.
FOR U.K. ONLY
This undertaking is in addition to a consumer's statutory rights and does not affect those rights in any way.
FRANÇAIS
GARANTIE
VS3002 is in conformity with the EMC directive and low-voltage directive.

Français
Do not expose the equipment to rain, moisture, dripping or splashing.
Do not remove the cover from the equipment.
Do not insert anything into the equipment through the ventilation holes.
Do not handle the mains cord with wet hands.
Do not cover the ventilation with any items such as tablecloths, newspapers, curtains, etc.
No naked flame sources, such as lighted candles, should be placed on the equipment.
When disposing of used batteries, please comply with governmental regulations or environmental public instruction's rules that apply in your country or area.
No objects fi lled with liquids, such as vases, shall be placed on the equipment.
When the switch is in the OFF position, the equipment is not completely switched off from MAINS.
The equipment shall be installed near the power supply so that the power supply is easily accessible.
Do not expose the unit to excessive heat such as direct sunlight, fire or the like.
Français
AVERTISSEMENTS
Thank you very much for purchasing this Marantz Video Selector.
Before using this unit, please read the User Guide carefully to ensure proper operation of the unit, and retain it together with the supplied warranty.
■ Accessories Check
Before use, check the below accessories were included in the package.
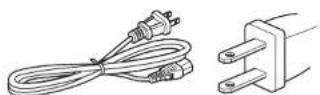
- AC power cord (U.S.A.) x 1 This plug has polarity. One pin is thicker than the other.
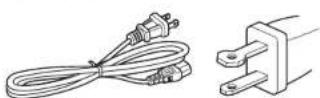
• AC power cord (Europe) x 1 This plug has round pins.
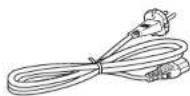
- AC power cord (Japan) x 1 The pins on both sides are the same shape.
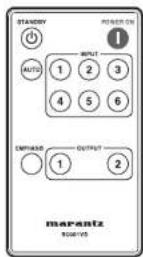
- Remote controller (battery included) × 1
- User Guide (This manual) × 1
- Warranty Card (U.S.A.) U.S.A. x 1 Canada x 1
- Warranty (for Japan) × 1
CONTENTS
FEATURES....2
BEFORE USING ....2
EQUIPMENT MAINS WORKING SETTING 2
COPYRIGHT 2
NAMES AND FUNCTIONS ....4
FRONT PANEL 4
REAR PANEL 5
REMOTE CONTROLLER 6
CONNECTIONS 7
CONNECTING TO DEVICES WITH HDMI JACKS 7
REMOTE CONTROL CONNECTION 8
CONNECTING THE POWER CORD 8
BASIC OPERATIONS ....9
-
TURNING ON THE POWER 9
-
SELECTING THE INPUT SIGNAL 9
-
SELECTING THE OUTPUT DEVICE 9
-
TURNING OFF THE POWER 9
OTHER FUNCTIONS ....10
AUTO INPUT FUNCTION (AUTO) 10
SPECIFICATIONS AND DIMENSIONS ....14
OTHERS....15
FEATURES

● Incorporates HDMI technology
HDMI (v1.3 with Deep Color, "x.v.Color", Dolby True HD)
HDMI
HDMI, the HDMigh-Definition
Multimedia Interface are trademarks or registered trademarks of HDMI Licensing LLC.
● Equipped with six HDMI Input jacks
Equipped with six input jacks, so that up to six different input devices can be connected.
● Equipped with two HDMI output jacks
Equipped with two output jacks. This enables the display to be switched between two different devices, such as a TV and projector, using a switch and without having to replace the cables.
● Enables stable signal switching
● Reduces noise in video and audio output signals (emphasis function)
Any generated noise is canceled out by switching the emphasis function on and off.
● Automatic input mode switching function (auto input function)
Detects cable connections and disconnections and the power being turned on and off to the connected devices, enabling automatic switching between input devices.
● Equipped with an RS-232C control jack that supports custom installation
● Equipped with a control jack that supports remote control systems (compatible with Marantz products)
● Equipped with a FLASHER IN Jack
BEFORE USING
This section must be read before any connection is made to the mains supply.
EQUIPMENT MAINS WORKING SETTING
Your Marantz product has been prepared to comply with the household power and safety requirements that exist in your area.
— Power requirements (U.S.A.)
AC 120V 60Hz
— Power requirements (Europe)
AC 230V 50/60Hz
— Power requirements (Japan)
AC 100V 50/60Hz
COPYRIGHT
Recording and playback of any material may require consent. For further information refer to the following:
— Copyright Act 1956
— Dramatic and Musical Performers Act 1958
— Performers Protection Acts 1963 and 1972
— Any subsequent statutory enactments and orders
A NOTE ABOUT RECYCLING

This product's packaging materials are recyclable and can be reused. This product and the accessories packed together are the applicable product to the WEEE directive except batteries.
Please dispose of any materials in accordance with your local recycling regulations.
When discarding the unit, comply with your local rules or regulations.
Batteries should never be thrown away or incinerated but disposed of in accordance with your local regulations concerning chemical wastes.
BEFORE USING
■ Operation of remote controller
Please make sure the below instructions are followed when operating your remote controller.
- Do not spill water or any other liquid on your remote controller.
- Do not drop, apply excessive impact on your remote controller.
- Do not leave your remote controller in a place such as;
- At high humidity/temperature (near heater, bathroom)
- At extremely low temperature
- Dusty
● Before using your remote controller
Note that your remote controller is provided with lithium battery and can be operative after removing insulation sheet.
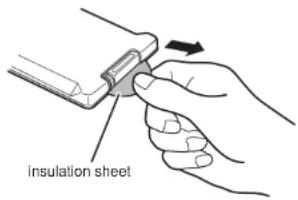
● Handling battery
Improper handling of lithium battery may cause heat generation, ignition or bursting, so be sure to follow the below instructions when handling the lithium battery.
- The supplied battery is provided to check the functionality of your remote controller.
- Use only battery type CR2025.
- Do not recharge your battery.
- Do not handle roughly or disassemble your battery.
- When you replace your battery, be sure to insert the battery with polarity (+)(-) correctly.
- Do not place your battery in any place where it will be subjected to direct sunlight or high temperature.
- Keep your battery out of the reach of children. In case of accidental ingestion, immediately consult a doctor.
- Leaky battery should be disposed immediately. If the liquid is spilt on your skin or cloth, you can get a skin burn, so be sure to handle leaky battery carefully. When the solution adheres to the skin and/or clothes, wash it with water and consult a doctor.
- At disposal of used batteries, insulate terminal parts by winding with tape. Dispose the battery away from fire in accordance with applicable local regulations.
● Battery replacement
If you find that the remote controller must be used closer to the unit than usual, the battery may have weakened. Replace the battery with a new one.
- Move the part shown by the arrow to the right using a sharp edge such as your fingernail.
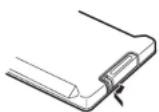
- Pull out the battery case.
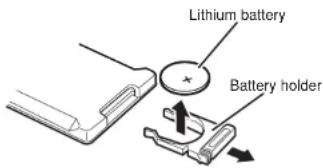
-
Replace the old lithium battery with a new one. The positive terminal should face upward.
-
Slide the holder into the remote controller.
● Remote-controllable range
Operate the unit with the remote controller within the range of the illustration below.
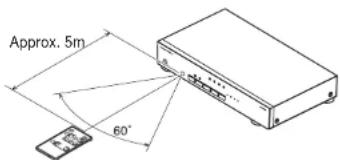
Remote controller
Precautions:
- Do not allow direct sunlight, an inverter fluorescent light or other strong source of light to shine onto the player's infrared signal reception window (remote sensor). Otherwise, the operation of the remote control unit may be disabled.
- Bear in mind that operating the remote control unit may cause other devices operated by infrared rays to be operated by mistake.
- The remote control unit cannot be operated if the space between the controller and the player's remote sensor is obstructed.
- Do not place any objects on top of the remote control unit. Doing so may cause one or more buttons to be held down which will cause the batteries to run down.
NAMES AND FUNCTIONS
FRONT PANEL
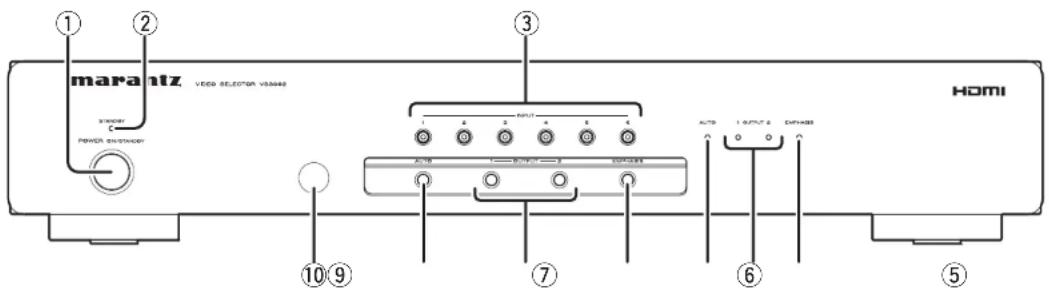
① POWER ON/STANDBY button
Switches between power on and off (standby). Press the button to turn on the power. Press it again to enter STANDBY mode.
② STANDBY indicator
Lights up in red when the unit is in STANDBY mode.
③ INPUT buttons 1 to 6 with indicators
Press to select INPUT 1 to 6. When you press the button, the corresponding indicator on each button lights up in red.
④ EMPHASIS Indicator
Lights up in yellow when the emphasis function of the unit is on.
⑤ OUTPUT indicators 1 and 2
When you press OUTPUT button 1 or 2, the corresponding indicator lights up in red.
⑥ AUTO indicator
Lights up in blue when the auto input function of the unit is on.
⑦ EMPHASIS button
Press to switch on or off the emphasis function of the unit.
⑧ OUTPUT buttons 1 and 2
Press to select OUTPUT 1 or 2.
⑨ AUTO button
Press to turn on the auto input function of the unit. When you press the button for 3 seconds or longer, the key lock function turns on.
⑩ Infrared receiver
Receives the infrared control signal from the remote controller.
④
⑧
NAMES AND FUNCTIONS
REAR PANEL
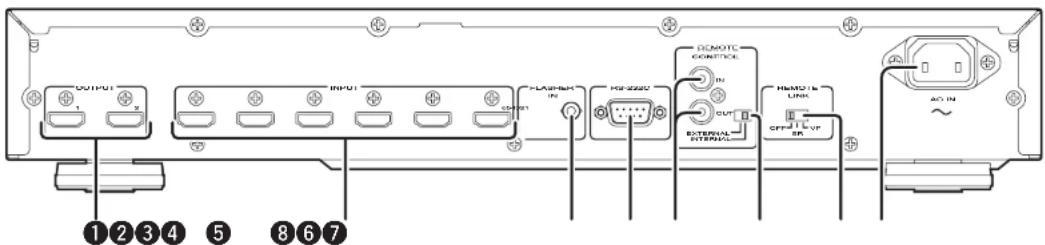
① HDMI OUTPUT Jacks 1 and 2
HDMI output jacks. There are two jacks, which can be connected to the HDMI input jacks of devices such as TVs, projectors and amps.
② HDMI INPUT jacks 1 to 6
HDMI input jacks. There are six jacks, which can be connected to the HDMI output jacks of devices such as videos and computers.
③ FLASHER IN Jack
This jack is for the external operation of the unit. It is not used when using the unit by itself.
④ RS-232C jack
A control jack for custom installers.
⑤ REMOTE CONTROL IN/OUT Jack
Connects to Marantz products that are equipped with a REMOTE CONTROL (RC-5) jack. Use when you want to perform system control of the unit with the remote controller.
6 INTERNAL/EXTERNAL switch
A switch that selects the reception method for the remote controller signal. When using the REMOTE CONTROL jack and FLASHER IN jack to control the unit from an external device, set the switch to "EXTERNAL." When using the unit by itself, set the switch to "INTERNAL." When the switch is set to "EXTERNAL," signals from the remote controller cannot be received.
⑦ REMOTE LINK switch
A switch that selects the device to which to apply the remote link function.
When you press INPUT button 1 to 6 after setting this switch, the set device is switched automatically to HDMI input from other input modes.
⑧ Power cord jack
Connect the supplied power cord to the unit and then connect the cord to a power outlet.
Note:
To prevent accidents, install in a position where the power cord can be removed from the unit. Three power cord types are supplied. Use the type that is appropriate for your region. (See page 1)
NAMES AND FUNCTIONS
REMOTE CONTROLLER
flowchart
graph TD
    A["STANDBY"] --> B["POWER ON"]
    B --> C["INPUT 1 2 3"]
    B --> D["OUTPUT 1 2"]
    E["AUTO"] --> F["1 2 3"]
    G["EMPHASIS"] --> H["1 2"]
    I["1"] --> J["2"]
    K["2"] --> L["3"]
    M["4"] --> N["5"]
    O["6"] --> P["1"]
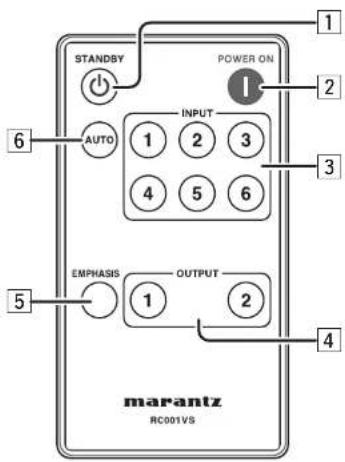
1| STANDBY button
While the power to the unit is on, press to switch the unit to STANDBY mode.
2 POWER ON button
Press to turn on the power to the unit.
3 INPUT buttons 1 to 6
Press to select INPUT 1 to 6.
4 OUTPUT buttons 1 and 2
Press to select OUTPUT 1 or 2.
5 EMPHASIS button
Press to switch on or off the emphasis function of the unit.
6 AUTO button
Press to turn on the auto input function of the unit.
CONNECTIONS
Notes:
- Before connecting, be sure to switch off the unit and the other devices to be connected.
- Use cables that are appropriate for the devices to be connected.
- When connecting, fully insert the plugs into the jacks. Plugs that are not fully inserted could cause a malfunction.
- Be sure to hold the plug when pulling out a cable. If you hold the cable itself when pulling it out, it could damage the cable and cause a connection defect.
- Read carefully the instructions of the device to be connected before performing the connections.
CONNECTING TO DEVICES WITH HDMI JACKS
■ Connecting to devices with HDMI output jacks
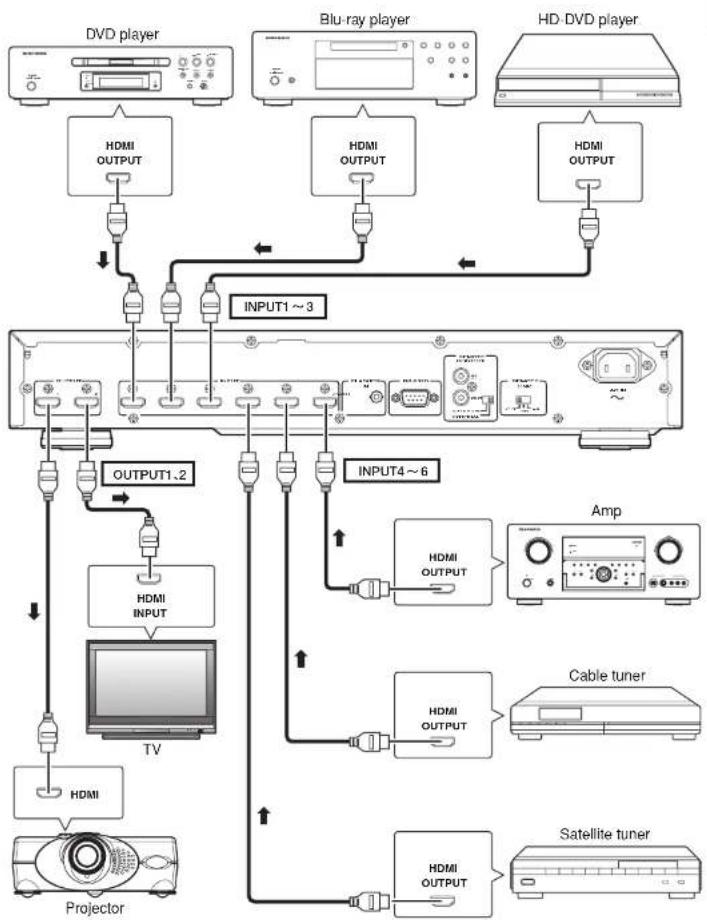
The unit is equipped with six HDMI input jacks. Connect to devices that are equipped with HDMI output jacks (for example, DVD players, Blu-ray players, HD-DVD players, satellite tuners, cable tuners, amps).
- Connect one end of the HDMI cable to one of the INPUT 1 to 6 jacks on the rear panel of the unit.
- Connect the other end of the HDMI cable to the HDMI output jack of the output device.
■ Connecting to devices with HDMI input jacks
The unit is equipped with two HDMI output jacks. Connect to devices that are equipped with HDMI input jacks (for example, video projectors, plasma TVs, LCD TVs, amps).
- Connect one end of the HDMI cable to OUTPUT jack 1 or 2 on the rear panel of the unit.
- Connect the other end of the HDMI cable to the HDMI input jack of the input device.
flowchart
graph TD
    A["DVD player"] --> B["HDMI OUTPUT"]
    C["Blu-ray player"] --> D["HDMI OUTPUT"]
    E["HD-DVD player"] --> F["HDMI OUTPUT"]
    G["TV"] --> H["HDMI INPUT"]
    I["Projector"] --> J["HDMI"]
    K["OUTPUT1~3"] --> L["INPUT4~6"]
    M["OUTPUT1.2"] --> N["HDMI INPUT"]
    O["Amp"] --> P["HDMI OUTPUT"]
    Q["Cable tuner"] --> R["HDMI OUTPUT"]
    S["Satellite tuner"] --> T["HDMI OUTPUT"]
CONNECTIONS
REMOTE CONTROL CONNECTION
If you connect the remote control jack of the unit to the remote control jack of another Marantz product, you can perform remote control of the connected devices as though they were a single system.
- When using the unit by itself, set the INTERNAL/EXTERNAL switch of the unit to "INTERNAL."
● When controlling a connected device from the unit
- Connect the REMOTE CONTROL OUT jack of the unit to the REMOTE CONTROL IN jack of the connected device.
- At this time, set the INTERNAL/EXTERNAL switch of the unit to "INTERNAL."
- When controlling the unit from a connected device
- Connect the REMOTE CONTROL IN jack of the unit to the REMOTE CONTROL OUT jack of the connected device.
- At this time, set the INTERNAL/EXTERNAL switch of the unit to "EXTERNAL." The remote controller infrared receiver of the unit is disabled and you can operate the unit through the remote controller infrared receiver of the connected device.
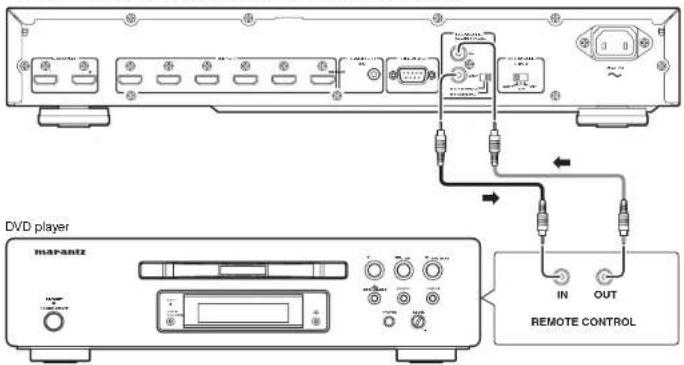
When controlling a connected device from the unit (set to INTERNAL)
When controlling the unit from a connected device (set to EXTERNAL)
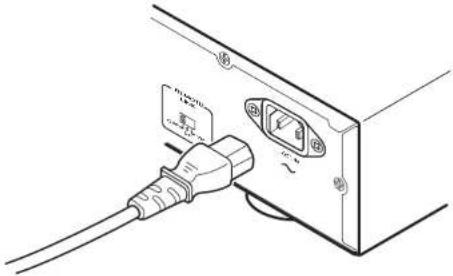
- Insert the supplied power cord into the power cord jack on the rear panel of the unit.
natural_image
Line drawing of a cable inserted into a device with two ports and a plug (no text or symbols)- Turn on the power switch of the connected device.
- Insert the power cord plug into an outlet.
The STANDBY indicator on the front panel lights up in red and the unit enters standby.
Notes:
- Make sure that the AC power cord is fully inserted into the power cord jack.
• Three AC power cord types are supplied.
Use the cord type that is appropriate for your country. (See page 1)
[When Using In the U.S. or Canada]
Use the power cord whose plug has polarity and where one pin is thicker than the other. [When Using In Europe]
Use the power cord with the round pins.
[When Using in Japan]
Use the power cord with the flat pins that are the same shape on both sides. - Do not touch the power cord with wet hands.
- When disconnecting the power cord, always make sure that you take hold of the plug. Yanking out or bending the cord can damage it and/or cause electric shocks or a fire.
BASIC OPERATIONS
Select an output device that is connected to the unit.
OUTPUT buttons 1 and 2
OUTPUT
buttons 1
and 2
Press the POWER ON/STANDBY button on the unit or the POWER ON button on the remote controller. The power to the unit is turned on and the STANDBY indicator on the front panel goes off.
2. SELECTING THE INPUT SIGNAL
Select an input device that is connected to the unit.
INPUT buttons 1 to 6
Press OUTPUT button 1 or 2 on the unit or the remote controller.
The output device corresponding to the number of the pressed button is selected and the indicator on the front panel lights up in red.
Note:
When OUTPUT 1 (OUTPUT 2) is selected, video and audio are not output from OUTPUT 2 (OUTPUT 1).
Press one of the INPUT buttons from 1 to 6 on the unit or the remote controller.
The input device corresponding to the number of the pressed button is selected and the indicator on the button lights up in red.
Press the POWER ON/STANDBY button on the unit or the STANDBY button on the remote controller.
The unit enters standby and the STANDBY indicator on the front panel lights up in red.
Notes:
- Do not pull out the power cord while the power to the unit is on. Doing so could cause a malfunction.
- The power to the unit is not completely turned off while in standby. If you will not use the unit for a long time, pull out the power cord from the outlet.
OTHER FUNCTIONS
AUTO INPUT FUNCTION (AUTO)
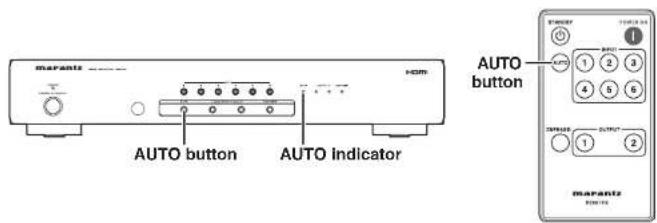
Press the AUTO button on the unit or the remote controller to turn on the auto input function. The AUTO indicator on the front panel lights up in blue.
When the auto input function is on, the unit monitors the input signals of the connected devices. When the unit detects a new input signal, the input is automatically switched to the corresponding device.
This function enables the unit's input device to be automatically switched simply by connecting or disconnecting cables or by turning on the power to a connected device.
The auto input function is on when the unit is shipped.
● Turning off the auto input function
Press one of the INPUT buttons from 1 to 6 on the unit or the remote controller. The auto input function is turned off and the AUTO indicator on the front panel goes off.
Notes:
- The auto input function may not operate correctly with some connected devices.
- When the auto input function is on, you cannot turn it off by pressing the AUTO button again.
KEY LOCK FUNCTION
When you press the AUTO button of the unit for 3 seconds or longer, the key lock function turns on.
When the key lock function turns on, the front panel buttons lock, and the unit can only be operated using the remote controller.
Press the AUTO button for 3 seconds or longer again to turn off the key lock function.
EMPHASIS FUNCTION
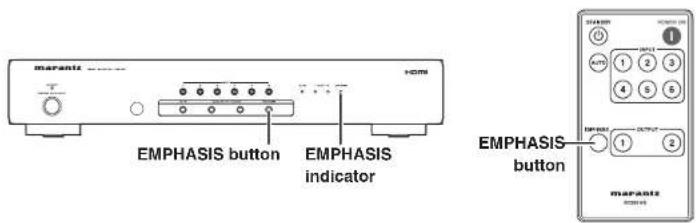
Press the EMPHASIS button on the unit or the remote controller to turn on the emphasis function. The EMPHASIS indicator on the unit lights up in yellow. Press the EMPHASIS button again to turn off the function.
When the emphasis function is on, if a signal that was input to the unit is then output again, the signal is corrected before being output. This is useful when noise is generated in the output video or audio. The effectiveness of this function depends on the connected devices and the length and type of cables that are used. In particular, we recommend trying this function when the output cable from the unit is 5 meters or longer. The effectiveness of this function may also depend on your system. Test out your system when the function is on and the function is off, and compare the results.
The emphasis function is off when the unit is shipped.
Notes:
- Sometimes, turning the emphasis function on or off makes no difference. (For example, when the accuracy of the input signal is good.)
- If using this function has no significant effect, replace the cable with a shorter one.
OTHER FUNCTIONS
REMOTE LINK FUNCTION
When you perform the remote control connections for a Marantz amp or projector and set the REMOTE LINK switch, the set device is switched automatically to HDMI input from other input modes.
If you do not need to automatically switch the HDMI input, set the REMOTE LINK switch to "OFF".
The switch is set to "OFF" when the unit is shipped.
● The models (made by Marantz) that support the remote link function are as follows. (As of September 2007)
- Amps SR4002, SR5002, SR7002, SR8002
- Projectors VP-10S1*, VP-11S1, VP-11S1H, VP-11S2, VP-12S2*, VP-12S3*,
VP-12S4, VP-15S1
(* Devices that require an HDMI-DVI conversion connector)
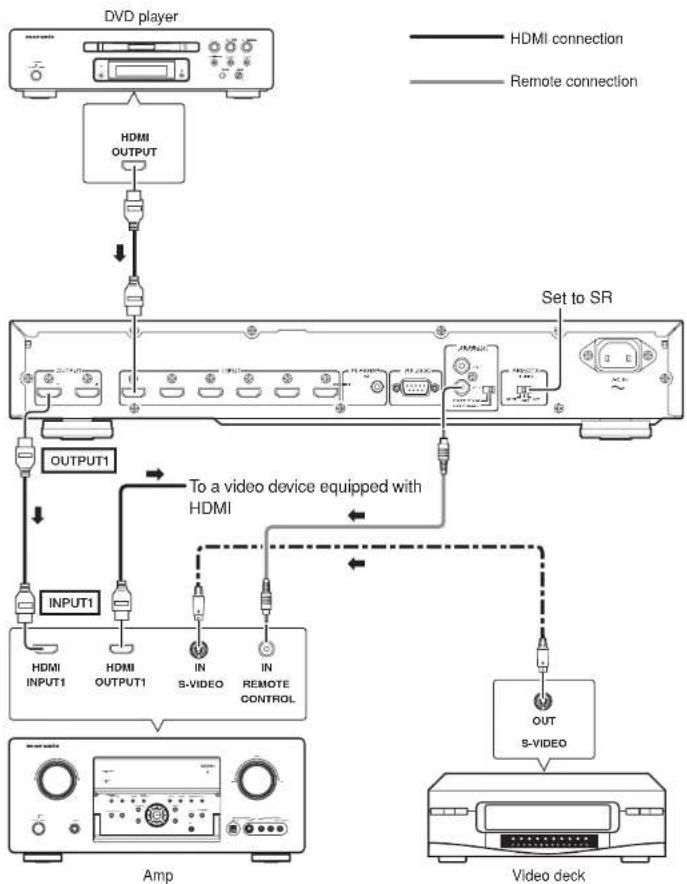
■ When you want to control an amp:
Set the REMOTE LINK switch to "SR"
- Connect the unit and the amp. Connect the HDMI INPUT 1 jack of the amp to the OUTPUT 1 jack of the unit.
Note:
This function only works when the HDMI INPUT 1 jack of an amp made by Marantz is connected to the OUTPUT 1 jack of the unit. It will not function correctly when other jacks are connected.
- Perform the remote control connections for the unit and the amp.
- Set the REMOTE LINK switch on the rear panel of the unit to "SR."
- When you press INPUT button 1 to 6 on the unit or remote controller, the amp is switched automatically to HDMI input from other input modes (the S-Video jack in the connection diagram).
flowchart
graph TD
    A["DVD player"] --> B["HDMI OUTPUT"]
    B --> C["Output1"]
    C --> D["To a video device equipped with HDMI"]
    D --> E["AMP"]
    E --> F["Video deck"]
    G["OUTPUT1"] --> D
    H["INPUT1"] --> D
    I["S-VIDEO"] --> D
    J["IN"] --> D
    K["OUT"] --> L["S-VIDEO"]
    M["Set to SR"] --> N["Output"]
    style A fill:#f9f,stroke:#333
    style G fill:#ccf,stroke:#333
    style H fill:#cfc,stroke:#333
    style I fill:#fcc,stroke:#333
    style J fill:#cff,stroke:#333
    style K fill:#ffc,stroke:#333
    style L fill:#fcc,stroke:#333
OTHER FUNCTIONS
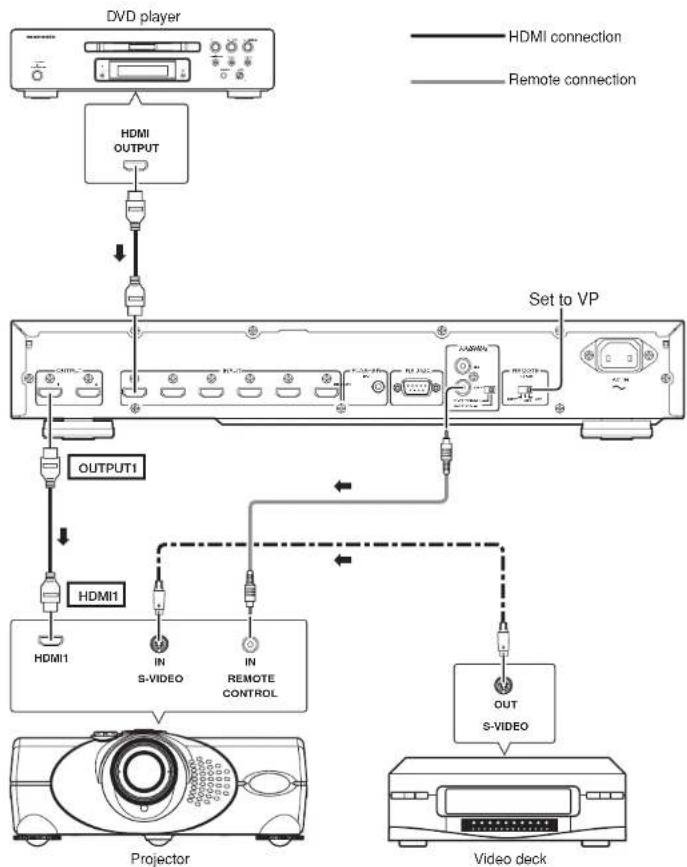
■ When you want to control a projector:
Set the REMOTE LINK switch to "VP"
- Connect the unit and the projector. Connect the HDMI1 of the projector and OUTPUT 1 jack of the unit.
Note:
This function only works when the HDMI1 jack of a projector made by Marantz is connected to the OUTPUT 1 jack of the unit. It will not function correctly when other jacks are connected.
- Perform the remote control connections for the unit and the projector.
- Set the REMOTE LINK switch on the rear panel of the unit to "VP."
- When you press INPUT button 1 to 6 on the unit or remote controller, the projector is switched automatically to HDMI input from other input modes (the S-Video jack in the connection diagram).
flowchart
graph TD
    A["DVD player"] --> B["HDMI OUTPUT"]
    B --> C["Output1"]
    C --> D["HDMI1"]
    D --> E["S-VIDEO"]
    D --> F["IN"]
    F --> G["Remote CONTROL"]
    G --> H["OUT"]
    H --> I["S-VIDEO"]
    I --> J["Video deck"]
    style A fill:#f9f,stroke:#333
    style J fill:#ccf,stroke:#333
TROUBLESHOOTING
Try the following troubleshooting before calling for service.
- Are the connections made properly?
- Are you operating the unit properly, following the instructions?
If the unit does not operate properly, check the items shown in the following table.
If any trouble cannot be solved by the instructions below, malfunction of the internal circuitry is suspected; immediately unplug the AC power cord and contact Marantz dealer or service center.
| Symptom Cause Solution | ||
| The power does not turn on. | Is the power cord disconnected? Properly insert the power cord. | |
| The power is on but there is no video or audio output. | Is the signal cable properly connected to the input jack? Properly connect the signal cable to the input jack. | |
| Is the input of the connected device selected? | Press one of the buttons from INPUT 1 to 6 on the unit or the remote controller to select the input of the connected device. | |
| Is the output of the connected device selected? | Press OUTPUT button 1 or 2 on the unit or the remote controller to select the output of the connected device. | |
| The video or audio is distorted. | Is the signal cable properly connected? Properly connect the signal cable. | |
| The remote controller does not work. | Is the battery worn out? Replace with a new battery. | |
| Are the unit and remote controller too far apart? Operate the remote controller closer to the unit. | ||
| Is there an obstruction between the unit and remote controller? Remove the obstruction. | ||
| Is the INTERNAL/EXTERNAL switch on the rear panel of the unit set to "EXTERNAL"? | Set the INTERNAL/EXTERNAL switch to "INTERNAL." | |
| The auto input function does not work. | Is the auto input function turned off? | Press the AUTO button on the unit or the remote controller to turn on the auto input function. |
| The emphasis function does not work. | Is the emphasis function turned off? | Press the EMPHASIS button on the unit or the remote controller to turn on the emphasis function. |
| Is the connection cable too long? (10 m or more) Replace the cable with a shorter one. | ||
| The remote link function does not work. | Does the connected device support the remote link function? See the description of the remote link function on page 11. | |
| Is the remote control cable disconnected? Properly connect the remote control cable to the input and output jacks. | ||
| Is the HDMI output cable connected to a jack other than INPUT 1 of the amp or HDMI1 of the projector? | Connect the HDMI output cable to INPUT 1 of the amp or HDMI1 of the projector. | |
SPECIFICATIONS AND DIMENSIONS
Electrical System
Input and output signals
HDMI INPUT 6 jacks (Ver. 1.3b, single link only)
HDMI OUTPUT 2 jacks (Ver. 1.3b, single link only)
REMOTE CONTROL IN ....1 jack (RCA)
REMOTE CONTROL OUT ....1 jack (RCA)
FLASHER IN.... 1 jack (3.5 φ mini jack)
Power requirement (U.S.A.) AC 120V 60Hz
(Europe) AC 230V 50/60Hz
(Japan) AC 100V 50/60Hz
Power consumption 5 W / 0.8 W (during standby)
Others
Operating temperature and humidity .....5 to 35°C / 30 to 85% (no condensation allowed)
Storage temperature and humidity ......-20 to 60°C / 30 to 85% (no condensation allowed)
● Maximum External Dimensions (Unit)
Width 440mm (17-3/8 inch)
Height 78mm (3-1/8 inch)
Depth 340mm (13-7/16 inch)
Mass (unit) 3.2kg (7.1 lbs)
● Supplied Items
- AC power cord
For the U.S. 1
For Europe....1
For Japan....1
- Remote controller (battery included)
- Instruction manual....1
• Warranty card (for the U.S.)
U.S.A....1
Canada....1
- Warranty (for Japan) ....1
● Dimensions (Unit: mm (inch))
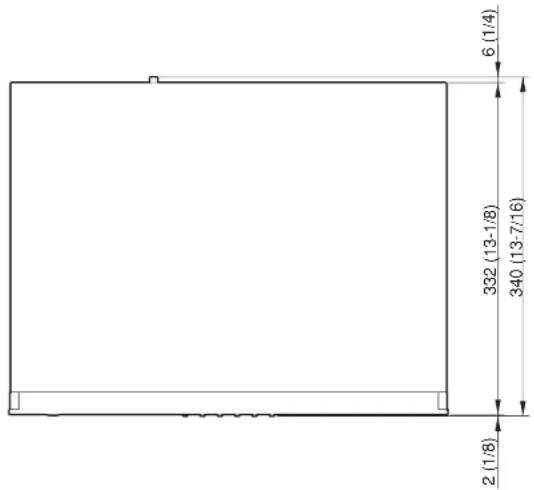
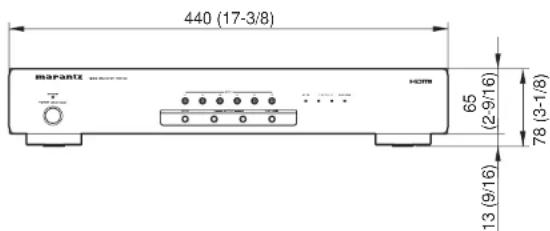
Design and specifications are subject to change without notice.
OTHERS
The section describes the care and maintenance tasks that must be performed to optimize the operation of your Marantz equipment.
■ Cleaning of equipment external surfaces
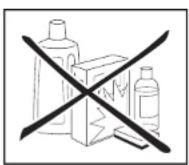
The exterior finish of your unit will last indefinitely with proper care and cleaning. Never use scouring pads, steel wool, scourging powders or harsh chemical agents (e.g., lye solution), alcohol, thinner, benzine, insecticide or other volatile substances as these wil mar the finish of the equipment. Likewise, never use cloths containing chemical substances. If the equipment get dirty, wipe the external surfaces with a soft, lint-free cloth.
If the equipment becomes heavily soiled:
- dilute some washing up liquid in water, in a ratio of one part detergent to six parts water.
- dip a soft, lint free in the solution and wring the it is damp.
- wipe the equipment with the damp cloth.
- dry the equipment by wiping it with a dry cloth.
■ Repairs
Only the most competent and qualified service technicians should be allowed to service the factory-trained warranty station personnel have the knowledge and special facilities needed for repair and calibration of this precision equipment. After the warranty period has expired, repairs will be performed for a charge if the equipment can be returned to normal operation.
In the event of difficulty, refer to your dealer or write directly to the nearest location to you that is listed on the Marantz Authorized Service Station list. If writing, please include the model and serial number of the equipment together with a full description of what you think is abnormal about the equipment's behaviour.
www.marantz.com
You can find your nearest authorized distributor or dealer on our website.
marantz®
is a registered trademark.

- WARNING
- NOTE:
- IMPORTANT SAFETY INSTRUCTIONS
- Power-Cord Protection
- Protective Attachment Plug
- Outdoor Antenna Grounding
- Lightning
- Power Lines
- Overloading
- Object and Liquid Entry
- Servicing
- Damage Requiring Service
- Replacement Parts
- Safety Check
- Wall or Ceiling Mounting
- Heat
- DECLARATION OF CONFORMITY
- ENGLISH
- WARRANTY
- RETAIN YOUR PURCHASE RECEIPT
- IMPORTANT
- FOR U.K. ONLY
- FRANÇAIS
- GARANTIE
- AVERTISSEMENTS
- ■ Accessories Check
- CONTENTS
- FEATURES
- HDMI
- BEFORE USING
- EQUIPMENT MAINS WORKING SETTING
- COPYRIGHT
- A NOTE ABOUT RECYCLING
- ■ Operation of remote controller
- ● Before using your remote controller
- ● Handling battery
- ● Battery replacement
- ● Remote-controllable range
- Precautions:
- NAMES AND FUNCTIONS
- FRONT PANEL
- ① POWER ON/STANDBY button
- ② STANDBY indicator
- ③ INPUT buttons 1 to 6 with indicators
- ④ EMPHASIS Indicator
- ⑤ OUTPUT indicators 1 and 2
- ⑥ AUTO indicator
- ⑦ EMPHASIS button
- ⑧ OUTPUT buttons 1 and 2
- ⑨ AUTO button
- ⑩ Infrared receiver
- REAR PANEL
- ① HDMI OUTPUT Jacks 1 and 2
- ② HDMI INPUT jacks 1 to 6
- ③ FLASHER IN Jack
- ④ RS-232C jack
- ⑤ REMOTE CONTROL IN/OUT Jack
- INTERNAL/EXTERNAL switch
- ⑦ REMOTE LINK switch
- ⑧ Power cord jack
- REMOTE CONTROLLER
- CONNECTIONS
- Notes:
- CONNECTING TO DEVICES WITH HDMI JACKS
- ■ Connecting to devices with HDMI output jacks
- ■ Connecting to devices with HDMI input jacks
- REMOTE CONTROL CONNECTION
- ● When controlling a connected device from the unit
- - When controlling the unit from a connected device
- BASIC OPERATIONS
- OUTPUT buttons 1 and 2
- SELECTING THE INPUT SIGNAL
- OTHER FUNCTIONS
- ● Turning off the auto input function
- KEY LOCK FUNCTION
- REMOTE LINK FUNCTION
- Set the REMOTE LINK switch to "SR"
- ■ When you want to control a projector:
- Set the REMOTE LINK switch to "VP"
- TROUBLESHOOTING
- SPECIFICATIONS AND DIMENSIONS
- Electrical System
- Others
- ● Maximum External Dimensions (Unit)
- ● Supplied Items
- ● Dimensions (Unit: mm (inch))
- ■ Cleaning of equipment external surfaces
- ■ Repairs
Brand : MARANTZ
Model : VS3002
Category : Hi-Fi System