
KG48X - Range hood BERTAZZONI - Free user manual and instructions
Find the device manual for free KG48X BERTAZZONI in PDF.


| Product type | Decorative island range hood |
| Brand | Bertazzoni |
| Model | KG48X |
| Width | 122 cm (48 inches) |
| Height | 60 - 110 cm (adjustable) |
| Depth | 53 cm |
| Net weight | 35 kg |
| Electrical supply | 220-240 V / 50 Hz |
| Maximum power | 400 W |
| Max airflow | 850 m³/h |
| Max noise level | 68 dB(A) |
| Number of speeds | 4 (including one intensive) |
| Filter type | Washable aluminum grease filter + activated charcoal filter (optional) |
| Lighting | LED, 2 x 3 W |
| Controls | Touchscreen with remote control |
| Recirculation function | Yes (with charcoal kit) |
| Extraction function | Yes, duct Ø 150 mm |
| Installation | Island or wall-mounted, adjustable height |
| Maintenance | Dishwasher-safe grease filter, clean glass surface with mild cleaner |
| Repairability index | 7.5/10 |
Frequently Asked Questions - KG48X BERTAZZONI
User questions about KG48X BERTAZZONI
0 question about this device. Answer the ones you know or ask your own.
Ask a new question about this device
Download the instructions for your Range hood in PDF format for free! Find your manual KG48X - BERTAZZONI and take your electronic device back in hand. On this page are published all the documents necessary for the use of your device. KG48X by BERTAZZONI.
USER MANUAL KG48X BERTAZZONI
K41AMLF1XE.UA
KG48X
K31AMLF1XE.UA
KG36X
K71AMLF1XE.UA
KG30X
Hood User manual
Fig.2 Fig.3
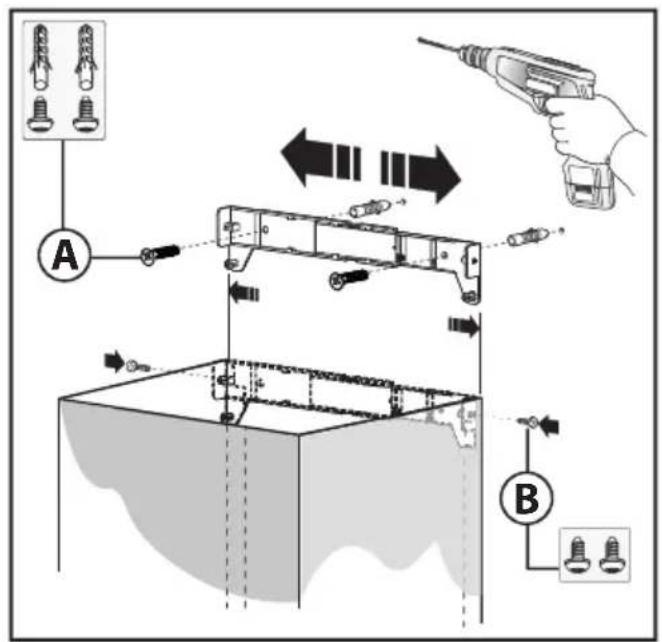
Fig.4 Fig.5
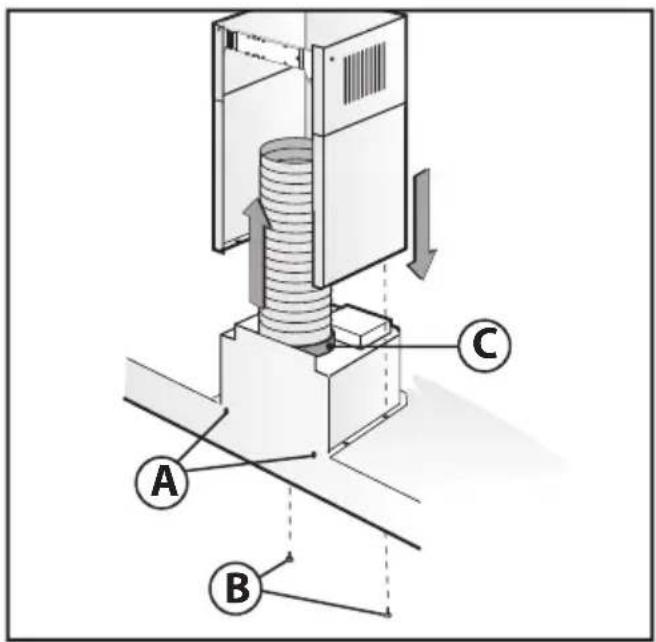
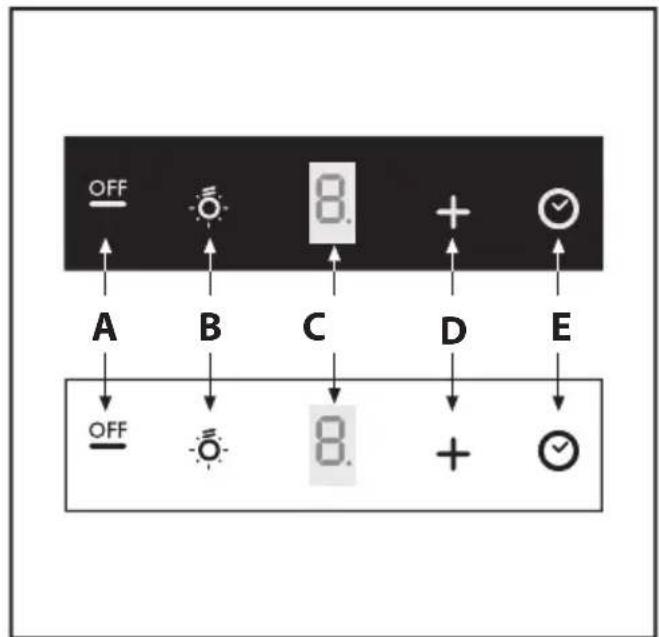
Fig.6
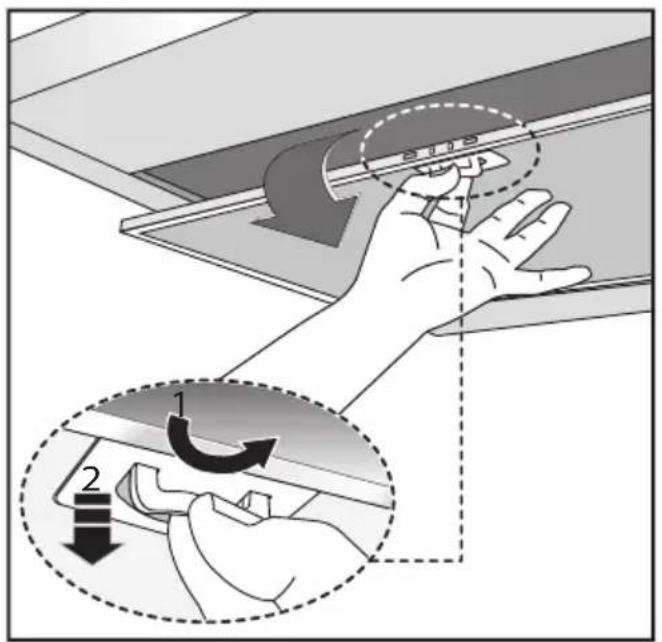
Fig.7 Fig.8
natural_image
Illustration of a hand using a tool to interact with a device inside a container (no text or symbols visible)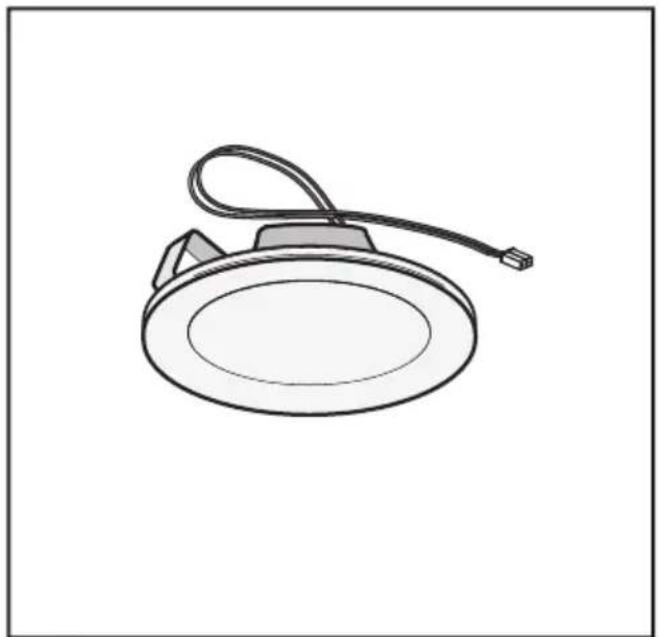
natural_image
Line drawing of a ceiling-mounted device with a cable and connector (no text or symbols)Fig.9
■ IMPORTANT SAFETY INSTRUCTIONS.
■ READ AND SAVE THESE INSTRUCTIONS.
■ PLEASE READ ENTIRE INSTRUCTIONS BEFORE PROCEEDING.
■ IMPORTANT: Save these Instructions for the Local Electrical Inspectors use.
■ INSTALLER: Please leave these Instructions with this unit for the owner.
■ OWNER: Please retain these instructions for future reference.
■ Take care when using cleaning agents or detergents.
■ Suitable for use in household cooking area.
■ WARNING - To reduce the risk of fire or electric shock, do not use this fan with any Solid-State Speed Control Device.
■ CAUTION - To reduce risk of fire and to properly exhaust air, be sure to duct air outside – Do not vent exhaust air into spaces within walls or ceilings or into attics, crawl spaces, or garages.
■ CAUTION - For general ventilating use only. Do not use to exhaust hazardous or explosive materials and vapors.
■ CAUTION - To avoid motor bearing damage and noisy and/or unbalanced impellers, keep drywall spray, construction dust, etc. off power unit.
■ CAUTION - Please read specification label on product for further information and requirements.
■ WARNING – TO REDUCE THE RISK OF FIRE, ELECTRIC SHOCK, OR INJURY TO PERSONS, OBSERVE THE FOLLOWING:
A. Use this unit only in the manner intended by the manufacturer. If you have questions, contact the manufacturer.
B. Before servicing or cleaning unit, switch power off at service panel and lock the service disconnecting means to prevent power from being switched on accidentally. When the service disconnecting means cannot be locked, securely fasten a prominent warning device, such as a tag, to the service panel.
■ WARNING - TO REDUCE THE RISK OF A RANGE TOP GREASE FIRE:
A. Never leave surface units unattended at high settings. Boilovers cause smoking and greasy spillovers that may ignite. Heat oils slowly on low or medium settings.
B. Always turn hood ON when cooking at high heat or when flambeing foods (i.e. Crepes
Suzette, Cherries Jubilee, Peppercorn Beef Flambè).
C. Clean ventilating fans frequently. Grease should not be allowed to accumulate on fan or filter.
D. Use proper pan size. Always use cookware appropriate for the size of the surface element.
E. Keep fan, filters and grease laden surface clean.
F. Use high range setting on range only when necessary. Heat oil slowly on low to medium setting.
G. Don't leave range unattended when cooking.
H. Always use cookware and utensils appropriate for the type and amount off food being prepared.
■ WARNING – TO REDUCE THE RISK OF INJURY TO PERSONS IN THE EVENT OF A RANGE TOP GREASE FIRE, OBSERVE THE FOLLOWING a:
A. SMOTHER FLAMES with a close-fitting lid, cookie sheet, or metal tray, then turn off the burner. BE CAREFUL TO PREVENT BURNS. If the flames do not go out immediately, EVACUATE AND CALL THE FIRE DEPARTMENT.
B. NEVER PICK UP A FLAMING PAN – You may be burned.
C. DO NOT USE WATER, including wet dishcloths or towels – a violent steam explosion will result.
D. Use an extinguisher ONLY if:
- You know you have a Class ABC extinguisher, and you already know how to operate it.
- The fire is small and contained in the area where it started.
- The fire department is being called.
- You can fight the fire with your back to an exit.
^a Based on “kitchen firesafety tips” published by NFPA.
Proper maintenance of the Range Hood will assure proper performance of the unit.
■ INSTALLATION INSTRUCTIONS
WARNING – TO REDUCE THE RISK OF FIRE, ELECTRIC SHOCK, OR INJURY TO PERSONS, OBSERVE THE FOLLOWING:
A. Installation work and electrical wiring must be done by qualified person(s) in accordance with all applicable codes and standards, including fire-rated construction.
B. Sufficient air is needed for proper combustion and exhausting of gases through the flue (chimney) of fuel burning equipment to prevent back drafting. Follow the heating equipment manufacturer's guideline and safety standards such as those published by the National Fire Protection Association (NFPA), and the American Society for Heating, Refrigeration and Air Conditioning Engineers (ASHRAE), and the local code authorities.
C. When cutting or drilling into wall or ceiling, do not damage electrical wiring and other hidden utilities.
D. Ducted fans must always be vented to the outdoors.
E. This unit must be grounded.
■ WARNING - TO REDUCE THE RISK OF FIRE, USE ONLY METAL DUCTWORK.
■ WARNING - UNDER CERTAIN CIRCUMSTANCES DOMESTIC APPLIANCES MAY BE DANGEROUS.
A. Do not check filters with hood working.
B. Do not touch the lamps after a prolonged use of the appliance.
C. No food must be cooked flambè underneath the hood.
D. The use of an unprotected flame is dangerous for the filters and could cause fires.
E. Watch constantly the fried food in order to avoid the cooking oil flares up.
F. Before performing any maintenance operation, disconnect the hood from the electrical service.
■ The manufacturers will not to accept any responsibility for eventual damages, because of failure to observe the above instructions.
■ INSTALLATION INSTRUCTIONS.
■ OPERATING INSTRUCTION.
■ READ AND SAVE THESE INSTRUCTIONS.
GENERAL
Carefully read the following important information regarding installation safety and maintenance. Keep this information booklet accessible for further consultations. The appliance has been designed for use in the ducting version (air exhaust to the outside - Fig.1B).
■ INSTALLATION INSTRUCTIONS
• Power Supply Connection:
For connection to the power supply refer to the follows Fig.8:
BLACK = L line
WHITE = N neutral
GREEN/YELLOW = G ground
A double-pole switch properly rated must be installed to provide the range hood power supply disconnection. The appliance must be installed at a minimum height of 26 inches (66 cm) from an electric cooker stove, or 30 inches (76 cm) from gas or combined cooker stoves. If a connection ductwork composed of two parts is used, the upper part must be placed outside the lower part. Do not connect the range hood exhaust duct air to the same duct air used to exhaust hot air or fumes from other appliances other than electrical. Before proceeding with the assembly operations, remove the anti-grease filter(s) (Fig.7) so that the unit is easier to handle.
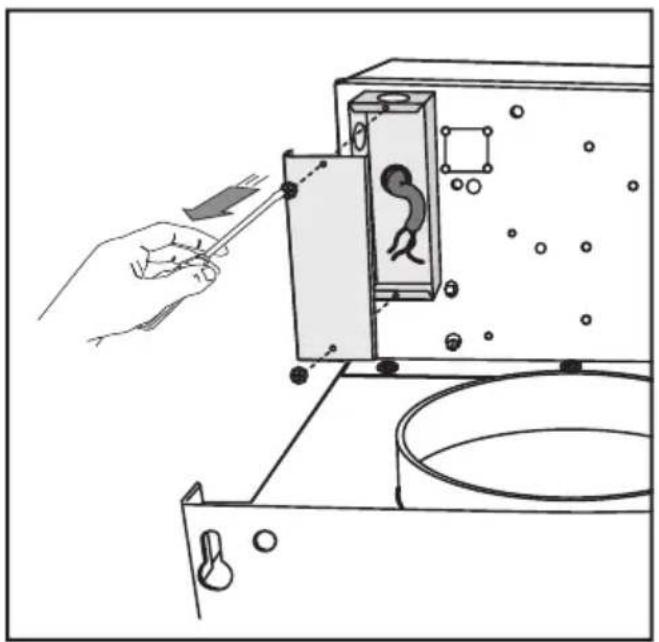
■ WARNING - TO REDUCE THE RISK OF FIRE, ELECTRIC SHOCK, OR INJURY TO PERSONS, OBSERVE THE FOLLOWING: Before making electrical connections to power supply, the electrical box must be secured in place as indicated in Fig.1.
- Before installing the appliance fix the electrical box as indicated in Fig.1:
- Remove the central screw Fig.1A.
- Lift the electrical plant box Fig.1B.
- Remove the 3 fixed screws Fig.1C.
- Position the electrical box so it is in line with the holes of the previously removed screws Fig.1D and tighten.
- Pay attention that the tear tape of the electrical box is inside the slot and then tighten screw Fig.1E.
- Fixing to the wall:
Drill the holes A respecting the distances indicated (Fig.3). Fix the appliance to the wall and align it in horizontal position to the wall units. When the appliance has been adjusted, definitely fix the hood using the screws A (Fig.5). For the various installations use screws and screw anchors suited to the type of wall (e.g. reinforced concrete, plasterboard, etc.). If the screws and screw anchors are provided with the product, check that they are suitable for the type of wall on which the hood is to be fixed.
• Fixing the decorative telescopic flue:
Arrange the electrical power supply within the dimensions of the decorative flue. If your appliance is to be installed in the ducting version or in the version with external motor, prepare the air exhaust opening. Adjust the width of the support bracket of the upper flue (Fig.4). Then fix it to the ceiling using the screws A (Fig.4) in such a way that it is in line with your hood and respecting the distance from the ceiling indicated in Fig.3. Connect the flange C to the air exhaust hole using a connection pipe (Fig.5). Insert the upper flue into the lower flue. Fix the lower flue to the hood using the screws B provided (Fig.5), extract the upper flue up to the bracket and fix it with the screws B (Fig.4).
USE
- The apparatus is equipped with the following controls (Fig.6):
Push-button A = On/off cooker hood switch. The appliance switches on at speed level 1, If the cooker hood is on depress the push-button for 2 sec. to switch off the cooker hood. If the cooker hood is at speed level 1 it will not be necessary to depress the push-button to switch the cooker hood off. Decreases the motor speed.
Push-button B = On/off lights switch.
Display C = Indicates the motor speed level selected and activates the timer.
Push-button D = Switches on the cooker hood. Increases the motor speed. Touching the key at 3rd speed, the intensive function runs for 10', then the appliance go back to work at the original speed. During this function the display blinks.
Key E = The Timer times the functions on activation for 15 minutes, after which they are switched off. The Timer is deactivated by re-pressing Key E. When the Timer is activated the decimal point must flash on the display. The Timer cannot be activated if the intensive speed is functioning.
The “clean air” function is activated by pressing key E for 2 seconds when the appliance is switched off. This switches the motor on for 10 minutes every hour at the first speed. During functioning a rotary movement of the peripheral segments must be visualised on the display. When this time has passed the motor switches off and the fixed letter “C” must be visualised on the display until the motor re-starts after 50 minutes for another 10 minutes and so on. Press any key apart from the light keys to return to normal functioning. Press key E to deactivate the function.
• Active carbon/grease filter saturation:
- When display item C flashes, at a speed where it alternates with the letter F (e.g. 1 and F), the grease filters must be washed.
- When display item C flashes, at a speed where it alternates with the letter A (e.g. 1 and A), the carbon filters must be replaced.
After the clean filter has been positioned correctly, the electronic memory must be reset by pressing button A for approximately 5 seconds, until the indication F or A shown on the display C stops flashing.
MAINTENANCE
- We recommend that the range hood is switched on before any food is cooked. We also
recommend that the appliance is left running for 15 minutes after the food is cooked, in order to thoroughly eliminate all contaminated air.
The effective performance of the range hood depends on constant maintenance; the anti-grease filter and the active carbon filter both require special attention.
- The anti-grease filter is used to trap any grease particles suspended in the air, therefore is subject to saturation (the time it takes for the filter to become saturated depends on the way in which the appliance is used).
- To prevent potential fire hazards, the anti-grease filters should be washed a minimum of every 2 months (it is possible to use the dishwasher for this task).
- After a few washes, the colour of the filters may change. This does not mean they have to be replaced.
If the replacement and washing instructions are not followed, the anti-grease filters may present a fire hazard.
- The active carbon filters are used to purify the air which is released back into the room. The filters are not washable or re-usable and must be replaced at least once every four months. The active carbon filter saturation level depends on the frequency with which the appliance is used, the type of cooking performed and the regularity with which the anti-grease filters are cleaned.
- Clean the range hood frequently, both inside and outside, using a cloth which has been dampened with denatured alcohol or neutral, non-abrasive liquid detergents.
- The light on the range hood is designed for use during cooking and not for general room illumination. Extended use of the light reduces the average duration of the bulb.
- Replacing light Leds "1.1 W" (Fig.9):
Replace the bulbs with new ones of the same type.
■ INSTRUCTIONS DE SECURITE IMPORTANTES.
■ POUR UN USAGE DOMESTIQUE EXCLUSIVEMENT.
■ LIRE ET CONSERVER LES INSTRUCTIONS.
■ COMMENCER PAR LIRE ENTIEREMENT LES INSTRUCTIONS.
natural_image
Symbolic logo featuring a stylized plant with leaves and a circular element containing a euro symbol (no text or numbers present)- Proper maintenance of the Range Hood will assure proper performance of the unit.
- ■ INSTALLATION INSTRUCTIONS
- GENERAL
- • Power Supply Connection:
- ■ WARNING - TO REDUCE THE RISK OF FIRE, ELECTRIC SHOCK, OR INJURY TO PERSONS, OBSERVE THE FOLLOWING: Before making electrical connections to power supply, the electrical box must be secured in place as indicated in Fig.1.
- - Fixing to the wall:
- • Fixing the decorative telescopic flue:
- USE
- - The apparatus is equipped with the following controls (Fig.6):
- • Active carbon/grease filter saturation:
- MAINTENANCE
Brand : BERTAZZONI
Model : KG48X
Category : Range hood