
34707 - Loudspeaker MONOPRICE - Free user manual and instructions
Find the device manual for free 34707 MONOPRICE in PDF.


| Product Type | 2-Way In-Ceiling Speaker |
| Brand | Monoprice |
| Model | 34707 |
| Woofer | 8" Aramid Fiber Cone |
| Tweeter | 0.75" Titanium Silk Dome |
| Nominal Impedance | 8 Ohms |
| Power Handling (RMS) | 80 Watts |
| Power Handling (Peak) | 160 Watts |
| Frequency Response | 49 Hz – 20 kHz |
| Sensitivity (1m/2.83V) | 90 dB ±2 dB |
| Crossover Frequency | 12 dB/octave @ 2.1 kHz |
| Cut-Out Diameter | ∅9.65" (∅245 mm) |
| Overall Diameter | ∅11.1" (∅281 mm) |
| Mounting Depth | 3.6" (92 mm) |
| Mounting Thickness Range | 3/8" – 1-1/4" |
| Grille | Removable, Paintable, Magnetic |
| High-Frequency Roll-Off Switch | 0 dB, -3 dB, -6 dB |
| Speaker Wire Connection | Push Terminals (accepts bare wire up to 14 AWG) |
| Recommended Wire | 14 AWG, In-Wall Rated |
| Indoor Use Only | Yes |
Frequently Asked Questions - 34707 MONOPRICE
User questions about 34707 MONOPRICE
0 question about this device. Answer the ones you know or ask your own.
Ask a new question about this device
Download the instructions for your Loudspeaker in PDF format for free! Find your manual 34707 - MONOPRICE and take your electronic device back in hand. On this page are published all the documents necessary for the use of your device. 34707 by MONOPRICE.
USER MANUAL 34707 MONOPRICE
34706 Monoprice Caliber Slim In-Ceiling Speakers, 6.5in Fiber 2-Way (pair)
34707 Monoprice Caliber Slim In-Ceiling Speakers, 8in Fiber 2-Way (pair)
34708 Monoprice Caliber Slim In-Wall Speakers, 6.5in Fiber 2-Way (pair)
34709 Monoprice Caliber Slim In-Wall Speakers, 8in Fiber 2-Way (pair)
User's Manual
CONTENTS
SAFETY WARNINGS AND GUIDELINES....3
INTRODUCTION....4
FEATURES....4
CUSTOMER SERVICE....4
PACKAGE CONTENTS 5
IN-WALL VERSUS IN-CEILING SPEAKERS 5
SPEAKER BREAK-IN 5
SPEAKER WIRE PREPARATION....6
PAINTING....7
INSTALLATION 8
TECHNICAL SUPPORT 10
HIGH-FREQUENCY ROLL-OFF....10
SPECIFICATIONS....11
SAFETY WARNINGS AND GUIDELINES
• These speakers are intended for indoor use only.
- Do not expose these speakers to water or moisture of any kind.
- If operating these speakers in a humid environment, ensure that no condensation occurs. Condensation could cause damage to the speaker cones and voice coils.
- Power off and unplug all Audio/Video components when making wired connections. Only apply power after all connections have been made.
- Double-check all connections prior to applying power to ensure that speaker polarity is properly made and that there are no stray wire strands, which could short the connections, either on the backs of the speakers or the AV receiver/amplifier.
- Do not use full volume until after the speakers have been fully broken-in.
- If you hear distortion, reduce the volume until the distortion is no longer audible. Distortion can sound like a buzzing, scratching, or hammering sound. Distortion can damage to or destroy the delicate speaker coils.
- Do not use cleaning fluids, solvents, or other chemicals to clean the speaker frames or grilles.
- Do not use excessive volume when listening to these speakers. If you experience pain, discomfort, or dizziness, reduce volume immediately. Prolonged exposure to excessive volume can cause permanent hearing damage.
- Do not disassemble or attempt to service these speakers.
- You must use speaker wire rated for in-wall use.
- Do not attempt to install these speakers near power outlets, wall switches, or ceiling fixtures. These objects indicate the presence of AC power lines within the wall or ceiling and should be avoided.
- When checking for the presence of objects behind the wall, do not try to force the wire past obstructions.
- Always check and adhere to your local building and fire safety codes before installing these speakers and running wires through the walls and ceiling.
INTRODUCTION
Thank you for purchasing these In-Wall/In-Ceiling Speakers!
In-wall/In-ceiling speakers are the ideal combination of sound quality and styling. Rather than cluttering the room with large box speakers trailing speaker wires, the speakers are virtually invisible, while filling the room with high fidelity audio. Featuring removable and paintable grilles, these speakers use aramid fiber woofers for superior bass and mid-range reproduction and silk/titanium tweeters for pronounced and articulate highs.
FEATURES
- Aramid fiber woofer
- Silk/Titanium tweeter
• 8-ohms nominal impedance - Removable and paintable grilles
CUSTOMER SERVICE
The Monoprice Customer Service department is dedicated to ensuring that your ordering, purchasing, and delivery experience is second to none. If you have any problem with your order, please give us an opportunity to make it right. You can contact a Monoprice Customer Service representative through the Live Chat link on our website
www.monoprice.com during normal business hours (Mon-Fri: 5am-7pm PT, Sat-Sun: 9am-6pm PT) or via email at support@monoprice.com
PACKAGE CONTENTS
Please take an inventory of the package contents to ensure you have all the items listed below. If anything is missing or damaged, please contact Monoprice Customer Service for a replacement.
1x 2-way in-wall/ceiling speaker
1x Installation template/paint mask
1x User's manual
IN-WALL VERSUS IN-CEILING SPEAKERS
In-Wall and In-Ceiling speakers are identical in concept and differ only in their form. Wall speakers are traditionally square, like windows and doors, while ceiling speakers are traditionally round, like light fixtures. The instructions in this manual specify installation into a wall, but the same procedures apply to ceiling installations.
SPEAKER BREAK-IN
In the same way that a new car requires a break-in period before it can be safely operated at high engine RPMs, speakers require a break-in period before they can be safely operated at maximum volume levels. Proper break-in ensures that the moving parts of the speaker (the cone and cone suspension) are allowed to flex and soften, losing the initial stiffness and allowing the speaker to move through its full intended range. After the break-in period, the speakers will produce richer and fatter sounding lows, warmer and smoother sounding mids, and cleaner and more accurate highs, without any hint of distortion.
The best way to break-in speakers is simply to play normal music or watch movies at moderate volume levels. The amount of time required for speaker break-in varies based on the operating environment, but is typically in the area of 50\~80 hours. It will take a bit longer in a cold or dry environment and a little less time in a warm or humid environment.
Note that the break-in period does not have to be continuous.
SPEAKER WIRE PREPARATION
Before attempting to make any connections it is best to look at the situation, get all the necessary materials together, and then make all the connections at once.
First, look at the back of your amplifier or receiver to determine what options it offers for making connections. Amplifiers and receivers typically employ either 5-way binding posts, spring-loaded terminals, or push terminals for the speaker connections.
A 5-way binding post can accept bare speaker wire, spade plugs, pin plugs, and banana plugs, while spring loaded terminals and push terminals can accept either bare speaker wire or pin plugs. Refer to the documentation that came with your amplifier or receiver to determine the maximum size/gauge speaker wire the speaker terminals can accept.
The in-ceiling speakers feature push terminals, which can accept pin plugs or bare wire up to 14AWG. The in-wall speakers feature blade connectors. You should use .250" 16-14AWG crimp style blue female disconnects (not included) on the speaker end of the speaker wire.
If your amplifier can accept it, you should use 14AWG speaker wire. Using pin plugs is highly recommended for several reasons. Plugs are easier to connect, don't run the risk of stray wire strands shorting the connections, allow for use of heavier gauge speaker wire in most cases, and it is much easier to identify the polarity from a color coded ring on a plug then from a subtle marking along the length of a wire.
Because the speaker wires will necessarily be run through your walls, you must use in-wall rated wire. This is required by fire safety codes and ensures that the wire jacket will not act as an accelerant in the event of a fire.
Rather than using fixed length speaker wires, it is best to get a roll and cut the wires to the length you will need them. This ensures that there is a minimum amount of excess wire. However, even if your amplifier is off-center, the lengths of wire used for each speaker pair should be identical. This keeps the impedance on each channel the same, which ensures that the volume levels, frequency ranges, and tonalities are identical. Any excess wire should be snaked back and forth, not coiled, to avoid creating an inductor/antenna for stray radio signals.
Before making the actual connections, cut each length of wire to size. Note the markings on the wire that differentiate between each conductor. Sometimes the marking clearly
identifies a positive and negative side. Some common clearly positive and negative markings or identifiers are:
| Positive | Negative |
| Red | Black |
| Copper | Silver |
| +++ | --- |
In many cases, the mark is a single stripe on the jacket of one of the connectors. In this
case the side with the stripe is generally
considered the positive side, but it really does not matter as long as you are consistent and always using the stripe as positive or always using it as negative.
When you are ready to prepare your speaker wires, first separate about 4" of wire, then strip
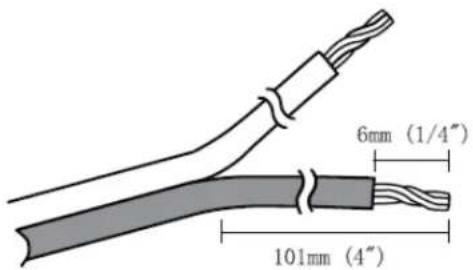
about 1/4" (6mm) insulation from the end and twist it to prevent stray strands. If you plan to use banana or pin plugs (highly recommended), install the plugs on the wire.
PAINTING
The grille and frame can be painted to match your walls, making the speaker even less noticeable. Perform the following steps to safely paint them without damaging the speaker.
-
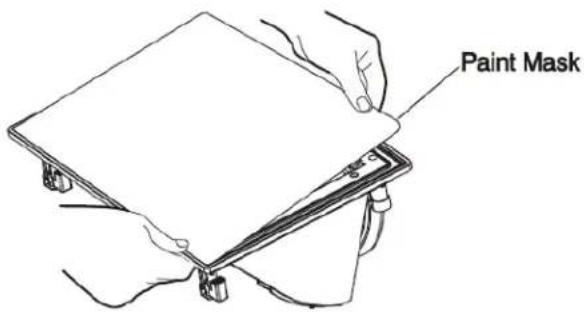
Remove the center portion of the cardboard installation template/paint mask. The central portion is the paint mask, while the outer portion is the installation template.
-
Completely remove the grille by inserting a paper clip or the included grille removal tool into one of the holes and pulling to lift it off the frame.
-
Remove the foam insert and set it aside.
- Insert the paint mask, covering the speaker while leaving the frame exposed.
- Paint the speaker frame and grille. It is best to use spray paint to avoid paint clogging the holes in the grille.
- Allow the paint to completely dry before proceeding with installation.
Ensure that the holes in the grille are not blocked by paint.
INSTALLATION
Perform the following steps to install the speaker onto a wall composed of drywall. Note that the same procedures apply to ceiling installations. The speaker can be mounted to a surface that is between 3/8" and 1-1/4" thick, with at least 4" internal clearance.
- Determine where you will be installing the speaker. Use a stud finder to ensure that there is sufficient space between the desired location and the adjacent studs. Be sure and check for horizontal framing members, as well. Use a pencil to mark the edges of the adjacent studs.
- If you have not already done so, remove the center portion of the cardboard installation template/paint mask and set it aside. The central portion is the paint mask, while the outer portion is the installation template.
- Position the installation template against the wall at the installation location.
- Use a carpenter's level to ensure that the template is level.
- Use a pencil to mark the cut line on the wall.

natural_image
Line drawing of a hand holding a rectangular object with a pen inserted, no text or symbols present- Remove the template from the wall and set it aside.
- Use the level again to check the cut lines to ensure that they are level. Repeat steps 3-6 as necessary until the cut lines are level.
- Drill a small hole in the middle of the cutout area. If the proposed installation location is not clear, you can more easily repair the small hole than if you cut without checking and find one or more obstructions.
- Take a stiff piece of wire, such as a hanger, and bend it 90^ about 8" from the end. Insert the wire past the bend, then rotate the wire 360^ to check for hidden obstructions behind the wall. Push it in to ensure that there is sufficient clearance behind the wall or ceiling.
- Once you know your installation location is clear, use a drywall or keyhole saw to cut along the cut lines.
- If you have not already done so, prepare your speaker wire in accordance with the guidelines in the Speaker Wire Preparation section above.
Important! Because the speaker wire will necessarily be routed through your walls, you must use in-wall rated speaker wire. - Route your speaker wire from the back of your amplifier, through the wall, to the installation location.
- If you have not already done so, completely remove the grille, which is held in place with magnets for ease of removal.
- Depress the positive/red push terminal on the back of the speaker and insert the bare wire lead or pin plug into the hole on the side of the terminal. Release the terminal.
- Depress the negative/black push terminal and insert the bare wire lead or pin plug into the hole on the side of the terminal. Release the terminal.
- Give a gentle tug on each lead to ensure that they are securely connected to the terminals.
- Ensure that the mounting tabs on the speaker assembly are turned inwards.
-
Position the speaker into the hole.
-
Using a #2 Phillips screwdriver, tighten each mounting screw to turn the mounting tabs back outward. Continue tightening until the mounting tabs are firmly against the back of the wall and the speaker is secure. Do not over-tighten the screws to avoid damage to the mounting tabs.
- Ensure that your amplifier is powered off and unplugged from the power source.
- Connect the amplifier end of the speaker wire to one of the speaker level outputs on your amplifier, taking care to match the polarity markings on the speaker wire or plugs.
Congratulations, your speaker is installed and ready for use!
TECHNICAL SUPPORT
Monoprice is pleased to provide free, live, online technical support to assist you with any questions you may have about installation, setup, troubleshooting, or product recommendations. If you ever need assistance with your new product, please come online to talk to one of our friendly and knowledgeable Tech Support Associates. Technical support is available through the online chat button on our website www.monoprice.com during regular business hours, 7 days a week. You can also get assistance through email by sending a message to tech@monoprice.com
This speaker is equipped with a high-frequency roll-off option, which can be used to attenuate the high-frequency response. If the speaker sounds too "bright", perform the following steps to set the high-frequency roll-off.
- Pull the edge of the grille to remove it.
- Using a flat-bladed screwdriver, turn the high-frequency roll-off switch to the -3dB or -6dB position. The default is 0dB (no attenuation).
- Replace the grille onto the speaker body.
SPECIFICATIONS
| Model | 34706 | 34707 |
| Speaker Type | 2-way in-ceiling speakers | 2-way in-ceiling speakers |
| Nominal Impedance | 8 ohms | 8 ohms |
| Woofers | 6.5" aramid fiber cone | 8" aramid fiber cone |
| Tweeter | 0.75" Titanium silk | 0.75" Titanium silk |
| Power Handling Capacity | 50 watts RMS100 watts peak | 80 watts RMS160 watts peak |
| Frequency Response | 56Hz ~ 20kHz | 49Hz ~ 20kHz |
| Sensitivity (1.0m/2.83V) | 89dB ±2dB | 90dB ±2dB |
| Crossover | 12dB @ 2.2kHz | 12dB @ 2.1kHz |
| Cut-Out Dimensions | ∅8.07" (∅205 mm) | 9.65" (∅245 mm) |
| Overall Dimensions | ∅9.6" (∅245 mm) | ∅11.1" (∅281 mm) |
| Mounting Depth | 3.3" (83 mm) | 3.6" (92 mm) |
| Model | 34708 | 34709 |
| Speaker Type | 2-way in-wall speakers | 2-way in-wall speakers |
| Nominal Impedance | 8 ohms | 8 ohms |
| Woofers | 6.5" aramid fiber cone | 8" aramid fiber cone |
| Tweeter | 1" Titanium silk | 1" Titanium silk |
| Power Handling Capacity | 50 watts RMS100 watts peak | 80 watts RMS160 watts peak |
| Frequency Response | 56Hz ~ 20kHz | 50Hz ~ 20kHz |
| Sensitivity (1.0m/2.83V) | 88dB ±2dB | 89dB ±2dB |
| Crossover | 12dB @ 2.3kHz | 12dB @ 2.3kHz |
| Cut-Out Dimensions | 6.69" x 10.63"(170 x 270 mm) | 8.70" x 12.74"(221 x 324 mm) |
| Overall Dimensions | 7.7" x 11.7"(196 x 296 mm) | 9.7" x 13.8"(247 x 349 mm) |
| Mounting Depth | 2.9" (74mm) | 3.7" (93mm) |
Brand : MONOPRICE
Model : 34707
Category : Loudspeaker