ZIC30GNNII - Refrigerator Monogram - Free user manual and instructions
Find the device manual for free ZIC30GNNII Monogram in PDF.


| Product type | Built-in refrigerator |
| Brand | Monogram |
| Model | ZIC30GNNII |
| Width | 76.2 cm (30 inches) |
| Depth | 61 cm (24 inches) |
| Height | 182.9 cm (72 inches) |
| Weight | Approximately 136 kg (300 lb) |
| Power supply | 120 V, 60 Hz, 15 A |
| Total capacity | Approximately 566 liters (20 ft³) |
| Main functions | Refrigeration, freezing, water and ice dispenser |
| Finish | Stainless steel |
| Lighting | Interior LED |
| Refrigerant | R-600a (isobutane) |
| Climate class | SN, N, ST, T |
| Noise level | Approximately 45 dB |
| Maintenance and cleaning | Clean surfaces with a soft cloth and mild detergent; dust the condenser every 6 months |
| Safety | Child lock, open door alarm |
| Spare parts and repairability | Water filter, ice bucket, shelves available; repair by a Monogram certified technician |
| General information | American side-by-side refrigerator, Energy Star certified |
Frequently Asked Questions - ZIC30GNNII Monogram
User questions about ZIC30GNNII Monogram
0 question about this device. Answer the ones you know or ask your own.
Ask a new question about this device
Download the instructions for your Refrigerator in PDF format for free! Find your manual ZIC30GNNII - Monogram and take your electronic device back in hand. On this page are published all the documents necessary for the use of your device. ZIC30GNNII by Monogram.
USER MANUAL ZIC30GNNII Monogram
30" Built-In Bottom-Freezer 2-Drawer Refrigerator
ENGLISH/FRANÇAIS/ESPAÑOL
ELEVATE EVERYTHING
MONOGRAM
Introduction
Your new Monogram Refrigerator makes an eloquent statement of style, convenience and kitchen planning flexibility. Whether you chose it for its purity of design or the assiduous details, you will find that your Monogram Refrigerator's superior blend of form and function will delight you for years to come.
The information on the following pages will help you operate and maintain your Refrigerator properly.
If you have any other questions, visit our Website at: monogram.com In Canada: monogram.ca
Contents
Consumer Services
Important Phone Numbers ..... 2 4
Model and Serial Numbers 3
Performance Data Sheet 19
Problem Solver 17, 1
Safety Instructions 4,5
Warranty ....
Care and Cleaning
Cleaning—Outside and Inside .... 14
Light Bulb Replacement 15
Vacation ....
Operating Instructions
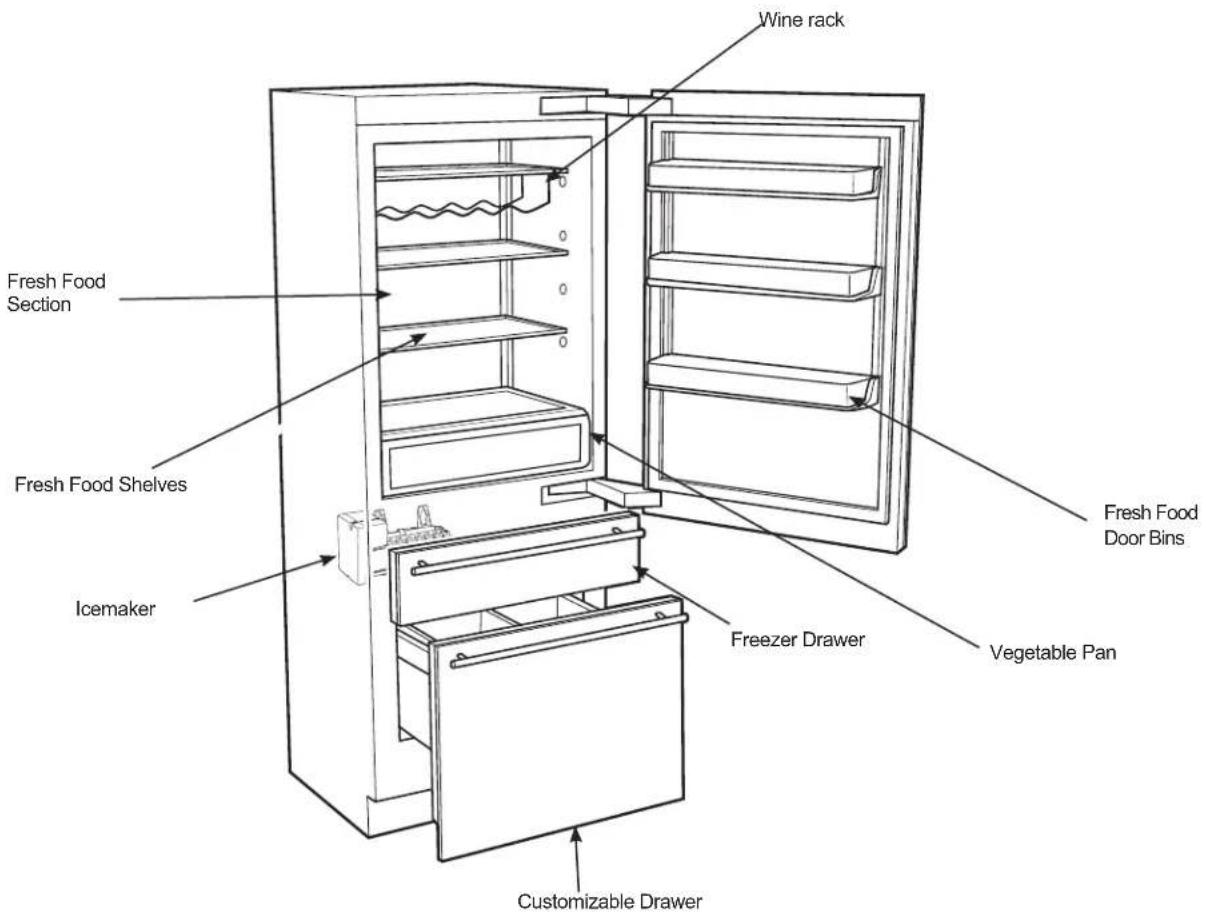
Features 6
Automatic Icemaker ....
Customizable Drawer 11
Door Bins 11
External Moisture Control 12
LED Display Lighting 12
Sabbath Mode 13
Shelves 10
Temperature Controls 7
Vegetable Pan 10
Water Filter 9
Wine/Beverage Rack 11
Preparation
Clearances 16
Location 16
Before
using
your
refrigerator
Read this manual carefully. It is intended to help you operate and maintain your new refrigerator properly.
Keep it handy for answers to your questions.
If you don't understand something or need more help, there is a list of toll-free consumer service numbers included in the back section of this manual.
OR
Visit our Website at: monogram.com
In Canada: monogram.ca
Consumer Information
| 30" Bottom-Freezer | ||
| Write down the model & serial numbers | You'll see them on a label inside the fresh food compartment, below the vegetable pan. | Before sending in this card, please write these numbers here: |
| Model Number | ||
| Serial NumberUse these numbers in any correspondence or service calls concerning your refrigerator. | ||
| If you received a damaged refrigerator | The warranty does not cover damage caused after delivery. | Immediately contact the dealer (or builder) that sold you the refrigerator. |
| Save time & money | Before you request service, check the Problem Solver in the back of this manual. | It lists causes of minor operating problems that you can correct yourself. |
| If you need service | To obtain service, see the Consumer Services page in the back of this manual.We're proud of our service and want you to be pleased. If for some reason you are not happy with the service you receive, here are steps to follow for further help.FIRST, contact the people who serviced your appliance. Explain why you are not pleased.In most cases, this will solve the problem.NEXT, if you are still not pleased, write all the details—including your phone number—to:Manager, Customer RelationsMonogramAppliance ParkLouisville, KY 40225 | In Canada:Director, Consumer RelationsMC Commercial IncSuite 310, 1 Factory LaneMoncton, N.B.E1C 9M3 |
WARNING
To reduce the risk of fire, explosion, electric shock, or injury when using your refrigerator, follow these basic safety precautions:
This refrigerator must be properly installed and located in accordance with the Installation Instructions before it is used.
■ Unplug the refrigerator before making repairs, or cleaning.
NOTE: Power to the refrigerator cannot be disconnected by any setting on the control panel.
NOTE: Repairs must be performed by a qualified Service Professional.
■ Do not try to replace a burned-out LED light. An authorized technician will need to replace the LED lights.
■ Replace all parts and panels before operating.
■ Do not use an extension cord.
■ Do not store or use gasoline or other flammable vapors and liquids in the vicinity of this or any other appliance.
■ Do not store explosive substances such as aerosol cans with a flammable propellant in this appliance.
■ To prevent suffocation and entrapment hazards to children, remove the fresh food and freezer doors from any refrigerator before disposing of it or discontinuing its use.
■ To avoid serious injury or death, children should not stand on, or play in or with the appliance.
Children and persons with reduced physical, sensory or mental capabilities or lack of experience and knowledge can use this appliance only if they are supervised or have been given instructions on safe use and understand the hazards involved.
This appliance is intended to be used in household and similar applications such as: staff kitchen areas in shops, offices and other working environments; farm houses; by clients in hotels, motels, bed & breakfast and other residential environments; catering and similar non-retail applications.
CAUTION
To reduce the risk of injury when using your refrigerator, follow these basic safety precautions.
- Do not clean glass shelves or covers with warm water when they are cold. Glass shelves and covers may break if exposed to sudden temperature changes or impact, such as bumping or dropping. Tempered glass is designed to shatter into many small pieces if it breaks.
- Keep fingers out of the "pinch point" areas; clearances between the doors and between the doors and cabinet are necessarily small. Be careful closing doors when children are in the area.
■ Do not touch the cold surfaces in the freezer compartment when hands are damp or wet, skin may stick to these extremely cold surfaces.
■ Do not refreeze frozen foods which have thawed completely.
In refrigerators with automatic icemakers, avoid contact with the moving parts of the ejector mechanism, or with the heating element that releases the cubes. Do not place fingers or hands on the automatic ice making mechanism while the refrigerator is plugged in.
STATE OF CALIFORNIA PROPOSITION 65 WARNINGS
⚠ WARNING
This product contains one or more chemicals known to the State of California to cause cancer and birth defects or other reproductive harm.
INSTALLATION
WARNING
EXPLOSION HAZARD
Keep flammable materials and vapors, such as gasoline, away from refrigerator. Failure to do so can result in fire, explosion, or death.
READ AND SAVE THESE INSTRUCTIONS
CONNECTING ELECTRICITY
WARNING

Electrical Shock Hazard.
Plug into a grounded 3-prong outlet
Do not remove the ground prong
Do not use an adapter
Do not use an extension cord.
Failure to follow these instructions can result in death, fire, or electrical shock.
Do not, under any circumstances, cut or remove the third (ground) prong from the power cord. For personal safety, this appliance must be properly grounded.
The power cord of this appliance is equipped with a 3-prong (grounding) plug which mates with a standard 3-prong (grounding) wall outlet to minimize the possibility of electric shock hazard from this appliance.
Have the wall outlet and circuit checked by a qualified electrician to make sure the outlet is properly grounded.
Where a standard 2-prong wall outlet is encountered, it is your personal responsibility and obligation to have it replaced with a properly grounded 3-prong wall outlet. Do not use an adapter.
The refrigerator should always be plugged into its own individual electrical outlet which has a voltage rating that matches the rating plate.
A 115 Volt AC, 60 Hz, 15- or 20-amp fused, grounded electrical supply is required. This provides the best performance and also prevents overloading house wiring circuits which could cause a fire hazard from overheated wires.
Never unplug your refrigerator by pulling on the power cord. Always grip plug firmly and pull straight out from the outlet.
Immediately discontinue use of a damaged supply cord. If the supply cord is damaged, it must be replaced by a qualified service professional with an authorized service part from the manufacturer.
When moving the refrigerator away from the wall, be careful not to roll over or damage the power cord.
PROPER DISPOSAL OF YOUR OLD REFRIGERATOR
WARNING
SUFFOCATION AND ENTRAPMENT HAZARD
Failure to follow these disposal instructions can result in death or serious injury
IMPORTANT: Child entrapment and suffocation are not problems of the past. Junked or abandoned refrigerators are still dangerous even if they will sit for "just a few days." If you are getting rid of your old refrigerator, please follow the instructions below to help prevent accidents.
Before You Throw Away Your Old Appliance
■ Take off the fresh food and freezer doors.
■ Leave the shelves in place so that children may not easily climb inside.
Refrigerant Disposal:
Dispose of appliance in accordance with Federal and Local Regulations. Flammable refrigerant and insulation material used requires special disposal procedures. Contact your local authorities for the environmentally safe disposal of your appliance.
WARNING
R600a Refrigerant
This appliance contains isobutane refrigerant, R600a, a natural gas with high environmental compatibility. However it is also combustible. Please adhere to the warnings below:
1) When handling, installing and operating the appliance, care should be taken to avoid damage to the refrigerant tubing.
2) Servicing shall be performed by factory-authorized service personnel and component parts shall be replaced with manufacturer-authorized replacement components.
3) Refrigeration products contain refrigerants, which under federal law must be removed prior to product disposal.
4) Keep ventilation openings in the appliance enclosures or in the built-in structure clear of obstruction.
5) Do not use mechanical devices or other means to accelerate the defrosting process.
6) Do not damage refrigerant circuit.
7) Do not use electrical appliances inside the food storage compartment of the appliance.
READ AND SAVE THESE INSTRUCTIONS

Fresh Food – Solid Door Unit

Upper Drawer – Freezer

Fresh Food – Glass Door Unit

Lower Drawer – Customizable
Temperature controls
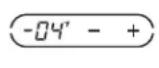
The temperature display shows the actual temperature of the fresh-food compartment, freezer drawer or customizable drawer when each one is selected by toggling the Zone indicator. The actual temperature will vary from the set temperature based on factors such as frequency of door openings, amount of food, defrost cycling and room temperature.
NOTE: Frequent door openings or doors left open for periods of time may increase the internal temperature of the compartments temporarily.
To turn off the cooling system, toggle the ZONE indicator to the fresh-food mode. Press the plus (+) pad until the display shows OFF.
To turn the cooling system on, toggle the ZONE indicator to the fresh-food mode and press the minus (−) pad until the desired temperature is displayed. The preset temperature of 0^ F for the freezer or 37^ F for the fresh-food unit will appear in the display.
To check the current temperature setting for a compartment, press the plus (+) or minus (−) pad once. After 5 seconds, the display will return to the actual temperature.
To change the temperature settings, press the plus (+) or minus (−) pad for each increment to the desired temperature set point. Allow 24 hours for the unit to reach the temperature you have set.
Temperature Ranges Low High
| Fresh Food | 34^1^ | 46^8^ |
| Freezer | -6^ | +6^ |
| Drawer | -21^ | -14^ |
Customizable Drawer Temperature Ranges
| Low | High | |
| Freezer | -6°F/-21°C | +6°F/-14°C |
| Chill | 34°F/1°C | 46°F/8°C |
| Wine | 40°F/4°C | 55°F/13°C |
NOTE: Setting the controls to OFF stops cooling, but does not shut off electrical power to the unit. All readings in °C will be rounded.
Changing display temperatures from °F to °C
To change the temperature display between Fahrenheit and Celsius, press both the plus (+) and minus (−) pads for 5 seconds.
Alarm
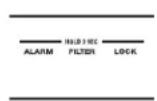
To turn the Alarm feature on, press and hold the ALARM button for 3 seconds. ALARM will be underlined when active. To turn off, press and hold the ALARM button for 3 seconds. The underline will disappear.
When the ALARM is active, the alarm will flash and beep if you keep the door open for more than 2 minutes.
Automatic icemaker
A newly installed refrigerator may take 12–24 hours to begin making ice. The refrigerator is shipped with the icemaker set to ON.
The icemaker will produce seven cubes per cycle—approximately 15 cycles in a 24-hour period, depending on freezer compartment temperature, room temperature, number of door openings and other use conditions.
If the refrigerator is operated before the water connection is made to the icemaker, set the icemaker to OFF. To set the icemaker to OFF, press the ZONE indicator on the control pad twice to select the freezer drawer. Press the ICE icon to the right. The line under ICE will disappear and the word OFF will show under ICE.
Throw away the first full bucket of ice.
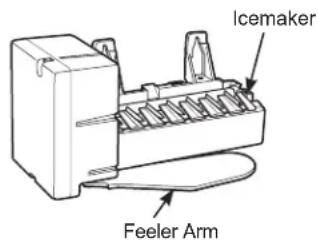
Be sure nothing interferes with the sweep of the feeler arm.
When the bin fills to the level of the feeler arm, the icemaker will stop producing ice.
It is normal for several cubes to be joined together.
If ice is not used frequently, old ice cubes will become cloudy, taste stale and shrink.
After the icemaker has been turned on again, there will be a delay of about 45 minutes before the icemaker resumes operations.
NOTE: In homes with lower-than-average water pressure, you may hear the icemaker water valve cycle on several times when making one batch of ice.
NOTE: Icemaker works best between 40 and 120 PSI home water pressure.
CAUTION
Avoid contact with the moving parts of the ejector mechanism, or with the heating element (located on the bottom of the ice maker) that releases the cubes. Do not place fingers or hands on the automatic ice making mechanism while the refrigerator is plugged in.
Accessing the icemaker and freezer drawer
The icemaker is located on the ceiling of the freezer drawer and to the left rear. There is an LED strip in the freezer drawer ceiling. The freezer drawer contains 1 ice bin.
Water filter cartridge
The water filter cartridge is located below the customizable drawer on the lower-right side of the appliance.
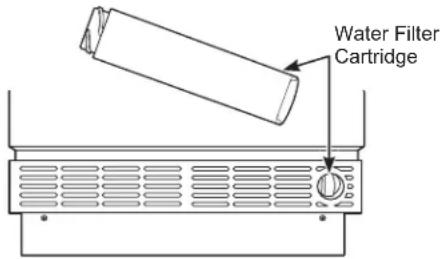
To Replace the Filter:
There is a replacement indicator light for the water filter cartridge on the control panel. The filter cartridge should be replaced when the word REPLACE appears beneath FILTER on the control panel.
IMPORTANT: Filter is mandatory for ice production.
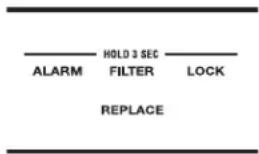
Installing the Filter Cartridge:
- Open the customizable drawer to gain access to the water filter cartridge.
- Remove the old cartridge by twisting counterclockwise. Pull forward on the filter to remove.
- Insert the new filter into the compartment and twist clockwise until the cartridge stops.
To Reset the Filter Status Light:
Press and hold the FILTER button for 3 seconds.
Replacement filters:
To order additional filter cartridges, visit our Website at monogram.com, or call GE Appliances Parts and Accessories, 877.959.8688. In Canada, call 1.800.661.1616
Filter Model Number GSWF
IMPORTANT NOTE: Remove the water filter to immediately stop any water leak from the icemaker.
Child control lockout
This child control lockout feature prevents unwanted changes to your temperature settings.
After the desired temperature is set, the temperature can be locked. To lock, press and hold the LOCK button for 3 seconds. To unlock, press and hold the LOCK button for 3 seconds.
30" Bottom-Freezer
Vegetable pan
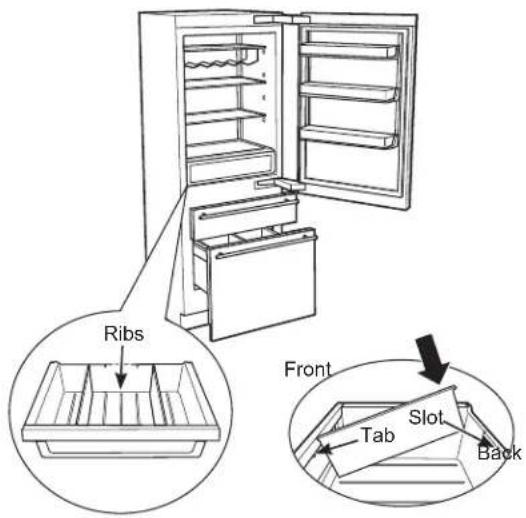
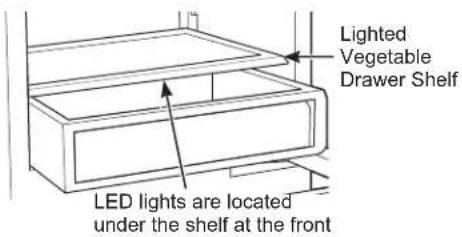
The Vegetable Pan in the fresh-food section of the refrigerator has LED strip lighting above the drawer.
There are adjustable dividers with several different position options. The divider is held in place by a tab located under the handle, a slot located on the back wall and a stabilizing rib on the bottom of the drawer for each position.
To change the divider position:
- Pull up on the back of the divider to release it from the slot in the back and off of the tab in the front.
- Slide the divider into a new location, making sure it seats into the rib on the bottom of the drawer.
- Pull up on the back of the divider to locate the front under the tab at the new location.
- Push down on the back of the divider to seat it into the slot at the new location.
Lighted vegetable drawer shelf
The lighted vegetable drawer shelf provides lighting for the lower compartments. The lights are recessed into the shelf to illuminate the drawers below.
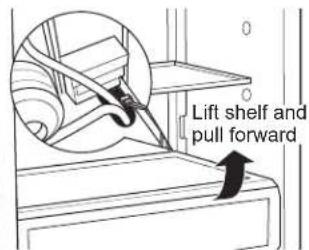
To remove the shelf:
- Lift the shelf and carefully pull forward to expose the wires.
- Unplug the shelf and carefully remove it from the refrigerator.
To replace the shelf:
- Carefully set the shelf onto the side rails, leaving the plug exposed.
- Plug the shelf into the refrigerator.
- Carefully slide the shelf into place.
Adjustable shelves
Tempered glass shelves in the fresh food section enable you to make efficient shelf arrangements to fit your family's food storage needs.
To adjust shelves: Tilt the shelf up at the front and slide it up or down along the back wall to the placement you want.
Handle glass shelves carefully. Rough handling of tempered glass can cause it to shatter.
To remove shelves:
NOTE: To remove a shelf, all shelves under it must first be removed.
- Remove any food from the shelf.
- Remove covers at the bottom of each track.
- Tilt the first shelf up at the front.
- Slide the shelf down along the back wall until you reach the bottom where the notch is located. Slide the shelf through the notch.
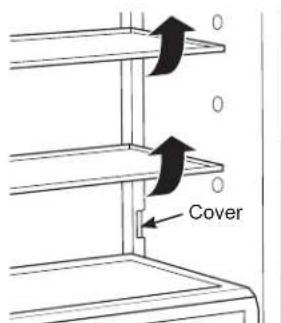
- Repeat for removing the other shelves.
To replace shelves:
Replace shelves by perform steps 1 through 4 in reverse.
30" Bottom-Freezer
Door bins
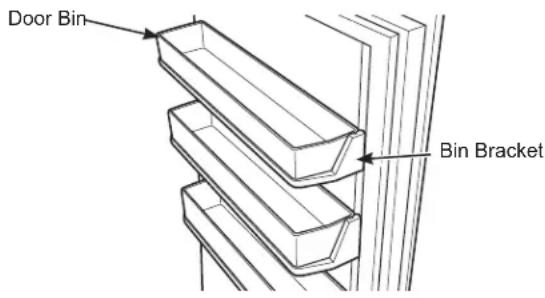
The door bins are removable. Lift bin out of the bin bracket to remove.
The bin brackets are adjustable and can move up and down to meet your storage needs.
Do this by tilting the bin up at the front and sliding it up or down along the door to the placement you desire.
Wine/ beverage rack
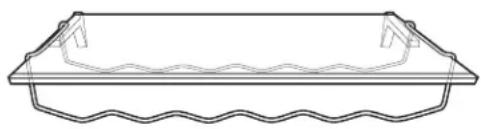
The wine/beverage rack fits onto one of the glass shelves in the fresh-food compartment. The rubber coating on the portions of the rack that sit on top of the shelf keeps the rack from slipping or scratching the shelf. The wine/beverage rack will hold 2-liter bottles, wine bottles and champagne bottles.
natural_image
Line drawing of a rectangular tray with wavy bottom and side handles (no text or symbols)Customizable drawer
The customizable drawer can be used as a freezer, as a fresh-food refrigerator or as a wine/beverage drawer.
To customize your drawer:
Press the ZONE indicator on the control pad to select the customizable drawer.
Recommended Temperatures for Customizable Drawer:
| Button Function Temperature | |
| Chill Fresh Food | 37°F/3°C |
| Freezer Freezer 0°F/-18°C | |
| Wine Wine Storage 55°F/13°C | |
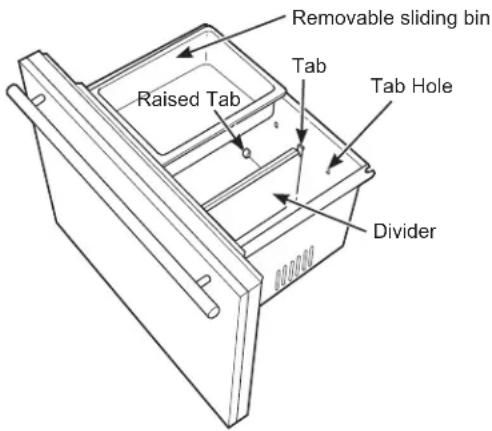
This drawer has LED strip lighting above it. There is also one adjustable divider that can be placed in different positions and a bin that can slide left or right in the drawer.
To change the divider position:
- Pull in the tabs at the top of the divider to release it from the tab holes at the front and back of the drawer.
- Lift the divider off of the raised tabs at the bottom of the drawer.
- Move the divider to its new location and slide it onto the raised tabs.
- Pull in the tabs at the top of the divider and position the divider so the tabs will fit into the tab holes. Release the tabs so they lock into place.
30" Bottom-Freezer
External moisture control
This product is equipped with an external moisture control feature. The refrigerator is shipped with the external moisture control feature off.
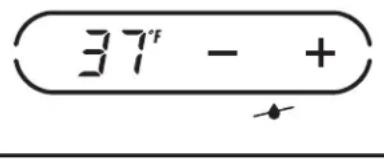
In some humid environments, moisture can form on the front surface of the refrigerator cabinet. If moisture does appear on the front surface of the refrigerator cabinet, turn on the external moisture control feature by pressing and holding the ALARM and LOCK buttons on the control panel for 5 seconds. When activated, a small picture of a water droplet with a line through it will appear below the (+) and (−) signs on the control panel.
LED display lighting
This refrigerator has LED lighting on both sides of the interior as well as above the freezer drawer and above the customizable drawer.
Glass Door Models Only
The glass door models have a display light option for the interior side lights: full power and 1/2 power.
In display mode at either full or 1/2 power, the lights will stay on after the door is closed and automatically go off after 1 hour.
To access the lighting options, press the ZONE indicator on the control pad. In fresh-food mode, the LIGHTS button is to the right on the control pad. When lights are at full power, there are 2 bars under LIGHTS; at 1/2 power, there is 1 one bar; when the lights are off, there are no bars.

Glass Door Model – Lights at Full Power

Glass Door Model – Lights at 1/2 Power

Glass Door Model – Lights Off
Sabbath Mode
The Sabbath Mode was designed for use on the Jewish Sabbath and Holidays. The Sabbath Mode feature makes it possible for observant Jews to refrigerate and freeze food during the duration of the holiday.
The Sabbath Mode feature can be set to override typical reactions caused by your interaction with the refrigerator. While in the Sabbath Mode, your refrigerator will still operate. However, the refrigerator will not respond to your actions.
While in the Sabbath Mode, you may notice the fan running when the door is opened, however, this is not a result of your actions. The fan will operate at predetermined times. The defrost heater will continue to defrost the refrigerator and freezer and will be activated on a timer. The defrost heater will not defrost as a result of door openings or any consumer actions.
ON/OFF—To activate the Sabbath Mode, hold down the ALARM button and (+) pad on the control panel for 5 seconds. SAB will be displayed on the control. SAB will remain in the display and the (+) pad and alarm button will remain lit until the Sabbath mode is deactivated. Controls and lights do not work until the ALARM button and (+) pad are held again for 5 seconds.
DISPLAYS, ALARMS and LIGHTS—The main temperature control displays will be deactivated, therefore they will not be lit, sound a tone or operate when touched. Door alarms and lights will be disabled.
ICEMAKER—The icemaker will continue to operate. The icemaker can be disabled by turning the icemaker OFF prior to the Sabbath (see Automatic Icemaker).
Care and Cleaning
30" Bottom-Freezer
Cleaning outside
Door handles and trim—Clean with a cloth dampened with soapy water. Dry with a soft cloth.
Keep the outside clean. Wipe with a clean cloth lightly dampened with mild liquid dish detergent. Dry with a clean, soft cloth.
Do not wipe the refrigerator with a soiled dish cloth or wet towel. These may leave a residue that can damage the finish. Do not use scouring pads, powdered cleaners, bleach or cleaners containing bleach because these products can scratch and damage the finish.
Stainless steel—The stainless steel doors and door handles (on some models) can be cleaned with a commercially available stainless steel cleaner. Cleaners with oxalic acid such as Bar Keepers Friend Soft Cleanser™ will remove surface rust, tarnish, and small blemishes. Use only a liquid cleaner free of grit and rub in the direction of the brush lines with a damp soft sponge. Do not use appliance wax or polish on the stainless steel.
Custom Wood Panels - please contact your custom panel supplier for direction on cleaning and care.
Cleaning inside
Turn off power at the circuit breaker or fuse box before cleaning. If this is not practical, wring excess moisture out of sponge or cloth when cleaning around switches, lights or controls.
Use warm water and baking soda solution - about a tablespoon (15 ml) of baking soda to a quart (1 liter) of water. This both cleans and neutralizes odors. Thoroughly rinse and wipe dry.
Other parts of the refrigerator—including door gaskets, vegetable drawer, ice storage bins and all plastic parts—can be cleaned the same way. After cleaning the door gaskets, apply a thin layer of petroleum jelly to the door gaskets at the hinge side. This helps keep the gaskets from sticking and bending out of shape.
CAUTION
Do not clean glass shelves
or covers with warm water when they are cold. Glass shelves and covers may break if exposed to sudden temperature changes or impact such as bumping or dropping. Tempered glass is designed to shatter into many small pieces if it breaks.
Do not wash any plastic refrigerator parts in the dishwasher.
Care and Cleaning
| 30” Bottom-Freezer | ||
| Preparing for vacation | For long vacations or absences, remove food from the refrigerator. Adjust the temperature up (+) until the unit turns off. Clean the interior with a baking soda solution of one tablespoon (15 ml) of baking soda to one quart (1 liter) of water. Leave the door open. | For shorter vacations, remove perishable foods and leave the control at the regular setting. However, if the room temperature is expected to drop below 60°F (16°C), follow the same instructions as for extended vacations.Turn off the icemaker and shut off the water supply to the freezer. |
Interior Light replacement
Do not try to replace a burned-out LED light.
An authorized technician will need to replace the LED lights.
Preparation
| 30" Bottom-Freezer | ||
| Refrigerator location | Do not install the refrigerator where temperatures will be below 60°F (16°C) because it will not run long enough to maintain proper temperatures.Do not install the refrigerator where the temperature will go above 100°F (37°C) because it will not perform properly. | Do not install the refrigerator in a location exposed to water (rain, etc.) or direct sunlight.Install the refrigerator on a floor strong enough to support it fully loaded. |
Clearances
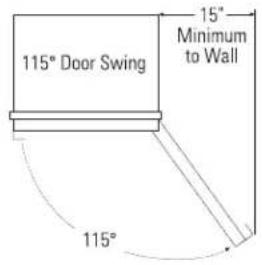
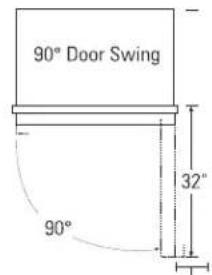
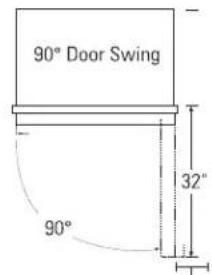
Allow 15" minimum clearance between the door and wall for a full 115° door swing. Allow 5" min. clearance to a wall for a 90° door swing for Monogram Stainless Steel (European) models.
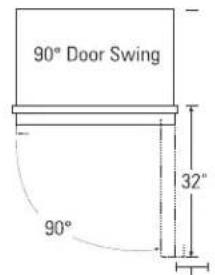
4" distance to Wall.
Questions? Use this problem solver!
PROBLEM POSSIBLE CAUSE
| REFRIGERATOR SYSTEM DOES NOT OPERATE | ·May be in defrost cycle when refrigerating system does not operate for about 45 minutes.·Temperature control in the OFF position.·If interior light is not on, refrigerator may not be plugged in at wall outlet.·The house fuse is blown/house circuit breaker is tripped. Replace fuse or reset the breaker.·Turn off the Sabbath Mode.·If your control panel says SHO, then your showroom mode was enabled. To turn this off, hold the ALARM button and (-) pad simultaneously for 5 seconds. |
| REFRIGERATING SYSTEM OPERATES FOR LONG PERIODS OR CYCLES ON FREQUENTLY (Modern refrigerators and freezers with more storage space and a larger freezer require more operating time. They start and stop often to maintain even temperatures.) | ·Normal when refrigerator is first plugged in. Wait 24 hours for the refrigerator to completely cool down.·Often occurs when large amounts of food are placed in refrigerator. This is normal.·Door left open or package holding door open.·Hot weather or frequent door openings. This is normal.·Temperature control set at the coldest setting. See Temperature Control. |
| VIBRATION OR RATTLING (Slight vibration is normal.) | ·Refrigerator may not be properly installed.- Anti-tip bracket may be loose.- Unit may not be level. |
| THUMPING SOUND WHEN CLOSING DOOR | ·This is a normal operating sound.·Closing the door slowly will minimize the sound. |
| OPERATING SOUNDS | ·The variable speed compressor.·Normal fan air flow—multiple fans blow cold air through the fresh-food and freezer compartments—other fans cool the compressor.·The fans change speeds in order to provide optimal cooling and energy savings.·These NORMAL sounds will also be heard from time to time:- You may hear a whooshing or gurgling sound when the door closes. This is due to pressure equalizing within the refrigerator.- A water dripping sound may occur during the defrost cycle as ice melts from the evaporator and flows into the drain pan.- The flow of refrigerant through the freezer cooling coils may make a gurgling sound like boiling water.- Water dropping on the defrost heater can cause a sizzling, popping or buzzing sound during the defrost cycle.- You may hear cracking or popping sounds when the refrigerator is first plugged in or during/after the defrost cycle. This happens as the refrigerator cools to the correct temperature.- The compressor may cause a clicking or chirping sound when attempting to restart (this could take up to 5 minutes).- The electronic control board may cause a clicking sound when relays activate to control refrigerator components.- Ice cubes dropping into the bin and water running in pipes as icemaker refills.- The icemaker water valve will buzz when the icemaker fills with water. |
PROBLEM POSSIBLE CAUSE
| DOOR NOT CLOSING PROPERLY | Package or bottle may be holding door open.Check the door gasket; it may be out of positionRefrigerator is not level. See Installation Instructions.Hinge springs deactivated. See Installation Instructions. |
| REFRIGERATOR TOO WARM | Temperature control not set cold enough. See Temperature Control.Hot weather or frequent door openings.Door left open for long time.Package may be holding door open. |
| ACTUAL TEMPERATURE NOT EQUAL TO SET TEMPERATURE | Refrigerator just plugged in. Allow 24 hours for system to stabilize.Door open for too long. Allow 24 hours for system to stabilize.Warm food added to refrigerator. Allow 24 hours for system to stabilize.Defrost cycle is in process. Allow 24 hours for system to stabilize. |
| FROST OR ICE CRYSTALS ON FROZEN FOOD(Frost within package is normal) | Drawer left open or package holding door open.Too frequent or too long door openings.Drawer may have been left open.Ice cubes or some other object may be stuck behind the drawer. |
| SLOW ICE CUBE FREEZING | Drawer may have been left open.Turn temperature control to a colder setting.Package may be holding drawer open. |
| ICE CUBES HAVE ODOR/TASTE | Old cubes need to be discarded.Ice storage bin needs to be emptied and washed.Unsealed packages in freezer may be transmitting odor/taste to ice cubes.Interior of freezer needs cleaning. See Care and Cleaning.Poor-tasting incoming water. Change the water filter. |
| AUTOMATIC ICEMAKER DOES NOT WORK | Icemaker is turned off.Water supply turned off or not connected.Freezer too warm.Piled up cubes in storage bin may cause icemaker to shut off too soon.Level cubes by hand.Ice bin is not in position.Clogged water filter.Reverse osmosis system installed. |
| MOISTURE FORMS ON OUTSIDE OF REFRIGERATOR | Not unusual during periods of high humidity. Wipe surface dry.Turn on the External Moisture Control feature. |
| MOISTURE COLLECTS INSIDE | Too frequent or too long door openings.In humid weather, air carries moisture into refrigerator when doors are opened.Lower drawer switched from (freezer) to chill or wine. |
| REFRIGERATOR HAS ODOR | Foods with strong odors should be tightly covered.Check for spoiled food. |
| INTERIOR LIGHTS DO NOT WORK | No power at outlet.LEDs need replacing. See Consumer Service Section. |
| DOOR DIFFICULT TO REOPEN IMMEDIATELY AFTER CLOSING | Tight door seal is due to pressure equalizing within the refrigerator. After closing the door, wait 5-30 seconds to reopen. |
Performance Data Sheet
SmartWater Filtration System
GSWF Cartridge
This system has been tested according to NSF/ANSI 42/53 for reduction of the substances listed below. The concentration of the indicated substances in water entering the system was reduced to a concentration less than or equal to the permissible limit for water leaving the system, as specified in NSF/ANSI 42/53.*
(100% safety factors built in for unmetered usage)
| Standard No. 42: Aesthetic Effects | ||||||||
| Parameter USEPA MCL | Influent Average | Influent Challenge Concentration | Effluent % Reduction | Min. Required | Reduction | |||
| Average Maximum | Average Minimum | |||||||
| Chlorine — 1.845 mg/L 2.0 mg/L | +10% < 0.05 mg/L | 0.05 mg/L >97.29% | 96.43% >50% | — | ||||
| T & O | — | — | — | — | — | — | — | |
| Particulate** | — 143,333 #/mL | at least 10,000 particles/mL | 29.83 #/mL | 140 #/mL | 99.98% | 99.91% | ≥ 85% | |
| Standard No. 53: Health Effects | ||||||||
| Parameter | USEPA MCL | Influent Average | Influent Challenge Concentration | Effluent | % Reduction | Min. Required Reduction | ||
| Average | Maximum | Average | Minimum | |||||
| Turbidity | 1 NTU*** 10 | 3 NTU*** | 1±1 NTU*** | 0.106 NTU | 0.14 NTU | 98.97% | 98.61% | 0.5 NTU |
| Cysts | 99.95% Reduction | 200,000 #/L | Minimum 50,000 L | 0 | 0 | >99.99% | >99.99% | >99.95% |
| Lead at pH 6.5 | 0.015 mg/L | 0.15 mg/L | 0.15 mg/L±10% | < 0.001 mg/L | < 0.001 mg/L | >99.33% | >99.33% | 0.010 mg/L |
| Lead at pH 8.5 | 0.015 mg/L | 0.14 mg/L | 0.15 mg/L±10% | 0.001 mg/L | 0.003 mg/L | >99.29% | 97.86% | 0.010 mg/L |
| Lindane | 0.0002 mg/L | 0.0216 mg/L | 0.002 mg/L±10% | < 0.00002 mg/L | < 0.00002 mg/L | 99.07% | 98.75% 0.0002 mg/L | |
| Atrazine | 0.003 mg/L | 0.008 mg/L | 0.009 mg/L±10% | < 0.002 mg/L | < 0.002 mg/L | >76.12% | >66.67% | 0.003 mg/L |
* Tested using a flow rate of 0.5 gpm; pressure of 60 psig; pH of 7.5 ± 0.5; temp. of 68° ± 5°F (20° ± 3°C)
** Measurement in Particles/ml. Particles used were 0.5-1 microns
*** NTU=Nephelometric Turbidity units
Operating Specifications
■ Capacity: certified for up to 750 gallons (2,838 l); up to six months
■ Pressure requirement: 40–120 psi (2.8–8.2 bar)
■ Temperature: 33–100°F (0.6–38°C)
■ Flow rate: 0.5 gpm (1.9 lpm)
General Installation/Operation/Maintenance Requirements
■ Flush new cartridge at full flow for 3 minutes to purge out trapped air.
■ Replace cartridge when flow becomes too slow.
Special Notices
■ Installation instructions, parts and service availability, and standard warranty are included with the product when shipped.
This drinking water system must be maintained according to manufacturer's instructions, including replacement of filter cartridges.
■ Do not use with water that is microbiologically unsafe or of unknown quality without adequate disinfection before or after the system. Systems certified for cyst reduction may be used on disinfected water that may contain filterable cysts.
■ The contaminants or other substances removed or reduced by this water treatment system are not necessarily in your water.
■ Check for compliance with the state and local laws and regulations.
Note that while the testing was performed under standard laboratory conditions, actual performance may vary. Systems must be installed and operated in accordance with manufacturer's recommended procedures and guidelines.
System tested and certified by NSF International against Standard 42 for the reduction of chlorine, taste and odor, particulate Class I and Standard 53 for the reduction of cyst, lead, Lindane, Atrazine and turbidity.
Manufactured for: GE Appliances, a Haier company
YOUR MONOGRAM REFRIGERATOR WARRANTY
Staple sales slip or canceled check here. Proof of original purchase date is needed to obtain service under warranty.
WHAT IS COVERED
From the Date of the Original Purchase
LIMITED TWO-YEAR WARRANTY
For two years from date of original purchase, we will provide, free of charge, parts and service labor in your home to repair or replace any part of the refrigerator or freezer that fails because of a manufacturing defect.
LIMITED FIVE-YEAR WARRANTY
For five years from date of original purchase, we will provide, free of charge, parts and service labor in your home to repair or replace any part of the sealed refrigerating system (the compressor, condenser, evaporator and all connecting tubing) that fails because of a manufacturing defect.
LIMITED ADDITIONAL SIXTH- THROUGH TWELFTH-YEAR WARRANTY ON THE SEALED SYSTEM
For the sixth through twelfth year from the date of the original purchase, we will provide, free of charge, replacement parts for any part of the sealed refrigerating system (the compressor, condenser, evaporator and all connecting tubing) that fails because of a manufacturing defect. You pay for the service trip to your home and for service labor charges.
LIMITED THIRTY-DAY WARRANTY ON WATER FILTER CARTRIDGE (Water filter, if included)
From the date of the original purchase we will provide, free of charge, replacement parts for any part of the water filter cartridge that fails because of a manufacturing defect. During this limited thirty-day warranty, we will also provide, free of charge, a replacement water filter cartridge.
This warranty is extended to the original purchaser and any succeeding owner for products purchased for ordinary home use in the 48 mainland states, Hawaii, Washington, D.C. or Canada. If the product is located in an area where service by a GE Appliances Authorized Servicer is not available, you may be responsible for a trip charge or you may be required to bring the product to an Authorized GE Appliances Service location for service. In Alaska the warranty is the same except that it is LIMITED because you must pay to ship the product to the service shop or for the service technician's travel costs to your home.
All warranty service will be provided by our Factory Service Centers or by our authorized Customer Care® servicers during normal working hours.
Should your appliance need service, during warranty period or beyond, call 800.444.1845. Please have your serial number and model number available when calling for service. In Canada call 800.561.3344
WHAT IS NOT COVERED
- Service trips to your home to teach you how to use the product.
- Replacement of house fuses or resetting of circuit breakers.
- Damage to the product caused by accident, fire, floods or acts of God.
- Failure of the product if it is used for other than its intended purpose or used commercially.
• Damage caused after delivery. -
Improper installation, delivery or maintenance. If you have an installation problem, contact your dealer or installer. You are responsible for providing adequate electrical, plumbing and other connecting facilities.
-
Replacement of the light bulbs, if included, or water filter cartridge, if included, other than as noted above.
- Replacement of the water filter cartridge, if included, due to water pressure that is outside the specified operating range or due to excessive sediment in the water supply.
- Loss of food due to spoilage.
- Incidental or consequential damage caused by possible defects with this appliance.
- Product not accessible to provide required service.
- Damage to finish, such as surface rust, tarnish, or small belmishes not reported within 48 hours of delivery.
EXCLUSION OF IMPLIED WARRANTIES—Your sole and exclusive remedy is product repair as provided in this Limited Warranty. Any implied warranties, including the implied warranties of merchantability or fitness for a particular purpose, are limited to one year or the shortest period allowed by law.
Some states/provinces do not allow the exclusion or limitation of incidental or consequential damages, so the above limitation or exclusion may not apply to you. This warranty gives you specific legal rights, and you may also have other rights which vary from state to state/province to province. To know what your legal rights are in your state/province, consult your local or state/provincial consumer affairs office or your state's Attorney General.
Warrantor: GE Appliances, a Haier company
Warrantor in Canada: MC Commercial, Burlington, ON, L7R 5B6
30" Bottom-Freezer
| With the purchase of your new Monogram appliance, receive the assurance that if you ever need information or assistance from Monogram, we will be there. All you have to do is call! | |
| Register Your Appliance | Register your new appliance on-line at your convenience! Timely product registration will allow for enhanced communication and prompt service under the terms of your warranty, should the need arise. You may also mail in the pre-printed registration card included in the packing material.In the US: Monogram.comIn Canada: Prodsupport.mabe.ca/crm/Products/ProductRegistration.aspx |
| Schedule Service | Expert Monogram repair service is only one step away from your door. Get on-line and schedule your service at your convenience any day of the year.In the US: Monogram.com or call 800.444.1845 during normal business hours.In Canada: Monogram.ca or call 888.880.3030 |
| Extended Warranties | Purchase a Monogram extended warranty and learn about special discounts that are available while your warranty is still in effect.In the US: Monogram.com or call 800.444.1845 during normal business hours.In Canada: Monogram.ca or call 888.880.3030. |
| Remote Connectivity | For assistance with wireless network connectivity (for models with remote enable), visit our website at Monogram.com or call 800.444.1845 in the US only. |
| Parts and Accessories | Individuals qualified to service their own appliances can have parts or accessories sent directly to their homes (VISA, MasterCard and Discover cards are accepted). Order on-line today 24 hours every day.In the US: Monogram.com or by phone at 800.444.1845 during normal business hours.Instructions contained in this manual cover procedures to be performed by any user. Other servicing generally should be referred to qualified service personnel. Caution must be exercised, since improper servicing may cause unsafe operation.Customers in Canada should consult the nearest Mabe service center, visit our website at Monogram.ca or call 888.880.3030. |
natural_image
Line drawing of a rectangular tray with wavy bottom and side handles (no text or symbols)Tiroir convertible
4" distance to Wall.
Garant: GE Appliances, a Haier company
Au Canada, Garant: MC Commercial, Burlington, ON, L7R 5B6
Cajón Superior - Freezer

natural_image
Line drawing of a mechanical component with a cable and connector (no text or symbols)Brazo
natural_image
Line drawing of a rectangular tray with wavy bottom and side handles (no text or symbols)Cajón adaptable
Glass Door Model – Lights at Full Power

Glass Door Model – Lights at 1/2 Power

Glass Door Model – Lights Off
Modo Sabático
4" distance to Wall.
- Introduction
- Contents
- Consumer Services
- Care and Cleaning
- Operating Instructions
- Preparation
- Before
- using
- your
- refrigerator
- OR
- WARNING
- CAUTION
- STATE OF CALIFORNIA PROPOSITION 65 WARNINGS
- ⚠ WARNING
- INSTALLATION
- EXPLOSION HAZARD
- READ AND SAVE THESE INSTRUCTIONS
- CONNECTING ELECTRICITY
- Electrical Shock Hazard.
- Do not, under any circumstances, cut or remove the third (ground) prong from the power cord. For personal safety, this appliance must be properly grounded.
- PROPER DISPOSAL OF YOUR OLD REFRIGERATOR
- SUFFOCATION AND ENTRAPMENT HAZARD
- Before You Throw Away Your Old Appliance
- Refrigerant Disposal:
- R600a Refrigerant
- Temperature controls
- Changing display temperatures from °F to °C
- Alarm
- Automatic icemaker
- Water filter cartridge
- To Replace the Filter:
- Installing the Filter Cartridge:
- To Reset the Filter Status Light:
- Replacement filters:
- Filter Model Number GSWF
- Child control lockout
- Vegetable pan
- To change the divider position:
- Lighted vegetable drawer shelf
- To remove the shelf:
- To replace the shelf:
- Adjustable shelves
- To remove shelves:
- To replace shelves:
- Door bins
- Wine/ beverage rack
- Customizable drawer
- To customize your drawer:
- Recommended Temperatures for Customizable Drawer:
- External moisture control
- LED display lighting
- Glass Door Models Only
- Sabbath Mode
- Cleaning outside
- Cleaning inside
- Interior Light replacement
- Clearances
- Questions? Use this problem solver!
- Performance Data Sheet
- SmartWater Filtration System
- GSWF Cartridge
- Operating Specifications
- General Installation/Operation/Maintenance Requirements
- Special Notices
- YOUR MONOGRAM REFRIGERATOR WARRANTY
- Staple sales slip or canceled check here. Proof of original purchase date is needed to obtain service under warranty.
- WHAT IS COVERED
- LIMITED TWO-YEAR WARRANTY
- LIMITED FIVE-YEAR WARRANTY
- LIMITED ADDITIONAL SIXTH- THROUGH TWELFTH-YEAR WARRANTY ON THE SEALED SYSTEM
- LIMITED THIRTY-DAY WARRANTY ON WATER FILTER CARTRIDGE (Water filter, if included)
- WHAT IS NOT COVERED
- Tiroir convertible
- Cajón adaptable
- Modo Sabático
Brand : Monogram
Model : ZIC30GNNII
Category : Refrigerator