ZGP486LDNSS - Cooker Monogram - Free user manual and instructions
Find the device manual for free ZGP486LDNSS Monogram in PDF.


| Product Type | Professional Gas Range |
| Brand | Monogram |
| Model | ZGP486LDNSS |
| Width | 48 inches (122 cm) |
| Number of Burners | 6 dual-stacked burners |
| Cooktop | Gas burners with electronic ignition and automatic reignition |
| Griddle | Yes, with height adjustment and thermostat |
| Grill | Infrared grill with reversible grate |
| Oven | Oven with convection, roasting, proofing, and self-clean |
| Number of Oven Racks | Extension racks and low-profile rack (depending on model) |
| Temperature Probe | Included |
| Sabbath Mode | Yes |
| Timer | Independent, up to 12 hours |
| Electrical Supply | 120 V, 60 Hz, grounded |
| Gas Supply | Natural gas or propane (LP) – convertible |
| Anti-Tip Device | Included |
| Self-Cleaning | Yes, 3-5 hour cycle |
| Maintenance and Cleaning | Dishwasher-safe grates; self-clean; manual cleaning of burners and panels |
| Replacement Parts | Available via customer service (phone 800.561.3344) |
| Warranty | 2 years parts and labor; 5 years burners; lifetime porcelain grates |
Frequently Asked Questions - ZGP486LDNSS Monogram
User questions about ZGP486LDNSS Monogram
0 question about this device. Answer the ones you know or ask your own.
Ask a new question about this device
Download the instructions for your Cooker in PDF format for free! Find your manual ZGP486LDNSS - Monogram and take your electronic device back in hand. On this page are published all the documents necessary for the use of your device. ZGP486LDNSS by Monogram.
USER MANUAL ZGP486LDNSS Monogram
Professional All-Gas
Ranges
ENGLISH/FRANÇAIS/ESPAÑOL
ELEVATE EVERYTHING
Contents
Consumer Information 3
Safety Information 5
Features of Your Range 9
Cooktop Controls
Electronic ignition & automatic reignition ..10
To light a surface burner ..... 1 0
Dual-flame stacked burners ..... 1 0
Surface Cooking
How to select flame size ..... 1 1
Wok cooking ....
Grill safety precautions 12
Using the IR grill 12
Grill grates 13
Grill radiant baffle 13
Griddle safety precautions, leveling ..... 1 4
Using the griddle 14
Features of Your Oven 15
Oven Control 16
Baking Tips
Rear oven vents 17
Aluminum Foil and Oven Liners ..... 17
Pan placement 17
Baking pans/sheets 17
Preheating 17
Oven Racks
Full extension oven racks ..... 1 8
Remove and replace oven racks.....18
Low profile oven rack 18
Baking
How to set the oven for baking ..... 1 9
Broiling
Introduction to broiling 20
How to set the oven for broiling ..... 20
Broiling guide 21
Aluminum foil 21
Convection Baking or Roasting
Introduction to convection cooking ..... 2 2
Cookware for convection cooking ..... 2 2
Adapting recipes 2 2
Convection roasting tips 22
How to set the oven for convection baking or roasting .....23
Using the Probe
How to use the probe with bake, convection bake and convection roast. . . 24
Using the probe 24
Proper placement of the probe ..... 2 5
Proofing
How to set the oven for proofing ..... 2 5
Self-Cleaning Oven
Self-cleaning safety precautions ..... 2 6
How to set the oven for cleaning.....26
After a clean cycle 27
Timer 27
Special Features
Oven thermostat adjustment ..... 2 8
Sabbath mode 28
Care and Cleaning
Control panel and knobs....29
Oven burners 29
Broiler pan, grid and roasting rack ..... 2 9
Oven racks 30
Low profile oven rack 30
Lift-off oven door....3 1
Probe 31
Oven lights 32
To clean the door 33
Stainless steel surfaces....33
Oven bottom 33
Dual-flame stacked burners 34
Spark igniter and electrodes ..... 3 5
Burner grates 35
Grease troughs 36
Griddle 36
Cutting board 36
Grill grate, frame and baffle. . . . . . . . . . . . . . . 37
Troubleshooting Tips 38
Warranty 43
Consumer Support 44
WARNING
If the information in this manual is not followed exactly, a fire or by result, causing property damage, personal injury or death.
- Do not store or use gasoline or other flammable vapors and liquids in the vicinity of this or any other appliance.
- WHAT TO DO IF YOU SMELL GAS
■ Do not try to light any appliance.
■ Do not touch any electrical switch; do not use any phone in your building.
- Immediately call your gas supplier from a neighbor's phone. Follow the gas supplier's instructions.
■ If you cannot reach your gas supplier, call the fire department.
- Installation and service must be performed by a qualified installer, service agency or the gas supplier.
ANTI-TIP DEVICE
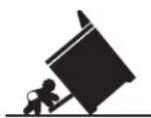
WARNING
Tip-Over Hazard
- A child or adult can tip the range and be killed.
• Install the anti-tip bracket to the wall or floor. - Engage the range to the anti-tip bracket by sliding the range back such that the foot is engaged.
- Re-engage the anti-tip bracket if the range is moved.
- Failure to do so can result in death or serious burns to children or adults.
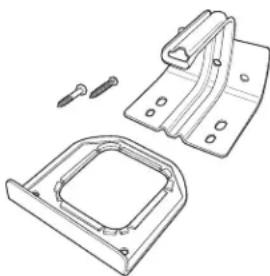
To reduce the risk of tipping the range, the range must be secured by a properly installed anti-tip bracket. See installation instructions shipped with the bracket for complete details before attempting to install.
For Professional All-Gas Ranges
To check if the bracket is installed and engaged properly, look underneath the range to see that the rear leveling leg is engaged in the bracket. On some models, the storage
drawer or kick panel can be removed for easy inspection. If visual inspection is not possible, slide the range forward, confirm the anti-tip bracket is securely attached to the floor or wall, and slide the range back so the rear leveling leg is under the anti-tip bracket.
If the range is pulled from the wall for any reason, always repeat this procedure to verify the range is properly secured by the anti-tip bracket.
Never completely remove the leveling legs or the range will not be secured to the anti-tip device properly.
natural_image
Technical line drawing of a mechanical bracket assembly with mounting holes and fasteners (no text or symbols)Anti-Tip Bracket
Kit Included
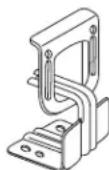
Rear View
Consumer Information
| Professional All-Gas Range | ||
| Remove packaging tape | Carefully remove all packaging, foam pads and tape.To assure no damage is done to the finish of the product, the safest way to remove the adhesive from packaging tape on new | appliances is an application of a household liquid dishwashing detergent. Apply with a soft cloth and allow to soak.NOTE: The adhesive must be removed from all parts. It cannot be removed if it is baked on. |
| Write down the model & serial numbers | You'll find them on a label located behind the left burner knob or below the control panel which is visible when the oven door is opened. | Before sending in the registration card, please write these numbers here:Model NumberSerial NumberUse these numbers in any correspondence or service calls concerning your range. |
| If you received a damaged cooktop | Immediately contact the dealer (or builder) that sold you the range. | |
| Trouble-shooting tips | Before you request service, check the Problem Solver in the back of this manual. | It lists causes of minor operating problems that you can correct yourself. |
| If you need service | To obtain service, see the Consumer Services page in the back of this manual.We're proud of our service and want you to be pleased. If for some reason you are not happy with the service you receive, here are steps to follow for further help. | FIRST, contact the people who serviced your appliance. Explain why you are not pleased.In most cases, this will solve the problem.NEXT, if you are still not pleased, write all the details—including your phone number—to:Manager, Customer RelationsGE AppliancesAppliance ParkLouisville, KY 40225 |
IMPORTANT SAFETY INFORMATION
READ ALL INSTRUCTIONS BEFORE USING THE APPLIANCE
WARNING
Read all safety instructions before using the product. Failure to follow these instructions may result
in fire, electrical shock, serious injury or death.
WARNING
GENERAL SAFETY INSTRUCTIONS
WARNING
NEVER use this appliance as a space heater to heat or warm the room. Doing so may result in carbon monoxide poisoning and overheating of the oven.
■ Use this appliance for its intended purpose as described in this owner's manual.
■ Have your range installed and properly grounded by a qualified installer in accordance with the provided installation instructions.
■ Any adjustment and service should be performed only by a qualified gas range installer or service technician. Do not attempt to repair or replace any part of your range unless it is specifically recommended in this manual.
- Your range is shipped from the factory set for use with natural gas or propane (LP) gas. It can be converted for use with either. If required, these adjustments must be made by a qualified technician in accordance with the installation instructions and local codes. The agency performing this work assumes responsibility for the conversion.
■ Have the installer show you the location of the range gas shut-off valve and how to turn it off if necessary.
- Plug your range into a 120-volt grounded outlet only. Do not remove the round grounding prong from the plug. If in doubt about the grounding of the home electrical system, it is your responsibility and obligation to have an ungrounded outlet replaced with a properly grounded, three prong outlet in accordance with the National Electrical Code. Do not use an extension cord with this appliance.
■ Before performing any service, unplug the range or disconnect the power supply at the household distribution panel by removing the fuse or switching off the circuit breaker.
■ Be sure all packing materials are removed from the range before operating to prevent ignition of these materials.
- Avoid scratching or impacting glass displays. Doing so may lead to glass breakage. Do not cook on a product with broken glass. Shock, fire, or cuts may occur.
■ Do not leave children alone or unattended in an area where an appliance is in use. They should never be allowed to climb, sit or stand on any part of the appliance.
CAUTION
■ CAUTION Do not store items of interest to children in cabinets above an oven - children climbing on the oven to reach items could be seriously injured.
■ Never block the vents (air openings) of the range. They provide the air inlets and outlets that are necessary for the range to operate properly with correct combustion. Air openings are located at the rear of the cooktop, at the top and bottom of the oven door, and at the bottom of the range.
■ Use only dry pot holders—moist or damp pot holders on hot surfaces may result in burns from steam. Do not let pot holders touch surface burners, burner grate, or oven heating element. Do not use a towel or other bulky cloth in place of pot holders.
- Do not touch the heating elements or the interior surface of the oven. These surfaces may be hot enough to burn even though they are dark in color. During and after use, do not touch, or let clothing or other flammable materials contact any interior area of the oven; allow sufficient time for cooling first. Other surfaces of the appliance may become hot enough to cause burns. Potentially hot surfaces include the burners, grates, oven vent opening, surfaces near the opening, crevices around the oven door, metal trim parts above the door, any backguard, or high shelf surface.
■ Do not heat unopened food containers. Pressure could build up and the container could burst, causing an injury.
READ AND SAVE THESE INSTRUCTIONS
IMPORTANT SAFETY INFORMATION READ ALL INSTRUCTIONS BEFORE USING THE APPLIANCE
WARNING
GENERAL SAFETY INSTRUCTIONS (cont.)
■ Cook food thoroughly to help protect against foodborne illness. Minimum safe food temperature recommendations can be found at www.lsItDoneYet.gov and www.fsis.usda.gov. Use a food thermometer to take food temperatures and check several locations.
■ Do not allow anyone to climb, stand or hang on the oven door, drawer or cooktop. They could damage the range or tip it over causing severe injury or death.
- Keep the ventilator hood and grease filters clean to maintain good venting and to avoid grease fires. Turn the ventilator OFF in case of a fire or when intentionally "flaming" liquor or other spirits on the cooktop. The blower if in operation, could spread the flames.
WARNING
KEEP FLAMMABLE MATERIALS AWAY FROM THE RANGE
Failure to do so may result in fire or personal injury.
- Do not store or use flammable materials in an oven or near the cooktop, including paper, plastic, pot holders, linens, wall coverings, curtains, drapes and gasoline or other flammable vapors and liquids.
■ Never wear loose-fitting or hanging garments while using the appliance. These garments may ignite if they contact hot surfaces causing severe burns.
■ Do not let cooking grease or other flammable materials accumulate in or near the range. Grease in the oven or on the cooktop may ignite.
WARNING
IN THE EVENT OF A FIRE, TAKE THE FOLLOWING STEPS TO PREVENT INJURY AND FIRE SPREADING
- Do not use water on grease fires. Never pick up a flaming pan. Turn the controls off. Smother a flaming pan on a surface unit by covering the pan completely with a well-fitting lid, cookie sheet or flat tray. Use a multi-purpose dry chemical or foam-type fire extinguisher.
If there is a fire in the oven during baking, smother the fire by closing the oven door and turning the oven off or by using a multi-purpose dry chemical or foam-type fire extinguisher.
If there is a fire in the oven during self-clean, turn the oven off and wait for the fire to go out. Do not force the door open. Introduction of fresh air at self-clean temperatures may lead to a burst of flame from the oven. Failure to follow this instruction may result in severe burns.
READ AND SAVE THESE INSTRUCTIONS
IMPORTANT SAFETY INFORMATION READ ALL INSTRUCTIONS BEFORE USING THE APPLIANCE
WARNING
COOKTOP SAFETY INSTRUCTIONS
■ Never leave the surface burners unattended at medium or high heat settings. Foods, especially oily foods, may ignite resulting in fire that could spread to surrounding cabinets.
■ Never leave oil unattended while frying. If allowed to heat beyond its smoking point, oil may ignite resulting in fire that may spread to surrounding cabinets. Use a deep fat thermometer whenever possible to monitor oil temperature.
■ To avoid oil spillover and fire, use the minimum amount of oil when using a shallow pan-frying and avoid cooking frozen foods with excessive amounts of ice.
■ Use proper pan size and avoid pans that are unstable or easily tipped. Select cookware that is matched to the size of the burner. Burner flames should be adjusted so that they do not extend beyond the bottom of the pan. Excessive flame may be hazardous.
■ Always use the LITE position when igniting the top burners and make sure the burners have ignited.
■ When using glass/ceramic cookware, make sure it is suitable for cooktop service; others may break because of sudden change in temperature.
■ To minimize the possibility of burns, ignition of flammable materials and spillage, the handle of a container should be turned toward the center of the range without extending over nearby burners.
■ Do not use a wok with a round metal support ring. The ring may trap heat and block air to the burner resulting in a carbon monoxide hazard.
■ Do not attempt to lift the cooktop. Doing so may damage the gas tubing to the surface burners resulting in a gas leak and risk of fire.
■ When disabling Lock Control (on some models), make sure the surface controls are set to the OFF position. This will prevent unintended gas flow from the burners.
■ Do not use aluminum foil to cover the grates or line any part of the cooktop. Doing so may result in carbon monoxide poisoning, overheating of the cooktop surfaces, or a potential fire hazard.
WARNING
OVEN SAFETY INSTRUCTIONS
WARNING
NEVER cover any slots, holes, or passages in the oven bottom or cover an entire rack with materials such as aluminum foil or oven liners. Doing so blocks air flow through the oven and may cause carbon monoxide poisoning. Never place foil or oven liners on the oven bottom. They can trap heat causing risk of smoke or fire.
■ Stand away from the range when opening the oven door. Hot air or steam which escapes can cause burns to hands, face and/or eyes.
■ Never place cooking utensils, pizza or baking stones, or any type of foil or liner on the oven floor. These items can trap heat or melt, resulting in damage to the product and risk of shock, smoke or fire.
- Place oven racks in desired location while oven is cool. If rack must be moved while oven is hot, be careful to avoid touching hot surfaces.
■ Do not leave items such as paper, cooking utensils, or food in the oven when not in use. Items stored in an oven can ignite.
■ Do not leave items on the cooktop near the oven vent. Items may overheat resulting in a risk of fire or burns.
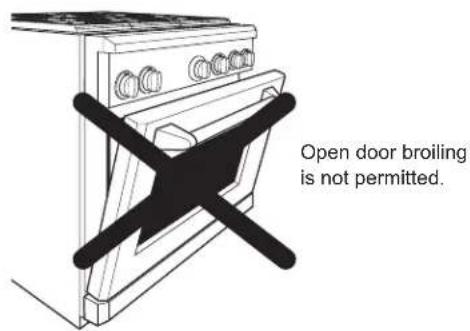
■ Never broil with door open. Open-door broiling is not permitted due to overheating of control knobs.
READ AND SAVE THESE INSTRUCTIONS
IMPORTANT SAFETY INFORMATION READ ALL INSTRUCTIONS BEFORE USING THE APPLIANCE
WARNING
SELF-CLEANING OVEN SAFETY INSTRUCTIONS
The self-cleaning feature operates the oven at temperatures high enough to burn away food soils in the oven. Follow these instructions for safe operation.
■ Do not touch oven surfaces during self-clean operation. Keep children away from the oven during self-cleaning. Failure to follow these instructions may cause burns.
■ Before operating the self-clean cycle, remove pans, shiny metal oven racks, and other utensils from the oven. Only porcelain-coated oven racks may be left in the oven.
■ Before operating the self-clean cycle, wipe grease and food soils from the oven. Excessive amount of grease may ignite leading to smoke damage to your home.
If the self-cleaning mode malfunctions, turn the oven off and disconnect the power supply. Have it serviced by a qualified technician.
■ Do not use oven cleaners. No commercial oven cleaner or oven liner protective coating of any kind should be used in or around any part of the oven.
- Do not clean the door gasket. The door gasket is essential for a good seal. Care should be taken not to rub, damage or move the gasket.
■ IMPORTANT: The health of some birds is extremely sensitive to the fumes given off during the self-cleaning cycle of any range. Move birds to another well-ventilated room.
STATE OF CALIFORNIA PROPOSITION 65 WARNINGS
WARNING
This product contains one or more chemicals known to the State of California to cause cancer, ther reproductive harm.
Self-clean electric ovens: Self clean ovens can cause low level exposure to some of the Proposition 65 substances, including carbon monoxide, during the cleaning cycle. Exposure to these substances can be minimized by opening a window or using a ventilation fan or hood.
Design
information
(Not all features are on all models. Appearance may vary.)
①
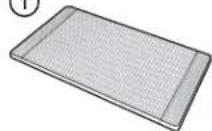
Bamboo Cutting Board
②
natural_image
Line drawing of a rectangular metal frame with two side slots and a label 'Toekick' at the bottom (no other text or symbols)③
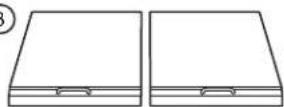
Grill and Griddle Covers
natural_image
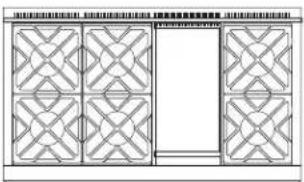
Pure architectural line drawing of a symmetrical window layout with no text, numbers, or symbols6 burners and griddle
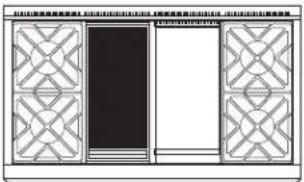
4 burners, grill and griddle
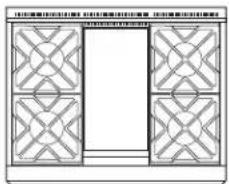
4 burners and griddle
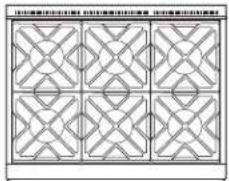
Double oven model shown includes a small oven.
| Feature Index Page | ||
| 1 | Bamboo Cutting Board (on some models) 36 | |
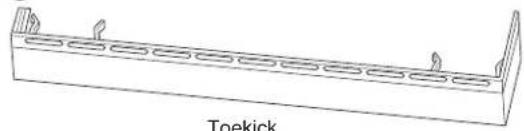
| 2 | Toekick — | |
| 3 | Grill and Griddle Covers (on some models) — | |
| 4 | Oven Vents 17 | |
| 5 | IR (Infrared) Grill 12 | |
| 6 | Grill and Griddle Grease Troughs 36 | |
| 7 | Griddle 14 | |
| 8 | Cooktop Burner Grates 35 | |
| 9 | Burner Location Indicator — | |
| 10 | LED Bullnose Task Lighting Control | — |
| 11 | Burner Control Knob with Lighted Bezel | 10, 29 |
| 12 | Oven Display | 16 |
| 13 | Mini-Knob(to select PROBE, TIMER or Special Features) | 16, 29 |
| 14 | Oven Mode Selector | 16 |
| 15 | Oven Temperature Knob | 16 |
| 16 | Kitchen Timer | 16, 27 |
| 17 | Leveling System (4) | — |
Professional All-Gas Range
Electronic ignition & automatic reignition
The range is equipped with electronic ignition which eliminates the need for a standing pilot light.
The burners on this range will automatically relight if the flame goes out.
All surface burner igniters will spark and make clicking sounds when any burner is turned on. Do not touch any of the burners when igniters are clicking.
Occasionally the burners may spark if excess wind or a draft blows the flame away from the burner's flame sensor.
The griddle and IR (infrared) grill are equipped with Glo-Bar igniters. The Glo-Bar remains energized whenever the griddle or IR grill is in use to ensure the burner always stays lit.
In case of a power outage, you can light the surface burners on your cooktop with a match. Hold a lighted match to the burner, then turn the knob to the LOW position. Use extreme caution when lighting burners this way.
Do not attempt to light the grill or griddle during a power outage. The gas to these burners will automatically shut off during a power outage.
To light a surface burner
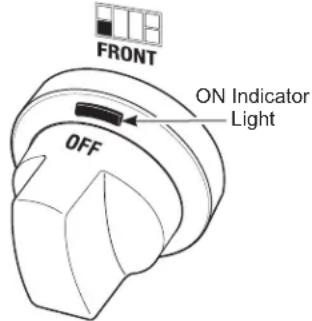
Push the control knob in and turn it counterclockwise to the LITE position.
WARNING
Burners should be
operated only when covered by cookware. Burner flames not covered by cookware present a risk of fire or clothing ignition. Never let flames extend beyond the sides of the cookware. Failure to comply may result in serious injury.
After the burner ignites, turn the knob to adjust the flame size.
To turn a burner off, turn the knob clockwise, as far as it will go, to the OFF position.
■ Do not operate a burner for an extended period of time without cookware on the grate. The finish on the grate may chip without cookware to absorb the heat.
■ The indicator light on each bezel verifies the burner is on. However, it should not be a substitute for visually checking the flame at the burner.
Dual-flame stacked burners
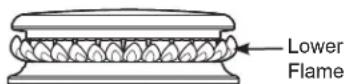
All surface burners on your range have two sets of flames stacked one on top of the other; the dual-flame burners have a lower (simmer) flame and a upper (main) flame.
When a burner is turned on, the lower flame will always light and stay on.
Simmering:
The stacked burner design provides a wide range of heat settings with which to simmer. Depending on the type and quantity of food, and pan size, the flame can be adjusted to suit your specific need. The lowest setting uses only the lower flame and can maintain delicate foods at a safe 140^ F.
Cooking:
Settings from LO to X-HI will use both upper and lower flames. Use LO to HI for all purpose cooking. Use HI or X-HI (highest setting) with larger diameter cookware.
X-HI and HI are very high heat settings and are intended to sear foods quickly and boil large quantities of water.
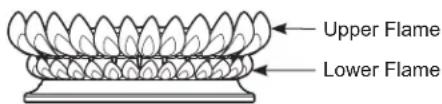
Professional All-Gas Range
How to select flame size
Watch the flame, not the knob, as you increase or reduce heat.
The flame size on a gas burner should match the cookware you are using.
FOR SAFE HANDLING OF COOKWARE, NEVER LET THE FLAME EXTEND UP THE SIDES OF THE COOKWARE. Any flame larger than the bottom of the cookware will not result in faster heating and could be hazardous.
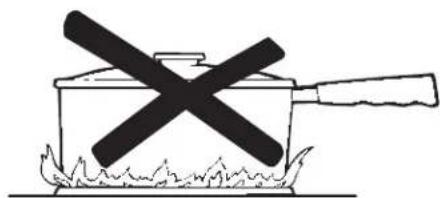
natural_image
Simple line drawing of a cooking pot with a crossed-out black X mark and flames on the base (no text or symbols)For surface stability, 6" minimum diameter cookware is recommended. Use larger diameter cookware for heat settings between HI and X-HI.
Wok cooking
The burner grates are uniquely designed to cook on either side. The flat side accommodates flat bottom cookware (stockpots, sauce pans, frying pans and flat bottom woks), while the wok side is designed to hold a wide variety of round bottom woks without the need for a separate ring.
For easy access, a front burner location is recommended for wok cooking.
The front center burner is recommended for wok cooking on 6-burner 36" and 48" ranges.
Do not use a wok support ring. Placing the ring over the burner or grate may cause the burner to work improperly, resulting in carbon monoxide levels above allowable standards. This could be hazardous to your health.
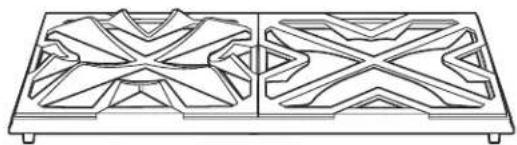
natural_image
Technical line drawing of a symmetrical mechanical or architectural component with two side panels (no text or symbols)Wok Side Flat Side
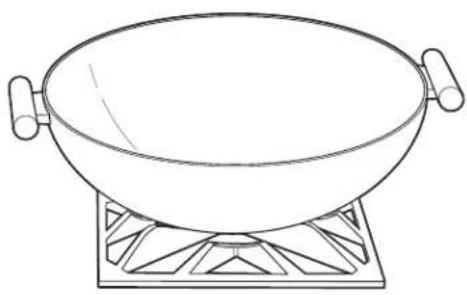
natural_image
Line drawing of a wok on a heating table (no text or symbols)Grill safety precautions (on some models)
WARNING
Fire Hazard
■ Use care when cooking greasy foods. Spilled grease may result in fire.
■ Never place any items on the grill when it is not in use. Heat from surrounding burners can heat the grill and may result in fire.
■ Place and remove the grill only when grill is cool and all surface burners are turned OFF.
Grease Flare-ups:
Occasionally, during grilling, grease drippings can ignite creating minor bursts of flame for a second or two. This is normal when grilling.
The grill radiant baffle is designed to catch excess grease, limiting flare-ups.
If a flare-up becomes excessive, remove the food from the grill and lower the heat setting until the flare-up subsides.
To further reduce flare-ups, trim excess fat around the edges of steaks and chops, use hamburger that is lean, remove the skin from poultry, etc.
Use a long spatula and a non-flammable mitt when turning food on the grill.
Grill Cover:
Remove the cover before lighting the burner. For your safety, the cover must be removed when using the grill. If the cover is left in place it will become extremely hot.
Cookware:
Do not use any cookware on the grill.
Using the IR grill
Remove the cover before lighting the burner. The cover must be removed when using the IR grill.
Set the control knob to PREHEAT. The longer the grill is preheated, the darker the grill marks will be on the food.
Allow 5 to 15 minutes to fully preheat the grill.
After preheat, the control knob may be set to any position between HI and LO.
Do not leave the grill unattended at any time.
The intense heat caramelizes fats and juices creating authentic barbecued flavor. The IR grill will achieve the same results as an outdoor grill.
All gas grills cook differently. Adjust cooking times and methods when using the IR grill.
Clean the grill grate, grease trough and grease basin after each use. Remove the parts for cleaning after they are cool to the touch.
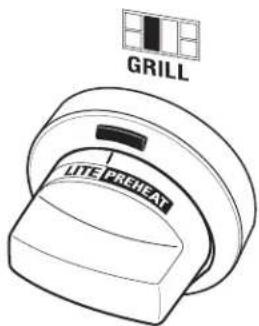
NOTE: The grill will take approximately 45 seconds to ignite. Unlike the surface burners, which use electric igniters, the grill uses a Glo-Bar for ignition. It takes approximately 45 seconds for the Glo-Bar to reach temperature. Gas is only supplied to the grill once the Glo-Bar reaches temperature.
Grill grates (on some models)
Remove the cover before lighting the IR grill.
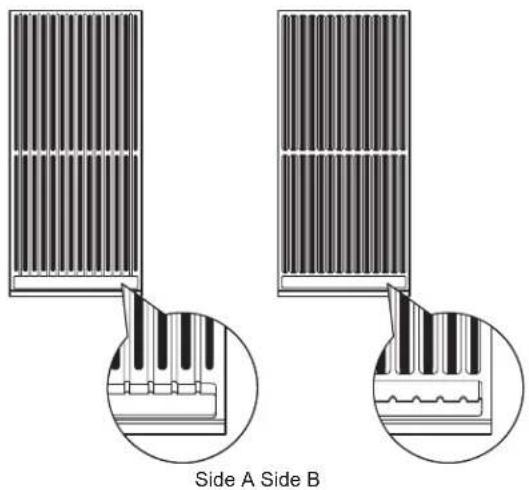
The grill grate is reversible. Place the handle end toward the front of the cooktop.
The grate will change color when subjected to the heat, and as oils cook onto the surface. This is normal and does not affect the cooking performance.
The porcelainized cast-iron grill grate does not need to be seasoned.
One side of the grate (Side A) is grooved and should be used for foods such as steak or hamburger patties. The grooves are sloped so the excess liquids and oils run toward the front of the grill and into the grease trough.
The other side of the grate (Side B) is designed for delicate foods such as fish.
Turn and move foods as needed.
| Food Setting Preheat | ||
| Hamburger Patties (8) HI or LO 5 Minutes | ||
| Chicken Breast (6)(Bone side down) LO 5 Minutes | ||
| T-Bone Steak(1-1/2" thick) LO 5 Minutes | ||
| Salmon LO 5 Minutes |
Grill radiant baffle
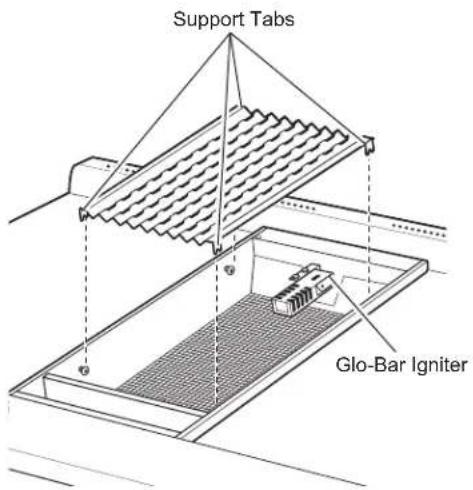
Models equipped with an IR grill have a radiant baffle which distributes the heat from the burners evenly across the grill area. The grill baffle also helps to limit grease flare-ups.
The grill baffle rests on tabs in the grill opening. Be sure the baffle is secured in place by fully engaging the tabs.
IMPORTANT: Avoid contact with the igniter. It is fragile and can chip or break.
Griddle safety precautions, leveling (on some models)
WARNING
Fire Hazard
■ Use care when cooking greasy foods. Spilled grease may result in fire.
■ Never place any items on the griddle when it is not in use. Heat from surrounding burners can heat the griddle and may result in fire.
■ Place and remove the griddle only when griddle is cool and all surface burners are turned OFF.
Remove the metal cover and the cutting board before turning the griddle on.
The griddle assembly should not be removed for cleaning.
Once the unit is in position, the griddle can be leveled. Remove the flue cover by lifting it straight up. Be careful not to scratch the surrounding stainless steel surfaces during removal of the flue cover.
The two inner screws are clamping screws for securing the griddle in place. Loosen these two screws before leveling. Do not remove these two screws.
The two outer screws are leveling screws. Do not remove these two screws. They can be turned to level the griddle or to provide a forward slope to help grease and oils to drain away from the food being cooked. After the first few uses, you will be able to judge the slope best suited for the foods you are cooking and personal preference.
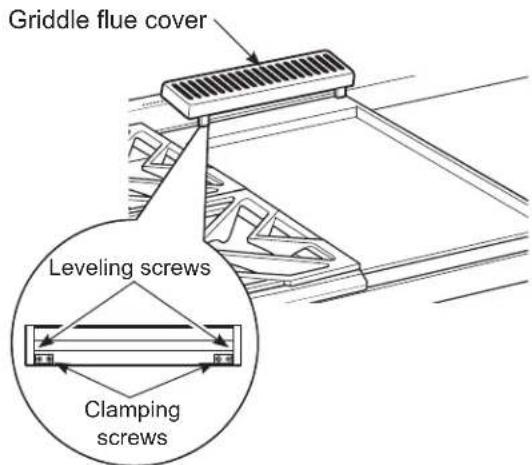
After leveling the griddle, tighten the clamping screws to secure griddle in place. Hand tighten screws; do not over-tighten.
Using the griddle
Clean the griddle thoroughly with hot soapy water before first use and after subsequent uses. The griddle surface is made of durable, highly polished Type 304 stainless steel backed by an aluminum plate for even heat distribution. Apply a light coating of cooking oil to the griddle surface to help prevent food from sticking.
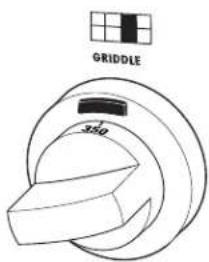
To heat the griddle, push in and turn the control knob to the desired temperature setting. The light on the bezel will glow to indicate that the thermostat control is working. The griddle is thermostatically controlled and can be set to maintain any temperature from 200°F to 450°F. Permit the griddle to preheat for 10 minutes before placing food on it.
NOTE: Unlike the surface burners which use spark igniters, the griddle uses a Glo-Bar for ignition. Gas flows to the griddle burner and ignition occurs approximately 45 seconds after the control knob is turned to a set temperature.
| Food Item Temperature Setting | |
| Pancakes 375°F | |
| Hamburgers 400°F | |
| Bacon* 400°F | |
| Grilled Cheese 350°F | |
| Eggs 275°F | |
*NOTE: Place bacon on a cold griddle. Do not preheat.
Design information NOTE: Not all features are on all models.
Full Extension Oven Rack Low Profile Oven Rack

Broiler Pan and Grid
Temperature Probe
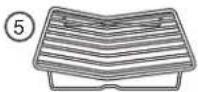
Roasting Rack
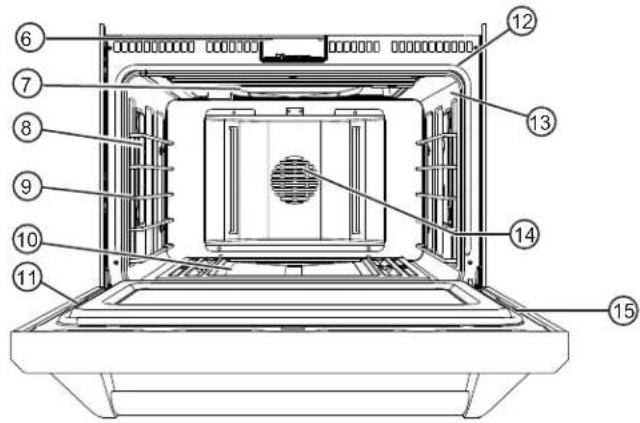
| Feature Index Page | ||
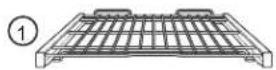
| 1 Full Extension Oven Rack(s)— 2 in large oven— 2 in small oven | 18, 19, 23, 30 | |
| 2 Low Profile Oven Rack (1 in large oven) 18, 19, 21, 30 | ||
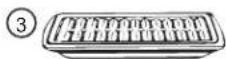
| 3 Broiler Pan and Grid 22, 29 | ||
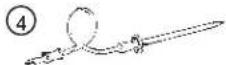
| 4 Temperature Probe 24, 31 | ||
| 5 Roasting Rack 22, 29 | ||
| 6 Automatic Oven Door Latch 26 | ||
| 7 IR (Infrared) Broil Burner 29 | ||
| 8 Halogen Oven Lights 32 | ||
| 9 Oven Rack Supports— 5 positions in large oven— 4 positions in small oven | 19, 23 | |
| 10 Bake Burner (under oven floor) 29 | ||
| 11 Oven Door Seal 33 | ||
| 12 Oven Frame Seal | 33 | |
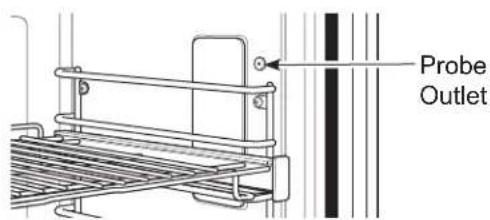
| 13 Temperature Probe Outlet— right side in large oven— left side in small oven | 24 | |
| 14 Convection Fan | 22, 23 | |
| 15 Oven Door | 31, 33 | |
NOTE: On models equipped with 2 ovens, both ovens have same features.
Features of your oven control and timer
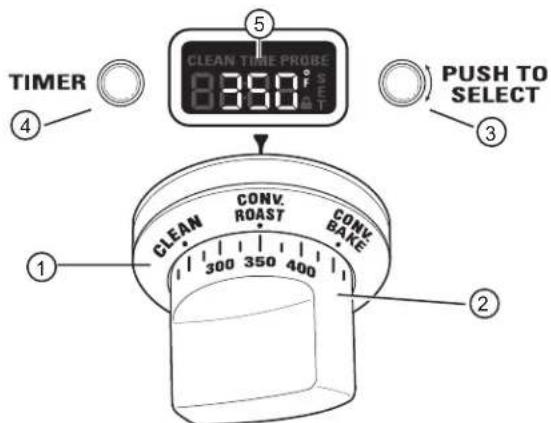
1 Oven Mode Selector – Turn outer ring to select:
PROOF – Maintains a warm environment useful for rising yeast-leavened products.
BAKE – Select for traditional baking.
CONV BAKE – Use for convection baking.
CONV ROAST – Use for convection roasting.
BROIL – Select for broiling.
CLEAN – Select for the self-cleaning function. See the Self-Cleaning Oven section.
2 Temperature Knob – Turn to select: Temperatures from 175^ F to 550^ F.
LOW BROIL – A lower broiling temperature is automatically set.
HIGH BROIL – A higher broiling temperature is automatically set.
CLEAN – The self-clean temperature is automatically set.
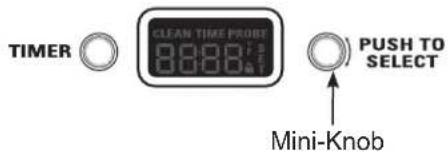
3 Mini-Knob – Turn to select and push to enter PROBE or TIMER settings. Also to adjust CLEAN cycle time.
4 Timer Button – Push to select the kitchen timer function. The timer does not control oven operations.
5 Oven Display – Displays oven functions such as oven and probe temperatures and kitchen timer.
The Oven Mode Selector (1) AND the Temperature Knob (2) must be set together in one of the following valid pairings:
| Oven Mode Selector Temperature | Knob |
| BAKE 175° to 550°F | |
| CONV BAKE 175° to 550°F | |
| CONVECTION/ROAST 175° to 550°F | |
| BROIL HIGH or LOW BROIL | |
| CLEAN CLEAN | |
| PROOF — |
To cancel a feature, turn either the Oven Mode Selector or the Temperature knob to OFF.
To cancel PROOF, turn the Oven Mode Selector to OFF.
Baking Tips
| Professional All-Gas Range | ||
| Rear oven vents | An internal cooling fan operates during all oven modes. The warm air from the oven is exhausted through vents located at the rear of the cooktop.Do not allow the airflow from the rear vents to be obstructed by cookware or towels. | 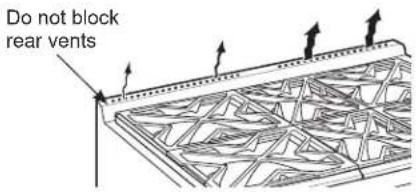 |
| Aluminum Foil and Oven Liners | ⚠️CAUTIONDo not use any type of foil or oven liner to cover the oven bottom. These items can trap heat or melt, resulting in damage to the product and risk of shock, smoke or fire. Damage from improper use of these items is not covered by the product warranty.Foil may be used to catch spills by placing a sheet on a lower rack, several inches below the food. Do not use more foil than necessary and never entirely cover an oven rack with aluminum foil. Keep foil at least 1-1/2" from oven walls to prevent poor heat circulation. | 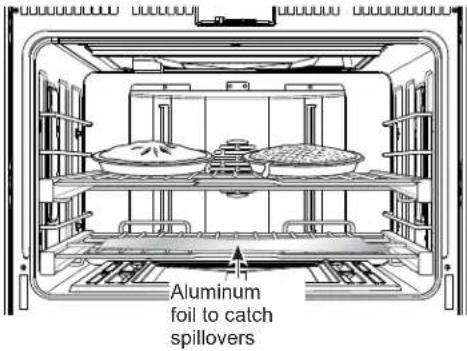 NOTE: “NO FOIL ON OVEN BOTTOM” note is enameled on the bottom of the oven cavity and is designed to withstand self-cleaning temperatures. Do not attempt to peal or scrape off. NOTE: “NO FOIL ON OVEN BOTTOM” note is enameled on the bottom of the oven cavity and is designed to withstand self-cleaning temperatures. Do not attempt to peal or scrape off. |
| Pan placement | For even cooking and proper browning, there must be enough room for air circulation in the oven. Baking results will be better if baking pans are centered as much as possible rather than being placed to the front or to the back of the oven. | |
| Baking pans/sheets | Use the proper baking pan. The type of finish on the pan effects the amount of browning that will occur.■ Dark, rough or dull pans absorb heat resulting in a browner, crisper crust. Use this type for pies. | ■ Shiny, bright and smooth pans reflect heat, resulting in a lighter, more delicate browning. Cakes and cookies require this type of pan or sheet.■ Glass baking dishes also absorb heat. When baking in glass baking dishes, the temperature may need to be reduced by 25°F. |
| Preheating | Allow the oven to preheat before placing food in the oven. Preheating is necessary for good results when baking cakes, cookies, pastry and breads. | NOTE: Condensation or fogging on the inside of the oven door glass is normal during the preheating of the oven and will evaporate usually by the end of the preheating cycle. |
Full extension oven racks
CAUTION
To avoid possible burns, place the racks in the correct position before turning on the oven.
The correct rack position depends on the kind of food and the browning desired.
The racks have a frame that locks into the rack supports on both sides. Once the frame is locked into place, always pull the rack out, by its upper front rail, to its full extension stop position, when placing or removing cookware.
Remove and replace oven racks
To remove a rack:
- Make sure the rack is pushed all the way into the oven.
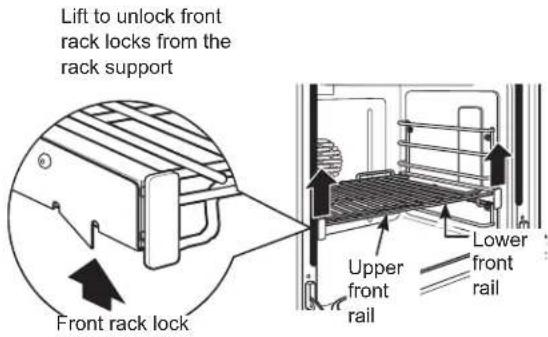
- Grasp the rack by both its upper front rail and its lower front rail and lift straight up to unlock the front rack locks from the rack supports.
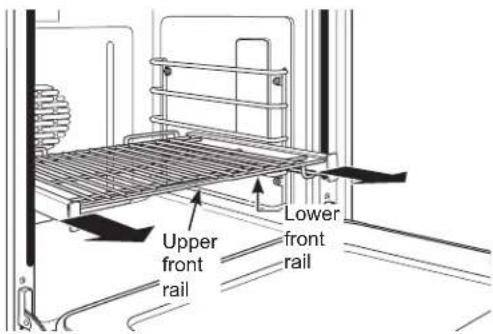
- Firmly holding onto both the upper and lower front rack rails, pull the rack forward and remove it from the oven.
To replace a rack:
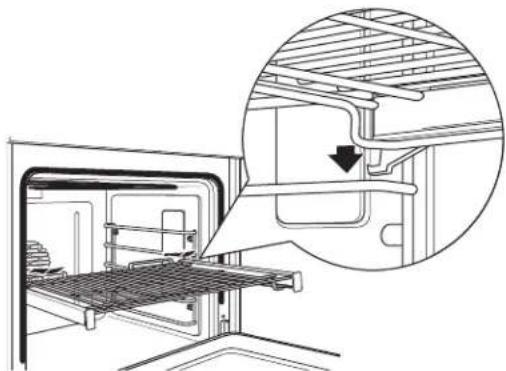
- Place the rear rack locks over and onto the rack supports (five rack positions are available including the top position).
natural_image
Technical line drawing of a mechanical assembly with an inset showing a detail of a component (no text or symbols present)- Slide the rack all the way in until the rear rack locks are secure on the rear rack supports and press the front rack locks onto the front rack supports.
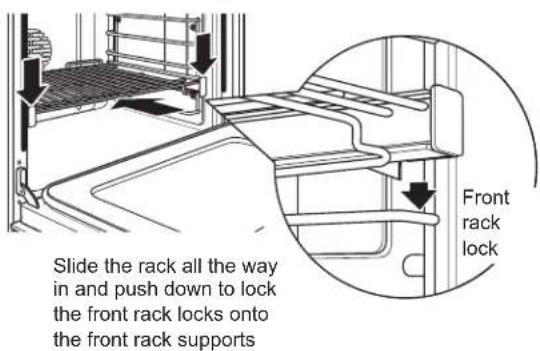
- Pull the rack all the way out to check that it is properly engaged.
Low profile oven rack
The low profile oven rack is designed for optimized performance when baking or broiling certain foods in your Monogram Professional All-Gas range. It can also be used as a normal oven rack with the full extension oven racks as well.
Please refer to the oven rack position table for your bake/broil/convection mode for details as to location and rack type for the best performance.
How to set the oven for baking
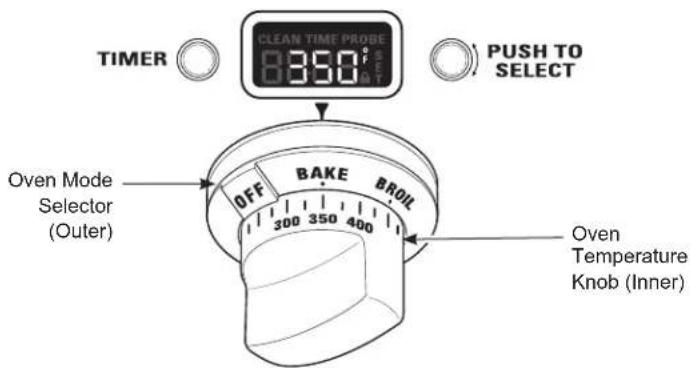
-
Turn the Oven Mode Selector to BAKE.
-
Using the Temperature knob, set the desired temperature, in 25^ F increments, from 175^ F to 550^ F.
The oven will now begin to preheat. The temperature display will begin at 100^ F and remain there until the oven exceeds that temperature. From that point, the display will show the actual temperature.
The interior lights will turn on and stay on until the oven is turned off. The convection oven fan will turn on temporarily during preheat. The control will beep when the oven is preheated and food can now be placed inside the oven.
- Turn the Oven Mode Selector and the Temperature knob to OFF when baking is finished.
NOTE: A cooling fan will turn on to cool internal parts. This is normal, and the fan may continue to run even after the oven is turned off.
Use the temperature probe when a precise internal temperature is important. See Using the probe.
natural_image
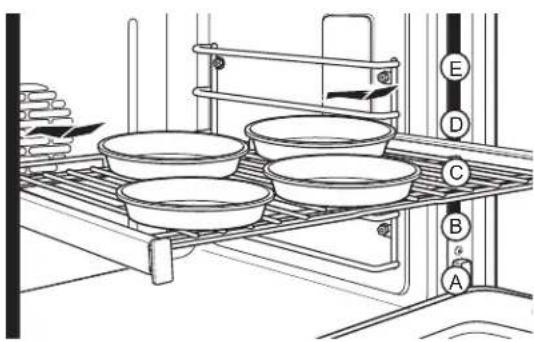
Line drawing of a kitchen rack with multiple bowls and a stand, no text or symbols presentFor best results when baking four cake layers at one time, place four pans on one shelf using the center position C. Place the pans so each has at least 1-1/2" air space around it.
natural_image
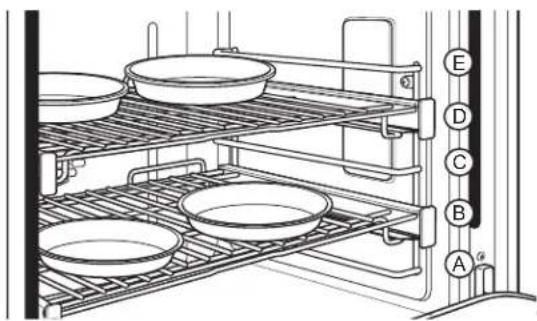
Technical line drawing of a rack with multiple bowls and labeled components (A–E), no readable text or symbols present.Or, place four pans using racks B and D. Stagger the pans so that one pan is not directly above another as shown above.
The oven has 5 rack positions. See the Full extension oven racks section for how to use, remove and replace the racks.
The double oven range has a small oven with 4 rack positions. Rack position C is not in the small oven.
| Type of Food | Large Oven Rack Position | Small Oven Rack Position |
| Angel food cake A A | ||
| Biscuits or muffins C | C | |
| Cookies C C | ||
| Brownies B C | ||
| 2 Layer cakes B B | ||
| 4 Layer cakes C — | ||
| Sheet cakes or 9 x 13 cakes | B or C | C |
| Quick breads | C B | |
| Bundt or pound cakes | B or C | B |
| Scratch Pies or pie shells | B B | |
| Frozen pies | B or C | — |
| Casseroles | B or C | C |
| Pizza | C B |
Suggested shelf positions are intended as general guidelines. Experiment with these positions for specific foods and personal preference.
Introduction to broiling
The broil mode has 2 settings. Choose HI or LO setting.
■ The HI setting can be used to seal in juices or provide intense browning or charring when needed for foods such as hamburgers, roasted vegetables, whole peppers, eggplant, corn, assorted cut vegetables, kabobs and very thin meats such as smoked pork chops, London broil and chicken.
■ The LO setting can be used for foods that need adequate browning and also need to be thoroughly cooked, like fish fillets, pork tenderloin and beef roast.
How to set the oven for broiling
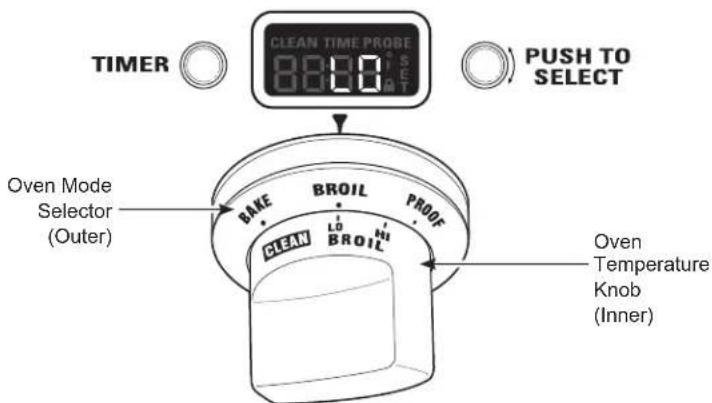
- Turn the Oven Mode Selector to BROIL
- Turn the Oven Temperature Knob to LO BROIL or HI BROIL. LO or HI will appear in the display.
NOTE: Always broil with the door closed. If the door is left open, the display will scroll "CLOSE door" and the elements will not turn on until the door is shut.
The oven interior lights will turn on and stay on until the oven is turned off.
- When broiling is finished, turn the Oven Mode Selector and the Temperature knob to OFF.
NOTE: A cooling fan will turn on to cool internal parts. This is normal, and the fan may continue to run even after the oven is turned off.
NOTE: Broil will not work if the temperature probe is plugged in. Never leave your probe inside the oven during a broil cycle.
Broiling guide
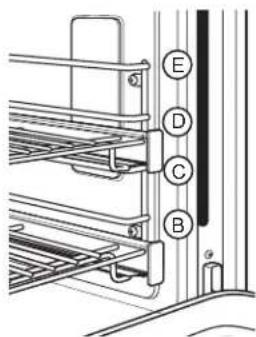
NOTE: In general, higher rack positions yield darker external searing and lower positions yield more doneness.
Due to the variety of of meats and cuts available, you may select alternate rack positions based on personal preferences of doneness and external searing. For optimal searing, preheat oven for 5-10 minutes.
The size, weight, thickness, starting temperature and your preference of doneness will affect broiling times. This guide is based on meats at refrigerator temperature.
| Food Doneness | Type or Thickness Rack | Position Broil Setting Comments | |||
| Steak Rare - | Medium Rare (140°F-150°F) | 1" thick D-E | Hi Steaks less than | 1" thick | are difficult to cook rare. They may cook through before browning. |
| Medium (160°F) | 3/4" to 1" thick C-D | Hi To avoid curling, slash | fat at 1" intervals. | ||
| Well Done (170°F) | 1/2" to 3/4" thick B-C Hi | ||||
| Chicken | Breast, bonless | B-C | Hi or Lo | Broil skin-side down first | |
| Breast, bone-in | B-C | Hi or Lo | |||
| Fish Fillets | 1-lb fillets 1/4" to 1/2" thick | D | Lo | Handle and turn very carefully | |
| Kabobs | (5 skewers) | D | Hi | ||
| Sliced Vegetables | D | Lo | |||
The U.S. Department of Agriculture says "Rare beef is popular, but you should know that cooking it to only 140^ means some food poisoning organisms may survive." (Source: Safe Food Book. Your Kitchen Guide. USDA Rev. June 1985.)
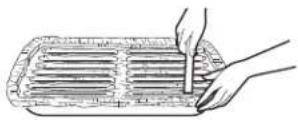
Aluminum foil
You can use aluminum foil to line the broiler pan and broiler grid. However, you must mold the foil tightly to the grid and cut slits in it just like the grid.
Professional All-Gas Range
Introduction to convection cooking
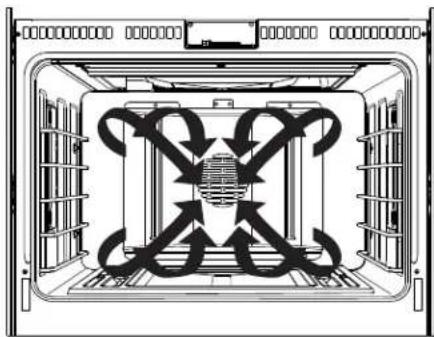
The Monogram reverse-air convection system fan periodically pauses, then changes direction to best distribute hot air throughout the oven. As a result, foods are evenly cooked and browned—often in less time with convection heat.
NOTE: The convection fan shuts off when the oven door is opened.
natural_image
Technical line drawing of a server rack with internal air flow patterns (no text or symbols)Cookware for convection cooking
Before using your convection oven, check to see if your cookware leaves room for air circulation in the oven. If you are baking with several pans, leave space between them. Also, be sure the pans do not touch each other or the walls of the oven.
Cookware used in standard BAKE will also work in CONV BAKE. See Baking Tips section.
It is recommended that when baking cookies, the best results are attained with a flat cookie sheet instead of a pan with sides. For recipes like oven-baked chicken, use a pan with low sides. Hot air cannot circulate well around food in a pan with high sides.
Adapting recipes
You can use your favorite recipes in the convection oven.
When convection baking, it may be necessary to reduce the baking temperature by 25^ F or to adjust the cooking time. No temperature adjustment is necessary when using CONV ROAST.
Some package instructions for frozen casseroles or main dishes have been developed using commercial convection ovens. For best results in this oven, preheat the oven and use the temperature on the package.
Convection roasting tips
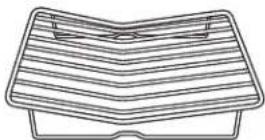
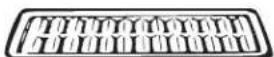
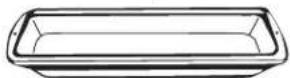
Use the broiler pan, grid and the roasting rack for best results. Use of the rack will result in improved browning on the underside of meat or poultry.
- Place the oven rack on a low rack position (A).
- Place the grid on the broiler pan and put the roasting rack over them.
- Place meat on the roasting rack.
Roasting Rack
Grid
Broiler pan
How to set the oven for convection baking or roasting
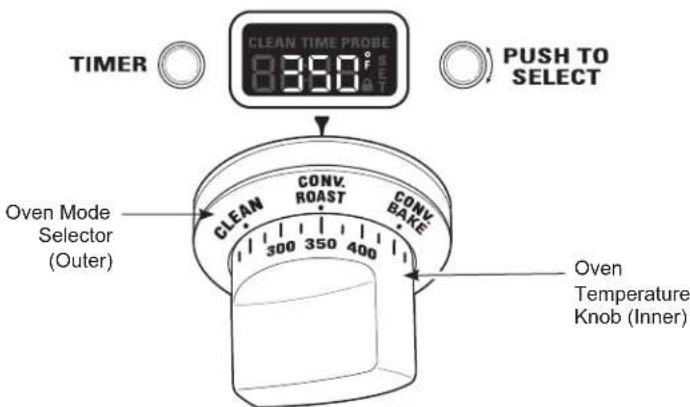
Convection Baking is ideal for evenly browned baked foods cooked on single or multiple racks. Select Convection Roast to roast large, tender cuts of meat uncovered.
When set on CONV BAKE or CONV ROAST, the rear convection elements and the fan operate when the oven is heating.
-
Turn the Oven Mode Selector to CONV BAKE or CONV ROAST.
-
Using the Temperature knob, set the desired temperature, in 25^ F increments, from 175^ F to 550^ F.
The oven will now begin to preheat. The temperature display will begin at 100^ F and remain there until the oven exceeds that temperature. From that point, the display will show the actual temperature.
| Type of Food | Large Oven Rack Position | Small Oven Rack Position |
| Muffins and Cupcakes (multiple racks) | B & D B & D | |
| Cookies (multiple racks) A, C & | E B & D | |
| Frozen Appetizer C — | ||
| Frozen Appetizer (multiple racks) A, C & | E — | |
| Roasting (large cuts of meat) A B | ||
| Turkey or Whole Chicken A B |
Suggested shelf positions are intended as general guidelines. Experiment with these positions for specific foods and personal preference.
The interior lights will turn on and stay on until the oven is turned off. The convection oven fan will turn on during preheat. The control will beep when the oven is preheated and food can be placed inside the oven.
- Turn the Oven Mode Selector and the Temperature knob to OFF when convection cooking is finished.
NOTE: A cooling fan will turn on to cool internal parts. This is normal, and the fan may continue to run even after the oven is turned off.
Use the temperature probe when a precise internal temperature is important. See Using the probe.
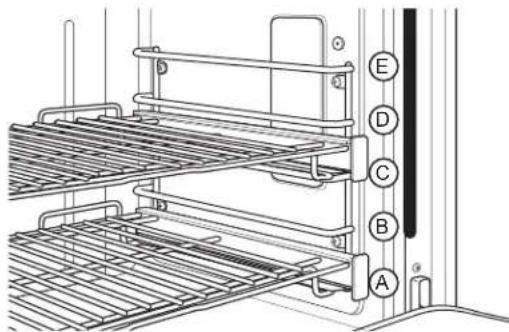
The oven has 5 rack positions. See the Full extension oven racks section for how to use, remove and replace the racks.
The double-oven range has a small oven with 4 rack positions. Rack position C is not in the small oven.
How to use the probe with bake, convection bake and convection roast
WARNING
Consuming undercooked food can result in foodborne illness. Use to the following instructions to ensure all portions of the food reach looking temperatures. Recommendations for minimum safe food can be found at www.foodsafety.gov or www.IsltDoneYet.gov.
CAUTION
Use oven mitts when inserting or removing the probe from the hot oven. Areas around the probe inlet can be very hot.
For many foods, especially roasts and poultry, internal food temperature is the best test for doneness. The temperature probe takes the guesswork out of cooking foods to the exact doneness you want.
The probe can be used with the BAKE, CONV BAKE and CONV ROAST.
- Push the tip of the probe into the thickest part of the meat.
- Place the rack in the desired rack position.
- Set the oven controls. Turn the Oven Mode Selector to CONV BAKE, CONV ROAST or BAKE. Turn the Temperature Knob to desired oven temperature in 25°F increments, from 175°F to 550°F. Allow the oven to preheat if necessary.
The oven and oven lights will turn on immediately and stay on until the oven is turned off.
-
Use oven mitts to place the food in the hot oven. Insert the plug into the outlet. Make sure it is pushed all the way in. Close the oven door.
-
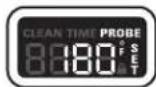
Turn the Mini-Knob to find the desired internal food temperature. Push the Mini-Knob to select that temperature.
TIMER


PUSH TO SELECT
The word PROBE and SET, will flash in the display until a temperature is selected. If no temperature is set, the probe will default to 100^ F. If the oven was not preheated, the display will show LO.
The internal food temperature can be set from a minimum of 100^ F and up to 200^ F maximum.
When food reaches the set internal temperature, the display will beep. To stop the reminder beep, turn the Oven Mode Selector and the Temperature Knob to OFF. Use oven mitts to remove the probe from the oven outlet.
To change the set internal temperature anytime in the cooking process, push the Mini-Knob and turn to adjust the temperature. Press the Mini-Knob to select.
Using the probe
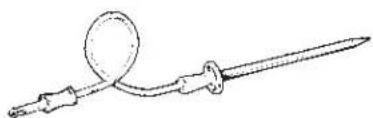
Use only the probe provided with the range. Use the handles of the probe and plug when inserting and removing them from the meat and oven outlet.
■ To avoid damaging the probe, do not use tongs to pull on the cable when removing it.
■ To avoid breaking the probe, make sure food is completely defrosted before inserting.
■ To prevent possible burns, always wear an oven mitt when removing the plug; internal oven surfaces may be hot.
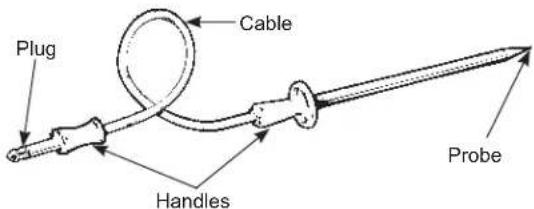
The temperature probe has a skewer-like probe at one end and a plug at the other end that goes into the outlet in the oven.
■ Never leave the probe inside the oven during a broil or self-cleaning cycle.
■ Do not store the probe in the oven.
Proper placement of the probe
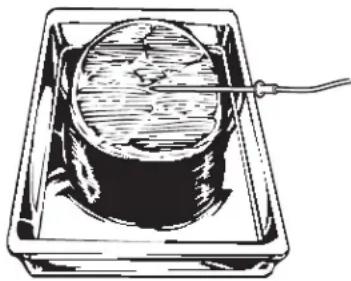
■ Measure the distance to the center of a roast by laying the temperature probe on top of the meat. Use your thumb and forefinger to mark where the edge of the meat will come on the probe.
■ Insert the probe up to the point marked with your finger. The tip of the probe should be in the center of the meat.
natural_image
Illustration of a cylindrical object with a rod inserted into it, placed inside a rectangular frame (no text or symbols)How to set the oven for proofing
The proofing feature maintains a warm environment which is useful for rising yeast-leavened dough.
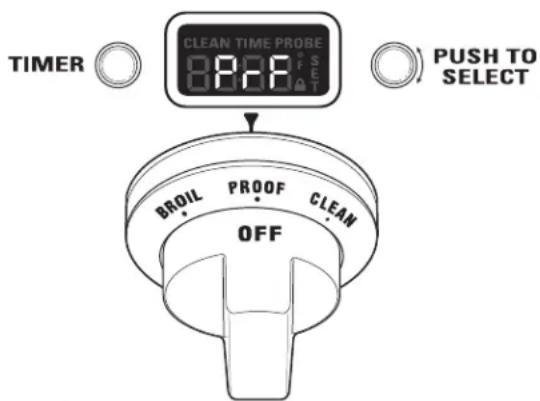
- Turn the Oven Mode Selector to PROOF. The display will show "PrF". PROOF mode will not operate when oven is above 125^ F. The display will scroll "too hot". Allow the oven time to cool.
For best results, cover the dough with a cloth or with greased plastic wrap.
Use rack position B or C in the large oven. Use rack position B in the small oven.
The proofing feature automatically provides the optimum temperature for the proofing process; therefore the Temperature knob does not affect the proof temperature.
The oven interior lights cycle on and off as necessary to maintain optimum proof temperature until the Oven Mode Selector has been turned to OFF.
■ To avoid lowering the oven temperature and lengthening proofing time, do not open the oven door unnecessarily.
- Check bread products early to avoid overproofing.
- When proofing is finished, turn the Oven Mode Selector to OFF.
CAUTION
Do not use the proofing
mode for warming food or keeping food hot. The proofing oven temperature is not hot enough to hold foods at safe temperatures.
Self-cleaning safety precautions
The self-clean oven feature is designed to make cleaning the inside of the oven easy by using very high temperatures to burn away food spills.
WARNING
Wipe up excess grease and other food spills with a damp cloth. Excessive food soils can ignite leading to smoke and heat damage.
■ Do not clean the oven seals, damage can occur.
■ Remove cookware, broiler pan, grid, probe and any aluminum foil from the oven.
■ Make sure the oven light lens and lens frame are in place.
■ Do not use commercial oven cleaners, abrasives or oven protectors in or near the self-cleaning oven.
■ We recommend venting your kitchen with an open window or using a ventilation fan/hood during the self-clean cycle.
■ Clean soil from around the frame and from around the oven door, outside the oven seals. These areas must be cleaned by hand.
■ The oven racks may be left in the oven during the self-clean cycle.
IMPORTANT: The health of some birds is extremely sensitive to the fumes given off during the self-cleaning cycle of any oven. Move birds to another well-ventilated room.
NOTE: During the self-clean cycle, the cooktop will be locked out and not functional. If a surface burner is turned on after the self-clean cycle has begun, a warning will be displayed on the Oven Display “err turn surf frnr off” and a beeping sound will be heard.
NOTE: Self-Clean will not work if the temperature probe is plugged in or if the Sabbath mode is set.
On double oven models, you can set a clean cycle in both ovens at the same time. The last oven set will automatically delay its start until the end of the first oven's clean cycle.
On double oven models, you can bake in one oven and self-clean in the other at the same time. However, you cannot use the PROOF mode setting in one oven while the other oven is self-cleaning.
How to set the oven for cleaning
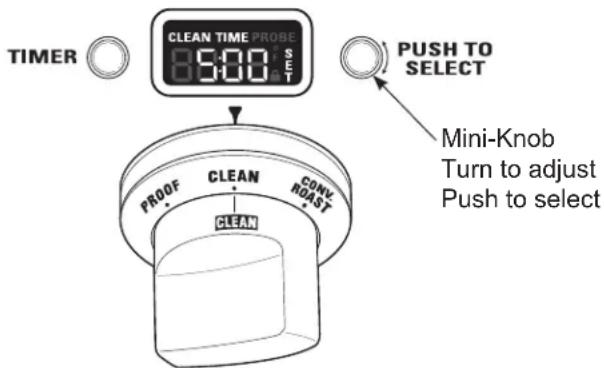
- Turn off all surface burners. (The CLEAN cycle will not start until all surface burners have been turned off.)
- Turn the Oven Mode Selector to CLEAN.
- Turn the Temperature knob to CLEAN.
The control automatically defaults to the recommended clean cycle time of 5 hours. The clean time may be adjusted to any time between 3 and 5 hours using the Mini-Knob. The display will show the actual time remaining. - Push the Mini-Knob to start the CLEAN cycle.
If "CLOSE door" scrolls in the display, the self-clean cycle has been selected but the door is not closed. Close the oven door.
The symbol will flash as the oven door is locked. It will not be possible to open the oven door during the clean cycle.
- After the clean cycle is complete and the oven has cooled, "End" will show in the display and the 📄will turn off. Turn the Oven Mode Selector and the Temperature knob to OFF.
To interrupt a clean cycle, turn the Oven Mode Selector and the Temperature knob to OFF. When the oven has cooled to a safe temperature, the 🔒 symbol will turn off indicating the door may be opened.
An interrupted clean cycle cannot be restarted until after the oven is cool enough for the door to unlock.
Professional All-Gas Range
After a clean cycle
You may notice some white ash in the oven. Wipe it up with a damp cloth after the oven cools.
If white spots remain, remove them with warm sudsy water and rinse thoroughly with a vinegar and water mixture. These deposits are usually a salt residue that cannot be removed by the clean cycle.
If the oven is not clean after one clean cycle, repeat the cycle.
Timer
NOTE: The timer is independent of all the other functions and does not control the oven.
To set the timer:
- Push the TIMER button.
- Turn the Mini-Knob to adjust any length of time up to 12 hours and push to select it.
On double oven models, each oven control has its own timer function. Each timer can be set independently.
The control will beep with 1 minute remaining and the display will show seconds until the timer counts down to :00. When the timer reaches :00, the control will beep 3 times followed by one beep every 6 seconds until the Mini-Knob is pushed.
To cancel the timer:
- Push the TIMER button.
- Turn the Mini-Knob to :00 and push to select.
To adjust the timer after start:
- Push the TIMER button.
- Turn the Mini-Knob to a new desired time and push to select.
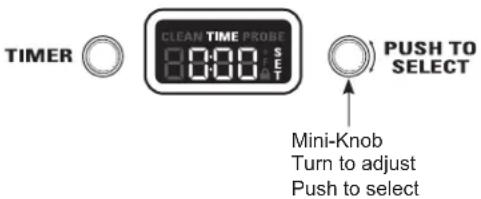
NOTE: The timer cannot be used while the oven is self-cleaning. (On double oven models, the timer for the oven that is not in the self-cleaning mode may be used.)
Oven thermostat adjustment
You may find that your new oven cooks differently than the one it replaced. Use your new oven for a few weeks to become more familiar with it. If you still think your new oven is too hot or too cold, you can adjust the thermostat yourself.
On double oven models, use the large oven controls to enter the mode and to select the adjustment.
To adjust the oven thermostat:
- Push and hold the TIMER button and Mini-Knob at the same time for 4 seconds until the display shows "SF" (Special Features).
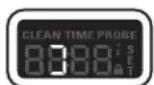
- Turn the Mini-Knob counterclockwise until the display scrolls "OFFSET". Push the Mini-Knob to select the offset mode.
- Turn the Mini-Knob to adjust the oven thermostat up to 35^ F hotter or (-) 35^ F cooler in 1^ F increments.
3 A. On double oven models, you can adjust the thermostat of the small oven by turning the Mini-Knob above the small oven. Use the large oven Mini-Knob to select that adjustment.
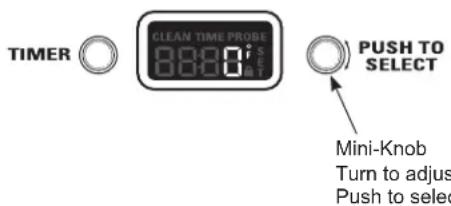
- Push the Mini-Knob to select your choice and exit the mode. If you do not wish to save changes, push the TIMER button to exit at any time.
NOTE: This adjustment will only affect Bake, Convection Bake and Convection Roast temperatures; it does not affect broiling or self-cleaning temperatures. The adjustment will be retained in memory after a power failure.
Do not use thermometers, such as those found in grocery stores, to check the temperature setting of your oven. These thermometers may vary 20–40 degrees.
Sabbath mode
To set the Sabbath mode:
The Sabbath mode is designed for use on the Jewish Sabbath and other Jewish holidays.
It can be used for baking only. It cannot be used for any other cooking mode.
When the Sabbath feature is set, the oven light and all audible beeps will be disabled. The feature will also provide a random delay period, of approximately 30 seconds to 1 minute, before the oven will turn on once it is set to BAKE.
- Push and hold the TIMER button and Mini-Knob at the same time for 4 seconds until the display shows "SF" (Special Features).
- Turn the Mini-Knob clockwise until the display scrolls "SAbbAtH." Push the Mini-Knob to select the Sabbath mode.
- Once "SAbbAtH" is selected, the display will scroll "SAbbAtH ON".
The Sabbath setting will control both ovens. The symbol will appear in both oven display windows.
For double oven models, use the large oven control to set the Sabbath feature for both ovens.
TIMER


PUSH TO SELECT
Mini-Knob
Turn to adjust
Push to select
To Cancel the Sabbath Mode:
Repeat steps 1, 2 and 3. The display will scroll "SAbbAtH OFF".
The oven temperature may be adjusted at any time by turning the temperature knob. There is a random delay before the oven elements respond.

Certified Sabbath Mode
Control panel and knobs
Be sure all controls are off and all surfaces are cool before cleaning any part of the range.
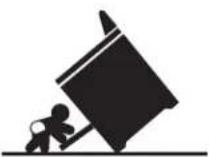
WARNING
If your range is removed for cleaning, servicing or any reason, be sure the anti-tip device is reengaged properly when the range is replaced. Failure to take this precaution could result in tipping of the range and can result in death or serious burns to children or adults.
Clean up spatters with a damp cloth. Remove heavier soil with warm, soapy water.
Do not use abrasives of any kind on the control panel or knobs.
The control knobs may be removed for easier cleaning. To remove a knob, pull it straight off the control panel. Wash the knobs in hot soapy water, but do not soak.
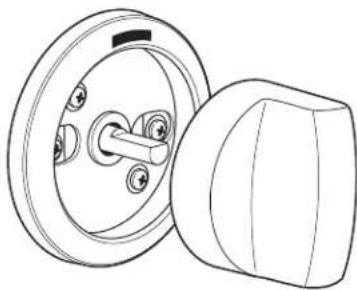
natural_image
Technical line drawing of a mechanical knob and dial (no text or symbols)NOTE: The Mini-Knob is not removable.
NOTE: For 30" ranges, ZGP304N and ZGP304L, place the knob with X-HI setting on the right-front side.
Oven burners
Do not attempt to clean the IR (Infrared) broil burner. Any soil will burn off when the burner is heated.
The bake burner is not exposed.
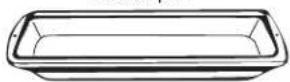
Broiler pan, grid and roasting rack
The broiler pan, grid and roasting rack are all dishwasher safe. However, baked on foods may require washing by hand with a commercial oven cleaner or abrasive detergent.
Do not store a soiled broiler pan or grid anywhere in the oven. Always properly dispose of excess grease.
CAUTION
Do not clean the broiler pan,
grid or roasting rack in a self-cleaning oven.
Roasting Rack
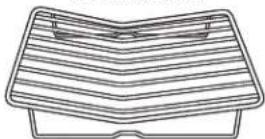
Grid
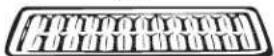
Broiler pan
Oven racks
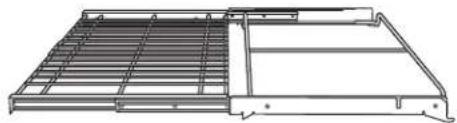
The racks may remain in the oven during the self-cleaning cycle without being damaged.
Periodically, after several self-clean cycles, the oven racks may need to be lubricated using the Graphite Lubrication shipped with your range. To order additional Graphite Lubrication, call our National Parts Center at 800.626.2002 and reference WB02T10303.
- Remove rack from the oven. See the Full extension oven racks section.
- Fully extend the rack on a table or countertop. Newspaper may be placed underneath the rack for easy cleanup.
natural_image
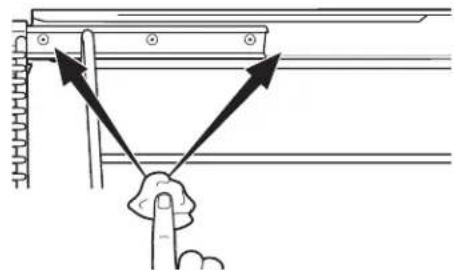
Technical line drawing of a mechanical component with internal grid structure (no text or symbols)- If there is debris in the slide tracks, wipe it away using a paper towel. NOTE: Any graphite lubricant wiped away must be replaced.
natural_image
Diagram showing two arrows pointing at a structural component with a finger inserted (no text or symbols)- Shake the graphite lubricant before opening it. Starting with left slide mechanism of the rack, place four (4) small drops of lubricant on the two (2) bottom tracks of the slide close to the bearing carriers.
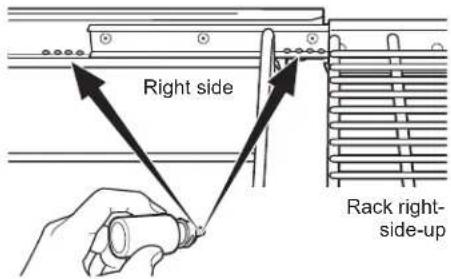
- Repeat for the right slide mechanism of the rack.
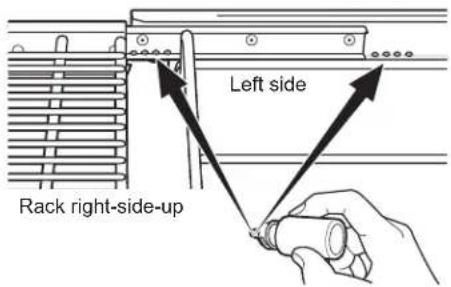
-
Open and close the rack several times to distribute the lubricant.
-
Replace the cap on the lubricant and shake it again. Turn the rack over and repeat steps 3, 4, 5 and 6.
-
Close the rack, turn rack right-side-up and place in the oven. See the Full extension oven racks section.
-
Repeat above steps for each rack.
NOTE: Do not use a cooking spray or other lubricant sprays on the slides.
Low profile oven rack
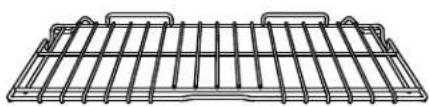
The gray porcelain-coated low profile rack may remain in the oven during the self-cleaning cycle without being damaged. It may also be cleaned using a mild abrasive cleanser. After cleaning, rinse the rack with clean water and dry with a clean cloth.
Periodically and after clean cycles, the low profile rack may need to be lubricated to aid sliding. Wipe the rack edges or oven rack supports with the Graphite Lubrication shipped with your range or vegetable oil.
To order additional Graphite Lubrication, call our National Parts Center at 800.626.2002 and reference WB02T10303.
natural_image
Line drawing of a wire mesh grid (no text or symbols)Lift-off oven door
The door is very heavy. Be careful when removing and lifting the door. Do not lift the door by the handle.
To remove the door:
- Fully open the door.
- Pull the hinge locks down toward the door frame, to the unlocked position. A tool, such as a small flat-blade screwdriver, may be required.
- Firmly grasp both sides of the door at the top.
- Close door to the door removal position, (approximately 15 degrees from closed) and lift it up and out until the hinge arm is clear of the slot.
To replace the door:
- Firmly grasp both sides of the door at the top.
- With the door at the same angle as the removal position, seat the indentation of the hinge arm into the bottom edge of the hinge slot. The notch in the hinge arm must be fully seated into the bottom of the slot.
- Fully open the door. If the door will not fully open, the indentation is not seated correctly in the bottom edge of the slot.
- Push the hinge locks up against the front frame of the oven cavity, to the locked position.
- Close the oven door.
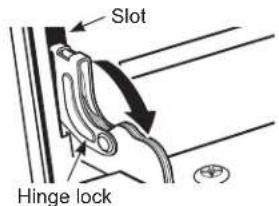
Pull hinge locks down to unlock
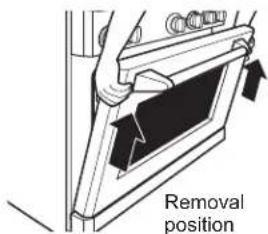
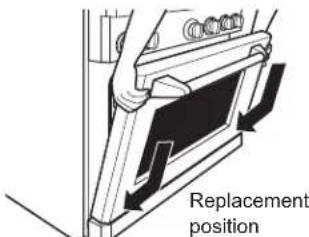
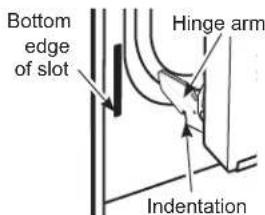
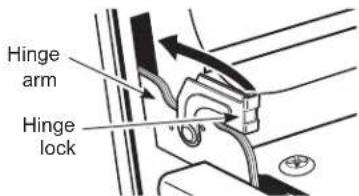
Push hinge locks up to lock
Probe
Allow the temperature probe to cool before cleaning.
The probe should be cleaned with soap and water by hand.
Do not immerse the temperature probe in water.
Do not store the temperature probe in the oven.
Do not clean the temperature probe in the self-cleaning oven.
natural_image
Line drawing of a medical or laboratory instrument with a circular component and two rods (no text or symbols)Oven lights
WARNING
SHOCK OR BURN HAZARD:
Before replacing oven light bulb, disconnect the electrical power to the range at the main fuse or circuit breaker panel. Failure to do so may result in electric shock or burn.
CAUTION
BURN HAZARD: The glass
cover and bulb should be removed when cool. Touching hot glass with bare hands or a damp cloth can cause burns.
Each oven is equipped with halogen light columns located on the side walls of the oven. The lights come on when the door is opened or when the oven is in a cooking cycle.
Each light assembly consists of a removable light cover with two locking clips and a light compartment with three halogen bulbs.
Be sure to let the light cover and bulb cool completely. For your safety, do not touch a hot bulb with bare hands or a damp cloth.
To remove:
- Remove the racks from the oven. See the Full extension oven racks section.
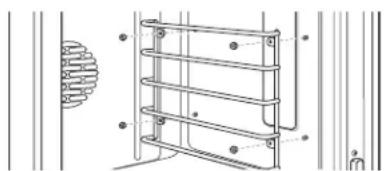
- Using a 7/16" nutdriver, remove the four nuts holding the rack supports to the oven wall.
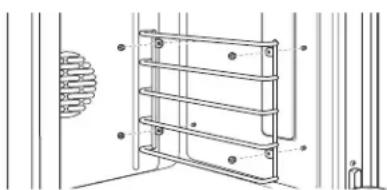
natural_image
Technical line drawing of a mechanical structure with no visible text or symbols- Remove the glass light cover by pulling its back edge out and rolling it toward you. Do not remove any screws.
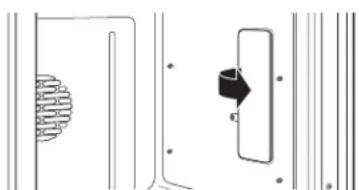
natural_image
Pure electrical circuit lines without any symbols- Using gloves or a dry cloth, remove the burned-out light bulb by pulling it straight out.
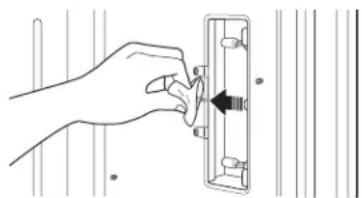
natural_image
Hand inserting a small component into a wall-mounted bracket (no text or symbols visible)To replace:
Use a new 120-volt Halogen bulb, with G8 pins, not to exceed 25 watts.
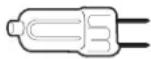
Replacement bulbs may be purchased by calling 800.626.2002. Order Part Number WB25T10064.
NOTE: Higher wattage bulbs will damage your oven.
Using gloves or a dry cloth, remove the bulb from its packaging. Do not touch the bulb with bare fingers. Oil from bare fingers may cause hot spots on the glass surface and lead to premature failure of the bulb. If you do touch the glass, clean it with alcohol prior to installation.
- Push the bulb straight into the receptacle all the way.
natural_image
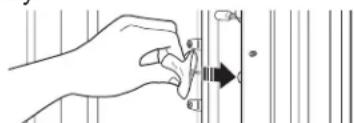
Line drawing of a hand holding a tool with an arrow pointing to a vertical line (no text or symbols)- Replace the light cover, by placing its front edge under the front two tabs in the light compartment. Roll the back edge into place, making sure that it is firmly seated.
NOTE: If the locking clips fell from the glass lens cover, hold them on the cover, in the correct position, while replacing the cover on the light compartment.
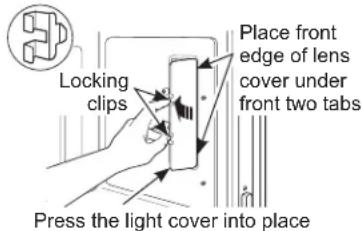
The light cover must be in place when using the oven.
- Reinstall the rack support. Be sure to orient the support so that the top tabs for the nuts are closest to the top of the oven. Lightly secure with the four nuts removed earlier, but do not over-tighten or the enamel could be chipped.
natural_image
Technical line drawing of a coiled metal structure with mounting holes and a coiled spring (no text or symbols)-
Replace the racks. See the Full extension oven racks section.
-
Reconnect electrical power to the oven.
Care and Cleaning
| Professional All-Gas Range | ||
| To clean the door | The oven frame and door, outside the oven seals, should be cleaned by hand. Enameled surfaces should be cleaned with hot soapy water. See Stainless Steel Surfaces section for all Stainless Steel areas. | Do not rub or clean the door seal—the fiberglass material of the seal has an extremely low resistance to abrasion. An intact and well-fitting oven seal is essential for energy-efficient operation and good baking results. If the seal becomes worn, frayed, damaged or displaced it must be replaced by a qualified technician. |
| Stainless steel surfaces | Do not use a steel-wool pad; it will permanently scratch the surface.To clean the stainless steel surface, use warm sudsy water or a stainless steel cleaner.Always wipe the surface in the direction of the grain. Follow the cleaner instructions for cleaning the stainless steel surface. | To inquire about purchasing stainless steel appliance cleaner, please call our toll-free number, 800.626.2002 or visit monogram.com. |
| Oven bottom | The oven bottom has a porcelain enamel finish. To make cleaning easier, protect the oven bottom from excessive spillovers. A smaller sheet of foil or sheet tray may be used to catch a spillover by placing it on the rack below the rack you are cooking on. This is particularly important when baking a fruit pie or other foods that are highly acidic. Hot fruit fillings or other foods that are highly acidic (such as tomatoes, sauerkraut and sauces with vinegar or lemon juice) may cause pitting and damage to the porcelain enamel surface and should be wiped up immediately. | Never fully cover a rack with aluminum foil. This will disturb the heat circulation and result in poor baking.To clean up spillovers, use soap and water, an abrasive cleaner or soap-filled scouring pad.Rinse well to remove soap before self-cleaning. |
Dual-flame stacked burners
The burner consists of three parts: the burner base, burner head, and burner cap. The burner head and burner cap can be lifted off, making them easy to clean.
CAUTION
DO NOT OPERATE THE
BURNER WITHOUT ALL BURNER PARTS IN PLACE.
Surface burners should be cleaned routinely, especially after bad spillovers, which could clog the slots and holes in the burner heads.
The electrode is located at the rear of each burner. Do not attempt to disassemble or clean around any burner while another burner is on. An electric shock may result.
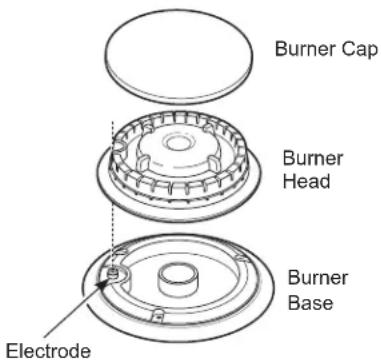
To remove the burner parts:
- Turn all controls OFF before removing any burner parts.
- When cool, you may lift off the burner grates, burner caps and burner heads for easier cleaning. Do not remove the burner bases.
NOTE: The ZGP304 model has 2 different size burners. Be sure to replace the burners in the same location.
Cleaning
Lift off burner parts only when cool. Wash in hot, soapy water. You may use a plastic scouring pad to remove burned-on food particles.
To remove burned-on food, soak the burner heads in a solution of mild liquid detergent and hot water for 20–30 minutes. For more stubborn stains, use a plastic scouring pad or toothbrush.
If the spill goes inside the burner head assembly, wash it under running water and shake to remove excess water.
After Cleaning
Before replacing the burner parts, shake out excess water and then dry them thoroughly.
To replace the burner parts:
Make sure that the burner parts are replaced in the correct location.
-
Replace the burner head on top of the burner base, making sure that the hole in the burner head is properly aligned with the electrode in the burner base. A small gap between the base and head is normal.
-
Place the burner cap on top of the burner head. Make sure that the burner cap is properly seated on the burner head.
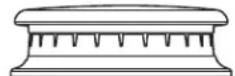
Burner cap properly seated
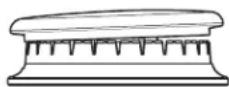
Burner cap not properly seated
Professional All-Gas Range
Spark igniter and electrodes
The electrode of the electronic ignition system is positioned at the rear of the burner base. When cleaning the cooktop, be careful not to snag the igniter with your cleaning cloth. Damage to the igniter could occur.
Be careful not to push in a control knob while cleaning. It could cause the igniter to spark.
Make sure that the white ceramic igniters on the cooktop are dry and clean. Clean the metal portion of the electrode with a soft cloth or emery board.
Do not attempt to remove the electrode from the cooktop.
Clean this metal part with an emery board.
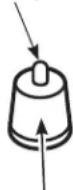
Do not clean this white ceramic part with an emery board.
Burner grates
The enameled cast-iron burner grates should be cleaned regularly.
You must put the grates on the self-clean oven rack during the self-clean cycle. DO NOT put the grate on the oven floor during a self-clean cycle. DO NOT put the frame inside the oven during a self-clean cycle. Only the grate can withstand the heat of the self-clean cycle. The frames may be cleaned by hand or in the dishwasher.
Wash them in hot soapy water, rinse, and dry thoroughly.
Although they are durable, the grates will gradually lose their shine, regardless of the best care you can give them. This is due to their continual exposure to high temperatures.
Do not operate a burner for an extended period of time without cookware on the grate. The finish on the grate may chip without cookware to absorb the heat.
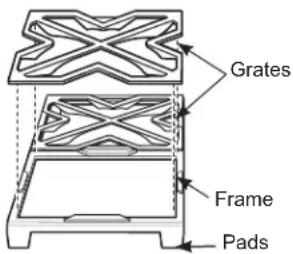
For stability, the frames have rubber pads on each corner. During cleaning and use, be careful not to damage or snag rubber pads.
Grease troughs (on some models)
Grease from the griddle and the grill will drain into the enameled cast-iron grease troughs at the front of the range. Once the troughs have cooled, they may be lifted out for easier cleaning.
To remove the cool grease trough from the griddle, slide it toward the front and lift up.
To remove the cool grease trough from the grill, lift the grill frame and lift out the trough.
Do not allow grease to accumulate in the grease troughs as it can be a fire hazard. Clean the grease troughs as soon as they are cool. The grease troughs can be cleaned by hand with hot soapy water or in the dishwasher. Wipe any spillage in the trough basin with a soft cloth.
For stability, the troughs have rubber pads at the front. Be careful not to damage the pads when removing for cleaning.
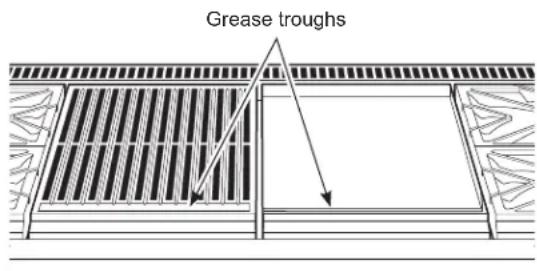
Griddle (on some models)
Thoroughly clean the griddle of grease and food particles, using a square-edged metal spatula, while it is still hot.
Wipe the griddle with a dry, heavy, coarse cloth to remove any remaining residue and food particles. If the griddle is cleaned with anything other than a dry, heavy, coarse cloth, it will need to be reseasoned.
Never flood the hot griddle with cold water. This could cause the griddle to crack or warp.
NOTE: It is normal for the stainless steel griddle to discolor to a yellow-brown color after use.
Cutting board (on some models)
Wash the bamboo cutting board with warm water and a mild soap. Occasionally, wipe it with mineral oil.
Do not clean the cutting board in the dishwasher.
natural_image
3D rendering of a rectangular grid-patterned object with no visible text or symbolsGrill grate, frame and baffle (on some models)
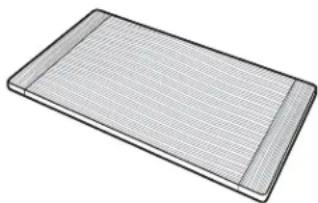
The IR Grill should be cleaned immediately after each use.
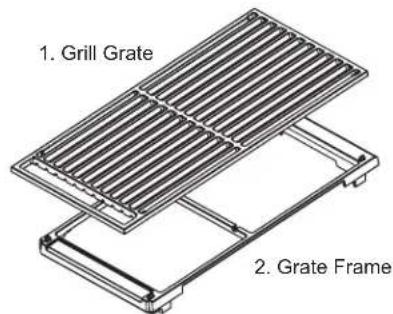
1. Clean the Grill Grate:
Turn the burner to OFF. Use a barbecue mitt to remove the hot grill grate. Place the grill grate in a basin or sink and scrub with a brass bristle brush. Rinse frequently.
The grill grate may also be cleaned in the oven during the self-cleaning cycle, or, it can be cleaned in the dishwasher.
2. Clean the Grill Grate Frame:
The grill grate frame can be cleaned by hand or in the dishwasher. Do not clean the grill grate frame in a self-cleaning oven. The grill grate frame has rubber pads on each bottom corner. Be careful not to damage the pads during the cleaning process.
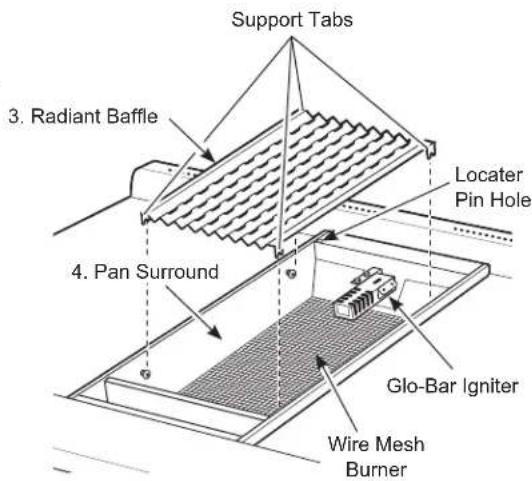
3. Clean the Radiant baffle:
Lift the baffle out of the pan. Clean the baffle with hot soapy water or in the dishwasher.
4. Clean the Pan Surround, Wire Mesh:
The pan surround and wire mesh cannot be removed. Clean them in place. Use a soft damp cloth to clean the pan surround. Gently brush food particles into the grease trough or use a vacuum cleaner for excess debris.
IMPORTANT: Keep the grill burner and ceramic igniter dry. Do not spray water or cleaner directly onto the wire mesh or igniter. Avoid contact with the igniter, it is fragile and can chip or break.
Reassemble the Grill:
Reverse the steps above to reassemble the grill. The radiant baffle support tabs should engage the pins on the side of the pan surround. Replace the grate frame. Be sure to engage the bottom locater pin with the pin hole at the left rear side of the pan. Replace the grill grate with the handle end towards the front of the range.
Before you call for service
| Problem Possible | Cause |
| Oven Will Not Work | A fuse in your home may be blown or the circuit breaker tripped.The oven controls are not properly set.The oven controls are set for cleaning. If necessary, allow the oven to cool; then open the door.Make sure the Oven Mode Selector is set to BAKE and the Temperature knob is set to a temperature. |
| Surface Burners Light But Oven Does Not | The oven gas shut-off valve may have accidentally been moved during cleaning or moving. |
| Oven Light(S) Do Not Work | The light bulb is defective. Replace the bulb.The oven is self-cleaning or the Sabbath feature is set. The oven lights do not come on during self-cleaning or if the Sabbath feature is set.The oven is set for Proof mode. The lights cycle on and off as necessary to maintain Proof temperature. |
| Food Does Not Bake Or Roast Properly | The oven controls are improperly set. See the Baking or Roasting section.Oven not preheated for a long enough time; wait for the oven to signal preheat.Incorrect cookware or cookware of improper size being used. See Baking Tips.Racks in the wrong position. See the Baking or Roasting section.Use a foil tent to slow down browning during roasting.Oven thermostat needs adjustment. See the Oven thermostat adjustment section. |
| Food Does Not Broil Properly | This model is designed for closed door broiling only. Close the door. Always broil with the door closed.The oven controls are not set at BROIL. See the Broiling section.The probe is plugged into the outlet in the oven. Remove the probe from the oven.Improper rack position being used.Cookware is not suited for broiling. Use the broiling pan and grid that came with your oven.Aluminum foil used on the broiling pan and grid has not been fitted properly and slit as recommended. |
| Oven Will Not Self Clean | The oven temperature is too high to set a self-clean operation.Allow the oven to cool below the locking temperature and reset the controls.The controls are not properly set. See the Self-Cleaning Oven section. |
| Cracking Or Popping Sound During Cleaning | This is normal. This is the sound of the metal heating and cooling during both the cooking and cleaning functions. |
| Excessive Smoking Occurs During Cleaning | The oven is heavily soiled. Turn the Oven Mode Selector and the Temperature knobs to OFF. Open the windows to rid the room of smoke. Wait until the locked door indicator light goes off. Wipe up excess soil and reset the clean cycle. |
| Oven Not Clean After A Clean Cycle | The oven was heavily soiled. Clean up heavy spillovers before starting the clean cycle. Heavily soiled ovens may need to self-clean again.Oven is connected to a 208V electrical supply. Set your cleaning time for 5 hours.The oven controls are not properly set. See the Self-Cleaning Oven section. |
| Oven Racks Are Difficult To Slide | The racks were cleaned in the self-clean cycle and now need periodic lubrication.Do not spray with a cooking spray or other lubricant sprays. See Full extension oven racks in the Care and Cleaning section. |
Before you call for service
| Problem Possible Cause | |
| Timer Does Not Work The timer cannot be used while the oven is self-cleaning. | |
| Oven Temperature Too Hot Or Too Cold | Oven thermostat needs adjustment. See the Oven thermostat adjustment section. |
| Oven Door Will Not Open After A Clean Cycle | The oven is too hot. Allow the oven to cool below locking temperature. |
| “Err Turn Surface Burners Off” Scrolls In The Display | Self-clean is in progress and the Cooktop Lockout feature is activated. No surface cooking is permitted during the self-clean operation. Wait until the self-cleaning operation has been completed. |
| “Close Door” Scrolls In The Display | The self-clean cycle has been selected but the door is not closed. Close the oven door. The symbol will appear in the display |
| Is On When You Want To Cook | The oven door is locked because the temperature inside the oven has not dropped below the unlocking temperature. Turn the Oven Mode Selector and the Temperature knobs to OFF. Allow the oven to cool. |
| F- And A Number Flash In The Display | The oven has a function error code. Turn the Oven Mode Selector and the Temperature knobs to OFF. Allow the oven to cool for one hour. Put the oven back into operation.Disconnect all power to the oven for 30 seconds and then reconnect power. If the function error code repeats, call for service. |
| Display Goes Blank The display is blank when the oven or timer is not in use.A fuse in your home may be blown or the circuit breaker tripped. Replace the fuse or reset the circuit breaker. | |
| Unable To Get The Display To Show “Sf” | The TIMER and the MINI-KNOB buttons must be pushed at the same time and held for 4 seconds. |
| “Probe” Appears In The Display | This is reminding you to enter a probe temperature after plugging in the probe. Enter a probe temperature |
| Shows In Display | The Sabbath mode has been selected. |
| Power Outage | If the oven was in use during a power outage or surge, the oven must be reset. Turn the Temperature knob and the Oven Mode Selector to OFF. Reset the controls to begin again. |
| Steam From The Vent When using the convection mode, it is normal to see steam coming out of the oven vent. As the number of racks or amount of food being cooked increases, the amount of visible steam will increase. | |
| Burning Or Oily Odor Emitting From The Vent | This is normal in a new oven and will disappear in time. |
| Strong Odor This is temporary. An odor from the insulation around the inside of the oven is normal for the first few times the oven is used. | |
| Fan Noise A cooling fan or a convection fan (depending on the function you are using) may turn on. This is normal. The cooling fan will turn on to cool internal parts. It may run after the oven is turned off. The convection fan may cycle on and off until the function is over or the door is opened. | |
Before you call for service
| Problem Possible | Cause | ||
| Convection Fan Not On All The Time | The convection fan (depending on the function you are using) may cycle on and off until the function is over or the door is opened for optimized performance. This is normal. In addition, the convection fan may cycle in the clockwise and counter clockwise direction until the function is over or the door is opened. | ||
| Burners Do Not Light Or Spark Randomly | Electrical plug is not plugged into a live power outlet.Gas supply not turned on.Burner parts not replaced correctly.Holes in the simmer rings or slits in the burner rings are clogged.Clogged orifice, or wet burners or electrodes.Cooktop Lockout feature is activated.A fuse in your home may be blown or circuit breaker tripped. | ||
| Burners Have Yellow Or Yellow-Tipped Flames | Burner parts not replaced correctly.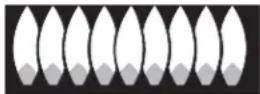 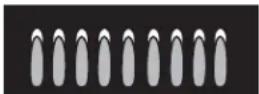 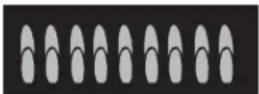 A. Yellow flames: Call for service.B. Yellow tips on outer cones: Normal for propane (LP) gas.If burner flames look like (A), call for service. Normal burner flames should look like (B) or (C), depending on the type of gas. A. Yellow flames: Call for service.B. Yellow tips on outer cones: Normal for propane (LP) gas.If burner flames look like (A), call for service. Normal burner flames should look like (B) or (C), depending on the type of gas. | ||
| Burner Flames Very Large Or Yellow | The range may be connected to the wrong fuel type. Contact the person who installed your range or made the conversion | ||
| Burner Control Knob Will Not Turn | When the knob is at the OFF position, it must be pushed in before it can be turned, and it can only be turned in a counterclockwise direction. When the knob is at any other position, it can be turned in either direction without being pushed inwards. | ||
| Condensation Or Fogging On The Inner Door Glass | Condensation or fogging on the inside of the oven door glass is normal during the preheating of the oven and will evaporate usually by the end of the preheating cycle. | ||
| Burner Flames contain Flickers of Orange | Airborne dust; cool-mist humidifier; debris on or inside burner. | ||
WHAT IS COVERED
YOUR MONOGRAM RANGE WARRANTY
Staple sales slip or cancelled check here. Proof of original purchase date is needed to obtain service under warranty. Please have serial number and model number available when calling for service.
LIMITED TWO-YEAR WARRANTY
For two years from date of original purchase, we will provide, free of charge, parts and service labor in your home to repair or replace any part of the range that fails because of a manufacturing defect.
LIMITED FIVE-YEAR WARRANTY
For five years from the date of original purchase, we will provide, free of charge, replacement gas surface burners if they fail in normal household use. (The grill, griddle and oven burners are not included.) You pay for the service trip to your home and all service labor charges.
LIMITED LIFETIME WARRANTY
For the lifetime of the gray porcelain enamel oven racks, we will provide, free of charge, replacement racks if they fail in normal household use. You pay for the service trip to your home and all service labor charges.
This warranty is extended to the original purchaser and any succeeding owner for products purchased for ordinary home use in the 48 mainland states, Hawaii and Washington, D.C. In Alaska the warranty is the same except that it is LIMITED because you must pay to ship the product to the service shop or for the service technician's travel costs to your home.
All warranty service will be provided by our Factory Service Centers or by our authorized Customer Care® servicers during normal working hours.
Should your appliance need service, during warranty period or beyond, in the U.S.A. call 800.444.1845. In Canada: 800.561.3344
WHAT IS NOT COVERED
■ Service trips to your home to teach you how to use the product.
■ Discoloration of the griddle plate or oven racks.
■ Chipping of porcelain enamel grates or oven racks.
■ Replacement of house fuses or resetting of circuit breakers.
■ Incidental or consequential damage caused by possible defects with this appliance.
■ Damage after delivery.
■ Damage to the product caused by accident, fire, floods or acts of God.
■ Product damage or failure of the product if it is abused, misused, used for other than the intended purpose, or used commercially.
- Improper installation, delivery or maintenance. If you have an installation problem, contact your dealer or installer. You are responsible for providing adequate electrical, gas, exhausting and other connecting facilities as described in the Installation Instructions provided with the product.
■ Product not accessible to provide required service.
EXCLUSION OF IMPLIED WARRANTIES
Your sole and exclusive remedy is product repair as provided in this Limited Warranty. Any implied warranties, including the implied warranties of merchantability or fitness for a particular purpose, are limited to one year or the shortest period allowed by law.
Some states do not allow the exclusion or limitation of incidental or consequential damages, so the above limitation or exclusion may not apply to you. This warranty gives you specific legal rights, and you may also have other rights which vary from state to state.
To know what your legal rights are in your state, consult your local or state consumer affairs office or your state's Attorney General.
Warrantor: GE Appliances, a Haier company
Warrantor in Canada: MC Commercial, Burlington, ON, L7R 5B6
Consumer Support
Professional All-Gas Range
| With the purchase of your new Monogram appliance, receive the assurance that if you ever need information or assistance from Monogram, we will be there. All you have to do is call! | |
| Register Your Appliance | Register your new appliance on-line at your convenience! Timely product registration will allow for enhanced communication and prompt service under the terms of your warranty, should the need arise. You may also mail in the pre-printed registration card included in the packing material.In the US:Monogram.comIn Canada:Prodsupport.mabe.ca/crm/Products/ProductRegistration.aspx |
| Schedule Service | Expert Monogram repair service is only one step away from your door. Get on-line and schedule your service at your convenience any day of the year.In the US:Monogram.comor call 800.444.1845 during normal business hours.In Canada:GEAppliances.ca/en/support/service-requestor call 800.561.3344 |
| Extended Warranties | Purchase a Monogram extended warranty and learn about special discounts that are available while your warranty is still in effect.In the US:Monogram.comor call 800.444.1845 during normal business hours.In Canada:GEAppliances.ca/en/support/purchase-extended-warrantyor call 800.290.9029 |
| Remote Connectivity | For assistance with wireless network connectivity (for models with remote enable),visit our website atMonogram.comor call 800.444.1845 in the US only. |
| Parts and Accessories | Individuals qualified to service their own appliances can have parts or accessories sent directly to their homes (VISA, MasterCard and Discover cards are accepted). Order on-line today 24 hours every day.In the US:Monogram.comor by phone at 800.444.1845 during normal business hours.Instructions contained in this manual cover procedures to be performed by any user. Other servicing generally should be referred to qualified service personnel. Caution must be exercised, since improper servicing may cause unsafe operation.Customers in Canada should consult the yellow pages for the nearest MC Commercial service center, visit our website atGEAppliances.ca/en/products/parts-filters-accessoriesor call 800.661.1616. |
| Contact Us | If you are not satisfied with the service you receive from GE Appliances, contact us on our Website with all the details including your phone number, or write to:In the US:General Manager, Customer Relations | Monogram, Appliance Park | Louisville, KY 40225Monogram.comIn Canada:Director, Consumer Relations, MC Commercial Inc. | Suite 310, 1 Factory Lane | Moncton, N.B. E1C 9M3GEAppliances.ca/en/contact-us |
MANUEL DU PROPRIÉTAIRE
76 cm (30 po), 91 cm (36 po)
et 121 cm (48 po)
Cuisinières au gaz
professionnelles
ELEVATE EVERYTHING
Table des matières
Plaque chauffante 36
natural_image
Technical line drawing of a mechanical bracket assembly with mounting holes and a side view (no text or symbols)CONSIGNES DE SÉCURITÉ RELATIVES AU FOUR
AVERTISSEMENT
Ne recouvrez JAMAIS les
natural_image
Technical line drawing of a Plinthe rectangular frame with four vertical slots and two protruding ports (no text or symbols on the diagram itself)natural_image
Pure architectural diagram of a symmetrical grid layout with no text, numbers, or symbolsnatural_image
Pure architectural diagram of a window with decorative panels and a central door (no text or symbols)natural_image
Pure geometric pattern with interlocking diamond shapes and no text or symbols6 brûleurs au gaz
4 brûleurs au gaz
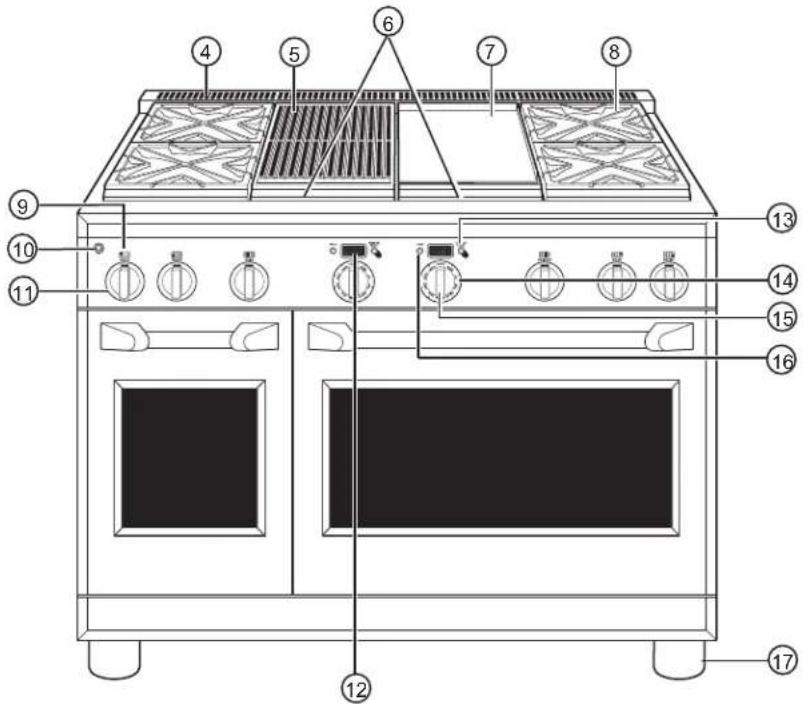
natural_image
Simple line drawing of a cooking pot with a crossed-out black X mark and flames on the base (no text or symbols)natural_image
Technical line drawing of a symmetrical mechanical or architectural component with two side panels (no text or symbols)Face du wok Face plate
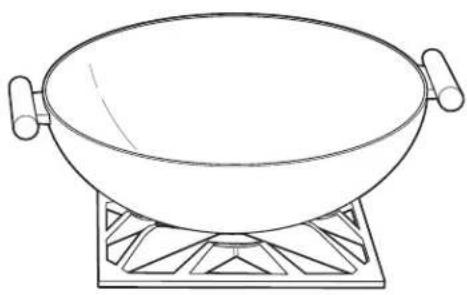
natural_image
Line drawing of a wok on a heating table (no text or symbols)natural_image
Technical line drawing of a mechanical assembly with an inset magnified view showing internal components (no text or symbols)natural_image
Line drawing of a rack with four bowls and labeled components (A, B, C, D, E) — no text or symbols present.natural_image
Technical line drawing of a rack with multiple bowls and labeled components (A–E), no readable text or symbols beyond labels.natural_image
Line drawing of a kitchen appliance with a black X symbol indicating no change or prohibition (no text or symbols present)natural_image
Technical line drawing of a server rack with internal air ducts and ventilation slots (no text or symbols)natural_image
Illustration of a cylindrical object inside a square frame with a pointer, no text or symbols presentnatural_image
Five-pointed star symbol with a central 'K' (no additional text or labels)Mode Sabbath homologué
natural_image
Technical line drawing of a mechanical switch component (no text or symbols)natural_image
Technical line drawing of a mechanical component with internal ribs and housing (no text or symbols)natural_image
Diagram showing a hand holding a tool with arrows pointing to a structural component (no text or symbols present)natural_image
Line drawing of a wire mesh grid (no text or symbols)natural_image
Line drawing of a medical or laboratory instrument with a circular component and two protruding rods (no text or symbols)Lampes du four
▲ AVERTISSEMENT
RISQUE DE DÉCHARGE
natural_image
Technical line drawing of a wall-mounted heating element with mounting holes and a circular component (no text or symbols)natural_image
Pure technical line drawing of mechanical components without any text, numbers, or symbolsnatural_image
Hand inserting a small object into a rectangular panel with a black arrow indicating the component (no text or symbols)natural_image
Hand holding a tool with an arrow pointing to a vertical line (no text or symbols)natural_image
Technical line drawing of a multi-tiered cylindrical structure with mounting holes, shown in 3D perspective (no text or symbols)natural_image
3D rendering of a rectangular metal tray with grid pattern (no text or symbols)Garant : GE Appliances, a Haier company
Garant au Canada : MC Commercial, Burlington, ON, L7R 5B6
natural_image
Technical line drawing of a mechanical bracket assembly (no text or symbols)natural_image
Simple line drawing of a rectangular metal frame with three vertical slots and two protruding pins (no text or symbols)Placa de protección
natural_image
Pure architectural or engineering diagram with symmetrical grid patterns and a central vertical structure (no text or symbols)natural_image
Pure geometric lattice pattern with interlocking shapes (no text or symbols)6 quemadores a gas
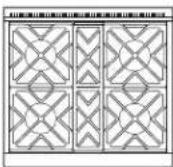
4 quemadores a gas
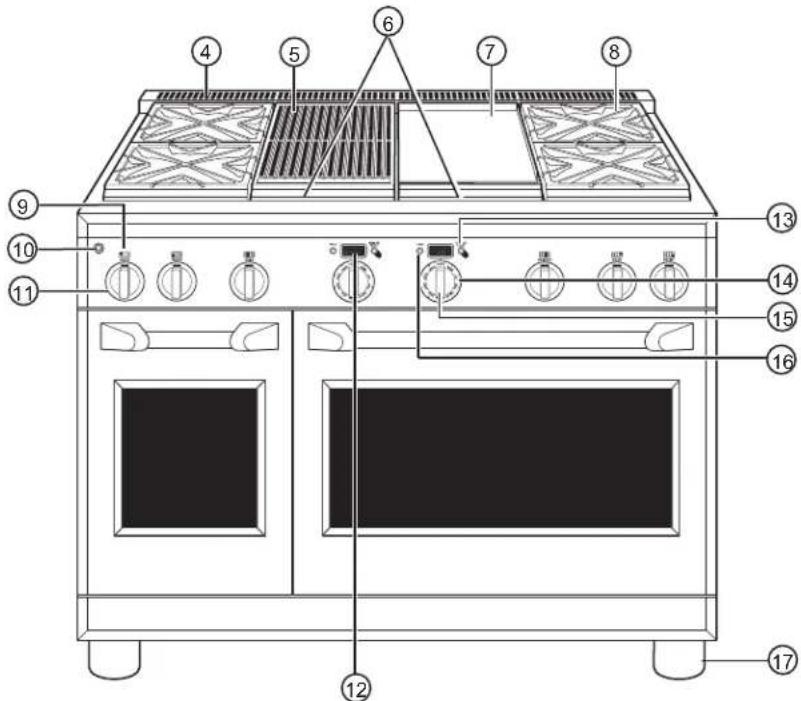
natural_image
Simple line drawing of a cooking pot with a crossed-out black X mark and flames underneath (no text or symbols)natural_image
Technical line drawing of a symmetrical geometric pattern with two central sections, no text or symbols present.natural_image
Line drawing of a large bowl on a metal stand (no text or symbols)natural_image
Technical line drawing of a mechanical assembly with an inset showing a detailed detail of internal components (no text or symbols present)natural_image
Technical line drawing of a rack-mounted appliance with multiple bowls and control panel (no text or symbols)natural_image
Technical line drawing of a rack with multiple bowls and a vertical scale labeled A through E (no text or symbols beyond labels)natural_image
Line drawing of a kitchen appliance with a crossed black symbol indicating prohibition (no text or labels)natural_image
Technical line drawing of a server rack with internal air ducts and ventilation slots (no text or symbols)natural_image
Illustration of a cylindrical object inside a square frame with a cable inserted, no text or symbols present.PRECAUCIÓN
natural_image
Technical line drawing of a mechanical switch component (no text or symbols)natural_image
Technical line drawing of a mechanical component with internal grid structure (no text or symbols)natural_image
Diagram showing two arrows pointing at a mechanical assembly with a finger inserted (no text or symbols)natural_image
Line drawing of a wire rack with multiple panes (no text or symbols)Puerta del horno desmontable
natural_image
Line drawing of a medical or laboratory instrument with a curved handle and circular component (no text or symbols)Luces del horno
ADVERTENCIA
PELIGRO DE
DESCARGA ELÉCTRICA O QUEMADURAS:
natural_image
Technical line drawing of a metal shelving unit with circular inset detail (no text or symbols)natural_image
Pure technical line drawing of mechanical components without any text, numbers, or symbolsnatural_image
Line drawing of a hand adjusting a door lock mechanism (no text or symbols)Para reemplazar:
natural_image
Hand holding a tool with an arrow pointing to a vertical line (no text or symbols visible)natural_image
Technical line drawing of a coiled metal structure with mounting holes (no text or symbols)natural_image
3D rendering of a rectangular grid-patterned object with no visible text or symbols- Contents
- Cooktop Controls
- Surface Cooking
- Baking Tips
- Oven Racks
- Baking
- Broiling
- Convection Baking or Roasting
- Using the Probe
- Proofing
- Self-Cleaning Oven
- Special Features
- Care and Cleaning
- Troubleshooting Tips 38
- WARNING
- ANTI-TIP DEVICE
- Tip-Over Hazard
- For Professional All-Gas Ranges
- IMPORTANT SAFETY INFORMATION
- READ ALL INSTRUCTIONS BEFORE USING THE APPLIANCE
- GENERAL SAFETY INSTRUCTIONS
- CAUTION
- READ AND SAVE THESE INSTRUCTIONS
- IMPORTANT SAFETY INFORMATION READ ALL INSTRUCTIONS BEFORE USING THE APPLIANCE
- GENERAL SAFETY INSTRUCTIONS (cont.)
- KEEP FLAMMABLE MATERIALS AWAY FROM THE RANGE
- IN THE EVENT OF A FIRE, TAKE THE FOLLOWING STEPS TO PREVENT INJURY AND FIRE SPREADING
- COOKTOP SAFETY INSTRUCTIONS
- OVEN SAFETY INSTRUCTIONS
- SELF-CLEANING OVEN SAFETY INSTRUCTIONS
- STATE OF CALIFORNIA PROPOSITION 65 WARNINGS
- Design
- information
- Electronic ignition & automatic reignition
- To light a surface burner
- Dual-flame stacked burners
- Simmering:
- Cooking:
- How to select flame size
- Wok cooking
- Grill safety precautions (on some models)
- Fire Hazard
- Grease Flare-ups:
- Grill Cover:
- Cookware:
- Using the IR grill
- Do not leave the grill unattended at any time.
- Grill grates (on some models)
- Grill radiant baffle
- Full extension oven racks
- Remove and replace oven racks
- To remove a rack:
- To replace a rack:
- Low profile oven rack
- Introduction to broiling
- How to set the oven for broiling
- Broiling guide
- Aluminum foil
- Introduction to convection cooking
- Cookware for convection cooking
- Adapting recipes
- Convection roasting tips
- Proper placement of the probe
- How to set the oven for proofing
- Self-cleaning safety precautions
- How to set the oven for cleaning
- After a clean cycle
- Timer
- To set the timer:
- To cancel the timer:
- To adjust the timer after start:
- Oven thermostat adjustment
- To adjust the oven thermostat:
- Sabbath mode
- To set the Sabbath mode:
- To Cancel the Sabbath Mode:
- Control panel and knobs
- Oven burners
- Broiler pan, grid and roasting rack
- Lift-off oven door
- To remove the door:
- To replace the door:
- Probe
- Oven lights
- SHOCK OR BURN HAZARD:
- BURN HAZARD: The glass
- To remove:
- To replace:
- To remove the burner parts:
- Cleaning
- After Cleaning
- To replace the burner parts:
- Spark igniter and electrodes
- Do not attempt to remove the electrode from the cooktop.
- Burner grates
- Grease troughs (on some models)
- Griddle (on some models)
- Cutting board (on some models)
- Clean the Grill Grate:
- Clean the Grill Grate Frame:
- Clean the Radiant baffle:
- Clean the Pan Surround, Wire Mesh:
- Reassemble the Grill:
- WHAT IS COVERED
- YOUR MONOGRAM RANGE WARRANTY
- Staple sales slip or cancelled check here. Proof of original purchase date is needed to obtain service under warranty. Please have serial number and model number available when calling for service.
- LIMITED TWO-YEAR WARRANTY
- LIMITED FIVE-YEAR WARRANTY
- LIMITED LIFETIME WARRANTY
- WHAT IS NOT COVERED
- EXCLUSION OF IMPLIED WARRANTIES
- MANUEL DU PROPRIÉTAIRE
- Table des matières
- CONSIGNES DE SÉCURITÉ RELATIVES AU FOUR
- AVERTISSEMENT
- Lampes du four
- ▲ AVERTISSEMENT
- RISQUE DE DÉCHARGE
- PRECAUCIÓN
- Puerta del horno desmontable
- Luces del horno
- ADVERTENCIA
- PELIGRO DE
- DESCARGA ELÉCTRICA O QUEMADURAS:
- Para reemplazar:
Brand : Monogram
Model : ZGP486LDNSS
Category : Cooker