
iLX-W650 - Audio Receiver ALPINE - Free user manual and instructions
Find the device manual for free iLX-W650 ALPINE in PDF.

| Product Type | Audio Receiver |
| Brand | Alpine |
| Model | iLX-W650 |
| Product Category | Marine/Vehicle Audio Receiver |
| Display | 6.1-inch Touchscreen |
| Dimensions (W x H x D) | 178 mm x 50 mm x 100 mm |
| Weight | 1.5 kg (approx.) |
| Power Output | 4 x 50 Watts Max |
| Audio Formats | MP3, WMA, FLAC, AAC, WAV |
| Connectivity | Bluetooth, USB, AUX, SiriusXM Ready |
| Smartphone Integration | Apple CarPlay, Android Auto |
| Amplifier | Built-in 4-channel |
| Remote Control | Included (wired) |
| Installation | Single DIN |
| Color | Black |
| Operating Voltage | 12V DC |
| Fuse Rating | 10A |
| Frequency Response | 20 Hz - 20 kHz |
| Signal-to-Noise Ratio | >90 dB |
| Inputs | Rear Camera, Steering Wheel Control |
| Outputs | 4-channel Preamp, Subwoofer |
| Media Playback | USB, Bluetooth Streaming |
| Care | Clean with soft dry cloth |
| Safety | Disconnect battery before installation |
| Repair | Seek professional service |
Frequently Asked Questions - iLX-W650 ALPINE
User questions about iLX-W650 ALPINE
0 question about this device. Answer the ones you know or ask your own.
Ask a new question about this device
Download the instructions for your Audio Receiver in PDF format for free! Find your manual iLX-W650 - ALPINE and take your electronic device back in hand. On this page are published all the documents necessary for the use of your device. iLX-W650 by ALPINE.
USER MANUAL iLX-W650 ALPINE
Please read before using this equipment.
• MODE D'EMPLOI
Thank you for purchasing this Alpine product. Please take a moment to protect your purchase by registering your product now at the following address: www.alpine-usa.com/registration You will be informed of product and software updates (if applicable), special promotions, news about Alpine.
www.alpine-usa.com/registration.
Operating Instructions
PRECAUTIONS
IMPORTANT INFORMATION .... 5
WARNING
Points to Observe for Safe Usage 5
WARNING 5
CAUTION 6
NOTICE 7
Getting Started
Location of Controls 9
Turning Power On or Off 9
Turning the System On 9
Adjusting the Volume 9
Lowering Volume Quickly 9
Touch Screen Operation 10
About the HOME Screen 10
About the Indicator Display 11
How to Input Characters and Numbers (Keypad) 11
Setup
Setup Operation 12
Sound Setup
Simple Sound Settings 13
Setting the Fader/Balance 13
Adjusting the Bass/Middle/Treble 13
Setting an Equalizer 13
Setting the Subwoofer 14
Advanced sound settings 14
Adjusting the Crossover Settings (X-Over) 14
Adjusting the Parametric Equalizer Curve (P-EQ) 15
Adjusting the Time Correction (TCR) ..... 15
Setting the Media Xpander (MX) 16
Setting Defeat 16
About the Crossover 16
About Time Correction 17
Volume Setup
Phone Volume Setup 18
Adjusting the Ring Tone Level 18
Adjusting the Caller Level 18
Adjusting the Microphone Level 18
Volume Setup except for Phones (Other) ..... 18
Volume Setting 18
System Setup
Clock Setup 19
Screen/Lighting Customize (Dimmer) ..... 19
Setting the Brightness of the Backlighting (Dimmer) 19
Adjusting the Minimum Level of Backlight 19
Adjusting the Dimmer of Button Lighting at Night 19
Language Setup 19
Reset 20
Connectivity Setup
SiriusXM Setup
Parental Lock 21
Bluetooth Setup
Device Setup 22
Pairing the Bluetooth Device 22
Setting the Bluetooth Device 22
Deleting a Bluetooth Device from the list .... 22
Displaying Bluetooth Information 22
Searching for a Bluetooth Device 22
Auto Connection 22
Downloading the Phonebook 22
Camera Setup
Camera Primary and Secondary Setting ..... 23
Camera Picture Quality Setup 23
Setting the Camera Signal Input 23
Turning the Rear Camera Guide On/Off .... 23
Adjusting the Rear Camera Guide 24
Information
Apple CarPlay (Optional)
Access to Apple CarPlay 25
Android Auto (Optional)
What is Android Auto 25
Activate Android Auto 25
Radio
Radio Basic Operation
Listening to the Radio 26
Presetting Stations Manually 26
Presetting Stations Automatically 26
Tuning to Preset Station 26
Scanning Stations 26
Scanning Preset Stations 26
USB Flash drive (Optional)
Playback 28
Fast-forwarding/Fast-reversing (USB Video) 28
Repeat Play (USB Audio or USB Video) ...... 28
Shuffle Play (USB Audio or USB Video) ..... 28
Searching for a Desired Song/Video/Photo .... 28
Slide Show (USB Photo) 28
About USB Video format 28
iPod mode on iPhone (Optional)
Playback 29
Searching for a Music File 30
Repeat Play 30
Shuffle Play 30
SiriusXM Satellite Radio Operation (Optional)
Receiving Channels with the SiriusXM Tuner .... 31
Tuning Channels by Category 31
Changing the Display 32
Checking the SiriusXM Radio ID Number ..... 32
Storing Channel Presets 32
Tuning Channels using Presets 32
Search Function 32
Selecting the Channel Directly 32
Parental Lock Function 32
Bluetooth Operation
Setup Before Using 33
About Bluetooth 33
About the Hands-free Phone 33
Before Using Bluetooth 33
Hands-free Phone Control
Answering a Call 34
Hanging up the Telephone 34
Calling 34
Making a phone call using the Phone Menu 34
Using Voice Recognition function 35
Using Siri 35
Voice Dial Function 36
Phone Operation Screen 36
Adjusting the Speech Volume 36
Changing the Voice Output 36
DTMF (Touch-Tone) Function 36
Phone Book Function 37
Synchronizing the Phone Book 37
Searching in the Phone Book 37
Bluetooth Audio
Playback 38
Repeat Play 38
Shuffle Play 38
Camera Operation (Optional)
Camera Operation 39
Displaying the Camera Image from the Menu screen 39
Displaying the rear view video while the car is in reverse 39
About the Rear Camera Guide .... 39
Information
Product Software Update 41
About the Supported Formats 41
About MP3/WMA/AAC/FLAC/WAV ..... 41
In Case of Difficulty 43
If this Message Appears .... 44
Specifications 45
Installation and Connections
WARNING 46
CAUTION 46
Precautions 46
Accessory List 47
Installation 47
Caution concerning the installation location 47
Mounting the Microphone 47
Installation example using the Original Mounting Bracket 47
Connections 48
If an ACC power supply is not available ..... 50
System Example 51
LIMITED WARRANTY
Operating Instructions
PRECAUTIONS
IMPORTANT INFORMATION
FCC COMPLIANCE STATEMENT
This equipment has been tested and found to comply with the limits for a Class B digital device, pursuant to part 15 of the FCC Rules. These limits are designed to provide more reasonable protection against harmful interference in a residential installation, and are more stringent than "outdoor" requirements.
Operation is subjected to the following two conditions: (1) This device may not cause harmful interference, and (2) this device must accept any interference received, including interference that may cause undesired operation.
This equipment generates, uses, and can radiate radio frequency energy and, if not installed and used in accordance with the instructions, may cause harmful interference to radio communications. However, there is no guarantee that interference will not occur in a particular installation. If this equipment does cause harmful interference to radio or television reception, which can be determined by turning the equipment off and on, you are encouraged to try to correct the interference by one of the following measures:
- Reorient or relocate the receiving antenna.
- Increase the separation between the equipment and the receiver.
- Connect the equipment into an outlet on a circuit different from that to which the receiver is connected.
- Consult an experienced radio/TV technician.
WARNING
Points to Observe for Safe Usage
- Read this manual carefully before using this disc and the system components. They contain instructions on how to use this product in a safe and effective manner. Alpine cannot be responsible for problems resulting from failure to observe the instructions in this manual.
- This manual uses various pictorial displays to show you how to use this product safely and to alert you to potential dangers resulting from improper connections and operation. Following are the meanings of these pictorial displays. It is important to fully understand the meanings of these pictorial displays in order to use this manual and the system properly.
- This product may be used with software applications. Please follow all usage instructions and warnings when using this product at all times. Do not use this product or any software application in a manner which will hinder safe operation of your vehicle.

WARNING
• Operation of the system while driving is dangerous. Users should stop vehicle before operating the software.
- Road conditions and regulations take precedence over information contained on the map display: observe actual traffic restrictions and circumstances while driving.
- This software is designed for use exclusively in the unit. It cannot and may not be used in conjunction with other hardware.

WARNING
This symbol means important instructions. Failure to heed them can result in serious injury or death.
INSTALL THE PRODUCT CORRECTLY SO THAT THE DRIVER CANNOT WATCH TV/VIDEO UNLESS THE VEHICLE IS STOPPED AND THE EMERGENCY BRAKE IS APPLIED.
It is dangerous for the driver to watch TV/Video while driving a vehicle. Installing this product incorrectly enables the driver to watch TV/Video while driving. This may cause a distraction, preventing the driver from looking ahead, thus causing an accident. The driver or other people could be severely injured.
DO NOT WATCH VIDEO WHILE DRIVING.
Watching the video may distract the driver from looking ahead of the vehicle and cause an accident.
DO NOT OPERATE ANY FUNCTION THAT TAKES YOUR ATTENTION AWAY FROM SAFELY DRIVING YOUR VEHICLE.
Any function that requires your prolonged attention should only be performed after coming to a complete stop. Always stop the vehicle in a safe location before performing these functions. Failure to do so may result in an accident.
KEEP THE VOLUME AT A LEVEL WHERE YOU CAN STILL HEAR OUTSIDE NOISES WHILE DRIVING.
Excessive volume levels that obscure sounds such as emergency vehicle sirens or road warning signals (train crossings, etc.) can be dangerous and may result in an accident. LISTENING AT LOUD VOLUME LEVELS IN A CAR MAY ALSO CAUSE HEARING DAMAGE.
MINIMIZE DISPLAY VIEWING WHILE DRIVING.
Viewing the display may distract the driver from looking ahead of the vehicle and cause an accident.
DO NOT DISASSEMBLE OR ALTER.
Doing so may result in an accident, fire or electric shock.
USE ONLY IN CARS WITH A 12 VOLT NEGATIVE GROUND.
(Check with your dealer if you are not sure.) Failure to do so may result in fire, etc.
KEEP SMALL OBJECTS SUCH AS SCREWS OUT OF THE REACH OF CHILDREN.
Swallowing them may result in serious injury. If swallowed, consult a physician immediately.
USE THE CORRECT AMPERE RATING WHEN REPLACING FUSES.
Failure to do so may result in fire or electric shock.
DO NOT BLOCK VENTS OR RADIATOR PANELS.
Doing so may cause heat to build up inside and may result in fire.
USE THIS PRODUCT FOR MOBILE 12V APPLICATIONS.
Use for other than its designed application may result in fire, electric shock or other injury.
MAKE THE CORRECT CONNECTIONS.
Failure to make the proper connections may result in fire or product damage.
BEFORE WIRING, DISCONNECT THE CABLE FROM THE NEGATIVE BATTERY TERMINAL.
Failure to do so may result in electric shock or injury due to electrical shorts.
DO NOT ALLOW CABLES TO BECOME ENTANGLED IN SURROUNDING OBJECTS.
Arrange wiring and cables in compliance with the manual to prevent obstructions when driving. Cables or wiring that obstruct or hang up on places such as the steering wheel, gear lever, brake pedals, etc. can be extremely hazardous.
DO NOT SPLICE INTO ELECTRICAL CABLES.
Never cut away cable insulation to supply power to other equipment. Doing so will exceed the current carrying capacity of the wire and result in fire or electric shock.
DO NOT DAMAGE PIPE OR WIRING WHEN DRILLING HOLES.
When drilling holes in the chassis for installation, take precautions so as not to contact, damage or obstruct pipes, fuel lines, tanks or electrical wiring. Failure to take such precautions may result in fire.
DO NOT USE BOLTS OR NUTS IN THE BRAKE OR STEERING SYSTEMS TO MAKE GROUND CONNECTIONS.
Bolts or nuts used for the brake or steering systems (or any other safety-related system), or tanks should NEVER be used for installations or ground connections. Using such parts could disable control of the vehicle and cause fire etc.
DO NOT INSTALL IN LOCATIONS WHICH MIGHT HINDER VEHICLE OPERATION, SUCH AS THE STEERING WHEEL OR GEARSHIFT.
Doing so may obstruct forward vision or hamper movement etc. and results in serious accident.

CAUTION
This symbol means important instructions. Failure to heed them can result in injury or material property damage.
HALT USE IMMEDIATELY IF A PROBLEM APPEARS.
Failure to do so may cause personal injury or damage to the product. Return it to your authorized Alpine dealer or the nearest Alpine Service Center for repairing.
HAVE THE WIRING AND INSTALLATION DONE BY EXPERTS.
The wiring and installation of this unit requires special technical skill and experience. To ensure safety, always contact the dealer where you purchased this product to have the work done.
USE SPECIFIED ACCESSORY PARTS AND INSTALL THEM SECURELY.
Be sure to use only the specified accessory parts. Use of other than designated parts may damage this unit internally or may not securely install the unit in place. This may cause parts to become loose resulting in hazards or product failure.
ARRANGE THE WIRING SO IT IS NOT CRIMPED OR PINCHED BY A SHARP METAL EDGE.
Route the cables and wiring away from moving parts (like the seat rails) or sharp or pointed edges. This will prevent crimping and damage to the wiring. If wiring passes through a hole in metal, use a rubber grommet to prevent the wire's insulation from being cut by the metal edge of the hole.
DO NOT INSTALL IN LOCATIONS WITH HIGH MOISTURE OR DUST.
Avoid installing the unit in locations with high incidence of moisture or dust. Moisture or dust that penetrates into this unit may result in product failure.
Product Cleaning
Use a soft dry cloth for periodic cleaning of the product. For more severe stains, please dampen the cloth with water only. Anything else has the chance of dissolving the paint or damaging the plastic.
Temperature
Be sure the temperature inside the vehicle is between +45°C (+113°F) and 0°C (+32°F) before turning your unit on.
Maintenance
If you have problems, do not attempt to repair the unit yourself. Return it to your Alpine dealer or the nearest Alpine Service Station for servicing.
Protecting the USB connector
- Only an iPhone or USB flash drive can be connected to the USB connector on this unit. Correct performance using other USB products cannot be guaranteed.
- If the USB connector is used, be sure to use only the supplied connector cable with the unit. A USB hub is not supported.
- Depending on the connected USB flash drive, the unit may not function or some functions may not be performed.
- The audio file format that can be played back on the unit is MP3/WMA/AAC/FLAC.
- Artist/song name, etc., can be displayed. Certain, special characters may not be correctly displayed.

CAUTION
Alpine accepts no responsibility for lost data, etc., even if data, etc., is lost while using this product.
On Handling USB Flash drive
- This unit can control a memory storage device that supports the USB Mass Storage Class (MSC) protocol. Playable audio file formats are MP3, WMA, AAC and FLAC.
- USB Flash drive function is not guaranteed. Use USB flash drive according to the terms of agreement. Read the USB flash drive Owner's Manual thoroughly.
- Avoid usage or storage in the following locations: Anywhere in the car exposed to direct sunlight or high temperatures. Anywhere the possibility of high humidity or corrosive substances are present.
- Fix the USB flash drive in a location where driver operation will not be hindered.
- USB Flash drive may not function correctly at high or low temperature.
- Use only certified USB flash drive. Note that even certified USB flash drive, may not function correctly depending on its type or state.
- Depending on the settings of the USB flash drive type, memory state or encoding software, the unit may not play back or display properly.
- USB Flash drive may take time to start playback. If there is a particular file other than audio in the USB flash drive, it may take considerable time before the file is played back or searched.
- The unit can play back "mp3," "wma" or "m4a" file extensions.
- Do not add the above extensions to a file other than audio data. This non-audio data will not be recognized. The resulting playback may contain noise that can damage speakers and/or amplifiers.
- It is recommended to back up important data on a personal computer.
- Do not remove the USB device while playback is in progress. Change SOURCE to something other than USB, then remove the USB device to prevent possible damage to its memory.
- Windows Media and the Windows logo are trademarks, or registered trademarks of Microsoft Corporation in the United States and/or other countries.
- Apple, iPhone, and Siri are trademarks of Apple Inc., registered in the U.S. and other countries. Apple CarPlay is a trademark of Apple Inc.
- Use of the Made for Apple and Works with Apple badges means that an accessory has been designed to connect specifically to the Apple product(s) identified in the Made for Apple badge and to work specifically with the technology identified in the Works with Apple badge, and has been certified by the developer to meet Apple performance standards. Apple is not responsible for the operation of this device or its compliance with safety and regulatory standards.
- Please note that the use of this accessory with an Apple product may affect wireless performance.
- Use of the Apple CarPlay logo means that a vehicle user interface meets Apple performance standards. Apple is not responsible for the operation of this vehicle or its compliance with safety and regulatory standards. Please note that the use of this product with iPhone may affect wireless performance.
- Sirius, XM and all related marks and logos are trademarks of Sirius XM Radio Inc. All rights reserved.
- Google, Android, Android Auto, Google Play and other marks are trademarks of Google LLC.
- The Bluetooth ^ word mark and logos are registered trademarks owned by the Bluetooth SIG, Inc. and any use of such marks by Alpine Electronics, Inc. is under license.
- MPEG Layer-3 audio coding technology licensed from Fraunhofer IIS and Thomson. Supply of this product only conveys a license for private,non-commercial use and does not convey a license nor imply any right to use this product in any commercial (i.e. revenue-generation) real time broadcasting (terrestrial, satellite, cable and/or any other media), broadcasting/streaming via internet, intranets and/or other networks or in other electronic content distribution systems, such as pay-audio or audio-on-demand applications. An independent license for such use is required. For details, please visit http://www.mp3licensing.com
Getting Started
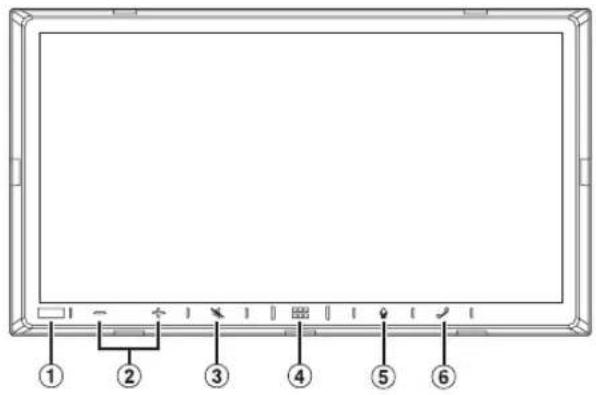
Location of Controls
text_image
① ② ③ ④ ⑤ ⑥① Dimmer Sensor
Sense the brightness of the car interior.
② (DOWN/UP) button
Touch to adjust the volume.
③ (MUTE) button
Touch to activate/deactivate the mute mode.
④ (HOME)/(Power Off) button
Activates the HOME screen.
Touch and hold this button for at least 1 second to turn the power off.
⑤ button
Depending on the connected smartphone, touch to activate Siri function or voice recognition mode.
⑥ (Phone) button
When a Hands-Free Phone is not connected:
The Bluetooth setting screen is displayed.
When a Hands-Free Phone is connected:
The phone number input screen (Keypad) is activated.
Touch and hold the button for at least 2 seconds to redial the most recent incoming call.
During an incoming call:
The phone call is started.
During a call:
The call finishes.
About the button descriptions used in this Owner's Manual
The buttons found on the face of the unit are expressed in bold (e.g. HOME)). The buttons found on the touch-screen display are shown in bold within brackets, [] (e.g. [×]).
Turning Power On or Off
Some of this unit's functions cannot be performed while the vehicle is in motion. Be sure to stop your vehicle in a safe location and apply the parking brake, before attempting these operations.
1 Turn the ignition key to the ACC or ON position.
The system turns on.
- When turned on, the system displays the last screen that was displayed before the ignition key was turned off. For example, if the unit is in radio mode when ignition is turned off, it will remain in radio mode when ignition is turned back on.
2 Touch and hold the (HOME)/(Power Off) button for at least 1 second to turn the power off.
- When the system is used for the first time, the language selection menu is displayed. Select the desired language, and then touch [OK].
- The unit can be turned on by touching the ☐HOME) button, button or ☐Phone) button.
- The unit is a precision device. Careful handling of the unit should provide you with years of trouble-free operation.
Turning the System On
When the system is used for the first time, the language selection menu is displayed.
Select a language, and then touch [OK].

text_image
Language Select English Français Español Portuguese- Some of this unit's functions cannot be performed while the vehicle is in motion. Be sure to stop your vehicle in a safe location and apply the parking brake before attempting these operations.
Adjusting the Volume
Adjust the volume by touching +. +
Volume decreases/increases continuously by touching and holding -/+
Volume: 0 - 35
Lowering Volume Quickly
Audio Mute function instantly lowers the volume level to 0.
1 Touch the 📂 (MUTE) button to activate the MUTE mode. The audio level will be 0.
2 Touching the 📂 (MUTE) button again will bring the audio back to its previous level.
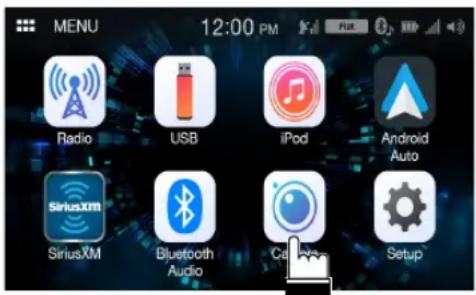
Touch Screen Operation
You can operate the system by using the touch panel on the screen.
- Be sure to touch the onscreen button lightly with the pad of your finger to avoid scratching the display.
Touch a button or list item on the screen lightly.
text_image
MENU 12:00 PM Radio USB iPod Android Auto SiriusXM Bluetooth Audio Call Audio Setup- If you touch a button and there is no reaction, remove your finger.
- Onscreen buttons that cannot be operated are dimmed.
About the HOME Screen
In the HOME screen, you can select the audio source and perform various setups or operations on the unit.
The HOME screen is displayed.

HOME screen example

text_image
MENU 12:00 PM Radio USB iPod Connectivity SiriusXM Bluetooth Audio Camera Setup| Radio Displays the | Radio main screen (page 26). |
| USB You can play back | back music files (MP3/WMA/AAC/FLAC/WAV), video files (MP4/AVI/WMV/MOV) and photo files (JPG/PNG/BMP) stored in a USB flash drive (page 27).• If a USB flash drive is not connected, this widget is not available. |
| iPod Displays the iPod | pod main screen (page 29).• If an iPhone is not connected, this widget is not available. |
| Connectivity You can use Apple CarPlay (page 25) or Android Auto (page 25).• If an iPhone 5s or later compatible with the Apple CarPlay function or a smartphone installed with the Android Auto App is not connected, this widget is not available.• When Apple CarPlay or Android Auto is available, the widget changes to [Apple CarPlay] / [Android Auto]. | |
| SiriusXM Displays the | SiriusXM main screen (page 31).• If a SiriusXM Tuner (Optional) is not connected, this widget is not available. |
| Bluetooth Audio Dis | plays the Bluetooth audio main screen (page 37). |
| Camera Displays camera images (page 39). | |
| Setup Displays the Setup screen (page 12). | |
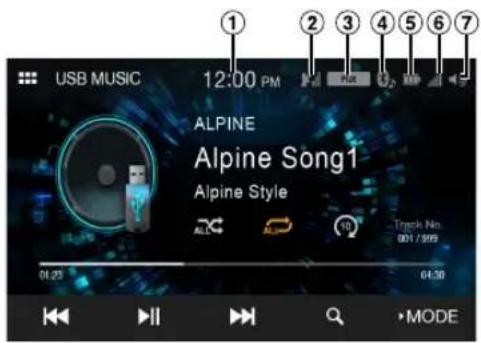
About the Indicator Display
The Indicator Bar at the top of the screen displays various types of information, like the current time.
text_image
USB MUSIC 12:00 PM ALPINE Alpine Song1 Alpine Style Track No. 001 / 999 04:25 04:30 MODE① Indicates the current time.
You can switch between the 12 hour display and 24 hour display options (page 19).
② Indicates the strength of the SiriusXM satellite radio signal.
③ Indicates the selected equalizer (page 13).
④ Lights up when connected to a Bluetooth compatible device. (Does not display when connection is set to OFF.)
(Both): Bluetooth connections to the audio device and Hands Free Phone.
(Audio): Bluetooth connection to audio device.
(Hands-free): Bluetooth connection to Hands-Free Phone.
⑤ Indicates the battery level of the connected Bluetooth device.
| Battery Level | Level 3 Level | Level 2 Level 1 | No Battery | |
| Icon |
This may not be displayed depending on the connected Bluetooth device.
⑥ Indicates the signal strength level of the connected Bluetooth compatible device.
Displayed when Bluetooth setting is ON.
| 0 | 1 | 2 | 3 | 4 | 5 |
⑦ Indicates the volume on/off status and shows the volume setting bar.
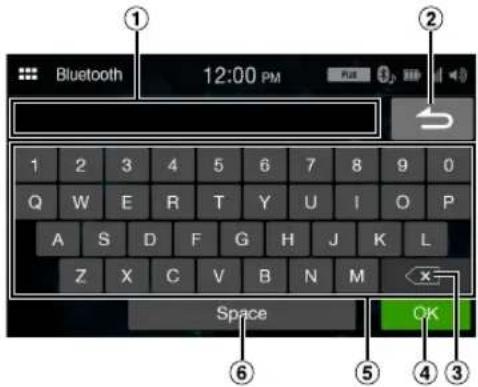
How to Input Characters and Numbers (Keypad)
The displayed screens and procedures may vary slightly depending on the function used, but the basic input method is the same.
text_image
Bluetooth 12:00 PM 1 2 3 4 5 6 7 8 9 0 Q W E R T Y U I O P A S D F G H J K L Z X C V B N M x- Space OK① Input screen area.
② Cancel
Keypad mode finishes.
③ (Delete)
Returns to the previous character and erases it.
Touching here for more than 2 seconds will erase all input characters.
④ Input number is confirmed.
⑤ Character keypad
⑥ Space
Setup
Setup Operation
To display the Setup Menu screen:
Your vehicle must be parked with the ignition key in the ACC or ON position. To do this, follow the procedures below.
1 Bring your vehicle to a complete stop at a safe location. Engage the parking brake.
2 Release the parking brake. (For safety, release the parking brake while depressing the foot brake pedal).
3 Engage the parking brake again.
- For automatic transmission vehicles, place the transmission lever in the Park position.
- "Simple Sound Settings" (page 13) and "Connectivity Setup" (page 20) can be set even not engaging the parking brake.
Now, the locking system for the Setup operation has been released. Engaging the parking brake can reactivate the Setup Menu, as long as the car's ignition has not been turned off. It is not necessary to repeat the above procedure (1 through 3).
Each time the ignition is turned OFF, perform the above procedure.
1 Touch the (HOME) button.
The HOME screen is displayed.
text_image
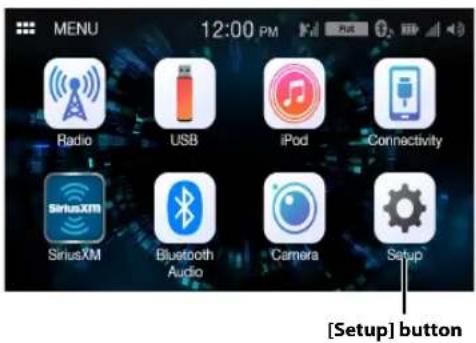
MENU 12:00 PM Radio USB iPod Connectivity SiriusXM Bluetooth Audio Camera Setup [Setup] button2 Touch [Setup].
The Setup main screen is displayed.
![ALPINE iLX-W650 - Touch [Setup]. - 1](/content/2026/05/877064/images/12c8432aecc4c2354127a19dc5ea3f915c20936b16e01ea1d9051e6b900038c6.jpg)
text_image
Setup Sound Volume System Connectivity SiriusXM Bluetooth Camera Information3 Touch the required setting icon, then touch the setting item.
Setting items:
Sound: See "Sound Setup" (page 13).
Volume: See "Volume Setup" (page 18).
System: See "System Setup" (page 19).
Connectivity: See "Connectivity Setup" (page 20).
SiriusXM: See "SiriusXM Setup" (page 21).
Bluetooth: See "Bluetooth Setup" (page 22).
Camera: See "Camera Setup" (page 23).
Information: See "Information" (page 24).
Sound Setup
[Sound] is selected on the Setup menu screen.
You can set up items related to the sound quality.
Touch [Advanced] or [Simple] to change the setting screen.
| Simple | |
| Fad./Bal. (page 13) | |
| Bass/Treble (page 13) | |
| EQ (page 13) | |
| Sub.W (page 14) | |
| Advanced* | |
| X-Over (page 14) | |
| P-EQ (page 15) | |
| TCR (page 15) | |
| MX (page 16) | |
| Defeat (page 16) | |
* Touch [>>] or [<<] to show further hierarchies.
Simple Sound Settings
[Simple] is selected on the Sound Setup menu screen.
Setting item:
Fad./Bal., Bass/Treble, EQ, Sub.W
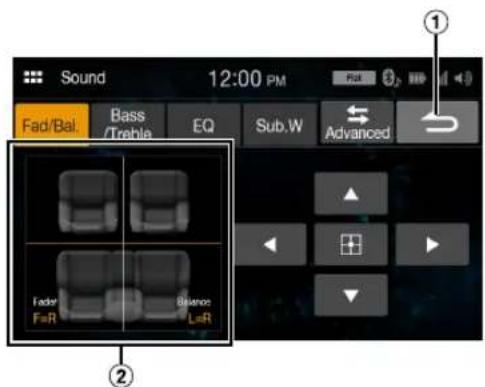
Setting the Fader/Balance
text_image
Sound 12:00 PM Fad/Bal. Bass EQ Sub.W Advanced Fader Balance F=R L=R① Cancel
Sound setup finishes.
② Fader/Balance Image area
Touch the desired point within the image area, or touch [ ]

Fader:
[10]Front to [10]Rear
Balance:
[10]Left to [10]Right
• To reset to the initial setting (Fader: F=R, Balance: L=R), touch [
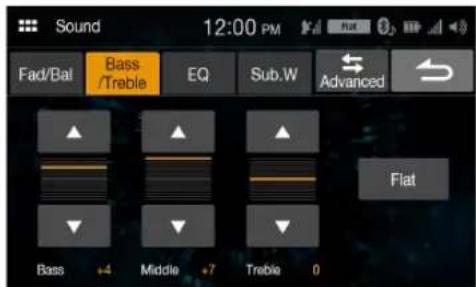
Adjusting the Bass/Middle/Treble
text_image
Sound 12:00 PM Fad/Bat Bass /Trable EQ Sub.W Advanced Flat Bass +4 Middle +7 Treble 0Touch [ ] or [ ] for each item to be adjusted.
Setting item:
Bass, Middle, Treble
Setting contents:
-7 to 7 (Initial setting: 0)
• To reset the initial setting (Bass: 0, Middle: 0, Treble: 0), touch [Flat].
- When the Defeat setting is [On], you cannot perform the set up.
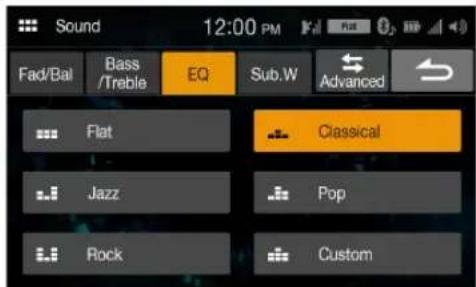
Setting an Equalizer
5 typical equalizer settings are preset at the factory for a variety of musical source material. You can also preset an equalizer by customizing.
text_image
Sound 12:00 PM Fad/Bal Bass /Treble EQ Sub.W Advanced Flat Classical Jazz Pop Rock CustomSetting item:
EQ
Setting contents:
Flat (Initial setting), Jazz, Rock, Classical, Pop, Custom
- When the Defeat setting is [On], you cannot perform the set up.
- Only one type can be set.
- When you select [Custom], the P-EQ setting screen is displayed (page 15).
- If you select a content except for [Custom] on this setting, P-EQ setting (page 15) will change P-EQ Setting.
Setting the Subwoofer Adjusting the Crossover Settings (X-Over)
text_image
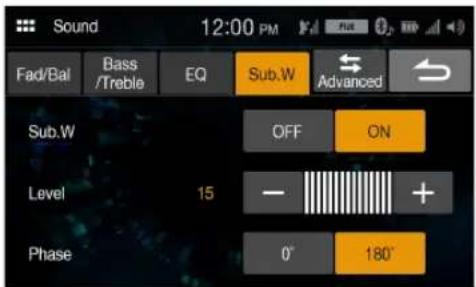
Sound 12:00 PM Fad/Bal Bass EQ Sub.W Advanced /Sub.W OFF ON Level 15 - + Phase 0° 180°Turning Subwoofer ON/OFF
If an optional subwoofer is connected to the unit, make the following setting.
Setting item:
Sub.W
Setting contents:
Off (Initial setting), On
Adjusting the Subwoofer Level
Setting item:
Level
Setting contents:
0 (Initial setting) to 15
- This setting is only available when "Sub.W" is set to [On].
Setting the Subwoofer Phase
The subwoofer output phase is toggled Subwoofer Normal (0°) or Subwoofer Reverse (180°).
Setting item:
Phase
Setting contents:
0^ (Initial setting), 180^
- This setting is only available when "Sub.W" is set to [On].
Advanced sound settings
[Advanced] is selected on the Sound Setup menu screen.
Setting item:
X-Over, P-EQ, TCR, MX, Defeat
Before performing the following procedures, see "About the Crossover" (page 16).
Setting item:
X-Over
1 Touch [Channel] to select the channel.
Each time you touch, the channel switches.
![ALPINE iLX-W650 - Touch [Channel] to select the channel. - 1](/content/2026/05/877064/images/b68c91be731e44830319ad94e7cdf6c826eacda75e01907b288251607efba22a.jpg)
text_image
Sound 12:00 PM X-Over P-EQ TCR Simple Level -12 SubW.LPF Frequency 63 Hz Slope 24 db/oct Flat Channel Preset1 Preset2 Preset3• The channel being adjusted is displayed in red.
Front HPF Rear HPF SubW LPF Front HPF →
2Adjust the crossover to your preference.
Selecting the Cut-Off Frequency
Touch [◀] or [▶] of "Frequency," and then select the cut-off frequency.
Setting contents:
20/25/31.5/40/50/63/80 (Initial setting) / 100/125/160/200 Hz
Adjusting the Slope
Touch [◀] or [▶] of "Slope," and then adjust the HPF or LPF slope.
Setting contents:
0 (Initial setting) / 6 / 12 / 18 / 24 dB/oct.
Adjusting the Level
Touch [−] or [+] of "Level," and then adjust the HPF or LPF level.
Setting contents:
-12 to 0 dB (Initial setting: 0)
3 Repeat steps 1 to 2 to make adjustment to the other channels.
4To store the adjusted setting value, touch and hold [Preset 1], [Preset 2], or [Preset 3] for at least 2 seconds.
- T o u c h [Flat] to initialize all values.
- If the Subwoofer setting is [Off], the Subwoofer setting cannot be edited (page 14).
- While adjusting the X-Over you should consider the frequency response of the connected speakers.
Calling the X-Over adjusted value
Calling the pre-set X-Over adjusted value.
Touch [Preset 1], [Preset 2], or [Preset 3] on the X-Over screen.
The setting stored in the Preset will be recalled.
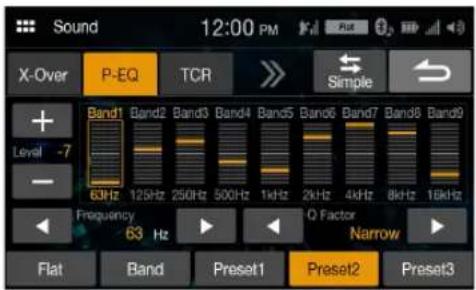
Adjusting the Parametric Equalizer Curve (P-EQ)
Parametric Equalizer (P-EQ) can adjust the center frequency/Q Factor (bandwidth)/level for the front and rear speakers independently. You can adjust only to the approximate frequency zone, but can then compensate by performing advanced correction of the sound.
Setting item:
P-EQ
- When the Defeat setting is [On], you cannot perform the set up.
1 Adjust the P-EQ to your preference.
text_image
Sound 12:00 PM X-Over P-EQ TCR Simple + Level -7 63Hz 125Hz 250Hz 500Hz 1kHz 2kHz 4kHz 8kHz 16kHz Frequency 63 Hz Narrow Flat Band Preset1 Preset2 Preset3Adjusting the Band
Touch [Band] to select the band to be adjusted.
Band1 Band2 ... Band8 Band9 Band1 →
- You can select a band directly by touching the screen.
Adjusting the Frequency
Touch [◀] or [▶] of "Frequency" to adjust the frequency of the selected band.
Adjustable frequency bands:
20 Hz to 20 kHz (in 1/3 octave steps)
Band1: 20 Hz to 100 Hz (63 Hz)
Band2: 63 Hz to 315 Hz (125 Hz)
Band3: 125 Hz to 500 Hz (250 Hz)
Band4: 250 Hz to 1 kHz (500 Hz)
Band5: 500 Hz to 2 kHz (1 kHz)
Band6: 1 kHz to 4 kHz (2 kHz)
Band7: 2 kHz to 7.2 kHz (4 kHz)
Band8: 5.8 kHz to 12 kHz (8 kHz)
Band9: 9 kHz to 20 kHz (16 kHz)
Adjusting the Level
Touch [−] or [+] of "Level" to adjust the level of selected band.
Setting contents:
-7 to 7 (Initial setting: 0)
Setting the Bandwidth
Touch [◀] or [▶] of "Q Factor" to select the bandwidth.
Setting contents:
Narrow / Medium / Wide (Initial setting)
2 To adjust another band, repeat step 1, and adjust all bands.
3 To store the adjusted setting value, touch and hold [Preset 1], [Preset 2], or [Preset 3] for at least 2 seconds.
- Band2 and Band5 are the same as the Bass and Middle controls. For details on setting Bass and Treble, see "Adjusting the Bass/Middle/Treble" (page 13).
- Settings exceeding the frequency of adjacent bands are not available.
- While adjusting the P-EQ, you should consider the frequency response of the connected speakers.
• To reflect the P-EQ setting, set "EQ" to [Custom] (page 13). - T o u c h [Flat] to initialize all values.
Calling the P-EQ adjusted value
Calling the pre-set P-EQ adjusted value.
Touch [Preset 1], [Preset 2], or [Preset 3] on the P-EQ screen.
The setting stored in the Preset will be recalled.
- Presets can be called on [Custom] of the "EQ" setting (page 13).
Adjusting the Time Correction (TCR)
Before performing the following procedures, see "About Time Correction" (page 17).
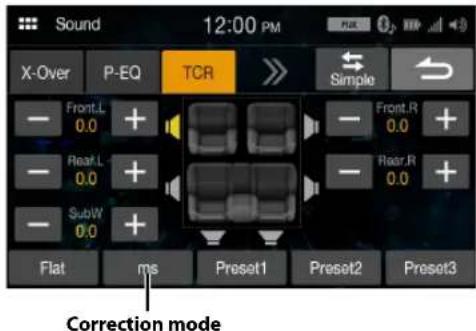
text_image
Sound 12:00 PM X-Over P-EQ TCR Simple Front.L 0.0 + Front.R 0.0 + Rear.L 0.0 + Rear.R 0.0 + SubW 0.0 + Flat ms Preset1 Preset2 Preset3 Correction modeSetting item:
TCR
1 Touch the Correction mode button to select [ms], [cm] or [inch].
2 Touch [−] or [+] for each speaker to adjust the time or distance.
0.0 msec to 9.9 msec (0.1 msec/step)
0.0 cm (0.0 inch) to 336.6 cm (133.7 inch) (3.4 cm/step)
All speaker setting values are adjustable in the range of 15 ms or
510 cm.
3 To store the adjusted setting value, touch and hold [Preset 1], [Preset 2], or [Preset 3] for at least 2 seconds.
• T o u c h [Flat] to set all values to 0.0.
- If the Subwoofer setting is [Off], the Subwoofer setting cannot be edited (page 14).
Calling the Time Correction Value
Calling the pre-set time correction value.
Touch [Preset 1], [Preset 2], or [Preset 3] on the time correction screen.
The setting stored in the Preset will be recalled.
Setting the Media Xpander (MX)
Media Xpander (MX) makes vocals or instruments sound distinct regardless of the music source. The SiriusXM, USB Flash drive and iPhone, will be able to reproduce the music clearly even in cars with a lot of road noise.
Setting item: MX
1 Touch [On] of "All MX OFF/ON".
![ALPINE iLX-W650 - Touch [On] of "All MX OFF/ON". - 1](/content/2026/05/877064/images/324e373dc4a205cdf01f6b06bf3b37d85a3da0f9f67e97d89e1e2d471ec377d0.jpg)
text_image
Sound 12:00 PM MX Defeat Simple BT Off All MX OFF/ON Off On2 Touch any of [Off] [ ] [ ] [ ]
• T o c a n c e l M X m o d e, set [Off] in step 1.
- MP3/WMA/AAc can have its own MX setting.
- When the Defeat setting is [On], you cannot perform the set up.
- The MX setting can be performed only when a source is currently selected.
Setting Defeat
If Defeat is [On], the MX and Equalizer setting are turned Off. This disables any settings made for these functions.
Setting item:
Defeat
Setting contents:
Off (Initial setting) / On
About the Crossover
Crossover (X-Over):
This unit is equipped with an active crossover. The crossover limits the frequencies delivered to the outputs. Each channel is controlled independently. Thus, each speaker pair can be driven by the frequencies for which they have been optimally designed.
The crossover adjusts the HPF (high pass filter) or LPF (low pass filter) of each band, and also the slope (how fast the filter rolls off the highs or lows).
Adjustments should be made according to the reproduction characteristics of the speakers. Depending on the speakers, a passive network may not be necessary. If you are unsure about this point, please consult your authorized Alpine dealer.
| Cut-off frequency (1/3 octave steps) | Slope | Level | |||
| HPF LPF | HPF LPF | ||||
| Subwoofer (LPF) | ---- | 20 Hz - 200 Hz | ---- | 0, 6, 12, 18, 24 dB/oct. | 0 to -12 dB |
| Rear speaker (HPF) | 20 Hz - 200 Hz | ---- | 0, 6, 12, 18, 24 dB/oct. | ---- | 0 to -12 dB |
| Front speaker (HPF) | 20 Hz - 200 Hz | ---- | 0, 6, 12, 18, 24 dB/oct. | ---- | 0 to -12 dB |
Low range High range
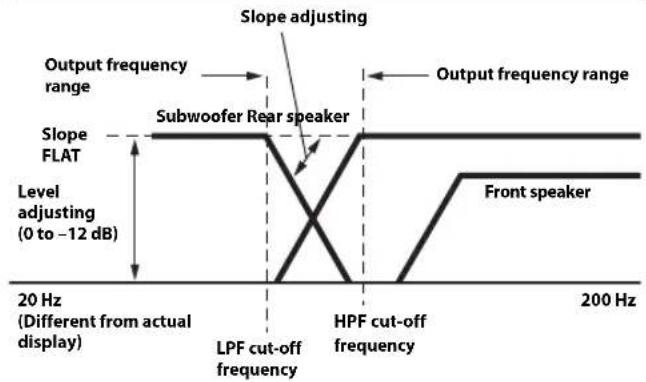
text_image
Slope adjusting Output frequency range Subwoofer Rear speaker Level adjusting (0 to -12 dB) 20 Hz (Different from actual display) LPF cut-off frequency HPF cut-off frequency 200 Hz Output frequency range Slope FLAT Front speaker- HPF (high pass filter): Cuts the lower frequencies and allows the higher frequencies to pass.
- LPF (low pass filter): Cuts the higher frequencies and allows the lower frequencies to pass.
- Slope: The level change (in dB) for a frequency change of one octave.
• The higher the slope value, the steeper the slope becomes. - Adjust the slope to FLAT to bypass the HP or LP filters.
- Do not use a tweeter without the HPF on or set to a low frequency, as it may cause damage to the speaker due to the low frequency content.
- Adjustment should be made according to the recommended crossover frequency of the connected speakers. Determine the recommended crossover frequency of the speakers. Adjusting to a frequency range outside that recommended may cause damage to the speakers. For the recommended crossover frequencies of Alpine speakers, refer to the respective Owner's Manual.
We are not responsible for damage or malfunction of speakers caused by using the crossover outside the recommended value.
About Time Correction
The distance between the listener and the speakers in a car vary widely due to the complex speaker placement. This difference in the distances from the speakers to the listener creates a shift in the sounds image and frequency characteristics. This is caused by the time delay between the sound reaching the listener's right versus the left ear.
To correct this, this unit is able to delay the audio signal to the speakers closest to the listener. This effectively creates a perception of increased distance for those speakers. The listener can be placed at an equal distance between the left and right speakers for optimum staging.
The adjustment will be made for each speaker in 3.4 cm steps.
Example 1. Listening Position: Front Left Seat
Adjust the time correction level of the front left speaker to a high value and the rear right to zero or a low value.
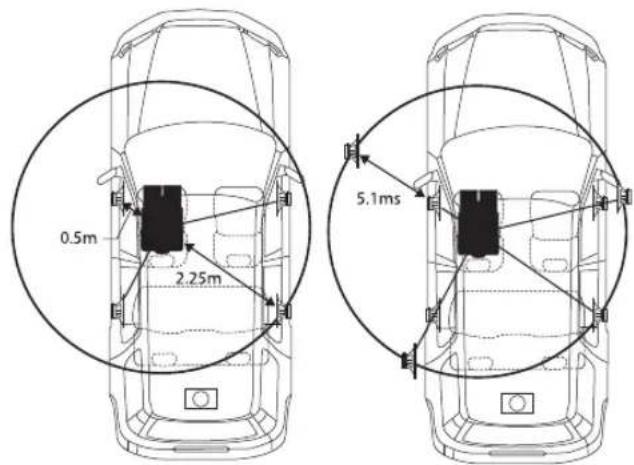
text_image
0.5m 2.25m 5.1msThe sound is not balanced because the distance between the listening position and the various speakers is different.
The difference in distance between the front left speaker and the rear right speaker is 1.75 m (68-7/8").
Here we calculate the time correction value for the front left speaker in the diagram on the above.
Conditions:
Farthest Speaker – listening position : 2.25 m (88-9/16")
Front left speaker – listening position : 0.5 m (19-11/16")
Calculation: L = 2.25 m - 0.5 m = 1.75 m (68-7/8")
Time correction = 1.75 ÷ 343* × 1,000 = 5.1 (ms)
* Speed of sound: 343 m/s (765 mph) at 20°C
In other words, giving the front left speaker a time correction value of 5.1 ms makes it seem as if its distance from the listener is the same as the distance to the farthest speaker.
Time correction eliminates the differences in the time required for the sound to reach the listening position.
The time of the front left speaker is corrected by 5.1 ms so that its sound reaches the listening position at the same time as the sound of other speakers.
Example 2. Listening Position: All Seats
Adjust the time correction level of each speaker to almost the same level.
1 Sit in the listening position (driver's seat, etc.) and measure the distance (in meters) between your head and the various speakers.
2 Calculate the difference between the distance correction value to the farthest speaker and the other speakers.
L = (distance to farthest speaker) - (distance to other speakers)
These values are the time correction values for the different speakers. Setting these values to make each sound reach the listening position at the same time as the sound of other speakers.
Time Correction Value List
| Time Difference (msec) | Distance (cm) | Distance (inch) | Time Difference (msec) | Distance (cm) | Distance (inch) |
| 0.0 0.0 0 | 0 5.1 173.4 68.3 | ||||
| 0.1 3.4 1 | 3 5.2 176.8 69.7 | ||||
| 0.2 6.8 2 | 7 5.3 180.2 71.0 | ||||
| 0.3 10.2 | 4.0 5.4 183.6 72.4 | ||||
| 0.4 13.6 | 5.4 5.5 187.0 73.7 | ||||
| 0.5 17.0 | 6.7 5.6 190.4 75.0 | ||||
| 0.6 20.4 | 8.0 5.7 193.8 76.4 | ||||
| 0.7 23.8 | 9.4 5.8 197.2 77.7 | ||||
| 0.8 27.2 | 10.7 5.9 200.6 79.1 | ||||
| 0.9 30.6 | 12.1 6.0 204.0 80.4 | ||||
| 1.0 34.0 | 13.4 6.1 207.4 81.7 | ||||
| 1.1 37.4 | 14.7 6.2 210.8 83.1 | ||||
| 1.2 40.8 | 16.1 6.3 214.2 84.4 | ||||
| 1.3 44.2 | 17.4 6.4 217.6 85.8 | ||||
| 1.4 47.6 | 18.8 6.5 221.0 87.1 | ||||
| 1.5 51.0 | 20.1 6.6 224.4 88.4 | ||||
| 1.6 54.4 | 21.4 6.7 227.8 89.8 | ||||
| 1.7 57.8 | 22.8 6.8 231.2 91.1 | ||||
| 1.8 61.2 | 24.1 6.9 234.6 92.5 | ||||
| 1.9 64.6 | 25.5 7.0 238.0 93.8 | ||||
| 2.0 68.0 | 26.8 7.1 241.4 95.1 | ||||
| 2.1 71.4 | 28.1 7.2 244.8 96.5 | ||||
| 2.2 74.8 | 29.5 7.3 248.2 97.8 | ||||
| 2.3 78.2 | 30.8 7.4 251.6 99.2 | ||||
| 2.4 81.6 | 32.2 7.5 255.0 100.5 | ||||
| 2.5 85.0 | 33.5 7.6 258.4 101.8 | ||||
| 2.6 88.4 | 34.8 7.7 261.8 103.2 | ||||
| 2.7 91.8 | 36.2 7.8 265.2 104.5 | ||||
| 2.8 95.2 | 37.5 7.9 268.6 105.9 | ||||
| 2.9 98.6 | 38.9 8.0 272.0 107.2 | ||||
| 3.0 102.0 | 40.2 8.1 275.4 108.5 | ||||
| 3.1 105.4 | 41.5 8.2 278.8 109.9 | ||||
| 3.2 108.8 | 42.9 8.3 282.2 111.2 | ||||
| 3.3 112.2 | 44.2 8.4 285.6 112.6 | ||||
| 3.4 115.6 | 45.6 8.5 289.0 113.9 | ||||
| 3.5 119.0 | 46.9 8.6 292.4 115.2 | ||||
| 3.6 122.4 | 48.2 8.7 295.8 116.6 | ||||
| 3.7 125.8 | 49.6 8.8 299.2 117.9 | ||||
| 3.8 129.2 | 50.9 8.9 302.6 119.3 | ||||
| 3.9 132.6 | 52.3 9.0 306.0 120.6 | ||||
| 4.0 136.0 | 53.6 9.1 309.4 121.9 | ||||
| 4.1 139.4 | 54.9 9.2 312.8 123.3 | ||||
| 4.2 142.8 | 56.3 9.3 316.2 124.6 | ||||
| 4.3 146.2 | 57.6 9.4 319.6 126.0 | ||||
| 4.4 149.6 | 59.0 9.5 323.0 127.3 | ||||
| 4.5 153.0 | 60.3 9.6 326.4 128.6 | ||||
| 4.6 156.4 | 61.6 9.7 329.8 130.0 | ||||
| 4.7 159.8 | 63.0 9.8 333.2 131.3 | ||||
| 4.8 163.2 | 64.3 9.9 336.6 132.7 | ||||
| 4.9 166.6 | 65.7 | ||||
| 5.0 170.0 | 67.0 | ||||
Volume Setup
[Volume] is selected on the Setup menu screen.
Phone Volume Setup
[Phone] is selected on the Volume Setup menu screen.

text_image
Volume 12:00 PM Phone Other Ring Vol. 11 - + Caller Vol. 11 - + Mic Vol. 11 - +Adjusting the Ring Tone Level
You can adjust the receive volume, during the call.
Setting item:
Ring Vol.
Setting contents:
01 to 11 (Initial setting: 05)
Adjusting the Caller Level
You can adjust the volume of the incoming call.
Setting item:
Caller Vol.
Setting contents:
01 to 11 (Initial setting: 05)
Adjusting the Microphone Level
You can adjust the transmit volume, during the call.
Setting item:
Mic Vol.
Setting contents:
01 to 11 (Initial setting: 05)
Volume Setup except for Phones (Other)
[Other] is selected on the Volume Setup menu screen.
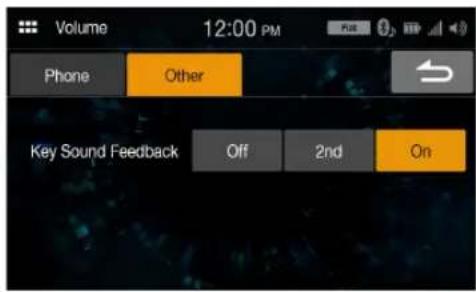
text_image
Volume 12:00 PM Phone Other Key Sound Feedback Off 2nd OnVolume Setting
You can change the volume of the sound heard when a button is touched.
Setting item:
Key Sound Feedback
Setting contents:
Off, 2nd, On
System Setup
[System] is selected on the Setup menu screen.
Setting item:
System
Setting contents:
Clock, Dimmer, Language, Reset
Clock Setup
[Clock] is selected on the System Setup Menu screen.
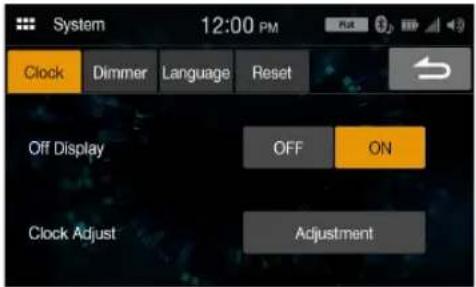
text_image
System 12:00 PM Clock Dimmer Language Reset Off Display OFF ON Clock Adjust AdjustmentSetting item:
Clock Adjust
Setting items:
12h (Initial setting), 24h
Setting contents:
01 - 12 or 00 - 23, 00 - 59, AM/PM
Setting Off Display
To not display the clock when turning the unit to OFF, set "Off Display" to [On].
Setting item:
Off Display
Setting contents
Off (Initial setting), On
Screen/Lighting Customize (Dimmer)
[Dimmer] is selected on the System Setup Menu screen.

text_image
System 12:00 PM Clock Dimmer Language Reset Dimmer Off On Auto Dimmer Level 0 - + Key illumination -1 - +Setting the Brightness of the Backlighting (Dimmer)
Backlighting is provided by LEDs light built into the liquid crystal panel. The illumination control adjusts the brightness of the backlighting based on the car ambient lighting for easier viewing.
Setting item:
Dimmer
Setting contents:
Off, On, AUTO (Initial setting)
Off: Deactivate Auto Dimmer mode to keep the background illumination of the monitor bright.
On: Keep the background illumination of the monitor dark.
AUTO: Adjust the brightness of the background illumination of the monitor automatically to the brightness of the car interior.
- When "On" is set, the setting is also applied for the button lighting in "Adjusting the Dimmer of Button Lighting at Night" (page 19) and "Adjusting the Minimum Level of Backlight" (page 19).
Adjusting the Minimum Level of Backlight
You can adjust the brightness of the backlight. This function could be used, for instance, to change the screen brightness while traveling at night.
Setting item:
Dimmer Level
Setting contents:
-14 to 14 (Initial setting: 0)
- This setting is only available when "Dimmer" is set to [On] or [AUTO].
Adjusting the Dimmer of Button Lighting at Night
You can adjust the brightness of the button lighting at night with the dimmer.
Setting item:
Key illumination
Setting level:
-2 to 2 (Initial setting: 0)
- This setting is only available when "Dimmer" is set to [On] or [AUTO].
Language Setup
[Language] is selected on the System Setup Menu screen. The Setup menu, feedback information, etc. for this unit can be changed to appear in the selected language.
Setting item:
Language
Setting contents:
English, Français, Español, Português
• The currently selected language is displayed.
Reset
[Reset] is selected on the System Setup Menu screen. You can initialize all data, to restore the factory settings. Remove the USB flash drive, etc. from the system before operation.
Setting item:
Reset
1 Touch [Reset].
2 After the confirmation message appears, touch [Yes]. The system starts initialization.
- Do not turn on/off the power, change the ignition key position or remove the screen panel until system restart is completed.
Connectivity Setup
[Connectivity] is selected on the Setup menu screen.
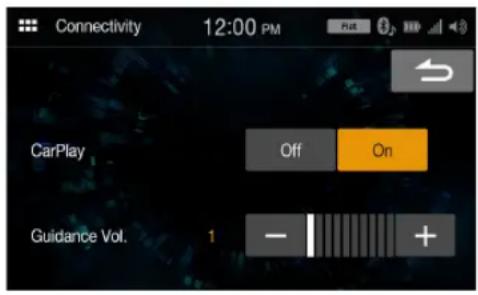
text_image
Connectivity 12:00 PM CarPlay Off On Guidance Vol. 1 - +Setting item:
Connectivity
Using Apple CarPlay mode
Setting item:
CarPlay
Setting contents
Off, On (Initial setting)
• To use iPhone as iPod mode, select [Off].
Adjusting the Guidance Volume
Setting item:
Guidance Vol.
Setting contents
00 to 10
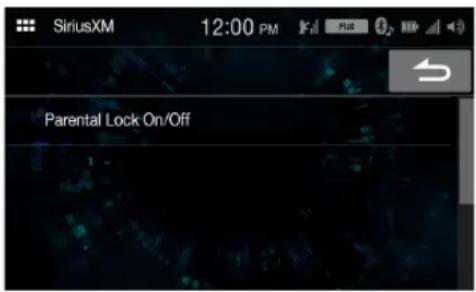
SiriusXM Setup
[SiriusXM] is selected on the Setup menu screen.
text_image
SiriusXM 12:00 PM Parental Lock On/OffSetting item:
SiriusXM
Setting contents:
Parental Lock On/Off
Parental Lock
You can lock out channels with passcode protection. Channels that are locked cannot be accessed without entering the passcode. You can unlock a channel or change the passcode using this menu option.
Setting item:
Parental Lock On/Off
1 Touch [Parental Lock On/Off].
A passcode input screen is displayed.
2 Touch the numeric keypad to input a 4-digit passcode.
The initial default 4-digit passcode is set to 0000.
After entering the digit, it is displayed as "●
• T o u x h [ ] to delete an entered number.
- To u c h [Delete All] to delete all entered numbers.
3 Touch [OK].
Setting the Lock status of individual channels
4 Touch [Manage Channels].
The channels list screen is displayed.
5 Touch [On] or [Off] of the channels list to set the Parent Lock.
Clearing the Lock of ALL the locked Channels
4 Touch [Reset].
5 Touch [Yes] to clear the lock of all the locked channels.
Touch [No] to cancel.
Changing the Lock Passcode
4 Touch [Manage Code].
The numeric keypad screen is displayed.
5 Use the keypad to enter the current (old) 4-digit passcode, and then touch [OK].
The initial passcode is set to "0000."
• T o u × h [ ] to delete an entered number.
• T o u c h [Delete All] to delete all entered numbers.
6Use the keypad to enter the new 4-digit passcode, and then touch [OK].
7 Use the keypad to enter the new 4-digit passcode a second time to verify it, and then touch [OK].
- Remember to keep a note of the passcode in a safe place in case you forget the code.
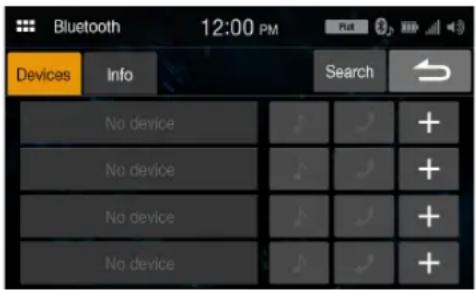
Bluetooth Setup
[Bluetooth] is selected on the Setup menu screen.
Setting item:
Bluetooth
Setting contents:
Devices, Info, Search
Device Setup
[Devices] is selected on the Bluetooth Setup Menu screen.
You can register and set up Bluetooth compatible devices.
text_image
Bluetooth 12:00 PM Devices Info Search No device No device No device No devicePairing the Bluetooth Device
1 Touch [Devices] on the Bluetooth Setup Menu screen.
2 Touch [+] of "No Device".
3 Select this unit (iLX-W650) to set the Bluetooth connection on the Bluetooth device.
When the device registration is complete, a message appears and the device returns to normal mode.
- The Bluetooth registration process differs depending on the device version and SSP (Simple Secure Pairing). If a 4 or 6 character Passcode appears on this system, enter the Passcode on the Bluetooth device.
- If a 6 character Passkey appears on this system, make sure the same passkey is displayed on the Bluetooth device, and follow the screen.
Setting the Bluetooth Device
Select one of 4 paired Bluetooth compatible devices that you previously registered.
1 Touch [Devices] on the Bluetooth Setup Menu screen.
2 Touch [♪] (Audio) or [♪] (Hands-free) of the device you want to connect from the Paired Device list.
Deleting a Bluetooth Device from the list
You can delete the information of a previously connected Bluetooth compatible device.
1 Touch [Devices] on the Bluetooth Setup Menu screen.
2 Touch [—] of the Bluetooth compatible device to delete from the Paired Device list.
3 Touch [Yes].
- T o u c h i n g [No] will cancel the setting.
Displaying Bluetooth Information
[Info] is selected on the Bluetooth Setup Menu screen.
You can display the Bluetooth device name and device address of this unit.
Setting item:
Info
- If you touch [Unpair all devices], all paired devices will be deleted from the unit.
Searching for a Bluetooth Device
Setting item:
Search
1 Touch [Search] on the Bluetooth Setup Menu screen.
The Bluetooth devices can be searched are displayed in a list.
2 Touch the device you want to connect from the list.
- You can register up to 4 Bluetooth compatible mobile phones.
- You can connect two Bluetooth Devices; one exclusively for Hands-Free Phone and one exclusively for Bluetooth Audio.
3 When the device registration is complete, a message appears and the device returns to normal mode.
- The Bluetooth registration process differs depending on the device version and SSP (Simple Secure Pairing). If a 4 or 6 character Passcode appears on this system, enter the Passcode using the Bluetooth device. If a 6 character Passkey appears on this device, make sure the same passkey is displayed on the Bluetooth compatible device.
- If all 4 devices have been registered, you cannot register a 5th device. To register another device, you need to delete one of the other 4 devices first.
Auto Connection
When the ACC is turned ON, the Bluetooth Hands-Free device is automatically connected. After connecting to the Hands-Free device, the Bluetooth Audio device is also connected automatically.
Downloading the Phonebook
If Hands-Free device is connected, you can download the phonebook from the device.
- When the device is disconnected, the downloaded phonebook is not shown.
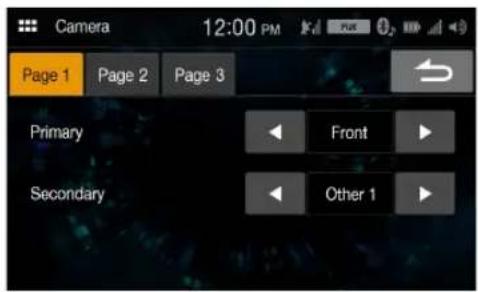
Camera Setup
[Camera] is selected on the Setup Menu screen.
You can set up items related to the Camera.
Touch [Page 1], [Page 2] or [Page 3] to change the screen.
text_image
Camera 12:00 PM Page 1 Page 2 Page 3 Primary Front Secondary Other 1Camera Primary and Secondary Setting
When you connect two cameras or more, set the priority for displaying on the screen.
Setting item:
Primary, Secondary (Page 1)
Setting contents:
Off, Rear, Front, Side (R), Side (L), Other 1, Other 2
- If the content is set to "Primary", it is not displayed in "Secondary". If the content "Secondary", it is not displayed in "Primary". These do not apply if the content is set to [Off].
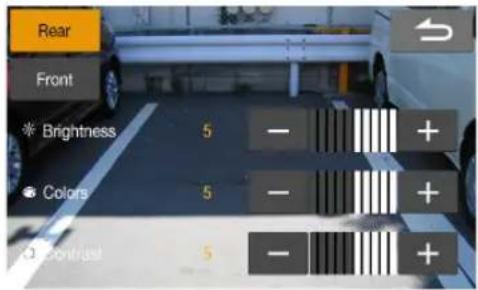
Camera Picture Quality Setup
You can adjust the picture quality for the primary and secondary cameras.
text_image
Rear Front Brightness 5 - + Colors 5 - + Contrast 5 - +Setting item:
Picture Quality (Page 2)
Further setting item:
Adjustment
- You can switch to the setup screen for the secondary camera by touching the secondary camera button.
- When both "Primary" and "Secondary" are set to [Off], [Page 2] cannot be selected.
Adjusting Brightness
Setting item:
Brightness
Setting contents:
-5 to 5 (Initial setting: 0)
- You can adjust the brightness between MIN (-5) and MAX (5).
Adjusting Color of Display
Setting item:
Colors
Setting contents:
-5 to 5 (Initial setting: 0)
- You can adjust the color between MIN (-5) and MAX (5).
Adjusting Display Contrast
Setting item:
Contrast
Setting contents:
-5 to 5 (Initial setting: 0)
- You can adjust the contrast between MIN (-5) and MAX (5).
Setting the Camera Signal Input
When the camera is connected, the video input signal type can be chosen.
Further setting item:
Camera Signal (Page 2)
Setting contents:
NTSC (Initial setting) / PAL
- When both "Primary" and "Secondary" are set to [Off], [Page 2] cannot be selected.
Turning the Rear Camera Guide On/Off
When displaying the rear camera view on the screen, you can set to hide or show the camera guide.
Setting item:
Rear Camera Guide (Page 3)
Setting contents:
Off / On
- When both "Primary" and "Secondary" are set to [Off], [Page 3] cannot be selected.
• To use this setting, set "Primary" or "Secondary" to [Rear].
Adjusting the Rear Camera Guide
You can adjust the camera guide position.
Setting item:
Rear Camera Guide (Page 3)
Further setting item:
Adjustment
1 Touch [Adjustment] on "Page3".
The camera guide adjustment screen is displayed.
- When both "Primary" and "Secondary" are set to [Off], [Page 3] cannot be selected.
• To use this setting, set "Primary" or "Secondary" to [Rear]. - To use this setting, set "Rear Camera Guide" to [On].
![ALPINE iLX-W650 - Touch [Adjustment] on "Page3". - 1](/content/2026/05/877064/images/c0f321033b62ec3ac097e808c9569399391dcd7cc188db456dddf43f19241abc.jpg)
text_image
Reset ↑ 215 ↓ ← 12 → + - +2 Touch the icon you want to move.
3 Touch [], [↑, [ ] ↓ [ ] move the icon.
- Touching [Reset] clears adjustments and returns to the setting before guide line alteration.
4 Touch [] to complete the adjustment and return to the previous screen.
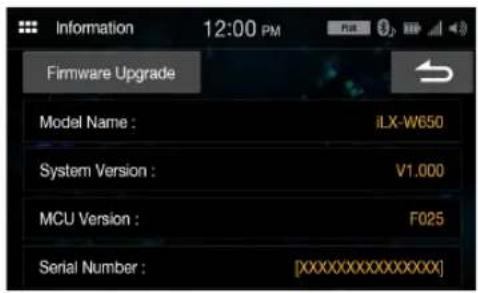
Information
[Information] is selected on the Setup menu screen.
Information about this system is shown.
text_image
Information 12:00 PM Firmware Upgrade Model Name : iLX-W650 System Version : V1.000 MCU Version : F025 Serial Number : [XXXXXXXXXXXXXX]- To update the software of this system, refer to "Product Software Update" (page 41).
Apple CarPlay (Optional)
Apple CarPlay is a smarter, safer way to use your iPhone in the car. Apple CarPlay takes the things you want to do with your iPhone while driving and puts them right on the unit. You can get directions, make calls, send and receive messages, and listen to music, all in a way that allows you to stay focused on the road. Just plug in your iPhone to the unit and go.
- Before using this function, plug in your iPhone using Lightning to USB Cable (Supplied with iPhone) to the unit.
- Some functions may not be available while driving.
- About iPhone models usable with this unit, see “iPod mode on iPhone (Optional)” (page 29). Only an iPhone 5s or later compatible with Apple CarPlay function.
- Before operating Apple CarPlay, set "CarPlay" to [On] (page 20).
Access to Apple CarPlay
1 Touch the (HOME) button.
The HOME screen is displayed.
2 Touch [Apple CarPlay].
The Apple CarPlay screen is displayed.
Touch the desired App icon on the unit, or use Siri function by touching the button.
- When a used iPhone 5s or later is reconnected, touch the pop-up message-"Apple CarPlay connected." within 5 seconds to access to Apple CarPlay screen.
- The App must be Apple CarPlay compatible in order to appear in the Home screen.
Android Auto (Optional)
What is Android Auto
Android Auto is designed to make it easier to use apps from your phone while you're on the road. Navigate with Google Maps, listen to playlists or podcasts from your favorite apps, and more.
Activate Android Auto
Download the Android Auto App from the Google Play store before continuing.
Just plug in your smartphone to the unit's USB connector, then follow the prompt to pair your smartphone with the unit.
- The connected smartphone with Android Auto will disconnect other phone's Bluetooth connection and pair to the unit.
1 Touch the (HOME) button.
The HOME screen is displayed.
2 Touch [Android Auto].
The Android Auto screen is displayed.
- You can make a call, use voice recognition function and Android Auto's compatible navigation app, etc.,
- Only Google approved apps with necessary driver-safety measures in place can be used.
Radio
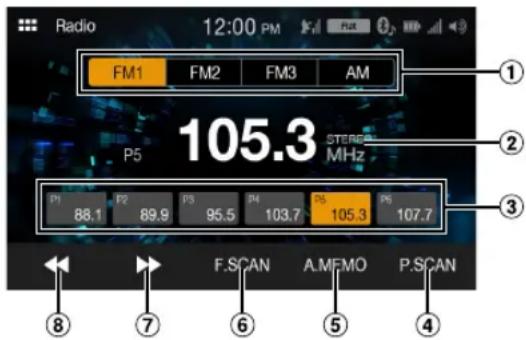
Radio main screen example
text_image
Radio 12:00 PM FM1 FM2 FM3 AM 105.3 STEREO MHz P5 P1 P2 P3 P4 P5 105.3 P6 107.7 88.1 89.9 95.5 103.7 F.SCAN A.MEMO P.SCAN① Band button
Switches a band.
② Information display
③ Preset button
Displays the preset stations with a short touch.
Touch for at least 1 second to memorise the current station as a preset station.
④ Plays each preset station for about 5 seconds.
⑤ Memorises stations automatically
⑥ Searches a station, and then plays it for about 5 seconds.
⑦ Increases frequency
Touch and hold to change the frequency continuously.
⑧ Decreases frequency
Touch and hold to change the frequency continuously.
Radio Basic Operation
Listening to the Radio
1 Touch the (HOME) button and select radio mode.
The display shows the radio mode screen.
2 Select the desired band from [FM1] / [FM2] / [FM3] / [AM].
3 Touch [◀◀], [▶▶] to change the radio frequency up or down respectively.
Touch and hold to change the frequency continuously.
Presetting Stations Manually
1 Tune in a desired radio station you wish to store in the preset memory by manual or automatic seek tuning.
2 Touch and hold the Preset number you want to store for at least 1 second.
The selected station is stored.
3 Repeat the procedure to store up to 5 other stations onto the same band.
To use this procedure for other bands, simply select the desired band and repeat the procedure.
A total of 24 stations can be stored in the preset memory (6 stations for each band; FM1, FM2, FM3, or AM).
- If a preset memory has already been set in the same preset number, it will be cleared and the new station will be memorized.
Presetting Stations Automatically
The tuner can automatically seek and store 6 strong stations in the selected band in ascending order of frequency.
Select the desired band then touch and hold [A.MEMO].
The tuner automatically seeks and stores 6 strong stations into the preset buttons in ascending order of frequency.
When automatic storing has completed, the station stored in the preset 1 is selected.
- If no stations are stored, the tuner will return to the original station you were listening to before the automatic storing procedure began.
- You can cancel this process by touching [A.MEMO] while the tuner is automatically seeking stations. Canceling will return the tuner preset to the previous setting.
Tuning to Preset Station
After selecting the desired band, touch the desired preset button.
Scanning Stations
The tuner can automatically seek and plays the station for 5 seconds each.
1 After selecting the desired band, touch [F.SCAN]. Scanning stations starts.
2 When the desired station is played, touch [F.SCAN] again.
Scanning Preset Stations
The tuner can automatically play preset stations for 5 seconds each.
1 After selecting the desired band, touch [P.SCAN]. Scanning preset stations starts.
2 When the desired station is played, touch [P.SCAN] again.
USB Flash drive (Optional)
You can play back music files (MP3/WMA/AAC/FLAC/WAV), video files (MP4/AVI/WMV/MOV) and photo files (JPG/PNG/BMP) stored in a USB flash drive on the internal player of this system.

WARNING
It is dangerous for the driver to watch video while driving the vehicle. The driver may be distracted from looking ahead and an accident could occur.
Install the unit correctly so that the driver cannot watch a video unless the car is stopped and the parking brake is applied.
If the unit is not installed correctly, the driver will be able to watch a video while driving and may be distracted from looking ahead and cause an accident. The driver or other people could be severely injured.
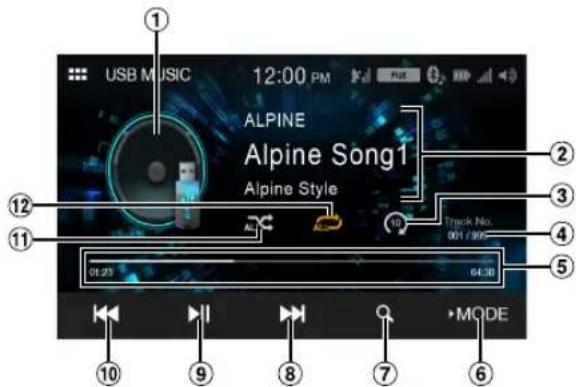
USB Audio mode screen
text_image
USB MUSIC 12:00 PM ALPINE Alpine Song1 Alpine Style Track No. 001 / 800 01.23 64.30 MODEUSB Video mode screen
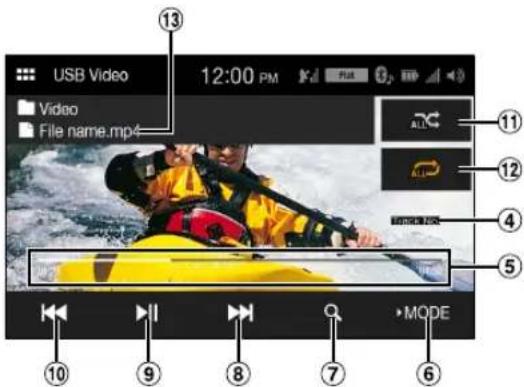
text_image
USB Video 12:00 PM Video File name.mp4 13 11 12 4 5 MODE 10 9 8 7 6USB Photo mode screen
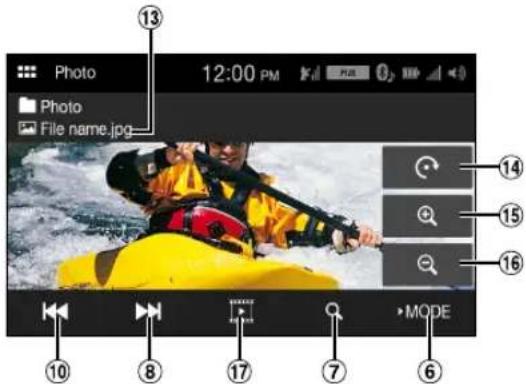
text_image
Photo 12:00 PM Photo File name.jpg 13 14 15 16 10 8 17 7 MODE 6① Artwork display
② Information display
③ Scan Play
④ Current track number/Total track number
⑤ Elapsed time/Total time for playing
⑥ Changes the USB mode
⑦ Displays the search screen
⑧ Finds the beginning of next chapter/Fast-forwards when touched for at least 1 second
⑨ Pause and Play
⑩ Finds the beginning of the current file/Finds a previous file within 1 second after playback starts/Fast-reverses when touched for at least 1 second
⑪ Shuffle mode
⑫ Repeat mode
⑬ File Name
⑭ Rotates
⑮ Zoom in
⑯ Zoom out
⑰ Play the Slide Show
The USB Video/USB Photo operation screen display during video/photo file playback
Touch the screen while the USB Video/USB Photo playback screen is displayed.
The USB Video/USB Photo operation screen is displayed.
- The operation screen changes to the visual screen in the USB Video/USB Photo mode for 5 seconds after an operation has been performed.
- For your safety, video is not displayed and only audio can be heard while driving.
Playback
1 Touch the (HOME) button and select USB mode. The display shows the USB mode screen.
2 Touch [▶ Mode].
3 Select the desired mode. USB Audio mode USB Video mode USB Photo mode
4 Touch [|◀◀] or [▶▶] to select the desired track (file).
Returning to the beginning of the current (or previous) track (file): Touch[ ◀◀◀ ▶
Fast reverse: Touch and hold [ ◀◀] .
Advancing to the beginning of the next track (file) : Touch[▶▶]
Fast forward: Touch and hold [▶▶▶] .
5 To pause playback, touch [▶] (USB Audio or Video). Touching [▶] again will resume playback.
- The playback time may not be correctly displayed when a VBR (Variable Bit Rate) recorded file is played back.
- If there is tag information, artist name/album name/track name is displayed.
- ID3 tag/WMA tag If an MP3/WMA/AAC/FLAC/WAV file contains ID3 tag/WMA tag information, the ID3 tag/WMA tag information is displayed. (e.g., song name, artist name, and album name)
Fast-forwarding/Fast-reversing (USB Video)
1 During playback, touch and hold [ ] (Fast-forward) or touch and hold [▶▶] (Fast-forward). Touch and hold for more than 1 second to fast-forward/fast-reverse.
2Release [ ] of [ ] to return to normal playback.
- No sound is played back during fast-forwarding/fast-reversing.
Repeat Play (USB Audio or USB Video)
1 Touch and hold [☐]. The [☐] button displays the currently selected mode.
2Select your desired Repeat mode. ALL : All files are repeatedly played back. File : Only the file currently playing is repeatedly played back. Folder : Only files in a folder are repeatedly played back.
- By only touching [ALL ☐], you can select the mode except for [File ☐].
Shuffle Play (USB Audio or USB Video)
1 Touch and hold [✗]. The [✗] button displays the currently selected mode.
2Select your desired Shuffle mode.
ALL ALL: All songs in the USB flash drive are played back in random sequence. Any one song does not play back again until all songs have been played back. Folder Folder is selected randomly and songs in the Folder are played back in order. After all songs are played in a Folder, the next Folder is selected randomly. OFF ✗: Shuffle mode is Off.
- By only touching [☐], you can select the mode except for [ALL ALL].
Searching for a Desired Song/Video/Photo
1 Touch [Q] (Search). 2 Touch [◀] or [▶] to select the folder.
3 Touch your desired File name.
When you select a Folder name, repeat the same procedure to select another Folder name or File name.
Slide Show (USB Photo)
The Slide Show shows photos that change every 2 seconds. Touch [▶] on the Photo mode screen.
About USB Video format
The video formats (USB Flash drive) supported by the unit are as follows.
- Supported Container: MP4/AVT/WMV/MOV
- Supported Video Coding: H.264/MPEG-4 AVC
- Supported Audio Coding: MP3, AAC
- MAX File Size: 4GB
iPod mode on iPhone (Optional)
A separately sold Lightning to USB cable (KCU-471i), etc., is required.
- This unit does not support video playback from iPhone which connected to this unit via USB Connector.
- Internet or telephone function, etc., of the iPhone is not controllable from the unit, but these functions can be controlled using the iPhone itself.
- Before operating iPod mode on iPhone, set "CarPlay" to [Off] (page 20).
About iPhone models usable with this unit
- The following devices have been tested and shown to work with this unit. Correct function of earlier versions cannot be guaranteed.
iPhone X
iPhone 8
iPhone 8 Plus
iPhone 7
iPhone 7 Plus
iPhone SE
iPhone 6s
iPhone 6s Plus
iPhone 6
iPhone 6 Plus
iPhone 5s
■ iPod main screen example
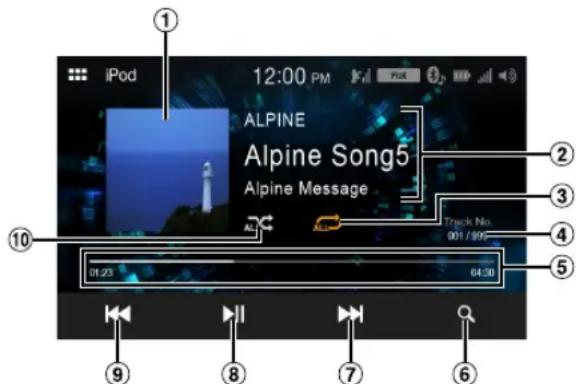
text_image
iPod 12:00 PM ALPINE Alpine Song5 Alpine Message Track No. 001 /800 01.23 64:30 ① ② ③ ④ ⑤ ⑥ ⑦ ⑧ ⑨① Artwork display
② Information display*
③ Repeat mode
④ Current song no./Total song no.
⑤ Elapsed time/Total time for playing
⑥ Displays the search screen
⑦ Finds the beginning of the current file/Finds a previous file within one second after playback starts/Fast-reverses when touched for at least 1 second
⑧ Pause and Play
⑨ Finds the beginning of the current file/Finds a previous file within one second after playback starts/Fast-reverses when touched for at least 1 second
⑩ Shuffle mode
* Podcast mode.
Playback
1 Touch the (HOME) button and select iPod mode.
The display shows the iPod mode screen.
2 Touch [◀◀] or [▶▶] or to select the desired track (file).
Returning to the beginning of the current (or previous) track (file): Touch[ ◀◀◀ ]
Fast reverse the current track : Touch and hold []
Advancing to the beginning of the next track (file) : Touch[ ▶▶] .
Fast forward the current track : Touch and hold [▶▶]
3 To pause playback, touch [▶].
- If a song is playing on the iPhone before it is connected to the unit, it will continue playing when it is connected.
- An episode may have several chapters. The chapter can be changed by touching [|◀◀] or [▶▶].
- If the artist, album or song name, created in iTunes, has too many characters, songs may not be played back when connected to the unit. Therefore, a maximum of 64 characters is recommended. The maximum number of characters for the unit is 64.
- Some characters may not be correctly displayed.
Searching for a Music File
An iPhone can contain thousands of songs. For this reason, this unit can make various searches using the search function as shown below. Using the Playlist/Artist/Album/Podcast/Audiobook/Genre/Composer/Song/iTunes Radio search mode's individual hierarchy, you can narrow down your search as shown in the table below.
| Hierarchy 1 Hierarchy 2 Hierarchy 3 Hierarchy 4 | |||
| Radio — — — | |||
| Playlists Songs — — | |||
| Artists | Albums | Songs — | |
| Albums | Songs | — — | |
| Songs | — — — | ||
| Genres | Artists | Albums | Songs |
| Composers | Albums | Songs | — |
| Podcast Episodes | — — | ||
| Audiobook | — — | — | |
For example: Searching by Artist name
The following example explains how an Artists search is performed.
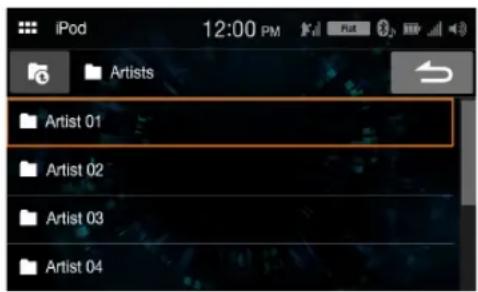
text_image
iPod 12:00 PM Artists Artist 01 Artist 02 Artist 03 Artist 041 Touch [Q] (Search) during playback.
2 Touch [Artists].
The Artists search screen is displayed.
3 Select the desired artist.
4Touch the desired album's name.
All songs of the selected album are displayed.
5 Touch the desired song's name.
The selected song is played back.
- If you touch [ ], the category browsing mode screen is displayed.
Repeat Play
1 Touch [←].
• T h e [ ] button displays the currently selected mode.
2Select your desired Repeat mode.
ALL ALL: All files are repeatedly played back.
File : Only the file currently playing is repeatedly played back.
OFF ⇔: Repeat mode is Off.
Shuffle Play
1 Touch [→].
• T h [ ] button displays the currently selected mode.
2Select your desired Shuffle mode.
The selected Shuffle mode changes the button.
ALL ALL :
All songs in the iPod are played back in random sequence. Any one song does not play back again until all songs have been played back.
OFF :
Shuffle mode is Off.
SiriusXM Satellite Radio Operation (Optional)
SiriusXM Tuner operation:
When an optional SiriusXM Tuner is connected to this unit, the following operations may be performed.
SiriusXM main screen example (Song Info. Mode)
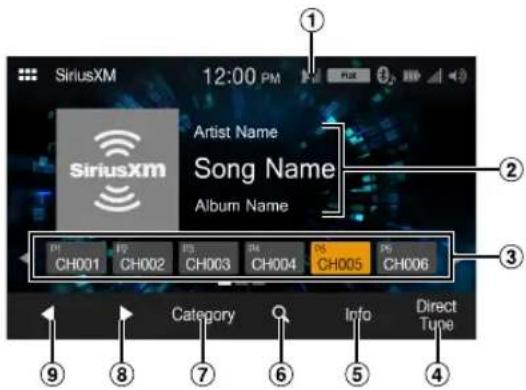
text_image
SiriusXM 12:00 PM Artist Name Song Name Album Name CH001 CH002 CH003 CH004 CH005 CH006 Category Info Direct Tune① Signal Indicator
Indicates the signal strength of SiriusXM.
② Information display
Channel Info. Mode:
Channel No/Long Channel Name/Category Name
Song Info.Mode:
Artist Name/Song Name/Content Info
③ Preset buttons
Displays the preset channels with a short touch.
Touch for at least 1 second to memorize the current channel as a preset channel.
④ Select the channel number
⑤ Changes text information
⑥ Displays the search screen
⑦ Changes to category browsing mode
⑧ Changes to the next channel
⑨ Changes to the previous channel
Receiving Channels with the SiriusXM Tuner
About SiriusXM Satellite Radio
Only SiriusXM ^® brings you more of what you love to listen to, all in one place. Get over 140 channels, including commercial-free music plus the best sports, news, talk, comedy and entertainment. Welcome to the world of satellite radio. A SiriusXM Vehicle Tuner and Subscription are required. For more information, visit www.siriusxm.com.
After you have found the SiriusXM Radio ID, you can activate your radio. See section "Checking the SiriusXM Radio ID Number."
In the USA, you can activate online or by calling SiriusXM Listener Care:
- Visit www.siriusxm.com/activatenow
• Call SiriusXM Listener Care at 1-866-635-2349
For Canadian Subscriptions, please contact:
- Visit www.siriusxm.ca/activatexm
• Call XM Customer Care at 1-877-438-9677 - The SiriusXM Satellite Radio controls on this unit are available only when a SiriusXM Tuner is connected.
1 Touch the (HOME) button and select SiriusXM mode.
The display shows the SiriusXM mode screen.
2 Touch [◀] or [▶] to select the desired channel. Touching and holding either button will rapidly browse through the channels.
- Refer to the SiriusXM Tuner User Guide for details on how to install the SiriusXM Tuner.
Tuning Channels by Category
Channels are grouped into categories based on the type of content heard on the channels.
1 Touch [Category] on the SiriusXM main screen to activate the category browsing mode.
The channels within the category of the current channel are listed.
Category browsing mode screen example

text_image
All Channel 12:00 PM Category Info Ch### - Channel Name Ch### - Channel Name Ch### - Channel Name Ch### - Channel Name- Touching [Info] changes the display of information for the channels in the category with the following three options. Channel No./Channel Name Channel No./Artist Name → Channel No./Song Title→Channel No./Content Info → Channel No./ Channel Name
2 Touch [◀] or [▶] on the category browsing mode screen to select a desired category.
The Category Name is shown at the top of the display.
3Select the desired channel.
Changing the Display
Text information, such as the channel name, artist name/feature, and song/program title, is available with SiriusXM. The unit can display this text information as explained below.
Touch [Info].
Each time you touch this button, the Channel Info. mode and the Song Info. mode switch alternately. For displayed contents, see "SiriusXM main screen example (Song Info. Mode)" (page 31).
Checking the SiriusXM Radio ID Number
To subscribe to the SiriusXM Satellite Radio service, it is necessary to locate and identify the Radio ID of your SiriusXM Tuner. You can check the Radio ID on the bottom surface of the SiriusXM Tuner box. You can also check it from this unit by performing the following procedure.
1 While receiving SiriusXM Radio, touch [◀] or [▶] to select channel "0".
The unit displays the Radio ID number.
2 To cancel the Radio ID number display, change the channel to a channel other than "0".
• The SiriusXM Radio ID does not contain the letters I, O, S, or F.
Storing Channel Presets
You can store 18 of your favorite SiriusXM channels for easy recall with Preset buttons.
1 Touch and hold the Preset number you want to store for at least 1 second to store the channel.
The selected channel is designated as a SmartFavorites channel.
2 Repeat the procedure to store up to 17 other channels.
A total of 18 channels can be stored in the preset memory.
- If you store a new channel into a preset which already has a channel assigned, the current channel will be cleared and replaced with the new one.
Tuning Channels using Presets
Touch any one of the Preset numbers you have already stored in the Preset mode screen.
The preset channel is received.
Search Function
1Touch

The Search list screen appears.
Search item:
All Channels / Category Name*
* The Category name for the channel currently being received is displayed.
- You can switch the category by touching [◀] or [▶] on the List screen after selecting a Search item.
- You can switch the display format by touching [Info] in the List screen after selecting a Search item.
Channel No./Channel Name Channel No./Artist Name Channel
No./Song Title Channel No./Content Info Channel No./Channel Name
Searching by Channel
2 Touch [All Channels].
All Channels will be displayed in a list.
3 Touch the selected channel.
The channel you selected is received.
Searching by Category
2 Touch Category Name.
The channels within the category of the current channel are listed.
3 Touch the selected channel.
The channel you selected is received.
Selecting the Channel Directly
You can directly select the channel number by using the numeric keypad.
1 Touch [Direct Tune].
The numeric keypad input screen is displayed.
2 Touch to input the channel number.
3 Touch [OK].
The selected channel is received.
Parental Lock Function
The Parental Control feature allows you to limit access to any SiriusXM channels, including those with mature content. When enabled, the Parental Control feature requires you to enter a passcode to tune to the locked channels. For information on setting the Parental Control passcode, see "Parental Lock" (page 21).
When a locked channel is selected, "Channel [xxx] Locked" is displayed and then the numeric keypad appears for you to enter the passcode.
Input the 4-digit passcode you set in "Parental Lock" (page 21).
The initial number is 0000.
- If you input a wrong passcode, "Incorrect Pass Code entered" is displayed.
- After entering the correct passcode, you can access all locked channels without entering the passcode again until the unit is powered off and then back on.
Bluetooth Operation
Setup Before Using
About Bluetooth
Bluetooth is a wireless technology allowing communication between a mobile device or personal computer over short distances. This enables a hands-free call or data transmission between Bluetooth compatible devices. Bluetooth transmission is available in the unlicensed 2.4 GHz spectrum if the distance between devices is within 10 meters. For details, refer to the Bluetooth website (http://www.bluetooth.com/).
- Depending on the Bluetooth version, a Bluetooth compatible device may not be able to communicate with this unit.
- Proper function of this unit with all Bluetooth compatible devices is not guaranteed. For handling of the Bluetooth compatible device, consult your Alpine dealer or Alpine website.
- Depending on the surroundings, Bluetooth wireless connection may be unstable.
- When you place a call, or perform setup operations, be sure to stop your car in a safe place.
- Depending on the connected Bluetooth compatible device(s), the function may differ. Also refer to the Owner's Manual of the connected device(s).
About the Hands-free Phone
Hands-free calls are possible when using a HFP (Hands-Free Profile) compatible mobile phone with this unit.
- Avoid performing a hands-free call in heavy traffic or on narrow or winding streets.
- Close the windows while calling to reduce background noise.
- If both calling parties are using hands-free devices, or the call is made in a noisy location, difficulty hearing the other person's voice is normal.
- Depending on telephone line conditions or certain mobile devices used, voices may sound unnatural.
- When using a microphone, speak as directly as you can into the microphone to obtain the best sound quality.
- Certain mobile phone features are dependent on the capabilities and settings of your service provider's network. Additionally, certain features may not be activated by your service provider, and/or the provider's network settings may limit the feature's functionality. Always contact your service provider about feature availability and functionality.
All features, functionality, and other product specifications, as well as the information contained in the Owner's Manual are based upon the latest available information and are believed to be accurate at the time of printing.
Alpine reserves the right to change or modify any information or specifications without notice or obligation. - Notice that when you connect an iPhone 5s or later/Android smartphone which installed Android Auto App, the operation screen may differ from this section.
Before Using Bluetooth
Before using the hands-free phone/audio function, the following settings need to be made.
Register a Bluetooth device in this unit.
• See "Bluetooth Setup" (page 22).
- You can search for this unit using a Bluetooth compatible device, and then connect that Bluetooth compatible device to this unit. The device name of this unit is "iLX-W650" and the initial number of the passcode is "0000." Also refer to the Owner's Manual of the connected device(s).
Hands-free Phone Control
Touch [Bluetooth] in the HOME screen to display the Bluetooth menu screen.
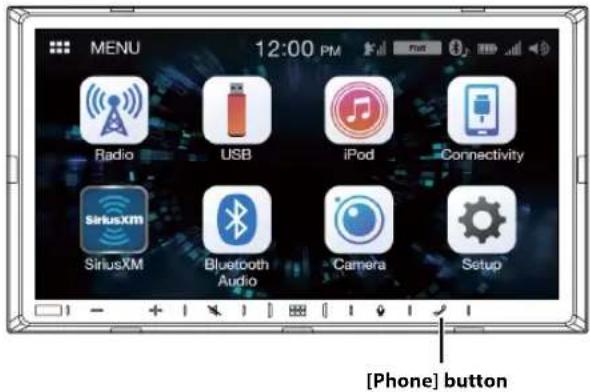
text_image
MENU 12:00 PM Radio USB iPod Connectivity SiriusXM Bluetooth Audio Camera Setup [Phone] button■ Phone menu screen example
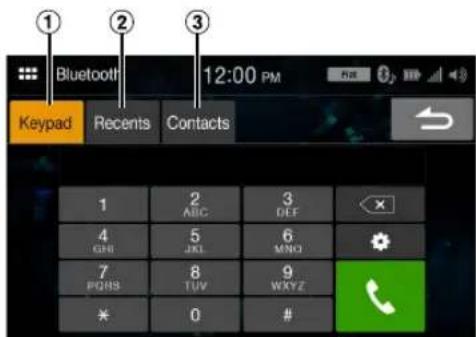
text_image
① Bluetooth 12:00 PM Keypad Recents Contacts 1 2 ABC 3 DEF 4 5 JKL 6 MNO 7 PGHS 8 TUV 9WXYZ * 0 #① Keypad screen
Use to type a phone number.
② Recent Events list*
You can display up to 60 items, such as phone numbers of the most recent incoming calls, missed calls and outgoing calls, and contact names that are registered in the Phone Book. When 60 items exist in the list, the oldest item is deleted when a further item is to be added.
③ Contacts list*
You can make a phone call from the Phone Book, or edit the Phone book.
* If the Hands-Free Phone is not connected, the Bluetooth Setup screen will be displayed. See "Bluetooth Setup" (page 22).
Answering a Call
1 An incoming call triggers the ringtone and an incoming call display.

text_image
Call 12:00 PM Incoming Call Alpine's Phone 010-1234-5678 Answer Decline2 Touch [Answer].
The call starts.

text_image
Call 12:00 PM 00:05 Alpine's Phone 010-1234-5678 Private- During a call, the audio for the current mode on the unit is muted. After calling, playback will resume.
- When the caller's number is transmitted to the system, if the caller's name is stored in the phone book, the name is displayed. If the name is not stored, the number is displayed.
• T o u c h [Decline] to reject an incoming call. - By touching [icon] during phone call, you can change to the Phone Operation screen and adjust the speech volume, etc. For details, see "Phone Operation Screen" (page 36).
Hanging up the Telephone
1 Touch [ ] (End Call).
The call finishes.
Calling
Making a phone call using the Phone Menu
Entering a Phone Number to Make a Call
1 Touch [Keypad].
The number input screen (Keypad) appears.
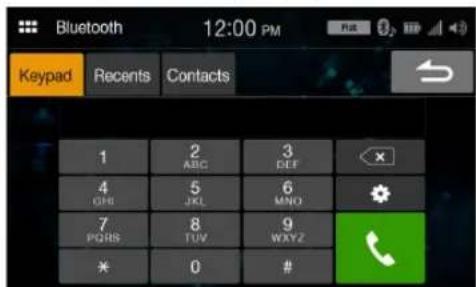
text_image
Bluetooth 12:00 PM Keypad Recent Contacts 1 2 ABC 3 DEF 4 5 JKL 6 MNO 7 PGHS 8 TUV 9 WXYZ * 0 #Touch[ ✕] to delete an entered number.
2 Enter the phone number you wish to call.
- You can enter up to 21 digits.
3 Touch [ ] (Call).
The phone call is started.
- To change the Bluetooth device, touch ## to display the Bluetooth Setup screen. See "Bluetooth Setup" (page 22).
Making a phone call from the Recent Events list
1 Touch [Recents] to change to the Recent Events list screen.

text_image
Bluetooth 12:00 PM Keypad Recents Contacts Incoming 1.01012345678 Outgoing 2.01012345678 Missed 3.01012345678 4.010123456782 Select a category from [Incoming], [Outgoing], or [Missed].
3 Touch the name of the contact or number you want to call.
The phone call is started.
Calling from the Contacts list (Phone Book)
1 Touch [Contacts] to change to the Contacts list screen.
2 Touch the name of the contact or number you want to call.
3 Touch the phone number.
The Phone Operation screen is displayed.
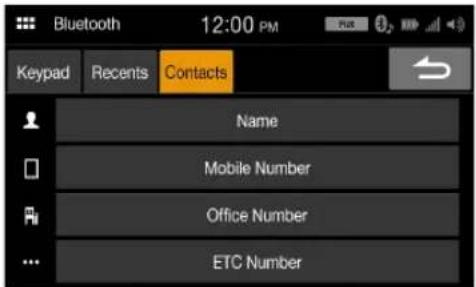
text_image
Bluetooth 12:00 PM Keypad Recents Contacts Name Mobile Number Office Number ETC Number4Touch the number you want to call.
The phone call is started.
- The Contacts list screen is also displayed by touching [💡] on the Phone Operation screen.
Using Voice Recognition function
You can use Siri function of your iPhone or make a telephone call by using voice operation of your smartphone.
- When using Apple CarPlay or Android Auto, the operation screen may differ from the screen design in the Owner's Manual.
Using Siri
You can use the Siri function of your iPhone. To use this function, set the Siri setting of your iPhone to ON.
- Connect your iPhone to the unit via Bluetooth, then set to "Hands-free" or "Both" (page 22).
- The available functions differ depending on the connected iPhone.
- Ask Siri to play a track from the music library applies only to USB source.
- Siri and other streaming services are enabled by connecting to compatible smartphones that are able to receive data. Please ensure that cellular data and/or Wi-Fi is turned on in the smartphone to enjoy these features.
- Extensive use of Siri or other streaming services may increase your phone's data usage. Please check with your phone company to ensure you have an appropriate Data plan.
1 Touch [图标] button.
![ALPINE iLX-W650 - Touch [图标] button. - 1](/content/2026/05/877064/images/2816bd43542c241cc8465816100981c75bd0a672952324a4db685d1882114f94.jpg)
text_image
Voice Recognition 12:00 PM Listening...The Voice Recognition mode screen is displayed.
2 Speak into the microphone supplied with this unit.
- If no speech is detected, the unit may pause depending on version of the connected iPhone. In that case, touch the microphone icon [💡] in the center of the Voice Control mode screen. You can continue to use the Voice Control mode.
3To finish the Voice Control mode, touch []. ×
- Depending on the iPhone, the Siri function may finish automatically.
- For adjusting the volume, see "Adjusting the Speech Volume" (page 36).
Voice Dial Function
You can make a telephone call by using voice operation.
- Connect your smartphone to the unit via Bluetooth, then set to "Hands-free" or "Both" (page 22).
1 Touch [图标] button.
![ALPINE iLX-W650 - Touch [图标] button. - 1](/content/2026/05/877064/images/8ad73fa2f356ef30a5c3af736e3cb599986a659f512d9d6e93cad1082ddf9e3d.jpg)
text_image
Voice Recognition 12:00 PM Listening...The Voice Dial mode screen is activated.
2 Say the telephone number\* or name\* you want to call, into the microphone.
* The number and name depend on the voice dial information stored in the smartphone.
3 To finish the Voice Dial mode, touch []. ✗
- You can perform this operation only when a voice dial compatible smartphone is connected.
- The Voice Dial function performance depends on the recognition range of the smartphone and mounting location of the microphone. Note when the microphone is mounted.
- Voice dial operation depends on the function being available on the smartphone. For details, refer to the owner's manual of the smartphone.
- Depending on the smartphone, the Voice Dial operation may finish automatically.
- For adjusting the volume, see "Adjusting the Speech Volume" (page 36).
Phone Operation Screen
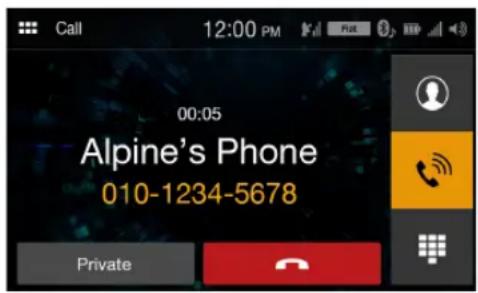
text_image
Call 12:00 PM 00:05 Alpine's Phone 010-1234-5678 PrivateAdjusting the Speech Volume
You can adjust Caller Level and Mic. Level (Microphone Level).
1 Touch [ ]
2 Touch [−] or [+] of "Mic Vol." or "Caller Vol."
You can adjust the volume in 11 levels.
- This operation is not available for the Private Call setting.
Changing the Voice Output
The voice output for calls is switchable between car speakers and the mobile phone speaker.
Touch [Private] or [Handsfree].
- Depending on the mobile phone, this operation may not be possible.
DTMF (Touch-Tone) Function
Transmits a DTMF (Touch-Tone) during a call.
1 Touch [■] (Keypad).
The number input screen (Keypad) appears.
2Input number.
- You can transmit a Touch-Tone signal during a call.
Phone Book Function
Phone Book screen example
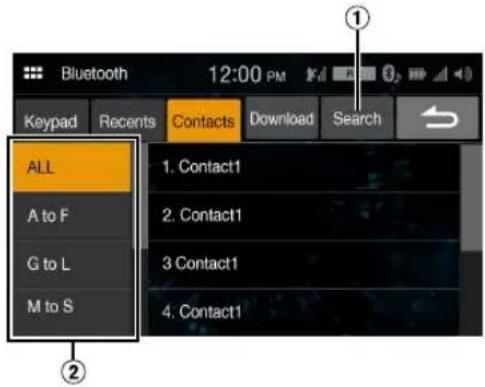
text_image
Bluetooth 12:00 PM Keypad Recents Contacts Download Search ALL A to F G to L M to S 1. Contact1 2. Contact1 3 Contact1 4. Contact1① Use to search by directly inputting a name or phone number with the Keypad.
For details, see "How to Input Characters and Numbers (Keypad)" (page 11).
② Use to narrow down your search for names, etc.
Synchronizing the Phone Book
You can synchronize the system's phone book with the mobile phone's phone book.
Touch [Download].
Synchronization of the phone books starts.
- You can store up to 1,000 registered name in the phone book.
- You can store up to 3 phone numbers by one person's name.
Searching in the Phone Book
You can make a call using the phone book search function.
1 Touch [Search].
The Input User Name screen (Keypad) is displayed.
2 Input the string of letters of the name that you want to search, then touch [OK].
A list of names beginning with the string of letters you entered is displayed.
3 Touch the name you want to call.
The Phone Operation screen is displayed.
4Touch the phone number.
The phone call is started.
- For details of how to input characters using the keypad, see "How to Input Characters and Numbers (Keypad)" (page 11).
Bluetooth Audio
If a Bluetooth compatible mobile phone, portable player, etc. is connected by wireless, you can play back a song (operation is controllable from the unit).
• Operation may vary, depending on the Bluetooth compatible device.
Bluetooth Audio main screen example

text_image
Bluetooth Audio 12:00 PM Artist Name Song Name Album Name Track No. 00 / 00 8 7 6 5 4① Information display
② Current track number/Total track number
③ Elapsed time/Total time for playing
④ Finds the beginning of next chapter/Fast-forwards when touched for at least 1 second
⑤ Pause and Play
⑥ Finds the beginning of the current file/Finds a previous file within one second after playback starts/Fast-reverses when touched for at least 1 second
⑦ Shuffle mode
⑧ Repeat mode
- The displayed onscreen buttons may differ depending on the AVRCP version.
- Song title/Artist title/Album title/Elapsed time do not display for AVRCP Ver. 1.0.
- To play back audio, a mobile phone or a portable player conforming to A2DP (Advanced Audio Distribution Profile) or AVRCP (Audio/Video Remote Control Profile) is required. Not all functions work with all devices.
- During a call, sound on the Bluetooth audio source is paused.
Compatible AVRCP versions: 1.0, 1.3, 1.4, 1.5
• Available functions may differ depending on the AVRCP version.
Playback
1 Touch the (HOME) button and select Bluetooth Audio mode.
The display shows the Bluetooth Audio mode screen.
2 Touch [◀◀] or [▶▶] to select the desired track (file).
Returning to the beginning of the current file: Touch[ ◀◀◀ ] .
Fast backward the current file: Touch and hold []
Advance to the beginning of the next file: Touch [▶▶▶] .
Fast forward the current file: Touch and hold [▶▶] .
3To pause playback, touch [].
Repeat Play
Available for AVRCP Ver. 1.4 and 1.5 only.
1 Touch [→].
• [ ⟹ displays the currently selected mode.
2Select your desired Repeat mode.
The selected Repeat mode changes the button.
All Track : Once all of the songs have finished playing, play back is repeated, starting with the first song.
Single Track 📊: Only the track currently playing is repeatedly played back.
Off: Repeat mode is Off.
- Operations may differ depending on the connected Bluetooth compatible device.
Shuffle Play
Available for AVRCP Ver. 1.4 and 1.5 only.
1 Touch [X].
• T h [ ] button displays the currently selected mode.
2Select your desired Shuffle mode.
The selected Shuffle mode changes the button.
All Track ALL: All songs in the Bluetooth compatible devices are played back in random sequence. Any one song does not play back again until all songs have been played back.
Off : Shuffle mode is Off.
- Operations may differ depending on the connected Bluetooth compatible device.
Camera Operation (Optional)
When an optional camera is connected, the view video of camera can be output to the monitor.
Rear camera:
If a rear camera is connected, when the vehicle is reversed, the rear camera view (guide marks for vehicle width and available distance) is displayed automatically on the screen of this unit.
Front camera:
You can check the front of the vehicle with a bad visibility road.
You can adjust the quality of the camera image. Setting items: Brightness / Color / Contrast See "Camera Picture Quality Setup" (page 23).
Camera Operation
Displaying the Camera Image from the Menu screen
1 Touch the (HOME) button.
The HOME screen is displayed.
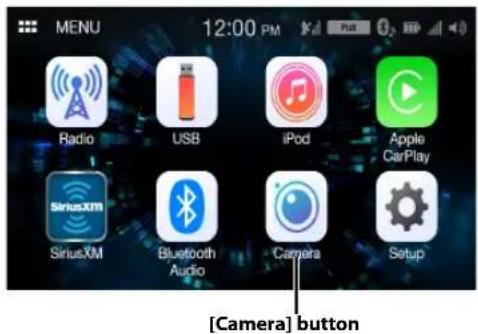
text_image
MENU 12:00 PM Radio USB iPod Apple CarPlay SiriusXM Bluetooth Audio Camera Setup [Camera] button- If both "Primary" and "Secondary" are set to [Off] (page 23), the [Camera] button cannot be selected.
2 Touch [Camera].
The view of the camera which is set in the "Primary" setting is displayed.
If "Primary" is set to [Off], the view of the camera set in the "Secondary" setting is displayed.
- Touch the screen when the camera image is displayed, and touch the secondary camera button to switch to the secondary camera view image.
- Touch the screen while the camera image is being displayed, and touch [×] to return to the main source screen or previous screen.
- You can perform a Guide Adjustment for the rear view image. For details, see "About the Rear Camera Guide" (page 39).
Displaying the rear view video while the car is in reverse
1 Shift the gear lever to the reverse (R) position.
The rear view image is displayed while the car remains in reverse.
- If neither "Primary" and "Secondary" is set to [Rear] (page 23), the rear view image is not displayed.
2If you shift the gear lever to a position other than reverse (R), the monitor returns to the previous screen.
- Touch the screen when the camera image is displayed, and touch the secondary camera button to switch to the secondary camera view image.
- Never depend solely on the camera when backing up. Always turn and look and only use the camera for additional assistance.
- This function is effective when the reverse wire is properly connected.
- You can perform a Guide Adjustment for the rear view image. For details, see "About the Rear Camera Guide" (page 39).
About the Rear Camera Guide
To display the guide, set "Turning the Rear Camera Guide On/Off" (page 23) to On. Also, to adjust the guide, see "Adjusting the Rear Camera Guide" (page 24).
■ Indication mark meaning
When the car is put into reverse gear, the monitor switches to the rear view camera image. Guides appear to help visualize the car's width and distance from the rear bumper.
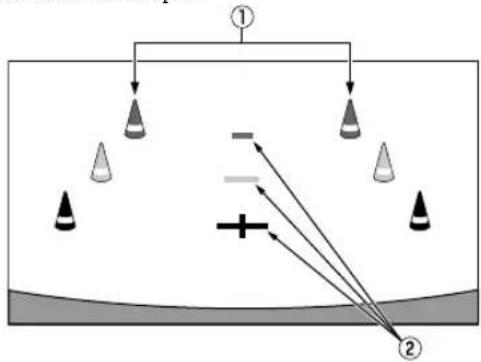
text_image
Diagram illustrating light reflection and refraction with labeled components and directional arrows① Car width extension marks (red, yellow and green in order of distance)
If properly calibrated, the marks indicate the car's width. This helps guide the car's path when backing up in a straight line.
The marks represent the distance from the rear of the car (from the rear end of the bumper).
- The marks do not move in synchronization with the steering wheel.
- Set the marks to suit the car's width.
② Distance guidance marks
The marks represent the distance from the rear of the car (from the rear end of the bumper).
-
The marks do not move in synchronization with the steering wheel.
• We recommend that you measure the actual distance to the marks when parked on a level surface. -
Depending on the condition of the car or road surface, the range of vision may vary.
- The camera has a limited range of vision. Objects at extreme angles to the camera (e.g. under the bumper or at opposite ends of the bumper) may not be in the its field-of-vision.
- The rear camera image may have a tint which is different from the actual surroundings.
- Depending on the car, the guidance may deviate to the right or left. This is not a malfunction.
Distance guidance mark
The distance guides represent the ground level distance from the rear bumper. It is difficult to accurately estimate the distance to objects above ground level.
In the following example, the distance to A is 0.5 m and the distance to B is 1 m.
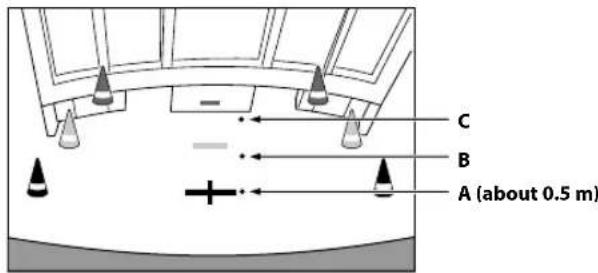
text_image
C B A (about 0.5 m)
text_image
about 1 m A B CIn the screen, according to the distance guidance marks, the truck seems to be parked about 1 m away (at the position B). In actual fact, however, if you reversed to position A, you would collide with the truck.
In the screen, positions A, B and C seem to be located in order of proximity. However, in actual fact, the position A and C are the same distance, and B is farther away than positions A and C.
- The car width extension mark represents the distance to the road surface. The distance to an object on the road is not accurately represented by the guides.
Error between the screen and the actual road surface
In the following conditions, errors are produced between the screen guidance and the actual road surface. (The illustrations represent a case when the camera is installed in the standard position.)
When there is a steep upward slope behind the car (example)
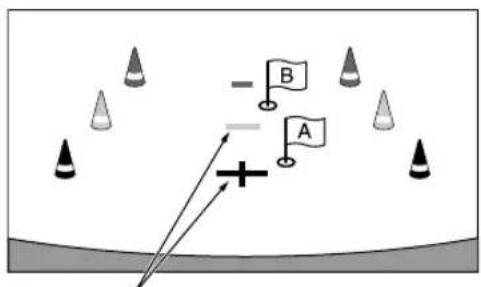
text_image
- B - A +Distance guidance marks
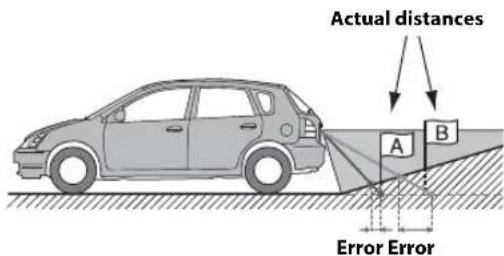
text_image
Actual distances A B Error ErrorThe distance guidance mark represents the distance to a flat road surface. Therefore in the case of an upward slope behind the car, the distance guides are displayed closer to the rear bumper than the actual distance. For example, if there is an obstacle on the upward slope, it may appear farther away than its actual position.
Also, an error may occur between the guidance and the actual path of the car on the road surface.
■ When there is a steep downward slope behind the car (example)
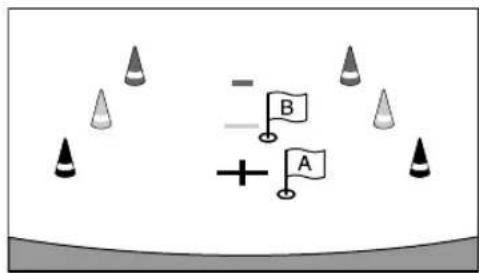
text_image
- B + A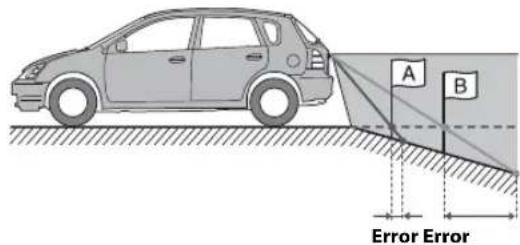
text_image
A B Error ErrorIn the case of a downward slope behind the car, the distance guides are displayed farther from the rear bumper than the actual distance.
If there is an obstacle on the downward slope, it seems closer than its actual position.
Also, an error may occur between the guidance and the actual path of the car on the road surface.
Information
Product Software Update
This product use software that can be updated through a USB flash drive. Download the software from the Alpine website and update the product using the USB flash drive.
1 Connect the USB flash drive which includes with the update software.
2 Touch [Information] on the Setup menu screen.
3 Touch [Firmware Upgrade]. Software updating starts.
Updating this product
Check the Alpine website for details on updating.
http://www.alpine-usa.com
Important information on the software
About the software license of the product
The software installed in the product contains open-source software. See the open source licenses at the end of the manual (page 56) for details on the open source software.
About the Supported Formats
About MP3/WMA/AAC/FLAC/WAV

CAUTION
Except for private use, duplicating audio data (including MP3/WMA/AAC/FLAC/WAV data) or distributing, transferring, or copying it, whether for free or for a fee, without permission of the copyright holder is strictly prohibited by the Copyright Act and by international treaty.
What is MP3?
MP3, whose official name is "MPEG Audio Layer 3," is a compression standard prescribed by the ISO, the International Standardisation Organisation and MPEG which is a joint activity institution of the IEC.
MP3 files contain compressed audio data. MP3 encoding is capable of compressing audio data at extremely high ratios, reducing the size of music files to as much as one-tenth their original size. This is achieved while still maintaining near CD quality. The MP3 format realizes such high compression ratios by eliminating the sounds that are either inaudible to the human ear or masked by other sounds.
What is WMA?
WMA, or "Windows Media™ Audio," is compressed audio data. WMA is similar to MP3 audio data.
What is AAC?
AAC is the abbreviation for "Advanced Audio Coding," and is a basic format of audio compression used by MPEG2 or MPEG4.
What is FLAC?
FLAC (Free Lossless Audio Codec) is an audio file codec for lossless compression, developed and offered as open source software.
Codecs with lossy compression forms, such as MP3 and AAC, reduce part of the data to improve compression efficiency.
However, FLAC can reconstruct compressed data to be an identical copy of the original data by performing lossless compression. The compression ratio of FLAC is about 50%.
Method for creating MP3/WMA/AAC/FLAC/WAV (USB Flash drive) files
Audio data is compressed using software with MP3/WMA/AAC/FLAC/WAV (USB Flash drive) codecs. For details on creating MP3/WMA/AAC/FLAC/WAV (USB Flash drive) files, refer to the user's manual for that software.
MP3/WMA/AAC/FLAC/WAV (USB Flash drive) files that are playable on this device have the file extensions.
MP3: "mp3"
WMA: "wma"
AAC: "m4a"
FLAC: "flac"/"fla"
WAV: "wav"
WMA is not supported for the following files, Windows Media Audio Professional, Windows Media Audio 10 std or Windows Media Audio 10 Pro Lossless.
There are many different versions of the AAC format. Confirm that the software being used conforms to the acceptable formats listed above. It's possible that the format may be unplayable even though the extension is valid.
Playback of AAC files encoded by iTunes is supported.
Supported playback sampling rates and bit rates
MP3 (USB Flash drive)
Sampling rates: 8 kHz, 11.025 kHz, 12 kHz, 16 kHz, 22.05 kHz, 24 kHz, 32 kHz, 44.1 kHz, 48 kHz
Bit rates: 8 - 384 kbps
WMA (USB Flash drive)
Sampling rates: 8 - 48 kHz
Bit rates: 8 - 384 kbps
AAC (USB Flash drive)
Sampling rates: 8 - 48 kHz
Bit rates: 8-384 kbps
FLAC (USB Flash drive)
Sampling rates: 8 - 48 kHz
Bit rates: 8 - 384 kbps
WAV (USB Flash drive)
Sampling rates: 8 - 48 kHz
Bit rates: 64 - 1,536 kbps
This device may not play back correctly depending on sampling rates.
ID3 tags/WMA tags
This device supports ID3 tag v1.0, v1.1, v2.2, v2.3, v2.4, and WMA tag Ver.1.x. If tag data is in an MP3/WMA/AAC file, this device can display the title (track title), artist name, and album name ID3 tag/WMA tag data.
For non-supported characters, “*” is displayed.
The number of characters may be limited, or not correctly displayed, depending on the tag information.
Playing back MP3/WMA/AAC/FLAC/WAV
MP3/WMA/AAC files are prepared, then written to a USB flash drive.
• Maximum numbers of playable files/folders
USB Flash drive: 3,000 files/255 folders (including Root Folder)
• Largest playable file size: 512 MB
Playback may not be performed if a disc exceeds the limitations described above.
If a file/folder name is long, the maximum possible number of files may decrease.
Media supported
The media that this device can play back a USB flash drive.
Corresponding File Systems
This device supports FAT 16/32.
The maximum nested folder depth is 8 (including the root directory). File names are limited to 128 characters (including the extension).
Valid characters for folder/file names are letters A-Z (all caps), numbers 0-9, and '_' (underscore).
Order of files
Files are played back in the order that the writing software writes them to the disc. Therefore, the playback order may not be what's expected. Verity the writing order in the software's documentation. The playback order of the folders and files is as follows. (The following numbers may differ from actually displayed numbers.)
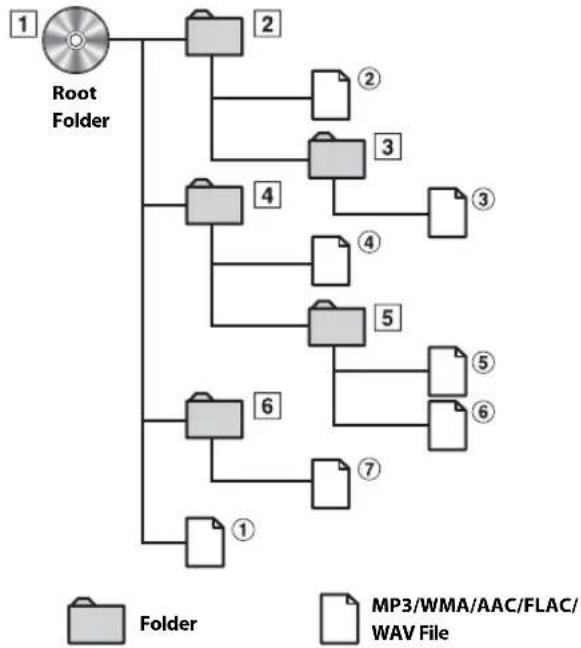
flowchart
graph TD
    A["Root Folder"] --> B["1"]
    A --> C["2"]
    A --> D["3"]
    A --> E["4"]
    A --> F["5"]
    A --> G["6"]
    A --> H["7"]
    A --> I["8"]
    B --> J["Folder ②"]
    C --> K["Folder ③"]
    D --> L["Folder ④"]
    E --> M["Folder ⑤"]
    F --> N["Folder ⑥"]
    G --> O["Folder ⑦"]
    H --> P["Folder ①"]
    I --> Q["Folder ②"]
    style A fill:#f9f,stroke:#333
    style B fill:#ccc,stroke:#333
    style C fill:#ccc,stroke:#333
    style D fill:#ccc,stroke:#333
    style E fill:#ccc,stroke:#333
    style F fill:#ccc,stroke:#333
    style G fill:#ccc,stroke:#333
    style H fill:#ccc,stroke:#333
    style I fill:#ccc,stroke:#333
    style J fill:#fff,stroke:#333
    style K fill:#fff,stroke:#333
    style L fill:#fff,stroke:#333
    style M fill:#fff,stroke:#333
    style N fill:#fff,stroke:#333
    style O fill:#fff,stroke:#333
    style P fill:#fff,stroke:#333
    style Q fill:#fff,stroke:#333
Terminology
Bit rate
This is the "sound" compression rate specified for encoding. The higher the bit rate, the higher the sound quality, but also the larger the files.
Sampling rate
This value shows how many times per second the data is sampled (recorded). For example, music CDs use a sampling rate of 44.1 kHz, so the sound is sampled (recorded) 44,100 times per second. The higher the sampling rate, the higher the sound quality, but also the larger the volume of data.
Encoding
Converting music CDs, WAVE (AIFF) files, and other sound files into the specified audio compression format.
Tag
Song information such as track titles, artist names, album names, etc., written into MP3/WMA/AAC/FLAC/WAV (USB flash drive) files.
Root folder
The root folder (or root directory) is found at the top of the file system. The root folder contains all folders and files. It is created automatically for all burned discs.
In Case of Difficulty
If you encounter a problem, please turn the power off, then on again. If the unit is still not functioning normally, please review the items in the following checklist. This guide will help you isolate the problem if the unit is at fault. Otherwise, make sure the rest of your system is properly connected, or then consult your authorized Alpine dealer.
Basic
No function or display.
- Vehicle's ignition is off.
- If connected according to the instructions, the unit will not operate with the vehicle's ignition off.
- Improper power lead connections.
- Check power lead connections.
- Blown fuse.
- Check the fuse on the battery lead of the unit; replace with the proper value if necessary.
No sound or unnatural sound.
- Incorrect setting of volume/balance/fader controls.
- Readjust the controls.
- Connections are not properly or securely made.
- Check the connections and firmly connect.
Screen not displayed.
- Brightness/Contrast control is set at the minimum position.
- Adjust the Brightness/Contrast control.
• Temperature in the vehicle is too low. - Increase the vehicle's interior temperature to operation temperature range.
- Connections to the Auxiliary Device are not securely made.
- Check the connections and firmly connect.
• The Parking Brake Lead is not connected.
• The Parking Brake is not engaged. - Connect the Parking Brake Lead, then engage the Parking Brake.
Movement of displayed picture is abnormal.
• Temperature in the vehicle is too high.
- Allow the vehicle's interior temperature to cool.
Radio
Unable to receive stations.
- No antenna, or open connection in the antenna cable.
- Make sure the antenna is properly connected; replace the antenna or cable if necessary.
Unable to tune stations in the seek mode.
- You are in a weak signal area.
Change the radio frequency manually.
- If the area you are in is a primary signal area, the antenna may not be grounded and connected properly. - Check your antenna connections; make sure the antenna is properly grounded at its mounting location.
• The antenna may not be the proper length.
- Make sure the antenna is fully extended; if broken, replace the antenna with a new one.
Broadcast is noisy.
• The antenna is not the proper length.
Extend the antenna fully; replace it if it is broken.
• The antenna is poorly grounded.
- Make sure the antenna is grounded properly at its mounting location.
• The station signal is weak and noisy.
- If above solution does not work, tune in another station.
USB Audio
Unit does not operate.
- Condensation.
- Wait a while (about 1 hour) for the condensation to dry.
Picture is unclear or noisy.
- Vehicle's battery power is weak.
- Check the battery power and wiring. (The unit may malfunction if the battery power is under 11 volts with a load applied.)
If this Message Appears
Various messages are displayed on the screen during operation. In addition to the messages telling you the current status or providing guidance for the next operation, there are also the following error messages. If one of these error messages is displayed, carefully follow the instructions in the solution column.
System
For your safety, this function is only available while the vehicle is parked.
- A setup operation, etc., was carried out while the vehicle was running.
- Move the vehicle to a safe location, stop, and engage the parking brake, then carry out this operation.
This device is not supported.
• A USB flash drive with a hub is connected.
You cannot play back from a USB flash drive with a hub. USB hub connections are also not supported.
Audio/Visual
This device is not supported.
- An iPhone that is not supported by the unit is connected.
Connect an iPhone that is supported by the unit.
• A USB device that is not supported by the unit is connected. - Attempt to connect another USB flash drive.
- Communication error.
- Turn the ignition key off, and then set to ON again.
- Check the display by reconnecting between the iPhone and the unit, using the iPhone cable.
- Check the display by reconnecting between the USB flash drive and the unit.
- Caused by the iPod/iPhone Software Version not being compatible with this unit.
- Update the iPhone Software Version to be compatible with this unit.
• The iPhone is not verified. - Change to another iPhone.
Please check the connection status.
- Communication error.
- Check the display by reconnecting between the iPhone and the unit, using the iPhone cable.
No Artist (/ No Song / No album)
• There are no data in the iPhone.
- Download data to the iPhone and connect to the unit.
- There are no tag-info in the USB Audio / iPod Audio.
No Files
• There are no data in the USB flash drive.
- Download data to the USB flash drive and connect to this unit.
Bluetooth
No Bluetooth device connected
• The Bluetooth audio device was not connected correctly.
- Check the settings for the unit and the Bluetooth audio device and reconnect.
SiriusXM
Check Tuner
- The SiriusXM Tuner is disconnected or the unit is having trouble communicating with the Tuner.
- Connect the Tuner or check the Tuner connection to the back of the unit.
Check Antenna
- The SiriusXM Satellite Radio antenna or cable is either damaged or not connected correctly to the SiriusXM Tuner.
- Check that the SiriusXM antenna cable is connected to the SiriusXM Tuner and check that the antenna cable is not kinked or otherwise damaged. Replace the antenna if necessary.
- SiriusXM products are available at your local car audio retailer or online at www.shop.siriusxm.com.
No Signal
• The SiriusXM satellite signal is too weak at the current location.
- Move the vehicle to a location with a clear view of the southern sky.
- Make sure the Satellite Radio antenna is properly mounted and not obstructed by metal objects.
Channel [xxx] Not Subscribed
Call SiriusXM to Subscribe
- The active channel has become unsubscribed or the requested channel is not available in your subscription package.
- In the U.S.A., visit www.siriusxm.com or call 1-866-635-2349 if you have questions about your subscription package or would like to subscribe to this channel. In Canada, visit www.siriusxm.ca or call 1-877-438-9677.
- The unit will revert to the previously selected channel or to channel 1 automatically.
Channel [xxx] Not Available
- The active channel is no longer in the SiriusXM channel lineup or the user has entered an invalid channel number.
- Visit www.siriusxm.com for information on the current channel lineup.
- The unit will revert to the previous channel or to channel 1 automatically.
Subscription Updated
Press Any screen to Continue
- Yoursubscriptionhasbeenupd
- Touch [OK] to clear this message.
Channel [xxx] Locked
• A locked channel is selected.
- Input the passcode on the number keypad screen, see "Parental Lock Function" (page 32). If wrong passcode is entered, "Incorrect Pass Code entered" will be displayed and the unit will revert to the previous channel.
Specifications
MONITOR SECTION
Screen Size 7"
LCD Type Transparent type TN LCD
Operation System TFT active matrix
Number of Picture Elements 1,152,000 pcs. (800 × 480 × 3 (RGB))
Effective Number of Picture Elements
99% or more
Illumination System LED
FM TUNER SECTION
Tuning Range 87.7 - 107.9 MHz
Mono Usable Sensitivity 9.3 dBf (0.8 μV/75 ohms)
50 dB Quieting Sensitivity 13.5 dBf (1.3 μV/75 ohms)
Alternate Channel Selectivity 80 dB
Signal-to-Noise Ratio 65 dB
Stereo Separation 35 dB
Capture Ratio 2.0 dB
AM TUNER SECTION
Tuning Range 530 - 1,710 kHz
Usable Sensitivity 25.1 μV/28 dBf
USB SECTION
USB requirements USB 2.0
Max. Power Consumption 1,000 mA (CDP Support)
USB Class USB (Play From Device)/
USB (Mass Storage Class)
File System FAT16/32
Number of Channels 2-Channels (Stereo)
Frequency Response ^* 1 5 - 20,000 Hz (±1 dB)
Total Harmonic Distortion 0.008% (at 1 kHz)
Dynamic Range 95 dB (at 1 kHz)
Signal-to-Noise Ratio 100 dB
Channel Separation 85 dB (at 1 kHz)
*1 Frequency response may differ depending on the encoder software/bit rate.
Bluetooth SECTION
Bluetooth Specification Bluetooth V4.2
Output Power +4 dBm Ave. (Power class 2)
| Profile | HFP (Hands-Free Profile) |
| PBAP (Phone Book Access Profile) | |
| A2DP (Advanced Audio Distribution Profile) | |
| AVRCP (Audio/Video Remote Control Profile) |
GENERAL
Power Requirement 14.4 V DC (11–16 V allowable)
Operating temperature -4^ to +140^ (-20^ to +60^)
Power Output 16 W RMS × 4*2
*2 Primary amplifier ratings per CEA-2006 Standard • Power output: measured at 4 Ohms and ≤ 1% THD+N • S/N: 80 dBA (reference: 1 W into 4 Ohms)
Weight 0.92 kg (2 lbs.)
Audio output level Preout (Front, Rear): 4V/10k ohms (max.) Preout (Subwoofer): 4V/10k ohms (max.)
CHASSIS SIZE
Width 178 mm (7")
Height 100 mm (4")
Depth 60 mm (2-6/16")
- Due to continuous product improvement, specifications and design are subject to change without notice.
- The LCD panel is manufactured using an extremely high precision manufacturing technology. Its effective pixel ratio is over 99.99% . This means that there is a possibility that 0.01% of the pixels could be either always ON or OFF.
Installation and Connections
Before installing or connecting the unit, please read the following and pages 7 to 12 of this manual thoroughly for proper use.

WARNING
KEEP SMALL OBJECTS SUCH AS SCREWS OUT OF THE REACH OF CHILDREN.
Swallowing them may result in serious injury. If swallowed, consult a physician immediately.
MAKE THE CORRECT CONNECTIONS.
Failure to make the proper connections may result in fire or product damage.
USE ONLY IN CARS WITH A 12 VOLT NEGATIVE GROUND.
(Check with your dealer if you are not sure.) Failure to do so may result in fire, etc.
BEFORE WIRING, DISCONNECT THE CABLE FROM THE NEGATIVE BATTERY TERMINAL.
Failure to do so may result in electric shock or injury due to electrical shorts.
DO NOT ALLOW CABLES TO BECOME ENTANGLED IN SURROUNDING OBJECTS.
Arrange wiring and cables in compliance with the manual to prevent obstructions when driving. Cables or wiring that obstruct or hang up on places such as the steering wheel, gear lever, brake pedals, etc. can be extremely hazardous.
DO NOT SPLICE INTO ELECTRICAL CABLES.
Never cut away cable insulation to supply power to other equipment. Doing so will exceed the current carrying capacity of the wire and result in fire or electric shock.
DO NOT DAMAGE PIPE OR WIRING WHEN DRILLING HOLES.
When drilling holes in the chassis for installation, take precautions so as not to contact, damage or obstruct pipes, fuel lines, tanks or electrical wiring. Failure to take such precautions may result in fire.
DO NOT USE BOLTS OR NUTS IN THE BRAKE OR STEERING SYSTEMS TO MAKE GROUND CONNECTIONS.
Bolts or nuts used for the brake or steering systems (or any other safety-related system), or tanks should NEVER be used for installations or ground connections. Using such parts could disable control of the vehicle and cause fire etc.
DO NOT INSTALL IN LOCATIONS WHICH MIGHT HINDER VEHICLE OPERATION, SUCH AS THE STEERING WHEEL OR GEARSHIFT.
Doing so may obstruct forward vision or hamper movement etc. and results in serious accident.

CAUTION
HAVE THE WIRING AND INSTALLATION DONE BY EXPERTS.
The wiring and installation of this unit requires special technical skill and experience. To ensure safety, always contact the dealer where you purchased this product to have the work done.
USE SPECIFIED ACCESSORY PARTS AND INSTALL THEM SECURELY.
Be sure to use only the specified accessory parts. Use of other than designated parts may damage this unit internally or may not securely install the unit in place. This may cause parts to become loose resulting in hazards or product failure.
ARRANGE THE WIRING SO IT IS NOT CRIMPED OR PINCHED BY A SHARP METAL EDGE.
Route the cables and wiring away from moving parts (like the seat rails) or sharp or pointed edges. This will prevent crimping and damage to the wiring. If wiring passes through a hole in metal, use a rubber grommet to prevent the wire's insulation from being cut by the metal edge of the hole.
DO NOT INSTALL IN LOCATIONS WITH HIGH MOISTURE OR DUST.
Avoid installing the unit in locations with high incidence of moisture or dust. Moisture or dust that penetrates into this unit may result in product failure.
Precautions
- Be sure to disconnect the cable from the (−) battery post before installing your unit. This will reduce any chance of damage to the unit in case of a short-circuit.
- Be sure to connect the color coded leads according to the diagram. Incorrect connections may cause the unit to malfunction or damage to the vehicle's electrical system.
- When making connections to the vehicle's electrical system, be aware of the factory installed components (e.g. on-board computer). Do not tap into these leads to provide power for this unit. When connecting the unit to the fuse box, make sure the fuse for the intended circuit of the unit has the appropriate amperage. When in doubt, consult your Alpine dealer.
- The unit uses female RCA-type jacks for connection to other units (e.g. amplifier) having RCA connectors. You may need an adaptor to connect other units. If so, please contact your authorized Alpine dealer for assistance.
- Be sure to connect the speaker (−) leads to the speaker (−) terminal. Never connect left and right channel speaker cables to each other or to the vehicle body.
Accessory List
Main unit....1
Power cable....1
USB extension cable 1
PRE OUT cable....1
Microphone 1
Owner's Manual ....1set
Installation
Caution
- Do not block the unit's fan, thus preventing air circulation. If blocked, heat will accumulate inside the unit and may cause a fire.
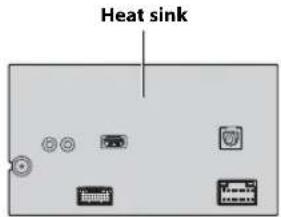
text_image
Heat sinkRear of the Unit
Caution concerning the installation location
Angle of installation
Install at an angle between horizontal and 30^ . Note that installing at an angle outside of this range will result in a loss of performance and possibly damage.
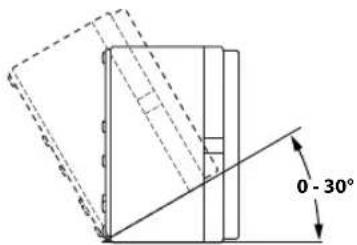
text_image
0 - 30°Mounting the Microphone
For safe use, make sure of the following:
- Location is stable and firm.
- Does not interfere with safety equipment.
- Driver's view and operations are not obstructed.
- Microphone is located where the driver's voice can be easily picked up (for example, on the sun visor).
When you speak into the microphone, you should not have to change your driving posture. This may cause a distraction, taking your attention away from safely driving your vehicle. Carefully consider direction and distance while mounting the microphone. Confirm that the driver's voice can be easily picked up at the selected location.
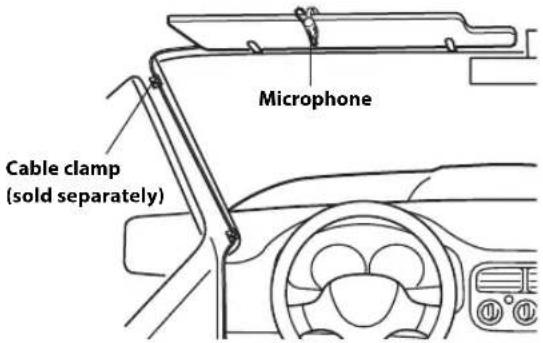
text_image
Cable clamp (sold separately) MicrophoneInstallation example using the Original Mounting Bracket
1 Mount the original mounting bracket to the unit using the supplied screws.
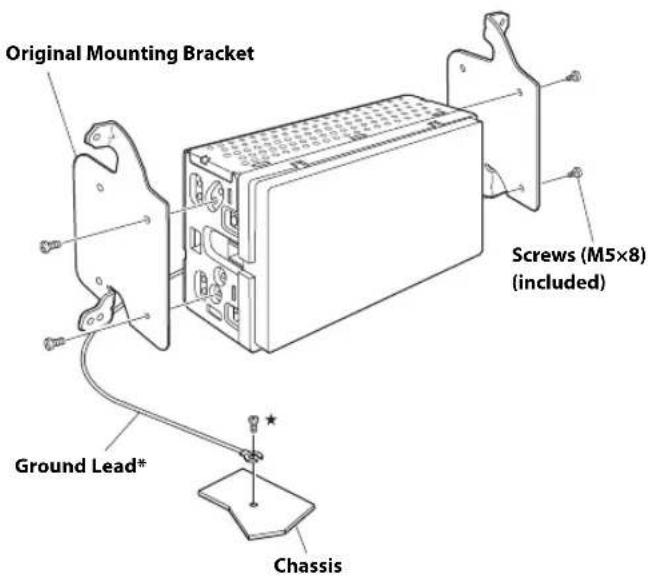
text_image
Original Mounting Bracket Screws (M5x8) (included) Ground Lead* Chassis2 Connect all other leads of the unit according to details described in the "Connections" (page 48).
3Mount the unit in a car.
* To securely connect the ground lead, use an already installed screw on a metal part of the vehicle (marked (★ or a clean, bare metal spot on the vehicle's chassis.
- Fix the cables carefully. Do not damage them by mounting them into movable parts, such as the seat rail, or by locating them against sharp or pointed edges.
4 Reattach the removed vehicle parts (panels, etc.) or other aftermarket dash kit back onto the vehicle.
Connections
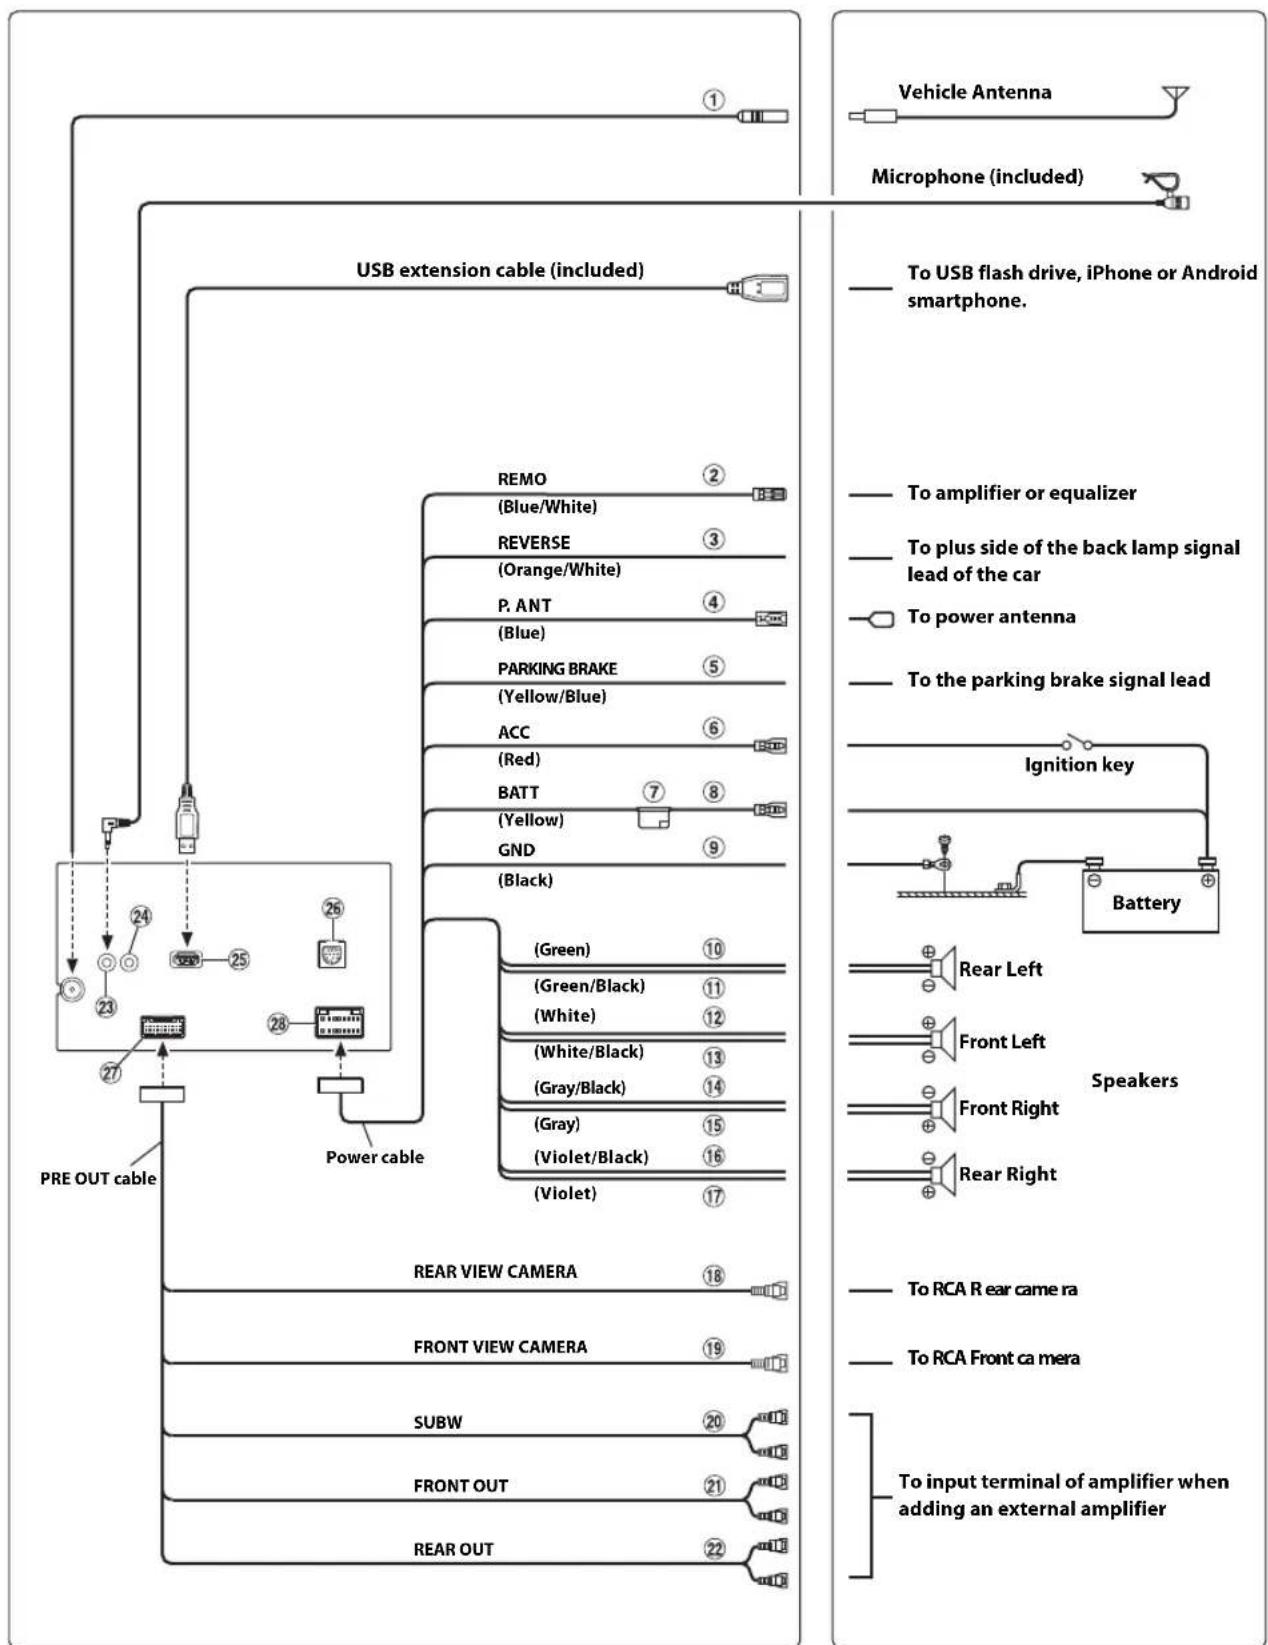
flowchart
graph TD
    A["PRE OUT cable"] --> B["USB extension cable (included)"]
    B --> C["REMO"]
    C --> D["Blue/White"]
    B --> E["REVERSE"]
    E --> F["(Orange/White)"]
    B --> G["P. ANT"]
    G --> H["(Blue)"]
    B --> I["PARKING BRAKE"]
    I --> J["(Yellow/Blue)"]
    B --> K["ACC"]
    K --> L["(Red)"]
    B --> M["BATT"]
    M --> N["(Yellow)"]
    B --> O["GND"]
    O --> P["(Black)"]
    P --> Q["(Green)"]
    Q --> R["(Green/Black)"]
    P --> S["(White)"]
    S --> T["(White/Black)"]
    P --> U["(Gray)"]
    U --> V["(Gray)"]
    P --> W["(Violet/Black)"]
    W --> X["(Violet)"]
    P --> Y["(Violet)"]
    Y --> Z["(Violet)"]
    A --> AA["Power cable"]
    AA --> AB["REAR VIEW CAMERA"]
    AB --> AC["FRONT VIEW CAMERA"]
    AB --> AD["SUBW"]
    AD --> AE["FRONT OUT"]
    AD --> AF["REAR OUT"]

    G --> AG["To power antenna"]
    AG --> AH["To plus side of the back lamp signal lead of the car"]
    AH --> AI["To amplifier or equalizer"]

    I --> AJ["To battery"]
    AJ --> AK["Ignition key"]
    AK --> AL["Back brake signal lead"]

    M --> AM["Rear Left"]
    AM --> AN["Front Left"]
    AN --> AO["Front Right"]
    AO --> AP["Rear Right"]

    V --> AQ["Rear Right"]

    X --> AR["To RCA Rear camera"]
    AR --> AS["To RCA Front camera"]

    Y --> AT["To input terminal of amplifier when adding an external amplifier"]
① Radio Antenna Receptacle
② Remote Turn-On Lead (Blue/White)
Connect this lead to the remote turn-on lead of your amplifier or signal processor.
③ Reverse Lead (Orange/White)
④ Power Antenna Lead (Blue)
Connect this lead to the +B terminal of your power antenna, if applicable.
- This lead should be used only for controlling the vehicle's power antenna. Do not use this lead to turn on an amplifier or a signal processor, etc.
⑤ Parking Brake Lead (Yellow/Blue)
Connect this lead to the power supply side of parking brake switch to transmit the parking brake status signals to the unit.
⑥ Switched Power Lead (Ignition) (Red)
Connect this lead to an open terminal on the vehicle's fuse box or another unused power source that provides (+) 12V only when the ignition is turned on or in the accessory position.
⑦ Fuse Holder (15A)
⑧ Battery Lead (Yellow)
Connect this lead to the positive (+) post of the vehicle's battery.
⑨ Ground Lead (Black)
Connect this lead to a good chassis ground on the vehicle. Make sure the connection is made to bare metal and is securely fastened using the sheet metal screw provided.
⑩ Left Rear (+) Speaker Output Lead (Green)
⑪ Left Rear (−) Speaker Output Lead (Green/Black)
⑫ Left Front (+) Speaker Output Lead (White)
⑬ Left Front (−) Speaker Output Lead (White/Black)
⑭ Right Front (−) Speaker Output Lead (Gray/Black)
⑮ Right Front (+) Speaker Output Lead (Gray)
⑯ Right Rear (−) Speaker Output Lead (Violet/Black)
⑰ Right Rear (+) Speaker Output Lead (Violet)
⑱ REAR CAMERA Input RCA Connector
Use when connecting a rear camera with RCA Output Connector.
⑲ FRONT CAMER Input RCA Connector
Use when connecting a front camera with RCA Output Connector.
⑳ Subwoofer RCA Connectors
②1 Front Output RCA Connectors
Can be used as Front Output RCA Connectors. RED is right and WHITE is left.
22 Rear Output RCA Connectors
Can be used as Rear Output RCA Connectors. RED is right and WHITE is left.
②3 MIC Input Connector To microphone (included)
24 Steering Remote Control Interface Connector To steering remote control interface. For details about connections, consult your nearest Alpine dealer.
25 USB Connector To USB flash drive, iPhone or Android smartphone.
26 SiriusXM Tuner Input Connector
To SiriusXM Tuner (sold separately).
- For more information on how to install the SiriusXM Connect Vehicle tuner, consult the installation guide included with the tuner.
27 CAMERA/PRE OUT Connector
28 Power Supply Connector
If an ACC power supply is not available
Connection Diagram of SPST Switch (sold separately)

flowchart
graph LR
    A["iLX-W650"] --> B["ACC (Red)"]
    A --> C["BATTERY (Yellow)"]
    B --> D["SPST SW (Optional)"]
    C --> D
    D --> E["FUSE (5A) (Optional)"]
    D --> F["FUSE (20A) (Optional)"]
    F --> G["Battery"]
- If your vehicle has no ACC power supply, add an SPST (single-pole, single-throw) switch (sold separately) and fuse (sold separately).
- The diagram and the fuse amperage shown above are in the case when the unit is used individually.
- If the switched power (ignition) lead of the unit is connected directly to the positive (+) post of the vehicle's battery, the unit draws some current (several hundred milliamperes) even when its switch is placed in the OFF position, and the battery may be discharged.
IMPORTANT
Please record the serial number of your unit in the space provided below and keep it as a permanent record. The serial number plate is located on the bottom of the unit.
SERIAL NUMBER: ____
INSTALLATION DATE:
INSTALLATION TECHNICIAN:
PLACE OF PURCHASE: ____
To prevent external noise from entering the audio system.
- Locate the unit and route the leads at least 10 cm away from the car harness.
- Keep the battery power leads as far away from other leads as possible.
- Connect the ground lead securely to a bare metal spot (remove any paint, dirt or grease if necessary) of the car chassis.
- If you add an optional noise suppressor, connect it as far away from the unit as possible. Your Alpine dealer carries various noise suppressors, contact them for further information.
- Your Alpine dealer knows best about noise prevention measures so consult your dealer for further information.
System Example
Connection of an iPhone
When connecting to an iPhone with a Lightning connector
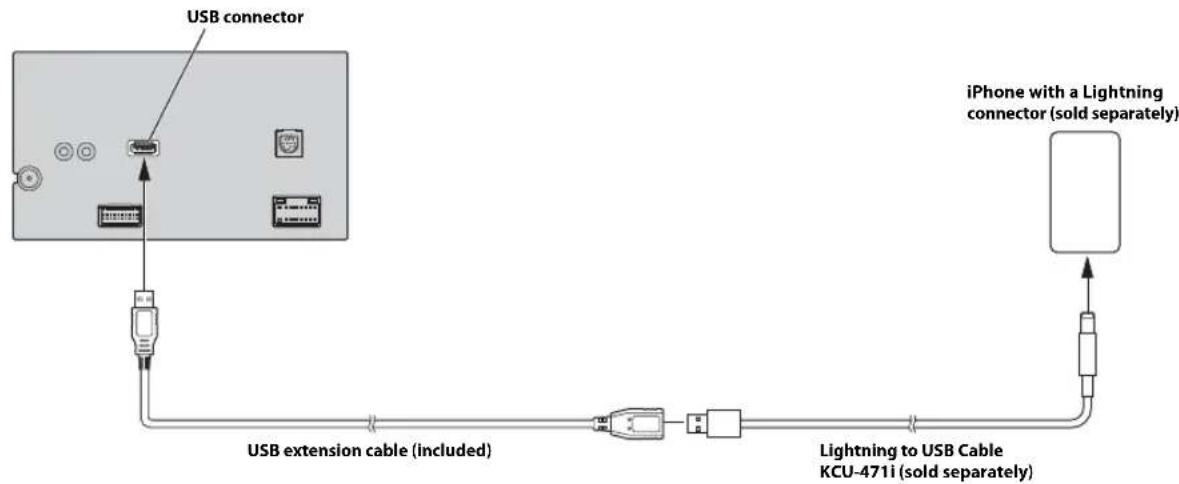
flowchart
graph TD
    A["USB connector"] --> B["USB extension cable (included)"]
    B --> C["Lightning to USB Cable KCU-471i (sold separately)"]
    C --> D["iPhone with a Lightning connector (sold separately)"]
- Do not leave an iPhone in a vehicle for a long time. Heat and humidity may damage the iPhone, and you may not be able to play it again.
Connection of a USB Flash Drive
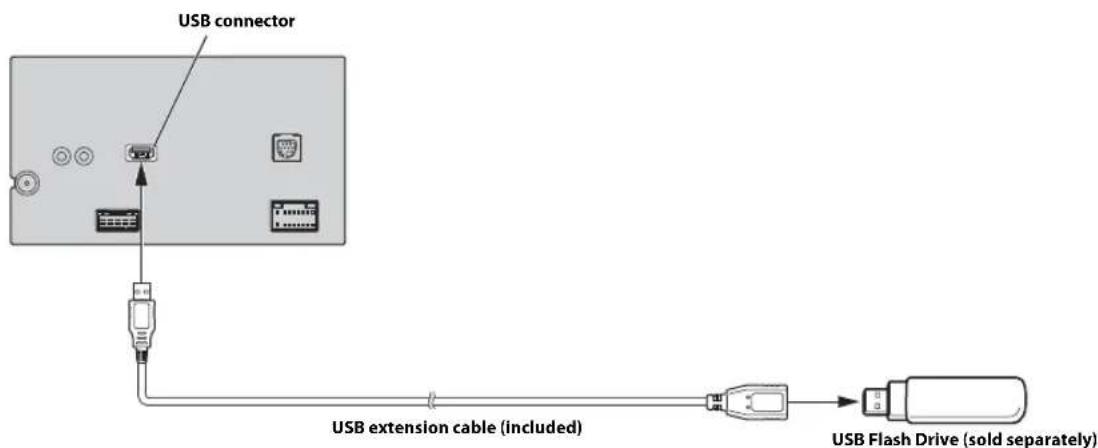
text_image
USB connector USB extension cable (included) USB Flash Drive (sold separately)- Do not leave a flash drive in a vehicle for a long time. Heat and humidity may damage the flash drive.
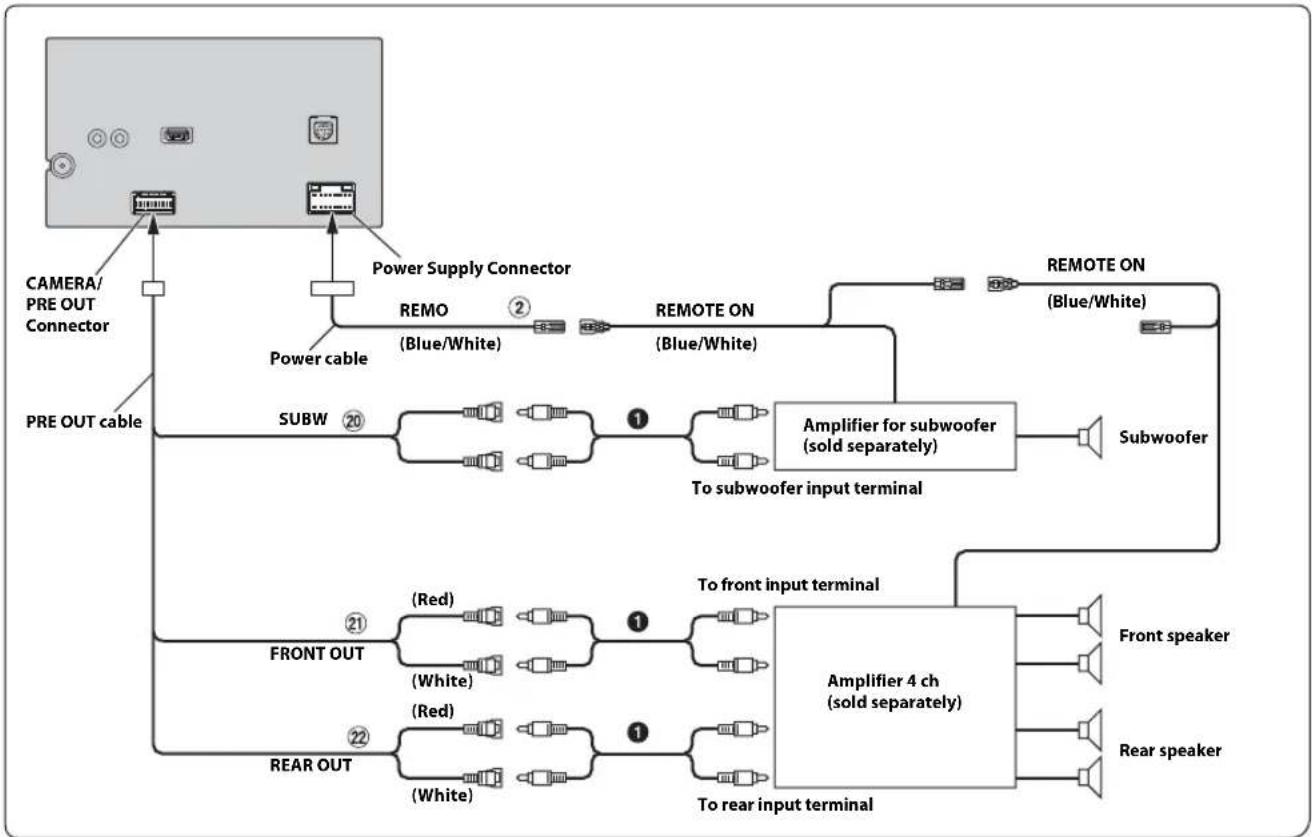
flowchart
graph TD
    A["CAMERA/PRE OUT Connector"] --> B["Power supply connector"]
    B --> C["REMO (Blue/White)"]
    B --> D["REMOTE ON (Blue/White)"]
    C --> E["To subwoofer input terminal"]
    D --> E
    E --> F["Subwoofer"]
    G["PRE OUT cable"] --> H["SUBW 20"]
    H --> I["Amplifier for subwoofer (sold separately)"]
    I --> J["To front input terminal"]
    J --> K["Amplifier 4 ch (sold separately)"]
    K --> L["Front speaker"]
    K --> M["Rear speaker"]
    N["FRONT OUT"] --> O["(Red) (White)"]
    N --> P["(Red) (White)"]
    N --> Q["(Red) (White)"]
    R["REAR OUT"] --> S["(Red) (White)"]
    R --> T["(Red) (White)"]
    R --> U["(Red) (White)"]
    V["TO rear input terminal"] --> K
    W["TO rear input terminal"] --> K
② Remote Turn-On Lead (Blue/White)
20 Subwoofer RCA Connectors
②1 Front Output RCA Connectors
⑳ Rear Output RCA Connectors
① RCA Extension Cable (sold separately)
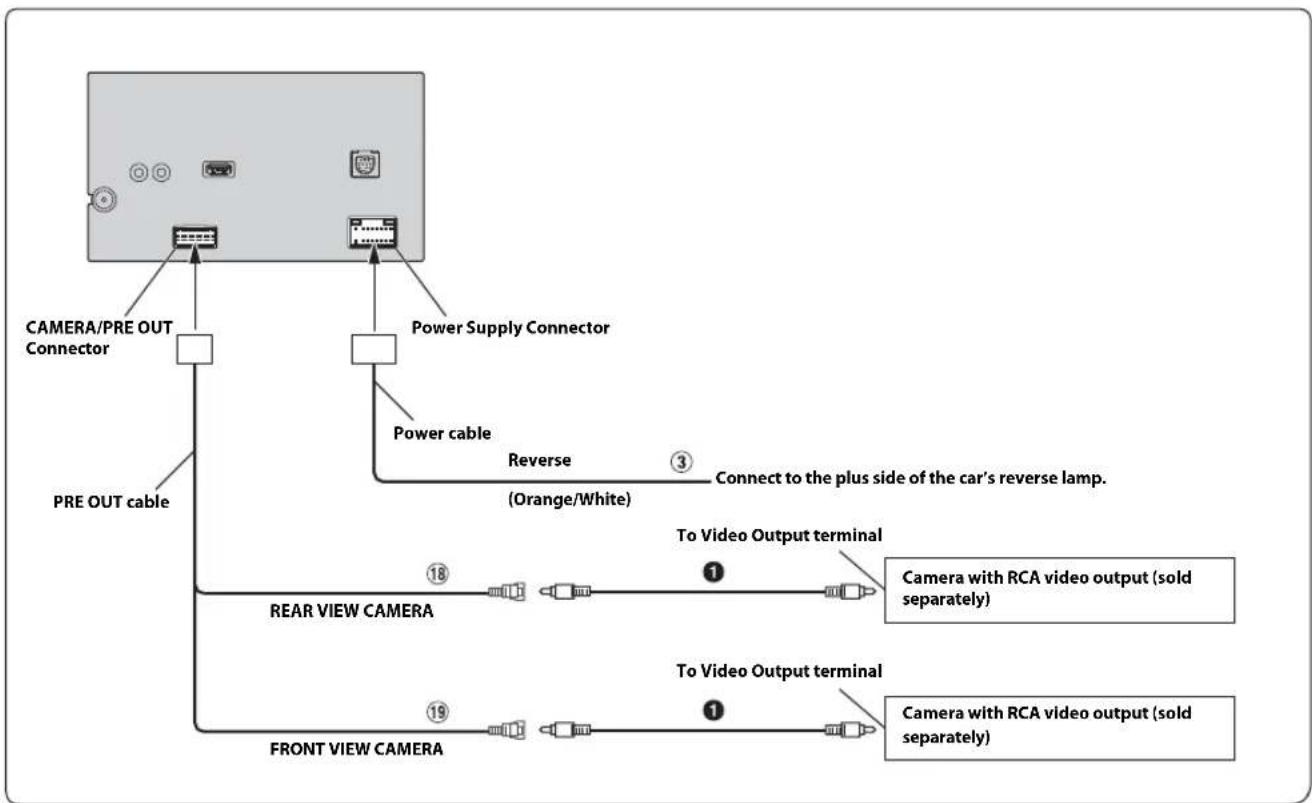
flowchart
graph TD
    A["CAMERA/PRE OUT Connector"] --> B["PRE OUT cable"]
    C["Power Supply Connector"] --> D["Power cable"]
    D --> E["Reverse (Orange/White)"]
    E --> F["Connect to the plus side of the car's reverse lamp."]
    G["REAR VIEW CAMERA"] --> H["To Video Output terminal"]
    I["FRONT VIEW CAMERA"] --> J["To Video Output terminal"]
    H --> K["Camera with RCA video output (sold separately)"]
    J --> L["Camera with RCA video output (sold separately)"]
③ Reverse Lead (Orange/White)
① RCA Extension Cable (sold separately)
⑱ REAR CAMERA Input RCA Connector
⑲ FRONT CAMERA Input RCA Connector
- Set the Camera Primary or Secondary setting to [Rear]. For details, refer to "Camera Primary and Secondary Setting" (page 23).
LIMITED WARRANTY
ALPINE ELECTRONICS OF AMERICA, INC. ("Alpine"), is dedicated to quality craftsmanship and is pleased to offer this Warranty. We suggest that you read it thoroughly. Should you have any questions, please contact your Dealer or contact Alpine at one of the telephone numbers listed below.
● PRODUCTS COVERED:
This Warranty covers Car Audio Products and Related Accessories ("the product"). Products purchased in the Canada are covered only in the Canada. Products purchased in the U.S.A. are covered only in the U.S.A.
● LENGTH OF WARRANTY:
This Warranty is in effect for one year from the date of the first consumer purchase.
● WHO IS COVERED:
This Warranty only covers the original purchaser of the product, who must reside in the United States, Puerto Rico or Canada.
WHAT IS COVERED:
This Warranty covers defects in materials or workmanship (parts and labor) in the product.
WHAT IS NOT COVERED:
This Warranty does not cover the following:
① Damage occurring during shipment of the product to Alpine for repair (claims must be presented to the carrier).
② Damage caused by accident or abuse, including burned voice coils caused by over-driving the speaker (amplifier level is turned up and driven into distortion or clipping). Speaker mechanical failure (e.g. punctures, tears or rips). Cracked or damaged LCD panels. Dropped or damaged hard drives.
③ Damage caused by negligence, misuse, improper operation or failure to follow instructions contained in the Owner's manual.
④ Damage caused by act of God, including without limitation, earthquake, fire, flood, storms or other acts of nature. Any cost or expense related to the removal or reinstallation of the product.
⑤ Service performed by an unauthorized person, company or association.
⑥ Any product which has the serial number defaced, altered or removed.
⑦ Any product which has been adjusted, altered or modified without Alpine's consent.
⑧ Any product not distributed by Alpine within the United States, Puerto Rico or Canada.
⑨ Any product not purchased from an Authorized Alpine Dealer.
● HOW TO OBTAIN WARRANTY SERVICE:
① You are responsible for delivery of the product to an Authorized Alpine Service Center or Alpine for repair and for payment of any initial shipping charges. Alpine will, at its option, repair or replace the product with a new or reconditioned product without charge. If the repairs are covered by the warranty, and if the product was shipped to an Authorized Alpine Service Center or Alpine, Alpine will pay the return shipping charges.
② You should provide a detailed description of the problem(s) for which service is required.
③ You must supply proof of your purchase of the product.
④ You must package the product securely to avoid damage during shipment. To prevent lost packages it is recommended to use a carrier that provides a tracking service.
● HOW WE LIMIT IMPLIED WARRANTIES:
ANY IMPLIED WARRANTIES INCLUDING FITNESS FOR USE AND MERCHANTABILITY ARE LIMITED IN DURATION TO THE PERIOD OF THE EXPRESS WARRANTY SET FORTH ABOVE AND NO PERSON IS AUTHORIZED TO ASSUME FOR ALPINE ANY OTHER LIABILITY IN CONNECTION WITH THE SALE OF THE PRODUCT.
● HOW WE EXCLUDE CERTAIN DAMAGES:
ALPINE EXPRESSLY DISCLAIMS LIABILITY FOR INCIDENTAL AND CONSEQUENTIAL DAMAGES CAUSED BY THE PRODUCT. THE TERM "INCIDENTAL DAMAGES" REFERS TO EXPENSES OF TRANSPORTING THE PRODUCT TO THE ALPINE SERVICE CENTER, LOSS OF THE ORIGINAL PURCHASER'S TIME, LOSS OF THE USE OF THE PRODUCT, BUS FARES, CAR RENTALS OR OTHERS COSTS RELATING TO THE CARE AND CUSTODY OF THE PRODUCT. THE TERM "CONSEQUENTIAL DAMAGES" REFERS TO THE COST OF REPAIRING OR REPLACING OTHER PROPERTY WHICH IS DAMAGED WHEN THIS PRODUCT DOES NOT WORK PROPERLY. THE REMEDIES PROVIDED UNDER THIS WARRANTY ARE EXCLUSIVE AND IN LIEU OF ALL OTHERS.
● HOW STATE/PROVINCIAL LAW RELATES TO THE WARRANTY:
This Warranty gives you specific legal rights, and you may also have other rights which vary from state to state and province to province. In addition, some states/provinces do not allow limitations on how long an implied warranty lasts, and some do not allow the exclusion or limitation of incidental or consequential damages. Accordingly, limitations as to these matters contained herein may not apply to you.
IN CANADA ONLY:
This Warranty is not valid unless your Alpine car audio product has been installed in your vehicle by an Authorized Installation Center, and this warranty stamped upon installation by the installation center.
● HOW TO CONTACT CUSTOMER SERVICE:
Should the product require service, please call the following number for your nearest Authorized Alpine Service Center.
CAR AUDIO 1-800-ALPINE-1 (1-800-257-4631) NAVIGATION 1-888-NAV-HELP (1-888-628-4357)
Or visit our website at; http://www.alpine-usa.com
About the Rules of Bluetooth Electromagnetic Radiation Regulation
Don't forget to take a moment to protect your purchase by registering your product now at the following address: www.alpine-usa.com/registration.
Open source licenses
- Iw IP
Copyright (c) 2001, 2002 Swedish Institute of Computer Science. All rights reserved.
Redistribution and use in source and binary forms, with or without modification, are permitted provided that the following conditions are met:
- Redistributions of source code must retain the above copyright notice, this list of conditions and the following disclaimer.
- Redistributions in binary form must reproduce the above copyright notice, this list of conditions and the following disclaimer in the documentation and/or other materials provided with the distribution.
- The name of the author may not be used to endorse or promote products derived from this software without specific prior written permission.
THIS SOFTWARE IS PROVIDED BY THE AUTHOR "AS IS" AND ANY EXPRESS OR IMPLIED WARRANTIES, INCLUDING, BUT NOT LIMITED TO, THE IMPLIED WARRANTIES OF MERCHANTABILITY AND FITNESS FOR A PARTICULAR PURPOSE ARE DISCLAIMED. IN NO EVENT SHALL THE AUTHOR BE LIABLE FOR ANY DIRECT, INDIRECT, INCIDENTAL, SPECIAL, EXEMPLARY, OR CONSEQUENTIAL DAMAGES (INCLUDING, BUT NOT LIMITED TO, PROCUREMENT OF SUBSTITUTE GOODS OR SERVICES; LOSS OF USE, DATA, OR PROFITS; OR BUSINESS INTERRUPTION) HOWEVER CAUSED AND ON ANY THEORY OF LIABILITY, WHETHER IN CONTRACT, STRICT LIABILITY, OR TORT (INCLUDING NEGLIGENCE OR OTHERWISE) ARISING IN ANY WAY OUT OF THE USE OF THIS SOFTWARE, EVEN IF ADVISED OF THE POSSIBILITY OF SUCH DAMAGE.
This file is part of the lwIP TCP/IP stack.
Author: Adam Dunkels adam@sics.se
OpenSSL
LICENSE ISSUES
The OpenSSL toolkit stays under a double license, i.e. both the conditions of the OpenSSL License and the original SSLeay license apply to the toolkit. See below for the actual license texts.
OpenSSL License
Copyright (c) 1998-2018 The OpenSSL Project. All rights reserved.
Redistribution and use in source and binary forms, with or without modification, are permitted provided that the following conditions are met:
- Redistributions of source code must retain the above copyright notice, this list of conditions and the following disclaimer.
- Redistributions in binary form must reproduce the above copyright notice, this list of conditions and the following disclaimer in the documentation and/or other materials provided with the distribution.
- All advertising materials mentioning features or use of this software must display the following acknowledgment: "This product includes software developed by the OpenSSL Project for use in the OpenSSL Toolkit. (http://www.openssl.org/)"
- The names "OpenSSL Toolkit" and "OpenSSL Project" must not be used to endorse or promote products derived from this software without prior written permission. For written permission, please contact openssl-core@openssl.org.
- Products derived from this software may not be called "OpenSSL" nor may "OpenSSL" appear in their names without prior written permission of the OpenSSL Project.
- Redistributions of any form whatsoever must retain the following acknowledgment: "This product includes software developed by the OpenSSL Project for use in the OpenSSL Toolkit (http://www.openssl.org/)"
THIS SOFTWARE IS PROVIDED BY THE OpenSSL PROJECT "AS IS" AND ANY EXPRESSED OR IMPLIED WARRANTIES, INCLUDING, BUT NOT LIMITED TO, THE IMPLIED WARRANTIES OF MERCHANTABILITY AND FITNESS FOR A PARTICULAR PURPOSE ARE DISCLAIMED. IN NO EVENT SHALL THE OpenSSL PROJECT OR ITS CONTRIBUTORS BE LIABLE FOR ANY DIRECT, INDIRECT, INCIDENTAL, SPECIAL, EXEMPLARY, OR CONSEQUENTIAL DAMAGES (INCLUDING, BUT NOT LIMITED TO, PROCUREMENT OF SUBSTITUTE GOODS OR SERVICES; LOSS OF USE, DATA, OR PROFITS; OR BUSINESS INTERRUPTION) HOWEVER CAUSED AND ON ANY THEORY OF LIABILITY, WHETHER IN CONTRACT, STRICT LIABILITY, OR TORT (INCLUDING NEGLIGENCE OR OTHERWISE) ARISING IN ANY WAY OUT OF THE USE OF THIS SOFTWARE, EVEN IF ADVISED OF THE POSSIBILITY OF SUCH DAMAGE.
This product includes cryptographic software written by Eric Young (eay@cryptsoft.com). This product includes software written by Tim Hudson (tjh@cryptsoft.com).
Original SSLeay License
Copyright (C) 1995-1998 Eric Young (eay@cryptsoft.com) All rights reserved.
This package is an SSL implementation written by Eric Young (eay@cryptsoft.com). The implementation was written so as to conform with Netscapes SSL.
This library is free for commercial and non-commercial use as long as the following conditions are aheared to. The following conditions apply to all code found in this distribution, be it the RC4, RSA, Ihash, DES, etc., code; not just the SSL code. The SSL documentation included with this distribution is covered by the same copyright terms except that the holder is Tim Hudson (tjh@cryptsoft.com).
Copyright remains Eric Young's, and as such any Copyright notices in the code are not to be removed.
If this package is used in a product, Eric Young should be given attribution as the author of the parts of the library used.
This can be in the form of a textual message at program startup or in documentation (online or textual) provided with the package.
Redistribution and use in source and binary forms, with or without modification, are permitted provided that the following conditions are met:
- Redistributions of source code must retain the copyright notice, this list of conditions and the following disclaimer.
- Redistributions in binary form must reproduce the above copyright notice, this list of conditions and the following disclaimer in the documentation and/or other materials provided with the distribution.
- All advertising materials mentioning features or use of this software must display the following acknowledgement:
"This product includes cryptographic software written by Eric Young (eay@cryptsoft.com)"
The word 'cryptographic' can be left out if the rouines from the library being used are not cryptographic related :-). - If you include any Windows specific code (or a derivative thereof) from the apps directory (application code) you must include an acknowledgement: "This product includes software written by Tim Hudson (tjh@cryptsoft.com)"
THIS SOFTWARE IS PROVIDED BY ERIC YOUNG "AS IS" AND ANY EXPRESS OR IMPLIED WARRANTIES, INCLUDING, BUT NOT LIMITED TO, THE IMPLIED WARRANTIES OF MERCHANTABILITY AND FITNESS FOR A PARTICULAR PURPOSE ARE DISCLAIMED. IN NO EVENT SHALL THE AUTHOR OR CONTRIBUTORS BE LIABLE FOR ANY DIRECT, INDIRECT, INCIDENTAL, SPECIAL, EXEMPLARY, OR CONSEQUENTIAL DAMAGES (INCLUDING, BUT NOT LIMITED TO, PROCUREMENT OF SUBSTITUTE GOODS OR SERVICES; LOSS OF USE, DATA, OR PROFITS; OR BUSINESS INTERRUPTION) HOWEVER CAUSED AND ON ANY THEORY OF LIABILITY, WHETHER IN CONTRACT, STRICT LIABILITY, OR TORT (INCLUDING NEGLIGENCE OR OTHERWISE) ARISING IN ANY WAY OUT OF THE USE OF THIS SOFTWARE, EVEN IF ADVISED OF THE POSSIBILITY OF SUCH DAMAGE.
The licence and distribution terms for any publicly available version or derivative of this code cannot be changed. i.e. this code cannot simply be copied and put under another distribution licence [including the GNU Public Licence.]
Unrarlib
Free License for UniquE RAR File Library
Copyright (C) 2000-2002 by Christian Scheurer (www.ChristianScheurer.ch) UNIX port by Johannes Winkelmann (jw@tks6.net)
You have the permission to use, copy, modify, and distribute the UniquE RAR File Library (also called URARFileLib or unrarlib) and its documentation for any purpose except for re-creating the RAR compression algorithm, which is proprietary. URARFileLib may not be used or modified to create RAR/WinRAR compatible archives, only decompression is permitted.
If you use URARFileLib, or parts of URARFileLib in your program, you must give the program away for free.
The above copyright notice must be shipped with all copies.
No representations are made about the suitability of the URARFileLib for any purpose. It is provided "as is" without expressed or implied warranty.
Christian Scheurer (cs@unrarlib.org)
- June 2002
zlib
zlib.h – interface of the 'zlib' general purpose compression library version 1.2.11, January 15th, 2017
Copyright (C) 1995-2017 Jean-loup Gailly and Mark Adler
This software is provided 'as-is', without any express or implied warranty. In no event will the authors be held liable for any damages arising from the use of this software.
Permission is granted to anyone to use this software for any purpose, including commercial applications, and to alter it and redistribute it freely, subject to the following restrictions:
- The origin of this software must not be misrepresented; you must not claim that you wrote the original software. If you use this software in a product, an acknowledgment in the product documentation would be appreciated but is not required.
- Altered source versions must be plainly marked as such, and must not be misrepresented as being the original software.
- This notice may not be removed or altered from any source distribution.
Jean-loup Gailly
Mark Adler
jloup@gzip.org
madler@alumni.caltech.edu
ALPINE®
7-INCH AUDIO/VIDEO RECEIVER iLX-W650
Made for
iPhone

Works with
Apple CarPlay
androidauto™
((Siriusxm))
READY

Bluetooth®

QUICK REFERENCE GUIDE GUIDE DE RÉFÉRENCE RAPIDE GUÍA DE REFERENCIA RÁPIDA
Please register your product at www.alpine-usa.com/registration to protect your purchase. Enregistrez-vous sur www.alpine-usa.com/registration pour protéger votre achat. Registre su producto en la dirección www.alpine-usa.com/registration para proteger su compra.
About the Rules of Bluetooth Electromagnetic Radiation Regulation
Apple CarPlay Operation (Optional)....6
Android Auto™ (Optional) 6
Radio Operation 7
USB Flash drive Operation (Optional)....7
SiriusXM Satellite Radio Operation (Optional) 8
iPod mode on iPhone (Optional)....9
Hands-Free Phone Control 10
Installation....11
Connections....13
Specifications 15
IMPORTANT
Please record the serial number of your unit in the space provided below and keep it as a permanent record.
SERIAL NUMBER:
INSTALLATION DATE:
INSTALLATION TECHNICIAN:
PLACE OF PURCHASE:
For details on all functions, refer to the Owner's Manual published on our website at http://www.alpine-usa.com. If required, an ALPINE dealer will readily provide you with a print out of the Owner's Manual published on the website.
WARNING

WARNING
This symbol means important instructions. Failure to heed them can result in serious injury or death.
INSTALL THE PRODUCT CORRECTLY SO THAT THE DRIVER CANNOT WATCH TV/VIDEO UNLESS THE VEHICLE IS STOPPED AND THE EMERGENCY BRAKE IS APPLIED.
It is dangerous for the driver to watch TV/Video while driving a vehicle. Installing this product incorrectly enables the driver to watch TV/Video while driving. This may cause a distraction, preventing the driver from looking ahead, thus causing an accident. The driver or other people could be severely injured.
DO NOT WATCH VIDEO WHILE DRIVING.
Watching the video may distract the driver from looking ahead of the vehicle and cause an accident.
DO NOT OPERATE ANY FUNCTION THAT TAKES YOUR ATTENTION AWAY FROM SAFELY DRIVING YOUR VEHICLE.
Any function that requires your prolonged attention should only be performed after coming to a complete stop. Always stop the vehicle in a safe location before performing these functions. Failure to do so may result in an accident.
KEEP THE VOLUME AT A LEVEL WHERE YOU CAN STILL HEAR OUTSIDE NOISES WHILE DRIVING.
Excessive volume levels that obscure sounds such as emergency vehicle sirens or road warning signals (train crossings, etc.) can be dangerous and may result in an accident. LISTENING AT LOUD VOLUME LEVELS IN A CAR MAY ALSO CAUSE HEARING DAMAGE.
MINIMIZE DISPLAY VIEWING WHILE DRIVING.
Viewing the display may distract the driver from looking ahead of the vehicle and cause an accident.
DO NOT DISASSEMBLE OR ALTER.
Doing so may result in an accident, fire or electric shock.
USE ONLY IN CARS WITH A 12 VOLT NEGATIVE GROUND.
(Check with your dealer if you are not sure.) Failure to do so may result in fire, etc.
KEEP SMALL OBJECTS SUCH AS SCREWS OUT OF THE REACH OF CHILDREN.
Swallowing them may result in serious injury. If swallowed, consult a physician immediately.
USE THE CORRECT AMPERE RATING WHEN REPLACING FUSES.
Failure to do so may result in fire or electric shock.
DO NOT BLOCK VENTS OR RADIATOR PANELS.
Doing so may cause heat to build up inside and may result in fire.
USE THIS PRODUCT FOR MOBILE 12V APPLICATIONS.
Use for other than its designed application may result in fire, electric shock or other injury.
MAKE THE CORRECT CONNECTIONS.
Failure to make the proper connections may result in fire or product damage.
BEFORE WIRING, DISCONNECT THE CABLE FROM THE NEGATIVE BATTERY TERMINAL.
Failure to do so may result in electric shock or injury due to electrical shorts.
DO NOT ALLOW CABLES TO BECOME ENTANGLED IN SURROUNDING OBJECTS.
Arrange wiring and cables in compliance with the manual to prevent obstructions when driving. Cables or wiring that obstruct or hang up on places such as the steering wheel, gear lever, brake pedals, etc. can be extremely hazardous.
DO NOT SPLICE INTO ELECTRICAL CABLES.
Never cut away cable insulation to supply power to other equipment. Doing so will exceed the current carrying capacity of the wire and result in fire or electric shock.
DO NOT DAMAGE PIPE OR WIRING WHEN DRILLING HOLES.
When drilling holes in the chassis for installation, take precautions so as not to contact, damage or obstruct pipes, fuel lines, tanks or electrical wiring. Failure to take such precautions may result in fire.
DO NOT USE BOLTS OR NUTS IN THE BRAKE OR STEERING SYSTEMS TO MAKE GROUND CONNECTIONS.
Bolts or nuts used for the brake or steering systems (or any other safety-related system), or tanks should NEVER be used for installations or ground connections. Using such parts could disable control of the vehicle and cause fire etc.
DO NOT INSTALL IN LOCATIONS WHICH MIGHT HINDER VEHICLE OPERATION, SUCH AS THE STEERING WHEEL OR GEARSHIFT.
Doing so may obstruct forward vision or hamper movement etc. and results in serious accident.

CAUTION
This symbol means important instructions. Failure to heed them can result in injury or material property damage.
HALT USE IMMEDIATELY IF A PROBLEM APPEARS.
Failure to do so may cause personal injury or damage to the product. Return it to your authorized Alpine dealer or the nearest Alpine Service Center for repairing.
HAVE THE WIRING AND INSTALLATION DONE BY EXPERTS.
The wiring and installation of this unit requires special technical skill and experience. To ensure safety, always contact the dealer where you purchased this product to have the work done.
USE SPECIFIED ACCESSORY PARTS AND INSTALL THEM SECURELY.
Be sure to use only the specified accessory parts. Use of other than designated parts may damage this unit internally or may not securely install the unit in place. This may cause parts to become loose resulting in hazards or product failure.
ARRANGE THE WIRING SO IT IS NOT CRIMPED OR PINCHED BY A SHARP METAL EDGE.
Route the cables and wiring away from moving parts (like the seat rails) or sharp or pointed edges. This will prevent crimping and damage to the wiring. If wiring passes through a hole in metal, use a rubber grommet to prevent the wire's insulation from being cut by the metal edge of the hole.
DO NOT INSTALL IN LOCATIONS WITH HIGH MOISTURE OR DUST.
Avoid installing the unit in locations with high incidence of moisture or dust. Moisture or dust that penetrates into this unit may result in product failure.
Getting Started
Controls Position
The screen design used in the Quick Reference Guide may differ from the actual screen.
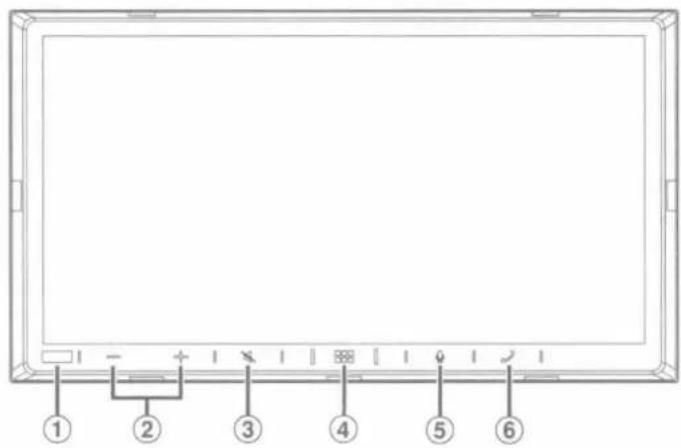
text_image
① ② ③ ④ ⑤ ⑥① Dimmer Sensor
Sense the brightness of the car interior.
② - / + (DOWN/UP) button
Touch to adjust the volume.
③ (MUTE) button
Touch to activate/deactivate the mute mode.
④ (HOME)/(Power Off) button
Activates the HOME screen.
Touch and hold this button for at least 2 seconds to turn the power off.
⑤ button
Depending on the connected smartphone, touch to activate Siri function or voice recognition mode.
⑥ (Phone) button
When a Hands-Free Phone is not connected:
The Bluetooth setting screen is displayed.
When a Hands-Free Phone is connected:
The phone number input screen (Keypad) is activated.
Touch and hold the button for at least 2 seconds to redial the most recent incoming call.
During an incoming call:
The phone call is started.
During a call:
The call finishes.
1 Turn the ignition key to the ACC or ON position.
The system is turned on.
2 Touch and hold the ☐☐☐ (HOME) button for at least 2 seconds to turn the power off.
- When the system is used for the first time, the language selection menu is displayed. Select the desired language, and then touch [OK].
About the HOME Screen
Select a widget on the HOME screen to perform various settings and operations of the function.
1 Touch the □□□ (HOME) button.
The HOME screen is displayed.
HOME screen example
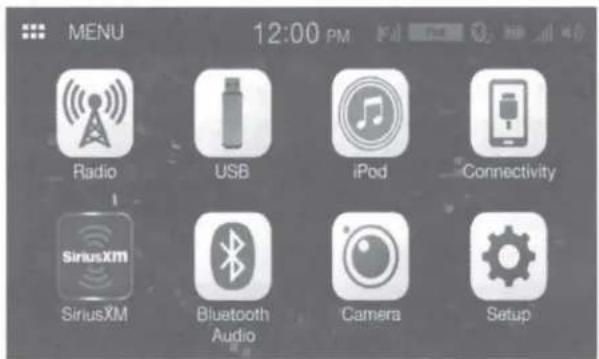
text_image
MENU 12:00 PM Radio USB iPod Connectivity SiriusXM SiriusXM Bluetooth Audio Camera Setup| Radio | Displays the Radio main screen. |
| USB | You can play back music files (MP3/WMA/AAC/FLAC/WAV), video files (MP4/AVI/WMV/MOV) and photo files (JPG/PNG/BMP) stored in a USB flash drive.If a USB flash drive is not connected, this widget is not available. |
| iPod | Displays the iPod main screen.If an iPhone is not connected, this widget is not available. |
| Connectivity (Apple CarPlay)/ (Android Auto) | You can use Apple CarPlay or Android Auto.If an iPhone 5s or later compatible with the Apple CarPlay function or a smartphone installed with the Android Auto App is not connected, this widget is not available.When Apple CarPlay or Android Auto is available, the widget changes to [Apple CarPlay] / [Android Auto]. |
| SiriusXM | Displays the SiriusXM main screen.If a SiriusXM Tuner (Optional) is not connected, this widget is not available. |
| Bluetooth Audio | Displays the Bluetooth audio main screen. |
| Camera | Displays camera images. |
| Setup | Displays the Setup screen. |
Apple CarPlay Operation (Optional)
Apple CarPlay is a smarter, safer way to use your iPhone in the car. Apple CarPlay takes the things you want to do with your iPhone while driving and puts them right on this unit. You can get directions, make calls, send and receive messages, and listen to music, all in a way that allows you to stay focused on the road. Just plug in your iPhone to this unit and go.
1 Touch the □□□ (HOME) button.
The HOME screen is displayed.
2 Touch [Apple CarPlay].
The Apple CarPlay screen is displayed.
• Refer to "Apple CarPlay" in the Owner's Manual for information on how to operate Apple CarPlay.
Owner's
Android Auto™ (Optional)
Android Auto™ (Optional)
Android Auto is designed to make it easier to use apps from your phone while you're on the road. Navigate with Google Maps, listen to playlists or podcasts from your favorite apps, send messages via voice, and more. Download the Android Auto App from the Google Play store before continuing.
1 Touch the □□□ (HOME) button.
The HOME screen is displayed.
2 Touch [Android Auto].
The Android Auto screen is displayed.
- Refer to "Android Auto" in the Owner's Manual for information on how to operate Android Auto.
Radio Operation
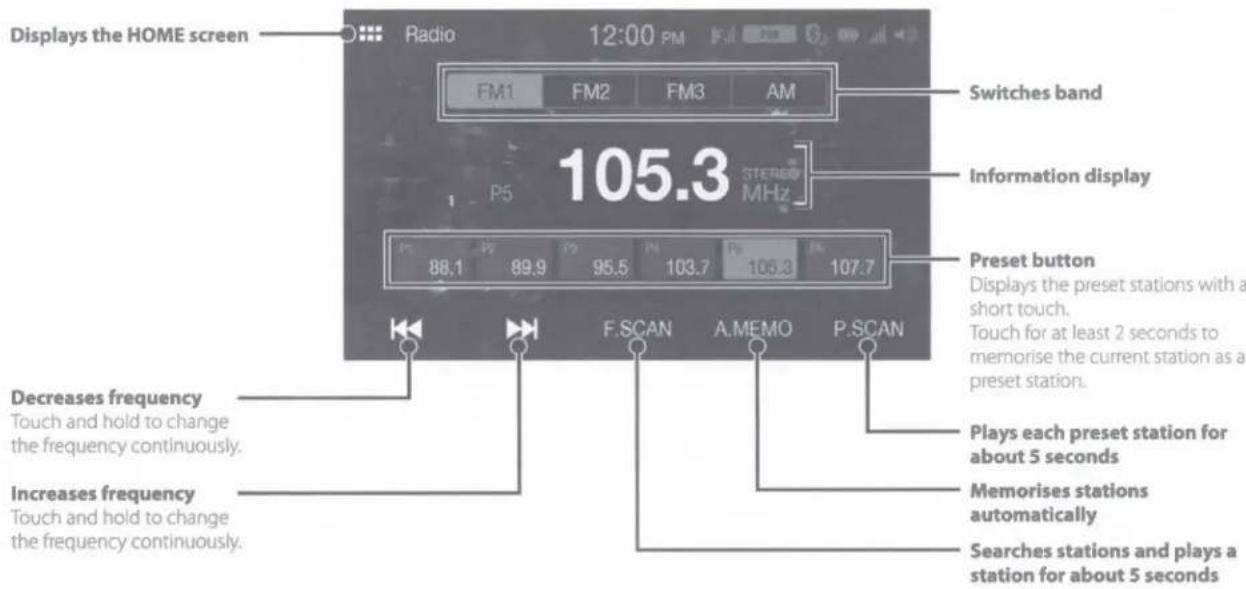
text_image
Displays the HOME screen Radio 12:00 PM FM1 FM2 FM3 AM Switches band P5 105.3 STEREO MHz Information display 88.1 89.9 95.5 103.7 Ps 106.3 107.7 Preset button Displays the preset stations with a short touch. Touch for at least 2 seconds to memorise the current station as a preset station. Decreases frequency Touch and hold to change the frequency continuously. Increases frequency Touch and hold to change the frequency continuously. F.SCAN A.MEMO P.SCAN Plays each preset station for about 5 seconds Memorises stations automatically Searches stations and plays a station for about 5 seconds• The patterns of some keys in the Quick Reference Guide may differ from the actual screen.
Owner's manual
USB Flash drive Operation (Optional)
USB Flash drive Operation (Optional)
You can play back music files (MP3/WMA/AAC/FLAC/WAV) and video files (MP4/AVI/WMV/MOV) stored in a USB flash drive on the internal player of this system.
USB Audio main screen example
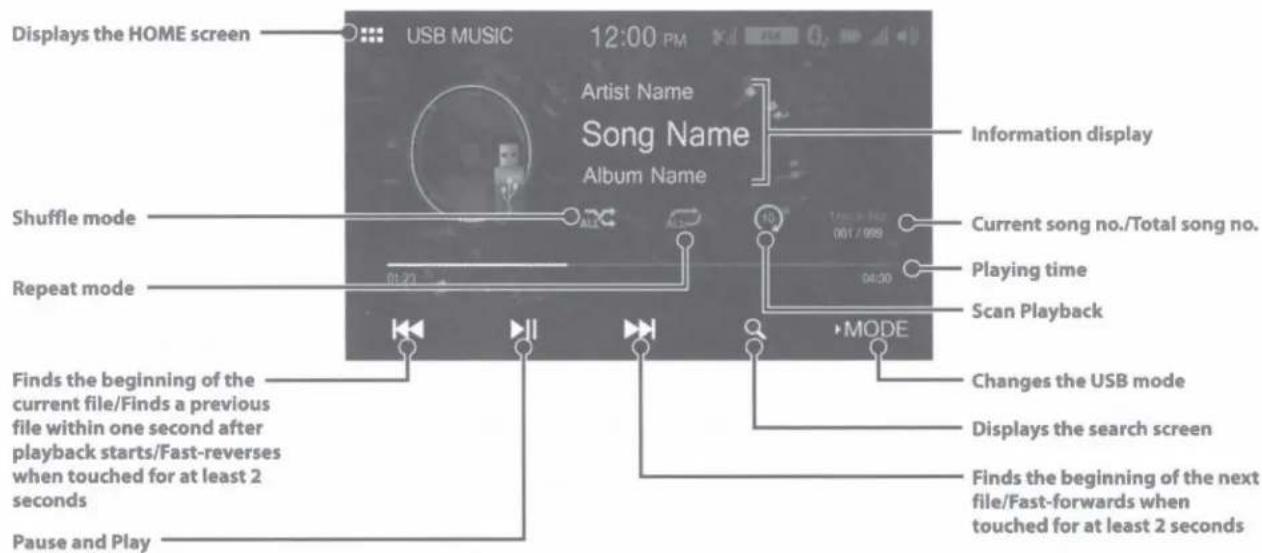
text_image
Displays the HOME screen USB MUSIC 12:00 PM Artist Name Song Name Album Name Information display Shuffle mode Current song no./Total song no. Repeat mode Playing time Scan Playback MODE Finds the beginning of the current file/Finds a previous file within one second after playback starts/Fast-reverses when touched for at least 2 seconds Changes the USB mode Displays the search screen Finds the beginning of the next file/Fast-forwards when touched for at least 2 seconds Pause and Play• The patterns of some keys in the Quick Reference Guide may differ from the actual screen.
SiriusXM Satellite Radio Operation (Optional)
When an optional SiriusXM Tuner is connected to this unit, the following operations may be performed.
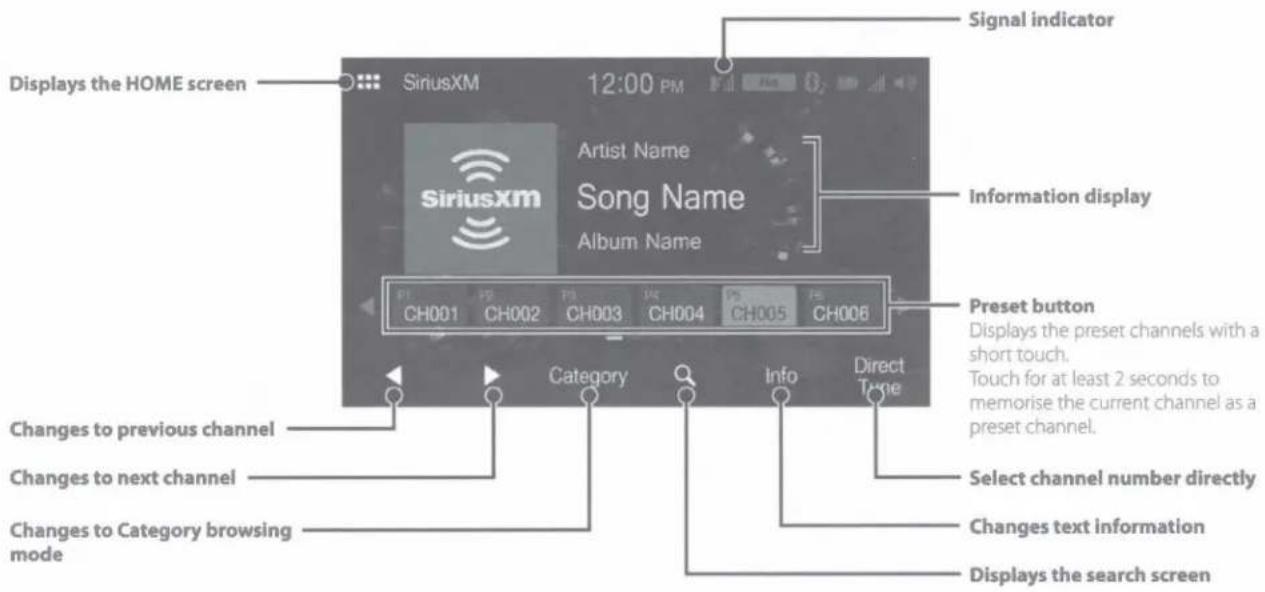
text_image
Signal indicator Displays the HOME screen SiriusXM 12:00 PM Artist Name Song Name Album Name Information display Preset button Displays the preset channels with a short touch. Touch for at least 2 seconds to memorise the current channel as a preset channel. Changes to previous channel Changes to next channel Changes to Category browsing mode Category Info Direct Tone Select channel number directly Changes text information Displays the search screen• The patterns of some keys in the Quick Reference Guide may differ from the actual screen.
iPod mode on iPhone (Optional)
A separately sold Lightning to USB cable (KCU-471i) is required depending on the type of iPhone.
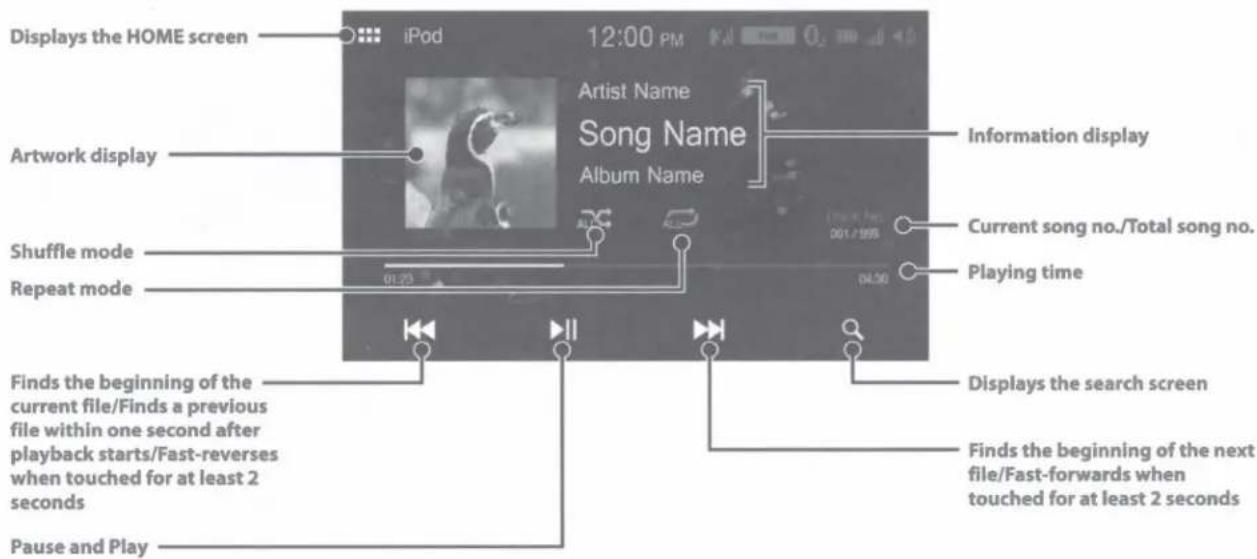
text_image
Displays the HOME screen iPod 12:00 PM Artist Name Song Name Album Name Information display Artwork display Shuffle mode Repeat mode 01:23 04:30 Current song no./Total song no. Playing time Finds the beginning of the current file/Finds a previous file within one second after playback starts/Fast-reverses when touched for at least 2 seconds Displays the search screen Finds the beginning of the next file/Fast-forwards when touched for at least 2 seconds Pause and Play- This unit supports iPhone (iPhone 5s or later) only. For using music playback only, set the "Apple CarPlay" setting to "Off" before connecting with your iPhone.
• The patterns of some keys in the Quick Reference Guide may differ from the actual screen.
Searching for a Music File
For example: Searching by Artist name
1 Touch [Q (Search)] during playback.
2 Touch [Artists].

text_image
iPod Library 12:00 PM Categories Radio Playlists Artists Albums3 Touch the desired artist's name.
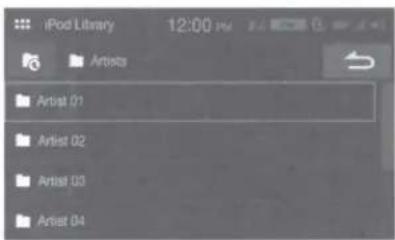
text_image
iPod Library 12:00 PM Artist01 Artist02 Artist03 Artist044 Touch the desired album's name.
5 Touch the desired song's name.
The selected song is played back.
Hands-Free Phone Control
The unit can connect with up to two hands-free phones.
How to connect to a Bluetooth compatible device (Pairing)
To display the Setup HOME screen:
- Bring your vehicle to a complete stop at a safe location. Engage the parking brake.
- Release the parking brake. (For safety, release the parking brake while depressing the foot brake pedal).
- Engage the parking brake again.
- For automatic transmission vehicles, place the transmission lever in the Park position.
1 Touch [Setup] on the HOME screen.
2 Touch [Bluetooth].
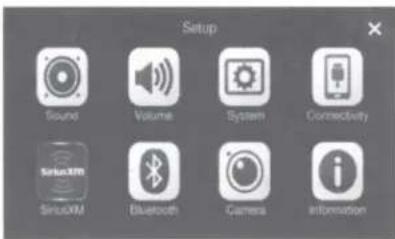
text_image
Setup Sound Volume System Connectivity SiriusXM Bluetooth Camera Information3 Touch [Search] to search for a new device.
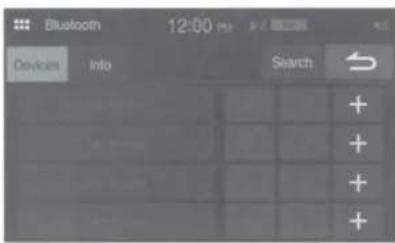
text_image
Bluetooth 12:00 PM Devices Info Search + + + + + +4 Touch the device you want to connect from the list.

text_image
Bluetooth 12:00 PM Search Result Search Alpine's Phone PH06 APN' Phone SHH0045 The device registration is complete.
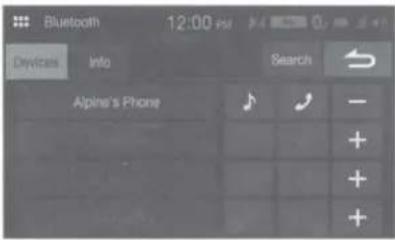
text_image
Bluetooth 12:00 PM Devices Info Search Alpine's Phone- You can register up to 4 Bluetooth compatible mobile phones.
- The Bluetooth registration process differs depending on the device version and SSP (Simple Secure Pairing). If a 4 or 6 character Passcode appears on this device, enter the Passcode using the Bluetooth compatible device. If a 6 character Passkey appears on this device, make sure the same passkey is displayed on the Bluetooth compatible device and touch "Yes."
Answering a Call
1 An incoming call triggers the ringtone and an incoming call display.
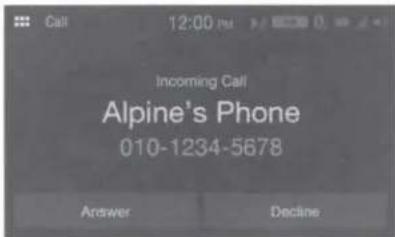
text_image
Call 12:00 PM Incoming Call Alpine's Phone 010-1234-5678 Answer Decline2 Touch [Answer].
The call starts.
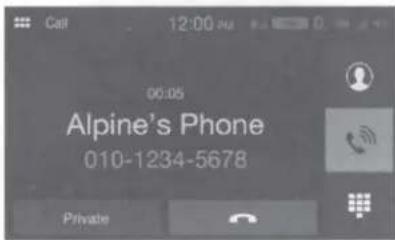
text_image
Call 12:00 PM 00:05 Alpine's Phone 010-1234-5678 PrivateHanging up the Telephone
1 Touch [ ] (End Call).
The call finishes.
Installation
Note on installation
• Install at an angle between horizontal and 30^ . Note that installing at an angle outside of this range will result in a loss of performance and possible damage.
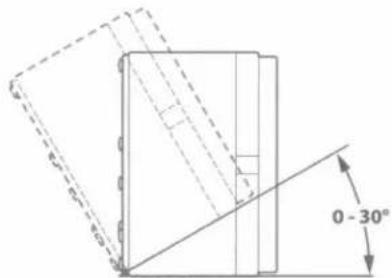
text_image
0 - 30°- Do not block the unit's heat sink, which would prevent air circulation. If blocked, heat will accumulate inside the unit and may cause a fire.
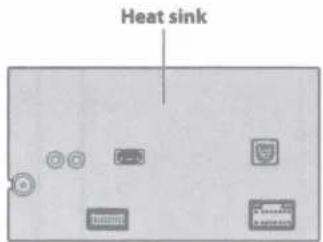
text_image
Heat sinkRear of the Unit
Mounting the Microphone
For safe use, make sure of the following:
• Location is stable and firm.
- Driver's view and operations are not obstructed.
- Microphone is located where the driver's voice can be easily picked up (on the sun visor, etc.).
When you speak into the microphone, you should not have to change your driving posture. This may cause a distraction, taking your attention away from safely driving your vehicle. Carefully consider direction and distance while mounting the microphone. Confirm that the driver's voice can be easily picked up at the selected location.
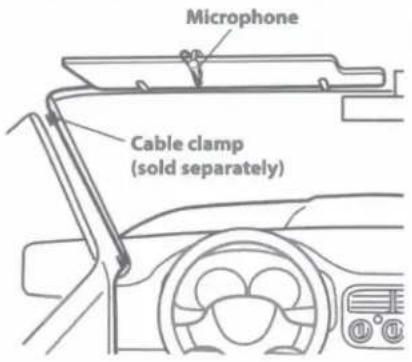
text_image
Microphone Cable clamp (sold separately)Installing the Unit
1 Mount the original mounting bracket to the unit using the supplied screws.

text_image
Original Mounting Bracket Screws (M5 × 8) (included) Ground Lead* Chassis2 Connect all other leads of the unit according to details described in the "Connections" (page 13).
3 Mounting the unit in a car.
* To securely connect the ground lead, use an already installed screw on a metal part of the vehicle (marked (★)) or a clean, bare metal spot on the vehicle's chassis.
- Fix the cables carefully. Do not damage them by tucking them into movable parts, such as a seat rail, or by locating them against sharp or pointed edges.
(If the ACC power supply is not available)
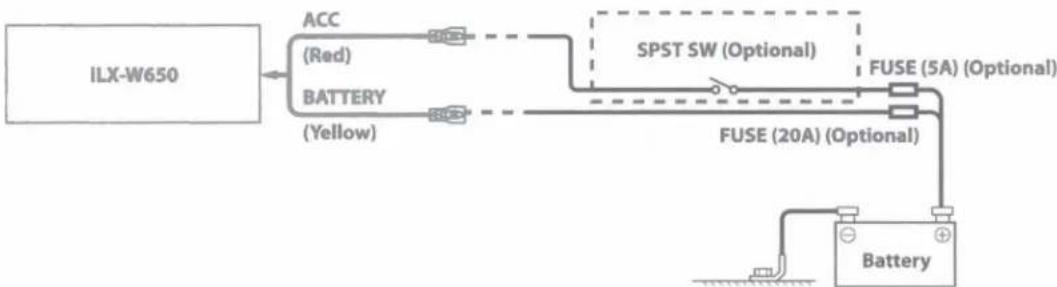
flowchart
graph LR
    A["ILX-W650"] --> B["BATTERY (Yellow)"]
    B --> C["ACC (Red)"]
    C --> D["SPST SW (Optional)"]
    D --> E["FUSE (20A) (Optional)"]
    E --> F["Battery"]
    D --> G["FUSE (5A) (Optional)"]
- If your vehicle has no ACC power supply, add an SPST (Single-Pole, Single-Throw) switch (sold separately) and fuse (sold separately).
• The diagram and the fuse amperage shown above are in the case when iLX-W650 is used individually.
- If the switched power (ignition) lead of the iLX-W650 is connected directly to the positive (+) post of the vehicle's battery, the iLX-W650 draws some current (several hundred milliamperes) even when its switch is placed in the OFF position, and the battery may be discharged.
Connections

flowchart
graph TD
    A["Vehicle Antenna"] --> B["Microphone (included)"]
    B --> C["USB Extension Cable (Included)"]
    C --> D["REMO"]
    D --> E["REVERSE"]
    E --> F["P. ANT"]
    F --> G["PARKING BRAKE"]
    G --> H["ACC"]
    H --> I["BATT"]
    I --> J["GND"]
    J --> K["PRE OUT cable"]
    K --> L["REAR VIEW CAMERA"]
    L --> M["FRONT VIEW CAMERA"]
    M --> N["SUBW"]
    N --> O["FRONT OUT"]
    O --> P["REAR OUT"]
    P --> Q["To input terminal of amplifier when adding an external amplifier"]
    C --> R["Lightning to USB Cable KCU-471i (sold separately)"]
    R --> S["USB Flash Drive (sold separately)"]
    S --> T["Ignition key"]
    T --> U["Battery"]
    U --> V["Rear Left"]
    U --> W["Front Left"]
    U --> X["Front Right"]
    U --> Y["Rear Right"]
    style A fill:#f9f,stroke:#333
    style B fill:#ccf,stroke:#333
    style C fill:#cfc,stroke:#333
    style D fill:#fcc,stroke:#333
    style E fill:#cff,stroke:#333
    style F fill:#ffc,stroke:#333
    style G fill:#cfc,stroke:#333
    style H fill:#fcc,stroke:#333
    style I fill:#ffc,stroke:#333
    style J fill:#cfc,stroke:#333
    style K fill:#fcc,stroke:#333
    style L fill:#cfc,stroke:#333
    style M fill:#cfc,stroke:#333
    style N fill:#cfc,stroke:#333
    style O fill:#cfc,stroke:#333
    style P fill:#cfc,stroke:#333
    style Q fill:#cfc,stroke:#333
    style R fill:#fcc,stroke:#333
    style S fill:#cfc,stroke:#333
    style T fill:#fcc,stroke:#333
    style U fill:#cfc,stroke:#333
    style V fill:#fcc,stroke:#333
    style W fill:#cfc,stroke:#333
    style X fill:#cfc,stroke:#333
    style Y fill:#cfc,stroke:#333
① Radio Antenna Receptacle
② Remote Turn-On Lead (Blue/White)
Connect this lead to the remote turn-on lead of your amplifier or signal processor.
③ Reverse Lead (Orange/White)
④ Power Antenna Lead (Blue)
Connect this lead to the +B terminal of your power antenna, if applicable.
This lead should be used only for controlling the vehicle's power antenna. Do not use this lead to turn on an amplifier or a signal processor, etc.
⑤ Parking Brake Lead (Yellow/Blue)
Connect this lead to the power supply side of parking brake switch to transmit the parking brake status signals to the unit.
⑥ Switched Power Lead (Ignition) (Red)
Connect this lead to an open terminal on the vehicle's fuse box or another unused power source that provides (+) 12V only when the ignition is turned on or in the accessory position.
⑦ Fuse Holder (15A)
⑧ Battery Lead (Yellow)
Connect this lead to the positive (+) post of the vehicle's battery.
⑨ Ground Lead (Black)
Connect this lead to a good chassis ground on the vehicle.
Make sure the connection is made to bare metal and is securely fastened using the sheet metal screw provided.
⑩ Left Rear (+) Speaker Output Lead (Green)
⑪ Left Rear (−) Speaker Output Lead (Green/Black)
⑫ Left Front (+) Speaker Output Lead (White)
⑬ Left Front (−) Speaker Output Lead (White/Black)
⑭ Right Front (−) Speaker Output Lead (Gray/Black)
⑮ Right Front (+) Speaker Output Lead (Gray)
⑯ Right Rear (−) Speaker Output Lead (Violet/Black)
⑰ Right Rear (+) Speaker Output Lead (Violet)
⑱ REAR CAMERA Input RCA Connector
Use when connecting a rear camera with RCA Output Connector.
19 FRONT CAMERA Input RCA Connector
Use when connecting a front camera with RCA Output Connector.
⑳ Subwoofer RCA Connectors
21 Front Output RCA Connectors
Can be used as Front Output RCA Connectors. RED is right and WHITE is left.
⑳ Rear Output RCA Connectors
Can be used as Rear Output RCA,Connectors. RED is right and WHITE is left.
②3 MIC Input Connector
To Microphone (included)
⑳ Steering Remote Control Interface Connector
To steering remote control interface.
For details about connections, consult your nearest Alpine dealer.
⑳ USB Connector
To USB flash drive, iPhone or Android smartphone.
②6 SiriusXM Tuner Input Connector
To SiriusXM Tuner (sold separately).
For more information on how to install the SiriusXM Connect Vehicle tuner, consult the installation guide included with the tuner.
27 CAMERA/PRE OUT Connector
28 Power Supply Connector
Specifications
MONITOR SECTION
Screen Size 7"
LCD Type Transparent type TN LCD
Operation System TFT active matrix
Number of Picture Elements 1,152,000 pcs. (800 × 480 × 3 (RGB))
Effective Number of Picture Elements
99% or more Illumination System LED
FM TUNER SECTION
Tuning Range 87.7 - 107.9 MHz
Mono Usable Sensitivity 9.3 dBf (0.8 μV/75 ohms)
50 dB Quieting Sensitivity 13.5 dBf (1.3 μV/75 ohms)
Alternate Channel Selectivity 80 dB
Signal-to-Noise Ratio 65 dB
Stereo Separation 35 dB
Capture Ratio 2.0 dB
AM TUNER SECTION
Tuning Range 530 - 1,710 kHz
Usable Sensitivity 25.1 μV/28 dBf
USB SECTION
USB requirements USB 2.0
Max. Power Consumption 1,000 mA (CDP Support)
USB Class USB (Play From Device)/
USB (Mass Storage Class)
File System FAT16/32
Number of Channels 2-Channels (Stereo)
Frequency Response*1 5 - 20,000 Hz (±1 dB)
Total Harmonic Distortion 0.008% (at 1 kHz)
Dynamic Range 95 dB (at 1 kHz)
Signal-to-Noise Ratio 100 dB
Channel Separation 85 dB (at 1 kHz)
*1 Frequency response may differ depending on the encoder software/bit rate.
Bluetooth SECTION
| Bluetooth Specification | Bluetooth V4.2 |
| Output Power | +4 dBm Ave. (Power class 2) |
| Profile | HFP (Hands-Free Profile) |
| PBAP (Phone Book Access Profile) | |
| A2DP (Advanced Audio Distribution Profile) | |
| AVRCP (Audio/Video Remote Control Profile) |
GENERAL
| Power Requirement | 14.4 V DC(11-16 V allowable) |
| Operating temperature | -4°F to +140°F(-20°C to + 60°C) |
| Power Output | 16 W RMS × 4 *2 |
*2 Primary amplifier ratings per CEA-2006 Standard
• Power output: measured at 4 Ohms and ≤ 1% THD+N
• S/N: 80 dBA (reference: 1 W into 4 Ohms)
Weight 0.92 kg (2 lbs.)
Audio output level
Preout (Front, Rear): 4V/10k ohms (max.)
Preout (Subwoofer): 4V/10k ohms (max.)
CHASSIS SIZE
| Width | 178 mm (7") |
| Height | 100 mm (4") |
| Depth | 60 mm (2-6/16") |
- Due to continuous product improvement, specifications and design are subject to change without notice.
- The LCD panel is manufactured using an extremely high precision manufacturing technology. Its effective pixel ratio is over 99.99%. This means that there is a possibility that 0.01% of the pixels could be either always ON or OFF.
- Windows Media and the Windows logo are trademarks, or registered trademarks of Microsoft Corporation in the United States and/or other countries.
• Apple, iPhone, and Siri are trademarks of Apple Inc., registered in the U.S. and other countries. Apple CarPlay is a trademark of Apple Inc.
- Use of the Made for Apple and Works with Apple badges means that an accessory has been designed to connect specifically to the Apple product(s) identified in the Made for Apple badge and to work specifically with the technology identified in the Works with Apple badge, and has been certified by the developer to meet Apple performance standards. Apple is not responsible for the operation of this device or its compliance with safety and regulatory standards.
- Please note that the use of this accessory with an Apple product may affect wireless performance.
- Use of the Apple CarPlay logo means that a vehicle user interface meets Apple performance standards. Apple is not responsible for the operation of this vehicle or its compliance with safety and regulatory standards. Please note that the use of this product with iPhone may affect wireless performance.
- Sirius, XM and all related marks and logos are trademarks of Sirius XM Radio Inc. All rights reserved.
- Google, Android, Android Auto, Google Play and other marks are trademarks of Google LLC.
- The Bluetooth® word mark and logos are registered trademarks owned by the Bluetooth SIG, Inc. and any use of such marks by Alpine Electronics, Inc. is under license.
- MPEG Layer-3 audio coding technology licensed from Fraunhofer IIS and Thomson. Supply of this product only conveys a license for private, non-commercial use and does not convey a license nor imply any right to use this product in any commercial (i.e. revenue-generation) real time broadcasting (terrestrial, satellite, cable and/or any other media), broadcasting/streaming via internet, intranets and/or other networks or in other electronic content distribution systems, such as pay-audio or audio-on-demand applications. An independent license for such use is required. For details, please visit http://www.mp3licensing.com
LIMITED WARRANTY
ALPINE ELECTRONICS OF AMERICA, INC. ("Alpine"), is dedicated to quality craftsmanship and are pleased to offer this Warranty. We suggest that you read it thoroughly. Should you have any questions, please contact your Dealer or contact Alpine at one of the telephone numbers listed below.
● PRODUCTS COVERED:
This Warranty covers Car Audio Products and Related Accessories ("the product"). Products purchased in the Canada are covered only in the Canada. Products purchased in the U.S.A. are covered only in the U.S.A.
● LENGTH OF WARRANTY:
This Warranty is in effect for one year from the date of the first consumer purchase.
● WHO IS COVERED:
This Warranty only covers the original purchaser of the product, who must reside in the United States, Puerto Rico or Canada.
WHAT IS COVERED:
This Warranty covers defects in materials or workmanship (parts and labor) in the product.
WHAT IS NOT COVERED:
This Warranty does not cover the following:
① Damage occurring during shipment of the product to Alpine for repair (claims must be presented to the carrier).
② Damage caused by accident or abuse, including burned voice coils caused by over-driving the speaker (amplifier level is turned up and driven into distortion or clipping). Speaker mechanical failure (e.g. punctures, tears or rips). Cracked or damaged LCD panels. Dropped or damaged hard drives.
③ Damage caused by negligence, misuse, improper operation or failure to follow instructions contained in the Owner's manual.
④ Damage caused by act of God, including without limitation, earthquake, fire, flood, storms or other acts of nature. Any cost or expense related to the removal or reinstallation of the product.
⑤ Service performed by an unauthorized person, company or association.
⑥ Any product which has the serial number defaced, altered or removed.
⑦ Any product which has been adjusted, altered or modified without Alpine's consent.
⑧ Any product not distributed by Alpine within the United States, Puerto Rico or Canada.
⑨ Any product not purchased from an Authorized Alpine Dealer.
● HOW TO OBTAIN WARRANTY SERVICE:
① You are responsible for delivery of the product to an Authorized Alpine Service Center or Alpine for repair and for payment of any initial shipping charges. Alpine will, at its option, repair or replace the product with a new or reconditioned product without charge. If the repairs are covered by the warranty, and if the product was shipped to an Authorized Alpine Service Center or Alpine, Alpine will pay the return shipping charges.
② You should provide a detailed description of the problem(s) for which service is required.
③ You must supply proof of your purchase of the product.
④ You must package the product securely to avoid damage during shipment. To prevent lost packages it is recommended to use a carrier that provides a tracking service.
● HOW WE LIMIT IMPLIED WARRANTIES:
ANY IMPLIED WARRANTIES INCLUDING FITNESS FOR USE AND MERCHANTABILITY ARE LIMITED IN DURATION TO THE PERIOD OF THE EXPRESS WARRANTY SET FORTH ABOVE AND NO PERSON IS AUTHORIZED TO ASSUME FOR ALPINE ANY OTHER LIABILITY IN CONNECTION WITH THE SALE OF THE PRODUCT.
● HOW WE EXCLUDE CERTAIN DAMAGES:
ALPINE EXPRESSLY DISCLAIMS LIABILITY FOR INCIDENTAL AND CONSEQUENTIAL DAMAGES CAUSED BY THE PRODUCT. THE TERM "INCIDENTAL DAMAGES" REFERS TO EXPENSES OF TRANSPORTING THE PRODUCT TO THE ALPINE SERVICE CENTER, LOSS OF THE ORIGINAL PURCHASER'S TIME, LOSS OF THE USE OF THE PRODUCT, BUS FARES, CAR RENTALS OR OTHERS COSTS RELATING TO THE CARE AND CUSTODY OF THE PRODUCT. THE TERM "CONSEQUENTIAL DAMAGES" REFERS TO THE COST OF REPAIRING OR REPLACING OTHER PROPERTY WHICH IS DAMAGED WHEN THIS PRODUCT DOES NOT WORK PROPERLY. THE REMEDIES PROVIDED UNDER THIS WARRANTY ARE EXCLUSIVE AND IN LIEU OF ALL OTHERS.
● HOW STATE/PROVINCIAL LAW RELATES TO THE WARRANTY:
This Warranty gives you specific legal rights, and you may also have other rights which vary from state to state and province to province. In addition, some states/provinces do not allow limitations on how long an implied warranty lasts, and some do not allow the exclusion or limitation of incidental or consequential damages. Accordingly, limitations as to these matters contained herein may not apply to you.
IN CANADA ONLY:
This Warranty is not valid unless your Alpine car audio product has been installed in your vehicle by an Authorized Installation Center, and this warranty stamped upon installation by the installation center.
● HOW TO CONTACT CUSTOMER SERVICE:
Should the product require service, please call the following number for your nearest Authorized Alpine Service Center.
CAR AUDIO
1-800-ALPINE-1 (1-800-257-4631)
NAVIGATION
1-888-NAV-HELP (1-888-628-4357)
Or visit our website at; http://www.alpine-usa.com
ALPINE®
ALPINE ELECTRONICS MARKETING, INC.
1-7, Yukigaya-Otsukamachi, Ota-ku,
Tokyo 145-0067, JAPAN
Phone: 03-5499-4531
ALPINE ELECTRONICS OF AMERICA, INC.
1500 Atlantic Blvd,
Auburn Hills, Michigan 48326, U.S.A.
Phone 1-800-ALPINE-1 (1-800-257-4631)
ALPINE ELECTRONICS OF AUSTRALIA PTY. LIMITED
161-165 Princes Highway,
Hallam Victoria 3803, Australia
Phone 03-8787-1200
ALPINE ELECTRONICS GmbH
Ohmstraße 4
Alpine House Fletchamstead Highway,
Coventry CV4 9TW, U.K.
www.alpine.co.uk
ALPINE ELECTRONICS FRANCE S.A.R.L.
Take a moment to protect your purchase by registering your product now at www.alpine-usa.com/registration. You will also be updated on product information, special promotions, Alpine news.
Thank you for choosing Alpine for your car audio equipment needs. Our goal is to produce the best audio/video/navigation products in the world and hope your expectations are met.
Please take a moment to protect your purchase by registering your product now at the following address: www.alpine-usa.com/registration. You will be informed of product and software updates (if applicable), special promotions, and news about Alpine. Also, by registering your product, you will automatically be entered for a chance to win various prizes such as gift cards, Alpine products, and/or a complete system.
We look forward to continue serving you in the future.
Sincerely,
The Alpine Team
French
Driving Mobile Media Innovation
iLX-W650
natural_image
Icon depicting a document with lines and a magnifying glass, symbolizing search or review (no text present)http://www.alpine-usa.com

text_image
Barcode image with blue vertical bars on white backgroundM3514672010
FOR VEHICLE USE ONLY/
POUR UNE UTILISATION À L'INTÉRIEUR D'UN VÉHICULE UNIQUEMENT/SÓLO PARA VEHÍCULOS
ALPINE®
KTA-450
4 CHANNEL POWER AMPLIFIER
• OWNER'S MANUAL
Alpine House Earplace Business
Covanty CV4, BTW UK
phone: 44-2476-719500
ALPINE ELECTRONICS DE
ESPANA S.A.
Portal de Gamama 36 Pabelion 32,
01013 Vidana (Alava) ARDO 122 SPAIN
phone: 34(945)283588
ALPINE ELECTRONICS OF
AUSTRALIA PTY., LTD
161-165 Prince Highway
Halem Victoria 3803 AUSTRALIA phone: 61/087851200
ALPINE ELECTRONICS
(CHINA) CO., LTD
East 28F, Hanwol Plaza No.7
Beijing (100004) PE CHINA
Phone: 86(10)6566-0308


ENGLISH
Information on Disposal of Old Electrical and Electronic
Equipment and battery (applicable for batteryless that have adopted apesarota waste collection systems)
If you want to dispose this product, do not mix it with general household waste. There is a separate collection system for used electronic products in accordance with legislation that requires proper treatment, recovery and recycling. Contact your local authority for details in locating a recycler facility relevant to you. Proper recycling and waste disposal will help conserve resources whilst preventing detrimental effects on our health and the environment.
###
Please read this OWNER'S MANUAL thoroughly to familiarize yourself with each control and function. We at ALPINE hope that your new KTA-450 will give you many years of listening enjoyment.
In case of problems when installing your KTA-450, please contact your authorized ALPINE dealer.
CAUTION: These controls are for tuning your system. Please consult your authorized Dealer for adjustment.
| WARNING | This symbol means important instructions.Failure to heed them can result in serious injury or death. |
| CAUTION | This symbol means important instructions.Failure to heed them can result in injury or properly damages. |

WARNING
• DO NOT OPERATE ANY FUNCTION THAT TAKES YOUR ATTENTION AWAY FROM SAFELY DRIVING
YOUR VEHICLE. Any function that requires your prolonged attention should only be performed after coming to a complete stop. Always stop the vehicle in a safe location before performing these functions. Failure to do so may result in an accident.
- KEEP THE VOLUME AT A LEVEL WHERE YOU CAN STILL HEAR OUTSIDE NOISES WHILE DRIVING. Excessive volume levels that obscure sounds such as emergency vehicle sirens or road warning signals (train crossings, etc.) can be dangerous and may result in an accident. LISTENING AT LOUD VOLUME LEVELS IN A CAR MAY ALSO CAUSE HEARING DAMAGE
• DO NOT DISASSEMBLE OR ALTER. Doing so may result in an accident, fire or electric shock.
- USE THIS PRODUCT FOR MOBILE 12V APPLICATIONS. Use for other than its designed application may result in fire, electric shock or other injury.
- DO NOT BLOCK VENTS OR RADIATOR PANELS. Doing so may cause heat to build up inside and may result in fire.
- MAKE THE CORRECT CONNECTIONS. Failure to make the proper connections may result in fire or product damage
- USE ONLY IN VEHICLES WITH A 12 VOLT NEGATIVE GROUND. (Check with your dealer if you are not sure.) Failure to do so may result in fire, etc.
- BEFORE WIRING, DISCONNECT THE CABLE FROM THE NEGATIVE BATTERY TERMINAL. Failure to do so may result in electric shock or injury due to electrical shorts.
- DO NOT ALLOW CABLESTO BECOME ENTANGLED IN SURROUNDING OBJECTS. Arrange wiring and cables in compliance with the manual to prevent obstructions when driving. Cables or wiring that obstruct or hang up on places such as the steering wheel, gear lever, brake pedals, etc. can be extremely hazardous.
- DO NOT SPLICE INTO ELECTRICAL CABLES. Never cut away cable insulation to supply power to other equipment. Doing so will exceed the current carrying capacity of the wire and result in fire or electric shock.
- DO NOT DAMAGE PIPE OR WIRING WHEN DRILLING HOLES. When drilling holes in the chassis for installation, take precautions so as not to contact, damage or obstruct pipes, fuel lines, tanks or electrical wiring. Failure to take such precautions may result in fire.
- DO NOT USE BOLTS OR NUTS IN THE BRAKE OR STEERING SYSTEMS TO MAKE GROUND
CONNECTIONS. Bolts or nuts used for the brake or steering systems (or any other safety-related system), or tanks should NEVER be used for installations or ground connections. Using such parts could disable control of the vehicle and cause fire etc.
- KEEP SMALL OBJECTS SUCH AS BOLTS OR SCREWS OUT OF THE REACH OF CHILDREN. Swallowing them may result in serious injury. If swallowed, consult a physician immediately.

CAUTION
- HALT USE IMMEDIATELY IF A PROBLEM APPEARS. Failure to do so may cause personal injury or damage to the product. Return it to your authorized Alpine dealer or the nearest Alpine Service Center for repairing.
- HAVE THE WIRING AND INSTALLATION DONE BY EXPERTS. The wiring and installation of this unit requires special technical skill and experience. To ensure safety, always contact the dealer where you purchased this product to have the work done.
- USE SPECIFIED ACCESSORY PARTS AND INSTALL THEM SECURELY. Be sure to use only the specified accessory parts. Use of other than designated parts may damage this unit internally or may not securely install the unit in place. This may cause parts to become loose resulting in hazards or product failure.
- ARRANGE THE WIRING SO IT IS NOT CRIMPED OR PINCHED BY A SHARP METAL EDGE. Route the cables and wiring away from moving parts (like the seat rails) or sharp or pointed edges. This will prevent crimping and damage to the wiring. If wiring passes through a hole in metal, use a rubber grommet to prevent the wire's insulation from being cut by the metal edge of the hole.
- DO NOT INSTALL IN LOCATIONS WITH HIGH MOISTURE OR DUST. Avoid installing the unit in locations with high incidence of moisture or dust. Moisture or dust that penetrates into this unit may result in product failure.
SERVICE CARE
◆ IMPORTANT NOTICE
This Amplifier has been type tested and found to
comply with the limits for a Class B computing device in accordance with the specifications in Subhart, Lof. Post
15 of FCC Rules. This equipment generates and uses
radio frequency energy, and it must be installed and used properly in accordance with the manufacturer's instructions
◆ For European Customers
Should you have any questions about warranty, please consult your store of purchase.
For Customers in other Countries
IMPORTANT NOTICE
Customers who purchase the product with which this notice
is packaged, and who make this purchase in countries other than the United States of America and Canada.
please contact your dealer for information regarding warranty coverage.
| SERIAL NUMBER: |
| INSTALLATION DATE: |
| INSTALLATION TECHNICIAN: |
| PLACE OF PURCHASE: |
IMPORTANT
| Please record the serial number of your unit in the space provided here and keep it as a permanent record. The serial number plate is located on the rear of the unit. |
SPECIFICATIONS
| Power Output | Ref: 14.4V, 4Ω, @ ≤1% THD+N | 50W RMS X 4 |
| Ref: 14.4V, 2Ω, @ ≤1% THD+N | 45W RMS X 4 | |
| DPP(Dynamic Peak Power) Output | Ref: 14.4V, 4Ω, @ ≤1% THD+N | 100W RMS x 4ch. |
| Ref: 14.4V, 2Ω, @ ≤1% THD+N | 100W RMS x 4ch. | |
| THD+N | Ref: 10W into 4Ω | <0.2% THD+N |
| Ref: Rated Power into 4Ω | <0.1% THD+N | |
| Ref: 10W into 2Ω | <0.1% THD+N | |
| Ref: Rated Power into 2Ω | <0.1% THD+N | |
| S/N Ratio | AES-17, Ref: 1 W into 4Ω | >85dB |
| AES-17, Ref: Rated Power into 4Ω | >95dB | |
| Frequency Response | +0 / -3 dB, Ref: 1 W into 4Ω | 15-50kHz |
| Input Sensitivity | Ref: Rated Power Into 4Ω, RCA | 0.152 to 2.80vrms |
| Ref: Rated Power Into 4Ω, Speaker | 0.33 to 6.05vrms | |
| Crossover | Selectable for front and rear channels | OFF/60/80/120Hz |
| Dimensions | Width | 89mm (3-1/2") |
| Height (inches) [with universal bracket] | 36mm (1-7/16") [38mm] | |
| Length (inches) [with universal bracket] | 181mm (7-1/8") [198mm] | |
| Weight | 0.6kg (1.3lbs) |
NOTE:
- Product improvements and specification are subject to change with out notice.
ACCESSORIES
| Input/Output/Power Wire Harness | 1 |
| Universal bracket set; 1 left & 1 right | 1ea |
| W650 mounting bracket with mounting screws, button head | 4 |
| Cable Tie | 4 |
| Self Tapping screw | 4 |
| W650 bracket to HU screws, M2.6 x 8mm | 2 |
FRANÇAIS
Introduction
Before making connections, be sure to turn the power off to all audio components. Connect the yellow battery lead from the amp directly to the positive (+) terminal of the vehicle's battery. Do not connect this lead to the fuse block.

CAUTION
◆ Caution on connection terminals/parts
- Keep electrically conductive objects away from the unit's terminals/parts (power terminals, fuses, speaker output terminals, RCA connectors, etc.). Doing so prevents a possible short circuit and damage to the unit.
- Use appropriate electrical source. The person installing this will choose the appropriate electrical source.
To prevent external noise from entering the audio system.
- Locate the unit and route the leads at least 10 cm (3-15/16") away from the car harness.
- Keep the battery power leads as far away from other leads as possible.
- Connect the ground lead securely to a bare metal spot
(remove any paint or grease if necessary) of the car chassis. - Your Alpine dealer knows best about noise prevention measures so consult your dealer for further information.
① Input/Output/Power Connector
② Input/Output/Power Wire Harness
③ Speaker Output Leads
Be sure to observe correct speaker output connections in the system. Connect the positive output (+) to the positive speaker terminal and the negative output (-) to the negative speaker terminal.
Note:
• Do not connect speaker leads together or to chassis ground.
④ Input Signal Leads
There are two options:
a) RCA Input Jacks
Connect these jacks to the line out leads on your head unit, you may or may not require extension cable.
b) Speaker Level Inputs
Cut off the RCA jacks, then connect the correct corresponding speaker outputs from the head unit directly to these twisted pair wires.
Note:
- For the "Speaker Level Input System" setting, connecting the Remote Turn-On Lead is not required due to the "REMOTE SENSING" function of this product. However, the "REMOTE SENSING" function may not work depending on the signal source connected. In such a case, connect the Remote Turn-On Lead to an incoming power supply wire (accessory power) in the ACC position.
⑤ Ground Lead (Black)
Connect this lead securely to a clean, bare metal spot on the vehicle's chassis. Verify this point to be a true ground by checking for continuity between that point and the negative (-) terminal of the vehicle's battery. Ground all your audio components to the same point on the chassis to prevent ground loops.
⑤ Battery Lead (Yellow)
Connect battery lead directly to BATT +
Be sure to add a 20A fuse (sold separately) as close as possible to the battery's (+) terminal.
⑦ Remote Turn-On Lead (Blue/White)
Connect this lead to the remote turn-on or power antenna (positive trigger, (+) 12V only) lead of your head unit.
CONNEXIONS (Fig. 1)
a) Slide switch 6 down for RCA
b) Slide switch 6 up for speaker
c) Refer to figure 2
⑨ Input Configuration Switch
a) Slide switch 5 up for 4 Ch. Mode
b) Slide switch 5 down for 2 Ch. bridged mode
Note:
- Input Configuration Switch should be in the left position for 2CH bridged output system.
⑩ High Pass Filter Selector Switches
Set the KTA-450 input gain to the minimum position. Using a dynamic CD as a source, increase the head unit volume until the output distorts. Then, reduce the volume 1 step (or until the output is no longer distorted).
Now, increase the amplifier gain until the sound from the speakers become distorted. Reduce the gain slightly so the sound is no longer distorted to achieve the optimum gain setting.
① Filter Selector Switches
Switch number 1 and 2 are for front channel filter settings. As shown the front filter is off.
| Switch section | Switch number | Function |
| A | 5 and 6 | Input configuration |
| B | 1 & 2, 3 & 4 | Filter configuration |
| C | N/A | Front/rear gain control |
A
| RCA Signal level | Switch 6 down | All Channels are affected |
| Speaker signal level | Switch 6 up | |
| 4 channel mode - normal | Switch 5 is up | 4 semi-independent Outputs. All are ground referenced |
| 2 channel mode - bridged | Switch 5 is down | BTL output |
ALTER Configuration B :

Filter off positions: front is switch 2 and 1 down. Rear is switch 4 and 3 down.

Filter is set for 60Hz high pass; switch 2 down and 1 is up. Rear is switch 4 is down and 3 is up.

Filter is set for 80Hz high pass; switch 2 up and 1 is down. Rear is switch 4 is up and 3 is down.

Filter is set for 80Hz high pass; switch 2 up and 1 is up. Rear is switch 4 is up and 3 is up.
| Function | Switch number & position | Function | Switch number & position |
| Front HPF off | 2 down & 1 down | Rear HPF off | 4 down & 3 down |
| Front HPF 60 Hz | 2 up & 1 down | Rear HPF 60 Hz | 4 up & 3 down |
| Front HPF 80 Hz | 2 down & 1 up | Rear HPF 80 Hz | 4 down & 3 up |
| Front HPF 120 Hz | 2 up & 1 up | Rear HPF 120 Hz | 4 up & 3 up |

Gain control C
The control is grouped as front 2 channels and rear 2 channels.
1. Full rated output is obtained with the appropriate settings.
2. Distortion can be had when the gain is set high in combination of high level input.
a. Example having the speaker level connection with the gain control set for RCA.
If your head unit does not have a traditional amplifier turn-on lead, refer to the options below for connection.
Please check your head unit for the conditions listed below: (Fig. 3)
a. The head unit does not have a remote turn-on or power antenna lead.
b. The head unit's power antenna lead is activated only when the radio is on (turns off in Bluetooth or CD mode).
c. The head unit's power antenna lead is logic level output (+) 5V, negative trigger (grounding type), or cannot sustain (+) 12V when connected to other equipment in addition to the vehicle's power antenna. If any of the above conditions exist, the remote turn-on lead of your KTA-450 must be connected to a switched power source (ignition) in the vehicle. Be sure to use a 3A fuse as close as possible to this ignition tap. Using this connection method, the KTA-450 will turn on and stay on as long as the ignition switch is on.
If this is objectionable, a SPST (Single Pole, Single Throw) switch, in addition to the 3A fuse mentioned above, may be installed in-line on the KTA-450 turn-on lead. This switch will then be used to turn on (and off) the KTA-450. Therefore, the switch should be mounted so that is accessible by the driver. Make sure the switch is turned off when the vehicle is not running. Otherwise, the amplifier will remain on and drain the battery.
① Blue/White
② Power Antenna
③ Remote Turn-On Lead
④ To other Alpine components' Remote Turn-On Leads
⑤ SPST Switch (optional)
⑥ Fuse (3A)
⑦ As close as possible to the vehicle's ignition tap
⑧ Ignition Source
AUTRES POSSIBILITÉS DE MISE SOUS TENSION DE
L'AMPLIFICATEUR (Fig. 3)
② Front Left Speaker (sold separately)
(2) Front Right Speaker (hard separately) (3) Back Left Speaker (paid assembly)
(2) Hall Lett spiesker (old separately) (3) Sirer Bird Ramesky (old separately)
(3) Field Right Speaker (solid separately) (5) BCA Transmission Cable (solid separately)
(3) PCA Extension Cable (plur se (2) Head Limit Wireless Convectra
(2) Head Unit Open (3) CT Head Unit
(2) 3D Hells Unit (3) PCA to Mini Tech Cable build separately
(2) MDA 10 Min
5.17.49
Financial
(2) This is a result of the agreement between the two methods, which are not equal to the same value.
② Lecteur MP3
2017年1月1日
(Español)
flowchart
graph TD
    A["Front intake terminal"] --> B["Front output terminal"]
    B --> C["Front output terminal of air intake"]
    C --> D["Front output terminal of air intake"]
    D --> E["Front output terminal of air intake"]
    E --> F["Front output terminal of air intake"]
    F --> G["Front output terminal of air intake"]
    G --> H["Front output terminal of air intake"]
    H --> I["Front output terminal of air intake"]
    I --> J["Front output terminal of air intake"]
    J --> K["Front output terminal of air intake"]
    K --> L["Front output terminal of air intake"]
    L --> M["Front output terminal of air intake"]
    M --> N["Front output terminal of air intake"]
    N --> O["Front output terminal of air intake"]
    O --> P["Front output terminal of air intake"]
    P --> Q["Front output terminal of air intake"]
    Q --> R["Front output terminal of air intake"]
    R --> S["Front output terminal of air intake"]
    S --> T["Front output terminal of air intake"]
    T --> U["Front output terminal of air intake"]
    U --> V["Front output terminal of air intake"]
    V --> W["Front output terminal of air intake"]
    W --> X["Front output terminal of air intake"]
    X --> Y["Front output terminal of air intake"]

4 Channel Speaker Level Output Connection Diagram/Diagramme de Connexion de Sortie de Niveau d'Enceinte à 4 Canaux/Diagrama de Conexiones de Salida de Nivel de Altavoz de 4 Canales

flowchart
graph TD
    A["Input: Laser-assisted laser stimulation"] --> B["Non-Newton laser excitation"]
    B --> C["Non-Newton excitation"]
    C --> D["Output: Laser-assisted laser excitation"]
    D --> E["Output: Laser-assisted laser excitation"]
    E --> F["Output: Laser-assisted laser excitation"]
    F --> G["Output: Laser-assisted laser excitation"]
    G --> H["Output: Laser-assisted laser excitation"]
    H --> I["Output: Laser-assisted laser excitation"]
    I --> J["Output: Laser-assisted laser excitation"]
    J --> K["Output: Laser-assisted laser excitation"]
    K --> L["Output: Laser-assisted laser excitation"]
    L --> M["Output: Laser-assisted laser excitation"]
    M --> N["Output: Laser-assisted laser excitation"]
    N --> O["Output: Laser-assisted laser excitation"]
    O --> P["Output: Laser-assisted laser excitation"]
    P --> Q["Output: Laser-assisted laser excitation"]
    Q --> R["Output: Laser-assisted laser excitation"]
    R --> S["Output: Laser-assisted laser excitation"]
    S --> T["Output: Laser-assisted laser excitation"]
    T --> U["Output: Laser-assisted laser excitation"]
    U --> V["Output: Laser-assisted laser excitation"]
    V --> W["Output: Laser-assisted laser excitation"]
    W --> X["Output: Laser-assisted laser excitation"]
    X --> Y["Output: Laser-assisted laser excitation"]
    Y --> Z["Output: Laser-assisted laser excitation"]
    Z --> AA["Output: Laser-assisted laser excitation"]
    AA --> AB["Output: Laser-assisted laser excitation"]
    AB --> AC["Output: Laser-assisted laser excitation"]
    AC --> AD["Output: Laser-assisted laser excitation"]
    AD --> AE["Output: Laser-assisted laser excitation"]
    AE --> AF["Output: Laser-assisted laser excitation"]
    AF --> AG["Output: Laser-assisted laser excitation"]
    AG --> AH["Output: Laser-assisted laser excitation"]
    AH --> AI["Output: Laser-assisted laser excitation"]
    AI --> AJ["Output: Laser-assisted laser excitation"]
    AJ --> AK["Output: Laser-assisted laser excitation"]
    AK --> AL["Output: Laser-assisted laser excitation"]
    AL --> AM["Output: Laser-assisted laser excitation"]
    AM --> AN["Output: Laser-assisted laser excitation"]
    AN --> AO["Output: Laser-assisted laser excitation"]
    AO --> AP["Output: Laser-assisted laser excitation"]
    AP --> AQ["Output: Laser-assisted laser excitation"]
    AQ --> AR["Output: Laser-assisted laser excitation"]
    AR --> AS["Output: Laser-assisted laser excitation"]
    AS --> AT["Output: Laser-assisted laser excitation"]
    AT --> AU["Output: Laser-assisted laser excitation"]
    AU --> AV["Output: Laser-assisted laser excitation"]
    AV --> AW["Output: Laser-assisted laser excitation"]
    AW --> AX["Output: Laser-assisted laser excitation"]
    AX --> AY["Output: Laser-assisted laser excitation"]
Fig. 6
2 Channel Speaker Level Bridged Output Connection Diagram/Diagramme de Connexion de Sortie Pontée de Niveau d'Enceinte à 2 Canaux/Diagrama de Conexiones de Salids de Nivel de Altavoz en Puente de 2 Canales
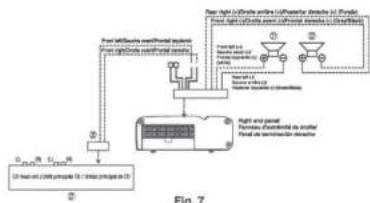
flowchart
graph TD
    A["Power Source"] --> B["Motor"]
    B --> C["Fan"]
    C --> D["Ground"]
    D --> E["Power Supply"]
    style A fill:#f9f,stroke:#333
    style B fill:#ccf,stroke:#333
    style C fill:#cfc,stroke:#333
    style D fill:#fcc,stroke:#333
    style E fill:#ffc,stroke:#333
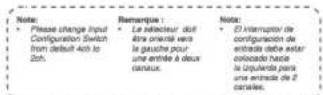

Stand Alone System, RCA Input Connection Diagram/Système Autonome, Diagramme de Connexion d'Entrée RCA/Sistema Independiente, Diagrama de Conexiones de Entrada RCA
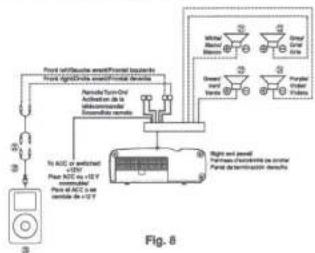
text_image
Power supply/DCs and panel transistors Power supply/DCs and panel transistors Panel Turn-Or Analog-to-analog transistors Transistors To AOC or switched +15V Power AOC on +5V Power of AOC to switch on +5V Right and panel Highway channelised in series Panel de transmission device Figure 8Stand Alone System, RCA Input, Bridged Output Connection Diagram/Système Autonome, Entrée RCA, Diagramma de Connexion de Sortie Pontée/Sistemas Independientes, Entrada RCA, Diagrama de Conexiones de Salida en Puente
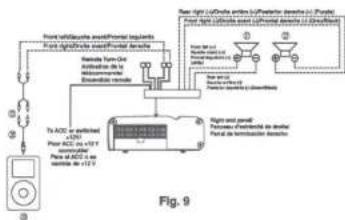
text_image
Point with/without power indicators Point with/without power indicators Transistor Transistor Transistor Transistor Transistor Transistor Transistor Transistor Transistor Transistor Transistor Transistor Transistor Transistor Transistor Transistor Transistor Transistor Transistor Transistor Transistor Transistor Transistor Transistor Transistor Transistor Transistor Transistor Transistor Transistor Transistor Transistor Transistor Transistor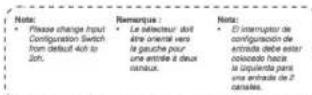
Assembly of;
- HU bracket to amp.
a. Attach bracket to amp: use the 4 black button head screws included. Tighten with 3mm
hex tool.
b. Place button head screws in place and tighten to be snug.
c. Secure the screw by tightening just about 1/4 turn more.
d. Follow diagram below
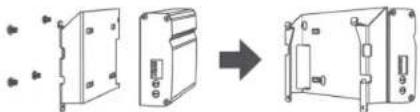
natural_image
Three technical line drawings of electronic components, showing front, side, and side views with no visible text or symbols.- HU bracket connected to HU
a. Remove the 2 bottom corner screws and place to the side. These are not used.
i. Use the 8mm screws in the kit. These replace the short ones.
b. The attachment process is to insert the assembled amp and its bracket with two tabs into their slot on the upper portion of radio rear panel. Pivot down.
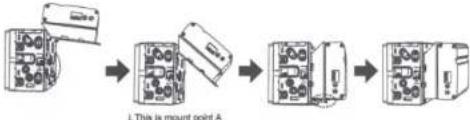
flowchart
graph LR
    A["Component 1"] --> B["Component 2"]
    B --> C["Component 3"]
    C --> D["Component 4"]
    D --> E["Component 5"]
    style A fill:#f9f,stroke:#333
    style E fill:#f9f,stroke:#333
    note right of B: "This is mount point A"
c. Move antenna cable to the cut out space and then finish pivoting the amp to make
contact.
d. Replace the 2 screws. Do not use an electric screw gun, you will strip it. This is mount point B.
- Universal bracket to amp.
a. Each end gets a unique bracket.
b. Remove 3 Philips screws from end panels, do not lose these.
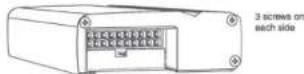
c. Place each bracket so that the 3 holes are visible and aligned.
1. For the switch control side the silk screen will be completely visible.
ii. Re use the 3 screws and replace. This will fix the bracket in place.
iii. Tighten to spun plus 1/8 turn to be tight
iv. Reheat for opposite side
d. Completed side:
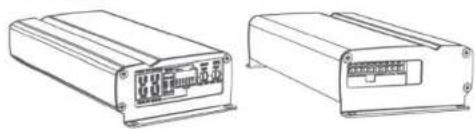
natural_image
Two technical line drawings of electronic components with no visible text or symbolsFixation du
natural_image
Three technical line drawings of electronic components, showing front, side, and top views with no visible text or symbols.natural_image
Two identical electronic device modules shown in line drawings, no text or symbols visible.Ensamblaje
natural_image
Three technical line drawings of electronic components, showing front, side, and side views with no visible text or symbols.flowchart
graph LR
    A["Raw Material Input"] --> B["Packaging"]
    B --> C["Assembly"]
    C --> D["Product Output"]