
UniFi Dream Machine Pro - Router Ubiquiti Networks - Free user manual and instructions
Find the device manual for free UniFi Dream Machine Pro Ubiquiti Networks in PDF.


| Product Type | Router (UniFi Dream Machine Pro) |
| Brand | Ubiquiti Networks |
| Dimensions | 442.4 x 43.7 x 285.6 mm (17.42 x 1.72 x 11.24 in) |
| Weight | 3.90 kg (8.60 lb); with mount brackets 3.99 kg (8.80 lb) |
| Power Supply | Internal 50W/12V, universal AC input 100-240VAC, 33W max consumption |
| Processor | Quad ARM Cortex-A57 Core at 1.7 GHz |
| System Memory | 4 GB DDR4 |
| On-Board Storage | 16 GB eMMC |
| HDD Bay | Supports 3.5" or 2.5" SATA HDD (not included) for NVR functionality |
| Networking Interfaces | 8x RJ45 LAN (10/100/1000), 1x RJ45 WAN, 1x 1/10G SFP+ LAN, 1x 1/10G SFP+ WAN, Bluetooth BLE |
| Display | 1.3" color touchscreen |
| LED Indicators | System status, HDD activity, RJ45 link/speed/activity, SFP+ link/speed/activity |
| Operating Temperature | -10 to 40°C (14 to 104°F) |
| Operating Humidity | 5 to 95% noncondensing |
| Certifications | CE, FCC, IC |
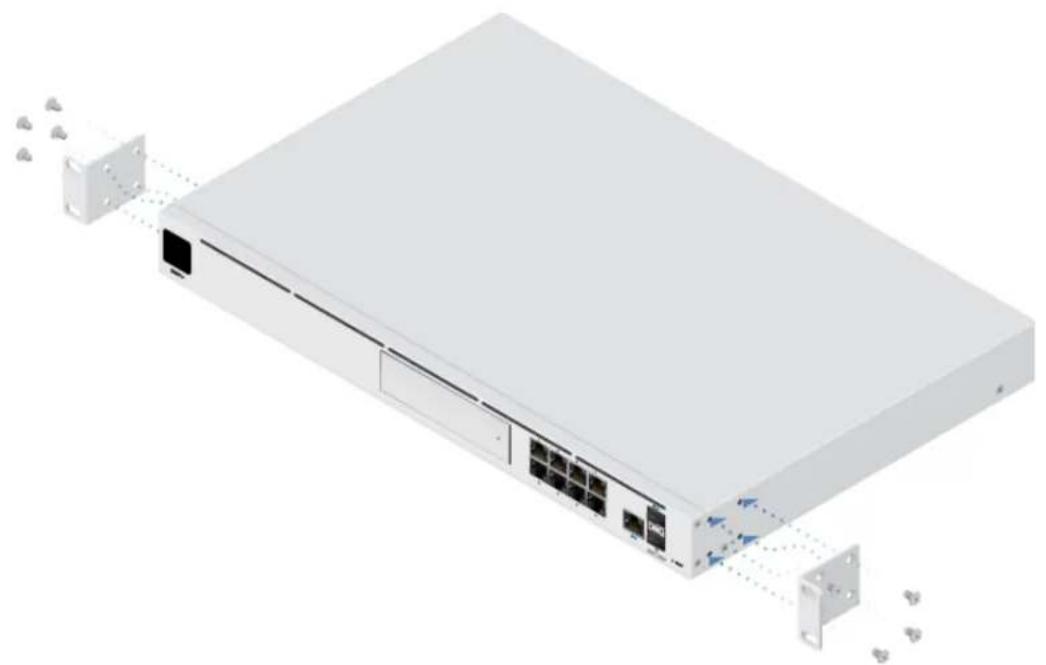
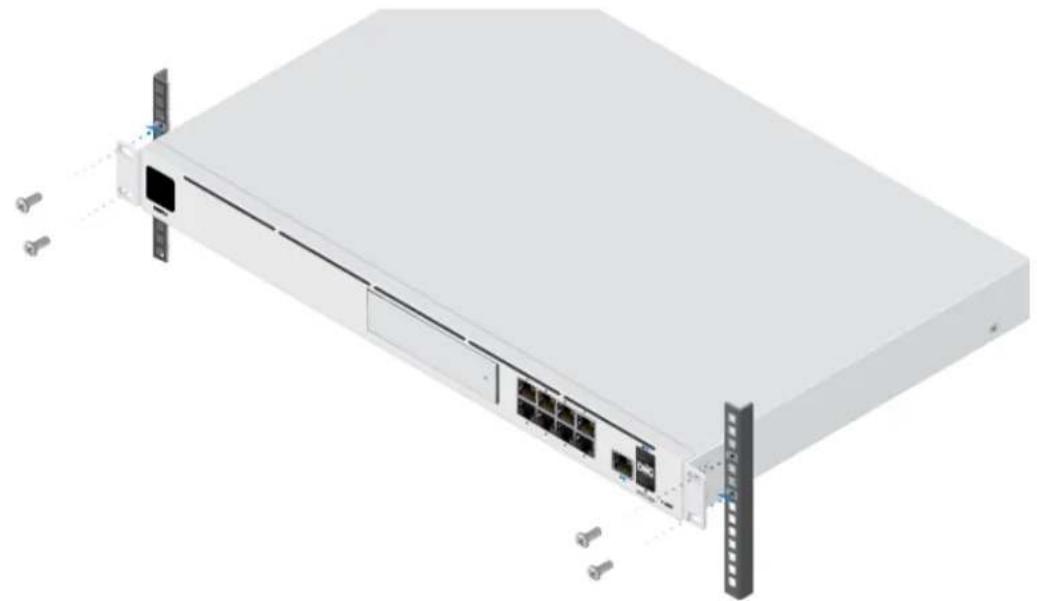
| Mounting | 19" rack, 1U height; includes rack-mount brackets and screws |
| Reset Method | Press and hold Reset button for ~10 seconds until display confirms reset |
| Default LAN IP | 192.168.1.1/24 (DHCP server enabled) |
| Included Accessories | Rack-mount brackets, bracket screws, mounting screws, cage nuts, security screw, power cord, rubber feet, 2.5" HDD screws |
| Maintenance | No user-serviceable parts; service by qualified technician only |
| Safety Warnings | Do not submerge in water; avoid use during electrical storms; use grounded outlet; only use approved attachments |
Frequently Asked Questions - UniFi Dream Machine Pro Ubiquiti Networks
User questions about UniFi Dream Machine Pro Ubiquiti Networks
0 question about this device. Answer the ones you know or ask your own.
Ask a new question about this device
Download the instructions for your Router in PDF format for free! Find your manual UniFi Dream Machine Pro - Ubiquiti Networks and take your electronic device back in hand. On this page are published all the documents necessary for the use of your device. UniFi Dream Machine Pro by Ubiquiti Networks.
USER MANUAL UniFi Dream Machine Pro Ubiquiti Networks
UniFi Dream Machine Pro Rack-Mount Brackets (Qty. 2) Bracket Screws (Qty. 8)

Mounting Screws (Qty. 4) Cage Nuts (Qty. 4) Security Screw

2.5" HDD Screws (Qty. 4) Power Cord Rubber Feet (Qty. 4)
System Requirement
Either of the following is required:
- iOS or Android™ Mobile Device with UniFi Network App Installed
• Web Browser: Google Chrome (Other browsers may have limited functionality)
IMPORTANT: We strongly recommend using UPS backup and power
Hardware Overview


| 1 Touchscreen Display | |
| Bootup Animation Initializing. | |
| Location Animation | This indicates that you clicked Locate in the UniFi Controller software. The software will also display the location of the device on the map. |
| 2 HDD LED | |
| Flashing White Indicates Read/Write Activity | |
| Steady Amber Indicates HDD Error | |
| 3 RJ-45 Speed/Link/Activity LED (Ports 1 - 9) | |
| Off No Link | |
| Amber | Link Established at 10/100 MbpsFlashing Indicates Activity |
| Green Link Established at 1 | Gbps |
| 4 SFP+ Speed/Link/Activity LED (Ports 10 - 11) | |
| Off No Link | |
| Green | Link Established at 1 GbpsFlashing Indicates Activity |
| White | Link Established at 10 GbpsFlashing Indicates Activity |
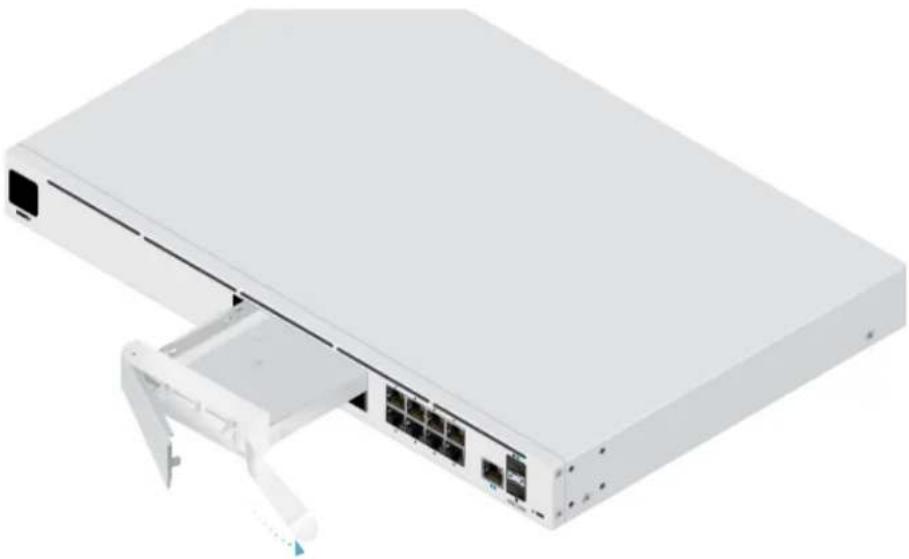
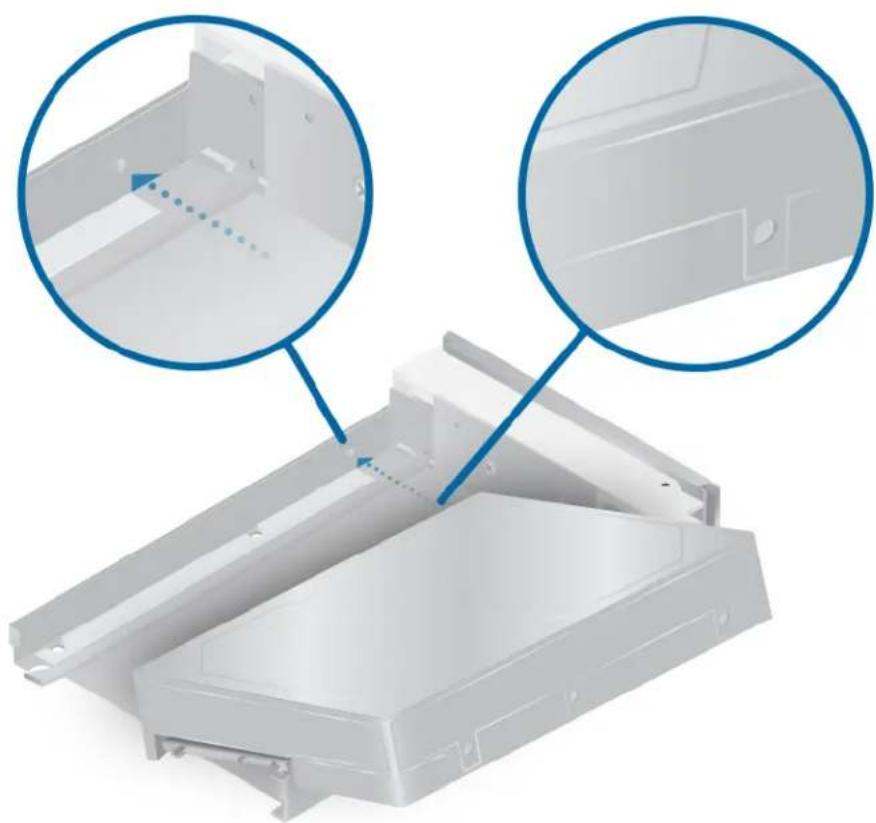
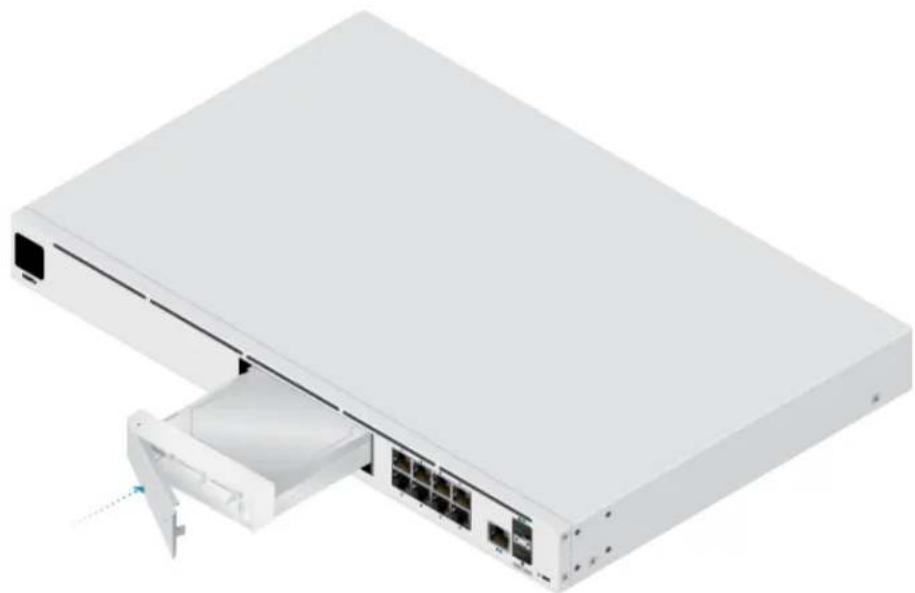
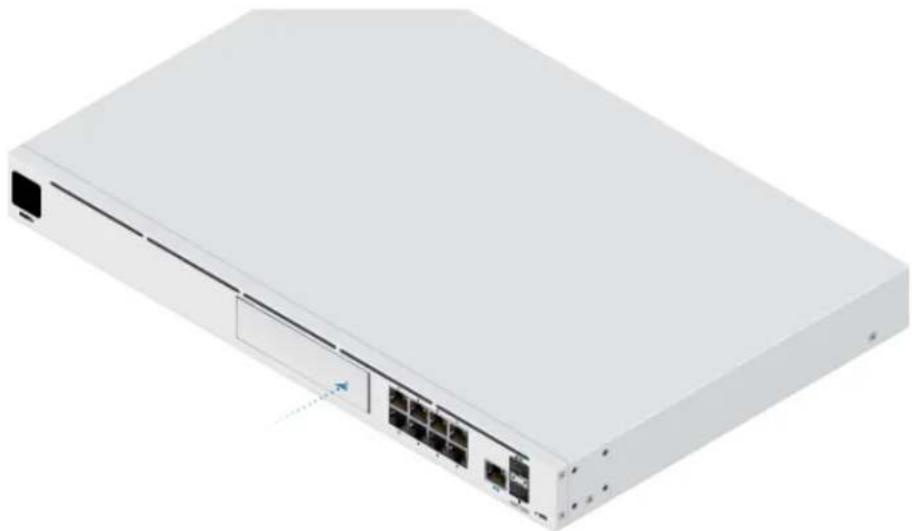
| 5 HDD Bay | |
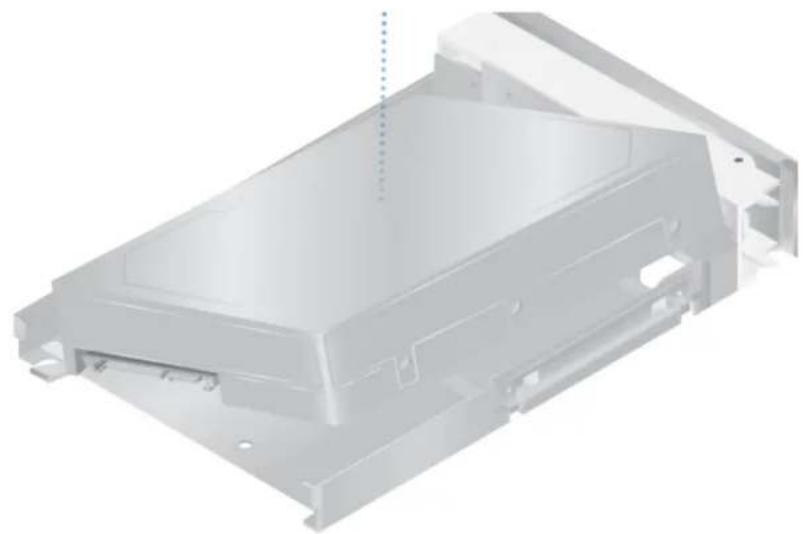
| Install a 3.5" or 2.5" HDD (not included) to use the device as an NVR for UniFi Protect. | |
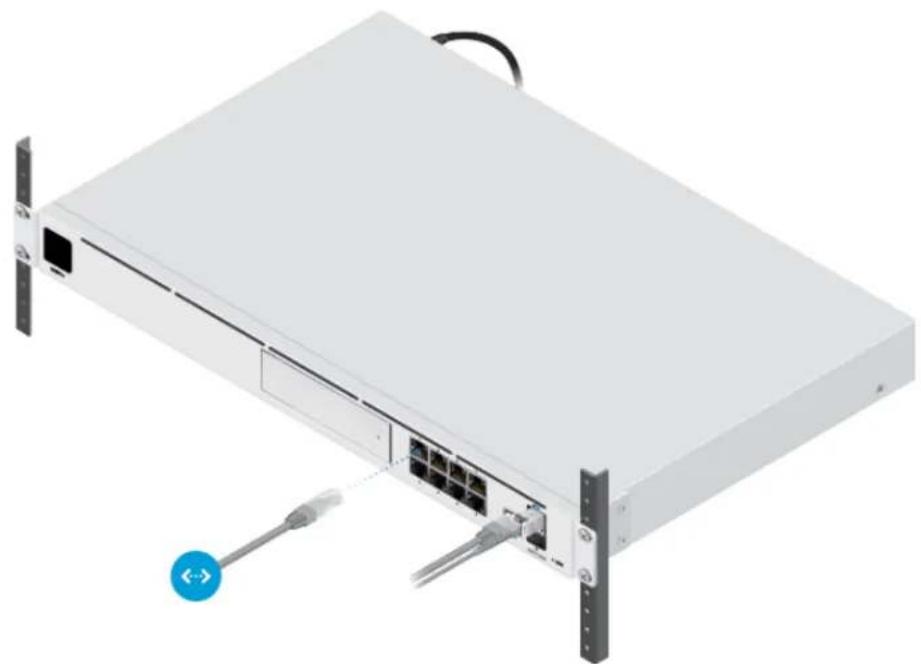
| 6 RJ45 LAN (Ports 1 - 8) | |
| The RJ45 ports support 10/100/1000 Ethernet connections. By default, they are set to DHCP Server with the fallback IP address, 192.168.1.1/24. | |
| 7 RJ45 Internet (Port 9) | |
| The RJ45 port supports a 10/100/1000 Ethernet connection. Set to DHCP Client by default. | |
| 8 SFP+ Internet (Port 10) | |
| The SFP+ port supports a 1/10G Ethernet connection. Set to DHCP Client by default. | |
| 9 SFP+ LAN (Port 11) | |
| The SFP+ port supports a 1/10G Ethernet connection. By default, it is set to DHCP Server with the fallback IP address, 192.168.1.1/24. | |
| 10 Reset Button | |
| Resets to factory defaults. The device should be running after bootup is complete. Press and hold the Reset button for about 10 seconds until the display indicates that the device has reset itself. After a few seconds, the LED will turn off, and the device will automatically reboot. | |
| 11 USP RPS LED | |
12 USP Connect DC Input
Reserved for future use.
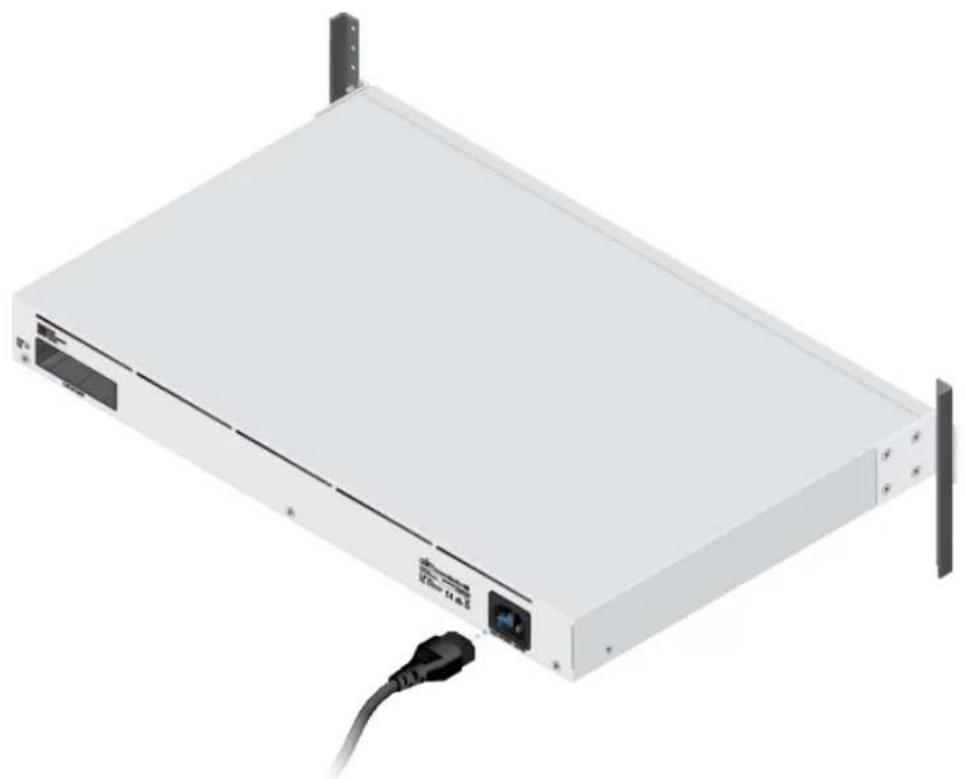
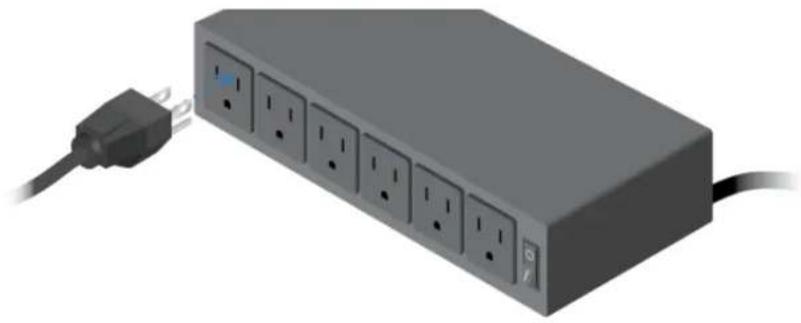
13 Power Port
Connect the included Power Cord to the Power port.
Installation Requirements
• Phillips screwdriver
- Standard-sized, 19" wide rack with a minimum of 1U height available
- For indoor applications, use Category 5 (or above) UTP cabling approved for indoor use.
- For outdoor applications, shielded Category 5 (or above) cabling should be used for all wired Ethernet connections and should be grounded through the AC ground of the power supply.
We recommend that you protect your networks from harmful outdoor environments and destructive ESD events with industrial-grade, shielded Ethernet cable from Ubiquiti. For more details, visit: ui.com/toughcable

Note: Although the cabling can be located outdoors, the UDM-Pro itself should be housed inside a protective enclosure.
Installing an HDD
Ensure the device is powered off before you install the 3.5" or 2.5" HDD (not included).
1.
UDM-Pro Quick Start Guide


3.
UDM-Pro Quick Start Guide
4.
UDM-Pro Quick Start Guide

OR
UDM-Pro Quick Start Guide

6.
UDM-Pro Quick Start Guide
Removing an 3.5" HDD
1.

2.
UDM-Pro Quick Start Guide
Hardware Installation
1.
2.
UDM-Pro Quick Start Guide

OR

UDM-Pro Quick Start Guide
Connecting Power
UDM-Pro Quick Start Guide
Connecting to the Internet
For information about compatible fiber SFP modules, visit: ubnt.link/UniFi_SFP_DAC_Compatibility

OR
UDM-Pro Quick Start Guide


UDM-Pro Quick Start Guide

Connecting to the LAN
1.
2.
UDM-Pro Quick Start Guide


4.
UDM-Pro Quick Start Guide

Configuration
You have the following options:
- Enable Bluetooth on your mobile device and use the UniFi Network app.
- Use a computer connected to the UDM-Pro on a LAN port. Go to "Chrome Instructions".
UniFi Network App
1.


Download on the
App Store

GET IT ON
Google Play
2.
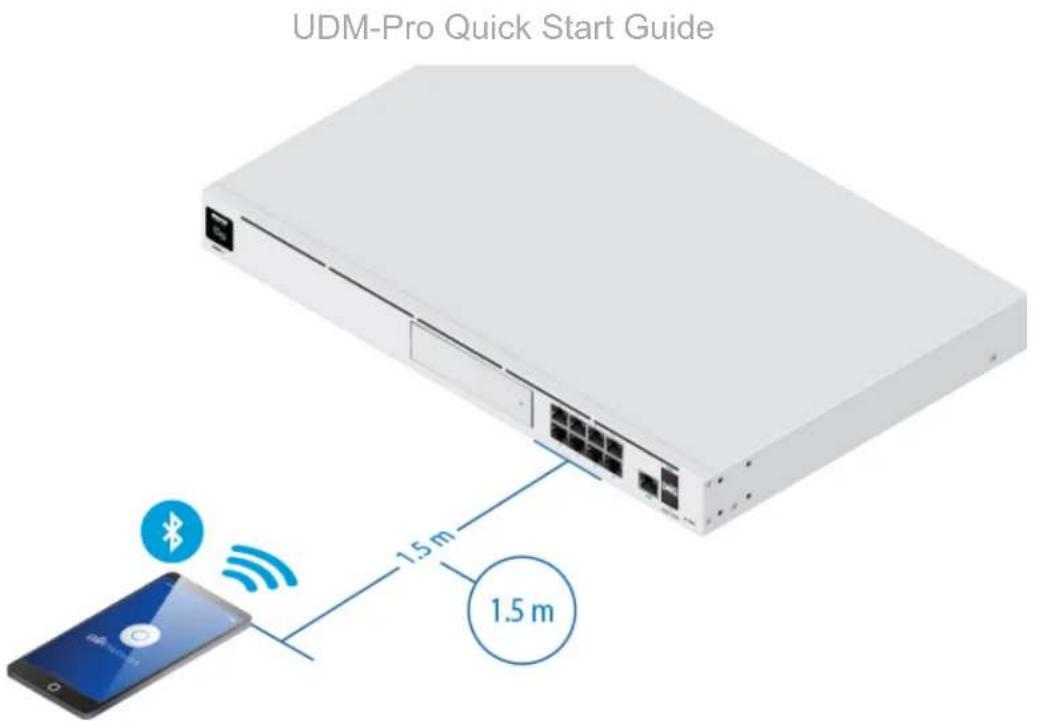
- Follow the on-screen instructions.
Chrome Instructions
Use the Chrome web browser to set up your device.
- Ensure that your host system is on the same Layer 2 network as the UDM-Pro.
- Launch the Chrome web browser and go to https://setup.ui.com

- Follow the on-screen instructions of the Setup Wizard.
After you run the UniFi Setup Wizard, a login screen will appear for the UniFi Network Controller management interface. Enter the Username and Password that you created in the UniFi Setup Wizard. Then click Sign in.
UDM-Pro Quick Start Guide

You can manage your network and view network statistics using the UniFi Network Controller management interface. For information on using the UniFi Network Controller software, refer to the User Guide located on our website at: ui.com/download/unifi
Specifications
| UDM-Pro | |
| Dimensions 442.4 x 43.7 x 285.6 mm | (17.42 x 1.72 x 11.24") |
| Weight 3.90 kg (8.60 lb)With Mount Brackets 3.99 kg (8.80 lb) | |
| InterfacesNetworking (8) 10/100/1000 RJ45 LAN PortsManagement Ethernet In-Band | (1) 10/100/1000 RJ45 WAN Ports(1) 1/10G SFP+ LAN Port(1) 1/10G SFP+ WAN Port(1) Bluetooth BLE |
| Max. Power Consumption 33W | |
| Power Method (1) Universal AC Input, 100 to 240VAC | (1) RPS DC Input |
| Power Supply Internal 50W/12V | |
| Supported Voltage Range 100 - 240VAC | |
| Display 1.3" Color Touch Panel | |
| LEDSystem StatusHDD ActivityRJ45 Link/Speed/ActivitySFP+ Link/Speed/Activity | |
| Processor Quad ARM Cortex-A57 Core at 1.7 GHz | |
| System Memory 4 GB DDR4 | |
| On-Board Flash Storage 16 GB eMMC | |
| Operating Temperature -10 to 40°C (14 to 104°F) | |
| Operating Humidity 5 to 95% Noncondensing | |
| Certifications CE, FCC, IC | |
Safety Notices
- Read, follow, and keep these instructions.
- Heed all warnings.
- Only use attachments/accessories specified by the manufacturer.

WARNING: Do not use this product in location that can be submerged by water.

WARNING: Avoid using this product during an electrical storm. There may be a remote risk of electric shock from lightning.
Electrical Safety Information
- Compliance is required with respect to voltage, frequency, and current requirements indicated on the manufacturer's label. Connection to a different power source than those specified may result in improper operation, damage to the equipment or pose a fire hazard if the limitations are not followed.
- There are no operator serviceable parts inside this equipment. Service should be provided only by a qualified service technician.
- This equipment is provided with a detachable power cord which has an integral safety ground wire intended for connection to a grounded safety outlet.
a. Do not substitute the power cord with one that is not the provided approved type. Never use an adapter plug to connect to a 2-wire outlet as this will defeat the continuity of the grounding wire.
b. The equipment requires the use of the ground wire as a part of the safety certification, modification or misuse can provide a shock hazard that can result in serious injury or death.
d. Protective earthing is provided by Listed AC adapter. Building installation shall provide appropriate short-circuit backup protection.
e. Protective bonding must be installed in accordance with local national wiring rules and regulations.
Limited Warranty
ui.com/support/warranty
The limited warranty requires the use of arbitration to resolve disputes on an individual basis, and, where applicable, specify arbitration instead of jury trials or class actions.
Compliance
FCC
Changes or modifications not expressly approved by the party responsible for compliance could void the user's authority to operate the equipment.
This device complies with Part 15 of the FCC Rules. Operation is subject to the following two conditions.
- This device may not cause harmful interference, and
- This device must accept any interference received, including interference that may cause undesired operation.
This equipment has been tested and found to comply with the limits for a Class A digital device, pursuant to part 15 of the FCC Rules. These limits are designed to provide reasonable protection against harmful interference when the equipment is operated in a commercial environment. This equipment generates, uses, and can radiate radio frequency energy and, if not installed and used in accordance with the instruction manual, may cause harmful interference to radio communications. Operations of this equipment in a residential area is likely to cause harmful interference in which case the user will be required to correct the interference at his own expense.
This radio transmitter has been approved by FCC.
ISED Canada
CAN ICES-3(A)/NMB-3(A)
This device complies with ISED Canada licence-exempt RSS standard(s). Operation is subject to the following two conditions:
- This device may not cause interference, and
- This device must accept any interference, including interference that may cause undesired operation of the device.
This radio transmitter has been approved by ISED Canada.
CAN ICES-3(A)/NMB-3(A)
Radiation Exposure Statement
- This equipment complies with radiation exposure limits set forth for an uncontrolled environment.
- This equipment should be installed and operated with minimum distance 20 cm between the radiator and your body.
- This transmitter must not be co-located or operating in conjunction with any other antenna or transmitter.
AVIS IMPORTANT
Australia and New Zealand

Warning: This equipment is compliant with Class A of CISPR 32. In a residential environment this equipment may cause radio interference.
Brazil

CE marking on this product represents the product is in compliance with all directives that are applicable to it.
UDM-Pro Quick Start Guide
| AT BE BG CY CZ DE DK EE EL ES FI FR HR HU | |||||||||||||
| IE | IT | LV | LT | LU | MT | NL | PL | PT | RO | SE | SI | SK | UK |
BFWA (Broadband Fixed Wireless Access) members noted in blue

Note: This device meets Max. TX power limit per ETSI regulations.
The following apply to products that operate in the 5 GHz frequency range:

Note: This device is restricted to indoor use only when operating in the 5150 - 5350 MHz frequency range within all member states.

Note: All countries listed may operate at 30 dBm. BFWA member states may operate at 36 dBm.

Note: Operation in the 5.8 GHz frequency band is prohibited in BFWA member states. Other countries listed may use the 5.8 GHz frequency band.
WEEE Compliance Statement
Declaration of Conformity
Online Resources




- SYSTEM REQUIREMENT
- 12 USP CONNECT DC INPUT
- 13 POWER PORT
- INSTALLATION REQUIREMENTS
- INSTALLING AN HDD
- REMOVING AN 3.5" HDD
- HARDWARE INSTALLATION
- CONNECTING TO THE INTERNET
- CONNECTING TO THE LAN
- CONFIGURATION
- UNIFI NETWORK APP
- CHROME INSTRUCTIONS
- SAFETY NOTICES
- ELECTRICAL SAFETY INFORMATION
- LIMITED WARRANTY
- COMPLIANCE
- FCC
- ISED CANADA
- CAN ICES-3(A)/NMB-3(A)
- RADIATION EXPOSURE STATEMENT
- AVIS IMPORTANT
- AUSTRALIA AND NEW ZEALAND
- BRAZIL
- UDM-PRO QUICK START GUIDE
- WEEE COMPLIANCE STATEMENT
- DECLARATION OF CONFORMITY
- ONLINE RESOURCES
Brand : Ubiquiti Networks
Model : UniFi Dream Machine Pro
Category : Router