
KCH30XV - Range hood BERTAZZONI - Free user manual and instructions
Find the device manual for free KCH30XV BERTAZZONI in PDF.


| Brand | Bertazzoni |
| Model | KCH30XV |
| Product type | Range hood |
| Usage | Domestic use only |
| Power supply | 120 V ~ 60 Hz, 3.3 A, 350 W |
| Number of speeds | 3 (low, medium, high) |
| Lighting | LED, 12 V, 4000 K, 1.5 W, type L28 |
| Installation type | External exhaust or recirculation |
| Exhaust duct diameter | 5" 29/32 (150 mm) |
| Grease filter | Metal, monthly cleaning (dishwasher safe) |
| Activated charcoal filter (optional) | Replacement every 4 months, ref. 901488 |
| Minimum distance above cooktop | 65.1 cm (25" 19/32) for electric; 75 cm (29" 17/32) for gas |
| Material | Stainless steel |
| Certifications | UL, compliance with electrical standards |
| Electrical protection | Ground fault circuit interrupter (GFCI) recommended for installation above a bathtub or shower |
| Maintenance | Regular interior/exterior cleaning with damp cloth and neutral detergent; do not use alcohol |
| Light replacement | By authorized technical service |
| Safety | Grounding mandatory; do not use with a solid state speed control |
| Warranty and support | https://us.bertazzoni.com/more/support (United States); https://ca.bertazzoni.com/more/support (Canada) |
Frequently Asked Questions - KCH30XV BERTAZZONI
User questions about KCH30XV BERTAZZONI
0 question about this device. Answer the ones you know or ask your own.
Ask a new question about this device
Download the instructions for your Range hood in PDF format for free! Find your manual KCH30XV - BERTAZZONI and take your electronic device back in hand. On this page are published all the documents necessary for the use of your device. KCH30XV by BERTAZZONI.
USER MANUAL KCH30XV BERTAZZONI
natural_image
Isometric line drawing of a three-tiered industrial chimney or duct structure (no text or symbols)
For any warranty information and service request, contact us:

In USA: https://us.bertazzoni.com/more/support In Canada: https://ca.bertazzoni.com/more/support
natural_image
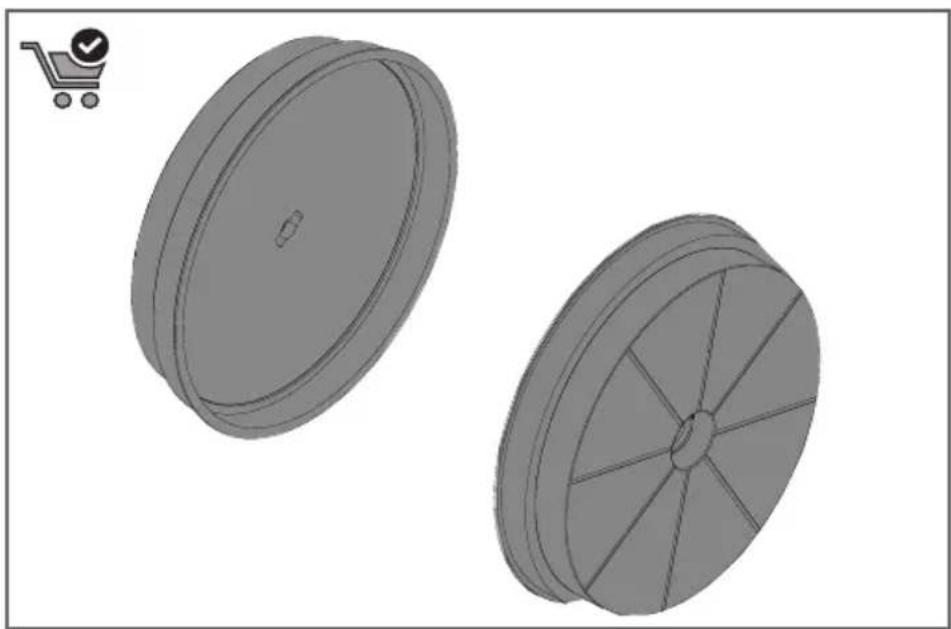
3D model of two mechanical components with a shopping cart icon in the corner (no text or symbols)Charcoal filter kit for recirculation cod. 901488
flowchart
graph TD
    A["Circle"] --> B["Circle"]
    C["Circle"] --> D["Circle"]
    E["Circle"] --> F["Circle"]
    G["Circle"] --> H["Circle"]
    I["Circle"] --> J["Square"]
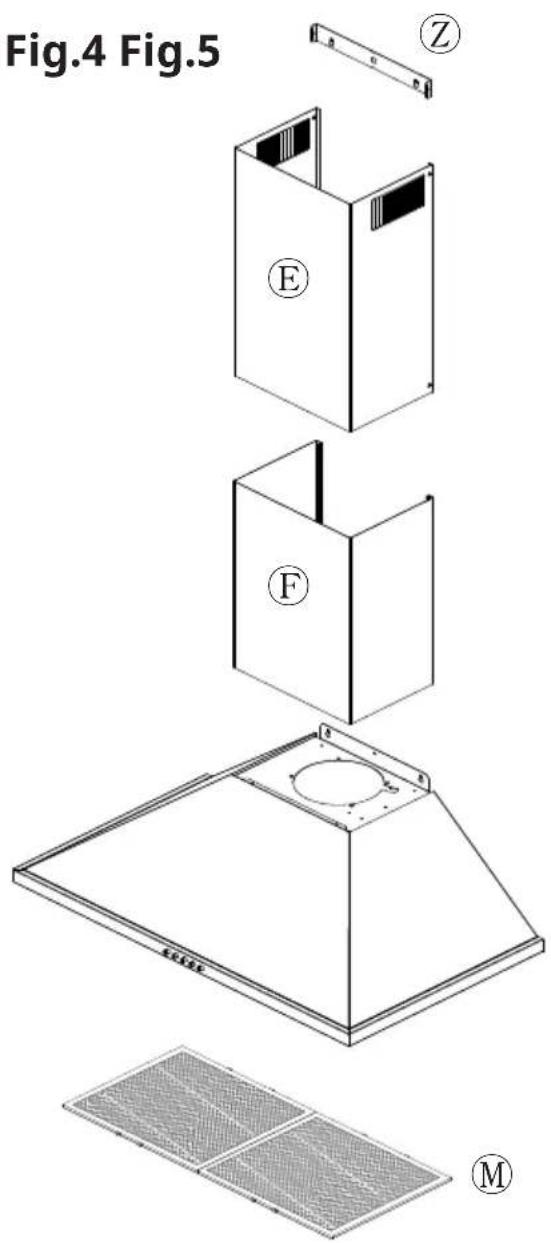
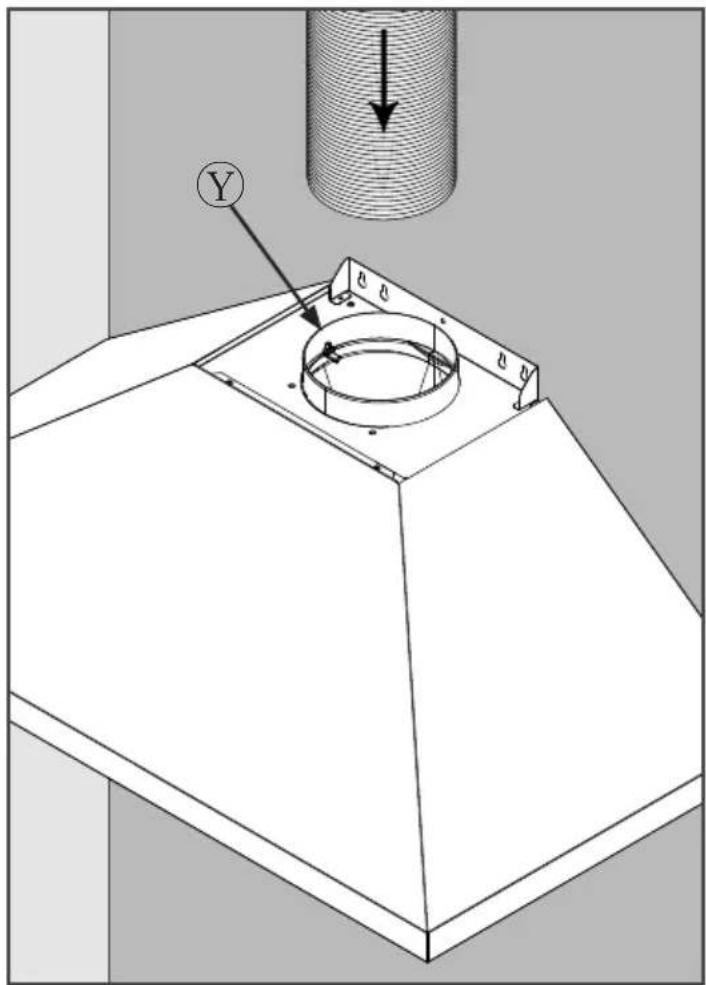
Fig.7
EN
IMPORTANT SAFETY INSTRUCTIONS
Carefully read the following important information regarding installation safety and maintenance. READ AND SAVE THESE INSTRUCTIONS for future reference.
REQUIREMENTS:
UL 350W AC 120V, 60 Hz 3.3A Circuit grounding.
- Do not connect the exhaust hood to the chimneys, flues and airducting the room.
- The evacuated air must not be let into a warm air duct.
- This appliance must be connected to a system equipped with earth or ground plate.
- When performing maintenance operations, disconnect the appliance from the field connection.
- Do not do any flambè cooking underneath the hood - When frying, never leave the pan alone because the cooking oil could flare up.
- Clean all the surfaces frequently to avoid danger of fire. To do so use a cloth and or brush soaked in denatured ethyl alcohol. It also important to remove and clean or substitute frequently the filter installed in the hood.
- It advisable to utilise ranges of the same width as the hood.
- Do not operate with a damaged cord or plug. Discard fan or return to an authorized service facility for examination and/or repair.
- Do not run cord under carpeting. Do not cover with throw rugs, runners or similar coverings. Position cord away from any area subject to foot traffic.
- Do not route cord under furniture or appliances.
- Do not operate any fan with a damaged cord or plug. Discard fan or return to an au-
thorized service facility for examination and/or repair. Do not run cord under carpeting.
- Wiring shall be protected from sharp edges (including male screw threads), burrs, fins, moving parts, and other agencies that might abrade the insulation on conductors.
INTRODUCTION
These instructions are designed to tell you of the various technical details of your cooker hood and to make you familiar with its use. Since these instructions cover more than one type of hood within the same series, it may be that reference is made to components that do not form part of the hood that you are installing. If used in exhaust mode, the hood will expel exhaust fumes outdoors through a duct. Fittings can vary from country to country. We reserve the right to modify the product without any notice always with the aim of improvements and in compliance with the relevant norms.
SUGGESTIONS FOR USING THE HOOD IN EXHAUST MODE
When an exhaust hood and a combustive heat source (es. gas surface burners) are used simultaneously, the suction of the hood may interfere with the airflow necessary for maintaining proper combustion on the heat source, creating depression.
To avoid this effect, the maximum depression in the room should not exceed 0,04 mbar (0,016 inH _2 O 4°C).
This can be achieved by creating a permanent opening in the room, allowing in sufficient ventilation from which the burner can draw necessary air undisturbed by the suction of the hood.
Note : All the exhaust ductwork in the apartment or house should be carefully verified. In case of doubts, get advice or carefully verified from the person or agency responsible for the building.
Note : The efficiency of the exhaust hood decreases as the length of the ducts and number of increase. When using the
exhaust version, follow these rules: Do not connect the exhaust hood to chimneys, flues, and air ducts serving the room. Before venting into exhaust flues and ducts no longer in use, ask for approval of person or agency responsible for the building. The evacuated air must not be let into a warm airduct. For the evacuation of the exhausted air please note official instructions.
INSTALLATION
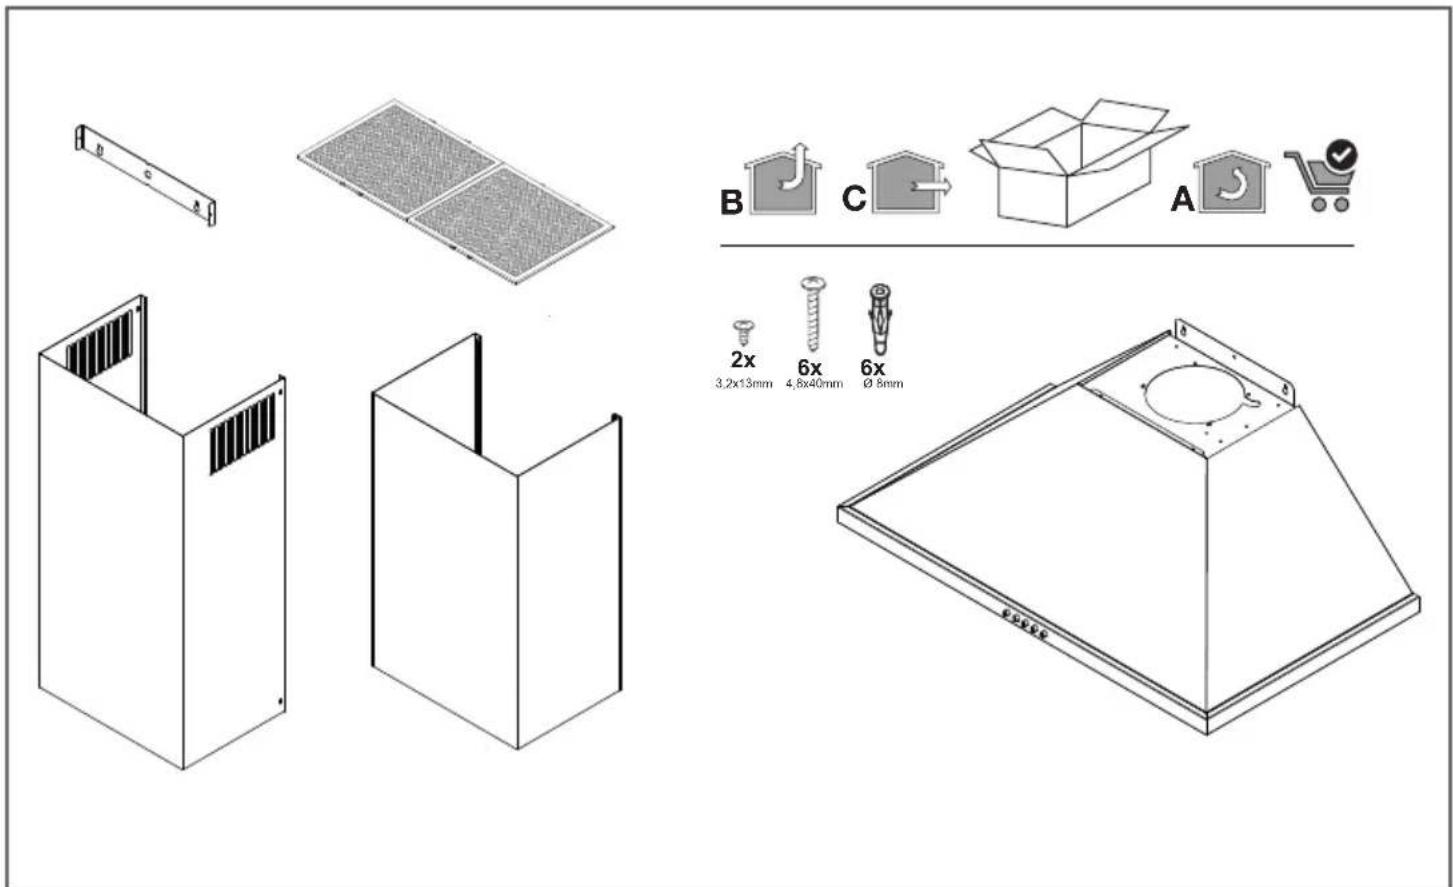
The hood may be in recirculating or in exhaust version (see A-B-C pag.2). Decide from the outset which type is to be installed. For better efficiency, we recommend installing the hood in the exhaust version (if possible).

RECIRCULATING VERSION (A)
The hood purifies the air and recycles the clean air back into the room. For this version, the following is required: a theft-proof cover, a reducer and charcoal filter. In the version with flue, the upper flue must have the air evacuation slots positioned in the upper part and the deflector must be used in place of the anti-theft cover. The upper flue air evacuation slots must be positioned at the top.

EXHAUST VERSION (B) (C)
The hood purifies the air and evacuates it to the outside through an exhaust duct or hole (diameter 5" 29/32).
Roof Venting (B)
Wall Venting (C)
AIR VENT
(for exhaust versions)
! Prepare the hole and the air vent duct (5" 29/32 diameter - The component is not included in the product, but can be purchased separately).
! Use a duct of the shortest possible length.
! Use a duct with as few elbows as possible (maximum elbow angle: 90^ ).
! Avoid drastic changes in the duct cross-
section.
! Use a duct with an as smoothest possible interior.
! The duct must be made of certified material.
! Do not connect the hood to smoke exhaust ducts for the products of combustion (boilers, fireplaces, stoves, etc).
! For the air vents comply with the provisions laid down by the competent authorities. In addition, the air must not be evacuated through a hole in the wall unless specifically intended for this purpose.
! Fit air intakes in the room to prevent the hood from creating a negative pressure in the room (which must not exceed 0.04 mbar); if the hood is used at the same time as non-electrical equipment (gas-, oil- and charcoal-fired stoves, etc.) the exhaust gas may be sucked in by the heat source.
ASSEMBLY
! WARNING: Very heavy product; hood handling and installation must be carried out by at least two persons.
! WARNING: Wear gloves and goggles when carrying out installation and maintenance operations.
! WARNING: Failure to install the screws or fixing device in accordance with these instructions may result in electrical hazards. !The minimum distance between the supporting surface for the cooking equipment on the hob and the lowest part of the range hood must be not less than 25" 19/32 from electric cookers and 29" 17/32 from gas or mixed cookers. If the instructions for installation for the gas hob specify a greater distance, this must be adhered to.
! Wall anchors are provided to secure the hood to most types of walls/ceilings. However, a qualified technician must verify suitability of the materials in accordance with the type of wall/ceiling. The wall/ceiling must be strong enough to take the weight of the hood. Do not tile, grout or silicone.
! In case of doubt, contact an authorized service provider.
CONNECTION EXHAUST
Link a 5" 29/32 diameter air outlet chimney to the spigot. This pipe is a separate accessory.
Warning: To reduce the risk of fire use only metal ductwork.
Attention: The appliance is provided with a supply cord, the appliance must be positioned so that the plug is accessible.
Attention : If there are three wires in the electrical supply cable they must be connected as follows:
$$ \begin{array}{l} \text { Grey / Yellow } = \text { ground - White } = \text { neutral - } \ \text { Black } = \text { line } \end{array} $$
Important : The hood manufacturer will not be responsible for any damage or loss caused by failure to observe these instructions.
Important : a damaged power supply cord must be replaced by an authorized service provider.
WARNING
GROUNDING INSTRUCTIONS
This appliance must be grounded. In the event of an electrical short circuit, grounding reduces the risk of electric shock by providing an escape wire for electric current. This appliance is equipped with a cord having a grounding. The plug must be plugged into an outlet that is properly installed and grounded.
WARNING : Improper grounding can result in a risk of electrical shock.
Consult a qualified electrician if the grounding instructions are not completely understood, or if doubt exists as to whether the appliance is properly grounded.
Do not use an extension cord. If the power supply cord is too short have a qualified electrician install an outlet near the appliance.
USING THE COOKER HOOD
The hood should be switched on before or at the moment the cooking process initiates. The filters are more effective if the fan is not switched off immediately after cooking or frying is completed, but only after a period of some 20-30 minutes. Before using the cooker hood please ensure that all plastic films like on metal grease filter and stainless steel ducting are removed.
INSTALLATION INSTRUCTIONS
This hood has been arranged to be installed above a cook top. It can be used in 2 ways:
- EXHAUST MODE: the kitchen fumes are purified by the metal anti-grease fumes filters and carried outside through a ducting system. (A-B)
INSTALLATION
The appliance must be installed at a minimum height of 25" 19/32 from an electric cooker stove, or 29" 17/32 from gas or combined cooker stoves. (Fig.1)
If a connection tube composed of two parts is used, the upper part must be placed outside the lower part.
Do not connect the cooker hood exhaust to the same conductor used to circulate hot air or for evacuating fumes from other appliances generated by other than an electrical source.
MOUNTING THE COOKER HOOD TO THE WALL
Drill holes A-B-C according to indications quoted in (fig.1).
Use screws and screw anchors suitable for wall (e.g. reinforced cement, plasterboard) for the mounting of the cooker hood. Where screws and screw anchors are supplied ensure that they are suitable for the type of wall where the cooker hood is to be mounted.
Affix the bracket Z to the wall via the drill holes C
Hang the cooker hood on the wall using the drill holes A.
Fasten the cooker hood using the fastening drill holes B.
EXHAUST VERSION
Connect the flange Y to the exhaust opening with a connecting tube Fig.5 (not necessary for recirculating version).
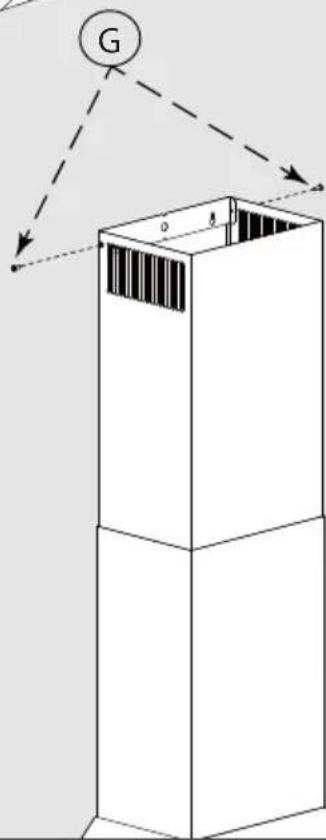
Thread the upper connector E to the inside of the lower connector F; hang the two connectors inserting them vertically on the cooker hood, unthread the upper connector E towards the top, locking it in with the appropriate screws in the drill holes G of the bracket Z (fig. 7) previously affixed to the wall via the drill holes C (fig. 1).
RE-CIRCULATING VERSION
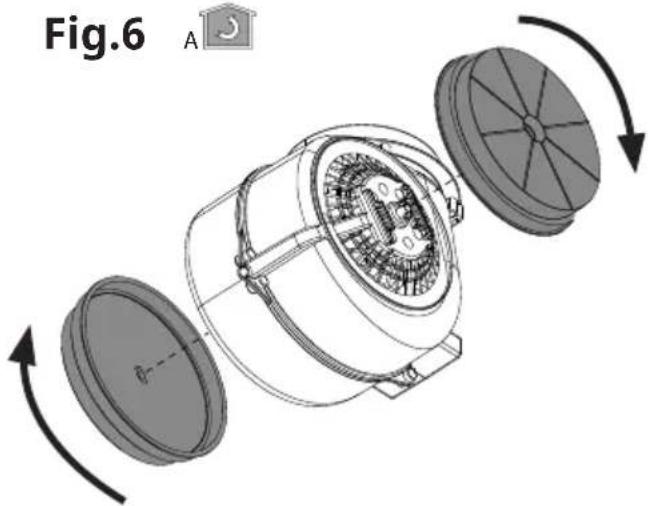
In order to transform your cooker hood from the exhaust version to the re-circulating version, ask your local retailer for active carbon filters and then carry out the assembly instructions for the filter version. The active carbon filters are not included in the hood, but must be purchased as a kit separately. The filters must be applied to the suction unit located inside the hood (fig. 6).
The air is replaced in the environment via the eyelets impressed on the connector A.
CONTROL PANEL
flowchart
graph TD
    A["○"] --> B["ABCDE"]
    C["△"] --> D["□"]
    E["×"] --> F["□"]
    G["▽"] --> H["□"]
    I["★"] --> J["□"]
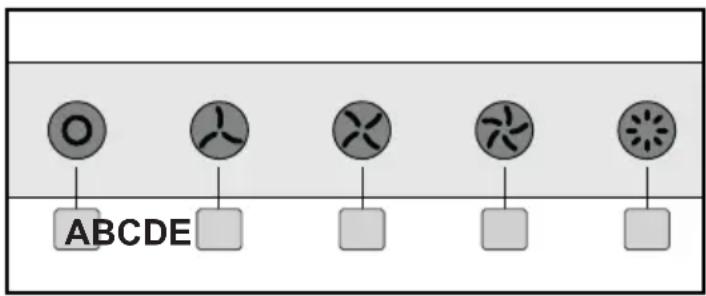
A- Fan-off
B- First speed (minimum)
C- Second speed (medium)
D- Third speed (maximum)
E- Light ON/OFF
MAINTENANCE
Caution! Before any cleaning or maintenance disconnect the hood from the mains by removing the plug or disconnecting the main switch of the dwelling.
Cleaning
The cooker hood should be cleaned regularly (at least with the same frequency with which you carry out maintenance of the grease filters) internally and externally. Clean using the cloth dampened with neutral liquid detergent, mild, non corrosive. Do not use abrasive products. DO NOT USE ALCOHOL!
WARNING: Failure to carry out the basic cleaning recommendations of the cooker hood and replacement of the filters may cause fire risks. Therefore, we recommend observing these instructions.
The manufacturer declines all responsibility for any damage to the motor or any fire damage linked to inappropriate maintenance or failure to observe the above safety recommendations.
The manufacturer declines all responsibility of damage or malfunctions due to appliance not being installed according to instructions.
Grease filter

The grease filter captures grease and oil particles. Filters must be cleaned once a month, using non aggressive detergents, either by hand or in the dishwasher, which must be set to a low temperature and a short cycle. When washed in a dishwasher, the grease filter may discolour slightly, but this does not affect its filtering capacity.
Charcoal filter (recirculating version only)
It absorbs unpleasant odours caused by cooking. The saturation of the charcoal filter occurs after prolonged use or frequent use, depending on the type of cooking and the frequency of cleaning of the grease filter. In any case it is necessary to replace the cartridge at least every four months. The charcoal filter may NOT be washed or regenerated.
Replacing lamps
The hood is equipped with a lighting system based on LED technology. The LEDs guarantee an optimum lighting, a duration up to 10 times as long as the traditional lamps and allow to save 90% electrical energy. For replacement, contact your local service provider or parts distributor.
The LED lamp replacement procedure is as follows (12V, 4000 K, 1.5 Watt, Type L28):
1) Disconnect the hood from the power supply.
2) Remove the grease filters.
3) Disconnect the LED lamp by disconnecting the connector from the wiring.
4) At the same time, squeeze the spring that locks the LED spotlight and push it out of its seat.
5) Insert the new spotlight, taking care to first pass the connector with its wiring.
6) Position the spring in a central position in the two appropriate grooves and press to fit the spotlight.
7) Reconnect the spotlight connector with the wiring harness connector.
8) Install the grease filters.
9) Reconnect the hood to the electricity supply.
10) Perform function check of the new spotlight.
READ AND SAVE THESE INSTRUCTIONS 1) WARNING - TO REDUCE THE RISK OF A RANGE TOP GREASE FIRE :
a. Never leave surface units unattended at high settings. Boilovers cause smoking and greasy spill overs that may ignite. Heat oils slowly on low or medium settings.
b. Always turn hood ON when cooking at high heat or when flambeing food (le crepes suzette, cherries jubilee, peppercorn beef flambè).
c. Clean ventilating fans frequently. Grease should not be allowed to accumulate on fan or filter.
d. Use proper pan size. Always use cookware appropriate for the size of the surface element.
2) WARNING : to reduce the risk of fire or electric shock, do not use this fan with any solid state speed control device
3) WARNING TO REDUCE RISK OF FIRE, ELECTRIC SHOCK, OR INJURY TO PERSON, OBSERVE THE FOLLOWING :
a. Use this unit only in the manner intended by the manufacturer. If you have questions, contact the manufacturer.
b. Before servicing or cleaning unit, switch power off at service panel and lock the service disconnecting means to prevent power from being switched on accidentally. When the service disconnecting means cannot be locked, securely fasten a prominent warning device, such as a tag, to the service panel.
4) CAUTION: For general Ventilating use only. Do not use to exhaust hazardous or explosive material and vapors.
5) WARNING TO REDUCE THE RISK OF INJURY TO PERSONS IN THE EVENT OF A RANGE TOP FIRE, OBSERVE THE FOLLOWING:
a. Smother flames with a close-fitting lid, cookie sheet, or metal tray, then turn off the burner. BE CAREFUL TO PREVENT BURNS. If the flames do not go out immediately. EVA-CUATE AND CALL THE FIRE DEPARTMENT.
b. NEVER PICKUP A FLAMING PAN You may be burned.
c. DO NOT USE WATER, including wet dishcloths or towels - a violent steam explosion will result.
d. Use an extinguisher only if :
-
You know you have a Class ABC extinguisher, and you already know how to operate.
-
The fire is small and contained in the area where it started.
-
The fire department is being called.
-
You can fight the fire with your back to
an exit. (based on “Kitchen Fire safety Tips” published by NFP A.
6) WARNING TO REDUCE THE RISK OF INJURY TO PERSONS IN THE EVENT OF A RANGE TOP FIRE, OBSERVE THE FOLLOWING:
a. Installation work and electrical wiring must be done by qualified person(s) in accordance with all applicable codes and standards, including fire rated construction.
b. Sufficient air is needed for proper combustion and exhausting of gases through the flue (chimney) of fuel burning equipment to prevent back drafting. Follow the heating equipment manufacturer's guideline and safety standards such as those published by the National Fire Protection Association (NFPA), and the American Society for heating, refrigeration and air conditioning engineers (ASHRAE) and the local code authorities.
c. When cutting or drilling into wall or ceiling, do not damage electrical wiring and other hidden utilities.
d. Ducted fans must always be vented to the outdoors.
e. If this unit to be installed over a tube or shower, it must be marked as appropriate for the application and be connected to a GFCI (Ground Fault Circuit Interrupter) protected branch circuit.
f. Never place a switch where it can be accessible from a tub or shower.
PROTECTING THE ENVIRONMENT
Suggestions for a correct use in order to reduce the environmental impact
- Switch ON the hood at minimum speed when you start cooking, and kept it running for few minutes after cooking is finished.
- Increase the speed only in case of large amount of smoke and steam.
- Replace the charcoal filter(s) when necessary to maintain a good odour reduction efficiency.
- Clean the grease filter(s) when necessary to maintain a good grease filter efficiency. - Use the maximum diameter of the ducting system indicated in this manual to optimize efficiency and minimize noise.
- Clean the grease filter(s) when necessary to maintain a good grease filter efficiency. - Use the maximum diameter of the ducting system indicated in this manual to optimize efficiency and minimize noise.
WARNING: Cancer and Reproductive Harm - www.P65Warnings.ca.gov.

- EN
- IMPORTANT SAFETY INSTRUCTIONS
- REQUIREMENTS:
- INTRODUCTION
- SUGGESTIONS FOR USING THE HOOD IN EXHAUST MODE
- INSTALLATION
- RECIRCULATING VERSION (A)
- EXHAUST VERSION (B) (C)
- AIR VENT
- ASSEMBLY
- CONNECTION EXHAUST
- Warning: To reduce the risk of fire use only metal ductwork.
- Important : The hood manufacturer will not be responsible for any damage or loss caused by failure to observe these instructions.
- WARNING
- GROUNDING INSTRUCTIONS
- USING THE COOKER HOOD
- INSTALLATION INSTRUCTIONS
- MOUNTING THE COOKER HOOD TO THE WALL
- EXHAUST VERSION
- RE-CIRCULATING VERSION
- MAINTENANCE
- Cleaning
- Grease filter
- Charcoal filter (recirculating version only)
- Replacing lamps
- READ AND SAVE THESE INSTRUCTIONS 1) WARNING - TO REDUCE THE RISK OF A RANGE TOP GREASE FIRE :
- 3) WARNING TO REDUCE RISK OF FIRE, ELECTRIC SHOCK, OR INJURY TO PERSON, OBSERVE THE FOLLOWING :
- 5) WARNING TO REDUCE THE RISK OF INJURY TO PERSONS IN THE EVENT OF A RANGE TOP FIRE, OBSERVE THE FOLLOWING:
- 6) WARNING TO REDUCE THE RISK OF INJURY TO PERSONS IN THE EVENT OF A RANGE TOP FIRE, OBSERVE THE FOLLOWING:
- PROTECTING THE ENVIRONMENT
- Suggestions for a correct use in order to reduce the environmental impact
Brand : BERTAZZONI
Model : KCH30XV
Category : Range hood