
ERE 3 Pearl - Beard trimmer Essentiel B - Free user manual and instructions
Find the device manual for free ERE 3 Pearl Essentiel B in PDF.


| Brand | Essentiel B |
| Model | ERE 3 Pearl |
| Product type | Electric shaver / Trimmer |
| Power supply | AC adapter 100-240 V~ 50/60 Hz, output 3 V ≈ 300 mA |
| Battery | 1.2 V, 600 mAh NiMH AAA (non-replaceable) |
| Charging time | 10 hours |
| Runtime | Approximately 30 minutes |
| Speed | 1 speed |
| Floating head | Yes, with lock/unlock |
| Bikini comb | Included |
| Cleaning brush | Included |
| Lubricating oil | Included |
| Charging base | Included |
| Cleaning the foil | Rinseable under water, must dry before reassembling |
| Use | On clean, dry skin, without cream or lotion |
| Charging indicator | Fixed red light during charging |
| Electrical class (shaver) | Class III |
| Electrical class (adapter) | Class II / IP20 |
| Protection | Do not immerse, do not use in bath or shower |
| Recycling | Device, accessories and battery recyclable (WEEE) |
Frequently Asked Questions - ERE 3 Pearl Essentiel B
User questions about ERE 3 Pearl Essentiel B
0 question about this device. Answer the ones you know or ask your own.
Ask a new question about this device
Download the instructions for your Beard trimmer in PDF format for free! Find your manual ERE 3 Pearl - Essentiel B and take your electronic device back in hand. On this page are published all the documents necessary for the use of your device. ERE 3 Pearl by Essentiel B.
USER MANUAL ERE 3 Pearl Essentiel B
natural_image
White disposable hairless brush with a flat blade and control knob, no visible text or symbols on the device itself.Notice d'utilisation / User guide / Bedienungsanleitung / Gebruiksaanwijzing
votre produit
Contenu de la boîte
natural_image
Line drawing of a handheld device with labeled points A and B (no text or symbols on the device itself)natural_image
Line drawing of a handheld device with multiple cutaway views (no text or symbols)
All information, designs, drawings and pictures in this document are the property of SOURCING & CREATION. SOURCING & CREATION reserves all rights to its brands, designs and information. Any copy and reproduction through any means shall be deemed and considered as counterfeiting.
your product
Contents of the box
• 1 electric razor
- 1 charging base
- 1 mains adapter
- 1 bikini line comb
- 1 cleaning brush
■ 1 vial of oil
• 1 set of operating instructions
Technical features
- On / off button
1 speed - Charge indicator light
- Charging base
• Ladies' razor:
Input: 1.2 V
- Battery (non replaceable): 1.2 V, 600 mAh NiMH AAA
- Mains adapter:
- Model: KH6-050080EU
- Input: 100-240 V\~ 50/60 Hz, 0.2 A
- Output: 3 V—300 mA
Class II / IP20
• Charging time: 10 hours
• Battery life: 30 minutes - Only the grid can be rinsed in water. Dry before reassembling.
| Product information for power consumption and maximum time to reach applicable low power mode | |
| Power consumption in off mode | NA |
| Power consumption in standby | 0.30 W |
| The maximum time needed to automatically reach the applicable low power mode or condition | NA |
| Power consumption in network standby if all wired network ports are connected and all wireless network ports are activated | NA |
Description of the appliance

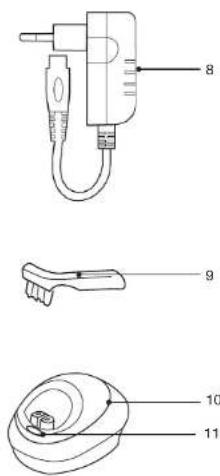
- Bikini line comb
- Grid
- Shaver head
- Mount
- Lock/unlock the floating head
-
On/Off button
-
Insertion port for charger
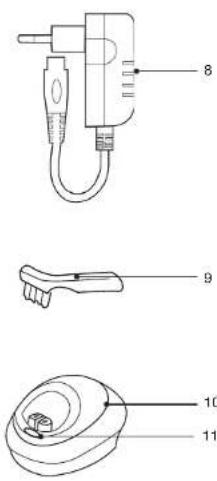
- Mains adapter
- Cleaning brush
- Charging base
- Charge indicator light
charging the appliance
Recharging the appliance
Before first use and when variations in intensity are detected, the appliance must be recharged.

natural_image
Line drawing of a handheld device with labeled points A and B (no text or symbols on the device itself)- Turn the "on/off" button to the "off" position.
- Unwind the mains adapter cable fully.
- Insert the power cable plug into the port on the power supply base provided (A).
- Place the electric razor on its base (B).
- Plug the mains adapter into a wall socket (220-240 V\~). The charge indicator light on the base of the appliance lights up red constantly throughout charging, and stays lit even after charging.
-
Your appliance is ready to use after charging for 10 hours. When this time has elapsed, unplug the adapter from the power socket.
-
During the first charging of the appliance or when the appliance has not been used for several months, charging time will be longer.
- The razor is likely to heat slightly during the charging process, which has no impact on its operation.
A complete charge lasts around 10 hours and gives you a battery life of around 30 minutes.

Please note: Be careful not to leave the appliance on charge for more than 24 hrs as this may damage the battery.
Advice for battery maintenance
- A new battery only achieves maximum performance after being charged and discharged two or three times.
- Do not dispose of the battery or the appliance along with household waste. In order to protect the environment, dispose of the appliance and batteries in accordance with the regulations in force.
- Place them in the recycling bins provided or take them back to your store.
use

WARNING:
- Never use the appliance in the bath, in the shower, near water (above a washbasin or a bathtub) or in a damp room. Danger of electrocution!
- Do not immerse the appliance in water.
Before every use
- The razor must be free of hairs and dirt. Use the cleaning brush provided to clean the appliance. You can also remove the grid from the appliance and run it under a stream of water. Then dry the grid before replacing on the appliance.
• Make sure that the appliance is clean and in perfect working condition.
Preparation of the skin
- Your skin must be clean and dry. Do not apply cream, moisturiser or alcoholic lotion before shaving.
- Your appliance will be more efficient and much easier to use if you use it regularly.
During shaving
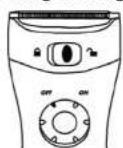
- Unwind the power cord completely.
- Turn the On/Off button to the On position to switch on the appliance.
- While shaving, stretch your skin with your free hand. This will lift the hairs and reduce pulling sensations.
For optimal performance, place the razor head on the skin forming a right angle (90°). The on/off button of the appliance must be facing the skin.
- Move the appliance around the skin slowly and continuously in the opposite direction to hair growth.
• To avoid any danger of irritation, do not press the appliance too hard onto your skin while shaving.
- On certain areas of the body, hairs grow in different directions. If this is the case, move the appliance in different directions for optimal results.
• If you perspire while shaving, dry your skin by patting with a soft cloth.
5. At the end of use, turn the on/off button to the off position to switch off the appliance.
- It is possible that your skin will need several days/weeks to adapt to your appliance's shaving system.
The floating head:
- The floating head makes the appliance very flexible when shaving sensitive areas or adjusting contours.
• To unlock the floating head, turn the button to the position
• To lock it, turn the button to the position
The comb:
• The comb can be used as a cutting guide for the bikini line.
- Place the comb on the razor head, the teeth pointing inwards, until you hear it click into place. Place the razor head at a 45^ angle.
• To remove the comb, pull it lightly backwards.
For direct use with the mains
- Unwind the power cord completely.
- Connect the mains adapter to the appliance.
- Plug the mains adapter into a wall socket.
- While shaving, stretch your skin with your free hand and refer to points "3" and "4" of the preceding section.
• To relax your skin, we advise you to apply a moisturising cream immediately after shaving. - Use an exfoliating cream or sponge regularly (for example in the shower) 24 hrs after shaving to remove the top layer of dead skin.
- Clean the appliance immediately after use (see "Maintenance and Cleaning" section.)
After shaving
cleaning and maintenance
Please note!
- Switch off the appliance then unplug the adapter from the mains socket and the appliance before cleaning or carrying out maintenance on it.
- Never immerse the appliance or the power cable in water or any other liquid.
- Never use abrasive products, scouring pads or substances such as alcohol or acetone to clean the appliance.

natural_image
Line drawing of a handheld device with multiple cutaway views (no text or symbols)
Ensure that you clean the head and grid of your razor after every use.
- Remove the grid by pressing on each side of it and simultaneously pushing it upwards.
- Push the shaver head outwards with your thumb or index finger.
- Use the brush provided to remove hair.
- Rinse the grid only under warm running water and allow it to dry completely.
- Replace the shaver head and the grid on the mount.
- Ensure that the appliance is completely dry before using it again or storing it.
Lubrication: for optimal shaving comfort, we advise you to oil the shaver head around once per month: apply a drop of oil (provided) to the shaver head, then operate the appliance for a few seconds. Then switch off the razor and dry off the excess oil with a soft, dry cloth.
All information, designs, drawings and pictures in this document are the property of SOURCING & CREATION. SOURCING & CREATION reserves all rights to its brands, designs and information. Any copy and reproduction through any means shall be deemed and considered as counterfeiting.
Ihr Produkt
Inhalt
natural_image
Line drawing of a handheld device with labeled points A and B (no text or symbols on the device itself)natural_image
Line drawing of a handheld device with multiple cutouts and a handle (no text or symbols)
All information, designs, drawings and pictures in this document are the property of SOURCING & CREATION. SOURCING & CREATION reserves all rights to its brands, designs and Information. Any copy and reproduction through any means shall be deemed and considered as counterfeiting.
uw product
Inhoud van de doos
natural_image
Line drawing of a handheld device with labeled points A and B (no text or symbols on the device itself)natural_image
Line drawing of a handheld electronic device with multiple ports and a handle (no text or symbols)
All information, designs, drawings and pictures in this document are the property of SOURCING & CREATION. SOURCING & CREATION reserves all rights to its brands, designs and Information. Any copy and reproduction through any means shall be deemed and considered as counterfeiting.
All information, designs, drawings and pictures in this document are the property of SOURCING & CREATION. SOURCING & CREATION reserves all rights to its brands, designs and information. Any copy and reproduction through any means shall be deemed and considered as counterfeiting.
Protection of the environment
This symbol attached to the product means that it is an appliance whose disposal is subject to the directive on waste from electrical and electronic equipment (WEEE). This appliance may not in any way be treated as household waste and must be subject to a specific type of removal for this type of waste. Recycling and recovery systems are available in your area (waste removal) and by distributors. By taking your appliance at its end of life to a recycling facility, you will contribute to environmental conservation and prevent any harm to your health.

Umweltschutz
\* Tested in our laboratories
Warranty valid from the date of purchase (receipt as proof of purchase). This warranty does not cover defects or damage caused by improper set up, incorrect use, or normal wear and tear of this product.
\* In unseren Labors getestet
SERVICE RELATION CLIENTS / Customer Relations Department / Kundenservice / Klantenafdeling
Avenue de la Motte CS 80137 59811 Lesquin cedex contact@sc-ub.com
Art. 8003726 Ref. ERE 3 PEARL
FABRIQUÉ EN R.P.C. / Made in China / Hergestellt in VR China / Gefabriceerd in VRC.
SOURCING & CREATION Avenue de la Motte 59810 Lesquin - FRANCE

- votre produit
- Contenu de la boîte
- your product
- Contents of the box
- Technical features
- charging the appliance
- Recharging the appliance
- Advice for battery maintenance
- use
- WARNING:
- Before every use
- Preparation of the skin
- During shaving
- The floating head:
- The comb:
- For direct use with the mains
- After shaving
- cleaning and maintenance
- Please note!
- Ihr Produkt
- Inhalt
- uw product
- Inhoud van de doos
- Protection of the environment
- Umweltschutz
- \* Tested in our laboratories
- \* In unseren Labors getestet
Brand : Essentiel B
Model : ERE 3 Pearl
Category : Beard trimmer