
CHMB100 - Blender Champion - Free user manual and instructions
Find the device manual for free CHMB100 Champion in PDF.


| Product Type | Personal Blender |
| Model | CHMB100 |
| Brand | Champion |
| Power | 7000 W |
| Jar Capacity | 0.5 L and 0.8 L (2 jars included) |
| Jar Material | Plastic (dishwasher safe) |
| Blade Material | Stainless steel (sharp, removable) |
| Lid Types | Seal Lid and Sip & Seal Lid |
| Functions | Ice crushing, chopping, blending, nutrient extraction, smoothie making |
| Control | Pulse operation (turn jar clockwise to start, counterclockwise to stop) |
| Safety Features | Built-in safety lock, thermal switch, overload protection |
| Maximum Continuous Operation | 180 seconds (then 60 sec rest) |
| Care and Cleaning | Motor base wipe with damp cloth; jars, lids, attachments top-rack dishwasher safe |
| Storage | Store upright in cool, dry place |
| Warranty | 2 years in Sweden, Norway, Denmark, Finland |
| Country of Origin | Assembled in China |
| Design | Designed in Sweden |
Frequently Asked Questions - CHMB100 Champion
User questions about CHMB100 Champion
0 question about this device. Answer the ones you know or ask your own.
Ask a new question about this device
Download the instructions for your Blender in PDF format for free! Find your manual CHMB100 - Champion and take your electronic device back in hand. On this page are published all the documents necessary for the use of your device. CHMB100 by Champion.
USER MANUAL CHMB100 Champion
natural_image
Champion blender with black and silver casing, labeled 'CHAMPION' and '7000 WATTS' on a reflective surface (no additional text or symbols)EN - English
SE - Svenska
DK - Danske
NO - Norsk
FI - Suomi
EN
- To protect against electrical shock, do not submerge the appliance or allow the power cord to come into contact with water or any other liquid.
- This appliance is not intended for use by persons (including children) with reduced physical, sensory or mental capabilities, or lack of experience and knowledge, unless they have been given supervision or instruction concerning use of the appliance by a person responsible for their safety.
- Do not allow young children to operate the appliance or use as a toy.
- Never let the appliance operate unattended.
- Remove the power cord from the electrical outlet when not in use, before assembling or disassembling parts and before cleaning. To unplug, grasp the plug and pull from the electrical outlet. Never pull from the power cord.
- Do not abuse the power cord. Never carry the appliance by the power cord or yank it to disconnect from electrical outlet; instead grasp the plug and pull to disconnect.
- Do not operate any appliance with a damaged cord or plug, or after the appliance malfunctions, has been dropped or damaged in any manner.
- If the power cord is damaged, it must be replaced by the manufacturer, a certified service agent or similarly qualified persons in order to avoid a hazard.
- Do not let the power cord hang over the edge of table or counter or touch hot surfaces such as the stove.
- Always use appliance on a dry, level surface. Sinks, drain boards or uneven surfaces must be avoided.
- Keep hands, hair, clothing, as well as utensils out of jar while processing to reduce the risk of severe injury to persons or damage to the appliance. A scraper may be used but only when the appliance is not running.
- CAUTION: Blade assembly is sharp, handle with care. When handling the blade assembly, always hold by the base of the blade assembly.
- Avoid contact with moving parts.
- Do not use the appliance if blade assembly is bent or damaged.
- To reduce risk of injury, never place the blade assembly on the base without the proper attachment.
- Do not operate this appliance on or near any hot surface (such as gas or electric burner or in a heated oven).
- The use of attachments or accessories not recommended or sold by the manufacturer may cause fire, electric shock or personal injury.
- Do not remove the jar from the motor base while the appliance is running.
- To reduce the risk if injury, never operate the appliance without the blade assembly in place; Do not try to defeat the interlock mechanism; make sure that the attachment is properly installed before operating the appliance.
- Do not expose jars to extreme temperature changes.
- CAUTION: Do not process hot food or hot liquids.
- Do not overfill.
- Do not operate the appliance empty.
- If the appliance overheats, a thermal switch will become activated and shut off the motor. To reset, unplug the appliance and let it cool down for approximately 30 minutes before using again.
- This product is intended for household use only. Do not use outdoors.
- Appliance accessories are not intended to be used in the microwave. Do not place the jar or the lid in the microwave as it may result in damage to the accessories.
- Never immerse the motor unit in water or any other liquid, not rinse it under the tap.
- Unplug the appliance immediately after use.
- Keep the appliance out of the reach of children.
- Always unplug the appliance before you start cleaning the appliance.
- To avoid occurring danger, please assemble product correctly.
- Make sure the blade is securely fastened to the accessories before you assemble them onto the motor unit.
- Do not attempt to repair or disassemble the appliance. There are no user-service able parts.
- WARNING: Extension cords are not recommended for use with this product.
Getting To Know Your Appliance

A Seal Lid

B Sip & Seal Lid

C 0.5L Jar
D 0.8L Jar

natural_image
Transparent plastic container with a narrow neck and flared top (no text or symbols visible)E Motor Base
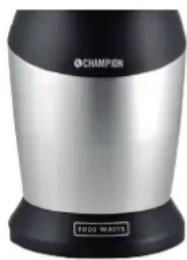
natural_image
Exterior view of a modern office building (no signage)F Blade
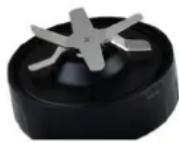
NOTE: Attachments are interchangeable.
The blender is a high powered innovative tool with a compact design and outstanding performance. It is perfect for ice crushing, chopping, blending, and nutrient and vitamin extraction. Blend and go with the convenient Sip&Seal lids, create delicious drinks to get you out the door quickly! Best results are achieved when you Pulse.
Before first use
Before using your appliance for the first time, it is important that you read and follow the instructions in this use and care booklet, even if you feel you are familiar with this type of appliance.
EN
CAUTION: Blades are sharp! Use extreme caution when handling the blade assemblies. Always hold them by the base of the blade assembly.
- Remove all packaging material and labels from the appliance.
- Wash the lids, jars and attachments in warm, soapy water with a soft cloth. Use caution when washing the blade assemblies as the blades are very sharp.
- Rinse and dry thoroughly
- Jars, lids and attachments are all dishwasher safe. It is recommended that the lids and attachments be placed on the top rack. Ensure that the attachments are removed from the jars before placing in the dishwasher.
- Wipe the motor base clean with a damp cloth.
Use
ASSEMBLY:

natural_image
Line drawing of a blender with three blades and a base, showing a circular arrow indicating rotation (no text or symbols)Fig.1
Fig.2
Fig.3
REMOVAL:

natural_image
Line drawing of a blender with a handle and spool, showing no text or symbolsFig.5
natural_image
Diagram showing a blender with a handle and blade, then open to reveal internal contents (no text or symbols)- Place the motor base on a clean, dry, level surface such as a counter or table top.
- Make sure the unit is unplugged.
- Add ingredients to the jar.
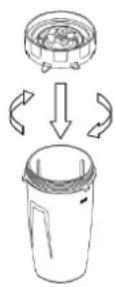
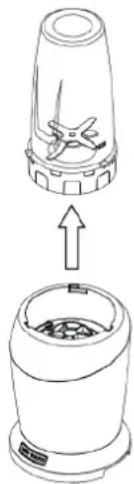
- Place the blade onto the jar and twist it on tightly until you have a good seal.(Fig. 1)
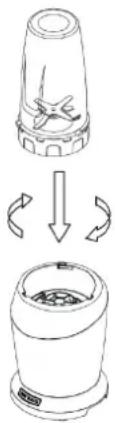
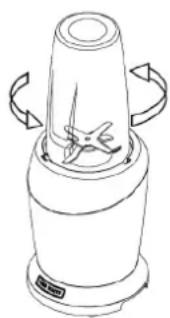
- Turn the jar upside down and place it onto the motor base, aligning the tabs on the jar with the motor base, aligning the tabs on the jar with the motor base. Turn it clockwise, the unit is ready for use.(Fig. 3)
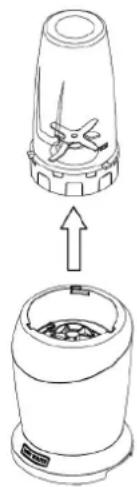
- When you have reached your desired consistency, stop the appliance by turning the jar counterclockwise (Fig. 4) and pull straight up to remove.(Fig. 5)
NOTE: Do not overfill! To avoid spilling, do not add ingredients past the "Max" fill line. - Turn the jar upright and remove the Blade Assembly by twisting the blade assembly counterclockwise. Be sure to store the Blade Assembly attached to an empty jar when not in use.
- Place the Sip & Seal lid onto the jar, twist to seal and enjoy!
- Make sure that the motor base is unplugged when not in use.
Safety features
Built-in safety lock
The blender has a built-in safety lock feature, this ensures that you can only switch on the appliance while the cup and the blade sub-assembly are assembled on the motor base securely. If the appliance is correctly assembled, the built-in safety lock will be unlocked.
IMPORTANT: In the base of each blade's collar, there is a silicone gasket seal that creates an airtight fit with the jars. After dishwashing and before each use, always check to make sure the gasket is properly in place, as the heat from some dishwashers may cause the gasket to become loose.
WARNING: Do not operate the motor continuously for more than 180 seconds at a time. Allow the motor to rest for 60 seconds before continuing.
NOTICE: If the blade is not running smoothly, stop the product and add some liquid, or reduce ingredients in the cup.
NOTE: To prevent product overheating, dry ingredients must not be processed for more than 30 seconds at a time.
EN
| PUROPSE SUGGESTED JAR TYPE OF FOOD | ||
| Chopping 0.5L | 0.8L | NutsChocolate |
| Grating 0.5L Cheese | Bread Crumbs | |
| Mixing 0.5L | 0.8L | BattersDips |
| Sauces 0.5L | 0.8L | VinaigretteSalad DressingsSimple Sauces |
| Frozen Blending 0.5L | 0.8L | IceFrozen FruitIce Cream |
| Nutrient Juices/Smoothies 0 | 5L | |
| 0.8L | ||
Care & Maintenance
HOW TO CLEAN
CAUTION: Make sure that the motor base is unplugged from the power source.
- Wait until the blender has cooled down sufficiently before cleaning it.
-
Do not immerse the motor base into water or any liquid, or place into a dishwasher.
-
Separate/remove all parts from each other.
- Clean the motor base with a slightly damp cloth and wipe dry
- Place jars in the dishwasher. Place the lids and attachments on the top rack. Use caution when handling the blade assemblies as the blades are very sharp.
- Whenever possible, rinse parts immediately after processing to make cleanup easier.
- Store the product in a cool, dry place.
NOTE:
You may also wash the jars by filling the jar to the Max fill line with warm water and drop of dish washing detergent, placing the blade assembly on the jar and pulsing a few times. Do not fill the jar more than Max fill line with water because it will overflow. Once clean, remove the jar from the motor base. Rinse the jar, attachment and lid under running water. Allow all the parts to dry before storing.
Tips:
Use a small brush (not included) to remove particles of food lodged underneath the blades.
HOW TO STORE
- Store the appliance upright. Do not place anything on top. Store the jars and the rest of the attachments along side the appliance where they will not be damaged and won't cause a hazard.
- Remove and empty the jar and ensure that no food is jamming the cutting blades.
- Allow the appliance to cool for approximately 30 minutes.
| PROBLEMS POSSIBLE REASONS & SOLUTIONS | |
| Motor doesn't start or attachment doesn't rotate. For the jars, make sure that the tabs are seated in the slots and turned clockwise | |
| Food is unevenly chopped. Either you are chopping too much food at once, or you are not pulsing properly. Reduce the amount of food in the jar. | |
| Food is too finely chopped or too watery | The food has been over processed. Use short operating for best results. |
| You can not achieve snow from ice cubes. For best result use ice straight from the freezer. Try using short operating instead of long one. | |
| Jar is leaking Make sure that your lid or blade assembly is properly assembled to the jar. Leaking may occur if it is misaligned when twisted onto the jar. Turn the lid tightly clockwise. | |
| Unit doesn't turn on Make sure the unit is plugged in.Make sure the blade assembly is properly assembled to the jar and that is not misaligned | |
| Unit doesn't turn off Unplug the power cord from the electrical outlet and call customer service for support | |
| Doesn't mix well Pulse ingredients for best results. Press down on the jar in short intervals for even blending and chopping. For frozen ingredients, pulse in short intervals of 2-5 seconds and repeat. | |
| Lid/blade assembly will not properly align to the jar | Set the jar on a level surface. Place the lid or blade assembly on top of the jar and align the threads so that the lid/blades sit flat on the jar. Twist clockwise so that the lid/blades evenly align to the jar until you have a tight seal. |
Warranty
Champion Nordic guarantees that this product is free from manufacturing defects in terms of materials and workmanship during a period of 2 years in Sweden, Norway, Denmark and Finland. This warranty period begins on the day the product is purchased or delivered. Champion Nordic has no obligation to repair or replace products that are not accompanied by a valid proof of purchase. This warranty applies only to products purchased and used for home use and does not cover damage resulting from abuse, failure to comply with the instructions from Champion Nordic, cases in which the product has been modified or subjected to unauthorized repair, improper packaging on the part of the owner, normal wear and tear, or improper handling on the part of a transport company.
Correct Disposal of this product
This marking indicates that this product should not be disposed with other household wastes throughout the EU. To prevent possible harm to the environment or human health from uncontrolled waste disposal, recycle it responsibly to promote the sustainable reuse of material resources.


CHAMPION
Champion®
Makadamgatan 14 | 254 64 Helsingborg | Sweden
Designed in Sweden | Assembled in China


VIKTIG SÄKERHETSINFORMATION
SE
natural_image
Transparent plastic container with a narrow neck and flared top (no text or symbols visible)D.0,8l behållare

natural_image
Exterior view of a modern office building (no signage)E.Motorenhet

F.Knivbladsenhet
natural_image
Line drawing of a blender with three blades and a base, showing a circular arrow indicating rotation (no text or symbols)Fig.1
Fig.2
Fig.3
REMOVAL:
natural_image
Line drawing of a blender with a handle and spool, showing no text or symbolsFig.5

natural_image
Diagram showing a blender with a handle and internal components, no text or symbols presentDesigned in Sweden | Assembled in China


natural_image
Transparent plastic container with a flared rim (no text or symbols visible)E.Motorenhed
natural_image
Exterior view of a modern office building (no signage)F.Knivblad-enhed

BEMÆRK: Denne blender er en kraftig maskine med et kompakt design og en fantastisk ydeevne. Den knuser is, hakker, mixer og blender. Blend dine foretrukne smoothies og tag din beholder, som du kan drikke direkte fra.
Før anvendelse
natural_image
Diagram showing a blender with three blades and a base device, illustrating the process of rotation (no text or symbols)Fig.3
REMOVAL:

natural_image
Line drawing of a blender with a handle and spool, showing rotation arrows (no text or symbols)Fig.4

natural_image
Line drawing of a blender with a top and bottom views showing internal components (no text or symbols)Fig.5
Designed in Sweden | Assembled in China

natural_image
Transparent plastic cylindrical container with narrow neck (no text or symbols visible)D.0,81 beholder
natural_image
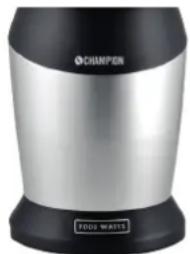
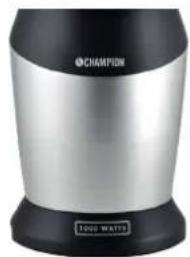
Exterior view of a CHAMPION brand blender with 1000 watts label (no additional text or symbols)E.Motorenhet
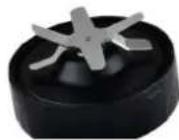
F.Knivbladenhet
natural_image
Diagram showing a food processor with three stages of processing (no text or symbols)Fig.3

natural_image
Line drawing of a blender with a handle and spool, showing rotation arrows (no text or symbols)Fig.4
natural_image
Line drawing of a blender with a handle and lid, showing an upward arrow indicating transformation (no text or symbols)Fig.5
Designed in Sweden | Assembled in China
FI
natural_image
Transparent plastic container with a narrow neck (no text or symbols visible)D.0,8l säiliö

natural_image
Exterior view of a modern office building (no signage)E.Moottoriyksikkö
natural_image
Diagram showing a blender with three blades and a base, illustrating the process of rotation around it (no text or symbols present)Fig.3

natural_image
Line drawing of a blender with a handle and spout, no text or symbols presentFig.4

natural_image
Diagram showing a blender with a handle and an arrow indicating upward motion (no text or symbols)Fig.5
Designed in Sweden | Assembled in China
Brand : Champion
Model : CHMB100
Category : Blender