
iSoundSpa SS-7000 - Pregnant HOMEDICS - Free user manual and instructions
Find the device manual for free iSoundSpa SS-7000 HOMEDICS in PDF.


| Product Type | Sound Machine / Alarm Clock Radio / Docking Station |
| Brand | HoMedics |
| Model | iSoundSpa SS-7000 |
| Nature Sounds | 6: Night, Ocean, Brook, Sunrise, Rain, Waterfall |
| Radio Bands | AM/FM with digital tuner |
| Alarm Features | Dual alarm with snooze; wake to iPod, nature sound, radio, or beep |
| Nap Timer | 15, 30, 45, or 60 minutes with selectable wake mode |
| Projection | Projects time on wall/ceiling in blue light; adjustable angle and focus |
| iPod Compatibility | Charging dock with 7 inserts for various iPod models (excluding Shuffle) |
| Auxiliary Input | 3.5mm aux jack for external devices |
| Display | Easy-to-read LCD with backlight (adjustable dimmer) |
| Speaker Type | Premium quality speakers |
| Power Source | DC adapter (included); backup: CR2025 lithium battery |
| Backup Battery | 1 x CR2025 (pre-installed, remove plastic strip before use) |
| Dimensions (Approx.) | Not specified; compact tabletop design |
| Weight (Approx.) | Not specified |
| Maintenance | Clean with soft dry cloth; do not use liquids or abrasives |
| Safety | Indoor use only; keep away from water; unplug before cleaning |
| Warranty | 1-year limited warranty |
| Accessories Included | DC adapter, AM loop antenna, auxiliary cable, 7 iPod inserts |
Frequently Asked Questions - iSoundSpa SS-7000 HOMEDICS
User questions about iSoundSpa SS-7000 HOMEDICS
0 question about this device. Answer the ones you know or ask your own.
Ask a new question about this device
Download the instructions for your Pregnant in PDF format for free! Find your manual iSoundSpa SS-7000 - HOMEDICS and take your electronic device back in hand. On this page are published all the documents necessary for the use of your device. iSoundSpa SS-7000 by HOMEDICS.
USER MANUAL iSoundSpa SS-7000 HOMEDICS
HoMedics Service Center
1.800.466.3342
8:30 - 5:00 p.m. (EST) M - F
Dirección postal:
HoMedics
Consumer Relations
Service Center Dept. 168
3000 Pontiac Trail
Commerce Township, MI
48390
Correo electrónico:
cservice@homedics.com
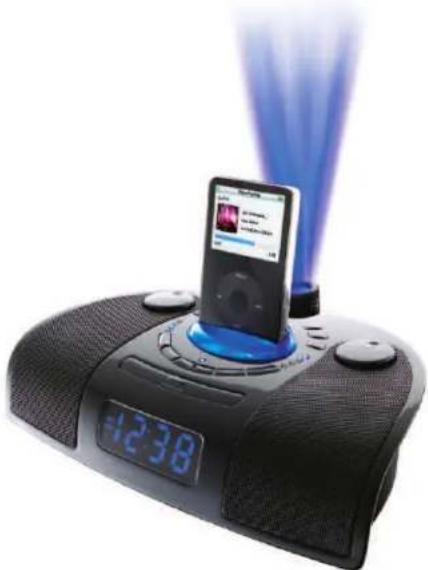
sound machine | projection alarm clock radio | docking station for iPod
natural_image
Black electronic device with a CD and a music player displaying a blue flash, no visible text or symbols on the device itself.Instruction Manual and
Warranty Information
SS-7000
1 year limited warranty
HOMEDICS
Create your perfect sleep environment.
Thank you for purchasing iSoundSpa, the HoMedics ultimate sound dock and relaxation machine. This, like the entire HoMedics product line, is built with high-quality craftsmanship to provide you years of dependable service. We hope you will find it to be the finest product of its kind.
iSoundSpa helps create your perfect sleep environment. Fall asleep to any of the six calming sounds, then wake to iPod, sounds, radio, or beep tone. iSound Spa can also mask distractions to improve your concentration while you read, work or study.
IMPORTANT SAFETY INSTRUCTIONS:
When using an electrical appliance, basic precautions should always be followed, including the following:
READ ALL INSTRUCTIONS BEFORE USING
DANGER - To reduce the risk of electric shock:
• Always unplug the appliance from the electrical outlet immediately after using and before cleaning.
- Do not reach for an appliance that has fallen into water. Unplug it immediately.
- Do not place or store appliance where it can fall or be pulled into a tub or sink. Do not place in or drop into water or other liquid.
WARNING - To reduce the risk of burns, fire, electric shock or injury to persons:
- Close supervision is necessary when this appliance is used by or near children, invalids or disabled persons.
- Use this appliance only for its intended use as described in this manual. Do not use attachments not recommended by HoMedics; specifically any attachments not provided with the unit.
- Never operate this appliance if it has a damaged cord, plug, cable or housing. If it is not working properly, if it has been dropped or damaged, return it to Homedics Service Center for examination and repair.
- Keep cord away from heated surfaces.
- Never drop or insert any object into any opening.
- Do not operate where aerosol (spray) products are being used or where oxygen is being administered.
Caution: All servicing of this product must be performed by authorized HoMedics Service Personnel onl
- Do not carry this appliance by supply cord or use cord as handle.
• To disconnect, remove plug from outlet. - This appliance is designed for indoor use only. Do not use outdoors.
- Only set on dry surfaces. Do not place on surface wet from water or cleaning solvents.
SAVE THESE INSTRUCTIONS
Caution – Please read all instructions carefully before operating.
- Never leave the appliance unattended, especially if children are present.
- Never cover the appliance when it is in operation.
- This unit should not be used by children without adult supervision.
• Always keep the cord away from high temperature and fire. - Do not lift, carry, hang, or pull the product by the power cord.
- If the adaptor sustains damage, you must stop using this product immediately and contact the HoMedics Service Center. (See the warranty section for the HoMedics address.)
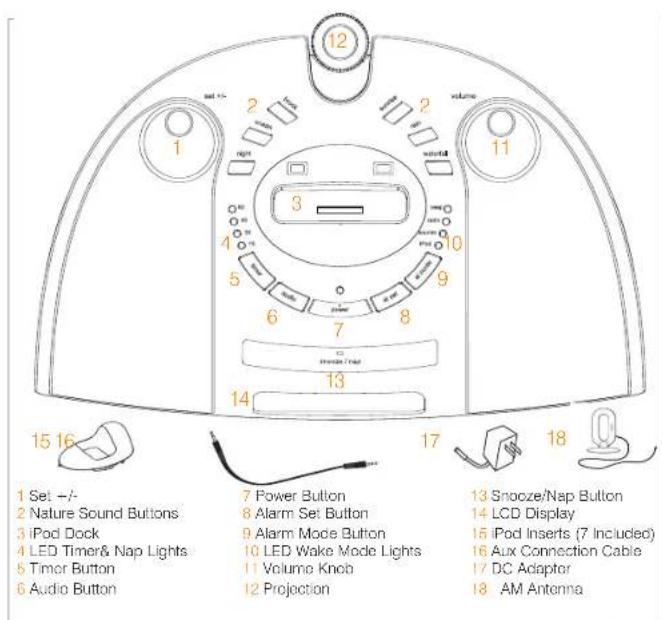
iSoundSpa Clock Radio Features
• 6 Nature Sounds: Night, Ocean, Brook, Sunrise, Rain and Water Fall
- Charging docking station for iPod
• Premium quality speakers
• AM/FM radio with digital tuner
- Dual Alarm with Snooze
- Nap – Auto timer options 15, 30, 45 or 60 minutes
- Four wake options - iPod, radio, beep or nature sound
- Easy-to-read clock with LCD display
• Projection feature projects time on the wall or ceiling in a soothing blue light
• Factory preset time with DST adjustment feature
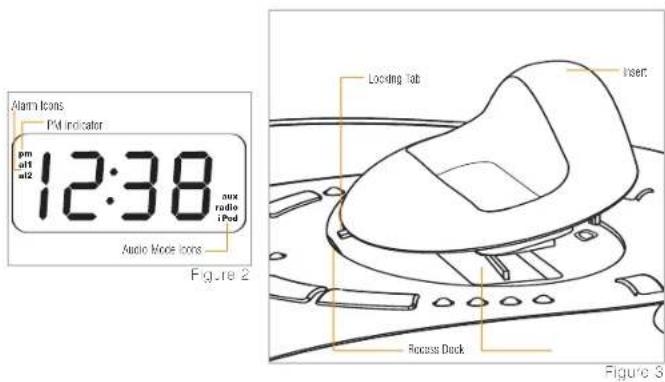
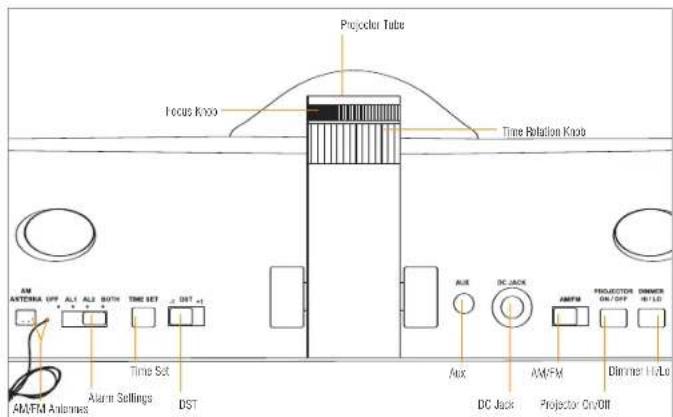
Figure 4
Before You Begin
The iSoundSpa uses a backup battery system to provide continuous alarm and clock settings in the event of a power failure. When the Backup Battery is installed – In the event of a power failure or the DC cord is accidentally disconnected, the LCD display will not remain lit, but the current time and alarm time settings will be temporarily maintained.
One lithium backup battery is already installed prior to shipping. There is a plastic strip under the lithium battery to prevent battery drain in shipping. Remove the plastic strip before setting clock time.
Getting Started
Setting Clock Time
- Press the TIME SET BUTTON located on the back of the unit (Fig. 4); hour digit will begin flashing. Turn the SET +/- KNOB until the current hour is displayed. Remember to set the correct AM or PM (an icon in the upper left of the time display is the PM INDICATOR; there is no AM indicator) (Fig. 2).
- Press the TIME SET BUTTON again; minute digits will begin flashing. Turn the SET +/- KNOB until the current minute is displayed.
- Press the TIME SET BUTTON again to exit the clock setting mode or after 5 seconds the display will stop flashing to indicate the time is set.
Replace Backup Battery
One lithium backup battery is already installed prior to shipping. There is a plastic strip under the lithium battery to prevent battery drain in shipping. Remove the plastic strip before setting clock time.
- Make sure the DC adaptor is connected. Otherwise the time setting may be lost during battery replacement.
- Open the battery compartment cover located on the bottom of the unit.
- Insert one 3-volt lithium battery (Model#: CR2025), checking that the positive polarity faces toward you.
- Close the compartment cover.
Charging your iPod®
- Select the correct insert for your particular iPod ^ model from among the 7 different inserts included (Fig. 1). Each insert is labeled with the name and/or size of an iPod model. Place the selected insert in the docking area so that the iPod 30-pin connector passes through the opening in the insert.
Note: Make sure you are using the correct insert for your iPod ^® (see chart) and that it is properly docked into the iSoundSpa.
Failure to do so may damage your iPod ^® .
WARNING: INSERTS ARE DESIGNED FOR APPLE iPOD MUSIC PLAYERS ONLY. ATTEMPTING TO ATTACH OR FORCE ANY NON- iPOD MUSIC PLAYER INTO ANY OF THE ENCLOSED INSERTS WILL DAMAGE AND EVEN DESTROY YOUR DEVICE.
- Slide locking tab into front recess and gently press the insert downward into the dock (Fig. 3).
- Carefully place your iPod into the docking area so that the 30-pin connector in the dock is fully connected to the 30-pin socket on the bottom of your iPod. (The iPod must not be in a case or "skin"). The blue LED light under the insert will illuminate to indicate the iPod is docked properly.
| Insert Label | iPods |
| Shuffle Rest | iPod Shuffle (iSoundSpa will not charge the iPod Shuffle) |
| iPod mini | iPod mini |
| iPod nano | iPod nano |
| iPod w/video (30GB) | iPod w/video(30GB) |
| iPod w/video (60 & 80GB) | iPod w/video(60GB, 80GB) |
| Thin iPods | 3G iPod(10GB, 15GB, 20GB), 4G iPod(20GB), U2 iPod(20GB), iPod photo(20GB,30GB), Color U2 iPod(20GB), Color Display(20GB) |
| Thick iPods | 3G iPod(30GB,40GB), 4G iPod(40GB), iPod photo(40GB,60GB), Color Display (60GB) |
Note: When you dock your iPod ^® it recharges (until fully charged).
- To remove/replace an insert, first remove your iPod, then grip the insert and pull gently upwards.
Important: The iPod ^® Shuffle will NOT charge or dock.
Listening to Your iPod®
- Press the POWER BUTTON on the iSoundSpa to turn it on (Fig. 1).
- Toggle through the AUDIO BUTTON to play the iPod (Fig. 1). The IPOD ICON will appear on the LCD display in the lower right hand corner to indicate that the iPod mode has been selected (Fig. 2).
Note: When the iPod is docked and in standby mode, it will automatically begin playing once the iPod mode is selected on the unit.
- Press the PLAY/PAUSE button on your iPod to pause play; press again to resume play.
- Turn the VOLUME KNOB on the unit to adjust the system volume (Fig. 1).
- Press the on your iPod to go to the next or previous track.
- To turn off the unit, press the POWER BUTTON. The iPod will continue charging in the dock.
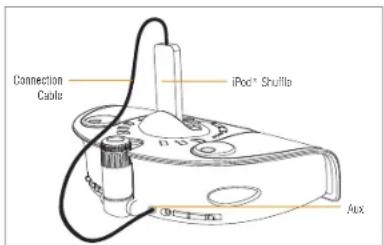
Figure 5
natural_image
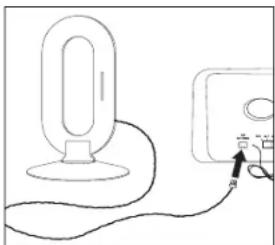
Simple line drawing of a stand connected to a device with a cable (no text or symbols)Figure 5a
Listening to a non-docking iPod® or other portable audio devices
If you are using an iPod without a docking port, other MP3 player, or other portable audio device, you can play it through the iSoundSpa via the Aux Jack located on the back of the unit.
- Plug one end of the Connection Cable (included) into the headphone or line-out jack on your MP3 device and the other end of the Connection Cable into the iSoundSpa Aux jack, located on the back of the unit (Fig. 5).
- Press the POWER BUTTON on the unit to turn it on (Fig. 1).
- Toggle through the AUDIO BUTTON on the unit until you reach the auxiliary mode (Fig. 1). The AUX ICON will appear in the lower right hand corner on the LCD display to indicate that the auxiliary mode has been selected (Fig. 2).
- Turn on and play your MP3 device.
- Use the VOLUME KNOB on the unit to adjust the system volume (Fig. 1).
Note: You may need to adjust the volume on your MP3 device too.
- To turn off the unit, press the POWER BUTTON.
Note: You also need to turn off your MP3 device too.
Listening to Nature Sounds
- Press the POWER BUTTON on the unit to turn it on (Fig. 1).
- Select the nature sound you wish to listen to and press the corresponding button (Fig. 1).
- Turn the VOLUME KNOB on the unit to adjust the system volume (Fig. 1).
- To turn off the nature sounds, press the POWER BUTTON to turn it off, or switch the audio mode by pressing the AUDIO BUTTON (Fig. 1).
Note: When the unit is turned on, it will always default to the last mode used.
Listening to the Radio
Extend FM wire antenna fully for best FM reception (do not strip, alter or attach to other antennas).
Snap the AM loup antenna into the base provided. Next, plug the AM loop antenna into the connector located on the back of the unit for best AM reception (Fig 5a).
- Press the POWER BUTTON on the unit to turn it on (Fig. 1).
- Toggle through the AUDIO BUTTON to play the radio (Fig. 1). The RADIO ICON will appear in the lower right hand corner on the LCD display to indicate that the radio is on (Fig. 2).
- Slide the AM/FM SWITCH located on the back of the unit to select AM or FM band (Fig. 4).
- Turn the SET +/- KNOB on the unit to tune in the desired station (Fig. 1).
- Turn the VOLUME KNOB on the unit to adjust the system volume (Fig. 1).
- To turn off the unit, press the POWER BUTTON.
Using Auto-Timer
While listening to your iPod, the nature sounds, or the radio, you may set a timer so the unit will automatically turn off.
- Toggle through the TIMER BUTTON until the corresponding blue LED light illuminates next to the time of your choice, 15, 30, 45, or 60 minutes (Fig. 1).
- To cancel the timer, toggle through the TIMER BUTTON until the blue LED light is not illuminated, which indicates you are at the off position.
Setting And Using The Alarms Setting Alarm1 or Alarm2 (Individually)
- Slide the ALARM SWITCH located on the back of the unit to AL1 or AL2 (Fig. 4). The AL1 or AL2 ICON will appear in the upper left hand corner on the LCD display to indicate which alarm is activated (Fig. 2).
- Press the AL SET BUTTON twice; hour digits will begin flashing (Fig. 1). Turn the SET +/- KNOB until the desired hour is displayed (Fig. 1). Remember to set the correct AM or PM (an icon to the left of the time display is the PM INDICATOR; there is no AM indicator) (Fig. 2).
- Press the AL SET BUTTON again; minute digits will begin flashing. Turn the SET +/- KNOB until the desired minute is displayed.
- Press the AL SET BUTTON again to exit the alarm setting mode or after 5 seconds the display will stop flashing to indicate the alarm is set. Note: You can press the AL SET BUTTON at any time to review the alarm setting.
- Toggle through the AL MODE BUTTON until the corresponding blue LED light illuminates next to the wake mode of your choice, iPod, sound, radio, or beep (Fig. 1).
Note: To wake to iPod, your iPod must be properly docked in the unit, or it will default to beep wake mode.
Note: When using the sound mode, the unit will set to the last sound you listened to. If you wish to change it, first, turn the power on, then press the sound you wish to wake to. Lastly, turn the power off.
- When the alarm is sounding, press the POWER BUTTON on the unit to turn the alarm OFF (Fig. 1). The alarm will come on again the next day at the same time.
- To stop the alarm from coming on the next day, slide the ALARM SWITCH located on the back of the unit to the OFF position. The AL1 or AL2 ICON will disappear on the LCD display to indicate the alarm is disarmed.
Note: If the alarm sounds for 30 minutes continuously it will automatically turn off.
Setting Alarm1 and Alarm2 (Together)
- Slide the ALARM SWITCH located on the back of the unit to BOTH (Fig. 4). The AL1 and AL2 ICON will appear on the LCD display to indicate both alarms are activated (Fig. 2).
Note: You cannot change the alarm time when BOTH is selected. If you need to change the alarm time for either alarm, follow step 1 under Setting Alarm 1 or Alarm 2 (Individually). - Toggle through the AL MODE BUTTON until the corresponding blue LED light illuminates next to the wake mode of your choice, iPod, sound, radio, or beep (Fig. 1). Both AL1 & AL2 must wake to the same mode. Note: To wake to iPod, your iPod must be properly docked in the unit, or it will default to beep wake mode.
Note: When using the sound mode, the unit will set to the last sound you listened to. If you wish to change it, first, turn the power on, then press the sound you wish to wake to. Lastly, turn the power off.
- When the alarm is sounding, press the POWER BUTTON on the unit to turn the alarm OFF (Fig. 1). The alarm will come on again the next day at the same time.
- To stop the alarm from coming on the next day, slide the ALARM SWITCH located on the back of the unit to the OFF position. The AL1 and AL2 ICONS will disappear on the LCD display to indicate the alarms are disarmed.
Note: If one of the alarm users still needs their alarm set, you will need to slide the ALARM SWITCH located on the back of the unit to the alarm that corresponds to their wake time.
Note: If the alarm sounds for 30 minutes continuously it will automatically turn off.
Snooze Operation
- Press the SNOOZE/NAP BUTTON on the unit while the alarm is sounding (Fig. 1). The alarm will go off temporarily and will go on again in approx. 9 minutes. You may use this feature until you turn the alarm off. Note: To turn off the snooze function prior to the alarm activating, press the POWER BUTTON twice. The alarm will come on again the next day at the same time.
Nap Operation
The NAP TIMER FUNCTION will wake you after a nap of 15, 30, 45, or 60 minutes without the need to change your regular Alarm 1 or Alarm 2 settings.
-
If the system is playing, press the POWER BUTTON to off (Fig. 1).
-
Toggle through the SNOOZE/NAP BUTTON until the corresponding blue LED light illuminates next to the time of your choice, 15, 30, 45, or 60 minutes (Fig. 1).
-
Toggle through the AL MODE BUTTON until the corresponding blue LED light illuminates next to the wake mode of your choice, iPod, sound, radio, or beep (Fig. 1). Note: To wake to iPod, your iPod must be properly docked in the unit, or it will default to beep wake mode.
- The alarm will sound to wake you up after the selected amount of minutes has passed.
- To cancel the NAP TIMER, press the SNOOZE/NAP BUTTON, until the blue LED light is not illuminated, which indicates you are at the off position.
Dimmer Control
- Press the DIMMER HI/LO BUTTON located on the back of the unit to adjust the backlight intensity of the LCD display & the lights located in the docking area (Fig. 4).
Using the Projection Feature
- To turn on the projection feature, press the PROJECTOR ON/OFF BUTTON located on the back of the unit (Fig. 4). The time is now projected on the wall or ceiling.
- The angle of the projector can be adjusted to angle on the ceiling or wall by moving the PROJECTOR TUBE forward or backward (Fig. 4).
-
To turn the angle of the time that appears on the wall of ceiling, rotate the TIME ROTATION KNOB until you have reached your desired result (Fig. 4).
Note: The TIME ROTATION KNOB will rotate up to 350 degrees. -
To focus the time on the wall or ceiling rotate the FOCUS KNOB until you have reached your desired result (Fig. 4).
Maintenance
To Store
You may leave the unit on display, or you can store it in its box in a cool, dry place.
To Clean
Use only a soft dry cloth to clean the enclosure of the unit.
NEVER use liquids or abrasive cleaner to clean.
Modifications not authorized by the manufacturer may void users authority to operate this device.
Note: This equipment has been tested and found to comply with the limits for a Class B digital device, pursuant to Part 15 of the FCC Rules. These limits are designed to provide reasonable protection against harmful interference in a residential installation. This equipment generates, uses and can radiate radio frequency energy and, if not installed and used in accordance with the instructions, may cause harmful interference to radio communications. However, there is no guarantee that interference will not occur in a particular installation. If this equipment does cause harmful interference to radio or television reception, which can be determined by turning the equipment off and on, the user is encouraged to try to correct the interference by one or more of the following measures:
- Reorient or relocate the receiving antenna.
- Increase the separation between the equipment and receiver.
- Connect the equipment into an outlet on a circuit different from that to which the receiver is connected.
- Consult the dealer or an experienced radio/TV technician for help
Note: The manufacturer is not responsible for any radio or TV interference caused by unauthorized modifications to this equipment. Such modifications could void the users authority to operate the equipment.
HOMEDICS
HoMedics Service Center
1.800.466.3342
8:30 - 5:00 p.m. (EST) M - F
Mail To:
HoMedics
Consumer Relations
Service Center Dept. 168
3000 Pontiac Trail
Commerce Township, MI
48390
e-mail:
cservice@hamedics.com
ONE YEAR LIMITED WARRANTY
HoMedics sells its products with the intent that they are free of defects in manufacture and workmanship for a period of one year from the date of original purchase, except as noted below. HoMedics warrants that its products will be free of defects in material and workmanship under normal use and service.
To obtain warranty service on your HoMedics product, mail the product and your dated sales receipt (as proof of purchase), postpaid, to the following address: HoMedics Service Center, Dept. 168, 3000 Pontiac Trail, Commerce Township, MI 48390. No COD's will be accepted.
HoMedics does not authorize anyone, including, but not limited to, Retailers, the subsequent consumer purchaser of the product from a Retailer or remote purchasers, to obligate HoMedics in any way beyond the terms set forth herein.
This warranty does not cover damage caused by misuse or abuse; accident; the attachment of any unauthorized accessory; alteration to the product; improper installation; unauthorized repairs or modifications; improper use of electrical/power supply; loss of power; dropped product; malfunction or damage of an operating part from failure to provide manufacturers recommended maintenance; transportation damage; theft; neglect; vandalism; or environmental conditions; loss of use during the period the product is at a repair facility or otherwise awaiting parts or repair; or any other conditions whatsoever that are beyond the control of HoMedics.
This warranty is effective only if the product is purchased and operated in the United States of America. A product that requires modifications or adoption to enable it to operate in any other country than the country for which it was designed, manufactured, approved and/or authorized, or repair of products damaged by these modifications is not covered under this warranty.
THE WARRANTY PROVIDED HEREIN SHALL BE THE SOLE AND EXCLUSIVE WARRANTY. THERE SHALL BE NO OTHER WARRANTIES EXPRESS OR IMPLIED INCLUDING ANY IMPLIED WARRANTY OF MERCHANTABILITY OR FITNESS OR ANY OTHER OBLIGATION ON THE PART OF THE COMPANY WITH RESPECT TO PRODUCTS COVERED BY THIS WARRANTY. HOMEDICS SHALL HAVE NO LIABILITY FOR ANY INCIDENTAL, CONSEQUENTIAL OR SPECIAL DAMAGES. IN NO EVENT SHALL THIS WARRANTY REQUIRE MORE THAN THE REPAIR OR REPLACEMENT OF ANY PART OR PARTS WHICH ARE FOUND TO BE DEFECTIVE WITHIN THE EFFECTIVE PERIOD OF THE WARRANTY, NO REFUNDS WILL BE GIVEN. IF REPLACEMENT PARTS FOR DEFECTIVE MATERIALS ARE NOT AVAILABLE, HOMEDICS RESERVES THE RIGHT TO MAKE PRODUCT SUBSTITUTIONS IN LIEU OF REPAIR OR REPLACEMENT.
This warranty does not extend to the purchase of opened, used, repackaged and/or resealed products, including but not limited to sale of such products on Internet auction sites and/or sales of such products by surplus or bulk resellers. Any and all warranties or guarantees shall immediately cease and terminate as to any products or parts thereof which are altered, or modified, without the prior express and written consent of HoMedics.
This warranty provides you with specific legal rights. You may have additional rights which may vary from state to state. Because of individual state regulations, some of the above limitations and exclusions may not apply to you.
©2006 HoMedics, Inc. and its affiliated companies, all rights reserved. HoMedics® is a registered trademark of HoMedics, Inc. and its affiliated companies. SoundSpa™ is a trademark of HoMedics, Inc. and its affiliated companies. All rights reserved.
iPod is a trademark of Apple Computer, Inc., registered in the U.S. and other countries.
IB-SS7000E
HOMEDICS
iSoundSou
natural_image
Black electronic device with a CD and a music player displaying a blue flash, no visible text or symbols on the device itself.- HOMEDICS
- IMPORTANT SAFETY INSTRUCTIONS:
- READ ALL INSTRUCTIONS BEFORE USING
- SAVE THESE INSTRUCTIONS
- Caution – Please read all instructions carefully before operating.
- iSoundSpa Clock Radio Features
- Before You Begin
- Getting Started
- Setting Clock Time
- Replace Backup Battery
- Charging your iPod®
- Listening to Your iPod®
- Listening to a non-docking iPod® or other portable audio devices
- Listening to Nature Sounds
- Listening to the Radio
- Using Auto-Timer
- Setting And Using The Alarms Setting Alarm1 or Alarm2 (Individually)
- Setting Alarm1 and Alarm2 (Together)
- Snooze Operation
- Nap Operation
- Dimmer Control
- Using the Projection Feature
- Maintenance
- To Store
- To Clean
- ONE YEAR LIMITED WARRANTY
- iSoundSou
Brand : HOMEDICS
Model : iSoundSpa SS-7000
Category : Pregnant