
FLOORMATE PLUS FL700 011 - Floor cleaner HOOVER - Free user manual and instructions
Find the device manual for free FLOORMATE PLUS FL700 011 HOOVER in PDF.

| Product type | Floor cleaner |
| Brand | HOOVER |
| Model | FLOORMATE PLUS FL700 011 |
| Power supply | Mains (grounded cord, 13 A fuse) |
| Cleaning modes | Vacuuming, washing, drying |
| Usage | Hard floors (vinyl, linoleum, marble, laminate, etc.) |
| Clean water tank capacity | Approx. 1.2 L (measure 60 ml detergent plus warm water to fill line) |
| Dirty water tank capacity | With auto shut-off to prevent overflow |
| Brush type | Removable brush block (ref. F5, 35601337) |
| Filter | Washable and reusable (ref. S116, 35601336) |
| Additional features | Solution release trigger, mode selector, handle release pedal |
| Safety | Grounded, child safety, dirty water tank auto shut-off |
| Maintenance | Regular cleaning of filter, nozzle, and brushes |
| Spare parts | Washable filter (S116), Brush block (F5) |
| Warranty | 12 months (conditions vary by country) |
| Weight | Approx. 7 kg (estimated) |
| Dimensions (L x W x H) | Approx. 40 x 30 x 50 cm (estimated) |
Frequently Asked Questions - FLOORMATE PLUS FL700 011 HOOVER
User questions about FLOORMATE PLUS FL700 011 HOOVER
0 question about this device. Answer the ones you know or ask your own.
Ask a new question about this device
Download the instructions for your Floor cleaner in PDF format for free! Find your manual FLOORMATE PLUS FL700 011 - HOOVER and take your electronic device back in hand. On this page are published all the documents necessary for the use of your device. FLOORMATE PLUS FL700 011 by HOOVER.
USER MANUAL FLOORMATE PLUS FL700 011 HOOVER


IMPORTANT SAFETY REMINDERS
This cleaner should only be used for domestic cleaning, as described in this user guide. Please ensure that this guide is fully understood before operating the appliance. Use only attachments recommended or supplied by Hoover.
When using cleaning tools ensure to always steady the product with your other hand. This will ensure the product does not fall while in use.
WARNING: Danger of scalding. This product is very hot when used. Avoid any contact with steam.
WARNING: Electricity can be extremely dangerous. This appliance must be earthed. This plug is fitted with a 13 amp fuse (UK only).
IMPORTANT: The wires in the mains power lead are coloured in accordance with the following code: Blue – Neutral Brown – Live
AFTER USE: Switch the cleaner off and remove the plug from the electricity supply. Always switch off and remove the plug before cleaning the appliance or attempting any maintenance task.
SAFETY WITH CHILDREN, ELDERLY OR THE INFIRM:
This appliance can be used by children aged from 8 years and above and persons with reduced physical, sensory or mental capabilities or lack of experience and knowledge if they have been given supervision or instruction concerning use of the appliance in a safe way and understand the hazards involved. Children shall not play with the appliance. Cleaning and user maintenance shall not be made by children without supervision.
HOOVER SERVICE: To ensure the continued safe and efficient operation of this appliance we recommend that any servicing or repairs are only carried out by an authorised Hoover service engineer.
IT IS IMPORTANT THAT YOU
- Use indoors only.
- Use only on surfaces moistened by the cleaning process or small spills. Do not immerse product.
- For use on bare floors or sealed wood floors. NOT for use on carpets.
• Always install float before any wet pick up operation. - Close supervision is necessary when any appliance is used by or near children. Do not allow cleaner to be used as a toy or to run unattended at any time.
- Keep hair, loose clothing, fingers, feet and all parts of body away from openings and moving parts.
- Do not pick up anything that is burning or smoking, such as cigarettes, matches, or hot ashes.
- Do not pick up or use flammable or combustible materials such as gasoline or fine wood sandings or use in areas where they may be present.
- Avoid picking up hard, sharp objects with the cleaner. They may damage the machine.
- Do not put any object into openings. Do not use with any opening blocked; keep free of dust, lint, hair, and anything that may reduce air flow.
- Do not pull or carry by cord, use cord as a handle, close door on cord or pull cord around sharp edges or corners. Do not run appliance over cord. Keep cord away from heated surfaces.
• Always disconnect cord from electrical outlet before servicing the cleaner. - Unplug cleaner when not in use. Turn off all controls before unplugging.
- Do not unplug by pulling on cord. To unplug, grasp the plug, not the cord.
- Never handle plug or appliance with wet hands.
- Do not clean over floor electrical outlets.
- Do not use without tanks in place.
- Use extra care when cleaning on stairs. Do not place cleaner on stairs.
- Keep detergents and other cleaners out of children's reach.
- Do not pick up chlorine bleach, drain cleaner, gasoline or any other toxic material with this appliance.
- When using recommended chemicals with this machine, be certain area is well ventilated.
- Do not use a flammable or combustible liquid to clean a floor.
- Follow manufacturer's instructions for all chemicals used with this machine. Do not exceed recommended mixing ratios.
- Store in a dry place. Do not expose machine to freezing temperatures.
- Do not continue to use your cleaner if it appears to be faulty. If the power cord is damaged stop using the cleaner IMMEDIATELY. To avoid a safety hazard, an authorised Hoover service engineer must replace the power cord.
- Use cleaner only for its intended use as described in the instructions.
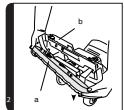
GETTING TO KNOW YOUR CLEANER
A. Soft Hand Grip
B. ON/OFF Switch
C. Solution Trigger: squeeze to release cleaning solution
D. Mode Selector Dial: turns brushes ON for wet washing and OFF for drying and vacuuming
E. Clean Water Solution Tank Cap/Measuring Cup
F. Clean Water Solution Tank
G. Clean Water Solution Tank Release
H. Dirty Water Tank Release
I. Dirty Water Tank Lid and Filter
J. Dirty Water Tank: collects dry debris as well as dirty cleaning solution
K. Nozzle Release Buttons: release nozzle for easy clean-up (located behind nozzle)
L. Nozzle
M. Squeegee (underneath nozzle)
N. Bumper
O. Soft-tread Wheels
P. Carrying Handle
Q. Upper Handle Release Button
R. Cord Hooks: top hook rotates for quick cord release
S. Handle Release Pedal
ASSEMBLING YOUR CLEANER
Remove all components from the packaging.
Install Brushes and Nozzle
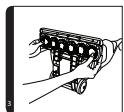
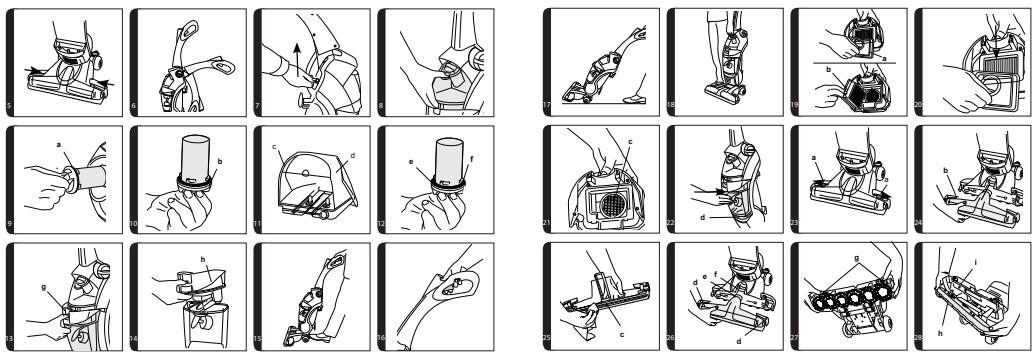
- To install brushes, place handle in upright position. Tilt cleaner back so that it rests on the floor. Align post (a) on brush block with hole (b) on bottom of cleaner. Turn brushes slightly until post fits easily into hole. [2]
- Press brush assembly firmly to snap into place. [3]
- To install nozzle, make sure latches (c) are out. Align middle section (d) of nozzle with opening (e) on cleaner. Remove cardboard packing insert from squeegee area on underside of nozzle. [4]
- While holding nozzle in place, slide latches inward to lock in place. [5]
Unfold / Fold the Handle
- Raise upper handle to upright position until it locks in place. [6]
- Press upper handle release button to fold handle to storage position. [7]
USING YOUR CLEANER
Clean Water Tank Solution
The Clean Water Solution Tank holds detergent and water that is to be dispersed onto the surface being cleaned.
- Turn cleaner off and disconnect from electrical outlet.
- Place carpet cleaner handle in the upright, locked position. [6]
- To remove tank, squeeze release button and pull tank straight out. [8]
- Rotate tank cap counter-clockwise and lift up to remove cap (a). [9]
- Turn cap (b) upside down to serve as a measuring cup. [10]
-
For hard surface floors such as vinyl, linoleum, marble, laminate wood, polyurethane sealed wood or other wood floors that can normally be cleaned using water, use one cup (60ml) of low foam producing floor detergent.
-
Pour cleaning detergent into tank (c). Fill tank to fill line (d) with warm water. [11]
- If rubber ring (e) on cap has become dislodged, reposition it with uneven side against ledge (f) as shown. [12]
- Replace cap. Rotate cap clockwise until it locks in place. Cap must be locked in place for proper performance and to prevent leaking.
- Slide tank straight into position until latch snaps in place.
Note: Check for worn spots or joint separations before using, as these conditions could lead to damaged flooring when using water to clean floor.
IMPORTANT: Do not use cleaning concentrates that contain solvent based ingredients.
Cleaning Floors
Recommended cleaning sequence:
VACUUM: Vacuum to remove loose dirt, hair and debris.
WASH: Clean the floor surface. The brushes will provide light agitation to help loosen dirt.
DRY: Pickup reduces drying time of the floor surface.
- Set Mode selector dial to VACUUM position and vacuum floor. [1D]
- Fill Clean Water Solution Tank with either floor cleaning detergent and water.
- Turn Mode selector dial to WASH position. [1D]
- Dry hands and plug cleaner into a properly grounded outlet.
- Step on handle release pedal and lower handle to operating position. [15] Turn cleaner ON. [1B]
- To release solution, squeeze trigger. Slowly move cleaner forward and backward over area to be cleaned. Squeeze trigger to release solution as needed. [16]
- Overlap strokes by one inch to help prevent streaking. The cleaner's suction will pick up the dirty solution throughout cleaning.


GB
- To greatly enhance drying of the floor surface, release trigger and turn Mode selector dial to the DRY position. [1D] Continue to move cleaner over the area to pick up the dirty solution.
- To continue cleaning another area, turn Mode selector dial to WASH position. [1D] Repeat cleaning motion.
- Empty Dirty Water Tank or clean the filter when the motor sound becomes higher in pitch and there is a loss of suction (see "Automatic shut-off" section).
Picking up spills
Your cleaner may also be used to pick up small liquid spills (1L or less, never to exceed 1/4 inch in depth) on non-carpeted floors.
Turn Mode selector dial to the WASH position and release the trigger. Continue to move cleaner over the area to pick up the spill.
Transporting your cleaner
- To move your cleaner from room to room, put handle in upright position, tilt cleaner back on rear wheels and push forward. [17]
- The cleaner may also be lifted using the carrying handle (A) on the front of the cleaner. [18]
Storage
Before storing cleaner:
• Turn cleaner OFF and disconnect from electrical outlet.
• Empty and rinse solution and Dirty Water Tanks. Allow to air dry.
- Press on upper handle release button to lower handle for storage.
• Make sure that nothing is pressing on the nozzle squeegee.
- Do not store cleaner on a wood surface unless cleaner is completely dry.
MAINTENANCE
Emptying The Dirty Water Tank
Automatic "Shut Off"
An automatic suction shut-off is built into the Dirty Water Tank to prevent the tank from overflowing. When the shut-off activates, the cleaner will not pick up debris and the sound of the motor will change. The Dirty Water Tank is full and must be emptied.
- Turn cleaner off and disconnect from electrical outlet.
- To remove tank, press down on release button (g) and pull tank straight out. [13]
- Remove tank lid (h). Empty tank. [14]
Note: Although not necessary for satisfactory performance, it is recommended that the Dirty Water Tank be emptied after dry vacuuming and before wet operation.
Cleaning the Filters
The tank lid contains a washable, reusable filter. Clean this filter when suction is low or reduced.
- Turn cleaner off and disconnect from electrical outlet.
- Remove Dirty Water Tank and lid [13&14] Remove filter lid (a), then remove filter (b). [19]
- Remove loose debris from filter by tapping the filter or gently brushing using your hand. The filter may also be rinsed for additional cleaning. Allow filter to air dry between uses.
- Reposition filter.
- Replace filter lid. Press down firmly until snapped in place. [20]
- Dry or loose debris will also collect on the filter screen located in the tank lid. To remove debris from screen, remove the pleated filter from the lid. Remove debris from screen (c). [21]
- The filter screen may also be cleaned by rinsing it under running water.
- Reposition pleated filter in lid. Replace lid onto Dirty Water Tank, pressing down firmly until snapped in place.
- To replace Dirty Water Tank, place bottom of tank behind ledge (d) and push tank straight into cleaner body until it is locked in place. [22]
Cleaning the Nozzle
- Slide the two nozzle release latches (a) outward. [23]
- Remove nozzle (b) by pulling straight out. [24]
- Rinse nozzle under running water. Remove debris from squeegee (c) and wipe with a damp cloth. [25]
- To replace nozzle, make sure latches (d) are out. Cleaner should be in the upright position for easier assembly of the nozzle. Align middle section (e) of nozzle with opening (f) on cleaner. [26]
- While holding nozzle in place, slide latches inward to lock in place. [5]
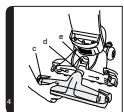
Cleaning and Changing the Brush Assembly
How to Remove
- Place handle in the upright position. Remove tanks to prevent leaking. Set aside.
- Pull the two nozzle release buttons (a) out. [23] Remove nozzle. [24] Tilt cleaner back so handle rests on floor.
- Push two brush release buttons (g) and remove the brush assembly. [27]
- The brushes can be washed with a mild detergent and rinsed. Do not use a solvent based detergent.
3


GB
How to Replace
- To replace brushes, align post (h) on brush block with hole (i) on bottom of cleaner. Turn brushes slightly until post fits easily into hole. Press brush assembly firmly to snap into place. [28]
- Return cleaner to upright position. Replace nozzle, making sure latches (d) are out. Align middle section (e) of nozzle with opening (f) on cleaner. [26]
- While holding nozzle in place, slide latches inward to lock in. [5]
IMPORTANT INFORMATION
Hoover spares and Consumables
Always replace parts with genuine Hoover spares. These are available from your local Hoover dealer or direct from Hoover. When ordering parts always quote your model number.
Spares
| Washable Filter | S116 | 35601336 |
| Brush Block | F5 | 35601337 |
Hoover Service
Should any faults occur with your cleaner during the first 12 months contact the Hoover Customer Helpline on the number below.
Quality
Hoover's factories have been independently assessed for quality. Our products are made using a quality system which meets the requirements of ISO 9001.
The Environment:
This appliance is marked according to the European Directive 2002/96/EC on Waste Electrical and Electronic Equipment (WEEE). By ensuring this product is disposed of correctly you will help prevent potential negative consequences for the environment and human health, which could otherwise be caused by inappropriate waste handling of this product.
The symbol on the product indicates that this product may not be treated as household waste. Instead it shall be handed over to the appliance collection point for recycling of electrical and electronic equipment. Disposal must be carried out in accordance with the local environmental regulations for waste disposal. For more detailed information about treatment, recovery and recycling of this product, please contact your local city office, your household waste disposal service or the shop where you purchased the product.
Your Guarantee
The guarantee conditions for this appliance are as defined by our representative in the country in which it is sold. Details regarding these conditions can be obtained from the dealer from whom the appliance was purchased. The bill of sale or receipt must be produced when making any claim under the terms of this guarantee.
Subject to change without notice.
TROUBLESHOOTING
Should you have a problem with the product, complete this simple user checklist before calling your local Hoover service.
| PROBLEM | POSSIBLE CAUSE | SOLUTION |
| Cleaner won't run | Power cord not firmly plugged in.Blown fuse or tripped breaker | Plug unit in firmlyCheck fuse or breaker in home. Replace |
| Low suction | Washable filter is dirty.Dirty water tank is full and the auto shut off engaged.Tanks not in placeFilter or filter lid not in place.Nozzle not in place. | Clean washable filterEmpty the dirty water tankMake sure tanks are locked in place.Make sure filter and filter lid are properly positioned.Make sure nozzle is replaced properly and locked in place. |
| Water puddling behind cleaner | Wrong detergent used.Clean water solution tank not in place.Dirty water tank full. | Use recommended detergents to reduce foaming.Make sure clean water solution tank is installed properly.Empty dirty water tank. |
| Cleaner won't pick up dirty solution | Dirty water tank not in place.Dirty water tank full.Filter or filter lid not in place. | Make sure Dirty Water Tank is installed properly.Empty Dirty Water Tank.Make sure Filter and Filter lid are properly positioned. |
| Cleaner solution won't dispense | Tanks not in place.Clean water solution tank is empty. | Make sure tanks are locked in place.Refill Clean Water Solution Tank. |
| Brushes wont rotate | Blown fuse or tripped breaker. | Check fuse or breaker in home. Replace fuse / reset breaker in home.If the brushes continue to stall and the breaker trips again, clean the brushes to remove debris. |


IMPORTANTS RAPPELS DE SÉCURITÉ
- IMPORTANT SAFETY REMINDERS
- SAFETY WITH CHILDREN, ELDERLY OR THE INFIRM:
- IT IS IMPORTANT THAT YOU
- GETTING TO KNOW YOUR CLEANER
- ASSEMBLING YOUR CLEANER
- Install Brushes and Nozzle
- Unfold / Fold the Handle
- USING YOUR CLEANER
- Clean Water Tank Solution
- Cleaning Floors
- Picking up spills
- Transporting your cleaner
- Storage
- MAINTENANCE
- Emptying The Dirty Water Tank
- Automatic "Shut Off"
- Cleaning the Filters
- Cleaning the Nozzle
- Cleaning and Changing the Brush Assembly
- How to Remove
- How to Replace
- IMPORTANT INFORMATION
- Hoover spares and Consumables
- Spares
- Hoover Service
- Quality
- The Environment:
- Your Guarantee
- TROUBLESHOOTING
- IMPORTANTS RAPPELS DE SÉCURITÉ
Brand : HOOVER
Model : FLOORMATE PLUS FL700 011
Category : Floor cleaner