AE6BSMP - Oven Hygena - Free user manual and instructions
Find the device manual for free AE6BSMP Hygena in PDF.


| Product Type | Built-in Electric Oven |
| Brand | Hygena |
| Model | AE6BSMP |
| Overall Dimensions (H x W x D) | 595 x 595 x 560 mm |
| Built-in Dimensions (H x W x D) | 560 x 560 x 550 mm |
| Weight | Approx. 35 kg |
| Power Supply | 220-240 V, 50/60 Hz, 3500 W |
| Energy Efficiency Class | A |
| Energy Consumption (Conventional) | 0.87 kWh |
| Energy Consumption (Fan Forced) | 0.70 kWh |
| Oven Capacity | 73 Liters |
| Number of Functions | 8 (Fan, Top/Bottom Heat, Grill, etc.) |
| Cleaning Type | Catalytic Enamel |
| Door Type | CoolTouch, Double Glazed |
| Safety Features | Child Lock, Auto Shut-off, Residual Heat Indicator |
| Spare Parts Availability | 5 years (via manufacturer or Hygena service) |
| Repairability Index | 8.0/10 |
Frequently Asked Questions - AE6BSMP Hygena
User questions about AE6BSMP Hygena
0 question about this device. Answer the ones you know or ask your own.
Ask a new question about this device
Download the instructions for your Oven in PDF format for free! Find your manual AE6BSMP - Hygena and take your electronic device back in hand. On this page are published all the documents necessary for the use of your device. AE6BSMP by Hygena.
USER MANUAL AE6BSMP Hygena
hygena Built-in pyrolytic oven
Operating Instructions - Please keep for future reference
AE6BSMP

natural_image
Line drawing of a standard open oven with control panel and door (no text or symbols)Important - Please read these instructions fully before using
These instructions contain important information which will help you get the best from your appliance and help to ensure safe and correct installation, use and maintenance.
If you need help or have damaged or missing parts, call the Customer Helpline: 0845 600 4632
Parts 2
Safety Information 3-4
Installation 5-7
Positioning 5
Cabinet cut-out sizes 6
Electrical connection 7
User instructions 8-14
Using the oven 8-11
Using the timer 12-13
Accessories 14
Cleaning and Maintenance 15
Cleaning and Maintenance 15
Transporting the oven 15
Trouble Shooting 16
Technical specifications 17
Guarantee 18

Product code
AE6BSMP
Please familiarise yourself with the parts and accessories listed below
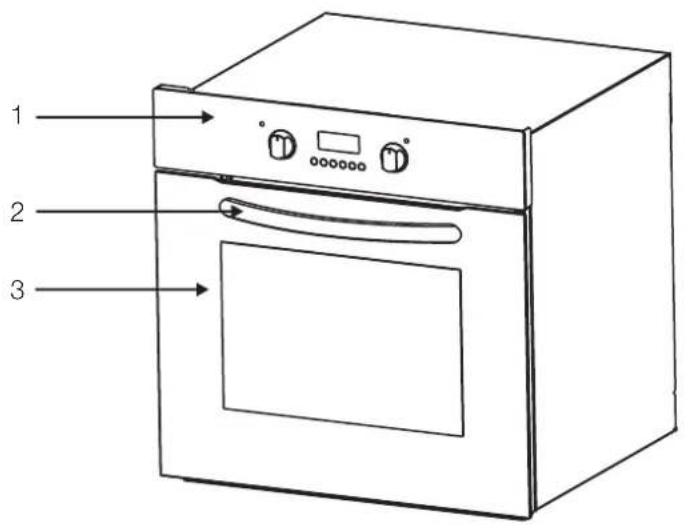
- Oven rack support
- Fan cover
- Grill pan and handle set
- Oven rack
Accessories
Grill pan and handle set
READ THESE INSTRUCTIONS CAREFULLY AND COMPLETELY BEFORE USING YOUR APPLIANCE, AND KEEP IT IN A CONVENIENT PLACE FOR REFERENCE WHEN NECESSARY.
THIS MANUAL IS PREPARED FOR MORE THAN ONE MODEL IN COMMON. YOUR APPLIANCE MAY NOT HAVE SOME OF THE FEATURES THAT ARE EXPLAINED IN THIS MANUAL. PAY ATTENTION TO THE EXPRESSIONS THAT HAVE FIGURES, WHILE YOU ARE READING THE OPERATING MANUAL.
General Safety Warnings
-This appliance can be used by children aged from 8 years and above and persons with reduced physical, sensory or mental capabilities or lack of experience and knowledge if they have been given supervision or instruction concerning use of the appliance in a safe way and understand the hazards involved. Children shall not play with the appliance. Cleaning and user maintenance shall not be made by children without supervision.
-WARNING: The appliance and its accessible parts become hot during use. Care should be taken to avoid touching heating elements. Children less than 8 years of age shall be kept away unless continuously supervised.
-WARNING: Danger of fire: do not store items on the cooking surfaces.
-WARNING: If the surface is cracked, switch off the appliance to avoid the possibility of electric shock.
-The appliance is not intended to be operated by means of an external timer or separate remote-control system.
-During use, the appliance becomes hot. Care should be taken to avoid touching heating elements inside the oven.
-During use, handles held for short periods in normal use can get hot.
-Do not use harsh abrasive cleaners or sharp metal scrapers to clean the oven door glass and other surface since they can scratch the surface, which may result in shattering of the glass or damage to the surface.
-Do not use steam cleaners for cleaning the appliance.
-WARNING: Ensure that the appliance is switched off before replacing the lamp to avoid the possibility of electric shock.
-CAUTION: Accessible parts may be hot when the cooking or grilling is in use. Young children should be kept away.
-Your appliance is produced in accordance with all applicable local and international standards and regulations.
- Manaintenance and repair work must be made only by authorized service technicians. Installation and repair work that is carried out by unauthorised technicians may endanger you. It is dangerous to alter or modify the specifications of the appliance in any way.
-Prior to installation, ensure that the local distribution conditions (nature of the gas and gas pressure or electricity voltage and frequency) and the requirements of the appliance are compatible. The requirements for this appliance are stated on the label.
-CAUTION: This appliance is designed only for cooking food and is intended for indoor domestic household use only and should not be used for any other purpose or in any other application, such as for non-domestic use or in a commercial environment or room heating.
-Do not try to lift or move the appliance by pulling the door handle.
-All possible security measures have been taken to ensure your safety. Since the glass may break, you should be careful while cleaning to avoid scratching. Avoid hitting or knocking on the glass with accessories.
-Ensure that the supply cord is not wedged during the installation. If the supply cord is damaged, it must be replaced by the manufacturer, its service agent or similarly qualified persons in order to prevent a hazard.
-While the oven door is open, do not let children climb on the door or sit on it.
Installation Warnings
-Do not operate the appliance before it is fully installed.
-The appliance must be installed by an authorized technician and put into use. The producer is not responsible for any damage that might be caused by defective placement and installation by unauthorized people.
-When you unpack the appliance, make sure that it is not damaged during transportation. In case of any defect; do not use the appliance and contact a qualified service agent
immediately. As the materials used for packaging (nylon, staplers, styrofoam...etc) may cause harmful effects to children, they should be collected and removed immediately.
-Protect your appliance against atmospheric effects. Do not expose it to effects such as sun, rain, snow etc.
-The surrounding materials of the appliance (cabinet) must be able to withstand a temperature of min 100°C.
During usage
-When you first run your oven a certain smell will emanate from the insulation materials and the heater elements. For this reason, before using your oven, run it empty at maximum temperature for 45 minutes. At the same time you need to properly ventilate the environment in which the product is installed.
-During usage, the outer and inner surfaces of the oven get hot. While opening the oven door, step back to avoid the hot steam coming out of the oven. There may be a risk of burns.
-Do not put flammable or combustible materials, in or near the appliance when it is operating.
-Always use oven gloves to remove and replace food in the oven.
-Do not leave the cooker while cooking with solid or liquid oils. They may catch fire on condition of extreme heating. Never pour water on to flames that are caused by oil. Cover the saucepan or frypan with its cover in order to choke the flame that has occurred in this case and turn the cooker off.
-If you will not use the appliance for a long time, plug it off. Keep the main control switch off. Also when you do not use the appliance, keep the gas valve off.
-Make sure the appliance control knobs are always in the "0" (stop) position when it is not used.
-The trays incline when pulled out. Be careful not to let hot liquid spill over.
-When the door or drawer of the oven is open, do not leave anything on it. You may unbalance your appliance or break the cover.
-Do not put heavy things or flammable or ignitable goods (nylon, plastic bag, paper, cloth...etc) into the drawer. This includes cookware with plastic accessories (e.g. handles).
-Do not hang towels, dishcloths or clothes from the appliance or its handles.
During cleaning and maintenance
-Always turn the appliance off before operations such as cleaning or maintenance. You can do it after plugging the appliance off or turning the main switches off.
-Do not remove the control knobs to clean the control panel.
TO MAINTAIN THE EFFICIENCY AND SAFETY OF YOUR APPLIANCE, WE RECOMMEND YOU ALWAYS USE ORIGINAL SPARE PARTS AND TO CALL ONLY OUR AUTHORIZED SERVICE AGENTS IN CASE OF NEED.
Positioning
We hope that this modern, functional oven, which is made with quality parts and materials will meet your cooking needs. Make sure you read the manual to help to ensure successful results and also to help prevent problems with the appliance in the future. The information given below contains important points that are necessary for correct positioning and service operations. They should be read without exception especially by the technician who will position the appliance.
IMPORTANT - Contact an authorised service agent for installation of your oven.
Choosing a place for the oven
1- There are several points to pay attention to when choosing a place for your oven. Make sure to take into account our recommendations below in order to prevent any problems and dangerous situations, which might occur later.
2 - When choosing a place for the oven, attention should be paid to ensure that there are no flammable or combustible materials in close vicinity, such as curtains, oil, cloth etc.
3 - Furniture surrounding the oven must be made of materials resistant to temperatures above 80 C°. The dimensions and material of the cabinet in which the oven will be installed must be appropriate and resistant to increases in temperature.
4 - Required changes to wall cabinets and exhaust fans above the built-in combined product as well as minimum heights from the oven board are shown in Figure 1. Accordingly, the exhaust fan should be at a minimum height of 65 cm from the hob board. If there is no exhaust fan the height should not be less than 70 cm.
5- In a correct installation, contact with electrical or insulated parts must be prevented. Insulating parts need to be fitted in a way to ensure that they cannot be removed by using any kind of tool.
6 -Installing the appliance in the close to a refrigerator or a deep-freezer is not recommended. Otherwise, the performance of the above-mentioned appliances will be negatively affected due to emanating heat.
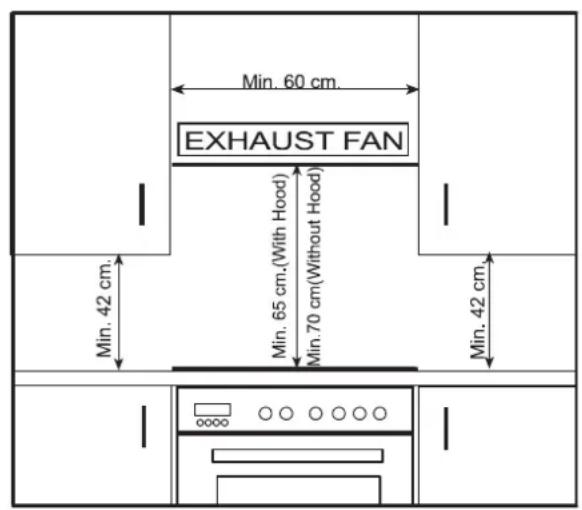
Figure 1
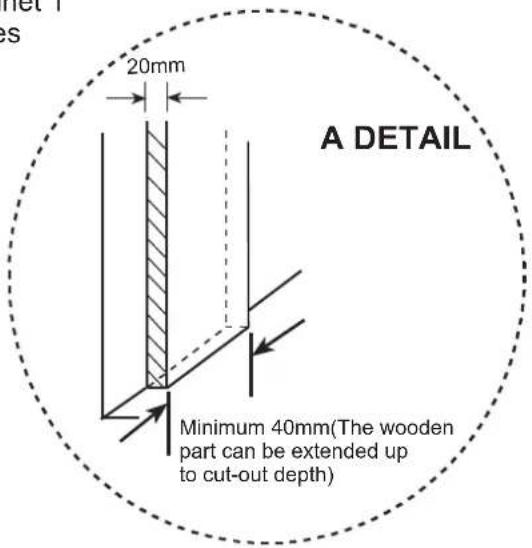
Cabinet cut-out sizes
OPTION 1: Regular Installation

OPTION 2: Flush Installation

You can use either cabinet 1 or cabinet 2 cut-out sizes
Product sizes

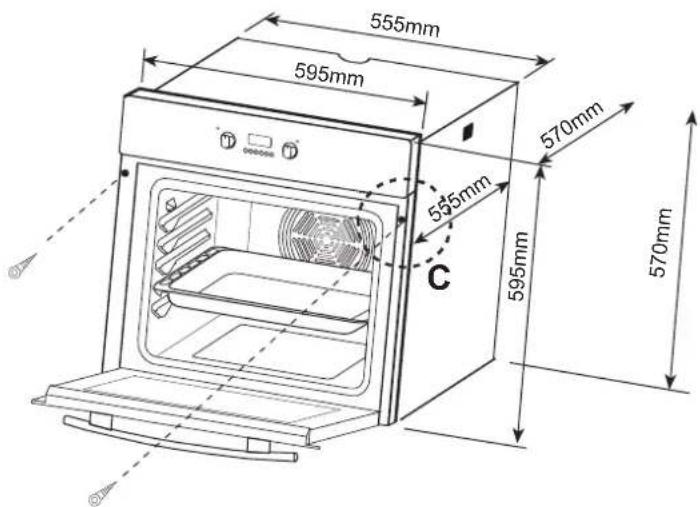
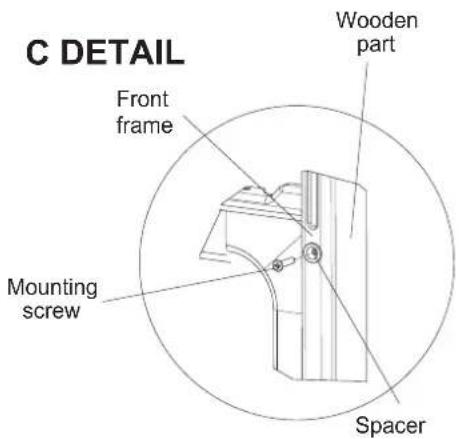
Insert the oven into cabinet by pushing it forward. Open the oven door and insert 2 screws in the holes located on the oven frame. While the product frame touches the wooden surface of cabinet, tighten the screws.
Electrical connection
Wiring and safety of the oven
The instructions given below must be followed without fail during wiring :
IMPORTANT - The earthing cable must be connected via the screw with the earthing mark. Supply cable connection must be as shown in Figure 2. If there is no earthed outlet conforming to regulations in the installation environment, call the Authorised Service immediately.
IMPORTANT - The earthed outlet must be in close vicinity of the appliance. Never use an extension cord.
IMPORTANT - The supply cable should not contact the products hot surface.
IMPORTANT - In case of any damage to the feeder cable, please call the Authorised Service agent. The cable must be placed by the Authorised Service agent.
IMPORTANT - Wiring of the appliance must be performed by the Authorized Service agent. H05VV-F type supply cable must be used.
IMPORTANT - Faulty wiring may damage the appliance. Such damage will not be covered under the warranty.
IMPORTANT - The appliance is designed to connect to 220-240V\~ electricity supply if your household supply is different than the value given above, call the Authorized Service immediately.
IMPORTANT - The Manufacturer declares that it bears no responsibility whatsoever for any kind of damage and loss arising from not complying with these safety instructions.

Figure 2
Using the oven
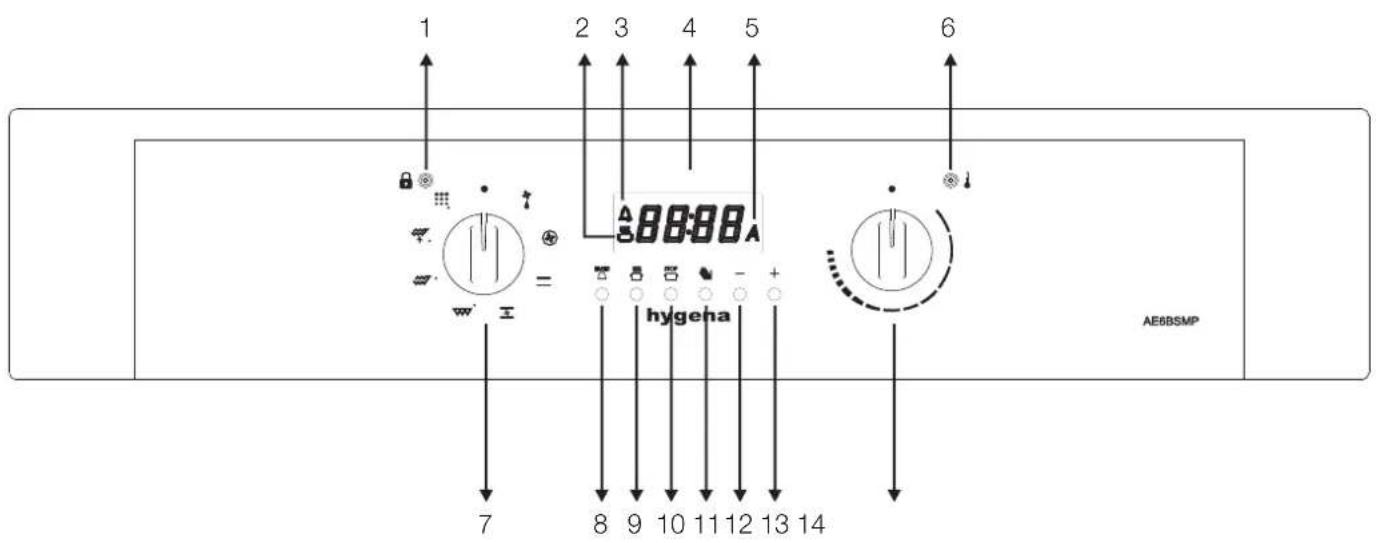
- Thermostat indicator light
- Manual operation symbol
- Minute minder symbol
- Timer Display
- Auto function symbol
- Oven function indicator light
-
Thermostat control knob
-
Button 1 - Minute minder
- Button 2 - Manual operation
- Button 3 - End cook
- Button 4 - Duration
- Button 5 - Minus
- Button 6 - Plus
- Oven function control knob
Oven Function Control Knob:
Select the oven functions by turning the control knob (Figure 3). You need to adjust the function selection button and the oven thermostat knob together to a temperature value you wish to select-Otherwise the function stage you selected will not operate.
Oven Thermostat Knob:
For you to select the oven function control knob. When the temperature inside your oven reaches the value you set, the thermostat will cut the circuit and the thermostat light will go off. When the temperature falls below the set value, the thermostat will again be turned on and the thermostat light will be on.
Oven functions

Defrost function
The oven's sight was will be turned on, the fan starts operating.
To use the defrost function, take your frozen food and place it in the oven on a shelf placed in the third slot from the bottom. It is recommended that you can place an oven tray under the defrosting food, to catch the water accumulated due to melting ice. This function will not cook or bake your food, it will only help to defrost it.

Turbo function
The oven's tighter width at and warning be turned on, the ring heating element and fan will start operating.
The turbo function evenly disperse the heat in the oven. All foods on all racks will be cooked evenly. It is recommended to pre-heat the oven about 10 minutes.

Static cooking function
The oven's tighter width at and warning be turned on, the lower and upper heating elements will start operating.

natural_image
Abstract circular diagram with shaded segments and small symbols (no readable text or labels)Figure 3

natural_image
Abstract circular graphic with concentric arcs and a dot, no text or symbols presentFigure 4

natural_image
Illustration of a food delivery box with two food items inside (no text or symbols)Figure 5
The static cooking function emits heat, ensuring even cooking of the lower and upper food. This is ideal for making pastries, cakes, baked pasta, lasagne and pizza. Prehating the oven for 10 minutes is recommended and it is best to cook on only one shelf at a time in this function.

Fan function
The oven's tighter width at and warning be turned on, the upper and lower heating elements and fan will start operating.
This function is very good for obtaining results in baking pastry. Cooking is carried out by the lower and upper heating element within the oven and by the fan providing air circulation, which will give a slight grill effect to the food. It is recommended to pre-heat the oven about 10 minutes.

Grilling function
The oven's tighter will stat and warning be turned on, the grill heating element will start operating.
The function is used for grilling and toasting foods, use the upper shelves of oven. Lightly brush the wire grid with oil to stop foods sticking and place foods in the center of the grid. Always place a tray beneath to catch any drips of oil or fat. It is recommended to preheat the oven about 10 minutes.
WARNING - When grilling, the oven door must be closed and the oven temperature should be adjusted to 200°C.

Faster grilling function
The oven's tighter kilstat and warning be turned on, the grill and upper heating elements will start operating.
The function is used for faster grilling and for covering a larger surface area, such as grilling meats, use the upper shelves of oven. Lightly brush the wire grid with oil to stop foods sticking and place foods in the center of the grid. Always place a tray beneath to catch any drips of oil or fat. It is recommended to preheat the oven about 10 minutes.
WARNING - When grilling, the oven door must be closed and the oven temperature should be adjusted to 200^ C.

Double grill and Fan function
The oven's lighter wildstat and warning be turned on, the grill and upper heating elements and fan will start operating.
The function is used for faster grilling of thicker foods and for covering a larger surface area. Both the upper heating elements and grill will be energised along with the fan to ensure even cooking.
Use the upper shelves of oven. Lightly brush the wire grid with oil to stop foods sticking and place foods in the center of the grid. Always place a tray beneath to catch any drips of oil or fat. It is recommended to preheat the oven about 10 minutes.
WARNING - When grilling, the oven door must be closed and the oven temperature should be adjusted to 200^ C.

Pyrolytic cleaning function
This function allows you to clean throughly the oven cavity.
WARNING - Before activating pyrolytic cleaning function, remove any excessive spillage and make sure that the oven is empty.
Do not leave anything inside the oven cavity (e.g. wire grids, shallow tray, deep tray etc.) As this could heavily damage them.
WARNING - Before activating the pyrolytic cleaning function, remove the wire oven shelves and shelf supports (if available).
WARNING - Ensure that the oven door closed before activating the pyrolytic cleaning function.
WARNING - The oven door will be locked when the pyrolytic function started.
WARNING - When the pyrolytic cleaning function is on, it is advisable not to use a hob if it is fitted above the oven. This could cause overheating and damage to both appliances.
WARNING - During the pyrolytic cleaning cycle the oven door becomes hot. Children should be kept away until it has cooled.
WARNING - At the end of pyrolytic cleaning process, the display shows the time of day.
Pyrolytic Cleaning
1 - The oven cavity is coated with a special emanel resistant to high temperatures.
2 - During the pyrolytic cleaning operation, the temperature inside the oven can reach about 475^ C does burning food residuals. For your security, during the pyrolytic cleaning operation, the oven door automatically locks.
3 - Upon completion of the cleaning operation the oven door will be locked until the oven cavity has cooled down.
4 - The cooling fan operates until the oven has cooled down. After cooking, it is advisable to remove all the food residues with a wet sponge.
5 - It is advisable to wipe the oven over with a sponge soaked in warm water after each pyrolytic cleaning cycle is carried out.
6 - During the Pyrolytic operation, some smell and fume will be emanated due to destruction of the food residual, it is normal. Oven cleaning fumes could be fatal to birds and disturb especially childrens and pets, so all should be moved into the other room until it was finished. During the Pyrolytic operation, the room where the oven installed must be ventilated sufficiently and the kitchen door should be closed to avoid passing smell and fume to other rooms..
Using the timer
After your appliance is connected to your mains supply for the first time, the numbers on the timer display will flash. Before you can select a cooking function or set a temperature, you must set the appliance into “manual operation” mode.
To select manual operation mode, press the button 2 on the control panel.
Setting the time of day
After setting your oven for manual operation, you should also set the time of day. Use the button 5 and 6 to adjust the time that appears in the display.
After setting the display to the correct time, release the button 5 and 6. After 5 seconds the time will fix in the display you will be able to use your oven.
Setting the minute minder function
You are able to set the minute minder at any time, regardless of whether an oven function has been selected. You can set a period of time using the minute minder function and an alarm will sound when this period of time has elapsed.
Press the button 1, the display will show a value of 00:00. Set the period of time that you wish the minute minder to countdown for, by using the button 5 and 6.
Once the display has got to your desired countdown time, let go of the button 5 and 6. The minute minder symbol will appear on the time display.
Once a countdown time has been set, it is possible to shorten or lengthen the time by using the button 5 and 6.
An alarm will sound when the countdown time has elapsed. The alarm can be silenced by pressing the button 1 or 2.
Setting the duration function
This function will allow you to set a countdown time similar to the minute minder function. However the oven will no longer continue to heat, once the countdown period has elapsed.
Use the thermostat control knob to set the temperature that you require. The manual operation symbol will appear on the display.
Use the oven function knob to select the mode of cooking that you require.
It is then possible to set the duration of the cooking time that you require.
Press the button 4 and the display will show a value of 00:00. Set the period of time that you wish the duration function to countdown for, by using the button 5 and 6.
Once the display has got to your desired countdown time, let go of the button 5 and 6. The countdown will start immediately on the word A will appear on the time display.
Once a countdown time has been set, it is possible to shorten or lengthen the time by using the button 5 or 6.
An alarm will sound when the countdown time has elapsed and the oven will switch off. The word A will flash and the heating symbol will disappear.
To silence the audible signal and return the oven to manual operation mode. You should press the button 2, the word A will disappear from the display and the manual operation symbol will appear instead.
IMPORTANT - If you do not turn the thermostat control and oven function knob to 0. Then the appliance will continue to operate as soon as you press the button 2.
Setting the end cook function
This function is similar to the duration function, however instead of selecting a period of time that you wish the oven to switch off. You select the time of day that you wish the oven switch off.
Use the thermostat control knob to set the temperature that you require. The manual operation symbol will appear on the display.
Use the oven cooking function knob to select the mode of cooking that you require.
Press the button 3 and the display will show a value of 00:00. Set time of day that you wish the oven to stop cooking by using the button 5 and 6. The timer will calculate how long the cooking time will be, based on the time of day
that you have selected and show it on the display.
Once the display has got to the time of day that you want the oven to stop cooking, let go of the button 5 and 6. The countdown will start immediately and the word A will appear on the timer display.
When the time is set, it can be modified by pressing the button 5 and 6.
When the time of day reaches the end of cooking time that you set, the oven will switch off and an alarm will sound. The word A will flash and the heating symbol will disappear.
To silence the audible signal and return the oven to manual operation mode, you should press the button 2, the word A will disappear from the display and the manual operation symbol will appear instead.
Setting the start and end time function
This function will allow you to set a time in the future that the oven switches on and a time that the oven will switch off.
Use the thermostat control knob to set the temperature that you require. The manual operation symbol will appear on the display.
Use the oven function knob to select the mode of cooking that you require.
Press the button 4 and the display will show a value of 00:00. Set the period of time that you wish to cook for, by using the button 5 and 6.
The word A will appear on the timer display. Immediately press the button 3 and the timer display will show the value 00:00. Set the time of day that you want the oven switch off at, using the button 5 and 6.
The oven will calculate what time it needs to switch on, so that your food will cook for the length of time that you selected. It will automatically switch itself on, once it reaches the time of day that it has calculated.
When the time of day reaches the end cooking time that you set, the oven will switch off and an alarm will sound. The word A will flash and the heating symbol will disappear.
To silence the audible signal and return the oven to manual operation mode, you should press the button 2, the word A will disappear from the display and the manual operation symbol will appear instead.
Adjusting the audible signal
To adjust the level of the audible signal, when it is sounding, press the button 5 and it will adjust through the 3 sound levels. Release the button 5 and the sound level of the audible signal will be set.
Accessories
You can use other cooking utensils, but they must be heat and flame resistant. You can also use glass dishes, cake molds, special oven trays that are appropriate for use in oven. Pay attention to the using instructions by the manufacturer of those accessories.
In case small size dishes are used, place the dish onto the chrome grid, it will completely be on the middle part of the grid.
Do not leave an oven tray or dish in a cold environment right after cooking. Do not put onto cold and wet surfaces. Place on a dry kitchen cloth or dish cross, ensure it to cools slowly, otherwise the glass tray or dish may be broken.
If you will grill in your oven; we recommend you use the grill that was given in the tray provided (If your product includes this material). If you use the big wire grill; put a tray onto one of the lower shelves for oils to be collected. Also put some water into it for ease of cleaning.
Using the grill pan and handle set
WARNING - Always use an oven glove to protect your hand when using the grill as all the metal parts can become very hot!
The grill pan has a detachable handle. Ensure when using the grill pan handle that it is centralized and secure as shown in the figure.
Do not leave the handle in position when grilling. If the handle is left in position when grilling, it will get very hot.


Figure 6
Cleaning & Maintenance
Cleaning
Before starting to clean your oven, be sure that all control buttons are off and your appliance has cooled. Unplug the appliance.
Do not use cleaning materials containing particles that might scratch the enamelled and painted parts of your oven. Use cream cleaners or liquid cleaners, which do not contain particles. As they might harm the surfaces, do not use caustic creams, abrasive cleaning powders, rough wire wool or hard tools. In the event the excess liquids spilling over your oven should burn, it may cause a damage to the enamel. Immediately clean up the split liquids. Do not use steam cleaners for cleaning the oven.
Cleaning the interior of the oven
Make sure to unplug the oven before starting to clean it. You will obtain best results if you clean the oven interior while the oven is slightly warm. Wipe your oven with a soft piece of cloth dampened with soap water after each use. Then wipe it again, this time with a wetted cloth, and wipe it dry. A complete clean using dry and powder type cleaners. For product with catalytic enamel frames, the rear and side walls of the inner frame do not require cleaning. However; depending on usage, it is recommended that you replace them after a certain period of time.
The door seal may be cleaned using a sponge that has been soaked in lukewarm water. Do not use abrasive cleaners and do not crumble the seal.
Check the door seals around the oven periodically. If the seals are damaged, please contact your nearest Technical Service Center, to get a replacement seal helpline number 0845 600 4632.
Maintenance
Replacing the Oven Light
It is recommended that you leave this operation to the Authorized Service agent. Unplug the oven first and make sure that it is cold. After removing the lid in front of the light, take the bulb of its place. Insert the new bulb resistant to 300°C, which you will find at Authorized Services, into the place of the bulb(230V, 25W, Type E14) you have removed. Then fit the light protecting glass back into its place. After that, your oven will be ready for use.
Transporting the oven
If you need to transport your oven, keep the original case of product and carry in its original case when needed to be carried. Follow the transport signs on case. Tape the oven to the cooking panel. Place a paper between on the oven door, then tape it to the side surfaces of oven. Tape cardboard or paper onto the front cover on interior glass of oven as it will be suitable to the tray. If it does not have the original case; prepare a carriage box so that the appliance, especially external surfaces (glass and painted surfaces) of oven is protected against external forces.
Basic troubleshooting before contacting service
| Problem Possible cause | Solution | |
| - Oven does not turn on. - Power is turned off.- Timer has not adjusted to the day of time. | - Make sure tthe electrical connections are operational and switches are set to the open/ on positions.- Adjust the timer. | |
| No heat or oven does not warm up. | - Oven temperature control is incorrectly set.- Oven door has been left open. | - Check the oven temperature control knob is set correctly.- Make sure oven door is closed.Avoid opening frequently during cooking. |
| Oven light does not operate. | - Lamp has failed.- Electrical supply is disconnected or switched off. | - Replace lamp according to the instructions on page 12.- Make sure the electrical supply is turned on at wall socket outlet. |
| Cooking is uneven within the oven. | - Oven shelves are incorrectly positioned. | - Position the shelves towards the top or bottom of the oven following cooking guidelines. The top of the oven will be hotter than the bottom.Important If problems persist call an authorised installation engineer or the customer helpline on 0845 600 4632. |
| Model/Item | AE6BSMP |
| Power supply | (230)V~/50 Hz |
| Maximum power | 3200 W |
| Size(H x W x D) | 595x595x570 mm |
| Cut-Out Dimensions(H xW x D) | 600x600x580 mm |
| Net weight | 37.5 kg. |
| Oven Volume | 56 lt. |
| Electric Cooker energy rating | A |
| Energy Consumption according to the EN50304 | 0.89 / 0.79 |

We apologise for any inconvenience caused by any minor inconsistencies in these instructions, which may occur as a result of product improvements and development.
Disposal information

natural_image
Symbol of a trash bin with crossed lines indicating no waste or restriction, no text presentThe symbol on the product or on its packaging indicates that this product may not be treated as household waste. Instead it shall be handed over to the applicable collection point for the recycling of electrical and electronic equipment.
By ensuring this product is disposed of correctly, you will help prevent potential negative consequences for the environment and human health, which could otherwise be caused by inappropriate waste handling of this product. For more detailed information about recycling of this product, please contact your local city office, your household waste disposal service or the shop where you purchased the product.
Product Guarantee
This product is guaranteed against manufacturing defects for a period of

Year
This product is guaranteed for twelve months from the date of original purchase. Any defect that arises due to faulty materials or workmanship will either be replaced, refunded or repaired free of charge where possible during this period by the dealer from whom you purchased the unit.
The guarantee is subject to the following provisions:
- The guarantee does not cover accidental damage, misuse, cabinet parts, knobs or consumable items.
- The product must be correctly installed and operated in accordance with the instructions contained in this manual.
- It must be used solely for domestic purpose.
- The guarantee will be rendered invalid if the product is re-sold or has been damaged by inexpert repair.
- Specifications are subject to change without notice.
- The manufacturer disclaims any liability for the incidental or consequential damages.
- The guarantee is in addition to, and does not diminish your statutory or legal rights.
- In the event of a problem with the product with in the guarantee period call the Customer Helpline: 0845 600 4632.
Guarantor: Argos Ltd 489 - 499 Avebury Boulevard
Central Milton Keynes
MK9 2NW
- hygena Built-in pyrolytic oven
- Important - Please read these instructions fully before using
- Parts 2
- Safety Information 3-4
- Installation 5-7
- User instructions 8-14
- Cleaning and Maintenance 15
- Trouble Shooting 16
- Technical specifications 17
- Guarantee 18
- Please familiarise yourself with the parts and accessories listed below
- Accessories
- -WARNING: Ensure that the appliance is switched off before replacing the lamp to avoid the possibility of electric shock.
- -CAUTION: Accessible parts may be hot when the cooking or grilling is in use. Young children should be kept away.
- Installation Warnings
- During usage
- During cleaning and maintenance
- TO MAINTAIN THE EFFICIENCY AND SAFETY OF YOUR APPLIANCE, WE RECOMMEND YOU ALWAYS USE ORIGINAL SPARE PARTS AND TO CALL ONLY OUR AUTHORIZED SERVICE AGENTS IN CASE OF NEED.
- Positioning
- Choosing a place for the oven
- Cabinet cut-out sizes
- Electrical connection
- Wiring and safety of the oven
- Using the oven
- Oven Function Control Knob:
- Oven Thermostat Knob:
- Oven functions
- Defrost function
- Turbo function
- Static cooking function
- Fan function
- Grilling function
- Faster grilling function
- Double grill and Fan function
- Pyrolytic cleaning function
- Pyrolytic Cleaning
- Using the timer
- Setting the time of day
- Setting the minute minder function
- Setting the duration function
- Setting the end cook function
- Setting the start and end time function
- Adjusting the audible signal
- Using the grill pan and handle set
- Cleaning & Maintenance
- Cleaning
- Cleaning the interior of the oven
- Maintenance
- Replacing the Oven Light
- Transporting the oven
- Disposal information
- Product Guarantee
- Year
Brand : Hygena
Model : AE6BSMP
Category : Oven