Bergen 238/6777 - Storage furniture Hygena - Free user manual and instructions
Find the device manual for free Bergen 238/6777 Hygena in PDF.


| Product Type | Cooker Hood |
| Brand | Hygena |
| Model | Bergen 238/6777 |
| Width | 600 mm |
| Depth | 500 mm |
| Height | 150 mm (minimal) |
| Weight | 12 kg |
| Power Supply | 220-240 V ~ 50 Hz |
| Maximum Power Consumption | 150 W |
| Fan Speed Settings | 3 |
| Maximum Extraction Rate | 400 m³/h |
| Noise Level (Max Speed) | 65 dB(A) |
| Lighting | LED, 2 x 3 W |
| Grease Filter Type | Aluminum mesh, washable |
| Control Type | Push buttons |
| Duct Diameter | 150 mm |
| Energy Class | C |
| Mounting Type | Wall-mounted |
| Material | Stainless steel |
| Warranty | 2 years |
Frequently Asked Questions - Bergen 238/6777 Hygena
User questions about Bergen 238/6777 Hygena
0 question about this device. Answer the ones you know or ask your own.
Ask a new question about this device
Download the instructions for your Storage furniture in PDF format for free! Find your manual Bergen 238/6777 - Hygena and take your electronic device back in hand. On this page are published all the documents necessary for the use of your device. Bergen 238/6777 by Hygena.
USER MANUAL Bergen 238/6777 Hygena
Assembly Instructions Please keep for future reference
238/6777
hygena

natural_image
Isometric line drawing of three stacked diamond shapes within a 3D grid (no text or symbols)Dimensions
Width - 87.7cm
Depth - 48.8cm
Height - 1.8cm
Important – Please read these instructions fully before starting assembly
If you need help or have damaged or missing parts, please visit: www.argos-support.co.uk
or email: Help@ClickSpares.co.uk (quoting your original order number)
Alternatively, call the Spares Helpline on: 0370 112 1928
For any other queries please contact the Customer Helpline on: 0345 640 2020
Issue 3 - 05/11/15

Safety and Care Advice
Important – Please read these instructions fully before starting assembly
- Check you have all the components and tools listed on the following pages.
- Remove all fittings from the plastic bags and separate them into their groups.
- Keep children and animals away from the work area, small parts could choke if swallowed.
• Make sure you have enough space to layout the parts before starting.
- During assembly do not stand or put weight on the product, this could cause damage.
• Assemble the item as close to its final position (in the same room) as possible.
- Assemble on a soft level surface to avoid damaging the unit or your floor.
- Parts of the assembly will be easier with 2 people.

• To reduce the likelihood of damaging your product please ensure that your
power drill is set on a low torque setting.
Care and maintenance
- Only clean using a damp cloth and mild detergent, do no use bleach or abrasive cleaners.
• From time to time check that there are no loose screws on this unit.
• This product should not be discarded with household waste. Take to your local authority waste disposal centre.
Handy Hints
- Assemble all parts and bolts loosely during assembly, only once the product is complete should you fully tighten the bolts
• Regularly check and ensure that all bolts and fittings are tightend properly.
Note: if required the next page can be cut out and used as reference throughout the assembly. Keep this page with these instructions for future reference.
Components - Panels
For damaged or missing parts, please visit: www.argos-support.co.uk or email: Help@ClickSpares.co.uk
Please check you have all the panels listed below

natural_image
Blank white image with faint smudges and corner markers (no text or symbols)
Horizontal
(87.7×48.8cm)
P1902
natural_image
Blank white image with no visible content, text, or symbols
Shelf x 2
(87.7×48.8cm)
P1900
Components - Fittings
Please check you have all the fittings listed below
Note: The quantities below are the correct amount to complete the assembly. In some cases more fittings may be supplied than are required.
1/1
| ASmall locking screw x 6 | FK1056 | BCam 20x12mm Expando housing x 6 | CShelf support with fixinghole x 8 | FK1207 |
| D12,5mm Screw x 8 | FK1309 |
Tools required

Phillips screwdriver
(medium & large)

Flatblade screwdriver
(medium)
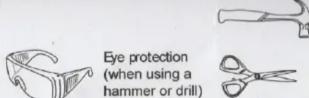
Eye protection (when using a hammer or drill)

Small hammer
Scissors
Ruler - Use this ruler to help correctly identify the screws
0 5 10 15 20 25 30 35 40 45 50 55 60 65 70 75 80 85 90 95 100 105 110 115 120 125 130 135 140 145 150 155 160 165 170

The screws length is measured from the head to the point (30mm screw shown).
3
Assembly Instructions
Step 1
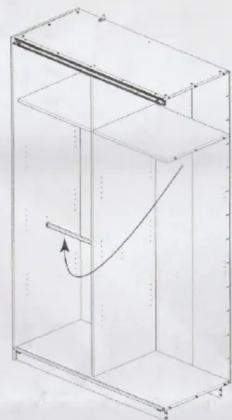
Insert the fittings
a
change the place of one hanging-rail as shown.
a:
natural_image
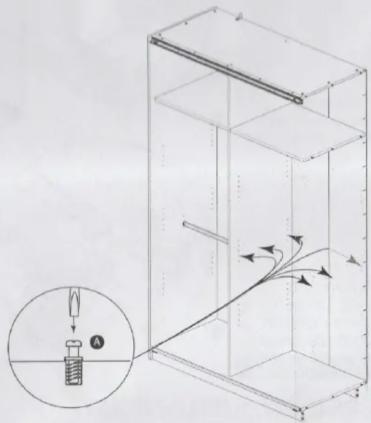
Isometric line drawing of a rectangular container with internal structure and a curved arrow indicating direction (no text or symbols)b:
Insert 6 small locking screws A as shown.
b:
Assembly Instructions
Step 2
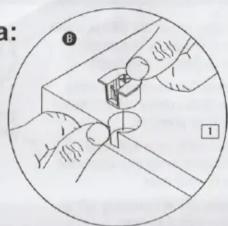
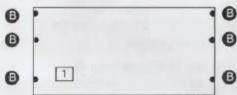
Inserting Horizontal a: Push Cam Expando housing Ⓑ into the hole of the Horizontal 1.
b: Turn Horizontal 1 and lower it onto the small locking screws A.
C: Tighten the Cams Ⓑ with a Philips screwdriver.
a:
b:

Assembly Instructions
Step 3
inserting shelves
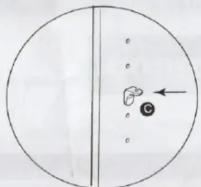
a: Push shelf supports © in hole as shown.
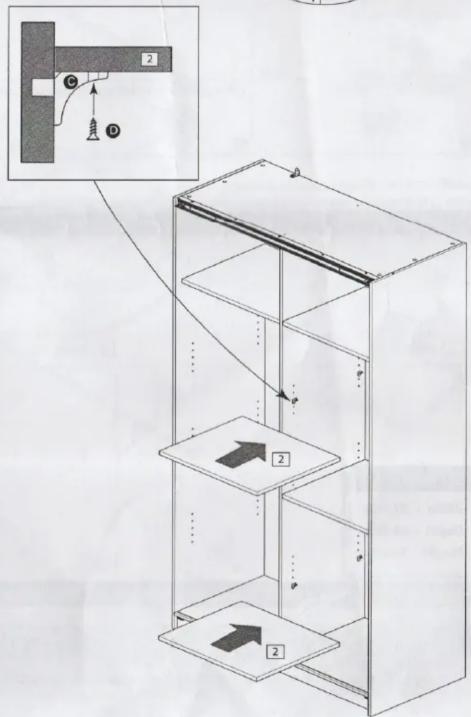
b: Position shelves 2 onto shelf supports C and fix by screwing eight chipboardscrews D through shelf supports C into shelves 2.
6
a:
b:
- Dimensions
- Important – Please read these instructions fully before starting assembly
- Safety and Care Advice
- Care and maintenance
- Handy Hints
- Components - Panels
- Components - Fittings
- Please check you have all the fittings listed below
- Tools required
- Ruler - Use this ruler to help correctly identify the screws
- Assembly Instructions
- Step 1
- Step 2
- Step 3
Brand : Hygena
Model : Bergen 238/6777
Category : Storage furniture