
NZ643NCNCBK - Cooker SAMSUNG - Free user manual and instructions
Find the device manual for free NZ643NCNCBK SAMSUNG in PDF.

| Product Type | Induction Hob |
| Brand | Samsung |
| Model | NZ643NCNCBK |
| Appliance Dimensions (Width x Depth x Height) | 575 mm x 505 mm x 56 mm |
| Worktop Cut-out Dimensions (Width x Depth) | 560 mm x 490 mm |
| Corner Radius | 3 mm |
| Net Weight | 11.3 kg |
| Gross Weight | 14.2 kg |
| Connection Voltage | 220-240 V ~ 50/60 Hz |
| Maximum Connected Load Power | 7.2 kW |
| Number of Cooking Zones | 4 (including bridge zones) |
| Cooking Zone 1 (rear left) Diameter / Power | 160 mm / 1400 W (Boost 2000 W) |
| Cooking Zone 2 (front left) Diameter / Power | 210 mm / 2200 W (Boost 3200 W) |
| Bridge Zones (front and rear) Power | 1800 W each (Boost 2600 W each) |
| Complete Bridge Zone Power | 3600 W (Boost 4600 W) |
| Control Type | Touch control sensors |
| Key Functions | Power Boost, Auto Heat Up, Keep Warm, Bridge Control, Child Safety Lock, Timer, Residual Heat Indicator, Pan Detection |
| Safety Features | Safety shutoff, child lock, automatic switch-off, residual heat indicator, overheating protection |
| Cleaning | Ceramic glass surface, use damp cloth and ceramic glass cleaner; avoid abrasive cleaners |
| Cookware Compatibility | Induction-compatible (magnetic base) such as steel, cast iron, stainless steel (if labeled) |
| Installation Type | Flush-mounted into countertop |
| Warranty (if any) | Refer to manual for service contact |
Frequently Asked Questions - NZ643NCNCBK SAMSUNG
- The hob is switched on and the cooking zone is selected.
- The pan is suitable for induction (magnetic base) and the correct size.
- The heat setting is not set to 0.
- The child lock is not activated.
If the display shows 'u', the cookware is unsuitable or missing. If the problem persists, contact customer service.
User questions about NZ643NCNCBK SAMSUNG
0 question about this device. Answer the ones you know or ask your own.
Ask a new question about this device
Download the instructions for your Cooker in PDF format for free! Find your manual NZ643NCNCBK - SAMSUNG and take your electronic device back in hand. On this page are published all the documents necessary for the use of your device. NZ643NCNCBK by SAMSUNG.
USER MANUAL NZ643NCNCBK SAMSUNG

natural_image
Simple line drawing of a door handle with an arrow indicating direction (no text or symbols)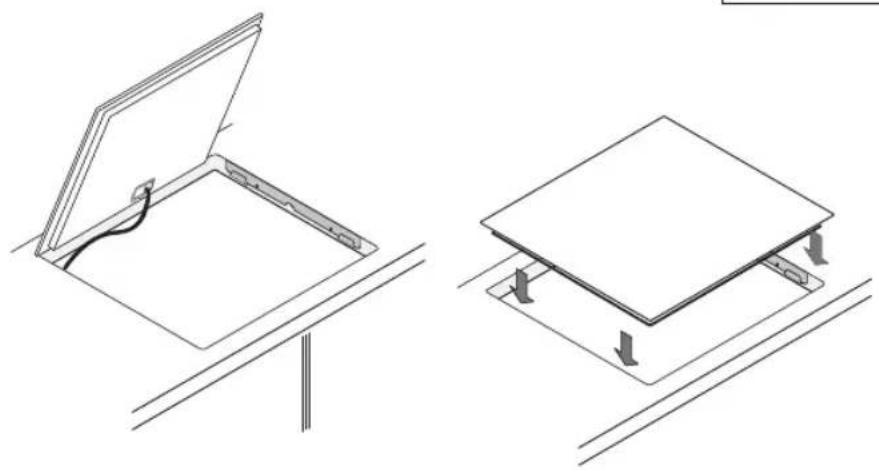
natural_image
Technical line drawing showing two views of a flatboard installation with a cable and support structure (no text or symbols)natural_image
Illustration of a frying pan with a U-shaped magnet above it, showing magnetic field lines (no text or symbols)KÄRLENS STORLEK
natural_image
Illustration of a hand pointing at four gray buttons with control symbols, no text or labels presentnatural_image
Illustration of a hand using a power tool to clean or brush the brush (no text or symbols visible)natural_image
Abstract diagram with curved lines and scattered gray shapes, no text or symbols presentHÄLLRAM (TILLVAL)

natural_image
Simple line drawing of a door handle with an arrow indicating direction (no text or symbols)
natural_image
Technical line drawing showing two views of a flatboard installation with a cable and support structure (no text or symbols)deler og funksjoner
kokeSoNer
APPARATETS N∅KKELFUNKSJONER
natural_image
Illustration of a frying pan with a U-shaped magnet above it, showing magnetic field lines (no text or symbols)ST∅RRELSE PÅ KOKEKAR
natural_image
Hand interacting with a touchscreen device displaying multiple function keys (no text or symbols visible)- Når du skal slå av barnesikringen, berører du Lås-bryteren 🔒 i omtrent 3 sekunder en gang til. Innstillingen bekreftes med et lydsignal.
- Trykk på bryterne for varmeinnstilling (+ eller -).
natural_image
Hand interacting with a control panel displaying multiple buttons and a cursor (no text or symbols visible)natural_image
Illustration of a hand using a power tool to clean or brush the edge of a curved surface (no text or symbols)Problematisk smuss
- Fjern fastbrent sukker, smeltet plast, aluminiumsfolie eller andre materialer med en glasskrape straks, mens det fortsatt er varmt.

ADVENSE
natural_image
Abstract diagram with concentric arcs and scattered gray shapes, no text or symbols presentKOMFYRTOPPRAMME (ALTERNATIV)

ADVARSE
UNNGÅ SKADER PÅ APPARATET
- Ikke bruk komfyrtoppen som arbeidsplate eller som oppbevaringsplass.
- Ikke slå på en kokesone hvis det ikke står kokekar på komfyrtoppen eller hvis kokekaret er tomt.
- Keramisk glass er veldig sterkt og motstandsdyktig, men det er ikke uknuselig. Det kan bli skadet hvis en spesielt skarp eller hard gjenstand faller ned på komfyrtoppen.
- Ikke plasser kasseroller på komfyrtopprammen. Det kan føre til oppskraping og skade på overflaten.
- Unngå å søle etsende væsker, for eksempel eddik, sitronsaft og avskallingsmidler, på komfyrtopprammen. Slike væsker kan forårsake matte flekker.
- Hvis sukker eller en blanding som inneholder sukker, kommer i kontakt med en varm kokesone og smelter, må det renses vekk umiddelbart med en kjøkkenskrape, mens det fortsatt er varmt. Hvis det får avkjøles, kan det skade overflaten när det fjernes.
- Hold alle gjenstander og materialer som kan smelte, for eksempel plast, aluminiumsfolie og stekefolie, borte fra den keramiske glassflaten. Hvis noe av denne typen smelter på komfyrtoppen, må det umiddelbart fjernes med en skrape.

natural_image
Diagram showing a mechanical component with an arrow indicating direction (no text or symbols present)
natural_image
Technical line drawing showing two views of a flatboard installation with a cable and support structure (no text or symbols)natural_image
Illustration of a frying pan with a U-shaped magnet above it, showing magnetic field lines (no text or symbols)ASTIOIDEN KOKO
KOSKETUSPAINIKKEIDEN KÄYTTÖ
natural_image
Hand pointing at a control panel with four buttons and a square display (no text or symbols visible)natural_image
Illustration of a hand using a power tool to clean or brush the brush (no text or symbols visible)Ongelmalika
natural_image
Abstract diagram with curved lines and scattered gray shapes, no text or symbols presentLIEDEN KEHYS (LISÄVARUSTE)

InSTALLATION AF kOmFuRET
12
DELE OG FunkTIONER
16
InDEn Du STARTER
20
bRuG AF kOmFuRET
20


natural_image
Simple line drawing of a door handle with an arrow indicating direction (no text or symbols)
natural_image
Technical line drawing showing two views of a flatboard installation with a cable and support structure (no text or symbols)natural_image
Illustration of a frying pan with a U-shaped magnet above it, showing magnetic field lines (no text or symbols)ST∅RRELSE PÅ K∅KKENT∅J
BRUG AF BER∅RINGSSENSORERNE
natural_image
Hand pointing at a control panel with six buttons and a square display (no text or symbols visible)natural_image
Hand interacting with a touchscreen display showing icons and a timer (no text or symbols)F.eks. svarer den forreste, venstre indikator til den forreste, venstre kogezone.
-- vises på timerens display.
natural_image
Illustration of a hand pointing at a control panel with four buttons and a square display (no text or symbols)- Rør ved tasten Automatisk opvarmning.
natural_image
Illustration of a hand using a power tool to clean or brush the brush (no text or symbols visible)natural_image
Simple line drawing of a curved surface with scattered cloud-like shapes (no text or symbols)KOMFURRAMME (TILBEH∅R)

Thank you for purchasing this Samsung product. To receive more complete service, please register your product at
www.samsung.com/register
SAMSUNG
using this manual
Please take the time to read this owner's manual, paying particular attention to the safety information contained in the following section, before using your appliance. Keep this manual for future reference. If transferring ownership of the appliance, please remember to pass the manual on to the new owner.
ImportaNt Safety SymbolS aNd preCautIoNS.
The following symbols are used in the text of this Owner's Manual :
| WARNING | Hazards or unsafe practices that may result in severe personal injury or death. |
| CAUTION | Hazards or unsafe practices that may result in minor personal injury or property damage. |
| CAUTION | To reduce the risk of fire, explosion, electric shock, or personal injury when using your hob, follow these basic safety precaution. |
| Do NOT attempt. | |
| Do NOT disassemble. | |
| Do NOT touch. | |
| Follow directions explicitly. | |
| Unplug the power plug from the wall socket. | |
| Make sure the machine is grounded to prevent electric shock. | |
| Call the service center for help. | |
| Note | |
| Important | |
2\_using this manual
safety instructions
The safety aspects of this appliance comply with all accepted technical and safety standards. However, as manufacturers we also believe it is our responsibility to familiarize you with the following safety instructions.

eleCtrlCal Safety
Be sure the appliance is properly installed and grounded by a qualified technician.
The appliance should be serviced only by qualified service personnel. Repairs carried out by unqualified individuals may cause injury or serious malfunction. If your appliance is in need of repair, contact your local service centre. Failure to follow these instructions may result in damage and void the warranty.
Flush - mounted appliances may be operated only after they have been installed in cabinets and workplaces that conform to the relevant standards. This ensures sufficient protection against contact for electrical units as required by the essential safety standards.
If your appliance malfunctions or if fractures, cracks or splits appear:
- switch off all cooking zones;
- disconnect the hob from the mains supply; and
- contact your local service centre.

Child Safety
This appliance is not intended for use by young children or infirm persons without the adequate supervision of a responsible adult.
Young children should be supervised to ensure that they do not play with the appliance.
The cooking zones will become hot when you cook. Always keep small children away from the appliance.
This appliance is to be used only for normal cooking and frying in the home. It is not designed for commercial or industrial use.
Never use the hob for heating the room.
Take care when plugging electrical appliances into mains sockets near the hob. Mains leads must not come into contact with the hob.
Overheated fat and oil can catch fire quickly. Never leave surface units unattended when preparing foods in fat or oil, for example, when cooking chips.
Turn the cooking zones off after use.
Always keep the control panels clean and dry.
Never place combustible items on the hob. It may cause fire.
Do not use the hob to heat aluminium foil, products wrapped in aluminium foil or frozen foods packaged in aluminium cookware.
There is the risk of burns from the appliance if used carelessly.
Cables from electrical appliances must not touch the hot surface of the hob or hot cookware.
Do not use the hob to dry clothes.
Never store flammable materials such as aerosols and detergents in draws or cupboards under the hob.
WARNING : Users with Pacemakers and Active Heart Implants must keep their upper body at a minimum distance of 30cm from induction cooking zones when turned on. If in doubt, you should consult the manufacturer of your device or your doctor.

Safety wheN CleaNINg
Always turn the appliance off before cleaning.
For safety reasons do not clean the appliance with a steam jet or high - pressure cleaner.
Clean the hob in accordance with the cleaning and care instructions contained in this manual.
4\_safety instructions
Severe warNINg SIgNS for INStallatIoN

The installation of this appliance must be performed by a qualified hob service technician trained by the manufacturer. Please see the section "Installing your Hob".
Plug the power cord into the proper wall socket or higher and use the socket for this appliance only. Plug the power plug into the wall socket firmly. In addition, do not use an extension cord.
- Failure to do so and sharing a wall socket with other appliances using a power strip or extending the power cord may result in electric shock or fire.
- Do not use an electric transformer. It may result in electric shock or fire.
The installation of this appliance must be performed by a qualified technician or service company.
- Failing to do so may result in electric shock, fire, an explosion, problems with the product, or injury.
Appliance should allow to disconnection of the appliance from the supply after installation. The disconnection may be achieved by having the plug accessible or by incorporating a switch in the fixed wiring in accordance with the wiring rules.

Do not install this appliance near a heater, inflammable material.
Do not install this appliance in a humid, oily or dusty location, in a location exposed to direct sunlight and water (rain drops).
Do not install this appliance in a location where gas may leak.
- This may result in electric shock or fire.
The appliance is not intended for installing in road vehicles, caravans and similar vehicles etc.

This appliance must be properly grounded.
Do not ground the appliance to a gas pipe, plastic water pipe, or telephone line.
- This may result in electric shock, fire, an explosion, or problems with the product.
- Never plug the power cord into a socket that is not grounded correctly and make sure that it is in accordance with local and national codes.

CautIoN SlgNS for INStallatIoN

This appliance should be positioned in such a way that it is accessible to the power plug.
- Failure to do so may result in electric shock or fire due to electric leakage.
Install your appliance on a level and hard floor that can support its weight.
- Failure to do so may result in abnormal vibrations, noise, or problems with the product.
Install the appliance while maintaining the proper distance from the wall.
- Failure to do so may result in fire due to overheating.
The minimum height of free space necessary above the top surface of the hob

Severe warNINg SlgNS for eleCtrlC

Remove all foreign substances such as dust or water from the power plug terminals and contact points using a dry cloth on a regular basis.
- Unplug the power plug and clean it with a dry cloth.
- Failure to do so may result in electric shock or fire.
safety instructions
Plug the power plug into the wall socket in the right direction so that the cord runs towards the floor.
- If you plug the power plug into the socket in the opposite direction, the electric wires within the cable may be damaged and this may result in electric shock or fire.
Plug the power plug into the wall socket firmly. Do not use a damaged power plug, damaged power cord or loose wall socket.
- This may result in electric shock or fire.
Do not pull or excessively bend the power cord.
Do not twist or tie the power cord.
Do not hook the power cord over a metal object, place a heavy object on the power cord, insert the power cord between objects, or push the power cord into the space behind the appliance.
- This may result in electric shock or fire.
Do not pull the power cord, when unplugging the power plug.
- Unplug the power plug by holding the plug.
- Failure to do so may result in electric shock or fire.
When the appliance or the cord is damaged, contact your nearest service centre.

CautIoN SlgNS for eleCtrlC
Unplug the power plug when the appliance is not being used for long periods of time or during a thunder/lightning storm.
- Failure to do so may result in electric shock or fire.
Unplug the power plug when the appliance is not being used for long periods of time or during a thunder/lightning storm.
- Failure to do so may result in electric shock or fire.

Severe warNINg SIgNS for uSINg
In the event of a gas leak (such as propane gas, LP gas, etc.), ventilate immediately without touching the power plug. Do not touch the appliance or power cord.
- Do not use a ventilating fan.
- A spark may result in an explosion or fire.
During use the appliance becomes hot. Care should be taken to avoid touching heating elements inside the hob.
ALWAYS use hob gloves when removing a dish from the hob to avoid unintentional burn.
WARNING : The contents of feeding bottles and baby food jars shall be stirred or shaken and the temperature checked before consumption, in order to avoid burns.
If the supply cord is damaged, it must be replaced by the manufacturer, its service agent or similarly qualified persons in order to avoid a hazard.
Children should be supervised to ensure that they do not play with the appliance
WARNING : Only allow children to use the hob without supervision when adequate instructions have been given so that the child is able to use the hob in a safe way and understands the hazards of improper use.
6\_safety instructions

The appliance is not intended for use by persons (including children) with reduced physical, sensory or mental capabilities, or lack of experience and knowledge, unless they have been given supervision or instruction concerning use of the appliance by a person responsible for their safety.
WARNING : Accessible parts may become hot during use. To avoid burns young children should be kept away.
WARNING : If the surface is cracked, switch off the appliance to avoid the possibility of electric shock. Do not use your hob until the glass surface has been replaced.
Metallic objects such as knives, forks, spoons and lids should not be placed on the hob surface since they can get hot.
WARNING : Ensure that the appliance is switched off before replacing the lamp to avoid the possibility of electric shock.

Do not touch the power plug with wet hands.
- This may result in electric shock.
Do not turn the appliance off by unplugging the power plug while an operation is in progress. - Plugging the power plug into the wall socket again may cause a spark and result in electric shock or fire.
Keep all packaging materials well out of the reach of children, as packaging materials can be dangerous to children.
- If a child places a bag over its head, it may result in suffocation.
- Failing to do so may result in electric shock, burns or injury.
- If a child places a bag over its head, it may result in suffocation. - Failing to do so may result in electric shock, burns or injury.
Never use this appliance for purposes other than cooking.
- Failure to do so may result in fire.
Never heat plastic or paper containers and do not use them with the hob function.
- Failure to do so may result in fire.
Do not over-heat food.
- This may result in fire.
Do not heat food wrapped in paper such as magazines or newspaper.
- This may result in fire.
Do not use or place inflammable sprays or objects near the hob.
- This may result in fire or an explosion.
To heat beverages such as coffee, tea, liquor or water or dishes such as curry, soup or stew, use a low power setting and make sure to stir the contents while heating them.
- Using a high power setting can cause the contents to boil over without warning and cause serious burns.
Do not insert fingers, foreign substances or metal objects such as pins or needles into the inlet, outlet, and holes. If foreign substances are inserted into any of these holes, unplug the power plug from the wall socket and contact your product provider or nearest service centre.
- Failure to do so may result in electric shock or injury.
NEVER fill the container to the top and choose a container that is wider at the top than at the bottom to prevent the liquid from boiling over. Bottles with narrow necks may also explode if overheated.
NEVER heat a babys bottle with the teat on, as the bottle may explode if overheated.
Do not immerse the power cable or plug in water and keep the power cable away from heated surfaces.
Do not operate this appliance if it has a damaged power cable or plug.
WARNING : Liquids and other foods must not be heated in sealed containers since they are liable to explode.
Do not attempt to repair, disassemble, or modify the appliance yourself.
- Do not use any fuse(such as cooper, steel wire, etc.) other than the standard fuse.
- When repairing or reinstalling the appliance is required, contact your nearest service centre.
- Failure to do so may result in electric shock, fire, problems with the product, or injury.
If any foreign substance such as water has entered the appliance, unplug the power plug and contact your nearest service centre.
- Failure to do so may result in electric shock or fire.
If the appliance is flooded, please contact your nearest service centre.
- Failure to do so may result in electric shock or fire.
If the appliance generates a strange noise, a burning smell or smoke, unplug the power plug immediately and contact your nearest service centre.
- Failing to do so may result in electric shock or fire.
CAUTION CautIoN SlgNS for uSINg
Take care as beverages or food may be very hot after heating.
- Especially when feeding a child, check that it has cooled sufficiently.
Take care when heating liquids such as water or other beverages.
- Avoid using a slippery container with a narrow neck.
- Failing to do so may result in an abrupt overflow of the contents and cause burns.
Do not hold food or any part thereof during or immediately after cooking.
- Use cooking gloves because it may be very hot and you could burn yourself.
When the surface is cracked, turn the power switch of the appliance off.
- Failure to do so may result in electric shock.
8\_safety instructions

Small amounts of food require shorter cooking or heating time.
If normal times are allowed they may overheat and burn.
Children should be supervised to ensure that they do not play with the appliance.
Any spillage should be removed from the lid before opening and the hob surface should be allowed to cool before closing the lid (Model which has lid only).

Do not stand on top of the appliance or place objects (such as laundry, hob cover, lighted candles, lighted cigarettes, dishes, chemicals, metal objects, etc.) on the appliance.
- This may result in electric shock, fire, problems with the product, or injury.
Do not operate the appliance with wet hands.
- This may result in electric shock.
Do not spray volatile material such as insecticide onto the surface of the appliance.
- As well as being harmful to humans, it may also result in electric shock, fire or problems with the product.
Do not place the appliance over a fragile object such as a sink or glass object.
- This may result in damage to the sink or glass object.
Take care when removing the wrapping from food that has just been taken out of the appliance.
- If the food is hot, hot steam may be emitted abruptly when removing the wrapping and you may burn yourself.
Do not unplug the appliance by pulling at the power cord, always grip plug firmly and pull straight out from the outlet.
- Damage to the cord may cause short-circuit, fire and/or electric shock
Appliances are not intended to be operated by means of an external timer or separate remote-control system.
Do not stare at the hob elements (Model which was installed halogen lamp only).
After use, switch off the hob element by its control and do not rely on the pan detector (Model which was installed pan detector only).

Severe warNINg SlgNS for CleaNINg

Do not clean the appliance by spraying water directly onto it.
Do not use benzene, thinner or alcohol to clean the appliance.
- This may result in discoloration, deformation, damage, electric shock or fire.
Before cleaning or performing maintenance, unplug the appliance from the wall socket.
- Failure to do so may result in electric shock or fire.
For your safety, do not use high-pressure water cleaners or steam jet cleaners.

CautIoN SlgNS for CleaNINg

The hob should be cleaned regularly and any food deposits removed.
Failure to maintain the hob in a clean condition could lead to deterioration of the surface that could adversely affect the life of the appliance and possibly result in a hazardous situation.

Take care not to hurt yourself when cleaning the appliance (external/internal).
- You may hurt yourself on the sharp edges of the appliance.
Do not clean the appliance with a steam cleaner. - This may result in corrosion.
disposal instructions

dISpoSINg of the paCkagINg material
All materials used to package the appliance are fully recyclable. Sheet and hard foam parts are appropriately marked. Please dispose of packaging materials and old appliances with due regard to safety and the environment.

proper dISpoSal of your old appllaNCe
WARNING : Before disposing of your old appliance, make it inoperable so that it cannot be a source of danger.
To do this, have a qualified technician disconnect the appliance from the mains supply and remove the mains lead.
The appliance may not be disposed of in the household rubbish.
Information about collection dates and public refuse disposal sites is available from your local refuse department or council.
CorreCt dISpoSal of thIS produCt (waSte eleCtrlCal & eleCtroNIC eQulpmeNt)
(Applicable in countries with separate collection systems)
This marking on the product, accessories or literature indicates that the product and its electronic accessories (e.g. charger, headset, USB cable) should not be disposed of with other household waste at the end of their working life. To prevent possible harm to the environment or human health from uncontrolled waste disposal, please separate these items from other types of waste and recycle them responsibly to promote the sustainable reuse of material resources.
Household users should contact either the retailer where they purchased this product, or their local government office, for details of where and how they can take these items for environmentally safe recycling.
Business users should contact their supplier and check the terms and conditions of the purchase contract. This product and its electronic accessories should not be mixed with other commercial wastes for disposal.
10
_disposal instructions
contents
INsTAIING The hOb
12
pARTs AND feATURES
16
befORe yOU beGIN
20
hOb Use
20
12 Regulations and compliance
12 Safety instructions for the installer
13 Connecting to the mains power supply
14 Installing into the countertop
16 Cooking zones
16 Control panel
17 Components
17 Induction heating
18 The key features of your appliance
19 Safety shutoff
19 Residual heat indicator
20 Temperature detection
20 Initial cleaning
20 Cookware for induction cooking zones
21 Suitability test
21 Size of pans
21 Operating noises
22 Using suitable cookware
22 Using the touch control sensors
23 Switching the appliance on
23 Select cooking zone and heat setting
23 Switching the appliance off
24 Switching a cooking zone off
24 Using the child safety lock
25 Timer
26 Power boost control
26 Bridge control
27 Auto heat up
28 Power Management
28 Suggested settings for cooking specific foods
29 Hob
30 Hob frame (option)
30 To avoid damaging your appliance
31 FAQs and troubleshooting
32 Service
33 Technical data
33 Cooking zones
Contents _11
CleANING AND CARE
29
WARRANTy ANd seRvICe
31
TeChNICAL DATA
33
installing the hob

WARNING
Be sure the new appliance is installed and grounded only by qualified personnel.
Please observe this instruction. The warranty will not cover any damage that may occur as a result of improper installation.
Technical data is provided at the end of this manual.
regulatioNS aNd CompllaNCe
This appliance meets the following standards:
- EN 60335 - 1 and EN 60335 - 2 - 6, relating to the safety of electrical appliances for household use and similar purposes;
- EN 60350, or DIN 44546 / 44547 / 44548, relating to the operating features of electric cookers, hobs, ovens, and grills for household use;
EN 55011
EN 55014-2
• EN 61000 - 3 - 2; and
• EN 61000 - 3 - 3, relating to basic requirements for electromagnetic compatibility (EMC).

This appliance complies with the following EU Directives:
• 2006/95/EC, Low Voltage Directive
• 2004/108/EEC, Electromagnetic Compatibility Directive
Safety INStruCtIoNS for the INStaller
- A device must be provided in the electrical installation that allows the appliance to be disconnected from the mains at all poles with a contact opening width of at least 3 mm. Suitable isolation devices include line protecting cut - outs, fuses (screw type fuses are to be removed from the holder), earth leakage trips and contactors.
- With respect to fire protection, this appliance corresponds to EN 60335 - 2 - 6. This type of appliance may be installed with a high cupboard or wall on one side.
- Drawers may not be fitted underneath the hob.
• The installation must guarantee shock protection. - The kitchen unit in which the appliance is fitted must satisfy the stability requirements of DIN 68930.
- For protection against moisture, all cut surfaces are to be sealed with a suitable sealant.
- On tiled work surfaces, the joints in the area where the hob sits must be completely filled with grout.
- On natural, artificial stone, or ceramic tops, the snap action springs must be bonded in place with a suitable artificial resin or mixed adhesive.
- Ensure that the seal is correctly seated against the work surface without any gaps.
Additional silicon sealant must not be applied; this would make removal more difficult when servicing.
• The hob must be pressed out from below when removed.
• A board is to be installed underneath the hob. - The ventilation gap between the worktop and front of the unit underneath it must not be covered.
12\_installing the hob
CoNNeCtINg to the maINS power Supply
Before connecting, check that the nominal voltage of the appliance, that is, the voltage stated on the rating plate, corresponds to the available supply voltage. The rating plate is located on the lower casing of the hob.

Shut off power to circuit before connecting wires to circuit.
The heating element voltage is AC 230 V\~. The appliance also works perfectly on networks with AC 220 V\~ or AC 240 V\~.
The hob is to be connected to the mains using a device that allows the appliance to be disconnected from the mains at all poles with a contact opening width of at least 3 mm, eg. automatic line protecting cut - out, earth leakage trips or fuse.

The cable connections must be made in accordance with regulations and the terminal screws tightened securely.

Once the hob is connected to the mains supply, check that all cooking zones are ready for use by briefly switching each on in turn at the maximum setting with suitable cookware.

When the hob is powered on for the first time, all displays light and the child safety lock is activated.

Pay attention (conformity) to phase and neutral allocation of house connection and appliance (connection schemes); otherwise, components can be damaged. Warranty does not cover damage resulting from improper installation.

If the supply cord is damaged, it must be replaced by a special cord or assembly available from the manufacturer or its service agent.
| 1N ~ • | 2N ~ |
 | 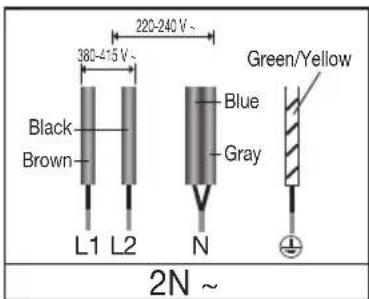 |
| 2 x 1N ~ |  For correct supply connection, follow the wiring diagram attached near the terminals. For correct supply connection, follow the wiring diagram attached near the terminals. |
 |
INStallING INto the CouNtertop

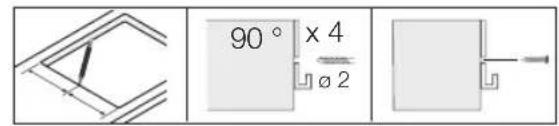
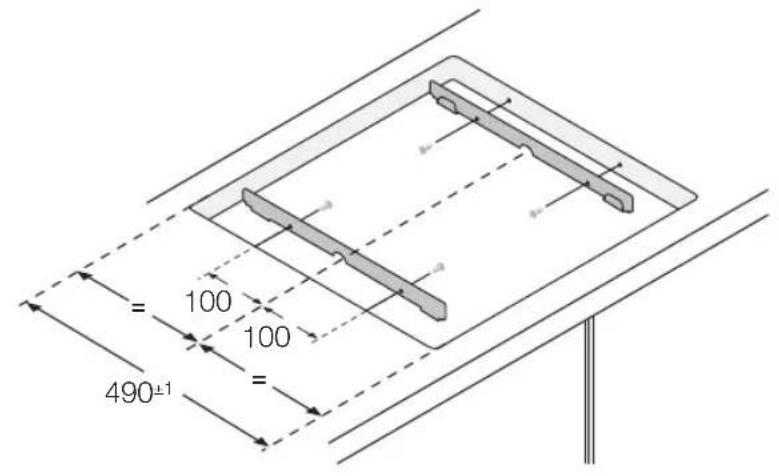
Make a note of the serial number on the appliance rating plate prior to installation. This number will be required in the case of requests for service and is no longer accessible after installation, as it is on the original rating plate on the underside of the appliance.
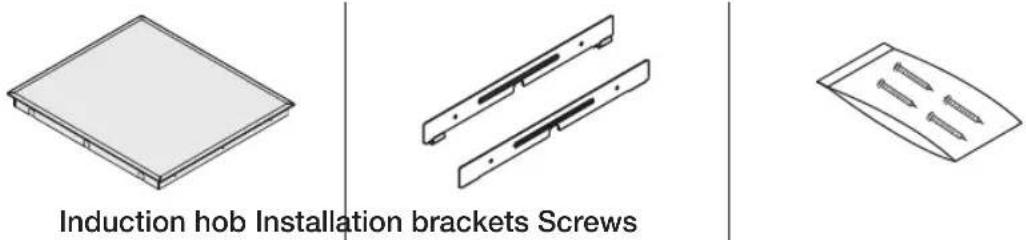
Pay special attention to the minimum space and clearance requirements. Secure the brackets at both sides with the provided screws before mounting the hob onto the brackets.
14\_installing the hob

natural_image
Simple line drawing of a door handle with an arrow indicating direction (no text or symbols)
natural_image
Technical line drawing showing two views of a flatboard installation with a cable and support structure (no text or symbols)parts and features
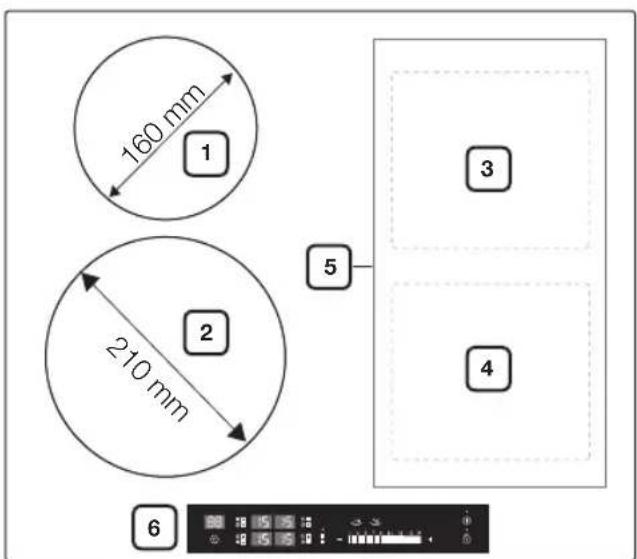
CookING ZoNeS
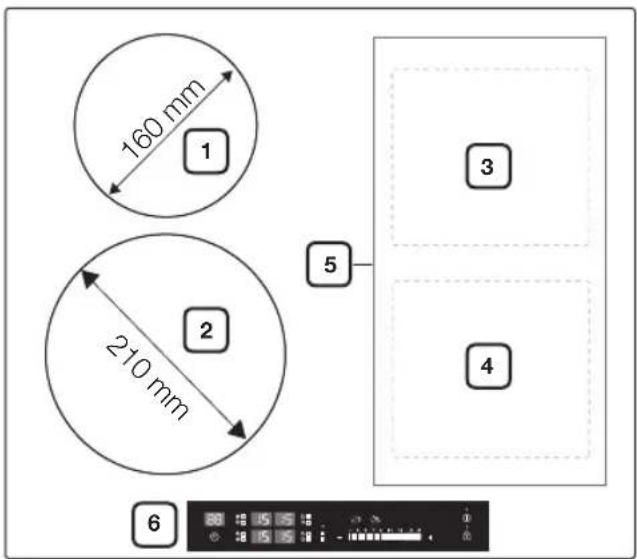
- Induction cooking zone 1400 W with Power Boost 2000 W
- Induction cooking zone 2200 W with Power Boost 3200 W
- Induction rear Bridge zone 1800 W with Power Boost 2600 W
- Induction front Bridge zone 1800 W with Power Boost 2600 W
- Induction complete Bridge zone 3600 W with Power Boost 4600 W
- Control panel
CoNtrol paNeI
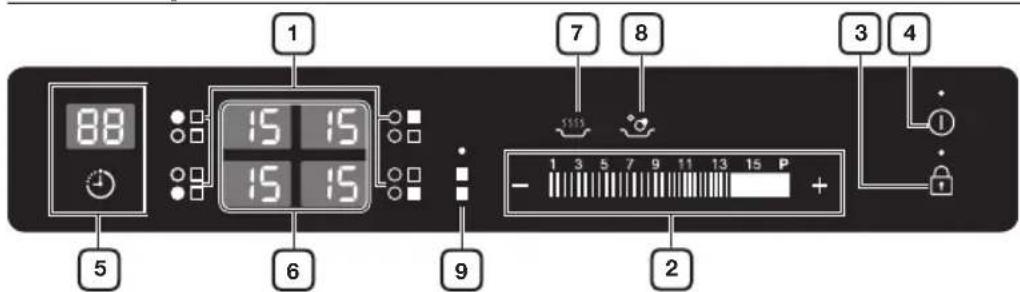
- Cooking zone selectors
- Heat setting selectors
- Lock control sensor
- On/Off control sensor
- Timer control sensor
- Indicators for heat settings and residual heat
- Keep warm
- Auto heat up
- Complete Bridge zone selector
16_parts and features
COMPONENTS
INDUCTION HEATING
- The Principle of Induction Heating: When you place your cookware on a cooking zone and you turn it on, the electronic circuits in your induction hob produce "induced currents" in the bottom of the cookware which instantly raise cookware's temperature.
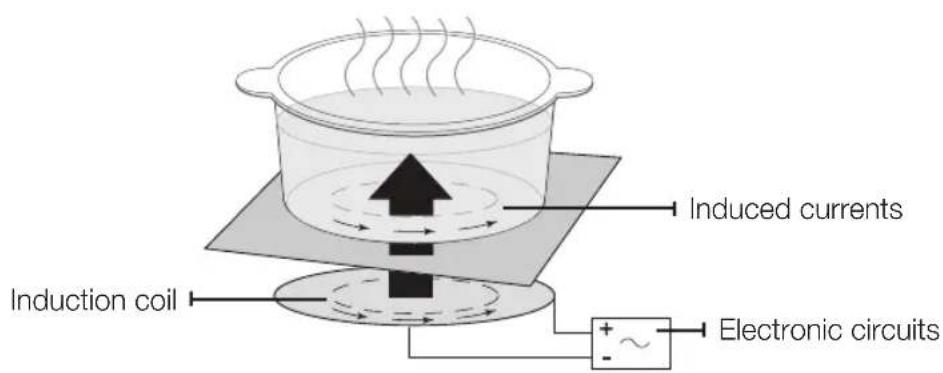
- Greater speed in cooking and frying: As the pan is heated directly and not the glass, the efficiency is greater than in other systems because no heat is lost. Most of the energy absorbed is transformed into heat.
THE KEY FEATURES OF YOUR APPLIANCE
- Ceramic glass cooking surface : The appliance has a ceramic glass cooking surface and four rapid - response cooking zones.
- Touch control sensors : Your appliance is operated using touch control sensors.
- Easy cleaning : The advantage of the ceramic glass cooking surface and the control sensors is their accessibility for cleaning. The smooth, flat surface is easy to clean.
- On/Off sensor: The "On/Off" control sensor provides the appliance with a separate mains switch. Touching this sensor switches the power supply on or off completely.
- Control and function indicators : Digital displays and indicator lights provide information about settings and activated functions, as well as the presence of residual heat in the various cooking zones.
- Safety shutoff: A safety shutoff ensures that cooking zones switch off automatically after a period of time if the setting has not been changed.
- Residual heat indicator : An icon for residual heat appears in the display if the cooking zone is so hot that there is a risk of burning.
- Power Boost P: Use this function to heat up the contents of the pan faster than maximum power level 'H'. (The display will show P)
- Auto Pan-Detection : Each cooking zone incorporates an automatic pan-detection system, the system is calibrated in order to recognize pans of a diameter just slightly smaller than the cooking zone. Pans must always be placed centrally on each cooking zone. And you should use suitable cookware.
-
Digital displays : The four display fields are assigned to the four cooking zones. They show the following information:
-
- the appliance has been switched on,
- 1 to 15 P selected heat settings,
- H residual heat,
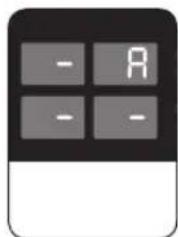
- the child lock is activated; and
- Error message, the touch sensor button has been touched for longer than 8 seconds.
- Error message, when the hob is overheated because of abnormal operation. (example: operation with empty cookware)
- error message, cookware is unsuitable or too small or no cookware has been placed on the cooking zone.
- Keep warm 📋: Use this function to keep warm cooked food. (The display will show 📋)
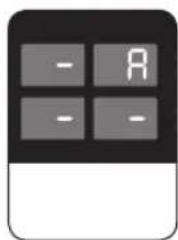
- Auto heat up 📁 : Use this function to heat at the highest power level for a certain period of time. (The display will show ‘R’.) After completion, cooking zone will automatically reduce to a lower power level.
⚠️ Warning Never leave the hob unattended when in use. This may result in fire.
- Complete Bridge zone selector B: Use this function to expand cooking zone into complete right side.
18_parts and features
SAFETY SHUTOFF
If one of the cooking zones is not switched off or the heat setting is not adjusted after an extended period of time, that particular cooking zone will automatically switch itself off.
Any residual warmth will be indicated with H (for "hot") in the digital displays corresponding to the particular cooking zones.
The cooking zones switch themselves off at the following times.
| Heat setting Switch off | |
| 1-3 After 6 hours | |
| 4-6 After 5 hours | |
| 7-9 After 4 hours | |
| 10-15 After 1.5 hours |

If the Hob is overheated because of abnormal operation, 📄 I be displayed. And the Hob will be switched off.

If cookware is unsuitable or too small or no cookware has been placed on the cooking zone, 📄 will be displayed. And after 1 minute the corresponding cooking zone will be switched off.

Should one or more of the cooking zones switch off before the indicated time has elapsed, see the section "Troubleshooting".
Other reasons why a cooking zone will switch itself off
All cooking zones will immediately switch themselves off if liquid boils over and lands on the control panel.
The automatic shutoff will also be activated if you place a damp cloth on the control panel. In both of these instances, the appliance will need to be switched on again using the main On/Off control ① sensor after the liquid or the cloth has been removed.
RESIDUAL HEAT INDICATOR
When an individual cooking zone or the hob is turned off, the presence of residual heat is shown with an H (for "hot") in the digital display of the appropriate cooking zones. Even after the cooking zone has been switched off, the residual heat indicator goes out only after the cooking zone has cooled.
You can use the residual heat for thawing or keeping food warm.

As long as the residual heat indicator is illuminated, there is a risk of burns.

If the power supply is interrupted, the H symbol will go out and information about residual heat will no longer be available. However, it may still be possible to burn yourself. This can be avoided by always taking care when near the hob.
TEMPERATURE DETECTION
If for any reason the temperatures on any of the cooking zones were to exceed the safety levels, should this happen then the cooking zone will automatically reduce to a lower power level.
When you have finished using the hob, the cooling fan will continue to run until the hob's electronics has cooled down. And the cooling fan switched itself on and off depending upon the temperature of the electronics.
before you begin
INITIAL CLEANING
Wipe the ceramic glass surface with a damp cloth and ceramic cooktop glass cleaner.

Do not use caustic or abrasive cleaners. The surface could be damaged.
hob use
COOKWARE FOR INDUCTION COOKING ZONES
The induction hob can only be turned on when a cookware with a magnetic base is placed on one of the cooking zones. You can use the following suitable cookware.
Cookware material
| Cookware material Suitable | |
| Steel, Enamelled steel Yes | |
| Cast iron Yes | |
| Stainless steel If appropriately labelled by the manufacturer | |
| Aluminium, Copper, Brass No | |
| Glass, Ceramic, Porcelain No | |

Cookware for induction hob is labelled as suitable by the manufacturer.

Certain cookware can make noise when being used on induction cooking zones. These noise are not a fault in the appliance and do not affect operation in any way.
20_before you begin
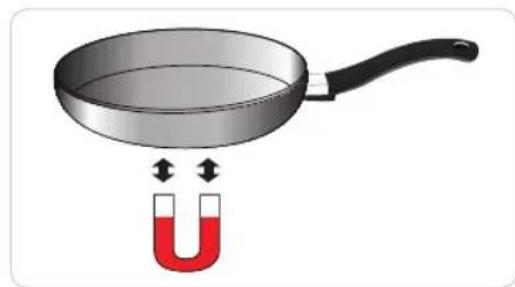
SUITABILITY TEST
Cookware is suitable for induction cooking, if a magnet sticks to the bottom of the cookware and cookware is labelled as suitable by the cookware manufacturer.
natural_image
Illustration of a frying pan with a U-shaped magnet above it, showing magnetic field lines (no text or symbols)SIZE OF PANS
Induction cooking zones adapt automatically to the size of the bottom of the cookware up to a certain limit. However the magnetic part of the bottom of the cookware must have a minimum diameter depending upon the size of the cooking zone.
| Diameter of cooking zones Minimum diameter of the bottom of the cookware | |
| 210 mm 140 mm | |
| 160 mm 100 mm | |
| Front or Rear Bridge 120 mm | |
| Complete Bridge 180 mm, oval, fish kettle | |
OPERATING NOISES
If you can hear.
- Cracking noise: cookware is made of different materials.
- Whistling: you use more than two cooking zones and the cookware. is made of different materials.
• Humming : you use high power levels. - Clicking: electric switching occurs.
• Hissing, Buzzing : the fan operates.
The noise are normal and do not refer to any defects.
hob use _21
USING SUITABLE COOKWARE
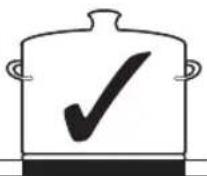
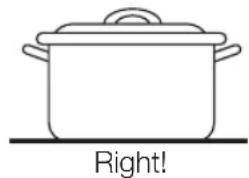
Better pans produce better results.
- You can recognise good pans by their bases. The base should be as thick and flat as possible.
- When buying new pans, pay particular attention to the diameter of the base. Manufacturers often give only the diameter of the upper rim.
- Do not use pans which have damaged bases with rough edges or burrs. Permanent scratching can occur if these pan are slid across the surface.
- When cold, pan bases are normally bowed slightly inwards (concave). They should never be bowed outwards (convex).
- If you wish to use a special type of pan, for example, a pressure cooker, a simmering pan, or a wok, please observe the manufacturer's instructions.
Energy saving tips

You can save valuable energy by observing the following points.
- Always position pots and pans before switching on the cooking zone.
- Dirty cooking zones and pan bases increase power consumption.
- When possible, position the lids firmly on the pots and pans to cover completely.
- Switch the cooking zones off before the end of the cooking time to use the residual heat for keeping foods warm or for thawing.
natural_image
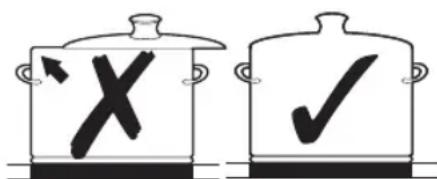
Simple line drawing of a cooking pot with label 'Right!' below (no other text or symbols)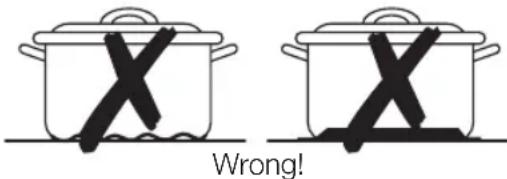
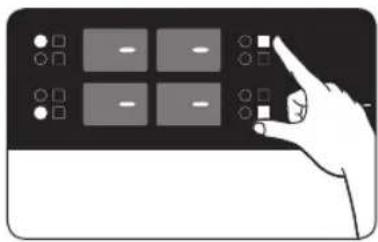
USING THE TOUCH CONTROL SENSORS
To operate the touch control sensors, touch the desired panel with the tip of your pointed finger until the relevant displays illuminate or go out, or until the desired function is activated.
Ensure that you are touching only one sensor panel when operating the appliance. If your finger is too flat on the panel, an adjacent sensor may be actuated as well.
22\_hob use
SwItChINg the appllaNCe oN
-
Touch the Lock control 🔒 sensor for approximately 3 seconds.
-
The appliance is switched on using the On/Off control ① sensor.
Touch the On/Off control Ⓐ sensor for 1 second.
The digital displays will show - .
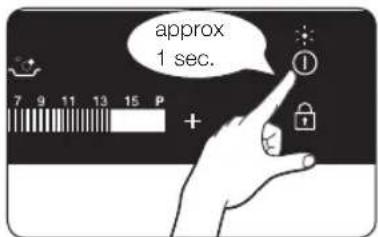
After the On/Off control ① sensor has been actuated to switch on your appliance, a heat setting must be selected within approximately 10 seconds. Otherwise, the appliance will switch itself off for safety reasons.
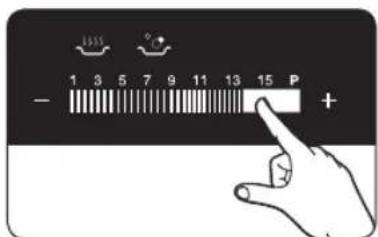
SeleCt CookINg ZoNe aNd heat SettINg
- For selecting the cooking zone, touch the corresponding cooking zone's key.
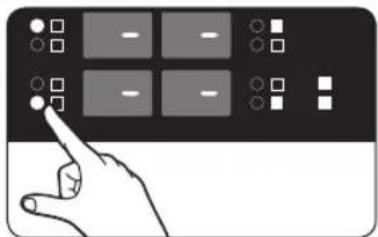
- For setting and adjusting the power level, touch the Heat setting selectors.
If more than one sensor is pressed for longer than 8 seconds, will show in the heat setting display. To reset, touch the On/Off control ① sensor.
SwItChINg the applIaNCe off
To completely switch off the appliance, use the
On/Off control Ⓘ sensor.
Touch the On/Off control ① sensor.

After switching off a single cooking zone or the entire cooking surface, the presence of residual heat will be indicated in the digital displays of the corresponding cooking zones in the form of an H (for "hot").
hob use
SWITCHING A COOKING ZONE OFF
To switch off a cooking zone, return the setting to
- by using the control panel's -control sensor.
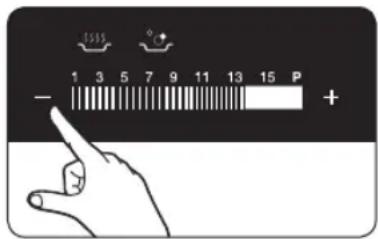
To switch off more quickly, touch the corresponding cooking zone's key twice.
You can use the child safety lock to safeguard against unintentionally turning on a cooking zone and activating the cooking surface.
Also the control panel, with the exception of the On/Off control ① sensor, can be locked in order to prevent the settings from being changed unintentionally, for example, by wiping over the panel with a cloth.
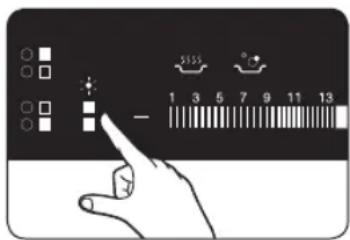
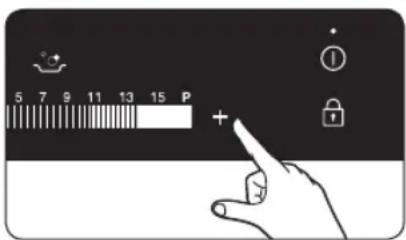
Switching the child safety lock on / off
- Touch the Lock control sensor for approximately 3 seconds. An acoustic signal will sound as confirmation.
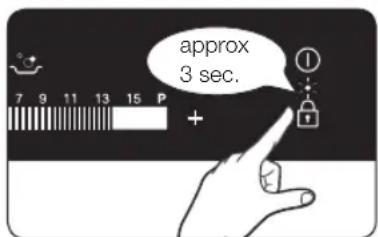
- Touch any control sensor. Will appear in the displays, indicating the child safety lock has been activated.

natural_image
Hand interacting with a touchscreen display showing L, clock, and grid of square icons (no text or symbols)- For switching the child safety lock off, touch the Lock control 🔒 sensor again for 3 seconds.
An acoustic signal will sound as confirmation.
After switching off the appliance, child safety lock will be activated automatically within some minutes for safety reasons.
24_hob use
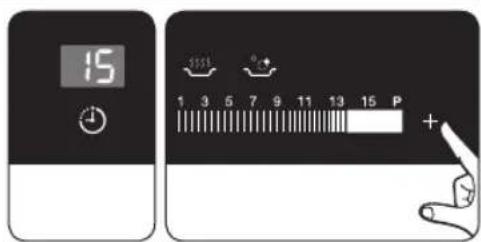
TIMER
There are two ways to use the timer:
Using the timer as a safety shutoff:
If a specific time is set for a cooking zone, the cooking zone will shut itself off once this period of time has elapsed. This function can be used for multiple cooking zones simultaneously.
Using the timer to count down:
The countdown timer cannot be used if a cooking zone has been switched on.
Setting the safety shutoff
The cooking zone(s) for which you want to apply the safety shutoff must be switched on.
- Using the Timer control ⏻ sensor, select the cooking zone for which the safety shutoff time is to be set.
After the first active cooking zone is selected, touching the timer's control sensor will cause the corresponding indicator to flash slowly.
For example, the front left indicator corresponds to the front left cooking zone.
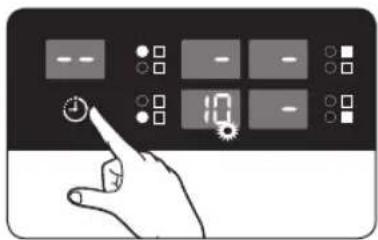
-- will appear in the timer display.
The next active cooking zone is selected by touching the Timer control ⏻ sensor again.
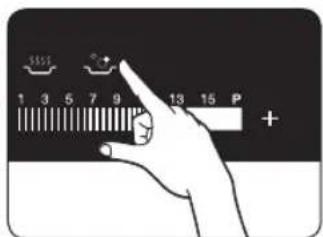
- Use the Timer setting selectors (
+ or Ⓗ to set the desired amount of time, for example, 15 minutes, after which the cooking zone will automatically switch itself off.
The safety shutoff is now activated.
To display the time remaining for any of the cooking zones, use the Timer control 🔍 sensor.
The corresponding control indicator will begin to blink slowly.
The settings are reset using the Timer setting selectors (+) or (-). After the set period of time has elapsed, the cooking zone automatically switches itself off, an acoustic signal sounds as confirmation and the timer display indicates.

To make the settings more quickly, touch any of the + or control sensors until the desired value is reached.
If the ⏻ control sensor is touched first, the time setting will begin at 99 minutes; if the ╒ control sensor is touched first, the time setting will begin at 1 minute.
Countdown timer
For the countdown timer to be used, the appliance must be switched on but all the cooking zones must be switched off.
- Touch the Timer control ⏻ sensor.
-- will appear in the timer display.
- Set the desired period of time using the Timer setting selectors (⊕ or ⊕)
The countdown timer function is now activated and the remaining time appears in the timer display.
To adjust the remaining time, touch the Timer control ⏻ sensor. and change the setting using the Timer setting selectors (+) or (-)
POWER BOOST CONTROL
The power boost function ☐ makes additional power available to the each cooking zones. (example : bring a large volume of water to the boil)
The power boost function is activated for maximum 10 minutes for each cooking zones.
After these times, the cooking zones automatically return to power level 15
In certain circumstances, the Power boost function may be deactivated automatically to protect the internal electronic components of the hob.
BRIDGE CONTROL
The bridge function can operate complete right side cooking zone for using large size cookware. (example : oval cookware, fish kettle)
- Touch the complete bridge zone sensor key.
- Touch the heat setting selectors (+) or (-) Heat setting display of right side(front, rear) will be changed together.
AUTO HEAT UP
- Touch the corresponding cooking zone's key.
natural_image
Illustration of a hand pointing at a control panel with four buttons and a square display (no text or symbols)- Touch the Auto heat up key.
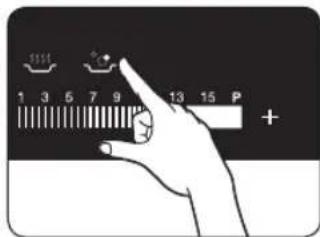
- Set the desired power level which will be used after Auto heat up.
The cooking zone switches on automatically at the highest power level and then switches to the continued power level which you have previously selected.
Auto heat up time depends on which continued power level has been chosen (see chart).
| Continued power level | Auto heat up time (approx.) [min : sec] |

Never leave the hob unattended when in use. This may result in fire.
As the higher continued power level settings are generally used for frying food, only a relatively short heat-up time is needed to heat up the pan initially.
Auto heat up is not suitable for food that is cooked in a large volume of water. (example: pasta)
Place a lid on the pan.
POWER MANAGEMENT
The cooking zones have a maximum power available to them.
If this power range is exceeded by switching on the power boost function , Power Management automatically reduced the heat setting of paired another cooking zone.
• Left side : No.1 and No.2 is paired cooking zone
- Right side: No.3 and No.4 is paired cooking zone The indicator for this cooking zone changes from the heat setting set to maximum possible heat setting.
- Example
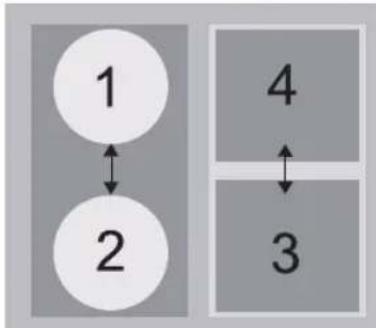
flowchart
graph TD
    A["1"] <--> B["2"]
    C["4"] <--> D["3"]
| Last heat setting of cooking zone (No.3) | Paired another cooking zone's heat setting (No.4) | |
| original heat setting | automatically changed heat setting | |
| Power Boost 15 level 13 level | ||

When the complete Bridge zone function is activated, Power Management automatically reduce the heat setting of left side(No.1 and No.2).

If the all left side(No.1 and No.2) cooking zones are used, maximum possible heat setting of complete Bridge zone is 15.
To use the power boost function P for complete Bridge zone, switch off one of the left side cooking zone.
SUGGESTED SETTINGS FOR COOKING SPECIFIC FOODS
The figures in the table below are guidelines. The heat settings required for various cooking methods depend on a number of variables, including the quality of the cookware being used and the type and amount of food being cooked.
| Switch Setting | Cookingmethod Examples for Use | |
| 14-15 | Warming Sautéing Frying | Warming large amounts of liquid, boiling noodles, searing meat, (browning goulash,braising meat) |
| 10-13 | Intensive Frying | Steak, sirloin, hash browns, sausages, pancakes / griddle cakes |
| 8-9 Frying | Schnitzel / chops, liver, fish | h, rissoles, fried eggs |
| 6-7 Boiling | Cooking up to 1.5 l liquid | potatoes, vegetables |
| 3-5 | Steaming Stewing Boiling | Steaming and stewing of small amounts of vegetables, boiling rice and milk dishes |
| 1-2 Melting | Melting butter, dissolving | gelatine, melting chocolate |

The heat settings indicated in the table above are provided only as guidelines for your reference.

You will need to adjust the heat settings according to specific cookware and foods.
28
hob use
cleaning and care
HOB

Cleaning agents must not come into contact with a heated ceramic glass surface: All cleaning agents must be removed with adequate amounts of clean water after cleaning because they can have a caustic effect when the surface becomes hot. Do not use any aggressive cleaners such as grill or oven sprays, scouring pads or abrasive pan cleaners.

Clean the ceramic glass surface after each use when it is still warm to the touch. This will prevent spillage from becoming burnt onto the surface. Remove scales, watermarks, fat drippings and metallic discolouration with the use of a commercially available ceramic glass or stainless steel cleaner.
Light Soiling
- Wipe the ceramic glass surface with a damp cloth.
- Rub dry with a clean cloth. Remnants of cleaning agent must not be left on the surface.
- Thoroughly clean the entire ceramic glass cooking surface once a week with a commercially available ceramic glass or stainless steel cleaner.
- Wipe the ceramic glass surface using adequate amounts of clean water and rub dry with a clean lint - free cloth.
Stubborn Soiling
- To remove food that has boiled over and stubborn splashes, use a glass scraper.
- Place the glass scraper at an angle to the ceramic glass surface.
- Remove soiling by scraping with the blade.

Glass scrapers and ceramic glass cleaners are available from specialty retailers.
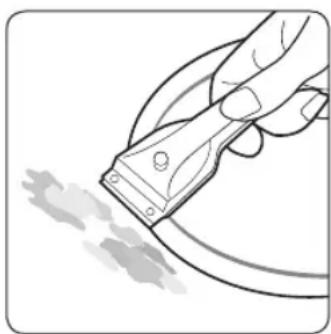
natural_image
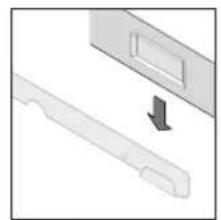
Illustration of a hand using a power tool to clean or brush the brush (no text or symbols visible)cleaning and care
Problem Dirt
- Remove burnt-on sugar, melted plastic, aluminium foil or other materials with a glass scraper immediately and while still hot.

There is a risk of burning yourself when the glass scraper is used on a hot cooking zone:
- Clean the hob as normal when it has cooled down.
If the cooking zone on which something has melted has been allowed to cool, warm it up again for cleaning.

Scratches or dark blemishes on the ceramic glass surface, caused, for example, by a pan with sharp edges, cannot be removed. However, they do not impair the function of the hob.
natural_image
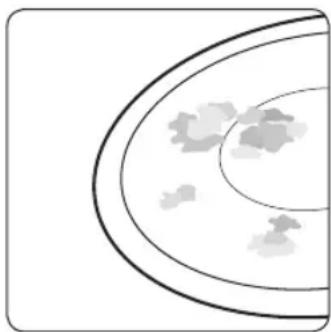
Simple line drawing of a circular object with internal cloud-like shapes, no text or symbols present.HOB FRAME (OPTION)

Do not use vinegar, lemon juice or scale remover on the hob frame; otherwise dull blemishes will appear.
- Wipe the frame with a damp cloth.
- Moisten dried debris with a wet cloth. Wipe and rub dry.
TO AVOID DAMAGING YOUR APPLIANCE
- Do not use the hob as a work surface or for storage.
- Do not operate a cooking zone if there is no pan on the hob or if the pan is empty.
- Ceramic glass is very tough and resistant to temperature shock, but it is not unbreakable.
It can be damaged by a particularly sharp or hard object dropping onto the hob.
- Do not place pans on the hob frame. Scratching and damage to the finish may occur.
- Avoid spilling acidic liquids, for example, vinegar, lemon juice and descaling agents, onto the hob frame, since such liquids can cause dull spots.
- If sugar or a preparation containing sugar comes into contact with a hot cooking zone and melts, it should be cleaned off immediately with a kitchen scraper while it is still hot. If allowed to cool, it may damage the surface when removed.
- Keep all items and materials that could melt, for example, plastics, aluminium foil and oven foils, away from the ceramic glass surface. If something of this nature melts onto the hob, it must be removed immediately with a scraper.
warranty and service
faQS aNd troubleShootINg
A fault may result from a minor error that you can correct yourself with the help of the following instructions. Do not attempt any further repairs if the following instructions do not help in each specific case.

Repairs to the appliance are to be performed only by a qualified service technician. Improperly effected repairs may result in considerable risk to the user. If your appliance needs repair, please contact your customer service centre.
What should I do if the cooking zones are not functioning?
Check for the following possibilities:
- The fuse in the house wiring (fuse box) is intact. If the fuses trip a number of times, call an authorised electrician.
• The appliance is properly switched on.
• The control indicators in the control panel are illuminated.
• The cooking zone is switched on.
• The cooking zones are set at the desired heat settings.
What should I do if the cooking zones will not switch on?
Check for the following possibilities:
- A period of more than 10 seconds has elapsed between when the On/Off button was actuated and the desired cooking zone switches on (see the section "Switching the appliance on").
- The control panel is partially covered by a damp cloth or liquid.
What should I do if the display except for Hhe residual warmth indicator suddenly disappears?
This could be a result of one of two possibilities:
• The On/Off sensor was accidentally actuated.
- The control panel is partially covered by a damp cloth or liquid.
What should I do if, after the cooking zones have been switched off, residual warmth is not indicated in the display?
Check for the following possibility:
- The cooking zone was only briefly used and therefore did not become hot enough. If the cooking zone is hot, please call the customer service centre.
What should I do if the cooking zone will not switch on or off?
This could be due to one of the following possibilities:
• The control panel is partially covered by a damp cloth or liquid.
• The child safety lock is on.
What should I do if the 5 Display is illuminated?
Check for the following:
- The control panel is partially covered by a damp cloth or liquid. To reset, press the "On/Off" control sensor.
warranty and service
What should I do if the 📞 i splay is illuminated?
Check for the following:
• The hob is overheated because of abnormal operation.
- After hob is cooled down, press the "On/Off" control sensor for resetting.
What should I do if the pdisplay is illuminated?
Check for the following:
- Cookware is unsuitable or too small or no cookware has been placed on the cooking zone
• If you use suitable cookware, displayed message will automatically disappear.
What should I do if the cooling fan runs after the hob is turned off?
Check for the following:
- When you have finished using the hob, the cooling fan runs by itself for cooling down.
- After the hob's electronics has cooled down, the cooling fan will be turned off.
If you request a service call because of an error made in operating the appliance, the visit from the customer service technician may incur a charge even during the warranty period.
SERVICE
Before calling for assistance or service, please check the section "Troubleshooting." If you still need help, follow the instructions below.
Is it a technical fault?
If so, please contact your customer service centre.
Always prepare in advance for the discussion. This will ease the process of diagnosing the problem and also make it easier to decide if a customer service visit is necessary.
Please take note of the following information.
• What form does the problem take?
• Under what circumstances does the problem occur?
When calling, please know the model and serial number of your appliance. This information is provided on the rating plate as follows:
• Model description
• S/N code (15 digits)
We recommend that you record the information here for easy reference.
Model:
Serial number:
When do you incur costs even during the warranty period?
- if you could have remedied the problem yourself by applying one of the solutions provided in the section “Troubleshooting”.
- if the customer service technician has to make several service calls because he was not provided with all of the relevant information before his visit and as a result, for example, has to make additional trips for parts. Preparing for your phone call as described above will save you the cost of these trips.
32\_warranty and service
technical data
TECHNICAL DATA
| Appliance dimensions | Width 575 mm | |
| Depth 505 mm | ||
| Height 56 mm | ||
| Worktop cut - out dimensions | Width 560 mm | |
| Depth 490 mm | ||
| Corner radius 3 mm | ||
| Connection voltage 220 - 240 V ~ 50 / 60 Hz | ||
| Maximum connected load power 7.2 kW | ||
| Weight | Net 11.3 kg | |
| Gross 14.2 kg | ||
COOKING ZONES
| Position Diameter Power | |
| Rear left 160 mm 1400 W / Boost 2000 W | |
| Front left 210 mm 2200 W / Boost 3200 W | |
| Front Bridge - | 1800 W / Boost 2600 W |
| Rear Bridge | - |
| Complete Bridge - | 3600 W / Boost 4600 W |
technical data
memo

memo
SAMSUNG
QUESTIONS OR COMMENTS
| COUNTRY | CALL | OR VISIT US ONLINE AT |
| AUSTRIA 0810 - SAMSUNG (7267864, € 0.07/min) | www.samsung.com | |
| BELGIUM 02-201-24-18 | www.samsung.com/be (Dutch)www.samsung.com/be_fr (French) | |
| DENMARK 70 70 19 70 | www.samsung.com | |
| FINLAND 09 856350 50 | ||
| FRANCE 01 48 63 00 00 | ||
| 0180 5 SAMSUNG bzw.GERMANY267864* (*0,14 €/Min. aus dem dt.Festnetz, aus dem Mobilfunk max. 0,42 €/Min.) | ||
| ITALIA 800-SAMSUNG(726-7864) | ||
| CYPRUS 8009 4000 only from landline(+30) 210 6897691 from mobile and land line | ||
| GREECE(+30) 210 6897691 | 80111-SAMSUNG (80111 726 7864) only from land linefrom mobile and land line | |
| LUXEMBURG 261 03 710 | ||
| NETHERLANDS | 0900-SAMSUNG (0900-7267864) (€ 0,10/Min) | |
| NORWAY | 815 56480 | |
| PORTUGAL | 808 20-SAMSUNG(808 20 7267) | |
| SPAIN 902 - 1 - SAMSUNG (902 172 678) | ||
| SWEDEN 0771 726 7864 (SAMSUNG) | ||
| SWITZERLAND | 0848 - SAMSUNG(7267864, CHF 0.08/min) | www.samsung.com/ch (German)www.samsung.com/ch_fr (French) |
| U.K | 0330 SAMSUNG (7267864) | www.samsung.com |
| EIRE | 0818 717100 | |
Code No.: DG68-00461A-02