61784 - Coffee maker Lakeland - Free user manual and instructions
Find the device manual for free 61784 Lakeland in PDF.


| Product Type | Coffee Maker |
| Brand | Lakeland |
| Model | 61784 |
| Dimensions (approx.) | 25 x 20 x 30 cm |
| Weight (approx.) | 1.5 kg |
| Power Rating | 900 W |
| Water Tank Capacity | 1.5 L |
| Main Functions | Brew coffee, keep warm, programmable timer, auto shut-off |
| Filter Type | Permanent or paper filter (#4) |
| Carafe Material | Glass |
| Control Type | Button with LCD display |
| Safety Features | Auto shut-off, overheat protection |
| Cleaning & Maintenance | Removable filter basket, descaling recommended monthly |
| Spare Parts Available | Carafe, filter basket, water tank |
| Repairability | Limited user-serviceable parts; refer to manual for disassembly |
| Manual Pages | 20 |
| Country of Origin | China (typical) |
Frequently Asked Questions - 61784 Lakeland
User questions about 61784 Lakeland
0 question about this device. Answer the ones you know or ask your own.
Ask a new question about this device
Download the instructions for your Coffee maker in PDF format for free! Find your manual 61784 - Lakeland and take your electronic device back in hand. On this page are published all the documents necessary for the use of your device. 61784 by Lakeland.
USER MANUAL 61784 Lakeland
natural_image
Exterior view of a modern kitchen blender with open lid and label 'LAKELAND' (no other text or symbols visible)Model: 61784
LAKELAND TOUCHSCREEN BEAN TO CUP
Thank you for choosing the Lakeland Touchscreen Bean to Cup.
Please take a little time to read this booklet before you use your appliance and keep it in a safe place for future reference.
Quick and easy to use, Touchscreen Bean to Cup makes coffee just the way you want it, freshly ground beans straight to the coffee jug. With an easy-clean, permanent filter it cuts down on waste, perfect where space or kitchen facilities are limited.
Here at Lakeland, our award-winning family-owned business still offers the same excellent quality, value for money and exceptional customer service as when we founded the company back in the 1960s.
Our products are hand-picked and thoroughly tested so you can be sure that everything you purchase will be a pleasure to use for many years to come.
CONTENTS
Product features....4
Safety cautions....6
Touchscreen control panel functions....9
Recommended dosage for coffee beans and ground coffee....10
Using your Touchscreen Bean to Cup for the first time....11
Instructions for use....13
Hints and tips 15
Frequently asked questions 16
Care and cleaning....17
Cleaning the Touchscreen Bean to Cup....18
Technical information ....19
Electrical connections 19
Recycling your electricals 19
PRODUCT FEATURES
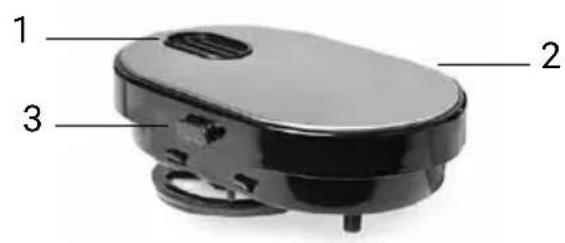
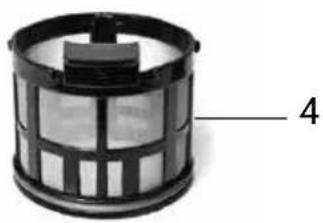
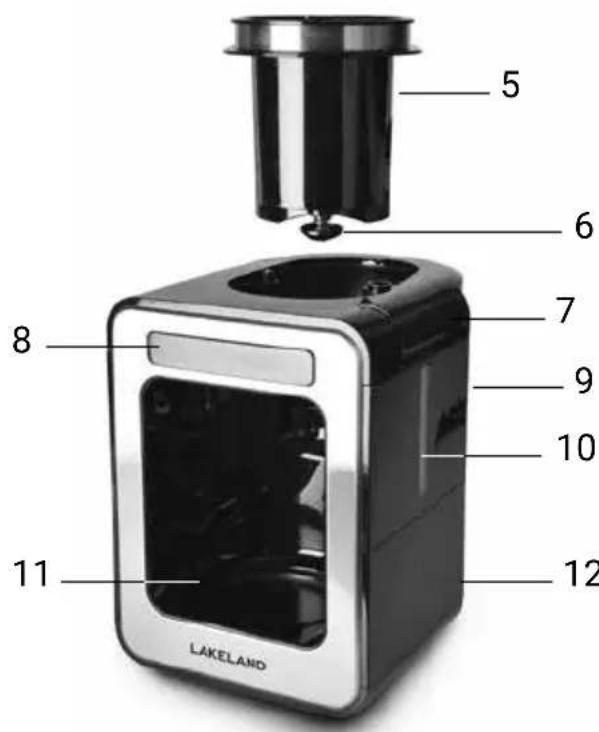
natural_image
Cylindrical object with internal grid pattern and labeled part '4' (no text or symbols on the object itself)- Steam vent
- Grind basket lid
- Grind basket lid release button
- Filter
- Grind basket
- Anti-drip valve
- Water reservoir lid
- Touchscreen control panel
- Water reservoir
- Cup capacity window
- Warming tray
- Cord and plug
- Coffee jug lid
- Coffee jug
natural_image
Close-up of a mechanical component with a central knob, no visible text or symbols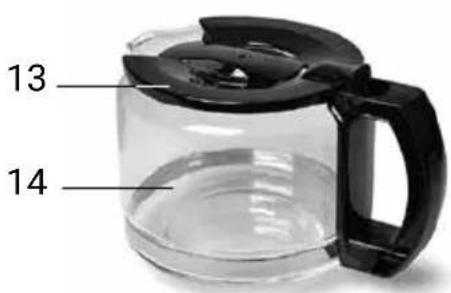
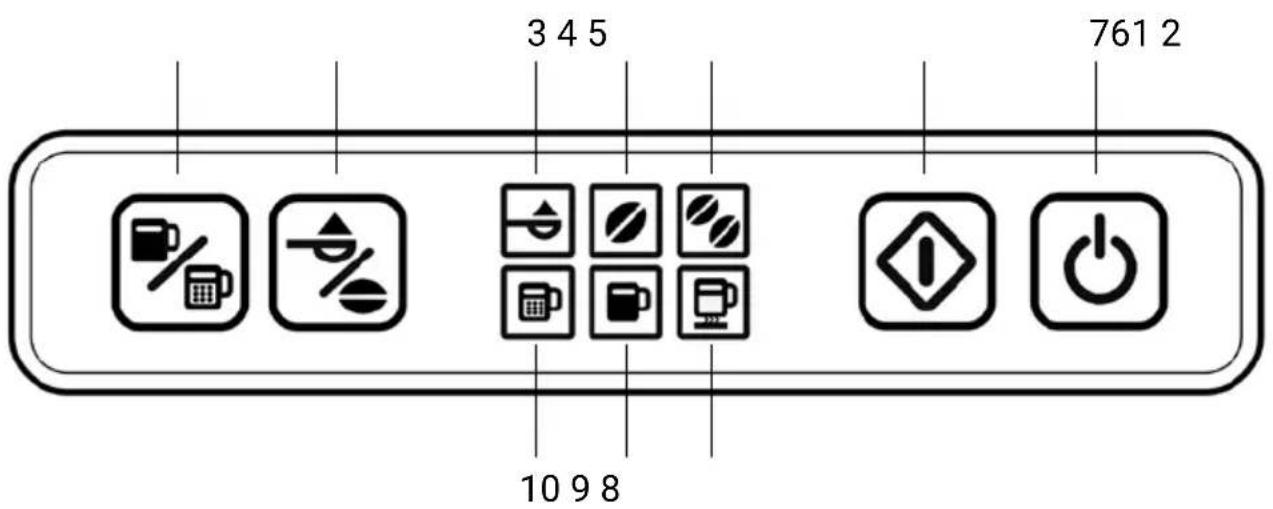
- Strong or light coffee icon
- Coffee beans or ground coffee icon
- Ground coffee mode
- Coffee beans 1 mode
- Coffee beans 2 mode
- Start icon
- ON/OFF icon
- Warming mode
- Strong taste mode
- Light taste mode
SAFETY CAUTIONS
Carefully read all the instructions before using the appliance and keep in a safe place for future reference. Always follow these safety cautions when using the appliance to avoid personal injury or damage to the appliance. This appliance should be used only as described in this instruction book.
- This appliance can be used by children aged from 8 years and above and persons with reduced physical, sensory or mental capabilities or lack of experience and knowledge if they have been given supervision or instruction concerning use of the appliance in a safe way and understand the hazards involved. Children shall not play with the appliance. Cleaning and user maintenance shall not be done by children unless they are older than 8 and supervised.
- Make sure your electricity supply matches the voltage shown on the appliance.
- Ensure all packaging materials and any promotional labels or stickers are removed from the appliance before the first use.
- Always inspect the appliance before use for noticeable signs of damage. Do not use if damaged or has been dropped. In the event of damage, or if the appliance develops a fault contact the Lakeland customer care team on 015394 88100.
- Do not use this appliance if the lead is damaged. Contact the Lakeland customer care team on 015394 88100.
• Always use the appliance on a dry, level, heat resistant surface.
- Unplug from the mains when not in use and before cleaning. To disconnect, turn the socket to "off" and remove the plug from the mains socket.
- Do not use any accessories or attachments with this appliance other than those recommended by Lakeland.
- To protect against fire, electric shock or personal injury, do not immerse cord, plug or lid in water or other liquids.
- Do not leave the lead hanging over the edge of a kitchen table or worktop. Avoid contact between the lead and hot surfaces.
- For indoor use only.
- For domestic use only.
- This appliance should be used for preparation of drinks as described within the instructions for use that accompany it.
- Always ensure that your hands are dry before removing the plug from the mains socket. Never pull the plug out of the mains socket by its lead.
- To avoid injury or possible fire, do not cover the appliance when in use.
- Do not connect this appliance to an external timer or remote control system.
- An extension cable may be used with care. The electrical rating of the cable should be at least as great as the appliance. Do not allow the cable to hang over the edge of the worktop or touch any hot surfaces.
- This appliance complies with the basic requirements of Directives 2014/30/EU (Electromagnetic Compatibility) and 2014/35/EU (Low Voltage Directive).
- WARNING: A cut off plug inserted into a 13 amp socket is a serious safety (shock) hazard. Ensure the cut off plug is disposed of safely.
- CANTION: The plastic bags used to wrap this appliance or the packaging may be dangerous. To avoid risk of suffocation, keep these bags out of reach of babies and children. These bags are not toys.
- Do not place the appliance on or near a gas or electric oven, or any hot surfaces.
- Do not move the appliance while it is switched on.
- Only use the coffee jug supplied with this appliance. Ensure the coffee jug is securely on the warming tray before switching on the appliance. It must never be used in an oven, on a hob or in a microwave.
- DO NOT put the hot coffee jug down onto a wet or cold surface. Always place on a heat resistant mat.
- DO NOT use the coffee jug if it is damaged. Handle the glass jug with care as the glass is very fragile. Never use the appliance if the jug shows any signs of cracks.
- The water reservoir must be filled with water to at least the '1 cup MIN' mark, before it is switched on. DO NOT fill beyond the '4 cup MAX' mark, or the appliance may spit boiling water.
- CAUTION: The blade is very sharp. Care must be taken when handling the blade. Avoid contact with moving parts.
- CAUTION: The warming tray surface is subject to residual heat after use.
- Use the coffee grinder to grind roasted coffee beans only. Grinding other substances, such as nuts, spices or unroasted beans may dull the blade and cause poor grinding or injury.
WARNING - HOT SURFACES
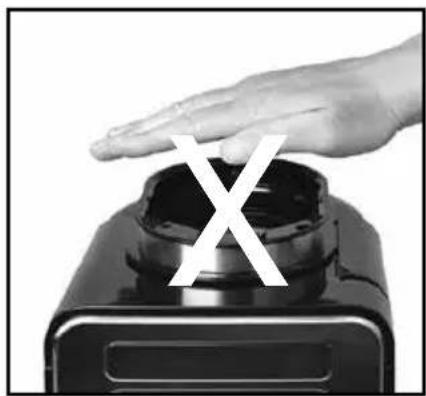
Do not open the grind basket lid, water reservoir lid or reach into the water reservoir when the appliance is switched on. Hot steam will escape and is a scalding hazard. Ensure the water reservoir lid is fully closed.
DO NOT place any cloths or objects over the steam vent.
Never take off the grind basket lid so that your arm is over the appliance when in use, hot steam will escape and may cause injury.
Surfaces marked with this symbol ⚠️ will be hot when the appliance is on and for some time after it is switched off.
Only lift the coffee jug by its handle.
Allow the appliance to fully cool down before moving, cleaning or storing.
natural_image
Hand pressing down on a black appliance with a large 'X' symbol overlay (no text or symbols on the appliance itself)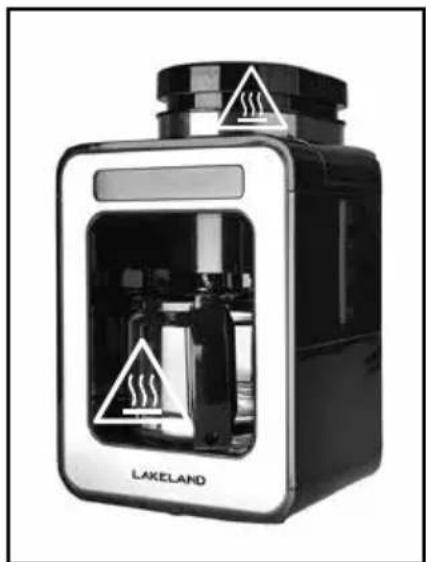
natural_image
Exterior view of a black industrial device labeled 'LAKELAND' with warning symbols (no readable text beyond label)TOUCHSCREEN CONTROL PANEL FUNCTIONS
ON/OFF icon: When you plug in and switch on at a socket, the LED will continuously flash, touch the icon once, the LED will stop flashing and the appliance will enter into the standby mode. If you need to stop the brewing progress, touch the icon once again.
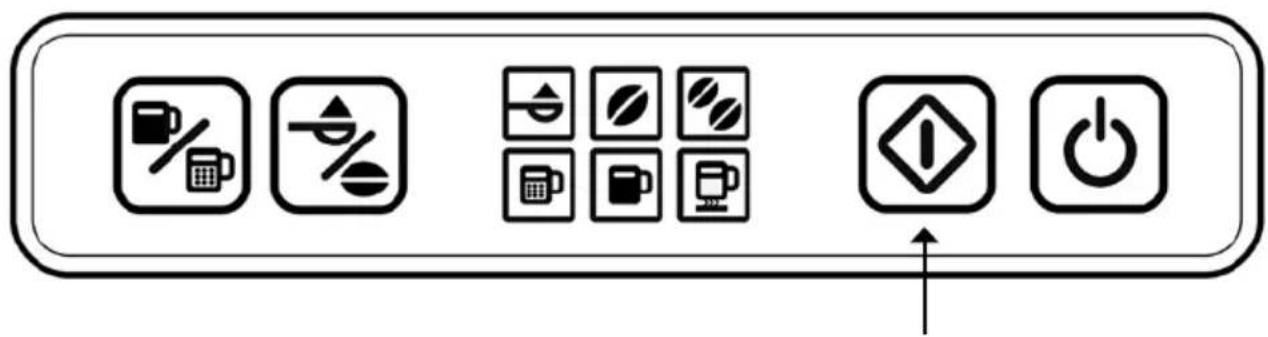
Start icon: After setting the working mode, touch the icon once to start the grinding or brewing process.
Strong or light coffee icon: The appliance will switch between strong taste coffee and light taste coffee mode, when you touch this icon.
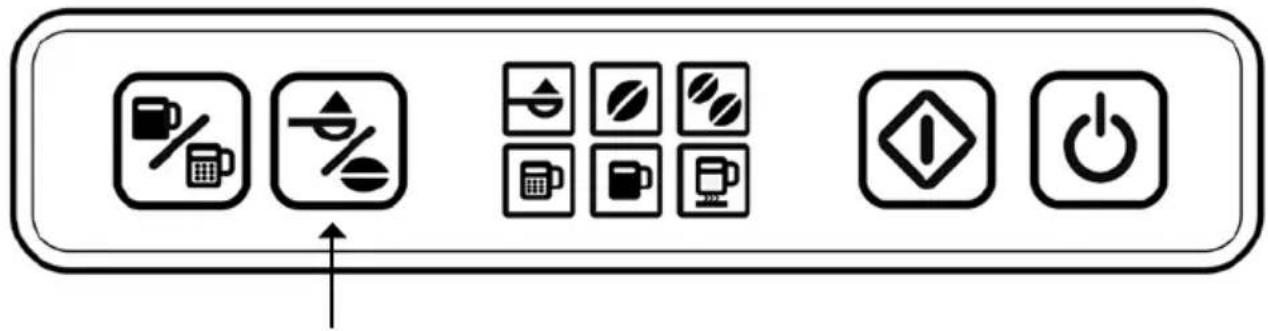
Coffee beans or ground coffee icon: The appliance will switch between coffee beans and ground coffee mode, when you touch this icon.
Ground coffee mode: LED illuminated, meaning that you choose the ground coffee for brewing coffee. When the LED is flashing, this means that the appliance is brewing coffee.
Coffee beans "1" mode: LED illuminated, meaning that you choose the coffee beans to brewing 1-2 cups of coffee. When the LED is flashing, this means that the appliance is brewing coffee.
Coffee beans "2" mode: LED illuminated, which is meaning that you choose the coffee beans to brewing 3-4 cups of coffee. When the LED is flashing, this means that the appliance is brewing coffee.
Strong taste mode: LED illuminated, means that you choose the strong taste coffee mode.
Light taste mode: LED illuminated, means that you choose the light taste coffee mode.
Warming mode: When the brewing has finished, this LED will continuously flash, meaning that the appliance has automatically entered into warming mode. After 30 minutes, all the LEDs will go out except the ON/OFF icon LED will flash.
RECOMMENDED DOSAGE
FOR COFFEE BEANS AND GROUND COFFEE
| Number of cups Recommended dosage | Coffee beans mode Ground coffee mode | |
| 1 cup 1 1⁄2 flat spoons (about 11g) |  |  |
| 2 cups 2 flat spoons (about 14g) |  |  |
| 3 cups 3 flat spoons (about 21g) |  |  |
| 4 cups 4 flat spoons (about 28g) |  |  |
USING THE TOUCHSCREEN BEAN TO CUP FOR THE FIRST TIME
- Unpack the Touchscreen Bean to Cup, remove all the packaging materials.
- Before first use, wipe the main unit with a clean damp cloth.
- Wash the coffee jug, grind basket lid, filter, grind basket and measuring spoon in hot soapy water, rinse and dry thoroughly.
- Make sure all parts are clean and dry before assembling the product.
- Place the appliance on a dry, level heat resistant surface.
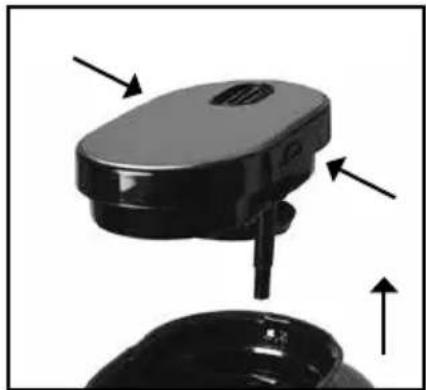
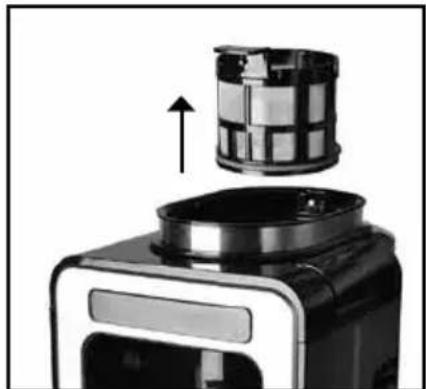
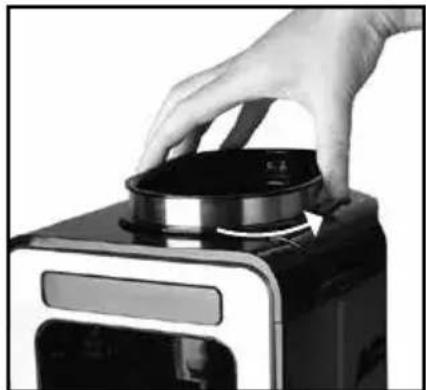
DISASSEMBLING THE APPLIANCE
natural_image
Close-up of a black electronic device with a speaker and antenna, showing internal components and directional arrows (no text or symbols)- Press the grind basket lid release button on the left of the grinder basket lid and then lift.
natural_image
Close-up of a kitchen appliance with a cylindrical lid and upward arrow indicating motion (no text or symbols visible)- Hold the handle of filter and lift out.
natural_image
Close-up of a hand pressing down on a kitchen appliance with a lid (no visible text or symbols)- Turn the grind basket anti-clockwise until you hear a click and then lift out.
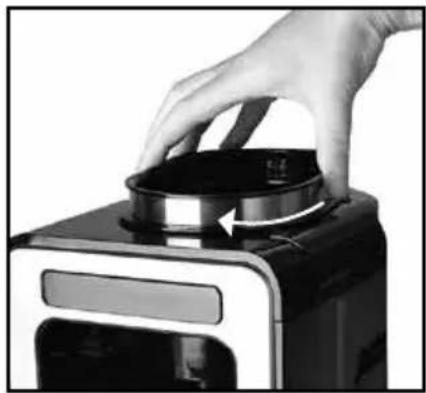
ASSEMBLING THE APPLIANCE
natural_image
Close-up of a hand pressing down on a black microwave oven with a circular lid (no text or symbols visible)- Place the grind basket into the main unit and then turn it clockwise until you hear a click.
natural_image
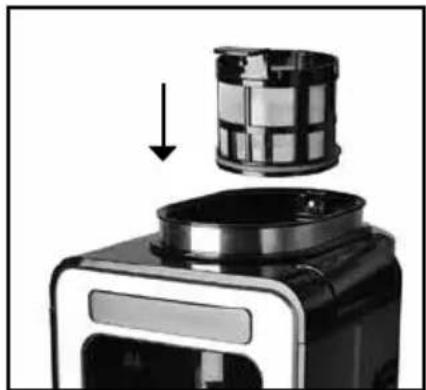
Close-up of a kitchen appliance with a cylindrical lid and a downward arrow indicating a process (no text or symbols visible)- Place the filter into the grind basket, making sure that the filter handle is located in the gap.
natural_image
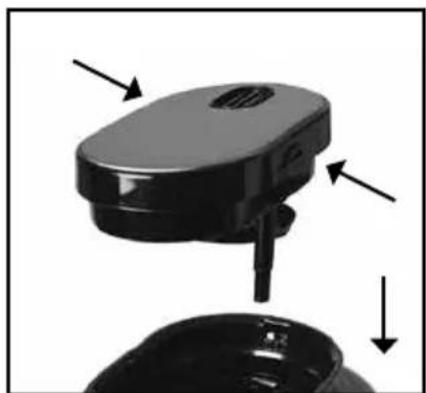
Close-up of a black electronic device with arrows indicating component movement (no text or symbols visible)- Replace the grind basket lid by pressing downwards until you hear a click.
natural_image
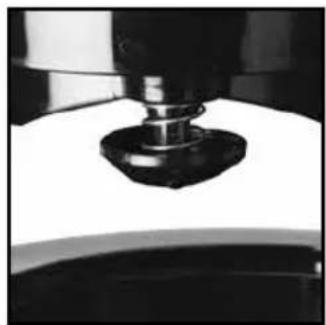
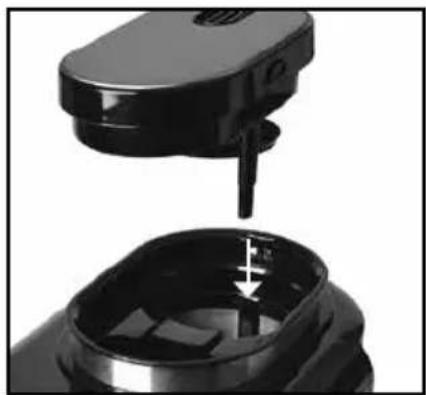
Close-up of a black robotic device with a spool inserted into a container, showing internal components (no text or symbols visible)-
PLEASE NOTE: The water tube must be located inside the water inlet.
-
Before first use, fill the coffee jug with fresh cold water and run this through the appliance, following the steps on the next page to thoroughly clean with NO coffee beans or ground coffee present. Do this three times.
INSTRUCTIONS FOR USE
- When you switch on the appliance for the first time there may be a slight burning smell. This is normal for a new product and will disappear after a few uses.
- Check grinder basket before use for the presence of foreign objects.
- Fill the coffee jug with fresh cold tap water.
- Lift the water reservoir lid and fill the water reservoir with the water from your coffee jug.
- Then close the water reservoir lid.
WARNING: To avoid the risk of burning or scalding from hot coffee or steam do not use more than 500ml of water or fill beyond the '4 cup MAX' mark inside the tank or the appliance may spit boiling water. Always use a minimum of 150ml of water.
- Place the empty coffee jug onto the warming tray.
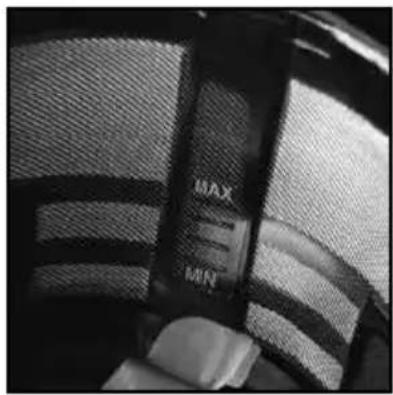
- Add 11g of fresh coffee beans or ground coffee. You can add more or less according to your taste, but always use a minimum of 7g and a maximum of 28g. Do not fill beyond the 'MAX' mark inside the filter.
PLEASE NOTE: Ensure that the coffee beans or ground coffee DO NOT fall into the water inlet, otherwise this will cause the appliance to malfunction.
- Switch on the appliance by touching the ON/OFF icon, the LED will stop flashing and the appliance will enter into the standby mode.
PLEASE NOTE: If no icon is touched within 2 minutes under standby mode, the appliance will automatically enter into the off mode.
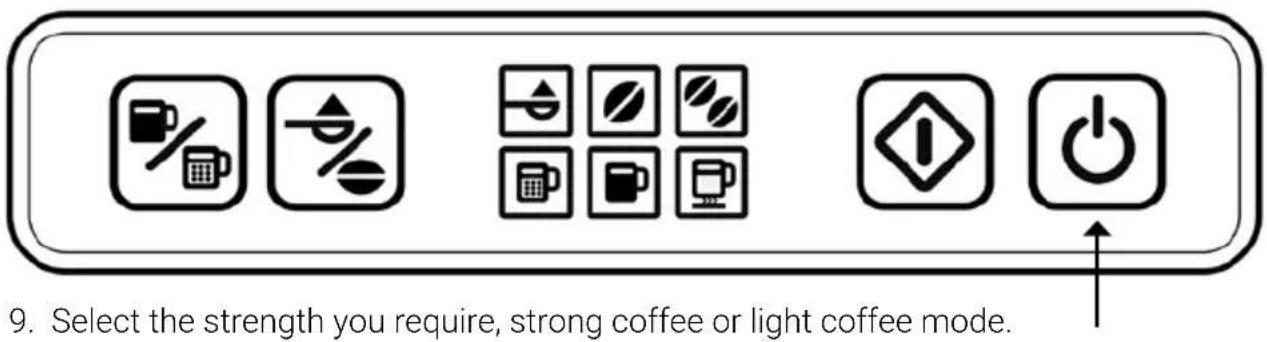
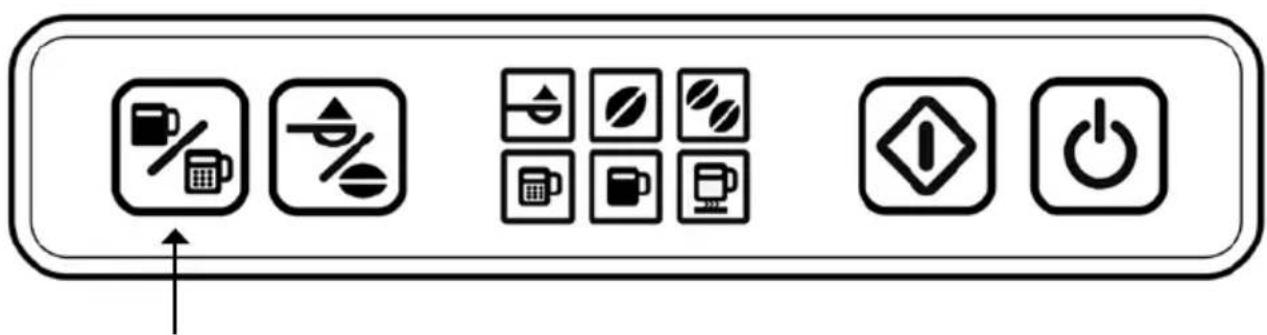
- Select the coffee beans or ground coffee mode.
- Touch the START icon, the appliance will start to work, meanwhile, the corresponding LED of coffee beans or ground coffee will continuously flash until the water tank is emptied, then automatically enter into the warming mode and the LED will start to continuously flash. The warming tray will keep your coffee warm for around 30 minutes.
-
After 30 minutes, all the LEDs will go out except the ON/OFF icon LED which will flash.
-
Enjoy your coffee.
WARNING: Do not open the water reservoir lid or reach into the water reservoir when the appliance is switched on. Ensure the tank lid is fully closed. Keep hands away from the appliance when water is heating, steam is hot. The appliance surfaces may be hot when in use or just used. Water will remain hot for a considerable time after brewing and is a scalding hazard.
NOTE: The thermostat inside the appliance will need to cool completely before you can brew another coffee jug of coffee. This will take around 5 minutes.
HINTS AND TIPS
- Ground coffee does not stay fresh for as long as coffee beans. If you are using ground coffee, watch expiry dates and buy in small amounts.
- If you are grinding coffee beans using your own grinder, try to use the ground coffee within a week of grinding.
- Use approximately 7 grams of coffee beans or ground coffee for each cup (125ml) or one level measuring spoon.
- To avoid the coffee maker overflowing, use less ground coffee when brewing decaf or flavoured coffee.
- For hotter coffee, warm your coffee jug with warm water before brewing.
FREQUENTLY ASKED QUESTIONS
Question: Why does the coffee taste weak?
Answer: There is not enough coffee beans or ground coffee being used. Add more coffee to the filter. You must always use a minimum of 7g of coffee per cup.
Question: Why is coffee overflowing from the filter basket?
Answer: There is too much water in the water reservoir. Use the coffee jug to measure the amount of water you are putting into the water reservoir.
Do not use more than 500ml of water, or fill beyond the '4 cup MAX' mark on the cup capacity window.
Question: Why is the grind basket overflowing or the coffee brewing too slowly?
Answer: There is too much coffee in the filter. Refer to the 'Recommended dosage for coffee beans and ground coffee'. The coffee may be ground too finely. The filter may not be in the correct position.
Question: Why is the coffee not brewing or the coffee machine not turning on?
Answer: The water reservoir may be empty or the appliance is not plugged in. Check the water reservoir is filled and the appliance is plugged in.
The thermostat inside the appliance may need to cool down completely before you can make another coffee jug. This will take around 5 minutes.
Question: Why is the coffee maker taking a long time to brew?
Answer: The coffee maker may need cleaning. See 'Care and Cleaning', the coffee maker may need descaling.
CARE AND CLEANING
- Switch off and unplug the appliance from the socket before cleaning.
• Always allow the appliance to cool down completely before cleaning. - Clean thoroughly before using for the first time and after every use.
- Check the parts for wear or damage after every few uses.
- Do not use abrasive cleaners or steel wool.
- Never immerse the main unit in water or any other liquid. To clean the outer surfaces, wipe with a clean damp cloth and dry thoroughly before storing.
- Wash all removable parts in hot soapy water, rinse and dry thoroughly before reusing or storing.
natural_image
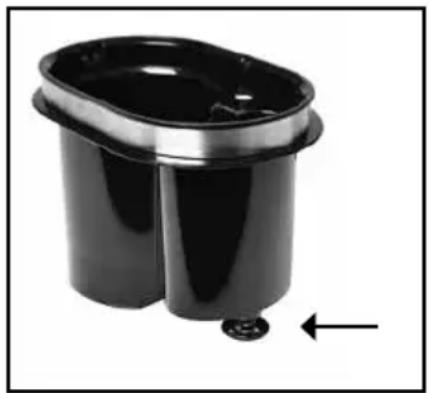
Black cylindrical container with a metallic rim and a small bolt, shown with an arrow pointing to it (no text or symbols visible)- When washing the grind basket, also press the anti-drip valve at the bottom to make sure it is clean inside this mechanism.
- If the coffee maker is not going to be used for a period of time, empty the water reservoir completely, by turning it upside down.
- Store the Touchscreen Bean to Cup with the power cable loosely coiled. Never wrap it tightly around the product.
CLEANING THE TOUCHSCREEN BEAN TO CUP
- Bitter tasting coffee, a ‘sizzling’ noise during brewing, or a prolonged brewing time compared to normal indicate that the appliance may need descaling.
- We recommend cleaning the water reservoir once a month or when the appliance has made 25 brews or more frequently in hard water areas.
- Ensure there is no coffee in the brewer.
- Remove the filter, then lock the grinder basket lid into place
- Mix 2 cups of cold water and 2 cups of white wine vinegar, and pour into the water reservoir. You can use a liquid descaler suitable for coffee maker, and read carefully the instructions on its package before use.
- Place the coffee jug onto the warming tray.
- Plug the appliance to the socket and switch on. Touch the ON/OFF icon, then set the appliance to Ground Coffee mode. Touch the Start icon, the appliance will start to work. The LED of ground coffee icon will continuously flash.
- Once the LED of Ground Coffee stops flashing. Empty the coffee jug.
- Then fill the water reservoir with 4 cups of fresh clean cold tap water, and run another brew cycle. Do this three times to thoroughly clean, allowing it to cool between cycles.
NOTE: Never refill the water reservoir with the used descaling solution because it is no longer active.
WARNING: Never interrupt the descaling process. Malfunctions caused by scale deposited inside the appliance are not covered by the guarantee if the descaling process is not carried out properly.
TECHNICAL INFORMATION
- Power: 600W.
• Voltage: 220-240V.
• Frequency: 50/60Hz.
• Flex length approx. 70cm (27½")
ELECTRICAL CONNECTIONS
THIS APPLIANCE MUST BE EARTHED
The appliance is fitted with a fused three-pin plug to BS1363 which is suitable for use in all homes fitted with sockets to current specifications.
CHANGING THE 5 AMP FUSE
Use a 5 amp BS1362 fuse. Only BSI or ASTA approved fuses should be used. If you are unsure which plug or fuse to use, always refer to a qualified electrician.
NOTE: After replacing or changing a fuse on a moulded plug which has a fuse cover, the cover must be refitted to the plug; the appliance must not be used without a fuse cover. If lost, replacement fuse covers can be obtained from an electrical shop. This appliance complies with the following EU Directives: 2014/35/EU (Low Voltage Directive) and 2014/30/EU (EMC Directive).
UK CA CE RoHS
RECYCLING YOUR ELECTRICALS
The Waste Electrical and Electronic Equipment (WEEE) Directive requires UK distributors to maximise separate collection and environmentally friendly processing of WEEE.
UK distributors (including retailers) are required to provide a system which allows all customers buying new electrical equipment the opportunity to recycle their old items free of charge.
As a responsible retailer, we have met these requirements by offering all customers buying new electrical and electronic equipment free take-back of their old electricals on a like-for-like basis.
- LAKELAND TOUCHSCREEN BEAN TO CUP
- CONTENTS
- PRODUCT FEATURES
- SAFETY CAUTIONS
- WARNING - HOT SURFACES
- TOUCHSCREEN CONTROL PANEL FUNCTIONS
- RECOMMENDED DOSAGE
- FOR COFFEE BEANS AND GROUND COFFEE
- USING THE TOUCHSCREEN BEAN TO CUP FOR THE FIRST TIME
- DISASSEMBLING THE APPLIANCE
- ASSEMBLING THE APPLIANCE
- INSTRUCTIONS FOR USE
- HINTS AND TIPS
- FREQUENTLY ASKED QUESTIONS
- CARE AND CLEANING
- CLEANING THE TOUCHSCREEN BEAN TO CUP
- TECHNICAL INFORMATION
- ELECTRICAL CONNECTIONS
- THIS APPLIANCE MUST BE EARTHED
- CHANGING THE 5 AMP FUSE
- UK CA CE RoHS
- RECYCLING YOUR ELECTRICALS
Brand : Lakeland
Model : 61784
Category : Coffee maker