255.99279 - Wine cellar KENMORE - Free user manual and instructions
Find the device manual for free 255.99279 KENMORE in PDF.


| Product Type | Wine Chiller / Wine Cellar |
| Brand | Kenmore |
| Model | 255.99279 |
| Temperature Range | 41°F to 65°F (5°C to 18°C) |
| Control Type | Electronic touch pad with LED display |
| Interior Light | LED light with on/off control |
| Shelving | 5 wire shelf racks + wire base rack |
| Door Type | Glass door |
| Electrical Requirements | 115V, 15A, grounded outlet |
| Installation | Freestanding only, not built-in |
| Clearance Requirements | Sides: 3/4 in (19 mm), Top: 2 in (50 mm), Back: 2 in (50 mm) |
| Temperature Conversion | Press and POWER together for 2 seconds to switch °F/°C |
| Alarm Features | High temperature alarm (3 cycles of 30 seconds), can be silenced by pressing any key |
| Failure Codes | "E" and "F" for service; "L" for too cold; "H" for too hot |
| Cleaning | Use baking soda solution; avoid abrasives, ammonia, bleach |
| Door Gasket Maintenance | Clean every 3 months; apply petroleum jelly to hinge side |
| First Use | Run empty for 2-3 hours before loading wine |
| Power Interruption | Unplug during outage; keep door closed to preserve coolness |
| Child Safety | Remove doors when disposing; leave shelves in place |
| Warranty | 1 year limited warranty |
Frequently Asked Questions - 255.99279 KENMORE
User questions about 255.99279 KENMORE
0 question about this device. Answer the ones you know or ask your own.
Ask a new question about this device
Download the instructions for your Wine cellar in PDF format for free! Find your manual 255.99279 - KENMORE and take your electronic device back in hand. On this page are published all the documents necessary for the use of your device. 255.99279 by KENMORE.
USER MANUAL 255.99279 KENMORE
Get it fixed, at your home or ours!
Your Home
For troubleshooting, product manuals and expert advice:

managemylife
www.managemylife.com
For repair – In your home – of all major brand appliances, lawn and garden equipment, or heating and cooling systems, no matter who made it, no matter who sold it!
For the replacement parts, accessories and owner's manuals that you need to do-it-yourself.
For Sears professional installation of home appliances and items like garage door openers and water heaters.
1-800-4-MY-HOME®
Call anytime, day or night
(1-900-469-4663)
(U.S.A. and Canada)
www.sears.com
www.sears.ca
Our Home
For repair of carry-in items like vacuums, lawn equipment, and electronics, call anytime for the location of the nearest Sears Parts & Repair Service Center
1-800-488-1222 (U.S.A.) 1-800-469-4663 (Canada) www.sears.com www.sears.ca
To purchase a protection agreement on a product serviced by Sears:
1-800-827-6655 (U.S.A.)
1-800-361-6665 (Canada)
When installed, operated and maintained according to all supplied instructions, if this appliance fails, due to a defect in material or workmanship within one year from the date of purchase, call 1-800-4-MY-HOME to arrange for free repair.
This warranty applies for only 90 days from the purchase date if this appliance is ever used for other than private household purposes.
This warranty covers only defects in material and workmanship. Sears will NOT pay for:
- Expendable items that can wear out from normal use, including but not limited to filters, belts, light bulbs, and bags.
- A service technician to instruct the user in correct product installation, operation or maintenance.
- A service technician to clean or maintain this product.
- Damage to or failure of this product if it is not installed, operated or maintained according to the all instructions supplied with the product.
- Damage to or failure of this product resulting from accident, abuse, misuse or use for other than its intended purpose.
- Damage to or failure of this product caused by the use of detergents, cleaners, chemicals or utensils other than those recommended in all instructions supplied with the product.
- Damage to or failure of parts or systems resulting from unauthorized modifications made to this product.
Disclaimer of implied warranties; limitation of remedies
Customer's sole and exclusive remedy under this limited warranty shall be product repair as provided herein. Implied warranties, including warranties of merchantability or fitness for a particular purpose, are limited to one year or the shortest period allowed by law. Secars shall not be liable for incidental or consequential damages. Some states and provinces do not allow the exclusion or limitation of incidental or consequential damages, or limitation on the duration of implied warranties of merchantability or fitness, so these exclusions or limitations may not apply to you.
This warranty applies only while this appliance is used in the United States.
This warranty gives you specific legal rights, and you may also have other rights which vary from state to state.
Sears Brands Management Corporation, Hoffman Estates, IL 60179
MASTER PROTECTION AGREEMENTS
Congratulations on making a smart purchase. Your new Kenmore®product is designed and manufactured for years of dependable operation. But like all products, it may require preventive maintenance or repair from time to time. That's when having a Master
Protection Agreement can save you money and aggravation. The Master Protection Agreement also helps extend the life of your new product. Here's what the Agreement includes:
Parts and labor needed to help keep products operating properly under normal use, not just defects. Our coverage goes well beyond the product warranty. No deductibles, no functional failure excluded from coverage—real protection.
☑ Expert service by a force of more than 10,000 authorized Sears service technicians, which means someone you can trust will be working on your product.
√ Unlimited service calls and nationwide service, as often as you want us, whenever you want us.
☑ "No-lemon" guarantee - replacement of your covered product if four or more product failures occur within twelve months.
☑ Product replacement if your covered product can't be fixed.
√ Annual Preventive Maintenance Check at your request - no extra charge.
√ Fast help by phone – we call it Rapid Resolution – phone support from a Sears representative on all products. Think of us as a “talking owner’s manual.”
√ Power surge protection against electrical damage due to power fluctuations.
☑ \$250 Food Loss Protection annually for any food spoilage that is the result of mechanical failure of any covered refrigerator or freezer.
√ Rental reimbursement if repair of your covered product takes longer than promised.
☑ 25% discount off the regular price of any non-covered repair service and related installed parts.
Once you purchase the Agreement, a simple phone call is all that it takes for you to schedule service. You can call anytime day or night, or schedule a service appointment online.
The Master Protection Agreement is a risk free purchase. If you cancel for any reason during the product warranty period, we will provide a full refund, or a prorated refund anytime after the product warranty period expires. Purchase your Master Protection Agreement today!
Some limitations and exclusions apply. For prices and additional information in the U.S.A. call 1-800-827-6655.
Sears Installation Service
For Sears professional installation of home appliances, garage door openers, water heaters, and other major home items, in the U.S.A. or Canada call 1-800-4-MY-HOME®.
PARTS AND FEATURES
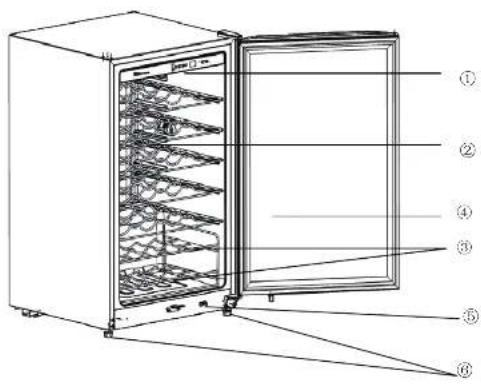
- Control Panel
- Wire Shelf Racks (5)
- Wire Base Rack
- Glass Door
- Interior Light Control Switch
- Adjustment Legs
(Turn to left to raise; turn to right to lower)
SAVE THESE INSTRUCTIONS
DANGER
Risk of child entrapment. Before you throw away your old wine chiller, take off the doors. Leave the shelves in place so that children may not easily climb inside.
CFC/HCFC DISPOSAL
Your old wine chiller may have a cooling system that used CFCs or HCFCs
(chlorofluorocarbons or hydrochlorofluorocarbons). CFCs and HCFCs are believed to harm stratospheric ozone if released to the atmosphere. Other refrigerants may also cause harm to the environment if released to the atmosphere.
If you are throwing away your old wine chiller, make sure the refrigerant is removed for proper disposal by a qualified technician. If you intentionally release refrigerant, you may be subject to fines and imprisonment under provisions of environmental legislation.
WARNING: NEVER store food items of any type in this wine chiller. Because wine chiller temperature settings are warmer than refrigerator settings, food items stored in wine chiller are liable to spoilage, which can result in serious foodborne illness if consumed.
Thank you for using this Kenmore product. This easy-to-use manual will guide you in getting the best use of your wine chiller.
PRODUCT RECORD
Staple your receipt to your manual.
Model number: 255.99279
Record the model and serial number of your unit in the spaces provided to the right.
Serial number:
PREPARING TO USE YOUR WINE CHILLER
Unpacking Your Wine Chiller
- Remove all packaging material. This includes the foam and the adhesive tape from all outside and inside surfaces, as well as accessories and racks. Slide out and remove the plastic or foam guard used to protect the compressor from shipping damage caused by vibration and shock.
- Inspect and remove any remaining packaging, tape or printed materials before powering on the wine chiller.
- Check to be sure you have all accessories and parts listed in the Parts and Features section.
Proper Air Circulation
To ensure that your wine chiller works at the maximum efficiency it was designed for, you should install it in a location where there is proper air circulation, plumbing and electrical connections.
The following are recommended clearances around the wine chillers:
Sides.... 3/4 inches (19 mm)
Top. 2 inches (50 mm)
Back. 2 inches (50 mm)
Electrical Requirements
Make sure there is a suitable power outlet (115 volts, 15 amps) with proper grounding to power the wine chiller.
WARNING: NEVER cut off the third grounding prong from the power cord plug to accommodate a two prong outlet. Removal of the prong provides no effective grounding for the appliance, which can result in serious injury or death from electrical shock.
Your wine chiller is designed for freestanding installation only. It should not be recessed or built-in. Place the wine chiller on a floor strong enough to support it fully loaded. When moving the wine chiller, never tilt it by more than a 45 degrees angle. This could damage the compressor and the sealed system.
If the wind chillor has been tilted more than 45 degrees, let it stand in an upright
position for at least 1 hour prior to plugging it into the power source. This will allow the refrigerant to settle and reduce the possibility of a malfunction in the cooling system.
Plug the pipe chiller into an exclusive, properly installed grounded wall outlet. Do not under any circumstances cut or remove the third (grounding) prong from the power card. See the WARNING in Electrical Requirements on the previous page. Any questions concerning power and/or grounding should be directed toward a certified electrician or a Sears or other qualified service dealer. After plugging the appliance into a wall outlet, allow the unit to run for 2:3 hours so that the interior is sufficiently cool before opening the door to place bottles into the compartment.
Installation Limitations
Do not install your wine cooler in any location not properly insulated or heated, such as in a garage. Your wine chiller is not designed to operate in temperature settings below 55° Fahrenheit.
Select a suitable location for the wine chiller on a hard even surface away from direct sunlight or heat sources such as radiators, baseboard heaters or cooking appliances.
Handle Installation
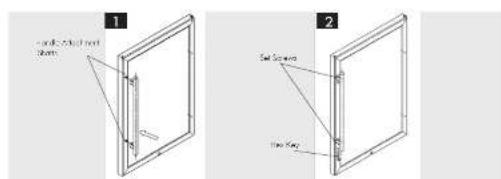
- Set the attachment shafts of the handle over the attachment posts protruding from the door. To avoid turning unit over, attach handles with set screws facing up. If unit is turned over to facilitate attaching handle so that screws will not be seen, you must wait 1 hour before plugging unit into power source.
- Use a 3 mm hex key to securely tighten the set screws in the handle attachment shafts to the attachment posts of the door.
FEATURES AND USE
Initial Use
To reach the set coldness level when operating the wine chiller for the first time, run it without wine load until you hear the compressor stop. This usually takes 2 to 3 hours. Once the set temperature is reached, load wine into the wine chiller.
Note: If the wine chiller has been placed in a horizontal or more than 45^ tilted position for any period of time, wait 1 hour before plugging it in.
Temperature Control

Temperature Adjustment
: Press this pad once and the temperature will increase 1^ F/C.
V : Press this pad once and the temperature will decrease I^c F/C.
The wine chiller can be operated by adjusting the temperature control buttons (up arrow and down arrow) to various settings.
The new desired temperature will flash on the display for a few seconds and then switch back to the actual temperature which will gradually change until setpoint is reached.
The temperature range MIN and MAX is 41^ - 65^ ( 5^ - 18^ ), which is ideal for wine storage, 41^ is best for white wine, and 64^ is ideal for reds.
LED light pad: press to turn light on or off.
POWER On/Off: Press this pad to power the unit on or off.
Press 🔒 and POWER together for 2 seconds to convert between Fahrenheit temperature and Celsius temperature.
Failure Codes
if "E" and "F" display, contact Sears or another qualified service center for unit repair.
If the temperature in the chiller is too low, it will display "L". Adjust the temperature control to a warmer setting.
If the temperature in the chiller is too high, the control will flash "H", and an alarm will sound for 30 seconds. One minute later, the alarm will continue to sound for another 30 seconds. After three times, the alarm will not sound any more. You can press any key to cancel the sound alarm.
Storing too many cans or bottles in the chiller may cause the temperature in the chiller to rise temporarily.
Normal Operating Sounds You May Hear
At times you may hear boiling water, qurgling sounds, etc. that are the result of the refrigerant circulating through the cooling coils
CARE AND CLEANING
Cleaning and Maintenance
WARNING: To avoid electric shock, always unplug your wine chiller before cleaning. Ignoring this warning may result in death or injury.
CAUTION: Before using cleaning products, always read and understand the cleaning processes explained in this manual. Follow cleaning product manufacturers's instructions and warnings to avoid personal injury or product damage.
General Cleaning
Prepare a cleaning solution of 1 to 2 tablespoons of baking soda mixed with warm water. Use a sponge or soft cloth, dampened with the cleaning solution, to wipe down your wine chillor.
Rinse with clean warm water and dry with a soft cloth.
Do not use harsh chemicals, abrasives, ammonia, chlorine bleach, concentrated detergents, solvents or metal scouring pads. Some of these chemicals may dissolve, damage and/or discolor your wine chiller.
Door Gaskets
Clean door gaskets every three months according to the instructions described above in General Cleaning.
Apply a light coating of petroleum jelly to the hinge side of the door gaskets to keep the gaskets plicable and ensure a good seal.
Power Interruptions
Occasionally there may be power interruptions due to thunderstorms or other causes. Remove the power cord plug from the AC outlet when a power outage occurs. Keep the wine chiller door closed to preserve compartment coolness for as long as possible. After a prolonged power outage, you should clear the inside of the chiller compartment before loose.
Vacation and Moving Care
for long vacations or absences, unplug the unit, remove wine bottles from wine chiller, turn the temperature dial to the OFF position and clean the door gaskets according to the General Cleaning section. Prop door open, so air can circulate inside. If moving the wine chiller, always keep it in a vertical position. Do not move unit when in a horizontal position, as possible damage to the sealed system could occur.
TROUBLESHOOTING
| Wine Chiller does not operate | Check if the temperature control is in the Off position. Check if wine chiller is plugged in. Check if there is power at the AC outlet by checking the circuitbreaker. |
| Compartment temperature is noticeably warmer or colder than set temperature. | The problem can be resolved if you just turn off power of the wine chiller for 5 minutes and then restart it. If the temperature is too warm, check it several hours later to see if it has cooled down to the set temperature. If the temperature is too cold, check the next day to see if it has warmed to the set temperature. |
| The inside of wine chiller is not cold | The wine chiller door is opened too often. Leave door shut for 4 - 5 hours to restore desired costiness level. |
| The wine chiller doesn't cool down | Press POWER button; check if power supply is connected. |
| LED does not light | Take unit to a Sears or other qualified service dealer for LED lamp repairs. |
| Glass door has water condensation droplets | Condensation on the door glass is normal when the weather is hot or humid. If the door is kept open too long or opened too frequently, condensation can occur. If the chiller is not level, the door can become misaligned, allowing a small air gap which can cause condensation. Use the Adjustment Leg to level the unit. To remove condensation, wipe the door glass with a soft cloth, and leave the door closed for 4 -5 hours to reduce further condensation occurrence. |
NOTES
NOTES
12
13
6/8/10
GARANTÍA LIMITADA KENMORE
- Get it fixed, at your home or ours!
- Your Home
- managemylife
- 1-800-4-MY-HOME®
- Our Home
- This warranty covers only defects in material and workmanship. Sears will NOT pay for:
- Disclaimer of implied warranties; limitation of remedies
- MASTER PROTECTION AGREEMENTS
- SAVE THESE INSTRUCTIONS
- DANGER
- CFC/HCFC DISPOSAL
- PRODUCT RECORD
- PREPARING TO USE YOUR WINE CHILLER
- Unpacking Your Wine Chiller
- Proper Air Circulation
- Electrical Requirements
- Installation Limitations
- FEATURES AND USE
- Initial Use
- Failure Codes
- Normal Operating Sounds You May Hear
- CARE AND CLEANING
- Cleaning and Maintenance
- General Cleaning
- Door Gaskets
- Power Interruptions
- Vacation and Moving Care
- GARANTÍA LIMITADA KENMORE
Brand : KENMORE
Model : 255.99279
Category : Wine cellar