
Knus S WBL-1200B - Blender WILFA - Free user manual and instructions
Find the device manual for free Knus S WBL-1200B WILFA in PDF.


| Product Type | Blender |
| Brand | Wilfa |
| Model | Knus S WBL-1200B |
| Power | 1200 W |
| Capacity | 1.5 L |
| Material | Glass jug, stainless steel blades |
| Speeds | Variable speed with pulse function |
| Functions | Blending, crushing ice, smoothies, soups |
| Dimensions (H x W x D) | 40 x 18 x 18 cm |
| Weight | 3.5 kg |
| Cord Length | 1.2 m |
| Dishwasher Safe Parts | Jug, lid, and measuring cap |
| Safety Features | Non-slip feet, overload protection |
| Spare Parts Available | Replacement jug, blade assembly, lid |
| Repairability | Modular design; parts available online |
| Warranty | 2 years |
Frequently Asked Questions - Knus S WBL-1200B WILFA
User questions about Knus S WBL-1200B WILFA
0 question about this device. Answer the ones you know or ask your own.
Ask a new question about this device
Download the instructions for your Blender in PDF format for free! Find your manual Knus S WBL-1200B - WILFA and take your electronic device back in hand. On this page are published all the documents necessary for the use of your device. Knus S WBL-1200B by WILFA.
USER MANUAL Knus S WBL-1200B WILFA
natural_image
Exterior view of a modern kitchen blender with a handle and control knob (no visible text or symbols)BL-1200 blender / Smoothie maker
NO BRUKSANVISNING
SE BRUKSANVISNING
DK BRUGSANVISNING
FI KÄYTTÖOHJE
GB INSTRUCTION MANUAL
Sikkerhetsinstruks
A Målebeger
B Lokk
natural_image
Simple diagram showing a downward arrow and a light bulb-like shape, no text or symbols present.natural_image
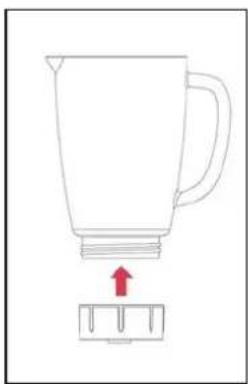
Simple line drawing of a lamp with a downward arrow indicating light or illumination (no text or symbols)- Skru festeanordningen på glassmuggen inntil den sitter skikkelig.
natural_image
Line drawing of a blender with an arrow pointing to its base (no text or symbols)natural_image
Line drawing of a blender with a handle and lid, showing a downward arrow indicating process (no text or symbols)- Koble apparatet til strømuttaket.
natural_image
Line drawing of a pitcher with a lid and arrow indicating downward motion (no text or symbols)natural_image
Simple line drawing showing a bucket being lowered into a container (no text or symbols)natural_image
Simple diagram showing a downward arrow and a light bulb-like shape (no text or symbols)natural_image
Simple line drawing of a lamp with a downward arrow indicating light or illumination (no text or symbols)natural_image
Simple line drawing of a blender with an arrow pointing to its base (no text or symbols)natural_image
Line drawing of a blender with a red downward arrow indicating process (no text or symbols)natural_image
Line drawing of a pitcher with a lid and arrow indicating downward motion (no text or symbols)natural_image
Simple line drawing of a bucket being lowered into a tray (no text or symbols)natural_image
Simple diagram showing a downward arrow and a conical object with a handle (no text or symbols)natural_image
Simple line drawing of a lamp with a downward arrow indicating light or illumination (no text or symbols)natural_image
Line drawing of a blender with an arrow pointing to its base (no text or symbols)natural_image
Line drawing of a blender with a red downward arrow indicating process (no text or symbols)natural_image
Line drawing of a pitcher with a lid and arrow indicating downward motion (no text or symbols)natural_image
Simple line drawing of a bucket pouring liquid into a container (no text or symbols)natural_image
Simple line drawing of a lamp with a downward arrow and a rectangular base (no text or symbols)natural_image
Line drawing of a blender with an arrow pointing to its base (no text or symbols)natural_image
Line drawing of a blender with a red downward arrow indicating process (no text or symbols)natural_image
Line drawing of a pitcher with a lid and handle, showing a red downward arrow indicating compression or disassembly (no text or symbols)natural_image
Simple line drawing showing a bucket being lowered into a tray (no text or symbols)■ Before using this appliance, read the user instructions carefully.
- Keep these instructions, warranty card, purchase receipt and, if possible, the box, together with inner packaging.
■ This appliance is only for domestic use, and not for commercial use.
■ Always disconnect the appliance from the supply if it is left unattended and before assembling, disassembling or cleaning.
■ Do not allow children to use the appliance without supervision.
■ Inspect the power cable and appliance regularly. If any defect is found, do not operate.
■ Do not attempt to repair the unit yourself, it must be repaired by qualified technicians to avoid any hazard.
If the supply cord is damaged, it must be replaced by the manufacturer, its service agent or a qualified person in order to avoid a hazard.
- Keep appliance and cable away from direct radiant heat from the sun, from damp, from sharp edges and other dangers
■ Never use your appliance without paying attention! Always unplug the unit when not in use, even for a moment.
■ Never use any accessories or parts from other manufacturers.
■ Do not use outdoors.
■ Never immerse the unit in water or any other liquids, or come into contact with them. Do not use it with wet hands.
If the appliance should become wet or damp, remove plug from mains socket immediately. Do not put your hands in the water!
■ Use this appliance only for its intended purpose.
■ Never touch the rotating tools while still in motion; always wait for them to stop.
■ Never use this appliance to mix or stir anything other than foods.
The appliance is not be used by children or person with reduced physical, sensory or mental capabilities, or lack of experience and knowledge, unless they have been given supervision or instruction. Children should be supervised to ensure that they do not play with the appliance.
Parts description
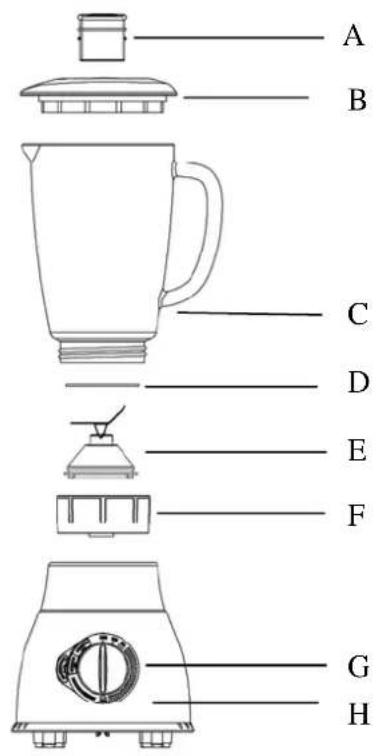
A Measuring Cup
B Lid
C Glass Jar with level indication
D Sealed ring
E Blade assembly unit
F Blade assembly unit interface
G Control panel
H Motor unit
Built-in safety lock
This function ensures that user can only switch the appliance on when the accessories have been placed on the unit in correct position. When the accessories have been fixed properly, the unit can only be switched on. (i.e. Built-in safety lock function is disabled at this moment)
Before first use
Clean the units and parts thoroughly before you use the appliance for the first time.
Using the appliance
Control panel
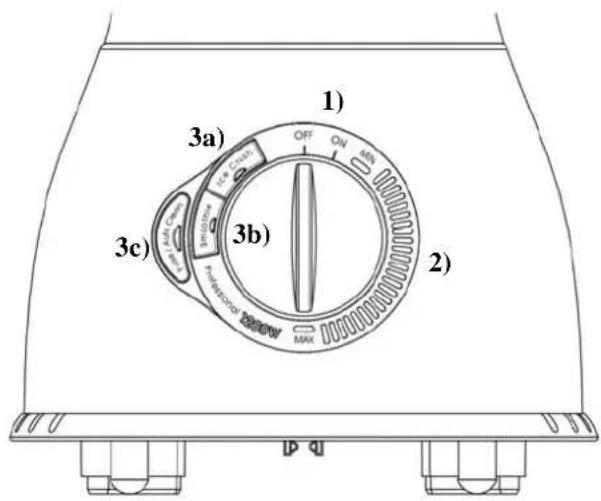
To switch on the appliance, turn the knob to "ON" position. The "ON" light will be illuminated.
To control the rotary speed, turn the knob at between “MIN” & “MAX” position. The light will be illuminated at the desired position.
To use the quick function, turn the knob to "ON" position. The light on the three buttons start to blink.
Crush ice button
Press this button to crush the ice. The appliance starts crushing according to the pre-set speed profile. Press the button again to stop the process. Or the unit will operate automatically after running for 30 seconds.
Smoothie button
Press this button to make delicious smoothies. The appliance starts mixing according to the pre-set speed profile. Press the button again to stop the process; Or the unit will operate automatically after running for one minute.
Pulse / Auto clean button
Press the button to run the Auto mode. The appliance starts operating according to the pre-set speed profile. Press the button again to stop the process. Or the unit will operate automatically after running for one minute.
How to assembling the appliance
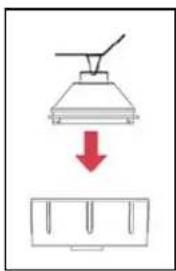
- Place the sealed ring on the blade assembly unit.
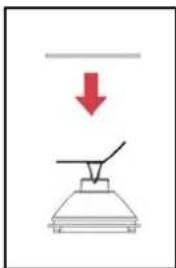
- Place the blade assembly unit on the interface.
natural_image
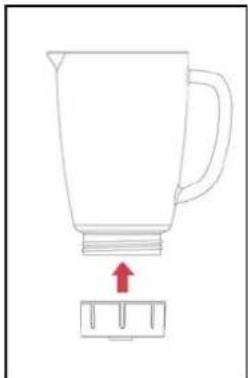
Simple line drawing of a lamp with a red downward arrow indicating light or illumination (no text or symbols)- Screw the unit interface onto the glass jar bottom until it is fixed properly.
natural_image
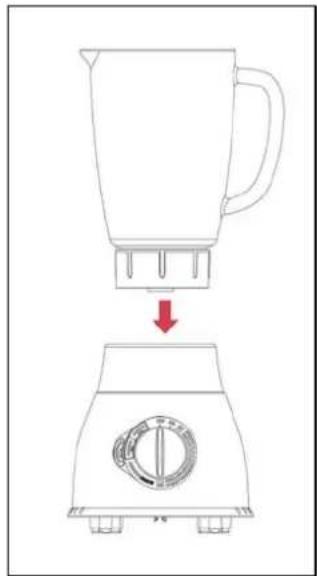
Simple line drawing of a blender with an arrow pointing to its side panel (no text or symbols)- Place the glass jar with blade assembly unit interface on the motor unit. The handle can be placed in two positions: either located at the right hand side or left hand side.
natural_image
Line drawing of a blender with a red downward arrow indicating process (no text or symbols)- Connect to main power supply.
How to use the blender jar
-
Place the ingredients in the jar.
-
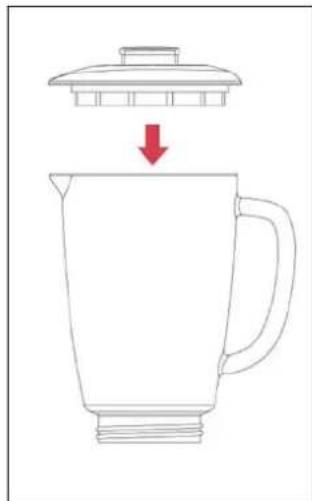
Place the lid on the jar and close it tightly.
natural_image
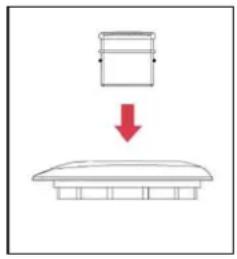
Line drawing of a pitcher with a lid and arrow indicating downward motion (no text or symbols)- Insert the measuring cup into the lid opening.
natural_image
Simple line drawing of a bucket being lowered into a tray (no text or symbols)- Select the speed by turning the control knob or press the Quick-select button.
Note: Do not let the appliance to operate more than 3 minutes continuously. Let the appliance to cool down to room temperature before continue operating the appliance.
After using the blender
- Disconnect the power from main supply.
- Remove the lid (together with measuring cup) from the jar.
- Remove the jar (together with blade assembly unit interface) from the motor part.
- Detach the blade assembly unit interface from the bottom of the jar.
Note: Always clean the removable parts immediately after use.
Note: It is recommended to cut the meat or other food into smaller pieces before putting them in the jar. Do not operate with large quantities of food at one time.
Cleaning
Always clean the removable parts immediately after use.
Note: Be careful when cleaning the parts. Avoid touching the sharp blades!
- Disconnect the power from main supply.
-
Disassemble all removable parts before cleaning.
-
Clean all removable parts in dishwasher or in lukewarm water with cleanser.
- Use dry cloth to clean the main body.
Technical Data
Model: BL-1200
Power Supply: AC 220V-240V 50/60Hz
Output: 1200W
Short Operation Time (KB): 3 minutes
Marketed by: AS WILFA
Industriveien
25
Postboks
146
1483 Skytta, Norway
Tlf: +47 67 06 33 00
Fax: +47 67 06 33 91
According to Waste of Electrical and Electronic Equipment (WEEE) directive, WEEE should be separately collected and treated. If at any time in future you need to dispose of this product please do NOT dispose of this product with household waste. Please send this product to WEEE collecting points where available.
Brand : WILFA
Model : Knus S WBL-1200B
Category : Blender