LSTB200 - Receiver Logik - Free user manual and instructions
Find the device manual for free LSTB200 Logik in PDF.


| Product Type | Digital Terrestrial Receiver (Set-Top Box) |
| Brand | Logik |
| Model | LSTB200 |
| Dimensions (W x D x H) | 267 x 114 x 43 mm |
| Weight | 450 g |
| Power Supply | 220-240 V AC, 50-60 Hz |
| Power Consumption | 9 W (max) |
| Input Frequency Range | 174 MHz – 862 MHz |
| Main Processor | Cheertek CT216T-Z |
| Flash Memory | 2 MB |
| SDRAM | 16 MB |
| Active Antenna Output | 5 V |
| Video Output | TV SCART (RGB/CVBS), VCR SCART |
| RF Connectors | ANT IN, ANT OUT (loop through) |
| Remote Control | Infrared with 2x AAA batteries |
| Electronic Programme Guide | 7-day EPG |
| Parental Control | Pin code lock (default 0000) for channels and menus |
| Timer Features | Add, edit, delete timers with repeat options |
| Channel Management | Move, delete, rename, lock, and set favourites |
| Automatic Channel Search | Full scan with LCN support |
| Software Upgrade | Over Air Download (OAD) automatic at 3:00 AM |
| Operating Temperature | 5°C to +40°C |
| Storage Temperature | -20°C to +70°C |
| Humidity | 25% to 75% relative |
| Accessories Included | 1x RF cable, 1x Quick Setup Guide, 1x Instruction Booklet |
Frequently Asked Questions - LSTB200 Logik
User questions about LSTB200 Logik
0 question about this device. Answer the ones you know or ask your own.
Ask a new question about this device
Download the instructions for your Receiver in PDF format for free! Find your manual LSTB200 - Logik and take your electronic device back in hand. On this page are published all the documents necessary for the use of your device. LSTB200 by Logik.
USER MANUAL LSTB200 Logik
- INTRODUCTION....2
- SAFETY PRECAUTIONS ....3
- PREPARING 5
3.1. REMOTE CONTROL ....5
3.2. CONNECTIONS....5
3.2.1. CONNECTION TO THE TV 5
3.2.2. CONNECTION TO A VCR 6
3.2.3. PUTTING INTO OPERATION....6
3.2.4. SOCKETS 7
- REMOTE CONTROL FUNCTIONS ....7
4.1. REMOTE CONTROL LAYOUT 7
MENU INTERFACE 9
FIRST TIME INSTALLATION....9
MAIN MENU....9
- CHANNEL LIST 9
5.1. NAVIGATING THE WHOLE LIST OF CHANNELS....10
5.2. MOVING CHANNELS 10
5.3. DELETING UNWANTED CHANNEL 10
5.4. RENAMING CHANNELS ....10
5.5. ADDING LOCKS TO CHANNELS....10
5.6. SETTING FAVOURITES....11
- PROGRAMME GUIDE (7 DAYS EPG) 11
- TIMERS....12
- SETUP 12
8.1. CONFIGURATION MENU....13
8.1.1 TV TYPE 13
8.1.2. TV OUT 13
8.1.3. FAVOURITE MODE....13
8.1.4.CHANNEL LIST 13
8.1.5. SCAN ENCRYPTED 13
8.1.6. RECEIVER UPGRADE - OAD 14
8.1.7. PARENTAL CONTROL....14
8.1.7.1. MATURITY LOCK (Not available on some models)....14
8.1.7.2. MENU LOCK....14
8.1.7.3. SET PIN 14
8.2. LANGUAGE 15
8.3. INSTALLATION....15
8.3.1. AUTOMATIC SEARCH 15
8.3.2.CHANNEL SEARCH 16
8.3.3. FIRST TIME INSTALLATION....16
- MESSAGES ....16
- CHANNEL NAVIGATION....17
- VOLUME CONTROL 17
- TROUBLE SHOOTING GUIDE3....18
- TECHNICAL SPECIFICATIONS ....18
- IMPORTANT NOTICE 19
1. INTRODUCTION
Introduction.
Thank you for purchasing this product. It will give you good service if you take note of all safety notices and recommendations.
Contents of appliance.
1 x Set top Box 1 x Remote Control. 2 x "AAA" cells 1 x This instruction booklet 1 x Quick Setup Guide 1 x RF cable
2. SAFETY PRECAUTIONS
Do not place the product where a piece of furniture or other heavy object could trap the power cord (mains lead). Handle the power cord by the plug. Do not pull out the plug by tugging the cord and never touch the power cord when your hands are wet as this could cause a short circuit or electric shock. Never make a knot in the cord or tie it with other cords. The power cords should be routed in such a way that they are not likely to be stepped on. A damaged power cord can cause fire or give you an electrical shock. Check the power cord periodically to see if it is damaged. If it is damaged, please ask an approved service agent to replace it.
For your own safety read following instructions carefully before attempting to connect this device to the mains.
This unit is designed to operate on a 220V-240V AC - 50Hz supply only. Connecting it to other power sources may damage it. Ensure that the supply corresponds to the information on the rating label on the bottom of the unit. This component system may be fitted with a non-rewireable plug. If it is necessary to change the fuse in a non-rewireable plug, the fuse cover must be refitted. If the fuse cover becomes lost or damaged, the plug most not be used until a replacement, available from the manufacturer, is obtained. It is important that the colour of the replacement fuse cover corresponds with the colour marking on the base of the plug. If the plug needs to be changed because it is not suitable for your socket, or it becomes damaged, it should be cut off and the fuse removed immediately. Please dispose of the plug safely and out of reach from children. Under no circumstance should the cut-off plug be inserted into a mains socket outlet due to high risk of electric shock. Then fit an appropriate plug carefully following the wiring instructions shown below.
IMPORTANT
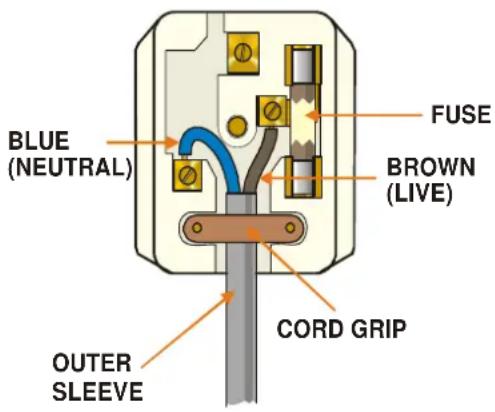
The wires in the mains plug should be connected as shown in the diagram.
The colours of the wires in the mains lead of the unit may not correspond with the coloured markings identifying the terminals in your plug. Connect them as follows:
The wire which is coloured blue must be connected to the terminal which is marked with the letter 'N' or coloured black.
The wire which is coloured brown must be connected to the terminal which is marked with the letter 'L' or coloured red.
There should be no connection to earth terminal of your plug. If you use a 13 Amp (BS1363) plug, you will need a 5 Amp fuse.
The mains plug is the disconnect device and therefore must remain readily operable.
How to replace the fuse
Open the fuse compartment with a blade screwdriver and replace the fuse. When replacing the fuse in the plug, use an ASTA or BSI approved 5 AMP fuse and be sure to re-fit the fuse cover. If the plug supplied with this equipment has a detachable fuse cover, be sure to attach the fuse cover after you change the fuse. Never use the plug without the fuse cover.
If you should lose the fuse cover, please contact an electrical goods retailer.
If in doubt, consult a competent electrician on how to replace the fuse.

This symbol means that this unit is double insulated. An earth connection is not required.
CAUTION
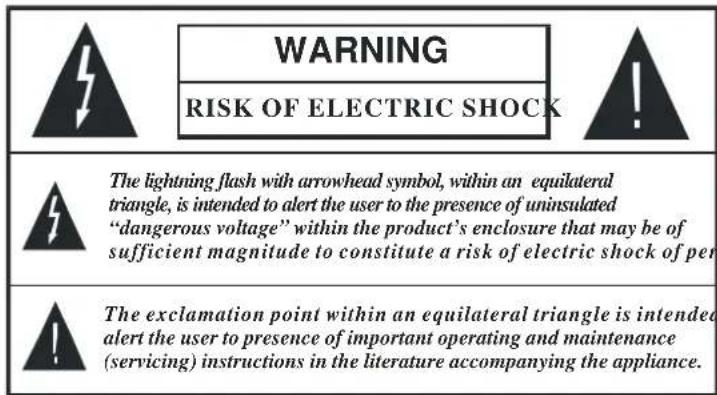
To prevent electric shock, disconnect from the mains before removing cover. No user serviceable parts inside. Refer servicing to qualified service personnel. Disconnect from the mains supply before cleaning.
Power Source
This unit should only be connected to a 220-240V AC 50 Hz power supply. Do not connect to any other supply.
Power Lead
Do not place the lead where it may be stepped on or tripped over. Do not place heavy objects on the lead. If the lead becomes cut or damaged, please disconnect the unit from the mains supply.
Location
Place on a solid base such as a shelf or in a TV cabinet or similar. Do not place near heat sources such as radiators, fires or similar.
Do not block ventilation holes or place in a location that does not allow free airflow.
Do not place the unit near water or in high humidity areas. Avoid splashing. If the unit does get wet, please call an approved service agent.
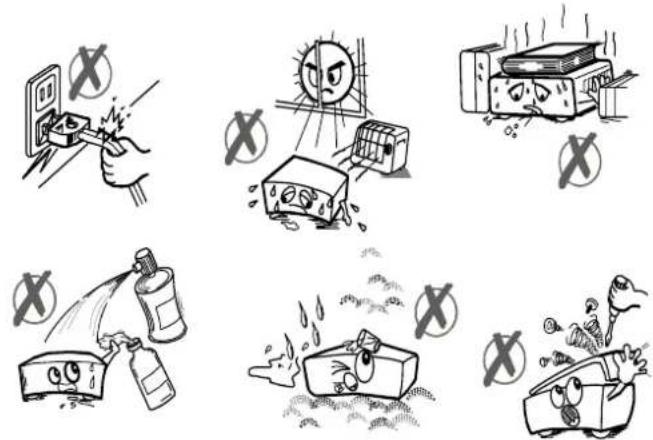
Do not place any objects into the ventilation slots.
Should any of the above take place, do NOT open the unit yourself. You will invalidate your warranty and cause a possible safety hazard, as there are high voltages inside.
Lightning
During thunderstorms or going on holiday, it is recommended that the aerial (if outdoor) is disconnected, to prevent damage to the aerial input circuits.

Battery Disposal
When the batteries in the remote control are worn out, do NOT break open or throw on a fire. Do not place in household waste. Contact your local waste authority for advice.
Cleaning
Do not use chemical cleaners. Use a dry duster. If there are stubborn stains, use a damp cloth with dilute soap.
FRONT PANEL

REAR PANEL
![graph TD A["Antenna OUTANTENNA IN"] --> B["AERIAL OUT"] A --> C["AERIAL IN"] A --> D["TV SCART"] A --> E["VCR SCART"] F["AC IN"] --> G["35025435"]](/content/2026/05/873200/images/dafa6849fb4fe34eb04a4ffcd97001f49eb7294464d48d719c0cdf9007a43f75.jpg)
3. PREPARING
3.1. REMOTE CONTROL
First open the battery cover on the underside of the remote control. Put in both batteries 1.5Volt (RO3/AAA) referring to the imprinted symbols (+/-) in the battery case and put on the battery cover again. While using the remote control, direct it towards the front side of the receiver. If the remote control does not work or the chosen function does not work, the batteries are most probably exhausted and they should be replaced as soon as possible. Please use only the leak proof batteries. It is best to remove the batteries from the remote unit if you will not be using the remote control unit for long time.
3.2. CONNECTIONS
3.2.1. CONNECTION TO THE TV
Connect your set-top box (STB) using a suitable multi-pin SCART Lead from the TV SCART socket on your STB to a SCART input socket on the rear of your TV. If your TV does not have a SCART socket, unfortunately this box will not be suitable. This STB has RGB or CVBS outputs from the SCART socket. If your TV has RGB inputs you may select this in the STB Configuration menu for best results.
3.2.2. CONNECTION TO A VCR
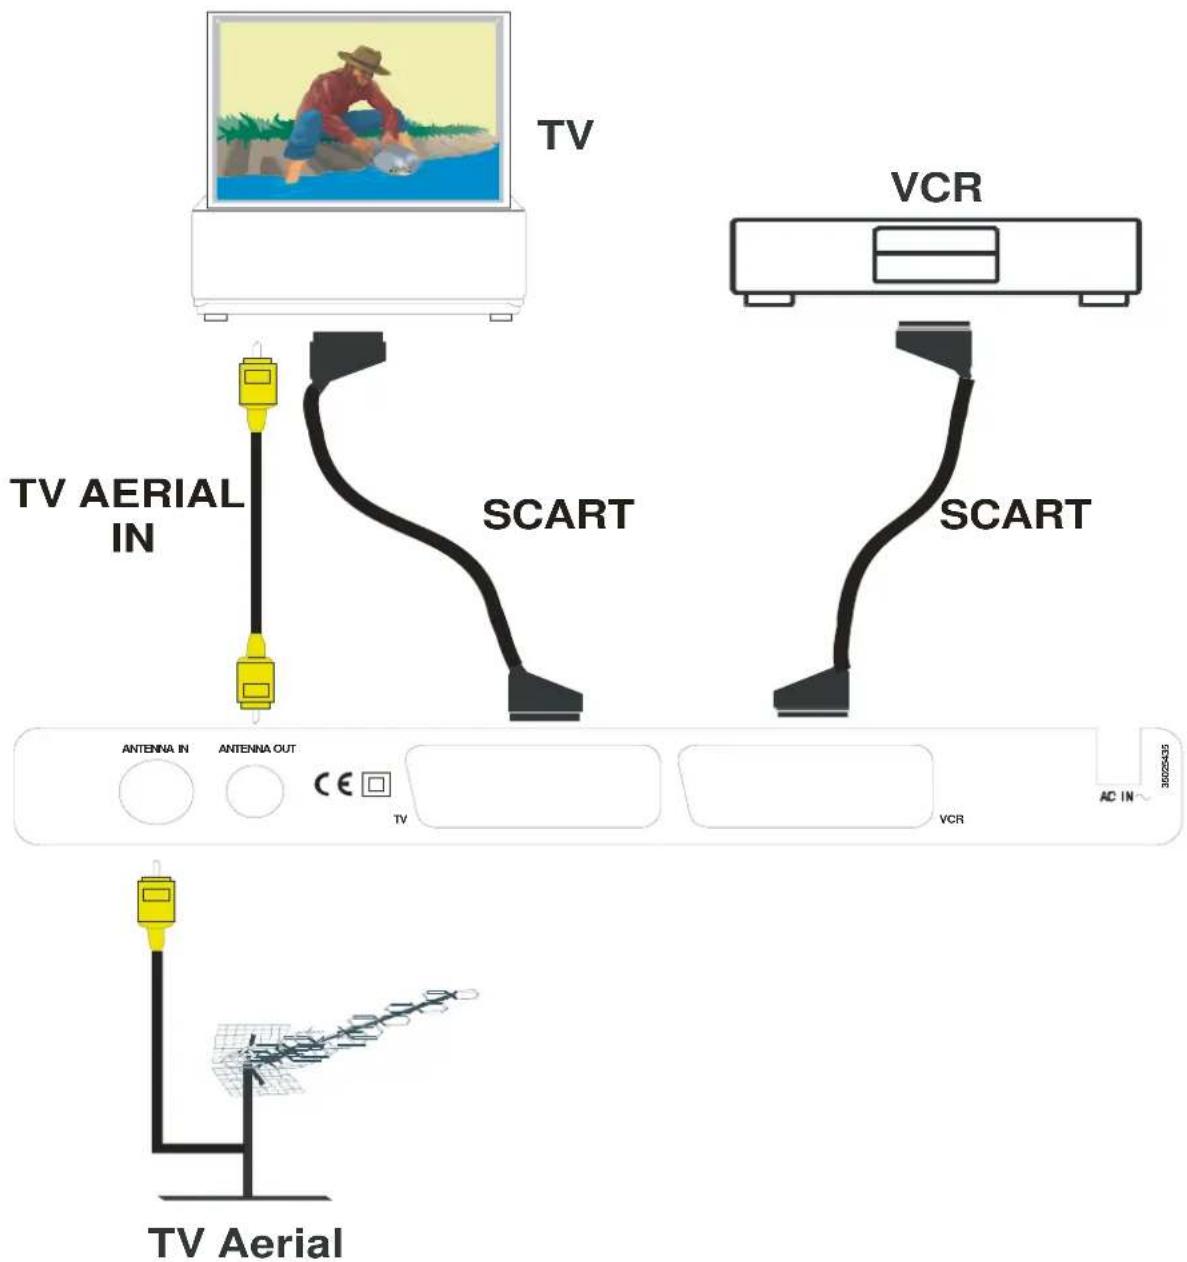
1) Connect one end of a Scart cable to the TV Scart connector on the STB and the other end to a Scart connector on your TV. 2) Connect one end of a Scart cable to the VCR Scart connector on the STB and the other end to a Scart connector on your VCR.
3.2.3. PUTTING INTO OPERATION
Be sure that you have made all the cable connections. After plugging the mains cord of the set-top-box into the mains supply, a blue light will be seen on the front panel (Standby mode). When the set-top-box is first powered up, please wait for about 7 seconds before activating the receiver, since booting of software will take some time. Then, you can turn on your digital set-top box by pressing the standby button on the remote control. You will see that the blue light on the front panel goes out (Power on mode).
3.2.4. SOCKETS
- TV SCART
- VCR SCART
- Two IEC connectors: ANT IN is the antenna input. ANT OUT is for outputting the loop-through of analogue or digital signals.
4. REMOTE CONTROL FUNCTIONS
4.1. REMOTE CONTROL LAYOUT
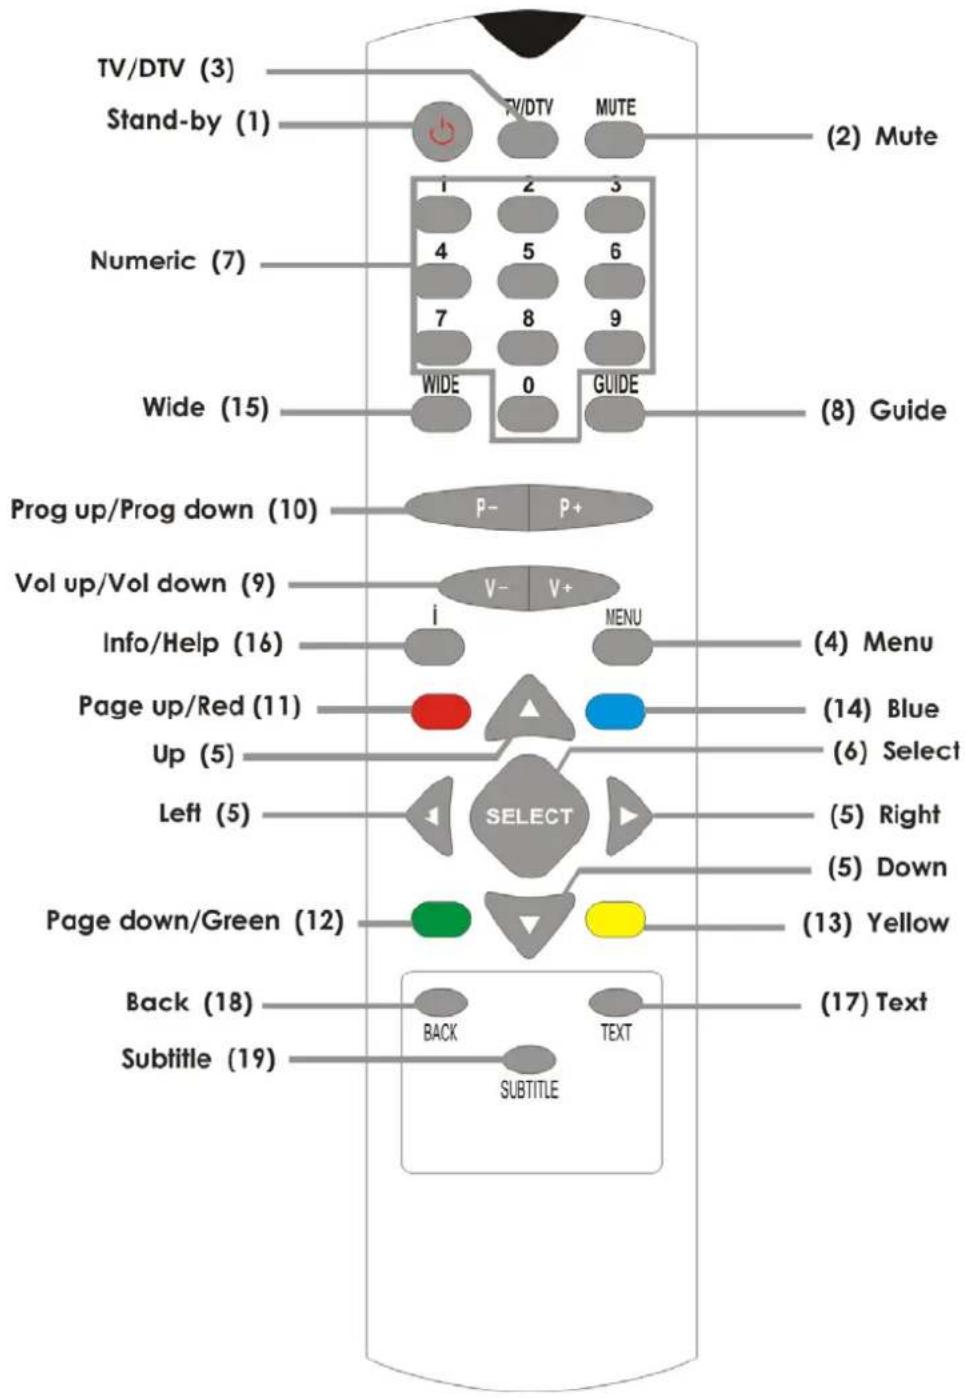
| BUTTON | FUNCTION | |
| 1 | Standby | Turns the receiver on and into Standby. |
| 2 | Mute | Silences received audio. |
| 3 | TV/DTV | Switches between STB and VCR devices. |
| 4 | Menu | Displays the Main Menu. Exits menus. |
| 5 Up, Down, Left, Right | Moves between menu items. | |
| 6 | Select | Makes selection in a menu. |
| 7 | Number keys | Changes channels. |
| Enters numbers and letters | into menus. | |
| 8 | Guide | Displays and exit electronic programme guide. |
| 9 | V+, V- | Adjusts the received audio volume. |
| 10 | P+, P- | Changes channels. |
| 11 | Page Up/Red | Moves up a page through channel list.Selects red option in digital teletext.In EPG menu, changes the channels page by page. |
| 12 | Page Down/Green | Moves down a page through channel list.Selects green option in digital teletext.In EPG menu, changes the channels page by page. |
| 13 | Yellow | Selects yellow option in digital teletext.Changes the days in 7 days EPG. |
| 14 | Blue | Selects blue option in digital teletext.Changes the days in 7 days EPG. |
| 15 | Wide | Selects screen format. |
| 16 | iEnables / Disables Info bar. | Displays menu help. |
| 17 | Text | Starts and stops digital teletext. |
| 18 | Back | Exits menus. |
| 19 | Subtitle | Turns Subtitles ON and OFF. |
MENU INTERFACE
FIRST TIME INSTALLATION
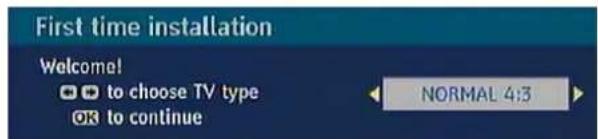
When the box is started from standby for the first time, there will be no channels stored in memory. A "First time Installation" menu will be displayed. Select the TV type (screen format). To continue, press the SELECT key.
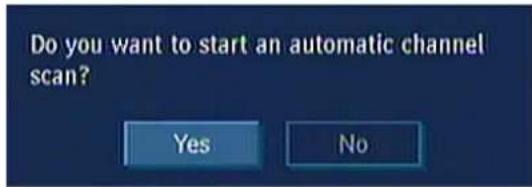
A warning message will appear, asking you if you want to start automatic search or not. Choose the option YES, press the SELECT button to start Automatic search. The STB will start to search for all the stations in your area and will store them.
MAIN MENU
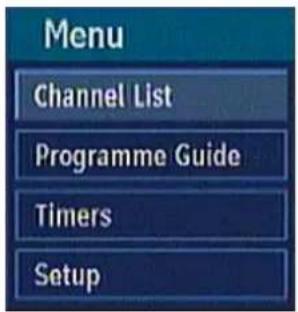
The Main Menu is accessed by pressing the MENU button. The items accessed through the Main Menu are:
1.) Channel List 2.) Programme guide 3.) Timers 4.) Setup
5. CHANNEL LIST
The following operations can be performed in this menu:
- Navigating the whole list of channels
- Moving channels (Optional)
- Deleting unwanted channels
- Renaming channels
- Adding locks to channels
- Setting the favourite list
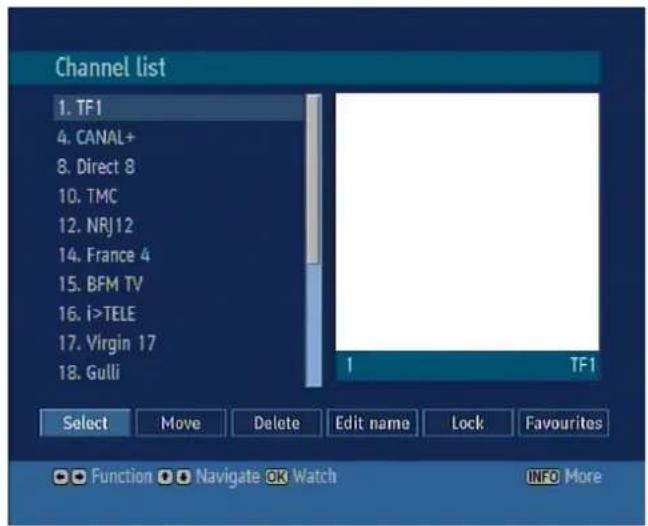
The channel table is where channels are managed. To enter the channel list, press the SELECT button on your remote control or press the MENU button and, using the “▲/▼” buttons, select the option “Channel list”.
5.1. NAVIGATING THE WHOLE LIST OF CHANNELS
In the channel table, “▲/▼” serves to move the focus to the previous or next channel, and the RED/GREEN BUTTON for page up and page down. To watch a specific channel, highlight it using the RED BUTTON / GREEN BUTTON, then press SELECT. The name and number of the selected channel will then be displayed at the bottom of the preview screen. If the selected channel is password protected, a pop-up menu is displayed. If the correct code is entered, the selected channel can be watched. You can also select another channel by navigating with the “▲/▼” buttons. The scroll bar in the middle of the screen shows the relative position of the currently visible channels with respect to the whole list.
5.2. MOVING CHANNELS
Reordering the list can be done by moving the programs one by one to new positions. To do this, the "Move" button should be highlighted by pressing the "◀/▶" keys. Using the "▲/▼" keys, select the programme to be moved and press the SELECT button. Then, enter the new channel number for the programme you want to move, and the programme will be placed as you entered. In some countries, the order of the channels is arranged automatically by the broadcaster. This is called logical channel number (LCN). If the selected country has LCN support, the channels will be enumerated one by one, beginning from number 1. You cannot move any programme to a position after the last saved one. If you try to do this, both programmes will change their places. If LCN support is not available, you can move the channels between 1-999, as you wish.
5.3. DELETING UNWANTED CHANNEL
To delete a channel, highlight it using “▲/▼/RED/GREEN”, then highlight the “Delete” button using “◀/▶” and press SELECT. A message is displayed to confirm your decision. If you still want to delete, press SELECT once more and the channel will be deleted; otherwise, the operation will be cancelled if you select “NO”.
5.4. RENAMING CHANNELS
To rename a specific channel, the name must be highlighted and then select the "Edit Name" button and press SELECT. Following the previous procedure, the name appears in the middle of the screen with the first character highlighted. Now “◀/▶” moves to the previous/next character. “▲/▼” toggles the current character, i.e., ‘b’ becomes ‘a’ on “▼” and ‘c’ on “▲”. Pressing the numeric buttons ‘0...9’ replaces the highlighted character with the characters printed above the button one by one as the button is pressed. Pressing MENU cancels the editing and SELECT saves the new name.
5.5. ADDING LOCKS TO CHANNELS
Channel Locking provides password-protected access to channels selected by parents. In order to lock a channel, you should know the parental Lock password (set to 0000 in the factory and can only be changed from the Configuration Menu). Then highlight the channel to be locked and select the "Lock" button. When SELECT is pressed, a password dialog is displayed. Enter the parental Lock code, press SELECT, and the Lock icon will be displayed in front of the selected channel. Repeat the same operation to cancel the Lock.
5.6. SETTING FAVOURITES
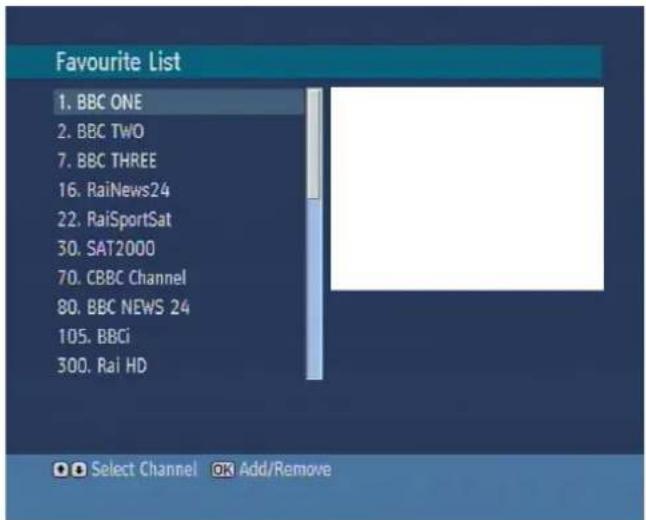
Favourite list provides an easy way to group programs in a customizable way. In the channel list Table menu, the programs can only be added or removed from a favourite list.
In order to add or remove a program from a favourite list, highlight the "Favourite" button using "◀ / ▶"
buttons, the favourite submenu will be displayed. Then select the program to be added/removed to/from the favourite list using “▲/▼”, choose the favourite list name (in which the program will be added) using “◀/▶” buttons, then press SELECT. The favourite program icon will be displayed or removed in/from the selected program bar. Pressing Menu button saves all your settings.
Pressing Menu button saves all your settings.
6. PROGRAMME GUIDE (7 DAYS EPG)
Electronic Program Guide appears on the screen. It is able to get information of the channel - programs weekly by means of 7-DAY-EPG. All programs of channels are displayed. The current program is highlighted and if you press the info button, there will be a brief information about the programs of the channel, such as: name, short/extended event description, start & end time. By pressing “◀/▶” buttons continuously, the time scale can be changed. If there is any event information data available, only program names and dates are displayed. Across the bottom of the screen there is an info bar showing all the available commands which are listed below.
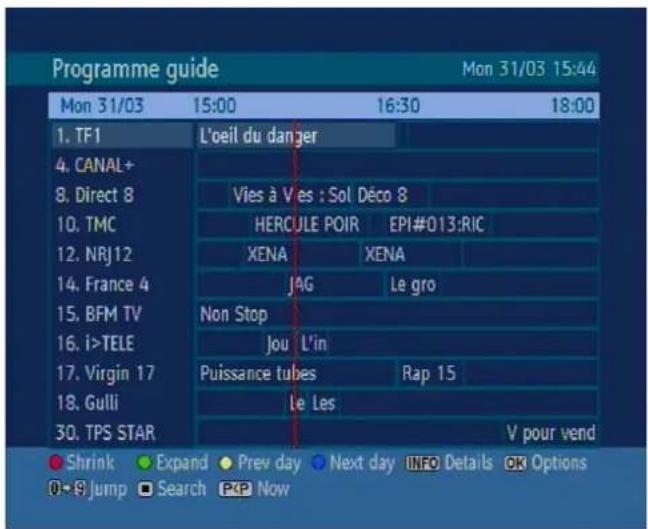
RED BUTTON (SHRINK): make the info boxes smaller.
GREEN BUTTON (EXPAND): makes the info boxes larger.
YELLOW BUTTON (PREV DAY): displays the programs of the previous day.
BLUE BUTTON (NEXT DAY): displays the programs of the next day.
INFO (DETAILS): displays the short extended programs in detail.
OK (OPTIONS): shows the programme options including "Select Channel".
NUMERIC BUTTONS (JUMP): go to preferred channel directly via numeric buttons.
■ (SEARCH): activates the "Guide Search" window. P<P (NOW): shows the current programme.
7. TIMERS
To display the "Timers" window, activate it from the main menu. The features of this menu are as follows:
Delete: You can delete the highlighted single timer or series timer.
Edit: You can edit the saved timers.
Add: By pressing this button, you will go to the "Add Timer" menu.
To add a timer, press the YELLOW button on the remote and the "Add Timer" window appears.
Mode: By using the "◀/▶" buttons, you will choose between "Show all" or "TV only".
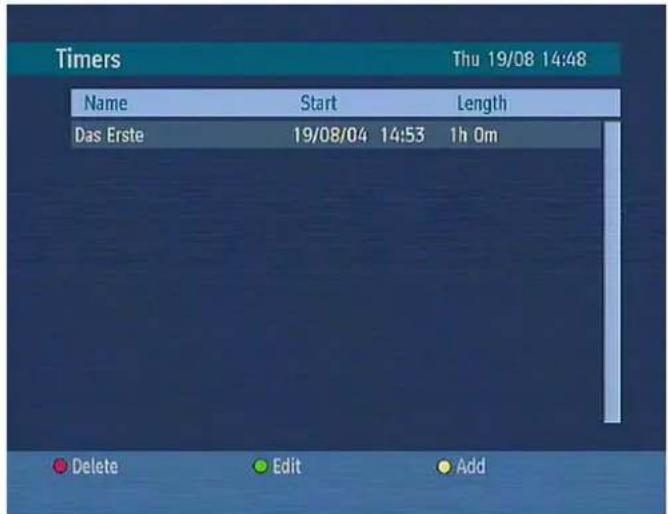
Channel: The "◀ / ▶" buttons will navigate the user through the TV or Radio list.
Date: Enter the start date using either the “◀ / ▶” or “0,1,2...,9” buttons.
Start: Enter the start time using either the “◀ / ▶” or “0,1,2...,9” buttons.
End: Enter the end time using either the “◀ / ▶” or “0,1,2...,9” buttons.
Duration: Displays the duration of the recording. This is automatically calculated after the start and end times have been entered.
Repeat: Using the “◀ / ▶” buttons, you can change the repeat rate between once, daily, and weekly.
Change/Delete: Permit or prohibit any modifications for other users.
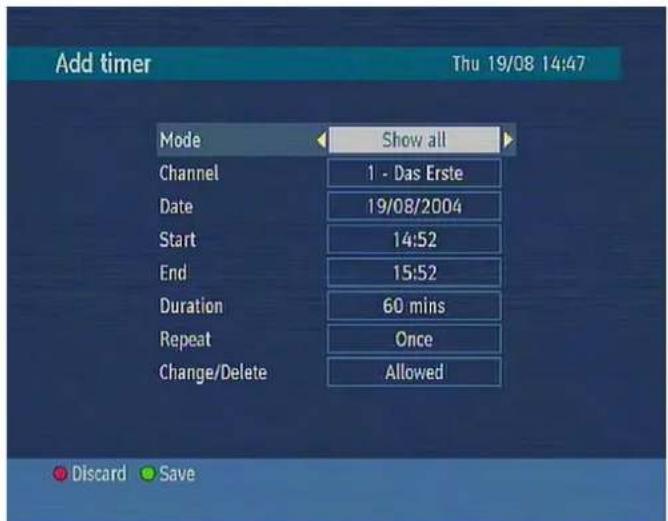
When a Timer Start time is reached, the receiver switches to the set channel. Save the adjustments by means of the GREEN button or cancel with the RED button. Edit the list via the GREEN button and delete with the RED button.
8. SETUP
The adjustments in this menu are:
![graph LR A["Menu"] --> B["Channel List"] A --> C["Programme Guide"] A --> D["Timers"] A --> E["Setup"] F["Setup"] --> G["Configuration"] F --> H["Language"] F --> I["Installation"]](/content/2026/05/873200/images/b7b4b406164a19e9c470527082bcbfa51fe2b2508aa5407aa17e5b01e553cdae.jpg)
8.1. CONFIGURATION MENU
You can configure the settings of your set top box. Select Configuration from the Setup menu and press SELECT to enter this menu. Press the BACK button on the remote to exit.
8.1.1 TV TYPE
Digital terrestrial television channels can broadcast programmes in a widescreen format which must be output differently to normal and widescreen TV sets. This function tells the receiver the screen format of the TV connected so that broadcasts are displayed correctly. Highlight the TV Type line in the Configuration menu and use the “◀ / ▶” buttons to select “4:3” if you have a standard TV set connected or “16:9” if it is a widescreen TV. This function duplicates the selection made at the time of first installation and can be used if you change TV sets.
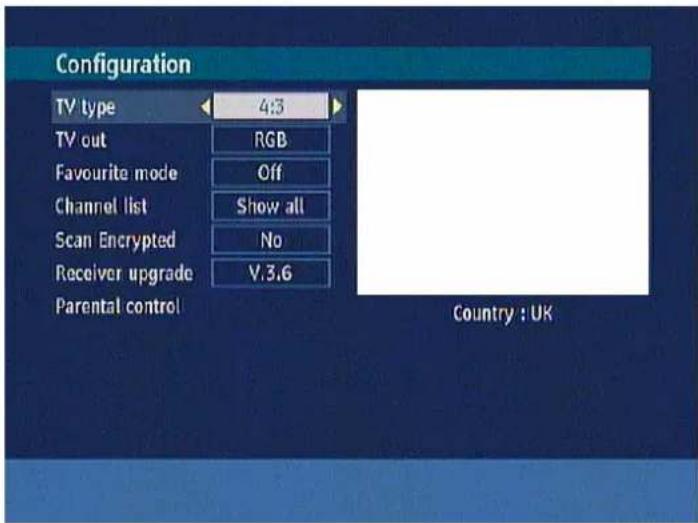
8.1.2. TV OUT
The receiver can output RGB and CVBS signal from the TV SCART on the rear panel. Although the RGB format results in a better quality picture, not all equipment can cope with an RGB signal.
8.1.3. FAVOURITE MODE
This function enables or disables the favourite channel list mode by pressing the “◀ /▶” buttons. If a favourites list exists, it will switch to the list number selected. If there is no favourite listing, a warning message is displayed.
8.1.4. CHANNEL LIST
Use the “▲/▼” buttons to go to the Channel List option. Use the “◀/▶” buttons to toggle Channel List Mode. If you select “TV Only”, you navigate through only TV channels; if you select “Radio Only”, you navigate through only radio channels; if you select “Text Only”, you navigate through only text channels with the PR+/PR- buttons. To save the recent changes and exit, press the MENU button.
8.1.5. SCAN ENCRYPTED
Use the “▲ / ▼” buttons to go to the Scan Encrypted Channels option. Use the “◀ / ▶” buttons to toggle YES or NO for searching for encrypted channels.
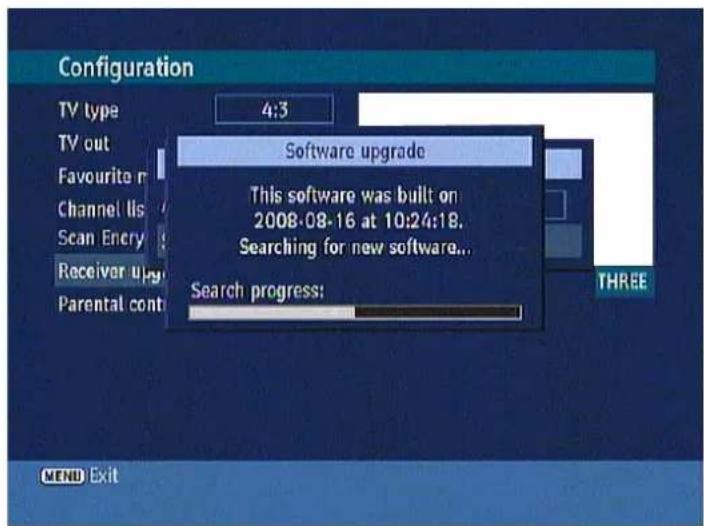
8.1.6. RECEIVER UPGRADE - OAD
Over Air Download (OAD): To ensure that your STB always has the most up-to-date information, please ensure that after use it is set to its standby mode. The STB automatically powers up at 3:00 A.M. each day and searches for any new information that may be broadcast and will download this to your receiver automatically. This operation will normally take approximately 30 minutes.
8.1.7. PARENTAL CONTROL
Use the “▲/▼” buttons to go to the “Parental Control” option. Press the SELECT button to enter the menu. A box asking for the lock code is displayed. The code is set to “0000” initially. Enter the lock code. If it is incorrect, "Wrong Pin" is displayed. If it is correct, the Parental Control Menu is displayed.
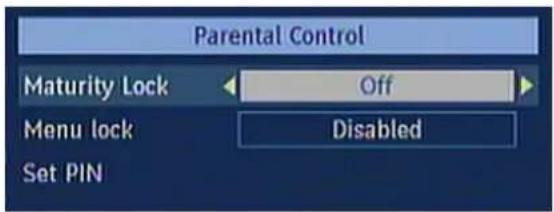
8.1.7.1. MATURITY LOCK (Not available on some models)
Use the “▲ / ▼” buttons to go to the Maturity Lock option. Use the “◀ / ▶” buttons to toggle Maturity Lock Mode. When set, this option gets the maturity information from the broadcast and if this maturity level is disabled, it does not show video-audio.
8.1.7.2. MENU LOCK
In Menu Lock, you can set locking for All Menus or the Installation Menu to restrict access to these menus. If the menu lock is disabled, there will be free access to the menu system. Use the “▲/▼” buttons to go to the Menu Lock option. Use the “◀/▶” buttons to choose Menu Lock Mode.
DISABLED: All menus are unlocked.
ALL MENUS: All menus are accessible only with the correct lock button. So the user can't add, delete, rename channels, or set timers.
INSTALLATION MENU: Installation menu is locked. So the user can't add channels. Changes will be updated after exiting 'Configuration Menu'.
8.1.7.3. SET PIN
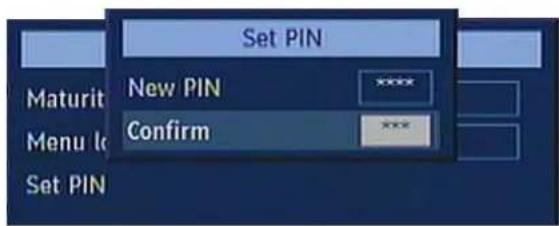
Use “▲/▼” buttons to go to “Set PIN” option. Press SELECT to display the “Set PIN” window. Use NUMERIC buttons to enter new pin number. You will need to input your new pin a second time for verification purposes. If both pin numbers are four digits long and the same, the pin will be changed. The factory default pin number is 0000. If you change the pin number, make sure you write it down and keep it safe.
8.2. LANGUAGE
In this menu the user can adjust the preferred language. Language is changed by pressing SELECT button.
![graph LR A["Setup"] --> B["Configuration"] A --> C["Language"] A --> D["Installation"] E["Language settings"] --> F["Menu"] E --> G["English"] H["Preferred"] --> I["Audio"] H --> J["Subtitle"] H --> K["Guide"] L["Current"] --> M["Audio"] L --> N["Subtitle"] O["English"] --> P["None"]](/content/2026/05/873200/images/d75ce5f32e0499fda88796edd63f88e0cd779e537bbde2abd8797490efedc109.jpg)
Menu: shows the language of the system
Preferred
These settings will be used if available. Otherwise the current settings will be used.
➢ Audio: by pressing “◀ / ▶” buttons change the audio language. Subtitle: alter the subtitle language with “◀ / ▶” buttons. The chosen language will be seen in subtitles.
Guide: by pressing “◀ / ▶” buttons change the guide language.
Current
➢ Audio: if audio language is supported, change the audio language by pressing “◀ / ▶” buttons. Subtitle: if subtitle is backed up, alter the subtitle language with “◀ / ▶” buttons. The chosen language will be seen in subtitles.
8.3. INSTALLATION
The Installation menu mainly intends to help you for building a Channel Table into your receiver in most efficient way. These are located in Installation Menu:
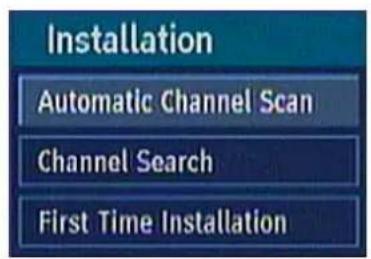
- Automatic Search
- Channel Search
- First Time Installation
8.3.1. AUTOMATIC SEARCH
![graph LR A["Setup"] --> B["Configuration"] A --> C["Language"] A --> D["Installation"] E["Installation"] --> F["Automatic Channel Scan"] E --> G["Channel Search"] E --> H["First Time Installation"]](/content/2026/05/873200/images/48dd1777b5fe7dbb7e59a69bfa14f66cc257edfdf96e9adb8ed66c79de645b01.jpg)
Automatic search is started by selecting SELECT in the auto-search pop-up menu. All the multiplexes are searched and a channel table is created automatically. Any existing channels will be erased. All channels found are stored in a sorted form with respect to their channel numbers.
8.3.2. CHANNEL SEARCH
Only channels can be searched. Enter the number using the numeric buttons and press SELECT to commence.
8.3.3. FIRST TIME INSTALLATION
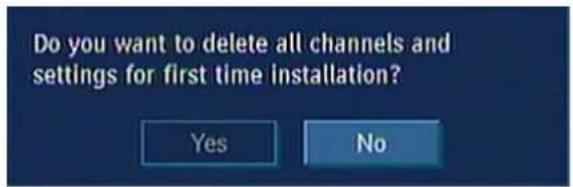
The user can use this item to load default settings, which had been loaded to the receiver at the factory. To install factory settings, highlight 'First Time Installation' menu and press SELECT button, then you will be asked to confirm deleting all channels and settings. By selecting YES and pressing the SELECT button, the whole channel table will be deleted. After the factory settings are loaded, 'First Time Installation' will begin.
9. MESSAGES
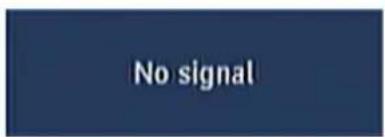
When the box receives no signal (e.g., the antenna cable is disconnected), "NO SIGNAL" message is seen on the screen.
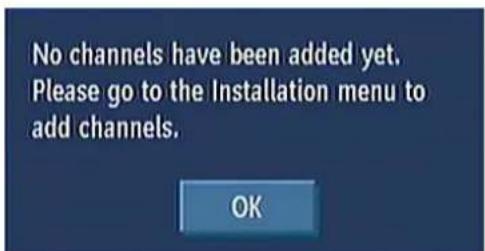
When there is no channel stored in the box, Timer Menu and Channel Table Menus are not accessible. Channel navigation is not allowed. Therefore, trying to enter these menus or do channel navigation will display a warning message on the screen.
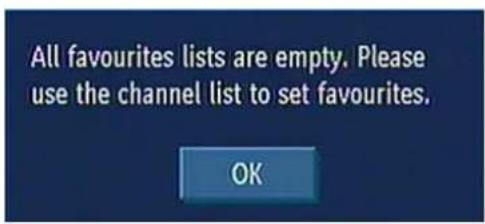
When there is no menu on the screen, you can switch between Favourite Lists using the FAV button. If the favourite list is empty, the following warning message is displayed:
10. CHANNEL NAVIGATION
Channel "P+/P-" Buttons: Pressing "P+/P-" buttons will help you to go to the next or the previous channel in the list.
Numeric Buttons: Pressing a number button will activate a small digit entry window on the left upper corner of the screen. After a digit is entered, the box will wait for 2 seconds till you enter another digit. If no digit is entered during these 2 seconds, then the box will switch to the entered number channel.
If a number that is greater than the maximum number of channels is entered, the box will switch automatically to the last channel. Each time the box switches to the desired channel, an information window is displayed on the lower part of the screen. The small bar on top right of the banner indicates the current signal quality.
When INFO button is pressed, and when changing channels the information window is displayed on the lower part of the screen. The small bar indicates the program duration. On the channel info window there are:
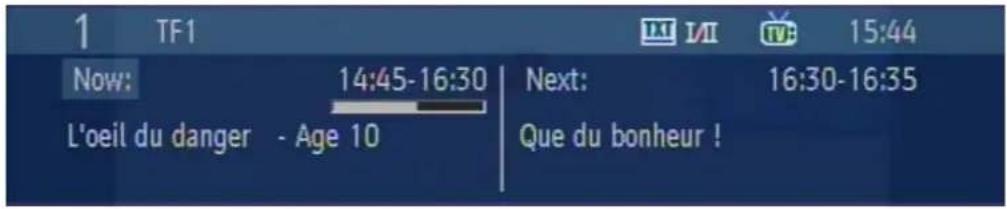
Current event name next event name, and their start and end times. Program duration bar. Program mode (TV or Radio). Channel number. Name of the channel.
The second press of the info button brings up a box containing a brief description of the currently viewed programme.
You can now use the > button to change the programme description to that of the next programme on the current channel.
On a blank screen, if you press the up/down buttons, the info banner will appear and you can switch between channels saved in the list. To watch one of them, press the SELECT button. If you press the INFO button, you will switch to the last watched channel and the info banner will be closed.
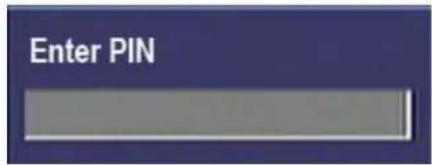
When switching to a locked channel (channel), lock code is requested via a window as shown in the picture. Only after the correct code is entered, it is allowed to access to this channel. To skip this channel, Channel "P+/P-" buttons must be used.
11. VOLUME CONTROL
When "V+ / V-" buttons are pressed, a banner is displayed, this shows the present volume level graphically. By keeping these buttons pressed, the sound can be increased with "V+" or decreased "V-" button.

When the MUTE button is pressed, a mute symbol is displayed on the screen. This symbol will disappear in 3 or 4 seconds after the MUTE button is pressed. The mute symbol is not displayed on the screen in case of any menu displayed.

12. TROUBLE SHOOTING GUIDE3
| TROUBLE | POSSIBLE REASONS | WHAT TO DO |
| The standby led is not lit. | Mains cable is not connected. | Check if the mains cable is plugged into the power socket. |
| No picture or sound. | No signal or weak signal. | Check the signal cable and scart connectors. |
| The settings you have done in the menus have not been changed. | The digital set-top box was unplugged without first going to standby. | Before unplugging your digital set-top box, wait for going to standby. |
| The remote control is not working. | The digital set-top box is in standby.Remote control is incorrectly aimed.Battery exhausted. | Press the standby buttonCheck if nothing blocks the front panel.Change the batteries. |
| You have forgotten any channel lock code. | Start first time installation. After then, the lock will be removed. |
13. TECHNICAL SPECIFICATIONS
GENERAL
| Supply Voltage | : 220 - 240 V AC, 50-60Hz |
| Input Frequency | : 174MHz - 862 MHz |
| Power consumption | : 9 W (max) |
| Operating temperature | : 5°C to +40°C |
| Active antenna output | : 5 V |
| Storage temperature | : -20°C to +70°C |
| Humidity | : 25 to 75 % rel |
| Physical dimensions | : 267 X 114 X 43 mm |
| Weight | : 450 g |
HARDWARE CONFIGURATION
| Main Processor | : | Cheertek CT216T-Z |
| Flash Memory | : | 2 Mbyte |
| SDRAM | : | 16 Mbyte |
14. IMPORTANT NOTICE
DIGITAL SWITCHOVER AND YOUR TV EQUIPMENT
WHAT YOU NEED TO DO TO ENJOY WATCHING TV DURING AND FOLLOWING DIGITAL SWITCHOVER
Starting in 2008* and ending in 2012, television services in the UK will go completely digital, TV region by TV region.
To continue using this digital TV equipment during and following digital switchover, you will need to “reset” your digital TV channels.
Users of this digital TV product must reset their channels on at least 2 different occasions, normally 1 month apart when switchover happens. Digital UK, the body leading digital TV switchover, and broadcasters will advise you when to reset your channels on each occasion.
If you do not reset your channels, you risk losing some or all of your TV services during and following switchover.
Please refer to the instruction manual supplied with your digital TV equipment for help with resetting channels. Some manufacturers refer to resetting channels as “rescanning” channels or “retuning”.
Please note that in order to receive the maximum number of available TV services on your equipment you must "reset" channels, not "add" channels.
For more information about this, please contact your equipment supplier or visit www.digitaluk.co.uk.
Helpline no.:
0870 6001 338
(UK customers only) Calls charged at National Rate.
Following information is only for EU-member states:
The use of the symbol indicates that this product may not be treated as household waste. By ensuring this product is disposed of correctly, you will help prevent potential negative consequences for the environment and human health, which could otherwise be caused by inappropriate waste handling of this product. For more detailed information about recycling of this product, please contact your local city office, your household waste disposal service or the shop where you purchased the product.

- INTRODUCTION
- CONTENTS OF APPLIANCE
- SAFETY PRECAUTIONS
- IMPORTANT
- HOW TO REPLACE THE FUSE
- CAUTION
- POWER SOURCE
- POWER LEAD
- LOCATION
- LIGHTNING
- BATTERY DISPOSAL
- CLEANING
- FRONT PANEL
- REAR PANEL
- PREPARING
- REMOTE CONTROL
- CONNECTIONS
- CONNECTION TO THE TV
- CONNECTION TO A VCR
- PUTTING INTO OPERATION
- SOCKETS
- REMOTE CONTROL FUNCTIONS
- REMOTE CONTROL LAYOUT
- MENU INTERFACE
- FIRST TIME INSTALLATION
- MAIN MENU
- CHANNEL LIST
- NAVIGATING THE WHOLE LIST OF CHANNELS
- MOVING CHANNELS
- DELETING UNWANTED CHANNEL
- RENAMING CHANNELS
- ADDING LOCKS TO CHANNELS
- SETTING FAVOURITES
- PROGRAMME GUIDE (7 DAYS EPG)
- TIMERS
- SETUP
- CONFIGURATION MENU
- TV TYPE
- TV OUT
- FAVOURITE MODE
- SCAN ENCRYPTED
- RECEIVER UPGRADE - OAD
- PARENTAL CONTROL
- MATURITY LOCK (NOT AVAILABLE ON SOME MODELS)
- MENU LOCK
- SET PIN
- LANGUAGE
- PREFERRED
- CURRENT
- INSTALLATION
- AUTOMATIC SEARCH
- CHANNEL SEARCH
- MESSAGES
- CHANNEL NAVIGATION
- VOLUME CONTROL
- TROUBLE SHOOTING GUIDE
- TECHNICAL SPECIFICATIONS
- GENERAL
- HARDWARE CONFIGURATION
- IMPORTANT NOTICE
- DIGITAL SWITCHOVER AND YOUR TV EQUIPMENT
- WHAT YOU NEED TO DO TO ENJOY WATCHING TV DURING AND FOLLOWING DIGITAL SWITCHOVER
- HELPLINE NO
- FOLLOWING INFORMATION IS ONLY FOR EU-MEMBER STATES
Brand : Logik
Model : LSTB200
Category : Receiver