
DigitRadio 585 - Radio TECHNISAT - Free user manual and instructions
Find the device manual for free DigitRadio 585 TECHNISAT in PDF.


| Product Type | Digital Radio DAB+/FM |
| Brand | TechniSat |
| Model | DigitRadio 585 |
| Dimensions (W x H x D) | 200 x 130 x 80 mm |
| Weight | 0.8 kg |
| Power Supply | Mains adapter 230 V~50 Hz or batteries (not included) |
| Power Consumption | 5 W max |
| Reception | DAB+ (Band III) and FM (87.5-108 MHz) |
| Speaker | 1 x 3 W, monophonic |
| Display | Backlit LCD screen |
| Main Functions | Auto scan, 30 presets, alarm, standby, sleep timer, DAB+ information display |
| Connectivity | Headphone jack 3.5 mm, auxiliary input (3.5 mm) |
| Housing Material | ABS plastic |
| Maintenance and Cleaning | Dust with a soft dry cloth; do not use abrasive cleaners |
| Safety | Do not expose to moisture, heat sources, or liquids |
| Spare Parts and Repairability | Mains adapter available as spare part; repair by authorized service center |
| Package Contents | Radio, mains adapter, user manual |
| General Information | Portable radio for domestic use; 2-year warranty |
Frequently Asked Questions - DigitRadio 585 TECHNISAT
User questions about DigitRadio 585 TECHNISAT
0 question about this device. Answer the ones you know or ask your own.
Ask a new question about this device
Download the instructions for your Radio in PDF format for free! Find your manual DigitRadio 585 - TECHNISAT and take your electronic device back in hand. On this page are published all the documents necessary for the use of your device. DigitRadio 585 by TECHNISAT.
USER MANUAL DigitRadio 585 TECHNISAT
natural_image
Abstract geometric composition with yellow, blue, and white triangular shapes (no text or symbols)TechniSat
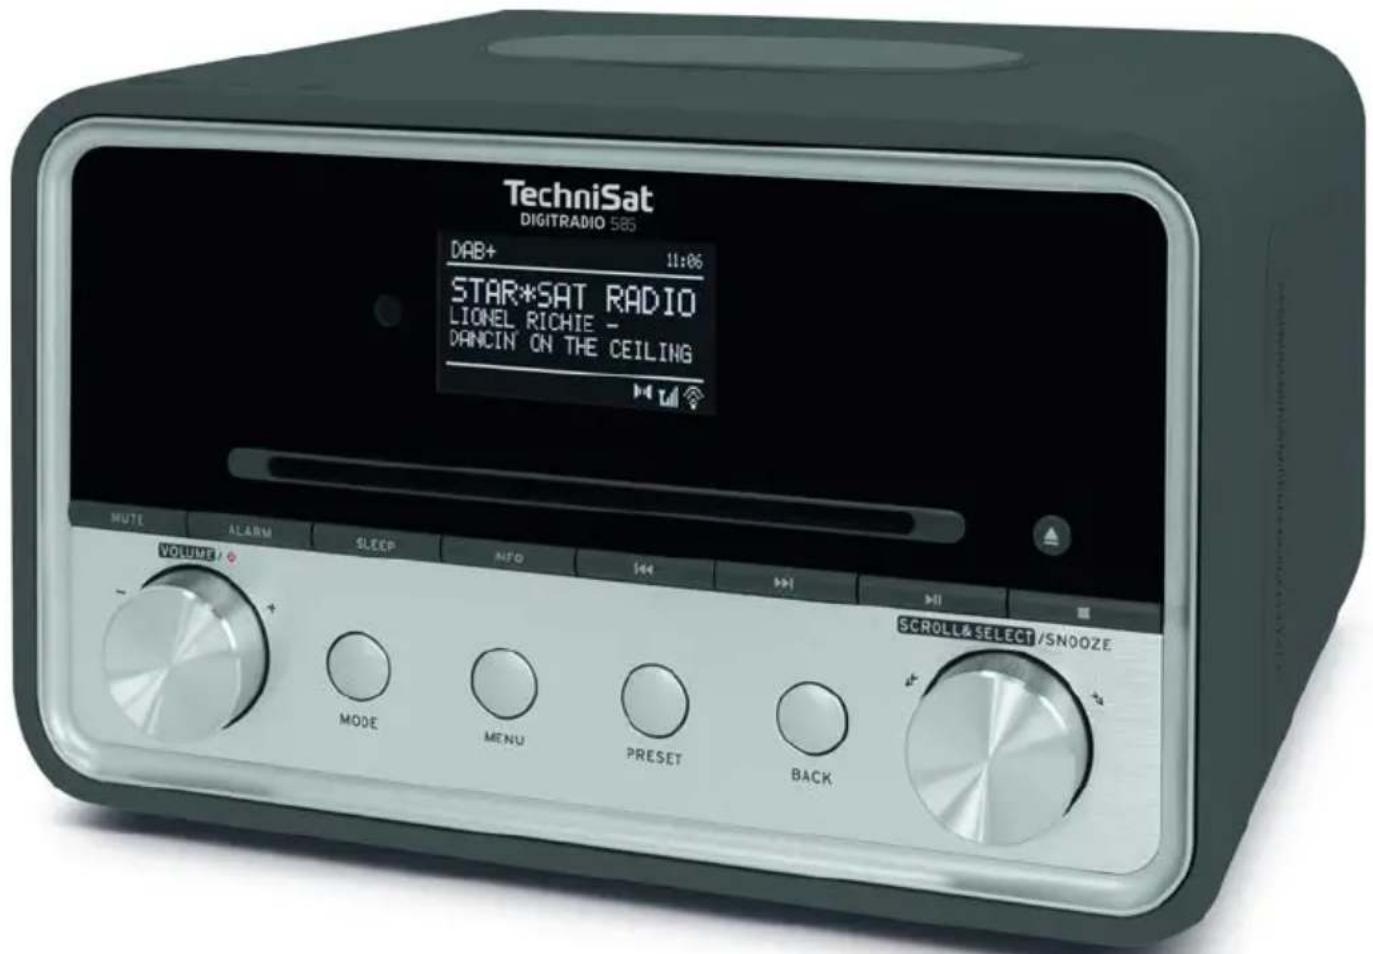
DIGITRADIO 585
9 Spotify Connect....19
11.9 Dynamic Label Plus....23
The Spotify Software is subject to third party licenses found here: https://www.spotify.com/connect/third-party-licenses.

11.9 Dynamic Label Plus
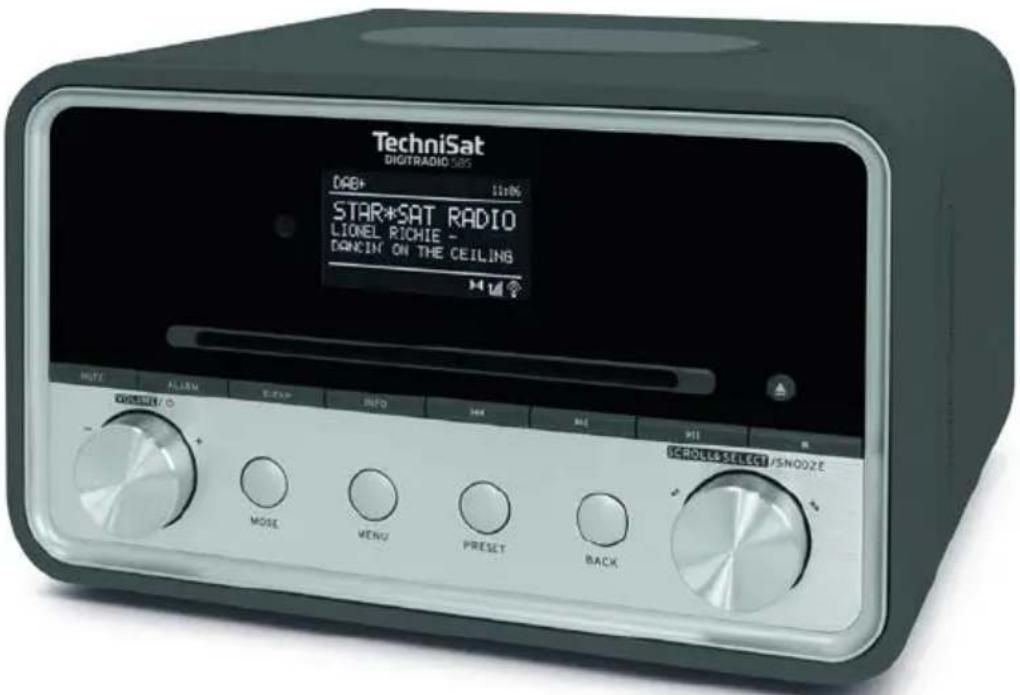
Internet radio with DAB+/FM tuner and Bluetooth streaming
1 Illustrations
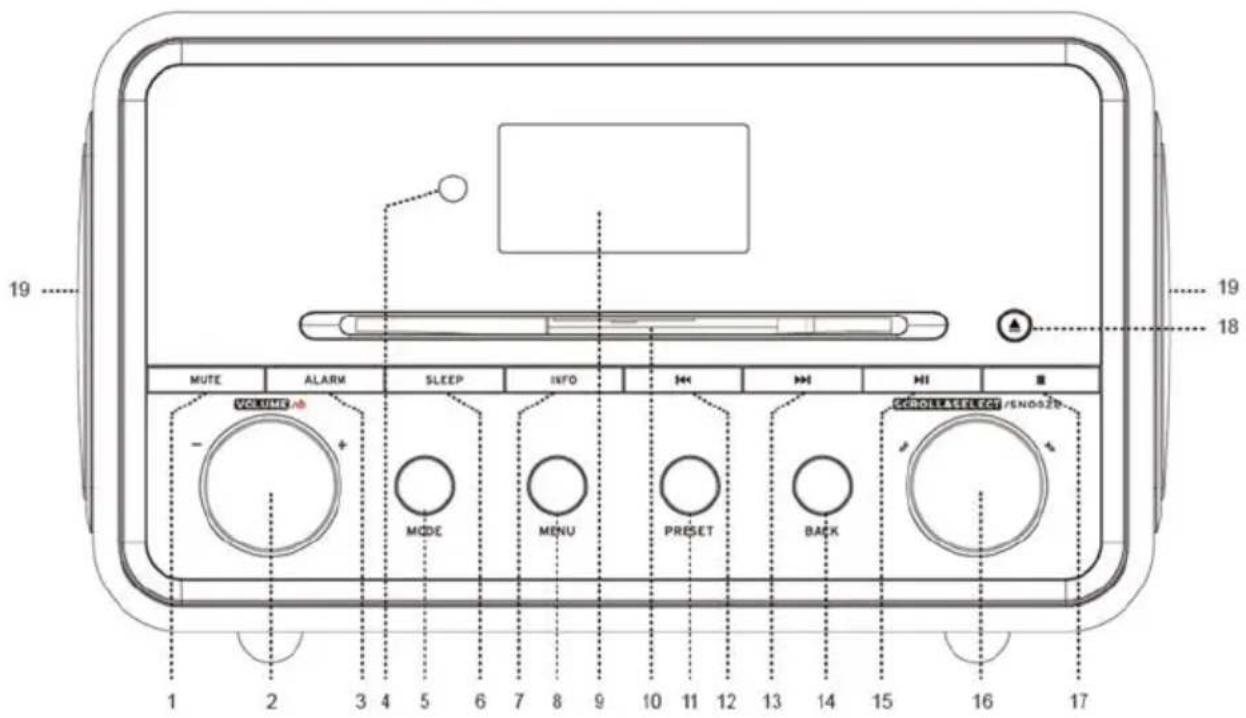
1.1 Front view
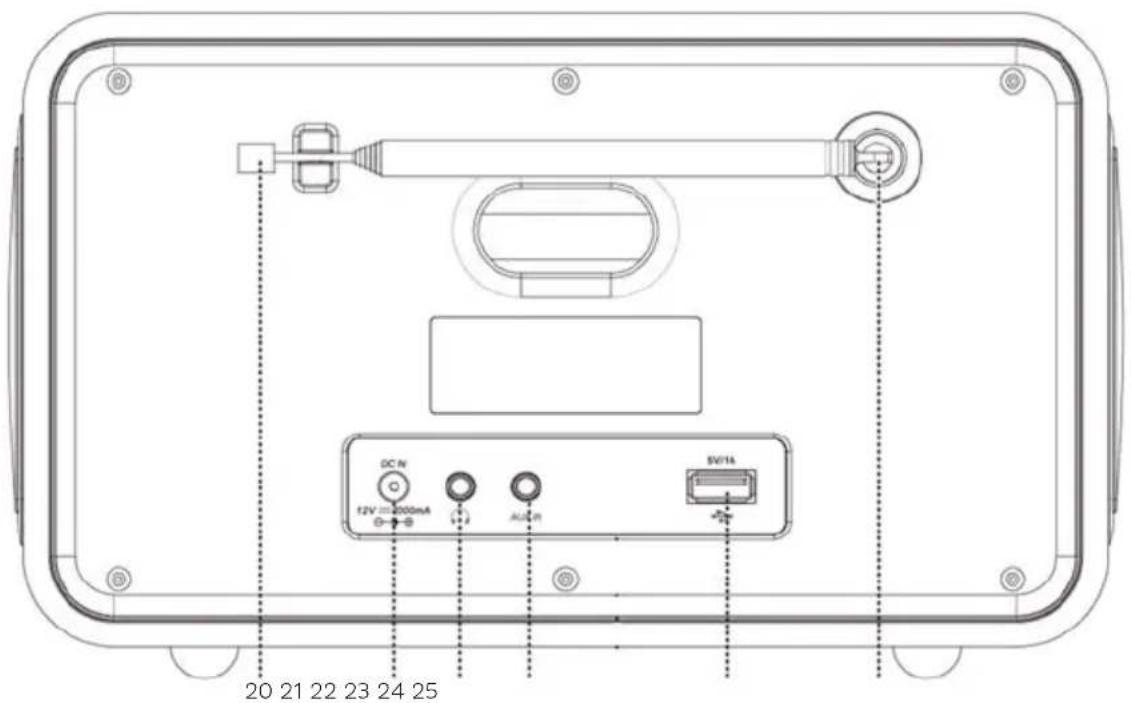
1.2 View from the rear
1 MUTE 11 PRESET
2 VOLUME/ 12Search for Track/Backwards
3 ALARM 13 Search for Track/Forwards
4 IR receiver 14 BACK
5 MODE 15 Play/Pause
6 SLEEP 16 Scroll&Select/Snooze
7 INFO 17 Stop
8 MENU 18 CD Eject
9 Display 19 Speaker
10 CD compartment
20 Telescopic antenna 23 AUX IN
21 DC IN 24 USB port
22 Headphone connection 25 Antenna connection
1.3 Remote control
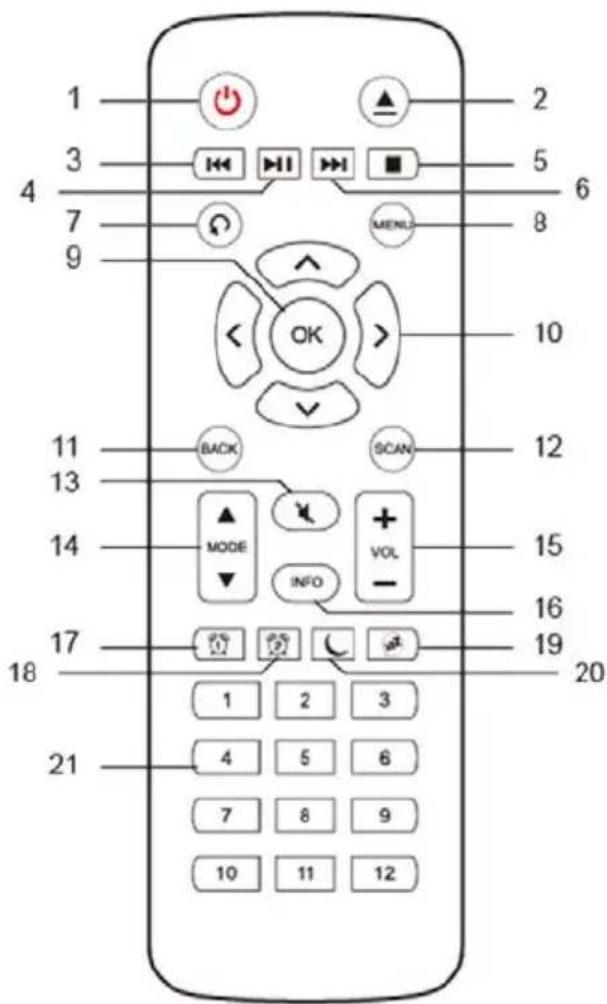
1 On/Standby
2 Eject
3 Back
4 Play/Pause
5 Stop
6 Forward
7 Playback options
8 MENU
9 OK
10 Arrow keys
11 BACK
12 SCAN
13 MUTE
14 MODE
15 Volume
16 INFO
17 Alarm 1
18 Alarm 2
19 Snooze
20 Sleep timer
21 Number buttons 1-12
2 Contents
1 Illustrations 44
1.1 Front view....44
1.2 View from the rear 44
1.3 Remote control 45
2 Contents....46
3 Safety instructions....48
3.1 Signs and symbols used 49
3.2 Intended use....50
3.3 Target group for this instruction manual 50
3.4 Using the DIGITRADIO 585 safely 50
4 Legal notices 51
4.1 Service instructions....52
5 Setting up the device....52
6 Description of the DIGITRADIO 585....53
6.1 Scope of delivery....53
6.2 Special features of the DIGITRADIO 585....53
6.3 Preparing the DIGITRADIO 585 for operation....54
6.3.1 Connect and align the antenna 54
6.3.2 Connecting the power supply unit 54
6.3.3 Insert the batteries into the remote control....54
6.4 General device functionality 55
6.4.1 Switching on the device 55
6.4.2 Switching off the device 55
6.4.3 Operating the device with the remote control....55
6.4.4 Adjusting the volume....56
6.4.5 Activating the mute function....56
6.4.6 Retrieving displays....56
6.4.7 Visual displays 57
7 Menu operation 57
7.1 Main menu 57
7.2 Source selection....57
8 Internet radio ....58
8.1 Last listened to....58
8.2 Station list....58
9 Spotify Connect ....59
10 Playing music (UPnP & USB media) 59
10.1 Playing media....60
10.2 Providing music via the Windows media player....60
11 DAB+ (digital radio) function....60
11.1 What is DAB+? 60
11.2 DAB radio reception....61
11.3 Performing a station scan....61
11.3.1 Manual scan....61
11.4 Selecting stations....61
11.5 Saving DAB stations....62
11.6 Selecting the programmed stations 62
11.7 Deleting a saved memory slot....62
11.8 Signal intensity....62
11.9 Dynamic Label Plus....63
11.10 Setting DRC 63
11.11 Deleting inactive stations....63
11.12 Sorting the stations....63
12 FM mode....63
12.1 Switching on the radio mode 63
12.2 FM reception with RDS information....64
12.3 Manual station selection....64
12.4 Automatic station selection 64
12.5 Setting mono/stereo....64
12.6 Saving FM stations....65
12.7 Selecting the programmed stations....65
12.8 Deleting a saved memory slot....65
13 Bluetooth....65
13.1 Activating the Bluetooth mode....65
13.2 Pairing 66
13.3 Playing music....66
14 Audio/Playing MP3 CDs....66
14.1 General information on CDs/MP3 CDs....66
14.2 The discs you can use....67
14.3 Playing CDs....67
14.4 Setting the track....68
14.5 Quick search....68
14.6 Repeat function....68
15 Audio input....68
16 Other functions....69
16.1 Sleep function....69
16.2 Alarm 9
16.2.1 Setting the alarm time....69
16.2.2 Switching off the alarm after being woken....70
16.2.3 Switching off the alarm....70
17 System settings....71
17.1 Equaliser....71
17.1.1 My EQ setting 71
17.2 Internet settings....71
17.2.1 WPS connection....72
17.3 Time settings....72
17.4 Language....73
17.5 Factory settings....73
17.6 Software update....73
17.7 Set-up wizard....74
17.8 Info....75
17.9 Display backlight 75
17.10 Data protection notice....76
18 Charging function for external devices....76
18.1 Wired charging of external devices 76
18.2 Wireless charging of external devices 76
19 Control via Amazon Alexa 76
19.1 Setting up the Nuvola account....77
19.2 Activating and linking Nuvola skill....76
19.3 Alexa control commands....79
20 Cleaning....79
21 Troubleshooting 80
22 Technical specifications / manufacturer's instructions.... 81
3 Safety instructions
Preface
Dear Customer,
Thank you for choosing the DIGITRADIO 585 from TechniSat.
This instruction manual is intended to help you get to know the extensive functions that your new unit offers and to make the best use of them.
It will help you to use the DIGITRADIO 585 properly and safely.
It is intended for anyone concerned with installing, connecting, operating, cleaning or disposing of the unit. Keep the instruction manual in a safe place for future reference.
You can find an up-to-date version of the instruction manual on the TechniSat homepage (www.technisat.de).
We have kept the operating instructions as brief as possible and have used terminology that everybody can understand.
We hope you enjoy your
TechniSat DIGITRADIO 585!
The TechniSat Team
3.1 Signs and symbols used
In this instruction manual:

Indicates a safety instruction which can lead to serious injuries or death if not observed. Note the following signal words:
DANGER - Serious / fatal injury
WARNING - Serious injury, possibly fatal
CAUTION - Injury

This identifies information that must always be observed to prevent defects, data loss/misuse and undesired operation. It also describes additional functions of your unit.

Beware of electrical voltage. Follow all safety instructions to avoid electric shock. Do not open the device under any circumstances.
On the unit:

Indoor use - Devices with this symbol are only suitable for indoor use.

Protection class II - Electrical devices of protection class II are electrical devices with continuous double and/or reinforced insulation and no connection options for a protective conductor. The casing of an electrical device of protection class II, which is enclosed in an insulating material, can form part or all of the additional or reinforced insulation.

Your device bears the CE symbol and complies with all requisite EU standards.

Electronic devices do not belong in the household waste and must be disposed of properly in accordance with Directive 2002/96/EC of the European Parliament and of the Council dated January 27, 2003 concerning waste electrical and electronic equipment. Please return this unit to the designated public collection point for disposal at the end of its service life.

Observe all information and safety instructions in this instruction manual. Keep the instruction manual in a safe place for future reference.
3.2 Intended use
The device is designed to receive radio broadcasts via DAB+, FM and the Internet. Music media can be streamed via a WLAN network connection or Bluetooth. The device has been designed for private use and not for commercial purposes.
3.3 Target group for this instruction manual
The instruction manual is intended for anyone concerned with installing, operating, cleaning or disposing of the device.
3.4 Using the DIGITRADIO 585 safely
Please take note of the following information to minimise safety risks, to prevent damage to the device and to make a contribution to environmental protection. Please read all of the safety information carefully and keep it for future reference. Always follow all warnings and instructions in this instruction manual and on the rear of the device.

WARNING!
Never open the device!
Touching live parts can be fatal!

Observe all of the following instructions for the intended use of the device and to prevent damage to the device and injury to persons.
- Do not repair the device yourself. Repairs should only be carried out by trained experts. Contact our customer service department.
- The device should only be operated under the intended environmental conditions.
- Do not expose the device to dripping or splashing water. If water has penetrated the device, switch it off and inform the Service department.
- Do not expose the device to heat sources which could heat it up more than normal use will.
- If you detect a device defect, odour or smoke, a major malfunction, or damage to the housing, inform the Service department immediately.
- The device must only be operated at the mains voltage specified on the power supply unit. Never try to operate the device at any another voltage.
- If the device shows signs of damage, it must not be put into operation.
-
Do not put the device into operation in the vicinity of bath tubs, showers, swimming pools or running/splashing water. There is a risk of electric shock and/or device defects.
-
Foreign bodies, e.g. nails, coins, etc. must not be allowed to fall inside the device. Do not touch the connection contacts with metal objects or your fingers. This could lead to short-circuits.
- This device is not intended to be used by people (including children) with limited physical, sensory or mental capacities or lack of experience and/or knowledge, unless they are supervised by a person responsible for their safety or they have been instructed by them as to how to use the device. Never allow children to use the device unsupervised.
- Modifications to the device are prohibited.
4 Legal notices

TechniSat herewith declares that the radio system model DIGITRADIO 585 corresponds to Directive 2014/53/EU. The complete text of the EU Declaration of Conformity is available at the following web address:
TechniSat accepts no liability for product damage as a result of external influences, wear or improper handling, unauthorised repairs, modifications or accidents.

Changes and printing errors reserved. Version 03/20. Copying and reproduction are subject to the publisher's consent. The respective current version of the instructions can be downloaded in PDF format in the download area of the TechniSat Homepage at www.technisat.de.

DIGITRADIO 585 and TechniSat are registered trademarks of:
D-54550 Daun/Eifel, Germany
www.technisat.de
The names of the companies, institutions or brands referred to are trademarks or registered trademarks of the respective owners.
The Spotify Software is subject to third party licences found here: https://www.spotify.com/connect/third-party-licenses.

The device may only be operated in enclosed rooms in the 5 GHz WLAN range in the countries listed below.
| BE CY FI FR HU LY LI | |||
| LU NL ES SE UK CH DE |
4.1 Service instructions

This product is quality-tested and provided with the legally-specified warranty period of 24 months from the date of purchase. Please keep your receipt as proof of purchase. In the event of warranty claims, please contact the product dealer.

Note!
Should you experience a problem with this unit, or for queries and information, our Technical Hotline is available:
Mon. - Fri. 8:00 am - 6:00 pm on:
+49 (0) 3925 9220 1800.

Repairs can also be ordered directly online at www.technisat.de/reparatur.
If the device needs to be returned, please use the following address only:
39418 Stassfurt, Germany
5 Setting up the device
Place the device on a firm, secure and horizontal base. Make sure the area is well ventilated.

Note:
- Do not place the radio on soft surfaces such as carpets and blankets, or near to curtains and wall hangings. These could obstruct the ventilation openings. The necessary flow of air could be interrupted as a result. This could potentially lead to fire in the device.
- Do not place the device near to sources of heat, such as radiators. Avoid direct sunlight and very dusty environments.
- Do not select a location for the device with high air humidity, e.g. a kitchen or sauna, since condensation could damage the device. The device is intended for use in a dry environment and in a moderate climate and must not be exposed to dripping or splashing water.
- Please note that the device feet could leave coloured marks on some types of furniture surfaces in certain situations. Place a protective layer between your furniture and the device.
- Keep the DIGITRADIO 585 away from devices that emit intense magnetic fields.
- Do not place any heavy objects on the device.
- Route the mains cable in such a way that nobody can trip over it. Ensure that the mains cable or the power supply unit are always easily accessible, so that the device can be quickly disconnected from the power supply!
Insert the plug fully into the socket to ensure connection to the mains.
Use a suitable, easy-to-access mains connection and avoid using multiple socket strips!
In the case of malfunctions or detecting smoke or odour from the housing, remove the plug from the power outlet immediately!
Remove the plug if the device is not going to be used for a prolonged period, e.g. before going away on a long trip.
6 Description of the DIGITRADIO 585
6.1 Scope of delivery
Before start-up, please check whether everything has been delivered.
1 x DIGITRADIO 585
1 x remote control + batteries
1 x power supply unit
1 x instruction manual
6.2 Special features of the DIGITRADIO 585
The DIGITRADIO 585 is comprised of a DAB+/FM/Internet radio receiver having the following functions:
- You can store up to 12 DAB+ and 12 FM stations.
- The radio receives on the FM 87.5–108 MHz (analogue) frequencies and DAB+ 174.9–239.2 MHz (digital antenna).
- Internet radio via WLAN connection.
- Spotify Connect
- MP3 CD player
- The device has a time and date display.
- Music playback via Bluetooth connection.
- Wireless charging of external devices.
- Operation via the TechniSat CONNECT App or via Amazon Echo devices.
6.3 Preparing the DIGITRADIO 585 for operation
6.3.1 Connect and align the antenna
The number and quality of the stations to be received depend on the reception conditions at the installation location. Excellent reception can be achieved using the telescopic antenna.
Remove the telescopic antenna from its holder, align it and extend it.

The exact alignment of the telescopic antenna is often important, in particular on the outskirts of the DAB+ reception area. On the Internet you can quickly find the location of the nearest transmission tower by visiting www.dabplus.de.

Start the first scan at a window pointing in the direction of the transmission mast. If the weather conditions are poor, DAB+ reception may be limited.

Do not touch the telescopic antenna during station playback. This could reduce the reception and lead to sound dropouts.
6.3.2 Connecting the power supply unit

Ensure that the operating voltage of the power supply unit matches the mains voltage before you insert it into the wall socket.

WARNING!
Do not touch the mains plug with wet hands; electric shock hazard!

WARNING!
Route the mains cable in such a way that nobody can trip over it.
Use the supplied power cable to connect to the port marked DC-IN (21) on the back of the DIGITRADIO 585. Then connect the power cable to the mains.
6.3.3 Insert the batteries into the remote control
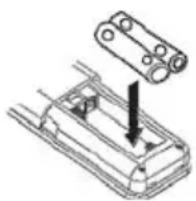
Open the battery compartment on the back of the remote control by pushing it in the direction of the arrow.
Insert the batteries (2 x AAA 1.5 V) in accordance with the polarity indicated in the battery compartment.
natural_image
Technical line drawing of a mechanical assembly with a cylindrical component and a base plate (no text or symbols)Close the battery compartment lid carefully again to ensure that the lid retaining tabs engage in the housing.

To operate the remote control, you will need 2 x alkaline batteries (type Micro, 1.5 V, LR03/AAA). Ensure that the polarity is correct when inserting.
- Promptly change batteries that are losing power.
- Leaking batteries can cause damage to the remote control.
- If the device is not being used for a prolonged period, remove the batteries from the remote control.
- Important information concerning disposal: batteries can contain toxic substances which harm the environment. Therefore, it is imperative to dispose of the batteries according to the legal provisions in force. Never dispose of batteries in normal household waste.
6.4 General device functionality
Settings and functions can be carried out both using the buttons on the device and with the remote control. The description of the operation in this instruction manual refers to the buttons on the remote control.
6.4.1 Switching on the device
You can use the VOLUME/ knob (2) on the device or On/Standby (1) on the remote control to switch the device on or back to standby.

After switching on for the first time, you can launch the set-up wizard (Section 17.7). Here you can set the date and time either via DAB/FM, Internet or no update (manual). The device will then attempt to establish a connection to a WLAN network. To do so, select the corresponding WiFi network and, if required, enter the WiFi password with the remote control.
6.4.2 Switching off the device
You can use the VOLUME/ knob (2) on the device or On/Standby (1) on the remote control to switch the device on or back to standby. The date and time are shown in the display.
6.4.3 Operating the device with the remote control
With the infrared remote control you can operate the most important device functions from the comfort of your armchair. When operating the device with the remote control, please take into account the following points:
Point the remote control at the front of the device.
Visual contact between the transmitter and the receiver must be guaranteed.
If the range of the remote control reduces, replace the batteries by new ones.

The maximum range is approximately 5 metres from the front of the device.
6.4.4 Adjusting the volume
Use the Volume +/- (15) buttons on the remote control or VOLUME (2) on the device to set the volume. The set volume is shown in the display.
6.4.5 Activating the mute function
You can switch off the volume at the touch of a button using the MUTE button (13).

This mode is indicated in the status bar by a corresponding icon.
The sound is switched back on by pressing the MUTE button again.
6.4.6 Retrieving displays
By repeatedly pressing the INFO (16) button during playback from a source, the following information can be viewed and scrolled through:
Internet radio: Play music (UPnP media):
Track, artist Artist
Description Album
Genre Bit rate, sound format
Reliability Playback buffer
Bit rate, sound format Date
Playback buffer
Date
DAB mode:
DLS: continuous text with additional information which the stations may provide
Programme type
Ensemble/multiplex (group name) frequency, channel
Signal intensity
Signal error rate bit rate in kbps sound format
Date
Station name
FM mode:
RT radio text (if transmitted) PTY - programme type
Frequency, date
USB playback:
Track, artist, album, path, playback buffer bit and sampling rate, playback buffer, Date, running time
6.4.7 Visual displays
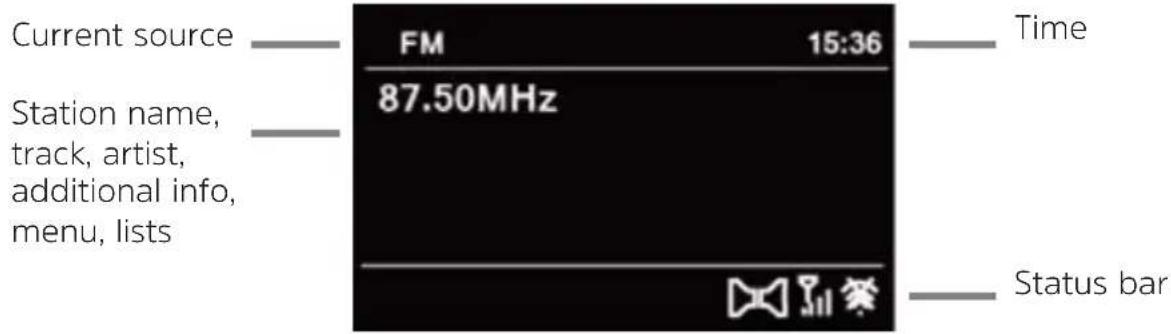

Depending on the selected function/source, the visual display shown may vary. Take note of the instructions on the display.
7 Menu operation
Menu navigation primarily takes place using the MENU, ◀/▶/▲/▼ and OK buttons on the remote control.
The menu is divided into the respective submenu for the currently selected source and the main menu. To navigate in submenus, either press the OK button or alternatively the ▶ button.
* highlights the current selection.
You can go back one step by pressing the BACK or ◀ button.

Close menu: press BACK or MENU multiple times or wait for approx. 15 seconds.
7.1 Main menu
The main menu takes you to all the functions and settings for the DIGITRADIO 585.
Press the MENU button to access the main menu.

If you are currently in a playback source, you can use the MENU button to access the submenu for this source. To reach the main menu while in the open submenu, use the ▲ or ▼> Main Menu buttons to select the Main menu item and press OK.
7.2 Source selection
Press the MODE button as often as required until the desired source is shown in the display.
Alternatively:
Press the MENU button.

If you are in a submenu, select the main menu as described in Section 7.1.
Using the ▲ or ▼ buttons, select the desired source and confirm your selection with OK.
8 Internet radio
The DIGITRADIO 585 is equipped with an Internet radio receiver.
In order to receive Internet radio stations/channels, you need a WiFi router with Internet access.
Press the MODE button as often as required until [Internet Radio] is shown in the display.
Alternatively:
Press the MENU button and then select [Main menu > Internet radio].

If you are in a submenu, select the main menu as described in Section 7.1.

If you are starting Internet radio for the first time without having configured a WiFi connection, the search wizard appears which shows you all the WiFi networks within range. Use the ▲/▼ and OK button to select the WiFi network you recognise and enter the password using the displayed keyboard. Then select OK and press the OK button. If the password entered is
correct a connection to the network is now established. The signal bar in the status bar of the display indicates whether the connection has been established.

To cancel the entry, select GANGESS the OK button. If you make a typing error you can delete the last letter entered using BKSP
8.1 Last listened to
Select [MENU > Last listened to], to display a list with the last stations listened to.
Select a station using the ▲ or ▼ buttons and play it by pressing OK.
8.2 Station list
Press the MENU button and select the Station list item.

Under Station list, all Internet radio stations are displayed separated into different categories. Moreover, you also have access to your favourites here.
Based on a category/country/genre, select a station and press the OK button.

To add a station to the My favourites list, keep the OK button pressed during playback until "Favourite added" appears. Or you can hold down one of the number buttons 1 - 12 to save a station to it.

To obtain additional information on the station currently being played, press the INFO button (Section 6.4.6).

To add your own stations or favourites, please register them on the website: http://nuvola.link/sr. To do so, you need an access code that you can request in the DIGITRADIO 585 under [Internet Radio > MENU > Station list> Help].
9 Spotify Connect
Use your smartphone, tablet or computer as a remote control for Spotify. You can find out more by going to www.spotify.com/connect.

The Spotify software is subject to third-party licences that you can find here: http://www.spotify.com/connect/third-party-licenses
10 Playing music (UPnP & USB media)
You have the option of playing music media stored on a UPnP server or on a connected USB mass storage device via the DIGITRADIO 585. To do this, firstly a connection to the WLAN network is required and, secondly, the USB medium must be attached to the USB port.
Please observe the instructions in Section 17.2 for setting up a LAN/WiFi connection.

The UPnP media server must be located on the same network as the DIGITRADIO 585.
Press the MODE button as often as required until [Play music] is shown in the display.
Alternatively:
Press the MENU button and then select [Main menu> Play music].

If you are in a submenu, select the main menu as described in Section 7.1.

If you are starting Internet radio for the first time without having configured a WiFi connection, the search wizard appears which shows you all the WiFi networks within range. Use the ▲/▼ and OK button to select the WiFi network you recognise and enter the password using the displayed keyboard.
Then select OK press the OK button. If the password entered is correct a connection to the network is now established. The signal bar in the status bar of the display indicates whether the connection has been established.

To cancel the entry, select GANGLESS the OK button. If you make a typing error you can delete the last letter entered using BKSP
10.1 Playing media
Select [Shared media] followed by the server on which your music is located.

The folder structure display depends on the folder structure on your media server.

Select Playback list to play located lists on your media server.

The menu has random play and repeat play options. A corresponding symbol appears in the status bar.
Select [Play USB] to play music tracks from a USB data medium.
10.2 Providing music via the Windows media player
As an alternative to a UPnP server, it is also possible for you to play music using Windows Media Player, version 10 or above. To do so, music sharing must be set up in Windows Media Player.
Ensure that the Windows PC and the DIGITRADIO 585 are located in the same network and switched on.
Start the Media Player and enable media streaming sharing.
If required, select the DIGITRADIO 585 in the following device overview and select Allow.

The procedure may vary depending on the Windows/Media Player version.
11 DAB+ (digital radio) function
11.1 What is DAB+?
DAB+ is a new digital format through which crystal clear sound with no noise can be heard. In contrast to conventional analogue radio stations, DAB+ can be used to broadcast multiple stations on one and the same frequency. This is referred to as an ensemble or multiplex.
An ensemble is comprised of the radio station, as well as several service components or data services which are broadcast individually by the radio stations.
For further information, please visit e.g. www.dabplus.de or www.dabplus.ch.
11.2 DAB radio reception
Press the MODE button as often as required until [DAB Radio] appears in the display.
Alternatively:
Press the MENU button and then select [Main menu > DAB].

If you are in a submenu, select the main menu as described in Section 7.1.

If DAB is being started for the first time, a complete station scan is performed. The station list is then shown (see Section 11.4).
11.3 Performing a station scan
The automatic scan scans all DAB+ band III channels and thereby finds all stations being broadcast within the reception area.

After the scan is complete, the first station is played back in alphanumeric order.
In order to perform a complete scan, press the SCAN button. "Scan" appears in the display. The scan starts and the progress bar appears in the display.
When completed, press ▲ or ▼ and OK to select a station.
Alternatively: press the MENU button and select using ▲ or ▼[Scan]. Confirm by pressing OK.

If no stations are found, check the antenna and change the installation location if required (section6.3.1).
11.3.1 Manual scan
Proceed as follows if you want to run a station scan manually:
Select [Menu > Set Manually] and press the OK button.
Select a station frequency and press the OK button.

If stations are being broadcast on the selected frequency, this will be indicated on the stability bar (see also Section 11.8). If these stations are not currently included in your station list, they will now be stored there.
11.4 Selecting stations
You can check the stations found on the device. To do so press ▲ or ▼.
To select a station press OK.Alternatively, you can press the MENU button and use ▲ or ▼ to select > [Station list].
11.5 Saving DAB stations
The favourites memory can store up to 12 stations.
The saved stations remain stored even in the event of a power cut.
Setting the desired stations.
Press one of the number buttons 1 - 12 and hold it down. [Saved] appears in the display.
Repeat the process to save other stations.
Alternatively:
Press and hold the PRESET button on the device, use the SCROLL&SELECT knob to select a Favourites storage slot and then press the SCROLL&SELECT knob.
11.6 Selecting the programmed stations
Press the desired number button 1-12. If no station is saved in the selected programme slot, [Memory slot empty] appears.
Alternatively:
Press and hold the PRESET button on the device, use the SCROLL&SELECT knob to select a Favourites storage slot and then press the SCROLL&SELECT knob.
11.7 Deleting a saved memory slot
Save a new station to the respective programme slot.
11.8 Signal intensity
Press the INFO button as often as required until the signal intensity is shown.
The bar modulation shows the current level.
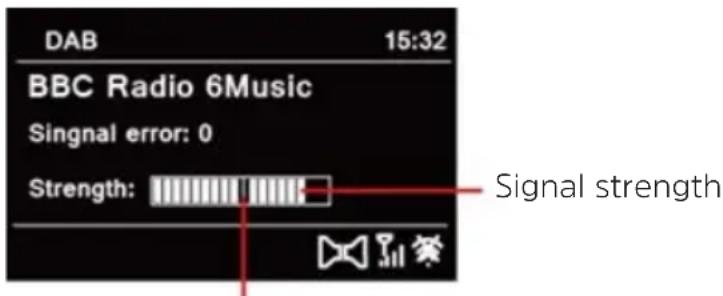
Minimum signal strength

Stations with a signal intensity below the required minimum signal intensity are not transmitting a strong enough signal. If required, align the antenna as described in section 6.3.1.

By pressing the INFO button several times, different information can be scrolled through, such as station type, multiplex name, frequency, signal error rate, data bit rate, station format, date.
11.9 Dynamic Label Plus
If supported by the programme provider, the Dynamic Label Plus service also allows, for example, the name of the current programme or the track and artist to be displayed.
11.10 Setting DRC
The compression rate balances dynamic vibrations and thereby any volume variations that occur.
Press the MENU button and select > [Volume Adjustment] to select the desired compression rate.
With the compression rate choose:
DRC high - High compression
DRC low - Low compression
DRC off - Compression switched off
Confirm by pressing OK.
11.11 Deleting inactive stations
Press the MENU button and use ▲ or ▼ to select > [Delete inactive stations].
Confirm by pressing OK.
Using ▲ or ▼, select > [Yes] and confirm by pressing OK.
11.12 Sorting the stations
Press the MENU button and then ▲ or to select ▼> [Station order].
Select a sorting type with ▲ or ▼ and confirm your selection with OK.

You can choose between: Alphanumeric, Provider and Valid.
12 FM mode
12.1 Switching on the radio mode
Press the MODE button as often as required until [FM Radio] is shown in the display.
Alternatively:
Press the MENU button and select [Main Menu > FM]. If you are in a submenu, select the main menu as described in Section 7.1.

When switching on for the first time, the frequency 87.5 MHz is set.

If you have already set or saved a station, the radio plays the last station set.

In the case of RDS stations, the station name appears.
Adjust the antenna to improve reception.
12.2 FM reception with RDS information
RDS is a procedure for broadcasting additional information via FM stations. Broadcasters with RDS might, for example, broadcast their station name or the programme type. This is shown in the display.
The device can show the following RDS information:
RT (Radio text),
PS (Station name),
PTY (Programme type).
12.3 Manual station selection
Press ▲ or ▼ in FM mode to set the desired station. The display shows the frequency in steps of 0.05 MHz.
12.4 Automatic station selection
Press SCAN to start the automatic scan. The station frequency runs upwards in the display.
or
In FM mode, hold down ▲ or ▼ for approx. 2 seconds to automatically search for the next station with a strong enough signal.

If an FM station with sufficient signal intensity is found, the scan stops and the

station is played. If an RDS station is being received, the station name appears and, possibly, radio text.

Please use manual station selection for setting weaker stations.

Under Menu > Scan settings you can set whether the scan only finds strong stations (Strong stations only). To do so press the MENU button and > Scan settings > [Yes]. Confirm the selection with OK.
12.5 Setting mono/stereo
Press the MENU button and use ▲ or ▼ to select > Audio setting.
Select [YES] for playback in mono sound only in the event of weak FM reception.
Confirm by pressing OK.
12.6 Saving FM stations
The favourites memory can store up to 12 stations.
The saved stations remain stored even in the event of a power cut.
Setting the desired stations.
Press one of the number buttons 1 - 12 and hold it down. [Saved] appears in the display.
Repeat the process to save other stations.
Alternatively:
Press and hold the PRESET button on the device, use the SCROLL&SELECT knob to select a Favourites storage slot and then press the SCROLL&SELECT knob.
12.7 Selecting the programmed stations
Press the desired number button 1-12. If no station is saved in the selected programme slot, [Memory slot empty] appears.
Alternatively:
Press and hold the PRESET button on the device, use the SCROLL&SELECT knob to select a Favourites storage slot and then press the SCROLL&SELECT knob.
12.8 Deleting a saved memory slot
Save a new station to the respective programme slot.
13 Bluetooth
13.1 Activating the Bluetooth mode
Press the MODE button as often as required, until [Bluetooth] appears in the display.
Alternatively:
Press the MENU button and then select [Main Menu > Bluetooth].

If you are in a submenu, select the main menu as described in Section 7.1.

In the status bar in the display, a flashing [BT] indicates the pairing mode.

If the DIGITRADIO 585 has already been paired with another device which is within range, the connection is automatically established.
13.2 Pairing
Activate Bluetooth on your music player, e.g. a smartphone or tablet.

If you activate Bluetooth on your music player, please consult the corresponding instruction manual for the device which you wish to pair with the DIGITRADIO 585.

Please note that only 1 device can be connected to the DIGITRADIO 585 at any time.

Ensure that you do not exceed the maximum Bluetooth range of 10 metres to guarantee excellent playback quality.
Select the list of Bluetooth devices found on your music player.
In the list, search for the item DIGITRADIO 585 and select it. If the selection requires a PIN, enter 0000 (4 x zero).
If the pairing has completed successfully, the [BT] symbol in the DIGITRADIO display stops flashing.
13.3 Playing music
Select a music track on your music player and play it.
The sound is now played via the DIGITRADIO 585.

You can use the Play buttons on the DIGITRADIO remote control to control the playback on your music player (only with compatible devices).

Ensure that the volume on your music player is not set too low.
14 Audio/Playing MP3 CDs
14.1 General information on CDs/MP3 CDs
The device is designed for music CDs that are played with audio data (CD-DA or MP3 for CD-R and CD-RW). MP3 formats must be created with ISO 9660 Level 1 or Level 2. Multi-session CDs cannot be read.
In MP3 mode, the terms "Folder" = Album and "Track" are critical. "Album" corresponds to the folder on the PC, "track" to the PC file or a CD-DA track.
The device sorts the albums or the tracks of an album into alphabetical order by name. If you prefer a different order, change the name of the track or album and place a number in front of the name.
When burning a CD-R and CD-RW with audio data, various problems can arise which could occasionally compromise smooth playback. This is caused by faulty software and hardware settings or the blank disc being used. Should such errors arise, you should contact your CD burner/burner software manufacturer or search for the relevant information, e.g. on the Internet.

If you create audio CDs, observe the legal requirements and do not breach third-party copyrights.

The device can play CDs with MP3 data (.mp3, .wma) and normal audio CDs (.wav). Do not use any other extensions such as *.doc, *.txt, *.pdf, etc. if audio files are being converted to MP3.

Given the variety of different encoder software, it cannot be guaranteed that every MP3 file can be played without a problem.

In the event of tracks/files being faulty, playback will continue with the next track/file.

When burning the CD, it is worth doing so at low speed and creating the CD as a single session and finalised.
14.2 The discs you can use
The CD player is compatible with CD, CD-R/RW and MP3 CD media. You can only play discs with a disc size of 12 cm and a playing time of 74 min. on this device.

If you transport the device, remove the discs from the drive. This prevents damage to the CD player and the disc.

The playback quality with MP3 CDs depends on the bit rate setting and the burning software used.
14.3 Playing CDs
Switch to CD player mode by pressing the MODE button.
[CD] is shown in the display.
Insert the CD with the labelled side facing upwards. Ensure that the CD is not positioned at an angle. The CD is automatically drawn in by the device.
The data on the CD is scanned. [Reading] appears in the display. Playback then begins with the first track (audio CD) or the first track in the first folder (MP3 CD).

Do not perform any operation until the CD content has been completely read, to ensure that all the required information on the CD has been read. With MP3 CDs in particular, this process can take some time.

To insert/remove the CD, please hold it by the edge.
By pressing the Play/Pause ▶ button, you can pause playback (the playing time appears in the display), or continue playback by pressing it again.
Use the Stop button to stop playback. The total number of tracks appears in the display.

Always stop the playback prior to removing the CD.
14.4 Setting the track
Use the Previous Track or Next Track buttons to skip to the next or previous track.
The display shows the respective folder ([F]) and track ([T]) number.
14.5 Quick search
While the track is playing, you can perform a quick search forwards or backwards to find a specific section.
Hold down the Previous Track or Next Track buttons to quickly skip forward or back within a track for as long as the button is held down.
14.6 Repeat function
You can select whether a track, the entire folder/album (only for MP3 CDs) or all of the tracks on the CD are to be repeated.
Press the Repeat button multiple times. The selected mode appears in the display using an icon (Repeat Track, Repeat Album, Repeat All, Shuffle).
To switch the function off again, press the Repeat track button as often as required until the icon no longer appears.
15 Audio input
You can play sound on an external device via the DIGITRADIO 585 speaker.
Connect the external device to the AUX IN port (23, 3.5 mm jack) on the rear of the device.
Use the MODE button to select the audio input. [Aux In] appears in the display.

The playback is controlled on the external device. Do not set the volume too low to prevent distortion.
16 Other functions
16.1 Sleep function
Press the MENU button and then select [Main Menu > Sleep].

If you are in a submenu, select the main menu as described in Section 7.1.
You can use the ▲ or ▼ buttons to set the period for Sleep off in 15, 30, 45 or 60 minute intervals, after which the device switches to standby while in any operating mode.
Alternatively:
Press the SLEEP button several times.

A clock symbol appears in the status bar of the display with the time remaining until the DIGITRADIO 585 switches to standby.
16.2 Alarm
Press the MENU button and then select [Main Menu > Alarm].

If you are in a submenu, select the main menu as described in Section 7.1.
Alternatively:
Press the Alarm 1 or Alarm 2 button to jump straight to alarm configuration.
16.2.1 Setting the alarm time

The alarm function cannot be operated until the correct time has been set. Depending on the set-up, this either occurs automatically or has to be set manually. The time can either be updated manually, via DAB / FM or via the Internet. See Section 17.3 for further information.
Select an alarm time memory (Alarm 1 or Alarm 2) using the ▲ or ▼ buttons and confirm with OK.
Alternatively:
Press the Alarm 1 or Alarm 2 button to jump straight to alarm configuration.
Go through all the points one after the other. Confirm each entry with the OK button.
Repeat
Here you can select from Daily (every day of the week), Once, Weekdays (Mon - Fri) or Weekends (Sat and Sun). Press the OK button to apply the setting.
Time
Here you can enter the alarm time and date (if required).
First use the ▲/▼ buttons to select the hours and press the OK button to accept this. Then you input the minutes. Accept this by pressing the OK button.

If Repeat> [Once] has been selected, you must also enter the date as well as the time.
Mode
You then enter the source. The available options are BUZZER, Internet Radio, DAB or FM. Press the OK button to accept the setting.
Programme
If you have selected Internet Radio, DAB or FM, you can then enter whether or not you want to be woken up by the last station listened to or by one from your Favourites list.
Volume
Use the ▲/▼ buttons to select the volume with which you wish to be woken up.
Save
Press the OK button to save the alarm.

The alarm is active as soon as you have set the alarm repeat to Daily, Once, Weekend, or Workdays. The status bar shows an alarm symbol with the corresponding number of the active alarm.
16.2.2 Switching off the alarm after being woken
Push the On/Standby button to switch the alarm off.
Press the SNOOZE button to switch on the snooze function. By repeatedly pressing SNOOZE you can also select the length of the pause from 5, 10, 15 or 30 minutes.

The alarm symbol appears in the display again if the alarm repeat is set to Daily, Weekend or Workdays.
16.2.3 Switching off the alarm
Select the corresponding alarm under > Repeat: Off.
17 System settings
All settings explained in this section apply equally to all sources.
Open the menu and use the ▲/▼ buttons to select [Main Menu > System Settings]. Press the OK button to open the system settings.

If you are in a submenu, select the main menu as described in Section 7.1.
17.1 Equaliser
Press the MENU button and then select [Main Menu > System Settings > Equaliser].
Here you can carry out different equaliser settings to adapt the sound to your taste. You can choose from:
Normal, Jazz, Rock, Soundtrack, Classic, Pop, News, and My EQ.
Use the ▲/▼ buttons to select the equaliser setting and press the OK button to accept the setting.
17.1.1 My EQ setting
In the menu select [System Settings > Equaliser > My EQ settings].
Select [Bass] to increase/decrease the bass or [Treble] to increase/decrease the treble.
Change the value with the ▲ or ▼ buttons and press OK.
This preset can be retrieved at any time in My EQ.
17.2 Internet settings
Press the MENU button and then select [Main Menu > System Settings > Internet Settings].

If you are in a submenu, select the main menu as described in Section 7.1. This menu you will find some settings and information on Internet connection.
Select Network wizard to establish a WiFi connection.

The network wizard shows you all the WiFi stations within range. Use the ▲/▼ and OK button to select the WiFi network you recognise and enter the password using the displayed keyboard. Then select ▲/▼ press the OK button. If the password entered is correct a connection to the network is
now established. The signal bar 📋 the status bar of the display indicates whether the connection has been established.

To cancel the entry, select GANGESS the OK button. If you make a typing error you can delete the last letter entered using BKSP
17.2.1 WPS connection
Select WPS set-up if your router has the WPS function. This establishes a direct connection to the router without having to enter the WiFi password.

If you activate WPS on your router, please observe its instruction manual.
Start WPS on your router by pressing the corresponding button.
On the DIGITRADIO 585, select [Press Button]. Take note of the instructions on the display.
If your router supports the WPS PIN, select PIN on the DIGITRADIO 585 and take note of the PIN shown in the display. This PIN must then be entered on the router.

To find out more on the current connection select Settings.

Select Manual setting, if you know your network parameters and would like to configure them manually. Take note of the instructions on the display.

Select Delete network profile, to delete connections no longer required.

Select Allow WiFi connection in standby mode if the WiFi connection should be retained in standby mode as well. This setting increases power consumption but enables App control via the TechniSat CONNECT App.
17.3 Time settings
Press the MENU button and then select [Main Menu > System Settings > Time and Date].

If you are in a submenu, select the main menu as described in Section 7.1.
Select [Time/date setting] to set the time and date manually. Use the ◀ or ▶ buttons to select a value. Change it using the ▲ or ▼ buttons.
Confirm by pressing OK.
Select [Time Updates] to determine whether time updates should be automatic via DAB, FM or the Internet, or whether you would like to enter it manually.
To do so, select [DAB update], [FM update], [NET update] or [No update].
Under the [Set format] option you can activate 12 or 24 hour format. Confirm your selection with the OK button.
Under [Set time zone], select the current time zone in your location.
Under [Summertime] you specify whether summertime should currently be active.
17.4 Language
Press the MENU button and then select [Main Menu > System Settings > Language].
i If you are in a submenu, select the main menu as described in Section 7.1.
Using ▲ or ▼, select the language and confirm the selection by pressing OK.
17.5 Factory settings
If you change the location of the device, e.g. when moving house, it is possible that the saved stations can no longer be received. In this case you can reset the device to factory settings to delete all the saved stations and then launch a new scan.
Press the MENU button and then select [Main Menu > System Settings > Factory Settings].
i If you are in a submenu, select the main menu as described in Section 7.1.
Confirm by pressing OK.
Use ◀ or ▶ to select Yes and confirm the confirmation prompt by pressing OK.
All previously stored stations and settings will now be deleted. After resetting, you can start or skip the set-up wizard (Section 17.7).
17.6 Software update
From time to time software updates may be provided which may contain improvements or bug fixes. This keeps the DIGITRADIO 585 permanently up-to-date.
Press the MENU button and then select [Main Menu > System Settings > Software Update].
i If you are in a submenu, select the main menu as described in Section 7.1.
Select [Auto Update] if the DIGITRADIO 585 should search for new software versions periodically.
Select [Check now] if you want to check immediately whether a new software version is available.
i If a software update has been located, follow the instructions on the display.
In order to find software updates and upload them, the DIGITRADIO 585 must be connected to the Internet. Do not switch the DIGITRADIO 585 off during the update process!
17.7 Set-up wizard
Press the MENU button and then select [Main Menu > System Settings > Set-up Wizard].
i If you are in a submenu, select the main menu as described in Section 7.1.
When switching on for the first time, the set-up wizard starts automatically.
As soon as [Run now] is shown on the display, select [YES].
If you select [No], the wizard closes and you need to perform the required settings manually.
You will be taken through the settings in various steps.
Under [Time format], select the desired display format for the time display (Section 17.3).
During the next step you must select via which source the time is to be synchronised (for more information refer to Section 17.3).
If you have selected [Update from the Net], you must then enter the time zone and summer-/wintertime.
Depending on the time and date settings, some of the network settings are now performed.
Select whether the WiFi connection should remain active in standby mode as well. Press the OK button.
Ensure that the device is within the reception range of the desired WiFi network and that you have the access data. In some cases it may be necessary to carry out some settings on the router. In this case, please refer to the corresponding instruction manual.

After a search for available wireless networks you are shown the result.
Select the wireless network you want and confirm the selection with OK. Select [Skip WPS] to enter the password.

If it is a protected network you will be asked to enter the corresponding access key.
To do this, mark the respective character.
Enter the selected character by pressing the OK button.

Proceed in this way until the complete access key can be seen in the input field.

To cancel the entry, select GANGESS the OK button. If you make a typing error you can delete the last letter entered using BKSP
Then select and OK the OK button. If the password entered is correct a connection to the network is now established.
If [Set-up wizard completed] appears in the display, press the OK button.
17.8 Info
Press the MENU button and then select [Main Menu > System Settings > Info].

If you are in a submenu, select the main menu as described in Section 7.1.
Confirm by pressing OK.
The software version is shown.
You return to the menu by pressing the MENU button.
17.9 Display backlight
It is possible to set the display brightness both for operation and standby.
Press the MENU button and then select [Main Menu > System Settings > Backlight].

If you are in a submenu, select the main menu as described in Section 7.1.
Select [Operation] or [Standby] to apply the setting for operating mode or standby mode.
You can now set the brightness in three steps from High to Medium to Low and Off (only in standby mode).
Confirm the selection with OK.
You return to the menu by pressing the MENU button.
17.10 Data protection notice
Press the MENU button and then select [Main Menu > System Settings > Data Protection].
i If you are in a submenu, select the main menu as described in Section 7.1.
Here you will find a link to the current data protection information relating to your device.
You return to the menu by pressing the MENU button.
18 Charging function for external devices
The DIGITRADIO 585 has a wired and wireless (to Qi standard) charging function for external devices such as mobile phones and smartphones.

Warning: Do not use both variants at the same time. This can cause damage to your devices.
18.1 Wired charging of external devices
Use the original charging cable (USB) for your external device and insert the USB plug into the USB port (24) on the rear of the DIGITRADIO 585.
The external device can be charged at a maximum of 5 V and 1 A.
18.2 Wireless charging of external devices
If your external device has a wireless charging function (wireless charging to Qi standard), you can place it on the charging mat on the top of the DIGITRADIO 585. The display of your external device must be facing upwards when doing so. If correctly orientated, the charging process will begin automatically. Please refer to the instruction manual for your external device for more information on wireless battery charging.
19 Control via Amazon Alexa
You can control the DIGITRADIO 585 conveniently via an Amazon Echo device using the Alexa voice assistant. Several basic requirements are needed for this.
- The DIGITRADIO 585 must be connected to the Internet.
- You need an Amazon Alexa compatible device, such as Amazon Echo, which has a registered Amazon account and is also connected to the Internet.
-
The DIGITRADIO 585 and Amazon Echo device must be located on the same network.
-
You need to set up the UNDOK App from your smartphone manufacturer's App store.
-
You need a Frontier Nuvola account and the Nuvola skill for Alexa.
19.1 Setting up the Nuvola account
Download and install the UNDOK App from your smartphone manufacturer's App store.
Once you have opened the UNDOK App, the audio systems overview appears with all the devices on your network.

In order for the Alexa voice controller to clearly identify and control the DIGITRADIO 585, you should assign a unique name to the radio in advance (e.g.: kitchen, living room, etc.. Note that letters such as Y, those with accents, or numbers can lead to misinterpretation). To do this, select the DIGITRADIO 585 by tapping on it in the audio device overview. Then tap on the cog icon at upper right and then on the Rename field.
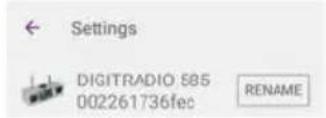
-
In the audio systems overview, tap on the cog icon.
-
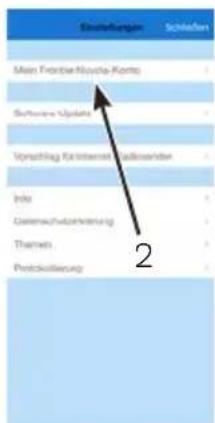
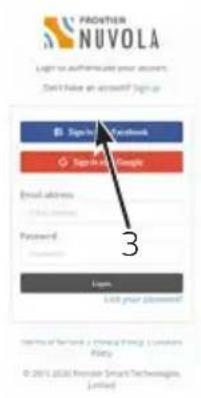
Tap on My Frontier Nuvola account.
-
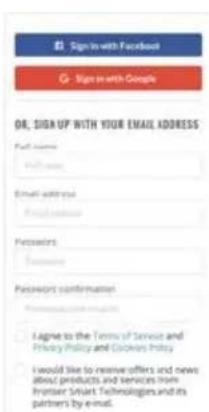
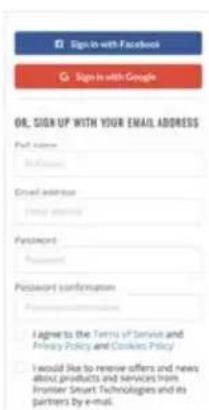
To create a new account, tap on Register.
-
Enter your name, email address and password for the new account. This data will be required again later for the Nuvola skill.
-
Tap on Register to set up the account.
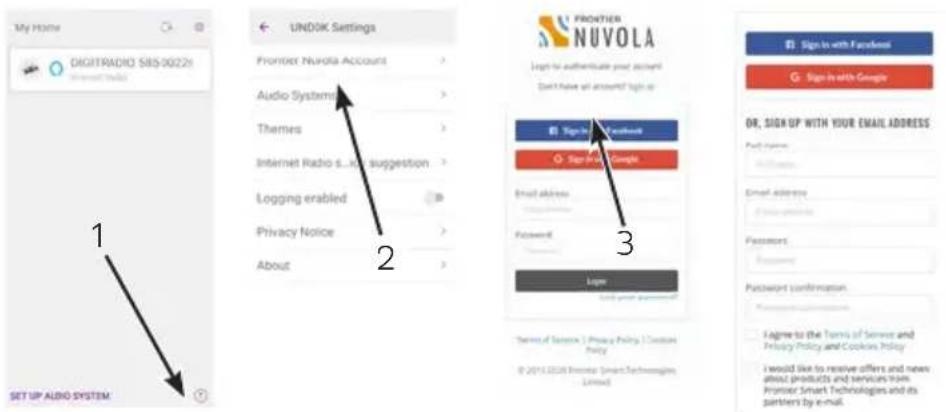

Once you have set up the account, you will receive an email with a confirmation link. Tap on the link in the email to activate the account.
After the account has been successfully set up, you can now link the DIGITRADIO 585 to the Nuvola account.
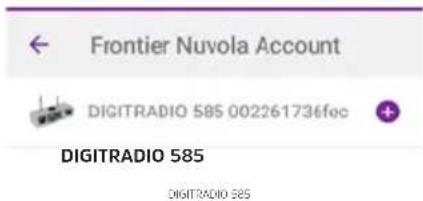
Tap on Add Device.
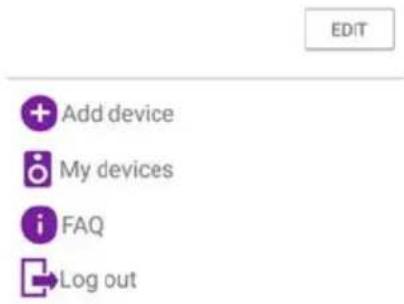
Then tap on the DIGITRADIO 585 to allocate it to your Nuvola account.

The DIGITRADIO 585 now appears under My Devices.
19.2 Activating and linking Nuvola skill
After the DIGITRADIO 585 has been linked to your Nuvola account, the Nuvola Alexa skill must now be installed and also linked to your Nuvola account.
Open the Alexa App on your smartphone.
Open the sidebar and tap on Skills and Games.Open Search and search for "Nuvola".
Tap on the Nuvola skill and then on the ACTIVATE FOR USE field.
You are now forwarded to Nuvola account linking. Enter the access data for your Nuvola account and then tap on REGISTER.
Once the skill has been linked, Alexa should automatically find a new Smart Home device and a corresponding message will appear in the App. If not, tap on Add Device in the sidebar in the Alexa App. Then tap on Other and SEARCH FOR DEVICES.

If you are operating multiple Smart Home devices via the Alexa App, you can allocate the DIGITRADIO 585 to a room.
19.3 Alexa control commands
Here is a list of possible Alexa voice control commands.
Alexa, play
Alexa, play
Alexa lower the volume in the kitchen.
Alexa, increase the volume in the kitchen.
Alexa, set the volume in the kitchen to 5 (warning: the volume on the device can be adjusted to 32 levels, but only 10 via Alexa).
Alexa, switch
Alexa, play the next/previous song/track on
Alexa, Stop/Pause

20 Cleaning

To prevent the risk of electric shock, you must not clean the device using a wet cloth or under running water. Remove the mains plug prior to cleaning!

You must not use scouring pads, scouring powder and solvents such as alcohol or petrol.

Do not use any of the following substances: salt water, insecticides, chlorine or acid-based solvents (ammonium chloride), scouring powder.

Clean the housing using a soft, damp cloth. Do not use solvents, spirit, thinners, etc.; you could damage the surface of the device.

Only clean the display with a soft, cotton cloth. If required, use a cotton cloth with small amounts of non-alkaline, diluted, water or alcohol-based soap solution.

Use the cotton cloth to gently rub the surface until it is completely dry.
21 Troubleshooting
If the device does not operate as intended, check the following table for information.
| Symptom Possible cause/remedy | |
| The device cannot be switched on. | The device is not being supplied with power. Connect the power supply unit correctly to the socket and to the device. |
| No sound can be heard. Increase the volume. | |
| The display does not switch on. Disconnect the device from the power supply and then reconnect it. | |
| Poor reception via DAB+/FM. Change the position of the antenna or the DIGITRADIO 585. | |
| The device cannot be operated. Disconnect the device from the power supply and then reconnect it. | |
| External device is not charging via wireless charging | Change the position of the charging mat until the charging process begins. |
| Bad Bluetooth connection and dropouts | Do not exceed the maximum range for Bluetooth of 10m. |
If the malfunction has not been resolved, even after performing the checks described, please contact the Technical Hotline.
22 Technical specifications / manufacturer's instructions
Subject to technical changes and errors.
| Operating types Internet, DAB/DAB+, FM, E | Bluetooth, CD, USB, Spotify. |
| Power supply DC: 12 V, 3 A via supplied external power cable | |
| Frequencies FM: 87.5-108 MHz | DAB/DAB+: Band III 174-240 MHzBluetooth: 2.402 - 2.480 GHzWiFi: 2.412 - 2.472 GHz, 5.150 - 5.725 GHz |
| Transmission capacity Bluetooth: 4 dBm | WLAN: 16 dBm |
| Power consumption Operating max.: 36 W | Standby: < 1 WStandby with network connection: < 2 WAutostandby after 15 minutes without playing/use |
| Audio output performance 2 x 10 W RMS | |
| Ambient conditions Operating: 0 °C ~ 40 °C | Relative humidity: 5% ~ 80 %Storage: -10 °C ~ 50 °CHumidity: < 95 % |
| Dimensions (W x H x D) 240 mm x 148 mm | x 220 mm |
Technical data for supplied power cable
| Manufacturer TechniSat Digital GmbH, Julius-Saxler-Strasse 3, D-54550 Daun, Germany | |
| Model number SW1203000-I02 | |
| Input voltage AC 100 - 240 V | |
| Input AC frequency 50/60 Hz | |
| Output voltage DC 12.0 V | |
| Output current 3.0 A | |
| Output capacity 36.0 W | |
| Average efficiency during operation | 88.3 % |
| Efficiency under low load (10 %) | 86.9 % |
| Power consumption under zero load | 0.07 W |
Mode d'emploi
DIGITRADIO 585
1 MUTE 11 PRESET
5 MODE 15 Lecture/Pause
6 SLEEP 16 Scroll&Select/Snooze
7 INFO 17 Arrêt
8 MENU 18 Éjecter le CD/Eject
9 Spotify Connect....99
11.9 Dynamic Label Plus....103
The Spotify Software is subject to third party licenses found here: https://www.spotify.com/connect/third-party-licenses.

11.9 Dynamic Label Plus

9 Spotify Connect ....139
10 Riprodurre musica (media UPnP e USB)....139
11.9 Dynamic Label Plus....143
11.10 Impostare DRC 143
natural_image
Mechanical assembly diagram showing a component being inserted into a housing (no text or symbols visible)11.9 Dynamic Label Plus

6 SLEEP 16 Scroll&Select/Snooze
7 INFORMATIE 17 Stop
9 Spotify Connect....179
11.9 Dynamic Label Plus....183
11.10 DRC instellen....183
The Spotify Software is subject to third party licenses found here: https://www.spotify.com/connect/third-party-licenses.

11.9 Dynamic Label Plus

1 MUTE (tavs) 11 PRESET
6 SLEEP (sove) 16 Scroll|Select/Snooze
7 INFO 17 Stop
9 Spotify Connect 219
10 Afspil musik (UPnP & USB medier)......219
10.1 Afspil medier....220
10.2 Gør musik klar over Windows Media-Player 220
11.5 Gem DAB-station....222
11.9 Dynamic Label Plus....223
11.10 Indstil DRC 223
11.11 Slet inaktive stationer....223
16.2.3 Sluk for alarm....230
17 Systemmindstillinger 231
17.1 Equalizer....231
17.1.1 Egen EQ-indstilling 231
natural_image
Technical line drawing of a mechanical assembly with a cylindrical component and a downward arrow indicating motion (no text or symbols)11.9 Dynamic Label Plus
16.2.3 Sluk for alarm
Vælg den passende alarm i menuen gentagelse > Gentagelse: off.
17 Systemindstillinger

11.9 Dynamic Label Plus....263
11.9 Dynamic Label Plus

6 SLEEP 16 Scroll & Select / Snooze
7 INFO 17 Stop
8 MENU 18 Vysunutie CD / Eject
9 Displej 19 Reproduktor
10 Priečinok na CD
9 Spotify Connect 299
10 Prehrávanie hudby (UPnP a USB médiá)....299
11.9 Dynamic Label Plus....303
11.10 Nastavenie DRC 303
natural_image
Technical line drawing of a mechanical component with a downward arrow indicating assembly or adjustment (no text or symbols)Opatrne zatvorte kryt priehradky na batérie tak, aby úchytné výčnelky krytu zacvakli do priehradky.

11.9 Dynamic Label Plus

9 Spotify Connect....339
11.9 Dynamic Label Plus....343
11.9 Dynamic Label Plus
Nato se dotaknite DIGITRADIO 585, da ga dodelite računu Nuvola.

- TechniSat
- DIGITRADIO 585
- Spotify Connect....19
- Dynamic Label Plus
- Illustrations
- Front view
- View from the rear
- Remote control
- Contents
- Illustrations 44
- Contents....46
- Safety instructions....48
- Legal notices 51
- Setting up the device....52
- Description of the DIGITRADIO 585....53
- Menu operation 57
- Internet radio ....58
- Spotify Connect ....59
- Playing music (UPnP & USB media) 59
- DAB+ (digital radio) function....60
- FM mode....63
- Bluetooth....65
- Audio/Playing MP3 CDs....66
- Audio input....68
- Other functions....69
- System settings....71
- Safety instructions
- Preface
- Signs and symbols used
- In this instruction manual:
- On the unit:
- Intended use
- Target group for this instruction manual
- Using the DIGITRADIO 585 safely
- WARNING!
- Legal notices
- Service instructions
- Setting up the device
- Description of the DIGITRADIO 585
- Scope of delivery
- Special features of the DIGITRADIO 585
- Preparing the DIGITRADIO 585 for operation
- Connect and align the antenna
- Connecting the power supply unit
- Insert the batteries into the remote control
- General device functionality
- Switching on the device
- Switching off the device
- Operating the device with the remote control
- Adjusting the volume
- Activating the mute function
- Retrieving displays
- Internet radio: Play music (UPnP media):
- DAB mode:
- FM mode:
- USB playback:
- Visual displays
- Menu operation
- Main menu
- Source selection
- Internet radio
- Last listened to
- Station list
- Spotify Connect
- Playing music (UPnP & USB media)
- Playing media
- Providing music via the Windows media player
- DAB+ (digital radio) function
- What is DAB+?
- DAB radio reception
- Performing a station scan
- Manual scan
- Selecting stations
- Saving DAB stations
- Selecting the programmed stations
- Deleting a saved memory slot
- Signal intensity
- Setting DRC
- Deleting inactive stations
- Sorting the stations
- FM mode
- Switching on the radio mode
- FM reception with RDS information
- Manual station selection
- Automatic station selection
- Setting mono/stereo
- Saving FM stations
- Selecting the programmed stations
- Deleting a saved memory slot
- Bluetooth
- Activating the Bluetooth mode
- Pairing
- Playing music
- Audio/Playing MP3 CDs
- General information on CDs/MP3 CDs
- The discs you can use
- Playing CDs
- Setting the track
- Quick search
- Repeat function
- Audio input
- Other functions
- Sleep function
- Alarm
- Setting the alarm time
- Repeat
- Time
- Mode
- Programme
- Volume
- Save
- Switching off the alarm after being woken
- Switching off the alarm
- System settings
- Equaliser
- My EQ setting
- Internet settings
- WPS connection
- Time settings
- Language
- Factory settings
- Software update
- Set-up wizard
- Info
- Display backlight
- Data protection notice
- Charging function for external devices
- Wired charging of external devices
- Wireless charging of external devices
- Control via Amazon Alexa
- Setting up the Nuvola account
- Activating and linking Nuvola skill
- Alexa control commands
- Cleaning
- Troubleshooting
- Technical specifications / manufacturer's instructions
- Mode d'emploi
- Spotify Connect....99
- Spotify Connect ....139
- Riprodurre musica (media UPnP e USB)....139
- Spotify Connect....179
- Spotify Connect 219
- Afspil musik (UPnP & USB medier)......219
- Systemmindstillinger 231
- Sluk for alarm
- Systemindstillinger
- Spotify Connect 299
- Prehrávanie hudby (UPnP a USB médiá)....299
- Spotify Connect....339
Brand : TECHNISAT
Model : DigitRadio 585
Category : Radio