
AVXSB10UHD - Dash cam AUDIOVOX - Free user manual and instructions
Find the device manual for free AVXSB10UHD AUDIOVOX in PDF.


| Product Type | Universal Seatback In-Vehicle Entertainment System |
| Display | 10.1 inch TFT LCD, 1024x600 resolution, capacitive multi-touch |
| Operating System | Android (quad-core processor, 8GB RAM, 8GB internal memory) |
| Pre-installed Apps | Google Play Store, Chrome, Netflix |
| DVD Player (SB10MD1 only) | Integrated DVD player (DVD, DVD±R, CD, CD-R/RW) |
| HDMI Input (SB10M1 only) | HDMI 1.4b, HDCP 1.4 compliant |
| USB Port | USB 2.0, supports up to 64GB storage, 1A charging output |
| MicroSD Card Slot | Supports SD, SDHC, SDXC up to 64GB |
| Wi-Fi | 802.11 a/b/g/n/ac dual-band |
| SmartStream Mirroring | Wireless screen mirroring for Android (Miracast) |
| Dual Screen | Wired content sharing between monitors (standard resolution) |
| Wi-Fi Dual Screen | Wireless content sharing between monitors (high resolution) |
| FM Modulator | 100-channel wireless FM transmitter (88.1-107.9 MHz) |
| IR Headphone Transmitter | Dual-channel infrared, range approx. 2.5m |
| Remote Control App | Voxx Link (Android and iOS) for full system control |
| Wired Headphone Jack | 3.5mm stereo output per monitor |
| Power Supply | 10.5-16 VDC, max 18W |
| Dimensions (approx.) | 10.1" screen diagonal; overall size varies by model |
| Cleaning | Use only lightly dampened lint-free cloth; no solvents or abrasives |
| Safety | Do not use while driving; keep away from children; avoid pressure on screen |
| Warranty | 36 months limited warranty (Audiovox) |
Frequently Asked Questions - AVXSB10UHD AUDIOVOX
User questions about AVXSB10UHD AUDIOVOX
0 question about this device. Answer the ones you know or ask your own.
Ask a new question about this device
Download the instructions for your Dash cam in PDF format for free! Find your manual AVXSB10UHD - AUDIOVOX and take your electronic device back in hand. On this page are published all the documents necessary for the use of your device. AVXSB10UHD by AUDIOVOX.
USER MANUAL AVXSB10UHD AUDIOVOX
Universal Seatback In-Vehicle Entertainment System

natural_image
Line drawing of two computer monitors with control buttons (no text or symbols)Owner's Manual
Congratulations
Congratulations on your purchase of this In-Vehicle Entertainment System! The system has been designed to provide passengers with unlimited content options delivering smiles for many miles. Please read the directions that follow to familiarize yourself with the product to ensure that you obtain the best results from your equipment.
Safety Precaution
The system has been designed so that it can be directly controlled through the monitors touch screen interface or remotely controlled directly by the user(s) using the VoxxLink APP. If the users are too young to control the system monitors themselves, adults in the vehicle can remotely control the system monitors using the VoxxLink APP. It is recommended that pyhysical source media such as DVDs, USB thumb drives, and SD cards are not changed while the vehicle is in motion. Enjoy your entertainment system but remember that the safety of all passengers remains the number one priority.
Warnings
- Do not use any solvents or cleaning materials when cleaning the video monitors.
- Do not use any abrasive cleaners, they may scratch the screen.
- Use only a lightly dampened lint free cloth to wipe the screen if it is dirty.
- Before putting on headphones always adjust the volume setting to the lowest position.
- Do not put pressure on the screen.
- Caution children to avoid touching or scratching the screen, as it may become dirty or damaged.
Patented, refer to www.voxxintl.com/company/patents
© 2019 Voxx Electronics. All rights reserved.
This manual, or any portion thereof, may not be reproduced without the express written permission of Voxx Electronics.
Design and specifications subject to change without notice. The images shown in the examples may differ from actual operation.
Software subject to change without notice for performance and function improvements.
TABLE OF CONTENTS
System Features 5
Accessories 6
Description of parts (SB10MD1) 7
Description of parts (SB10M1) 8
Getting Started 9
Home Main Menu 10
APPs 11
SmartStream Android 12
SmartStream iOS 13
HDMI Port Information....14
USB & SD Card Playback....15
WIFI Dual Screen....16
Dual Screen....18
Wi-Fi Setup....19
VOXX LINK....21
WFMM 23
IR Headphone Transmitter 24
Language 25
About Device & Check for Update 26
Time Zone & Reset 28
Volume & Brightness Control 29
DVD Playback (SB10MD1) 30
Media Type and File Type Compatibility....31
Troubleshooting 32
General Specifications....34
Compliance Information....35
SB10MD1 FEATURES
• Android Operating System
- Quad-core Processor
- RAM (8GB)
- Internal Memory (8GB)
• 10.1" TFT LCD Display (1024x600)
- Capacitive Multi-Touch Panel
- User Downloadable Apps
(Play Store, Chrome, Netflix Pre-loaded*)
- MicroSD Card (Supports up to 64GB)
• USB 2.0 Input (Supports up to 64GB) - SmartStream Screen Mirroring (Android Devices)
- Integrated DVD Player
• Dual Screen (Share Content Between Monitors)
• Wi-Fi Dual Screen (Share Content Between Monitors)
• 100 Channel Wireless FM Modulator
• Dual Channel IR Headphone Transmitter
• Wi-Fi 802.11 a/b/n/g Dual Band (Hotspot Required)
• VOXX LINK Remote Control (APP for Android and iOS)
SB10M1 FEATURES
- Android Operating System
- Quad-core Processor
- RAM (8GB)
- Internal Memory (8GB)
• 10.1" TFT LCD Display (1024x600)
• Capacitive Multi-Touch Panel - User Downloadable Apps (Play Store, Chrome, Netflix Pre-loaded*)
- MicroSD Card (Supports up to 64GB)
• USB 2.0 Input (Supports up to 64GB) - SmartStream Screen Mirroring (Android Devices)
- HDMI Input
• Dual Screen (Share Content Between Monitors)
• Wi-Fi Dual Screen (Share Content Between Monitors)
• 100 Channel Wireless FM Modulator
• Dual Channel IR Headphone Transmitter
• Wi-Fi 802.11 a/b/n/g Dual Band (Hotspot Required)
• VOXX LINK Remote Control (APP for Android and iOS)
ACCESSORIES
Wireless Headphones
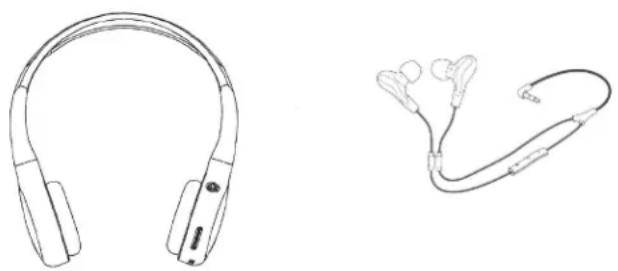
Each monitor includes a built-in dual channel infrared transmitter for use with the included wireless headphones. The wireless headphones must be used within a direct line of sight from the screen. Infrared transmission, like visible light, travels only in a straight line.
How to Use the Wireless Headphones
When wearing the headphones, make sure to observe the "Left" and "Right" labels. The headphones must be oriented correctly in order to receive the audio signal. Press the power button located on the side of the headphone. To switch between channel "A" (Driver's side) and channel "B" (Passenger side), slide the selector switch to the "A" or "B" position. Volume can be adjusted by rotating the wheel on the outside of the channel select button. The headphones are designed to automatically turn off after approximately 3 minutes of no activity to help prevent battery drain. If the headphones are not going to be used for an extended amount of time it is recommended to remove the batteries to prevent damage of the headphones due to battery corrosion.
natural_image
Line drawings of two types of earbuds, one with black outline and the other with white outline (no text or symbols)Wired Headphone Input
The System will allow you to use your personal headphones (not included) to listen to audio content. There are 3.5mm stereo headphone output jacks located on the side of each monitor which can be used with most standard stereo headphones. The volume control of personal headphones can be adjusted by selecting the volume icon and adjusting up/down.
DESCRIPTION OF PARTS (SB10MD1)
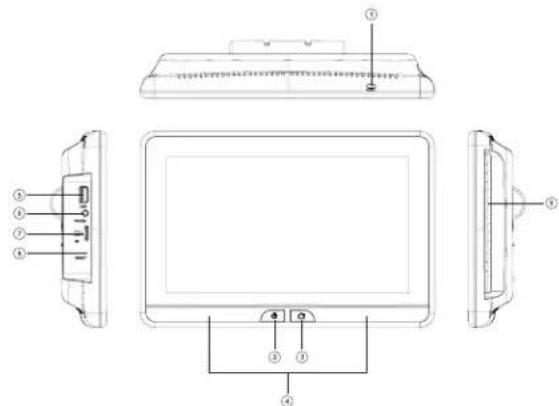
1. DVD Disc Eject Button
This button is used for ejecting a disc from the built-in DVD player.
2. PowerButton
This button is used to turn the system ON/OFF.
3. HomeButton
This button is used to display the Home Menu Screen.
4. IRTransmitter
Used to broadcast the audio signal to the wireless headphones.
5. USBPort
This input supports media playback from a USB thumb drive (up to 64GB). This port will also support USB charging (1amp) to provide power to a device that requires external USB power.
6. Wired Headphone Jack
For use with wired headphones equipped with a 3.5mm cable.
7. Micro SD Card Slot
This input supports media playback from micro SD cards (up to 64GB).
8. Reset
This button provides a system-level power reset. It does not affect the user settings.
9. DVD Disc Insertion Slot
Insert a disc with label side facing towards the user.
DESCRIPTION OF PARTS (SB10M1)

1. PowerButton
This button is used to turn the system ON/OFF.
2. HomeButton
This button is used to display the Home Menu Screen.
3. IRTransmitter
Used to broadcast the audio signal to the wireless headphones.
4. Reset
This button provides a system-level power reset. It does not affect the user settings.
5. Micro SD Card Slot
This input supports media playback from micro SD cards (up to 64GB).
6. Wired Headphone Jack
For use with wired headphones equipped with a 3.5mm cable.
7. USBPort
This input supports media playback from a USB thumb drive (up to 64GB). This port will also support USB charging (1amp) to provide power to a device that requires external USB power.
8. HDMIInput
This input is used to connect a HDMI compatible device.
GETTING STARTED
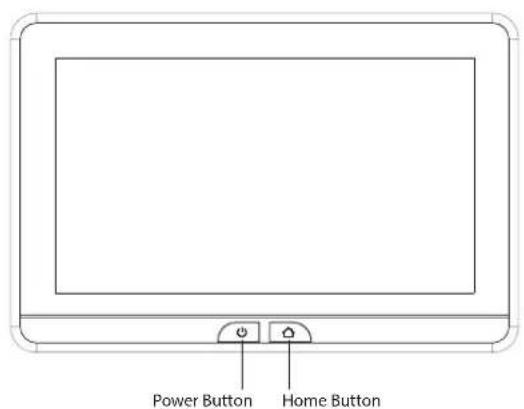
- To start the system, the vehicle ignition key switch must be in ACC or engine ON position.
- The Power Button and Home Buttons will flash RED and BLUE while the system is booting up. Once the boot up process is completed, the Power Button and Home Buttons will turn RED, and stay in the Standby position. It will take approximately 12 seconds to 15 seconds to complete the system boot up process.
- Once the Power and Home buttons are solid RED, press the Power Button to turn the system ON and the logo image will appear on the screen. After the logo image displays, the Home Main Menu will appear on the screen.
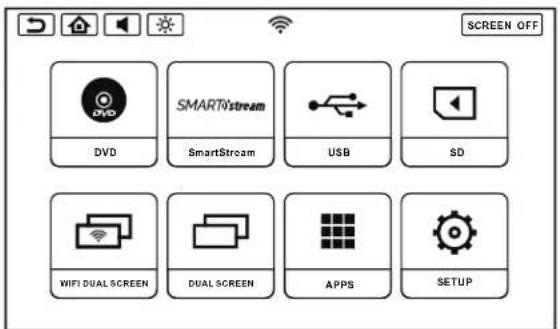
HOME MAIN MENU
SB10MD1 SB10M1
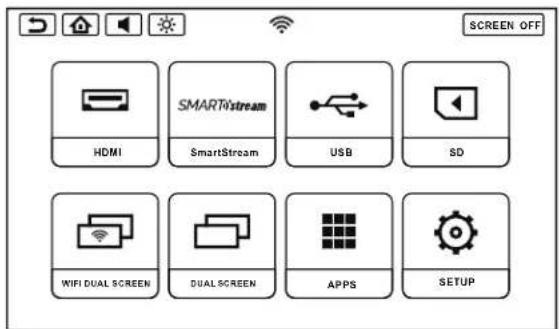
SYSTEM APPLICATIONS
This system comes pre-loaded with the following apps: Google Play Store, Chrome Browser, and Netflix. You may also log into the Play Store with your Google account and download your favorite apps directly. If you do not have Google account, creating one is easy and free.
- Connect the SB10MD1 and SB10M1 monitors to a Wi-Fi hotpsot. Refer to page 19 for details.
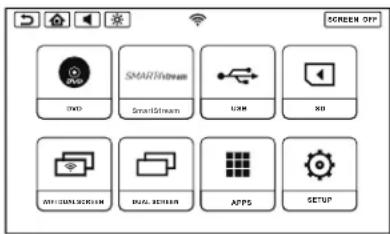
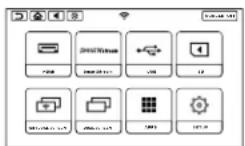
- Select "APPS" from the main menu screen.
- Select the Play Store to download your choice of applications (connection to a Wi-Fi hotspot is required).
- Touch the log-in button and use the on-screen keyboard to enter your Google account credentials to allow access to the Play Store.
- Download and install the apps you wish to use on the system. The SB10MD1 and SB10M1 monitors each allow you to install separate apps on each device.
- From the "APPS" main screen, you may choose the application you wish to use on the system. Press the "HOME" button to exit any applications and return to the "HOME" screen.

NOTES:
A total of (12) applications can be installed on each monitor. Google Play Store, Chrome Browser, and Netflix are pre-loaded from the factory and cannot be deleted.
Users can download (9) apps in addition to the (3) that are pre-loaded on each monitor.
Once (9) apps have been downloaded to each monitor, an app must be deleted before a new app can be downloaded.
SMARTSTREAM ANDROID
- Select the SmartStream icon on the Main Menu.

- Select the Android icon on the screen.
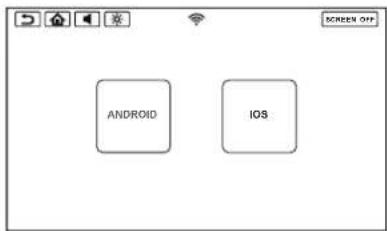
- Device Name: SB10M1_xxxx or SB10MD1_xxxx will appear on the screen.

-
Select the Mirroring function on your Smartphone. Your Smartphone will start searching for devices. *See your Smartphone's Operation Manual for details on how to operate screen mirroring.
-
After searching is completed, the monitor name will appear on your Smartphone screen. Select the monitor name displayed on your Smartphone.
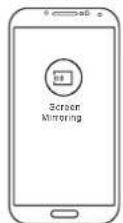
》

》

》

-
Your Smartphone will now start connecting to the monitor.
-
Once connected, your Smartphone's screen will mirror to the monitor and allow you to play back your desired content.
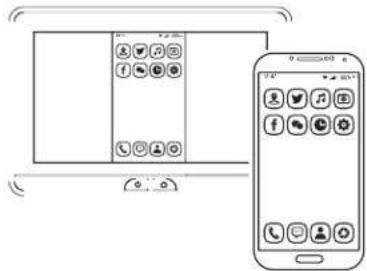
SMARTSTREAM iOS
- Press the SmartStream icon on the Main Menu.
- Select the iOS icon on the screen.
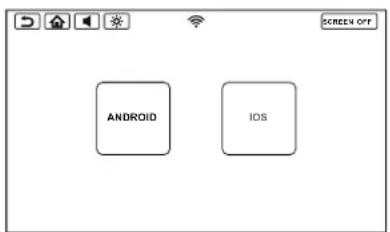
- SmartStream does not support iOS devices due to Apple limitations in wireless content transfer. Each system monitor will display a message describing this limitation. Due to this limitation, please connect your iOS device using the HDMI input on the SB10M1 monitor.

SB10MD1 Screen Message

SB10M1 Screen Message
NOTE: Smartphone/Tablet manufacturers in addition to App providers may place restrictions on the type of content that can be transmitted wirelessly. Generally this pertains to copyrighted material. This is not a performance issue or malfunction with this system.
SMARTSTREAM iOS (CONTINUED)
- Please use a genuine Apple HDMI Adaptor & HDMI Cable to connect your iOS device to the SB10M1 monitor's HDMI Input and select HDMI as the video source to play content from your iOS device. Aftermarket Apple HDMI adapters may not function properly with the system.
natural_image
Simple line drawing of a smartphone with blank screen and handle (no text or symbols)


natural_image
Line drawing of a flat-screen monitor with two buttons at the bottom (no text or symbols)
HDMI INPUT (SB10M1 ONLY)
This input can be used for devices with HDMI outputs. Connectivity of Smartphones or tablets to the system will require an HDMI cable and HDMI adapter which are not included and sold separately at most consumer electronics retailers. For connection to all other HDMI devices, please refer to the owner's manual included with your HDMI device.
NOTE: Some HDMI devices may require power that can be supplied from the system monitor's USB input.
USB & SD CARD PLAYBACK
USB PLAYBACK
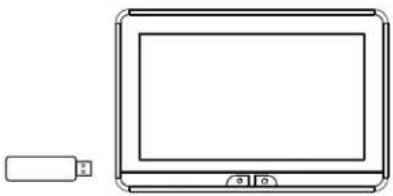
- Insert a USB storage device into either monitor's USB port.
natural_image
Line drawing of a flat-screen monitor with a small rectangular object beside it (no text or symbols)- Select USB source in the Main Menu.

- Select the file type: Video, Music, or Photo.

SD CARD PLAYBACK
- Insert a Micro SD Card into either monitor's SD card slot.

natural_image
Line drawing of a flat-screen monitor with control buttons (no text or symbols)- Select SD source in the Main Menu.

- Select the file type: Video, Music, or Photo.
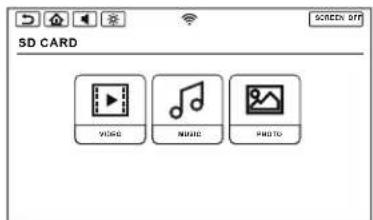
NOTE: The USB and SD card inputs on each monitor will support a maximum storage media size of 64GB.
WIFI DUAL SCREEN
Wi-Fi Dual Screen allows you to wirelessly share content between monitors in high-resolution. Either monitor can be setup as the Transmitting or Receiving monitor.
- To setup each monitor as a Transmitting or Receiving monitor, select WIFI Dual Screen from each monitor's main menu.

- To setup a monitor as the Transmitting Monitor, press the Transmitting Monitor icon. To setup a monitor as the Receiving Monitor, press the Receiving Monitor icon.

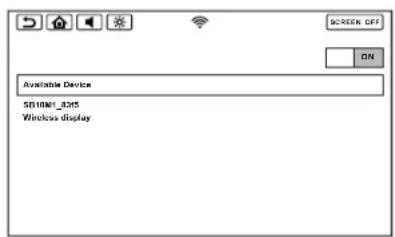
- The Receiving monitor will display its Device Name as shown below.

- After a few seconds, the Receiving monitor's Device Name will be displayed under "Available Device" on the Transmitting Monitor.
WIFI DUAL SCREEN(CONTINUED)
- Select the Receiving Monitor by pressing the Device Name. The Transmitting monitor will then establish a connection to the Receiving Monitor. Once a connection is established, "Connected" will appear under the Device Name.
Transmitting Monitor

- Once connected, the Receiving Monitor will mirror the Transmitting Monitor in high resolution.
Receiving MonitorTransmitting Monitor

- To stop mirroring of the Transmitting Monitor's content on the Receiving Monitor, press the Home button on the Receiving Monitor.
DUAL SCREEN
Dual Screen allows you to share content between monitors in standard resolution.
- To mirror content from one monitor to the other, select Dual Screen on the receiving monitor.


- To stop mirroring content on the receiving monitor, press the Home button on the receiving monitor.
NOTE: Dual Screen mode can only be selected on one monitor at a time. If Dual Screen mode is selected on both monitors at the same time, a white screen will appear on both monitors. Press the Home button on either monitor to resume normal operation.
WIFI SETUP
- Select SETUP in the Main Menu.
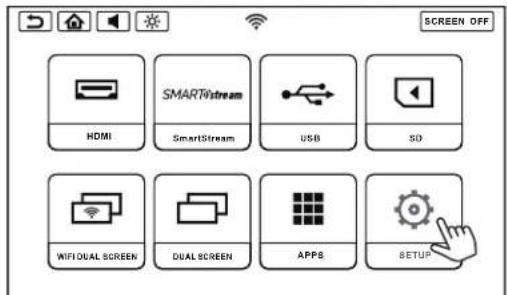
- Select WIFI from the setup menu. Turn ON the WIFI and then touch the WIFI bar to see a listing of available Wi-Fi networks.


- Select a Wi-Fi network from the available list.
WIFI CONNECTION (CONTINUED)
- Touch the line to enter the password, and the on-screen keyboard will appear.
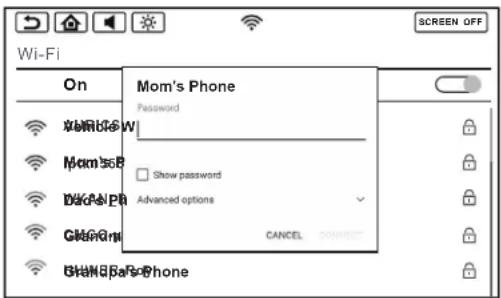
- Enter the Wi-Fi password using the on screen keyboard. Then press "DONE" to enter the password.

- The monitor will now connect to the Wi-Fi network. Once a Wi-Fi network is saved into memory, the monitors will automatically reconnect to that network as long as the Wi-Fi setting is set to "ON".
NOTE: In order to enable full functionality of the system, each monitor will need to be connected to a Wi-Fi hotspot. Up to (10) Wi-Fi hotspots can be saved in the memory of each monitor.
VOXX LINK
Voxx Link is an APP developed for Android and Apple smartphones and tablets that allows full system remote control and visual monitoring of the system without having to directly see or directly touch the monitors. This is a great tool to allow content selection and control of the system for actual users who may be infants and toddlers, too young to control the system themselves.
Download and install the VOXX LINK APP from the Google Play Store or Apple APP Store onto your Android or iOS Smartphone. Scan the QR codes on this page to get direct access to the APPs.
If the system monitors and the device you wish to control the system using Voxx Link are not already connected to the same Wi-Fi network, both system monitors and the intended controlling smart device must be connected to the same network.
Example 1 (Using hotspot on smartphone to establish internet/APP access)
- Turn on your phone's personal hotspot.
- Connect the system monitors to your phone's hotspot following the Wi-Fi instructions on page 19.
- Once the system monitors and the smartphone are connected to the same network, the smartphone will show as the connected device in the Voxx Link setup menu.
In this setup scenario, the smartphone becomes the gateway to accessing the Internet/APPs and it also becomes the Voxx Link remote control.
Example 2 (Using a vehicle's built-in hotspot or a portable hotspot device to establish internet/APP access)
- Turn on the hotspot.
- Connect the system monitors to the hotspot following the Wi-Fi instructions on page 19.
- Connect the smart device you wish to control the system with to the hotspot (connect smart device to the hotspot through the smart device Wi-Fi setup).
- Once the system monitors and the smartphone are connected to the same network, the hotspot will show as the connected device in the Voxx Link setup menu.
In this setup scenario, the hotspot becomes the gateway to accessing the Internet/APPs and it also becomes the network for the monitors and the Voxx Link controlling device.


Apple Link

Android Link
NOTE: If the network name does not display on the monitor in the Voxx Link setup menu, press the "Scan" button in the upper right hand corner of the monitor to refresh the list.
VOXX LINK (CONTINUED)

》

》

》
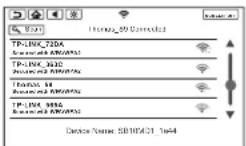
- Once the network connection is established between the controlling device and the system monitors, open the Voxx Link APP.
- After the initial splashscreen, the monitors will display under "Available Network".
- Select the monitor you wish to control. Once selected, that monitor's display will appear on the controlling device.
- To select a different monitor, exit to the controlling device's home screen and go back into the Voxx Link APP to select a different monitor.
NOTES:
- In the available network listing, the monitor currently connected to the controlling device will be highlighted in green.
- The only Voxx Link control limitation is exiting Wi-Fi Dual Screen or Dual Screen mode. If one of the system monitors is placed into a receiving mode, that monitor can only exit from that mode by pressing the Home button on that system monitor.

》

》

》


Controlling Device
WFMM (WIRELESS FM MODULATOR)
WFMM allows you to broadcast audio content from either system monitor to your vehicle's factory audio system through an FM station. Only one monitor can transmit audio to the factory audio system at one time. Make sure only one monitor's WFMM transmitter is "ON" at a given time to prevent interference.
- Select SETUP in the Main Menu.

- Select WFMM inside the SETUP screen.
- Touch the ON button to turn ON the WFMM, touch the OFF button to turn OFF the WFMM.

- Touch the frequency button to select your preferred frequency, and tune your radio FM to the same frequency. This will allow you to listen to the audio from the monitor through your FM Radio.
NOTE: For best results and to avoid interference, select an FM radio frequency that does not have content broadcasting.
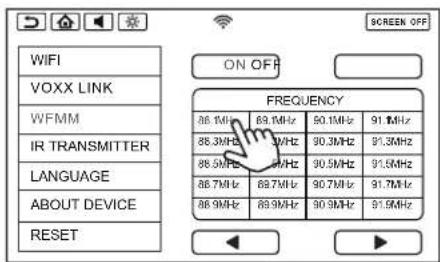
- Touch the ◀button to go to the previous page.
Touch the ▶ button to go to next page. NOTE: There are 100 total frequencies available, with 20 different frequencies on each page.

- Select SETUP in the Main Menu.

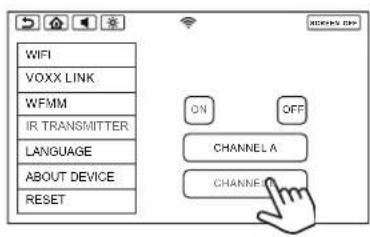
- Select IR Transmitter inside the SETUP screen.
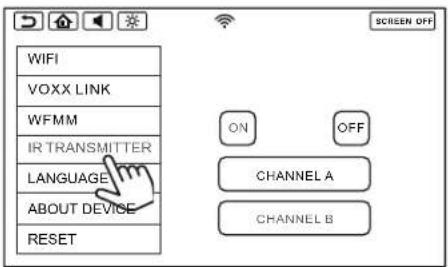
- Touch the ON or OFF button to turn ON or OFF the IR Transmitter.

- Select the desired Channel (A or B) for the IR Transmitter. It is recommended to select Channel A for one monitor and Channel B for the other monitor.
Set the switch on your IR Headphones to channel A or B to listen to the audio from the monitor you prefer.

natural_image
Line drawing of a pair of headphones with earbuds and headband (no text or symbols)USER INTERFACE LANGUAGE
- Select SETUP in the Main Menu.

- Select Language inside the SETUP screen.
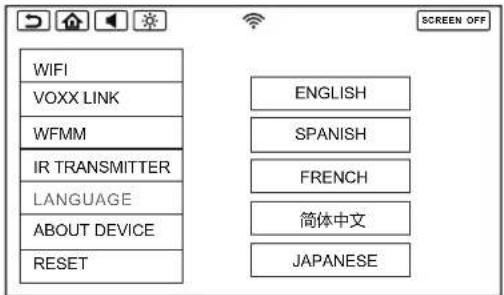
- Select your preferred language.
ABOUT DEVICE & CHECK FOR UPDATE
- Select SETUP in the Main Menu.

- Select "ABOUT DEVICE" in the SETUP screen, touch the "CHECK FOR UPDATE" button to check for new software availability.
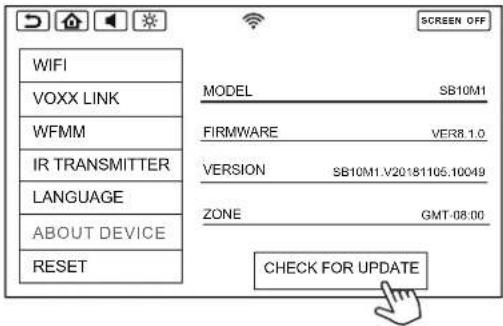
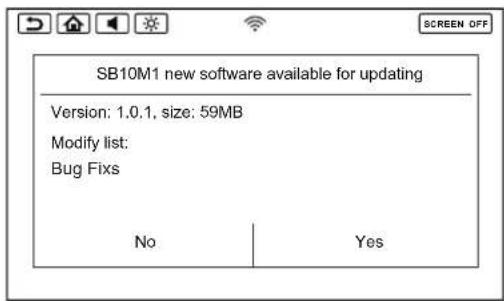
- A notification message will appear on screen if a software update is available for the monitor. Each system monitor will need to be updated independently.

- Press Yes to download the software update, or press No to update the software at another time.
ABOUT DEVICE & CHECK FOR UPDATE (CONTINUED)
- This message will appear on the screen if the monitor is not connected to a Wi-Fi hotpost.

- This message will appear on the screen if the software version is already up to date.
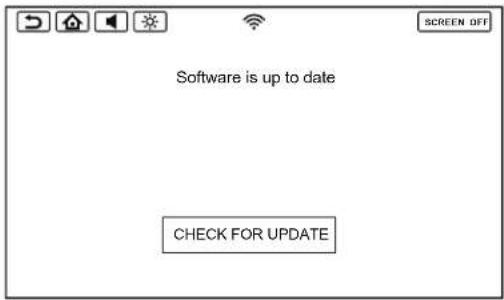
NOTE: As long as the system monitors are connected to a Wi-Fi hotspot, the monitors will be able to receive software updates when they become available. It is highly recommended that you update the system monitors whenever an update is made available to ensure your system maintains peak performance. Being a computer-based device, the system will require periodic updates which are managed through "Over-the-Air" software updates. If a software update is available, an "Update Available" message will appear on the home screen of the system monitors.
TIME ZONE
- Select SETUP in the Main Menu.
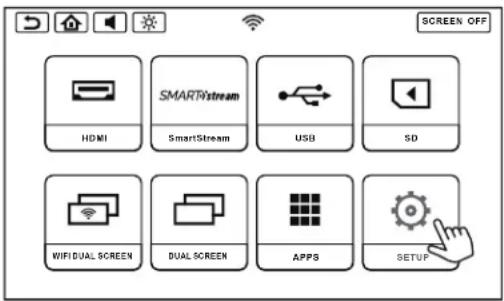
- Select "ABOUT DEVICE" in the SETUP screen, touch the "ZONE" button to set the time zone to your local time zone.

RESET
- Select SETUP in the Main Menu.

- Select "RESET" inside the SETUP screen. Touch the "Factory Setting" button to reset all monitor settings back to factory defaults.
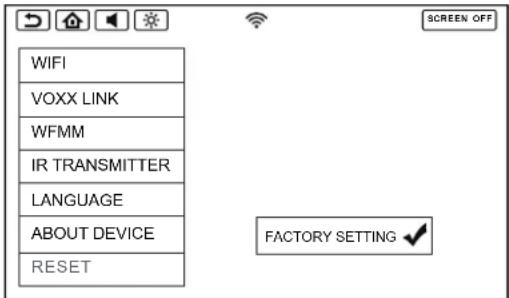
NOTE: The RESET function inside the SETUP menu removes all user settings and reverts the system monitors back to their factory default state. The RESET buttons on the side of each monitor resets the system monitors without deleting user settings.
VOLUME CONTROL & BRIGHTNESS CONTROL
VOLUME CONTROL (WIRED HEADPHONES ONLY)
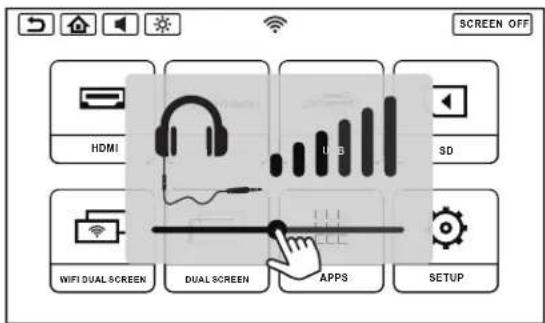
- Touch the Volume Button inside the Info Bar to change the volume settings for optional wired headphones connected to the 3.5mm port on the side of each monitor.

- Touch and slide the volume level indicator to the right to increase the volume, and to the left to decrease the volume.
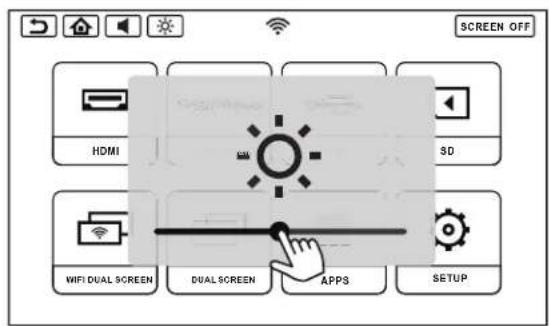
BRIGHTNESS CONTROL
- Touch the Brightness Button inside the Info Bar to change the brightness settings.

- Touch and slide the brightness level indicator to the right to increase the brightness, and to the left to decrease the brightness.
DVD PLAYBACK (SB10MD1 MONITOR)
DVD Region Code
The DVD player is preset to a region code at the factory depending on where the DVD player is sold. A DVD from a different region cannot be played in this unit and the unit will display "WRONG REGION".
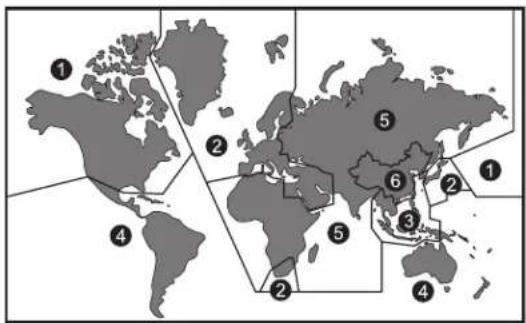
Region 2 - Japan, Europe, South Africa, Middle East, Greenland
Region 3 - S. Korea, Taiwan, Hong Kong, Parts of South East Asia
Region 4 - Australia, New Zealand, Latin America (including Mexico)
Region 5 - Eastern Europe, Russia, India, Africa
Region 6 - China
Supported Disc Types
DVD-Video: DVD contains video
DVD +/- R: DVD contains video
CD-DA: CD contains audio
CD-Video: CD contains video
CD-R/RW: CD contains audio
Unsupported Disc Types
Super Audio CD
Optical disc CD-1
CD-ROM
DVD-ROM
DVD-RAM
DualDisc
DIVX
MiniDisc
AVCHD
HD DVD
NOTE: This system is capable of playing most recordable DVD formats.
However, due to the variety of disc manufacturers and software, playback cannot be guaranteed.
Loading Discs
Before a disc is loaded, make sure that it is compatible with the player. Select
DVD from the main source and insert a disc with label side facing towards the user.
Playing Discs
Once a disc is inserted, playback will automatically begin. If a disc is already inserted, select DVD from the main source menu to resume playback. Touch the screen during playback to display the on-screen controls.
MEDIA & FILE TYPE COMPATIBILITY
Media Compatibility
This system is compatible with the media formats listed in the table below.
- The metadata or file information of some audio and video files may not be correctly displayed.
- Some content that is protected by DRM (Digital Rights Management) may be in a format that is not supported by this system.
- There may be a delay before playback begins when using USB flash drives or SD cards with complex folder hierarchies or many files.
- Some audio, video, and image files may be incompatible with this system due to file characteristics, file format, recording software used, directory structure, and/or the type of audio/video encoding used.
Storage Device Formatting
This system is compatible with the FAT32 format for USB flash drives and micro SD cards up to 64GB. Refer to the documentation that comes with your storage device for more details on how to format.
| Supported Formats | ||
| Format Extension Supported Variations/Codecs | ||
| VIDEO | VC-1 .wmv .asf MPEG-2 Part 2, WMV | |
| AVL.avi H.264, MPEG-2 Part 2, MPEG-4 Part 2 | ||
| MP4 .mp4 .m4v .mov H.263, H.264 , H.265, MPEG-4 Part 2 | ||
| Matroska .mkv H.264, H.265, MPEG-4 Part 2 | ||
| MPEG .dat .mpg .vob MPEG-1/2 | ||
| AUDIO | AAC .m4a ,aac ADIF ,ATDS Header AAC-LC and AAC-HE, AAC-ELD | |
| ASF .wma | WMA Version 4, 4.1, 7, 8, 9 @ 8kbps~320Kbps | |
| FLAC .flac | Compression Levels 0~8 | |
| AMR .3gp | AMR-NB, AMR-WB | |
| MPEG .mp1 , mp2 , mp3 | MPEG-1/2/2.5 Audio Layer 1, 2, 3 @ 8kbps~320Kbps | |
| OGG .ogg | Q1~ Q10 | |
| WAV .wav | MS-ADPCM, IMA-ADPCM, PCM | |
| PHOTO | BMP .bmp | |
| GIF .gif | ||
| JPEG .jpg , jpeg | ||
| PNG .png | ||
TROUBLESHOOTING
| Symptom Remedy | |
| Monitor does not power on | Verify the vehicle is in the ON/RUN or ACC position.If the Power and Home buttons on each monitor are not illuminated, verify the cable connection to each monitor and/or the power and ground connections to the vehicle. |
| Monitor frozen - will not respond | Soft reset each monitor by turning each monitor off, then back on again.Hard reset the system by turning the ignition off, then back on, or by activating the reset button on the side of each monitor. |
| Disc will not play (SB10MD1) | Check to make sure the disc is inserted with the label side facing towards the user.Check if the disc is defective by trying another disc. Check the type of disc being played.This unit only plays DVD (Single, Dual Layer), DVD-R/+R, DVD+R Dual layer, DVD-RW/+RW, CD, CD-R, and CD-RW.The unit and the disc are coded by region. If the region codes don't match, the DVD can't be played. |
| Disc plays, but stops intermittently (SB10MD1) | The disc may be dirty and need cleaning.Condensation may have formed inside the unit. Remove the disc and allow unit to dry out.The disc may be scratched too badly to play. |
| DVD playback - distorted picture (SB10MD1) | Check the disc for fingerprints and clean with a soft cloth, wiping from center to edge. |
| Cannot advance through a DVD movie (SB10MD1) | You cannot advance through the opening credits and warning information that appears at the beginning of DVDs because the disc is programmed to prohibit these actions.Some discs may not allow this function. Try another disc. |
| No sound or distorted sound | Make sure that the external media device is connected properly, and all cables are securely inserted into the appropriate jacks.Verify that the batteries in the wireless headphones are fresh.If you are using the wireless headphones, make sure you turn on the power and select the correct monitor (A or B).Verify the volume is turned up on wireless headphones or the system volume is turned up for wired headphones.Verify nothing is blocking the path between the monitor IR sensor and wireless headphones.When placing the wireless headphones on your head, make sure to observe the Left and Right orientation. The wireless headphones must be oriented correctly (facing forward) to receive the audio signal. |
| Monitor feels warm When the monitor is in use for a long period of time, the surface will be warm. This is normal. | |
| HDMI input not working | Some mobile devices may require a special HDMI cable and/or adapter. Contact your HDMI device supplier for the HDMI cable and/or adapter. Some devices may need to boot up before showing picture.Ensure you are using an OEM branded (Apple, Samsung, etc.) HDMI cable and/or adapters. Generic HDMI cables and/or adapters may not function properly with this system. |
| Cannot connect monitors to a Wi-Fi network (hotspot) | Check to make sure the correct Wi-Fi network password is used. Refer to page 19 for more details. |
| Monitor is not registering in the Voxx Link APP | Make sure your smart device has the latest version of the Voxx Link APP installed.Ensure the system monitors and the mobile device are connected to the same Wi-Fi network. Refer to page 21 for more details.Make sure Wi-Fi is turned on in the system menu, then briefly turn the Wi-Fi off then on again. |
| Cannot establish an Android SmartStream connection | Select the Android icon from the SmartStream menu.Check to make sure mobile device supports Miracast. Visit www.wi-fi.org for a current list of Miracast certified devices.Check to make sure Miracast is enabled on the mobile device. Miracast may be called something differently depending on the mobile device and its operating system. |
| Cannot establish an iOS SmartStream connection | SmartStream does not support iOS devices due to Apple limitations in wireless content transfer. Each system monitor will display a message describing this limitation. Due to this limitation, please connect your iOS device using the HDMI input on the SB10M1 monitor. |
| Cannot play certain files from USB or micro SD cards | Audio/video files embedded with DRM (Digital Rights Management) or copyright protection may not playback on this system. This is not a performance issue, but a limitation that content providers may place on their content.Some USB storage devices and micro SD cards may not be compatible (older USB thumb drives or micro SD cards).Due to ongoing technological advancements, some USB flash drives and micro SD cards may be incompatible with this system. |
| Monitor is locked using Google's "Find My Device" service | Contact Voxx tech at 1-800-645-4994 for instructions on how to restore monitor operation. |
NOTE: The system was designed to satisfy users of every tech level. Specifically related to downloadable APPs available through the Google Play Store, the performance of these APPs is based upon the strength of the Wi-Fi hotspot signal coming into the vehicle in addition to the performance of the APP itself. A poor Wi-Fi connection to the internet can have an impact on content playback that can be mistaken for a performance flaw in the system. Before assuming that the system has a performance issue, please verify that the Wi-Fi signal strength through your hotspot is strong and that all APPs are updated to their latest version. If you believe that the system has a performance issue, please contact Voxx tech at 1-800-645-4994 so that an agent can assist you further in troubleshooting your system.
GENERAL SPECIFICATIONS
| Display Type 10.1" | Capacitive Touch Screen, Resolution: 1024 (RGB) x 600 |
| LCD Backlight Type LED | Backlight Life: 20,000 Hours |
| Supported Disc Types | DVD (Single, Dual Layer), DVD-R/+R, DVD+R Dual layer, DVD-RW/+RW, CD, CD-R, CD-RW |
| General | Operation Voltage: 10.5VDC ~ 16VDC, Operation Power: 18W max @ 12VDC,Operation Temperature: 32 ~ 131°F (0 ~ 55°C) |
| Frequency Response | 40Hz ~ 20kHz +/- 3dB |
| HDMI Support Version | 1.4b, HDCP 1.4 Compliant |
| Wireless Headphones | 2-Channel Stereo, (Typical Infrared Range: 2.5m) |
| Wi-Fi Network | 802.11a/b/g/n/ac Dual Band |
| FM Modulation | 88.1MHz ~ 107.9MHz |
| USB Support Version | 1.1, Version 2.0 High Speed, 5 watt (1 Amp) Max Charging Output, 64GB Max Capacity |
| Micro SD Card Support | SD, SDHC, SDXC, 64GB Max Capacity |
COMPLIANCE INFORMATION
FCC Notice
This device complies with Part 15 of FCC Rules and Industry Canada license-exempt RSS standard(s). Operation is subject to the following two conditions: (1) this device may not cause interference, and (2) this device must accept any interference, including interference that may cause undesired operation of this device.
This transmitter must not be co-located or operated in conjunction with any other antenna or transmitter. The Bluetooth antenna cannot be removed (or replaced) by user.
Alteration or modifications carried out without appropriate authorization may invalidate the user's right to operate the equipment.
This equipment has been tested and found to comply with the limits for a Class B digital device, pursuant to Part 15 of the FCC Rules. These limits are designed to provide reasonable protection against harmful interference in a residential installation. This equipment generates, uses and can radiate radio frequency energy and, if not installed and used in accordance with the instructions, may cause harmful interference to radio communications. However, there is no guarantee that interference will not occur in a particular installation. If this equipment does cause harmful interference to radio or television reception, which can be determined by turning the equipment off and on, the user is encouraged to try to correct the interference by one or more of the following measures:
- Reorient or relocate the receiving antenna.
- Increase the separation between the equipment and receiver.
- Connect the equipment into an outlet on a circuit different from that to which the receiver is connected.
- Consult the dealer or an experienced radio/ TV technician for help.
DVD Video Playback
This item incorporates copy protection technology that is protected by U.S. patents and other intellectual property rights of Rovi Corporation. Reverse engineering and disassembly are prohibited.
IOS
IOS is a trademark or registered trademark of Cisco in the U.S. and other countries and is used under license.
AAC
AAC is short for Advanced Audio Coding and refers to an audio compression technology standard used with MPEG-2 and MPEG-4. Several applications can be used to encode AAC files, but file formats and extensions differ depending on the application which is used to encode.
MP3
Supply of this product only conveys a license for private, non-commercial use and does not convey a license nor imply any right to use this product in any commercial (i.e. revenue-generating) real time broadcasting (terrestrial, satellite, cable and/or any other media), broadcasting/streaming via internet, intranets and/or other networks or in other electronic content distribution systems, such as pay-audio or audio-on-demand applications. An independent license for such use is required. For details, please visit http://www.mp3licensing.com.
WMA/WMV
Windows Media is either a registered trademark or trademark of Microsoft Corporation in the United States and/or other countries. This product includes technology owned by Microsoft Corporation and cannot be used or distributed without a license from Microsoft Licensing, Inc.
COMPLIANCE INFORMATION
FLAC
Copyright © 2000-2009 Josh Coalson
Copyright © 2011-2013 Xiph.Org Foundation
Redistribution and use in source and binary forms, with or without modification, are permitted provided that the following conditions are met:
Redistributions of source code must retain the above copyright notice, this list of conditions and the following disclaimer.
Redistributions in binary form must reproduce the above copyright notice, this list of conditions and the following disclaimer in the documentation and/or other materials provided with the distribution.
Neither the name of the Xiph.org Foundation nor the names of its contributors may be used to endorse or promote products derived from this software without specific prior written permission.
THIS SOFTWARE IS PROVIDED BY THE COPYRIGHT HOLDERS AND CONTRIBUTORS "AS IS" AND ANY EXPRESS OR IMPLIED WARRANTIES, INCLUDING, BUT NOT LIMITED TO, THE IMPLIED WARRANTIES OF MERCHANTABILITY AND FITNESS FOR A PARTICULAR PURPOSE ARE DISCLAIMED. IN NO EVENT SHALL THE FOUNDATION OR CONTRIBUTORS BE LIABLE FOR ANY DIRECT, INDIRECT, INCIDENTAL, SPECIAL, EXEMPLARY, OR CONSEQUENTIAL DAMAGES (INCLUDING, BUT NOT LIMITED TO, PROCUREMENT OF SUBSTITUTE GOODS OR SERVICES; LOSS OF USE, DATA, OR PROFITS; OR BUSINESS INTERRUPTION) HOWEVER CAUSED AND ON ANY THEORY OF LIABILITY, WHETHER IN CONTRACT, STRICT LIABILITY, OR TORT (INCLUDING NEGLIGENCE OR OTHERWISE) ARISING IN ANY WAY OUT OF THE USE OF THIS SOFTWARE, EVEN IF ADVISED OF THE POSSIBILITY OF SUCH DAMAGE.
SD/SDHC/SDXC
SD, SDHC and SDXC Logos are trademarks or registered trademarks of SD-3C LLC in the United States, other countries or both.
HDMI
The terms HDMI and HDMI High-Definition Multimedia Interface, and the HDMI Logo are trademarks or registered trademarks of HDMI Licensing, LLC in the United States and other countries.
Dolby Digital
This product will down-mix Dolby Digital signals internally and the sound will be output in stereo. Manufactured under license from Dolby Laboratories. Dolby and the double-D symbol are trademarks of Dolby Laboratories.
European Waste Electrical and Electronic Equipment (WEEE) Notice
In accordance with Directive 2012/19/EU of the European Parliament on waste electrical and electronic equipment (WEEE):
The symbol above indicates that separate collection of electrical and electronic equipment is required. When this product has reached the end of its serviceable life, it cannot be disposed of as unsorted municipal waste. It must be collected and treated separately. It has been determined by the European Parliament that there are potential negative effects on the environment and human health as a result of the presence of hazardous substances in electrical and electronic equipment. It is the users' responsibility to utilize the available collection system to ensure WEEE is properly treated.

All other trademarks and their respective logos cited herein are the property of their respective owners.
NOTES

For Customer Service
Visit Our Website At
www.voxxelectronics.com
Product Information, Photos.
FAQ's, Owner's Manuals
FIRST TIME SETUP
Powering up the System
- When vehicle power is applied to the system, the POWER and HOME buttons on each monitor will flash RED/BLUE for approximately 12 to 15 seconds and then the buttons will remain solid RED. This is normal and a notification that the system is booting up. Once the POWER and HOME buttons are solid RED, you can press the POWER button to turn on the monitors.
Wi-Fi
- Press the Ⓧ Setup icon to open the Settings Menu.
- Toggle the WIFI to "ON".
- Press WIFI to show available networks.
- Select the WIFI network you would like to connect to and use the touchscreen keyboard to enter the password.
- Press the green check mark to connect. The system will remember and automatically reconnect to any saved available networks (maximum of 10).
Wireless Headphones
- To use the wireless headphones, press the Ⓧ Setup icon to open the settings menu.
- Select "IR TRANSMITTER" and toggle the switch to "ON".
- Select "CHANNEL A" or "CHANNEL B" on each monitor.
- Set the switch on your wireless headphones to "A" or "B" to listen to that monitor.
Downloading Apps on the System Monitors
- Select the ■apps icon from the main menu.
- Open the "Play Store" application, preloaded on the system. You will need to create or sign in with your Google account.
- Browse the Google Play Store and download the applications you wish to the system monitors.
Voxx Link
- Go to the Google Play Store or iTunes Store and download the free Voxx Link application for your Smart Device. Your Smart Device must be connected to the same WIFI network as the System Monitors for the Voxx Link app to function.
- Press the setup icon to open the settings menu.
- Select "VOXX LINK" from the menu on the left. This will enable the feature.
- Open the application on your mobile device and select the monitor you wish to control (example: SB10MD1_xxx). Once selected, the Monitor's screen will display on your mobile device, allowing full control of the Monitor.
NOTE: This Voxx Link application is designed to allow a remote user (ie. Parent) that does not have direct visibility to each monitors to control each monitor.
Scan the QR Codes below to download the Voxx Link application.
iTunes Store

Google Play Store

QUICK START GUIDE
10.1" SEATBACK IN-VEHICLE
ENTERTAINMENT SYSTEM
Congratulations on the purchase of your In-Vehicle Entertainment System!
This Quick Start Guide is a brief tutorial allowing you quick access to enjoying your new system. You will find the system very user friendly and intuitive but in the event you need further information on how to operate your system, please go to the following URL to review or download the complete Operation Manual:
www.voxxintl.com/seatbackOM
SYSTEM FEATURES:
• DVD Player – Plays DVDs, CDs, MP3 discs
- HDMI Input – Connect HDMI Devices such as Smart Phones or Game Consoles
- SmartStream – Allows Wireless Content Transfer from Smart Phones to Monitors
• SD Input – Media Playback of Videos, Music, Photos
- USB Input – Media Playback of Videos, Music, Photos, and Charging Support for USB based devices
- Wi-Fi Dual Screen – Wireless content sharing between System Monitors in Hi-Def
- Dual Screen – Wired content sharing between System Monitors in Standard-Def
- Apps – Download apps from the Google Play Store (Google Play Store, Google Chrome, and Netflix preloaded)
- Setup:
• Wi-Fi - Connect to an In-Vehicle Wi-Fi Hotspot or other Wi-Fi Hotspot (ie. Smart Phone) for full functionality of the system
- Voxx Link - Allows Wi-Fi pairing of an Android or iOS based Smart Device to the System Monitors allowing full system remote control and monitoring of the System Monitors from anywhere in the vehicle. *Voxx Link app required
- WFMM - Built-In 100 Channel Wireless FM Transmitter to broadcast Audio from a System Monitor to a Vehicle's Audio System. *Must choose 1 monitor
- IR Transmitter - 2 Channel Wireless Headphone Transmitter
• Language - Select system language: English, Spanish, French, Chinese, or Japanese
- About Device - System Info and Update Tools
- Reset - Resets the System Monitor to Factory Default

700078
SB10MD1 OVERVIEW
WITH DVD PLAYER

- DVD Player - Plays DVDs, CDs, MP3 discs
- Eject Button - Eject a DVD, CD, or MP3 disc (on top of monitor)
- Micro SD Card Input - For SD Media Playback
- USB Input - For USB Media Playback and Charging Support
- Headphone Output - For use with Wired Headphones
- Reset - Reboots the Monitor
- Power - Turns the Monitor On/Off
- Home - Returns to Home Screen
- Return - Returns to Previous Screen
- Sound - Adjusts Wired Headphone Volume
- Brightness - Adjusts Screen Brightness
- Screen Off - Turns the Monitor Display Off *Touch the Screen to turn the Monitor back On
SB10M1 OVERVIEW
WITHOUT DVD PLAYER

- HDMI Input - Connect HDMI Devices such as Smart Phones or Game Consoles
- Micro SD Card Input - For SD Media Playback
- USB Input - For USB Media Playback and Charging Support
- Headphone Output - For use with Wired Headphones
- Reset - Reboots the Monitor
- Power - Turns the Monitor On/Off
- Home - Returns to Home Screen
- Return - Returns to Previous Screen
- Sound - Adjusts Wired Headphone Volume
- Brightness - Adjusts Screen Brightness
- Screen Off - Turns the Monitor Display Off *Touch the Screen to turn the Monitor back On
VOXXs
Seatback Entertainment
Kit Contents:
| Item # | Qty. | Component Description |
| 1 | 2 | SB10MD1, SB10M1 Monitors |
| 2 | 2 | L Connector Cable |
| 3 | 1 | T-Junction Cable |
| 4 | 2 | IR Headphone |
| 5 | 2 | Metal Shaft Bracket, Black |
| 6 | 2 | Metal Stent Briquetting, Black |
| 7 | 2 | Plastic Stent, Black |
| 8 | 2 | Bracket Cover, Black |
| 9 | 2 | Screw Cap |
| 10 | 2 | Nylon Tie |
| 11 | 1 | Screw Pack |
| 12 | 1 | SB10UHD Owner's Manual |
| 13 | 1 | Installation Manual |
| 14 | 1 | Voxx Registration Card |
| 15 | 1 | SB10UHD Owner's Manual |
Hardware Bag Contents:
| Item # | Qty. | Component Description |
| 1 | 1 | Screw Pack |
| 1 | 20 | Flat Washer |
| 10 | Flat Nut | |
| 10 | Lock Washer | |
| 12 | Screws, Black | |
| 4 | Screws, Silver |
Additional Items Required for Installation:
| Item # | Qty. | Component Description |
Recommended Tools:
| Safety Tools | |
| Seat/ Floor Covers | Blankets |
| Installation Tools | |
| 10mm Socket/Ratchet | #2 Phillips Screwdriver |
| NRT-Nylon Removal Tool | |
| Special Tools | |
Color Applicability/ Trim Level:
| Vehicle Trim Color | AccessoryColor | ||||
| X | |||||
| X | |||||
| X | |||||
| X | |||||
General Applicability:
| Universal |
Issues
| Vehicles with NO guide sleeves |
LEGEND:

STOP: Damage to the vehicle may occur. Do not proceed until process has been complied with.
OPERATOR SAFETY: Use caution to avoid risk of injury.

CRITICAL PROCESS: Proceed with caution to ensure a quality installation. These points will be audited on a completed vehicle installation.

TOOLS & EQUIPMENT: This calls out the specific tools and equipment required for this process.
REVISION MARK: This mark highlights a change in installation with respect to previous issue.
INSTRUCTION/INSTALLATION NOTES:
- After Safety mandated preparatory steps have been taken, the installation sequence is the suggested method for completing the accessory installation.
- When prying panels, use masking tape on all surfaces that a tool may come in contact with to prevent marring.
- After a wire tie is fully fastened, cleanly cut excess wire tie length with a pair of wire cutters.
- The wiring information is on an "as is" basis without any representation or warranty. It is the installer's responsibility to verify any circuit before interfacing with it using a digital multi-meter.
- Manufacturer's service documents can be used for any vehicle disassembly that may be depicted differently from what the instruction states.
- Use Wiring Diagram on last page of document to clarify cable or component names.
A. Pre-Installation Precaution

- Use Seat and Floor protectors to avoid damage to surfaces.

Disconnecting the battery prior to any ground or harness removal/ tapping to prevent possible vehicle damage is recommended. The battery may be temporarily reconnected and disconnected throughout the installation process to perform various tasks. However, prior to doing so all connectors and harnesses must be reassembled and reconnected. Once tasks are completed disconnect battery until installation is complete and DVD system is ready to be tested. After testing, the vehicles interior may be re-assembled. If the vehicle is equipped with an Anti-theft radio, the code must be written down prior to disconnecting the battery cable. The code must be re-entered when the negative battery cable is re-installed. Disconnecting the battery may cause certain vehicle settings to be lost. Manufacturer's recommendations for the battery removal should be followed.
B. Disassemble Vehicle Trim
-
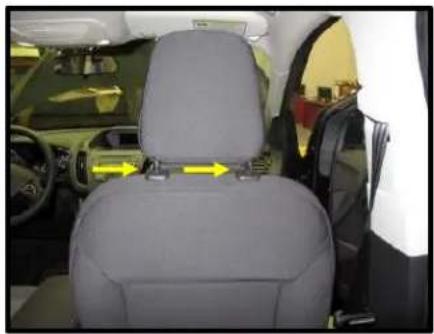
Remove headrest by depressing release buttons on each of the post guides and pulling up on the headrest. NOTE: Some vehicles headrest will remove by different methods. (Figure B1a-b)
-
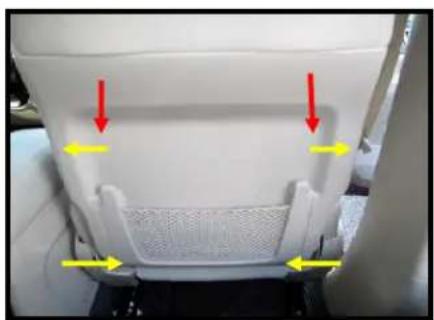
Remove seat back plastic. NOTE: Some vehicles seatback will remove by different methods. Some seats may be soft and only open at bottom section of the seat.
(Figure B2a-b)
Figure B1a
natural_image
Interior view of a car showing the rear seat, dashboard, and steering wheel (no visible text or symbols)Figure B1b

natural_image
Interior view of a car showing the backrest seat, dashboard, and steering wheel (no visible text or symbols)Figure B2a
natural_image
Close-up of a white plastic car seat with yellow directional arrows indicating movement or force (no text or symbols)Figure B2b

natural_image
Interior view of a car showing engine compartment with yellow arrows pointing to components (no visible text or symbols)C. Seat Harness Routing
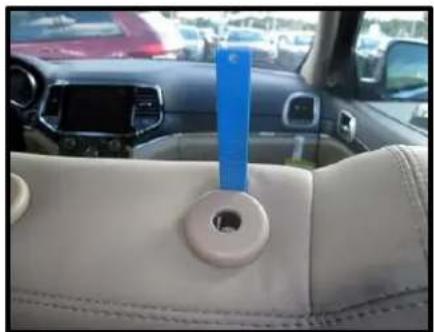
- Insert a NRT carefully between the guide sleeve and seat material creating a gap between. The NRT will then slide down between the foam and the frame. Once down, twist the NRT to create a larger gap. NOTE: In some seats you may have to remove the guide sleeve to properly slide the NRT between the foam and frame.
(Figure C1a-c)

- Route the straight end of the L Connector
harness down between the frame and foam. DO NOT route through the guide post hole.
Continue to pull the harness through the seat, exiting the lower seat opening. (Figure C2a-b)
Figure C1a

natural_image
Interior view of a car seatbelt with yellow arrows pointing to specific components (no text or symbols visible)Figure C1b

natural_image
Interior view of a car showing the rear seat, dashboard, and steering wheel (no visible text or symbols)Figure C1c
natural_image
Interior view of a car dashboard with white leather seat, blue vertical stripe, and red vehicle in background (no visible text or symbols)Figure C2a

natural_image
Interior view of a car showing a red and yellow object on the back of a dark textured surface, with a tool in use (no visible text or symbols)Figure C2b

natural_image
Interior view of a car showing a red plastic clip attached to the backrest area, with no visible text or symbols.

- Pull harness until approximately 12" of cable remains at the top of the seat. Slide cable along inside edge of guide sleeve. This will keep harness from being exposed under the bracket. (Figure C3a-b)
D. Monitor and Bracket assembly
-
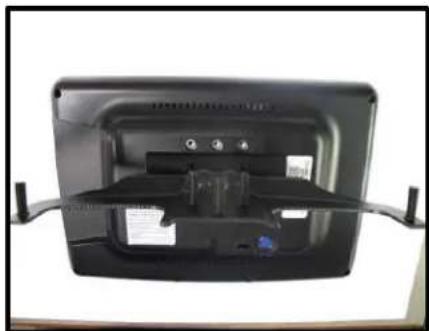
Lay Monitor face down on a soft surface. Notice the 3 locating dimples to align bracket. (Figure D1a-b)
-
Align bracket face into monitor opening making sure that the bracket aligns with dimples. All screw holes should align perfectly. (Figure D2a-b)
Figure C3a

natural_image
Interior view of a car showing the backrest seat, dashboard, and steering wheel (no visible text or symbols)Figure C3b

natural_image
Interior view of a car showing a car seat, dashboard, and attached cable with a yellow arrow pointing to the side (no text or symbols visible)Figure D1a

natural_image
Back view of a black electronic device with a small component and label (no readable text or symbols)Figure D1b

Figure D2a

natural_image
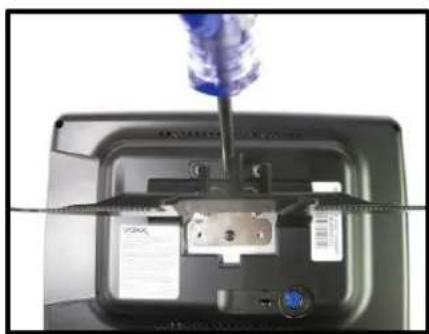
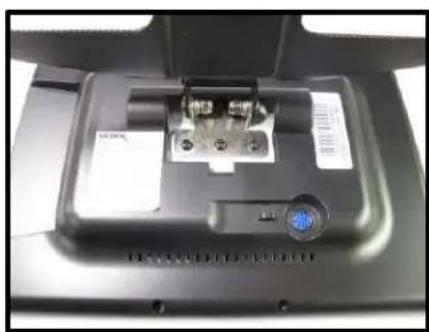
Back view of a black electronic device casing with visible circuit board and control panel (no text or symbols)- Install 6 screws into bracket and monitor
securing the assembly. (Figure D3a-c)

- Once bracket is secure to the monitor, install bracket cover. (Figure D4)
Figure D2b
natural_image
Back view of a black rectangular electronic device with visible ports and connectors (no text or symbols)Figure D3a

natural_image
Close-up of a black electronic device with a purple tool inserted, showing no visible text or symbols.Figure D3b
natural_image
Close-up of a screwdriver inserted into a device casing, showing internal components and a close-up view (no text or symbols visible)Figure D3c
natural_image
Close-up of a black electronic device with a metallic connector and a blue indicator light (no visible text or symbols)Figure D4
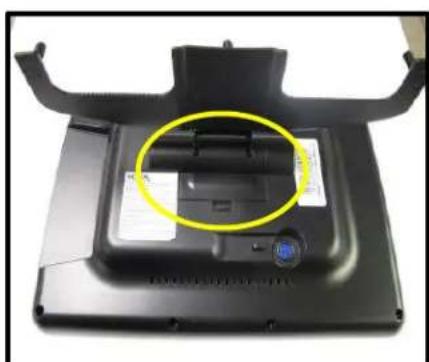
natural_image
Top-down view of a black electronic device with a yellow circle highlighting a component, no visible text or symbols.E. Mounting Monitor/ Bracket Assembly
-
Attach L Connector Harness to the rear of the monitor. (Figure E1)
-
To properly secure the harness to the monitor, first attach a wire tie to the eyelet next to the connection. Install harness connector and secure with the wire tie. Cut excess wire tie before installing monitor.
(Figure E2a-c)
- Slide Monitor / Bracket assembly under rear edge of the guide post. Then slide front bracket along front edge making sure middle bolt is in the bracket slot. (Figure E3a-b)
Figure E1
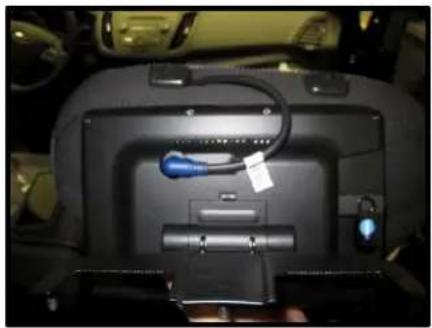
natural_image
Interior view of a car dashboard with visible blue connector and control panel (no text or symbols)Figure E2a

natural_image
Close-up of a laptop keyboard with a blue indicator light and attached cable (no visible text or symbols)Figure E2b

natural_image
Close-up of a black electronic device with a blue screwdriver inserted, no visible text or symbols on the device itself.Figure E2c

natural_image
Close-up of a blue cable connector inserted into a black electronic device casing (no visible text or symbols)Figure E3a

natural_image
Close-up of a car interior showing a hand inserting a plastic component into a black plastic case (no visible text or symbols)- While holding both brackets together install 5 flat washers and 5 flat nuts. Tighten all nuts to secure bracket underneath the guidepost.
(Figure E4a-b)

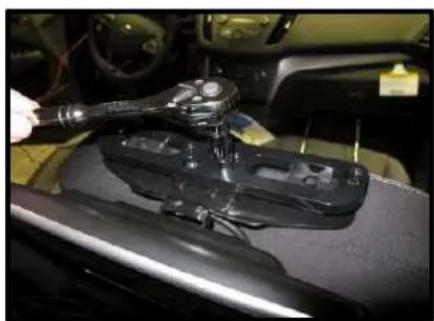
- Install Plastic spacer with 5 flat washers and 5 lock nuts. Tighten all nuts to secure spacer over the guidepost. NOTE: spacer may not sit flush due to the different shape and size of the Guidepost heads. Modifications can be made to better the fit and button movement.
(Figure E4)

- Attach Finish cover using 2 Philips screws.
(Figure E5)

Figure E3b

natural_image
Interior view of a car dashboard with a highlighted component (no visible text or symbols)Figure E4a
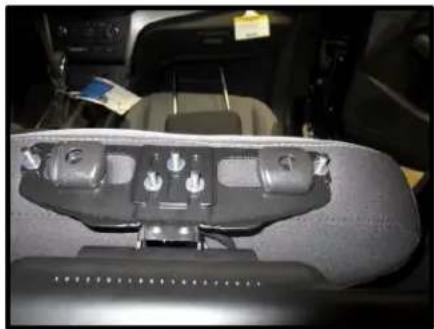
natural_image
Interior view of a car headrest with visible seat, dashboard, and camera components (no text or symbols)Figure E4b
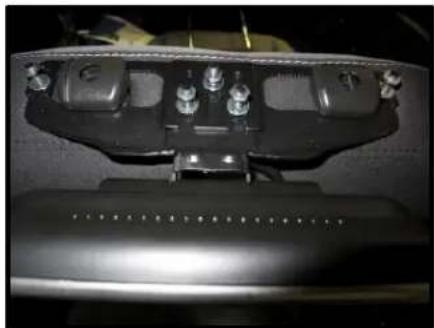
natural_image
Close-up of a mechanical component with no visible text or symbolsFigure E4
natural_image
Close-up of a mechanical component being adjusted, no visible text or symbolsFigure E5

natural_image
Interior view of a car dashboard with a handheld tool interacting with the wheel (no visible text or symbols)
- Re-install headrest. NOTE: Some slight modification may be done to the bracket cover to allow headrest to move up and down freely. (Figure E6)
- Continue routing harnesses following factory harnesses from the lower seat to a central location in the vehicle. Attach Upper harness to the T-Harness. NOTE: The Audio/Video Output will only output A/V signals from the monitor that is connected to the M1 Monitor side of the T-Harness. When connecting to an external monitor, it is important to review with the end user which monitor they would like to have as the source monitor (SB10MD1 or SB10M1). (Figure E7a-b)
F. Power/Ground Location
- Locate an Accessory Power source (+12 VDC should be present when the ignition key is in the accessory and run positions. 0 VDC should be present when ignition key is in the off position). Locate a good ground. Generally, these wires can be located at ignition switch, power outlet, or fuse box. NOTE: Ensure that the switched power is fused at the source. Failure to do so may result in vehicle and wiring damage.
Figure E6

natural_image
Interior view of a car showing the rear seat, steering wheel, and dashboard (no visible text or symbols)Figure E7a

Figure E7b


G. Reassemble Trim
- Trim all wire tie ends
- Reassemble all trim removed in earlier sections.
H. Complete Installation
- Install (2) AAA batteries in each headphone set.
- Store remotes, owner's manual and headphones in center console, glove box, or seat back pockets.
CONNECT TO THE NEXT GENERATION IN-VEHICLE SEAT-BACK SYSTEM

DUAL 10.1" SMARTVEHICLE SEAT-BACK ENTERTAINMENT SYSTEM
DUAL ANDROID, DVD, HDMI, SD, USB, SMARTSTREAM & TOUCH-SCREEN INTERFACE
| Model Year | Make Model | Fitment w/ Supplied Universal Bracket | Additional Bracket Mounting Accessory Required | Comments | |
| 2018 2019 | ACURA ILX Yes | ||||
| 2018 2019 | ACURA MDX Yes | REQUIRES EXTENSION BRACKET ACCESSORYMODEL # SBK-EXT1WILL ADVISE ETA ON BRACKET ACCESSORY | |||
| 2018 2020 | ACURA RDX Yes | ||||
| 2019 2019 | ACURA RLX Yes | REQUIRES EXTENSION BRACKET ACCESSORYMODEL # SBK-EXT1WILL ADVISE ETA ON BRACKET ACCESSORY | |||
| 2019 2020 | ACURA TLX Yes | REQUIRES EXTENSION BRACKET ACCESSORYMODEL # SBK-EXT1WILL ADVISE ETA ON BRACKET ACCESSORY | |||
| 2019 2019 | ALFA ROMEO Giulia Yes | ||||
| 2019 2019 | ALFA ROMEO Stelvio Yes | ||||
| 2018 2019 | AUDI A3 UNDER REVIEW | REQUIRES BRACKET ACCESSORYMODEL # SBK-GS-16 | |||
| 2018 2019 | AUDI A4 Yes | REQUIRES BRACKET ACCESSORYMODEL # SBK-GS-16 | |||
| 2019 2019 | AUDI A5 Yes | REQUIRES BRACKET ACCESSORYMODEL # SBK-GS-16 | |||
| 2019 2019 | AUDI A6 Yes | REQUIRES BRACKET ACCESSORYMODEL # SBK-GS-16 | |||
| 2019 2019 | AUDI A7 Yes | REQUIRES BRACKET ACCESSORYMODEL # SBK-GS-16 | |||
| 2019 2019 | AUDI A8 UNDER REVIEW | ||||
| 2018 2019 | AUDI Q3 | Yes | REQUIRES BRACKET ACCESSORYMODEL # SBK-GS-16 | ||
| 2018 2019 | AUDI Q5 | Yes | REQUIRES BRACKET ACCESSORYMODEL # SBK-GS-16 | ||
| 2018 2019 | AUDI Q7 | Yes | REQUIRES BRACKET ACCESSORYMODEL # SBK-AUDI | ||
| 2018 2019 | AUDI Q8 | Yes | REQUIRES BRACKET ACCESSORYMODEL # SBK-AUDI | ||
| Model Year | Make Model | Fitment w/ Supplied Universal Bracket | Additional Bracket Mounting Accessory Required | Comments | ||
| 2018 2019 | BMW X1 Yes | |||||
| 2019 2019 | BMW X2 Yes | |||||
| 2019 2019 | BMW X3 Yes | SEE TECH BULLETIN | ||||
| 2019 2019 | BMW X4 Yes | SEE TECH BULLETIN | ||||
| 2018 2019 | BMW | X5 Series w/Sport Seating | Yes | SEE TECH BULLETIN | ||
| 2018 2019 | BMW | X5 Series w/Luxury Seating | Yes | REQUIRES BRACKET ACCESSORYMODEL # SBK-GS-16 | ||
| 2019 2019 | BMW | X6 Series w/Sport Seating | Yes | SEE TECH BULLETIN | ||
| 2019 2019 | BMW | X6 Series w/Luxury Seating | Yes | REQUIRES BRACKET ACCESSORYMODEL # SBK-GS-16 | ||
| 2019 2019 | BMW | X7 Series w/Sport Seating | Yes | SEE TECH BULLETIN | ||
| 2019 2019 | BMW | X7 Series w/Luxury Seating | Yes | REQUIRES BRACKET ACCESSORYMODEL # SBK-GS16WILL ADVISE ETA ON BRACKET ACCESSORY | ||
| 2019 2019 | BMW | 3 Series w/Sport Seating | No | |||
| 2019 2019 | BMW | 3 Series w/Luxury Seating | No | |||
| 2019 2019 | BMW | 4 Series w/Sport Seating | Yes | SEE TECH BULLETIN | ||
| 2019 2019 | BMW | 4 Series w/Luxury Seating | Yes | SEE TECH BULLETIN | ||
| 2019 2019 | BMW | 5 Series w/Sport Seating | Yes | SEE TECH BULLETIN | ||
| 2019 2019 | BMW | 5 Series w/Luxury Seating | Yes | REQUIRES BRACKET ACCESSORYMODEL # SBK-GS-16 | ||
| 2019 2019 | BMW | 6 Series w/Sport Seating | Yes | SEE TECH BULLETIN | ||
| 2019 2019 | BMW | 6 Series w/Luxury Seating | Yes | REQUIRES BRACKET ACCESSORYMODEL # SBK-GS-16 | ||
| 2018 2019 | BMW | 7 Series w/Sport Seating | Yes | SEE TECH BULLETIN | ||
| 2019 2019 | BMW | 7 Series w/Luxury Seating | Yes | REQUIRES BRACKET ACCESSORYMODEL # SBK-GS-16 | ||
| Model Year | Make Model | Fitment w/ Supplied Universal Bracket | Additional Bracket Mounting Accessory Required | Comments | |
| 2018 2019 | BUICK Enclave Yes | REQUIRES BRACKET ACCESSORYMODEL # SBK-GS-16 | |||
| 2018 2019 | BUICK Encore Yes | ||||
| 2018 2019 | BUICK Envision No | ||||
| 2018 2019 | BUICK Lacrosse Yes | ||||
| 2018 2019 | BUICK Regal Yes | ||||
| 2018 2019 | CADILLAC CT6 Yes | REQUIRES BRACKET ACCESSORYMODEL # SBK-GS-14 | |||
| 2018 2019 | CADILLAC CTS | Yes | REQUIRES BRACKET ACCESSORYMODEL # SBK-GS-14 | ||
| 2018 2019 | CADILLAC Escalade | Yes | |||
| 2018 2019 | CADILLAC XT4 | Yes | |||
| 2018 2019 | CADILLAC XT5 | Yes | |||
| 2018 2019 | CADILLAC XTS Yes | REQUIRES BRACKET ACCESSORYMODEL # SBK-GS-14 | |||
| 2019 2019 | CHEVROLET Blazer | Yes | REQUIRES BRACKET ACCESSORYMODEL # SBK-GS-16 | ||
| 2018 2019 | CHEVROLET Colorado | Yes | |||
| 2018 2019 | CHEVROLET Cruze Yes | ||||
| 2018 2019 | CHEVROLET Equinox | Yes | REQUIRES BRACKET ACCESSORYMODEL # SBK-GS-16 | ||
| 2018 2019 | CHEVROLET Impala | Yes | |||
| 2019 2019 | CHEVROLET Malibu | Yes | REQUIRES BRACKET ACCESSORYMODEL # SBK-GS-16 | ||
| 2018 2019 | CHEVROLET Silverado 1500 | Yes | REQUIRES BRACKET ACCESSORYMODEL # SBK-GS-16 | ||
| 2018 2019 | CHEVROLET Silverado HD | Yes | REQUIRES BRACKET ACCESSORYMODEL # SBK-GS-16 | ||
| 2018 2019 | CHEVROLET Suburban | Yes | |||
| 2018 2019 | CHEVROLET Tahoe | Yes | |||
| 2018 2019 | CHEVROLET Traverse | Yes | REQUIRES BRACKET ACCESSORYMODEL # SBK-GS-16 | ||
| 2019 2019 | CHEVROLET Trax | Yes | REQUIRES BRACKET ACCESSORYMODEL # SBK-GS-16 | ||
| 2018 2019 | CHRYSLER 300 No | ||||
| 2018 2019 | CHRYSLER Pacifica Yes | ||||
| 2018 2019 | DODGE Caravan Yes | Will work with 2nd Row (3rd Row viewing) w/out Stow n Go Seating | |||
| 2018 2019 | DODGE Charger No | ||||
| 2018 2019 | DODGE Challenger No | ||||
| 2018 2019 | DODGE Durango Yes | ||||
| 2018 2019 | DODGE Journey Yes | ||||
| 2019 2019 | DODGE Ram 1500 | Yes | |||
| 2019 2019 | DODGE Ram 2500 | Yes | |||
| 2019 2019 | DODGE Ram 3500 | Yes | |||
| 2019 2019 | FIAT 500x | Yes | |||
| 2018 2019 | FORD Edge | Yes | |||
| 2018 2019 | FORD Escape | Yes | |||
| 2018 2019 | FORD Expedition Yes | ||||
| 2018 2019 | FORD Explorer | Yes | |||
| 2019 2019 | FORD Eco Sport Yes | ||||
| 2019 2019 | FORD Fiesta | Yes | |||
| 2018 2019 | FORD Flex | Yes | |||
| 2019 2019 | FORD Focus | Yes | |||
| 2019 2019 | FORD Fusion | Yes | |||
| 2018 2019 | FORD F 150 | Yes | |||
| 2018 2019 | FORD Super Duty | Yes | |||
| 2019 2019 | FORD Taurus Yes | ||||
| 2019 2019 | FORD Transit Yes | ||||
| 2019 2019 | FORD Transit Connect | Yes | |||
| 2019 | 2019 | FORD Ranger Yes | |||
| 2018 | 2019 | GENESIS G70Sport | Yes | ||
| 2018 | 2019 | GENESIS G70Elite | No | ||
| 2018 | 2019 | GENESIS G80 UNDER REVIEW | |||
| 2018 | 2019 | GENESIS G90 No | |||
| 2018 | 2019 | GMC Acadia Yes yes | REQUIRES BRACKET ACCESSORYMODEL # SBK-GS-16 | ||
| 2018 | 2019 | GMC Canyon Yes | |||
| 2018 | 2019 | GMC Sierra 1500 Yes | REQUIRES BRACKET ACCESSORYMODEL # SBK-GS-16 | ||
| 2018 | 2019 | GMC Sierra HD | Yes | REQUIRES BRACKET ACCESSORYMODEL # SBK-GS-16 | |
| 2018 | 2019 | GMC Terrain | Yes | REQUIRES BRACKET ACCESSORYMODEL # SBK-GS-16 | |
| 2018 | 2019 | GMC Yukon | Yes | ||
| 2018 | 2019 | GMC Yukon Denali | Yes | ||
| 2019 | 2019 | HONDA Accord Yes | |||
| 2019 | 2019 | HONDA Civic Yes | |||
| 2019 | HONDA Clarity UNDER REVIEW | ||||
| 2019 | 2019 | HONDA CR V Yes | |||
| 2019 | 2019 | HONDA FIT Yes | |||
| 2019 | 2019 | HONDA HR V Yes | |||
| 2019 | 2019 | HONDA Insight UNDER REVIEW | |||
| 2019 | 2019 | HONDA Odyssey Yes | Will work with 2nd Row(3rd Row viewing) | ||
| 2019 | 2019 | HONDA Passport Yes | |||
| 2019 | 2019 | HONDA Pilot | Yes | Will work with 2nd Row(3rd Row viewing) | |
| 2019 | 2019 | HONDA Ridgline | Yes | ||
| 2019 2019 | HYUNDAI Accent UNDER REVIEW | ||||
| 2018 2019 | HYUNDAI Elantra Yes | Contact Voxx Tech for install Instructions | |||
| 2018 2019 | HYUNDAI Kona Yes | ||||
| 2019 2019 | HYUNDAI Nexo UNDER REVIEW | ||||
| 2019 2019 | HYUNDAI Santa Fe (5 Passenger) | Yes | Contact Voxx Tech for install instructions | ||
| 2019 2019 | HYUNDAI Santa Fe XL (7 Passenger) | Yes | Contact Voxx Tech for install instructions | ||
| 2018 2019 | HYUNDAI Sonata Yes | Contact Voxx Tech for install instructions | |||
| 2018 2019 | HYUNDAI Tucson No | ||||
| 2020 | HYUNDAI Palisade UNDER REVIEW | ||||
| 2019 2019 | INFINITI Q50 UNDER REVIEW | ||||
| 2019 2019 | INFINITI Q70 Yes | ||||
| 2019 2019 | INFINITI QX30 | UNDER REVIEW | |||
| 2019 2019 | INFINITI QX50 | Yes | |||
| 2018 2019 | INFINITI QX60 | Yes | |||
| 2018 2019 | INFINITI QX80 | Yes | |||
| 2019 2019 | JAGUAR E Pace | Yes | REQUIRES BRACKET ACCESSORY MODEL # SBK-GS-14 | ||
| 2019 2019 | JAGUAR F Pace | Yes | REQUIRES BRACKET ACCESSORY MODEL # SBK-GS-14 | ||
| 2019 2019 | JAGUAR I Pace | Yes | REQUIRES BRACKET ACCESSORY MODEL # SBK-GS-14 | ||
| 2019 2019 | JAGUAR XE | Yes | REQUIRES BRACKET ACCESSORY MODEL # SBK-GS-14 | ||
| 2019 2019 | JAGUAR XF | UNDER REVIEW | |||
| 2019 2019 | JAGUAR XJ | Yes | REQUIRES EXTENSION BRACKET ACCESSORY MODEL # SBK-EXT1 WILL ADVISE ETA ON BRACKET ACCESSORY | ||
| 2019 2019 | JEEP Cherokee Yes | ||||
| 2018 2019 | JEEP Compass Yes | ||||
| 2018 2019 | JEEP Grand Cherokee Yes | ||||
| 2018 2019 | JEEP Renegade Yes | ||||
| 2018 2019 | JEEP Wrangler JL Yes | ||||
| 2018 2019 | JEEP Wrangler JK Yes | ||||
| 2020 | JEEP | Gladiator | Yes | ||
| 2019 2019 | KIA | Cadenza | Yes | Contact Voxx Tech for install instructions | |
| 2018 2019 | KIA | Forte | Yes | ||
| 2019 2019 | KIA | K900 | Yes | Contact Voxx Tech for install instructions | |
| 2018 2019 | KIA | Niro | Yes | Contact Voxx Tech for install instructions | |
| 2018 2019 | KIA | Optima | Yes | Contact Voxx Tech for install instructions | |
| 2019 2019 | KIA | Rio | UNDER REVIEW | ||
| 2018 2019 | KIA | Sedona | Yes | Contact Voxx Tech for install instructions | |
| 2018 2019 | KIA | Sorrento | Yes | Contact Voxx Tech for install instructions | |
| 2019 2019 | KIA Soul | Yes | Contact Voxx Tech for install instructions | ||
| 2018 2019 | KIA | Sportage | Yes | Contact Voxx Tech for install instructions | |
| 2018 2019 | KIA | Stinger | Yes | Contact Voxx Tech for install instructions | |
| 2020 | KIA | Telluride | Yes | Contact Voxx Tech for install instructions | |
| 2018 2019 | LAND ROVER | Discovery | REQUIRES BRACKET ACCESSORYMODEL # SBK-GS-14 | ||
| 2018 2019 | LAND ROVER | Discovery Sport | REQUIRES BRACKET ACCESSORYMODEL # SBK-GS-14 | ||
| 2018 2019 | LAND ROVER | Evoque | REQUIRES BRACKET ACCESSORYMODEL # SBK-GS-14 | ||
| 2018 2019 | LAND ROVER | Range Rover | REQUIRES BRACKET ACCESSORYMODEL # SBK-GS-14 | ||
| 2018 2019 | LAND ROVER | Ranger Rover Sport | REQUIRES BRACKET ACCESSORYMODEL # SBK-GS-14 | ||
| 2018 2019 | LAND ROVER | Velar | REQUIRES BRACKET ACCESSORYMODEL # SBK-GS-14 | ||
| Model Year | Make Model | Fitment w/ Supplied Universal Bracket | Additional Bracket Mounting Accessory Required | Comments | ||
| 2018 | 2019 | LEXUS ES | Yes | |||
| 2018 | 2019 | LEXUS GS | Yes | |||
| 2018 | 2019 | LEXUS GX | Yes | REQUIRES EXTENSION BRACKET ACCESSORYMODEL # SBK-EXT1WILL ADVISE ETA ON BRACKET ACCESSORY | ||
| 2019 | LEXUS IS | Yes | REQUIRES EXTENSION BRACKET ACCESSORYMODEL # SBK-EXT1WILL ADVISE ETA ON BRACKET ACCESSORY | |||
| 2018 | 2019 | LEXUS LX | Yes | |||
| 2018 | 2019 | LEXUS LS | Yes | REQUIRES EXTENSION BRACKET ACCESSORYMODEL # SBK-EXT1 & the SBK-GS-14WILL ADVISE ETA ON BRACKET ACCESSORY | ||
| 2018 | 2019 | LEXUS NX | Yes | |||
| 2020 | LEXUS NX | No | ||||
| 2018 | 2019 | LEXUS RX | Yes | REQUIRES EXTENSION BRACKET ACCESSORYMODEL # SBK-EXT1WILL ADVISE ETA ON BRACKET ACCESSORY | ||
| 2019 | 2019 | LEXUS UX | Yes | |||
| 2020 | 2020 | LINCOLN | Aviator | Yes | REQUIRES BRACKET ACCESSORYMODEL # SBK-LINC | |
| 2018 | 2019 | LINCOLN | Continental | Yes | REQUIRES BRACKET ACCESSORYMODEL # SBK-LINC | |
| 2018 | 2019 | LINCOLN | MKC | Yes | ||
| 2018 | 2018 | LINCOLN | MKX Yes | |||
| 2019 | 2019 | LINCOLN | MKZ Yes | |||
| 2019 | 2019 | LINCOLN | MKT Yes | |||
| 2019 | 2019 | LINCOLN | Nautilus | Yes | ||
| 2018 | 2019 | LINCOLN | Navigator (Perfect Position Seating - 24 or 30 way Seats Only) | Yes | REQUIRES BRACKET ACCESSORYMODEL # SBK-LINC | |
| 2018 | 2019 | LINCOLN | Navigator (10 way Seating ) | UNDER REVIEW | ||
| 2018 | 2019 | MASERATI | Ghibli | UNDER REVIEW | ||
| 2018 | 2019 | MASERATI | Lavante UNDER REVIEW | |||
| 2019 | 2019 | MASERATI | Quattroporte | UNDER REVIEW | ||
| 2018 | 2018 | MAZDA | 3 | No | ||
| 2018 | 2018 | MAZDA | 6 | UNDER REVIEW | ||
| 2018 | 2019 | MAZDA | CX 3 | Yes | ||
| Model Year | Make Model | Fitment w/ Supplied Universal Bracket | Additional Bracket Mounting Accessory Required | Comments | ||
| 2018 | 2019 | MAZDA CX | 5 Yes | |||
| 2018 | 2019 | MAZDA CX | 9 Yes | Will work with 2nd Row (3rd Row viewing) | ||
| 2019 | 2019 | MERCEDES A | Class No | |||
| 2018 | 2019 | MERCEDES C | Class Yes | SEE TECH BULLETIN | ||
| 2019 | 2019 | MERCEDES CLA | No | |||
| 2018 | 2019 | MERCEDES CLS | No | |||
| 2019 | 2019 | MERCEDES E | Class No | |||
| 2018 | 2019 | MERCEDES G | Class No | |||
| 2018 | 2019 | MERCEDES GLA | Yes | SEE TECH BULLETIN | ||
| 2019 | 2019 | MERCEDES GLC | Yes | SEE TECH BULLETIN | ||
| 2018 | 2019 | MERCEDES GLE | Yes | SEE TECH BULLETIN | ||
| 2020 | MERCEDES GLE | Yes | REQUIRES BRACKET ACCESSORY MODEL # SBK-GS-14 | |||
| 2018 | 2019 | MERCEDES GLS | Yes | SEE TECH BULLETIN | ||
| 2018 | 2019 | MERCEDES S | Class | Yes | SEE TECH BULLETIN | |
| 2019 | 2019 | MERCEDES Sprinter UNDER REVIEW | ||||
| 2019 | 2019 | MINI | Cooper | UNDER REVIEW | ||
| 2019 | 2019 | MINI | Cooper S | UNDER REVIEW | ||
| 2019 | 2019 | MINI Countryman UNDER REVIEW | ||||
| 2018 | 2019 | MITSUBISHI | Eclipse Cross | Yes | ||
| 2019 | 2019 | MITSUBISHI | Mirage | UNDER REVIEW | ||
| 2019 | 2019 | MITSUBISHI | Mirage G4 | UNDER REVIEW | ||
| 2018 | 2019 | MITSUBISHI | Outlander | Yes | ||
| 2018 | 2019 | MITSUBISHI | Outlander Sport | Yes | ||
| Model Year | Make Model | Fitment w/ Supplied Universal Bracket | Additional Bracket Mounting Accessory Required | Comments | |
| 2019 2019 | NISSAN Altima Yes | ||||
| 2018 2019 | NISSAN Armada Yes | ||||
| 2019 2019 | NISSAN Frontier Yes | ||||
| 2018 2019 | NISSAN Maxima Yes | ||||
| 2018 2019 | NISSAN Murano | Yes | |||
| 2019 2019 | NISSAN NV200 | UNDER REVIEW | |||
| 2018 2019 | NISSAN Pathfinder Yes | ||||
| 2018 2019 | NISSAN Sentra Yes | ||||
| 2018 2019 | NISSAN Titan Yes | ||||
| 2018 2019 | NISSAN Titan XD | Yes | |||
| 2019 2019 | NISSAN Rogue Yes | ||||
| 2019 2019 | NISSAN Rogue Sport | Yes | |||
| 2019 2019 | NISSAN Versa | Yes | |||
| 2019 2019 | NISSAN Versa Note | Yes | |||
| 2019 2019 | PORSCHE Cayenne | Yes | REQUIRES BRACKET ACCESSORY MODEL # SBK-GS-14 | ||
| 2019 2019 | PORSCHE Macan | Yes | REQUIRES BRACKET ACCESSORY MODEL # SBK-GS-14 | ||
| 2019 2019 | PORSCHE Panamera | No | |||
| 2019 2019 | RAM 1500 Yes | ||||
| 2019 2019 | RAM 250 | Yes | |||
| 2019 2019 | RAM 3500 Yes | ||||
| 2019 2019 | SUBARU Accent Yes | ||||
| 2019 2019 | SUBARU Crosstrek Yes | ||||
| 2019 2019 | SUBARU Forester Yes | ||||
| 2019 2019 | SUBARU Impreza Yes | ||||
| 2019 2019 | SUBARU Legacy Yes | ||||
| 2019 2019 | SUBARU Outback Yes | ||||
| 2019 2019 | SUBARU WRX No | ||||
| 2018 2019 | TOYOTA 4Runner | Yes | REQUIRES EXTENSION BRACKET ACCESSORYMODEL # SBK-EXT1WILL ADVISE ETA ON BRACKET ACCESSORY | ||
| 2019 2019 | TOYOTA Avalon Yes | ||||
| 2019 2019 | TOYOTA Camry | Yes | |||
| 2018 2019 | TOYOTA C-HR | UNDER REVIEW | |||
| 2019 2019 | TOYOTA Corolla Yes | ||||
| 2019 2019 | TOYOTA Corolla Hatchback | Yes | |||
| 2019 2019 | TOYOTA Corolla Yes | ||||
| 2020 | TOYOTA Corolla Yes | ||||
| 2018 2019 | TOYOTA Highlander | Yes | |||
| 2018 2019 | TOYOTA Land Cruiser | UNDER REVIEW | |||
| 2018 2019 | TOYOTA Prius | UNDER REVIEW | |||
| 2018 2019 | TOYOTA Prius C UNDER REVIEW | ||||
| 2018 2019 | TOYOTA Prius Prime | UNDER REVIEW | |||
| 2019 2019 | TOYOTA RAV4 | Yes | |||
| 2019 2019 | TOYOTA Sequoia UNDER REVIEW | ||||
| 2018 2019 | TOYOTA Sienna Yes | REQUIRES EXTENSION BRACKET ACCESSORYMODEL # SBK-EXT1WILL ADVISE ETA ON BRACKET ACCESSORY | |||
| 2018 2019 | TOYOTA Tacoma Yes | ||||
| 2018 2019 | TOYOTA Tundra Yes | REQUIRES EXTENSION BRACKET ACCESSORYMODEL # SBK-EXT1WILL ADVISE ETA ON BRACKET ACCESSORY(Will not lock into original position) | |||
| 2019 2019 | TOYOTA Yaris Yes | ||||
| 2019 2019 | VW Atlas Yes | REQUIRES BRACKET ACCESSORYMODEL # SBK-GS-14 | |||
| 2019 2019 | VW Golf Yes | ||||
| 2019 2019 | VW Jetta Yes | REQUIRES BRACKET ACCESSORYMODEL # SBK-GS-14 | |||
| 2019 2019 | VW Passat Yes | ||||
| 2018 2019 | VW Tiguan | Yes | REQUIRES BRACKET ACCESSORYMODEL # SBK-GS-14 | ||
| 2018 2019 | VOLVO S60 | Yes | REQUIRES BRACKET ACCESSORYMODEL # SBK-VOLV WILL ADVISE ETA ON BRACKET | ||
| 2019 2019 | VOLVO S60 R | Yes | REQUIRES BRACKET ACCESSORYMODEL # SBK-VOLV WILL ADVISE ETA ON BRACKET | ||
| 2019 2019 | VOLVO S90 | UNDER REVIEW | |||
| 2018 2019 | VOLVO V60 | UNDER REVIEW | |||
| 2018 2019 | VOLVO V90 | Yes | REQUIRES BRACKET ACCESSORYMODEL # SBK-VOLV WILL ADVISE ETA ON BRACKET | ||
| 2019 2019 | VOLVO XC40 No | ||||
| 2018 2019 | VOLVO XC60 | Yes | REQUIRES BRACKET ACCESSORYMODEL # SBK-VOLV WILL ADVISE ETA ON BRACKET | ||
| 2018 2019 | VOLVO XC90 | Yes | REQUIRES BRACKET ACCESSORYMODEL # SBK-VOLV WILL ADVISE ETA ON BRACKET | ||
| Owner's Manual: www.voxxintl.com/seatbackOM | |||||
| Install Manual: www.voxxintl.com/seatbackIM | |||||
| For Technical Support Please Call 1-800-371-7725Customer service, Please call 1-800-645-4994 (opt 4) | |||||
| Install -https://youtu.be/NXcwq9nUmJs | Customer -https://youtu.be/sIhuL0JRomg | ||||

LIMITED WARRANTY
Applies to AUDIOVOX Model AVXSB10UHD
AUDIOVOX®
VOXX ELECTRONICS CORP. (the Company) warrants to the original retail purchaser of this product that, should this product or any part thereof, under normal use and conditions, be proven defective in material or workmanship within 36 months from the date of original purchase, such defect(s) will be repaired or replaced with reconditioned product (at the Company's option) without charge for parts and repair labor.
To obtain repair or replacement within the terms of this Warranty, the product is to be delivered with proof of warranty coverage (e.g. dated bill of sale), specification of defect(s), transportation prepaid, to the Company at the address shown below:
Shine Electronics, 10-15 46th Road, LIC, NY 11101
This Warranty does not extend to the elimination of externally generated static or noise, to correction of antenna problems, to costs incurred for installation, removal or re-installation of the product, or to damage to digital memory/media devices, gaming devices, discs, speakers, accessories, or vehicle electrical systems.
This Warranty does not apply to any product or part thereof which, in the opinion of the Company, has suffered or been damaged through alteration, improper installation, mishandling, misuse, neglect, accident, or by removal or defacement of the factory serial number/bar code label(s). THE EXTENT OF THE COMPANY'S LIABILITY UNDER THIS WARRANTY IS LIMITED TO THE REPAIR OR REPLACEMENT PROVIDED ABOVE AND, IN NO EVENT, SHALL THE COMPANY'S LIABILITY EXCEED THE PURCHASE PRICE PAID BY PURCHASER FOR THE PRODUCT.
This Warranty is in lieu of all other express warranties or liabilities. ANY IMPLIED WARRANTIES, INCLUDING ANY IMPLIED WARRANTY OF MERCHANTABILITY, SHALL BE LIMITED TO THE DURATION OF THIS WRITTEN WARRANTY. ANY ACTION FOR BREACH OF ANY WARRANTY HEREUNDER INCLUDING ANY IMPLIED WARRANTY OF MERCHANTABILITY MUST BE BROUGHT WITH IN A PERIOD NOT EXCEEDING 12 MONTHS AFTER EXPIRATION OF THE WARRANTY. IN NO CASE SHALL THE COMPANY BE LIABLE FOR ANY CONSEQUENTIAL OR INCIDENTAL DAMAGES FOR BREACH OF THIS OR ANY OTHER WARRANTY, LOSS OF REVENUE OR LOSS OF ACTUAL OR ANTICIPATED PROFITS (INCLUDING LOSS OF PROFITS ON CONTRACTS). No person or representative is authorized to assume for the Company any liability other than expressed herein in connection with the sale of this product.
Some states do not allow limitations on how long an implied warranty lasts or the exclusion or limitation of incidental or consequential damage so the above limitations or exclusions may not apply to you. This Warranty gives you specific legal rights and you may also have other rights which vary from state to state.
VOXX Electronics Corporation, 180 Marcus Blvd., Hauppauge, New York 11788 • 1-800-645-4994
AUDIOVOX MOBILE VIDEO 36 MONTH LIMITED WARRANTY
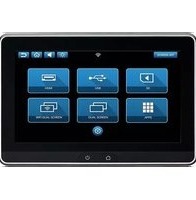
- Universal Seatback In-Vehicle Entertainment System
- Congratulations
- Safety Precaution
- Warnings
- TABLE OF CONTENTS
- SB10MD1 FEATURES
- SB10M1 FEATURES
- ACCESSORIES
- Wireless Headphones
- How to Use the Wireless Headphones
- Wired Headphone Input
- DESCRIPTION OF PARTS (SB10MD1)
- DVD Disc Eject Button
- PowerButton
- HomeButton
- IRTransmitter
- USBPort
- Wired Headphone Jack
- Micro SD Card Slot
- Reset
- DVD Disc Insertion Slot
- DESCRIPTION OF PARTS (SB10M1)
- PowerButton
- HomeButton
- IRTransmitter
- Reset
- Micro SD Card Slot
- USBPort
- HDMIInput
- GETTING STARTED
- HOME MAIN MENU
- SYSTEM APPLICATIONS
- NOTES:
- SMARTSTREAM ANDROID
- SMARTSTREAM iOS
- SMARTSTREAM iOS (CONTINUED)
- HDMI INPUT (SB10M1 ONLY)
- USB & SD CARD PLAYBACK
- USB PLAYBACK
- SD CARD PLAYBACK
- WIFI DUAL SCREEN
- WIFI DUAL SCREEN(CONTINUED)
- DUAL SCREEN
- WIFI SETUP
- WIFI CONNECTION (CONTINUED)
- VOXX LINK
- VOXX LINK (CONTINUED)
- WFMM (WIRELESS FM MODULATOR)
- USER INTERFACE LANGUAGE
- ABOUT DEVICE & CHECK FOR UPDATE
- ABOUT DEVICE & CHECK FOR UPDATE (CONTINUED)
- TIME ZONE
- RESET
- VOLUME CONTROL & BRIGHTNESS CONTROL
- VOLUME CONTROL (WIRED HEADPHONES ONLY)
- BRIGHTNESS CONTROL
- DVD PLAYBACK (SB10MD1 MONITOR)
- DVD Region Code
- Supported Disc Types
- Unsupported Disc Types
- Loading Discs
- Playing Discs
- MEDIA & FILE TYPE COMPATIBILITY
- Media Compatibility
- Storage Device Formatting
- GENERAL SPECIFICATIONS
- COMPLIANCE INFORMATION
- FCC Notice
- DVD Video Playback
- IOS
- AAC
- MP3
- WMA/WMV
- FLAC
- SD/SDHC/SDXC
- HDMI
- Dolby Digital
- European Waste Electrical and Electronic Equipment (WEEE) Notice
- FIRST TIME SETUP
- Powering up the System
- Wi-Fi
- Downloading Apps on the System Monitors
- QUICK START GUIDE
- 10.1" SEATBACK IN-VEHICLE
- ENTERTAINMENT SYSTEM
- SYSTEM FEATURES:
- SB10MD1 OVERVIEW
- SB10M1 OVERVIEW
- VOXXs
- Seatback Entertainment
- LEGEND:
- INSTRUCTION/INSTALLATION NOTES:
- Pre-Installation Precaution
- Disassemble Vehicle Trim
- Seat Harness Routing
- Monitor and Bracket assembly
- Mounting Monitor/ Bracket Assembly
- Power/Ground Location
- Reassemble Trim
- Complete Installation
- LIMITED WARRANTY
- AUDIOVOX®
- AUDIOVOX MOBILE VIDEO 36 MONTH LIMITED WARRANTY
Brand : AUDIOVOX
Model : AVXSB10UHD
Category : Dash cam