003854 - Leaf blower Meec Tools - Free user manual and instructions
Find the device manual for free 003854 Meec Tools in PDF.


| Product Type | Leaf Blower |
| Brand | Meec Tools |
| Model | 003854 |
| Power Source | 230 V ~ 50 Hz, 1200 W |
| Air Speed | 200 km/h (max) |
| Air Volume | 800 m³/h |
| Speed Settings | Variable speed trigger |
| Weight | 4.5 kg |
| Dimensions (L x W x H) | 80 x 25 x 30 cm |
| Noise Level | 95 dB(A) |
| Vibration Level | 2.5 m/s² |
| Safety Features | Double insulation, thermal overload protection |
| Maintenance | Clean air intakes regularly; inspect power cord |
| Replacement Parts | Available from Meec Tools; includes fan wheel, motor brushes |
| Repairability | Moderate; user-replaceable carbon brushes, cord |
Frequently Asked Questions - 003854 Meec Tools
User questions about 003854 Meec Tools
0 question about this device. Answer the ones you know or ask your own.
Ask a new question about this device
Download the instructions for your Leaf blower in PDF format for free! Find your manual 003854 - Meec Tools and take your electronic device back in hand. On this page are published all the documents necessary for the use of your device. 003854 by Meec Tools.
USER MANUAL 003854 Meec Tools
003854
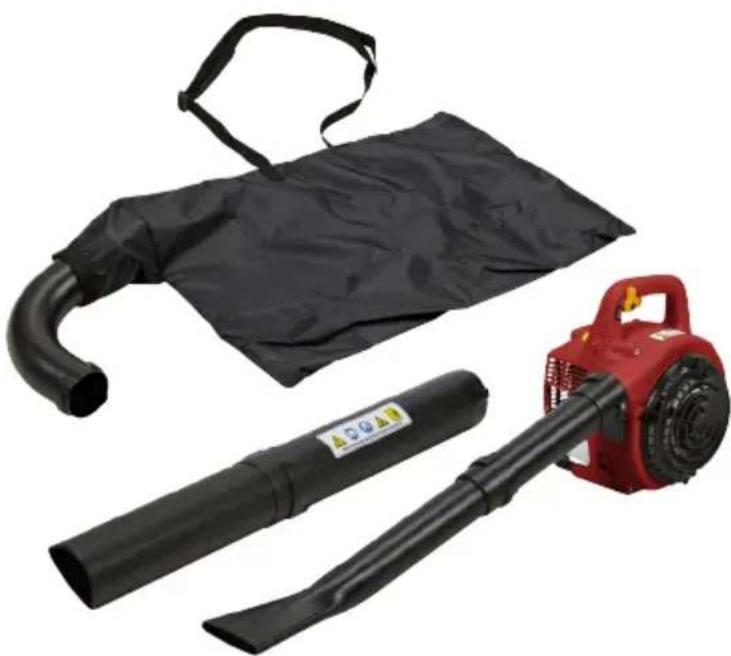
natural_image
Product photo of a black canopy cover, black handheld air cleaner, and red electric fan (no text or symbols visible)
SE LÖVBLÅS/-SUG
Operating instructions (Translation of the original instructions) Important! Read the user instructions carefully before use. Save them for future reference.
Värna om miljön!
Care for the environment!
Must not be discarded with household waste! This product contains electrical or electronic components that should be recycled. Leave the product for recycling at the designated station e.g. the local authority's recycling station.
Jula reserves the right to make changes. In the event of problems, please contact our customer service.
www.jula.com
Tillverkare/ Produsent/ Produenci/ Manufacturer
Jula AB, Box 363, 532 24 SKARA
Distributör/ Distributør/ Dystrybutor/ Distributor
Jula Poland Sp. z o.o., ul.
EC DECLARATION OF CONFORMITY
EG FÖRSÄKRAN OM ÖVERENSSTÄMMELSE
EF SAMSVARSERKLÆRING
DEKLARACJA ZGODNOŚCI WE

Jula AB, Box 363, SE-532 24 SKARA, SWEDEN
certify that the design and manufacturing of this product
Machinery Directive 2006/42/EC
EN 15503:2009+A2
Electromagnetic Compatibility Directive 2014/30/EU
EN 14982:2009
Outdoor Noise Directive 2000/14/EC, amended by 2005/88/EC
This product was CE marked in year -17
Name and address of the person authorised to compile the technical file:
natural_image
Diagram of a car interior showing a fuel can being poured into a car, with a no-smoking symbol nearby (no text or labels)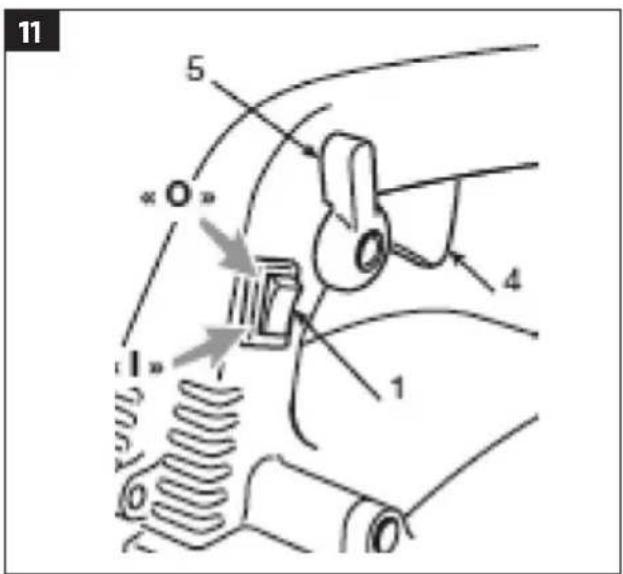
natural_image
Technical line drawing of a mechanical assembly with internal components (no text or symbols)The image is too blurry to recognize any text content.
15
SÄKERHETSANVISNINGAR
- The machine is not intended to be used by persons (children or adults) with any form of functional disorder or by persons who do not have sufficient experience or know-how on how to use it, without the supervision of someone who is responsible for their safety.
- Keep children under supervision to make sure they do not play with the machine.
• Never allow children to use the machine. - Never allow persons who are not familiar with the machine, or who have not read these instructions, to use it. There may be local regulations for the minimum age of persons allowed to use the machine.
- Do not use the machine when other persons, especially children, or pets are in the vicinity.
- Do not use the machine near open windows, or doors, etc.
- Stay alert. Pay attention to what you are doing, and use your common sense when working with the machine Never use the machine if you are tired or under the influence of drugs, alcohol or medication. A moment of inattention can result in serious personal injury.
- Wear safety glasses and suitable personal safety equipment. Depending on the type of machine and how it is used, safety equipment such as dust masks, non-slip safety shoes, safety helmets and ear protection reduce the risk of personal injury.
- Wear long trousers. Wear a hair net if you have long hair. Do not wear loose-fitting clothes, jewellery, or watches etc. that can fasten in moving parts. Wear suitable clothing.
- Persons with breathing difficulties and persons using the leaf blower in very dusty conditions should always wear a particle filter mask.
- The machine makes a lot of noise. Risk of hearing impairment if ear protection is not used.
- Pay attention to the surroundings and avoid causing any interference. The machine must only be used at a reasonable time of day, i.e. not early morning or late at night when it can disturb other people. Follow the applicable local regulations regarding permissible working hours. The machine should be used with the lowest possible engine speed necessary to do the work.
- Avoid accidental starting. There is a severe risk of injury if you carry the machine with your finger on the throttle lever.
- Carefully inspect the area where the machine is to be used and remove any stones, wires, bones or other foreign objects.
- Avoid unbalanced and awkward positions when working. Always maintain a firm footing and good balance. This will ensure you have better control in unexpected situations.
- If the area to be cleared is dusty, dampen the surface slightly or use a sprinkler.
- Do not use the machine in explosive environments, such as in the vicinity of flammable liquids, gases or dust. The machine produce sparks, which can ignite dust and fumes.
- Use the full length of the blowpipe so that the air flow acts close to the ground.
- Use a rake or broom to scrape up debris before blowing.
- Do not use the machine for long periods of time. Take regular breaks.
- Never use the machine if the guards or covers are dismantled or damaged, or without the safety devices in place.
- Never immerse the machine in water or any other liquid.
- Keep the handles on the machine clean, dry and free from oil, petrol and dirt.
WARNING!
- Only use parts and accessories recommended by the manufacturer. The use of other parts can result in personal injury and/or material damage. It will also invalidate the warranty.
- Never use the machine if the guards or covers are dismantled or damaged, or without the safety devices in place.
- Keep your hands and feet away from the openings when the machine is in use.
- Never use the machine if the guards or covers are dismantled or damaged. Never use the machine without the safety devices in place.
- Switch off the machine and wait until all moving parts have completely stopped before cleaning and/or maintenance.
- Never start the engine indoors or in an enclosed area. Exhaust fumes from the engine contain carbon monoxide, an odourless and highly dangerous gas – risk of serious personal injury and/or death.
Symbols
The following symbols are used on the product:
 | WARNING: |
 | Read the instructions. |
 | Wear safety glasses. |
 | Wear ear protection. |
 | Wear safety gloves. |
 | Wear safety shoes. |
 | Keep at a safe distance when working with the machine. |
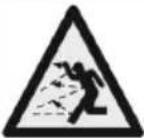 | WARNING: Ejected objects can cause serious personal injury. |
 | WARNING: Risk of personal injury. Keep your hands and other parts of your body away from rotating parts – risk of serious personal injury and/or death. |
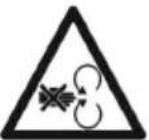 | DANGER: Rotating parts. Keep your hands and feet away from the openings when the machine is in use. |
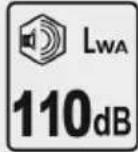 | Guaranteed sound power level. |
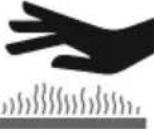 | WARNING: The engine and exhaust pipe get very hot when in use – risk of burn injuries. |
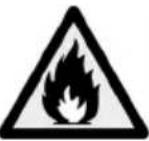 | WARNING: Petrol is highly flammable and can in some circumstances be explosive. Avoid sources of heat, e.g. smoking cigarettes, naked flames, electrical sparks, etc. |
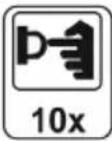 | Primer bulb Press the primer bulb 10 times before starting a cold engine. |
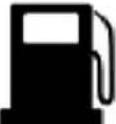 | Fuel tank |
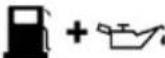 | Use a mixture of oil and petrol. The mixing ratio is 40:1 (40 parts of petrol to 1 part of two-stroke oil). |
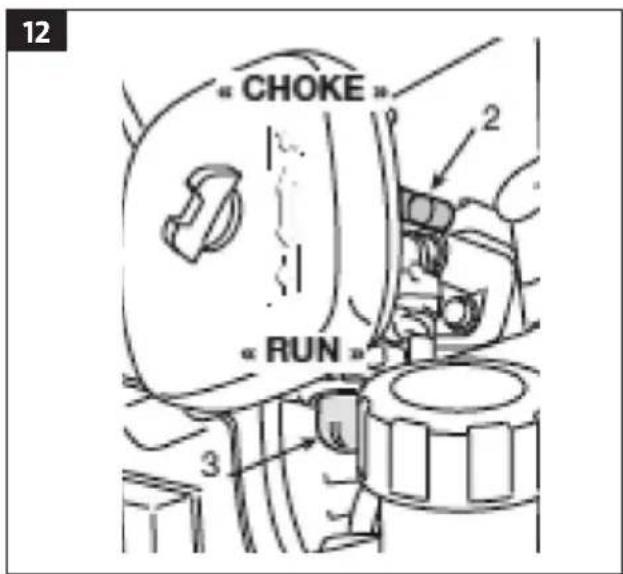
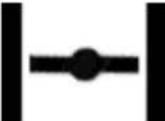 | Choke closed. This is the position for cold starting. |
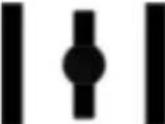 | Choke open. This is the position for starting when the engine is warm. |
 | Approved as per applicable directives. |
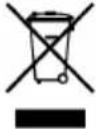 | Recycle discarded product as electrical waste. |
TECHNICAL DATA
| Engine type Air cooled, two-stroke |
| Displacement 25.4 cm3 |
| Max output 0.7 kW |
| Max speed 7900/7500 rpm |
| Speed no load 3500 ± 300 rpm |
| Max air speed 250 km/h |
| Max air flow 8.5 m3/min |
| Tank volume 650 cm3 |
| Fuel mixing ratio 40:1 |
| Sound pressure level, LpA 97.0 dB(A), K = 3 dB |
| Measured sound power level, LwA 108.4 dB(A), K = 2.5 dB |
| Guaranteed sound power level, LwA 110 dB(A), K = 2.5 dB |
| Vibration level 5.09 m/s2, K = 1.5 m/s2 |
| Weight 6 kg |
Always wear ear protection.
DESCRIPTION
- Bag
- Tube to bag
- Suction tube 1
- Suction tube 2
- Blowpipe 2
- Blowpipe 1
- Engine switch
- Catch for throttle lever
- Throttle lever
- Intake grille
- Spark plug
- Idling adjuster
- Choke
- Starter handle
- Fuel tank cap
-
Bottom handle
-
Primer bulb
- Air filter cover
- Top handle
FIG. 1
ASSEMBLY
NOTE:
Do not start the leaf blower until it is fully assembled.
Assembly for blower function
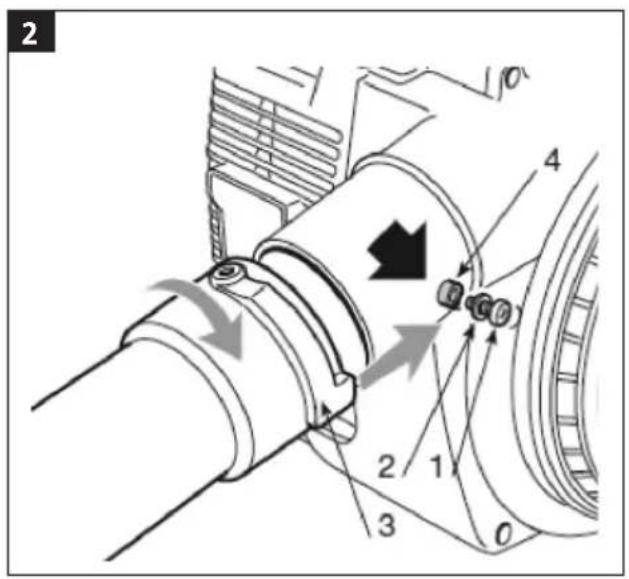
- Remove the screw (1) and washers (2).
- Align blowpipe 1 (3) to the tap (4) on the air outlet, put on the pipe and turn 90° clockwise to lock.
FIG. 2
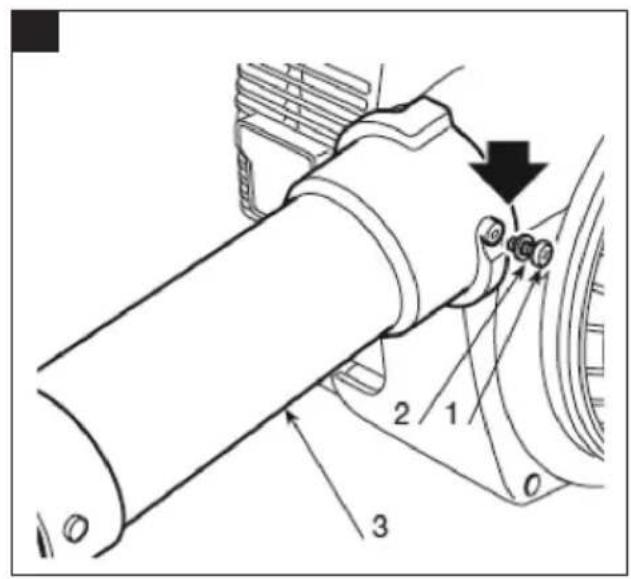
- Fix the blowpipe (3) on the air outlet with the screw (1) and washers (2).
FIG. 3
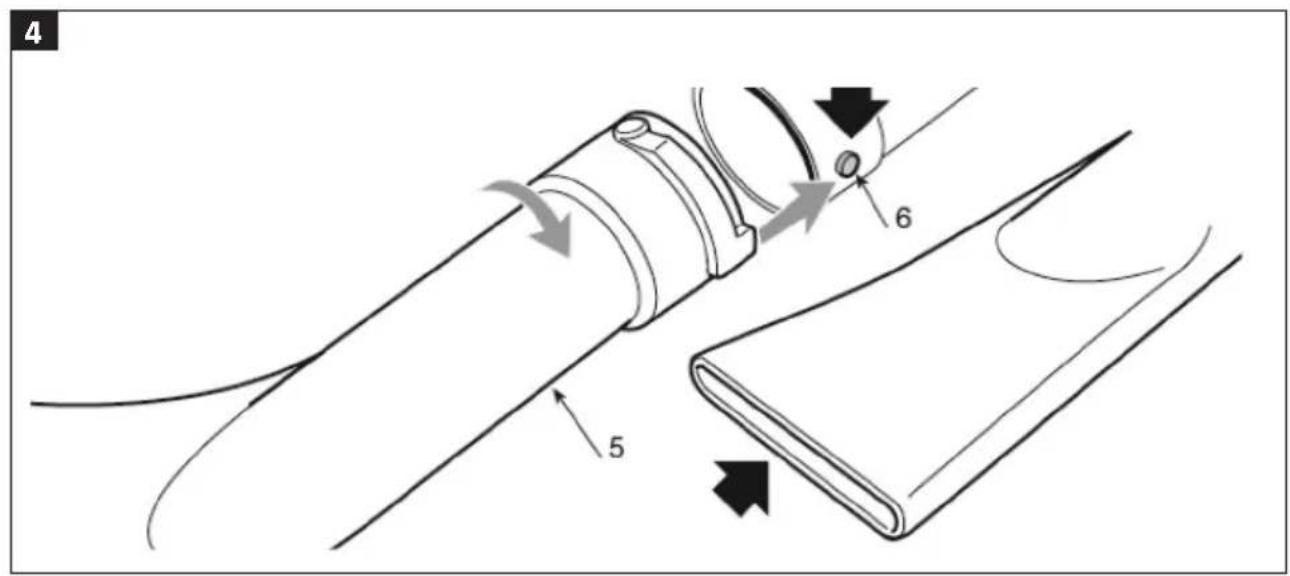
- Align blowpipe 2 (5) to the tap (6) on blowpipe 1, put on the pipe and turn 90° clockwise to lock.
FIG. 4
NOTE:
- When correctly assembled the flat part of the pipe points to the ground.
- When the blower function is used the machine cannot be started unless the blowpipe is fitted.
Assembly for suction function
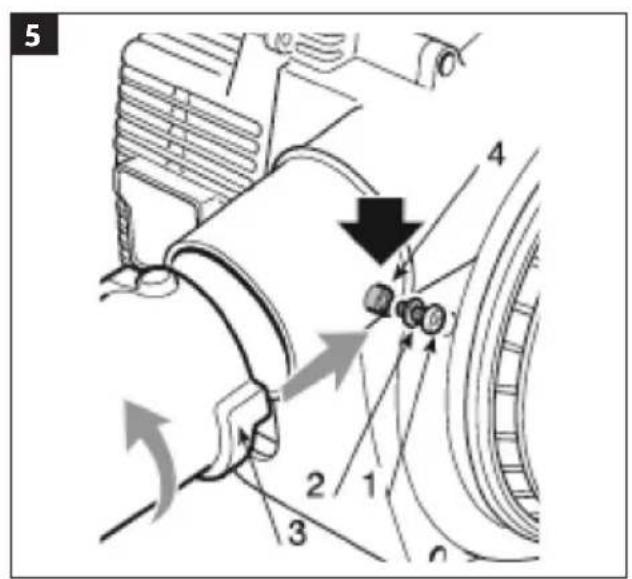
- Remove the screw (1) and washers (2).
- Align tube (3) to the bag to the tap (4) on the air outlet, put on the tube and turn 90° clockwise to lock. When correctly assembled the bottom part of the tube points down
and to the left of the user.
FIG. 5
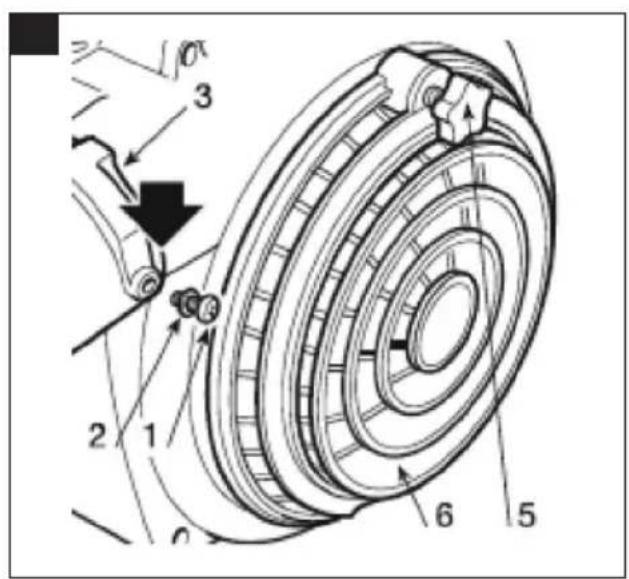
- Fix the tube (3) on the air outlet with the screw (1) and washers (2).
- Undo the knob (5) and open the grille (6).
FIG. 6
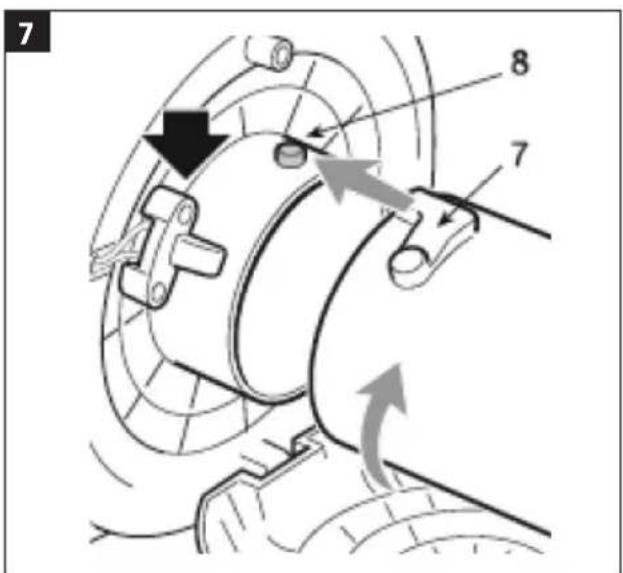
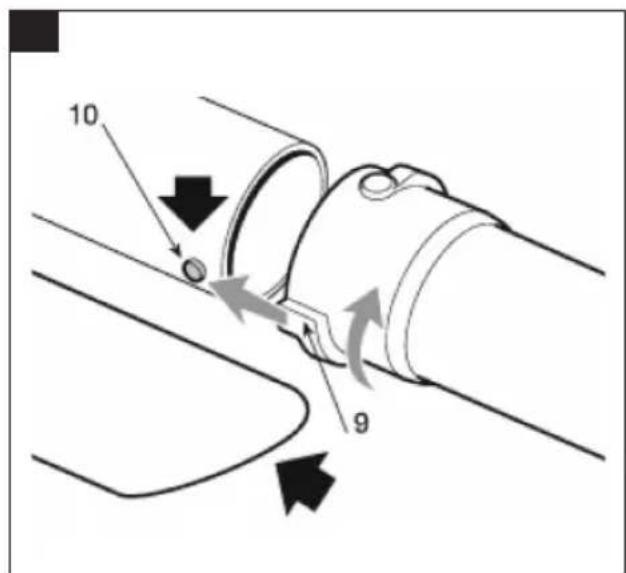
- Align suction tube 1 (7) to the tap (8) on the air outlet, put on the tube and turn 90° clockwise to lock.
FIG. 7
- Align suction tube 2 (9) to the tap (10) on suction tube 1, put on the tube and turn 90° clockwise to lock.
FIG. 8
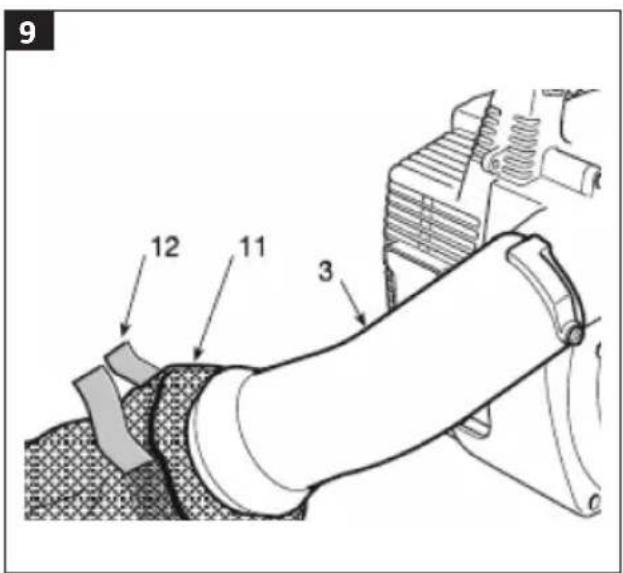
- Put the end of the tube (3) in the bag (11) and close the opening with the supplied Velcro fastener (12).
FIG. 9
- Hang the bag over the shaft and adjust the height with fastener.
NOTE:
- When correctly assembled the round part of the tube points to the ground.
- When the suction function is used the machine cannot be started unless the suction tube is fitted.
USE
Intended use
The leaf blower is intended to be used to blow and draw up leaves and debris such as grass cuttings and twigs. Never use the leaf blower for anything other than its intended purpose. The leaf blower must only be used in dry areas. The leaf blower is intended to be used by one person.
Before starting
Check the following points before starting the engine:
• That the fuel system is not leaking.
- That the equipment is in good condition with the safety devices and accessories undamaged and correctly fitted.
- That all screw unions are properly tightened.
- That all moving parts can move freely and without jamming.
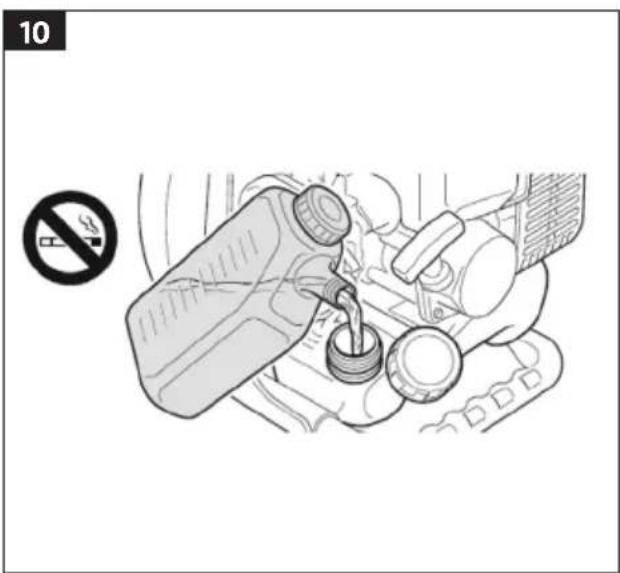
Refilling fuel
WARNING!
- Risk of personal injury. Petrol is highly flammable and can in some circumstances be explosive.
- Do not smoke when refuelling, or when using the machine.
- Switch off the engine and allow the leaf blower to cool before filling up with fuel.
- Fill up with fuel outdoors or in a well-ventilated area.
- The fuel mixing ratio is 40:1 (40 parts of petrol to 1 part of two-stroke oil).
-
Move the leaf blower at least 3 metres from the filling point before starting the engine.
-
Carefully clean the area around the fuel cap to avoid impurities getting into the fuel tank.
- Shake the fuel container before filling.
- Open the cap slowly to relieve any overpressure.
- Carefully pour the fuel in the tank. Do not fill more than to the bottom edge of the filler tube, so that the fuel can expand.
-
Replace the fuel cap and firmly tighten.
-
Clean the area around the fuel cap.
- Check that the tank and fuel lines are not leaking fuel.
FIG. 10
| Fuel mixing ratio | |
| 1 litre of petrol | 0.025 litres of 2-stroke oil |
| 5 litres of petrol | 0.125 litres of 2-stroke oil |
Starting
- Put the engine switch in the ON position.
FIG. 11
- Move the choke lever to the closed position I→I.
FIG. 12
-
Press the primer bulb 10 times.
-
Pull the starter handle 3–5 times to start the engine. Pull the starter cord slowly until it catches (10–15 cm) and then pull it out fully a few times, to turn the engine over and distribute the oil.
-
When the engine has started, wait a few seconds and put the choke in the open position
-
Switch off the engine immediately by putting the engine switch in the OFF position if there is a problem while working.
-
If the engine is hot leave the choke in position I.↑↓
NOTE:
• See troubleshooting chart if the engine does not start after several attempts.
- Always pull the starter handle straight out. If the handle is pulled at an angle the cord will rub against the guide and get worn. Keep a firm grip on the handle and move it slowly back to its original position.
Warm start
Do as follows to start a warm engine:
- Put the engine switch in the ON position.
- Press the primer bulb 10 times.
- Put the choke lever in the open position and pull the starter cord until the engine starts.
Switching off
Normal switching off
To switch off the engine move the throttle lever to idling mode and put the engine switch in the OFF position.
Emergency stop
Put the engine switch in the OFF position to switch off the leaf blower immediately in an emergency situation.
HOW TO USE
- Only use the leaf blower in daylight, or in good artificial lighting.
- The leaf blower should be used with lowest possible engine speed necessary to do the work.
- Carefully inspect the area where the leaf blower is to be used and remove any foreign objects.
- Hold the blower nozzle just above the ground and sweep the blowpipe from side to side while moving forwards, pointing the nozzle at the material to be removed.
- Never point the blower at people or animals.
WARNING!
Make sure that removed material does not cause personal injury and/or material damage. Never point the air flow at people or animals. Never point the air flow into the wind.
Blower function
IMPORTANT:
• Always keep a firm grip with your right hand in the top handle when working.
- Adjust the engine speed to the material to be removed.
- Use a low engine speed for light material and small twigs on grass.
- Use a medium engine speed for grass and leaves on a hard surface.
- Use a high engine speed for heavier material, such as newly fallen snow or piles of leaves.
WARNING!
- Make sure that removed material does not cause personal injury and/or material damage.
- Never point the air flow at people or animals. Never point the air flow into the wind.
Suction function
IMPORTANT:
- Always hold the machine firmly with both hands when working.
- Hold the top handle with your left hand and the bottom handle with your right hand, with the bag to the right of your body.
The suction function works best at medium/high speed. Keep the round end of the tube a few centimetres over the ground when working. The bag functions as a filter, in the same way as a normal vacuum cleaner.
- Make sure that the bag hangs freely and that the strap does not get twisted.
- Do not fill up the bag completely full.
- Switch off the engine.
- Open the zip and empty the bag without
taking it off the tube. Remove any drawn up objects that can damage the bag immediately.
IMPORTANT:
- Do not draw up wet grass or leaves, this can block the rotor.
- Do not overfill the bag, this will reduce the capacity of the machine and can cause the engine to overheat.
After use
- Switch off the engine according to the instructions.
- Release the spark plug lead from the spark plug.
- Empty the bag after using the suction function.
- If the blowpipe has been removed, replace the screw and washers.
- If the suction tube has been removed, close the grille and tighten the knob.
MAINTENANCE
The leaf blower is designed to work for a long time with a minimum of maintenance. Proper maintenance and regular cleaning are essential for the leaf blower to work satisfactorily.
- Make sure that all the screw unions are properly tightened to keep the product in safe condition.
- Replace damaged or worn parts.
- Only use approved spare parts and accessories.
- Store the leaf blower in a dry place when not in use.
- The manufacturer cannot accept liability for any damage resulting from failure to follow these instructions.
NOTE:
Only use parts and accessories recommended by the manufacturer. The use of other parts can result in personal injury and/or material damage. It will also invalidate the warranty.
Cleaning
WARNING!
Release the spark plug lead from the spark plug before cleaning.
- Keep the ventilation openings on the leaf blower clean to prevent the engine overheating.
- Keep the handles clean, dry and free from oil and grease.
- Clean with a soft cloth moistened with a mild detergent, ideally every time after it has been used.
- Never pour or swill water on the leaf blower. Clean the engine casing with a damp cloth. Do not use strong detergents or solvents, they can damage the plastic parts on the leaf blower. Wipe the engine casing all over.
- Only use spare parts and accessories, recommended by the manufacturer. The use of other parts or accessories can result in the risk of personal injury and/or material damage.
Cleaning the air filter
The engine will not work properly if the air filter is blocked because of the reduction in the supply of air to the carburettor. The foam plastic filter unit can get blocked by dust and pollen, etc. Check the filter at regular intervals.
- Release the filter cover and remove the foam plastic filter unit.
FIG. 13
-
Replace the filter cover to prevent anything getting into the air intake.
-
Wash the filter unit in hot water and a mild detergent, and allow to dry.
NOTE:
- Never use petrol or flammable solvents to clean the filter.
• Always replace a damaged air filter, otherwise the engine can be damaged. - Do not start the engine without an air filter.
Fuel filter
There is a filter in the fuel tank to prevent impurities getting into the engine. Have the filter replaced every year at an authorised service centre.
Adjusting the idling speed
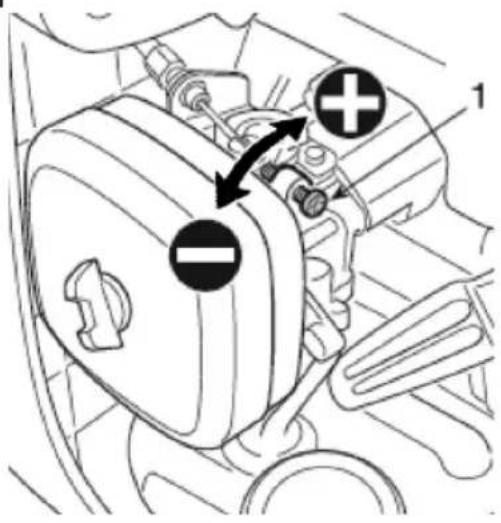
The idling speed must be adjusted if the engine keeps stopping, or if the speed cannot be controlled with the throttle lever.
- Start the engine and run on idle for a few minutes. Now adjust the idling speed with the screw.
FIG. 14
- Turn clockwise to increase the engine speed.
- Turn anticlockwise to reduce the engine speed.
- The engine should idle smoothly after adjusting.
Cleaning and replacing the spark plug
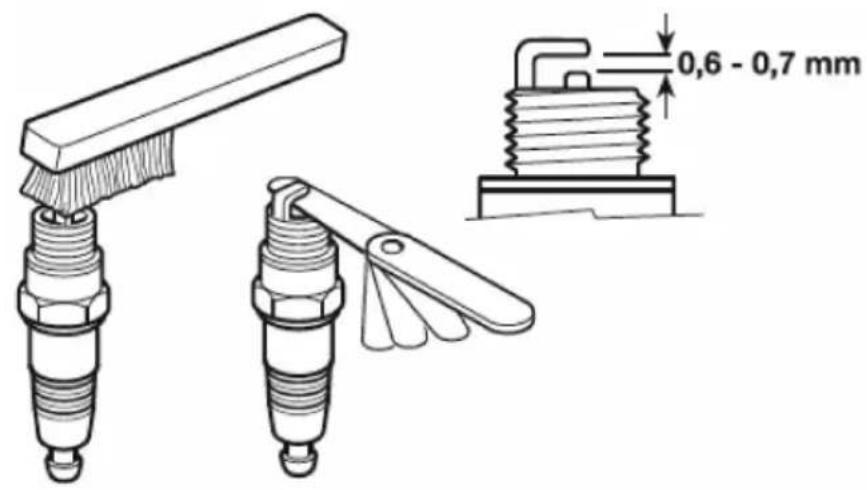
Check the electrode gap on the spark plug every year, or if the engine does not run properly or is difficult to start. The electrode gap should be 0.6–0.7 mm.
- Wait until the engine has cooled.
- Release the spark plug lead from the spark plug and unscrew the spark plug with the
supplied spanner.
- Replace the spark plug with a new one of the same type if the electrodes are corroded or burnt, or if there are excessive deposits on the electrodes.
- Deposits on the spark plug can be a result of too much oil in the fuel mixture, poor quality of oil, old fuel mixture, or blocked air filter.
- Carefully screw in the spark plug by hand to avoid threading problems.
- Tighten the spark plug with the spark plug spanner.
- If a torque wrench is used, tighten to 12–15 Nm.
- Connect the spark plug lead to the spark plug.
FIG. 15
Emptying the fuel tank
The fuel tank should be emptied before putting the leaf blower away for a long time. Empty outdoors, or in a well-ventilated area. Allow the engine to cool completely before emptying the fuel tank. Use a suitable underlay, and make sure fuel or oil does not get into the ground.
- Place a suitable container under the fuel tank.
- Unscrew the fuel cap.
- Turn the fuel tank upside down.
- Allow the fuel to run out.
- Replace the fuel cap and firmly tighten.
Storage
If the leaf blower is not going to be used for a month or more, prepare it for long-term storage. Failure to follow the storage instructions can result in fuel in the carburettor evaporating and leaving deposits, which can make the engine difficult to start and lead to expensive repairs.
EN
- Open the fuel cap slowly to relieve any overpressure in the fuel tank.
- Empty the fuel tank.
- Start the engine and run on idle until it stops because of a lack of fuel.
- Allow the engine to cool.
- Unscrew the spark plug.
- Pour a teaspoon of pure 2-stroke oil in the cylinder through the spark plug hole. Slowly pull the starter cord a few times to distribute the oil.
- Screw the spark plug back on.
NOTE:
Store the leaf blower in a dry, well-ventilated area. Never store the leaf blower indoors where there are sources of heat, such as a boiler, water heater, tumble drier or electric motors that can emit sparks. Risk of igniting fuel fumes.
Use after storage
- Unscrew the spark plug.
- Pull the starter cord a few times to remove excess oil.
- Clean the spark plug and check the electrode gap, or replace with a new spark plug.
- Screw the spark plug back on.
- Prepare to use the leaf blower in accordance with the instructions.
WARNING!
Do not store the leaf blower in a damp area or unprotected outdoors.
Transport
- Allow the engine to cool before
transporting and/or putting it away.
• Always switch off the engine, even when moving the machine short distances within the work area.
• Always carry the machine by the handle. Do not touch the engine – risk of burn injuries.
- Secure the machine firmly when transporting it in a vehicle.
- Empty the fuel tank before transporting in a vehicle.
TROUBLESHOOTING
| Problem Possible cause Action | ||
| The engine will not start, or starts but then stops. | Incorrect starting procedure. Follow the starting instructions. | |
| Deposits on the spark plug electrodes, or incorrect electrode gap. | Clean or replace the spark plug. | |
| The air filter is blocked. Clean or replace the filter. | ||
| Carburettor fault. Contact a service centre. | ||
| The intake grille is open, but the suction tube is not fitted. | Close the grille, or fit suction tube. | |
| The engine starts, but has no power. | The air filter is blocked. Clean or replace the filter. | |
| Carburettor fault. Contact a service centre. | ||
| The engine does not run smoothly and has no power at high speed. | Deposits on the spark plug electrodes, or incorrect electrode gap. | Clean or replace the spark plug. |
| Carburettor fault. Contact a service centre. | ||
| The bag is full, or blocked. Empty the bag. | ||
| The engine smokes. Incorrect fuel mixture. Mix the fuel according to the instructions. | ||
- SE LÖVBLÅS/-SUG
- EC DECLARATION OF CONFORMITY
- EG FÖRSÄKRAN OM ÖVERENSSTÄMMELSE
- EF SAMSVARSERKLÆRING
- DEKLARACJA ZGODNOŚCI WE
- SÄKERHETSANVISNINGAR
- WARNING!
- Symbols
- DESCRIPTION
- ASSEMBLY
- NOTE:
- Assembly for blower function
- 2
- 3
- 4
- Assembly for suction function
- 5
- 6
- 7
- 8
- 9
- USE
- Intended use
- Before starting
- Refilling fuel
- Starting
- 11
- 12
- Warm start
- Switching off
- Normal switching off
- Emergency stop
- HOW TO USE
- Blower function
- IMPORTANT:
- Suction function
- After use
- MAINTENANCE
- Cleaning
- Release the spark plug lead from the spark plug before cleaning.
- Cleaning the air filter
- 13
- Fuel filter
- Adjusting the idling speed
- 14
- Cleaning and replacing the spark plug
- Emptying the fuel tank
- Storage
- EN
- Use after storage
- Transport
Brand : Meec Tools
Model : 003854
Category : Leaf blower