
HVH 551/1 X - Cooker HOOVER - Free user manual and instructions
Find the device manual for free HVH 551/1 X HOOVER in PDF.


| Product type | Ceramic glass hob |
| Brand | Hoover |
| Model | HVH 551/1 X |
| Number of cooking zones | 4 Hilight zones |
| Supply voltage | 220-240 V / 50 Hz |
| Installed electric power | 7100 W |
| Product dimensions (W x D) | 595 x 510 mm |
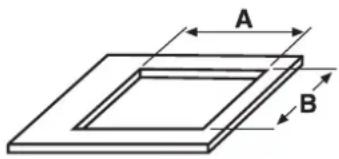
| Building-in dimensions (A x B) | 560 x 490 mm |
| Control type | Touch control with digital display |
| Residual heat indicator | Yes (displays 'H') |
| Timer function | Yes, up to 99 minutes |
| Lock function | Yes, to lock controls |
| Fast heater boost | Yes, per zone |
| Automatic cut-off | Yes, if left on too long |
| Surface material | Glass ceramic |
| Cleaning products | Specialized cream and scraper for glass ceramic |
| Installation type | Built-in |
| Electrical connection | Terminal block, various configurations (see manual) |
| Spare parts availability | Contact after-sales service |
| Warranty | Repair free of charge at Service Centre (with guarantee certificate) |
Frequently Asked Questions - HVH 551/1 X HOOVER
User questions about HVH 551/1 X HOOVER
0 question about this device. Answer the ones you know or ask your own.
Ask a new question about this device
Download the instructions for your Cooker in PDF format for free! Find your manual HVH 551/1 X - HOOVER and take your electronic device back in hand. On this page are published all the documents necessary for the use of your device. HVH 551/1 X by HOOVER.
USER MANUAL HVH 551/1 X HOOVER
natural_image
Pure geometric diagram with curved and dashed lines, no text or symbols presentREAD THE INSTRUCTIONS BOOKLET CAREFULLY TO MAKE THE MOST OF YOUR HOB.
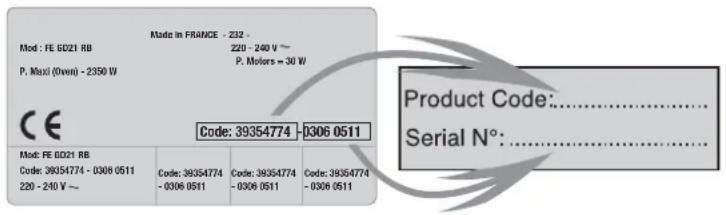
We recommend you keep the instructions for installation and use for later reference, and before installing the hob, note its serial number below in case you need to get help from the after sales service.
Identification plate
(located under the hob's bottom casing)
- It is strongly recommended to keep children away from the cooking zones while they are in operation or when they are switched off, so long as the residual heat indicator is on, in order to prevent the risks of serious burns.
- When cooking with fats or oils, take care always to watch the cooking process as heated fats and oils can catch fire rapidly.
- The hob's control area is sensitive, do not place hot containers on it.
- Aluminium foil and plastic pans must not be placed on heating zones.
- After every use, some cleaning of the hob is necessary to prevent the build up of dirt and grease. If left, this is recooked when the hob is used and burns giving off smoke and unpleasant smells, not to mention the risks of fire propagation.
- It is advisable not to stare directly at the halogen elements.
- Do not touch the heat zones during operation or for a while after use.
- Never cook food directly on the glass ceramic hob. Always use the appropriate cookware.
- Always place the pan in the centre of the unit that you are cooking on.
- Do not use the surface as a cutting board.
- Do not slide cookware across the hob.
- Do not store heavy items above the hob. If they drop onto the hob, they may cause damage.
- Do not use the hob as a working surface.
- Do not use the hob for storage of any items.
- In the unlikely event of a surface crack appearing, do not use the hob. Immediately disconnect the hob from the electrical power supply and call the After Sales Service.
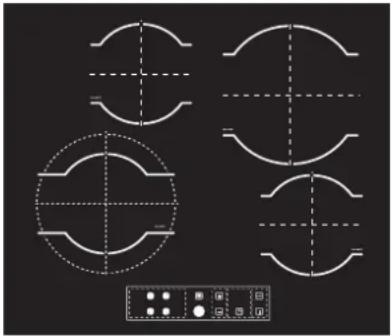
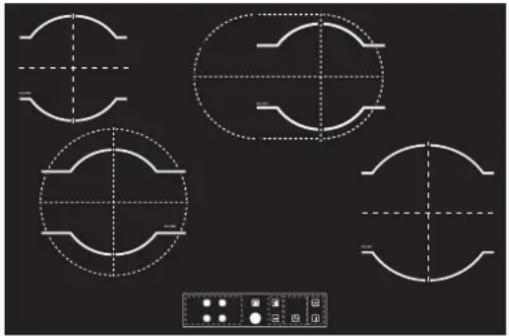
| HVHCOOKING HOB | ||
| Burners | 4 Hilight | 4 Hilight |
| Supply voltage (V/Hz) | 220-240/50 | 220-240/50 |
| Installed electric power (W) | 7100 | 7600 |
| Product size (l x p) mm. | B 595x510X 570x500 | B 775x510X 750x500 |
| Building-in dimensions (AxB) | 560x490 | 560x490 |
 |  |  |
We are constantly striving to improve product quality and as such may modify appliances to incorporate the latest technical improvements.

Glass Ceramic Hobs conform to directives 73/23/CEE and 89/336/CEE.
INSTALLATION
Installing a domestic appliance can be a complicated operation which if not carried out correctly, can seriously affect consumer safety. It is for this reason that the task should be undertaken by a professionally qualified person who will carry it out in accordance with the technical regulations in force. In the event that this advice is ignored and the installation is carried out by an unqualified person, the manufacturer declines all responsibility for any technical failure of the product whether or not it results in damage to goods or injury to individuals.
BUILT-IN
The furniture in which your hob will be installed and all adjacent furniture, should be made from materials that can withstand high temperatures. In addition, all decorative laminates should be fixed with heat-resistant glue.
Installation:
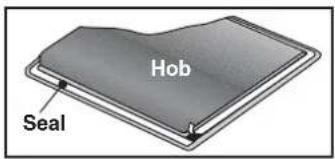
- A watertight seal is supplied with the hob.
Before fitting:
- turn the hob upside down, with the glass surface facing downwards.
Make sure the glass is protected.
- fit the seal round the hob.
- make sure that it is correctly fitted to avoid any leakage into the supporting cabinet.
- Leave a gap of at least 5 cm between the appliance and the vertical sides of the adjacent furniture.
- If, when installing the hob, the lower hob face is adjacent to an area normally accessible when handling or cleaning, fit a partition 1 cm below the base of the hob to avoid any risk of scorching or damage.
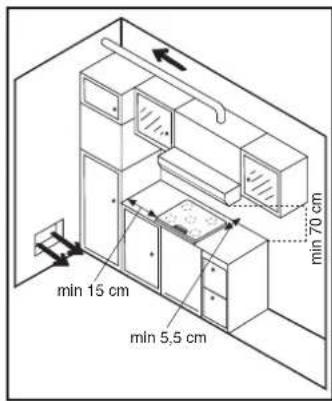
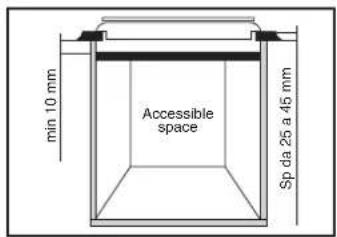
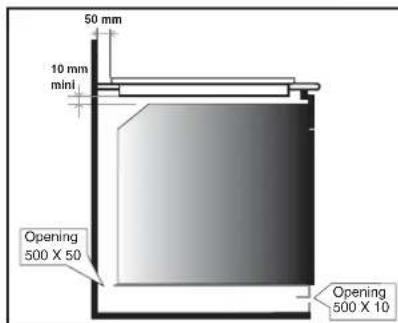
It is forbidden to fit the hob above a non-ventilated oven
ELECTRICAL CONNECTION
"The installation must conform to the standard directives." The manufacturer declines all responsibility for any damage that may be caused by unsuitable or unreasonable use.
Warning :
- Always check before any electrical operation, the supply tension shown on the electricity meter, the adjustment of the circuit-breaker, the continuity of the connection to earth to the installation and that the fuse is suitable.
- The electrical connection to the installation should be made via a socket with a plug with earth, or via an omnipole cut-out switch with an opening gap of at least 3 mm. If the appliance has a socket outlet, it must be installed so that the socket outlet is accessible.
- The yellow/green wire of the power supply cable must be connected to the earth of both power supply and appliance terminals.
- The manufacturer cannot be held responsible for any accidents resulting from the use of an appliance which is not connected to earth, or with a faulty earth connection continuity.
- Any queries regarding the power supply cord should be referred to After Sales Service or a qualified technician.
A power cord is not supplied with the appliance, but the hob is equipped with a terminal block which enables you to choose the correct connection for the particular power supply.
CONNECTION TO THE TERMINALS ON THE TERMINAL BLOCK:
To proceed with the connection, you must adhere to the following instructions.
- Before making the connection, make sure that the installation is protected by a suitable fuse, see table, and that it is fitted with wires of a large enough section to supply the appliance normally.
- Choose the supply cord in accordance with the recommendations in the table.
- Turn the hob, with the glass side against the worktop, providing you have protected the glass!
natural_image
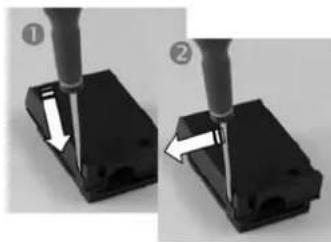
Two-step diagram showing a tool pressing a black component, labeled with arrows (no text or symbols present)- Open the cover in the following sequence:
• find the two tabs located on the sides,
- put the blade of a flat screw-driver in front of each tab, push in and press,
- remove the cover.
- Connect the power supply cable:
- comply with the information of the table and the markings on the terminal board and install the shunts (the shunts, inserted in the terminal board, make a bridge between two terminals),
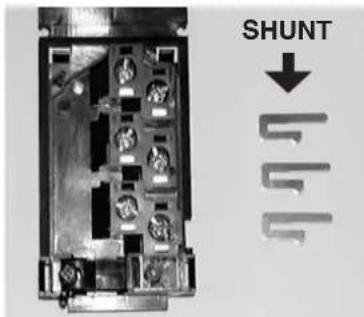
- strip the end of each conductor and attach them to the terminals, complying with the information given in the table,
- unscrew the cable clamp,
• pass the lead through the cable clamp.
When you have finished the connection operation to the appliance terminals, tighten the cable clamp and close the cover.
Note: make sure the terminal board screws are tight.
ELECTRICAL CONNECTION
| Monophase 220-240V~ | Two phases 220-240V2~ | Two phases 220-415V2N~ | Three phases 220-240V3~ | Three phases 380-415V3N~ | |
| 25 A 25 A | 25 A 25 A 16 | AFUSE | |||
| CABLE AREA TYPE | 3 G 2,5 mm _2 H05RR-F,H05VV-F,H05V2V2-F | 3 G 2,5 mm _2 H05RR-F,H05VV-F,H05V2V2-F | 4 G 2,5 mm _2 H05RR-F,H05VV-F,H05V2V2-F | 4 G 2,5 mm _2 H05RR-F,H05VV-F,H05V2V2-F | 5 G 1,5 mm _2 H05RR-F,H05VV-F,H05V2V2-F |
| CONNEC-TION TO THE TERMIMAL BLOCK | 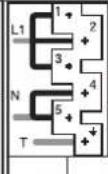 | 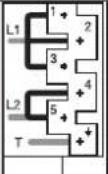 | 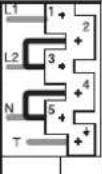 | 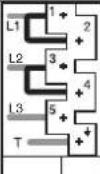 | 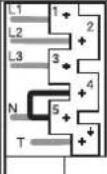 |
| 2 Phase shunt 1-2 shunt 2-35 Neutral shunt 4-5T Earth | 2 Phase shun 1-2 shunt 2-35 Phase shunt 4-5T Earth | 1 Phase 3 Phase shunt 2-35 Neutral shunt 4-5T Earth | 1 Phase shunt 1-23 Phase shunt 3-45 PhaseT Earth | 1 Phase 2 Phase3 Phase5 Neutral shunt 4-5T Earth |
HOB COOKWARE ADVICE
Using good quality cookware is critical for setting the best performance from your hob.

natural_image
Three identical illustrations of cooking utensils with crossed-out marks, no text or symbols present- Always use good quality cookware with perfectly flat and thick bases: using this type of cookware will prevent hot spots that cause food to stick. Thick metal pots and pans will provide an even distribution of heat.
- Ensure that the base of the pot or pan is dry: when filling pans with liquid or using one that has been stored in the refrigerator, ensure that the base of the pan is completely dry before placing it on the hob. This will help to avoid staining the hob.
- Use pans whose diameter is wide enough to completely cover the surface unit: the size of the pan should be no smaller than the heating area. If it is slightly wider the energy will be used at its maximum efficiency.
THE CHOICE OF COOKWARE - The following information will help you to choose cookware which will give good performance.
Stainless Steel : highly recommended. Especially good with a sandwich clad base. The sandwich base combines the benefits of stainless steel (appearance, durability and stability) with the advantages of aluminium or copper (heat conduction, even heat distribution).
Aluminium : heavy weight recommended. Good conductivity. Aluminium residues sometimes appear as scratches on the hob, but can be removed if cleaned immediately.
Because of its low melting point, thin aluminium should not be used.
Cast Iron : usable, but not recommended. Poor performance. May scratch the surface.
Copper Bottom / stoneware: heavy weight recommended. Good performance, but copper may leave residues which can appear as scratches. The residues can be removed, as long as the hob is cleaned immediately. However, do not let these pots boil dry. Overheated metal can bond to glass hobs. An overheated copper pot will leave a residue that will permanently stain the hob.
Porcelain/enamel : Good performance only with a thiny smooth, flat base.
Glass-ceramic : not recommended. Poor performance. May scratch the surface.
HOW TO OPERATE THE GLASS CERAMIC HOB
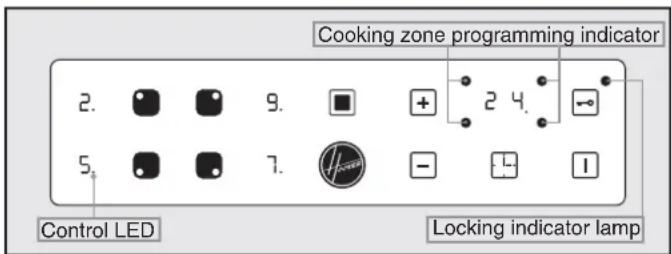
- After powering up the hob, wait 8 seconds to activate the electronic controls.
- Press the button 1, for 3 seconds. Electronic control of the hob is activated. In each display zone the heat level 2 is displayed and the control LED blinks.
- After 10 seconds without use, the electronic control goes off and the starting operation has to be repeated.
• STARTING A COOKING ZONE
- Press the selection button of the required cooking zone. In the display zone, the control LED is on steady. It shows that the zone is live.
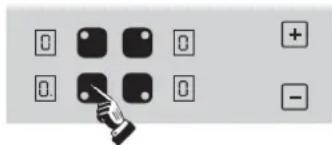
- Press the ☐ or + button to select a heat level between 1 and 9. Hold down the + or - button and the heat level increases or decreases gradually.
The following examples are for information only. Personal experience should then let you adapt these settings to your taste and habits.
0 : Off
1 : )
2 : ) ..... Melting heat
3 : Keeping hot
4 : Heating up
5 : Thawing, stewing, full cooking, low temperature cooking
6 : Cooking without lid
7 : Frying, meat browning and roasting
8 : High temperature cooking and roasting, seizing
9 : Frying, boiling large quantities of water.....
• STOPPING A COOKING ZONE
- Press the selection button of the required cooking zone.
- Press the ☐ button to display heat level ☐. Now the zone goes off, the indicator ☐ goes off after 10 seconds.
- To stop rapidly, press the ☐ and + buttons at the same time. The heat level automatically goes down to ☐. The cooking zone goes off.
- GENERAL STOP
The cooking zones and the timer can be stopped at any moment by pressing for 3 seconds on the On-Off button.

• RESIDUAL HEAT INDICATOR
The control panel tells the user when the surface temperature of the cooking zones exceeds about 60^ C, by the following displaying: H. When the temperature goes back below 60^ C, the H display goes off.
For ending the cooking, we advise switching off the cooking zone and using the residual heat of the zone to finish cooking gently. N.B. After a cut in the current, the residual heat indicator disappears completely, even if the surface temperature exceeds 60^ C.
• OPERATING THE ADDITIONAL COOKING ZONE (Only on some models)
• TO START THE ADDITIONAL COOKING ZONE:
- Press the button ☐ . In the next 10 seconds
- Press the button for the zone with the addition. In the display zone, the blinking lamp goes steady. It shows that the zone is live.
- Select a heat level between 1 and 9. ( + or - )
- Press the button ■ to start the additional zone.
• TO STOP THE ADDITIONAL ZONE:
- The cooking zone with addition must be live: in the display zone, the lamp must be on. If not, select the relevant zone again.
- Press de button ■ . The display LED for the additional zone disappears. The additional cooking zone goes off.
- To rapidly stop the complete cooking zone, press the + o - buttons at the same time. The heat level automatically goes down to ☐. The cooking zone goes off.
• PROGRAMMING A COOKING ZONE
Every cooking zone can be programmed for a maximum time of 99 minutes. Only one zone, at a time, can be programmed.
- Start the required zone by following the previous instructions. The control LED near the heat level must be displayed, it shows that the zone is live.
- Press the Timer button.
The zone mark around the timer display shows the controlled zone.
- Press the + button to select the time in minutes.
This is saved automatically after three seconds.
The programmed time can be modified at any moment by pressing the timer selection button, the timer control LED must be on. When the time has run, the cooking zone goes off automatically and an audible beep sounds for 1 minute. Press any button to stop it.
The programmed time can be reset to ☐ using the ☐ button or pressing the + and - buttons at the same time, the cooking zone is then no longer linked to the timer but stays operational. So you will have to stop the zone independently.
The timer can be used alone as a reminder, it will ring at the end of the programmed time.
The locking function holds the current settings, or prevents anyone from starting the hob. It is also used for cleaning the control strip as the controls can be locked without the hob being on.
- Start the required cooking zones.
- Select a heat level for each of them.
- Press the 📄 button to set the data; in this way no other button works, except the On/Off button.
The locking indicator lamp → comes on.
To release the locking function, just press the button; the indicator lamp goes off, all the controls work again. If when the controls are locked, the timer is on, the time will be counted automatically and the zone switched off at the end of the programmed time.
If the locking control is on when the hob is finally shut down, the locking control stays operational and prevents any action when the hob is restarted, press the 📄 button to release the locking function.
Every cooking zone on the hob is equipped with a fast heater for raising the cooking zone's temperature faster:
Starting the fast heater
- Start the required zone, press the + button to obtain position 9 release the - button briefly and press it again; the display alternates showing A "fast heater" and 9 heat level.
- If necessary reduce to the required heat position.
E.g. 1800 W zone at position 6 = 32% of 1800 W power released When the "Fast heater" is on, the zone supplies 1800 W power for 2.5 minutes, and adjusts to 576 W after this time.
* For increased safety, the cooking zones cut off automatically if they are left on too long. The cut off depends on the heat level used.
CLEANING AND MAINTENANCE
- Before carrying out any maintenance work on the hob, allow it to cool down.
- Only products, (creams and scrapers) specifically designed for glass ceramic surfaces should be used. They are obtainable from hardware stores.
- Avoid spillages, as anything which falls on to the hob surface will quickly burn and will make cleaning more difficult.
- It is advisable to keep away from the hob all substances which are liable to melt, such as plastic items, sugar, or sugar-based products.
MAINTENANCE:
- Place a few drops of the specialised cleaning product on the hob surface.
- Rub any stubborn stains with a soft cloth or with slightly damp kitchen paper.
- Wipe with a soft cloth or dry kitchen paper until the surface is clean.
If there are still some stubborn stains:
- Place a few more drops of specialised cleaning fluid on the surface.
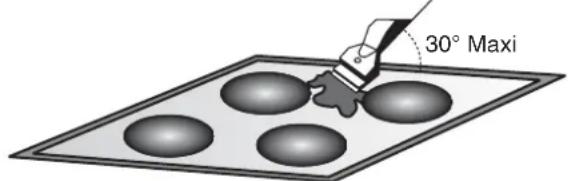
- Scrape with a scraper, holding it at an angle of 30^ to the hob, until the stains disappear.
- Wipe with a soft cloth or dry kitchen paper until the surface is clean.
- Repeat the operation if necessary.
A FEW HINTS:
Frequent cleaning leaves a protective layer which is essential to prevent scratches and wear. Make sure that the surface is clean before using the hob again. To remove marks left by water, use a few drops of white vinegar or lemon juice. Then wipe with absorbent paper and a few drops of specialised cleaning fluid. The control knobs can be removed for a complete cleaning. However, you must care not to let any liquid go into the open zones, and then to push the knobs fully on fitting back. The glass ceramic surface will withstand scraping from flat-bottomed cooking vessels, however, it is always better to lift them when moving them from one zone to another.
NB:
Do not use a sponge which is too wet.
Never use a knife or a screwdriver.
A scraper with a razor blade will not damage the surface, as long as it is kept at an angle of 30^ .
Never leave a scraper with a razor blade within the reach of children.
Never use abrasive products or scouring powders.
- The metal surround (on some models): to safely clean the metal surround wash with soap and water, rinse, then dry with a soft cloth.
AFTERCARE
Before calling out a Service Engineer please check the following:
— that the plug is correctly inserted and fused; If the fault cannot be identified:
switch off the appliance — do not tamper with it — call the Aftercare Service Centre. The appliance is supplied with a guarantee certificate that ensures that it will be repaired free of charge at the Service Centre.
PROBLEM SOLVING
Cooking zones that do not maintain a rolling boil or a fast enough frying rate.
- You must use pans which are absolutely flat. If light is visual between the pan base and a straight edge, the surface unit will not transfer heat properly.
- Pan bottoms should closely match the diameter of the heat zone selected.
Foods cook slowly.
- Improper cookware being used. Pan bases should be flat, fairly heavy-weight and the same diameter as the heat zone selected.
Tiny scratches (may appear as cracks or abrasions) on the glass surface of the hob.
- Incorrect cleaning methods, cookware with rough bases, or coarse particles (salt or sand) trapped between the cookware and the surface of the hob. Use recommended cleaning procedures, be sure cookware bases are clean before use and use cookware with smooth bases.
Metal markings (may appear as scratches).
- Do not slide aluminium cookware across the surface. Use recommended cleaning procedure to remove marks. - Incorrect cleaning materials have been used, spillage or grease stains remain on the surface, use a razor scraper and recommended cleaning product.
Dark streaks or specks.
- Use a razor scraper and recommended cleaning product.
Areas of discoloration on cooktop.
- Marks from aluminium and copper pans as well as mineral deposits from water or food can be removed with the cleaning cream.
Hot sugar mixtures / plastic melted to the surface.
• See the Glass Hob Cleaning section.
The hob is out of order, or some heat zones do not work.
- The shunt bars are not properly fitted on the terminal block. Check the connection is made in conformity with the instructions page 2.
The hob does not operate.
- A big spill or object covers at least two buttons, for at least 10 seconds. Clean up the spill or remove the object.
- The control panel is locked. Press the "Locking" button to release.
The hob does not cut off
- The control panel is locked. Press the "Locking" button to release. Refer to the section, page 4.
The hob stops automatically
- A spill covers at least two buttons for more than 10 seconds; the hob switches to safety, and an audible beep sounds so long as the buttons are covered. Clean up the spill or remove the object. - The cooking zones stop automatically if they are left on for too long. Refer to the section, page 4.
Frequency of on/off operations for cooking zones
• The on-off cycles vary according to the required heat level:
- low level: short operating time,
- high level: long operating time.
“H” display, residual heat indicator, blinking
- The electronic temperature is too high. A technician should verify the fitting in compliance with the recommendations, page 2.
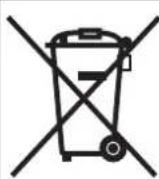
This appliance is marked according to the European directive 2002/96/EC on Waste Electrical and Electronic Equipment (WEEE). By ensuring this product is disposed of correctly, you will help prevent potential negative consequences for the environment and human health, which could otherwise be caused by inappropriate waste handling of this product. The symbol on the product indicates that this product may not be treated as household waste.
Instead it shall be handed over to the applicable collection point for the recycling of electrical and electronic equipment Disposal must be carried out in accordance with local environmental regulations for waste disposal.
For more detailed information about treatment, recovery and recycling of this product, please contact your local city office, your household waste disposal service or the shop where you purchased the product.
natural_image
Two-step diagram showing a tool pressing a component into a black base, with arrows indicating direction (no text or symbols present)natural_image
Interior view of an electronic device showing internal components and connectors (no visible text or symbols)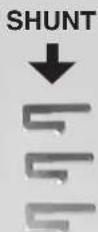
natural_image
Three identical illustrations of cooking pots with crossed-out handles, no text or symbols presentnatural_image
Two-step diagram showing a tool pressing into a black plastic component, labeled with arrows (no text or symbols present)natural_image
Three identical illustrations of a cooking pot with crossed-out handles, no text or symbols presentnatural_image
Two-step diagram showing a tool pressing into a black plastic component, with arrows indicating the process (no text or symbols present)natural_image
Three identical illustrations of cooking pots with crossed-out handles, no text or symbols presentPROBLEMAS E SOLUÇÕES
natural_image
Two-step diagram showing a tool pressing into a black plastic component, labeled with arrows (no text or symbols present)natural_image
Three identical illustrations of cooking utensils with crossed-out marks, no text or symbols presentnatural_image
Symbol of a trash bin crossed with a diagonal line, no text or numbers presentnatural_image
Two-step diagram showing a tool pressing into a black plastic component, labeled ① and ② (no text or symbols present)natural_image
Three identical illustrations of cooking pots with crossed-out handles, no text or symbols presentnatural_image
Two-step diagram showing a tool pressing a black component, with arrows indicating direction of movement (no text or symbols present)natural_image
Three identical illustrations of cooking utensils with crossed marks, no text or symbols presentnatural_image
Two-step diagram showing a tool pressing into a black mechanical component, labeled ① and ② (no text or symbols present)natural_image
Three identical illustrations of cooking utensils with crossed marks, no text or symbols present- INSTALLATION
- BUILT-IN
- Installation:
- Before fitting:
- Make sure the glass is protected.
- ELECTRICAL CONNECTION
- Warning :
- CONNECTION TO THE TERMINALS ON THE TERMINAL BLOCK:
- - Open the cover in the following sequence:
- - Connect the power supply cable:
- HOB COOKWARE ADVICE
- HOW TO OPERATE THE GLASS CERAMIC HOB
- • STOPPING A COOKING ZONE
- - GENERAL STOP
- • RESIDUAL HEAT INDICATOR
- • OPERATING THE ADDITIONAL COOKING ZONE (Only on some models)
- • TO START THE ADDITIONAL COOKING ZONE:
- • TO STOP THE ADDITIONAL ZONE:
- • PROGRAMMING A COOKING ZONE
- Starting the fast heater
- CLEANING AND MAINTENANCE
- MAINTENANCE:
- If there are still some stubborn stains:
- A FEW HINTS:
- Do not use a sponge which is too wet.
- AFTERCARE
- Before calling out a Service Engineer please check the following:
- PROBLEM SOLVING
- Cooking zones that do not maintain a rolling boil or a fast enough frying rate.
- Foods cook slowly.
- Tiny scratches (may appear as cracks or abrasions) on the glass surface of the hob.
- Metal markings (may appear as scratches).
- Dark streaks or specks.
- Areas of discoloration on cooktop.
- Hot sugar mixtures / plastic melted to the surface.
- The hob is out of order, or some heat zones do not work.
- The hob does not operate.
- The hob does not cut off
- The hob stops automatically
- Frequency of on/off operations for cooking zones
- “H” display, residual heat indicator, blinking
- PROBLEMAS E SOLUÇÕES
Brand : HOOVER
Model : HVH 551/1 X
Category : Cooker